Springfield Precision Instruments 91465SF RF THERMOMETER/HYGROMETER User Manual How to Set Time
Springfield Precision Instruments, Inc RF THERMOMETER/HYGROMETER How to Set Time
USERS MANUAL
Features:
1. Time display: Hours/Minutes/Seconds
2. Calendar: Month, Date, Year
3. Countdown timer
4. 12/24 selection
5. Low battery indicator for base station and remote sensors
6. Temperature range:
Indoor: -10 ~ +70 C
Outdoor: -40 ~ +70 C
7. C/F selection
8. Battery: 2 X AAA for base station and 2 X AAA for remote sensors
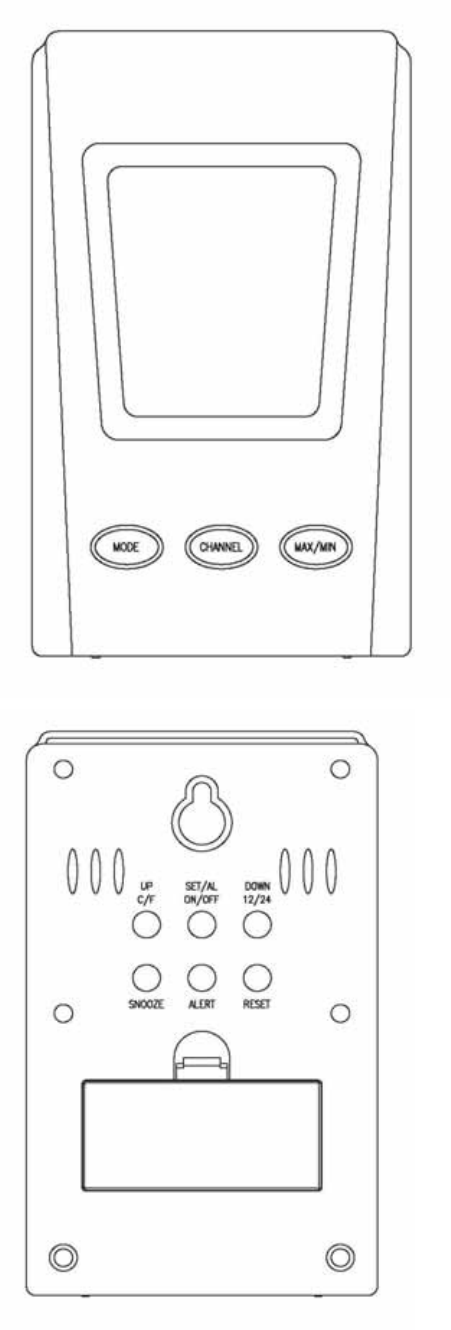
Keys for base station:
1. MODE
2. CHANNEL
3. MAX/MIN
4. UP/(C/F)
5. SET/(AL.ON/OFF)
6. DOWN/(12/24)
7. SNOOZE
8. ALERT
9. RESET
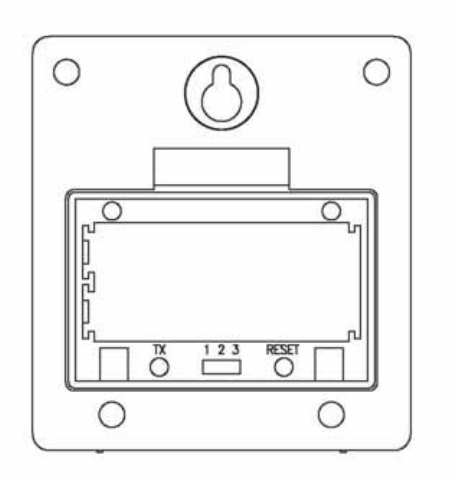
Keys for remote sensor:
1. TX
2. CHANNEL SELECTION
3. RESET
How to Set Time:
1. In normal time display mode, press and hold SET key for 2 seconds till the Hour
flashes. Press UP and Down key to adjust Hour.
2. Press SET key again, Minute will flash. Follow the same procedure as above to adjust
Minute.
3. Press SET key again, and follow the above procedure to adjust Month, Date and Year.
4. Press CHANNEL key anytime to return to the normal time display mode.
5. It will return to normal time display if no key is pressed within 20 seconds.
12/24 Hour Selection
In normal time display mode, press DOWN/ (12/24) key to set the time display in 12 hour
or 24 hour format.
How to Set Alarm:
This unit can be set 2 different alarm times: Alarm 1 and Alarm 2.
How to set and activate alarm 1:
1. In normal time display mode, press MODE key once, it will enter Alarm 1 mode and
the Alarm 1 icon (A1) will show on the display.
2. Press SET key to activate/deactivate alarm. When the alarm is activated, the Alarm
Bell icon will show on the display.
3. Press and hold SET key for 2 seconds till the alarm hour flashes. Press UP and
DOWN key to adjust the Hour to your desired alarm time. Press SET key again, the
alarm minute will flash. Press UP and DOWN key to adjust the Minute accordingly.
Press SET key to return to the normal time display mode.
4. Press CHANNEL key anytime to return to the normal time display mode.
5. It will return to normal time display if no key is pressed within 20 seconds.
How to set and activate alarm 2:
1. In normal time display mode, press MODE key two times and it will enter Alarm 2
mode and the Alarm 2 icon (A2) will show on the display.
2. Follow the procedures as Alarm 1 setting above, you can set and activate/deactivate
alarm 2.
How to set and use countdown timer:
1. In normal time display mode, press MODE key 3 times and it will enter the countdown
timer mode. The TIMER icon will show on the display.
2. Press and hold SET key for 2 seconds till the countdown timer hour flashes. Press UP
and DOWN key to adjust the Hour to your desired hour. Press SET key again, the
countdown timer minute will flash. Press UP and DOWN key to adjust the Minute
accordingly. Press SET key again, the countdown timer second will flash. Press UP
and DOWN key to adjust the Second accordingly. Press SET key to finish the setting.
3. Press SET key again to start the countdown timer.
4. When the countdown timer reaches 00:00:00, an alarm will sound.
5. When the countdown timer is running, press SET key to pause the countdown. Press
SET key again to re-start countdown.
ATTENTION:
In any setting modes above, press CHANNEL key at any time to return to normal display
mode.
How to check calendar:
In normal time display mode, press SET key once, it will show hours:minutes:seconds.
Press SET key again, it will show calendar in Month: Date: Year format.
F/C selection:
Press DOWN/(C/F) to select the temperature display in F or C.
How to register the remote sensors
First install the batteries in the base station. The Receiving Signal icon will be flashing for
5 minutes, which indicates that the base station is ready to pickup the signals sent from
remote sensors. Set the Channel Selection switch in each remote sensor (up to 3 remote
sensors) to different channels (channel 1 to 3). And then install batteries for remote
sensors within the time the Receiving Signal icon is flashing on the base station display.
How to register new remote sensors if the Receiving Signal Icon is not flashing on
the base station display
Press and hold CHANNEL key more than 2 seconds, the Receiving Signal icon will be
flashing on the display for 5 minutes, which indicates that the base station is ready for new
remote sensors to be registered. Install the batteries in the new remote sensors or press
TX or RESET button if the remote sensors already have the battery installed. The new
remote sensors will be registered.
Check temperatures in different remote sensors:
Press Channel to display temperature in different remote sensors in sequence: Ch1 – Ch2
– Ch3 – Auto scroll – Ch1 –
Maximum/Minimum/Clear temperature:
1. Press MAX/MIN/CLEAR key display the maximum and minimum temperature
recorded in the last 24 hours.
2. Press and hold MAX/MIN/CLEAR to clear the record
Temperature alert:
1. How to set alert temperatures for indoor temperature:
Press and hold ALERT key until indoor temperature display flashes. The UP Arrow
icon will show as well, which represents the upper limit temperature. Press UP and
DOWN key to adjust the upper limit alert temperature. Press ALERT key again, the
DOWN Arrow icon will show, which represents the lower limit temperature. Press UP
and DOWN key to adjust the lower limit alert temperature. Press ALERT key again to
return to normal mode.
2. How to set alert temperatures for outdoor temperatures:
Press and hold ALERT key until indoor temperature display flashes. Press CHANNEL
key to select which channel temperature will be set (from Channel 1 to 3). The upper
limit temperature in the selected channel will flash. Press UP and DOWN key to adjust
the upper limit alert temperature. Press ALERT key again, the DOWN Arrow icon will
show, which represents the lower limit temperature. Press UP and DOWN key to
adjust the lower limit alert temperature. Press ALERT key to return to normal mode.
3. Press ALERT key to turn on/off temperature alert function. If the alert function is
activated, the ALERT icon (ARROW) will show on the display.
This device complies with Part 15 of the FCC Rules. Operation is subject to the following
Conduction: (1) this device may not cause harmful interference, and (2) this device must
accept any interference received, including interference that may cause undesired
operation.
FCC NOTE: THE MANUFACTURER IS NOT RESPONSIBLE FOR ANY RADIO OR TV
INTERFERENCE CAUSED BY UNAUTHORIZED MODIFICATIONS TO THIS EQUIPMENT.
SUCH MODIFICATIONS COULD VOID THE USER’S AUTHORITY TO OPERATE THE
EQUIPMENT.