Springfield Precision Instruments 91586 Wireless Multi-Zone Digital Weather Center User Manual
Springfield Precision Instruments, Inc Wireless Multi-Zone Digital Weather Center
User manual
Federal Communications Commission Requirements
Warning: ‘CHANGES OR MODIFICATIONS NOT EXPRESSLY APPROVED BY THE PARTY
RESPONSIBLE FOR COMPLIANCE WITH THE FCC’S RULES (THE FCC’GRANTEE’)
COULD VOID THE USER’S AUER’S AUTHORITY TO OPERATE THE EQUIPMENT’.
Note: This equipment has been tested and found to comply with the limits for a Class B digital devices,
pursuant to part 15 of the FCC Rules. These limits are designed to provide reasonable protection
against harmful interference in a residential installation. This equipment generates, uses an can radiate
radio frequency energy and, if not installed and used in accordance with the instructions, may cause
harmful interference to radio communications. However, there is no guarantee that interference will
not occur in a particular installation. If this equipment does cause harmful interference to radio or
television reception,which can be determined by turning the equipment off and on. the user is
encouraged to try to correct the interference by one or more of the following measures:
1、Reorient or relocate the receiving antenna.
2、Increase the separation between the equipment and receiver.
3、Connect the equipment into an outlet on a circuit different from that to which the receiver is
connected.
4、Consult the dealer or an experienced radio/TV technical for help.
THIS DEVICE COMPLIES WITH PARTS 15 OF THE FCC RULES.
OPERATION IS SUBJECT TO THE FOLLOWING TWO CONDITIONS:
(1)THIS DEVICE MAY NOT CAUSE HARMFUL INTERFERENCE,AND (2)THIS DEVICE
MUST ACCEPT ANY INTERFERENCE RECEIVED,INCLUDING INTERFERENCE THAT MAY
CAUSE UNDESIRED OPERATION.
S6Z-91586
FEATURES AND SPECIFICATIONS
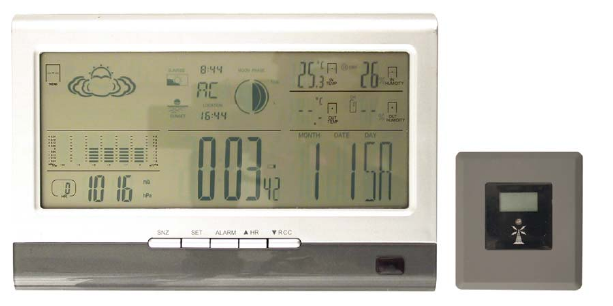
BASE STATION
• Indoor / RF outdoor temperature
• Monitors temperature and humidity at up to 4 locations (additional sensors required)
• Memory function to recall min./max. temperature and humidity readings
• Auto scroll remote temperature and humidity readings
• Indoor / outdoor temperature displayed in °C or °F
• Indoor temperature range 32°F to 122°F (0°C to 50°C)
• Outdoor temperature range -22°F to 158°F (-30°C to 70°C)
• Temperature tolerance +/-2°F (+/- 1.1°C)
• Indoor and outdoor temperature and humidity trend indicators
• Programmable high / low temperature alarm
• Indoor and outdoor hygrometer monitors humidity levels between 20% - 90%
• Humidity tolerance +/- 5%
• Barometric weather forecaster with weather icons
• Barometric bar graph with history recall
• Barometric pressure trend indicator
• 12/24 hour selectable clock with 2 daily alarms and snooze
• Calendar with day of the week display
• Moon phase icons
• Sunrise / sunset time display
• Low, medium, high tide display
• Low battery indicator
• Tabletop easel stand or wall mount
• Requires (2) AA batteries
REMOTE SENSOR
• 433MHz transmission frequency
• Transmission range 100 ft. (may be shorter based on interference present)
• LCD readout showing temperature and humidity
• Temperature range -22°F to 158°F (-30°C to 70°C)
• Temperature tolerance +/- 2°F (+/- 1.1°C)
• Tabletop easel stand or wall mount
• Requires (2) AAA batteries
BATTERY INSTALLATION AND SETUP
• Position the remote sensor near the base station and remove the wall mounting bracket / easel stand.
• Open the battery compartment using a screwdriver to remove 4 screws at the back of the remote sensor.
• The remote is preset to channel “1”. If you are installing additional remotes, slide the channel selector
switch to the desired channel.
• Insert (2) AAA batteries according to the polarity markings.
• Press the °C/°F button to select your desired setting.
• Open the battery door at the back of the base station and insert (2) AA batteries according to the polarity
markings. You will hear an audible signal.
• NOTE: The battery compartment is sized for four batteries but only two are required. Insert the batteries in
the top section with the spring contact. The other two positions can be used for battery storage.
• Replace the battery door.
• The base station will begin to look for the RF signal from the remote sensor.
• When the outdoor temperature and humidity readings are shown on the base station the connection is
confirmed. The connection may take several minutes.
• Replace the battery compartment cover of the remote sensor. If the rectangular rubber gasket has been
dislodged, re-position it properly in the rectangular channel to seal the battery compartment. Re-install 4
screws. Do not over-tighten the screws.
Notes:
• Do not mix old and new batteries.
• Do not mix alkaline, standard (carbon zinc), or rechargeable (nickel cadmium) batteries.
• For maximum performance in normal conditions we recommend using good quality alkaline batteries.
When temperatures are below 32°F, alkaline batteries can lose power resulting in a loss of remote
transmission. If you reside in an area that experiences frequent temperatures below freezing, we
recommend using lithium batteries to minimize the loss of transmission.
Locating the Base Station and Remote Sensor
• Choose a suitable place for the base station and remote outdoor sensor within the transmission distance.
• Place the base unit near a window, but away from direct sunlight or sources of heat or air conditioning to
ensure accurate temperature readings.
• The remote sensor is water resistant, but not waterproof. Locate the sensor in an area where it will not be
exposed to rain, snow or ice which can damage the electronic circuitry.
• The location you choose is critical for maximizing the transmission range. The remote sensor is designed to
transmit unimpeded 80 to 100 ft. Transmitting through walls, metal doors and metal framed windows may
reduce the transmission range. To optimize the transmission distance, the remote should be positioned in a
location that minimizes these obstructions. Interference from other sources such as home security systems,
wireless doorbells and wireless home entertainment equipment may interrupt the transmission signal
temporarily.
OPERATING INSTRUCTIONS
Before entering the following settings, wait until there are numerical readings in all fields of the LCD display.
°C / °F Selection
• Press the °C/°F button at the back of the base station to display the temperature in °C or °F on the base
station.
Time Zone Selection
The display to the right of the time indicates time zone. This must be set manually.
• Press the ▲ button to select your time zone. E for Eastern, P for Pacific, M for Mountain and C for Central.
After you have set the time on your weather center, at any time you can press ▲ to view the time in the
other time zones.
Setting the Time and Date
• Press and hold the SET button for 3-4 seconds until the year is flashing.
• Press ▲ or ▼ to set the year.
• Press SET and the month will be flashing.
• Press ▲ or ▼ to set the month.
• Press SET and the date will be flashing.
• Press ▲ or ▼ to set the date.
• Press SET and 12/24 will be flashing.
• Press ▲ or ▼ to select 12 or 24 hour timing mode.
• Press SET and the hour will be flashing.
• Press ▲ or ▼ to set the hour.
• Press SET and the minutes will be flashing.
• Press ▲ or ▼ to set the minutes.
• Press SET and you will have the option of selecting Daylight Savings Time.
• Press ▲ to select Daylight Savings Time ON or OFF.
• Press SET to lock in the settings.
Daily Alarms
When activated, the alarms will sound at the pre-set time every day until de-activated.
To view the current alarm settings, press ALARM to view the first alarm time (A1 will show next to the time).
Press ALARM again to view the second alarm time (A2 will show next to the time). Press ALARM again to
revert to current time or the unit will revert automatically in 7-8 seconds.
Setting the Daily Alarms
• Press the ALARM button to select the alarm you want to set.
• Press and hold the ALARM button for 3-4 seconds until A1 appears and the alarm hour is flashing.
• Press ▲ or ▼ to set the A1 alarm hour.
• Press ALARM and the alarm minutes will be flashing.
• Press ▲ or ▼ to set the A1 alarm minutes.
• Press ALARM and A2 appears and the alarm hour is flashing.
• Press ▲ or ▼ to set the A2 alarm hour.
• Press ALARM and the alarm minutes will be flashing.
• Press ▲ or ▼ to set the A2 alarm minutes.
• Press ALARM to lock in the settings.
Activating and De-activating the Daily Alarms
• Press ▼ once activate Alarm 1. (The alarm 1 icon will show).
• Press ▼ again to activate Alarm 2. (The alarm 2 icon will show).
• Press ▼ again to activate both Alarm 1 and 2. (Both alarm icons will show).
• Press ▼ again to de-activate the alarms. (Neither alarm icon will show).
Snooze Function and Silencing the Alarm
• When the alarm sounds, press SNZ to activate the snooze function or press any other button to silence the
alert.
• When snooze is activated the Zz symbol will appear and the alarm will sound every 5 minutes to a
maximum of 7 times.
• When the alarm sounds again, press SNZ to continue the snooze function or press any other button to
silence the alert.
• The alarm icon will remain on the display and the alarm will sound every day at the pre-set time until de-
activated.
TEMPERATURE ALERTS
You can program your weather center to sound an alert whenever the outdoor temperature exceeds the upper or
lower pre-set limit. The temperature alert can be set for all remote channels. When setting the alert
temperatures, the display will change in increments of 1.8°F or 1.0°C. The low temperature alert setting must
be at least 1.8°F (1.0°C) below the high temperature alert setting.
Setting the Temperature Alert Levels
• Press and hold the ALERT button for 3-4 seconds until the outdoor temperature and icon are flashing.
• Press CH to select the channel on which you would like to set the alert.
• Press ▲or ▼°C/°F to set your desired high temperature alert level.
• Press ALERT to confirm the setting and the icon for low temperature limit will be flashing.
• Press ▲or ▼°C/°F to set your desired low temperature alert level.
• Press ALERT to confirm the settings. (The and icons will be displayed).
When the temperature reaches the high or low limit, there will be an audible signal and the outdoor temperature
and and icons will begin flashing. As long as the temperature exceeds the pre-set limit the display will
continue to flash and the alert will sound every 60 seconds.
De-activating the Temperature Alerts
• Press ALERT to de-activate the temperature alerts.
• The and alarm symbols will no longer be displayed.
MAXIMUM AND MINIMUM TEMP / HUMIDITY MEMORY
• Press the MEM button once to display the highest recorded temperature and humidity readings since the last
reset. MAX will show on the display.
• Press MEM again to display the lowest recorded temperature and humidity readings since the last reset.
MIN will show on the display.
• Press MEM again to return to the normal display or wait 7-8 seconds and the display will revert
automatically. The MAX or MIN icon will no longer be displayed.
• To clear either the maximum or minimum record, when the appropriate record is on the display press and
hold the MEM button for 3-4 seconds.
HUMIDITY AND TEMPERATURE TREND DISPLAYS

After you insert the batteries your weather center will begin to track and record temperature and relative
humidity data. The displays will initially show a neutral trend (horizontal arrow or dot).
Temperature Trend
• After one hour, if the temperature is more than 1.8°F (1.0°C) higher than the previous record, an up arrow
will be displayed.
• If the temperature is more than 1.8°F (1.0°C) lower than the previous record, a down arrow will be
displayed.
• If the temperature change is less than this amount a horizontal arrow or dot will be displayed.
Humidity Trend
• After one hour, if the relative humidity is more than 5% higher than the previous record, an up arrow will be
displayed.
• If the relative humidity is more than 5% lower than the previous record, a down arrow will be displayed.
• If the relative humidity change is less than this amount a horizontal arrow or dot will be displayed.
BAROMETRIC PRESSURE DISPLAY
Pressure Display Selection
• Press ▲to select either inHg (inches of mercury) or hPa (hectopascals).
Barometric Pressure History
• The bar graph on your weather center displays barometric pressure history for the prior 12 hours. The
column to the right shows the current pressure. Moving to the left are the prior time periods, beginning with
-1 hour, then -2 hours, -3 hours, -6 hours and -12 hours.
• Below the bar graph is the current numerical pressure reading in either inHg or hPa.
• To display the numerical pressure reading for prior periods, use the HISTORY button. Press once to view
the pressure reading one hour prior, twice to view two hours prior, etc. up to 12 hours prior.
Weather Forecast
Barometric pressure data must be accumulated by your weather center for 12 hours before the weather forecast /
weather icon function is operational.
TIDE, MOON PHASE, SUNRISE AND SUNSET DISPLAYS
Your weather center will display tide, moon phase and sunrise / sunset times based on your location. City codes
are pre-programmed into the unit. Determine the city nearest your location using the list below.
• Press and hold the LOC button for 3-4 seconds until the city selection is flashing.
• Press ▲ or ▼ to select the city nearest your location.
• Press LOC to confirm your selection.

CANADA
Montreal YMQ Vancouver YVR
Ottawa YOW Toronto YYZ
Quebec YQB
UNITED STATES
Atlanta, GA ATl
Atlantic City, NJ AIY Milwaukee, WI MKE
Baltimore, MD MTN Minneapolis, MN MSP
Boston, MA BOS Nashville, TN BNA
Buffalo, NY BUF New Orleans, LA MSY
Charlotte, NC CLT New York, NY NYK
Chicago, IL CHI Oklahoma City, OK OKC
Cincinnati, OH CVG Orlando, FL ORL
Cleveland, OH CLE Philadelphia PA PHL
Dallas, TX DFW Phoenix, AZ PHX
Denver, CO DEN Pittsburgh, PA PIT
Detroit, MI DTT Portland, OR PDX
Honolulu, HI HNL Raleigh, NC RDU
Houston, TX HOU Richmond, VA RIC
Indianapolis, IN IND Sacramento, CA SMF
Juneau, AK ALA Salt Lake City, UT SLC
Kansas City, MO MKC San Antonio, TX SAT
Las Vegas, NV LAS San Francisco, CA SFO
Lincoln, NE LNK San Jose, CA SJC
Little Rock, AR LIT Seattle, WA SEA
Los Angeles, CA LAX St. Louis, MO STL
Madison, WI MSN Tucson, AZ TUS
Miami, FL MIA Washington D.C. WAS
LIMITED WARRANTY
Springfield warrants this product to be free from defects in workmanship or material for a period of one year
from the date of purchase. ALL IMPLIED WARRANTIES, INCLUDING BUT NOT LIMITED TO
WARRANTIES OF FITNESS AND MERCHANTABILITY ARE HEREBY LIMITED IN DURATION
TO A PERIOD ENDING ONE YEAR FROM THE DATE OF PURCHASE. Some states do not allow
limitations on how long an implied warranty lasts, so the above limitation may not apply to you. This warranty
gives you specific legal rights, which vary, from state to state. During the warranty period, such defects will be
repaired or the defective instrument will be replaced at our option. This warranty does not cover damages
through accident or misuse. IN ADDITION, SPRINGFIELD IS NOT RESPONSIBLE FOR
INCIDENTAL OR CONSEQUENTIAL DAMAGES INCURRED AS A RESULT OF DEFECT. Repair
or replacement will be made at our option without additional charge if the instrument is returned postpaid with
$4.00 for return postage and handling to: