Spyder Xtra Users Manual OCR
2015-09-01
: Spyder Spyder-Xtra-Users-Manual-804642 spyder-xtra-users-manual-804642 spyder pdf
Open the PDF directly: View PDF ![]() .
.
Page Count: 2
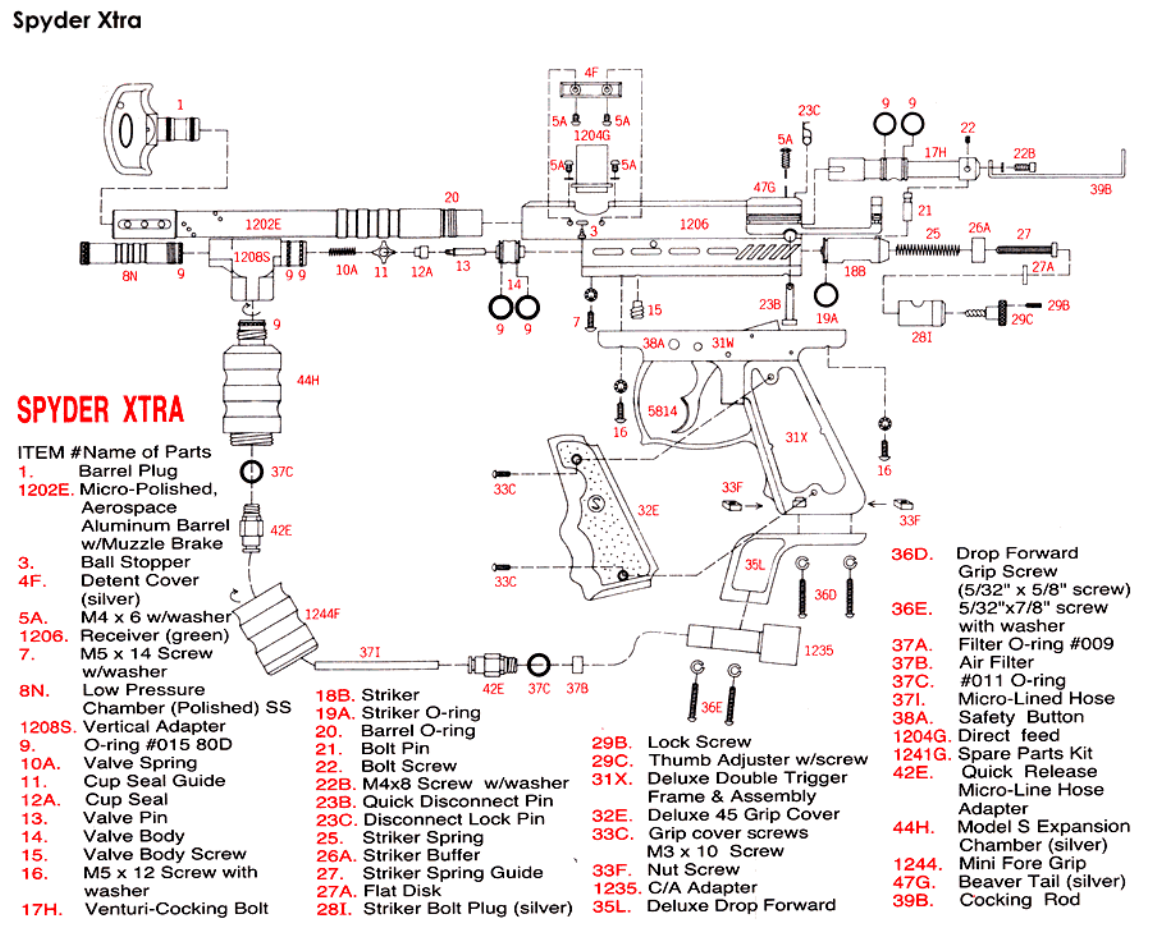
TROUBLESHOOTING
ONE OR MORE OF THE FOLLOWING MAY CAUSE RECOCKING RELATED PROBLEMS:
a. The pressure in the tank is too low or too high.
b. Need lubrication. (See OPERATION GUIDE in P4)
c. #19A (striker o-ring) is damaged. Replace with new Kingman or Kingman-approved o-ring.
(Note: the #19A O-ring cannot be substituted by a tank o-ring or a #9 o-ring).
d. Need to clean barrel and upper chamber of the receiver.
e. Paintball may be defective. (i.e. expired, change shape)
f. #9 (bolt o-ring) is damaged or the o-ring has expanded or swelled. Replace with a new o-ring.
g. After ball breaks, remove all parts from UPPER chamber of receiver, wipe parts clean, and reassemble parts into receiver. Also
make sure to clean barrel with squeegee.
HELPFUL HINTS
Always remove air tank before any disassembly of your marker. DO NOT remove #14 (valve body) unless specific valve body
repairs are needed. If needed, remove valve body with a long, soft-tipped object such as the eraser end of a pencil. DO NOT
remove the valve body with a screwdriver as it will damage the valve body and cause air leaks. (Note: #15 screw must be
removed prior to taking out the valve body),
Air leaks are usually cause by a damaged valve body or damaged cup seal (#12). Replace with new valve body and/or cup seal if
necessary.
To assure marker is assembled properly, follow the schematic drawing or place parts in order during disassembly. Parts
assembled backwards or placed in the wrong order will cause marker to malfunction.
SPYDER XTRA OPERATION GUIDE:
1. To put the marker on "SAFE", push the safety from the 'PUSH SAFE" side of the trigger frame. To disengage the safety, point
the marker in safe direct on, push in the safety from the "PUSH FIRE" side of the trigger frame.
2. Cock the marker by pulling the Cocking Bolt (#39B) rearward until it latches.
Caution: if you let go before it latches, your marker may fire.
3. Tighten the air tank until it is snug. If a leak occurs between the air tank and the CIA Adapter, replace the tank o-ring.
4. Install a 7/8" elbow with loader into the vertical feed. Fill the loader with .68 caliber paintballs only.
5. With the safety off, fire the marker by pulling the trigger.
6. Only use lubrication specifically designed for paintball markers. To lubricate your marker, you will need to disassemble your
marker (please note how parts are removed from marker as this will ease reassembly). Remove the Disconnect Lock Pin (# 23C)
and the Disconnect Pin (#23B). Hold down the Striker Plug (#28I) and Thumb Adjuster (#29C), as internal parts may be spring-
loaded. As you pull the cocking knob out of the receiver, the Cocking Bolt (#17H) and Striker (#18B) will also be removed.
7. Lubricate O-rings #9 and #19A with a few drops of paintball oil only.
8. Reassemble parts back into the marker. Note: when putting the Cocking Bolt and Striker back into the marker, you will need
to apply pressure behind the bolt while pulling the trigger at the same time. This will allow the Bolt and Striker to be properly
installed back into the receiver.
9. When you are finished shooting the marker, first, unload the marker of all paintballs. Note: there may be a ball in the
receiver; take a couple of shots in safe direction to make sure that the barrel and receiver are empty. Second, put the barrel lug
into the barrel. Put the safety on and slowly unscrew the air source tank. Caution: do not unscrew the tank valve from the
tank. Doing so may cause serious injury or death.
10. Empty the hopper or remove the hopper off the marker to stop the flow of paintballs in the marker.
