Sricctv Technology SP020 IP Camera User Manual SP022
Shenzhen Sricctv Technology Co., Ltd. IP Camera SP022
User Manual
IP Camera
Quick User Manual
For Videos of how to setup IP Cameras please visit Website: www.sricam.com/videos
Customer Service
Monday - Saturday
9:00-18:00 Beijing Time (UTC +8)
E-Mail: Support@sricam.com
Skype ID: tech.sricam
Website: www.sricam.com
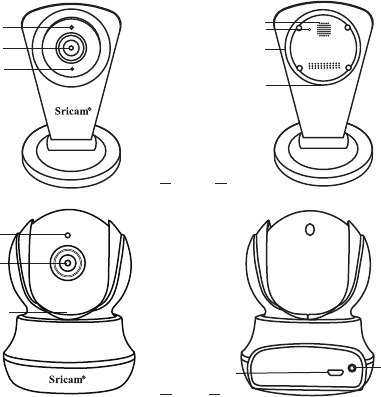
IR Sensor
IR Sensor
Lens
Lens
Speaker
Microphone
Reset
Reset
MicroSD card Slot
MicroSD card Slot
DC 5V Power Slot
DC 5V Power Slot
Reset
Products Introduction
Before starting setup
Make sure of the following:
• Your router supports the 2.4GHz frequency band (802.11b/g/n).
• Your router DHCP is enabled.
• Your smartphone is connected to the Internet with a WLAN/Wi-Fi that the camera will connect with.
• You know the WLAN/Wi-Fi password.( No special characters in the password and Wi-Fi SSID
such as @#$%^&*).
• Your smartphone, camera, and router should be within about 8 feet during setup. After your camera
is set up,you can move the camera to your preferred location.
Note: For watch live video on App without internet, please go to page 6: FAQ2.
SP009C
SP020
1
Sricam App Installation
Start setup
Step1.
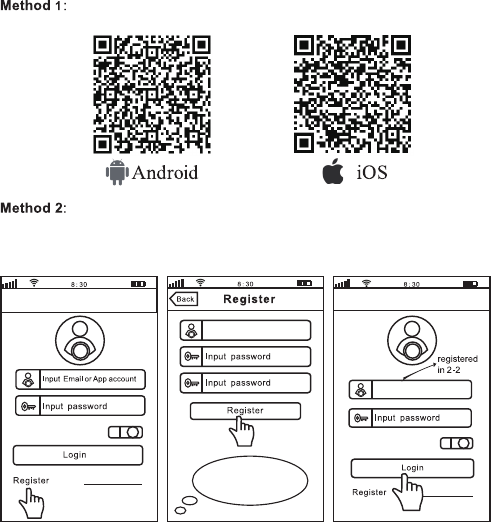
Go directly to Step3 if the Sricam App is already download and registered in your smartphone.
Scan the QR code to download the“Sricam” App.
Search“Sricam”on Google Play or iOS App Store.
2-1 2-2 2-3
After download the App “Sricam”, please install and register a user account.
0551876
Input a email
Keep password
Keep password
Please creat a password
for App account ,please don't
input your email password
Forgot Password?
Forgot Password?
Step2. Register an App user account
2
Step3. Product Connection
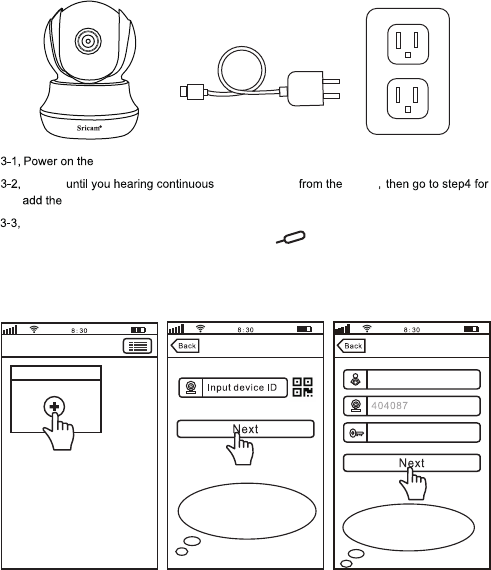
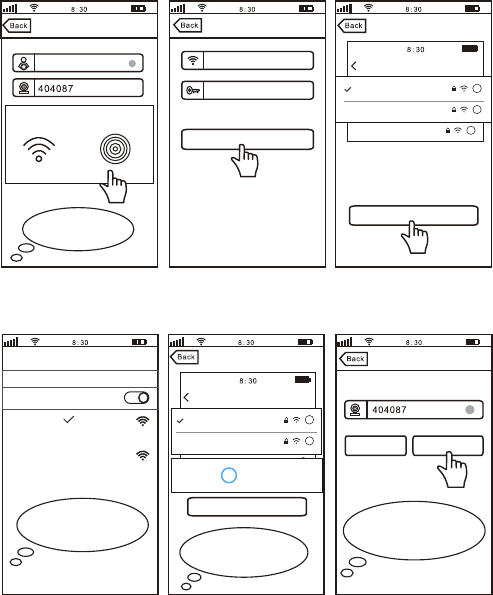
If you can’t hear the beeping sound from the device within 1 minute, you need reset the
device first. Press RESET button by a reset pin for 10 seconds until you hear a
clash sound from the device. Then waiting until you hear continuous beeping sound from
the device, and go to Step4 for add the device on App “Sricam”.
Waiting
on App “Sricam”.
.
Step4. Add the camera on App
4-1 4-2 4-3
Add deviceAdd deviceDevice List
Note: The “Device ID” can
be found on the label which is
attached to the camera. Note: Here take camera
ID:404087 as an example.
Add new device
IPCam
Input password(default:888888)
beeping sound device
device
camera.
3
4-4 4-5 4-6
4-7 4-8 4-9
Next
WLAN
WLAN
MEYE_404087
Turn on or turn off
Wi-Fi Setting
Setting Wi-Fi
NO SIM 100%
MEYE_898888
MEYE_1022222
TP-LINK
i
i
i
Connect
Sricamsales
Secured
Loading
Wi-Fi Setting
Wi-Fi setting succeed
Skip
Change Password
Note: Password should be
3-9 characters long (A-Z,0-9)
without special characters.
Configuring Wi-Fi ..., please
wait for couple of minutes
Note: After your smart
phone is connected to the AP
Hotspot,back to App.
56
Add device Wi-Fi Setting
salestest
Next
Next
Input Wi-Fi Password
Wi-Fi Setting
Setting Wi-Fi
Smart Wi-Fi AP Hotspot
NO SIM 100%
MEYE_898888
MEYE_1022222
TP-LINK
i
i
i
Note: Tap “Next” go to setup Wi-Fi. Please
connect your smart phone to Wi-Fi: MYEY_
404087. Then back to App
Note: Tap
AP Hotspot.
IPCam
Device offline ,please choose camera
network connection mode
4
4-10
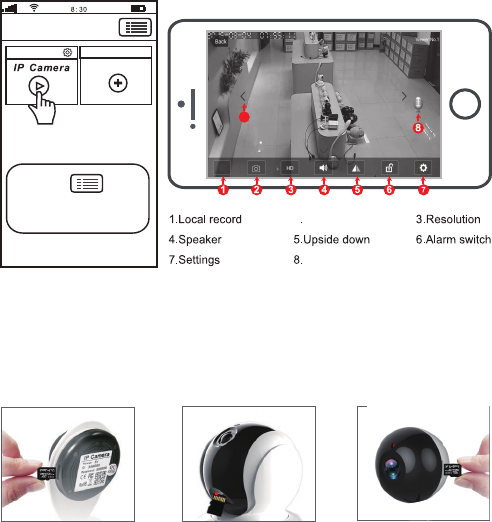
1) Insert the microSD card to the camera
IPCam Add new device
Device List
Tap this button for
setting App“Authority. Multi-Media,
System,About us, Update, Logout.”
Live video stream on smart phone
Microphone
9
2) MicroSD card format and record setting
9.Pan & Tilt
2.Screenshots
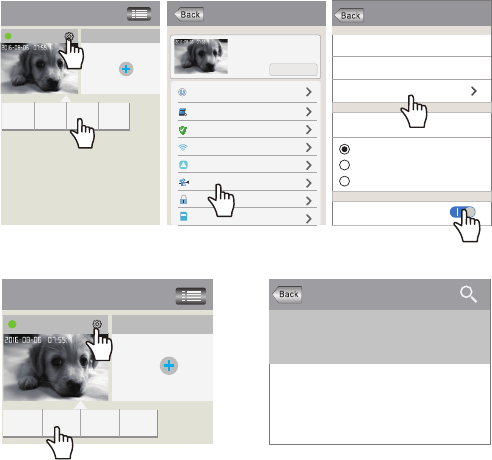
FAQ1: MicroSD card record and playback setting
Log in “Sricam” App and follow the steps: Setting-> Record Setting-> SD card Formatting-> Record
Switch
(Note: If the SD card recording is full, it will automatically loop coverage, you do not need to
manually delete the video files).
5
Record Setting
SD Card Free Space:827M
SD Card Formatting
Record Type
Record Switch
SD Card Total Space:3784M
Manual Record
Alarm Record
Timing Record
FAQ1-1 FAQ1-2 FAQ1-3
FAQ1-4 FAQ1-5
Playback-63
Devices List
SD card videos
Latest 1 day Latest 3 days Latest 1
month months
Lastest 3
Phone local videos
disc1/2017-02-02_14:00:00_S.av (1123S)
disc1/2017-02-02_13:30:00_S.av (1800S)
disc1/2017-02-02_13:00:00_S.av (1800S)
home Add new device
Modify Settings DeletePlayback
Devices List
IPCam
Add new device
Modify Settings
DeletePlayback
Settings
home
Device information
Time Setting
Media Setting
Security Setting
Network Setting
Alarm Setting
Record Setting
Defence Setting
Storage Setting
!
FAQ2: Configure and watch live videos on AP Hotspot mode
4) Record Playback on PC
For video files transfer from microSD card to your PC and playback ,you need use the “SricamPC”App
For “SricamPC”App and user manual, please visit website: www.sricam.com/download
3) Record Playback on App
1
1
2
2
It is worth watching live video on AP Hotspot mode when you using a charged or unstable WiFi internet.
But before use AP Hotspot, you must have an useable internet no matter is charged or unstable.
Because download and start the App Sricam need internet.
6
Add deviceAdd deviceDevice List
Note: The “Device ID” can
be found on the label which is
attached to the camera.
Add new device
IPCam
Input password(default:888888)
Live video stream on smart phone
9
FAQ2-1 FAQ2-2 FAQ2-3
FAQ2-4
Device is in AP LAN(local area network)
mode,do you need connect it to Wi-Fi
network
Skip Wi-Fi Setting
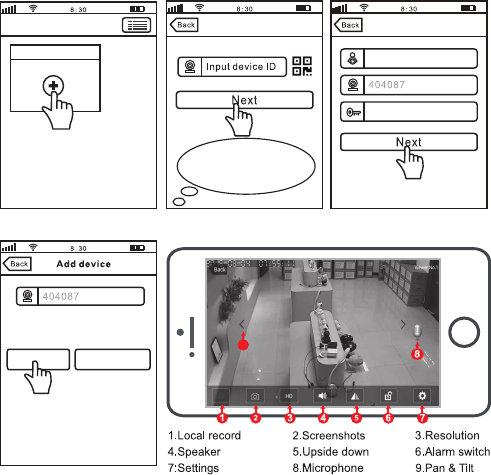
Step 1. Sricam App Installation.
Step 2. Register an App user account.
Step 3. Product Connection.
Step 4. Login Sricam App with the registered user account.
Step 5. Logout App and connect your smart phone to the Wi-Fi SSID: MEYE_Camera ID. ( For
example: Camera ID is 404087, WiFi SSID is: MEYE_404087).
Step 6. Start App and add the camera.
About Step 1, Step 2, Step 3, please go to user manual page 2 and page 3.
More FAQs please visit: www.sricam.com/faqs
7
FCC WARNING
This device complies with part 15 of the FCC Rules. Operation is subject
to the following two conditions: (1) this device may not cause harmful
interference, and (2) this device must accept any interference received,
including interference that may cause undesired operation.
Any changes or modifications not expressly approved by the party
responsible for compliance
could void the user's authority to operate the equipment.
NOTE: This equipment has been tested and found to comply with the
limits for a Class B digital device, pursuant to Part 15 of the FCC Rules.
These limits are designed to provide reasonable protection against
harmful interference in a residential installation. This equipment
generates, uses and can radiate radio frequency energy and, if not
installed and used in accordance with the instructions, may cause
harmful interference to radio communications. However, there is no
guarantee that interference will not occur in a particular installation.
If this equipment does cause harmful interference to radio or television
reception,
which can be determined by turning the equipment off and on, the user is
encouraged to try to correct the interference by one or more of the
following measures:
-- Reorient or relocate the receiving antenna.
-- Increase the separation between the equipment and receiver.
-- Connect the equipment into an outlet on a circuit different
from that to which the receiver is connected.
-- Consult the dealer or an experienced radio/TV technician for help.
To maintain compliance with FCC’s RF Exposure guidelines, This
equipment should be installed and operated with minimum distance
between 20cm the radiator your body: Use only the supplied antenna.
FCC ID:2AC6K-SP020