Stanley Black and Decker DCT100 Outdoor Access Point User Manual Installation Guide
Stanley Black & Decker Outdoor Access Point Installation Guide
Contents
- 1. User manual
- 2. User Manual_rev
- 3. Installation Guide
Installation Guide
DCT100 Professional Outdoor Installation
To install a DCT100 WiFi Access Point outdoors, an installer may utilize the DCT1001 WiFi AP
bracket, DeWalt DW0881 ¼” Tripod or DeWalt DW0737 Construction Tripod.
Installation must be performed by a professional installer.
The DCT100 WiFi Access Point must be mounted with the DeWALT logo facing up or
down to comply with FCC regulations. This mounting orientation must be achieved by
ensuring the plane of the surface with the DeWalt logo is perpendicular to plumb. Any
time the device is moved the mounting orientation must be confirmed to be with
DeWALT logo facing up or down.
1. DCT1001 WiFi AP Bracket
a. Included Parts
i. Bracket Assembly Qty. 1
ii. Quick Release Clamp Qty. 2
b. Surface Mounting
i. Required Materials
1. Anchoring Hardware
2. Drill
3. Bracket Assembly
ii. The DCT100 WiFi Access point must be mounted in an upward, or
downward orientation, with the DeWalt logo perpendicular to plumb.
1.
a. Mark the bracket holes on mounting surface
i.
b. Drill holes

i.
c. Align bracket with mounting holes
d. Fasten bracket to surface with fasteners appropriate for
mounting surface material
i.
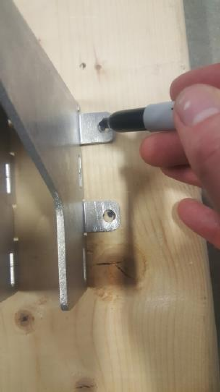
e. Place AP on bracket assembly
f. Thread bracket assembly thumb screw into the DCT100
Access Point until the AP is secured to the bracket
i.
ii.
c. Pole Mounting
i. Required Materials
1. Bracket Assembly
2. Quick Release Clamps
3. Flat head Screwdriver
ii. The DCT100 WiFi Access point must be mounted in an upward, or
downward orientation, with the DeWalt logo perpendicular to plumb.
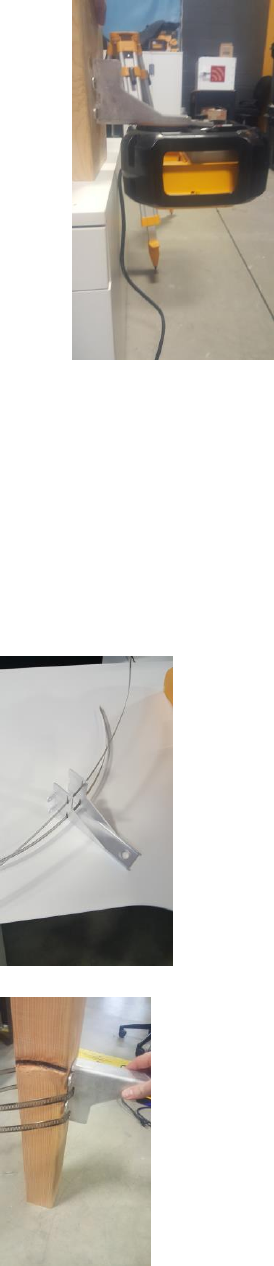
1. Thread the quick release clamps through the vertical slots on the
mounting bracket
a.
2. Place bracket against pole in desired location
a.

3. Insert loose end of the quick release clamp into the retaining
assembly
4. Pull loose end until taught
5. Turn the Quick Release Clamp’s tension screw until desired
tension is achieved
a.
6. Repeat steps c-e for the second quick release clamp
7. Place AP on bracket assembly
8. Thread bracket assembly thumb screw into the DCT100 Access
Point until the AP is secured to the bracket
a.
b.
2. Tripod Mount
a. DW0881 ¼” Tripod Mounting
i. The DCT100 WiFi Access point must be mounted in an upward, or
downward orientation, with the DeWalt logo perpendicular to plumb.

1.
ii. Thread the ¼”x20 mounting bolt into the ¼”x20 tapped hole on the bottom
of the DCT100 Access Point and tighten until the AP is secured to the
tripod.
1.
iii. Adjust tripod legs to desired height
1.
b. DW0737 Construction Tripod Mounting
i. The DCT100 WiFi Access point must be mounted in an upward, or
downward orientation, with the DeWalt logo perpendicular to plumb.

1.
ii. Thread the 5/8"x11 mounting bolt into the 5/8"x11 tapped hole on the
bottom of the DCT100 Access Point until the AP is secured to the tripod.
1.
iii. Adjust tripod legs to desired height
1.
iv. Press the feet of the tripod into the ground

3. DCT100 WiFi Access Point Setup
a. Required Materials
i. DEWALT DCT100 WiFi Access Point
ii. Ethernet cable - not included
iii. DEWALT WiFi app (available for Android 4.4 or greater and iOS 9 or
greater)
iv. Active Internet Connection
b. Procedure
i. Go to Apple App Store or Google Play Store to download the DEWALT
WiFi App and create a DEWALT WiFi account.
1.
ii. Power up the access point with the included 120V AC power Cable
iii. Connect the access point to the modem or local area network (Ethernet
cable not included).
iv. Open the DEWALT WiFi app, tap the (+) in the bottom right hand corner
to register your first DEWALT WiFi Access Point, and set up your WiFi
network by creating a network name and password.
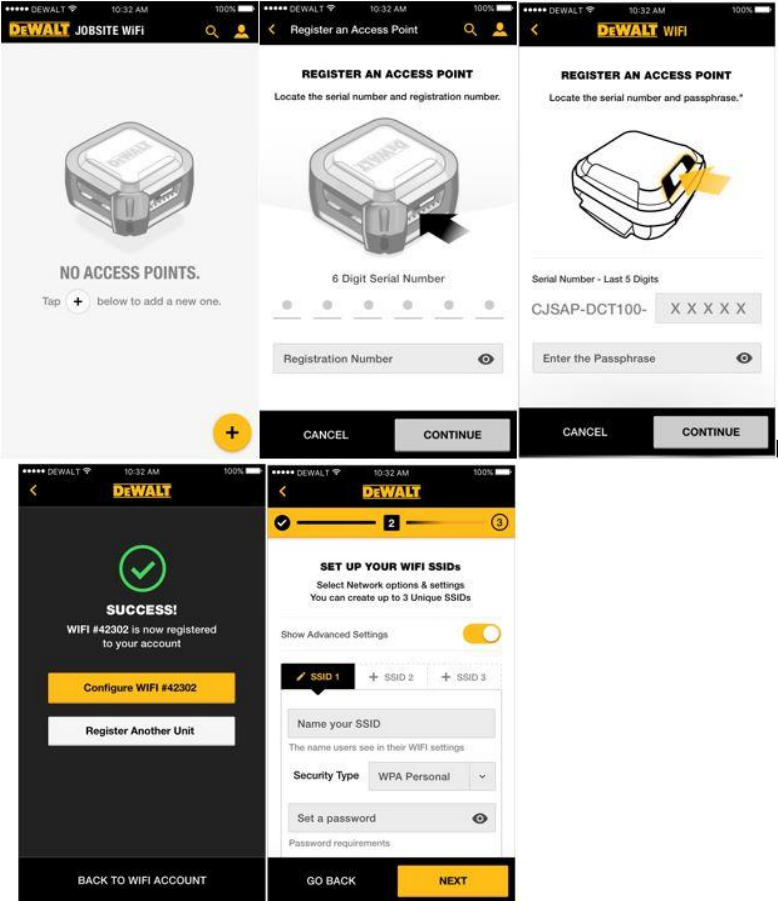
v.
vi.
vii. Tap the (+) icon in the bottom right hand corner to register and/or add
more units to your WiFi network.
4. Refer to the DCT100 User Manual for additional instructions and important safety
warnings..