StarVedia Technology 90171101 Wireless Cam User Manual
StarVedia Technology Inc Wireless Cam
User Manual rev.pdf
Product View
Quick Installation Guide
Day&Night IP Camera
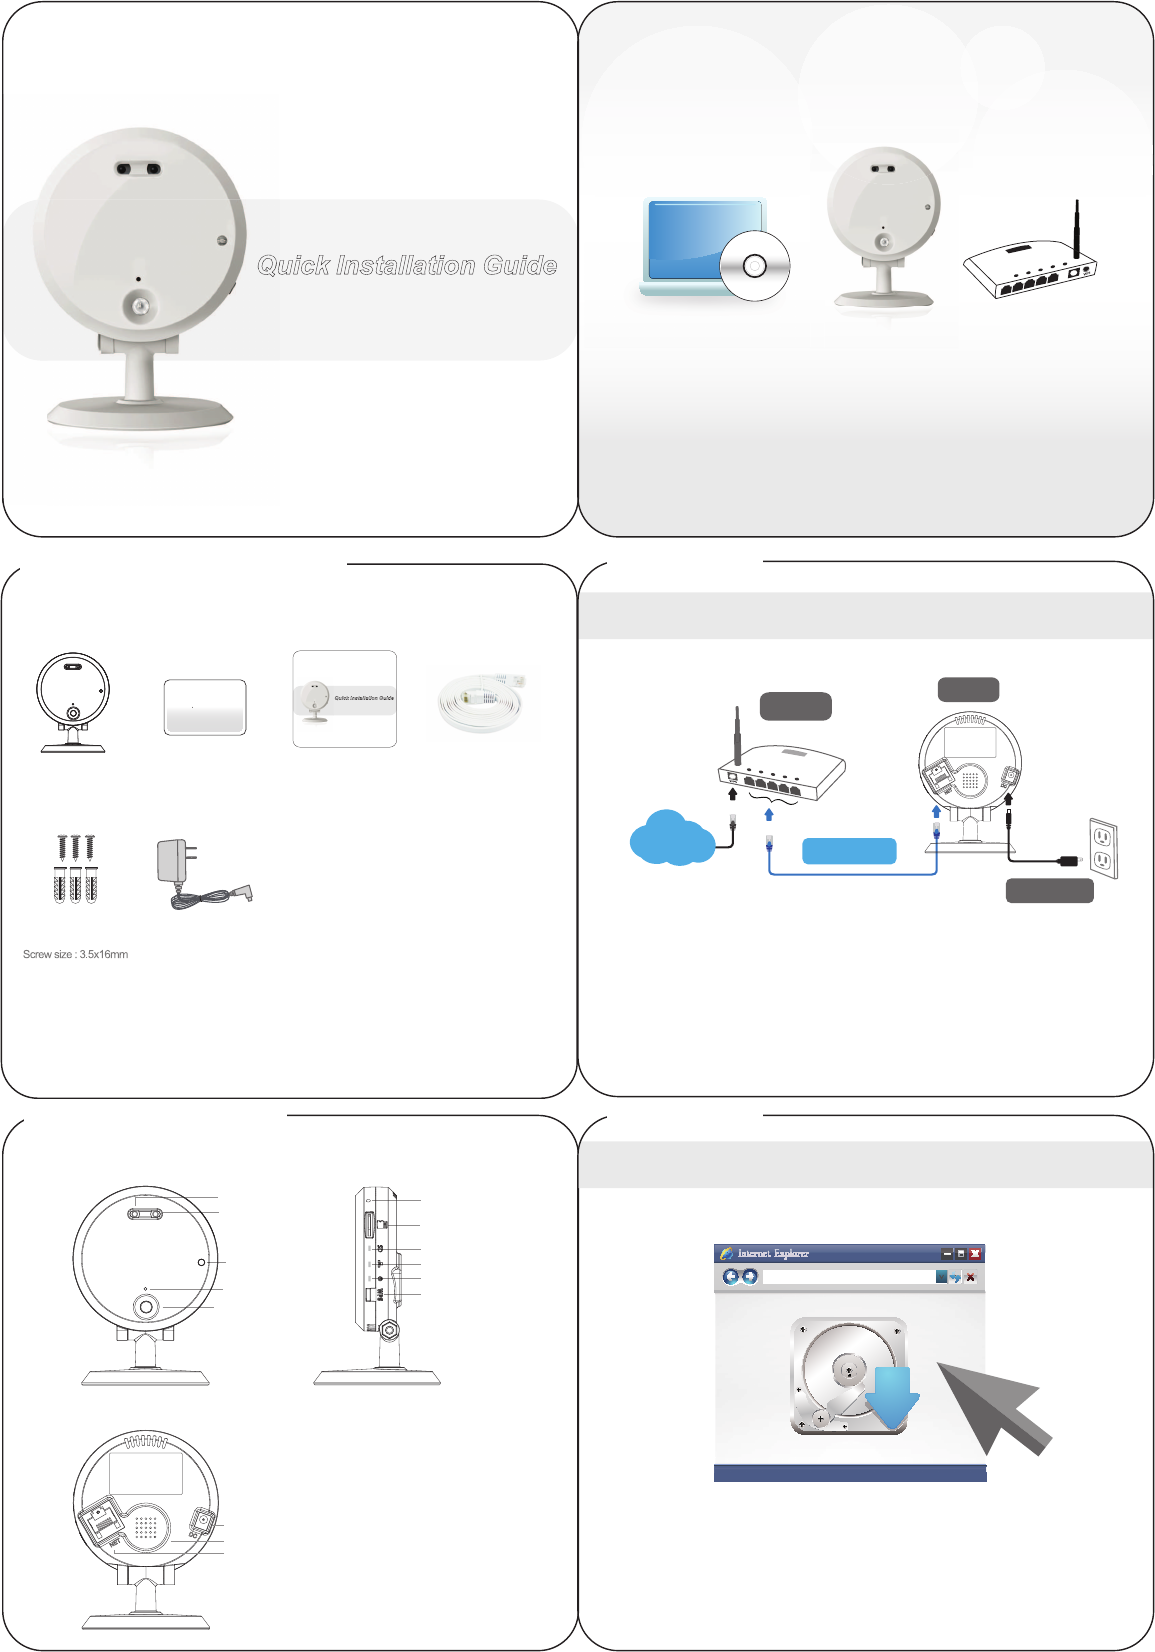
Connect IP Cam to Internet
1. Connect the power adapter.
2. Connect the Ethernet cable to the NAT/Router.
3.The IP camera will get IP address from the NAT/Router (with DHCP
enabled) automatically and connect to internet. Check if the red
LED of IP camera is always on. If it’s blinking, please check step 1
and step 2 again.
Install CamView Software
Please download the latest CamView software with the following information :
Website: http://www.starvedia.com/download.html
Username: viewer
Password: camview
Step 1.
Step 2.
Installation Guide
IP Cam
NAT/Router
Ethernet Cable
Power Adapter
Quick Installation Guide
Day&Night IP Camera
IR LED
Light Detector
Microphone
Night Time Lens
!"!#$%&'()
Micro-SD Card Slot
*+,-(./0$12-3$4)3+,25()$670
7#8!-)!#$4)3+,25()$670
/#2#&"$4)3+,25()$670
9:/$%&'()
Day Time Lens
[ Front View ]
[ Back View ]
[ Right Side View ]
Internal Speaker
Power Jack
Ethernet Jack
ID
Password
IP Cam QIG
Anchors
and Screws
ID/Password Card
Pow e r A d apt e r
Eth e r ne t Ca b l e
LAN
WAN
Package Contents
Qu
Internet
www.starvedia.com/download.html
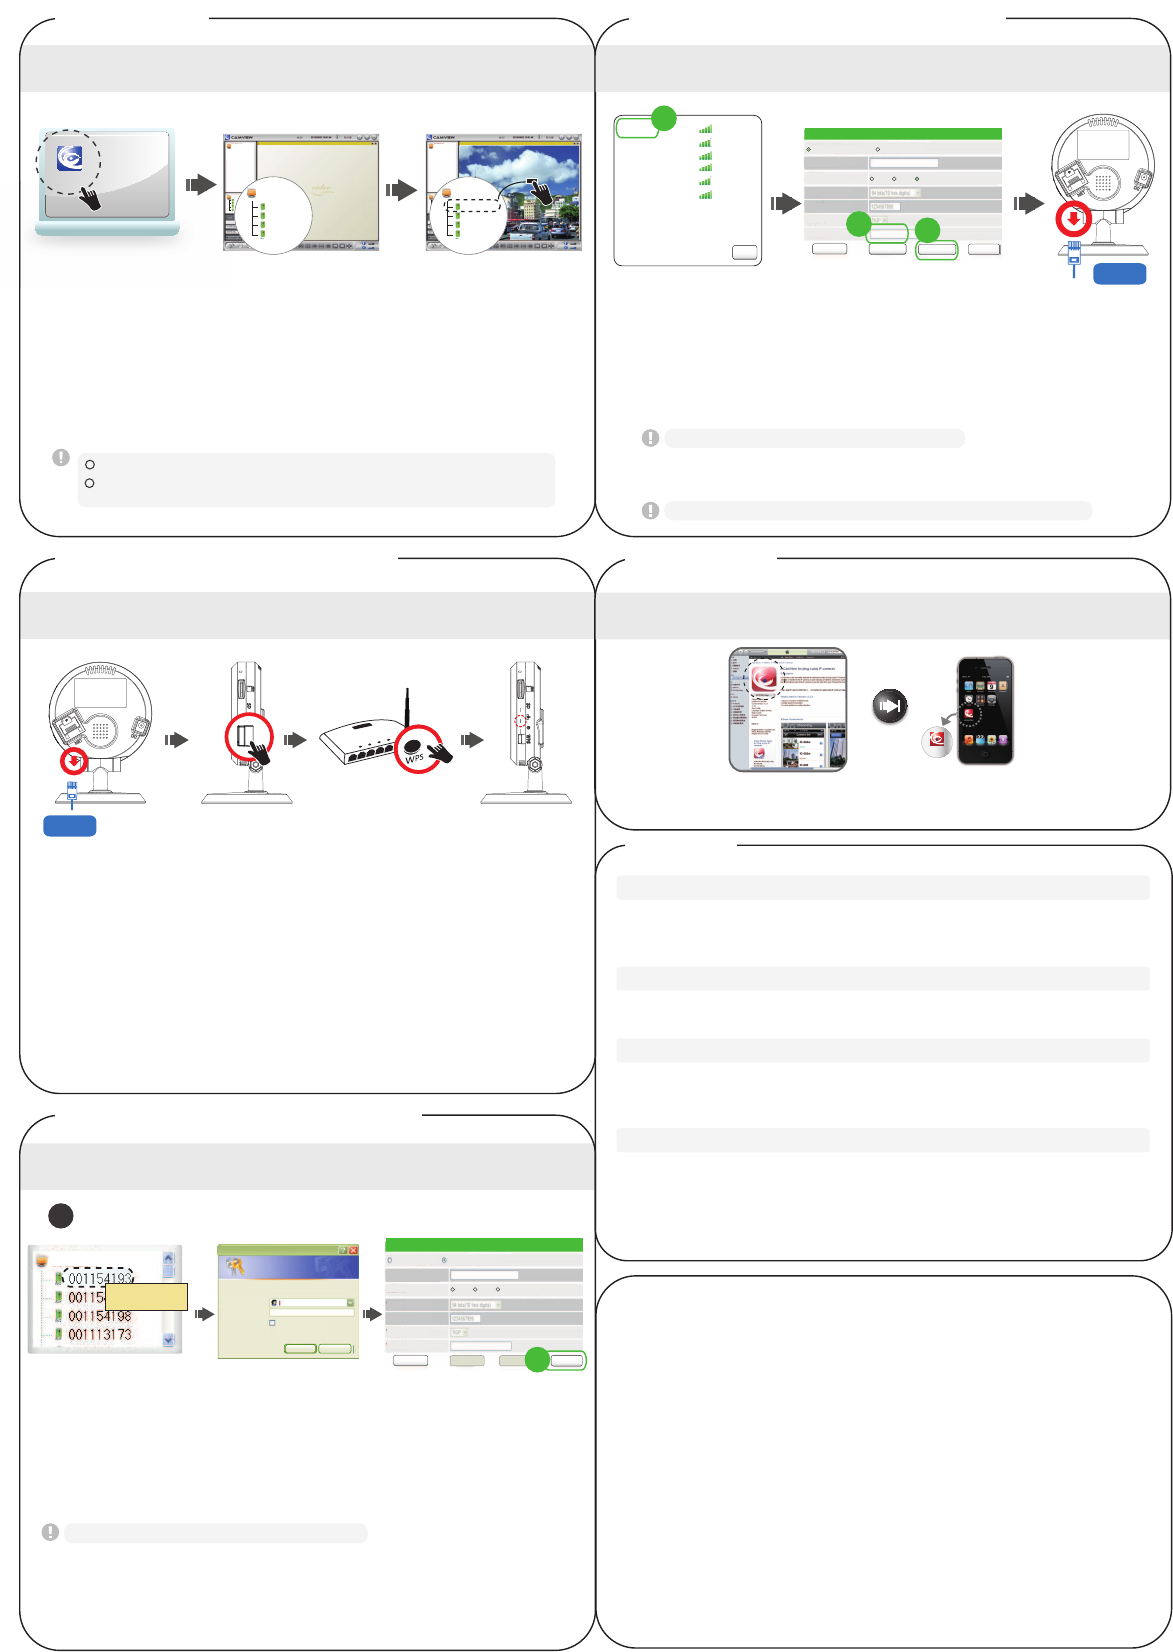
1. Remove the Ethernet cable from the camera.
2. Press the WPS button on the IP camera.
3. Press the WPS button on the NAT/Router.
4. The blue LED on the IP camera will start blinking. If the blue LED
stops blinking and is always on in one minute, the wireless network
is connected successfully.
1 2 3 4
nDbnWjfx
CamView Software Usage
Wireless Setting of IP Cam - If router has WPS button
Wireless Setting of IP Cam - If no WPS on router
Step 3.
Step 4-1.
Step 4-2-1.
Step 4-2-2.
Camera List
Bvup!Tfbsdi
00100 1001
00100 1002
00100 1003
00100 1004
Auto search
00100 1001
00100 1002
00100 1003
00100 1004
Auto Search
001001001
001001002
001001003
001001004
Auto Search
001001001
001001002
001001003
001001004
00100 1001
DbnWjfx
1.Execute the installed CamView software on the desktop or from “Start
!"#$"%&' (%&)*+, (%&)*+,-.
/.01+23456#27+%"81-2,*992:*';9%<261+2=!28%&+"%2*>261+29#8%92>+6,#"?.
3.Double click the camera and key in the password on the ID/password
card to see the video.
12 3
@#528%>2:"%$261+28%&+"%2#>261+23456#27+%"81-2%"+%26#261+23(%&+"%2A*'6-2%"+%.
1
2
Camera List
@#528#59:2%9'#2%::2>+,2*6+&2#>261+23(%&+"%2A*'6-2%"+%2B<223(%&+"%2A*'6-2 3C+,2(%&+"%-2
D+<2*>28%&+"%2=E2%>:2!%'',#":.
Please make sure the Ethernet cable is connected to the IP Cam !
!
1 2 3.1
F.G*$16289*8?28%&+"%2#>261+23456#27+%"81-2%"+%2%>:289*8?23H+B2(#>I*$5"+-.
/.D+<2*>261+2%:&*>2%88#5>62%>:2;%'',#":26#2+>6+"261+2,+B28#>I*$5"%6*#>2
;%$+.2(9*8?23C+6,#"?JH*K*27+85"*6<-2#I261+28#>I*$5"%6*#>2&+>5.
3. Four steps to setup the wireless connection:
2222L.F2(9*8?261+23H*K*278%>-2B566#>M2%99261+2%N%*9%B9+2,*"+9+''24!2,*99222
be listed in 10 seconds.
01+2:+I%5962%:&*>2%88#5>62*'23%:&*>-M2%>:2>#2;%'',#":.
Web Configure
WiFi Security Settings
3.1
Řőł ĩij Ī Įő Ŕ Ōĩ Ř őł ġ űŦ ų ŴŰ ůŢŭ ĪŏŰů Ŧ Řņ ő
Enable WiFi function Disable WiFi function
SSID
Security mode
WEP Encryption
WPA Encryption
H!4O!7D2D+<
HP!2D+<
Save&Apply WiFi scan
IP address WiFi test
Auto Search
admin
Yes
Use rname(U ):
Pas sword(P ):
Remember my password(R)
Can cel
Connect to 10.0.0.198
Wireless Setting of IP Cam - If no WPS on router
3.2 3.3
If scanning failed, please check the antenna or AP.
L.Q.2=I261+23H*K*26+'6-2'588++:+:M2"+&#N+261+2P61+">+628%B9+2I"#&261+2222
IP camera to start the wireless connection.
Please do not remove the Ethernet cable during WiFi test.
The blue LED and red LED will be always on after wireless connection is successful.
WiFi Security Settings
Enable WiFi function
SSID
Security mode
WEP Encryption
WPA Encryption
H!4O!7D2D+<
HP!2D+<
Disable WiFi function
Save&Apply IP address WiFi test
H!4R/SO!7DRH!42;+"'#>%9S
None
TEST
12345678
WEP
TEST 54Mbps WPA
54Mbps WPA
54Mbps WPA
54Mbps WPA
54Mbps WPA
54Mbps WPA
NAS
dir615-11n
Fujikin
Luminlite
001601981C6C
TD
3.2 Choose the wireless AP and key in the encryption key.
L.L2(9*8?23H*K*26+'6-2B566#>2%>:2,%*62I#"2/UVQU2'+8#>:'26#2N+"*I<2*I2261+22
222222+>8"<;6*#>2?+<2*'28#""+86.2=I23H*K*26+'6-2I%*9+:M281+8?23+>8"<;6*#>2?+<-2
and repeat step 3.1 and step 3.2 again.
3.2
3.2 3.3
Step 5.
Software for iPhone/iPad and Android mobiles
!9+%'+2'+%"81261+2'#I6,%"+2>%&+23&(%&)*+,-2#>261+24;;276#"+2I#"2
iPhone/iPad or on Android Market for Android mobiles.
More FAQs, please visit www.starvedia.com/FAQ01_list.html
Q1.What should I do if I forgot the password or the ID/Password card is missing?
!9+%'+2;"+''261+23"+'+6-2B566#>2I#"2I*N+2'+8#>:'.201+2=!28%&+"%2,*992B+2"+'+62
6#261+2I%86#"<2:+I%5962'+66*>$'.201+2:+I%5962%:&*>2%88#5>62*'23%:&*>-M2%>:2>#2
;%'',#":.201+2:+I%5962N*:+#O;9%<2;%'',#":2*'23*;8%&-.
Q2. How could I use IE browser to see the live video?
Please visit http://www.starvedia.com/live.html and key in the Cam ID and
password on the ID/Password card to see the live video.
Q3. What should I do if I cannot see the video remotely?
The red LED of the IP camera should be always on when the IP camera is
connected to the Internet. If the red LED is blinking, please double check the
network connection and settings again.
Q4. Where to download the latest CamView software?
Please download the latest CamView software with the following information :
Website: http://www.starvedia.com/download.html
Username: viewer
Password: camview
Warning
FAQs
WiFi scan
(Wireless model)
(Wireless model)
(Wireless model)
This equipment has been tested and found to comply with limits for a Class B digital device ,pursuant to Part 15
of the FCC rules. These limits are designed to provide reasonable protection against harmful interference in
residential installations. This equipment generates, uses, and can radiate radio frequency energy, and if not
installed and used in accordance with the instructions, may cause harmful interference to radio communica-
tions.
However, there is no guarantee that interference will not occur in a particular installation. If this equipment does
cause interference to radio or television equipment reception, which can be determined by turning the
equipment off and on, the user is encouraged to try to correct the interference by one or more of the following
measures:
-Reorient or relocate the receiving antenna -Move the equipment away from the receiver-Plug the equipment
into an outlet on a circuit different from that to which the receiver is connected.
-Consult the dealer or an experienced radio/television technician for additional suggestions You are cautioned
that any change or modifications to the equipment not expressly approve by the party responsible for compli-
ance could void Your authority to operate such equipment.
This device complies with Part 15 of the FCC Rules. Operation is subjected to the following two conditions
1) This device may not cause harmful interference.
2) This device must accept any interference received, including interference that may cause undesired
operation.
For Mobile Device Usage
Radiation Exposure Statement:
This equipment complies with FCC radiation exposure limits set forth for an uncontrolled environment. This
equipment should be installed and operated with minimum distance 20cm between the radiator & your body.
FCC Caution: Any changes or modifications not expressly approved by the party responsible for compliance
could void the user's authority to operate this equipment.
This transmitter must not be co-located or operating in conjunction with any other antenna or transmitter.
FCC Compliance Statement:
3.4
Ethernet
Cable
Ethernet
Cable
WPS