Starbucks Barista Sin 006 Operation Manual ManualsLib Makes It Easy To Find Manuals Online!
2014-12-11
: Starbucks-Barista Starbucks-Barista-Sin-006-Operation-Manual-121500 starbucks-barista-sin-006-operation-manual-121500 starbucks-barista pdf
Open the PDF directly: View PDF ![]() .
.
Page Count: 9
OPERATING INSTRUCTIONS
FOR YOUR SAFETY CAREFULLY READ THE OPERATING INSTRUCTIONS.
TYPE sIN 006
COD. 1.6.591.21.00 REV. 02 DEL 13/11/00
FOR HOUSEHOLD USE ONLY

3
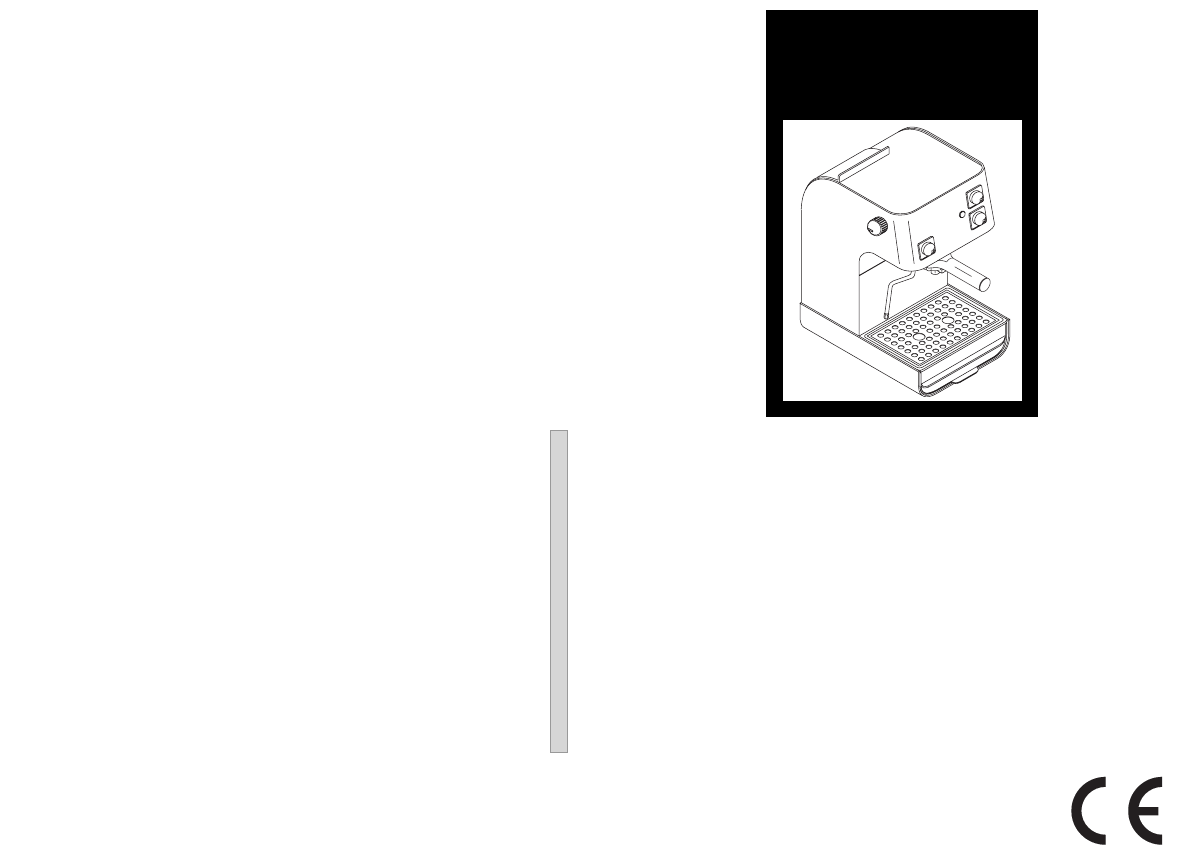
We congratulate for having bought this top-quality espresso machine and many
thanks you for your confidence in our products.
Before operating the machine, we recommend to read the following instructions
thouroughly which explain how to use, clean and maintain the machine. 8
10
H
3
5
6
2
7
1
12
G
13
11
4
9
DECALCIFICANTE
ACETO
ACIDO
54
12 13
14 15
16 17
18 19
20 21
22
24
23
A
7
6
La macchina per caffé è indicata per pre-
parare 1 o 2 tazze di caffé espresso ed è
dotata di un tubo orientabile per l'erogazione
del vapore e dell'acqua calda. I comandi
sulla parte anteriore dell'apparecchio sono
contrassegnati con i simboli di facile inter-
pretazione. Il corpo della macchina dall'ele-
gante design è stato progettato per uso do-
mestico e non è indicato per un funziona-
mento continuo di tipo professionale.
Attenzione: Non si assumono
responsabilità per eventuali
danni in caso di:
- Impiego errato e non confor-
me agli scopi previsti;
- Riparazioni non eseguite pres-
so centri di riparazione autoriz-
zati;
- Impiego di pezzi di ricambio e
accessori non originali.
In questi casi viene a mancare la
garanzia.
This espresso machine can brew one cup of
espresso or two cups simultaneously and
comes equipped with a moveable steam/hot
water arm. Controls on the front of the machine
are easily recognizable by their corresponding
icons. This elegantly designed espresso
machine has been manufactured for household
use only and should not be used in commercial
operations. Before using the machine,
thoroughly and carefully read the following
instructions and always observe the safety
precautions contained in this manual. Do not
use the machine prior to reading and
understanding the instructions in this manual!
Attention: The Manufacturer
declinesany responsibility for
damages resulting from, but
not limited to:
- Improper use of the machine;
- Unauthorized repairs or
repairs carried out byun
authorized per-sonnel;
- Use of non genuine spare
parts and acces-sories.
The abovementioned cases void the
warranty.
La machine à café est toute indiquée pour
préparer 1 ou 2 tasses à café espresso. Elle
est dotée d’une buse flexible pour la sortie
eau chaude / vapeur.
Les commandes sur la partie antérieure de
l’appareil sont marquées avec des symboles
faciles à interpréter. Le corps de la machine,
au design élégant, a été conçu pour un
usage domestique et non pour un
fonctionnement en continu de type
professionnel.
Attention: Nous n’assumons pas
de responsabilité pour
d’éventuels dommages en cas
de :
- Utilisation erronée et non con
forme aux buts prévus ;
- Réparations non exé-cutées
auprès de Cen-tres de
Réparat-ion agréés ;
- Emploi de pièces détac-hées et
d’accessoires non d’origine.
Dans ces cas la garantie ne
fonction-ne pas.
Verehrte Kundin, verehrter Kunde mit dies
ervollautomatischen
Kaffeemaschine kann Espresso-Kaffee,
Schümlikaffee aus Bohnen oder aus
gemahlenem Kaffee zubereitet werden. Wie
bei allen elektrischen Geräten ist auch bei
dieser Kaffeemaschine zur Vermeidung von
Verletzungen, Brand- oder Geräteschaden
besondere Sorgfalt nötig.
Bitte lesen Sie die vorliegende
Bedienungsanleitung vor
Inbetriebnahme der Kaffeemaschine
und beachten Sie die
Sicherheitshinweise. Personen, die mit der
Bedienungsanleitung nicht vertraut sind,
dürfen die Kaffeemaschine nicht benutzen.
Vorsicht: Für folgende Fälle
erlischt jeglicher Garantiean-
spruch:
- Schäden, die durch Verkalkung,
Nichtbeachtung der
Bedienungsanleitung, natürliche
Abnutzung, Verschmutzung,
Gewaltanwendung oder
übermäßiger Beanspruchung
entstanden sind.
- Reparaturen, die nicht von
autorisierten Fac-hleuten
durchgeführt wurden.
Nichtverwendung von Originalteilen
und Hilfs-mitteln.
2120 USING THIS INSTRUCTION MANUAL TECHNICAL DATA
Do not discard this manual. Keep it for fu-
ture reference in an easily accessible
place near the machine. If the machine
should change hands, make sure this
manual accompanies the machine.
For further information or questions
concerning specific situations or
problems, please contact your local
dealer or an authorized service center.
Description of symbols
The warning triangle shows all important
safety indications to ensure the user’s
safety while operating the machine.
Failure to observe the given safety
instructions may result in serious injuries.
Reference to figures, parts of the
machine and control components are
given by numbers or letters, as
exemplified by “B” above.
The inside first page of the cover of this
manual shows figures relevant to the text.
Keep it open for reference while reading
the instructions.
B
Table of Contents
page
Technical data ..................................... 21
Safety precautions............................... 23
Controls and machine parts............... 24
Set-up precautions .................................. 24
Connection to the Power Supply.......... 24
Packaging ................................................. 24
Filling water tank ...................................... 24
Priming the system ................................... 25
Brewing espresso ..................................... 25
Voltage rating Refer to rating plate on the machine
Power consumption Refer to rating plate on the machine
Machine housing Metal
Dimensions (l x h x w) 220 x 320 x 290 mm
Weight 8.5 kg
Power cord length * 1.2 m
Control panel Frontal
Filter holder Crema
Water tank Removable
Power supply Refer to rating plate on the machine
Pump pressure 13-15 bars
Boiler Stainless steel - brass
* If the power cord is defective or damaged, please contact an authorized service
center to replace it as a special tool is required. Do not attempt to use the machine if
the power cord is defective or damaged.
The manufacturer reserves the right to make any technical modifications deemed
necessary without prior notice.
This machine conforms to the European Directive 89/336/CEE (Legislative Decree 476
dated 04/12/92) relating to the elimination of radio frequency disturbances.
page
Choosing the quality of the coffee ...... 25
Dispensing hot water .............................. 26
Dispensing steam ..................................... 26
Cleaning.................................................... 26
Descaling .................................................. 26
Maintenance ........................................... 27
Miscellaneous information ..................... 27
Disposal of machine................................ 27
Troubleshooting ........................................ 28
"
C D
E F
OIL
B
A
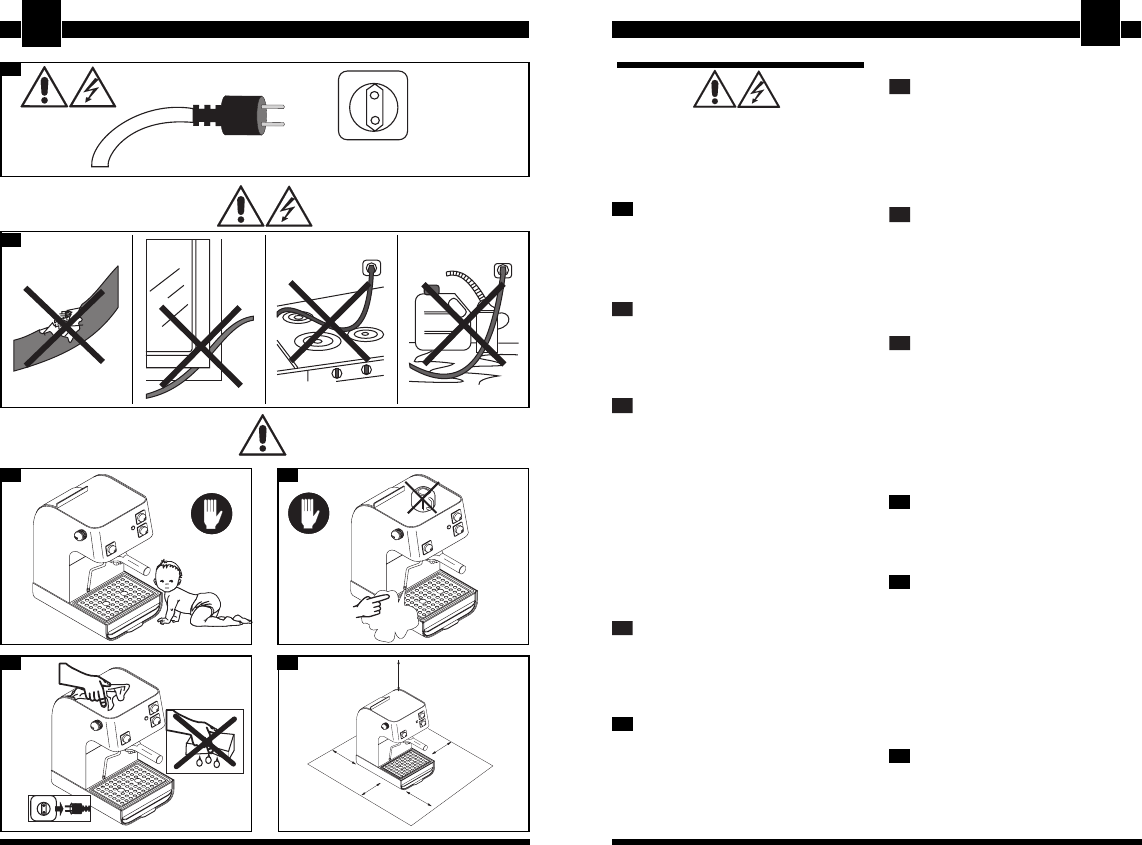
2322 SAFETY PRECAUTIONS SAFETY PRECAUTIONS
Never place electrical parts of the
machine in or near water: danger of
electrical shock!
Do not use the upper cover for heating
cups.
Intended usage
This espresso machine has been manufac-
tured for household use only. Do not use
the machine for any other purpose or at-
tempt to carry out technical modifications
to the machine.
A
Power supply
The machine should be plugged into a
suitable electrical outlet only. Make sure
the power of the electrical outlet corre-
sponds to the power indicated on the ra-
ting plate of the machine.
B
Power cord
If the power cord is damaged, do not at-
tempt to use the machine. Contact your
local dealer or an authorized service cen-
ter for the replacement of defective
power cords or plugs. Make sure the
power cord is not placed near hot or sharp
surfaces. Do not allow the cord to hang
freely from tables or shelves and do not
place the cord near oil. Do not pull on the
cord to move the machine. Do not yank
on the cord to unplug the machine. Ne-
ver touch the power cord with wet han-
ds.
C
Keep out of the reach of small chil-
dren
This espresso machine should be used only
by adults who have read this instruction
manual. Do not allow small children to play
near or with the machine.
Location of the machine.
Place the machine on a stable, flat surfa-
ce where it will not be knocked over and
cause injury. Be aware that the machine
makes hot water and steam: danger of
burns! Do not place the machine outside
or near hot surfaces or open flames in or-
der to avoid damage to same.
D
Danger of burns.
Avoid pointing steam or hot water toward
the body or hands. Always handle poten-
tially hot parts by the appropriate knobs
or levers. Touch the spouts only in the are-
as fitted with anti-burn protective devices.
Do not use the upper cover for heating
cups.
E
Cleaning
Before cleaning the machine, make sure
that the machine is turned off and that
the power cord is unplugged. Wait until the
machine has cooled. Never immerse the
machine in water. Do not attempt to di-
sassemble or modify any internal compo-
nents of the machine.
F
Area around the machine
For the proper functioning of the machine,
it is recommended:
• to place the machine on a stable, flat
surface;
• to place the machine in a clean, well-lit
area with an easily accessible electrical
outlet.
• to allow enough space around the
machine, as shown in the diagram.
Storing the machine
When the machine is not in use, unplug
the power cord. Place the machine in a
clean, dry, dust-free area, out of the rea-
ch of children.
Repairs / Maintenance
In the case of suspected operational pro-
blems, defects or faults, unplug the ma-
chine immediately. Never attempt to use
a defective machine. Do not attempt to
repair the machine yourself. Repairs should
be carried out only by authorized service
centers. The manufacturer declines any
responsibility for the machine and its com-
ponents and accessories for repairs made
by unauthorized personnel.
Fire
Do not use the machine in an area near
explosive objects. In the case of a fire, use
a carbon dioxide (CO
²
) based extinguisher.
Do not use water or powder extinguishers.
sizes in millimeter
2524 CONTROLS AND MACHINE PARTS - SET UP SETTING UP THE MACHINE AND USE
Controls and machine parts - set up
1
Water tank
2
Green “ready” light
3
Main switch
4
Filter holder mounting
5
Coffee button
6
Steam button
7
Steam arm
8
Steam/hot water knob
9
Drip tray and grill
10
Cover
11
Power cord
12
Water tank funnel
13
Accessories box
Accessories
G
Filter holder
H
Doser
Set-up precautions
Before setting up the machine, heed
the following safety precautions:
• place the machine in a safe place;
• keep children away from the
machine;
• do not place the machine on hot
surfaces or near open flames.
The machine is now ready to be set up.
Connection to the Power Supply
Electrical current can be dangerous,
therefore the safety precautions must be
rigorously respected.
T
he espresso machine should be
plugged into a suitable electrical
outlet only.
Make sure the power of the
electrical outlet corresponds to
the power indicated on the rating plate
of the machine.
Never use defective power cords
or plugs. Defective parts must be
replaced immediately by authorized
service personnel.
Warning! If an extension cord is used,
make sure that it has a minimum diameter
of 1 mm² and that it has a three-pole
outlet/ plug.
The voltage of the machine has been set
during production at the factory. Make
sure that the voltage of the power mains
corresponds to that on the rating plate
underneath the machine.
Make sure that the main switch (3) is in
the “0” position before plugging the
machine into the electrical outlet.
Packaging
The original box and packing materials
have been constructed specifically to
protect the machine during shipping. It is
recommended to keep the box and
packing materials for future shipping.
For your own safety and that of
others, carefully heed all safety
precautions indicated on pages 22 and 23.
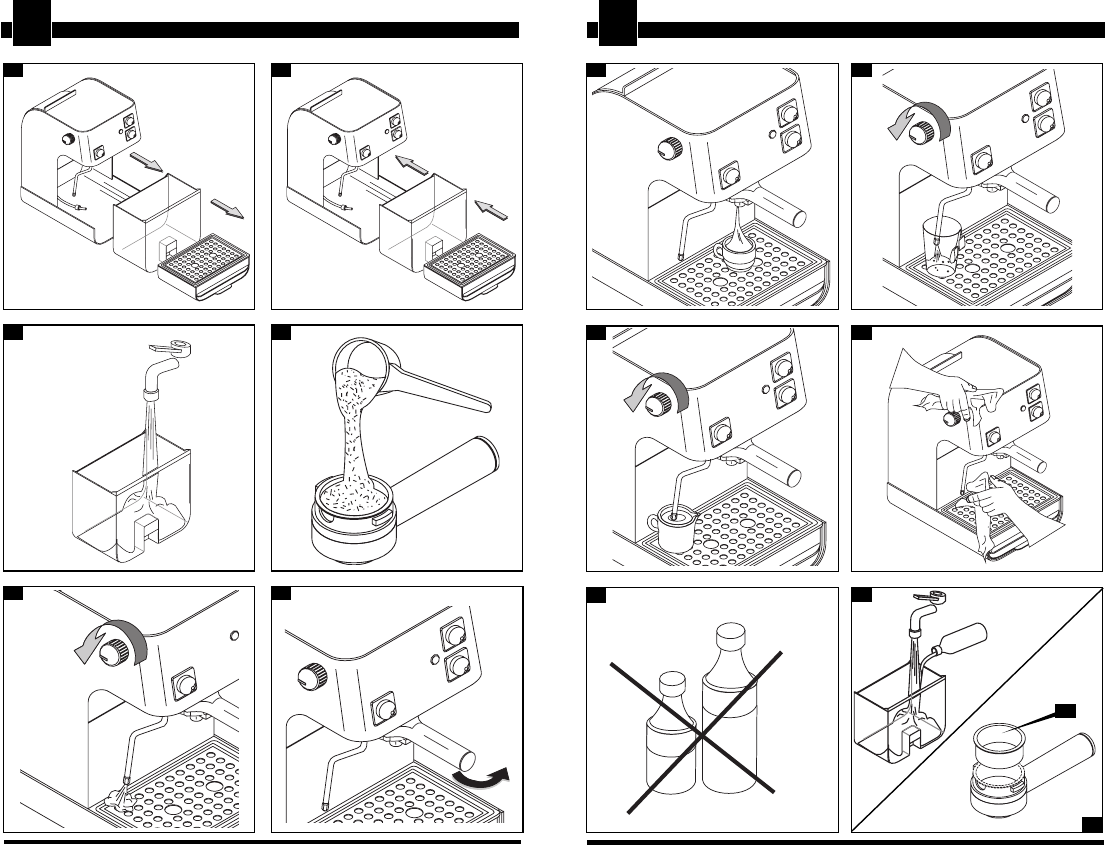
Filling water tank
• Remove the drip tray (9) and accesso-
ries box (13).
Remove the water tank by pulling it
our from the front of the machine.
Rinse the tank and fill it with fresh
water. Avoid overfilling the tank.
Replace the water tank. Make sure
the water tube hangs straight into the tank.
Do not bend the tube.
• Replace the drip tray (9) and accesso-
ries box (13).
The water tank also can be filled without
removing the tank.
Simply pour water into the water tank fun-
nel (12).
Always fill water tank only with
fresh, non-sparkling water. Never
fill with hot water or other liquids that could
damage the tank.
Never use the machine without
water. Before turning the machine
on, always make sure that the water tank
is filled.
Priming the system
Before the first use of the machine, after a
prolonged period without use, whenever
the water tank has run completely dry, or
after drawing steam the system must be
primed.
Direct the steam arm on the drip tray.
Open the steam/hot water knob (8) until a
steady stream of water is dispensed. Close
the knob. Insert the filter holder (G) into the
brew head (4) to pre-heat the filter holder.
The machine is now ready to dispense
coffee.
Brewing espresso
Press the main switch (3) and wait for the
green light (2) to come on. This indicates
that the machine has reached the proper
temperature.
Put 1 or 2 doses of ground coffee in
the filter, without pressing it, in order to
obtain 1 or 2 espresso servings.
With the special “Crema” (G) filter holder
supplied with the machine it is not
necessary to change the filter for one or
two servings.
Insert the filter holder into the brew
head, turning from left to right until it locks
into place.
Release the handle of the filter holder.
The filter holder will automatically move
slightly to the left.
This movement guaran-tees the perfect
operation of the filter holder.
Place the one or two cups on the drip
tray (9) below the filter holder ensuring that
they are correctly positioned under the
coffee spouts.
Make sure that the green “ready” light (2)
is on then press the coffee button (5).
When the cups contain the desired
amount of coffee, press the coffee button
(5) to stop the dispensing.
Wait a few seconds, then remove the filter
holder and empty the used grounds.
Cleaning hint: keep the filter of the filter
holder clean by removing it and washing
it with water.
Choosing the quality of the coffee
As a general rule all types of coffee on the
market can be used, however, since cof-
fee is a natural product and its flavor chan-
ges according to its origin and blend, it is
advisable to try different types in order to
find the one that best suits your personal
tastes.
For the best results we recommend using
a blend which is specifically prepared for
espresso machines.
12
14
13
16
15
17
18
2726 MISCELLANEOUS INFORMATION - DISPOSALSETTING UP THE MACHINE AND USE - MAINTENANCE
Dispensing hot water
Place a tea cup or glass under the
steam/hot water arm (7).
Open the steam/hot water knob (8). Hot
water will automatically be dispensed. To stop
the flow of hot water, turn the knob (8) off.
Danger of burns!
Use caution when dispensing hot
water, as small spurts of hot water may
occur. The steam arm becomes hot. Do
not touch it with bare hands.
Dispensing Steam
Press the steam button (6). The green “rea-
dy” light (2) will turn off until the machine
reaches the correct temperature. Then the
light (2) will come on again.
Point the steam arm (7) over the drip
tray (9), open the steam/hot water knob
(8) for a few seconds to release any ac-
cumulated water. After a few seconds, ste-
am will be produced. Close the knob (8).
Place a cup or a frothing pitcher un-
der the steam arm. Immerse the steam
arm into the liquid and open the knob (8).
Gently and slowly rotate the cup or pi-
tcher, using up and down motions to uni-
formly heat the liquid. To stop the steaming
function, close the knob (8) and turn off
the steam button (6).
Danger of burns!
Use caution when using the
steam arm. It becomes hot. Do not touch
it with bare hands.
Cleaning
Before cleaning the machine,
always make sure the machine is
off and that the power cord is unplugged.
Allow the machine to cool.
Do not immerse the machine into water
or any other fluids. Do not wash any parts
of the machine in the dishwasher.
Do not use abrasive detergents or
chemical agents to clean the
machine or its parts.
It is recommended to rinse out the
water tank (1) and refill it with fresh water
daily.
After heating milk always draw some
hot water to clean the steam arm.
Wipe the external housing of the ma-
chine periodically with a clean, damp,
non-abrasive cloth.
Follow the steps below to clean the
filter holder:
• Remove the filter (A) from the filter hol-
der. Place the filter in hot water and
wash it gently.
• Clean the inside of the filter holder ca-
refully to avoid damaging the pin and
the sealing ring.
Descaling
• Scale normally forms while the machine
is being used; descaling is necessary every
4-6 months of use or whenever you
observe a decrease in water flow.
If you wish to descale the machine
yourself, you may use any commercially
available non-toxic and/or non-harmful
descaling agent for coffee machines.
Warning! Never use vinegar as a
descaling agent.
• Mix the descaling agent with water
as directed on the package and pour
the solution into the water container;
place the water container inside the
machine.
• Turn on the machine by pressing the
main power switch.
• Position the steam tube over the drip
tray.
• Empty the entire contents from the
water container at intervals (one cup at a
time), by turning the steam knob
counterclockwise; to cut off flow turn the
knob (8) clockwise.
• During each interval, allow the descaling
agent to act for about 10-15 minutes.
• When all the descaling agent has
been used up, take out the water
container, rinse it out and fill it with fresh
drinking water.
• Place the container back inside the
machine; empty out 2/3 of the water in
the container by turning the steam knob
counterclockwise; to cut off floe turn the
knob clockwise.
• Let the machine heat up and empty
out the water remaining in the container
by turning the steam knob
counterclockwise; to cut off flow turn the
knob clockwise.
Should you use a descaling agent other
than the one recommended you are
advised in any case to follow the
manufacturer’s directions on the package.
Maintenance
Regular maintenance of your machine by
an authorized service center will prolong
the life and reliability of the machine. Keep
the original box and packing material for
transport.
Miscellaneous information
• This instruction manual contains informa-
tion necessary for the correct and safe
use and maintenance of the machine.
• The information provided and the ob-
servance of the instructions in this in-
struction manual provide the basis for
safe use during the operation and main-
tenance of the machine.
• For any information not contained in this
manual, or for further clarifications regar-
ding the instructions, please contact an
authorized service center, the purcha-
se place of the machine, or the manu-
facturer.
• This instruction manual does not consti-
tute part of a previous or pre-existing
agreement or legal contract and its
content is not affected by any such
agreements or contracts. . All responsi-
bilities of the manufacturer are based
on the relative sales contract which
contains the complete and exclusive
warranty conditions for the machine
which are neither limited nor extended
by this explanation.
• This instruction manual is copyrighted.
It is prohibited to photocopy or translate
this manual or parts thereof without
prior written permission from the
manufacturer.
Disposal of machine
• If the machine is to be disposed of for
some reason, render it non-usable by
cutting the power cord.
• Before cutting the power cord, make
sure it is no longer plugged in.
• Bring your non-usable machine to an
appropriate disposal center.
16
20
14
19
21
22
23
16
24
16
14
13
19
2928 TROUBLESHOOTING NOTE
Problem Possible cause Remedy
No water Fill water tank (page 24)
Coffee ground too finely Change type of coffee
Coffee pressed in filter holder Loosen coffee
Too much coffee in filter holder Reduce the quantity of coffee
using the doser
Steam/hot water knob (8) is Close knob
open
Limestone accumulation Descale the machine
(page 26)
Filter basket is blocked Clean the filter basket
Filter screen is blocked Clean the filter screen (page 26)
Handle of filter holder not in Move the handle of filter hol-
correct position der to the correct position
(page 25)
Too little coffee in the filter Add coffee (page 25)
holder
Stale or unsuitable coffee Use fresh coffee or try a diffe-
rent blend (page 25)
Filter holder not correctly Position the filter holder cor-
positioned in brew head rectly in the brew head
(page 25)
Upper edges of filter holder Clean the edges of the filter
have coffee residue holder
Boiler o-ring is dirty or worn-out Clean the o-ring or replace it
Too much coffee in the filter Reduce the quantity of coffee
holder using the doser
Unsuitable type of milk used Check the fat content
Green “ready” light (2) was Wait until the “ready” light co-
not on when the coffee mes on before pressing the
button (5) was pressed coffee button (5)
Filter holder was not Preheat the filter holder
preheated in brew head (page 25)
Cups were not preheated Preheat the cups
Water tank is empty Fill water tank with water
(page 24)
Espresso does not di-
spense or dispenses in
drops
Espresso dispenses too
quickly or there is no cof-
fee spume
Espresso comes out
along edges of filter hol-
der
Froth does not form in
milk
Espresso is too cold
Pump is very loud
