Stealth Cam Stc I540Ir Users Manual ManualsLib Makes It Easy To Find Manuals Online!
2014-12-11
: Stealth-Cam Stealth-Cam-Stc-I540Ir-Users-Manual-121502 stealth-cam-stc-i540ir-users-manual-121502 stealth-cam pdf
Open the PDF directly: View PDF ![]() .
.
Page Count: 44
Stealth Cam
STC-I540IR
User’s Manual
www.stealthcam.net
Version 1.0 04/08

STC-I540IR
www.stealthcam.net Toll Free 877-269-8490 2
For Customer Service or Warranty Information Call Toll Free
877-269-8490
Stealth Cam, LLC
P.O. Box 539504
Grand Prairie, TX 75053-9504
www.stealthcam.net
Stealth Cam Limited Warranty
Your Stealth Cam scouting camera is covered by a 90 day Limited Warranty on
parts and labor from the date of original purchase, and purchases must be
made through an authorized dealer. The warranty covers defects in
workmanship and materials. The warranty does not apply to units, which have
been damaged or abused intentionally or unintentionally. A purchase from
individuals or unauthorized internet sites voids the warranty.
Tampering with or altering the unit will void the warranty. Any unauthorized
service will void warranty. Original sales receipt must be produced for any
warranty service and a Return Authorization (RA) number must be obtained
from customer service at 877-269-8490 prior to returning product.

STC-I540IR
www.stealthcam.net Toll Free 877-269-8490 3
Introduction
Thank you for purchasing the Stealth Cam STC-I540IR digital video
scout camera. Your Stealth Cam is designed to provide many years of
service. The STC-I540IR is an infrared based camera with an industry
leading Infrared emitter range of up to 40 feet. Special Burst Mode
technology allows multiple exposures of up to 9 sequential still pictures
or a programmable video segment between 10 to 180 seconds, when
the PIR sensor is triggered.
Your STC-I540IR infrared camera provides superb color day time
pictures or AVI video clips. When the infrared LED emitter is activated
during low lighting conditions, it will provide you with black and white
still pictures or AVI video clips.

STC-I540IR
www.stealthcam.net Toll Free 877-269-8490 4
Contents
• STC-I540IR Digital Video Scouting Camera
• User Manual
• USB cable
• Tree Mounting Strap

STC-I540IR
www.stealthcam.net Toll Free 877-269-8490 5
Table of Contents
Warranty 2
Introduction 3
Camera Kit Contents 4
Table of Contents 5
Overview 6-8
Battery Power Options 9-10
Built-in Memory & SD Card Installation 11-13
Description of Features 14-16
Programming Your Scout Camera 17-23
Using your Camera 24-29
Manual Shooting Mode 30-31
Viewing Images and Deleting Images 32-36
Formatting memory 37
Using External Power Source 38
Technical Specifications 39
Camera Features 40-41
General Information
42-43
Moon Phase Chart 44
STC-I540IR
www.stealthcam.net Toll Free 877-269-8490 6
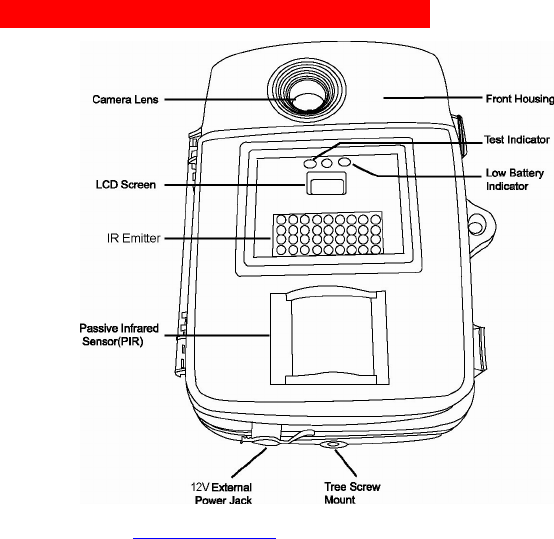
Camera Overview - Front Cover Panel
STC-I540IR
www.stealthcam.net Toll Free 877-269-8490 7
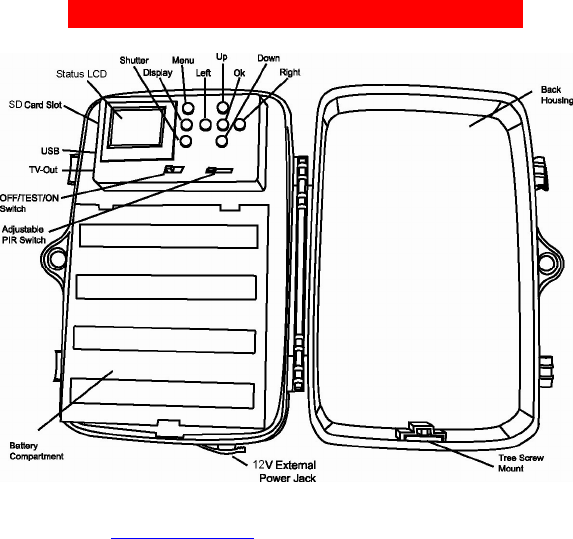
Camera Overview - Inside Control Panel

STC-I540IR
www.stealthcam.net Toll Free 877-269-8490 8
Camera Overview - Inside Side Panel

STC-I540IR
www.stealthcam.net Toll Free 877-269-8490 9
Battery Power Options
The Stealth Cam STC-I540IR is designed to operate using two different
battery power options. The camera must be in the OFF position when
installing or removing batteries. Use of batteries other than those
specified in this section may damage the camera and void your
warranty.
Using “C” Cell Batteries
The internal battery compartment accepts 8 “C” cell batteries. Pull up
on the bottom clip of the battery cover to open. Use fresh, high quality
alkaline batteries. Install batteries in the correct polarity (+/-) referring
to the illustration inside the battery compartment. Secure battery cover.
Precaution: When replacing batteries, replace all the batteries within
10 minutes. Otherwise, this will result in the loss of date / time setting
12V Lead Acid Battery (Recommended for extended field life)
To avoid replacing batteries when out in the field, the STC-I540IR is
equipped with an external power jack designed to accept a barrel plug
cable that attaches to an optional lead acid battery (Stealth Cam STC-
Downloaded from www.Manualslib.com manuals search engine

STC-I540IR
www.stealthcam.net Toll Free 877-269-8490 10
12VBB). Complete 12V Lead Acid battery kits offer significantly more
usage than standard alkaline batteries. They are available at your
Stealth Cam dealer, or call toll free (877) 269-8490. Only Stealth Cam
external battery accessories are recommended.

STC-I540IR
www.stealthcam.net Toll Free 877-269-8490 11
Built-in Memory & SD Memory Card Installation
Your STC-I540IR camera is equipped with 32MB of built in flash
memory. The camera is also equipped with an expandable media card
slot capable of accepting up to a 2GB SD card (sold separately). With
no memory card inserted into the slot, the camera will use the built in
flash memory to store images. If an SD card is inserted into the slot
then the camera will bypass the built in memory and utilize the SD card
memory. The front counter display will show the number of images of
either the built in flash memory or the inserted SD memory card after
you turn on the camera.

STC-I540IR
www.stealthcam.net Toll Free 877-269-8490 12
Inserting the SD Memory Card
Make sure the camera is in the OFF position when you insert or
remove a memory card.
• Insert SD memory card into the card slot completely, and in the
correct direction as shown on the inside of the housing.
• To remove the SD memory card, push in the card and pull out
the card gently.
Brand new SD cards are ready for use. If you are using an SD
card that was previously used in another camera, or other
device, make sure to format the card prior to use in this
camera.
To ensure proper SD card formatting, insert it into the card
slot and follow the steps page 37 to format the memory card.

STC-I540IR
www.stealthcam.net Toll Free 877-269-8490 13
Image & Video Capacity
Capacity High Low AVI (sec.)
32MB 20 65 120
64MB 40 130 240
128MB 80 260 480
256MB 160 520 960
512MB 320 1,040 1,920
1GB 640 2,080 3,840
2GB 1,280 4,160 7,680
NOTE: Picture / Image Capacity Chart provides approximate number of
images or AVI video based on resolution settings and the size of
memory card. These figures may vary depending on the amount of
detail in the image.
STC-I540IR
www.stealthcam.net Toll Free 877-269-8490 14
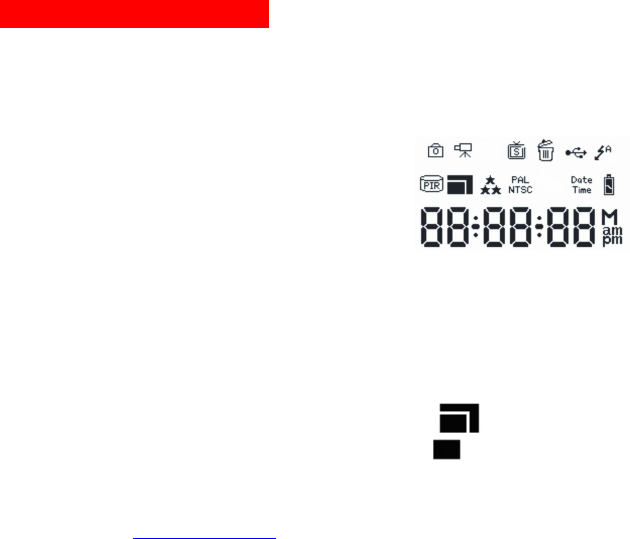
Description of Features
Below are illustrations and descriptions of the icons you will see
on the internal LCD screen as you enter specific modes for
programming.
• Auto Mode:
o Still images – Captures from
1~9 pictures per PIR triggering
o AVI video clip – Captures video
segments from 10 ~ 180
seconds per PIR triggering
• Manual Mode: Use as a point and shoot still image camera
or video camera.
• Image Resolution:
o 2560 x 1920: High image resolution
o 1600 x 1200: Low image resolution
o 640 x 480 Default video resolution

STC-I540IR
www.stealthcam.net Toll Free 877-269-8490 15
• Image Quality:
o One star = Low Quality
o Two stars = Normal Quality
o Three stars = High Quality
• Battery Status:
o Full: Batteries are full.
o Half: Batteries are half depleted.
o Low: Batteries are low. Front low battery LED indicator will
flash.
• When the camera has detected low batteries, (lower than
8.3 +/-0.2Volts for 1.5V C alkaline batteries; 10.3+/-0.2Volts
for External 12V Lead Acid Battery) the camera unit will
automatically power off within 30 seconds. Replace with
new batteries as camera functions may not work properly.
• Date and Time: Date/Time stamp will be shown on all your
images or the first frame of video files (using Windows Media

STC-I540IR
www.stealthcam.net Toll Free 877-269-8490 16
Player or Real Player).
• Moon Phase and Temperature: Moon phase /
temperature stamping on all still images and first frame of video.
• Time Out: To program the amount of time in minutes (1~60)
that the camera will sleep between PIR triggering.

STC-I540IR
www.stealthcam.net Toll Free 877-269-8490 17
Programming your camera
Slide the power switch to TEST position. You will hear two short
consecutive beeps followed by a third beep. Now you are ready to
program your camera. Press the MENU button once to start your
programming sequence.
For Manual Capture Mode
To capture still image or video clip using the manual shutter button.
The Camera icon or Video icon will flash:
Press Left/Right button to select between manual Still Image Mode or
manual AVI Video Mode. Press the OK button to confirm your setting
and then press Menu button to exit the programming mode. To
continue manual capture mode, see page 30 for operating instructions.
For Auto capturing mode, press Menu again to begin your program
setting sequence. You will see either your camera icon or video icon
flashing.
STC-I540IR
www.stealthcam.net Toll Free 877-269-8490 18
Resolution
Press the down button twice. The Resolution icon will flash.
Press Left/Right button to select either high resolution (2560 x 1920)
or low resolution (1600 x 1200)
Press OK to confirm the setting and the icon will stop flashing.
Press the Up button to change the previous setting, or the Down button
to program the Quality setting.
NOTE: If you press Menu before pressing the OK button, you will exit
the programming mode without saving your resolution setting.
Quality
The Quality icon will flash:
Press Left/Right button to select between:
Fine – Normal – Low
One star = Low quality
Two stars = Normal quality
Three Stars = Fine quality

STC-I540IR
www.stealthcam.net Toll Free 877-269-8490 19
Press OK to confirm setting, the icon will stop flashing.
Press the Up button to modify the previous setting or the Down button
to program the TV out setting.
NOTE: If you press Menu before pressing the OK button, you will exit
the programming mode without saving your quality setting.
TV (NTSC)
The factory default setting is NTSC for North America usage.
Date / Time Setting
(The camera uses the 24 hour military time format only.)
The Date/Time icon will flash.
Press OK to enter the setting mode.
Set date and time.
The month digit will be flashing on the LCD screen.
Month - Day - Year Hour - Minute - Second
1. Press Up/Down button to select the appropriate month.
2. Press Right button to enter the date setting.

STC-I540IR
www.stealthcam.net Toll Free 877-269-8490 20
3. Press Up/Down button to select the appropriate date.
4. Press Right direction button to enter the year setting.
5. Press Up/Down button to select the appropriate year.
6. Press Right button to enter the time setting.
7. Press Up/Down button to select the appropriate hour in military
time.
8. Press Right button to enter minute setting.
9. Press Up/Down button to select the appropriate minutes.
10. Press Right direction button to enter the seconds setting.
11. Press Up/Down button to select the appropriate second.
At the end of the time setting, press OK to confirm and exit the setting
menu.

STC-I540IR
www.stealthcam.net Toll Free 877-269-8490 21
Stealth Cam Settings – Burst Mode Technology
Stealth Cam digital cameras put you ahead of the game allowing
you to set and Capture sequences by programming 1-9 pictures
per triggering, or 10 -180 seconds of video.
To Program Still Image Burst Mode:
Slide the power switch from Off to Test position.
You will hear 2 consecutive short beeps follow by a 3rd beep. Press
Menu button once and you will see the camera icon flashing. Press OK
to confirm this option. Now press the DOWN button six times to scroll
through all of the icon settings. You will now see the burst mode digit
flashing.
Press Right button to select from 1 to 9 photos taken in sequence when
the camera is triggered.
Press OK to confirm your Burst Mode photo setting.
Press the Down button to select the Time Out interval in minutes (1-60
min).

STC-I540IR
www.stealthcam.net Toll Free 877-269-8490 22
Press the Right button to increase the time interval by one minute
increment or press the Left button to decrease the time interval by one
minute increment.
Press OK to confirm.
To Program AVI clip Mode:
Slide the power switch from Off to Test position.
You will hear 2 consecutive short beeps follow by a 3rd beep. Press
Menu button once, then press the Right Button once. You will see the
Movie icon flashing. Press O.K. to confirm this option.
Now press the Down button six times to scroll through all of the icon
settings. You will now see the AVI length setting digits flashing.
Press Right button to select from 10 seconds to 180 seconds of video
clip each time the camera is triggered.
Press OK to confirm your AVI length setting.
Press the Down button to select the Time Out interval in minutes (1-60
min).

STC-I540IR
www.stealthcam.net Toll Free 877-269-8490 23
Press the Right button to increase the time interval by one minute
increment or press the Left button to decrease the time interval by one
minute increment.
Press OK to confirm.
Once all settings have been completed, press the MENU button to
return to Camera Status Screen.

STC-I540IR
www.stealthcam.net Toll Free 877-269-8490 24
Using Your Camera
Once all program settings have been completed, your Stealth Cam is
ready for field use. To begin, slide the power toggle switch from Test
setting mode to the On position.
Please note that when you power off the camera, the front
LCD counter will remain on. This is normal.
Getting Started With Your Camera
Mounting Your Camera
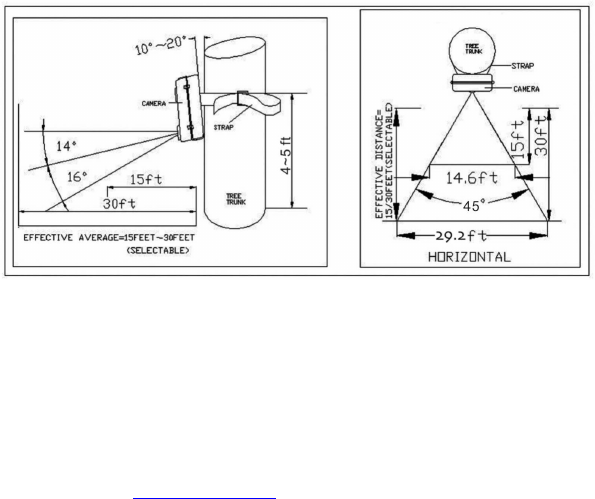
It is recommended to mount the camera 4~5 feet off the ground with
the camera pointed at a slight downward angle. Avoid mounting the
camera facing East or West as the rising and setting of the sun may
produce false triggers and overexposed images. Clear branches and
other debris away from the front of the camera so as not to block the
camera lens or PIR sensor.
STC-I540IR
www.stealthcam.net Toll Free 877-269-8490 25
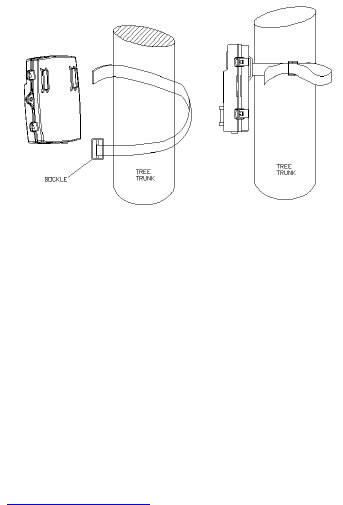
Mounting the Camera with Supplied Strap
• Insert the strap through the strap slots on the rear housing.
• Wrap the strap around the mounting surface. Secure the strap
and tighten the buckle in order to secure the camera.
In order to provide proper weather resistance, make sure
that both door latches are securely locked in place.
STC-I540IR
www.stealthcam.net Toll Free 877-269-8490 26
PIR Cover Area Diagram
Adjust the PIR Coverage Distance
• Your Stealth Cam offers a variable PIR detection distance.
• The PIR dial has Near to Far coverage.
• NEAR is approximately 15 ft; FAR is approximately 30 ft.
• Select the desired coverage distance.

STC-I540IR
www.stealthcam.net Toll Free 877-269-8490 27
Testing the Camera Coverage Area
• After mounting the camera, open front housing and slide the
power toggle switch to TEST.
• Close the front housing.
• Walk around in the front of the camera to see if you have
mounted the camera in the proper position. A green indicator
light on the front will blink when you have intruded the
coverage area.
• Adjust the camera position as needed, and repeat testing until
the desired coverage area is achieved.
• When you have completed testing the coverage area, open the
front housing and slide the power toggle switch from TEST to
ON position. This will exit the test mode. The camera will then
enter one minute count down mode. The front green LED
indicator will blink giving you one minute to leave the coverage
area. Then the camera will enter PIR detection mode.

STC-I540IR
www.stealthcam.net Toll Free 877-269-8490 28
Using the Camera in PIR Detection Mode
• Mount the camera to a tree or other sturdy object using either
the supplied mounting strap. (Please refer to the mounting
suggestions section in this manual)
• Open the front housing and slide the Toggle switch from OFF
to TEST position. You will hear two short consecutive beeps
followed by a third beep.
• Move the switch from Test to ON position to activate your PIR
mode.
• The camera’s green LED light will begin blinking and enter
count down mode. This is your indication to leave the coverage
area within one minute.
• After one minute, the camera will take between 1~9 pictures, or
AVI video clip based on your program settings. The camera will
then time out between 1~60 minutes also based on your
selection.
The time between motion detection and the camera taking
pictures may vary due to lighting and environment
conditions, program settings and battery power level.

STC-I540IR
www.stealthcam.net Toll Free 877-269-8490 29
The IR emitter will only activate in low light conditions.
AVI video operation is functional during day and night

STC-I540IR
www.stealthcam.net Toll Free 877-269-8490 30
Manual Shooting Mode
Using Manual Shoot Option in Still image mode
• Slide the power toggle switch to TEST position. You will hear
two short consecutive beeps followed by a third beep.
• Press the MENU button once. The Camera icon will flash.
• For still image capturing, press OK to select this option and
press Menu to exit to status screen.
• Camera icon will stop flashing on the LCD screen to indicate
still image mode.
• Point and hold the camera steady in the direction to capture an
image, and press the SHUTTER button once. Wait for the one
short beep follow by two consecutive beeps. This indicates the
image has been captured, and the LCD counter will update the
number of images in memory.

STC-I540IR
www.stealthcam.net Toll Free 877-269-8490 31
Using Manual Shoot Option in AVI Mode
• Slide the power toggle switch to TEST position. You will hear
two short consecutive beeps followed by a third beep.
• Press the MENU button. The Camera icon will flash.
• Press RIGHT button to select manual Video Capture Mode.
Video icon will display on the LCD screen to indicate AVI mode.
• Press OK to confirm setting, and the icon will stop flashing.
• Press MENU to exit settings.
• Point and hold the camera steady in the direction to capture the
video. Press the SHUTTER button to start video recording.
You will hear one beep as an indication that the recording
process has started.
• Press the SHUTTER button a 2nd time to stop video recording.
You will hear one beep as an indication that the recording has
stopped and you will see the front counter digit updated.
(Note: Make sure to press the SHUTTER button a 2nd time
to stop video recording, otherwise it will record video
indefinitely until the memory capacity is reached, or until
you turn the power off.)

STC-I540IR
www.stealthcam.net Toll Free 877-269-8490 32
Viewing Images
The STC-I540IR cam offers the user different options for viewing the
images. The external LCD display on the front of the housing will show
the number of images in memory.
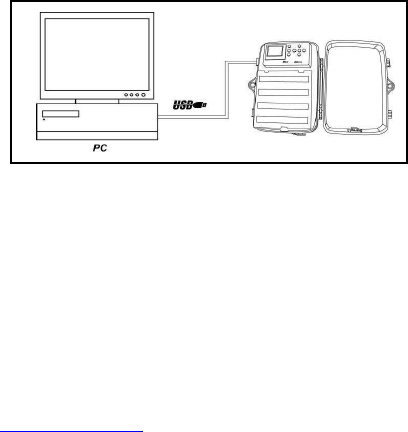
Download to PC to View Images
The Stealth Cam STC-I540IR Digital Scouting Camera is a plug and
play unit for users of Windows XP, 2000, and ME operating systems,
and need not install a camera driver. If your PC operating system is
older, then visit www.stealthcam.net to download the appropriate
camera driver.
NOTE: Users of Windows 98SE or earlier must download and
install the camera driver prior to connecting the USB cable.
• Make sure the Power switch is in the OFF position before
connecting the USB cable to the camera.
• After you connect the USB cable to the computer, you will see
a small USB ICON on the upper left hand corner of the LCD
screen.
• For a plug and play operating system, your computer will
STC-I540IR
www.stealthcam.net Toll Free 877-269-8490 33
recognize the camera as mass storage unit and allow you to
see the images stored in the camera, of images on the SD card
if you are using one.
Viewing the image on a handheld LCD TV video monitor, or your
home TV equipped with an RCA input jack (cables sold
separately)
For viewing on a handheld LCD TV, attach the appropriate cable to
the video OUT jack on the camera. Insert the other end into the video
IN jack on the handheld LCD TV monitor.
For viewing on your home TV, attach the appropriate cable to the
video OUT jack on the camera. Insert the other end into the RCA

STC-I540IR
www.stealthcam.net Toll Free 877-269-8490 34
video IN jack on the TV. Make sure to switch to VIDEO IN mode
on your TV. (See your TV owner’s manual for directions)
Turn on the TV monitor and slide the camera power switch to TEST.
• Your camera is preset to NTSC TV out system by default.
• Press the OK button on the camera. This will display the last
image captured.
• Using the LEFT/RIGHT buttons to select the image you wish to
view. Image number and total number of images in memory
will display on the center bottom of the screen.
• Once you have selected the image you wish to view, press the
UP button. This will magnify the image on the screen.
• Using LEFT/RIGHT/UP/DOWN buttons, you can move the
image to display different areas of the image.
• To return to the image selection view from the magnified image
screen, press the OK button.

STC-I540IR
www.stealthcam.net Toll Free 877-269-8490 35
Viewing AVI Clip on hand held TV or home TV monitor
• Follow the cable attaching instruction listed in hand held TV or
home TV monitor described in previous section.
• Press the OK button on the camera. This will display the last
image captured.
• Press LEFT / RIGHT button to scroll through the images in
memory. An AVI motion clip image will have a movie icon
showing on the upper left hand corner of the image.
• Press SHUTTER button to play back the AVI motion clip.
• To return to image selection view, press LEFT / RIGHT button
at the end of the AVI clip.

STC-I540IR
www.stealthcam.net Toll Free 877-269-8490 36
Deleting Images
At any time while viewing images on a Handheld TV or home TV
monitor, you may delete images one at a time or all at once.
• While viewing images in normal view, press MENU to enter the
DELETE menu.
• By default, your viewing monitor will display DEL 1. Use the
LEFT/RIGHT button to choose the desired function to delete
one picture at a time, DEL 1, or delete all pictures at one time,
DEL All.
• Press OK to enter Delete Mode. Press LEFT/RIGHT button to
choose either YES or NO to proceed with this function.
• Press OK again to confirm deleting image. After deleting
image, camera will return to picture viewing mode.

STC-I540IR
www.stealthcam.net Toll Free 877-269-8490 37
Formatting Memory Card
To erase images stored in memory, or to format an SD card:
Slide the power switch to TEST position. You will hear two short
consecutive beeps followed by a third beep.
• Press Menu button once.
• Press the Down button once.
• The Trash icon will flash. Press OK to confirm you want to
format the memory.
• The word “no” and the Trash icon will be flashing. If at this time
you decide not to proceed with the formatting of the memory,
press OK to exit. Otherwise press the Left button once. The
word “YES” and the Trash icon will flash. Press OK to confirm
you want to proceed with formatting the memory.
STC-I540IR
www.stealthcam.net Toll Free 877-269-8490 38
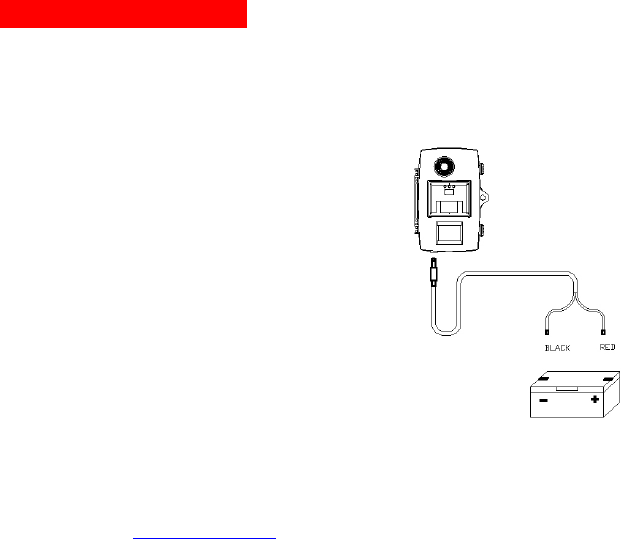
Using External Power
The Stealth Cam STC-I540IR is designed to be used with an
optional external 12V lead acid battery kit (STC-12VBB- sold
separately). It is recommended for use in cold weather
environments, or situations where your camera would be
unattended for long periods of time.
Make sure to install cables in
correct polarity (+/-) with a lead acid
battery. Incorrect voltage or
polarity (+/-) will result in damage to
the camera.

STC-I540IR
www.stealthcam.net Toll Free 877-269-8490 39
Technical Specifications
System Requirements and Compatibility
• Windows 98SE / 2000 / ME / XP
• P 450MHz or equivalent processor.
• 128MB SDRAM or above.
• VGA Video Card with 32MB RAM for minimum, Color 16 bit or
higher.
• An available USB Port.
If you have any questions regarding your PC specifications,
please call your PC manufacturer.

STC-I540IR
www.stealthcam.net Toll Free 877-269-8490 40
Camera Features
• Image sensor: 2 mega-pixel (Interpolation) RGB color
• Built in 1.8” B&W LCD display
• Built in 32MB flash memory for image & video storage
• External memory support: SD memory card up to 2GB
• Resolution Options: High (2560 x 1920), Lower (1600 x 1200)
• Quality Options: Low, Normal, Fine
• 4 Capturing Options:
Manual : Single or Video (AVI)
PIR activation : 1~9 Burst mode or adjustable Video clip
• Video performance: 10fps in 640 x 480
• Auto white balance and auto exposure
• 36 IR Emitter Range: 40 feet
• Military Time Format for date and time stamping
• Time/Date/Moon Phase/Temperature Stamping on all images
• Time/Date Stamping on first video frame (WMV & Real Player)
• 4 digits LCD Image counter; Battery low indicator

STC-I540IR
www.stealthcam.net Toll Free 877-269-8490 41
• Green Test LED indicator for area detection
• TV out support for NTSC system
• High precision 3P glass lens with IR coating
• Effective viewing Angle: 54 deg; Focus: 15 feet ~ Infinity
• PIR detection angle 45 degrees
• Adjustable PIR detection range up to 30ft
• Low power consumption:
Standby current: < 1 mA; Capture current < 150mA
• Interface type: USB
• Power: C size alkaline batteries x 8 (not included)
• Image format: Standard JPEG & Motion JPEG (AVI)

STC-I540IR
www.stealthcam.net Toll Free 877-269-8490 42
General Information
Storing conditions
• Store in cool and dry location when it’s not in use.
• Operating Environment: 14 to 104 deg F (-10 to 40 deg C).
20-85% relative humidity, non-condensing
Special Care Instructions
• The camera is designed to be weather resistant. Never attempt
to immerse the unit to water or any other liquid. This will
damage the unit and void the warranty.
• Use a soft lens cloth for cleaning the lens. Avoid touching the
lens with your fingers.
• Remove dirt or stains with a soft cloth dampened with water or
neutral detergent. Keep the camera in a dry and cool dust-free
environment or container when NOT in use.
• Take the batteries out when the camera will not be used for an
extended period of time.
• Avoid dropping the camera on to hard surfaces. Do not
disassemble the camera.

STC-I540IR
www.stealthcam.net Toll Free 877-269-8490 43
• Do not mix new and old batteries.
• Always use fresh batteries.
• For longer battery performance, use the Stealthcam lead acid
12V battery pack (optional).
• Do not open the camera in an attempt to do an unauthorized
service. This may cause serious damage to the unit and will
void the warranty.
This camera is a precision electronic device. Do not attempt to service
this camera yourself, as opening or removing covers, may expose you
to dangerous voltage points or other risks.
May be protected by one or more U.S. Patent numbers:
6,735,387 / 6,768,868 / 6,834,162 / 7,149,422 / 7,308,196
STC-I540IR
www.stealthcam.net Toll Free 877-269-8490 44
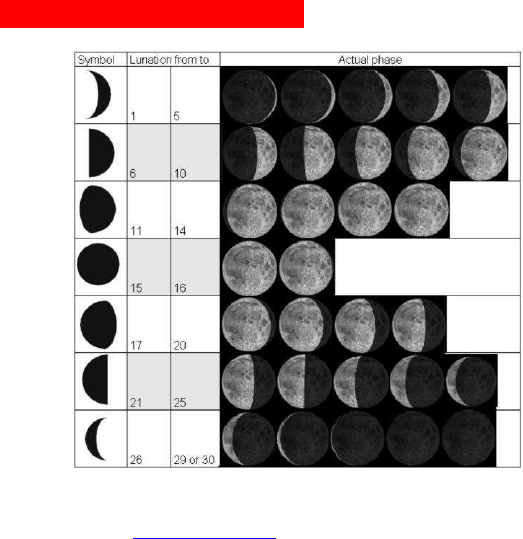
Moon Phase Symbol Chart
Product specifications are subject to change. Stealthcam is not responsible for any photographic or
typographical errors.
