Stihl Ar900 Backpack Battery Instruction Manual AR 900
2014-07-06
: Stihl Ar900-Backpack-Battery-Instruction-Manual ar900-backpack-battery-instruction-manual stihl pdf
Open the PDF directly: View PDF ![]() .
.
Page Count: 52
{
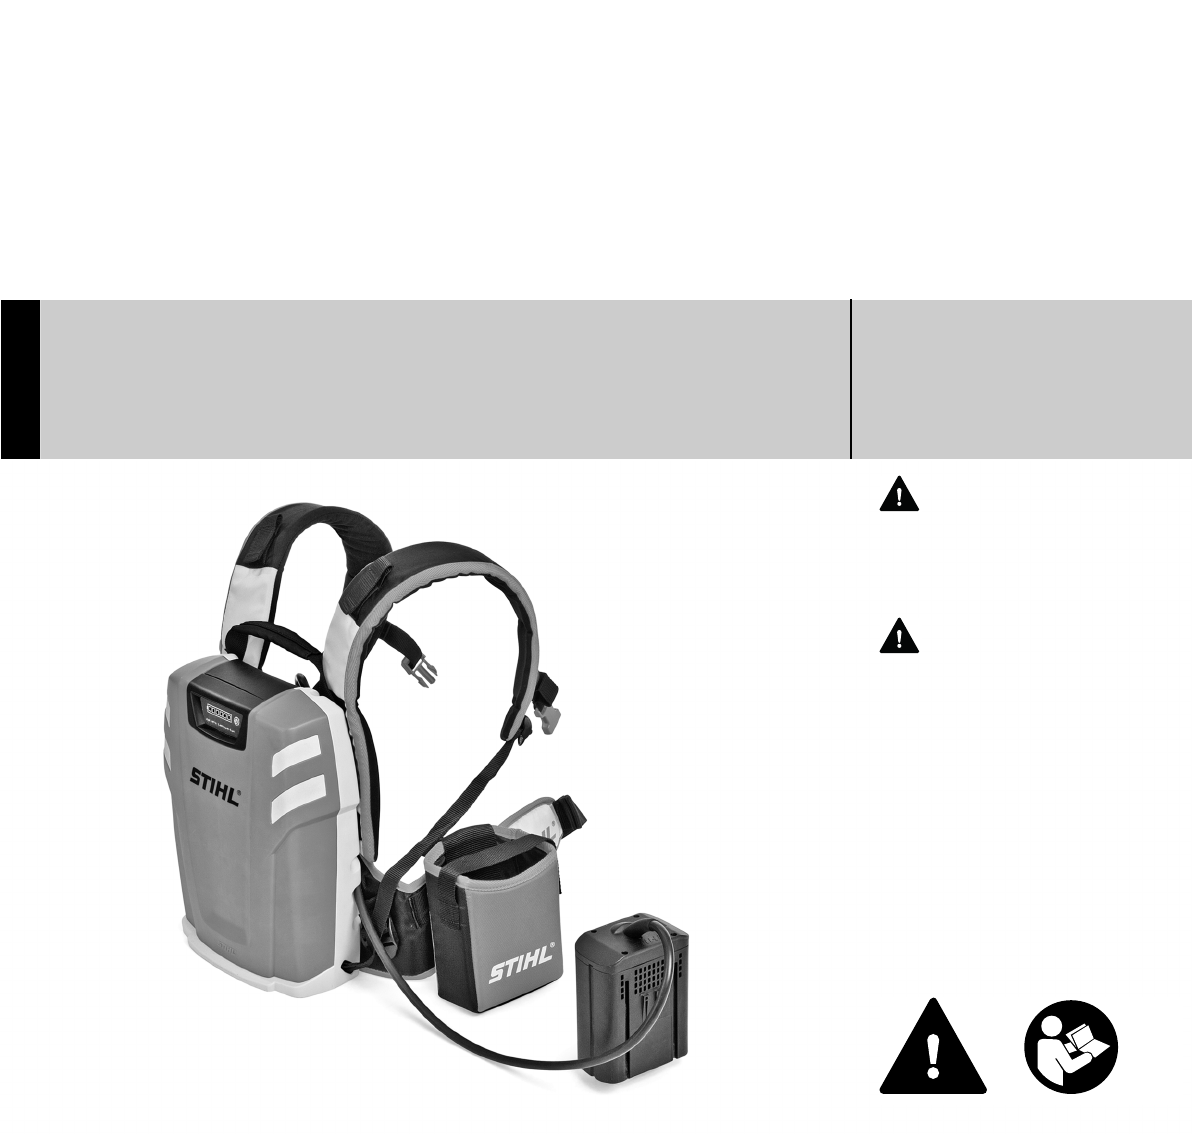
STIHL AR 900
WARNING
Read and follow all safety
precautions in Instruction Manual –
improper use can cause serious or
fatal injury.
ADVERTENCIA
Lea y siga todas las precauciones
de seguridad dadas en el manual
de instrucciones – el uso incorrecto
puede causar lesiones graves o
mortales.
Instruction Manual
Manual de instrucciones

Original Instruction ManualPrinted on chlorine-free paper
Printing inks contain vegetable oils, paper can be recycled.
© ANDREAS STIHL AG & Co. KG, 2013
0458-420-8621-A. VA1.C13.
0000006357_002_GB
AR 900
English
1
{This instruction manual is protected by copyright. All rights reserved, especially the rights to reproduce, translate and process
with electronic systems.
Contents
Allow only persons who fully understand
this manual to operate your backpack
battery.
It is important that you read, understand
and follow the safety precautions and
the operating and maintenance
instructions in the chapter "Safety
Precautions and Working Techniques"
before using your battery. For further
information you can go to
www.stihlusa.com.
Contact your STIHL dealer or the STIHL
distributor for your area if you do not
understand any of the instructions in this
manual.
WARNING
Some special safety precautions must
be observed to reduce the risk of
personal injury. Careless or improper
use may cause serious or even fatal
injury.
Guide to Using this Manual 2
Safety Precautions and Working
Techniques 2
Assembling the Battery 6
Fitting the Harness 7
Acoustic Signal 9
Charging the Battery 9
Light Emitting Diodes (LED) on
Battery 10
Light Emitting Diodes (LED) on
Charger 12
Connecting Battery to Power Tool 13
Disconnecting Battery from Power
Tool 13
Maintenance and Care 14
Main Parts 15
Specifications 16
Special Accessories 17
Troubleshooting 18
Maintenance and Repairs 21
Battery Recycling 21
Disposal 21
Trademarks 22
Addresses 23

AR 900
English
2
Pictograms
All the pictograms attached to or
embossed on the machine are shown
and explained in this manual.
Symbols in Text
Many operating and safety instructions
are supported by illustrations.
The individual steps or procedures
described in the manual may be marked
in different ways:
NA bullet marks a step or procedure.
A description of a step or procedure that
refers directly to an illustration may
contain item numbers that appear in the
illustration. Example:
NLoosen the screw (1).
NLever (2) ...
In addition to the operating instructions,
this manual may contain paragraphs
that require your special attention. Such
paragraphs are marked with the
symbols and signal words described
below:
DANGER
Indicates an imminent risk of severe or
fatal injury.
WARNING
Indicates a hazardous situation which, if
not avoided, could result in severe or
fatal injury.
NOTICE
Indicates a risk of property damage,
including damage to the machine or its
individual components.
Engineering Improvements
STIHL’s philosophy is to continually
improve all of its products. As a result,
engineering changes and improvements
are made from time to time. Therefore,
some changes, modifications and
improvements may not be covered in
this manual. If the operating
characteristics or the appearance of
your machine differs from those
described in this manual, please contact
your STIHL dealer for assistance.
WARNING
Use the STIHL battery only with STIHL
power tools and recharge it only with
STIHL chargers. Do not use the battery
for any other purpose since it may result
in accidents and injuries.
The battery is recommended for use
with the following STIHL power tools and
STIHL chargers:
STIHL MSA 160 C, MSA 200 C,
HSA 65, HSA 85, HSA 66, HSA 86,
HLA 65, BGA 85, FSA 65, FSA 85,
SPA 65
Guide to Using this Manual Safety Precautions and
Working Techniques
It is important that you
observe the following
information and
warnings.
It is important you read,
fully understand and
observe the following
safety precautions and
warnings. Read the
instruction manual and
safety precautions peri-
odically. Careless or
improper use may cause
serious or fatal injury.
Always read and observe
the instruction manual of
the STIHL tool powered
by this battery.
AR 900
English
3
STIHL AL 300
WARNING
Have your STIHL dealer show you how
to operate your backpack battery.
Observe all apllicable local safety
regulations, standards and ordinances.
WARNING
Do not lend or rent your battery without
the instruction manual. Be sure that
anyone using it understands the
information contained in this manual.
WARNING
Do not use it for other purposes, since
misuse may result in personal injury or
property damage, including damage to
the battery.
WARNING
Minors should never be allowed to use
this backpack battery. Bystanders,
especially children, and animals should
not be allowed in the area where it is in
use.
Safe use of a battery involves
1. the battery
2. the use of the battery.
THE BATTERY
For illustrations and definitions of the
battery see the chapter on "Main Parts".
WARNING
Do not place the battery on or near fires,
stoves or in other high-temperature
locations. Do not place the battery in
direct sunlight when not in use or store it
inside a vehicle in hot weather. Doing so
may cause the battery to generate heat,
rupture or ignite. Using the battery in this
manner may also result in a loss of
performance and a shortened life
expectancy.
In case of fire: Stay clear of any vapors
or gases generated, taking wind
direction into account. If possible without
danger, remove battery from the vicinity
of the fire. In principle, cooling the
battery or extinguishing the fire with
water is possible. It is preferable to
extinguish the fire with a multipurpose
dry chemical fire extinguisher. As for any
fire, evacuate the area and fight the fire
from a safe distance. Once the fire has
been extinguished, the area should be
monitored (fire watch) in case of a flare-
up, until the battery has cooled
sufficiently. Contact the proper
authorities immediately for appropriate
handling and safe disposal. Restrict
access to the area until completion of
clean-up. Do not touch the burnt battery
or any spilled liquids. Use inert
absorbent to absorb spilled liquids.
Protect the battery from direct sunlight
when it is not in use.
Immediately discontinue use of the
battery if, while using, charging or
storing, it emits smoke, an unusual
smell, feels hot or appears abnormal in
any other way.
Charge the battery before use.
If four light emitting diodes on the battery
flash red (see "Light Emitting Diodes
(LEDs) on Battery") and a rapid
sucession of short beeps sound for
several seconds (see "Acoustic Signal"),
the battery is not functioning properly –
disconnect the battery from the power
tool, take it off your back, check its
condition and contact your STIHL
servicing dealer immediately.
WARNING
If the battery emits smoke, heats up,
smells, makes noises or shows signs of
deformation, disconnect it from the
power tool, take it off your back, put it
down and immediately move a safe
distance away. Keep children and
animals away from the work area. Keep
battery away from combustible
materials.
Use the battery only with the harness
supplied – it must not be combined with
any other carrying straps (e.g. shoulder
strap, full harness, etc.).
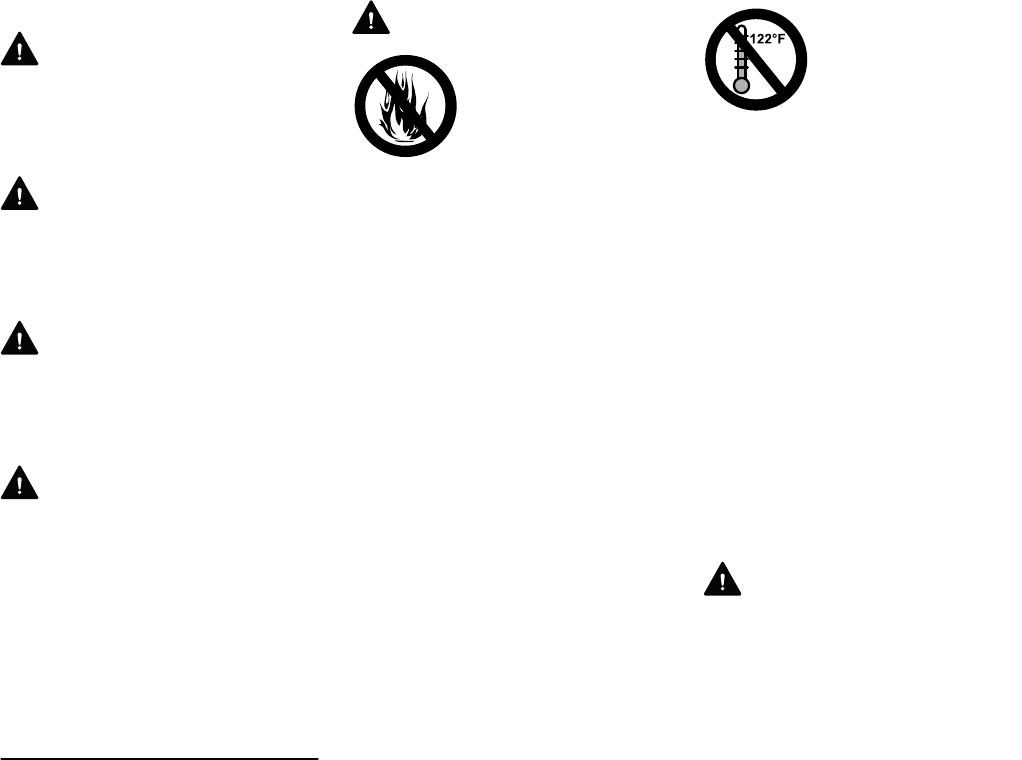
Risk of fire, explosion
and / or burns, including
chemical burns. Do not
disassemble, crush, heat
above 212 °F (100 °C),
expose to fire or inciner-
ate. Never expose the
battery to microwaves or
high pressures.
Use and store the bat-
tery only within a
temperature range from
14 °F (-10 °C) and no
more than 122 °F
(+ 50 °C).

AR 900
English
4
Do not place or hang the battery in an
elevated position (e.g. branches) – it
may fall down.
Never sit or stand on the battery. Never
place objects on the battery – do not
stack several batteries on top of one
another.
WARNING
Do not charge or use a defective,
damaged or deformed battery. Do not
open, drop, hit or damage battery. The
battery contains safety features and
devices, which, if, damaged, may cause
the battery to generate heat, rupture or
ignite.
Never insert objects into the cooling
slots of the adapter that connects the
battery to the power tool.
Inspect the adapter, the adapter's
contacts and the cable for damage at
regular intervals. If any damage is found,
contact your STIHL servicing dealer. Do
not continue using or charging a
malfunctioning, damaged, cracked or
deformed battery, cable or adapter.
Never bridge the adapter's contacts with
metallic objects (short circuit). The
battery may be damaged by a short
circuit. Keep a battery that is not in use
away from metal objects (e.g. nails,
coins, jewelry). Do not use metal
containers for transporting batteries.
WARNING
Fluid may leak from the battery if it is
damaged or is not used properly – avoid
contact with the skin! Leaking battery
fluid can cause skin irritation and
chemical burns. In the event of
accidental contact, wash affected areas
of skin with plenty of water and soap. If
battery fluid gets in the eye(s), do not rub
your eye(s) and rinse with plenty of
water for 15 minutes at least. Also seek
medical assistance.
Accessories and Spare Parts
Only use parts and accessories that are
explicity approved for this battery by
STIHL. If you have any questions in this
respect, consult your STIHL servicing
dealer.
STIHL recommends the use of genuine
STIHL replacement parts and
accessories. They are specifically
designed to match the product and meet
your performance requirements.
THE USE OF THE BATTERY
Transporting the Battery
Disconnect the battery from the power
tool – even when carrying it for short
distances. This avoids the risk of
accidental startup.
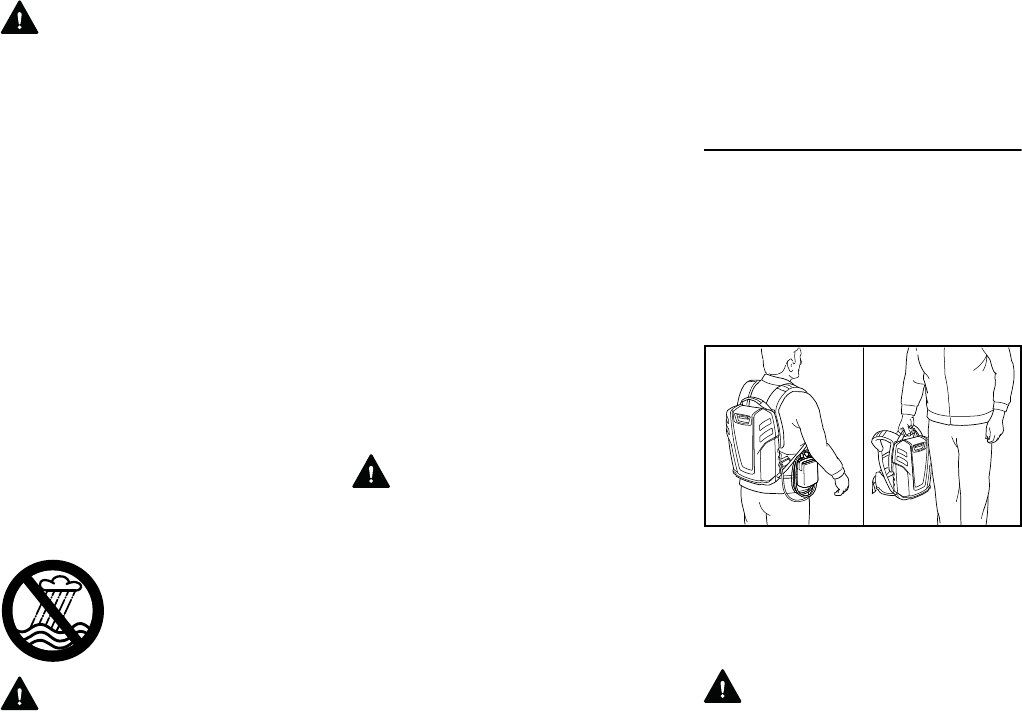
Carry the battery by the handle or on
your back.
In vehicles: Properly secure the battery
to prevent turnover and damage.
WARNING
Special precautions must be taken when
transporting a damaged or
malfunctioning battery. To reduce the
risk of accidents, always contact your
STIHL servicing dealer before
transporting such a battery.
Cleaning the Battery
Always clean dust and dirt off the battery
– do not use any grease solvents for this
purpose.
Clean plastic surfaces with a cloth. Do
not use aggressive detergents. They
may damage the plastic.
Do not spray the battery with water.
Do not use a pressure washer to clean
your battery. The solid jet of water may
damage parts of the battery and cause
malfunctions.
Storing the Battery
Disconnect the battery from the power
tool or charger.
Protect from rain – do not
immerse in fluids.
4865BA002 KN
AR 900
English
5
When the battery is not in use, put it in a
safe place it so that it does not endanger
others. Secure it against unauthorized
use.
Store the battery out of the reach of
children.
Store indoors in a dry and safe location.
Protect it from dirt and damage.
To ensure maximum battery life: Store
with a charge of about 30%.
Do not store spare batteries unused –
use in rotation.
Notes on Cable
Check the adapter and its cable and
plug for signs of damage. Never use a
damaged adapter, cable or plug.
Make sure the insulation of the cable
and plug is in good condition.
Straighten a twisted cable before use.
Position the cable so that it cannot be
reached or damaged by the cutting or
working attachment of the power tool
being used.
Do not chafe, squash, jerk or damage
the cable. Protect it from heat, oil and
sharp edges.
Do not use the cable for any other
purpose, e.g. for carrying or hanging up
the battery or power tool. Do not tug the
cable.
Position the cable so that it does not
endanger others – risk of tripping or
stumbling.
Notes on Operation
–when carrying out tests and
adjustments or cleaning
–before working on the power tool's
cutting or working attachment
–before leaving the machine
unattended
–when transporting
–storing the machine
–before performing repairs and
maintenance work
–in the event of a malfunction or in an
emergency
This avoids the risk of accidental startup.
Before Starting Work
Check that the battery is in good
condition – refer to appropriate chapters
in the instruction manual.
–Check condition of housing parts.
–Check condition of straps.
–Make sure cable, plug and adapter
are not damaged.
–Depress push button to activate the
LED display – see chapter "Light
Emitting Diodes (LED) on Battery".
–Acoustic signal should beep when
push button is released.
Do not continue using the battery if parts
of housing or straps are worn, cracked
or broken – contact STIHL servicing
dealer.
To reduce the risk of personal injury, use
the battery only if it is in good working
order.
Do not use the battery if any of its
components are damaged.
For emergencies: Practice quickly
opening the fastener on the waist belt,
loosening the shoulder straps and
setting down the battery. To avoid
damage, do not throw the battery to the
ground when practicing.
During Operation
WARNING
The battery is equipped with a visual and
acoustic signal. Your ability to hear the
acoustic signal may be reduced when
wearing hearing protection.
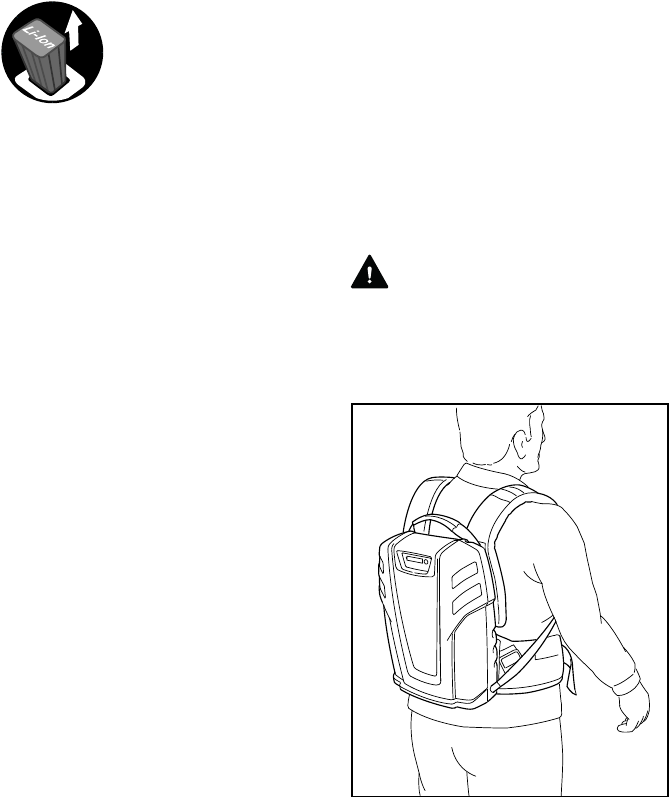
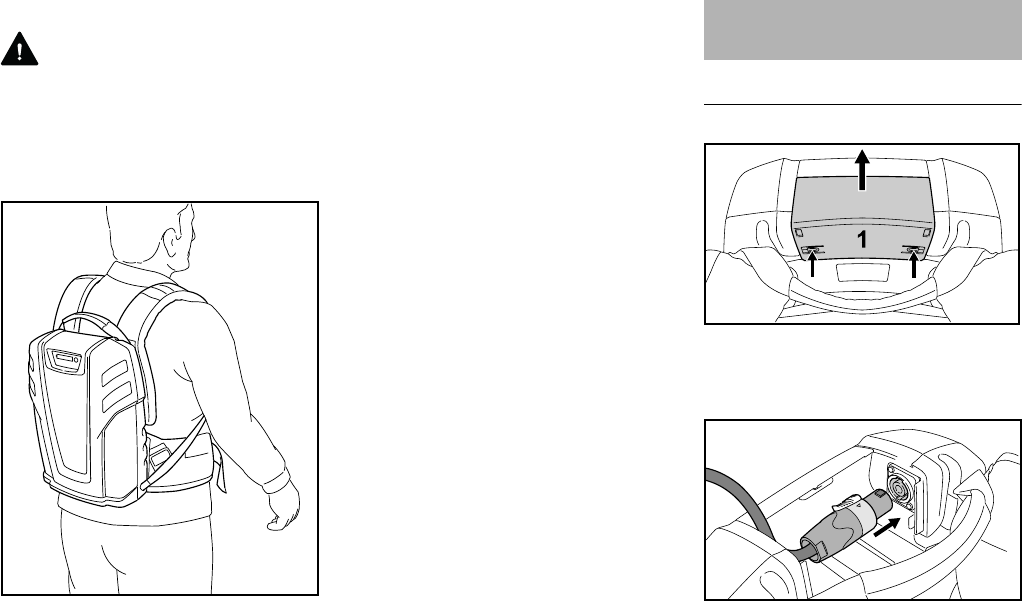
The battery is carried as a backpack.
Disconnect battery from
the power tool:
4865BA001 KN
AR 900
English
6
The battery is designed to be operated
by one person only. Do not allow other
persons in the work area.
Make sure you always have good
balance and secure footing.
Never work with the battery in trees, on
roofs or on a ladder or other insecure
support.
Make sure the cable cannot become
entangled or snag on objects – position
and secure the cable carefully before
starting work.
If the battery is subjected to unusually
high loads for which it was not designed
(e.g. heavy impact or a fall), always
check that it is in good condition before
continuing work – see also "Before
Starting Work". Do not continue
operating the battery if it is damaged. In
case of doubt, contact your STIHL
servicing dealer.
After Finishing Work
Clean the battery – see "Cleaning the
Battery".
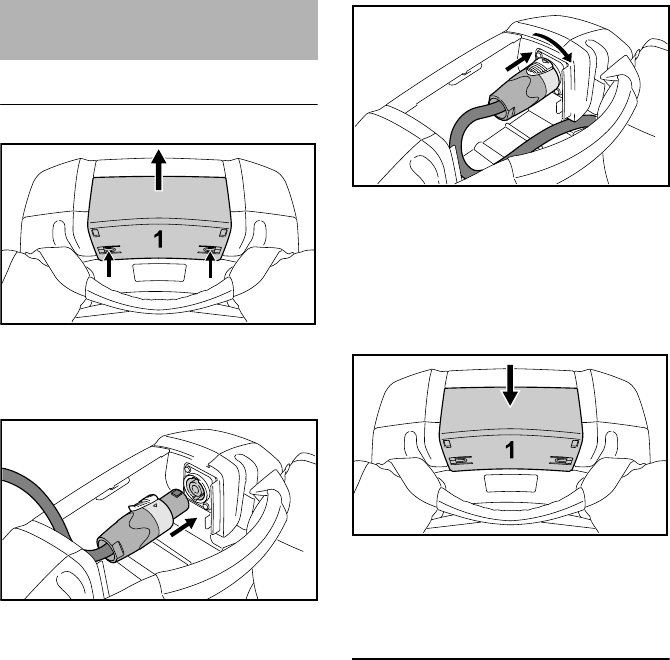
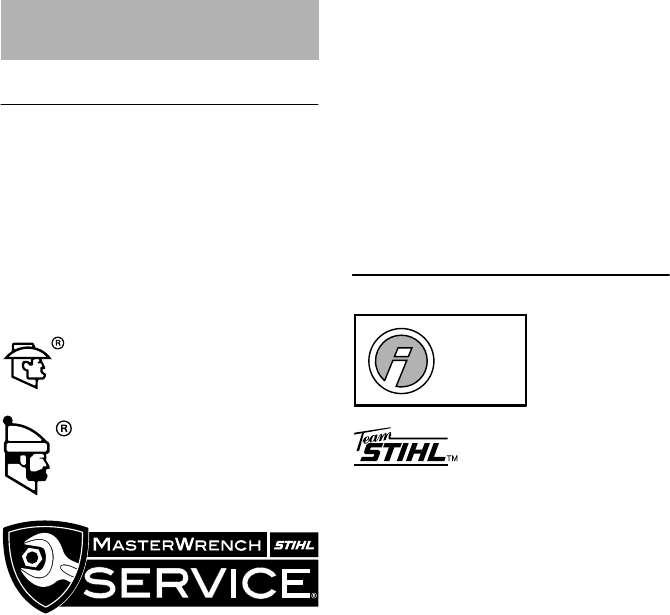
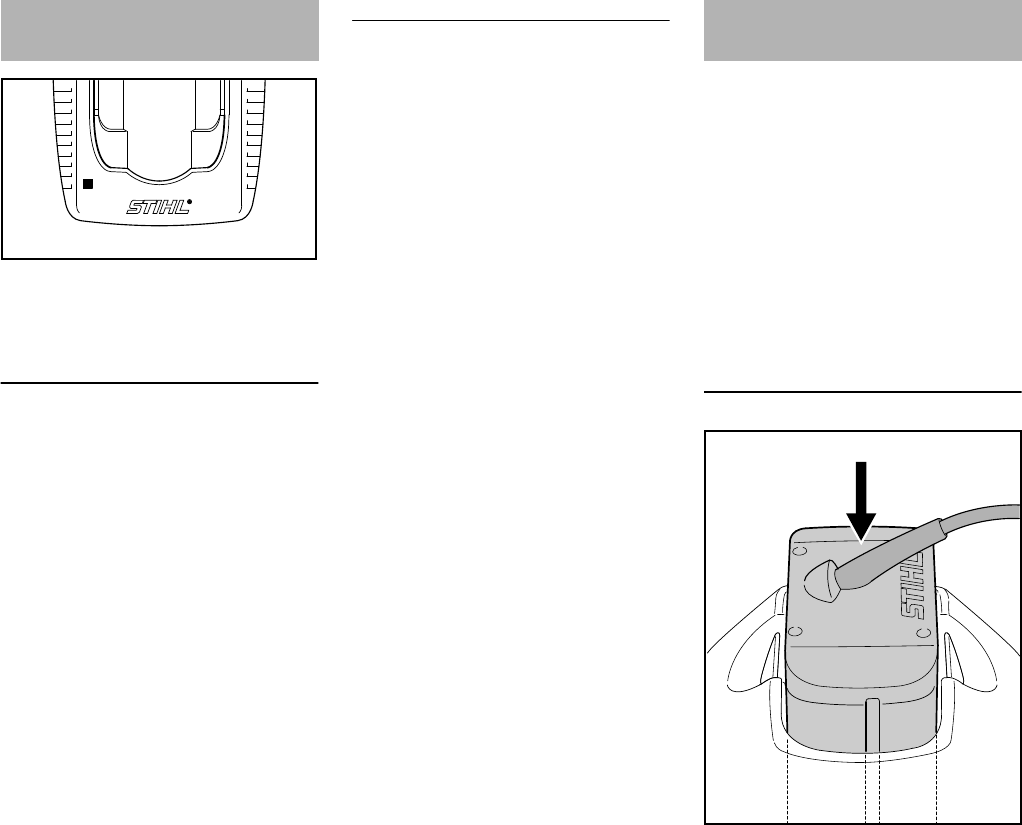
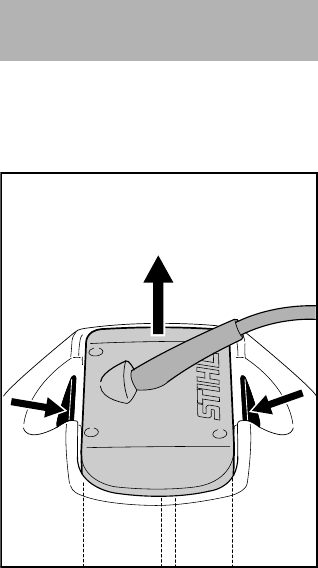
Connecting the Adapter
NRemove the cover (1) – press the
tabs (arrows) inwards and push the
cover upwards.
NInsert the plug (2) in the socket (3) –
line up the lugs on the plug with the
slots in the socket.
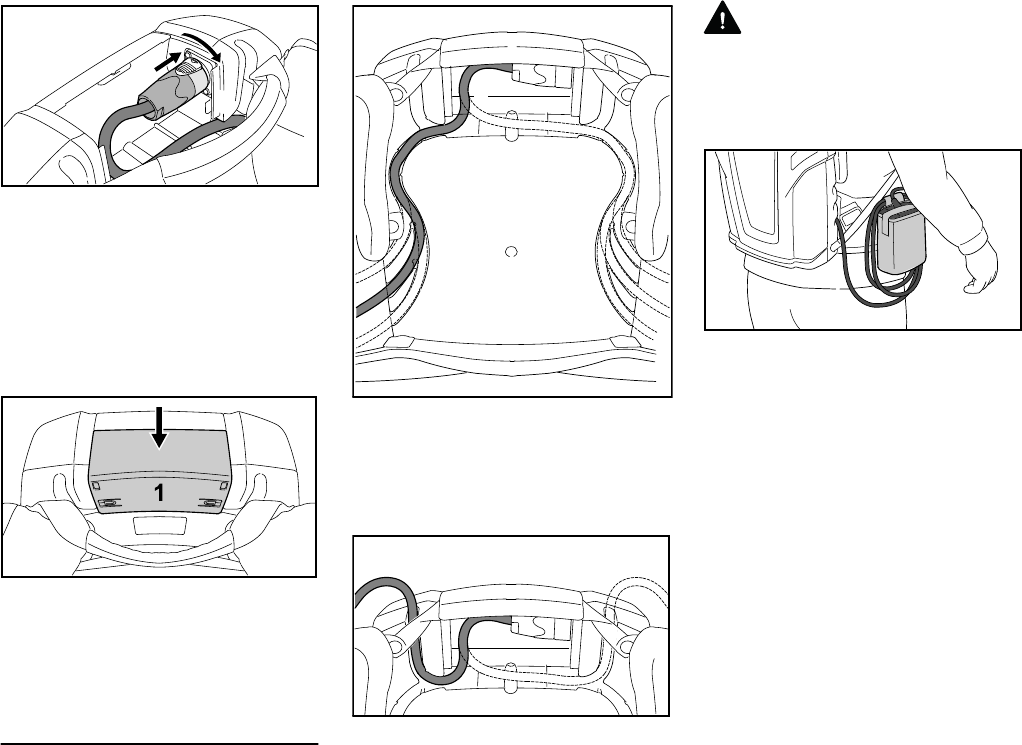
NPush the plug into the socket as far
as stop, then turn it clockwise until
the plug's latch (4) engages audibly.
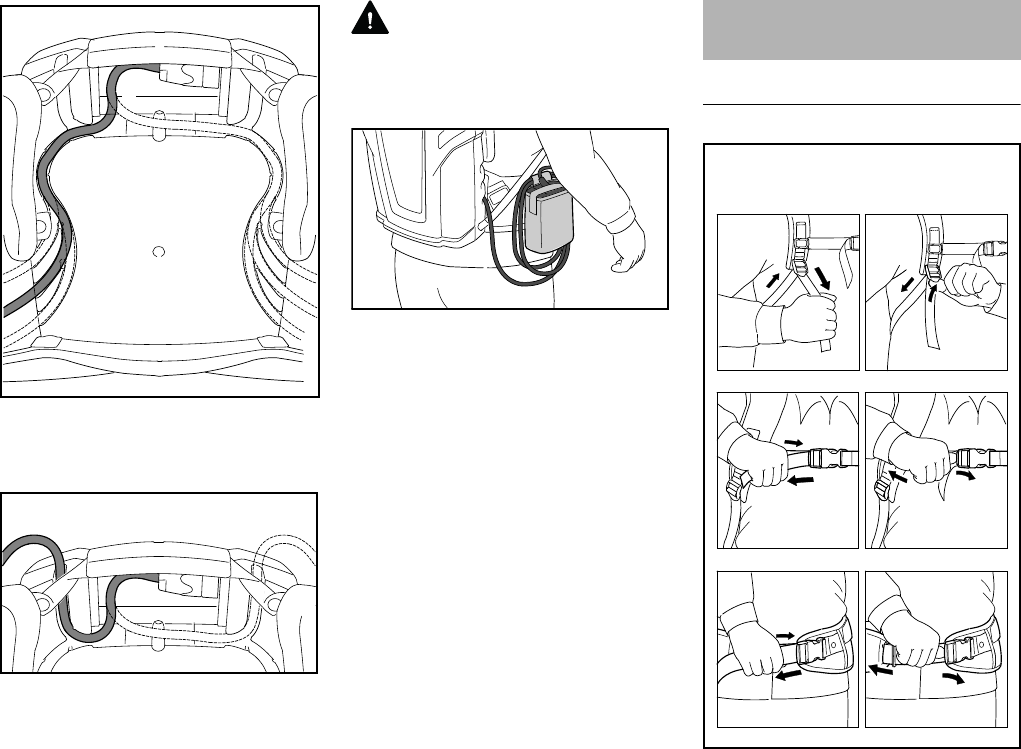
NFit cable (5) in the cable duct (6) in
the housing – see also "Positioning
the Cable".
NPush the cover (1) into place,
making sure the cable is properly
seated in the duct and not pinched.
Positioning the Cable
The cable can be fitted in different cable
ducts.
If the power tool being used with this
battery is:
Assembling the Battery
4865BA003 KN
2
3
4865BA004 KN
4
6
4865BA021 KN
5
4865BA023 KN
AR 900
English
7
Nnext to or behind your body – fit the
cable (1) in one of the lateral cable
ducts (2) and push it into place
Nin front of your body – fit the
cable (1) in one of the upper cable
ducts (2) and push it into place
Always use the cable outlets at the side
on which the power tool is held and
controlled.
WARNING
To reduce the risk of accidents, never
lay the cable diagonally – it may snag on
objects.
NIf the cable is too long, attach it to
the retainer on the bag.
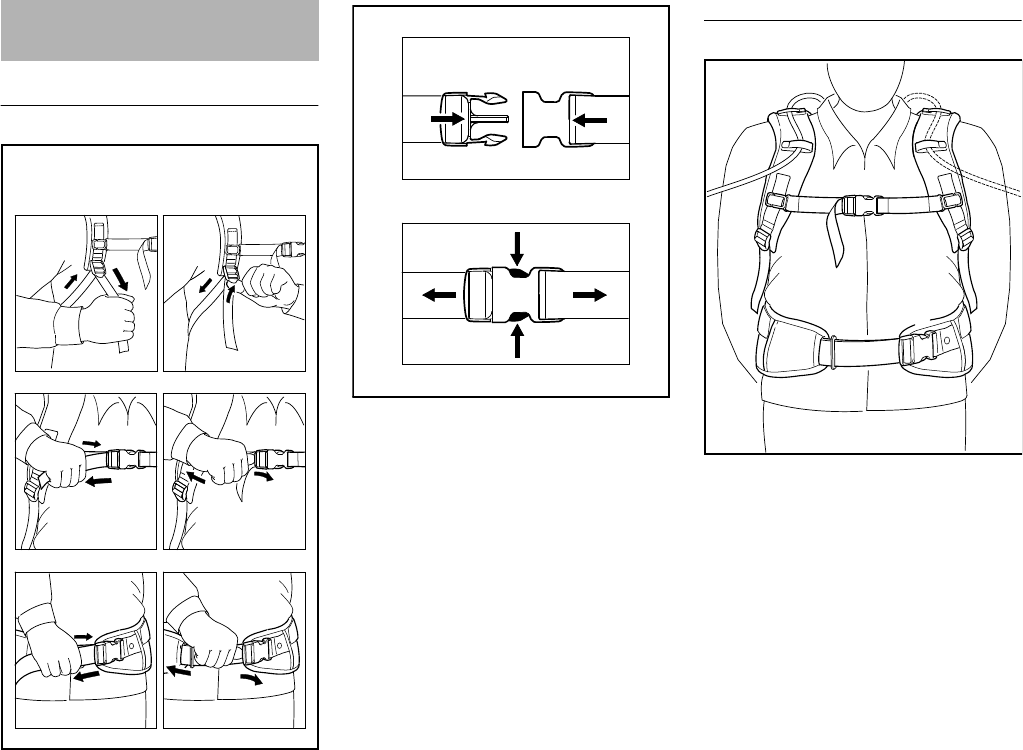
Adjusting the Harness Straps
APull the ends of the straps
downward to tighten the harness.
BLift the tabs of the adjusters to
loosen the straps.
4865BA005 KN
22
1
1
2
4865BA022 KN
4865BA006 KN
Fitting the Harness
4865BA007 KN
AB
AR 900
English
8
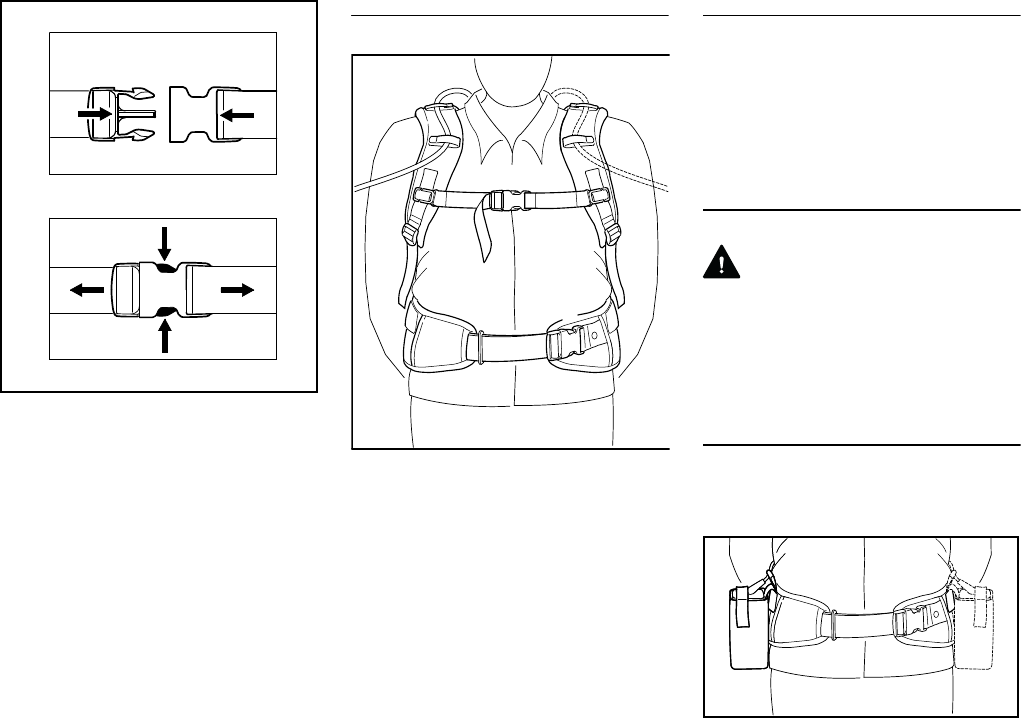
CClose and lock the quick-release
fastener by pushing it together.
DSqueeze the hooks to open the
quick-release fastener.
Put on the shoulder strap.
NFasten and adjust the waist belt (1)
so that it rests comfortably on your
hips – thread the end of the belt
through the loop (2) – do not let in
hang down.
NAdjust the harness straps (3) to the
correct length.
NAdjust chest strap (4) to correct
length and fasten it.
NIf you use the upper cable ducts –
see "Positioning the Cable" – thread
the cable through the hook and eye
fasteners (5).
The back padding must fit firmly and
securely against your back.
Removing Harness
NOpen the quick-release fasteners
on the waist belt and chest strap.
NLoosen the harness straps by lifting
the sliding adjusters and then take
off the battery.
Throwing off the machine
WARNING
The battery must be quickly thrown off in
the event of imminent danger. The waist
belt and chest strap must be opened
before throwing the battery to the
ground.
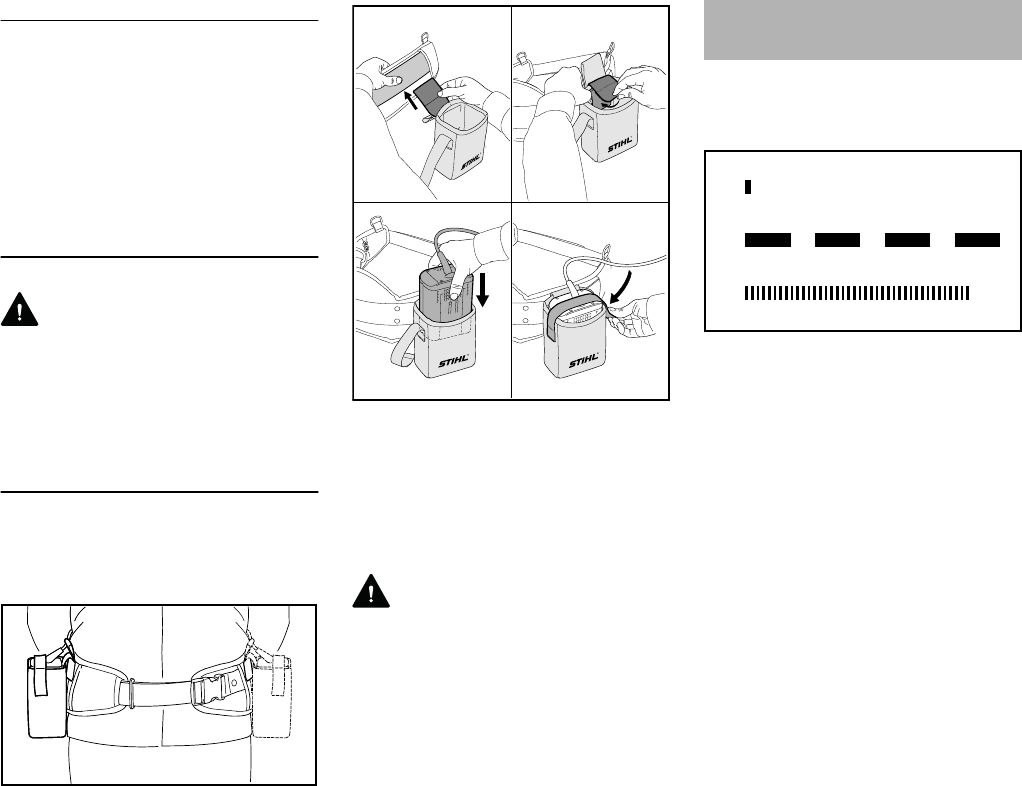
Pouch
Accommodates adapter during work
breaks and after finishing work.
Secure the pouch (1) to the waist belt
only in the positions shown.
C
D
4865BA027 KN
5
4
1
4865BA009 KN
2
3 3
5
55
4865BA010 KN
1
AR 900
English
9
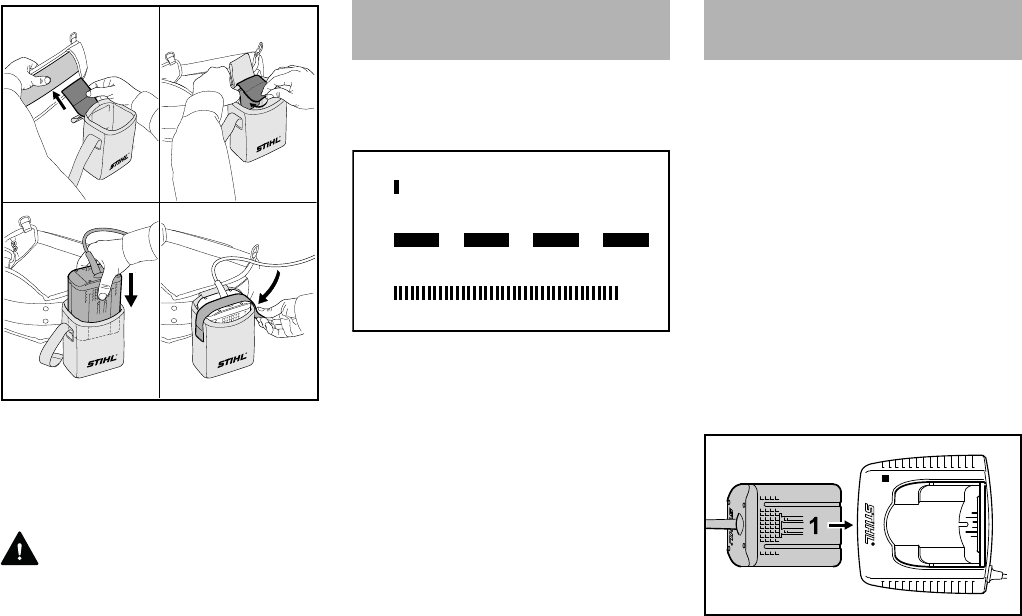
NAttach pouch to waist belt.
NInsert the adapter (2).
NClose the hook and eye fastener (3)
– the adapter is held in the pouch.
WARNING
Never transport metallic, pointed or
sharp objects in the pouch. They may
bridge the contacts in the adapter and
cause a short circuit.
The battery emits acoustic signals as
well as optical signals – see "Light
Emitting Diodes (LEDs) on Battery".
A factory-new battery is not fully
charged.
Recommendation: Fully charge the
battery before using it with your power
tool for the first time.
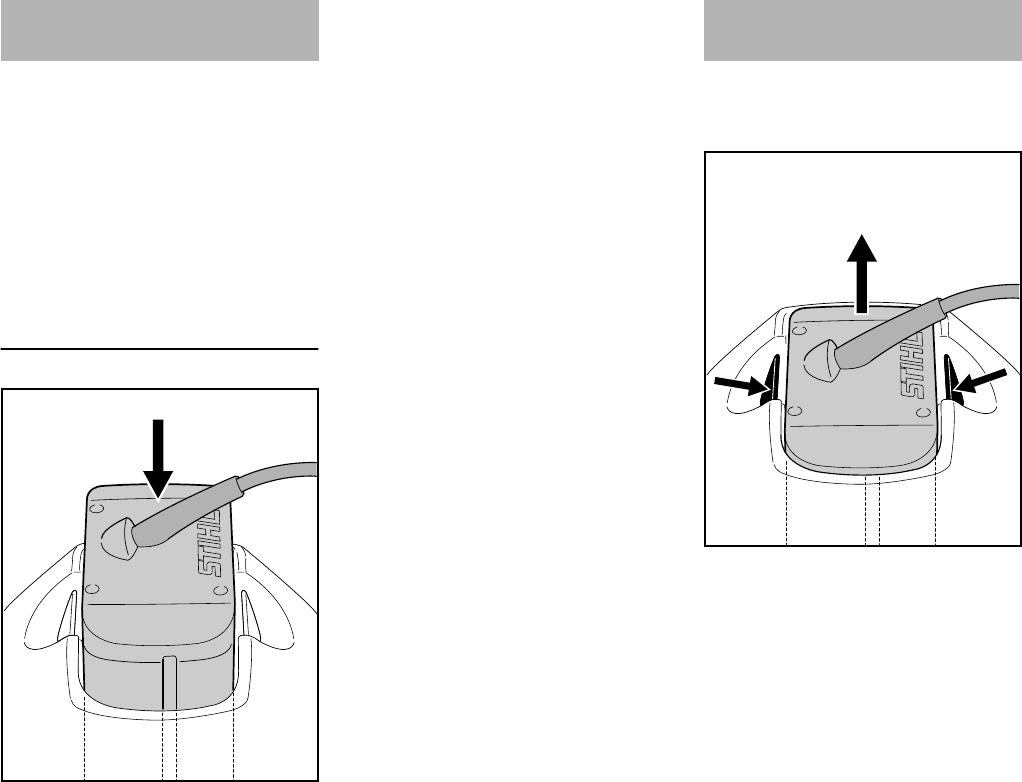
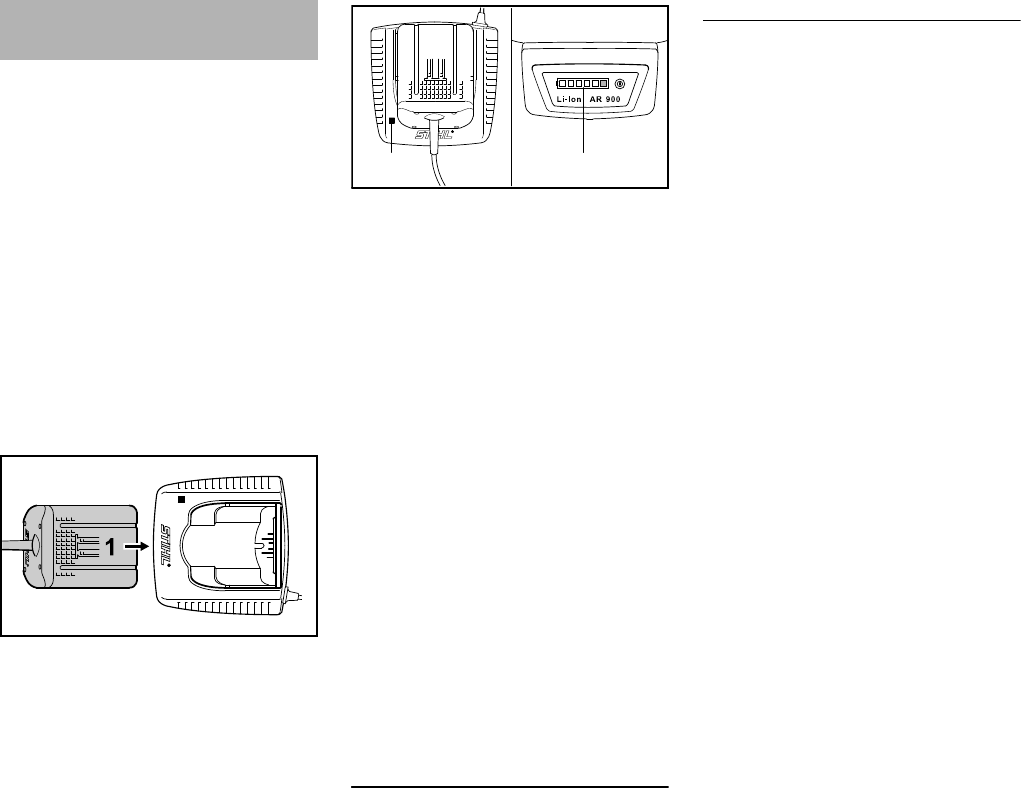
NConnect the charger to the power
supply – mains voltage and
operating voltage of the charger
must be the same – see
"Connecting Charger to Power
Supply".
Operate the charger indoors only in dry
locations at an ambient temperature
between 41 °F (5 °C) and 104 °F
(40 °C).
NPush the adapter (1) into the
charger (2) until you feel noticeable
resistance – then push it as far as
stop.
3
4865BA011 KN
2
Acoustic Signal
A A short beep
This signal is activated by pressing
and releasing the button on the bat-
tery – see "Main Parts".
Meaning: Acoustic signal works as it
should.
B Four long beeps
One LED on battery flashes green.
Meaning: Battery's state of charge is
low – recharge the battery.
C Rapid succession of short beeps 1)
Four LEDs on battery flash red.
Meaning: Malfunction in battery –
see "Troubleshooting".
1) Signal stops automatically after a
few seconds.
4865BA024 KN
A
B
C.......
Charging the Battery
2
4865BA012 KN
AR 900
English
10
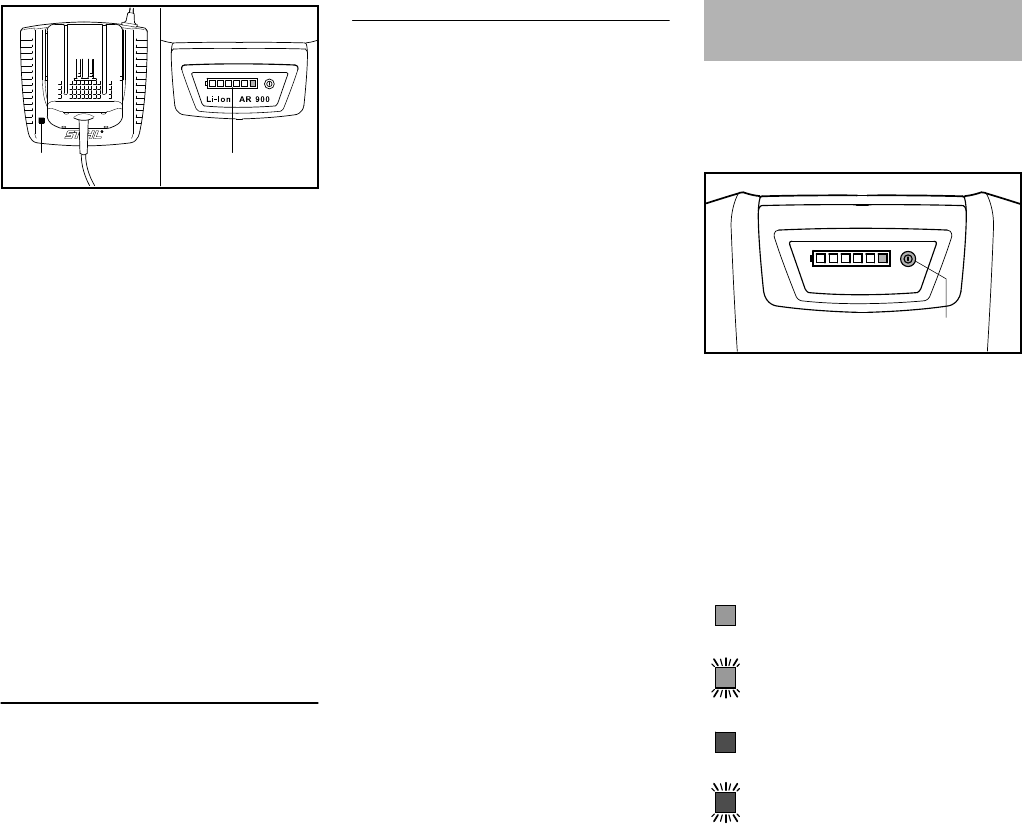
The light emitting diode (3) on the
charger comes on when the adapter is
inserted – see "Light Emitting Diode
(LED) on Charger".
Charging begins as soon as the light
emitting diodes (4) on the battery light
up green – see "Light Emitting Diodes
(LEDs) on Battery".
The charge time is dependent on a
number of factors, including battery
condition, ambient temperature, etc.,
and may therefore vary from the charge
time in the "Specifications".
The battery warms up during operation.
If a warm battery is inserted in the
charger, it may be necessary to cool it
down before charging. The charging
process begins only after the battery has
cooled down. The time required for
cooling may prolong the charge time.
AL 300 charger
The charger is equipped with a fan
which is audible when it is running.
End of Charge
The charger switches itself off
automatically when the battery is fully
charged:
–Light emitting diodes on the battery
go off
–The light emitting diode on the
charger goes off
–The charger's fan is switched off.
Remove the adapter from the charger.
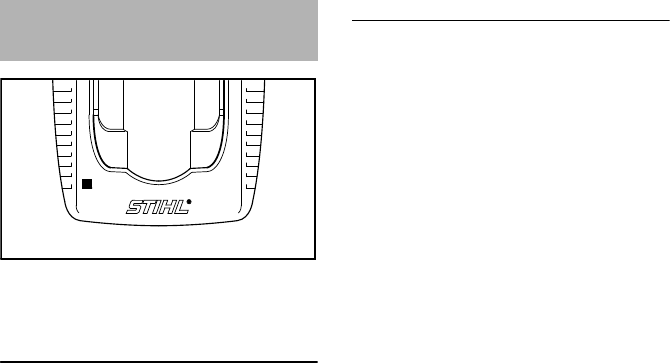
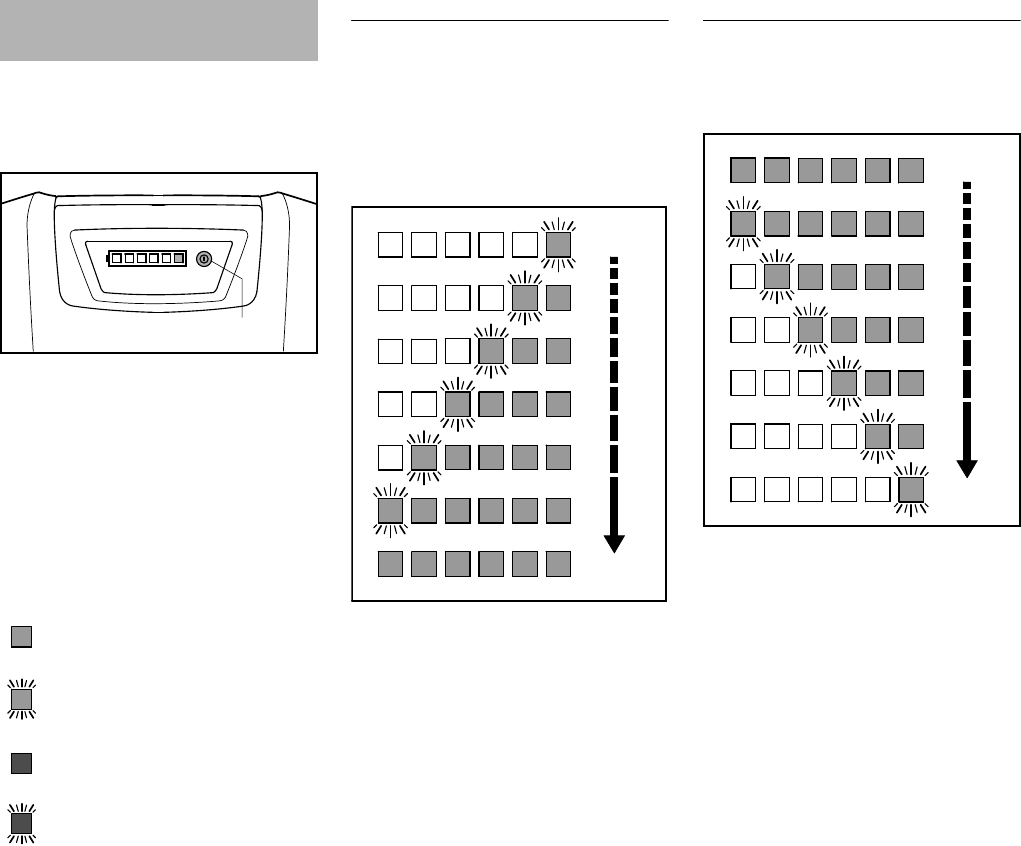
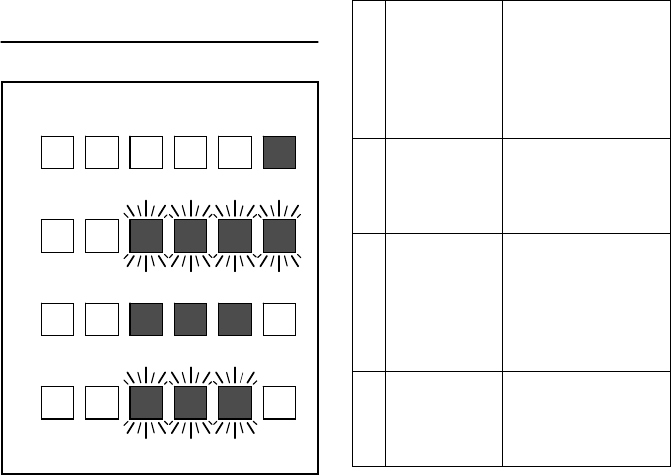
The light emitting diodes show the
battery's state of charge and any
problems with the battery or the power
tool being used.
NPress button (1) to activate the light
emitting diodes – the display goes
off automatically after 5 seconds.
–The acoustic signal must sound
briefly when the button is released
(to confirm function) – see also
"Acoustic Signal".
The light emitting diodes can glow or
flash green or red.
4
3
4865BA013 KN
Light Emitting Diodes (LED)
on Battery
Light emitting diode glows con-
tinuously green.
Light emitting diode flashes
green.
Light emitting diode glows con-
tinuously red.
Light emitting diode flashes red.
4865BA025 KN
1
AR 900 Lithium-Ion
AR 900
English
11
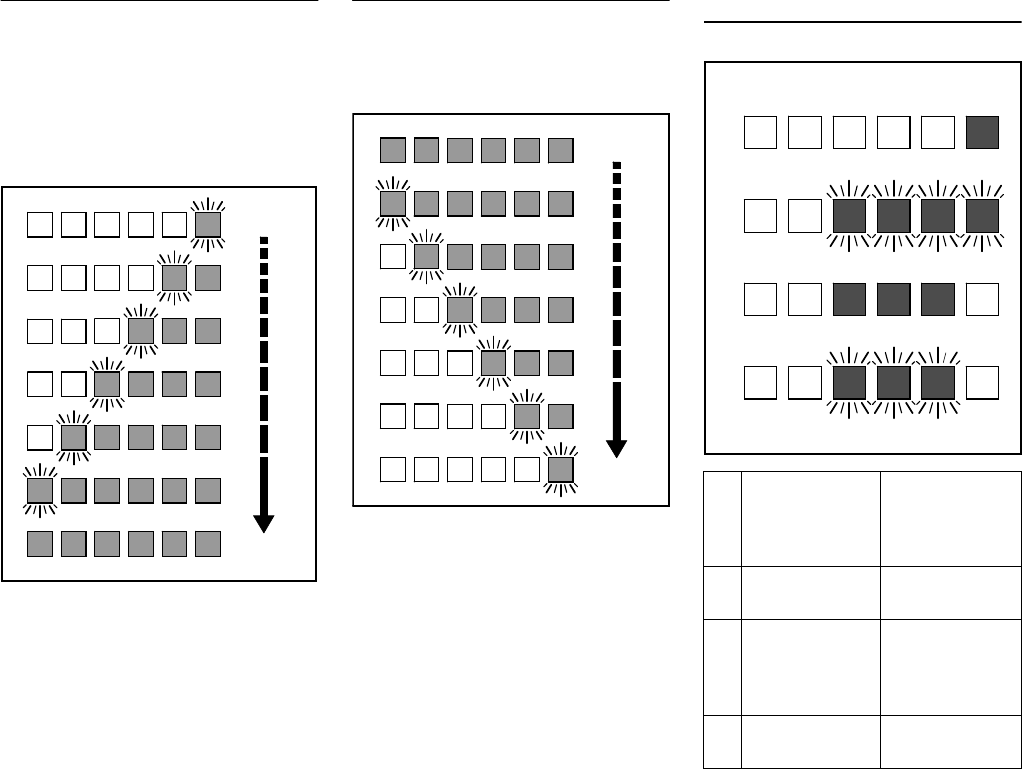
During Charging Process
The light emitting diodes glow
continuously or flash to indicate the
progress of charge.
A green flashing light emitting diode
indicates the capacity that is currently
being charged.
The light emitting diodes on the battery
go off automatically when the charge
process is completed.
If the light emitting diodes on the battery
flash or glow red – see "If the red light
emitting diodes glow continuously /
flash".
During Operation
The green light emitting diodes glow
continuously or flash to indicate the state
of charge.
If the battery is almost completely
discharged and the last LED begins to
flash, four long signals sound – see
"Acoustic Signal".
If the light emitting diodes on the battery
flash or glow red – see "If the red light
emitting diodes glow continuously /
flash".
If the red light emitting diodes glow
continuously / flash
4865BA015 KN
0 %
100 %
100 %
4865BA016 KN
0 %
A1 light emitting
diode glows
continuously
red:
Battery is too
hot1) 2)/cold1)
1) When charging: Charge process
starts automatically after the battery
has cooled down / warmed up.
B4 light emitting
diodes flash red
Malfunction in
battery 3)
C3 light emitting
diodes glow
continuously
red:
Power tool is too
hot – allow it to
cool down.
D3 light emitting
diodes flash red
Malfunction in
power tool 4)
4865BA025 KN
A
B
C
D
AR 900
English
12
The light emitting diode (1) on charger
glows continuously green or flashes red.
Green continuous light ...
... indicates the following:
The battery
–is being charged
–is too hot and must cool down
before charging
See also "Light Emitting Diodes (LEDs)
on Battery".
The green light emitting diode on the
charger goes off as soon as the battery
is fully charged.
Red flashing light ...
... indicates the following:
–No electrical contact between
battery and charger – remove and
refit the adapter
–Malfunction in battery – see also
"Light Emitting Diodes (LEDs) on
Battery".
–Malfunction in charger – have
charger checked by dealer – STIHL
recommends an authorized STIHL
servicing dealer.
2) During operation: Power tool
switches itself off – allow battery to
cool down for a while.
3) Electromagnetic problem or
malfunction. Acoustic signal can be
heard as a rapid series of sounds
lasting several seconds – see also
"Acoustic Signal". Disconnect
battery from power tool, take it off
your back, observe battery and
contact your STIHL servicing dealer
immediately – see also
"Troubleshooting".
4) Electromagnetic problem or
malfunction. Take the adapter out
of the power tool and refit it. Switch
on the power tool – if the light
emitting diodes still flash, the power
tool has a malfunction and must be
checked by a STIHL servicing
dealer.
Light Emitting Diodes (LED)
on Charger
1
3901BA019 KN
AR 900
English
13
A factory-new battery is not fully
charged.
Recommendation: Fully charge the
battery before using it for the first time.
NIf necessary, remove the cover from
the power tool's battery
compartment before fitting the
adapter, i.e. depress both locking
levers to unlock and remove the
cover.
Insert adapter
NInsert the adapter (1) in the power
tool – the adapter slides into the
compartment – press it down
carefully until it snaps into position –
the adapter must be flush with the
top of the housing.
The battery and power tool are now
connected together.
For further information on switching on
and operating the power tool: see the
instruction manual of the power tool
being operated with this battery.
NSwitch off the power tool – see also
instruction manual of the power tool
being used.
NDepress both locking levers (1) at
the same time to unlock the adapter.
NTake the adapter (2) out of the
power tool.
The battery and power tool are now
disconnected.
Connecting Battery to Power
Tool
4865BA018 KN
Disconnecting Battery from
Power Tool
1
1
4865BA019 KN
2

AR 900
English
14
Maintenance and Care
The following intervals apply to normal operating conditions only. If your daily work-
ing time is longer or operating conditions are difficult (very dusty work area, etc.),
shorten the specified intervals accordingly.
Always disconnect the battery from the power tool before performing any work on the
battery.
before starting work
after finishing work or daily
weekly
monthly
every 12 months
if problem
if damaged
if required
Battery Visual inspection XXXX
Clean X
Light emitting diodes (LEDs) Check operation – LED display must be
activated when button is pressed XX
Acoustic signal Check operation – brief signal must
sound when button is released XX
Adapter and cable Visual inspection XXX
Safety labels Replace X

AR 900
English
15
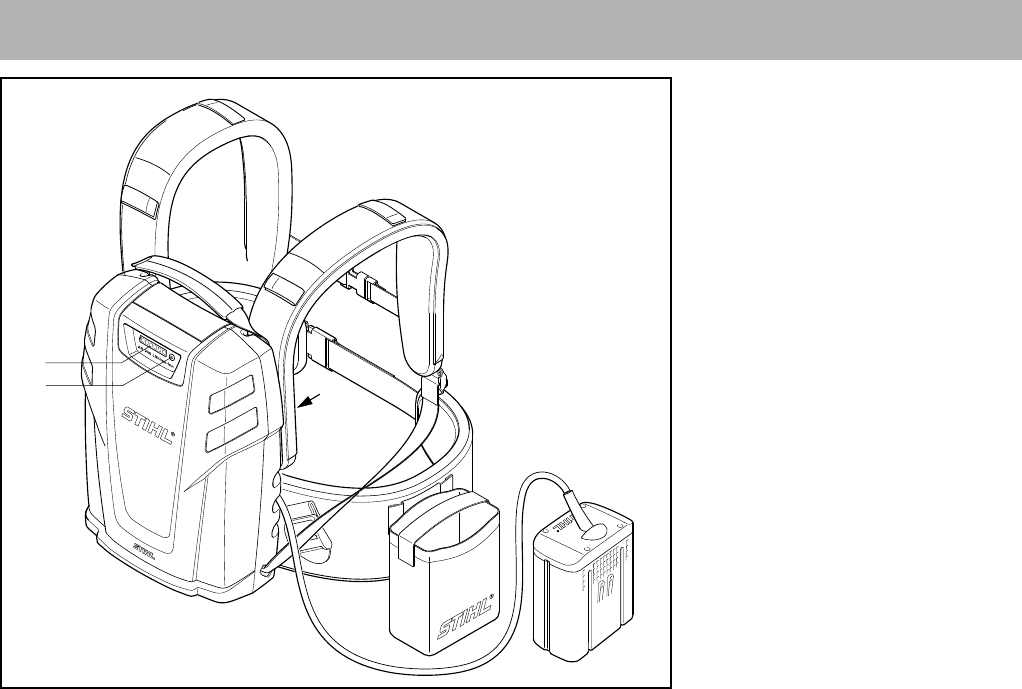
1Battery
2Light Emitting Diodes (LEDs) on
Battery
3Push Button
4Cover
5Carrying Handle
6Shoulder Straps
7Velcro Fasteners
8Chest Strap
9Hip/Waist Belt
10 Pouch
11 Cable
12 Adapter
#Serial number
Main Parts
8
77
7
7
#
4865BA020 KN
1
2
3
4
9
5
10
6
6
12
11

AR 900
English
16
Defintions
1. Battery
Supplies the motor of the power tool
(used with this battery) with
electrical power.
2. Light Emitting Diodes (LEDs) on
Battery
Indicate the state of charge and
operating condition of the battery.
3. Push Button
For activating light emitting diodes
(LEDs) on battery and for checking
operation of acoustic signal.
4. Cover
Covers and protects the plug
connection for the adapter.
5. Carrying Handle
For transporting the battery.
6. Shoulder Straps
Carry the battery comfortably on
back and shoulders.
7. Velcro Fasteners
For fitting the cable by using the
upper cable ducts.
8. Chest Strap
Ensures a more secure hold in the
chest area.
9. Hip/Waist Belt
Carries the battery comfortably on
hip / around the waist.
10. Pouch
Accommodates adapter during
work breaks and after finishing
work.
11. Cable
Supplies electric current from the
battery to the adapter.
12. Adapter
Supplies electric current to the
power tool.
Running time of the power tool is
dependent on the energy content of the
battery.
Charge Times
Transporting
STIHL batteries comply with the
requirements set forth in UN-Manual
ST/SG/AC.10/11/Rev.5/Part III,
Subsection 38.3.
Commercial air, vessel and ground
transportation of lithium ion cells and
batteries is regulated. The battery is
classified as a UN3091, Class 9,
packaging group 2 product. Shipping it,
Specifications
Type: Lithium-ion
Number of cells and
energy content accord-
ing to manufacturer's
specification.
Number of cells: 110
Energy content: 891 Wh
Capacity to
IEC EN 61960: 23.7 Ah
Weight: 15.7 lbs
(7.1 kg)
AL 300
– up to 80% capacity: 190 min
– up to 100% capacity: 250 min

AR 900
English
17
either as a complete tool or the battery,
requires compliance with all applicable
shipping regulations. Check with the
ground, vessel, air cargo or passenger
airline to determine if transport is
prohibited or subject to restrictions or
exemptions prior to shipping or travel.
Normally, no further conditions have to
be fulfilled by the user to transport
STIHL batteries by road to the power
tool’s operating site. Check and comply
with any special regulations that may
apply to your situation.
Contact your STIHL dealer for
information regarding special
accessories that may be available for
your product.
Special Accessories

AR 900
English
18
Troubleshooting
Always disconnect the battery from the power tool before performing any maintenance work.
Condition Cause Remedy
Power tool does not start after switch-on
No electrical contact between power
tool and battery
Remove adapter, check contacts and refit
adapter
Battery flat
(1 light emitting diode on battery
flashes green and four long beeps
sound)
Charge the battery
Battery too hot / too cold
(1 light emitting diode on battery glows
red)
Allow battery to cool down / at temperatures
of about 59°F - 68°F (15°C - 20°C), allow
battery to warm up slowly
Malfunction in battery
(4 light emitting diodes on battery flash
red and a rapid succession of beeps
sound for several seconds)
Disconnect battery from power tool, take it
off your back, observe battery and contact
your STIHL servicing dealer immediately.
If the battery emits smoke, heats up, smells,
makes noises or shows signs of deforma-
tion, disconnect it from the power tool, take
it off your back, put it down and immediately
move a safe distance away. Keep children
and animals away from the work area. Keep
battery away from combustible materials.
Power tool too hot
(3 light emitting diodes on battery glow
red)
allow power tool to cool down
Electromagnetic problem or malfunc-
tion in machine
(3 light emitting diodes on battery flash
red)
Take the adapter out of the power tool and
refit it. Switch on the power tool – if the light
emitting diodes still flash, the power tool has
a malfunction and must be checked by a
STIHL servicing dealer.
Dampness in machine and / or battery Allow power tool / battery to dry

AR 900
English
19
Power tool shuts down during operation
Battery or machine's electronics too
warm
Take the adapter out of the power tool; allow
the battery and power tool to cool down
Electrical or electromagnetic
malfunction
Remove the adapter and refit it again
Malfunction in battery
(4 light emitting diodes on battery flash
red and a rapid succession of beeps
sound for several seconds)
Disconnect battery from power tool, take it
off your back, observe battery and contact
your STIHL servicing dealer immediately.
If the battery emits smoke, heats up, smells,
makes noises or shows signs of deforma-
tion, disconnect it from the power tool, take
it off your back, put it down and immediately
move a safe distance away. Keep children
and animals away from the work area. Keep
battery away from combustible materials.
Always disconnect the battery from the power tool before performing any maintenance work.
Condition Cause Remedy

AR 900
English
20
Running time is too short Battery not fully charged Charge the battery
Useful life of battery has been reached
or exceeded
Have battery checked and replaced by
STIHL servicing dealer
Rapid succession of beeps sound for sev-
eral seconds and 4 light emitting diodes on
battery flash red
Malfunction in battery Disconnect battery from power tool, take it
off your back, observe battery and contact
your STIHL servicing dealer immediately.
If the battery emits smoke, heats up, smells,
makes noises or shows signs of deforma-
tion, disconnect it from the power tool, take
it off your back, put it down and immediately
move a safe distance away. Keep children
and animals away from the work area. Keep
battery away from combustible materials.
Four long beeps sound and 1 light emitting
diode on battery flashes green
Battery flat Charge the battery
Adapter jams when being inserted in power
tool / charger
Guides dirty Carefully clean the guides
Battery is not being charged even though
LED on charger glows green
Battery too hot / too cold
(1 light emitting diode on battery glows
red)
Allow battery to cool down / at temperatures
of about 59°F - 68°F (15°C - 20°C), allow
battery to warm up slowly
Operate charger only in closed, dry rooms
at ambient temperatures of 41°F -
104°F (5°C - 40°C)
Light emitting diode on charger flashes red
No electrical contact between charger
and battery
Remove the adapter and refit it again
Malfunction in battery
(4 light emitting diodes on battery flash
red and a rapid succession of beeps
sound for several seconds)
Disconnect battery from charger, observe
battery and contact your STIHL servicing
dealer immediately.
If the battery emits smoke, heats up, smells,
makes noises or shows signs of deforma-
tion, disconnect it from the charger and
immediately move a safe distance away.
Keep children and animals away from the
work area. Keep battery away from combus-
tible materials.
Malfunction in charger Have charger checked by STIHL servicing
dealer.
Always disconnect the battery from the power tool before performing any maintenance work.
Condition Cause Remedy

AR 900
English
21
Users of this unit should carry out only
the maintenance operations described
in this manual. Other repair work may be
performed only by authorized STIHL
service shops.
Warranty claims following repairs can be
accepted only if the repair has been
performed by an authorized STIHL
servicing dealer using original STIHL
replacement parts.
Original STIHL parts can be identified by
the STIHL part number, the {
logo and, in some cases, by the STIHL
parts symbol K. The symbol may
appear alone on small parts.
Battery Recycling Information
STIHL is committed to the development
of products that are environmentally
responsible. This commitment does not
stop when the product leaves the STIHL
dealer. STIHL has partnered with the
RBRC (Rechargeable Battery Recycling
Corporation) to promote the collection
and recycling of spent STIHL lithium ion
batteries in the United States and
Canada. The RBRC seal can be found
on every STIHL rechargeable battery
and indicates that STIHL has prepaid for
recycling the battery. The seal has a toll
free phone number (1-800-822-8837)
that connects you to information on
battery recycling locations and
information on battery disposal bans or
restrictions in your area. You can also
return your spent battery to any STIHL
authorized servicing dealer for recycling
free of charge.
When disposing of batteries, observe all
federal, state and local disposal rules
and regulations.
Keep away from children. Do not
disassemble and do not dispose of in
fire.
STIHL products must not be thrown in
the garbage can. Take the product,
accessories and packaging to an
approved disposal site for environment-
friendly recycling.
Contact your STIHL servicing dealer for
the latest information on waste disposal.
Maintenance and Repairs Battery Recycling Disposal
000BA073 KN
AR 900
English
22
STIHL Registered Trademarks
STIHL®
{
K
The color combination orange-grey
(U.S. Registrations #2,821,860;
#3,010,057, #3,010,058, #3,400,477;
and #3,400,476)
4-MIX®
AUTOCUT®
EASYSTART®
FARM BOSS®
iCademy®
MAGNUM®
MasterWrench Service®
MotoMix®
OILOMATIC®
STIHL Cutquik®
STIHL DUROMATIC®
STIHL Quickstop®
STIHL ROLLOMATIC®
STIHL WOOD BOSS®
TIMBERSPORTS®
WOOD BOSS®
YARD BOSS®
Some of STIHL’s Common Law
Trademarks
BioPlus ™
Easy2Start ™
EasySpool ™
ElastoStart ™
Ematic ™
FixCut ™
HT Plus ™
IntelliCarb ™
Master Control Lever ™
Micro ™
Pro Mark ™
Quad Power ™
Quiet Line ™
STIHL Arctic ™
STIHL Compact ™
STIHL HomeScaper Series ™
STIHL Interchangeable Attachment
Series ™
STIHL M-Tronic ™
STIHL MiniBoss ™
STIHL MotoPlus 4 ™
STIHL Multi-Cut HomeScaper Series ™
STIHL OUTFITTERS ™
STIHL PICCO ™
STIHL PolyCut ™
STIHL PowerSweep ™
STIHL Precision Series ™
STIHL Protech ™
STIHL RAPID ™
STIHL SuperCut ™
STIHL Territory ™
TapAction ™
TrimCut ™
This listing of trademarks is subject to
change.
Any unauthorized use of these
trademarks without the express written
consent of
ANDREAS STIHL AG & Co. KG,
Waiblingen is strictly prohibited.
Trademarks
TM
STIHL
Injection

AR 900
English
23
STIHL Inc.
536 Viking Drive
P.O. Box 2015
Virginia Beach
VA 23452-2015
Addresses

Manual de instrucciones original Impreso en papel libre de cloro.
Las tintas contienen aceites vegetales, el papel es reciclable.
© ANDREAS STIHL AG & Co. KG, 2013
0458-420-8621-A. VA1.C13.
0000006357_002_EA
AR 900
español / EE.UU
24
{Este manual de instrucciones está protegido por derechos de propiedad intelectual. Todos los derechos reservados, especial-
mente los derechos de reproducción, traducción y procesamiento con sistemas electrónicos.
Contenido
Permita que solamente las personas
que comprendieron totalmente este
manual manipulen su batería de
mochila.
Es importante que lea, comprenda y
respete las precauciones de seguridad y
las instrucciones de uso y
mantenimiento incluidas en el capítulo
“Precauciones de seguridad y técnicas
de funcionamiento” antes de utilizar la
batería. Para obtener más información,
puede visitar el sitio www.stihlusa.com.
Comuníquese con su concesionario
STIHL o con el distribuidor STIHL de su
región si no entiende alguna de las
instrucciones incluidas en este manual.
ADVERTENCIA
Es necesario adoptar medidas
especiales de seguridad para reducir el
riesgo de lesiones. El uso descuidado o
inapropiado puede causar lesiones
graves e incluso la muerte.
Acerca de este manual de
instrucciones 25
Medidas de seguridad y técnicas
de manejo 25
Armado de la batería 29
Uso de la correa para hombro 31
Señal acústica 32
Carga de la batería 33
Diodos fotoemisores (LED) de la
batería 34
Diodos fotoemisores (LED) del
cargador 36
Conexión de la batería a la
herramienta eléctrica 36
Desconexión de la batería de la
herramienta eléctrica: 37
Información para mantenimiento 38
Componentes importantes 39
Especificaciones 40
Accesorios especiales 41
Localización de averías 42
Información de reparación 46
Reciclado de las baterías 46
Desecho 46
Marcas comerciales 47
Direcciones 48
AR 900
español / EE.UU
25
Pictogramas
Todos los pictogramas que se
encuentran fijados o grabados en la
máquina se muestran y explican en este
manual.
Símbolos en el texto
Muchas de las instrucciones de uso y
seguridad vienen acompañadas de
ilustraciones.
Los pasos individuales o
procedimientos descritos en el manual
pueden estar señalados en diferentes
maneras:
NSe usa un punto para denotar un
paso o procedimiento.
Una descripción de un paso o
procedimiento que se refiere
directamente a una ilustración puede
contener números de referencia que
aparecen en la ilustración. Ejemplo:
NSuelte el tornillo (1).
NPalanca (2) ...
Además de las instrucciones de uso, en
este manual pueden encontrarse
párrafos a los que usted debe prestar
atención especial. Tales párrafos están
marcados con los símbolos y las
palabras identificadoras que se
describen a continuación.
PELIGRO
Indica un riesgo inminente de lesiones
graves o mortales.
ADVERTENCIA
Identifica una situación de peligro que,
al no evitarse, puede resultar en
lesiones graves o mortales.
INDICACIÓN
Indica el riesgo de daños a la propiedad,
incluyendo a la máquina o sus
componentes.
Mejoramientos técnicos
La filosofía de STIHL es mejorar
continuamente todos sus productos.
Como resultado de ello, periódicamente
se introducen cambios de diseño y
mejoras. Por lo tanto, es posible que
algunos cambios, modificaciones y
mejoras no se describen en este
manual. Si las características de
funcionamiento o la apariencia de su
máquina difieren de las descritas en
este manual, comuníquese con el
concesionario STIHL para obtener la
ayuda que requiera. ADVERTENCIA
Use la batería STIHL solamente con
herramientas eléctricas STIHL y
cárguela únicamente con cargadores
STIHL. No use la batería para otros
fines debido a que puede causar
accidentes y lesiones.
La batería está recomendada para
usarla con las siguientes herramientas
eléctricas y cargadores STIHL:
Acerca de este manual de
instrucciones Medidas de seguridad y
técnicas de manejo
Es importante que tenga
en cuenta los siguientes
datos y advertencias.
Es importante que lea,
comprenda totalmente y
respete las siguientes
advertencias y medidas
de seguridad. Lea el
manual de instrucciones
y las precauciones de
seguridad
periódicamente. El uso
descuidado o inadecuado
puede causar lesiones
graves o incluso la
muerte. Siempre lea y
respete el manual de ins-
trucciones de la
herramienta STIHL accio-
nada por esta batería.

AR 900
español / EE.UU
26
MSA 160 C STIHL, MSA 200 C,
HSA 65, HSA 85, HSA 66, HSA 86,
HLA 65, BGA 85, FSA 65, FSA 85,
SPA 65
AL 300 STIHL
ADVERTENCIA
Solicite a su concesionario STIHL que lo
instruya en el funcionamiento de la
batería de mochila. Respete todas las
disposiciones, las reglas y las normas
de seguridad local vigentes.
ADVERTENCIA
Nunca preste ni alquile su batería sin
entregar el manual de instrucciones.
Asegúrese de que todas las personas
que usen la máquina comprendan la
información de este manual.
ADVERTENCIA
No debe usarse para otros propósitos
debido a que el uso indebido puede
causar lesiones personales o daños a la
propiedad, incluso daños a la batería.
ADVERTENCIA
Nunca se debe permitir a los niños que
usen esta batería de mochila. No se
debe permitir la proximidad de otras
personas, especialmente niños y
animales, en los lugares en los que se
esté usando la máquina.
El uso seguro de una batería atañe a
1. la batería
2. el uso de la batería.
LA BATERÍA
Para ver ilustraciones y definiciones de
la batería, consulte el capítulo “Piezas
principales”.
ADVERTENCIA
No la coloque sobre o cerca del fuego,
estufas u otros sitios con altas
temperaturas. No exponga la batería a
la luz solar directa cuando no esté en
uso ni la almacene en un vehículo en
climas calurosos. De lo contrario, la
batería puede generar calor, agrietarse
o incendiarse. Además, si usa la batería
de este modo, puede disminuir su
rendimiento y su vida útil.
En caso de incendio: Manténgase
alejado de los vapores y los gases,
teniendo en cuenta la dirección del
viento. Si es posible hacerlo sin
exponerse a ningún riesgo, retire la
batería de las inmediaciones del
incendio. En principio, es posible enfriar
la batería o extinguir un incendio con
agua. Es preferible extinguir los
incendios con un extinguidor universal
con agente químico seco. Para
cualquier tipo de incendio, evacue el
área y extinga el fuego desde una
distancia segura. Una vez apagado,
controle la zona (vigilancia contra
incendios) hasta que la batería se haya
enfriado lo suficiente para actuar en
caso de que el fuego vuelva a
encenderse. Comuníquese
inmediatamente con las autoridades
correspondientes para manipular la
máquina correctamente y desecharla
con seguridad. Restrinja el acceso al
área hasta terminar de limpiar. No toque
la batería quemada ni ningún líquido
derramado. Use un absorbente inerte
para absorber los líquidos derramados.
Proteja la batería de la luz solar directa
cuando no esté en uso.
Interrumpa inmediatamente su uso si,
durante su uso, carga o
almacenamiento, la batería emana
humo, un olor inusual, está caliente al
tacto o tiene un aspecto anormal.
Cargue la batería antes de utilizarla.
Si cuatro diodos fotoemisores de la
batería destellan en rojo (consulte
“Diodos fotoemisores (LED) de la
batería”) y se activa una sucesión rápida
de pitidos breves durante varios
segundos (consulte “Señal acústica”), la
batería no está funcionando
correctamente. Desconéctela de la
herramienta eléctrica, quítesela de la
espalda, verifique su estado y
comuníquese inmediatamente con su
concesionario de servicio STIHL.
Riesgo de incendio,
explosión o quemadu-
ras, incluso aquellas
provocadas por produc-
tos químicos. No la
desarme, aplaste,
caliente a una tempera-
tura superior a 100 °C
(212 °F), exponga al
fuego ni la incinere.
Nunca la exponga a
microondas o altas
presiones.
Use y almacene la
batería únicamente a un
intervalo de temperatura
de -10 °C (14 °F) a un
máximo de 50 °C
(122 °F).
AR 900
español / EE.UU
27
ADVERTENCIA
Si la batería emite humo, se calienta,
emana olor, hace ruidos o presenta
indicios de deformación, desconéctela
de la herramienta eléctrica, quítesela de
la espalda, apóyela en el suelo y
desplácese inmediatamente a una
distancia prudente. Mantenga a los
niños y a los animales alejados de la
zona de trabajo. Mantenga la batería
alejada de materiales combustibles.
Utilice la batería únicamente con el
arnés provisto. No se debe combinar
con ninguna otra correa de transporte
(p. ej., correa para hombros, arnés
completo, etc.).
No coloque ni cuelgue la batería en una
posición elevada (p. ej., ramas) debido a
que podría caerse.
No se siente ni se pare sobre la batería.
Nunca coloque objetos sobre la batería.
No apile varias baterías una sobre la
otra.
ADVERTENCIA
No cargue ni use baterías defectuosas,
dañadas ni deformadas. No abra, deje
caer, golpee ni dañe la batería. La
batería tiene características y
dispositivos de seguridad que, en caso
de dañarse, pueden provocar que esta
genere calor, se agriete o se incendie.
Nunca inserte objetos en las ranuras de
enfriamiento del adaptador que conecta
la batería a la herramienta eléctrica.
Inspeccione a intervalos regulares para
verificar que no haya daños en el
adaptador, sus contactos y el cable. Si
detecta algún daño, comuníquese con
su concesionario de servicio STIHL. No
continúe usando ni cargando baterías,
cables o adaptadores averiados,
dañados, agrietados o deformados.
Nunca genere un puente entre los
contactos del adaptador y otros objetos
metálicos (cortocircuito). La batería
podría dañarse debido a un
cortocircuito. Mantenga las baterías en
desuso alejadas de objetos metálicos
(p. ej., clavos, monedas, joyas). No
emplee recipientes metálicos para
transportar baterías.
ADVERTENCIA
Puede haber fuga de líquido si la batería
está dañada o se utiliza
incorrectamente. Evite el contacto con la
piel. El líquido que se fuga de la batería
puede irritar la piel y causar
quemaduras. En caso de contacto
accidental, lave la zona afectada de la
piel con abundante agua y jabón. Si el
líquido penetra en los ojos, no los
restriegue; láveselos con abundante
agua durante al menos 15 minutos.
También debe consultar con un médico.
Accesorios y repuestos
Use únicamente piezas y accesorios
aprobados expresamente por STIHL
para esta batería. En caso de consultas,
comuníquese con su concesionario de
servicio STIHL.
STIHL recomienda el uso de piezas y
accesorios de repuesto originales
STIHL. Se diseñaron específicamente
para el producto y cumplen con las
exigencias de rendimiento.
EL USO DE LA BATERÍA
Traslado de la batería
Desconecte la batería de la herramienta
eléctrica, incluso al trasladarla por
distancias reducidas. De este modo, se
evita el riesgo de encender la máquina
involuntariamente.
Tome la batería de la manija o cárguela
en la espalda.
En vehículos: Sujete correctamente la
batería para impedir que se caiga y se
dañe.
ADVERTENCIA
Se deben adoptar precauciones
especiales al transportar una batería
dañada o averiada. Para disminuir el
riesgo de accidentes, siempre
comuníquese con su concesionario de
servicio STIHL antes de transportar una
batería en esas condiciones.
Protéjala de la lluvia. No
la sumerja en líquidos.
4865BA002 KN

AR 900
español / EE.UU
28
Limpieza de la batería
Siempre limpie el polvo y la tierra de la
batería. No use disolventes de grasa
para este propósito.
Limpie las superficies de plástico con un
trapo. No use detergentes abrasivos.
Estos pueden dañar el plástico.
No rocíe agua sobre la batería.
No utilice una lavadora a presión para
limpiar la batería. Un chorro fuerte de
agua puede dañar las piezas de la
batería y causar averías.
Almacenamiento de la batería
Desconecte la batería de la herramienta
eléctrica o del cargador.
Cuando la máquina esté en desuso,
almacénela en un lugar seguro de modo
que las demás personas no estén en
riesgo. Adopte las medidas necesarias
para proteger la máquina contra el uso
no autorizado.
Almacene la batería fuera del alcance
de los niños.
Almacénela en un recinto cerrado, seco
y bajo llave. Protéjala de la suciedad y
cualquier daño.
Para garantizar la máxima vida útil de la
batería: Almacénela con
aproximadamente un 30% de carga.
No almacene baterías sin usar. Alterne
su uso.
Notas sobre el cable
Inspeccione el adaptador, su cable y su
enchufe para verificar que no presenten
indicios de daño. Nunca use
adaptadores, cables o enchufes
dañados.
Asegúrese de que el aislamiento del
cable y del enchufe esté en buen
estado.
Estire los cables enroscados antes de
usarlos.
El cable debe ubicarse de modo que el
accesorio de corte o trabajo de la
herramienta eléctrica que está usando
no entre en contacto con este ni le
cause daños.
No pele, aplaste ni dañe el cable, y
tampoco tire de este. Protéjalo del calor,
el aceite y los bordes afilados.
No use el cable para otros fines, p. ej.,
para trasladar o colgar la batería o
herramienta eléctrica. No tire del cable.
Ubique el cable de modo que no ponga
en peligro a otras personas (riesgo de
tropezarse o caerse).
Notas sobre el funcionamiento
–al llevar a cabo pruebas y tareas de
ajuste o limpieza
–antes de trabajar con el accesorio
de corte o trabajo de la herramienta
eléctrica
–antes de dejar la máquina
desatendida
–al transportarla
–al almacenar la máquina
–al llevar a cabo tareas de reparación
o mantenimiento
–en caso de averías o emergencias
De este modo, se evita el riesgo de
encender la máquina involuntariamente.
Antes de empezar a trabajar
Verifique que la batería esté en buen
estado (consulte los capítulos
correspondientes en el manual de
instrucciones).
–Inspeccione el estado de las piezas
de la caja.
–Inspeccione el estado de las
correas.
–Verifique que el cable, el enchufe y
el adaptador no estén dañados.
–Presione el pulsador para activar la
pantalla de LED (consulte el
capítulo “Diodos fotoemisores
(LED) de la batería”).
–La señal acústica debe activarse al
soltar el pulsador.
No continúe usando la batería si alguna
pieza de la caja o las correas están
desgastadas, agrietadas o dañadas
(comuníquese con un concesionario de
servicio STIHL).
Para reducir el riesgo de lesiones, use la
batería únicamente si está en buen
estado de funcionamiento.
No use la batería si uno de sus
componentes está dañado.
En situaciones de emergencia:
Practique para abrir rápidamente el
sujetador de la correa para cintura,
aflojar las correas para hombros y
apoyar la batería en el suelo. Para evitar
daños, no deje caer la batería al suelo
cuando esté practicando.
Desconecte la batería de
la herramienta eléctrica:
AR 900
español / EE.UU
29
Durante el funcionamiento
ADVERTENCIA
La batería dispone de una señal
acústica y otra visual. Su capacidad
para oír la señal acústica puede verse
disminuida si usa protectores para
oídos.
La batería se lleva como una mochila.
La batería se diseñó para ser usada por
una sola persona. No deje que otras
personas estén en el lugar de trabajo.
Asegúrese de estar siempre en
equilibrio y de tener los pies firmemente
apoyados.
Nunca trabaje con la batería en árboles,
techos ni en escaleras o soportes
inseguros.
Verifique que el cable no se pueda
enredar ni enganchar con otros objetos.
Ubíquelo y sujételo cuidadosamente
antes de iniciar el trabajo.
Si la batería se somete a cargas
excesivas para las cuales no fue
diseñada (p. ej., impactos o caídas
considerables), siempre asegúrese de
que esté en buen estado antes de seguir
trabajando (consulte también “Antes de
empezar a trabajar”). No siga operando
la batería si está dañada. En caso de
consultas, comuníquese con su
concesionario de servicio STIHL.
Después de completar el trabajo
Limpie la batería (consulte “Limpieza de
la batería”).
Conexión del adaptador
NRetire la cubierta (1): presione las
lengüetas (flechas) hacia adentro y
empuje la cubierta hacia arriba.
NInstale el enchufe (2) en el
tomacorrientes (3): alinee las
orejetas del enchufe con las
ranuras del tomacorrientes.
4865BA001 KN
Armado de la batería
4865BA003 KN
2
3
4865BA004 KN
AR 900
español / EE.UU
30
NEmpuje el enchufe hasta el fondo
del tomacorrientes. A continuación,
gírelo en sentido horario hasta que
se oiga el encastre del pestillo (4)
del enchufe.
NInstale el cable (5) en el conducto
de cable (6) de la caja (consulte
también “Ubicación del cable”).
NEncastre la cubierta (1) en su lugar
y verifique que el cable esté
correctamente asentado en el
conducto y que no quede
aprisionado.
Ubicación del cable
El cable se puede colocar en diferentes
conductos de cable.
Si la herramienta eléctrica que se usa
con esta batería:
Nestá al lado o detrás de su cuerpo,
coloque el cable (1) en uno de los
conductos de cable laterales (2) y
empújelo hasta encastarlo en su
lugar.
Nestá delante de su cuerpo, coloque
el cable (1) en uno de los conductos
de cable superiores (2) y empújelo
hasta encastrarlo en su lugar.
Siempre use los tomacorrientes del
cable del lado desde el cual se sostiene
y manipula la herramienta eléctrica.
ADVERTENCIA
Para disminuir el riesgo de accidentes,
nunca ubique el cable en posición
diagonal debido a que podría
engancharse con otros objetos.
NSi el cable es muy largo, sujételo en
el retenedor de la bolsa.
4
6
4865BA021 KN
5
4865BA023 KN
4865BA005 KN
22
1
1
2
4865BA022 KN
4865BA006 KN
AR 900
español / EE.UU
31
Ajuste de las correas del arnés
ATire de los extremos de las correas
hacia abajo para apretar el arnés.
BLevante las lengüetas de las
hebillas de ajuste para aflojar las
correas.
CCierre y bloquee el accesorio de
liberación rápida; para ello,
presiónelo.
DApriete los ganchos para abrir el
accesorio de liberación rápida.
Colóquese la correa para hombros.
NAjuste y acomode la correa para
cintura (1) de modo que quede
cómodamente apoyada a la altura
de las caderas. Inserte el extremo
de la correa en la trabilla (2); no
permita que quede colgando.
NAjuste las correas del arnés (3)
hasta alcanzar la longitud correcta.
NRegule la correa para pecho (4) a
fin de corregir la longitud y ajústela.
NSi usa los conductos de cable
superiores (consulte “Ubicación del
cable”), inserte el cable a través de
los accesorios de enganche y de la
trabilla (5).
La almohadilla lumbar debe quedar
firmemente apoyada contra la espalda.
Uso de la correa para
hombro
4865BA007 KN
AB
C
D
4865BA027 KN
5
4
1
4865BA009 KN
2
3 3
5
55
AR 900
español / EE.UU
32
Retiro del arnés
NAbra los accesorios de liberación
rápida en la correa para cintura y la
correa para pecho.
NAfloje las correas del arnés; para
ello, levante las hebillas deslizantes
de ajuste y, a continuación, quite la
batería.
Eliminación de la máquina
ADVERTENCIA
Es necesario desechar rápidamente la
batería en caso de peligro inminente. La
correa para cintura y la correa para
pecho deben abrirse antes de apoyar la
batería en el suelo.
Bolsa
Permite guardar el adaptador durante
los descansos y después de terminar la
tarea.
Sujete la bolsa (1) a la correa para
cintura solamente en las posiciones
indicadas.
NSujete la bolsa a la correa para
cintura.
NInserte el adaptador (2).
NCierre el accesorio de enganche y
la trabilla (3). El adaptador queda
sujeto a la bolsa.
ADVERTENCIA
Nunca transporte objetos metálicos,
puntiagudos o filosos en la bolsa. Estos
pueden generar un puente entre los
contactos del adaptador y causar un
cortocircuito.
La batería emite señales acústicas y
visuales (consulte “Diodos fotoemisores
(LED) de la batería”).
4865BA010 KN
1
3
4865BA011 KN
2
Señal acústica
A Un pitido breve
Esta señal se activa al presionar y
soltar el botón de la batería (con-
sulte “Piezas principales”).
Significado: La señal acústica fun-
ciona como debe hacerlo.
B Cuatro pitidos largos
Un LED de la batería destella en
verde.
Significado: La batería tiene poca
carga; recárguela.
C Sucesión rápida de pitidos breves 1)
Cuatro LED de la batería destellan
en rojo.
Significado: Batería averiada (con-
sulte “Localización y resolución de
averías”).
1) La señal se detiene
automáticamente al cabo de unos
segundos.
4865BA024 KN
A
B
C.......
AR 900
español / EE.UU
33
Una batería de fábrica nueva no está
completamente cargada.
Recomendación: Cargue
completamente la batería antes de
usarla con la herramienta eléctrica por
primera vez.
NConecte el cargador al suministro
de energía eléctrica (el voltaje de la
red y el voltaje de funcionamiento
del cargador deben ser idénticos).
Consulte “Conexión del cargador al
suministro de energía eléctrica”.
Use el cargador solamente en recintos
cerrados y secos, a una temperatura
ambiente de 5 °C a 40 °C (41 °F a
104 °F).
NInserte el adaptador (1) en el
cargador (2) hasta que perciba una
resistencia; a continuación,
empújelo hasta el fondo.
El diodo fotoemisor (3) del cargador se
enciende cuando se inserta el
adaptador (consulte “Diodos
fotoemisores (LED) del cargador”).
La batería comienza a cargarse cuando
los diodos fotoemisores (4) de la batería
se encienden en verde (consulte
“Diodos fotoemisores (LED) de la
batería”).
El tiempo de carga depende de varios
factores, incluso el estado de la batería,
la temperatura ambiente, etc.; por lo
tanto, pueden variar con respecto al
tiempo de carga indicado en
“Especificaciones”.
La batería se calienta durante el
funcionamiento. Si se instala una
batería caliente en el cargador, es
posible que deba enfriarse antes de
cargarla. El proceso de carga comienza
únicamente cuando la batería está fría.
El tiempo que la batería necesita para
enfriarse puede prolongar el tiempo de
carga.
Cargador AL 300
El cargador está equipado con un
ventilador que emite un sonido cuando
está funcionando.
Culminación del proceso de carga
El cargador se apaga automáticamente
cuando la batería está completamente
cargada:
–Los diodos fotoemisores de la
batería se apagan.
–El diodo fotoemisor del cargador se
apaga.
–El ventilador del cargador se apaga.
Retire el adaptador del cargador.
Carga de la batería
2
4865BA012 KN
4
3
4865BA013 KN
AR 900
español / EE.UU
34
Los diodos fotoemisores indican el
estado de carga de la batería y cualquier
problema que pudiera presentarse en
esta o en la herramienta eléctrica usada.
NPresione el botón (1) para activar
los diodos fotoemisores. La pantalla
se apaga automáticamente al cabo
de 5 segundos.
–La señal acústica debe activarse
brevemente al soltar el botón (para
confirmar la función) (consulte
también “Señal acústica”).
Los diodos fotoemisores pueden
encenderse o destellar en verde o rojo.
Durante el proceso de carga
Los diodos fotoemisores se encienden
continuamente o destellan para indicar
el progreso de la carga.
Un diodo fotoemisor que destella en
verde indica la capacidad que
actualmente se está cargando.
Los diodos fotoemisores de la batería se
apagan automáticamente cuando se
completa el proceso de carga.
Si los diodos fotoemisores de la batería
destellan o se encienden en rojo,
consulte “Si los diodos fotoemisores
rojos se encienden
continuamente/destellan”.
Durante el funcionamiento
Los diodos fotoemisores verdes se
encienden continuamente o destellan
para indicar el estado de la carga.
Si la batería está casi completamente
descargada y el último LED comienza a
destellar, se activan cuatro señales
sonoras largas (consulte “Señal
acústica”).
Si los diodos fotoemisores de la batería
destellan o se encienden en rojo,
consulte “Si los diodos fotoemisores
rojos se encienden
continuamente/destellan”).
Diodos fotoemisores (LED)
de la batería
El diodo fotoemisor se enciende
en verde continuamente.
El diodo fotoemisor destella en
verde.
El diodo fotoemisor se enciende
en rojo continuamente.
El diodo fotoemisor destella en
rojo.
4865BA025 KN
1
AR 900 Lithium-Ion
4865BA015 KN
0 %
100 %
100 %
4865BA016 KN
0 %
AR 900
español / EE.UU
35
Si los diodos fotoemisores rojos se
encienden continuamente/destellan
4865BA025 KN
A
B
C
D
AUn diodo
fotoemisor se
enciende
continua-
mente en
rojo:
La batería está muy
caliente1) 2)/ fría1)
1) Durante el proceso de carga: El
proceso de carga se inicia
automáticamente una vez que la
batería se haya enfriado/calentado.
2) Durante el funcionamiento: La
herramienta eléctrica se apaga
automáticamente. Espere un
momento hasta que la batería se
enfríe.
BCuatro diodo
s fotoemiso-
res destellan
en rojo
Batería averiada 3)
CTres diodos
fotoemisores
se iluminan
continua-
mente en
rojo:
La herramienta
eléctrica está muy
caliente. Espere un
momento hasta que
se enfríe.
DTres diodos
fotoemisores
destellan en
rojo:
Herramienta
eléctrica averiada 4)
3) Problema electromagnético o
avería. La señal acústica se puede
oír en una serie rápida de sonidos
que duran varios segundos
(consulte también “Señal
acústica”). Desconecte la batería
de la herramienta eléctrica,
quítesela de la espalda,
inspecciónela y comuníquese
inmediatamente con su
concesionario de servicio STIHL
(consulte también “Localización y
resolución de averías”).
4) Problema electromagnético o
avería. Retire el adaptador de la
herramienta eléctrica y vuelva a
instalarlo en su lugar. Encienda la
herramienta eléctrica. Si los diodos
fotoemisores continúan
destellando, la herramienta
eléctrica está averiada y un
concesionario de servicio STIHL
debe inspeccionarla.
AR 900
español / EE.UU
36
El diodo fotoemisor (1) del cargador se
enciende continuamente en verde o
destella en rojo.
Una luz verde continua...
...significa lo siguiente:
La batería
–se está cargando
–está muy caliente y debe enfriarse
antes de cargarse
Consulte también “Diodos fotoemisores
(LED) de la batería”.
El diodo fotoemisor verde del cargador
se apaga cuando la batería está
completamente cargada.
Una luz roja destellante...
...significa lo siguiente:
–No hay contacto eléctrico entre la
batería y el cargador. Retire el
adaptador y vuelva a instalarlo.
–Batería averiada (consulte también
“Diodos fotoemisores (LED) de la
batería”).
–Cargador averiado (solicite al
concesionario que inspeccione la
batería). STIHL recomienda
comunicarse con un concesionario
de servicio STIHL autorizado.
Una batería de fábrica nueva no está
completamente cargada.
Recomendación: Cargue
completamente la batería antes de
usarla por primera vez.
NDe ser necesario, retire la cubierta
del compartimiento de la batería de
la herramienta eléctrica antes de
instalar el adaptador, es decir,
presione las dos palancas de
bloqueo para desbloquear y retirar
la cubierta.
Inserte el adaptador
NInserte el adaptador (1) en la
herramienta eléctrica. El adaptador
se desliza en el compartimiento.
Presiónelo cuidadosamente hacia
Diodos fotoemisores (LED)
del cargador
1
3901BA019 KN
Conexión de la batería a la
herramienta eléctrica
4865BA018 KN
AR 900
español / EE.UU
37
abajo hasta que encaje en su lugar.
El adaptador debe quedar a ras con
la parte superior de la caja.
Ahora, la batería y la herramienta
eléctrica están conectadas entre sí.
Para obtener más información acerca
del encendido y el funcionamiento de la
herramienta eléctrica, consulte el
manual de instrucciones de la
herramienta eléctrica que está usando
con esta batería.
NApague la herramienta eléctrica
(consulte también el manual de
instrucciones de la herramienta
eléctrica que está usando).
NPresione simultáneamente las dos
palancas de bloqueo (1) para
desbloquear el adaptador.
NExtraiga el adaptador (2) de la
herramienta eléctrica.
Ahora, la batería y la herramienta
eléctrica están desconectadas.
Desconexión de la batería de
la herramienta eléctrica:
1
1
4865BA019 KN
2

AR 900
español / EE.UU
38
Información para mantenimiento
Los intervalos que se indican a continuación corresponden únicamente a condicio-
nes normales de funcionamiento. Si la jornada diaria es más prolongada que lo
normal, o bien si las condiciones son extremas (zonas con demasiado polvo, etc.),
acorte apropiadamente los intervalos indicados.
Siempre desconecte la batería de la herramienta eléctrica antes de llevar a cabo
tareas en ella.
antes de comenzar el trabajo
después de completar el tra-
bajo o diariamente
semanalmente
mensualmente
cada 12 meses
si hay problemas
si presenta daños
si se requiere
Batería Inspección visual XXXX
Limpiar X
Diodos fotoemisores (LED)
Verificar el funcionamiento: la pantalla
de LED se debe activar al presionar el
botón
XX
Señal acústica
Verificar el funcionamiento: debe acti-
varse una señal sonora breve al soltar el
botón
XX
Adaptador y cable Inspección visual XXX
Etiquetas de seguridad Reemplazar X
AR 900
español / EE.UU
39
1Batería
2Diodos fotoemisores (LED) de la
batería
3Pulsador
4Cubierta
5Manija de transporte
6Correas para hombros
7Sujetadores de Velcro
8Correa para pecho
9Correa para cadera/cintura
10 Bolsa
11 Cable
12 Adaptador
#Número de serie
Componentes importantes
8
77
7
7
#
4865BA020 KN
1
2
3
4
9
5
10
6
6
12
11
AR 900
español / EE.UU
40
Definiciones
1. Batería
Suministra energía eléctrica al
motor de la herramienta eléctrica
(que se usa con esta batería).
2. Diodos fotoemisores (LED) de la
batería
Indican el estado de la carga y la
condición de funcionamiento de la
batería.
3. Pulsador
Permite activar los diodos
fotoemisores (LED) de la batería y
verificar el funcionamiento de la
señal acústica.
4. Cubierta
Cubre y protege la conexión de
enchufe del adaptador.
5. Manija de transporte
Permite transportar la batería.
6. Correa para hombros
Permite transportar la batería
cómodamente sobre la espalda y
los hombros.
7. Sujetadores de Velcro
Permiten sujetar el cable utilizando
los conductos de cable superiores.
8. Correa para pecho
Garantiza una sujeción más firme
en la zona del pecho.
9. Correa para cadera/cintura
Permite transportar la batería
cómodamente en la
cadera/alrededor de la cintura.
10. Bolsa
Permite almacenar el adaptador
durante los descansos y después
de terminar el trabajo.
11. Cable
Transmite la corriente eléctrica de la
batería al adaptador.
12. Adaptador
Transmite la corriente eléctrica a la
herramienta eléctrica.
El tiempo de funcionamiento de la
herramienta eléctrica depende del
contenido energético de la batería.
Tiempos de carga
Transporte
Las baterías STIHL cumplen con los
requisitos descritos en el Manual-UN
ST/SG/AC.10/11/Rev.5/Parte III,
Subsección 38.3.
El transporte comercial por aire, agua y
tierra de celdas de ión de litio y baterías
está regulado. Esta batería está
Especificaciones
Tipo: Iones de litio
Cantidad de celdas y
contenido energético
según las especificacio-
nes del fabricante.
Cantidad de celdas: 110
Contenido energético: 891 Wh
Capacidad según
EN 61960 de la IEC: 23,7 Ah
Peso: 7,1 kg
(15,7 lb)
AL 300
hasta 80% de la
capacidad: 190/min
hasta 100% de la
capacidad: 250/min

AR 900
español / EE.UU
41
clasificada como un producto UN3091,
Clase 9 y grupo de envasado 2. Para
transportarla, ya sea como parte de la
herramienta completa o sola, es
necesario cumplir con todas las normas
de transporte correspondientes. Antes
del transporte o traslado, consulte con la
empresa de transporte por tierra o agua,
o bien con la aerolínea de carga o
pasajeros, para determinar si el
transporte está prohibido o sujeto a
restricciones o exenciones.
Por lo general, el usuario no necesita
cumplir con ninguna condición adicional
para poder transportar baterías STIHL
por carretera hasta el sitio donde se
encuentra la herramienta eléctrica.
Verifique y respete cualquier norma
especial que pudiera aplicarse a su
situación.
Comuníquese con su concesionario
STIHL para información acerca de
accesorios especiales que pueden estar
disponibles para su producto.
Accesorios especiales

AR 900
español / EE.UU
42
Localización de averías
Siempre desconecte la batería de la herramienta eléctrica antes de llevar a cabo tareas de mantenimiento.
Condición Causa Solución
La herramienta eléctrica
no se pone en marcha al
encenderla
No hay contacto eléctrico entre la herramienta
eléctrica y la batería.
Retire el adaptador, inspeccione los contactos y
vuelva a instalar el adaptador.
Batería descargada
(Un diodo fotoemisor de la batería destella en
verde y se activan cuatro pitidos largos)
Cargue la batería.
La batería está muy caliente/fría
(Un diodo fotoemisor de la batería se enciende
en rojo)
Permita que la batería se enfríe/alcance una tempera-
tura de aproximadamente 15 °C a 20 °C (59 °F a
68 °F) o permita que la batería se caliente lentamente.
Batería averiada
(Cuatro diodos fotoemisores de la batería des-
tellan en rojo y se activa una sucesión rápida de
pitidos durante varios segundos)
Desconecte la batería de la herramienta eléctrica,
quítesela de la espalda, inspecciónela y comuníquese
inmediatamente con su concesionario de servicio
STIHL.
Si la batería emite humo, se calienta, emana olor,
hace ruidos o parece estar deformada, desconéctela
de la herramienta eléctrica, quítesela de la espalda,
apóyela en el suelo y desplácese inmediatamente a
una distancia prudente. Mantenga a los niños y a los
animales alejados de la zona de trabajo. Mantenga la
batería alejada de materiales combustibles.
La herramienta eléctrica se calienta
excesivamente
(Tres diodos fotoemisores en la batería se
encienden en rojo)
Deje que la herramienta eléctrica se enfríe.
Problema electromagnético o avería en la
máquina
(Tres diodos fotoemisores de la batería deste-
llan en rojo)
Retire el adaptador de la herramienta eléctrica y
vuelva a instalarlo en su lugar. Encienda la herra-
mienta eléctrica. Si los diodos fotoemisores continúan
destellando, la herramienta eléctrica está averiada y
un concesionario de servicio STIHL debe
inspeccionarla.
Humedad en la máquina o en la batería Deje que la herramienta eléctrica/batería se seque.

AR 900
español / EE.UU
43
La herramienta eléctrica
se apaga durante el
funcionamiento
La batería o los circuitos electrónicos de la
máquina están excesivamente calientes.
Retire el adaptador de la herramienta eléctrica y deje
que ambos se enfríen.
Avería de tipo eléctrico o electromagnético Extraiga el adaptador y vuelva a instalarlo en su lugar.
Batería averiada
(Cuatro diodos fotoemisores de la batería des-
tellan en rojo y se activa una sucesión rápida de
pitidos durante varios segundos)
Desconecte la batería de la herramienta eléctrica,
quítesela de la espalda, inspecciónela y comuníquese
inmediatamente con su concesionario de servicio
STIHL.
Si la batería emite humo, se calienta, emana olor,
hace ruidos o parece estar deformada, desconéctela
de la herramienta eléctrica, quítesela de la espalda,
apóyela en el suelo y desplácese inmediatamente a
una distancia prudente. Mantenga a los niños y a los
animales alejados de la zona de trabajo. Mantenga la
batería alejada de materiales combustibles.
Siempre desconecte la batería de la herramienta eléctrica antes de llevar a cabo tareas de mantenimiento.
Condición Causa Solución

AR 900
español / EE.UU
44
El tiempo de funciona-
miento es muy breve
La batería no está completamente cargada. Cargue la batería.
Se alcanzó o se superó la vida útil de la batería. Solicite a un concesionario de servicio STIHL que ins-
peccione y sustituya la batería.
Se activa una sucesión
rápida de pitidos
durante varios segun-
dos y cuatro diodos
fotoemisores de la
batería destellan en rojo
Batería averiada Desconecte la batería de la herramienta eléctrica,
quítesela de la espalda, inspecciónela y comuníquese
inmediatamente con su concesionario de servicio
STIHL.
Si la batería emite humo, se calienta, emana olor,
hace ruidos o parece estar deformada, desconéctela
de la herramienta eléctrica, quítesela de la espalda,
apóyela en el suelo y desplácese inmediatamente a
una distancia prudente. Mantenga a los niños y a los
animales alejados de la zona de trabajo. Mantenga la
batería alejada de materiales combustibles.
Se activan cuatro pitidos
largos y un diodo fotoe-
misor de la batería
destella en verde
Batería descargada Cargue la batería.
El adaptador se atasca
al insertarlo en la herra-
mienta eléctrica/el
cargador
Las guías están sucias. Limpie las ranuras cuidadosamente.
La batería no se carga a
pesar de que el LED del
cargador se enciende
en verde
La batería está muy caliente/fría
(Un diodo fotoemisor de la batería se enciende
en rojo)
Permita que la batería se enfríe/alcance una tempera-
tura de aproximadamente 15 °C a 20 °C (59 °F a
68 °F) o permita que la batería se caliente lentamente.
Utilice el cargador únicamente en lugares cerrados y
secos a temperaturas de 5 °C a 40 °C (41 °F a
104 °F).
Siempre desconecte la batería de la herramienta eléctrica antes de llevar a cabo tareas de mantenimiento.
Condición Causa Solución

AR 900
español / EE.UU
45
El diodo fotoemisor del
cargador destella en
rojo
No hay contacto eléctrico entre el cargador y la
batería.
Retire el adaptador y vuelva a insertarlo en su lugar.
Batería averiada
(Cuatro diodos fotoemisores de la batería des-
tellan en rojo y se activa una sucesión rápida de
pitidos durante varios segundos)
Desconecte la batería del cargador, inspecciónela y
comuníquese inmediatamente con su concesionario
de servicio STIHL.
Si la batería emite humo, se calienta, emana olor,
hace ruidos o parece estar deformada, desconéctela
del cargador y desplácese inmediatamente a una dis-
tancia prudente. Mantenga a los niños y a los animales
alejados de la zona de trabajo. Mantenga la batería
alejada de materiales combustibles.
Cargador averiado Solicite al concesionario de servicio STIHL que ins-
peccione el cargador.
Siempre desconecte la batería de la herramienta eléctrica antes de llevar a cabo tareas de mantenimiento.
Condición Causa Solución
AR 900
español / EE.UU
46
Los usuarios de esta máquina deben
efectuar únicamente los trabajos de
mantenimiento descritos en este
manual. Solamente los talleres
autorizados por STIHL deben llevar a
cabo los demás trabajos de reparación.
Los reclamos de garantía presentados
después de realizadas las reparaciones
serán aceptados únicamente si las
mismas fueron ejecutadas por un
concesionario de servicio autorizado
STIHL utilizando piezas de repuesto
originales de STIHL.
Es posible identificar las piezas
originales de STIHL por el número de
pieza STIHL, el logotipo de {
y, en ciertos casos, el símbolo K de
piezas STIHL. En las piezas pequeñas
el símbolo puede aparecer solo.
Información sobre reciclado de baterías
STIHL está comprometida con el
desarrollo de productos que protejan el
medio ambiente. Este compromiso no
termina cuando el producto sale del
concesionario STIHL. STIHL se asoció
con la RBRC (Corporación de Reciclaje
de Baterías Recargables) para fomentar
la recolección y el reciclado de baterías
de ion de litio STIHL en los Estados
Unidos y Canadá. En todas las baterías
recargables STIHL se puede encontrar
el sello de la RBRC, que indica que la
empresa aportó dinero para financiar el
reciclado de dicha batería. El sello lleva
impreso un número telefónico gratuito
(1-800-822-8837) que le permite
acceder a información sobre lugares de
reciclaje de baterías y prohibiciones o
restricciones respecto del reciclado de
baterías en su zona. También puede
devolver las baterías a cualquier
concesionario STIHL autorizado para
reciclarlas gratuitamente.
Al desechar baterías, respete todas las
leyes y normas federales, estatales y
locales sobre eliminación de desechos.
Mantenga el producto alejado de los
niños. No desarme el producto ni lo
incinere.
Los aparatos STIHL no se deben arrojar
al basurero. Lleve el producto, los
accesorios y el embalaje a un vertedero
autorizado para reciclarlos y contribuir
con el cuidado del medio ambiente.
Comuníquese con un concesionario de
servicio STIHL para obtener la
información más actualizada acerca de
la eliminación de desechos.
Información de reparación Reciclado de las baterías Desecho
000BA073 KN

AR 900
español / EE.UU
47
Marcas registradas de STIHL
STIHL®
{
K
La combinación de colores anaranjado-
gris (Números de registro EE.UU.
2,821,860; 3,010,057, 3,010,058,
3,400,477; y 3,400,476)
4-MIX®
AUTOCUT®
EASYSTART®
FARM BOSS®
iCademy®
MAGNUM®
MasterWrench Service®
MotoMix®
OILOMATIC®
STIHL Cutquik®
STIHL DUROMATIC®
STIHL Quickstop®
STIHL ROLLOMATIC®
STIHL WOOD BOSS®
TIMBERSPORTS®
WOOD BOSS®
YARD BOSS®
Algunos de las marcas comerciales de
STIHL por ley común
BioPlus ™
Easy2Start ™
EasySpool ™
ElastoStart ™
Ematic ™
FixCut ™
HT Plus ™
IntelliCarb ™
Master Control Lever ™
Micro ™
Pro Mark ™
Quad Power ™
Quiet Line ™
STIHL Arctic ™
STIHL Compact ™
STIHL HomeScaper Series ™
STIHL Interchangeable Attachment
Series ™
STIHL M-Tronic ™
STIHL MiniBoss ™
STIHL MotoPlus 4 ™
STIHL Multi-Cut HomeScaper Series ™
Stihl Outfitters ™
STIHL PICCO ™
STIHL PolyCut ™
STIHL PowerSweep ™
STIHL Precision Series ™
STIHL Protech ™
STIHL RAPID ™
STIHL SuperCut ™
STIHL Territory ™
TapAction ™
TrimCut ™
Esta lista de marcas comerciales está
sujeta a cambios.
Queda terminantemente prohibido todo
uso de estas marcas comerciales sin el
consentimiento expreso por escrito de
ANDREAS STIHL AG & Co. KG,
Waiblingen.
Marcas comerciales
TM
STIHL
Injection

AR 900
español / EE.UU
48
STIHL Inc.
536 Viking Drive
P.O. Box 2015
Virginia Beach
VA 23452-2015 EE.UU.
Direcciones
www.stihl.com *04584208621A*
0458-420-8621-A
0458-420-8621-A
englisch / spanisch USA
G U
englisch / spanisch USA
U
WARNING
This product contains chemicals
known to the State of California to cause
cancer, birth defects
or other reproductive harm.
ADVERTENCIA
Este producto contiene sustancias químicas
consideradas por el Estado de California como
causantes de cáncer, defectos de nacimiento u
otra toxicidad reproductora.
