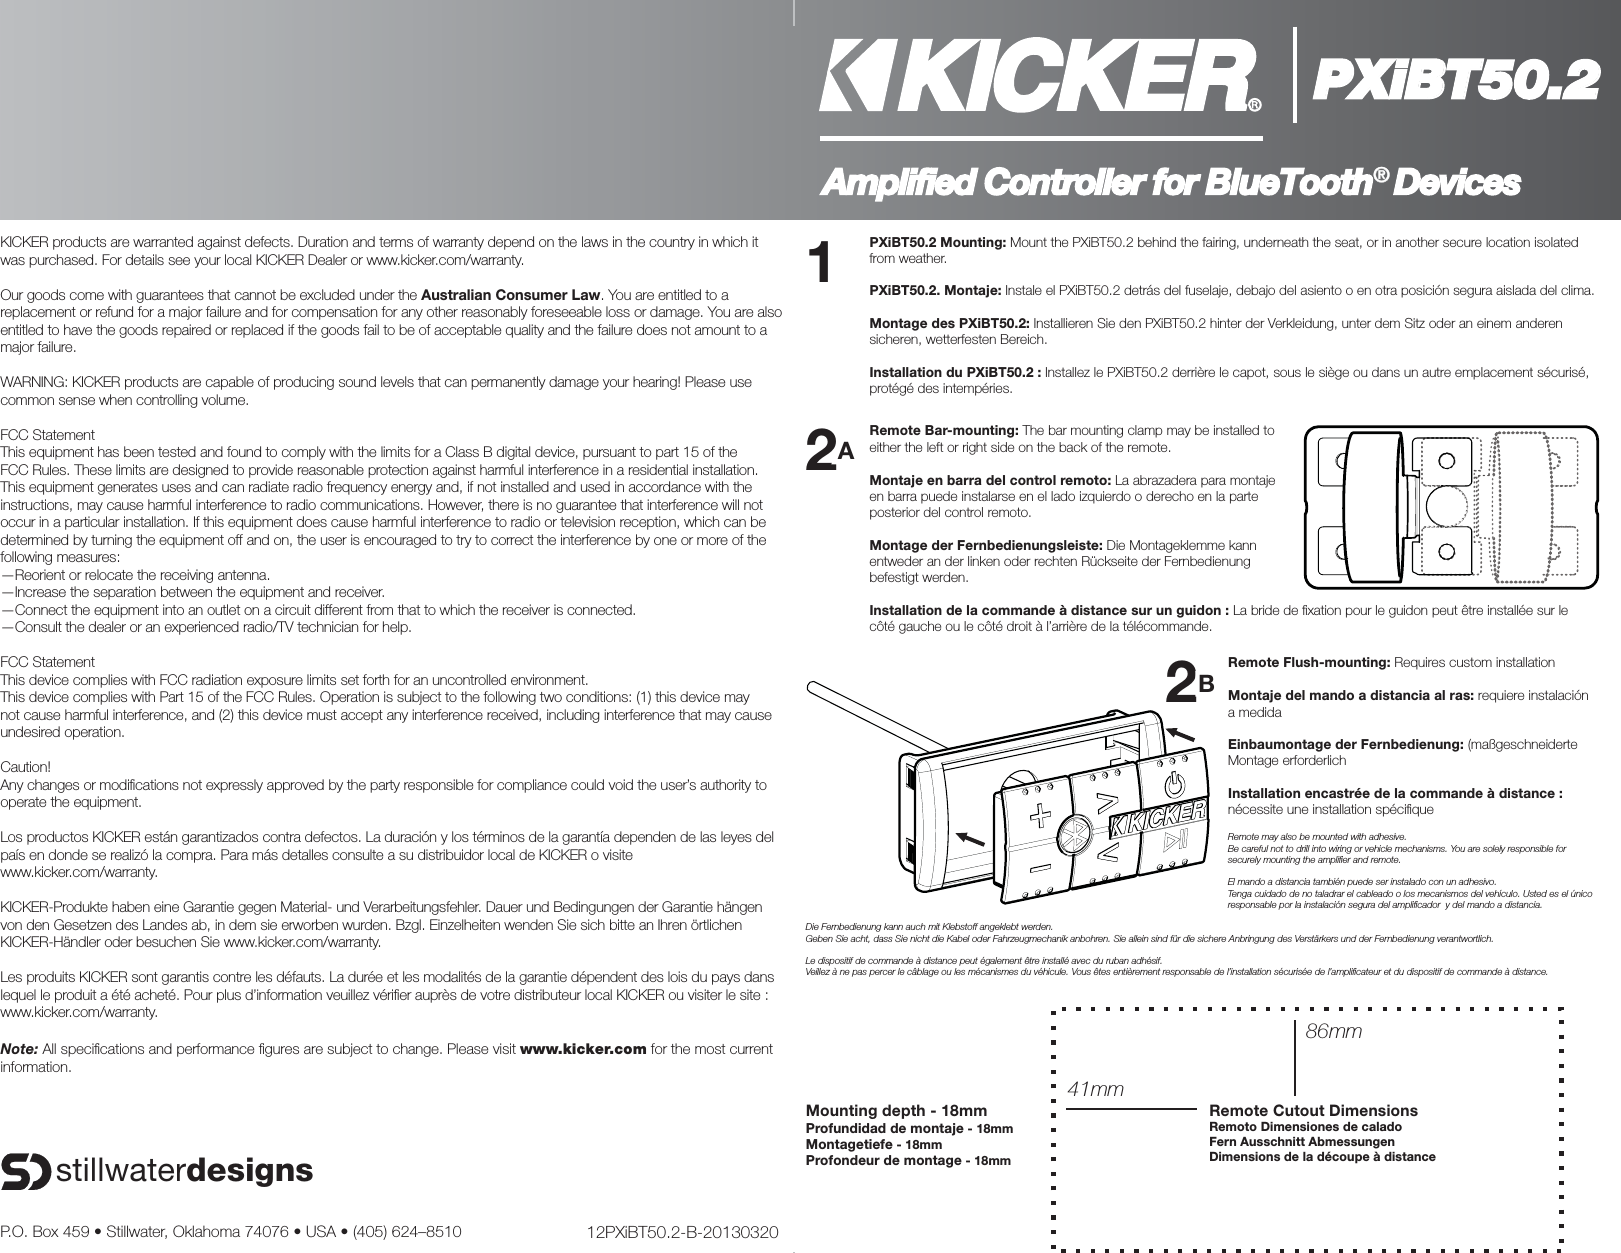
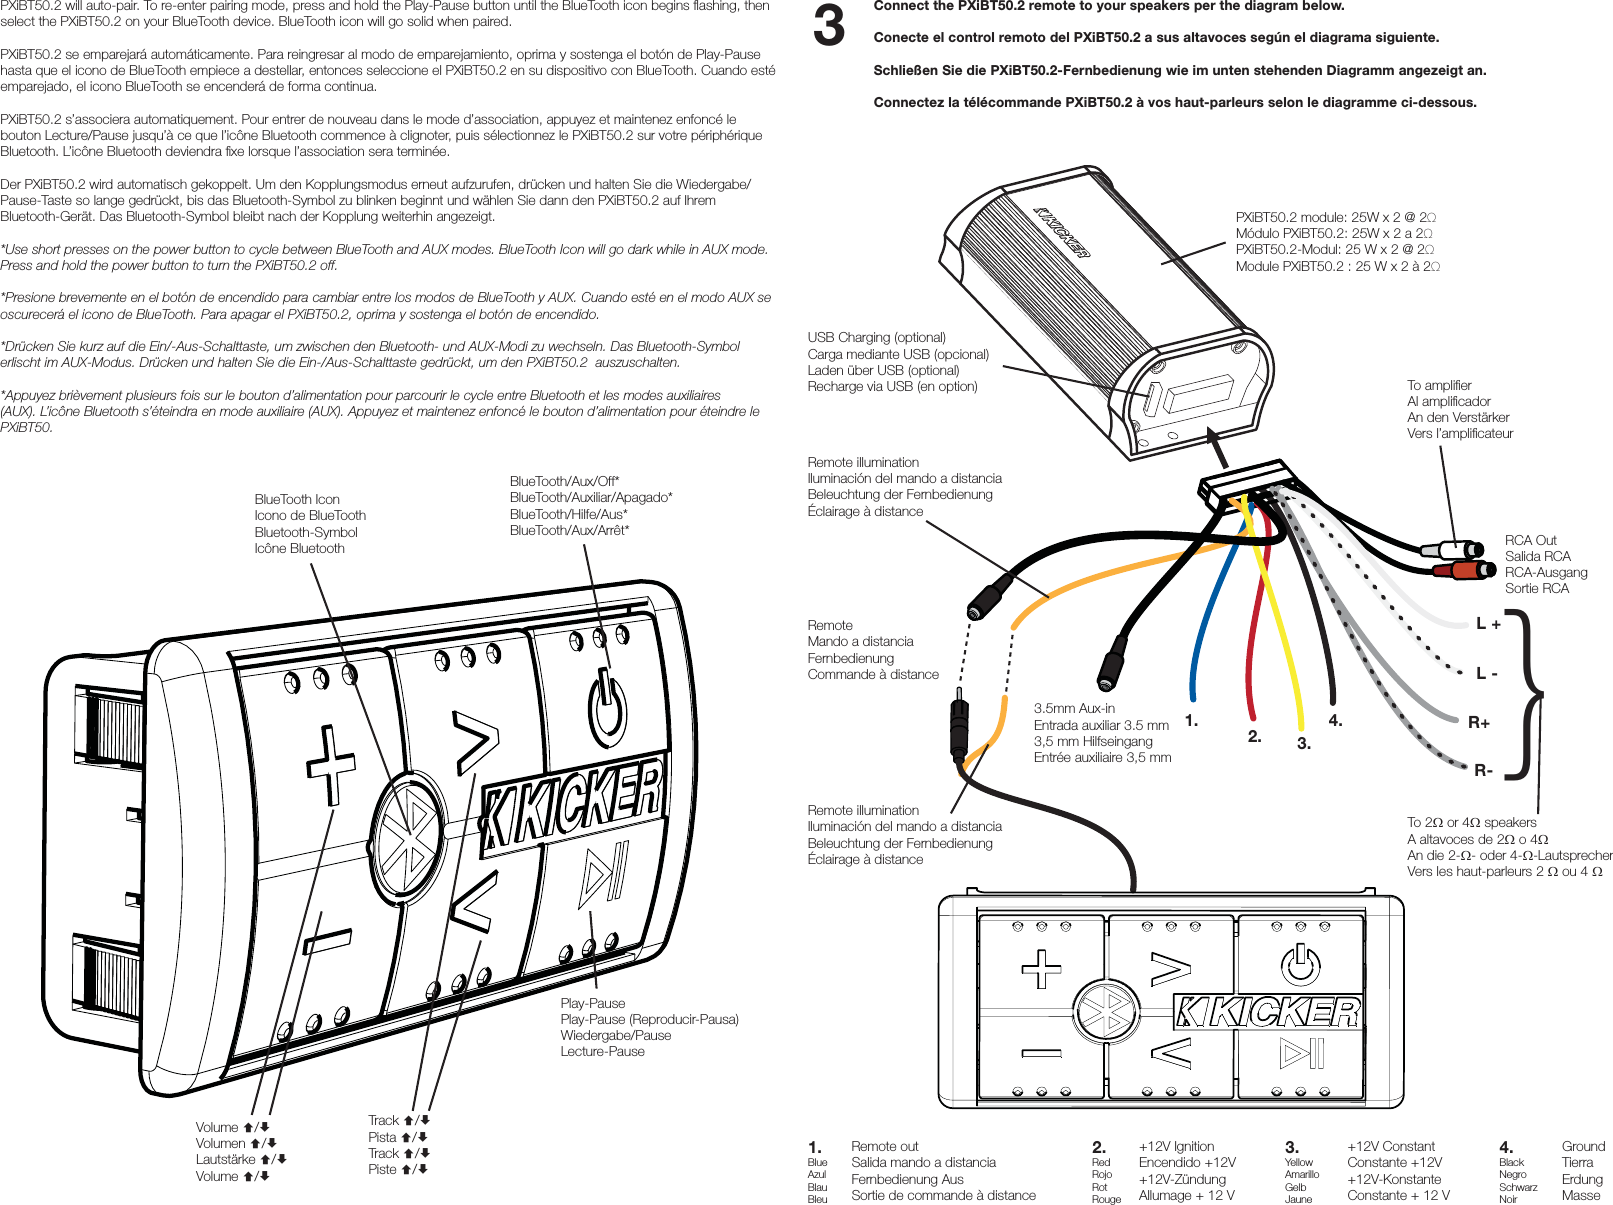
Stillwater Designs and Audio 40PXIBT502 Amplified Controller for BlueTooth Devices User Manual PXiBT Rev B indd

Stillwater Designs and Audio Inc. Amplified Controller for BlueTooth Devices PXiBT Rev B indd

User Manual

PXiBT50.2Amplified Controller for BlueTooth® DevicesPXiBT50.2 Mounting: Mount the PXiBT50.2 behind the fairing, underneath the seat, or in another secure location isolated from weather.PXiBT50.2. Montaje: Instale el PXiBT50.2 detrás del fuselaje, debajo del asiento o en otra posición segura aislada del clima.Montage des PXiBT50.2: Installieren Sie den PXiBT50.2 hinter der Verkleidung, unter dem Sitz oder an einem anderen sicheren, wetterfesten Bereich.Installation du PXiBT50.2 : Installez le PXiBT50.2 derrière le capot, sous le siège ou dans un autre emplacement sécurisé, protégé des intempéries.Remote Flush-mounting: Requires custom installationMontaje del mando a distancia al ras: requiere instalación a medidaEinbaumontage der Fernbedienung: (maßgeschneiderte Montage erforderlichInstallation encastrée de la commande à distance : nécessite une installation spécifi queRemote may also be mounted with adhesive.Be careful not to drill into wiring or vehicle mechanisms. You are solely responsible for securely mounting the amplifi er and remote.El mando a distancia también puede ser instalado con un adhesivo.Tenga cuidado de no taladrar el cableado o los mecanismos del vehículo. Usted es el único responsable por la instalación segura del amplifi cador  y del mando a distancia.Die Fernbedienung kann auch mit Klebstoff angeklebt werden.Geben Sie acht, dass Sie nicht die Kabel oder Fahrzeugmechanik anbohren. Sie allein sind für die sichere Anbringung des Verstärkers und der Fernbedienung verantwortlich.Le dispositif de commande à distance peut également être installé avec du ruban adhésif.Veillez à ne pas percer le câblage ou les mécanismes du véhicule. Vous êtes entièrement responsable de l’installation sécurisée de l’amplifi cateur et du dispositif de commande à distance.Remote Bar-mounting: The bar mounting clamp may be installed to either the left or right side on the back of the remote.Montaje en barra del control remoto: La abrazadera para montaje en barra puede instalarse en el lado izquierdo o derecho en la parte posterior del control remoto.Montage der Fernbedienungsleiste: Die Montageklemme kann entweder an der linken oder rechten Rückseite der Fernbedienung befestigt werden.Installation de la commande à distance sur un guidon : La bride de fi xation pour le guidon peut être installée sur le côté gauche ou le côté droit à l’arrière de la télécommande.Mounting depth - 18mmProfundidad de montaje - 18mmMontagetiefe - 18mmProfondeur de montage - 18mmRemote Cutout DimensionsRemoto Dimensiones de caladoFern Ausschnitt AbmessungenDimensions de la découpe à distance86mm41mmP.O. Box 459 • Stillwater, Oklahoma 74076 • USA • (405) 624–8510 12PXiBT50.2-B-20130320stillwaterdesignsKICKER products are warranted against defects. Duration and terms of warranty depend on the laws in the country in which it was purchased. For details see your local KICKER Dealer or www.kicker.com/warranty.Our goods come with guarantees that cannot be excluded under the Australian Consumer Law. You are entitled to a replacement or refund for a major failure and for compensation for any other reasonably foreseeable loss or damage. You are also entitled to have the goods repaired or replaced if the goods fail to be of acceptable quality and the failure does not amount to a major failure.WARNING: KICKER products are capable of producing sound levels that can permanently damage your hearing! Please use common sense when controlling volume.FCC StatementThis equipment has been tested and found to comply with the limits for a Class B digital device, pursuant to part 15 of the FCC Rules. These limits are designed to provide reasonable protection against harmful interference in a residential installation. This equipment generates uses and can radiate radio frequency energy and, if not installed and used in accordance with the instructions, may cause harmful interference to radio communications. However, there is no guarantee that interference will not occur in a particular installation. If this equipment does cause harmful interference to radio or television reception, which can be determined by turning the equipment off and on, the user is encouraged to try to correct the interference by one or more of the following measures: —Reorient or relocate the receiving antenna.—Increase the separation between the equipment and receiver. —Connect the equipment into an outlet on a circuit different from that to which the receiver is connected. —Consult the dealer or an experienced radio/TV technician for help. FCC StatementThis device complies with FCC radiation exposure limits set forth for an uncontrolled environment.This device complies with Part 15 of the FCC Rules. Operation is subject to the following two conditions: (1) this device may not cause harmful interference, and (2) this device must accept any interference received, including interference that may cause undesired operation.Caution!  Any changes or modifi cations not expressly approved by the party responsible for compliance could void the user’s authority to operate the equipment.Los productos KICKER están garantizados contra defectos. La duración y los términos de la garantía dependen de las leyes del país en donde se realizó la compra. Para más detalles consulte a su distribuidor local de KICKER o visite www.kicker.com/warranty.KICKER-Produkte haben eine Garantie gegen Material- und Verarbeitungsfehler. Dauer und Bedingungen der Garantie hängen von den Gesetzen des Landes ab, in dem sie erworben wurden. Bzgl. Einzelheiten wenden Sie sich bitte an Ihren örtlichen KICKER-Händler oder besuchen Sie www.kicker.com/warranty.Les produits KICKER sont garantis contre les défauts. La durée et les modalités de la garantie dépendent des lois du pays dans lequel le produit a été acheté. Pour plus d’information veuillez vérifi er auprès de votre distributeur local KICKER ou visiter le site : www.kicker.com/warranty.Note: All specifi cations and performance fi gures are subject to change. Please visit www.kicker.com for the most current information.22AA22BB11
Connect the PXiBT50.2 remote to your speakers per the diagram below.Conecte el control remoto del PXiBT50.2 a sus altavoces según el diagrama siguiente.Schließen Sie die PXiBT50.2-Fernbedienung wie im unten stehenden Diagramm angezeigt an.Connectez la télécommande PXiBT50.2 à vos haut-parleurs selon le diagramme ci-dessous.PXiBT50.2 module: 25W x 2 @ 2Ω Módulo PXiBT50.2: 25W x 2 a 2ΩPXiBT50.2-Modul: 25 W x 2 @ 2ΩModule PXiBT50.2 : 25 W x 2 à 2ΩTo 2 or 4 speakersA altavoces de 2 o 4An die 2-- oder 4--LautsprecherVers les haut-parleurs 2  ou 4 RemoteMando a distanciaFernbedienungCommande à distance+12V ConstantConstante +12V+12V-KonstanteConstante + 12 VGroundTierraErdungMasse+12V IgnitionEncendido +12V+12V-ZündungAllumage + 12 VRemote outSalida mando a distanciaFernbedienung AusSortie de commande à distanceL -Remote illuminationIluminación del mando a distanciaBeleuchtung der FernbedienungÉclairage à distanceRemote illuminationIluminación del mando a distanciaBeleuchtung der FernbedienungÉclairage à distanceRCA OutSalida RCARCA-AusgangSortie RCATo amplifi erAl amplifi cadorAn den VerstärkerVers l’amplifi cateurUSB Charging (optional)Carga mediante USB (opcional)Laden über USB (optional)Recharge via USB (en option)L +1.1.BlueAzulBlauBleu2.2.RedRojoRotRouge3.4.BlackNegroSchwarzNoir4.3.YellowAmarilloGelbJauneR+R-3.5mm Aux-inEntrada auxiliar 3.5 mm3,5 mm HilfseingangEntrée auxiliaire 3,5 mmPXiBT50.2 will auto-pair. To re-enter pairing mode, press and hold the Play-Pause button until the BlueTooth icon begins fl ashing, then select the PXiBT50.2 on your BlueTooth device. BlueTooth icon will go solid when paired.PXiBT50.2 se emparejará automáticamente. Para reingresar al modo de emparejamiento, oprima y sostenga el botón de Play-Pause hasta que el icono de BlueTooth empiece a destellar, entonces seleccione el PXiBT50.2 en su dispositivo con BlueTooth. Cuando esté emparejado, el icono BlueTooth se encenderá de forma continua.PXiBT50.2 s’associera automatiquement. Pour entrer de nouveau dans le mode d’association, appuyez et maintenez enfoncé le bouton Lecture/Pause jusqu’à ce que l’icône Bluetooth commence à clignoter, puis sélectionnez le PXiBT50.2 sur votre périphérique Bluetooth. L’icône Bluetooth deviendra fi xe lorsque l’association sera terminée.Der PXiBT50.2 wird automatisch gekoppelt. Um den Kopplungsmodus erneut aufzurufen, drücken und halten Sie die Wiedergabe/Pause-Taste so lange gedrückt, bis das Bluetooth-Symbol zu blinken beginnt und wählen Sie dann den PXiBT50.2 auf Ihrem Bluetooth-Gerät. Das Bluetooth-Symbol bleibt nach der Kopplung weiterhin angezeigt.*Use short presses on the power button to cycle between BlueTooth and AUX modes. BlueTooth Icon will go dark while in AUX mode. Press and hold the power button to turn the PXiBT50.2 off.*Presione brevemente en el botón de encendido para cambiar entre los modos de BlueTooth y AUX. Cuando esté en el modo AUX se oscurecerá el icono de BlueTooth. Para apagar el PXiBT50.2, oprima y sostenga el botón de encendido.*Drücken Sie kurz auf die Ein/-Aus-Schalttaste, um zwischen den Bluetooth- und AUX-Modi zu wechseln. Das Bluetooth-Symbol erlischt im AUX-Modus. Drücken und halten Sie die Ein-/Aus-Schalttaste gedrückt, um den PXiBT50.2  auszuschalten.*Appuyez brièvement plusieurs fois sur le bouton d’alimentation pour parcourir le cycle entre Bluetooth et les modes auxiliaires (AUX). L’icône Bluetooth s’éteindra en mode auxiliaire (AUX). Appuyez et maintenez enfoncé le bouton d’alimentation pour éteindre le PXiBT50.BlueTooth/Aux/Off*BlueTooth/Auxiliar/Apagado*BlueTooth/Hilfe/Aus*BlueTooth/Aux/Arrêt*BlueTooth IconIcono de BlueToothBluetooth-SymbolIcône BluetoothVolume /Volumen /Lautstärke /Volume /Track /Pista /Track /Piste /Play-PausePlay-Pause (Reproducir-Pausa)Wiedergabe/PauseLecture-Pause33}

Navigation menu