Stormblue USD2-S USB Drive User Manual 1BG Eng r1 4
Stormblue Co., Ltd. USB Drive 1BG Eng r1 4
Users Manual

Precautions
1. When removing the Universal Smart Drive from the USB port, please ensure that the Red light on the
Universal Smart Drive is not flashing and that the light is in fact Green. This will ensure that your data on
the device is not lost. It is very important that you check Universal Smart Drive light even if the dialog
box on your computer shows that the data transfer is finished.
2. When disconnecting the Universal Smart Drive in Windows Me, Windows 2000 and Windows XP, you
must double click the icon "Unplug or Eject Hardware" which is located at the bottom right corner of
your screen and follow the instructions before removing. If you are using a Macintosh OS, we suggest
that you use the “Eject” or “Put Away” option before unplugging the Universal Smart Drive. In LINUX
you should unmount the Universal Smart Drive before unplugging.
3. Please disconnect the Universal Smart Drive from the USB port before turning your computer on/off. It
is also important to ensure your computer has finished booting before connecting the Universal Smart
Drive.
4. Please ensure that you follow the instruction manual for proper driver installation if your operating
system is Windows 98/SE (see section: 6.Driver Installation for Windows 98/SE).
Universal Smart Drive
Contents
1. Introduction
2. Features
3. Specifications
4. Precautions for Using the Universal Smart Drive
5. How to use the Universal Smart Drive?
6. Driver Installation for Windows 98/SE
7. Linux Instructions for the Universal Smart Drive
8. Warranty Disclosure
9. Safety Notes
10. Tech Support

1. Introduction
Incredibly easy to transfer and store data from PC to PC, PC to Mac, Mac to Mac and Mac to PC.
The Universal Smart Drive is a compact, lightweight and portable storage device, which uses state of the art
technology. It is the world's smallest smart drive, which literally fits right into the palm of your hand! USB ports
allow for the fastest data transfer and you do not need a separate power device or cable.
Just plug the Universal Smart Drive into the USB port of your computer and the drive installs immediately on
it's own. It is truly a Plug and Play device. No more hassles of downloading software. You can also cross
platform your data from PC to Mac and vice versa.
On your desktop or notebook, the Universal Smart Drive looks and functions just like another hard drive. Carry
it on a strap around your neck, slip it into your pocket, or just hold it in the palm of your hand. Now you can take
your favorite movie, music, graphics library, valuable data or that very important business presentation with
you wherever you go!!!!
2. Features
l No drivers required*, Plug-N-Play via USB port on PC and Mac
l Various memory capacities ranging from 16MB to 1GB
l Ideal for transferring large data files between computers
l Fantastic for backing-up critical files
l Able to cross platforms from PC to Mac and vice versa
l Great for taking data from office to home and back to office
l Excellent for storing data, music files, pictures and important business presentations
* Installation program is required for Windows 98/SE. This program is supplied with the Universal Smart
Drive accessories or can be downloaded from our website (www.universalsmartdrive.com).

3. Specifications
Supported OS Windows 98/SE, Windows ME, Windows 2000, Windows XP
and Mac 8.6 or higher, Linux 2.4X or higher
System Requirements IBM PC/AT or compatible Desktop / Notebook / Sub-Notebook /
Laptop computers / Mac
(Pentium @ 100MHz or better) with USB ports
Power Supply USB Bus-powered (4.5V to 5.5V)
Capacities 16MB/32MB/64MB/128MB/256MB/512MB/1GB
Data Retention 10 years
Illumination Green: Device connected
Red: Data receiving or transmitting
Data Reading/Writing Speed Max 12Mbits/sec (depending on PC system)
Operating Temperature 0°C ~ +50°C
Storage Temperature -30°C ~ +80°C
Dimension (LxWxH) 91mm x 25mm x 15.5mm
Weight 32g
Certification FCC, CE, MIC
Warranty 1 year limited liability warranty
4. Precautions for Using the Universal Smart Drive
4.1 When removing the Universal Smart Drive from the USB port, please ensure that the Red light on the
Universal Smart Drive is not flashing and that the light is in fact Green. This will ensure that your data on
the device is not lost. It is very important that you check Universal Smart Drive light even if the dialog
box on your computer shows that the data transfer is finished.
4.2 When disconnecting the Universal Smart Drive in Windows Me, Windows 2000 and Windows XP, you
must double click the icon "Unplug or Eject Hardware" which is located at the bottom right corner of your
screen and follow the instructions before removing. If you are using a Macintosh OS, we suggest that
you use the “Eject” or “Put Away” option before unplugging the Universal Smart Drive. In LINUX you
should unmount the Universal Smart Drive before unplugging.
4.3 Please disconnect the Universal Smart Drive from the USB port before turning your computer on/off. It is
also important to ensure your computer has finished booting before connecting the Universal Smart
Drive.
4.4 Please ensure that you follow the instruction manual for proper driver installation if your operating
system is Windows 98/SE (see section: 6.Driver Installation for Windows 98/SE).
Note: If your operating system is Windows ME, Windows 2000, Windows XP, Macintosh Version 8.6 or
higher or Linux Kernel Version 2.4.x or higher, DO NOT USE the Windows 98/SE CD, as the necessary
software is already installed in the Universal Smart Drive. If your operating system is Windows 98/SE, it is
required that you install the Windows 98/SE drivers, which are included on the Windows 98/SE Installation
CD (see section 6. Driver Installation for Windows 98/SE).
5. How to use the Universal Smart Drive?
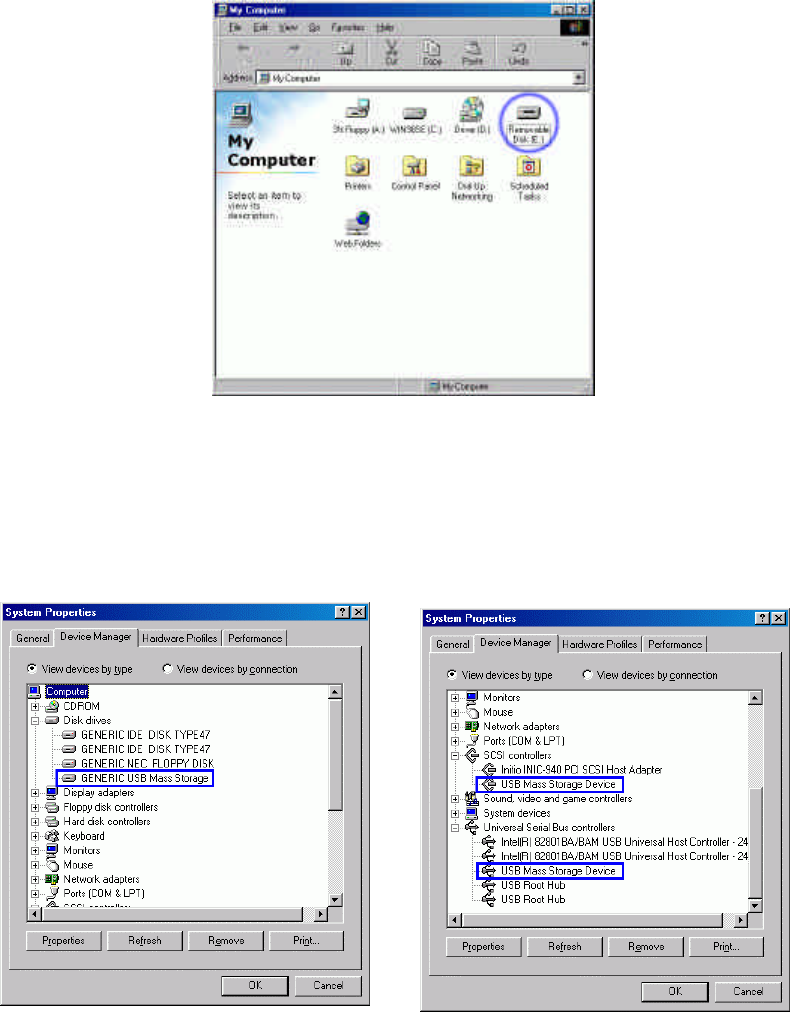
The Universal Smart Drive functions as a removable disk drive on your computer. When you insert the
Universal Smart Drive to the USB port of your PC or Mac, then the "removable disk" icon will appear in the "My
Computer Folder". You can use the Universal Smart Drive the same way as a Floppy disk or a Hard drive on
your computer. When you disconnect the Universal Smart Drive from the USB port, the above icon will
disappear (see section: 4. Precautions for Using the Universal Smart Drive).
You can determine if the USB controller is installed properly by selecting “Control Panel” - “System Properties”
“Device Manager” as the “USB Mass Storage Device” should appear under “Universal Serial Bus controllers”,
“Disk drives” and “SCSI controllers”.
6. Driver Installation for Windows98/SE
6.1 Auto Setup
6.1.1 Installation
1) Please ensure that the Universal Smart Drive is disconnected from computer.
2) Execute the setup file (Setup.exe) from the installation CD
(or download from http://www.universalsmartdrive.com/ ).
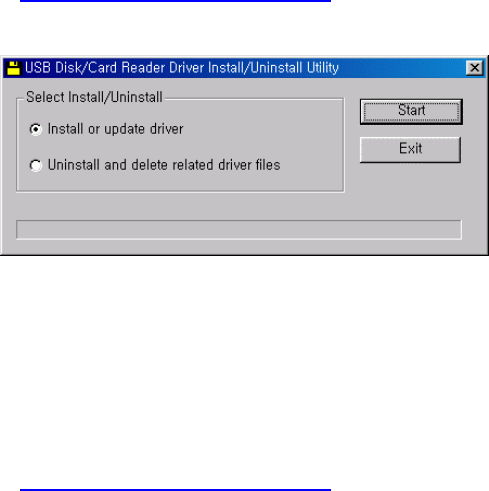
3) Select ‘Install or update driver’ in the dialog box and press ‘Start’.
6.1.2. Uninstall
1) Please ensure that the Universal Smart Drive is disconnected from computer.
2) Execute the setup file (Setup.exe) from the installation CD
(or download from http://www.universalsmartdrive.com/ ).
3) Select ‘Uninstall and delete related driver files’ in the dialog box and press ‘Start’.
6.2 Basic Setup
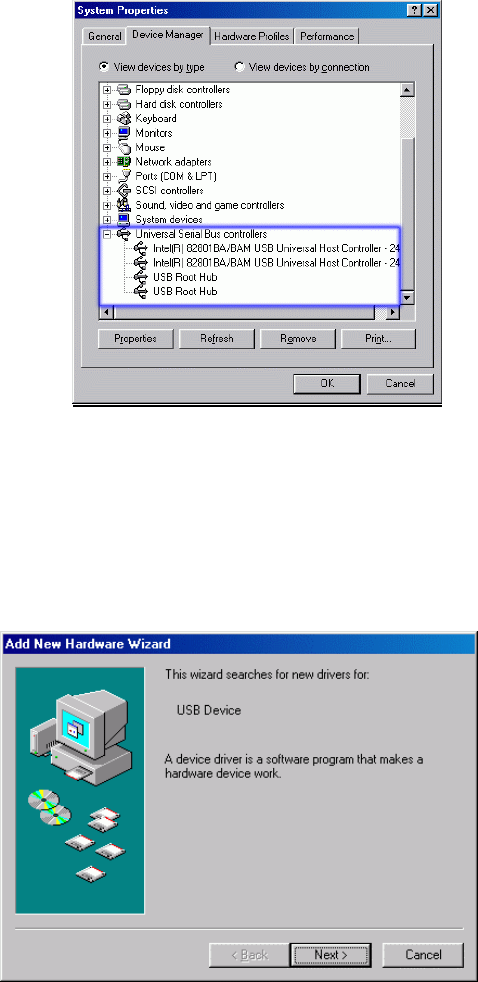
1) Before installation of the drivers, ensure that the USB controller of your computer is working well. Open the
“Control Panel”→ “System Properties”→ ”Device Manager”, to ensure “Universal Serial Bus controllers”
appear. If your computer does not have USB controllers, then the USB device will not work.
2) Insert the Windows 98/SE device driver CD in the computer, and plug the Universal Smart Drive into the
USB port. A “USB Mass storage Device” message appears and the following dialog box “Add New Hardware
Wizard” will show up on your screen. Then press “Next”.
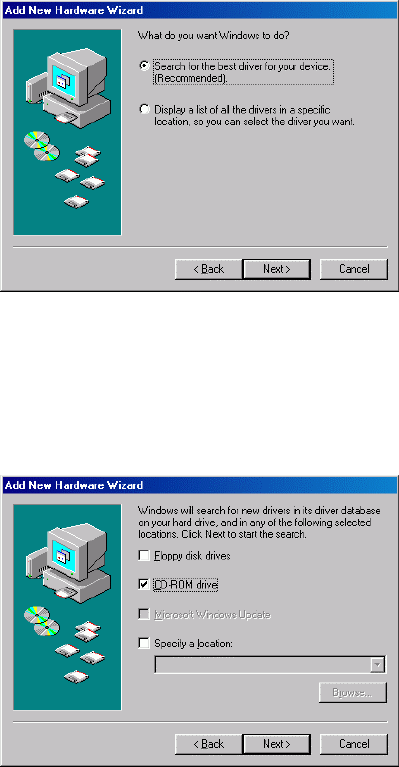
3) Dialog box shows how Windows searches for the USD drivers. Choose “ Search for the best driver.” and
press “Next”.
4) The dialog box shows where to locate the Universal Smart Drive device drivers. Select the option “CD-ROM
drive”. Press “Next” button.
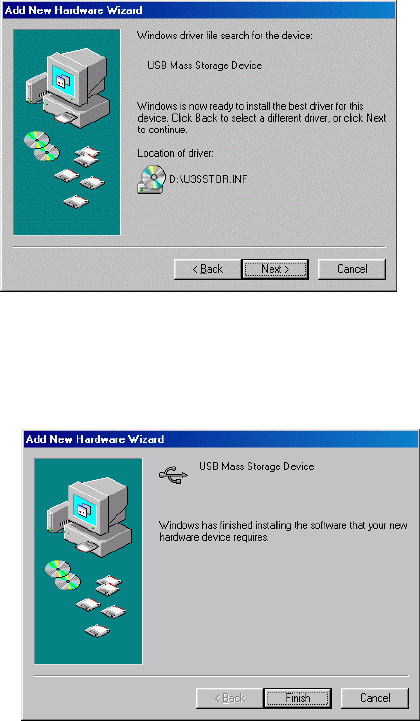
5) The dialog box shows that Windows has located the Universal Smart Drive device driver in drive ‘D’. Press
“Next” button.
6) The dialog box shows that Windows has finished the installation of the Universal Smart Drive device driver.
Press “Finish” button.
Now all drivers and controllers have been installed into your system. You should see the ‘Removable Disk’
icon appearing in the window when you activate the “My Computer” icon. Now you are ready to easily transfer
data between your Universal Smart Drive and your computer.
7. Linux Instructions for the Universal Smart Drive
[Installation]
1. Install Linux kernel version 2.4.x or higher.
2. Login as 'root'.
3. Open a terminal window after booting with X-Window.
4. Connect the Universal Smart Drive to the USB port.
5. Enter the following commands in the terminal window (shell input mode).
[Access to USB SCSI devices]
1. # ls /proc/scsi/usd-storage-0
=> The numbers of USB SCSI device are displayed. (0, 1, 2,....)
2. # cat /proc/scsi/usb-storage-0/0
=> The information of the firmware related to the Universal Smart Drive is displayed.
[Set Partitions or format mode]
1. # fdisk /dev/sda
=> You can use the ‘fdisk’ function in Linux. (Look for the fdisk manual for more details.)
[DOS format]
1. # mkfs.msdos /dev/sda1
=> You can format with DOS/FAT. (Caution: You cannot format when the Universal Smart Drive is
mounted.)
[Mount]
1. # mkdir /mnt/usd
=> Make a directory where the Universal Smart Drive will be mounted.
2. # mount /dev/sda1 /mnt/usd
=> Mount the Universal Smart Drive to ‘/mnt/usd’ directory.
(The Universal Smart Drive will be linked to ‘/mnt/usd’ if there is no special message.)
[Unmount]
1. # umount /dev/sda1
=> Release mount.
[The tips]
1. The command to unmount the Universal Smart Drive is 'umount'.
2. If you’re in '/mnt/usd' directory, the Universal Smart Drive cannot be unmounted.
3. We recommend you mount the Universal Smart Drive with '/etc/fstab' and '/dev/sda1 /mnt/usd auto
defaults 0 0' in the text editor.
4. In Red Hat Linux, you can use 'Disk Management(User Mount Tool)' in 'GNOME' for Mount management.
5. You should unmount the Universal Smart Drive before you remove the Universal Smart Drive when the LED
turns from Red to Green in a few seconds.

8. Warranty Disclosure
Your Universal Smart Drive comes with a one-year hardware warranty.
Stormblue, and K & C Tech warrants the Universal Smart Drive against defects in material and workmanship.
This warranty applies only to the original purchase of the Universal Smart Drive and is not transferable.
This warranty does not cover any incompatibilities due to user’s computer, hardware, software or any other
related system configuration in which the Universal Smart Drive interfaces.
Proof of purchase will be required before any warranty consideration by Stormblue, and K & C Tech.
This warranty does not apply to any failure or deficiency which has been caused by misuse, neglect,
alternation, improper installation or handling, unauthorized repair or modification, improper testing, accident or
causes external to the Universal Smart Drive, such as, but not limited to, excessive heat or humidity, power
failure or improper installation or removal of the device.
Stormblue, and K & C Tech’s warranty as set forth shall not be enlarged, diminished or affected by, and no
liability shall arise out of Stormblue, rendering of technical advice or service in connection with your order.
The warranty set forth above is not assigned by you.
This Warranty applies only to this product, and is governed by the laws of British Columbia, Canada.
9. Safety Notes
This equipment has been tested and found to comply with the limits for a Class B digital device, pursuant to Part
15 of the FCC Rules. These limits are designed to provide reasonable protection against harmful interference in
a residential installation. This equipment generates, uses and can radiate radio frequency energy and, if not
installed and used in accordance with the instructions, may cause harmful interference to
radio communications. However, there is no guarantee that interference will not occur in a particular
installation. If this equipment does cause harmful interference to radio or television reception, which can be
determined by turning the equipment off and on, the user is encouraged to try to correct the interference by one
or more of the following measures:
- Reorient or relocate the receiving antenna.
- Increase the separation between the equipment and receiver.
- Connect the equipment into an outlet on a circuit different from that to which the receiver is connected.
- Consult the dealer or an experienced radio/TV technician for help.
11. FCC Compliance Statement
That changes or modification not expressly approved by the party responsible for compliance could void the
user’s authority to operate the equipment.
This device complies with part 15 of the FCC Rules. Operation is subject to the following two conditions: (1) This
device may not cause harmful interference, and (2) this device must accept any interference received, including
interference that may cause undesired operation.
12. Technical Support
K & C Tech.
Tel : 1-888-640-0200
E-mail : support@universalsmartdrive.net or alternatively, more information, updates and technical
support can be found on our web site :
www.UniversalSmartDrive.com