Stormblue USD3500 USB MASS STORAGE DEVICE User Manual USERS MANUAL
Stormblue Co., Ltd. USB MASS STORAGE DEVICE USERS MANUAL
UserManual.wiki
>
Stormblue
>
USD3500 User Manual
USERS MANUAL
Navigation menu
Upload a User Manual
Namespaces
Wiki Guide
HTML
PDF
Info
Views
User Manual
Discussion / Help
Navigation
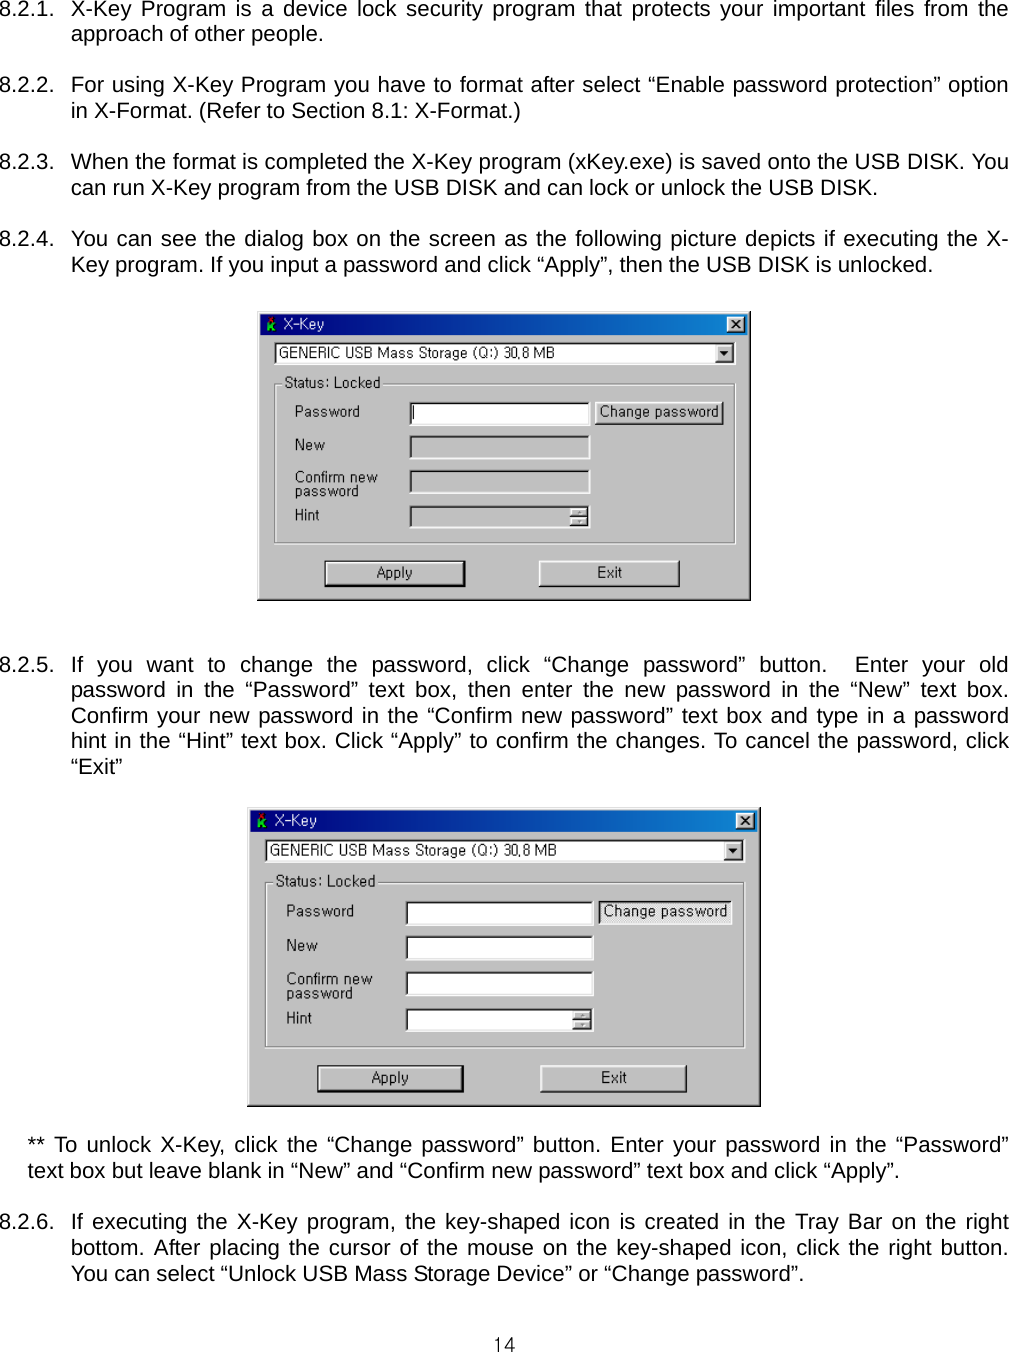
![75.2. Linux Operating System The USB DISK supports Linux kernel versions 2.4.x or higher. The following installation instructions have been documented below regarding Linux commands for the USB DISK. Please note that when disconnecting the USB DISK we suggest that you un-mount the USB DISK before removing. Linux Instructions for the USB DISK: [Installation] 1. Install Linux kernel version 2.4.x or higher. 2. Login as “root”. 3. Open terminal window after booting with X-Window. 4. Connect the USB DISK to the USB port. 5. Enter the following commands in the terminal window (shell input mode). [Access to USB SCSI devices] 1. # ls /proc/scsi/usb-storage-0 The numbers of USB SCSI device are displayed (0, 1, 2,....). 2. # cat /proc/scsi/usb-storage-0/0 The information of the firmware related to the USB DISK is displayed. [Set Partitions or format mode] 1. # fdisk /dev/sda You can use the “fdisk” function in Linux (Look for the fdisk manual for more details). [DOS format] 1. # mkfs.msdos /dev/sda1 You can format with DOS/FAT(note: You cannot format when the USB DISK is mounted). [Mount] 1. # mkdir /mnt/usd Make a directory where the USB DISK will be mounted. 2. # mount /dev/sda1 /mnt/usd Mount the USB DISK to “/mnt/usd” directory. (The USB DISK will be linked to “/mnt/usd” if there is no special message.) [Unmount] 1. # umount /dev/sda1 Release mount. [Tips] 1. The command to un-mount the USB DISK is “umount”. 2. If you’re in “/mnt/usd” directory, then the USB DISK cannot be un-mounted. 3. We recommend you mount the USB DISK with “/etc/fstab” and “/dev/sda1 /mnt/usd auto defaults 0 0” in the text editor. 4. In Red Hat Linux you can use “Disk Management (User Mount Tool)” in “GNOME” for Mount management. 5. You should unmount the USB DISK before you disconnect the drive; ensure the LED turns from blinking to lighting, which may take a few seconds.](https://usermanual.wiki/Stormblue/USD3500/User-Guide-371323-Page-7.png)
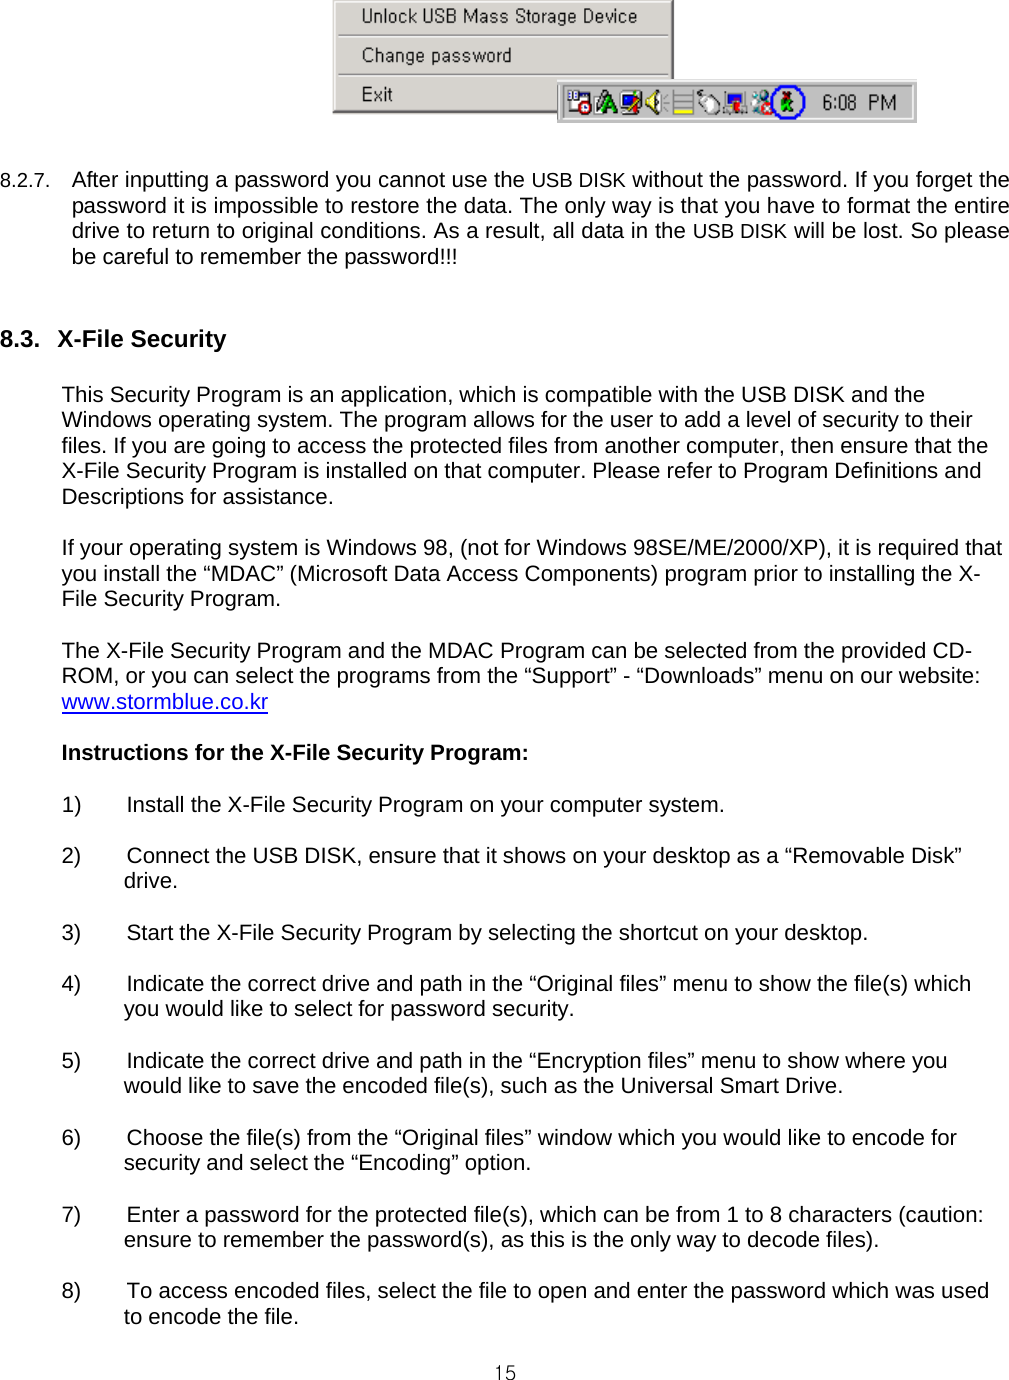
![86. CD Auto-run Program (only for Windows’ users) Auto-run program is executed automatically when you insert the CD-ROM in your PC. You can install required software through this program. ① Windows 98/SE Device Drivers : Refer to “7. Driver Installation for Windows®98/SE” ② X-Format : Refer to “8. Installation of X-Series Utilities” ③ X-Key [Device Lock] : USB DISK device Lock. Refer to “8. Installation of X-Series Utilities” ④ X-File Security[File Lock] : File Encryption program. Refer to “8. Installation of X-Series Utilities” ⑤ X-Lock [PC Lock]: PC Lock program. Refer to “8. Installation of X-Series Utilities” ⑥ X-Autorun : USB DISK file automatic-running program. Refer to “8. Installation of X-Series Utilities” ⑦ X-Mailer : No SMPT Mobile e-mailer program. Refer to “8. Installation of X-Series Utilities”](https://usermanual.wiki/Stormblue/USD3500/User-Guide-371323-Page-8.png)
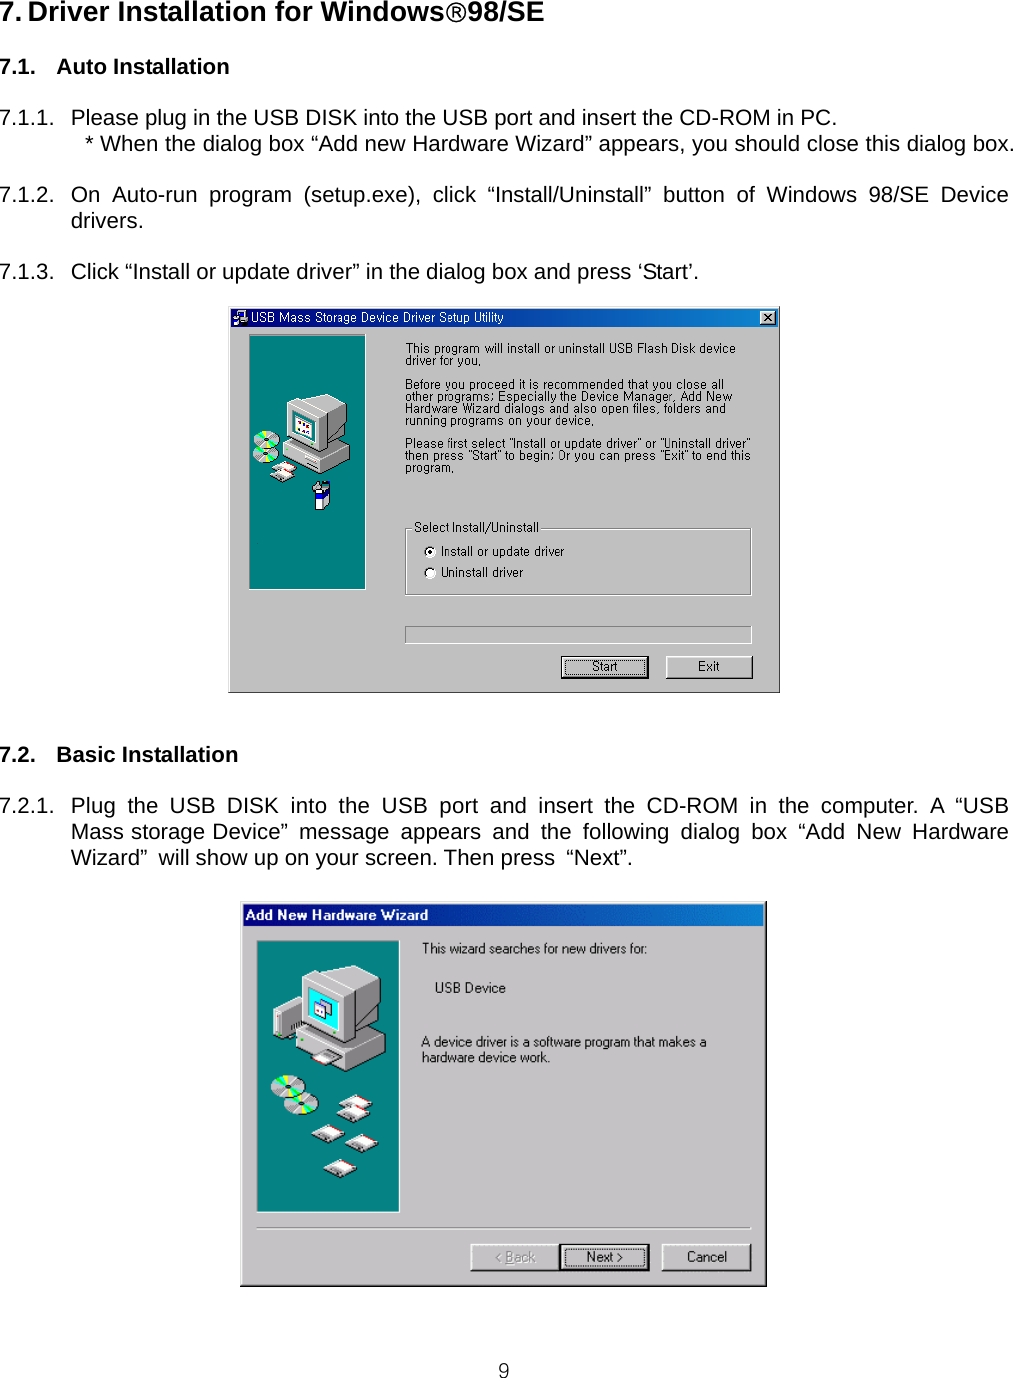
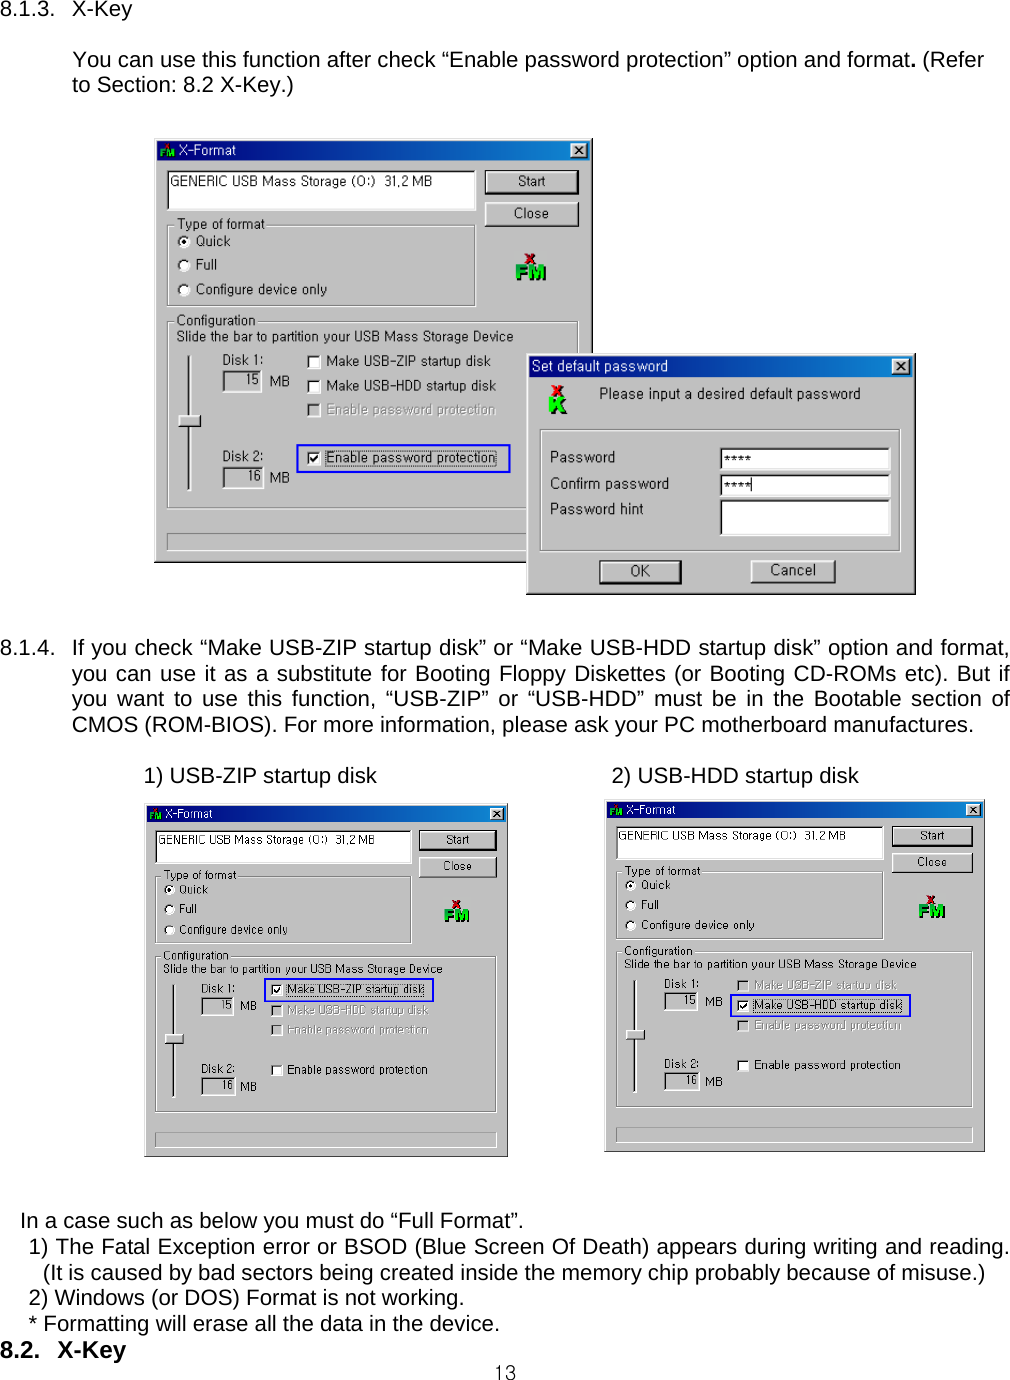
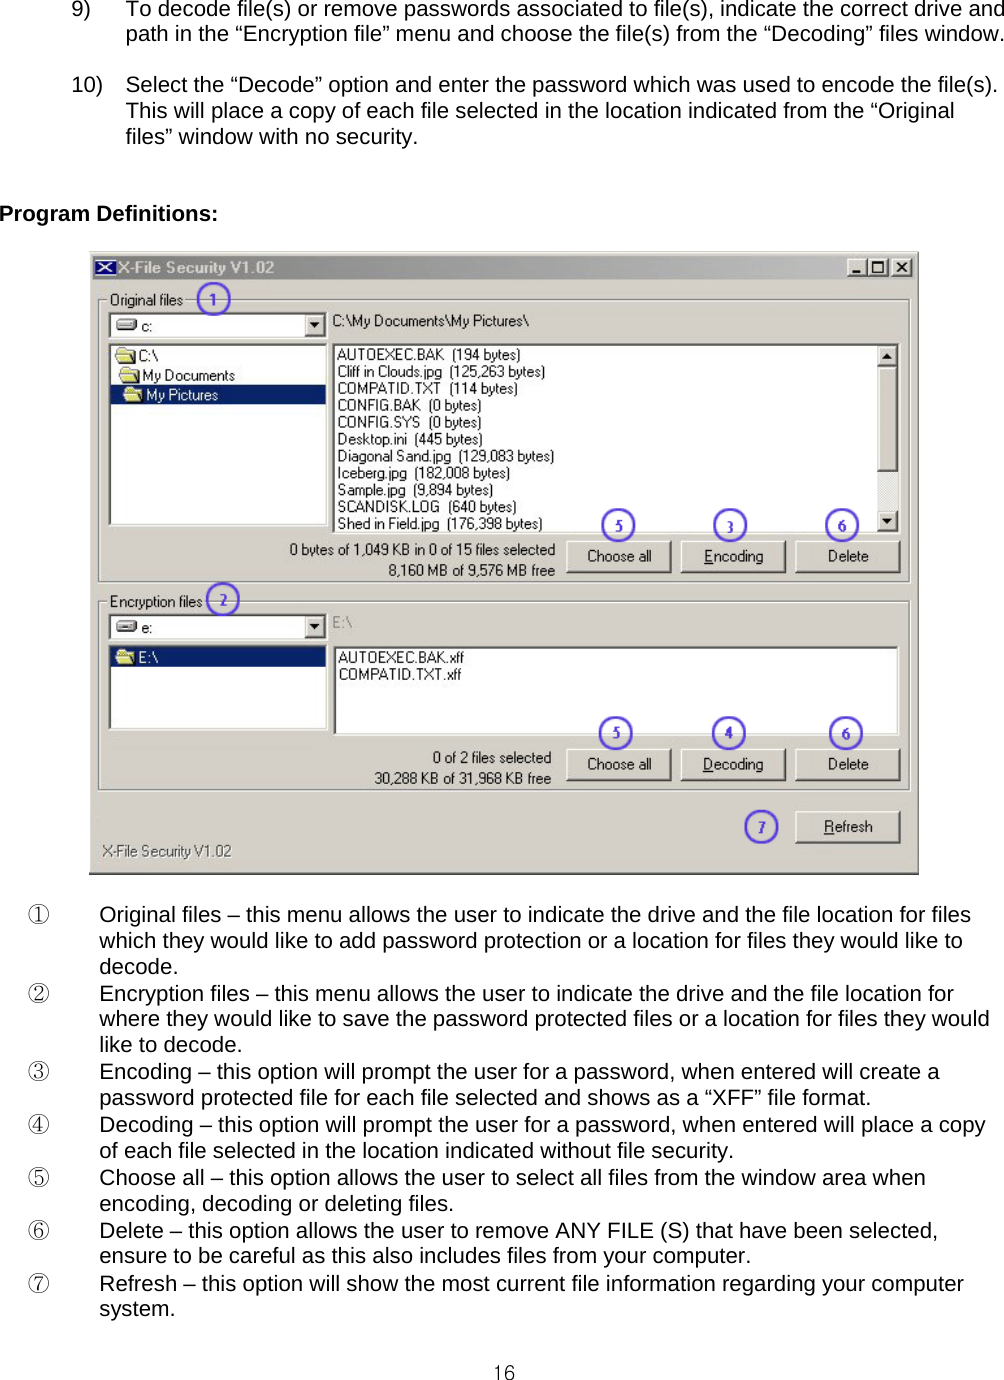
![128. Installation of X-Series Utilities 8.1. X-Format The USB DISK has been formatted at the Factory without the X-Key program and the Bootable disk program installed. Formatting the drive with X-Format is required for using the above programs with your operating system. Bootable function is available only for Windows 98/98SE/ME. After format is completed, unplug and reconnect the USB DISK to the USB port. 8.1.1. Open the X-Format program window, you can choose one of three types of formats as the following picture depicts [(a) in Pic]. Quick Format: As Logical Format, it’s similar to Windows Format. Full Format: As Physical Format, it makes all sectors of the memory clean, but it takes longer. Configure device only: It will perform “Configuration” [(b) in Pic.] such as “Make startup disk” or “Enable password protection” without checking or formatting the disk. Click “Start” button then execute format. [(c) In Pic.] 8.1.2. Partitioning the Disk You can partition the USB DISK by moving up and down along the slide bar and control the capacity of each disk. [box (d)]](https://usermanual.wiki/Stormblue/USD3500/User-Guide-371323-Page-12.png)
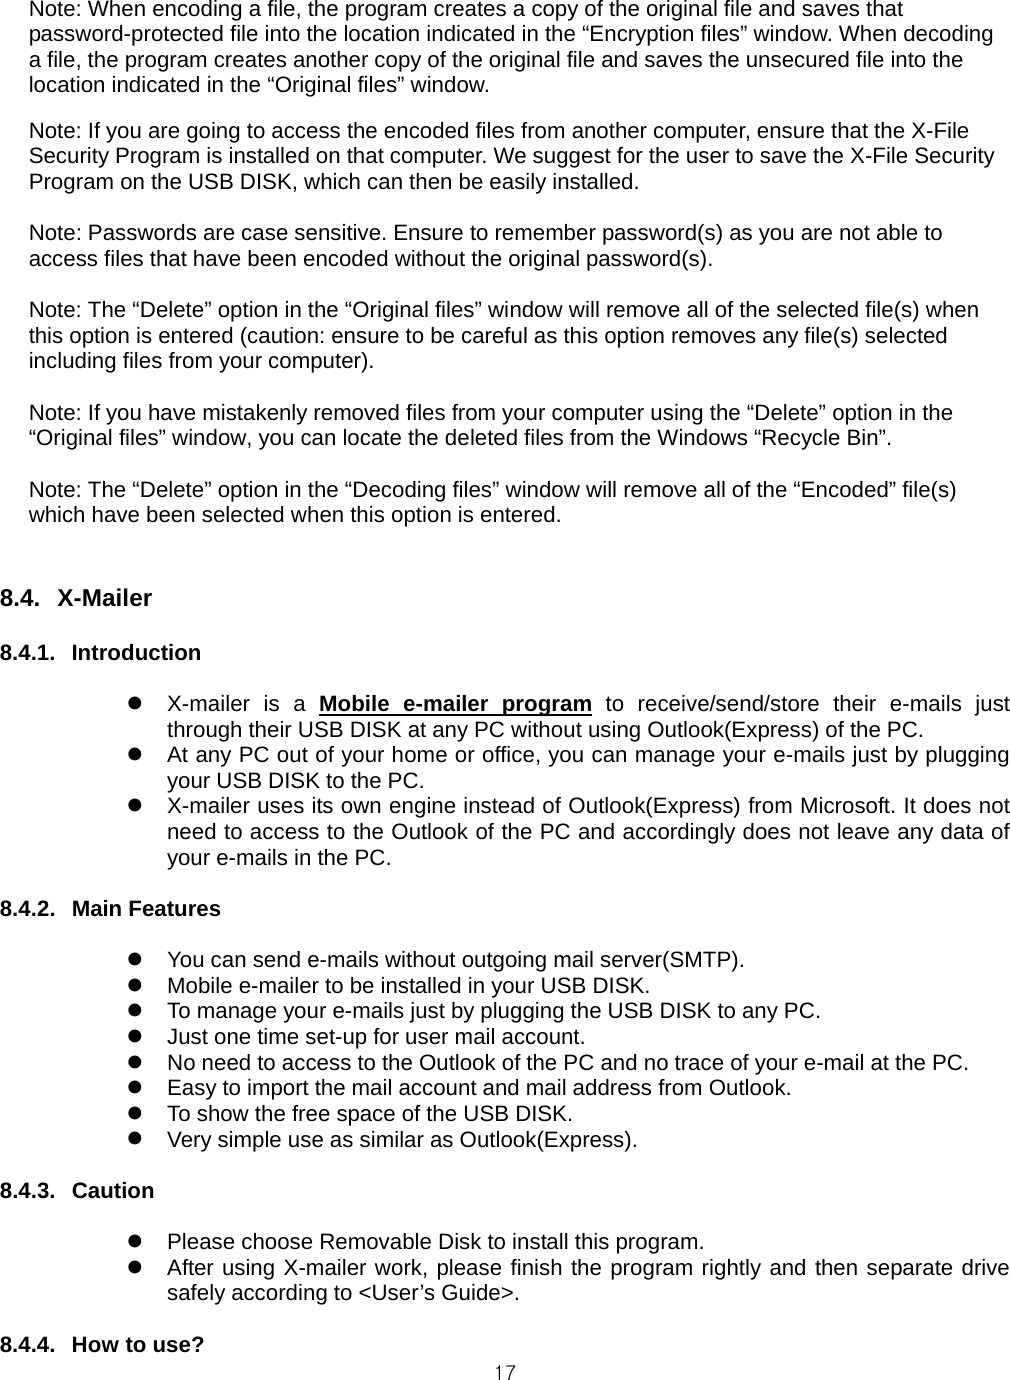
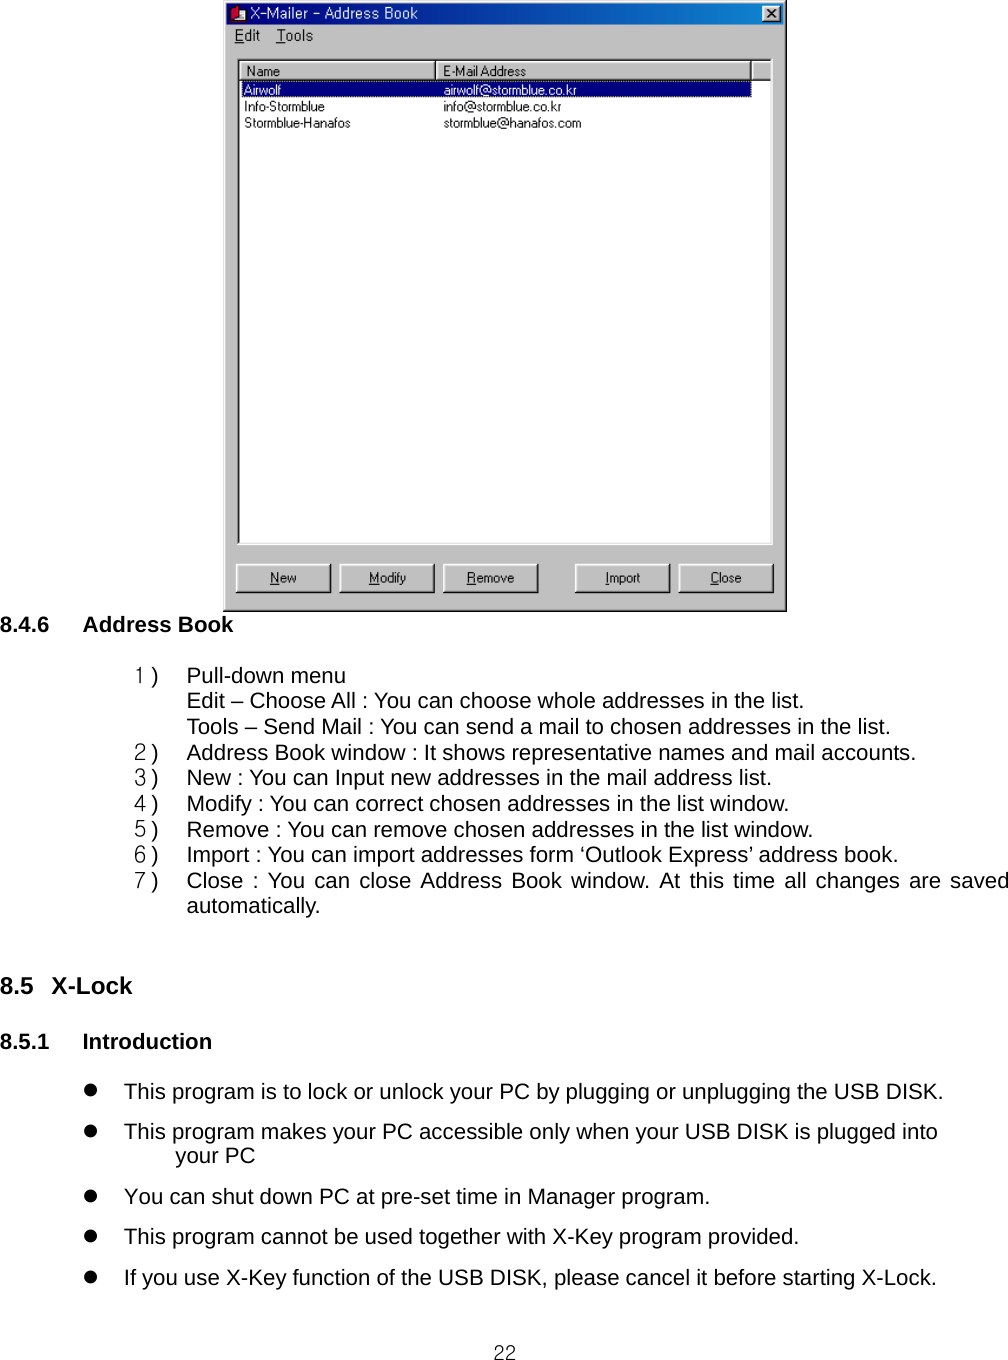
![238.5.2 X-Lock install and changing password 8.5.2.1 Install X-Lock program. (Re-Installing the program will remove the program.) 8.5.2.2 Click the “password change” button in the initial window of X-Lock. 8.5.2.3 Plug in the USB DISK and change password. * USB DISK must be plugged in when you change the password. * The default password is '1111'. 8.5.2.4 Write in new password and click “unlock”. 8.5.2.5 Disconnect the USB DISK from USB port safely. 8.5.2.6 Now the install process of X-Lock is completed. The X-Lock icon will be produced automatically on the desktop. 8.5.3 How to use X-Lock Manager ? 8.5.3.1 X-Lock manager can pause or restart X-Lock function. 8.5.3.2 Double click X-Lock Manager icon on desktop and run the Manager program. 8.5.3.3 Click [Enable X-Lock] button and X-Lock program will be loaded in PC and the program will run in background automatically. 8.5.3.4 Click [Disable X-Lock] button and X-Lock in background will unload in Pc and won’t run.](https://usermanual.wiki/Stormblue/USD3500/User-Guide-371323-Page-23.png)
![24 8.5.3.5 If you check "Background Picture" option, then the Picture shows on the system locked desktop. 8.5.3.6 If you check "Desktop Translucent Effect" option, then you can make transparent effect on the system locked desktop. 8.5.3.7 If you check “Schedule System Shutdown” option, then you can shut down the PC at the time you want. 8.5.3.8 If you click “Settings for System Shutdown” button, then you can make basic settings of system shut down. 8.5.3.9 If you want to login without the USB DISK, then press the [Ctrl+Shift+P] at the same time to login. 8.5.4 Caution This program can not be used with the X-Key program. If you want to use X-Lock program, then please remove the X-Key program. 8.6 X-Autorun 8.6.1 Introduction This program runs automatically the specified file in the USB DISK by plugging the USB DISK at USB port of PC. *This program cannot be used together with the X-Key program provided. If you use the X-Key function of the USB DISK, then please cancel it before starting X-Autorun. 8.6.2 Installation](https://usermanual.wiki/Stormblue/USD3500/User-Guide-371323-Page-24.png)
![258.6.2.1 Install X-Autorun program. ( Installing the program once more will remove the program.) 8.6.2.2 Double click X-Autorun Manager icon on the desktop and click 'X-Autorun Editor' button to start X-Autorun Editor. 8.6.2.3 Choose Removable disk on X-Autorun Editor window. 8.6.2.4 Click the [File Open]button and choose the file to run automatically. 8.6.2.5 If the chosen file needs an option, then input the value in ‘OPTIONS=’ line. It’s possible to input the value or omit. 8.6.2.6 Click [Save] button to save Autorun.inf file. 8.6.2.7 Disconnect the USB DISK from USB port safely. 8.6.2.8 Connect the USB DISK to USB port again and check whether the chosen file in "Command Line" works or not. (If it doesn’t work, then restart from No. 2.2.)](https://usermanual.wiki/Stormblue/USD3500/User-Guide-371323-Page-25.png)