Strong Frontier Sdn Bhd TE500T-T Tire Pressure Monitoring System User Manual Tire Pressure Monitoring System
Strong Frontier Sdn. Bhd. Tire Pressure Monitoring System Tire Pressure Monitoring System
UserManual.wiki
>
Strong Frontier Sdn Bhd
>
TE500T T User Manual
User Manual
Navigation menu
Upload a User Manual
Namespaces
Wiki Guide
HTML
PDF
Info
Views
User Manual
Discussion / Help
Navigation

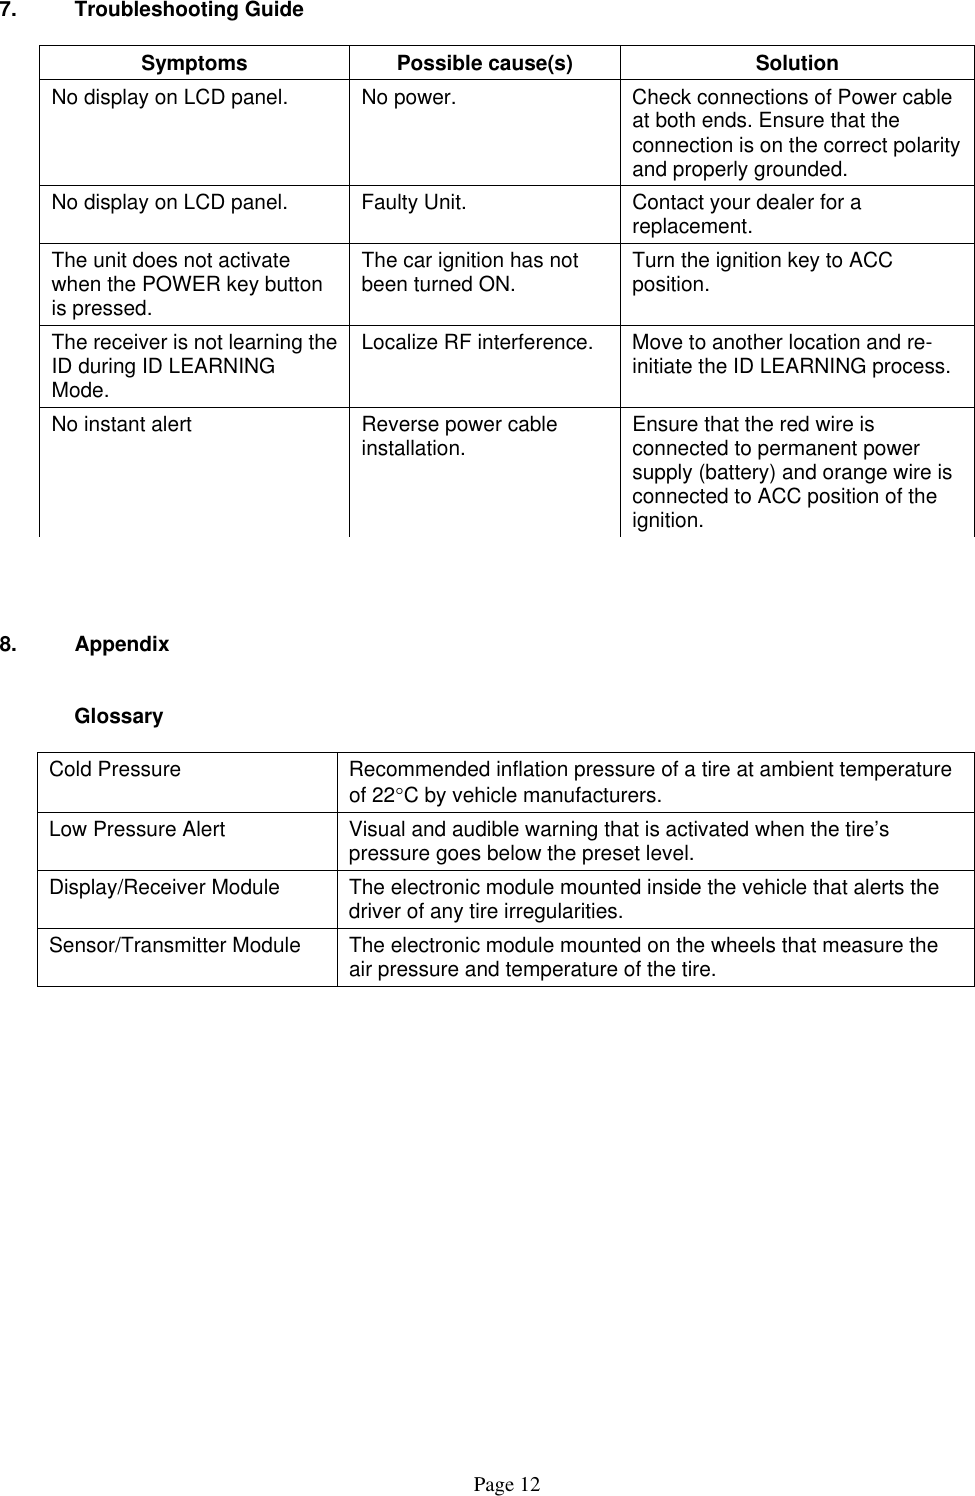
![Programming Manual Threshold Setting To set to other alert threshold value for pressure and temperature, press and hold [Auto/Manual] button for 1 second twice. For low pressure alert, the maximum limit is 399kPa (58 psi) while for temperature, the maximum limit is 99ºC (210ºF). Step 1 Upon entering this mode, the first digit of the tire pressure readout will blink, indicating that it is ready to accept new input. The value is changed by pressing the [ + ] button or [ - ] button to change the value. Note This mode will terminate automatically if there are no key-button activities after 10 seconds and will revert back to the original factory preset value. 캜Kpa Step 2 To confirm the selected value, press the [OK] button to save it. The second digit will blink to indicate that it is ready to accept new input. 캜Kpa Step 3 Repeat steps 1 and 2 to adjust the value of other digits on the LCD display for both pressure and temperature. 캜Kpa Note 1. Value shown is for reference only. 2. The setting of Manual Threshold Setting can only be done in kPa (Pressure) and ºC (Temperature). Refer to Annex 1 for conversion between the units. 3. To return to factory-preset value mode, press [Auto/Manual] button once. 4. To enter manual-preset value mode, press [Auto/Manual] button three times. ACT-P: Factory Preset MANUAL: Manual Preset Page 8](https://usermanual.wiki/Strong-Frontier-Sdn-Bhd/TE500T-T/User-Guide-278728-Page-9.png)
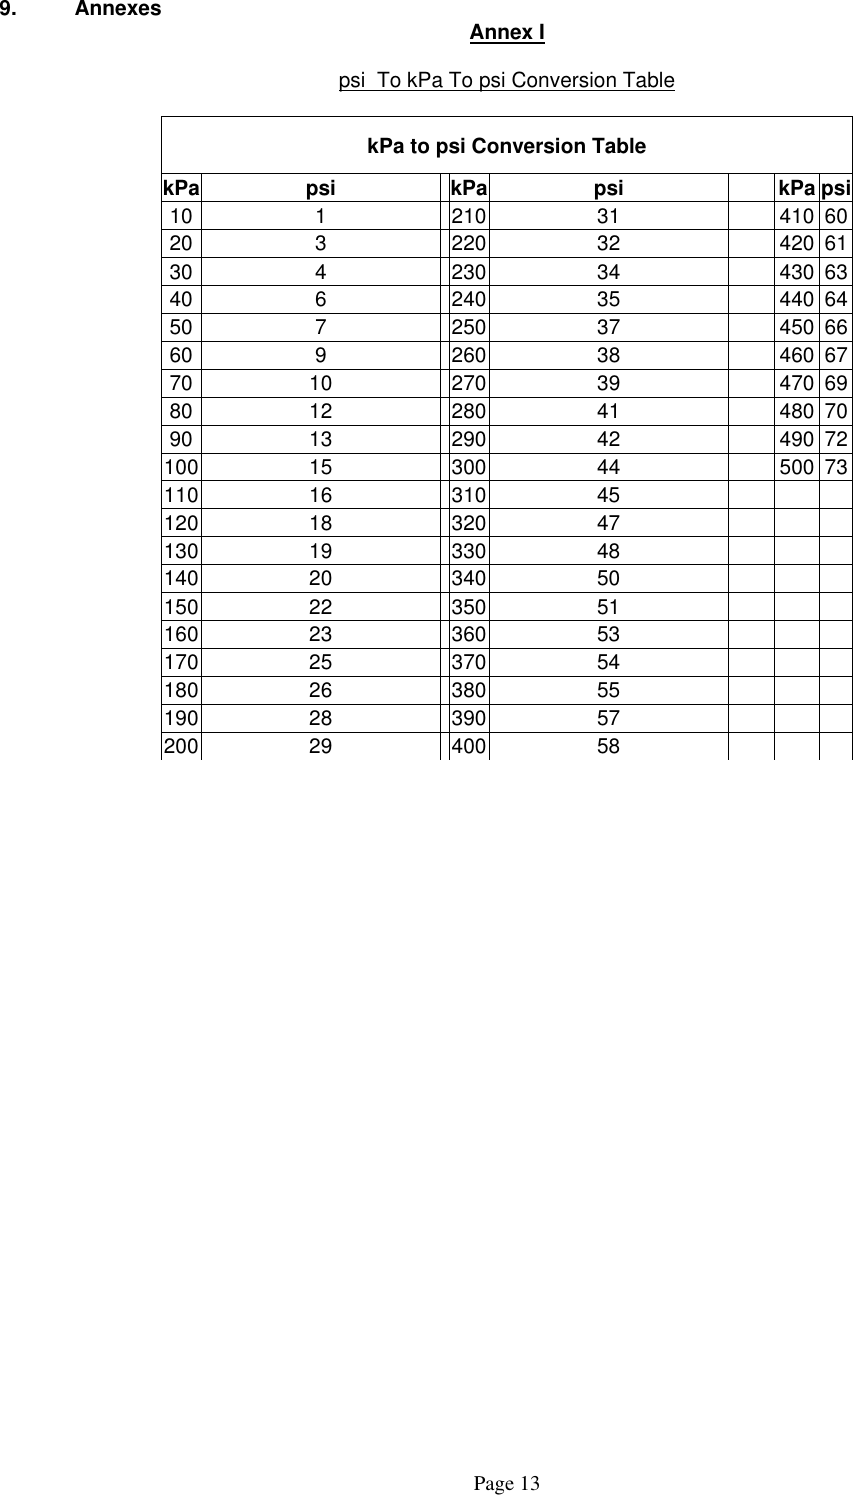
![Display Mode Press and hold [Auto/Manual] and [OK] button for 1 sec to alternate between Rotation Mode and Normal Mode. Press again to revert to the previous mode. Rotation Mode Each of the tires will be ‘scanned’ for the reading. The rotation will begin from Front Left tire, followed by Front Right Tire, Rear Left Tire, Rear Right Tire and the cycle will begin again with the Front Left Tire. This is indicated by a blinking tire icon. ACT-P캜Kpa J ACT-P캜Kpa K L ACT-P캜Kpa I ACT-P캜Kpa Rotation Mode Activated Normal Mode In the normal mode, the display will always show the tire with the lowest pressure value. To view information of other tires, use buttons to select the tire required. 캜 MANUALKpa Normal Mode Activated Note Value shown is for reference only. Page 9](https://usermanual.wiki/Strong-Frontier-Sdn-Bhd/TE500T-T/User-Guide-278728-Page-10.png)
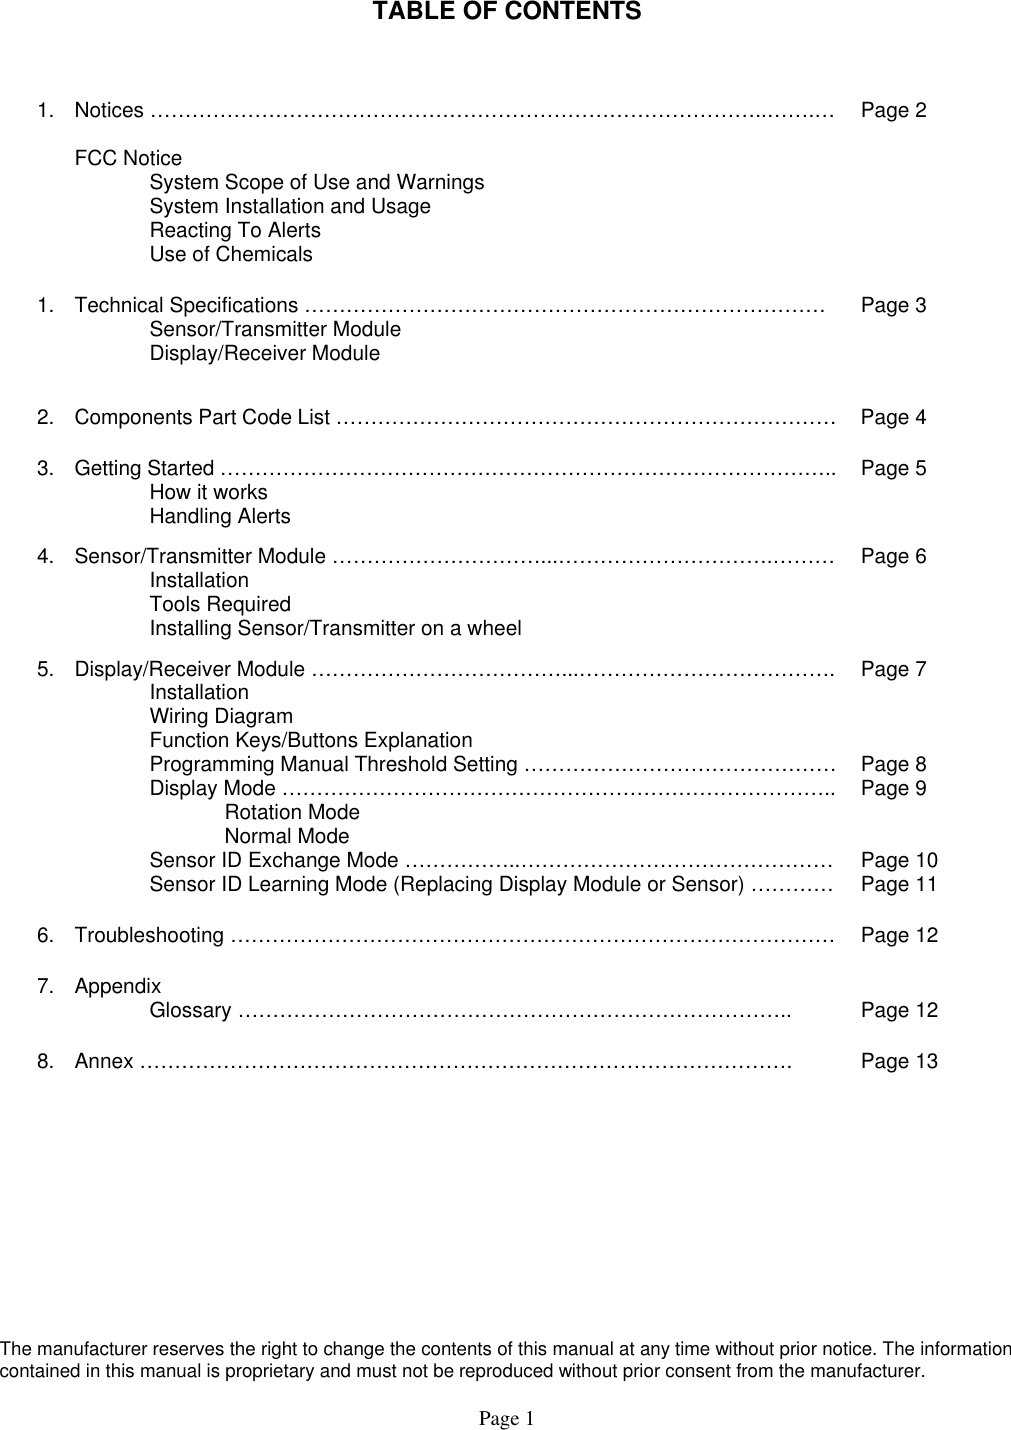
![Sensor ID Exchange Mode For rotation of tires, the Sensor ID data in the receiver must be changed accordingly to ensure that it indicates the correct tire when there are any irregularities. Step 1 Press [ID] button for 1 second or more to enter the Sensor ID Exchange Mode. The blinking tire icon and corresponding Sensor ID digit indicates that it is ready to accept inputs from user. For this example, assume that we are exchanging the Front Right Tire with the Rear Right Tire. Step 2 Press the front right tire button to select it. This will cause the front right tire icon and its corresponding ID digit to blink. Step 3 Use [+] key and [-] key to change the selected Sensor ID digit. In this case, press [+] twice and follow by the [OK] button to save the new Sensor ID value. Step 4 Next, press the rear right tire button to select it. The Rear Right Tire icon and its corresponding ID digit will blink. Step 5 Use [ + ] key and [ - ] key to change the selected Sensor ID digit. In this example, press [ - ] twice and follow by the [OK] button to save the new Sensor ID value. To exit this mode without saving, press [ID] button for 1 second and it will exit Sensor ID Exchange Mode. Step 6 The receiver will revert back to normal display and that complete the process of exchanging Sensor ID data in the receiver. ACT-P캜Kpa Page 10](https://usermanual.wiki/Strong-Frontier-Sdn-Bhd/TE500T-T/User-Guide-278728-Page-11.png)
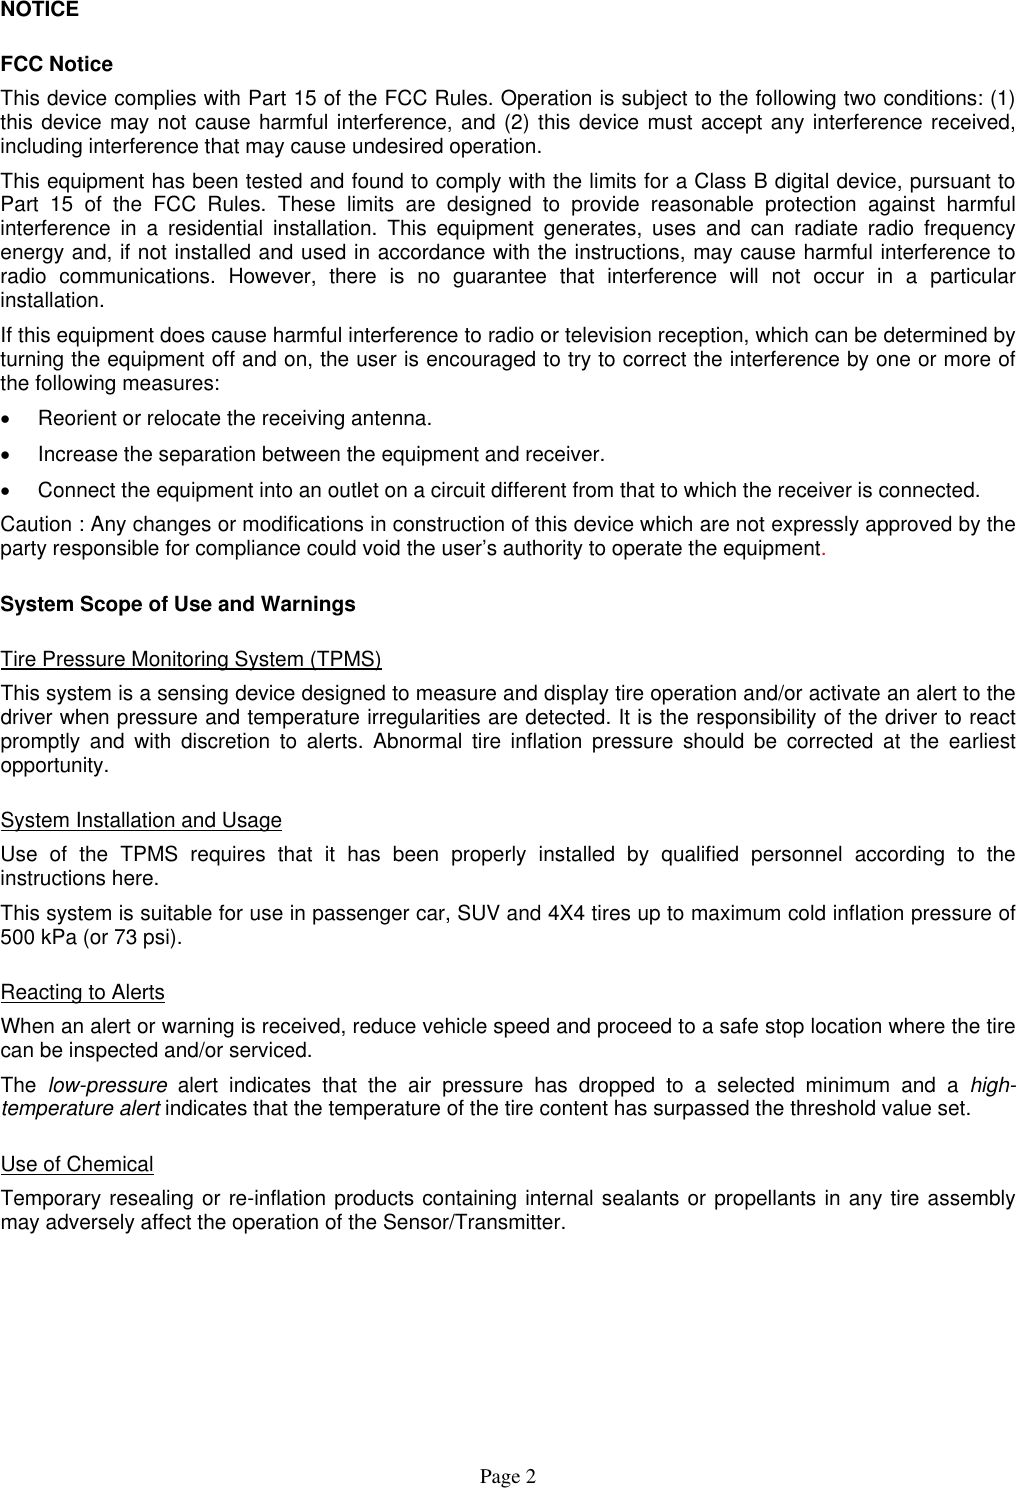
![Sensor ID Learning Mode (Replacing Display Module or Sensor) For programming of a new receiver unit or replacement of defective sensors, refer to the following steps. Figure 11 Step 1 Turn on the display module. Press [ID] button and [OK] button simultaneously for 1 second to enter Sensor ID Learning Mode. The blinking (once per second) of the tire icon, indicates that it is ready to accept new Sensor ID input. Select the tire that requires replacement of sensor by pressing the selected tire icon on the LCD display. Step 2 Press the micro switch on the new sensor (refer Figure 11) for 1 second. Upon receiving the new Sensor ID, the tire icon will blink at a faster rate (twice per second). Step 3 Press [OK] button to save the new Sensor ID. Step 4 If all 4 sensors are replaced, upon pressing the [OK] button for the tire, the receiver will revert back to the normal display. This indicates that the Sensor ID Learning Process is complete. Note 1. Pressing [ID] button at any time during the learning process will abandon any changes and revert back to the factory preset. 2. When replacing new display unit, all 4 sensor ID must be re-programmed and saved. 3. The receiver will not save any identical Sensor ID.Page 11](https://usermanual.wiki/Strong-Frontier-Sdn-Bhd/TE500T-T/User-Guide-278728-Page-12.png)