Summer Infant 02700T Baby Monitor User Manual 02700 Monitor IB 1 8
Summer Infant, Inc. Baby Monitor 02700 Monitor IB 1 8
Manual
Thank you for buying the Close2You™ Cordless Audio Monitor from
Summer Infant. This audio monitor is a great addition to any home.
The 49 MHz digital technology eliminates interference and provides a
secure and private transmission. The digital technology automatically
selects a free and secure channel so you only hear your baby. It allows
parent to monitor baby in the nursery from any part of the home within
600 ft. The Parent’s Unit features volume control, sound lights, out of range
indicator, convenient belt clip, rechargeable battery, and a recharging
base. The Baby’s Unit has a battery compartment that holds 4 “D”
batteries (not included) in case of power outages.
WARNING:
A
dult assembly required.
Exercise care when unpacking
and assembling product.
Baby’s Unit requires 4 “D” batteries (not included).
In portable mode, Parent’s Unit requires
one 3.6V rechargeable battery (included).
For Technical Support Call 1-800-268-6237 or
E-Mail at customerservice@summerinfant.com
™
02700
Summer Infant, Inc.
1275 Park East Drive
Woonsocket, RI 02895 USA
1-800-268-6237
Summer Infant Europe, LTD.
Office Suite 6, Second Floor
Bournehall House, Bournehall Road
Bushey, Hertfordshire WD23 3HP UK
+44 (0) 208 420 4429
© 2008 Summer Infant, Inc.
Please retain information
for future reference.
Colors and styles may vary.
MADE IN CHINA. 10/08
Summer Infant, Inc. Monitor Warranty Policy
Summer Infant Inc. will repair or replace (at our option) your unit free of charge
for 12 months from the date of purchase if the unit is defective in workmanship
or materials. To claim your repair/replacement, the product must be returned to
Summer Infant along with a copy of the original purchase receipt. In the
absence of the purchase receipt, the warranty will be 12 months from the date
of manufacture.
This warranty does not apply to normal wear or damage from misuse, abuse,
improper storage and handling, installation, accident, unauthorized repair or
alteration.
Please contact our Customer Service Department by phone at 1-800-268-6237
or via email at customerservice@summerinfant.com for details.
Close2You
Cordless Audio Monitor
We at Summer Infant stand behind all of our products. If
you are not completely satised or have any questions,
please contact our customer service department at
1-800-268-6237 or customerservice@summerinfant.com
(For Europe Call +44 (0)208 420 4429 or
customerserviceuk@summerinfant.com)
27
NOTE: Use only the original rechargable battery pack. Warranty
void if other batteries are used. Please contact Summer Infant, Inc. for
a replacement battery pack, contact information can be found on the
next page.
FCC Information
NOTE: This equipment has been tested and found to comply with the limits
CAUTION: Changes or modifications not expressly approved by Summer
BATTERY WARNING:
• Do not mix old and new batteries.
• Do not mix alkaline, standard, or rechargeable batteries.
• Remove batteries and unplug the rechargeable battery pack
pig tail when product is stored for long period of time or when
batteries are exhausted.
• Dispose of exhausted batteries properly.
• Use only the original rechargeable battery pack. Warranty void if
other batteries are used. Please contact Summer Infant, Inc. for
a replacement battery pack, contact information can be found
on page 8.
CAUTION:
KEEP SMALL PARTS OUT OF CHILD’S REACH.
WARNING:
THIS PRODUCT CANNOT REPLACE RESPONSIBLE
ADULT SUPERVISION.
• Prevent cord entanglement – do not place transmitter in crib or
within arm’s reach of baby. Never use extension cords with AC
adapters. Only use the AC Adapters provided.
• When an AC Adapter is plugged into an electrical outlet, do not
touch the exposed end.
• Test monitor before first use, periodically, and when changing
location of the components.
• Do not use monitor near water (such as bathtub, sink, etc.).
• Keep monitor away from heat sources (such as stoves, radiators,
etc.) and make sure there is proper ventilation (not on sofas,
cushions, beds, etc. which may block ventilation).
• Nursery monitors use public airwaves to transmit and receive
signals. This monitor may pick up signals from other monitors or
similar devices, and signals broadcast by this monitor may be
picked up by other receivers.
• This product is not a toy. Do not allow children to play with it.
3
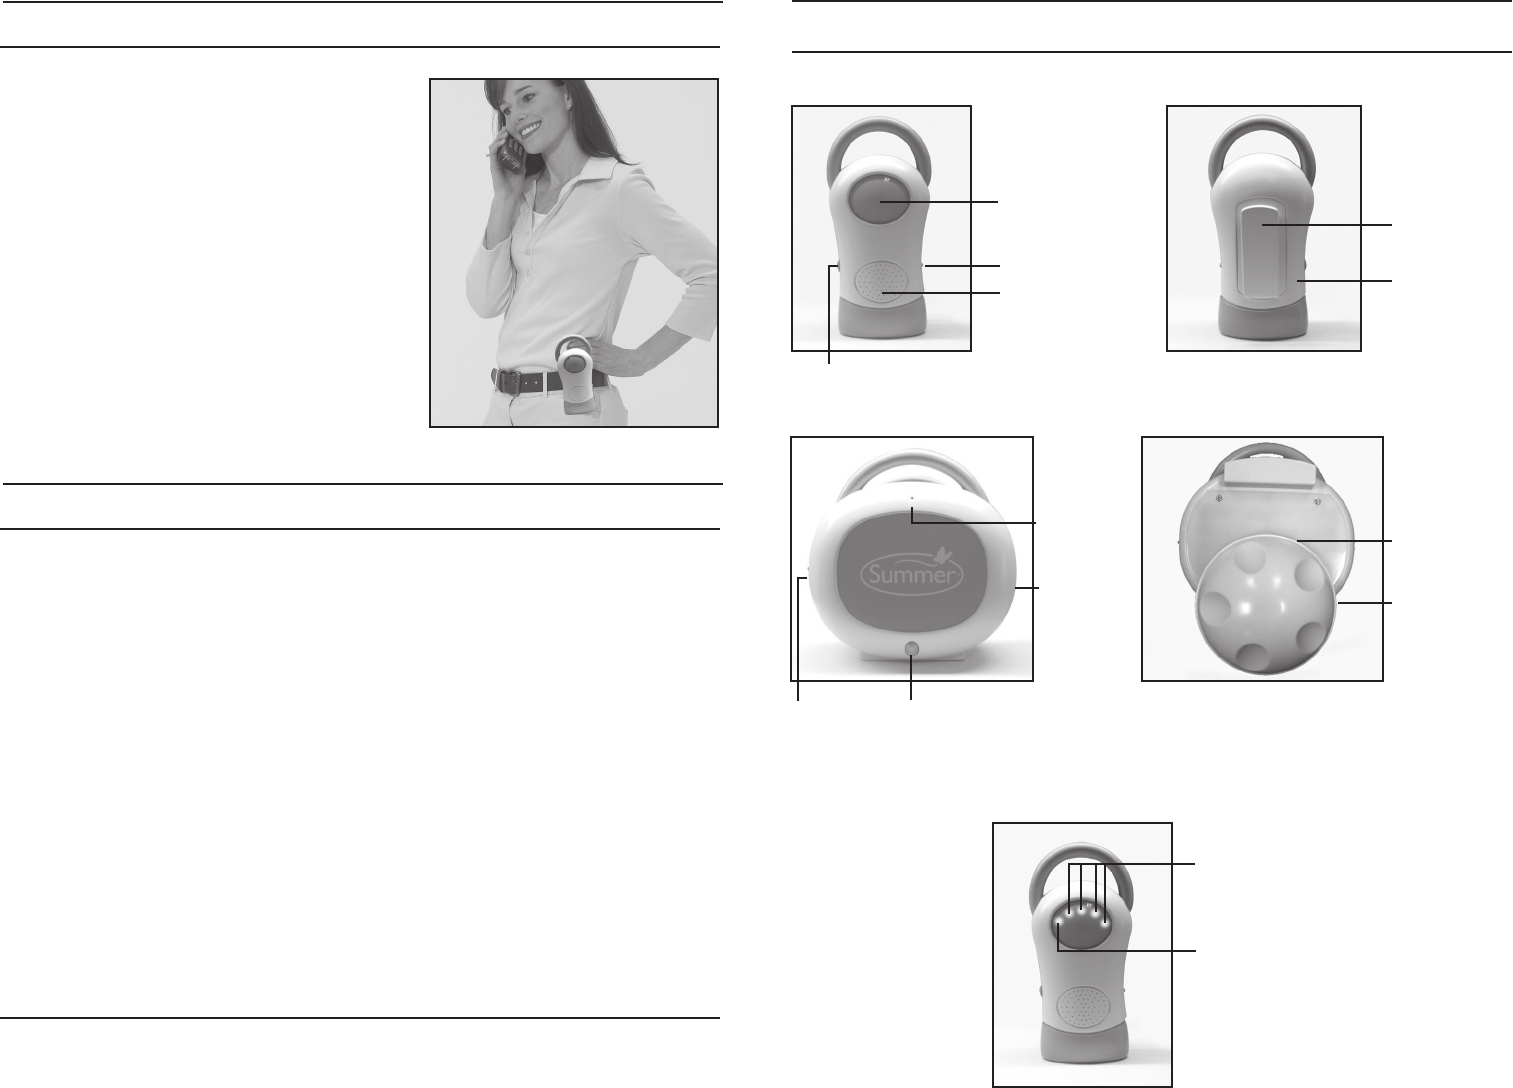
FEATURES & COMPONENTS:
6
SET UP & USE (continued):
Belt Clip:
For convenience and portability,
you can clip the Parent’s Unit to
your belt or waistband.
PROBLEM SOLVING:
No sound coming from speaker
• Make sure both Units are “ON.”
• Set volume to a higher setting.
Static
• Move the Parent’s Unit closer to the Baby’s Unit.
Squealing noise
• Parent’s Unit and Baby’s Unit too close together – move further apart.
• Turn down the volume on Parent’s or both Units.
Weak reception or no reception
• Make sure both Units are turned on.
• Move Parent’s Unit closer to the Baby’s Unit.
• Make sure the battery is charged.
If you experience a problem that is not noted in this manual, please
do not return the product to the store. Our Customer Service Department
may have a simple solution to your problem. Please call 1-800-268-6237 or
e-mail us at customerservice@summerinfant.com.
Sound LEDs
Volume Control
Parent’s Unit:
Speaker
Channel Switch
Parent’s Unit (Back View):
Belt Clip
Battery
Compartment
Power
(On/Off)
Baby’s Unit: Baby’s Unit (Back View):
Battery
Compartment
(Behind
Mounting
Bolt Cap)
Mounting
Bolt Cap
Function of Sound LEDs:
Sound Lights
* (see below for
important information)
GREEN
Power On
(will glow AMBER
when battery is low)
Microphone
Power LED
(Will turn amber
if batteries are low)
Channel
Switch
SET UP & USE:
45
SET UP & USE (continued):
To use the Parent’s Unit in Portable Mode
NOTE: Parent’s Unit should be charged 12-16 hours before first use. After
initial 12-16 hour charge, to achieve optimal battery life, charge battery
when overnight by plugging in AC adaptor and unplug all day
during use.
Step 1: For use in portable mode, the Parent’s Unit requires one 3.6V
rechargeable battery (included). When the power LED is amber color,
the battery needs to be recharged.
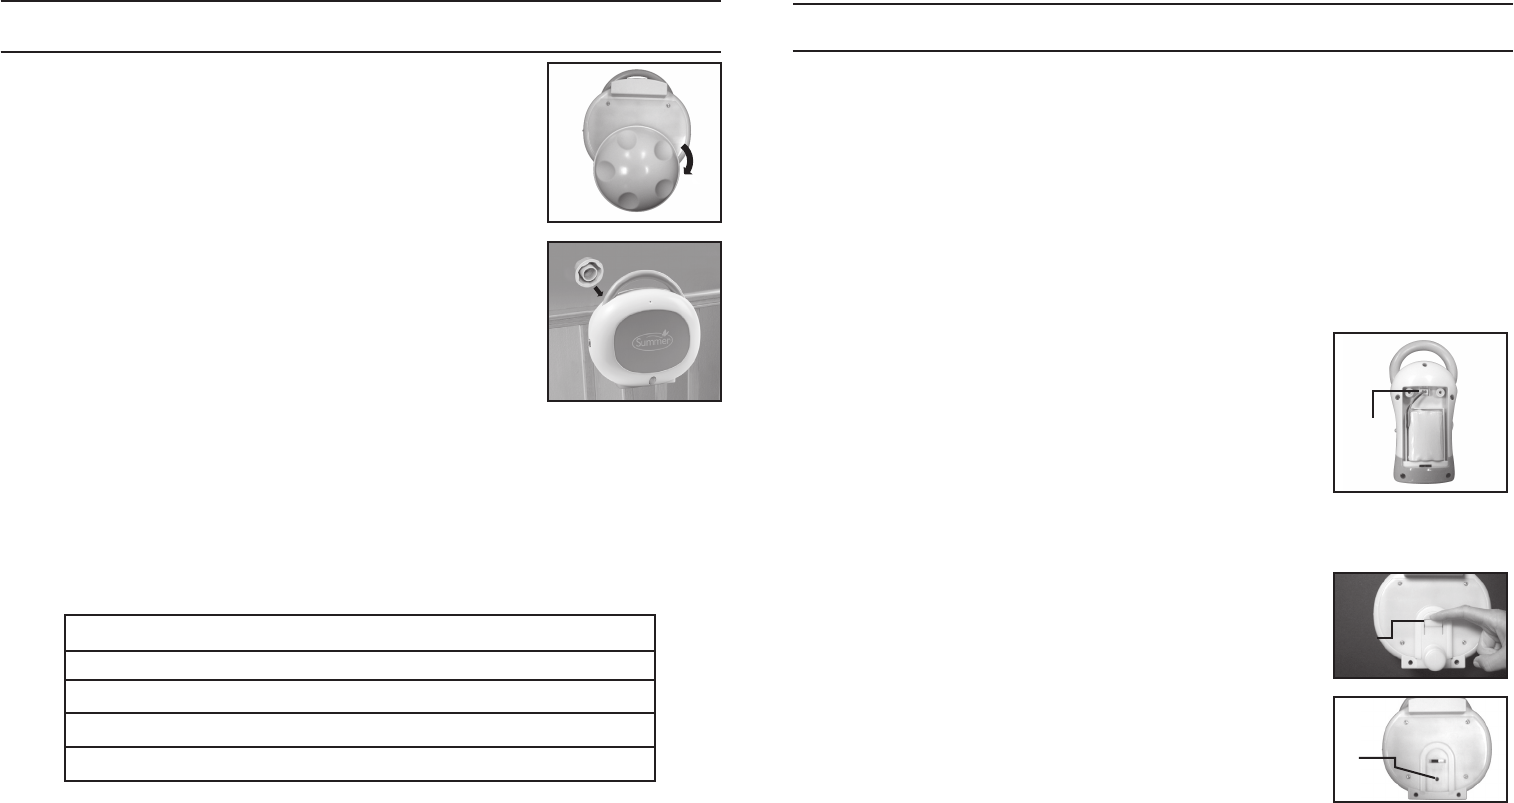
Parent’s Unit Battery Installation:
Note: This step is only needed if replacing battery.
Step 1: Locate the Battery Compartment on the back of
the Parent’s Unit and loosen the 2 battery compartment
screws with a Phillips head screwdriver.
Step 2: Open Battery Compartment door and
connect battery (Figure C). Ensure correct connection.
Replace door and tighten 2 screws.
Step 3: If a battery is exhausted, remove it immediately from
the Parent’s Unit and properly disposed of exhausted battery.
To use the Baby’s Unit outside of Crib:
Step 1: Remove Mounting Bolt Cap from Parent’s Unit.
Step 2: Remove Mounting Bolt by lifting tab and
sliding Mounting Bolt down out of groove (Figure D).
Step 3: Place Baby’s Unit in the nursery or on a flat
surface, such as a dresser, bureau or shelf (not in the
crib or within child’s reach).
NOTE: There is an AC adaptor jack on the back of the
Baby’s Unit under the sliding mount bolt (Figure E).
A Baby’s Unit AC adapter (#02770) is available by
calling Summer Infant Customer Service.
WARNING: Prevent cord entanglement. When using Baby’s Unit with an
AC adapter do not place Baby’s Unit in crib or within arm’s reach of baby.
Never use extension cords with AC adaptors. Only use the AC adapter
purchased from Summer Infant.
Testing the Unit:
You should be able to clearly hear all levels of sound coming from the
Baby’s Unit through the speaker on the Parent’s Unit. If no sound comes
from the speaker on the Parent’s unit check to make sure all cords are fully
plugged in and connected and make sure the batteries are fresh. Make
sure both units are turned on and on the same channel.
Baby’s Unit
Step 1: Remove the Mounting Bolt Cap by turning it
counter-clockwise (Figure A).
Step 2: Using a Phillips head screw driver remove the
4 screws to the battery door on back of unit.
Step 3: Insert 4 “D” batteries (not included) in the
back of the Baby’s Unit and replace battery cover.
Step 4: Position the Baby’s Unit so that the mounting
bolt passes between two vertical crib rails, with the top
piece of the Baby’s Unit resting on the horizontal
crib rail (Figure B).
Step 5: Screw the Mounting Bolt Cap onto the back
post to secure in place (Figure B).
Step 6: Switch Power on and switch Channel Switch to Channel A or
Channel B.
IMPORTANT: Please be sure that the Mounting Bolt Cap is screwed on
tightly to ensure that the Baby’s Unit is mounted securely in place.
Baby’s Unit Battery Life Information:
Hours Baby Unit is on per day Months of Use
6 13.2
12 6.6
16 5
24 3.3
Note: Turning Baby’s Unit off when not in use is recommended to conserve
battery life.
Parent’s Unit
Step 1: Place the Parent’s unit in the room from which you want to monitor
your baby (i.e. bedroom or living room). Plug the AC adapter into the AC
Adapter Jack on the left side of the unit and the other end into a standard
electrical outlet.
Step 2: Turn unit on and adjust volume level by using Volume/Power Dial
on left side of Parent Unit. Set Unit to Channel A or Channel B depending
on which channel Baby’s Unit was set to.
A
B
C
D
E
connect
battery
lift tab
and
slide down
AC
adaptor
jack