Sun Cupid 0SCI1000002 Bluetooth Keyboard User Manual
Sun Cupid (ShenZhen) Electronic Ltd. Bluetooth Keyboard
User Manual
NUU MiniKey
User Manual
Version: 1.0
Table of content:
* Package content
* NUU MiniKey
* Setting up of NUU MiniKey
* Use of NUU MiniKey
* Specification
Package content:
This package includes:
* NUU MiniKey
* Micro USB charging cable
* User manual
If any items are damaged or missing, please
contact our dealers for assistant.
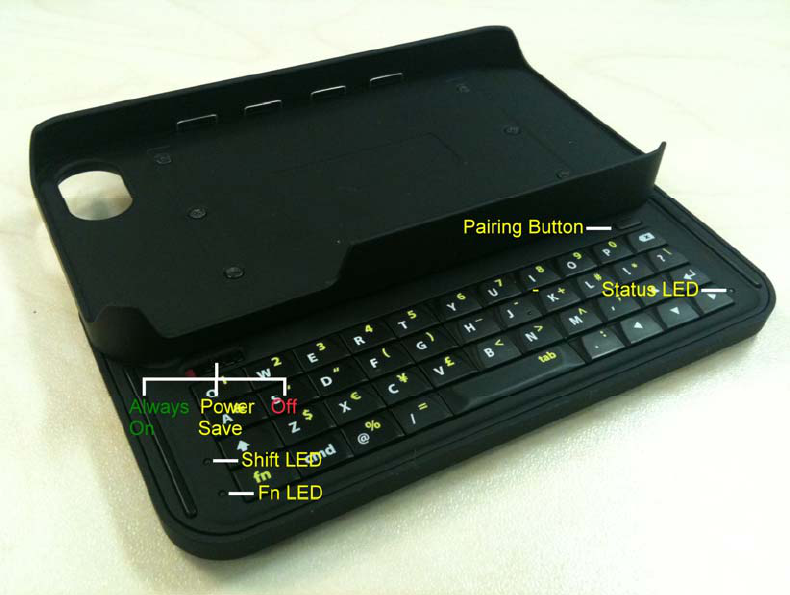
NUU MiniKey :
Setting up of NUU MiniKey:
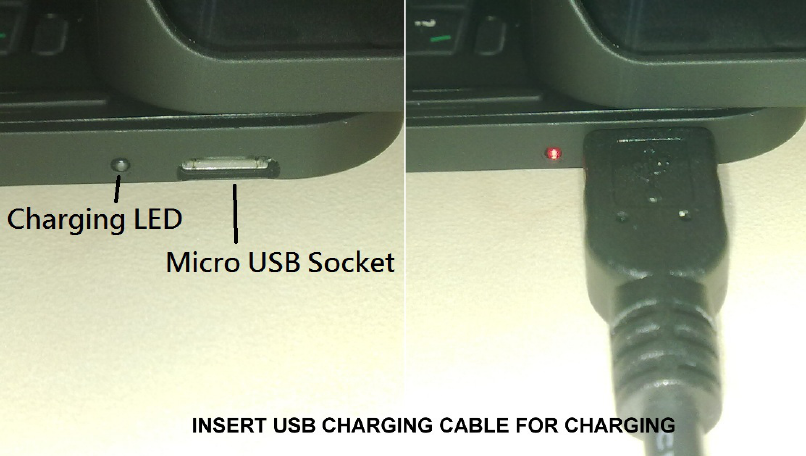
1. Insert the Micro USB charging cable into the
Micro USB socket of the NUU MiniKey. When
NUU MiniKey is charging, the charging red LED
will light up, and will go off after fully charged.
Please charge your NUU MiniKey for 8 hours
before first use.
2. Switch power button to ALWAYS ON MODE or
POWER SAVING mode. The status LED will
flash in green color and try to connect the
previous device via bluetooth;
3. Press the pairing button for more than 5
seconds to reset the bluetooth and ready to pair
a new device (e.g. a PC). The status LED will
flash in red and green alternatively;
Use of NUU MiniKey:
1. Power button;
The power button uses to OFF or selects the
operation modes of NUU MiniKey. Except OFF
mode, there are two operation modes: ALWAYS
ON and POWER SAVING.
ALWAYS ON mode: when NUU MiniKey sets in
this mode, bluetooth connection stays alive.
POWER SAVING mode: when NUU MiniKey
sets in this mode, if user doesn’t type anything
for 10 minutes, bluetooth module in NUU
MiniKey will goes into power saving mode.
Users press any key on the NUU MiniKey will
re-active the bluetooth connection. This mode
can enhance the battery life of NUU MiniKey.
2. Pairing button;

This button uses to reconnect or reset the
Bluetooth connection. Press this button once
will let NUU MiniKey reconnects to the device
that was connected before. Press this button
for more than 5 seconds will reset NUU
MiniKey’s Bluetooth and ready to pair another
device.
3. SHIFT key;
This key uses to enter the block letters in
keyboard. Double click this key for CAP lock,
and the SHIFT LED will light up. Press the
SHIFT key once to turn CAP lock off.
4. Fn (function) key;
This key uses to enter the special letters or
numeric characters in keyboard. Double click
this key enable “Fn” lock, and the FN LED will
light up. Press the Fn key once to turn “Fn” lock

off.
5. Cmd (command) key;
This key uses to enter the command set of
keyboard. Press once and both Shift LED and
Fn LED will light up. The following are the basic
commands provided:
Cmd + c: copy text;
Cmd + v: paste text;
Cmd + a: select all text;
Cmd + z: undo;
Cmd + ↑: move the cursor to top of document;
Cmd + ↓: move the cursor to bottom of
document;
Cmd + ←: move the cursor to beginning of
current line;
Cmd + →: move the cursor to end of current line;
6. Low battery;
When the NUU MiniKey is in low battery, the
status light will light up in red color.
Specification:
Size: 115mm X 60mm X 20mm
Weight: 90 grams
Operating temperature: 10°C to 40°C
Connecting protocol: Bluetooth v2.0
Connecting range: 10 meters
Power: Rechargeable Lithium
battery
Charging method: Micro USB cable
Charging time: 3 to 4 hours
Stand-by time: 72 hours
Consumption time: 2 hours (ALWAYS ON
mode)
Keyboard layout: United State 49 keys
Important Regulatory Information
This device complies with part 15 of the FCC rules. Operation is subject to
the following two conditions:
(1) This device may not cause harmful interference, and
(2) This device must accept any interference received, including
interference that may cause undesired operation.
FCC Part 15 Compliance Statement
Changes or modifications not expressly approved by the party responsible
for compliance could void the user's authority to operate the equipment.
This equipment has been tested and found to comply with the limits for a
Class B digital device, pursuant to Part 15 of the FCC Rules. These limits
are designed to provide reasonable protection against harmful interference
in a residential installation. This equipment generates uses and can radiate
radio frequency energy and, if not installed and used in accordance with the
instructions, may cause harmful interference to radio communications.
However, there is no guarantee that interference will not occur in a particular
installation. If this equipment does cause harmful interference to radio or
television reception, which can be determined by turning the equipment off
and on, the user is encouraged to try to correct the interference by one or
more of the following measures:
‧ Reorient or relocate the receiving antenna.
‧ Increase the separation between the equipment and receiver.
‧ Connect the equipment into an outlet on a circuit different from that to
which the receiver is connected.
‧ Consult the dealer or an experienced radio/TV technician for help.
RF Exposure warning statement:
The device has been evaluated to meet general RF exposure requirement.
The device can be used in portable exposure condition without restriction.