SunComm Technology SC-9029-RA GSM PHONE User Manual
SunComm Technology Co.,Ltd GSM PHONE
User manual

1
GSM Fixed Wireless Phone
Teléfono Fijo GSM Inalámbrico
User Manual/Manual del Usuario
2
1. GENERAL INTRODUCTION
Thank you for choosing our GSM Fixed Wireless Phone. This GSM
Fixed Wireless Phone with its advanced features has been specifically
designed to bring comfort and ease of use to your life. You can use
this phone to send SMS plus make and receive calls. Its GSM
functionality makes it ideal for use in rural areas.
Please read this user manual carefully before using your new phone
for the first time in order to familiarize yourself with, and get the
maximum benefit from, all its advanced features and functions.
When charging the phone for the first time, charge battery for at
least 16 hours.
Do not use the phone while driving.
Please put the phone indoors during a thunder storm.
Turn off your mobile phone while on plane
Follow relevant regulations or rules. Switch your device off near
medical equipment.
All wireless phones may be susceptible to interference, which
could affect the performance.
When cleaning the phone, please power off
Please do not put the phone near the computer
Do not expose the phone in the sun for a long time
Please do not pour any liquid into the phone
Please do not use the phone in rude way
When using the phone, please pay attention to the law of using
the phone
Please use the approved batteries, and only use the battery
charger approved by the phone producer
3
The phone use the dedicated, encrypted SIM card, please do
not try to use other SIM card, or it will damage the phone
The user manual is for you reference.
2. FUNCTION INTRODUCTION
support 850MHz/900Mhz/1800Mhz/1900MHz mobile
communication network
Speed dialing
Radial function
500 Phone P BOOK function
Volume adjustment of handset and speaker
Various ring tone for incoming calls and alarm clock
Various ring tone or mute for SMS
Receive and Send SMS, at maximum 200 SMS can be stored
LCD display date, time, signal strength, battery capacity
10 group of latest incoming calls, outgoing calls, missed calls can
be recorded, reviewed, deleted or called back
3. TECHNOLOGY
Temperature:-10℃~55℃
Humidity :≤90%
Air pressure:86~106Kpa
Working frequency:850MHz/900MHZ/1800MHz//1900MHz
size:200*175*65mm
Working voltage:AC100~220V,50Hz,DC 5V 1000mA
Additional battery:rechargeable battery
Standby time:more than 48 hours
Talk time:around 2 hours
Note: standby and talk times are affected by network preferences.
4
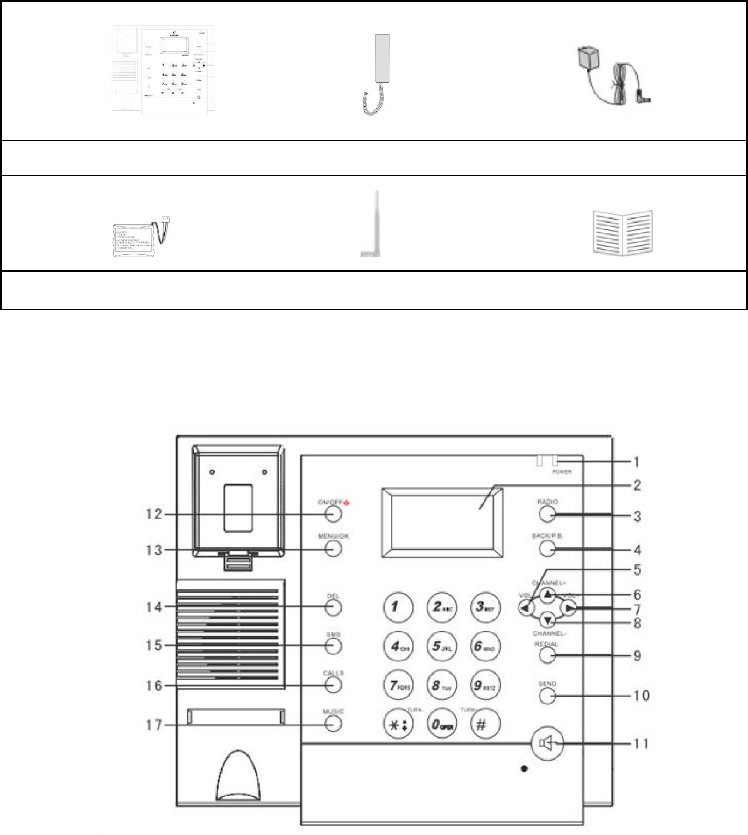
4. PACKING DETAILS
(1) 1pc phone base (2)1pc headset (3) one charger
(4)1pc battery (5)1pc antenna (6)user 's manual
Note: the packing details may differ from the actual product.
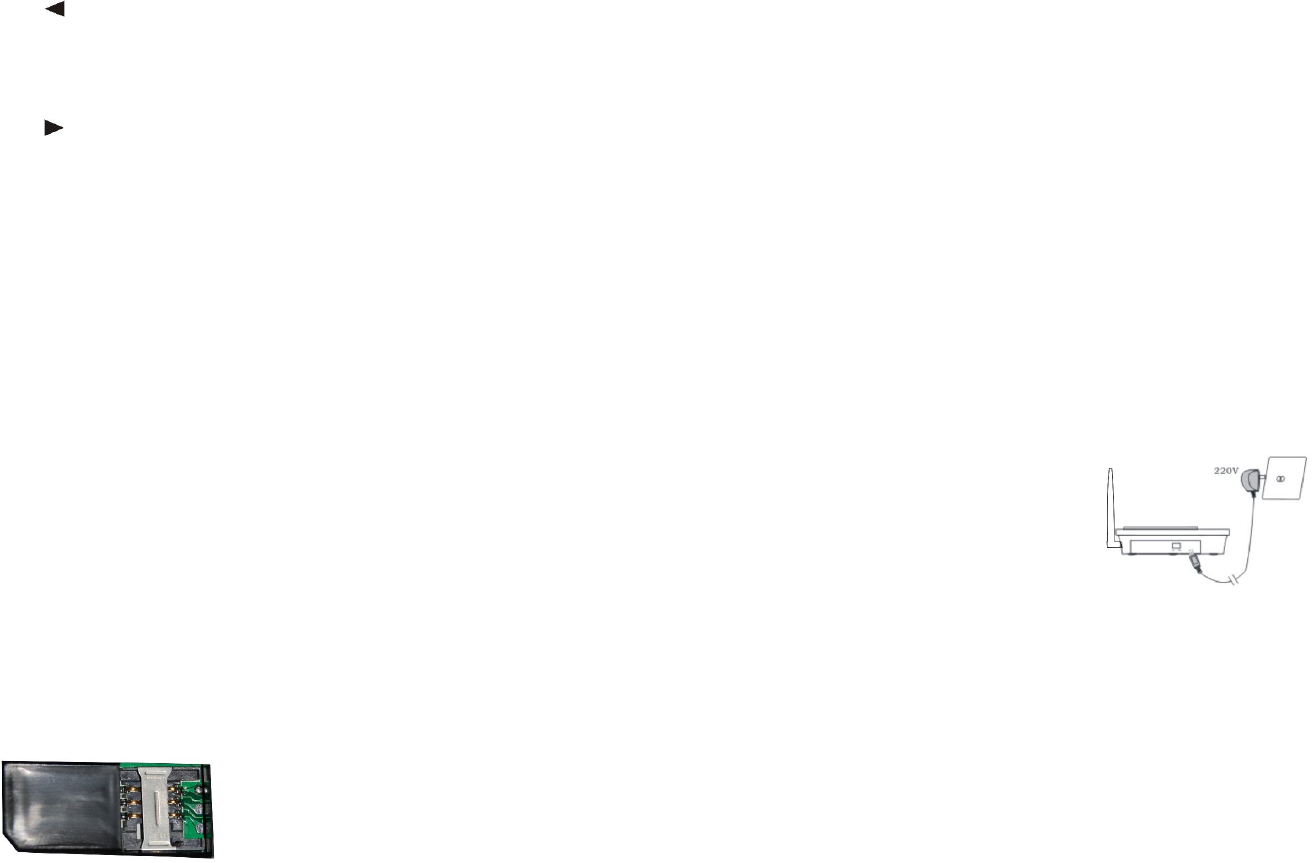
5. LAYOUT OF BASE UNIT
1. Power LED light: the LED light will turn on when you connect the unit
to the charger
2. LCD display: LCD display shows the date, time, signal strength, and
battery capacity
3. RADIO: this is the FM radio function
5
4. BACK/DEL: from the menu, press this key to return to the default
interface, when editing SMS you can use this button to delete words
5. 【▲】: when on a conversation, press this button to move the menu
upwards, when the phone is in standby mode, press this button to
check missed calls
6. 【 】: from the menu, press this button to decease the volume, in
standby mode press this button to go to the SMS inbox
7. 【▼】: when on a conversation, press this button to move the menu
downwards, in standby mode press this button to view received calls
8. 【 】: from the menu, press this button to increase the volume, in
standby mode, press this button ta write SMS
9. REDIAL: when the phone is off the hook, press this button to call the
last number dialed
10. SEND: After inputting a phone number, press this button to dial
the number, in standby mode, press this button to display the last
number dialed
11. SPEAKER: press this button to turn the speaker on and off
12. ON/OFF: press this button to turn the phone on and off
13. MENU/OK:in standby mode, press this button to go to the menu
settings, from the menu press this button to confirm a selection
14. Names: press this button to enter the phonebook, from the menu,
press this button to go back to the default screen
15. SMS: press this button to go to the SMS menu
16. CALLS: call list, press this button to enter the call list
17. RING TONE/MUTE: in standby mode, press this button to set the
ring tone, when on a conversation, press this button to MUTE the
phone
6. INSTALLING AND CONNECTING
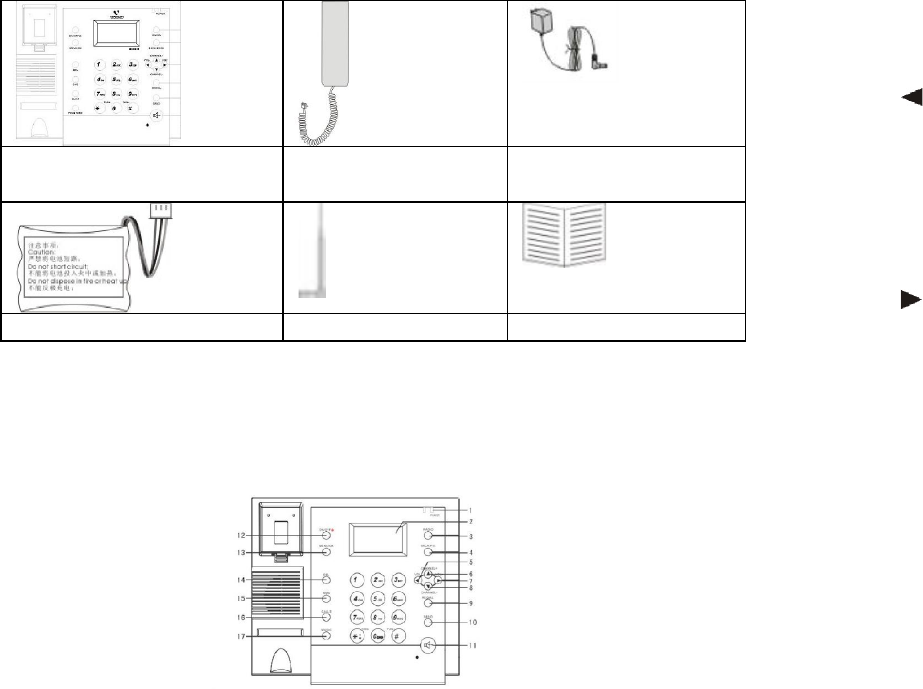
6-1 Installing the SIM card and battery
6
1. Remove the battery cover, with the SIM card facing down insert
the SIM card according to the shape of the card slot
2. Connect the battery’s 3-pin plug into the white socket of the
battery slot and insert the battery flat
3. Close the battery cover
Note:
Make sure to turn off the phone before removing the battery or
SIM card. Do not remove battery or SIM card while the phone is
turned, this can damage the phone and/or SIM card.
In order to protect the data on the SIM card, please back up
your data regularly. Do not touch the metal contacts of the SIM
card. The SIM card should be kept away from electromagnetic
areas. Once the SIM card is damaged, you cannot use the GSM
network.
In some cases the SIM card may already be installed so there is
no need for the user to install it.
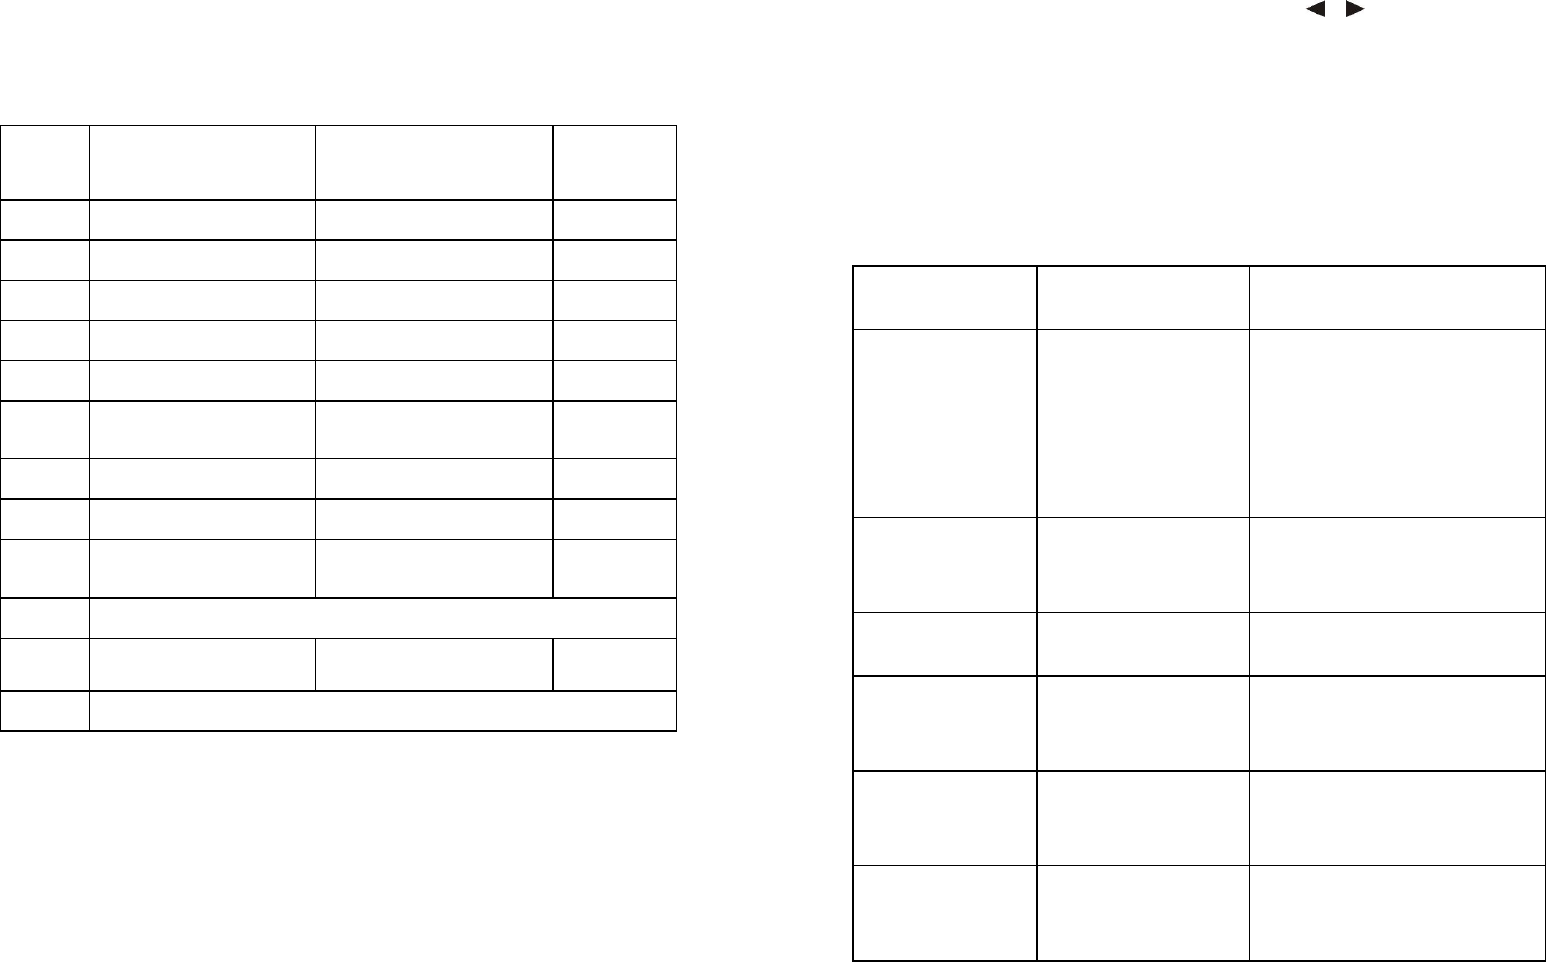
6-2 Connecting the power
6-3 Connecting the handset
Connect the headset connector to the phone
6-4 Turning the power on and off
Power on
Press and hold the ON/OFF key to turn on the phone. The phone will
play a wake-up tone and the LCD backlight will turn on. Next, the
phone will automatically search for a network. One the phone

7
enters standby mode, it is ready to use.
Note: the full signal strength is 6 levels, if the signal strength is less than
6, you can adjust the antenna to improve the signal quality.
Power off :press and hold the ON/OFF key until the LCD
backlight turns off, at this point the phone has been turned off.
7. OPERATION
7-1 Making a phone call
You can make a phone call in the following manners:
1) Pick up the handset or press the key, input the desired
number using the keypad and it will appear on the LCD display.
Press the SEND key to dial the number immediately or wait 5 seconds
and the number will be dialed automatically.
2) From the standby mode, press Names to enter the phonebook.
Select the desired number and press the SEND key, the number will
be dialed.
3) Go to the call lists and select the desired number. Press the
SEND key to dial the number.
4) Pick up the handset or press the key, press the REDIAL key
and the last number called will be redialed.
7-2 Receiving a call
When a call is received the caller ID will be displayed on the LCD
screen while the phone is ringing. You can pick up the handset,
or press the key to answer the call. When you are finished
with the conversation you can return the handset to the base or
press the key again.
7-3 Redial function
With the phone on or off the hook you can press the REDIAL
button, to redial the last number dialed.
8
7-4 Hands free function
With the phone on or off the hook you can press the
SPEAKER button to turn on the speaker and hands-free mode.
7-5 Send
After inputting the desired number you can press the SEND key to
dial the number. You can also dial a number by selecting it from the
phonebook or from the call lists.
7-6 Adjusting the volume
During a conversation, press VOL+ to increase the volume or
press VOL- to decrease the volume. The volume has a total of 7
levels. The volume buttons will adjust the handset or speaker volume
depending on which method you are using.
8. MENU
8-1 phonebook
You can save the name and number in the SIM card or in the
phone. Use the phone P BOOK function, you can add, search, delete
number. In standby mode, press MENU/OK key, and then press
number button 1, after 2 seconds, shall go into menu of phonebook.
8-1-1 phonebook:
Contacts: to check, edit, delete, copy, transfer, send message
etc.
Add new contacts: to add new contacts name for the desired
number in phone unit or SIM memory.
Delete all: to delete all number memory in SIM or phone unit
Copy all: to copy all number memory from SIM (phone unit) to
Phone unit (SIM) memory.
Store mode: to check SIM or phone unit memory mode.
9
8-2 Message:
The Message inbox and outbox and draft box can total save 200
message, The SIM card capacity is based on the SIM memory, The
inbox save all the received message, The outbox only store the
message which is ‘send and save’ . If the message did not send out,
it will save in draft box, after writing the message, if do not make any
further operation, it can directly back to main menu. Next time when
writing message, the phone can memorize last message, Long press
DEL key can delete all content, in standby mode, press MENU/OK key
to main menu, Press【2】key, after 2 seconds it will enter into message
menu.
8-2-1 write messages:
In standby mode, press MENU/OK key, then press【►】 enter messages
menu, or press the shortcut key SMS to enter the messages menu.
After entering messages menu, press 【◄ ►】key to select sub-menu
"Write message "and press MENU/OK key to confirm. Then you can
write message in the input field. Use 【◄ ►】key to move the cursor,
use * key to provide Symbol such as .,? ! Etc,use # key to change the
input method. Use numerical key to input the alphabet. After finishing
the message, press MENU/OK, then there are two options: "done"
and "use templates”, if you select "done" then you can do the
following operations:
Send only: the message will be sent out and not save.
Save-the message will be save in draft box and not be sent out
Use templates-the default message
If you select "use templates" the common used text in the "use
templates" will be added into the message you write, then you can
select "done" again to send the message out.
10
8-2-2 Inbox:
Go the SMS menu, press 【▲▼】key to select the INBOX
Press MENU/OK, the LCD display the received message
Press 【▲▼】to select the message
Press MENU/OK to confirm and read this message
Press 【▲▼】key to select message and after select one message,
you can press MENU/OK key to do following operations
Forward:forward the message to others。
Reply:Reply the received message. Press MENU/OK to write the
message. After writing, press MENU/OK to confirm and send out
the message
Delete: delete the message
Edit: edit the message,
Copy to SIM: copy the message in phone unit to SIM
Transfer to SIM: transfer the message from phone unit to SIM
Delete all: delete all the messages
Copy all: Copy all the message in SIM card to phone
Move all: delete all message in SIM card and move them to
phone
use numbers: save the senders' number to the phone or SIM
8-2-3 outbox:
enter SMS menu, press 【▲▼ 】key to select the outbox, Press
MENU/OK key to confirm and the LCD displays the outbox message.
Press 【▲▼】key to select the desired message and press MENU/OK
key to enter to read the selected message.
When select a message, you can do the following operations:
Send: send the message to others
Edit: edit the message, press MENU/OK can send out
Delete: delete the message
Copy to SIM: copy the message in phone unit to SIM
11
Transfer to SIM: transfer the message from phone unit to SIM
Delete all: delete all the messages
Copy all: Copy all the message in SIM card to phone
Move all: delete all message in SIM card and move them to
phone
use numbers: save the senders' number to the phone or SIM
8-2-4 draft box
If you write a message and save it but not send, it will be stored in the
draft box
After entering the message menu, press 【▲▼】key to select the draft
box, press MENU/OK to confirm, the LCD will display the message
stored in the draft box, selecting one message to read and press
MENU/OK again, you can do the operations such as "send, edit,
delete, copy to phone, move to phone, copy all, move all, delete all,
use numbers, which is same as the operation in inbox.
8-2-5 use template
The phone provides 10 pcs message as template which is common
used. So you can use the template message and sent out for
convenience. You can also write your own message and save as
template and erase the original template.
8-2-6 message setting:
After enter into the menu "messages", press 【▲▼】key to select
"Message settings", and then press MENU/OK key to enter into the
following setting.
8-2-6-1 profile settings: you can make the following setting
Message service center number: to set the MSC no. Press twice
the key" * "continuously can input "+"
12
Valid time: to set the valid time.(there are five options: 1
hour,12 hours,1 day, 1 week, maximum, sometimes, the valid
time is not exact, it is relevant to the network),after confirm the
set, press P BOOK key to save the setting.
type: to set the type as text, fax, page or email.
8-2-6-2 common settings: you can set to close or open the delivery
report and reply path, after setting, please remember to press P
BOOK key to save the setting, otherwise, the setting is not valid.
8-2-6-3 memory status: select this menu, you can check the memory
status
8-3 call history
In standby mode, press CALLS key to enter into call history menu, you
can see the following sub-menu, or press MENU/OK key to enter main
menu, then press【▲▼】 enter into call history menu.
8-3-1 missed call The phone can record 20 group missed calls
and the call time
After enter into "call history" menu, press 【▲▼】to select “missed calls",
then press MENU/OK key to check the missed calls.
Press 【▲▼ 】key to select the missed call number, and press
MENU/OK key to confirm, the LCD will display the caller information
including the caller's number, time, date, and frequency. Press
MENU/OK again, there are following options:
Delete- delete the missed call number
Save-save the missed call number to the phone P BOOK or SIM
Dial-dial out the number
Edit- edit the miss call number and save the number to SIM or
phone P BOOK
13
8-3-2 dialed calls:The phone can save 20 group dialed calls
After enter into "call history” menu, press 【▲▼】to select “dialed calls",
then press MENU/OK key to check the dialed calls.
The operation of Deleting, saving, dialing, editing the dialed calls is
same as that of missed calls.
8-3-3 received call:The phone can save 20 groups received
calls.
After enter into "call history” menu, press 【▲▼】to select “received
calls", then press MENU/OK key to check the received calls.
The operation of Deleting, saving, dialing, editing the received calls is
same as that of missed calls.
8-3-4 delete call logs: select this menu to delete the call
records.
After enter into "call history” menu, press 【◄ ►】to select "delete
call logs", then press MENU/OK key to confirm, there will be four
options:
Missed calls: to delete all the missed calls
Dialed calls: to delete all the dialed calls
Received calls: to delete all the received calls
Delete all: to delete all the missed calls, dialed calls and the
received calls
8-3-5 call timers: display the time and total duration of the
calls.
After enter into "call history” menu, press 【◄ ►】to select "call timer",
then press MENU/OK key to confirm, there will be four options:
last call: display the time of last call
Dialed calls: display total duration of all the dialed calls
Received calls: display total duration of all the received calls
14
Reset all time: clear all the time information and return to
00:00:00
8-4 settings
In standby mode, press MENU/OK to enter the main menu, press
【▲▼】 to enter into the menu "setting”: to
8-4-1 phone setup
After enter into the menu "setting" press【▲▼】to select the menu
"phone setup" and press MENU/OK key to confirm, then there will be
the following options
Time and date: set the time and date format.
After entering into "phone setup" menu, press 【▲▼】to select the
item "Time and date" press MENU/OK to confirm. There will be two
items: "Set time/date" and "Set format"
Set time/date: press【▲▼】key to select "Set time/date" and press
MENU/OK key to confirm
press【▲▼】key to select the time and press MENU/OK key again,
LCD display 00:00 (HH:MM), the former 00 is the hour, the latter is the
minute. Directly input the digits to change the time and use the【◄
►】key to move the cursor. After inputting the digits, press MENU/OK
key to confirm the input. Then press P BOOK key to save the change,
LCD will display "save?" "yes” “no", press MENU/OK key again, the
change will be saved. LCD will display "Done" to remind you the
operation is successful. If you do not want to save the change, just
press P BOOK key to return to former menu.
press【◄ ►】key to select the date and press MENU/OK key again,
the LCD display the date (YYYY/MM/DD), directly input the digits to
change the date and use the【◄ ►】key to move the cursor. After
inputting the digits, press MENU/OK key to confirm the input. Then
press P BOOK key to save the changes, LCD will display "save?" "yes”
15
“no", press MENU/OK key again, the change will be saved. LCD will
display "Done" to remind you the operation is successful. If you do not
want to save the change, just press P BOOK key to return to former
menu.
Set format: press【◄ ►】key to select "set format". The time format
can select 24hr or 12 hr. The date format can select YYYY/MM/DD or
MM/DD/YY or DD/MM/YY. The setting method is same as that of time
and date setting. After every setting, please remember to press P
BOOK key to save the new setting.
Language: only English.
Contrast: the LCD contrast shall be from 1~15 levels. Press 【◄ ►】
to change the contrast and press MENU/OK key to confirm.
LCD back light: there are four time selectable for LCD back
light,5s,15s,30s,45s press【◄ ►】key to select and MENU/OK key to
confirm. If the operation is successful, LCD will display "Done" for
about 1 second
8-4-2 call setup
After enter into the menu "setting" press【▲▼】to select the menu
"call setup" and press MENU/OK key to confirm, then there will be the
following options
Speed dial: after selecting the" speed dial "menu, you can set 3
speed dial numbers
Call waiting:
Auto dial:
8-4-3 security setup
After enter into the menu "setting" press【◄ ►】to select the menu
"security setup" and press MENU/OK key to confirm, then there will be
the following options
SIM lock: this menu you can set SIM lock to protect your SIM
16
information, when you set SIM lock, you need to set your own
password and remember it. You can also close the function by
select the menu “Off"
Change password: this menu you can change your password
8-4-4 restore factory settings:
When selecting the menu" restore factory setting" you need to input
a password. The original password is "1122".If you restore the factory
settings, all the phone P BOOK, call history,alarm,speed dial number
well be cleared
8-5 user profile
In standby mode, press MENU/OK to enter the menu, press 5 key to
get "user profiles": you can do the following operations:
8-5-1 ring tone setup
After enter user profile menu, press【▲▼】to select the menu "Tone
setup" and press MENU/OK key to confirm. Then you can select the
ring tone for incoming call, alarm, power on, message tone, keypad
tone.
8-5-2 volume
Use the same way as "Tone setup" to enter "Volume" menu, you can
set the volume for ring tone and key tone.
8-5-3 alert type
Use the same way as "Tone setup" to enter "Alert type", you can
select "ring" or "light only" for the alert.
8-5-4 ring type
Use the same way as "Tone setup" to enter "Ring type", you can select

17
single, repeat or ascending for the ring.
Single: when you select single, the ring will only sing once.
Repeat: when you select repeat, the ring will sing several times.
Ascending: when you select ascending, the ring will perform a
mounting effect from low to high.
8-5-5 extra tone
Use the same way as "Tone setup" to enter "extra tone", you can set
"on" or "off" of the warning tone, error tone, camp on tone, connect
tone
Warning: when low battery, the warning tone will ring.
Error: when message cannot send out or other mistake, the error tone
will ring
Camp on: when phone is on busy line, the camp on tone will ring to
remind you.
Connect tone; when the data line connect, the connect tone will
ring.
8-6 FM RADIO
Phone is standby, press MENU/OK, and then press 6 button to play FM
radio function.
FM OFF: after go into FM menu, press 【▲▼】to select ON or OFF
AJUST FREQUENCY: after go into FM menu, then input your desired
frequency, then press MENU/OK to confirm, and then press 【▲▼】to
finish setting or exit.
CHANNEL: after go into FM menu, press 【▲▼】to select play, re-name,
edit
VOL: you can adjust the FM volume
AUTO SEARCHING: after go into FM menu, press MENU/OK button,
then you can select to do auto searching
18
8-7 organizer
In standby mode, press MENU/OK to enter the menu, press 7 key to
get "organizer"; or press MENU/OK key to enter the menu, then press
【▲▼】to select the menu “organizer" and press MENU/OK key again
to enter.
After enter into the organizer menu, you can do ALARM operation:
The phone can set 3 pcs of alarm.
After enter the organizer menu, you can see ALARM function, and
press MENU/OK, you can see STATUS, TIME, SNOOZE (MIN), REPEAT
and ALARM TONE.
STATUS: you can check your alarm setting status
TIME: you can set your desired alarm time
SNOOZE (MIN): you can set this function to be OFF, you also can set
how many minutes that you can have a good sleep, such as 1
minute, 3 minutes, 5 minutes and 10 minutes selection.
REPEAT: you can OFF, Daily, Weekly, monthly and yearly
ALARM TONE: 12 tones selection
8-8 services
In standby mode, press MENU/OK to enter the menu, press 8 key to
select the menu “services" and press MENU/OK key again to enter.
This menu is subject to SIM card.
9. INPUT METHOD
The phone support Numeric, Multitap PR, Multitap pr. input method.
You can select the input method in the menu "settings" and you can
also change the input method by press # key during you writing
messages.
When inputting words, press DEL key delete the previous Alphabet.
Long press DEL key to delete all Alphabet or words, Press 【◄ ►、 、
】to move cursor
19
Press MENU/OK to confirm or the option on the screen left side. Press
P BOOK to the option on the screen right side. Press BACK to return to
power on interface.
The digit key function in corresponding input method as follows:
key ABC or abc
(=ABC)(=abc)
English capital or
small letter
(ABC) (abc)
Number
(123)
1 . . , ? ! ’”: ; @ _ & 1 1
2 A B C a b c A B C a b c 2
3 D E F d e f D E F d e f 3
4 G H I g h i G H I g h i 4
5 J K L j k l J K L j k l 5
6 M N O m n o M N O m n o 6
7 P Q R S p q r s P Q R S p q r s 7
8 T U V t u v T U V t u v 8
9 W X Y Z w x y z W X Y Z w x y z 9
* symbol
0 space (space)0()+-*=#% 0
# Change the input method
Multitap ABC input method: only input the English single words
In edit state, input the words by pressing the digit key
For example to input ‘HOME’, press the 【4】key two times to input H
Second press 【6】three times to input O
Third press 【6】one times to input M
Last input 【3】two times to input E
20
When cursor in edit area, press 【◄ ►、 、 】key to move the
cursor.
Press DEL key to delete the words, Long press DEL key can delete
all the digits
In Multitap ABC input method, maximum you can input 612 digits
10. TROUBLESHOOTING
Problems Possible reason Possible corrective
measure
No display, no
back light
The power did not
connect properly
use the approved
batteries, and only use the
battery charger approved
by the phone producer,
can connect the jack
properly
After dialing
cannot
connect
1.network problem
2.signal interfere
1.Try later。
2.Restart the phone。
No display but
with back light
Battery power is
low Charge the battery。
noise
Network problem
and signal weak
move around and try to
find somewhere with better
signal
SIM card error
1.battery low
2.SIM card
connect badly
1.Connect the power,
charge the phone
2.Adjust the SIM connector
signal poor
The network
parameter not
properly
Contact the operator, or
call the hotline
21
1. INFORMACIÓN GENERAL
Gracias por elegir nuestro teléfono fijo inalámbrico. Este teléfono
incorpora las últimas características y está diseñado
específicamente para hacer tu vida más fácil y más productiva. Por
medio de este teléfono usted puede: enviar mensajes SMS y hacer/
recibir llamadas. Esta unidad es ideal para uso en zonas rurales.
Este manual le permitirá familiarizarse con este teléfono. Lea las
instrucciones con cuidado antes de utilizar su teléfono nuevo para
poder obtener el beneficio máximo del mismo. Antes de utilizar el
teléfono por primera vez, siga estas indicaciones:
* Debe de cargar el teléfono por más de 16 horas antes de utilizarlo
por primera vez.
* No utilice el teléfono mientras este conduciendo un vehículo.
* Mantenga el teléfono dentro de su casa durante un mal tiempo o
una tormenta eléctrica.
* Apague su teléfono móvil cuando este abordo un avión.
* Siga todas las indicaciones y normas públicas. Apague el
dispositivo cuando se encuentre cerca de equipos médicos.
* Todos los teléfonos móviles pueden ser susceptibles a interferencias
que pudieran afectar su rendimiento.
* Apague el teléfono antes de limpiarlo.
* Por favor, no coloque el teléfono cerca de la computadora.
* No exponga el teléfono al sol durante mucho tiempo.
* Por favor, no derrame ningún líquido dentro del teléfono.
* No utilice el teléfono de forma inapropiada.
* Siempre utilice el teléfono de acuerdo a las leyes apropiadas.
* Solo utilice las baterías y el cargador aprobados por el fabricante
del teléfono.
22
* El teléfono utiliza una tarjeta SIM especial que esta codificada, no
intente utilizar otra tarjeta SIM porque esto pudiera dañar el teléfono.
* Mantenga este manual del usuario como referencia.
Las especificaciones están sujetas a cambio sin aviso.
Este manual se ha elaborado con el mayor cuidado pero ninguna
de las empresas afiliadas toman responsabilidad por cualquier error
o errores contenidos en el mismo.
Los ejemplos de las pantallas presentados en este manual son para
referencia solamente, las pantallas actuales del equipo pudieran
variar.
2. FUNCIONES BASICAS
* Frecuencias de redes móviles compatibles:
850MHz/900MHz/1800MHZ/
1900MHz
* Marcación rápida
* Función de radio
* Libreta telefónica con capacidad para 500 contactos
* Ajuste de volumen: para el auricular y el parlante
* Opciones para el timbre de llamadas y el despertador
* Opciones de tonos (o silenciar) para mensajes SMS
* Recibir/enviar mensajes SMS, capacidad para almacenar hasta
200 mensajes
* Pantalla LCD que muestra: fecha, hora, nivel de la señal, carga de
la batería
* Grupos de las ultimas 10 llamadas: recibidas, realizadas, y perdidas.
Estos números se pueden: guardar, borrar, revisar o llamar de nuevo.
3 , TECNOLOGÍA
* Temperatura: -10 ℃ ~ 55 ℃
* Humedad: ≤ 90 %
23
* Presión atmosférica: 86 ~ 106Kpa
* Frecuencias compatibles: 850MHz/900MHZ/1800MHz/1900MHz
* Tamaño : 200 * 175 * 65mm
* Voltaje: 100 ~ 220V, 50Hz , DC 5V 1000mA
* Batería adicional: batería recargable
* Tiempo en espera: más de 48 horas
* Tiempo de conversación: 2 horas aproximadas
Nota: el tiempo de espera y el tiempo de conversación se pueden
ver afectados por la red de comunicaciones.
4. EMPAQUE
Una unidad de base
Un auricular Un cargador
Una bacteria Una antena Manual del usuario
Nota: el empaque pudiera variar al presentado en este manual.
5. UNIDAD DE LA BASE
24
1 Indicador LED de ENCENDIDO: esta lámpara se enciende después
de conectar la unidad al cargador.
2 Pantalla LCD: muestra la fecha, hora, nivel de la señal, carga de la
batería
3 RADIO: función de radio FM
4 REGRESAR/BORRAR: desde el menú puede pulsar esta tecla para
regresar a la pantalla principal. Esta tecla también se puede utilizar
para borrar palabras desde la pantalla de mensajes SMS.
5 【 ▲ 】: Durante una llamada, pude pulsar este botón para mover
la pantalla hacia arriba. Cuando el teléfono está en estado de
espera, este botón le permite ver las llamadas perdidas.
6 【 】: Desde el menú, puede pulsar esta tecla para reducir el
volumen, en estado de espera, esta tecla sirve para entrar en el
sistema de SMS.
7 【 ▼ 】: Durante una llamada, puede utilizar esta tecla para mover
la pantalla hacia abajo, en estado de espera puede utilizar esta
tecla para ver las llamadas recibidas.
8 【 】: Desde el menú puede pulsar esta tecla para aumentar el
volumen, en estado de espera esta tecla sirve para entrar a escribir
un mensaje SMS.
9 REMARCACION: teniendo un tono discal, pulse la tecla de
REMARCACION para marcar el último número marcado.
10 ENVIAR: Después de marcar un número telefónico, pulse la tecla
de ENVIAR para efectuar la llamada. En el modo de espera, la
tecla sirve para ver el número ingresado en pantalla.
11 PARLANTE: Presione esta tecla para activar o apagar el parlante.
12 ENCENDIDO/APAGADO: Pulse esta tecla para encender o
apagar la unidad.

25
13 MENU/OK: en el modo de espera, pulse esta tecla para ir al menú
de configuración, desde el menú, pulse MENU/OK para confirmar
una selección.
14 CONTACTOS: desde el menú, pulse este botón para ver los
contactos guardados en el teléfono, también puede utilizar esta
tecla para volver a la pantalla principal.
15 MENSAJES: Desde el menú, pulse este botón para ir al menú de
mensajes SMS.
16 LLAMADAS: lista de llamadas, pulse esta tecla para entrar en los
registros de llamadas.
17 MUSICA: en estado de espera pulse esta tecla para configurar los
tonos de llamadas, en medio de una llamada esta tecla sirve para
apagar el micrófono del auricular.
6. INSTALACIÓN Y CONEXIÓN
6-1 Instalación de la tarjeta SIM y la batería
1. Remueva la cubierta de la batería, inserte la tarjeta SIM de
acuerdo a la forma de ranura.
2. Conecte el enchufe blanco de tres pines de la batería e inserte la
batería de manera plana.
3. Cierre la cubierta de la batería.
Nota:
* En ningún momento intente remover la tarjeta SIM con la unidad
encendida. Esto dañara la tarjeta.
* Con el fin de proteger los datos guardados en la tarjeta SIM, debe
26
de hacer una copia de respaldo. No toque los contactos metálicos
de la tarjeta SIM. La tarjeta SIM se debe mantener fuera de zonas
electromagnéticas. Una vez que se dañe la tarjeta SIM, no se puede
utilizar la red GSM.
* Algunas tarjetas SIM ya vienen integradas, por lo cual el usuario no
tiene que instalarla.
6-2 Fuente de Alimentación
6-3 Conexión del auricular
Conecte el conector del auricular al teléfono.
6-4 Encendido y apagado
* Para encender
Mantenga pulsada la tecla ENCENDIDO/APAGADO para encender
la unidad de teléfono. Al encender se escuchara un tono y se
encenderá la pantalla LCD. La unidad buscara la red de forma
automática. El teléfono se puede utilizar después que entre en el
estado de espera.
Nota: el nivel más alto de la señal es 6, cuando el nivel esta en
menos de 6 el usuario puede ajustar la antena.
* Para apagar
Mantenga pulsada la tecla ENCENDIDO/APAGADO, la pantalla LCD
se apagara lo cual indica que la unidad está apagada.
7. OPERACIÓN
7-1 Como realizar una llamada

27
Usted puede hacer llamadas de las siguientes maneras.
1) Levante el auricular o presione la tecla: , a continuación, ingrese
el número que desea marcar, este aparecerá en la pantalla LCD,
para realizar la llamada presione la tecla ENVIAR. Si no presiona la
tecla ENVIAR, el número se marcará automáticamente después de 5
segundos.
2) En el modo de espera, presione la tecla CONTACTOS para ver los
contactos guardados en el teléfono. Seleccione el número
deseado y pulse la tecla ENVIAR, el número se marcará.
3) Para marcar un número por medio de los registros de llamadas,
solo tiene que entrar a uno de los registros, seleccionar el numero
deseado y presionar la tecla ENVIAR.
4) Levante el auricular o pulse la tecla , después pulse la tecla
REMARCACION para marcar de nuevo el último número marcado.
7-2 Como contestar una llamada
* Cuando entra una llamada se escuchara el tono y el numero
aparecerá en la pantalla.
Para contestar puede levantar el auricular o puede oprimir la tecla
. Para terminar la llamada puede colgar el auricular o puede
pulsar la tecla de nuevo.
7-3 Función de remarcación
* Presione la tecla de REMARCACION para marcar de nuevo el
ultimo numero marcado.
7-4 Función de manos libres
El teléfono se puede utilizar de forma manos libres oprimiendo la
tecla de PARLANTE.
7-5 ENVIAR
28
Después de ingresar un número en pantalla, es número se puede
marcar pulsado la tecla de ENVIAR. También puede marcar un
número que se encuentre en memoria o en uno de los registros de
llamadas.
7-6 Ajustar el volumen
Durante una llamada puede pulsar las teclas VOL + y VOL- para subir
o bajar el volumen. El volumen llega hasta 7. Puede descolgar el
auricular para ajustar el volumen o puede oprimir la tecla para
ajustar el volumen del parlante.
8. MENÚ
8-1 Agenda
Puede guardar nombres y números telefónicos en la tarjeta SIM o
directamente en el teléfono. Utilice la función de CONTACTOS para:
guardar, buscar o borrar contactos. En el modo de espera, presione
la tecla MENÚ/OK, después pulse el botón numérico 1, y después de
2 segundos, se entra en el menú de los contactos.
8-1-1 Agenda:
* Contactos: para ver, editar, borrar, copiar, transferir, enviar masajes,
etc.
* Añadir contacto nuevo: para añadir un contacto nuevo en la
unidad de teléfono o la tarjeta SIM.
* Borrar todo: para borrar todo en la memoria del teléfono o en la
tarjeta SIM.
* Copiar todo: copiar todo de la memoria del teléfono a la tarjeta
SIM.
* Almacenamiento: para verificar la tarjeta SIM o la memoria de la
unidad.
29
8-2 Mensajes:
Se pueden guardar un total de 200 mensajes entre los que están en
la bandeja de entrada, los mensajes enviados y los borradores. La
capacidad de la tarjeta SIM depende de la capacidad de la
memoria. En la bandeja de entrada se guardan todos los mensajes
recibidos. El buzón de salida contiene los mensajes que se han
enviado y guardado. Si el mensaje no se envía, se guardará en la
carpeta de borradores. Después de escribir un mensaje, si no se
hace ninguna operación adicional, puede regresar directamente al
menú principal. La próxima vez que escriba un mensaje, el teléfono
memoriza el último mensaje escrito. Para borrar todo el contenido
presione y aguante la tecla DEL. En el modo de espera, presione la
tecla MENÚ/OK para ir al menú principal, presione y aguante la
tecla【 2 】, después de 2 segundos el teléfono entra al menú de los
mensajes.
8-2-1 Escribir mensajes:
En el estado de espera, pulse MENU/OK, y luego presione【►】 para
entrar al menú de mensajes o pulse la tecla de MENSAJES para
entrar a la función de SMS.
Desde el menú de mensajes puede presionar las teclas【◄ ►】para
entrar al sub- menú de “Escribir Mensaje”. Pulse MENU/OK para
confirmar y comenzar a escribir un mensaje. Utilice las teclas 【 ◄
► 】 para mover el cursor y la tecla de * para ingresar símbolos
como: . , ? ! . Utilice la tecla # para cambiar el método de entrada.
Use las teclas numéricas para ingresar letras. Después de terminar
con el mensaje, pulse MENU/OK, esto le dará dos opciones:
"Terminar" y " Usar plantillas". Si selecciona "Terminar" le aparecerán
las siguientes operaciones:
* Enviar: el mensaje será enviado pero no salvado.
* Guardar: el mensaje se guarda como borrador sin enviar
30
* Utilizar plantillas: el mensaje predefinido
Si selecciona "Utilizar plantillas" el texto genérico ingresado bajo esta
opción será añadido al mensaje. Usted puede seleccionar
"Terminar” de nuevo para enviar el mensaje.
8-2-2 Bandeja de entrada:
Oprima la tecla de menú SMS, pulse 【 ▲ ▼ 】 para seleccionar la
bandeja de entrada
Pulse MENU / OK, para mostrar los mensajes recibidos en pantalla
Oprima【 ▲ ▼ 】 para seleccionar el mensaje
Oprima MENU / OK para confirmar y leer el mensaje
Oprima【 ▲ ▼ 】 para seleccionar un mensaje. Después de haber
seleccionado un mensaje puede llevar a cabo la siguientes
operaciones:
* Reenviar: permite reenviar el mensaje.
* Responder: responder al mensaje recibido. Pulse MENU / OK para
escribir una respuesta. Después de escribir, pulse MENU / OK para
confirmar y enviar el mensaje.
* Borrar: borrar el mensaje
* Editar: edita el mensaje
* Copiar al SIM : copiar el mensaje del teléfono al SIM
* Transferir al SIM : transferir el mensaje desde el teléfono al SIM
* Borrar todo: borrar todos los mensajes
* Copiar todo : copiar todos los mensajes de la tarjeta SIM al teléfono
* Mover todo: borra todos los mensajes en la tarjeta SIM y moverlos al
teléfono
* Utilizar números: guardar el número de teléfono al teléfono o la
tarjeta SIM
8-2-3 Bandeja de salida:
Oprima la tecla de menú SMS, pulse 【 ▲ ▼ 】 para seleccionar la
bandeja de salida. Pulse MENÚ / OK para confirmar y mostrar los
31
mensajes en la bandeja de salida en pantalla.
Pulse 【 ▲ ▼ 】 para seleccionar el mensaje que desee leer y pulse
MENU / OK.
Después de seleccionar un mensaje, puede realizar las siguientes
operaciones :
* Enviar : enviar el mensaje
* Editar: editar el mensaje, pulse MENU / OK para enviar
* Borrar: borrar el mensaje
* Copiar a SIM : copiar el mensaje del teléfono al SIM
* Transferir a SIM : transferir mensaje del teléfono al SIM
* Borrar todo: borrar todos los mensajes
* Copiar todo : copia todos los mensajes de la tarjeta SIM al teléfono
* Mover todo: borra todos los mensajes en la tarjeta SIM y moverlos al
teléfono
* Utilizar números : guardar el número al teléfono o a la tarjeta SIM
8-2-4 Borradores
Si usted escribe un mensaje que quiere guardar sin enviar el teléfono
lo guarda como un borrador. Desde el menú de mensajes, pulse
【 ▲ ▼ 】 para seleccionar borradores, pulse MENU / OK para
confirmar, podrá ver los borradores en pantalla. Seleccione el
mensaje que desee leer y pulse MENU / OK. Puede realizar las
siguientes operaciones: "enviar , editar, borrar, copiar al teléfono,
mover al teléfono, copiar todo, mover todo, eliminar todo, utilizar
números. Las opciones son iguales a las que están disponibles
desde la bandeja de entrada.
8-2-5 Utilizar Plantillas
El teléfono incluye 10 plantillas para uso general. Es muy
conveniente poder seleccionar y enviar estos mensajes pre-escritos.
Usted también puede borrar estas plantillas originales y escribir sus
32
propios mensajes y guardarlos como plantillas.
8-2-6 Configurar Mensajes:
Desde el menú de "mensajes”, pulse 【 ▲ ▼ 】 para seleccionar
"Configurar mensajes" , a continuación, pulse la tecla MENÚ / OK
para cambiar las siguientes características de los mensajes:
8-2-6-1 Perfil - usted puede ajustar lo siguiente:
* Número de correo de voz: para establecer el servicio de correo de
voz. Presione la tecla “ * ” dos veces y a continuación la tecla "+"
* Tiempo válido: para establecer el tiempo válido (hay cinco
opciones: 1 hora, 12 horas, 1 día, 1 semana, como máximo). A
veces, el tiempo valido no es exacto (esto depende de la red de la
operadora local). Después de confirmar la configuración, oprima la
tecla de CONTACTOS para guardar.
* El tipo de mensaje puede ser: texto, fax, página o correo
electrónico.
8-2-6-2 Ajustes Básicos: puede seleccionar cerrar o abrir el reporte de
transmisión y también establecer la forma de responder. Después
de hacer cambios recuerde de oprimir la tecla de CONTACTOS para
guardar los mismos de lo contrario quedaran borrados.
8-2-6-3 Memoria: seleccione este menú para verificar la capacidad
de la memoria.
8-3 Registro de llamadas
Desde el estado en espera, pulse la tecla de LLAMADAS para entrar
al menú del registro de llamadas. Desde el sub-menú de
LLAMADAS puede oprimir la tecla de MENU/OK para regresar al
menú principal, o puede pulsar las teclas【 ▲ ▼ 】 para entrar al
menú del registro de llamadas.
33
8-3-1 Llamadas sin contestar: El teléfono puede guardar las últimas
20 llamadas sin contestar con la hora en que se registró. Desde el
menú de Registro de Llamadas, pulse 【 ▲ ▼ 】 para elegir las
llamadas sin contestar. Pulse la tecla MENÚ / OK para verificar las
llamadas.
Pulse las teclas【 ▲ ▼ 】 para seleccionar la llamada que desea.
Pulse MENU / OK para confirmar y la pantalla mostrará la
información de la llamada, incluyendo el número que llamo, la hora,
la fecha y cuantas veces llamaron. Presione MENU / OK de nuevo
para ver las siguientes opciones:
* Borrar: borrar la llamada seleccionada
* Guardar: guardar el número en CONTACTOS o en la tarjeta SIM
* Marcar: marcar el número
* Editar: editar el número y guardar en la tarjeta SIM o bajo
CONTACTOS
8-3-2 Llamadas Realizadas: El teléfono puede guardar las últimas 20
llamadas realizadas.
Desde el menú de Registro de Llamadas, pulse【 ▲ ▼ 】 para
seleccionar "Llamadas Realizadas”. Pulse la tecla MENU / OK para
ver el registro de las llamadas realizadas.
Las opciones de borrar, guardar, marcar y editar están disponibles
igual que en el menú de Llamadas sin contestar.
8-3-3 Llamadas Recibidas: El teléfono puede guardar las últimas 20
llamadas recibidas.
Desde el menú de Registro de Llamadas, pulse【 ▲ ▼ 】para
seleccionar "Llamadas Recibidas". Pulse la tecla MENU / OK para
ver el registro de las llamadas recibidas.
Las opciones de borrar, guardar, marcar y editar están disponibles
igual que en el menú de Llamadas sin contestar.
34
8-3-4 Borrar registros de llamadas: seleccione este menú para borrar
los registros de llamadas.
Desde el menú de Registros de Llamadas, pulse 【◄ ► 】para
seleccionar "Borrar Registros de Llamadas", pulse la tecla MENU /
OK para confirmar. El menú tiene cuatro opciones:
* Llamadas sin contestar: para borrar todas las llamadas sin contestar
* Llamadas realizadas: para borrar todas las llamadas realizadas
* Llamadas recibidas: para borrar todas las llamadas recibidas
* Borrar todo: para borrar todas las llamadas en todos los registros
8-3-5 Cronómetros de llamadas: muestra la hora y el tiempo total de
las llamadas.
Desde el menú de “Registro de Llamadas", pulse 【◄ ►】para
seleccionar "cronometro de llamadas" y pulse la tecla MENU / OK
para confirmar. El menú tiene cuatro opciones:
* Ultima llamada: muestra el tiempo de la última llamada
* Llamadas realizadas: muestra el tiempo total de todas las llamadas
realizadas
* Llamadas recibidas: muestra el tiempo total de todas las llamadas
recibidas
* Reiniciar los cronómetros: borrar toda la información y regresar el
tiempo a 00:00:00
8-4 Configuración
Desde el estado en espera, seleccione MENU / OK para pasar al
menú principal. Pulse las teclas【 ▲ ▼ 】para entrar al menú de
"Configuración".
8-4-1 Configuración del teléfono
Desde el menú de "Configuración", pulse【 ▲ ▼ 】para abrir el menú
de "Configuración del teléfono", y pulse MENU / OK para confirmar.
35
El menú tienen cuatro opciones:
* Fecha y hora: para cambiar la fecha, la hora y el formato. Desde
el menú "Configuración del teléfono", pulse【 ▲ ▼ 】para seleccionar
la opción "Fecha y hora", pulse MENU / OK para confirmar. El menú
tiene dos opciones: "Cambiar fecha y hora" y "Cambiar el formato".
- Cambiar fecha y hora: pulse 【 ▲ ▼ 】 para seleccionar "Cambiar
fecha y hora", pulse la tecla MENÚ / OK para confirmar. Pulse 【 ▲
▼ 】 para seleccionar el tiempo y pulse MENU / OK de nuevo. La
pantalla mostrara 00:00 (HH : MM). Utilice las teclas numéricas para
ingresar la hora directamente y las teclas 【◄ ►】para mover de la
hora a los minutos.
Para confirmar la hora nueva, oprima la tecla de MENU / OK. Pulse
la tecla de CONTACTOS para guardar el cambio, la pantalla
mostrará "guardar?" "sí", "no". Presione la tecla MENÚ / OK una vez
más para realizar el cambio. Si no desea efectuar el cambio, solo
oprima la tecla de CONTACTOS para regresar al menú anterior.
Pulse las teclas 【◄ ►】para seleccionar la fecha y oprima la tecla
MENU / OK de nuevo, la pantalla mostrara la fecha (YYYY / MM /
DD). Utilice la teclas numéricas para ingresar la fecha y las teclas
【◄ ► 】para mover entre el mes, día y año. Para confirmar la
fecha nueva pulse la tecla MENU / OK. A continuación, pulse la
tecla CONTACTOS para guardar el cambio, la pantalla mostrará
"guardar?" "sí", "no", presione la tecla MENÚ / OK para guardar el
cambio. Si no desea guardar los cambios, simplemente pulse la
tecla CONTACTOS para regresar al menú anterior.
- Cambiar formato: pulse【◄► 】para seleccionar "Cambiar Formato".
Puede seleccionar entre los siguientes formatos:
Hora: 24 horas o 12 horas
Fecha: AAAA / MM / DD o MM / DD / AA o DD / MM / AA.
36
El proceso para cambiar el formato es igual al utilizado para
cambiar la fecha. Recuerda que después de cada cambio debe
de oprimir la tecla de CONTACTOS para que queden registrados los
cambios.
* Idioma: Inglés solamente.
* Contraste: el contraste de la pantalla se puede ajustar del 1 hasta
el 15. Pulse
【◄ ►】para cambiar el contraste y pulse MENU / OK para confirmar.
* Iluminación de la pantalla: hay cuatro tiempos de duración para la
iluminación de la pantalla 5 segundos, 15 segundos, 30 segundos y
45 segundos pulse 【 ◄ ► 】 para seleccionar y la tecla MENU / OK
para confirmar.
8-4-2 Configuración de llamadas
Desde el menú de "Configuración", pulse la teclas 【 ▲ ▼ 】 para
seleccionar el menú "Configuración de llamadas" y pulse MENU / OK
para confirmar. El menú mostrara la siguientes opciones:
* Marcación rápida: desde el menú de "Marcación rápida", puede
configurar 3 números para marcación rápida
* Llamada en espera
* Marcación automática
8-4-3 Seguridad
Desde el menú de "Configuración", oprima las teclas de【◄ ► 】
para seleccionar el menú de "Seguridad" y pulse MENU / OK para
confirmar. El menú tiene las siguientes opciones:
* Bloqueo de SIM: le permite proteger la información en la tarjeta SIM
con tu propia clave. Esta función la puede deshabilitar si desea.
* Cambiar clave de seguridad: desde este menú puede cambiar la
clave
37
8-4-4 Restaurar la configuración de fábrica:
Cuando se selecciona el menú "restaurar la configuración de
fábrica" tiene que ingresar la clave original: "1122". Al restaurar la
configuración de fábrica toda la información guardada en la
unidad incluyendo los contactos, registros de llamadas, alarmas,
números programados será borrada.
8-5 Perfil de usuario
En el estado en espera, pulse MENU / OK para abrir el menú, pulse la
tecla 5 para ver los "perfiles de usuario": se pueden realizar las
siguientes operaciones:
8-5-1 Configuración de Sonidos: Desde el menú de Perfil de usuario,
pulse
【 ▲ ▼ 】 para entrar al menú "Sonidos" y pulse MENU / OK para
confirmar. A continuación, puede seleccionar el timbre para
llamadas, alarma, encendido, tono de mensaje y tono del teclado.
8-5-2 Volumen
Este ajuste funciona igual que la configuración de sonidos. Desde
el menú de “Volumen" puede ajustar el volumen del timbre y del
tono de las teclas.
8-5-3 Tipo de alerta
Este ajuste funciona de la misma manera que la configuración de
sonidos. Desde el menú de “Tipo de alerta", puede elegir "timbre" o
"indicador solamente".
8-5-4 Tipo de timbre
Este ajuste funciona de la misma manera que la configuración de
sonidos. Puede elegir de las siguientes opciones: un solo timbre,
38
repetir, timbre con aumento de volumen.
Un solo timbre: con esta opción el timbre sonara solo una vez.
Repetir: con esta opción el timbre se repite varias veces.
Aumento de volumen: el timbre se repite y el volumen aumenta.
8-5-5 Tonos Adicionales
Este ajuste funciona de la misma manera que la configuración de
sonidos. Los tonos adicionales se pueden utilizar o se pueden
deshabilitar. Estos se pueden asignar para: advertencias, errores,
conexión, batería, y otros.
Advertencia: cuando la carga de la batería esta baja, el tono de
advertencia sonará.
Error: cuando no se puede enviar un mensaje, el tono de error
sonará
Línea en uso: cuando la línea está en uso el teléfono lo indica con
un tono.
Conexión: cuando la línea de datos está conectada, el tono de
conexión sonará.
8-6 RADIO FM
Cuando el teléfono está en estado en espera puede oprimir la tecla
de MENU / OK, y después el botón número 6 para abrir la función de
radio FM.
FM ON/OFF: desde el menú del RADIO FM, pulse 【 ▲ ▼ 】 para
encender o apagar el radio.
SINTONIZAR RADIO: desde el menú del RADIO FM puede sintonizar la
emisora deseada, pulse la tecla MENU / OK para confirmar y las
teclas【 ▲ ▼ 】 para finalizar la sintonización o para salir.
EMISORA: desde el menú del RADIO FM, pulse 【 ▲ ▼ 】 para
seleccionar: reproducir, identificar o editar.
VOL: para ajustar el volumen del Radio FM

39
BUSQUEDA: desde el menú el RADIO FM, pulse el botón MENU / OK
para poder realizar una búsqueda automática
8-7 AGENDA
Desde el estado en espera, pulse MENU / OK para abrir el menú y
pulse la tecla número 7 para ir directamente a la AGENDA o puede
oprimir la tecla de MENU / OK y desde el menú pulse la teclas【 ▲
▼ 】 para seleccionar el menú "AGENDA" y pulse MENU / OK de
nuevo para entrar. Desde el menú de la agenda usted puede
programar hasta tres alarmas diferentes.
Desde el menú de la agenda puede ver la configuración de la
alarma incluyendo el estado, hora, aplazamiento de la alarma,
repetir la alarma.
ESTADO: usted puede verificar si la alarma esta activada o no
HORA: la hora deseada para la alarma
APLAZAMIENTO: esta función la puede deshabilitar pero también la
puede configurar para 1 minuto, 3 minutos, 5 minutos y 10 minutos.
REPETIR: esta función también la puede deshabilitar o la puede
configurar para: diario, semanal, mensual y anual.
Notificaciones de la alarma: la unidad tiene doce opciones de
notificaciones.
8.8 Servicios
Desde el estado en espera, pulse MENU / OK y la tecla número 8
para abrir el menú de "Servicios". Los servicios disponibles están
sujetos a la tarjeta SIM.
9. METODO DE INGRESO
El telefónico acepta ingresar información por medio del teclado
numérico, Multitap PR, y Multitap pr. Puede elegir el método
deseado desde el menú de “Configuración” o mientras que está
40
escribiendo un mensaje puede pulsar la tecla #. Cuando está
ingresando texto puede borrar la letra anterior presionando la tecla
DEL. Para borrar la palabra anterior tiene que oprimir y aguantar la
tecla DEL. Puede utilizar las teclas【◄ ►】para mover el cursor.
La siguiente tabla muestra las letras que corresponden a las teclas
numéricas.
Teclas
ABC o abc
(=ABC)(=abc)
Letras mayúsculas o
minúsculas (ABC) (abc)
Números
(123)
1 . . , ? ! ’”: ; @ _ & 1 1
2 A B C a b c
A B C a b c 2
3 D E F d e f
D E F d e f 3
4 G H I g h i G H I g h i 4
5 J K L j k l J K L j k l 5
6 M N O m n o M N O m n o 6
7 P Q R S p q r s
P Q R S p q r s 7
8 T U V t u v T U V t u v 8
9 W X Y Z w x y z W X Y Z w x y z 9
* Símbolo
0 Espacio (espacio)0()+-*=#% 0
# Cambiar método de ingreso
Método de ingreso Multitap ABC: para ingresar palabras en inglés.
Con este método tiene que ingresar las letras por medio de las
teclas numéricas. Para ingresar la palabra “CASA” tiene que
oprimir:
la tecla【2】tres veces para la letra C

41
la tecla【2】una vez para la letra A
la tecla【7】cuatro veces para la letra S y
la tecla【2】una vez para la letra A de nuevo
* Editando texto puede mover el cursor por medio de las teclas【◄
►】.
* Puede borrar una letra utilizando la tecla DEL, para borrar palabras
completas tiene que oprimir y aguantar la tecla DEL. Utilizando el
método de ingreso de Multitap ABC puede ingresar un máximo de
612 caracteres.
10 Soluciones a problemas
42
Problema Posible Causa Solución
No enciende la
pantalla, no funciona
la luz de fondo
No está conectada
correctamente la
fuente de poder
Utilice solo las baterías
y el cargador
aprobado por el
fabricante del
teléfono. Asegúrese
que todo está
conectado
correctamente
El teléfono no conecta
la llamada después de
marcar
1. Problema con la
red
2. Interferencia con
la señal
1. Intente de nuevo
en otro momento
2. Reinicie el teléfono
La pantalla no
funciona pero prende
la luz de fondo
La batería necesita
carga
Poner la batería a
cargar
Ruido en la línea
Problemas con la red
y con la potencia de
la señal
Muévase de lugar
hasta encontrar un
lugar con mejor señal
Error con la tarjeta SIM
1. Batería necesita
carga
2. La tarjeta SIM no
está instalada
correctamente
1. Conecte el teléfono
a la electricidad para
cargar la batería
2. Asegúrese que la
tarjeta SIM está
instalada
correctamente
Problemas con la señal
El teléfono no está
configurado
correctamente para
la red
Contacte a su
operadora local
43
FCC Statement:
1. This device complies with Part 15 of the FCC Rules. Operation is
subject to the following two conditions:
(1) This device may not cause harmful interference.
(2) This device must accept any interference received, including
interference that may cause undesired operation.
2. Changes or modifications not expressly approved by the party
responsible for compliance could void the user's authority to operate
the equipment.
NOTE:
This equipment has been tested and found to comply with the limits
for a Class B digital device, pursuant to Part 15 of the FCC Rules.
These limits are designed to provide reasonable protection against
harmful interference in a residential installation.
This equipment generates uses and can radiate radio frequency
energy and, if not installed and used in accordance with the
instructions, may cause harmful interference to radio
communications. However, there is no guarantee that interference
will not occur in a particular installation. If this equipment does cause
harmful interference to radio or television reception, which can be
determined by turning the equipment off and on, the user is
encouraged to try to correct the interference by one or more of the
following measures:
Reorient or relocate the receiving antenna.
Increase the separation between the equipment and receiver.
Connect the equipment into an outlet on a circuit different from that
to which the receiver is connected.
Consult the dealer or an experienced radio/TV technician for help.
SAR Information Statement
Your GSM Fixed wireless phone is a radio transmitter and receiver. It is
designed and manufactured not to exceed the emission limits for
44
exposure to radiofrequency (RF) energy set by the Federal
Communications Commission of the U.S. Government. These limits are
part of comprehensive guidelines and establish permitted levels of RF
energy for the general population. The guidelines are based on
standards that were developed by independent scientific
organizations through periodic and thorough evaluation of scientific
studies. The standards include a substantial safety margin designed
to assure the safety of all persons, regardless of age and health. The
exposure standard for wireless mobile phones employs a unit of
measurement known as the Specific Absorption Rate, or SAR. The
SAR limit set by the FCC is 1.6 W/kg. * Tests for SAR are conducted
with the phone transmitting at its highest certified power level in all
tested frequency bands. Although the SAR is determined at the
highest certified power level, the actual SAR level of the phone while
operating can be well below the maximum value. This is because the
phone is designed to operate at multiple power levels so as to use
only the power required to reach the network. In general, the closer
you are to a wireless base station antenna, the lower the power
output. Before a phone model is available for sale to the public, it
must be tested and certified to the FCC that it does not exceed the
limit established by the government adopted requirement for safe
exposure. The tests are performed in positions and locations (e.g., at
the ear and worn on the body) as required by the FCC for each
model. The highest SAR value for this model phone when worn on the
body, as described in this user guide, is 0.222W/Kg(Body-worn
measurements differ among phone models, depending upon
available accessories and FCC requirements). While there may be
differences between the SAR levels of various phones and at various
positions, they all meet the government requirement for safe
exposure. The FCC has granted an Equipment Authorization for this
model phone with all reported SAR levels evaluated as in

45
compliance with the FCC RF exposure guidelines. SAR information on
this model phone is on file with the FCC and can be found under the
Display Grant section of http://www.fcc.gov/ oet/fccid after
searching on
FCC ID: 2ACSK-SC-9029-RA Additional information on Specific
Absorption Rates (SAR) can be found on the Cellular
Telecommunications Industry Asso-ciation (CTIA) web-site at
http://www.wow-com.com. * In the United States and Canada, the
SAR limit for mobile phones used by the public is 1.6 watts/kg (W/kg)
averaged over one gram of tissue. The standard incorporates a
sub-stantial margin of safety to give additi
Body-worn Operation
This device was tested for typical body-worn operations. To comply
with RF exposure requirements, a minimum separation distance of
25mm must be maintained between the user’s body and the
handset, including the antenna. Third-party belt-clips, holsters, and
similar accessories used by this device should not contain any
metallic components. Body-worn accessories that do not meet these
requirements may not comply with RF exposure requirements and
should be avoided. Use only the supplied or an approved antenna.
46