Sunbeam TEA MAKER User Manual To The F6094117 51cc 46ed A000 29906eeb40b1
User Manual: Sunbeam TEA MAKER to the manual
Open the PDF directly: View PDF ![]() .
.
Page Count: 14

©2006 Sunbeam Products, Inc., doing business as Jarden Consumer Solutions.
All rights reserved. Distributed by Sunbeam Products, Inc.,
doing business as Jarden Consumer Solutions.
Boca Raton, Florida 33431.
1-877 ZARATEA (1-877-927-2832)
AMB:072106
Please visit www.zarafina.com for more information on ZARAFINA™ products
and collectibles, specialty tea selections and gift ideas!
©2006 Sunbeam Products, Inc. haciendo negocios como Jarden Consumer Solutions.
Todos los derechos reservados. Distribuido por Sunbeam Products, Inc.,
haciendo negocios como Jarden Consumer Solutions,
Boca Ratón, FL 33431.
1-877 ZARATEA (1-877-927-2832)
Printed in China P.N.
11
9724
Model Number: TH1000
zarafina.com
TEA MAKER MANUAL
MANUAL PARA
UTILIZAR LA TETERA
AUTOMÁTICA

27
Your Own Tea Moments
2
Important
IMPORTANT SAFEGUARDS
To reduce the risk of fire, electric shock and/or injury to persons,
basic safety precautions should always be followed when using
electrical appliances, including the following:
1.
READ ALL INSTRUCTIONS BEFORE USING THE TEA MAKER.
2.
Do not touch the Tea Maker's hot surfaces. Use handles or knobs
and do not open the lid or cover while steeping. Scalding may
occur if the lid is removed during steeping cycles.
3. To protect against electric shock, do not immerse the power
cord, power plug or Tea Maker in water or in any other liquid.
4. Close adult supervision is necessary when this appliance is used
by or near children.
5. Turn the Tea Maker OFF and unplug the power cord from the
power source when the Tea Maker is in use and before cleaning.
Allow the Tea Maker’s parts to cool before
putting on or taking
off parts and before cleaning the appliance.
6. Do not operate any appliance with a damaged power cord
or power plug or after the appliance malfunctions or has been
damaged in any manner. Return this appliance only to the
nearest Authorized Service Center for examination, repair
or adjustment.
7.
The use of accessory attachments other than manufacturer's
brand
products may cause hazards or injuries.
8. Do not use the Tea Maker outdoors.
9. Do not let the power cord hang over the edge of a table or
countertop, or allow it to come into contact with hot surfaces.
10. Do not place this Tea Maker on or near a hot gas stove,
electric burner or in a heated oven.
11
. To disconnect the Tea Maker, turn it OFF. Then, remove the
power plug from the wall outlet.
26
Your Own Tea Moments
3
Safeguards
12. Place the appliance on a hard, flat, level surface or on the
Tea Maker Serving Tray.
13. Avoid contact with any moving parts.
14. This Tea Maker is designed for household use only.
15.
Do not use this appliance for anything other than its intended use.
TEA POT USE AND CARE
IThis Tea Pot is designed for use with your ZARAFINA™
Tea Maker and therefore must never be used on a range
top or in any oven, including a microwave oven.
IDo not set a hot Tea Pot on a wet or cold surface.
IDo not use a cracked Tea Pot or a Tea Pot having
a loose or weakened handle.
IDo not clean the Tea Pot with abrasive cleaners,
steel wool pads or other abrasive materials.
IDo not place Tea Pot, Cups or Serving Tray
into the dishwasher.
I
Protect the Tea Pot from sharp blows, scratches
or rough handling.
IDo not dispense tea into anything other than
the Tea Pot provided.
WARNING! To reduce the risk of fire or electric
shock, do not remove any service covers. There
are no user serviceable parts inside the Tea
Maker. Only authorized personnel should repair
the Tea Maker.
Please read ALL of the instructions in this manual carefully before
you begin to use this appliance. Proper care and maintenance will
ensure a long life and a trouble-free operation for this appliance.
Please save these instructions and refer to them for cleaning and
care tips.
SAVE THESE INSTRUCTIONS
!
25
Garantía
GARANTÍA LIMITADA POR UN AÑO
Sunbeam Products, Inc., bajo el nombre de Jarden Consumer Solutions, (conjuntamente
"Sunbeam”) garantiza que durante el período de un año a partir de la fecha de compra,
este producto estará libre de defectos de materiales y de fabricación. Sunbeam, a su
propio juicio, reparará o sustituirá este producto o cualquiera de sus componentes
defectuosos durante el período de vigencia de esta garantía. El reemplazo se realizará con
un producto o componente nuevo o refabricado. Si este producto no se encuentra
disponible para su venta, se realizará el reemplazo con un producto similar de igual o
mayor valor. Esta garantía es exclusiva de Sunbeam.
Esta garantía es válida para el comprador minorista original a partir de la fecha de la compra
inicial y no es transferible. Conserve el recibo original de la compra. Para obtener una ejecución
de la garantía ser requiere un comprobante de compra. Los comerciantes de Sunbeam,
centros de servicio o tiendas que vendan los productos Sunbeam no tienen derecho a alterar,
modificar o cambiar de forma alguna los términos y condiciones de esta garantía.
Esta garantía no cubre el desgaste normal de las piezas o daños que resulten de
cualquiera de los siguientes casos: uso negligente o uso incorrecto del producto, uso con
un voltaje o corriente inadecuados, uso contrario a las instrucciones de operación,
desarmado, reparación o alteración por cualquier persona que no pertenezca a Sunbeam
o a un centro de servicio Sunbeam autorizado. Además, esta garantía no cubre: casos de
fuerza mayor, como incendios, inundaciones, huracanes y tornados.
¿CUÁLES SON LOS LÍMITES DE LA RESPONSABILIDAD DE ZARAFINA™?
Sunbeam no será responsable de ningún daño incidental o resultante ocasionado por la
infracción cualquier garantía o condición expresa, implícita o legal.
Salvo en la medida en que lo prohíban las leyes vigentes, toda garantía o condición
implícita de comercialización o idoneidad para un fin en particular está limitada al tiempo
de duración o vigencia de la garantía detallada anteriormente.
Sunbeam desconoce cualquier otra garantía o condición legal o representaciones,
expresas, implícitas, legales o similares.
Sunbeam no será responsable de ningún daño de cualquier índole que resulte de la compra,
uso o uso indebido de este producto, o imposibilidad de uso del mismo, incluidos los daños
incidentales, especiales, resultantes o similares, o la pérdida de ganancias, o daños que surjan
de algún agravio, incluida negligencia y negligencia severa, o fallas cometidas por Sunbeam,
sus agentes o empleados, o de cualquier infracción fundamental o no al contrato, o de
cualquier reclamo presentado al comprador por un tercero.
Algunas provincias, estados o jurisdicciones no permiten la exclusión o limitación de los daños
incidentales o resultantes, o las limitaciones sobre la duración de una garantía implícita, por lo
que las limitaciones o exclusiones arriba detalladas pueden no aplicarse en su caso.
Esta garantía le concede derechos legales específicos, y usted también puede hacer uso
de otros derechos que varían según la provincia, estado o jurisdicción.
CÓMO OBTENER UNA GARANTÍA DE SERVICIO
Si tiene alguna consulta en relación a esta garantía, o desea obtener una garantía de
servicio, comuníquese al número 1-877-ZARATEA y se le brindará la dirección de un centro
de servicio conveniente.
En Estados Unidos, esta garantía es exclusiva de Sunbeam Products, Inc., ubicado en
Boca Raton, Florida 33431.
NO DEVUELVA ESTE PRODUCTO A NINGUNA DE ESTAS
DIRECCIONES NI AL LUGAR DE COMPRA.
INTRODUCTION
Congratulations on your new purchase
of the ZARAFINA™ Tea Maker Suite,
the ultimate tea for two. Your steeper
is made to accommodate both loose
and bagged tea, while the unique
ZARAFINA™ Tea Maker Suite Tea Type
Setting feature enables you to reach the
ideal union of time and temperature.
Your steeper is artfully designed to give it
an appealing exterior, and meticulously
crafted to ensure your consistent pleasure
in the finest quality of tea, with minimal
effort. It is the ideal, ultimate tea encounter
for two.
4
Features
ZARAFINA™ TEA MAKER FEATURES AND BENEFITS
• Steeps up to 16 oz. or two cups of specialty tea.
•Tea Format Setting allows for steeping of both loose
and bagged tea.
•
Tea Type Setting
feature allows you to reach the ideal union
of time and temperature, depending on the tea used.
•
Tea Strength Setting
gives you the option to make mild
or strong tea to suit your taste.
• Removable Steeping Chamber for easy filling and cleaning.
•Stainless steel accents.
•Ceramic Cups, Serving Tray and Tea Pot included.
Please visit www.zarafina.com for more information on ZARAFINA™
products and collectibles, specialty tea selections and gift ideas!
TEA TIP: ZARAFINA™ teas offer the highest quality and variety.
We offer a tea for every taste from our signature blend to more
exotic teas for an adventurous tea experience.
24
Servicio
JARRAS DE TÉ
Comuníquese con el número 1-877 ZARATEA (1-877-927-2832) en
Estados Unidos para obtener mayor información sobre dónde
encontrar una tienda que venda los repuestos de las jarras de té.
REPARACIONES
Si su Tetera necesita servicio de reparaciones, no la devuelva a la tienda
donde la adquirió. Todas las reparaciones y recambios deben realizarse
a través de Sunbeam. Comuníquese con nosotros al siguiente número
de teléfono de llamada gratuita para conocer la ubicación del centro de
servicio autorizado más cercano a su domicilio.
En Estados Unidos: 1-877 ZARATEA (1-877-927-2832). También puede
visitar nuestro sitio web en www.zarafina.com para obtener una lista de
los centros de servicios.
Para facilitar nuestra atención al cliente, tenga a disposición el número
de modelo de la Tetera y la fecha de compra cuando se comunique con
nosotros. El número de modelo se encuentra en la parte inferior de la
Tetera .
Sus consultas, comentarios o sugerencias son bienvenidos. En todas
sus comunicaciones, incluya su nombre completo, dirección, número de
teléfono y una descripción del problema.
Visite nuestro sitio web en www.zarafina.com y descubra el secreto
para preparar una perfecta taza de té. También encontrará una
excelente combinación de recetas gourmet, consejos para recibir
visitas y la última información sobre los productos ZARAFINA™.
5
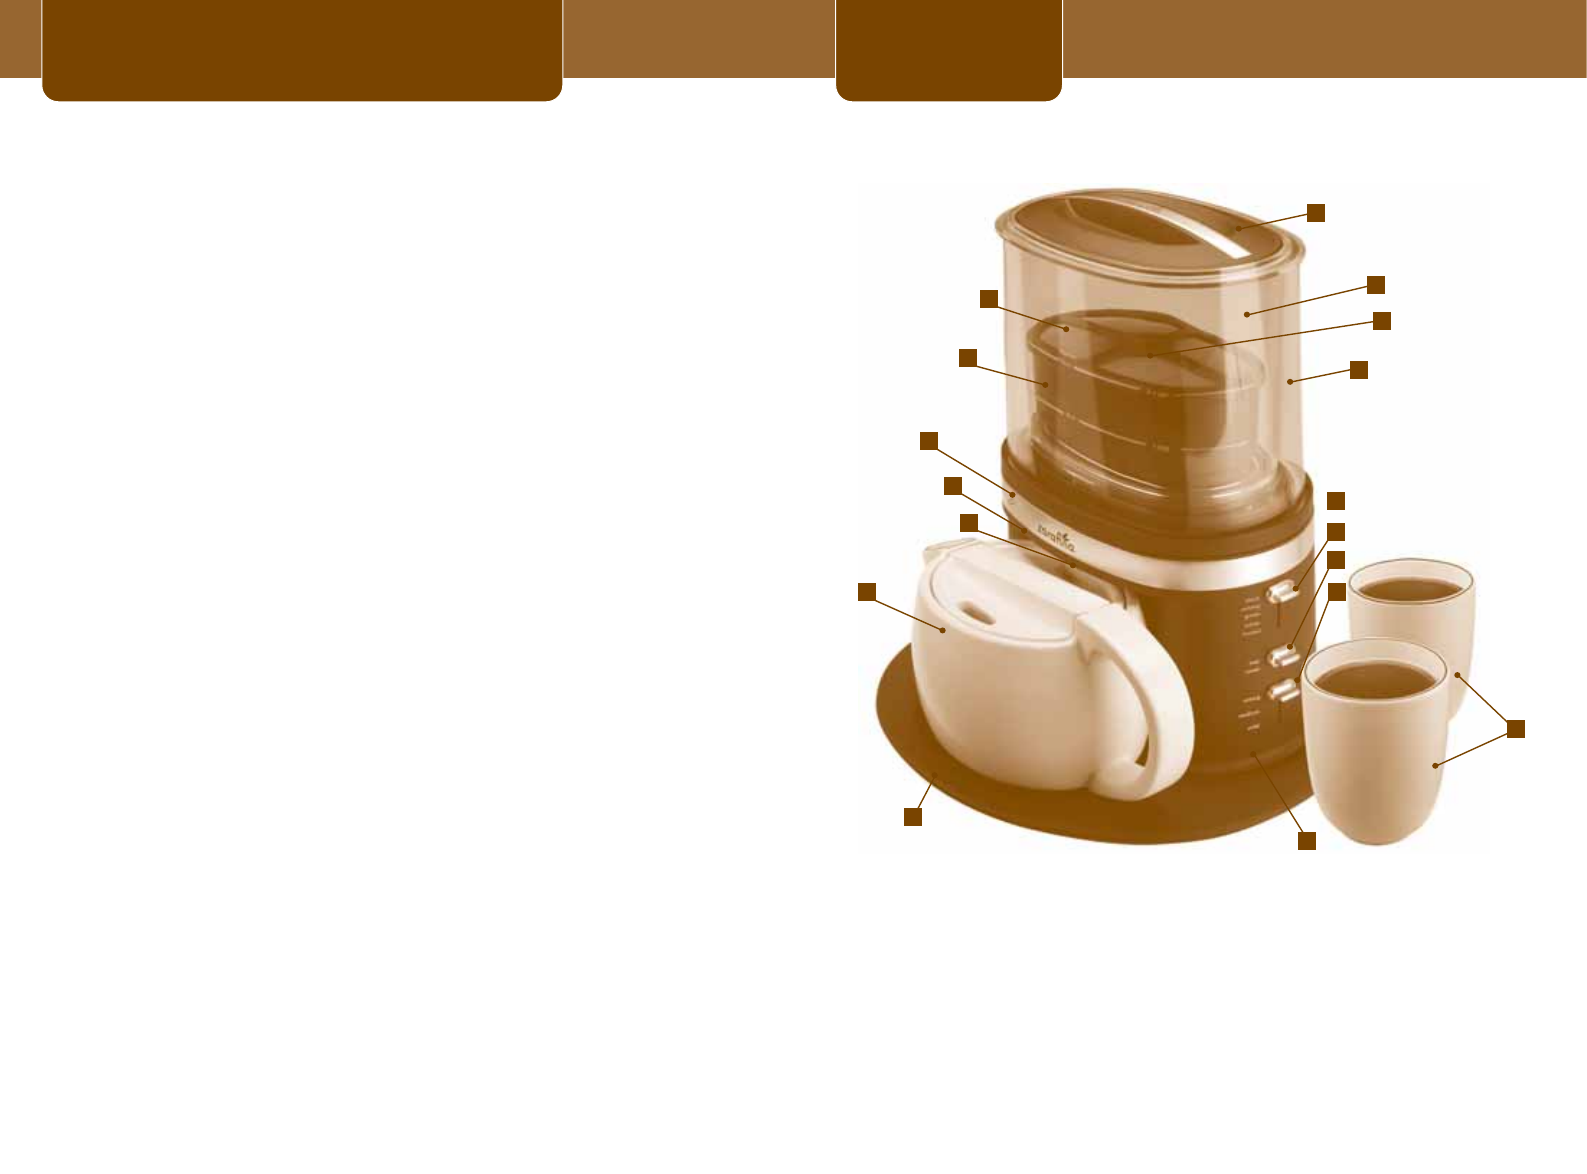
Diagram
1. Ceramic Tea Pot
2. Dispensing Valve
3. On/Off Setting
4. ZARAFINA™ Tea Leaf
Indicator Light
5. Infuser Basket
6. Infuser Basket Lid
7. Steeping Chamber Lid
8. Steeping Chamber (Internal)
9. Infuser Basket Stem
10. Upper Housing
1 1. Tea Settings:
a. Tea Type Setting
b. Tea Format Setting
c. Tea Strength Setting
12. Ceramic Tea Cups
13. Unit Base
14. Ceramic Serving Tray
DIAGRAM OF PARTS
1
11
a
b
c
14
2
3
10
6
5
7
4
8
9
13
12

23
Solución de Problemas
SOLUCIÓN DE PROBLEMAS CON SU TETERA
Su Tetera ZARAFINA™ ha sido diseñada cuidadosamente para brindar
muchos años de servicio sin problemas. En el caso improbable de que
su Tetera no funcione en forma satisfactoria, repase los siguientes
problemas posibles y siga los pasos recomendados ANTES de
comunicarse con el Centro de Servicio Autorizado.
POSIBLE
PROBLEMA CAUSA SOLUCIÓN
LA LUZ DE
ENCENDIDO NO SE
ENCIENDE.
LA TETERA NO
PREPARA TÉ.
LA TETERA SÓLO
VIERTE AGUA.
LA TETERA
FUNCIONA CON
LENTITUD.
EL TÉ TIENE UN
SABOR
DESAGRADABLE.
LA TETERA NO
VIERTE TÉ.
El electrodoméstico está
desenchufado.
El electrodoméstico está
desenchufado.
El depósito hervidor de
agua está vacío.
La Tetera no está ubicada
en el lugar correcto.
No hay hojas de té en la
canasta de filtro.
La Tetera necesita
limpieza.
La relación hojas de
té/saquitos de té y agua
está desproporcionada.
Se ha retirado la jarra de
té durante el vertimiento
ENCHUFE LA UNIDAD
ENCHUFE LA UNIDAD
LLENE EL DEPÓSITO
HERVIDOR DE AGUA CON
LA CANTIDAD DESEADA DE
AGUA
COLOQUE LA JARRA DE TÉ
CENTRADA
PERFECTAMENTE FRENTE A
LA TETERA DURANTE EL
CICLO DE INFUSIÓN.
AGREGUE LA CANTIDAD
DESEADA DE TÉ.
LIMPIE LA TETERA SEGÚN
LAS INSTRUCCIONES EN LA
SECCIÓN "LIMPIEZA Y
MANTENIMIENTO
PERIÓDICOS".
REFIÉRASE AL CUADRO DE
MEDIDAS DE TÉ PARA UNA
CORRECTA PREPARACIÓN.
VIERTA EL TÉ EN LA JARRA
RETIRANDO POR COMPLETO
EL DEPÓSITO HERVIDOR DE
AGUA.
6
Care & Instructions
SPECIAL CORD SET INSTRUCTIONS
1. A short power supply cord is provided to reduce the hazards
resulting from a person or pet becoming entangled in or
tripping over a longer cord.
2. An extension cord may be purchased and used if care is
exercised in its use.
3. If an extension cord is used, the marked electrical rating of
the extension cord must be at least 10 amps and 120 volts.
The resulting extended cord must be arranged so that it
will not drape over a countertop or tabletop, where it can
be pulled on by children or tripped over accidentally.
4. This appliance has a ground 3-prong electrical plug. It must be
plugged only into a properly grounded 3-prong outlet
. Do not
modify the plug in any way.
Before using your Tea Maker for the first time, wash the Tea Pot,
Tea Cups, Infuser Basket and removable Steeping Chamber using
a mild, non-abrasive detergent and water. Rinse each part thoroughly.
Proceed to steps 4 – 7 (Making Tea) simply using water to thoroughly
clean the inside of the product before use.
TEA TIP:
In order for a tea leaf to fully infuse its maximum
flavor capacity, it needs room to expand. Notice the beautiful
colors and shapes of the leaves as they steep. Appearance
is very much a part of the experience. Enjoy the tea.

22
Limpieza
LIMPIEZA DIARIA
Siempre desenchufe la Tetera y deje que el producto se enfríe antes
limpiarlo.
Retire el depósito hervidor de agua, la jarra de té y la tapa y lávelos con
una solución de agua caliente y jabón líquido suave. Nunca utilice
limpiadores abrasivos, esponjas de acero u otros materiales abrasivos.
No coloque en el lavavajillas.
PRECAUCIÓN: Nunca sumerja la Tetera o el depósito
hervidor en agua o en cualquier otro líquido ni los coloque
en el lavavajillas.
LIMPIEZA Y MANTENIMIENTO PERIÓDICOS
Descalcificando y removiendo manchas
de te de su maquina de te ZARAFINA™
Los minerales (calcio) que se encuentran en el agua dejarán depósitos
en su Tetera y podrán afectar su rendimiento. Se recomienda la
eliminación de estos depósitos en forma periódica utilizando
detergente de lava plato.
1. Las manchas de Te adentro del Depósito hervidor de agua(interno)
pueden ser removidas utilizando detergente de lava plato y trapo
un suave.
2. Enjuague la parte de adentro del Depósito hervidor de
agua(interno) con agua limpia. No sumerja el Depósito
hervidor de agua(interno) en agua.
3. Cambie el Depósito hervidor de agua(interno).
4. Posicione el Jarra de té de cerámica enfrente del Tetera
Automática.
5. Prenda el Tetera Automática y corra un ciclo completo
utilizando agua.
6. Vacie el Jarra de té de cerámica al terminar el ciclo.
Ahora su Tetera está limpia y lista para preparar nuevas jarras de
delicioso té caliente.
DESCALCIFICACIÓN SUGERIDA E INTERVALOS
DE REMOCION DE MANCHAS DE TE
Tipo de agua Frecuencia de limpieza
Agua blanda Cada 80 ciclos
Agua dura Cada 40 ciclos
7
Making Tea
DIRECTIONS FOR MAKING TEA
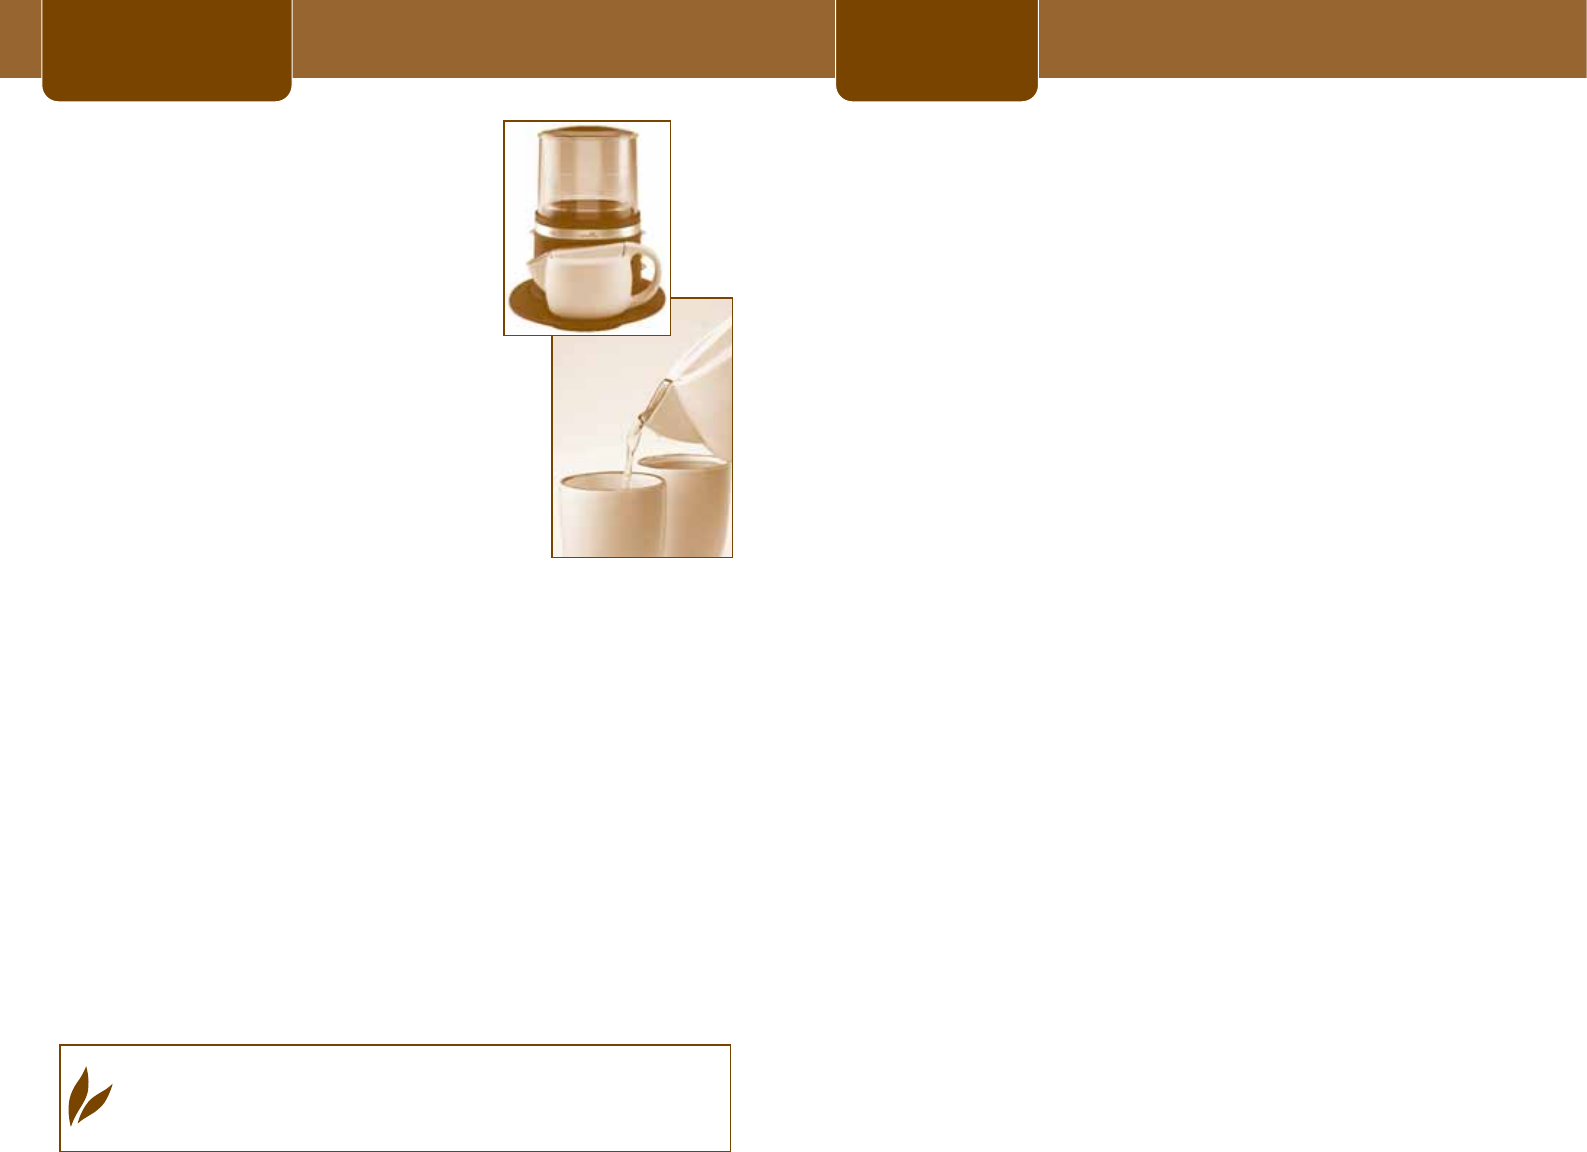
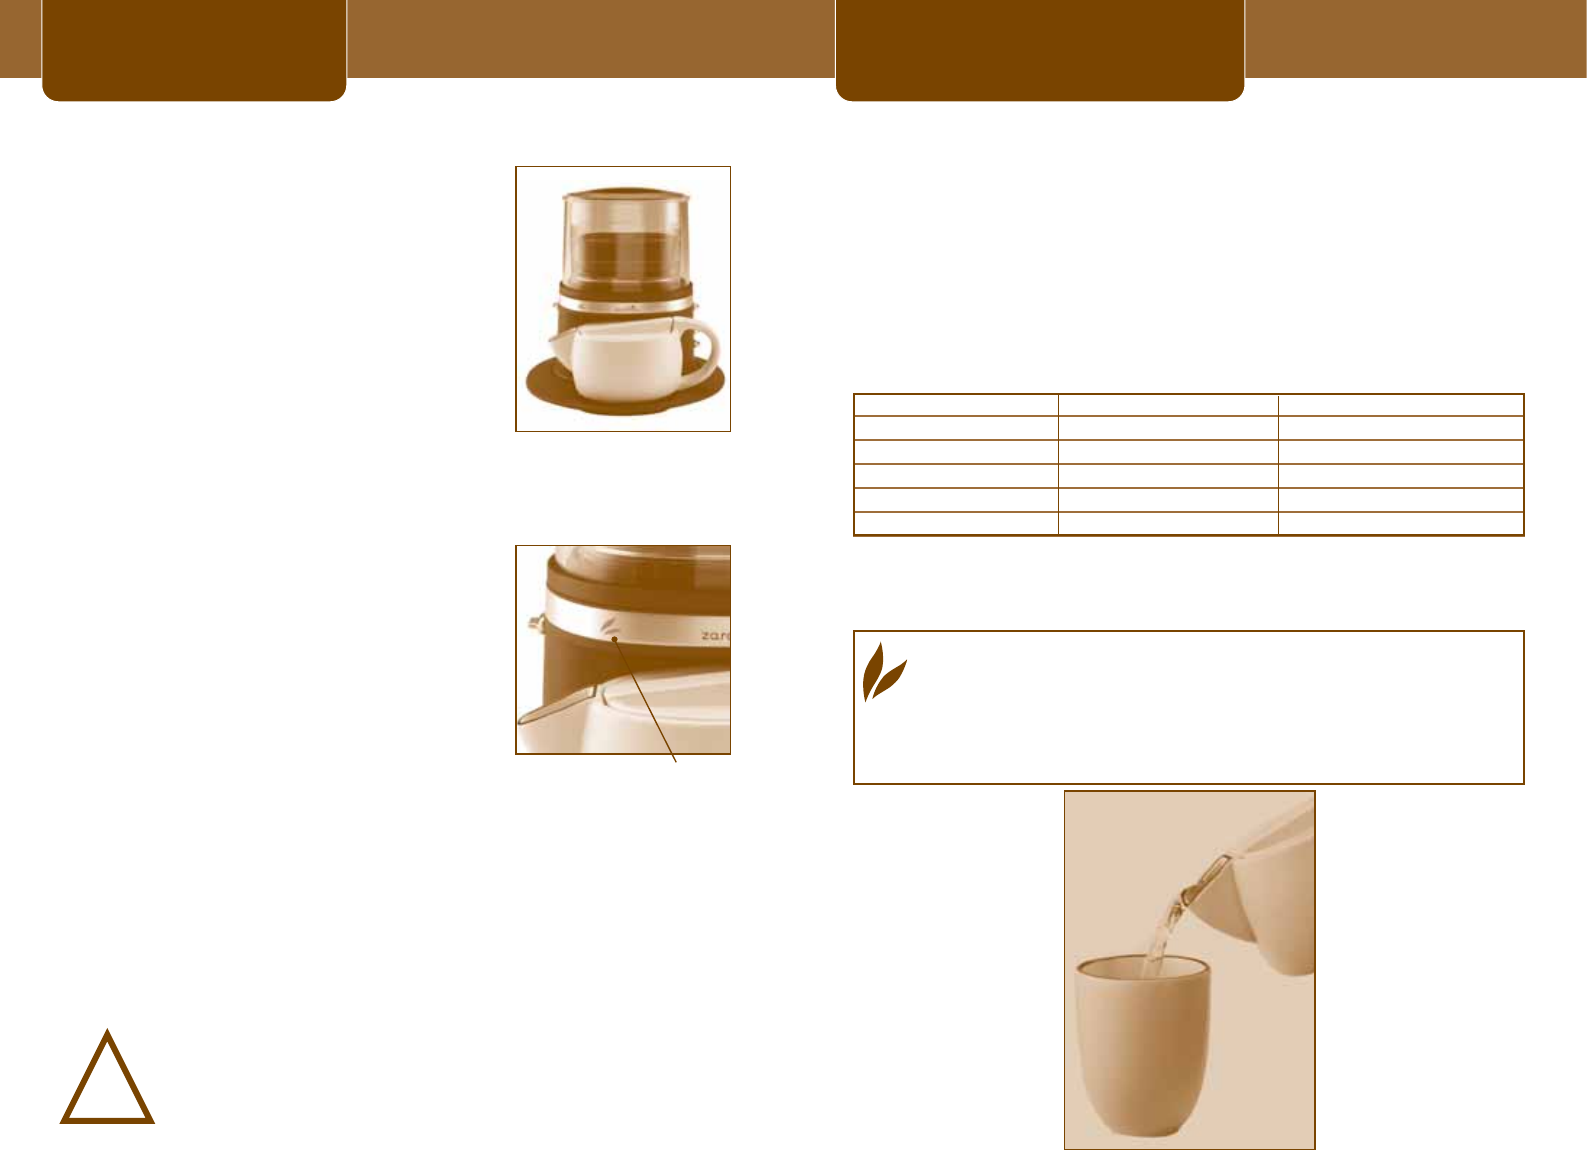
1.
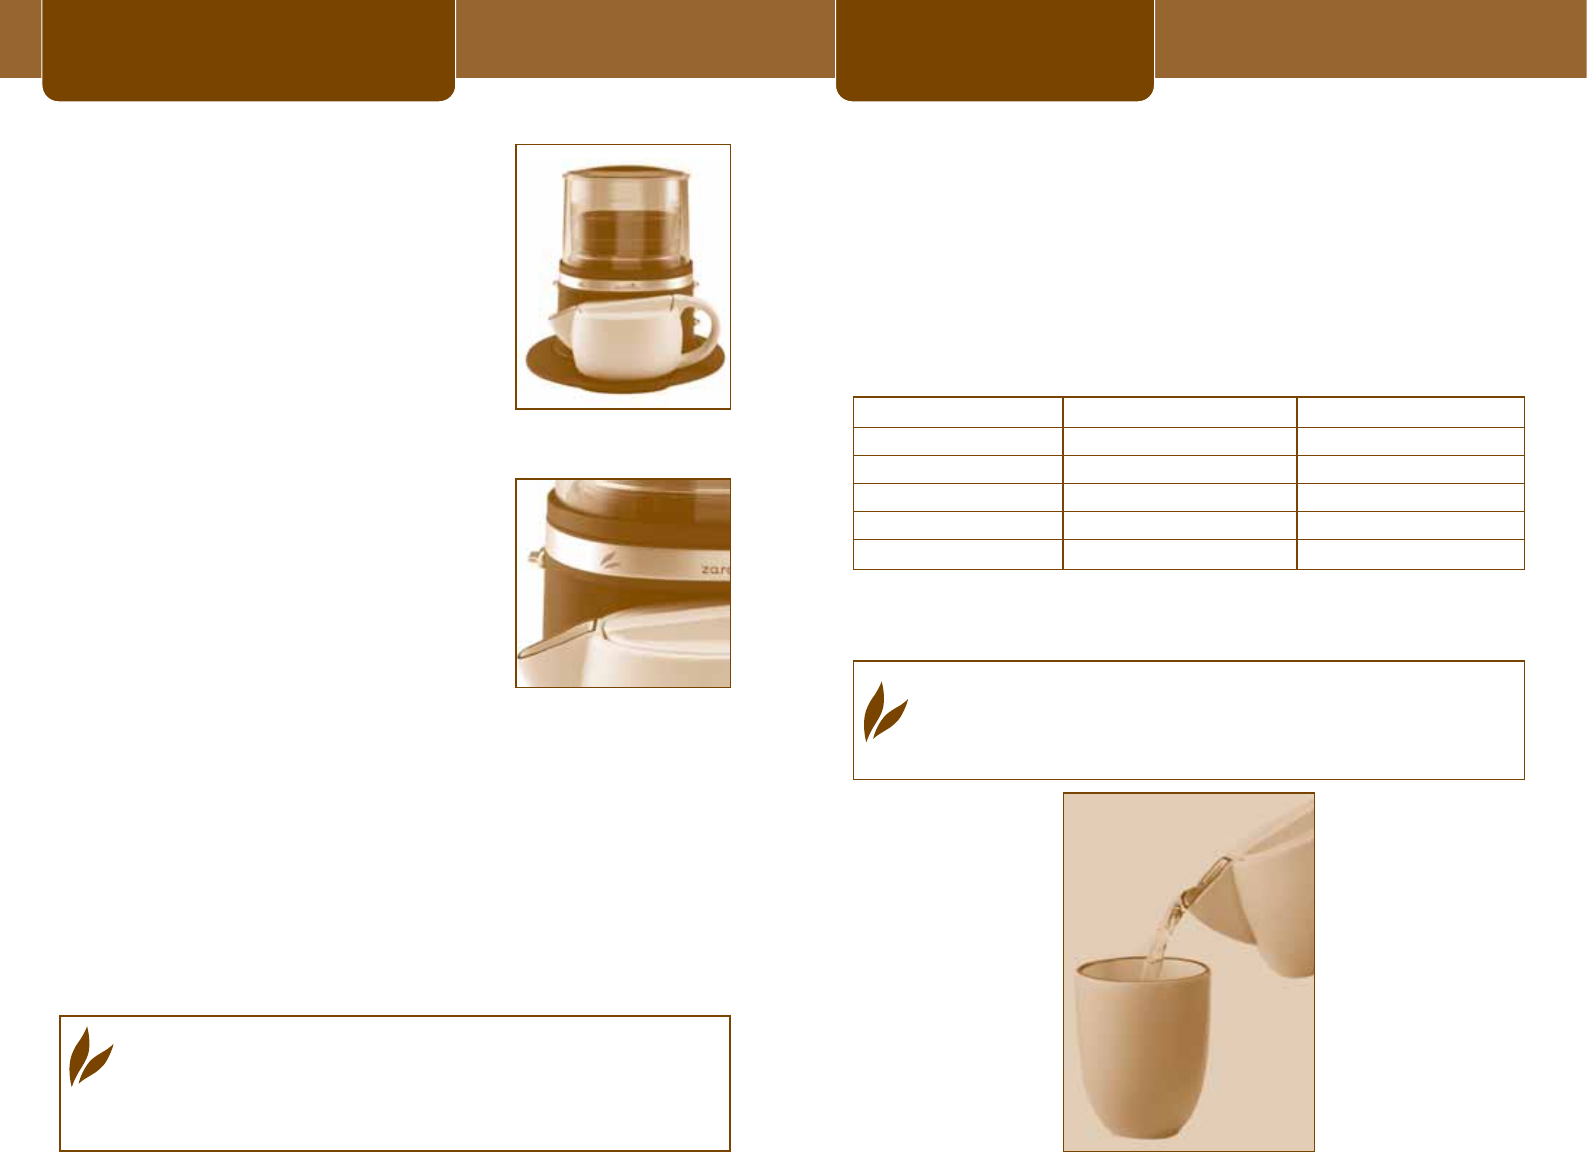
Remove the Steeping Chamber Lid and the Infuser Basket by
lifting up on the Infuser Basket Stem. (Picture 1)
2. Remove the Infuser Basket Lid and add
the desired amount of tea leaves or tea
bags, referring to the Tea Measuring Chart
on page 9.
NOTE:
If using tea bags,
please ensure
the removal of the paper
tag, by using the cutter on the Infuser
Basket Stem. Additionally, for best results,
do not add anything other than loose
or bagged tea to the Infuser Basket
or Steeping Chamber.
3. Replace the Infuser Basket Lid.
4.
Remove the Steeping Chamber and fill
with cold water to the
desired
capacity,
as marked on the side of the Steeping
Chamber.
Tap water
is acceptable but
if your tap water has a noticeable taste,
you may want to opt for filtered or
bottled water. For best results,
do not use Tea Pot to fill Steeping
Chamber with water.
5. Place the Infuser Basket into the
Steeping
Chamber.
NOTE:
The Infuser
Basket will float on top of the water. This
quality feature has been incorporated to
facilitate the assurance that only heated
water comes in contact with the tea leaves.
(Picture 2)
6. Replace the Steeping Chamber into the
unit
and replace the Steeping Chamber
Lid.
Make sure the Steeping Chamber is firmly
placed into the unit.
7. Adjust the Tea Settings on the right side
of the Tea Maker according to the type
of tea that you are making and the
desired strength of your choice.
(Picture 3)
P
ICTURE
1: I
NFUSER
B
ASKET
P
ICTURE
2: F
LOATING
I
NFUSER
B
ASKET
P
ICTURE
3: T
EA
S
ETTINGS
21
Preparación del Té
CUADRO DE MEDIDAS DE TÉ RECOMENDADAS.
Para obtener resultados óptimos, utilice hojas de té frescas. Use las
cucharas niveladoras de té con la cuchara medidora suministrada.
Té en hebras
1 cucharada = 1-1/2 cucharadas de té
Utilice más o menos té a su gusto
Té en saquitos
1 saquito de té = 1 taza
2 saquitos de té = 2 tazas
Utilice esta cantidad de té.
Variedad de té: Una taza: Jarra llena:
Té negro 1/2 cucharada 1 cucharada
Té oolong 1 cucharada 2 cucharadas
Té verde 1 cucharada 2 cucharadas
Té blanco 1 cucharada 2 cucharadas
Té de hierbas 1 cucharada 2 cucharadas
Para obtener mayor información sobre las selecciones especiales de té
ZARAFINA™, visite nuestro sitio web en www.zarafina.com
CONSEJO PARA LA PREPARACIÓN DEL TÉ: Todas las
variedades de té tienen fecha de vencimiento. Su té Zarafina
requiere el almacenamiento adecuado para prolongar el placer
de disfrutarlo. Conserve el té en un lugar fresco en un
recipiente opaco con tapa de cierre hermético. De este modo,
la luz y la humedad no secarán el té.
8
Making Tea
!
8. Insert the Tea Pot snugly in place under
the Tea Maker.
If not properly in place,
the Tea Maker will not dispense.
Do not dispense tea into anything
other than the provided Tea Pot.
9. Plug the cord into the electrical outlet
and turn the Tea Maker switch on the left
side of the unit to ON. The ZARAFINA™
Tea Leaf Indicator Light will illuminate,
and the water will begin to heat to the
desired temperature for making your
pre-selected tea.
Once the water has
been heated, the Infuser Basket will be
submerged into the water.
(Picture 4)
You will then hear the Tea Maker cycle
on and off throughout the steeping cycle
to maintain the ideal steeping
temperature for your chosen
variety of tea.
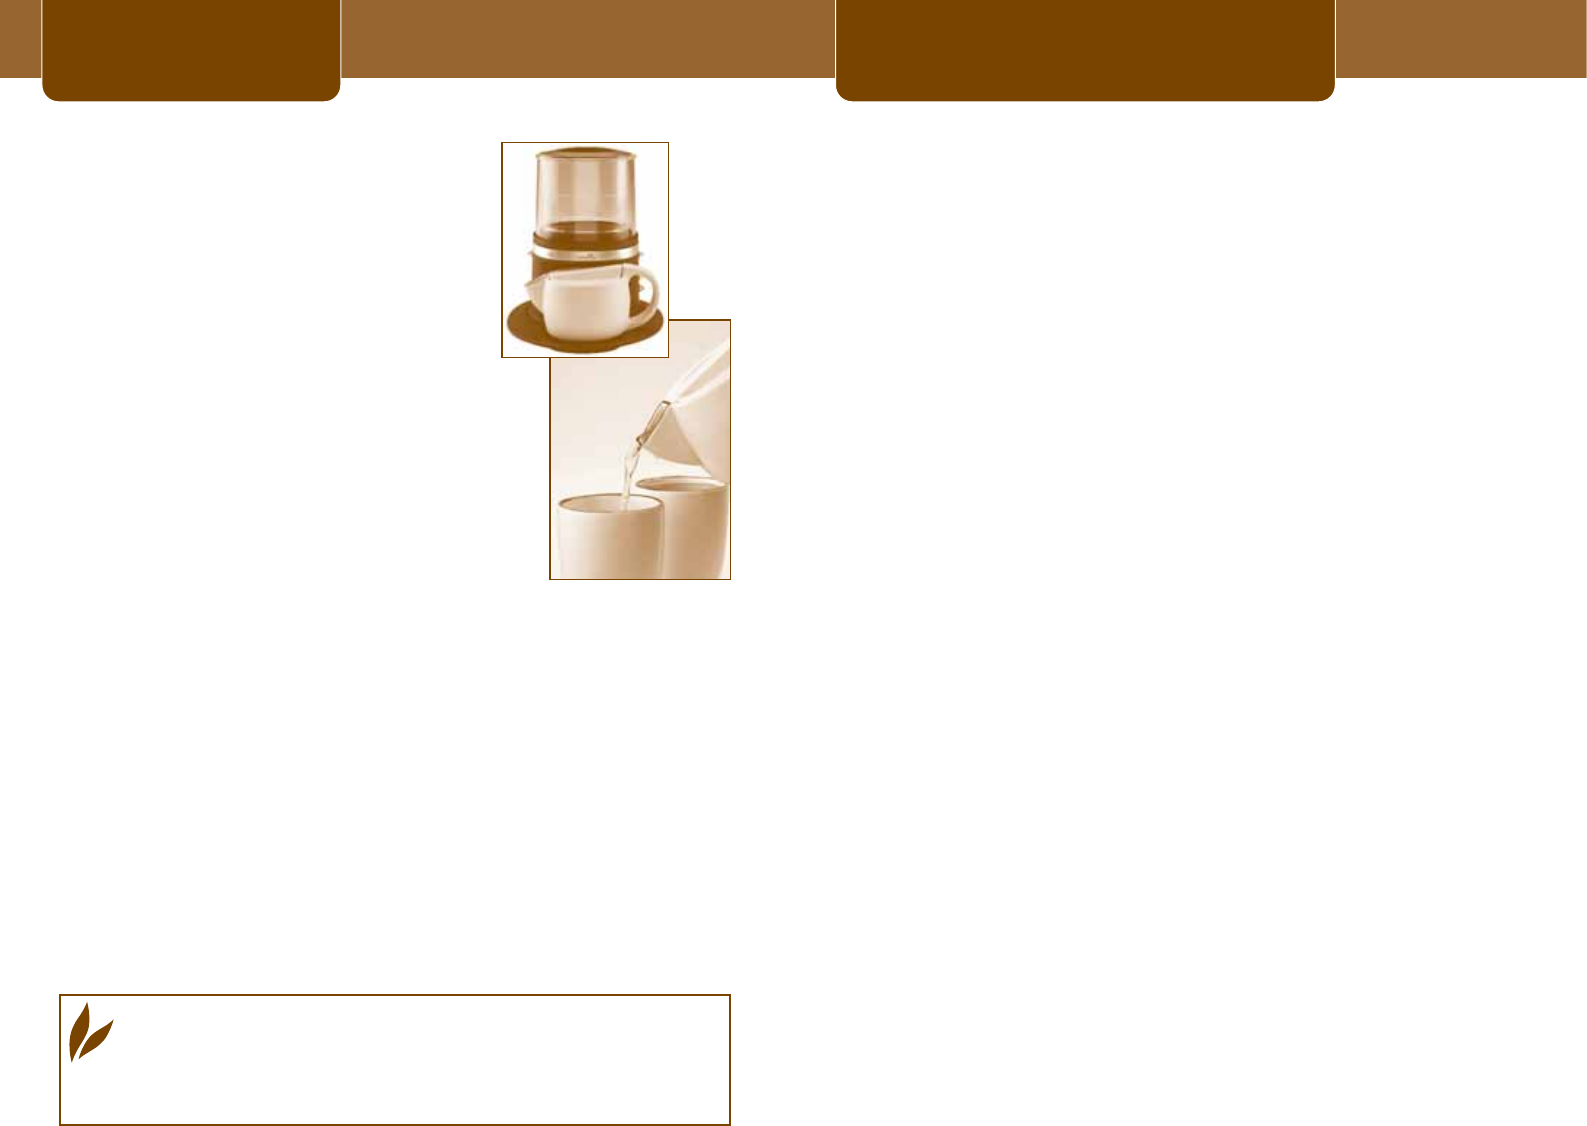
10. Once the steeping cycle is complete,
the ZARAFINA™ Tea Leaf Indicator Light
will blink and your tea will automatically
dispense into the Tea Pot provided with
your unit. (Picture 5)
11. Once the indicator light stops blinking,
you may now remove the ZARAFINA™
Tea Maker from the Ceramic
Serving Tray
and place the Ceramic Tea Pot and
Ceramic Cups on it for easy serving.
NOTE:
There will be tea remaining in the Steeping Chamber;
this is perfectly normal as it results from the tea leaves that
continue to descend even after the tea has been dispensed
into the Tea Pot.
Enjoy! To make another pot of tea, please repeat process
as needed.
Please unplug the power cord when not in use.
WARNING! To avoid risk of personal injury or damage
to property as a result of spilling, be sure the Tea Pot
is squarely centered in front of the Tea Maker during
the steeping cycle. Tea and loose tea leaves, both in
the Infuser Basket and Tea Pot, are very hot.
P
ICTURE
5: I
NDICATOR
L
IGHT
P
ICTURE
4: S
UBMERGED
I
NFUSER
B
ASKET
20
Preparación del Té
8. Inserte la jarra de té firmemente en su lugar
por debajo de la Tetera. Si no se la coloca
correctamente, la Tetera no verterá agua.
No vierta el té en ningún otro recipiente que
no sea la jarra de té suministrada.
9. Enchufe el cable en el tomacorriente y
encienda la Tetera con el interruptor que se
encuentra en el costado izquierdo de la unidad
(posición ON). La luz indicadora de hojas de té
ZARAFINA™ se iluminará, y el agua comenzará
a calentarse a la temperatura deseada para
preparar el té seleccionado previamente. Una
vez que el agua esté caliente, la canasta de
filtro se sumergirá en el agua. (Imagen 4)
A continuación escuchará encenderse y
apagarse el ciclo de la Tetera durante todo el
ciclo de infusión para mantener la temperatura
ideal para la variedad de té seleccionada.
10. Una vez que el ciclo de infusión finaliza, la
luz indicadora de hojas de té ZARAFINA™ se
encenderá en forma intermitente y el té se
verterá automáticamente en la jarra
suministrada con la unidad. (Imagen 5)
11. Una vez que la luz indicadora intermitente se
detiene, puede retirar la Tetera Zarafina™ de la
bandeja para servir de cerámica y colocar la jarra de té de cerámica
y las tazas de cerámica sobre ésta para servir el té con facilidad.
NOTA: Es perfectamente normal que queden restos de té en el
depósito hervidor de agua, esto es consecuencia de que las hojas de té
continúan descendiendo aún luego de que se vierte el té en la jarra.
¡A disfrutar! Para preparar otra jarra de té, repita el proceso a medida
que lo necesite.
Cuando no utilice el electrodoméstico, desenchufe el cable de
alimentación.
ATENCIÓN Para evitar el riesgo de lesiones personales o
daños a la propiedad como resultado de derrames,
asegúrese de que la jarra de té esté centrada perfectamente
en frente de la Tetera durante el ciclo de infusión. El té y las
hojas de té en hebras que se encuentran tanto en la canasta
de filtro como en la jarra de té están muy calientes.
I
MAGEN
5:
LA LUZ
INDICADORA
I
MAGEN
4: L
A CANASTA DE
FILTRO SE SUMERGIRÁ
9
Making Tea
SUGGESTED TEA MEASURING CHART
For best results, use fresh tea leaves. Use level tea scoops
with the measuring scoop provided.
Loose Tea
1 Scoop = 1-1/2 teaspoons
Use more or less tea to suit your taste
Bagged Tea
1 Tea Bag = 1 Cup
2 Tea Bags = 2 Cups
Use This Amount of Tea.
Tea Type: One Cup: Full Pot:
Black 1/2 Scoop 1 Scoop
Oolong 1 Scoop 2 Scoops
Green 1 Scoop 2 Scoops
White 1 Scoop 2 Scoops
Herbal 1 Scoop 2 Scoops
For more information on ZARAFINA™ specialty tea selections,
please visit us at
www.zarafina.com
TEA TIP:
All teas have a shelf life. To prolong the enjoyment
of your Zarafina tea,
proper storage is necessary. Store tea
in a cool place in an opaque
container
with a tightly sealing lid.
This will prevent sunlight and moisture
from drying out the tea.
19
Preparación del Té
INSTRUCCIONES PARA LA PREPARACIÓN DEL TÉ
1. Retire la tapa del depósito hervidor de agua
y la canasta de filtro levantando la base de
la canasta de filtro. (Imagen 1)
2. Retire la tapa de la canasta de filtro y
agregue la cantidad deseada de hojas o
saquitos de té; consulte el cuadro de
medidas de té en la página 9. NOTA: Si se
utilizan saquitos de té, asegúrese de retirar
la etiqueta de papel utilizando el cortador
sobre la base de la canasta de filtro.
Además, para lograr resultados óptimos, no
agregue nada más que té en hebras o en
saquitos en la canasta de filtro o en el
depósito hervidor de agua.
3. Vuelva a colocar la tapa de la canasta de filtro.
4. Retire el depósito hervidor de agua y llénelo
con agua fría hasta la medida deseada, según
las marcas en el costado del depósito. El agua
del grifo es aceptable pero si ésta tiene un
sabor perceptible, puede optar por filtrarla o
utilizar agua embotellada. Para obtener
resultados óptimos, no utilice la jarra de té para
llenar con agua el depósito hervidor.
5. Coloque la canasta de filtro en el depósito
hervidor de agua. NOTA: La canasta de filtro
flotará en el agua. Esta característica de
calidad se ha incorporado para asegurar que
sólo el agua caliente entre en contacto con
las hojas de té. (Imagen 2)
6. Coloque nuevamente el depósito hervidor
de agua en la unidad y la tapa
correspondiente. Asegúrese de que el
depósito hervidor de agua esté colocado
firmemente en la unidad.
7. Seleccione los indicadores para el té
ubicados en el costado derecho de la Tetera
según la variedad de té que esté preparando
y la intensidad deseada de su elección.
(Imagen 3)
I
MAGEN
1: L
A CANASTA
DE FILTRO
I
MAGEN
2: L
A CANASTA DE
FILTRO FLOTARÁ
I
MAGEN
3: S
ELECCIONES
PARA EL TÉ
DAILY CLEANING
Always unplug the Tea Maker and allow product to cool before cleaning.
Remove the Steeping Chamber, Tea Pot and Lid and wash them
in a solution
of hot water and mild liquid soap. Never use
abrasive cleansers, steel wool pads or other abrasive materials.
Do not place in dishwasher.
CAUTION!
Never immerse the Tea Maker or Steeping
Chamber in water, in any other liquid or place it
in the dishwasher.
REGULAR CLEANING AND MAINTENANCE
Decalcifying and Removing Tea Stains
in Your ZARAFINA™ Tea Maker
Minerals (calcium) found in water will leave deposits in your Tea Maker
and will affect its performance. It's recommended that you regularly
remove these deposits by using a dish detergent solution.
1. Tea stains and calcium build up can be removed on the inside
of the steeping chamber using dish detergent solution and a
soft cloth. Rub with the cloth until clean.
2. Rinse the inside of the steeping chamber with clean water.
Do not submerge the steeping chamber in water!
3. Replace the steeping chamber inside the tea maker and fill
with plain water.
4. Position the tea pot in front of the tea maker.
5. Turn on the tea maker and run through one complete cycle
with plain water.
6. Empty the tea pot after the cycle is complete.
Your Tea Maker is now clean and ready to brew the next pot
of delicious, hot tea!
SUGGESTED DECALCIFYING AND
TEA STAIN REMOVAL INTERVAL
Type of Water Cleaning Frequency
Soft Water Every 80 Cycles
Hard Water Every 40 Cycles
10
Cleaning
!

18
INSTRUCCIONES ESPECIALES PARA EL JUEGO DE CABLES
1. El cable de alimentación eléctrica suministrado es de corta longitud
a fin de reducir los riesgos producidos como consecuencia de que
una persona o animal se enrede o tropiece con un cable más largo.
2. Si se toman las medidas adecuadas para su uso también puede
adquirir un cable alargador.
3. Si se usa un cable alargador, la clasificación eléctrica del cable
alargador debe ser de al menos 10 amperes y 120 voltios. Debe
arreglarse el cable alargador resultante de modo tal que no cuelgue
sobre el mostrador o mesa, donde los niños puedan tirar de él o
tropezar con él accidentalmente.
4. Este artefacto tiene un enchufe eléctrico de tres cuchillas puesto a
tierra. Debe ser enchufado solamente en un tomacorriente para tres
cuchillas correctamente puesto a tierra. No modifique el enchufe en
ninguna manera.
Antes de utilizar la Tetera por primera vez, lave la jarra de té, las tazas,
la canasta de filtro y el depósito hervidor de agua desmontable con
agua y un detergente suave, no abrasivo. Enjuague cada pieza por
completo. Proceda con los pasos de 4 a 7 (Preparación del té) usando
solamente agua para limpiar completamente la parte interior del
producto antes de su utilización.
CONSEJO PARA LA PREPARACIÓN DEL TÉ: Para que la hoja
de té infunda al máximo su capacidad de sabor, necesita lugar
para expandirse. Observe las bellas formas y colores de las
hojas mientras se las deja en infusión. El aspecto también es
una parte sumamente importante de la experiencia.
Disfrute del té.
Instrucciones Especiales
TROUBLESHOOTING YOUR TEA MAKER
Your ZARAFINA™ Tea Maker has been carefully designed to give
you many years of trouble-free service. In the unlikely event that
your new Tea Maker does not operate satisfactorily, please review
the following potential problems and try the steps recommended
BEFORE you call an Authorized Service Center.
POSSIBLE
PROBLEM CAUSE SOLUTION
11
Troubleshooting
THE ON LIGHT
DOES NOT LIGHT UP.
THE TEA MAKER IS
NOT MAKING TEA.
ONLY WATER
COMES OUT OF
THE TEA MAKER.
THE TEA MAKER IS
WORKING SLOWLY.
THE TEA TASTES BAD.
THE TEA MAKER
DOESN'T DISPENSE
TEA.
The appliance
is unplugged.
The appliance
is unplugged.
The Steeping Chamber
is empty.
The Tea Pot is
not placed in the
right space.
There are no tea leaves
in the Infuser Basket.
The Tea Maker needs
to be cleaned.
The tea leaves-to-water
or bags-to-water ratio
is unbalanced.
The Tea Pot
has been removed
during dispensing.
PLUG UNIT IN.
PLUG UNIT IN.
FILL THE STEEPING
CHAMBER WITH THE
DESIRED AMOUNT
OF WATER.
PLACE THE TEA POT
SQUARELY CENTERED
IN FRONT OF THE TEA
MAKER DURING THE
STEEPING CYCLE.
ADD DESIRED AMOUNT
OF TEA.
CLEAN THE TEA MAKER
AS DESCRIBED IN
“REGULAR CLEANING AND
MAINTAINANCE” SECTION.
REFER TO THE TEA
MEASURING CHART
FOR PROPER BREWING.
DISPENSE TEA BY
REMOVING THE ENTIRE
STEEPING CHAMBER, POUR
INTO TEA POT.
17
Diagrama
1
11
a
b
c
14
2
3
10
6
5
7
4
8
9
13
12
1. Jarra de té de cerámica
2. Válvula dispensadora
3. Indicador de
Encendido/Apagado
4. Luz indicadora de hojas de té
ZARAFINA™
5. Canasta de filtro
6. Tapa de la canasta de filtro
7. Tapa del depósito hervidor
de agua
8. Depósito hervidor de agua
(interno)
9. Base de la canasta de filtro
10. Compartimiento superior
1 1. Indicadores para el té:
a. Indicador de variedad
de té
b. Indicador de tipo de té
c. Indicador de intensidad
de té
12. Tazas de cerámica para té
13. Base de la unidad
14. Bandeja para servir
de cerámica
DIAGRAMA DE LA PARTES
12
Service & Maintenance
TEA POTS
Please call 1-877 ZARATEA (1-877-927-2832) in the U.S. for
information on where you can find a store that carries replacement
Tea Pots.
REPAIRS
If your Tea Maker requires service, do not return it to the store
where you purchased it. All repairs and replacements must be
made by Sunbeam. Please call us at the following toll-free
telephone number to find the location of the nearest authorized
service center:
U.S. 1-877 ZARATEA (1-877-927-2832). You may also visit our
website at www.zarafina.com for a list of service centers.
To assist us in serving you, please have the Tea Maker model number
and date of purchase available when you call. The model number
is on the bottom of the Tea Maker.
We welcome your questions, comments or suggestions. In all
your communications, please include your complete name,
address, telephone number and a description of the problem.
Visit our website at www.zarafina.com and discover the secret
to infusing the perfect cup of tea. You will also find a rich blend
of gourmet recipes, entertaining tips and the latest information
on ZARAFINA™ products.
16
Introducción
INTRODUCCIÓN
Felicitaciones por la compra de su nueva
Tetera Automática ZARAFINA™, el mejor té
para dos. Su tetera está fabricada para
albergar en el contenedor tanto té en hebras
como en saquitos, mientras que la
característica única del indicador de variedad
de té de la Tetera Automática ZARAFINA™ le
permite alcanzar la unión ideal de tiempo y
temperatura.
El ingenioso diseño de la tetera brinda un
agradable aspecto exterior, a la vez que su rigurosa
fabricación asegura el placer constante de la mejor
calidad de té con mínimo esfuerzo. El encuentro
ideal del mejor té para dos.
CARACTERÍSTICAS Y BENEFICIOS DE LA
TETERA AUTOMÁTICA ZARAFINA™
• Prepara hasta 16 onzas ó dos tazas del mejor té.
• El indicador de tipo de té permite preparar infusiones tanto de té en
hebras como en saquitos.
• El indicador de variedad de té le permite alcanzar la unión ideal de
tiempo y temperatura dependiendo del té que utiliza.
• El indicador de intensidad del té le brinda la opción de preparar té
suave o fuerte para satisfacer su paladar.
• El depósito hervidor de agua desmontable facilita el llenado y la
limpieza.
• Detalles decorativos de acero inoxidable.
• Incluye tazas de cerámica, bandeja para servir y jarra de té.
Para obtener mayor información sobre los productos y accesorios
ZARAFINA™ visite el sitio www.zarafina.com donde podrá encontrar ideas
para regalos y selecciones especiales de té.
CONSEJO PARA LA PREPARACIÓN DEL TÉ: Las selecciones
de té ZARAFINA™ ofrecen la más alta calidad y variedad.
Ofrecemos una variedad de té para cada gusto, desde una
mezcla de elaboración propia hasta las variedades más
exóticas para disfrutar de una experiencia más audaz.
13
1-YEAR LIMITED WARRANTY
Sunbeam Products,
Inc., doing business as Jarden Consumer Solutions,
(collectively
“Sunbeam”) warrants that for a period of one year from the date of purchase, this product
will be free from defects in material and
workmanship.
Sunbeam
, at its option, will repair or
replace this product or any component
of the product found to be defective during the
warranty period. Replacement will be made with a new or remanufactured product or
component. If the product is no longer available, replacement may be made with a similar
product of equal or greater value. This is your exclusive warranty from Sunbeam.
This warranty is valid for the original retail purchaser from the date of initial retail purchase
and is not transferable. Keep the original sales receipt. Proof of purchase is required to
obtain warranty performance. Sunbeam dealers, service centers, or retail stores selling
Sunbeam products do not have the right to alter, modify or any way change the terms
and conditions of this warranty.
This warranty does not cover normal wear of parts or damage resulting from any of the
following: negligent use or misuse of the product, use on improper voltage or current,
use contrary to the operating instructions, disassembly, repair or alteration by anyone
other than Sunbeam or an authorized Sunbeam service center. Further, the warranty
does not cover: acts of God, such as fire, flood, hurricanes and tornadoes.
WHAT ARE THE LIMITS ON ZARAFINA™'S LIABILITY?
Sunbeam shall not be liable for any incidental or consequential damages caused
by the breach of any express, implied or statutory warranty or condition.
Except to the extent prohibited by applicable law, any implied warranty or condition of
merchantability or fitness for a particular purpose is limited in duration to the duration
of the above warranty.
Sunbeam
disclaims all other warranties, or conditions or representations, express, implied,
statutory or otherwise.
Sunbeam shall not be liable for any damages of any kind resulting from the purchase,
use
or misuse of, or inability to use the product including incidental, special, consequential
or
similar damages or loss of profits, or for damages arising from any tort, including
negligence or gross negligence, or fault committed by Sunbeam, its agents or employees
or for any breach of contract, fundamental or otherwise, or for any claim brought against
purchaser by any other party.
Some provinces, states or jurisdictions do not allow the exclusion or limitation of
incidental or consequential damages or limitations on how long an implied warranty
lasts, so the above limitations or exclusions may not apply to you.
This warranty gives you specific legal rights, and you may also have other rights that
vary from province to province, state to state or jurisdiction to jurisdiction.
HOW TO OBTAIN WARRANTY SERVICE
If you have any question regarding this warranty or would like to obtain warranty service,
please call 1-877-ZARATEA and a convenient service center address will be provided to you.
In the U.S.A., this warranty is offered by Sunbeam Products, Inc., located in Boca Raton,
Florida 33431.
PLEASE DO NOT RETURN THIS PRODUCT TO ANY OF
THESE ADDRESSES OR TO THE PLACE OF PURCHASE
Warranty Information

Seguridades
12. Coloque el electrodoméstico sobre una superficie plana, dura y
nivelada o en la Bandeja para Servir de la Tetera.
13. Evite el contacto con cualquiera de las piezas móviles.
14. Esta Tetera está diseñada sólo para uso doméstico.
15. No utilice este electrodoméstico con ningún otro fin diferente de su
uso previsto.
USO Y CUIDADO DE LA JARRA DE TÉ
I
Esta Jarra de Té está diseñada para utilizarse con la
Tetera Automática ZARAFINA™ y, por lo tanto, nunca
debe colocarse sobre una parrilla de estufa u horno,
incluido el horno microondas.
I
No coloque la jarra de té caliente sobre superficies
húmedas o frías.
I
No utilice la jarra de té si está agrietada o si tiene
alguna agarradera floja o desajustada.
I
No limpie la jarra de té con limpiadores abrasivos,
esponjas de acero u otros materiales abrasivos.
I
No coloque la jarra de té, las tazas o la bandeja para
servir en el lavavajillas.
I
Proteja la jarra de té de los golpes fuertes, rayas o
manipulación brusca.
I
No vierta el té en ningún otro recipiente que no sea
la jarra de té suministrada.
¡ATENCIÓN! Para reducir el riesgo de incendio o
descargas eléctricas, no retire ninguna de las tapas
de servicio. La Tetera no contiene piezas
reparables por el usuario en su interior. Sólo el
personal autorizado debe reparar la Tetera.
Lea cuidadosamente TODAS las instrucciones detalladas en este
manual antes de utilizar este electrodoméstico. El cuidado y el
mantenimiento adecuados asegurarán una larga vida útil y el
funcionamiento sin problemas de este electrodoméstico. Conserve
estas instrucciones y consultelas para obtener consejos de limpieza y
cuidado.
CONSERVE ESTAS
INSTRUCCIONES
!
14 15
Importante
MEDIDAS DE SEGURIDAD
IMPORTANTES
A fin de reducir el riesgo de incendio, descargas eléctricas y/o lesiones
personales siempre deben tomarse medidas básicas de seguridad al
utilizarse electrodomésticos, entre las que figuran:
1. LEA TODAS LAS INSTRUCCIONES ANTES DE UTILIZAR LA
TETERA AUTOMÁTICA
2. No toque las superficies calientes de la Tetera Automática. Use
mangos o agarraderas y no abra la tapa o cubierta durante el
proceso de infusión del té. Pueden ocurrir quemaduras si se retira
la tapa de la tetera durante los ciclos de infusión.
3. A fin de evitar descargas eléctricas, no sumerja el cable de
alimentación, el enchufe o la Tetera en agua o en cualquier otro
líquido.
4. Se requiere la estricta supervisión por parte de algún adulto si se
utiliza este electrodoméstico cerca de los niños, o si ellos mismos
los usan.
5. Apague la Tetera y desenchufe el cable de alimentación de la
fuente eléctrica cuando esté en uso y antes de la limpieza. Deje
enfriar las piezas de la Tetera antes de colocarlas en el aparato o de
retirarlas y antes de limpiar el electrodoméstico.
6. No haga funcionar ningún electrodoméstico cuyo cable de
alimentación o enchufe se encuentre dañado o si el aparato
funciona defectuosamente o está dañado de alguna forma. Lleve
este electrodoméstico únicamente al Centro de Servicio Autorizado
más cercano para su inspección, reparación o ajuste.
7. El uso de accesorios que no sean productos de la marca del
fabricante puede ser peligroso o causar alguna lesión.
8. No utilice la Tetera en exteriores.
9. No deje que el cable de alimentación cuelgue sobre el borde de
una mesa o mostrador ni que esté en contacto con superficies
calientes.
10. No coloque esta Tetera cerca o sobre una estufa a gas caliente,
quemador eléctrico o en un horno caliente.
11. Apague la Tetera para desconectarla. Luego, retire el cable de
alimentación del suministro eléctrico.
