Sunco Electronic SO95 Action camera User Manual
Sunco Electronic Co., Ltd Action camera Users Manual
User Manual
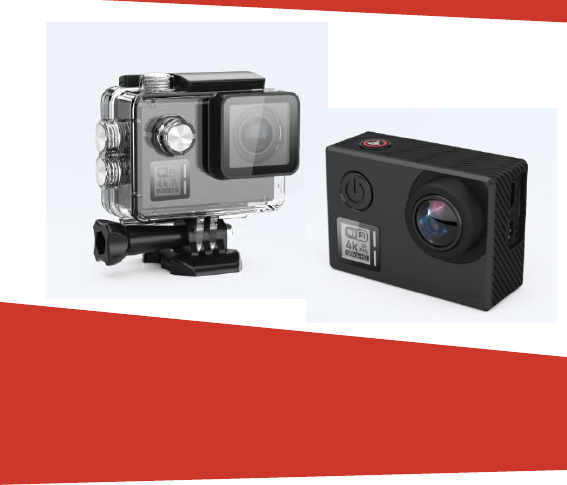
ActionCamera
Waterproof up to
40m Full HD video
4K 14MP camera
WiFi

1
Warning
1.
It is a high-precision product, please do not fall orcrash.
2.
Please donot expose theunitto strongmagneticobjects,suchasmagnetandeletricalmotor
3.
Never leave the products to high temperatures and directsunlight.
4.PleasechoosebrandedMicroSDcard.Neutralcardsarenotquaranteedtoworknormally.5.Pleased
onotplaceMicroSDcardnearstrongmagneticobjectstoavoiddataloss.
6.
While it is charging,keep the product out of children’sreach.
7.Keep the devices in cool,dry, and insulatedplaces.
Preface
Thisproductisahigh-definitiondigitalmotionvideorecordingdevicetailoredtomarketdemand.Ithasavarietyofindustry-
leadingfeatures,including:digitalvideorecording,photoshooting,audiorecording,andperfectforvehicle
datarecording,outdoorsports,homesecurity,deep-waterprobing,aerialphoto,etc,allowingyoutofilmatanytimeany
where. And it has a variety of patents.
Product Features
1.
Full high definition screen that displaysfascinating video srecorded
2.Sunplus SPCAV50M solution
3.14-megapixel photo shooting with166 degree wide angle lens
4.Wireless wifi transmission
5.
Car DVR recorder function
6.
HDMI HD output,Support FPV mode
7.Support storage cards up to 64GBmaximum
8.Multiple video recording formats:4K /2.7K/1080P /720P
9.Support MOV video recording format
10.Support Remote control function
2
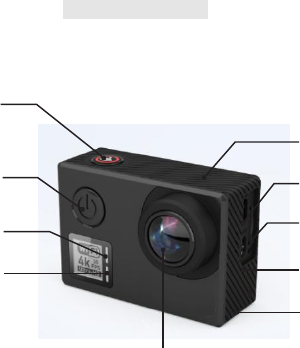
Product Schematic
OK /WIFI
Microphone
Power /Mode
WIFIIndicator
OperatingIndicator
Micro
USBSlot
SD CardSlot
HDMI Port
Speaker
Lens
3
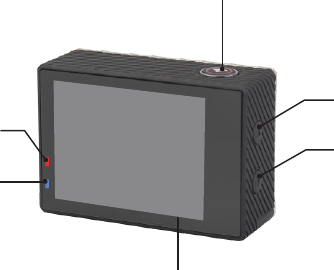
Operating
Indicator2
ChargingI
ndicator
Operating
Indicator3
Up
Down
Screen
5
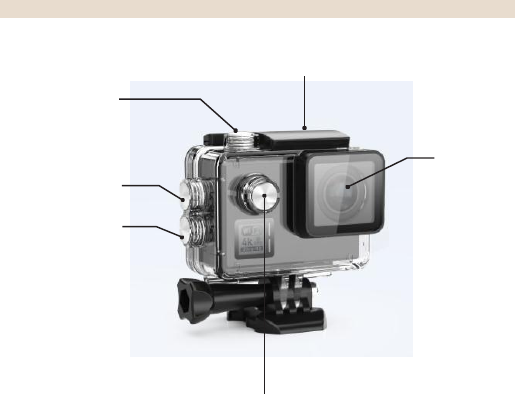
Waterproof coverSchematic
Waterproof case doorlock
OK /WIFI
Lens
Up
Down
Power /Mode
6
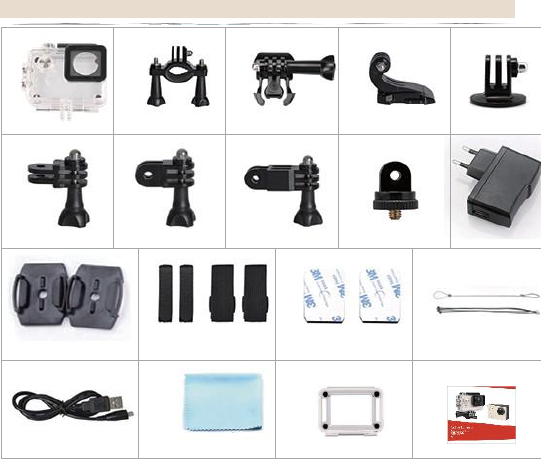
配件图
Accessories
Waterproofcase
Bicyclestand
mount1
mount2
Fixedmount
Switchsupport1
Switchsupport2
Switchsupport3
connector
Charger
Helmetmount
Ribbon
3M adhesivetape
Wirerope
USBcable
Wiper
backcover
Usermanual

7
Operation
1.
Inserting Micro SD Card
Note: Please choose branded Micro SD card and formatiton computer, before use. Neutral cards are not
guaranteed to work normally.
2.
Installing and removing battery
A. The battery door has been locked when the lock catch is in the ”LOCK”, push the lock catch to“ ”, then to
“ ”, the battery door will be open again.
B. Correctly install battery into camera as indicated by +/- symbols and direction of arrows marked on battery
until it’s in place.
C. About battery power: please refer to the symbol: Full power mode“” low power mode“ ”.
D. Remove battery: Open the battery cap and take battery out.
Note: Please push the lock catch to the position of ”LOCK” before use the device in case that battery looses or
falls in the process of using.
3.
Battery Charging
A. Camera can charge by either connecting it to computer or power adapter.
B. Charging camera on vehicle by connecting it to car charger.
C. Camera can record video while charging (switch into Vehicle-mounted Mode in “menu”).
D. Charging can be done even when it’s powered off.
4.
Power mode
Press and hold power for 3-5 seconds to turn it on/off.
5.Mode Switching
Switching between video recording/photo shooting/playback/menu by pressing “Power On-Off” button.
6.WIFI Control
Before use WIFI Control function, please install iSmart DV software to your mobile phone or tablet PC.
After switching camera on, press the WIFI button for 2 seconds and turn on/off WIFI function. (WIFI icon
will be display or disappear at the top right of the screen.) When turning on WIFI function, camera will
reset. WIfi icon become green after reseting and waitig for 5 seconds. (It expresses that WIFI can be
connected normally now.) 2.Open the WIFI connection of mobile phone to search for the camera device:
AC530 from the available wireless networks. (Password is1234567890.)
3.Open the installation of iSmart DV software
7. Start the camera, shift to setting menu, find "Remote control Pair", then press "OK" button, the camera will display
"Remote control Pair Start", at the same time, press any key on the remote control, it will flash blue light. On the
camera screen, it displays " Pair", after around 20 seconds, you could see " remote control Pair Success!", that
means connect successfully, then back to normal mode.
8. How to record videos and configure recording setting
8-1. Video Recording
Switch to recording mode and there will be an icon in the upper left corner of the screen.
Press OK to start recording and the icon will start to flash. Press “OK” again if you want to stop and

8
disappear
8-2. Photo Shooting & Setting
Switch the camera on and press “Mode” to select “Photo shooting Mode”, there will be an icon in the upper left
corner of display screen and the camera is in photo shooting mode. Press “OK” to take photos.
8-3. Burst Mode & Setting
Switch the camera on and press “Mode” to select “Photo shooting Mode”, there will be an icon in the
upper left corner of display screen and the camera is in photo shooting mode. Press “OK” to take photos.
8-4. File Storage & Playing
Switch the camera to the “Playback Mode” (“ ”is shown on the top left corner of video preview mode, and
“ ”is shown on the top left corner of photo preview mode.), select files by using the UP and DOWN arrows,
then replay and stop video or review photos by pressing the shooting button. You can also replay by mobile
phones via WIFI.
Note: When camera crashs formal function, you can detach battery and install again, it will go back to normal
Specifications
Image
Sensor
Type
1/2.3” CMOS 14MP (Panasonic MN34112)
Effective
Pixels
Approx. 14Mega Pixels (4320 * 3240)
Output Pixels
Approx. 14.24 Mega Pixels
Lens
Focal Length
Lens f= 3.06mm
F No.
F= 2.8
F.O.V(D)
166°(H=120° V=89°)
LCD Display
2” 960*240 dots matrix TFT LCD
Viewfinder
Optical
Viewfinder
No
Focusing
Type
Fixed
Exposure
Control
Programmed AE
Compensation
±2EV (0.33 EV steps) -2.0/-1.0/+0.0/+1.0/2.0
ISO
Auto, 100, 200, 400, 800, 1600

9
Equivalent
LED
Modes
No
White Balance
Auto /Daylight / Shade/Tungsten Light /
Fluorescent/Underwater
Video resolution
4K/30P
4K 3840x2160 P30
2.7K 2704x1520 P30
1080P: 1920x1080 P60/P30
720P: 1280x720 P120/P60/P30
Audio
Mic and Speaker (Mono) Equipped
Image Stabilization
On/Off
Remote control
Remote control is about 8 meters from the maximum
Remote control pairing
Select Remote Pair
Media
Internal memory: no internal memory
External memory: supporting SDHC Card up to 64GB
Video encoder
H.265:On/Off

10
Image Size
14MP
14M(4320x3240)
10M (4320x2430)
8M(3840x2160)
5M(2592x1944)
2M(1920x1080)
Video Output
HDMI: Support 1920x1080 P60, output With CEC
Composite: NTSC/PAL
Time Lapse Function
OFF /3 Seconds / 5 Seconds / 10 Seconds / 30 Seconds / 60
Seconds
Photo Functions
Self Timer :OFF / 3 Seconds / 5 Seconds / 10 Seconds / 30
Seconds / 60 Seconds
Burst Rate :OFF / 3 P/s / 7 P/s / 15 P/s /30P/s
Time Lapse Photo Interval :OFF / 3 Seconds / 5 Seconds /
10 Seconds / 30 Seconds
Time Lapse photo shooting time: 5Min/10Min/15Min/20Min
Default Mode
Video
EIS
On / OFF
Motion
Detection
Off / Low / Medium / High
Loop Record
OFF./ 2 Min. / 3 Min. / 5 Min.

11
TV Mode :
NTSC / PAL
Light Freq. :
50HZ / 60HZ
Screen_Off :
OFF / 30 Seconds / 1 Min. / 2Min.
WiFi LED:
ON / OFF
Sharpness :
Strong / Noraml / Soft
Scene
Mode :
Normal / Flashi/Night/Sports/Landscape/Portrait/Sunset
ISO :
Auto / 100 / 200 / 400 / 800 / 1600
EV :0.0
EV :-2.0 / -1.0 / +0.0 / +1.0 / +2.0
Time Setup
set-up time
Date Format
Y/M/D,D/M/Y,M/D/Y
WIFI:
ON / OFF
WiFi SSID :
AC530
WiFi
Password :
1234567890

12
Format
YES/NO
Default
Setting
YES/NO
Version :
AC530 V1.0
Language
English / Simple Chinese/ Traditional Chinese
Interface
USB 2.0 : Recharging/File Transfer
Power Source
Li-ion rechargeable Battery 1050mAH
Accessories
Car power adaptor, Mount, USB Cable, HDMI Cable, AV
Cable
Dimensions (W*H*D)
L: 61mm, W:42mm, H:23 mm(with lens part will be 33mm)
Weight
about 78.5g(With battery)
Support
Mass Storage Driver
Windows XP(Service pack 2) or later
Mac OS X 10.5.11 or later
System Requirements
For Windows
*PC with processor better than Pentium 4 3.2GHz
*Windows XP(Service pack 2) or later
*Minimum 1 GB System RAM
*Minimum 256 MB RAM Video Card
*USB port, CD-ROM drive
*1024*768 pixels, 32-bit color display compatible monitor
FCC STATEMENT :
This device complies with Part 15 of the FCC Rules. Operation is subject
to the following two conditions:
(1) This device may not cause harmful interference, and
(2) This device must accept any interference received, including
interference that may cause undesired operation.
Warning: Changes or modifications not expressly approved by the party
responsible for compliance could void the user's authority to operate the
equipment.
NOTE: This equipment has been tested and found to comply with the
limits for a Class B digital device, pursuant to Part 15 of the FCC Rules.
These limits are designed to provide reasonable protection against
harmful interference in a residential installation. This equipment
generates uses and can radiate radio frequency energy and, if not
installed and used in accordance with the instructions, may cause harmful
interference to radio communications. However, there is no guarantee
that interference will not occur in a particular installation. If this equipment
does cause harmful interference to radio or television reception, which
can be determined by turning the equipment off and on, the user is
encouraged to try to correct the interference by one or more of the
following measures:
Reorient or relocate the receiving antenna.
Increase the separation between the equipment and receiver.
Connect the equipment into an outlet on a circuit different from that to
which the receiver is connected.
Consult the dealer or an experienced radio/TV technician for help.
RF warning statement:
The device has been evaluated to meet general RF exposure
requirement. The device can be used in portable exposure condition
without restriction.