Sunco Electronic V20 360 Wifi Action Camera User Manual 7140
Sunco Electronic Co., Ltd 360 Wifi Action Camera 7140
User Manual


1
Warning
1.Keep it safe from falling and dropping.
2.Keep it distance from any strong magnetic interference objects like electrical
machine to avoid strong radio waves that might be damaging the product and
affect the sound or image quality.
3.Don’t expose the product directly to high temperatures and strong sunlight.
4.We recommend using high quality Micro SD Card for the best results.
5.Don’t place your Micro SD card near strong magnetic objects to avoid data error.
6.In case of overheating, unwanted smoke or unpleasant smell from the device,
unplug it immediately from the power outlet to prevent hazardous fire.
7.Keep it safety from children while on charging.
8.Stored the device in a cool, dry and dust free location.
2
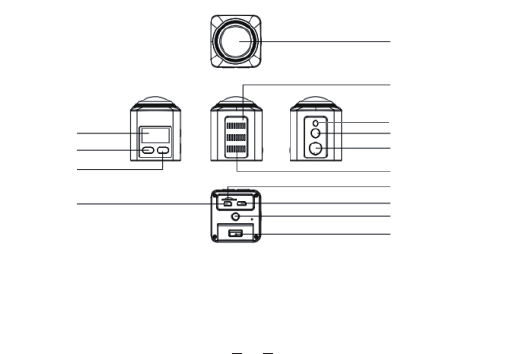
Camera introduce:
Lens
Speaker
WIFI Indicator
ON/OFF/Mode Switch
OK
Sound hole
MicroSD card port
HDMI port
Screw thread hole
Battery cover
LCD display
wifi/up
down
Micro USB port
1. Insert the card
Firstly ,insert a Micro SD card .as followings:
3
1. Insert the card
Firstly ,insert a Micro SD card .as followings:
Operation instruction
Notice : Pls turn off the camera when plug in /take out card
Support Class6 or above TF card, suggest Cass 10 or above high speed card
for professional recording. Please choose branded micro SD Card and format
it before using.
4
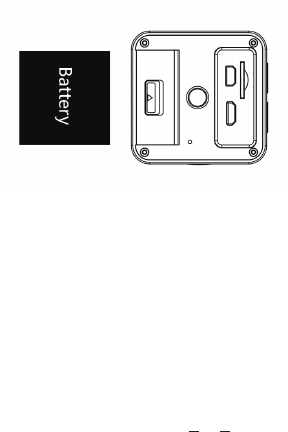
2. Plug in and take out the battery
Slide down the battery cover could open it.
According to the P/N sign and arrow direction , install the battery into camera
correctly.
3.Battery charging
Support PC USB , standard USB charger and car charger for charging.
4. Turn on/off
Turn on: Long press 3 seconds Mode key ,camera turn on.
Turn off: Long press 3 seconds Mode key , camera turn off.
5
WIFI Indicator
ON/OFF/Mode(Charge Indicator)
OK(Video Indicator)
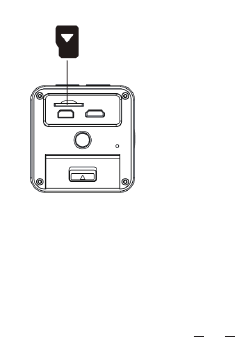
5. Mode switch :
Turn on the camera , press on/off key again and again , it will show cycling recording/
Photo/Slow motion/setting mode. As follows:
6
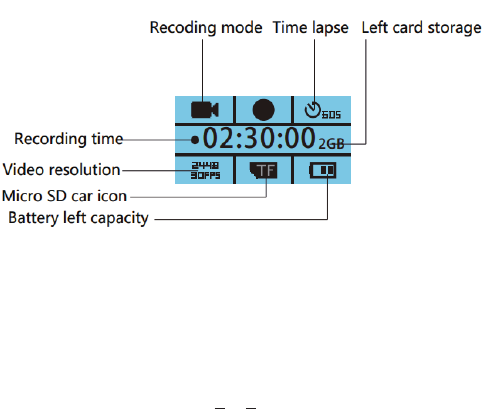
6. Video mode:
At recording mode , short press “OK”key to start recording. Then LCD screen
will show recorded time and recording icon. Short press”OK”key again ,camera
stop recording and save the video file. Short press “down”key to enter recording
setting.
7
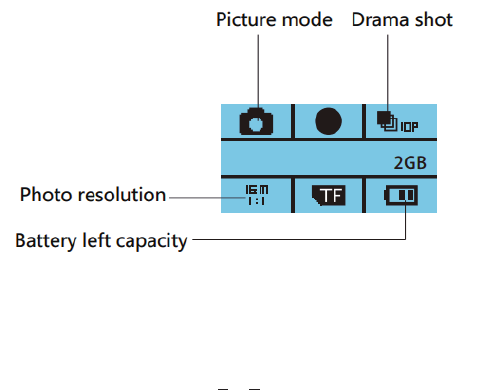
7. Picture Mode:
At Picture mode , aim the object you want to shot ,press”OK”key to take
picture. Pictures will be saved automatically.
8
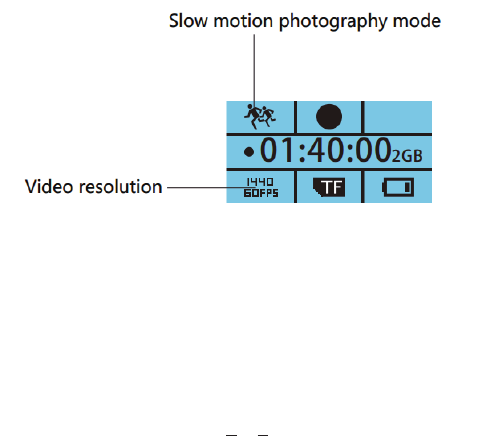
8. Slow motion photography mode:
At slow motion photography mode ,press”OK”key to record. Recording
resolution (1440p/60fps), enter into slow motion recording, The top left
corner of the screen will show slow motion recording icon. Video resolution
is 1440P60fps. Watch the video in playback shows slow motion video.
Short press “down” key to enter slow motion setting directly.
9
9. Setting:
Press “OK”key to enter setting mode ,you could set some specification and
function for recording ,taking picture and language.
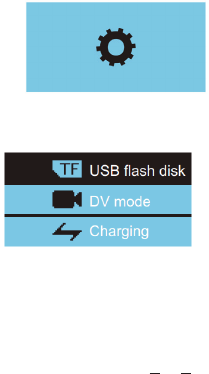
10. Connect PC :
Choose “USB Flash disk”to manage TF card data.
Choose “PC Camera”, charge and use PC Camera function at same time.
Choose “Charge mode”, just charge for DV.

10
11. HDMI output :
Under camera turn on , use HDMI cable (optional) to connect Television(HDTV).
You could playback picture and video on TV.
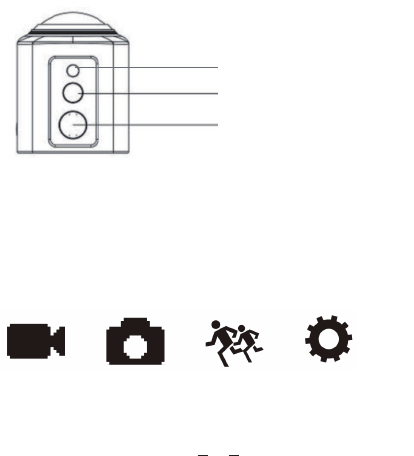
12. Indicator:
1.Working (Blue)
Blue light flickers while recording; Blue light lasts when exited recording;
Blue light lasts while replaying the file;
2.WIFI (Yellow)
Yellow light flickers once WIFI opened;
Yellow light extinguished once WIFI off;
3.Turn on/Charging(Red)
Red light flickers 3 times when turned on; Red light lasts while charging and
extinguished when finished; Red light flickers when turned off;
13. Buttons:
(1)Mode Button:
Long-press for 3 sec to turn on; long-press for 3 sec to turn off;
It can switch between mode of recording/photos taking/slow motion/settings by
short-press to exit;
(2)OK key:
Short-press to confirm when it is on recording/photos taking/slow motion/
settings state;
(3)WIFI /Up key:

11
hort-press to select the last menu when it is on Settings state;
Long-press to turn on WIFI when it is on recording/photos taking/slow motion
state;
Short-press to turn off the WIFI when it is on WIFI state.
(4)Down select button:
Short-press to pass into Settings when it is on Recording/photos taking/slow
motion state;
Short-press to select next menu when it is on Settings state;
14.WIFI Connection:
1. Please install XDV 360 APP in your device before using WIFI;
2. Long-press on WIFI/UP select button when device turned on, it will show
WIFI icon and the indicator light on;
3. Open WIFI on your device ,search “X60000-XXXX”and connect;
(Password:12345678);
4.You can preview the current time recording when opened XDV360 and
playback/download/delete/sharing files can be also achieved;
Remarks:
For Android device, search and download “XDV360” in Google;
For IOS device, search and download “XDV360”in Apple Store;
You also could scan the following 2D code by your phone :

12
Specification:
DSP
Sensor
Allwinner V3
SONY IMX179
Video Resolution
2448×2448 30fps (1:1)
2048×2048 30fps (1:1)
1440×1440 60fps (1:1)
1440×1440 30fps (1:1)
1072×1072 60fps (1:1)
1072×1072 30fps (1:1)
Photo Resolution
16M(4096X4096) (1:1)
12M(3264*3264) (1:1)
8M(2880*2880) (1:1)
5M(2448x2448) (1:1)
Lens 220°FOV
Exposure -3, -2, -1, 0, 1, 2, 3
White Balance auto, sunny, cloudy, incandescent, fluorescence
Capture Mode Normal, Timed, Auto, Dram Shot
Recording Normal recording, Loop recording,
Time-lapse recording

13
Slow Motion 1440p60fps
Screen 0.96" Lattice screen LCD
Remote controller Support RF 2.4G(optional)
Image Format JPEG
Video Format MP4
Video Compression H.264
Data connection Micro USB2.0, HDMI
Extended Memory MAX to 128G, Micro SDHC
Indicator Light Blue: working Yellow: WIFI
Red: Turn on/Charging
Microphone
Speaker
Battery
Recording time
Charging Time About 2-3 hours
1440P/About 120 minutes
1050mAh(Battery removable)
Built-in 8Ω 1w
Built-in
WIFI 802.11b/g/n, 2.4G

14
Language
English, Simple Chinese, Traditional Chinese,
Korean, Russian, French, German, Italian,
Spanish, Portuguese, Japanese
Operating System
Size
Weight
Windows XP/7/8.1/10/Vista and Mac 10.5
or above
45mm*44mm*56mm
63g(device only),80g(including battery
and memory card)
Waterproof 30M working undersea with waterproof case
Outdoor activity,bicycle,diving, housing,
aerial image, show,VR virtual magic glass
Application
Simple description of the problem and the solution
1.Crashed because of improper operation;
It can be recovered by removing battery for re-installation;
2. It supports 128G Micro SD, please purchase branded SD card after being
tested qualified; And we do not ensure it can work normally once it inserts
neutral card after formatted;
3. What is Time-lapse Recording?
By setting recording time interval, it records for a period of time at the same

15
scenes and objects automatically, and make the pictures taken to be a video
within several minutes in order to display the video which needs a long time
to process; It removes the inconvenience caused by long time recording;
(Tips: The above features may change, subject to the actual prototype
without notice)
FCC STATEMENT :
This device complies with Part 15 of the FCC Rules. Operation is subject to
the following two conditions:
(1) This device may not cause harmful interference, and (2) This device must
accept any interference received, including interference that may cause
undesired operation.
Warning: Changes or modifications not expressly approved by the party
responsible for compliance could void the user's authority to operate the
equipment.
NOTE: This equipment has been tested and found to comply with the limits for
a Class B digital device, pursuant to Part 15 of the FCC Rules. These limits are
designed to provide reasonable protection against harmful interference in a
residential installation. This equipment generates uses and can radiate radio
frequency energy and, if not installed and used in accordance with the
instructions, may cause harmful interference to radio communications.
However, there is no guarantee that interference will not occur in a particular
installation. If this equipment does cause harmful interference to radio or
television reception, which can be determined by turning the equipment off
and on, the user is encouraged to try to correct the interference by one or more

16
of the following measures:
Reorient or relocate the receiving antenna.
Increase the separation between the equipment and receiver.
Connect the equipment into an outlet on a circuit different from that to which
the receiver is connected.
Consult the dealer or an experienced radio/TV technician for help.
RF warning statement:
The device has been evaluated to meet general RF exposure requirement.
The device can be used in portable exposure condition without restriction.