Sundax M64-VANTA VGA Card User Manual users manual
Sundax Enterprises Ltd. VGA Card users manual
Sundax >
users manual
1
SUNDAX ENTERPRISES LTD.
VGA CARD
FCC ID : XXXM64-VANTA
2
FEDERAL COMMUNICATIONS COMMISSION
This device complies with Part 15 of the FCC Rules. Operation is subject to the following
two conditions:(1) this device may not cause harmful interference, and (2) this device must
accept any interference received, including interference that may cause undesired
operation.
NOTE
This equipment has been tested and found to comply with the limits for a Class B digital
device, pursuant to Part 15 of the FCC Rules. These limits are designed to provide
reasonable protection. This equipment generates, uses and can radiated radio frequency
energy and, if not installed and used in accordance with the instructions, may cause harmful
interference to radio communications. However, there is no guarantee that interference will
not occur in a particular installation If this equipment does cause harmful interference to
radio or television reception, which can be determined by turning the equipment off and on,
the user is encouraged to try to correct the interference by one or more of the following
measures:
3
-Reorient or relocate the receiving antenna.
-Increase the separation between the equipment and receiver.
-Connect the equipment into an outlet on a circuit different from that to which the receiver is
connected.
-Consult the dealer or an experienced radio/TV technician for help.
Shielded interface cables (except AV cable and S cable)must be used in order to comply
with emission limits.
Changes or modifications not expressly approved by the party responsible for compliance
could void the user‘s authority to operate the equipment.
I
4
Congratulations and welcome your purchase of this advanced graphic accelerator or sound card. This enclosed
setup CD contains all the information about the board.
May you enjoy it doing it by yourself. Following is the important installation procedure in Chapter 1 and 2.
Chapter 1 Hardware Installation - Safely placing the card in your computer
Chapter 2 Software Installation - Easily installing the enhanced driver
Chapter 3 TV-out setup(Optional)
Chapter 4 Video Mode Tables
Chapter 1 Hardware Installation - Safely placing the card in your computer
1. Please power off your computer and monitor, then disconnect the monitor from the back of your computer.
2. Be aware to discharge your body's static electricity by touching the metal surface of computer chassis. Then
remove the computer cover.
3. If there is an existing card in your system, replace it gently but save the screw. Or, you may need to remove the
cover from the rear of expansion slot that you select.
4. Align your card with an empty corresponding expansion slot (PCI or AGP), then carefully grasp the card by top
edge and put it firmly into the slot. Secure the screw to fasten the card in place and replace the computer cover.
5. Plug the monitor cable into your card, then turn on the computer and monitor.
6. Now you have finished the hardware installation and are ready to install the driver.
5
Chapter 2 Software installation - Easily installing the enhanced driver
The Setup CD title bring you to take advantage of your card's performance. But, there are some issues you should
note in advance.
1. If it is the first time you install the card by the Plug and Play feature of Windows 95/98/2000. Windows will find a
new hardware and ask for the driver. There are four (4) different kind conditions from Windows 98, Windows 2000,
Windows 95 OSR 2, Windows 95 and Windows NT. The basic rule is to click " Next ", " Next"...until " Finish ".
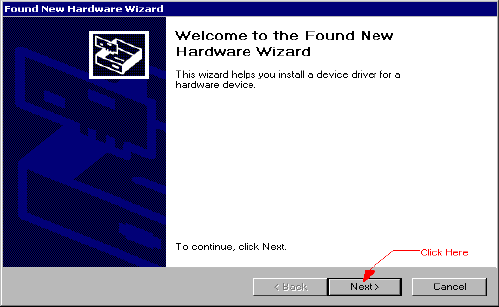
For Windows 2000:
(The general rule is to click Next", Next" ... until Finish")
After launch Windows 2000, you will see a dialog similar to the one (Add new hardware Wizard) in the
window.
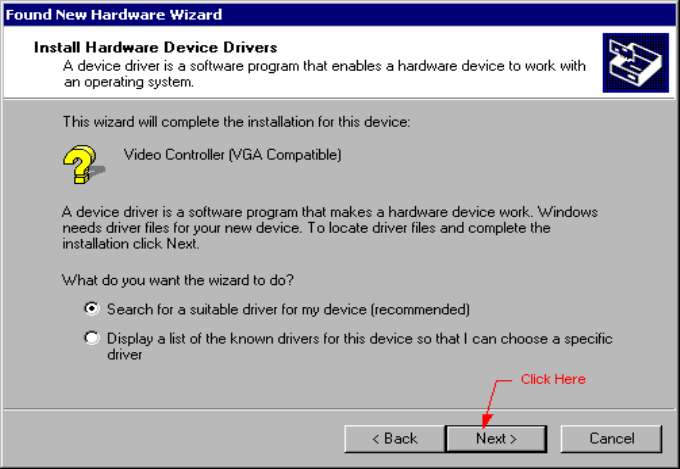
The default is " Next ", press " Next ", after that, you will see a dialog as follows.
6
The default is " Search for a suitable driver.... ", select it then press "Next ", after that, you will see a dialog as
follows.
7
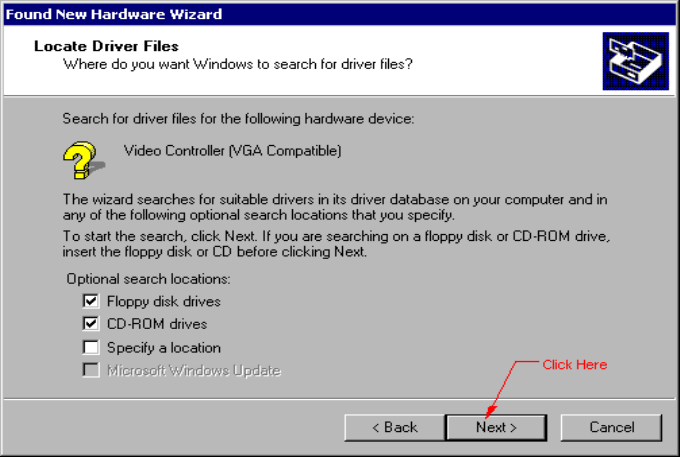
The default is " Next ", press " Next ", after that, you will see a dialog as follows.

8

9
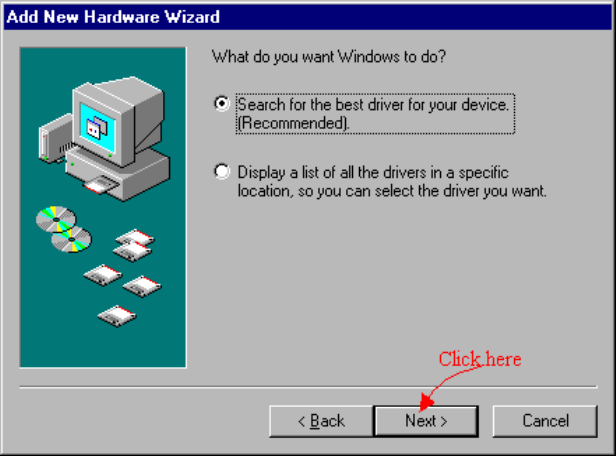
For Windows 98:
(The general rule is to click Next", Next" ... until Finish")
After launch Windows 98, you will see a dialog similar to the one (Add new hardware Wizard) in the
window.
10
The default is " Next", press " Next ", after that, you will see a dialog as follows.
The default is " Search for the best driver.... ", select it then press "Next ", after that, you will see a dialog as
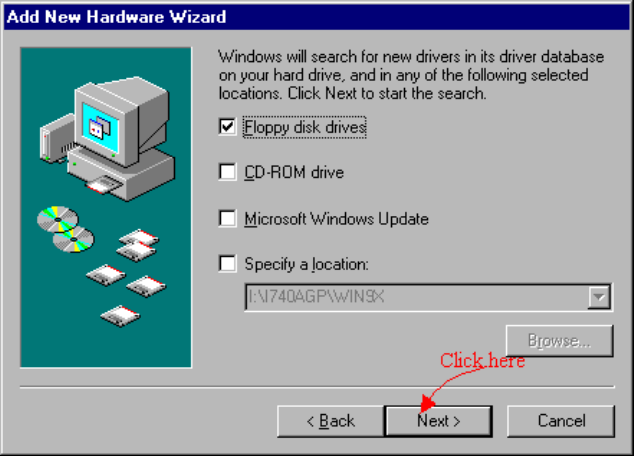
11
follows.
12
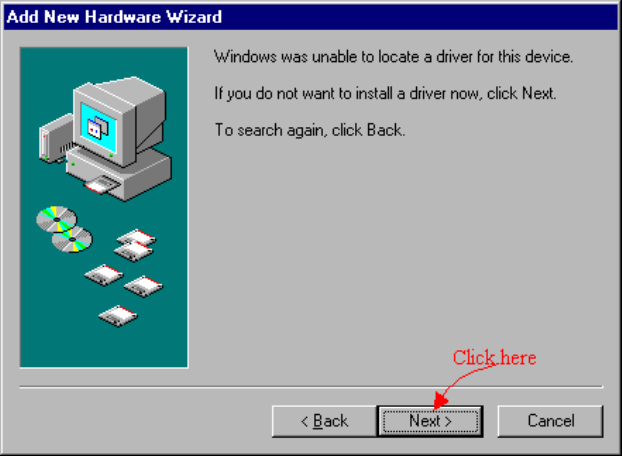
The default is " Next ", press " Next ", after that, you will see a dialog as follows.
The default is " Next ", press " Next ", after that, you will see a dialog as follows.
13
While Windows prompt you to restart Windows, please click " Yes " to restart your system. After Windows
restarting, go to step 2.

14
For Windows 95 OSR2:
The general rules is to click Next", Next".... until Finish "
While Windows prompt you to restart Windows, Click " Yes " to restart Windows. After Windows restarting, go to
step 2.
For Windows 95 (Original Version)
After launch Windows 95, you will see a dialog similar to the one (New Hardware Found) in the windows.
Click " Do not install a driver (Windows will not prompt you again) " then press " OK ".
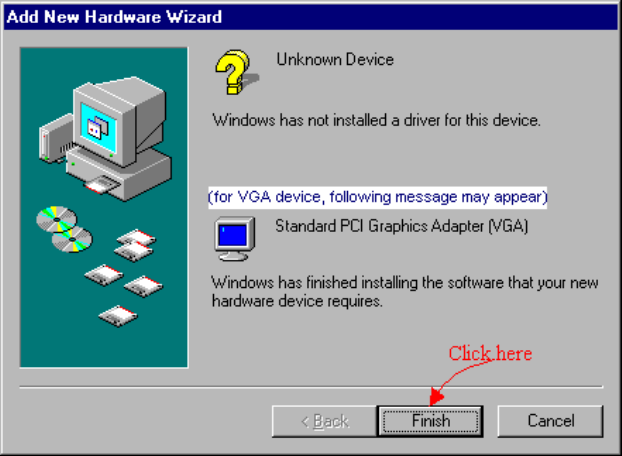
After that, if the card you are installing is a VGA card, you will see the below dialog; for the other cards, you can
skip the following procedure and go directly to step 2.
While Windows prompt you restart Windows; please click " Yes " to restart your system. After Windows restarting
go to step 2.
For Windows NT:
1. Please select VGA mode from boot menu, if it is your first time to start Windows NT.
2. Insert the Setup CD into your CD-ROM driver.
IF Windows 95/98/2000 runs the CD-ROM automatically, proceed to step 3.
3. It will auto-launch the setup program on Windows 95/98/2000 or Windows NT then click a proper driver.
4. If you are on the other platform on the setup program does not auto-run, please double click the
MSSETUP.EXE on the root of the setup CD. After a setup display in the specific setup window, you can
conveniently install the driver and related software by the on-screen instructions to complete the installation.
While Windows prompt you to restart Windows, please click YES to restart your system.
15
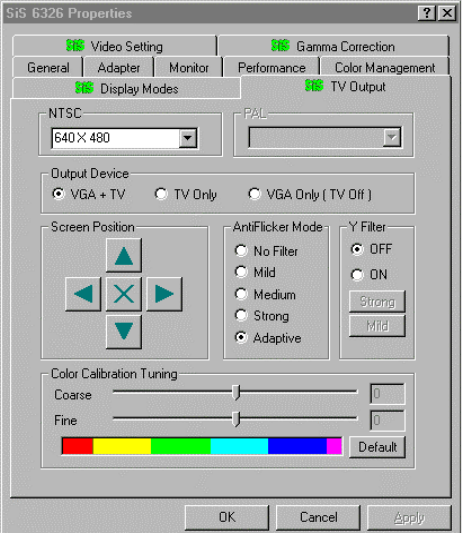
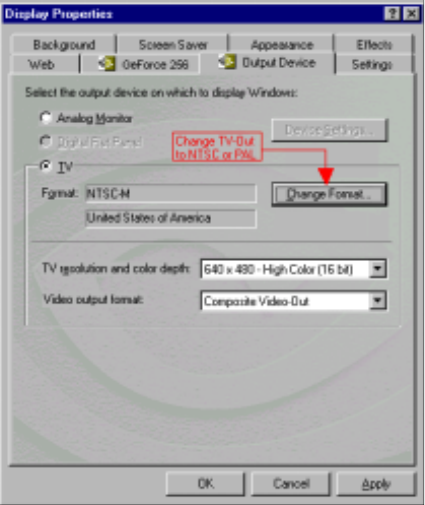
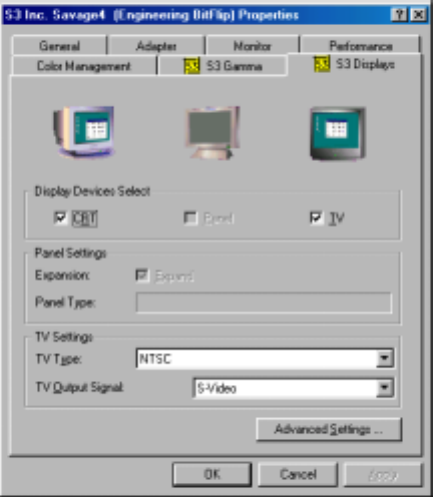
Chapter 3 TV-out setup(Optional)
TV-out function is executable by connecting S cable or AV cable with television. First, you must choose CRT
monitor or TV. If you choose TV, please choose correct TV-out system "NTSC" or "PAL" according to your TV
signal specfication.
Caution: 1. If you would like to transfer output function to connect with TV, please set up the resolution in
800x600 or 640x480 mode. Otherwise, you will fail to transfer to TV-out.
2. When your screen shows black and white image, please enter properties to adjust TV-out system
complying with the one which your area belongs to.(NTSC/PAL)
16
SiS6326 AGP/PCI
17
NVidia M64/Vanta/TNT2/TNT2 Ultra/GeForce 256
18
Savage4 with TV
19
Chapter 4 Video Mode tables
Video Mode tables
20
GeForce 256 AGP
Color Depth 8-bit 16-bit 24-bit 32-bit
Resolution Refresh Rate Refresh Rate Refresh Rate Refresh Rate
640x480 60-240 60-240 - 60-240
800x600 60-240 60-240 - 60-240
1024x768 60-170 60-170 - 60-170
1152x864 60-120 60-120 - 60-100
1280x1024 60-85 60-85 - 60-75
1600x1200 60-100 60-100 - 60
Savage 2000 AGP 64MB
Color Depth 8-bit 16-bit 24-bit 32-bit
Resolution Refresh Rate Refresh Rate Refresh Rate Refresh Rate
640x480 60-200 60-200 - 60-200
800x600 60-200 60-200 - 60-200
1024x768 60-160 60-160 - 60-120
1152x864 60-120 60-120 - 60-120
1280x1024 60-120 60-120 - 60-85
1600x1200 60-100 60-100 - 60
21
SiS 300 AGP 16MB/32MB
Color Depth 8-bit 16-bit 24-bit 32-bit
Resolution Refresh Rate Refresh Rate Refresh Rate Refresh Rate
640x480 60-160 60-160 - 60-160
800x600 60-160 60-160 - 60-120
1024x768 60-120 60-120 - 60-185
1280x1024 60-185 60-85 - 43
1600x1200 60-85 60-70 - -
SiS 305 AGP 16MB/32MB
Color Depth 8-bit 16-bit 24-bit 32-bit
Resolution Refresh Rate Refresh Rate Refresh Rate Refresh Rate
640x480 60-160 60-160 - 60-160
800x600 60-160 60-160 - 60-120
1024x768 60-120 60-120 - 60-185
1280x1024 60-185 60-85 - 43
1600x1200 60-85 60-70 - -
nVidia TNT AGP/16MB
Color Depth 8-bit 16-bit 24-bit 32-bit
Resolution Refresh Rate Refresh Rate Refresh Rate Refresh Rate
22
640x480 60-170 60-170 - 60-170
800x600 60-144 60-144 - 60-144
1024x768 60-100 60-100 - 60-100
1152x864 60-100 60-100 - 60-100
1280x1024 60-85 60-85 - 60-85
1600x1200 60-75 60-75 - 60-75
Trio 3D AGP/8MB
Color Depth 8-bit 16-bit 24-bit 32-bit
Resolution Refresh Rate Refresh Rate Refresh Rate Refresh Rate
640x480 60-85 60-75 60-75 -
800x600 56-85 56-85 56-85 -
1024x768 43-85 43-85 43-85 -
1280x1024 43-60 43-60 43-60 -
1600x1200 - - - -
nVidia TNT2 AGP/16/32MB
Color Depth 8-bit 16-bit 24-bit 32-bit
Resolution Refresh Rate Refresh Rate Refresh Rate Refresh Rate
640x480 60-170 60-170 - 60-170
800x600 60-144 60-144 - 60-144
1024x768 60-100 60-100 - 60-100
1152x864 60-100 60-100 - 60-100
23
1280x1024 60-85 60-85 - 60-85
1600x1200 60-75 60-75 - 60-75
nVidia TNT2 Ultra AGP/16/32MB
Color Depth 8-bit 16-bit 24-bit 32-bit
Resolution Refresh Rate Refresh Rate Refresh Rate Refresh Rate
640x480 70-120 70-120 - 70-120
800x600 60-240 60-240 - 60-240
1024x768 60-170 60-170 - 60-100
1152x864 60-150 60-150 - 60-140
1280x1024 60-120 60-120 - 60-100
1600x1200 60-85 60-85 - 60-75
SiS6326 AGP/PCI 8MB
Color Depth 8-bit 16-bit 24-bit 32-bit
Resolution Refresh Rate Refresh Rate Refresh Rate Refresh Rate
640x480 60-120 60-120 60-120 -
800x600 56-120 56-120 56-120 -
1024x768 43-120 43-120 43-120 -
1280x1024 43-85 43-85 43-85 -
1600x1200 60-75 60-75 - -
nVidia M64 AGP/16/32MB
24
Color Depth 8-bit 16-bit 24-bit 32-bit
Resolution Refresh Rate Refresh Rate Refresh Rate Refresh Rate
640x480 60-170 60-170 - 60-170
800x600 60-144 60-144 - 60-144
1024x768 60-100 60-100 - 60-100
1152x864 60-100 60-100 - 60-100
1280x1024 60-85 60-85 - 60-85
1600x1200 60-75 60-75 - 60-75
Riva 128/ZX AGP/8MB
Color Depth 8-bit 16-bit 24-bit 32-bit
Resolution Refresh Rate Refresh Rate Refresh Rate Refresh Rate
640x480 60-75 60-75 - 60-75
800x600 60-75 60-75 - 60-75
1024x768 60-75 60-75 - 60-75
1152x864 60-75 60-75 - 60-75
1280x1024 60-75 60-75 - 60-75
1600x1200 60 60 - 60
Vanta AGP/16/32MB
Color Depth 8-bit 16-bit 24-bit 32-bit
Resolution Refresh Rate Refresh Rate Refresh Rate Refresh Rate
640x480 60-170 60-170 - 60-170
25
800x600 60-100 60-100 - 60-100
1024x768 60-85 60-85 - 60-85
1152x864 60-100 60-100 - 60-100
1280x1024 60-85 60-85 - 60-85
1600x1200 60 60 - 60
Savage4 AGP/16/32MB
Color Depth 8-bit 16-bit 24-bit 32-bit
Resolution Refresh Rate Refresh Rate Refresh Rate Refresh Rate
640x480 60-160 60-160 - 60-160
800x600 56-85 56-85 - 56-85
1024x768 60-85 60-85 - 60-85
1152x864 60-100 60-100 - 60-100
1280x1024 60-85 60-85 - 60-85
1600x1200 60 60 - 60
Cirrus Logic 5465 AGP/ 4MB
Color Depth 8-bit 16-bit 24-bit 32-bit
Resolution Refresh Rate Refresh Rate Refresh Rate Refresh Rate
640x480 60-85 60-85 60-85 -
800x600 56-85 56-85 56-85 -
1024x768 60-85 60-85 60-85 -
1152x864 70-85 70-85 70-85 -
1280x1024 60-85 60-85 60-75 -
1600x1200 60-96i 60-96i - -
26
Remark: Refresh rate might be varied slightly according to user's monitor size.