Sungworld Electronics A13SOUND SOUND BOX User Manual UserManual
Shenzhen Sungworld Electronics Co., LTD. SOUND BOX UserManual
USERS MANUAL
1
Table of Contents
Introduction & Basic Care…………………………...2
The MP3 Player………………………………………3
The Cube Speaker System…………………………6
Operating the Player/Cube………………………...10
Operating the MP3 Player…………………………14
Troubleshooting…………………………………….18
Technical Specifications…………………………...21
FCC Information…………………………………….23
Warranty Information……………………………….25
Questions? Visit www.youtopiallc.com or call (877) 244-2864.

2
Introduction & Basic Care
Before using the player, please read this manual carefully
to obtain the best possible performance from your player.
Keep this manual for future reference.
IN THE BOX
• Portable cube speaker system
• Removable MP3 player
• Preloaded digital music card
• Stereo ear buds
• USB cable
• AC adapter
• Quick start guide
• Universal MP3 player adapter
BASIC CARE AND OPERATION
• Do not immerse or operate in or near water. These
units are neither waterproof nor water-resistant.
• Do not disconnect unit from computer while uploading
or downloading files, or formatting the memory. Allow
the operation to be completed before disconnecting
or you may lose or corrupt your data/files.
• Store and operate units in temperatures between -14
degrees F and 113 degrees F.
• Avoid dropping or involving units in high impact.
• Clean your units with a soft cloth moistened only with
mild soap and water. Stronger cleaning agents can
damage the surface of the units.
3
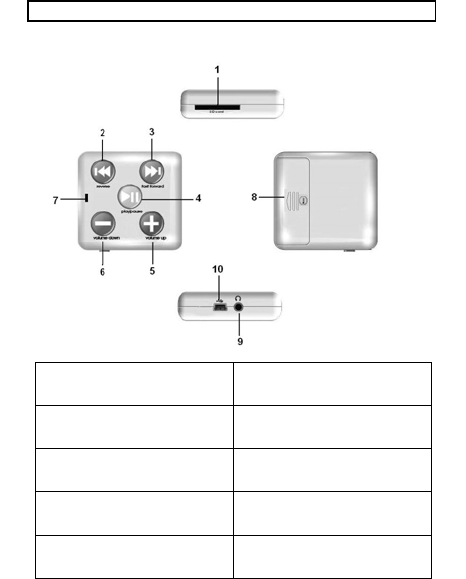
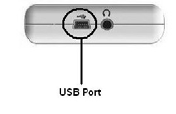
The MP3 Player
1 – SD Card Slot 6 – Volume Down
2 – Back / Previous Song 7 – LED indicator
3 – Forward / Next Song 8 – Battery Compartment
4 – Play / Pause / Stop /
Power On and Off 9 – Earphone Jack
5 – Volume Up 10 – Mini-USB port
4
FEATURES AND CONTROLS
1. SD CARD SLOT – Compartment for your SD card
2. BACK / PREVIOUS SONG – Plays previous song; or,
scrolls back through current song
3. FORWARD / NEXT SONG – Plays next song; or,
scrolls forward through current song
4. “PLAY / PAUSE / STOP / POWER ON and OFF” –
Plays, pauses, stops and powers on and off the unit. This
function button will be referred to as “PLAY” in this guide.
5. VOLUME UP – Increases volume
6. VOLUME DOWN – Decreases volume
7. LED INDICATOR – Light indicates operation mode
8. BATTERY COMPARTMENT – Use 1 x AAA alkaline
battery
9. EARPHONE JACK – Connects to speaker system, or
insert to earphone plug
10. MINI-USB PORT – Connects to speaker system, or
use the USB cable to connect player or computer
BATTERY INSTALLATION / REPLACEMENT
The player requires one “AAA” battery to operate if you
are using the player as a personal portable device with
earphones. The player does not require a battery if it is
connected to the speaker system, which will supply power
to the player through USB connection.
5
To install or replace the battery:
1. Remove the safety screw from the battery lid
2. Slide the battery cover following the direction of
the arrow
3. Remove the old battery if replacing it
4. Install new “AAA” (1.5V) battery according to
the correct polarity indicated, (+) and (-)
5. Put the battery cover back on until the latch
snaps in place
6. Place the screw back on the battery lid.
Precautions:
• Use only the size and type of battery specified
• Battery polarity must be inserted correctly for safe
and proper use. Reversed polarity may cause
damage to the device
• If the device will not be used for a long period,
remove the battery to prevent damage or injury
from possible battery leakage
• If battery leakage occurs and comes in contact
with skin, immediately flush affected area with
running water (not hot) and contact nearest
Poison Control Center
6
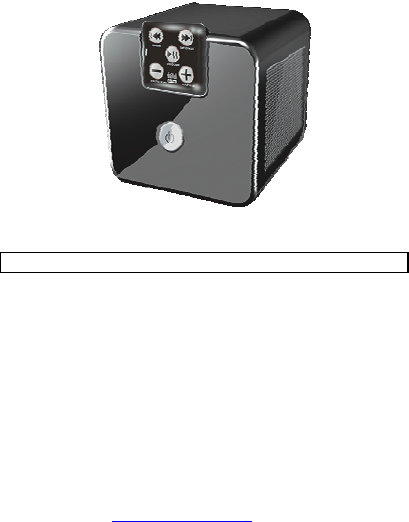
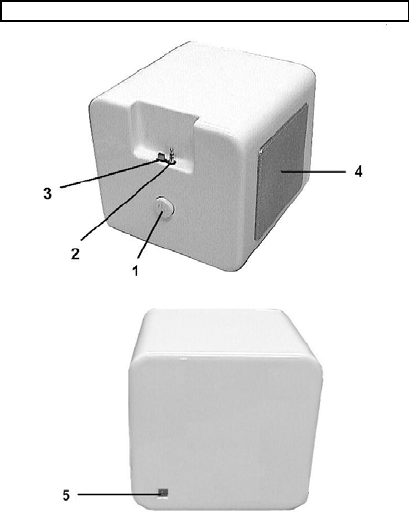
The Cube Speaker System
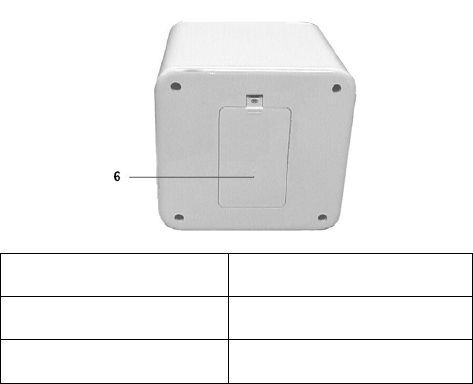
7
1 – Power On and Off Button 4 – Speaker
2 – Audio Jack 5 – DC Jack (Located At Back of
Unit)
3 – USB Plug 6 – Battery Door (Located At
Bottom of Unit)
POWER OPTIONS
Battery Installation / Replacement
The speaker system requires six (6) “AA” batteries to
operate. Alkaline batteries are recommended for the
longest playtime.
8
To install or replace batteries:
1. Remove the safety screw from the battery lid
2. Lift the battery cover to remove
3. Remove the old batteries, if replacing
4. Install new “AA” (1.5V) batteries according to the
correct polarity indicated, (+) and (-)
5. Put the battery cover back on and tighten the
screw back on the battery lid. Do not overturn to
prevent screw threads from stripping
Precautions:
• Use only the size and type of battery specified
• Battery polarity must be inserted correctly for
safe and proper use. Reversed polarity may
cause damage to the unit
• If the unit will not be used for a long period,
remove the batteries to prevent damage or
injury from possible battery leakage
• If battery leakage occurs and comes in contact
with skin, immediately flush affected area with
running water (not hot) and contact nearest
Poison Control Center

9
AC Adaptor
The speaker system may be powered using an AC
adaptor. To use, insert the plug of the AC Adaptor into
the speaker’s DC Jack (located at the back of unit).
Then plug the AC Adaptor into an AC Outlet (120V AC,
60Hz).
NOTE:
• Remove the DC plug and disconnect the AC
Adaptor when not in use
• Use only adaptors with correct Input and
Output specifications designated for the unit
• Use only adaptors that meet certified safety
requirements and standards – e.g., UL
approved

10
Operating the MP3/Cube Speaker System
To operate your player with the speaker system, please
follow these instructions.
1) INSERT/REMOVE SD CARD
Make sure the player is turned OFF before inserting
your SD card. Insert the SD card into the slot with the
label side of the card facing the player’s backside and
the connector pins (on the back of the card) downward.
See illustration. Gently press down on the SD card
until it is securely in the slot.
To remove the SD card, press down on top of the card
and the player will eject the card from the player.
11
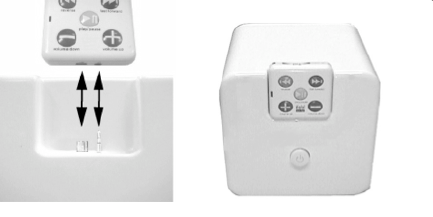
2) INSTALL PLAYER INTO THE CUBE SPEAKER
SYSTEM
Insert your player into the speaker unit’s carriage by
sliding the player downward with the buttons facing
forward and USB port and earphone jack facing down.
Align the player’s USB port and earphone jack to the
speaker unit’s USB plug and earphone plug,
respectively, and gently connect together. The player
should be firmly positioned in the unit’s carriage.
NOTE:
• Be certain the player is properly installed into
the speaker system before turning ON either
the speaker unit or player
• Do NOT force the player down into the unit or
damage may occur as a result
12
3) TURN THE PLAYER AND SPEAKERS ON
Press the POWER ON/OFF button on The Cube speaker
unit to turn the unit on. This will automatically turn the
player on as well. The LEDs on The Cube speaker unit
and player will activate to indicate that power is on.
NOTE: The MP3 player does not require a battery when
it is connected to The Cube speaker unit. The speaker
system will supply power to the player through the USB
connection.
4) MUSIC PLAYBACK
Press the PLAY button on the MP3 player to start
listening to your song files. The LED will start to blink
while in the play mode. If the MP3 player does not
immediately activate after pressing the PLAY button,
please wait several seconds and then press PLAY again.
The MP3 player may need a moment to read the SD card.
It is suggested that you lower the volume to a safe level
before pressing PLAY to prevent any excessive noise that
could damage or harm your hearing.
Volume Setting
Press the VOLUME UP or VOLUME DOWN button to
adjust the volume to your preference.
13
Fast Forward or Back
Press the FORWARD or BACK button to listen to the next
or previous song, respectively. During playback of a song,
you may also scroll fast forward or back through the song
by pressing and holding down the FORWARD or BACK
button. The song will continue at the point of the song
where you release the button.
Pause
During playback, press the PLAY button to pause or stop
play. To resume playback, press the PLAY button again.
NOTE: If left inactive while in pause/stop, the MP3 player
will automatically turn OFF after approximately 40
seconds
5) TURN THE MP3 PLAYER AND THE CUBE
SPEAKER OFF
To turn OFF the system, press the POWER ON/OFF
button on The Cube speaker unit. This will automatically
turn the MP3 player off as well.
NOTE: It is recommended that you disconnect the AC/DC
adaptor from The Cube speaker unit when not in use.

14
Operating the MP3 Player
To operate your MP3 player as a personal portable
device, please follow these instructions.
1) TURNING THE PLAYER ON / OFF
Press down and hold the PLAY button for approximately
3 seconds to turn ON the MP3 player. Once the LED
light activates release the PLAY button.
To turn OFF the MP3 player, press down and hold the
PLAY button for approximately 5 seconds until the LED
light flashes, then release the PLAY button. No light
indicates the power is OFF.
2) MUSIC PLAYBACK
With the MP3 player ON, earphones inserted into the
earphone jack, and SD card inserted in the player, press
the PLAY button to start listening to your song files. If the
player does not immediately activate after pressing the
PLAY button, please wait several seconds and then press
PLAY again. The MP3 player may need a moment to
read the SD card. Adjust the volume according to your
preference. It is suggested that you lower the volume to
a safe level before pressing PLAY to prevent any
excessive noise that could damage or harm your hearing.
15
WARNING: USE THIS PRODUCT AT YOUR OWN RISK.
Using the headphones continuously at high volume
may result in permanent hearing loss. It is highly
recommended to use your unit at moderate volume
levels and under the supervision of an adult. Use this
product with extreme caution to avoid accident or
injury while engaging in any activity that requires
your full attention. Do not use player with earphones
while driving, cycling or operating any motorized
vehicle. Abide by your local laws.
DOWNLOADING AND DELETING SONG FILES
You may download and delete your own song files
through the player using a writable non-protected SD card.
The MP3 player will work with most leading brand name
SD cards.
Operating System Requirements: Computers with
Windows XP, VISTA or MAC OS X 10.0 or higher
Attach the supplied mini-USB cable into the MP3
player and connect into computer USB port.
Make sure
there is an SD
card inserted into
the MP3 player.
16
1. For Windows OS, once the player is properly connected to
your computer it will detect the player as a removable disk.
You should open the folder when the prompt asks you
what to do. If there is no automatic prompt, search for the
drive under “My Computer” then click on the drive to open
the folder.
2. For Mac OS, an icon will appear on your desktop or the
folder will automatically open. Click to open the folder if it
does not automatically open.
3. To transfer song files from your computer to the SD card,
click to select the song files on the computer that you want
and drag into the folder
4. Wait for song files to finish copying
5. To remove song files from the card, select and click on the
files you want removed then drag into your music file,
“Recycle Bin” or “Trash”, or right-click your mouse and
select the “Delete” command.
6. After transferring or removing song files, properly eject or
safely remove the MP3 player you’re your computer, then
unplug the cable from your computer USB port and from
the MP3 player
When using Windows Media Player:
1. Open Windows Media Player 11.
2. Click on the “sync list” pull-down menu to locate the music
files you want to download to the player. Then make sure
to check the box next to the files you want to download.
17
3. Select the portable player device that you want to copy to
from the right side drop down menu.
4. Click the “start sync” to start transferring music files from
your computer to the player.
5. After all of the files have been transferred, safely remove
the player and unplug the cable from the USB port and
player.
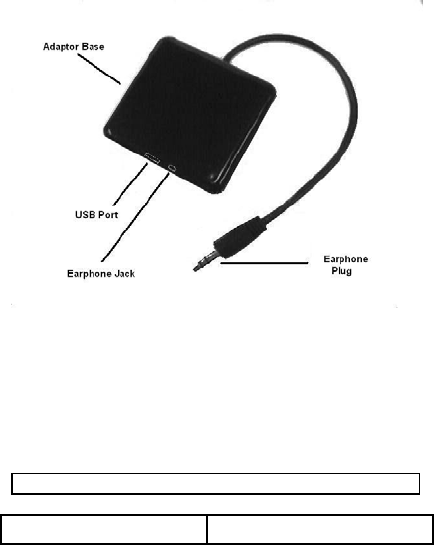
MP3 CONNECTION ADAPTOR
Your speaker system includes an adaptor that allows you
to connect other MP3 players to play song files through
your speaker unit. Simply install the adaptor base into
the speaker unit’s carriage as you would with your regular
18
player as described in “Operating Your System”, Step 2.
Once the adaptor is installed, connect the earphone plug
into the MP3 player’s earphone jack and follow the
instructions as described in “Operating Your System”,
Step 3.
NOTE: The speaker unit will not supply power to other MP3
players. These MP3 players will require their own power source.
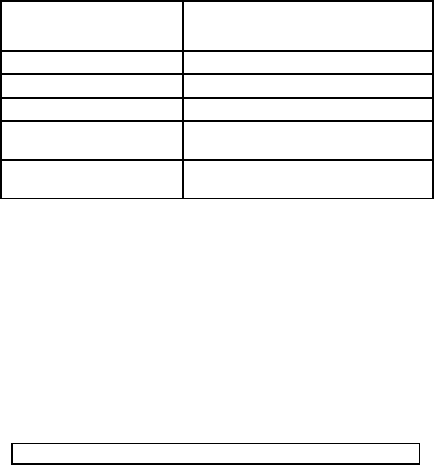
Troubleshooting
Problem Solution

19
No power • Check if the battery(s) is
installed correctly
• Check that the power is
ON
• Install a new battery(s)
• Check if the CD plug
and/or AC adaptor are
plugged in correctly
• Be certain that the AC
adaptor has the correct
specifications and is
working properly
No sound can be heard • Adjust the volume level
• If using earphones,
check that they are
properly connected
• Try a different set of
earphones
• Check that the SD card
is suitable for this
player
• Check if your music files
are not corrupted
• Check if your music file
format is supported by
the player (This player is
not able to playback
DRM-protected files)
•
Check if the
p
la
y
er is

20
properly connected to the
speaker unit
• Check if the LED lights
are activated (power ON)
• Reset the speaker
system and/or player by
removing the battery(s)
for a few seconds, then
reinstall
Files not able to
transfer
• Check if the cable plugs
are properly connected
• Check if your computer’s
operating system
supports the player
• Check if the SD card has
enough memory
• Reset the player by
removing the battery for
a few seconds, then
reinstall
• Disconnect AC adaptor,
then reinstall
• Check if the files are
suitable for the SD card
• Check if the files are
DRM-protected, as they
are not transferable
21
Player or speaker unit
freezes and does not
activate
• Disconnect player from
USB cable
• Reset the player by
removing the battery(s)
for a few seconds then
reinstall
• Install a new battery(s)
• Disconnect AC adaptor,
then reinstall
MP3 Player Technical Specifications
Operating Systems Windows XP or Vista, Mac
OS X 10.0 or higher
Music format support MPEG 1, 2, 3, WMA
Bit rate Mp3: 8-320kbps
Wma: 32-192kbps
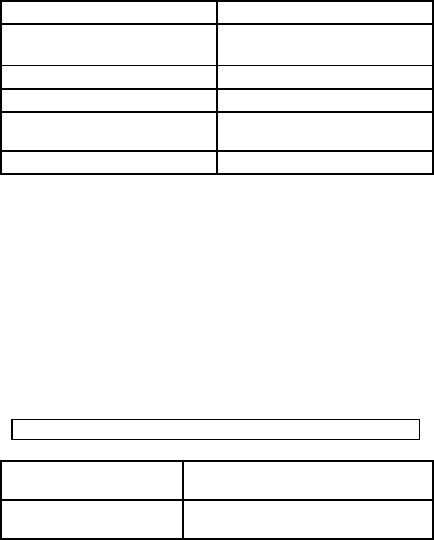
22
Frequency range 20Hz~20KHz
Type of port 2.0,Compatible with
USB1.1
Memory media SD Card
Memory size 32MB to 4GB
Battery “AAA” (1.5 volt) alkaline
battery
File system FAT32
Cube Speaker System Technical Specifications
Peak Music Power
Output 24W
Amplifier output
Power 4W*2(THD=1% ,fin=1KHz)
23
Frequency
Response 80Hz-20KHz
Speaker Size 2.75''
Speaker Power 5W
Speaker Impedance 8ohm
Battery “AAA” (1.5 volt) alkaline battery
x 6
AC Adaptor Input: AC100V, 50Hz
Output: DC6V, 800mA
FCC Information
U.S. - FEDERAL COMMUNICATIONS COMMISSION
(FCC)
This device complies with Part 15 of the FCC Rules.
Operation is subject to the following conditions:
(1) This device may not cause harmful interference, and
24
(2) This device must accept any interference received,
including interference that may cause undesired
operation.
(3) Shielded cables must be used with this unit to ensure
compliance with the Class B FCC limits
WARNING: Changes or modifications to this unit not
expressly approved by the party responsible for compliance
could void the user's authority to operate the equipment.
NOTE: This equipment has been tested and found to
comply with the limits for a Class B digital device,
pursuant to Part 15 of the FCC Rules. These limits are
designed to provide reasonable protection against
harmful interference in a residential installation. This
equipment generates uses and can radiate radio
frequency energy and, if not installed and used in
accordance with the instructions, may cause harmful
interference to radio communications. However, there is
no guarantee that interference will not occur in a
particular installation. If this equipment does cause
harmful interference to radio or television reception, which
can be determined by turning the equipment off and on,
the user is encouraged to try to correct the interference
by one or more of the following measures:
• Reorient or relocate the receiving antenna.
• Increase the separation between the equipment
and receiver.
• Connect the equipment into an outlet on a circuit
different from that to which the receiver is needed.
• Consult the dealer or an experienced radio/TV
25
technician for help.
This Class B digital apparatus complies with Canadian
ICES-003.
Cet appareil numérique de la classe B est conforme à la
norme NMB-003 du Canada.
Limited 90-Day Warranty Information
WARRANTY COVERAGE:
Youtopia LLC warrants this product to be free from defects
in workmanship and materials, under normal use and
conditions, for a period of ninety (90) days from the date of
original purchase. Youtopia LLC’s warranty obligation is
limited to the terms set forth below.
26
Who is covered:
Youtopia LLC warrants the product to the original
purchaser or the person receiving the product as a gift
against defects in materials and workmanship as based on
the date of original purchase (“Warranty Period”) from an
authorized dealer or authorized retailer. The original sales
receipt showing the product name and the purchase date
from an authorized retailer is considered such proof.
What is covered:
The Youtopia LLC warranty covers new products if a
mechanical defect arises and a valid claim is received by
Youtopia LLC within the Ninety (90) Day Warranty Period.
At its option, Youtopia LLC will either (1) repair the product
at no charge, using new or refurbished replacement parts,
or (2) exchange the product with a product that is new or
which has been manufactured from new, or serviceable
used parts and is at least functionally equivalent or most
comparable to the original product in Youtopia LLC’s
current inventory, or (3) refund the original purchase price
of the product.
Youtopia LLC warrants replacement products or parts
provided under this warranty against defects in materials
and workmanship from the date of the replacement or
repair for ninety (90) days or for the remaining portion of
the original product’s warranty, whichever provides longer
coverage for the buyer. When a product or part is
exchanged, any replacement item becomes the
purchasers’ property and the replaced item becomes
27
Youtopia LLC’s property. If a refund is granted, the
returned product becomes Youtopia LLC’s property.
Before returning this product for service, please first
replace the batteries (if applicable) with fresh ones, as
exhausted or defective batteries are the most common
cause of problems encountered.
If service is still required:
2) Pack the unit in a well padded, heavy
corrugate box.
3) Enclose a photocopy of the sales receipt or
proof of purchase.
4) Enclose a brief explanation of the problem as
well as your return address and contact
information
5) Send the unit prepaid and insured to the
Youtopia LLC Service Center listed below:
Youtopia LLC
Attn: Service Department
397 Ridge Road, Suite 5
Dayton, NJ 08810
REPLACEMENT PRODUCT OR REFUND CAN ONLY
BE SENT IF ALL WARRANTY REQUIREMENTS ARE
MET. FAILURE TO FOLLOW ALL REQUIREMENTS
CAN RESULT IN A DELAY.
What is not covered:
The Limited Warranty applies only to the products
manufactured by or for Youtopia LLC that can be identified
28
by the trademark, trade name, or logo affixed to it. This
Limited Warranty does not apply to any non-Youtopia LLC
hardware product or any software, even if packaged or
sold with the product. Non-Youtopia LLC manufacturers,
suppliers, or publishers may provide a separate warranty
for their own products packaged with the bundled product.
Youtopia LLC is not liable for any damages to or loss of
any programs, data, or other information stored on any
media contained with the product, or any non-Youtopia
LLC product or part not covered by this warranty.
Recovery or reinstallation of programs, data, or other
information is not covered under this Limited Warranty.
Disclaimer of Warranty:
This warranty is valid only if the product is used for the
purpose for which it was designed. It does not cover (1)
products which have been damaged by negligence or willful
actions, misuse or accident, or which have been modified or
repaired by unauthorized persons; or (2) cracked or broken
cabinets, or units damaged by excessive heat.
This warranty is only valid in the United States of America.

29
© 2008 Youtopia LLC, All rights reserved
Printed in China