Sungworld Electronics SP80 MP3 Digital music player with SD Memory Slot User Manual new SP80 manual
Shenzhen Sungworld Electronics Co., LTD. MP3 Digital music player with SD Memory Slot new SP80 manual
Users Manual
1
MP3 Player with SD Card Slot
User Manual
Model SP80

2
Table of Contents
Introduction & Basic Care…………………………...3
The MP3 Player………………………………………4
Operating the Player …………………………...…...8
Menu Options………………………………………11
Downloading & Deleting Song Files………………17
Troubleshooting………..…………………………...19
Technical Specifications…………………………...21
FCC Information…………………………………….22
Questions? Visit www.youtopiallc.com or call (877) 244-2864.

3
Introduction & Basic Care
Before using the player, please read this manual carefully
to obtain the best possible performance from your player.
Keep this manual for future reference.
IN THE BOX
• MP3 player
• Earphones
• Battery
• Instruction manual
BASIC CARE AND OPERATION
• Do not immerse or operate in or near water. These
units are neither waterproof nor water-resistant.
• Do not disconnect unit from computer while uploading
or downloading files, or formatting the memory. Allow
the operation to be completed before disconnecting
or you may lose or corrupt your data/files.
• Store and operate units in temperatures between -14
degrees F and 113 degrees F.
• Avoid dropping or involving unit in high impact.
4
The MP3 Player
5
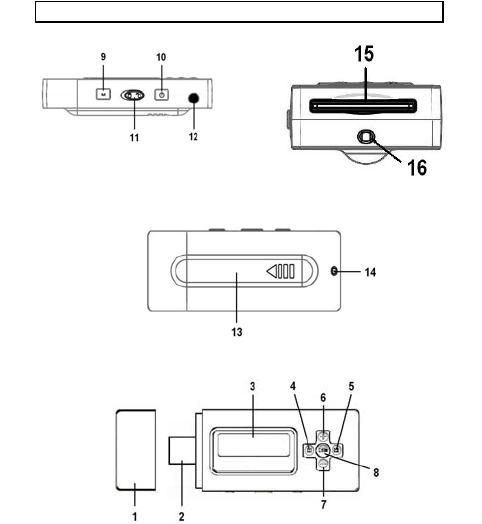
FEATURES and FUNCTIONS
1. USB cap – Cover for USB plug
2. USB plug – Connects player to USB port
3. Display Screen – Displays lyrics/ID3 tag and
function icons (see following section)
4. BACK / PREVIOUS SONG – Plays previous song;
or, scrolls back through current song
5. FORWARD / NEXT SONG – Plays next song; or,
scrolls forward through current song
6. VOLUME UP – Increases volume
7. VOLUME DOWN – Decreases volume
8. PLAY / PAUSE / STOP – Plays and pauses/stops
song. This function button will be referred to as
“PLAY” in this guide.
9. MENU – Selects different player features, including
SD CARD-INTERNAL MEMORY
10. POWER – Turns power on or off
11. HOLD – Locks function buttons to prevent
accidental activation
12. Earphone Jack – Insert earphone plug
13. Battery Compartment – Use 1 x AAA alkaline
battery
14. Lanyard eyelet (1) – Eyelet for lanyard
15. SD card slot – Compartment for your SD card
16. Lanyard eyelet (2) – Eyelet for lanyard
6
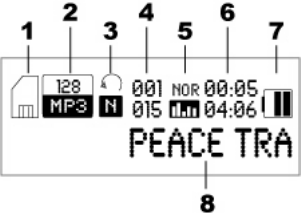
SCREEN DISPLAY DETAILS
1. SD Card / Internal Memory Usage – Shows if
player is accessing SD card or internal memory
files
2. Bit rate and File format – Shows file specifications
3. Playback Mode – Shows operation selected in
REPEAT options (see MENU “A” options)
4. Song number and Total number of songs – Top
number shows song number being played; Bottom
number shows total number of songs
5. Equalizer Mode – Indicates operation selected in
EQUALIZER Mode (see MENU “A” options)
6. Running and Total song time – Top number shows
current run time; Bottom number shows total song
time duration
7. Battery Level – Shows battery power level
8. Song Text – Shows song title or ID3 tag
BATTERY INSTALLATION / REPLACEMENT

7
The player requires one “AAA” battery to operate. An
alkaline battery is recommended for the longest playtime.
To install or replace the battery:
1. Remove the USB cap to access the battery cover
2. Slide the battery cover following the direction of the
arrow
3. Remove the old battery if replacing it
4. Install new “AAA” (1.5V) battery according to the
correct polarity indicated, (+) and (-)
5. Put the battery cover back on until the latch snaps
in place
6. Place the USB cap securely back on the player
Precautions:
• Use only the size and type of battery specified
• Battery polarity must be inserted correctly for safe
and proper use. Reversed polarity may cause
damage to the device
• If the device will not be used for a long period,
remove the battery to prevent damage or injury
from possible battery leakage
• If battery leakage occurs and comes in contact with
skin, immediately flush affected area with running
water (not hot) and contact nearest Poison Control
Center
1.5VAAA
8
Operating the Player
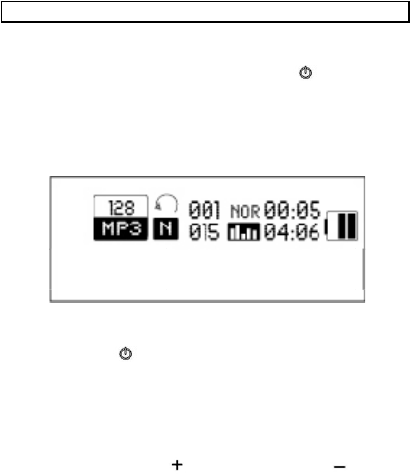
TURNING THE PLAYER ON / OFF
• Press down and hold the POWER button for
approximately 3 seconds to turn ON the player.
The screen will activate and “YOUTOPIA LLC” will
appear. The player will then be set in the MUSIC
mode with the following default screen.
• To turn OFF the player, press down and hold the
POWER button for approximately 3 seconds.
The sign-off will be displayed followed by the
screen deactivating.
VOLUME SETTING
Press the VOLUME UP or VOLUME DOWN button
to adjust the volume accordingly.
INSERTING AND REMOVING SD CARD
• Make sure the player is turned OFF before
inserting your SD card.
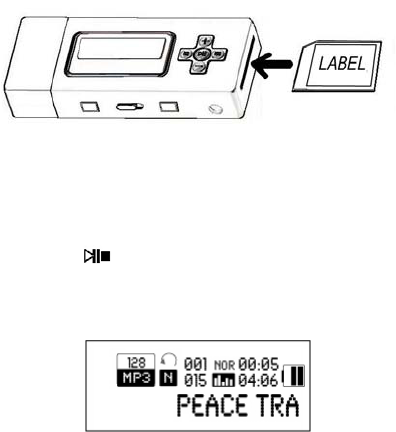
9
• Insert the SD card into the slot with the label side
facing same side as the display screen and front-
end (Connection pins located on bottom-side of SD
card) going in first. See illustration.
• Gently slide and push in the SD card until it is
securely in the slot. This should be indicated by a
click.
• To remove the SD card, turn OFF the player, then
press down gently on the card, release, and the
player will eject the card from the player.
MUSIC PLAYBACK
• With the player ON and SD card inserted, press the
PLAY button. The song file files from the
player’s internal memory will be accessed first
since this is the default source. Your screen should
have the following display.

10
• To listen to song files stored on your SD card, your
player should be ON with SD card inserted. Press
and hold the PLAY button for several seconds
to switch to the SD card source and start playing
songs. The screen will then display an SD card
icon on the far left side.
If the player does not immediately activate after
pressing the PLAY button, please wait several
seconds and then press PLAY again. The
player may need a moment to read the SD card.
To switch between the player’s internal memory
and SD card, press and hold the PLAY button
for several seconds each time.
NOTE: It is suggested that you lower the volume to a
safe level before pressing PLAY to prevent any
excessive noise that could damage or harm your
hearing.
11
Fast Forward or Back
Press the FORWARD or BACK button to listen
to the next or previous song, respectively.
Pause / Stop
During playback, press the PLAY button to pause
or stop play. To resume playback, press the PLAY
button again.
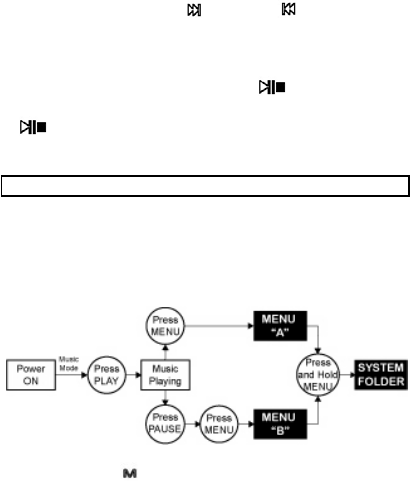
Menu Options
There are three sets of options available to customize the
player and further enhance your listening enjoyment. The
chart below lists the steps and summary of the options
available.
Press the MENU button to select Menu “A” while music
is playing, press PAUSE and then MENU to open Menu
“B”, and press and hold MENU in either “A” or “B” menus
to open SYSTEM FOLDER.
12
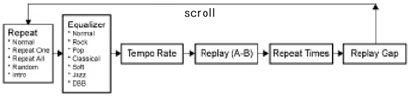
MENU “A” options
A) REPEAT
Press MENU to select. Use FORWARD or BACK buttons
to scroll through the options. Press MENU again to make
selection.
1) Normal – Plays back songs in order
2) Repeat One – Repeats playback of selected song
3) Repeat All – Plays back all songs in a continuous
loop
4) Random – Plays back all songs in a random order.
5) Intro – Plays first 10 seconds of each song file for up
to one cycle.
B) EQUALIZER
Press MENU to select. Use FORWARD or BACK buttons
to scroll through the options. Press MENU again to make
selection.
1) Nor (Normal)
2) Rock
3) Pop
4) Classical
5) Soft
6) Jazz
7) DBB (Dynamic Bass Boost)

13
C) TEMPO RATE
This option allows you to alter the tempo during playback.
Use VOLUME UP or VOLUME DOWN button to
adjust level.
D) REPLAY (A-B)
This option allows you to select a specific part of a song
(i.e., point A to point B) and play it back continuously up
to 10 times.
1 – Press MENU button to select this option. The icon A-
B will appear on the screen.
2 – The letter “A” in the icon will begin flashing to indicate
the point where the file will start repeating (point A).
Press the FORWARD button to start the selection.
3 – The letter “B” in the icon will then begin flashing to
indicate the point where the file will end (point B).
Press the FORWARD button to end the selection.
4 - The player will then playback the part of the file you
selected, from point A to point B. The playback will
14
continuously repeat up to 10 times.
5 - To end the playback, press the MENU or PLAY button.
E) REPEAT TIMES
This option allows you to repeat playback up to 10 times.
Press VOLUME UP or DOWN to select level.
F) REPLAY GAP
This option allows you to set the time difference (i.e., gap)
between each REPLAY playback.
Press VOLUME UP or DOWN to select level.

15
MENU “B” options
A) LOCAL FOLDER
Access files stored in the player’s internal memory
B) CARD FOLDER
Access files stored in the SD card
C) DELETE FILE
Deletes selected file from the selected source.
Press FORWARD button to move between YES and NO
option. Press MENU to confirm. Warning: files will not be
able to be recovered if deleted.
D) DELETE ALL
Deletes all files from the selected source.
Press FORWARD button to move between YES and NO
option. Press MENU to confirm.
Warning: files will not be able to be recovered if deleted.
E) EXIT
Select to exit from this option

16
SYSTEM FOLDER options
A) BACKLIGHT
Option allows you to set the length of time (0-30 seconds)
for backlight to stay on or off.
Press VOLUME UP or DOWN to select time.
B) LANGUAGE
Option displays player’s screen text in the selected
language
1) English
2) French
3) Spanish
C) POWER OFF
1) Off Time
Option allows you to set the time (0-60 seconds) that
player will automatically turn off if left idle.
Press VOLUME UP or DOWN to select time.
2) Sleep
Option allows player to automatically enter into sleep
mode if left idle for a set time (0-120 minutes).
Press VOLUME UP or DOWN to select time.

17
D) CONTRAST
Option sets screen display contrast level.
Press VOLUME UP or DOWN to select level.
E) MEMORY INFO
Option provides the player’s memory storage information
F) VERSION
Option lists the player’s current version
Downloading & Deleting Song Files
You may download and delete your own song files in the
MP3 player’s internal memory or on a writable non-
protected SD card. The player will work with most leading
brand name SD cards.
Operating System Requirements: Computers with
Windows XP, VISTA and MAC OS X 10.0 or higher
1. Connect the player to your computer’s USB port
either directly with the player’s USB plug or with the
supplied USB connector cable. Make sure there is
an SD card inserted into the player if you wish to
access or manage this source as well.
2. For Windows OS, once the player is properly
connected to your computer it will detect the player
as an MP3 device (internal memory) and
removable disk (SD card). You should open the
18
folder you wish to access when the prompt asks
you. If there is no automatic prompt, search for the
drive under “My Computer” then click on the
respective drive to open the folder.
3. For Mac OS X, icons will appear on your desktop or
the folder will automatically open for both the
internal memory and SD card. Click to open the
respective folder if it does not automatically open.
4. To transfer song files from your computer, click to
select the song files on the computer that you want
and drag into folder / source that you want to
manage.
5. Wait for song files to finish copying
6. To remove song files from the card, select and click
on the files you want removed then drag into
“Recycle Bin” or “Trash”, or right-click your mouse
and select “Delete” command.
Note: For Mac OS, you may be required to
“Empty Trash” after placing the files in the
“Trash” in order to clear the files.
7. After transferring or removing song files, properly
eject or safely remove player from computer, then
unplug cable from computer USB port and from
MP3 player. Failure to properly eject or safely
remove the player may result in lost data.

19
Troubleshooting
Problem Solution
No power • Check if the battery is installed
correctly
• Check that the POWER button is
being engaged properly
• Check that the HOLD switch is off
before pressing POWER button
• Install a new battery
No sound can be
heard
• Adjust the volume level
• Check if the earphones are
properly connected
• Try a different set of earphones
• Check that the SD card is suitable
for this player
• Check if your music files are not
corrupted
• Check if your music file format is
supported by the player (This
player is not able to playback DRM-
protected files)
• Check if you are accessing the
correct source (i.e., internal
memory or SD card)

20
Files not able to
transfer
• Check if the cable plugs are
properly connected
• Check if your computer’s operating
system supports the player
• Check if there is sufficient memory
on your SD card or in the player’s
internal memory
• Reset the player by removing the
battery for a few seconds, then
reinstall
• Check if the files are suitable for
the SD card
• Check if the files are DRM-
protected, as they are not
transferable
• Check if the SD card is re-writable
and unlocked
Player freezes and
does not activate
• Disconnect player from USB cable
• Reset the player by removing the
battery for a few seconds then
reinstall
• Install a new battery
Abnormal words
displayed on the
screen
• Check if the correct language is
selected.
• Check the text input (e.g., ID3) of
your music file
• Reset the player by removing the
battery for a few seconds and then
reinstalling
• Install a new battery

21
Technical Specifications
Operating Systems Windows XP or Vista, Mac OS X 10.0
or higher
Music format support MPEG 1, 2, 3, WMA
Bit rate Mp3: 8-320kbps
Wma: 32-192kbps
Signal/noise ratio ≥80DB
Separation ≥80DB
Earphone Output L 4mW, R 4mW
Type of port 2.0, Compatible with USB1.1
Memory media SD Card or NAND flash
Internal Memory size 1GB
SD Cards Supported 64MB to 4GB
Battery “AAA” (1.5 volt) alkaline battery
Display 128x32 pixels
File system FAT32

22
FCC Information
U.S. - FEDERAL COMMUNICATIONS COMMISSION
(FCC)
This device complies with Part 15 of the FCC Rules.
Operation is subject to the following conditions:
(1) This device may not cause harmful interference, and
(2) This device must accept any interference received,
including interference that may cause undesired
operation.
(3) Shielded cables must be used with this unit to ensure
compliance with the Class B FCC limits
WARNING: Changes or modifications to this unit not
expressly approved by the party responsible for compliance
could void the user's authority to operate the equipment.
NOTE: This equipment has been tested and found to
comply with the limits for a Class B digital device,
pursuant to Part 15 of the FCC Rules. These limits are
designed to provide reasonable protection against
harmful interference in a residential installation. This
equipment generates uses and can radiate radio
frequency energy and, if not installed and used in
accordance with the instructions, may cause harmful
interference to radio communications. However, there is
no guarantee that interference will not occur in a
particular installation. If this equipment does cause
harmful interference to radio or television reception, which
can be determined by turning the equipment off and on,
the user is encouraged to try to correct the interference by

23
one or more of the following measures:
• Reorient or relocate the receiving antenna.
• Increase the separation between the equipment
and receiver.
• Connect the equipment into an outlet on a circuit
different from that to which the receiver is needed.
• Consult the dealer or an experienced radio/TV
technician for help.
This Class B digital apparatus complies with Canadian
ICES-003.
Cet appareil numérique de la classe B est conforme à la
norme NMB-003 du Canada.

24
© 2008 Youtopia LLC, All rights reserved
Printed in China