Sungworld Electronics SW-E700X Note Book User Manual
Shenzhen Sungworld Electronics Co., LTD. Note Book Users Manual
Users Manual
Table of Contents
Chapter 1 Introducing NETBOOK ........................................................................................ 1
1.1 Notes for this manual ..................................................................................................... 1
1.2 Symbols for this manual ................................................................................................ 1
1.3 Safety precautions .......................................................................................................... 1
1.4 Introduction .................................................................................................................... 3
Top side .......................................................................................................................... 3
Right side ........................................................................................................................ 5
Left side .......................................................................................................................... 6
Rear side ......................................................................................................................... 6
1.5 Product features ............................................................................................................. 7
1.6 Preparing your NETBOOK ........................................................................................... 7
Chapter 2 Getting started ....................................................................................................... 8
2.1 Using AC power ............................................................................................................ 8
2.2 Using battery power ....................................................................................................... 9
2.3 Touchpad usage ........................................................................................................... 10
2.4 Emergency shutdown................................................................................................... 11
Chapter 3 Using the NETBOOK ......................................................................................... 12
3.1 Basic operation ............................................................................................................ 12
Power on ....................................................................................................................... 12
Desktop ......................................................................................................................... 12
Shut down ..................................................................................................................... 12
My Computer................................................................................................................ 12
My documents .............................................................................................................. 13
Storage Card ................................................................................................................. 13
3.2 Network ....................................................................................................................... 14
Network connection / disconnection ............................................................................ 14
IE browser .................................................................................................................... 15
Windows messenger ..................................................................................................... 15
3.3 Entertainment ............................................................................................................... 16
Video play .................................................................................................................... 16
Photo browsing ............................................................................................................. 16
Media Player ................................................................................................................. 17
3.4 Office software application ......................................................................................... 17
Microsoft WordPad ...................................................................................................... 17
Microsoft Word (Text Maker) ...................................................................................... 17
Microsoft Excel (Plan Maker) ...................................................................................... 18
PowerPoint (Presentation) ............................................................................................ 18
FoxitReader .................................................................................................................. 18
3.5 Others ........................................................................................................................... 1 9
Calculate ....................................................................................................................... 19
WinRAR ....................................................................................................................... 19
Chapter 4 System settings .................................................................................................... 20
4.1 Certificates (Optional) ................................................................................................. 20
4.2 Date/time ...................................................................................................................... 20
4.3 Display (Optional) ....................................................................................................... 21
4.4 Internet options ............................................................................................................ 21
4.5 Keyboard ...................................................................................................................... 2 2
4.6 Mouse (optional) .......................................................................................................... 22
4.7 Network and dial-up connections ................................................................................ 23
4.8 Owner ........................................................................................................................... 23
4.9 Regional settings .......................................................................................................... 24
4.10 Remove programs ...................................................................................................... 25
4.11 PC connection (Optional) .......................................................................................... 25
4.12 System ........................................................................................................................ 26
4.13 Volume & Sounds...................................................................................................... 27
4.14 Power ......................................................................................................................... 27
4.15 Password .................................................................................................................... 28
4.16 Storage Manager ........................................................................................................ 28

1
Chapter 1 Introducing NETBOOK
1.1 Notes for this manual
Information provided in this manual may varies from model to model, so your model
may not have some of the features described in this book. Pictures of features may also
be different from actual one. This book reserves the right to change any information
without any notice.
1.2 Symbols for this manual
A few notes and warnings are used throughout this guide, allowing you to complete
certain tasks safely and effectively. These notes have different degrees of importance as
follows.
WARNING: Important information that must be followed for safe operation.
IMPORTANT: Vital information that must be followed to prevent damage to
data, components, or persons.
TIP: Tips for completing tasks.
NOTE: Information for special situations.
1.3 Safety precautions
The following safety precautions will increase the life of the NETBOOK.
Follow all precautions and instructions. Except as described in this manual, refer all
servicing to qualified personnel. Do not use damaged power cords, accessories, or other
peripherals. Do not use strong solvents such as thinners, benzene, or other chemicals on
or near the surface.
2
z Disconnect the AC power and remove the battery packs before cleaning. Wipe
the NETBOOK using a clean cellulose sponge or chamois cloth dampened with
a solution of nonabrasive detergent and a few drops of warm water and remove
any extra moisture with a dry cloth.
z DO NOT place on uneven or unstable work surfaces. Seek servicing if the casing
has been damaged.
z DO NOT leave the NETBOOK on your lap or any part of the body to prevent
discomfort or injury from heat exposure.
z DO NOT press or touch the display panel. Do not place together with small items
that may scratch or enter the NETBOOK.
z DO NOT place or drop objects on top and do not shove any foreign objects into
the NETBOOK.
z DO NOT expose to strong magnetic or electrical fields.
z DO NOT expose to dirty or dusty environments. Do not operate during a gas
leak.
z DO NOT expose to or use near liquids, rain, or moisture.
z DO NOT use the modem during electrical storms.
z DO NOT carry or cover a NETBOOK that is powered on with any materials that
will reduce air circulation such as a carrying bag.
z SAFE TEMP: This NETBOOK should only be used in environments with
ambient temperatures between 5℃ and 40℃.
z INPUT RATING: Refer to the rating label on the rear side of the NETBOOK and
be sure that your power adapter complies with the rating.
Transportation precautions
To prepare the NETBOOK for transport, you should turn it OFF and disconnect all
external peripherals to prevent damage to the connectors. Therefore, you should not
transport the NETBOOK while the power is still ON. Close the display panel and check
that it is latched securely in the closed position to protect the keyboard and display
panel.
The NETBOOK’s surface is easily dulled if not properly cared for. Be careful not to rub
or scrape surfaces when transporting your NETBOOK. You can purchase an optional
carrying case for protection from dirt, water, shock, and scratches.

3
Charging Your Batteries
If you intend to use battery power, be sure to fully charge your battery pack and any
optional battery packs before going on long trips. Remember that the power adapter
charges the battery pack as long as it is plugged into the computer and an AC power
source. Be aware that it takes much longer to charge the battery pack when the
NETBOOK is in use.
Airplane Precautions
Contact your airline if you want to use the NETBOOK on the airplane. Most airlines
have restrictions for using electronic devices. Most airline allow electronic use only
between but not during take offs and landings.
There are three main types of airport security devices: X-ray machines (used on items placed on
conveyor belts), magnetic detectors (used on people walking through security checks), and magnetic
wands (hand-held devices used on people or individual items). You can send your NETBOOK and
diskettes through airport X-ray machines. However, it is recommended that you do not send your
NETBOOK or diskettes through airport magnetic detectors or expose them to magnetic wands.
1.4 Introduction
E700(with Windows CE system) is a low cost broadband access terminal for today’s
word of communications convergence and digital multimedia entertainment. It provides
multimedia entertainment, High-speed broadband internet access, and work on the go!
It is equipped with various functions, such as electronic-book, MP3 play, Game player,
enlarged PDA, and common business software such as web browsing, word processing,
spreadsheets and more. Perfect for the light business traveler, student, and every kid
wanting to enjoy the experience of exploring the world of broadband multi-media! The
best way to learn to use your new product is to play and experiment, and refer to the
online help and web links provided!
Top side
Refer to the diagram below to identify the components on this side of the NETBOOK.

4
1. Display panel
The display panel functions the same as a desktop monitor. The NETBOOK uses an
active matrix TFT LCD, which provides excellent viewing like that of desktop monitors.
Unlike desktop monitors, the LCD panel does not produce any radiation or flickering,
so it is easier on the eyes. Use a soft cloth without chemical liquids (use plain water if
necessary) to clean the display panel.
2. Power switch
The power switch allows powering ON and OFF the NETBOOK and recovering from
STR. Press the switch once to turn ON and hold it turn OFF the NETBOOK. The power
switch only works when the display panel is opened.
3. Audio speaker system
The built-in stereo speaker system allows you to hear audio without additional
attachments. The multimedia sound system features an integrated digital audio
controller that produces rich, vibrant sound (results improved with external stereo
headphones or speakers). Audio features are software controlled.
4. Keyboard
The keyboard provides keys with comfortable travel (depth at which the keys can be
depressed) and palm rest for both hands.
5. Touchpad and buttons
The touchpad and its buttons comprise a pointing device that provides the same
functions as a desktop mouse. Scrolling is available to allow easy web and document
navigation.
5
6. Status indicators (front)
Battery charge indicator
The battery charge indicator (LED) shows the status of the battery’s power as follows:
ON: The NETBOOK battery is charging when AC power is connected.
OFF: The NETBOOK battery has been completely charged or drained without
charging.
Power indicator
The power indicator lights when the NETBOOK is turned ON and blinks slowly when
the NETBOOK is in the Save-to-RAM (Suspend) mode. This indicator is OFF when the
NETBOOK is turned OFF.
Num Lock indicator
When the light turns green, it means the Num lock on the keyboard (Num Lock) key has
been activated. When the button activated, you can use embedded numeric keypad.
Caps lock indicator
When the light turns green, it means the caps lock on the keyboard (Caps Lock) key has
been activated. When the activation buttons all playing out of the alphabet keys are all
capital letters.
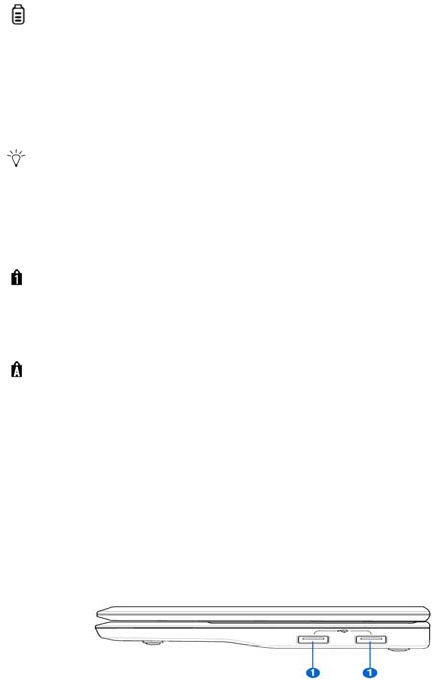
Right side
Refer to the diagram below to identify the components on this side of the NETBOOK.
1. USB host port (2.0/1.1)
The USB (Universal serial bus) port is compatible with USB 2.0 or USB 1.1 devices
such as keyboards, storage devices, connected in a series up to USB1.1 and USB2.0.
USB allows many devices to run simultaneously on a single computer, with some
peripherals acting as additional plug-in sites or hubs. Also, the USB supports
hot-swapping function.
6
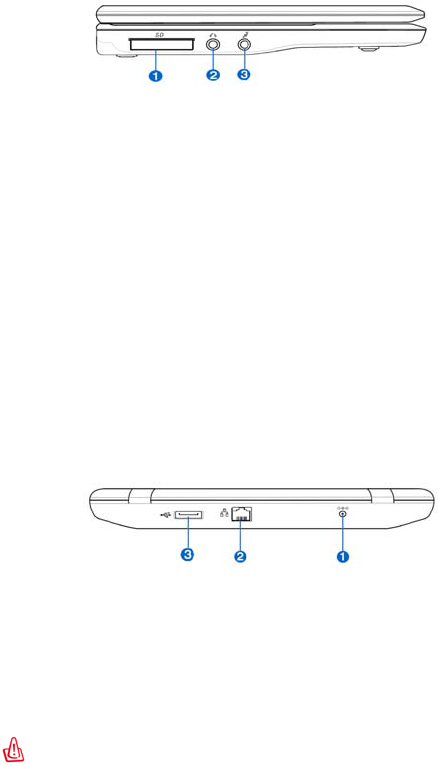
Left side
Refer to the diagram below to identify the components on this side of the NETBOOK.
1. Memory card slot
The built-in memory card reader can read MMC/SD cards from devices such as digital
cameras, MP3 players, mobile phones, and PDAs.
2. Headphone output jack
The stereo headphone jack (3.5mm) connects the NETBOOK’s audio out signal to
amplified speakers or headphones. Using this jack automatically disables the built-in
speakers.
3. Microphone jack
The microphone jack is designed to connect the microphone used for voice narrations,
or simple audio recordings.
Rear side
Refer to the diagram below to identify the components on this side of the NETBOOK.
1. Power (DC) input
The supplied power adapter converts AC power to DC power for use via this jack.
Power supplied through this jack supplies power to the NETBOOK and charges the
internal battery pack. To prevent damage to the NETBOOK and battery pack, always
use the supplied power adapter.
Caution: May become warm to hot when in use. Be sure not to cover the adapter and keep it
away from your body.

7
2. LAN port
The eight-pin RJ-45 LAN port supports a standard Ethernet cable for connection to a
local network. The built-in connector allows convenient use without additional
adapters.
3. USB host port (2.0/1.1)
The USB (Universal serial bus) port is compatible with USB 2.0 or USB 1.1 devices
such as keyboards, storage devices, connected in a series up to USB1.1 and USB2.0.
USB allows many devices to run simultaneously on a single computer, with some
peripherals acting as additional plug-in sites or hubs. Also, the USB supports
hot-swapping function.
1.5 Product features
z Processor: ARM926
z Display terminal: 7-Inch 800*480 high resolution TFT-LCD digital screen, True
color image display
z Input: Standard 80key keyboard and Mouse
z Sound card: AC97voice card
z Communication: Broadband internet access, 10/100MB Ethernet port, Build in
Wireless LAN adapter
z System: Embedded Windows CE 6.0 operating system –high security & virus
free
1.6 Preparing your NETBOOK
These are only quick instructions for using your NETBOOK. Read the following
chapters for detailed information.
1. Connect the AC power adapter
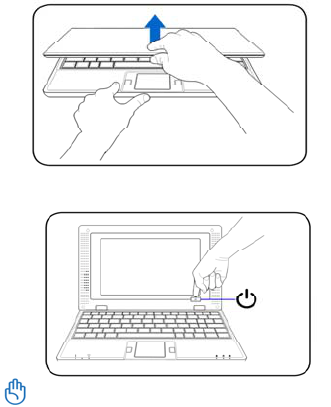
8
The wall outlet differs in type by country. Your NETBOOK ships with an adapter
compliant with your national standard. The illustration above is for reference only and
may not exactly show your specific configuration.
2. Open the display panel
3. Turn ON the NETBOOK
When you open the display panel, do not force it down to the table or else the hinges may break!
Chapter 2 Getting started
2.1 Using AC power
The NETBOOK power comprises two parts, the power adapter and the battery power
system. The power adapter converts AC power from a wall outlet to the DC power
required by the NETBOOK. Your NETBOOK comes with a universal AC-DC adapter
for connection to any 100V-120V as well as 220V-240V outlets without setting
switches or using power converters. Different countries may require an adapter to
connect the provided US-standard AC power cord to a different standard. Most hotels

9
provide universal outlets to support different power cords as well as voltages. It is
always best to ask an experienced traveler about AC outlet voltages before traveling.
The power adapter may become warm to hot when in use. Be sure not to cover the adapter and
keep it away from your body.
Damage may occur if you use a different adapter to power the NETBOOK or use the
NETBOOK’s adapter to power other electrical devices. If there is smoke, burning scent, or extreme
heat coming from the AC-DC adapter, seek servicing. Seek servicing if you suspect a faulty AC-DC
adapter. You may damage both your battery pack(s) and the NETBOOK with a faulty AC-DC
adapter.
2.2 Using battery power
The NETBOOK is designed to work with a battery pack. The battery pack consists of a
set of battery cells housed together. A fully charged pack will provide several hours of
battery life. Additional battery packs are optional and can be purchased separately
through an NETBOOK retailer. Remember to fully charge the battery before first use
and whenever it is depleted to prolong battery life.
Only use battery packs and power adapters supplied with this NETBOOK or specifically
approved by the manufacturer or retailer for use with this model or else damage may occur to the
NETBOOK.
Battery care
The NETBOOK’s battery pack, like all rechargeable batteries, has a limit on the number
times it can be recharged. The battery pack’s useful life will depend on your
environment temperature, humidity, and how your NETBOOK is used. It is ideal that
the battery be used in a temperature range between 5 and 40 . You must also take ℃℃
into account that the NETBOOK internal temperature is higher than the outside
temperature. Any temperatures above or below this range will shorten the life of the
battery. But in any case, the battery pack’s usage time will eventually decrease and a
10
new battery pack must be purchased from an authorized dealer for this NETBOOK.
Because batteries also have a shelf life, it is not recommended to buy extras for storing.
For safety reasons, DO NOT throw the battery in fire, DO NOT short circuit the contacts, and
DO NOT disassemble the battery. If there is any abnormal operation or damage to the battery pack
caused by impact, turn off the NETBOOK and contact an authorized service center.
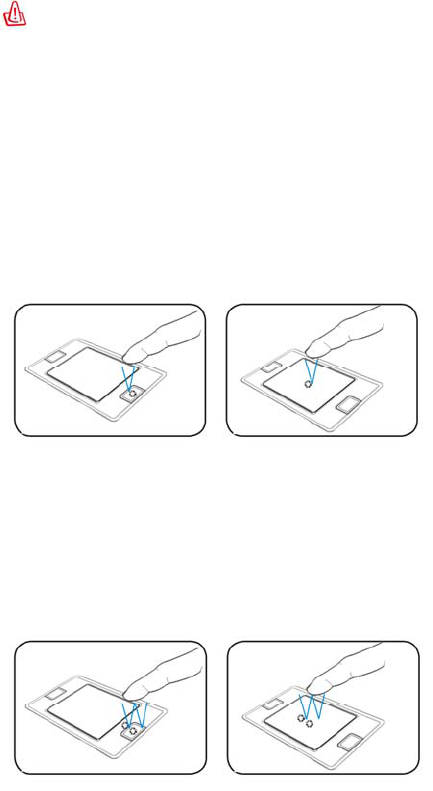
2.3 Touchpad usage
Clicking/Tapping-With the cursor over an item, press the left button or use your
fingertip to touch the touchpad lightly, keeping your finger on the touchpad until the
item is selected. The selected item will change color. The following 2 illustrations
produce the same results.
Double-clicking/ Double-tapping-This is a common skill for launching a program
directly from the corresponding icon you select. Move the cursor over the icon you wish
to execute, press the left button or tap the pan twice in rapid succession, and the system
launches the corresponding program. If the interval between the clicks or taps is too
long, the operation will not be executed. The following 2 illustrations produce the same
results.
Dragging-Dragging means to pick up an item and place it anywhere on the screen you
wish. You can move the cursor over the item you select, and while keeping the left

11
button depressed, moving the cursor to the desired location, then release the button. Or,
you can simply double-tap on the item and hold while dragging the item with your
fingertip. The following illustrations produce the same results.
2.4 Emergency shutdown
In case your operating system cannot properly turn off, there is an additional way to
shutdown your NETBOOK:
Shutdown: Hole the power button until the system shut down.
Your NETBOOK isn’t with a reset button, so you can not reset your NETBOOK by it .If
you want to turn on your NETBOOK after emergency shutdown, you should wait for
3~5 seconds, and then press the power button once again.
DO NOT use emergency shutdown while data is being written or read; doing so can result in
loss or destruction of your data.

12
Chapter 3 Using the NETBOOK
3.1 Basic operation
Power on
Power on and the computer enters the loading wince picture below after a few seconds.
Desktop
This interface is the desktop interface accessible to program.
The same style as other Windows systems, “My Computer” can be accessible from
here.
Note: Clicking an icon twice is double click and clicking once is click. Clicking an icon is
right clicking the icon; all the right clicks of the icon below are such an operation.
Shut down
Click on Start and select “Turn off” from list.
My Computer
Double click “My Computer” and the following interface will appear.
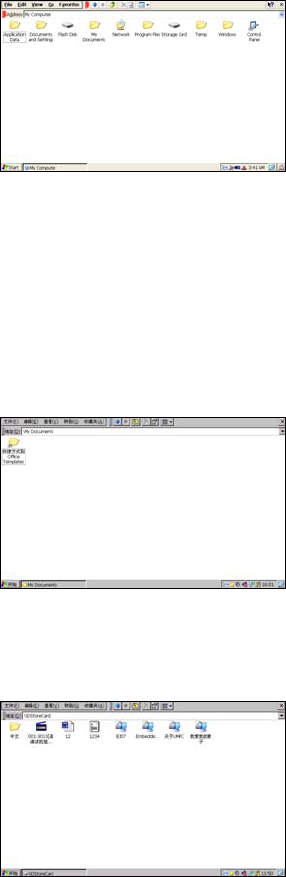
13
The “Flash Disk” icon behaves as a “hard drive”, “Storage Card” is “SD Store Card”
drivers. Except “Local Disk”, “Storage Card” and “Application Data”, all the other files
are Windows system files, which can not be altered at will. Two folders, “My
Document” and “Storage Card” are introduced hereunder.
My documents
Double click “My documents” folder in “My Computer” folder or “My documents”
icon on the desktop, the following interface will appear. You can manage your
documents.
Storage Card
Double click “Storage Card” folder, it will display your files and folders saved in
storage card.
14
These folders can be deleted, renamed and also can be copied to other folders.
3.2 Network
Network connection / disconnection
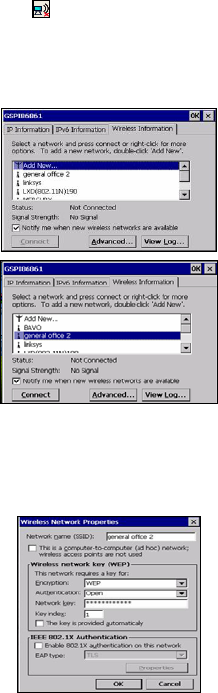
1. Wireless connection
(1) Click “WIFI Power” icon on the desktop, click the bottom “Power on”-“OK”.
(2) Click the wireless icon in taskbar at bottom right corner, as shown in the
figure. The computer will automatically search for WIFI network, and arrange it
in line with strength of signal. Select your favorite network as the figure below
shows and click “Connect”.
(3) As it is shown in the figure, configure it in the dialog that pops up according to
actual conditions (if the WIFI network requires password, please inquire network
administrator, because password must be input to connect). The display after
connected to WIFI network is as shown in the figure below.
15
2. Wireless disconnection
If you want to disconnect the network, at the “Wireless Information” item, you can right
click the network which has been connected, choose “Delete”, and then the network will
be disconnected.
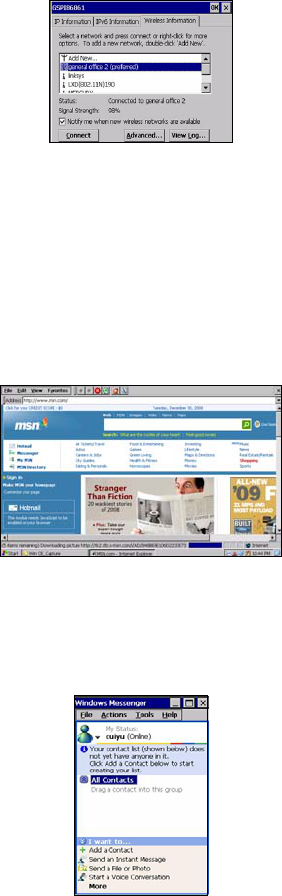
IE browser
Click “internet explorer” icon on the desktop, input website by means of keyboard, as
shown in the figure below:
Windows messenger
Click “Windows messenger” icon on the desktop, input account number and password
by means of keyboard, as shown in the figure below:
16
3.3 Entertainment
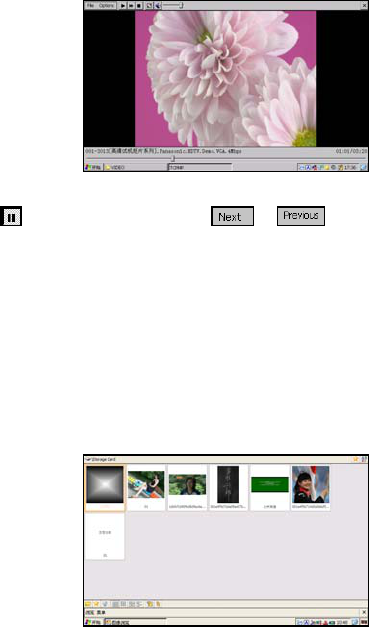
Video play
Open video folder, as shown in the figures below. Double click a video play file to start
playing. The player is TCPMP. Click the icon in menu bar or press the left key for full
screen playing. Press the left key once again, and then the video will stop playing and
quit full screen.
Press to play/pause , Press “File” of & to jump to next video play
file. It works like standard TCPMP.
Photo browsing
Click “Image Viewer” icon, choose the image format, and then open the photo
folder, as shown in the figures below. Double click the photo to start browsing.
17
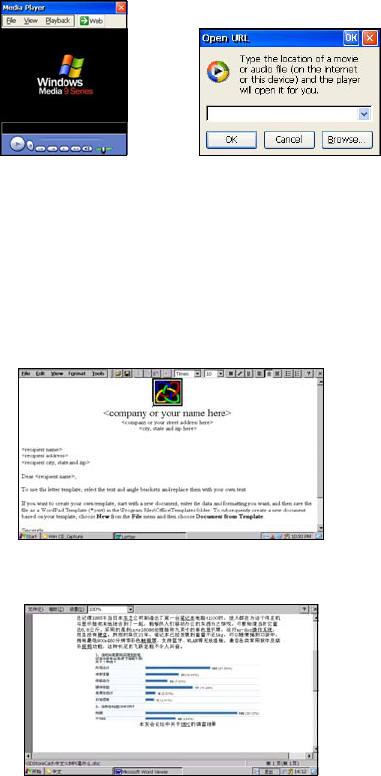
Media Player
On the desktop, double click the “Media Player” icon and click menu bar “file” -“open”,
chose your file, The Media player will play it .
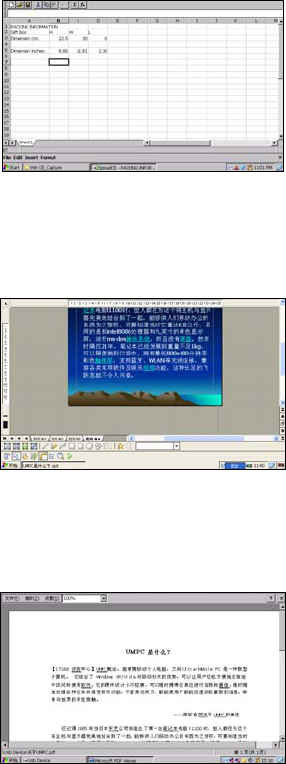
3.4 Office software application
The office system of Mini laptop consists of Microsoft WordPad, Text Maker, Plan Maker,
Presentation, and FoxitReader, as shown in the figures below.
Microsoft WordPad
Microsoft Word (Text Maker)
18
Microsoft Excel (Plan Maker)
PowerPoint (Presentation)
FoxitReader
19
3.5 Others
Calculate
It performs all standard mathematics operations. This works like PC windows standard
calculator.
WinRAR
Similar you can find icon on the desktop ,about operation the “winrar”, please find
the correlative data.
The WinRar support “Winrar” and “WinZip” format.
20
Chapter 4 System settings
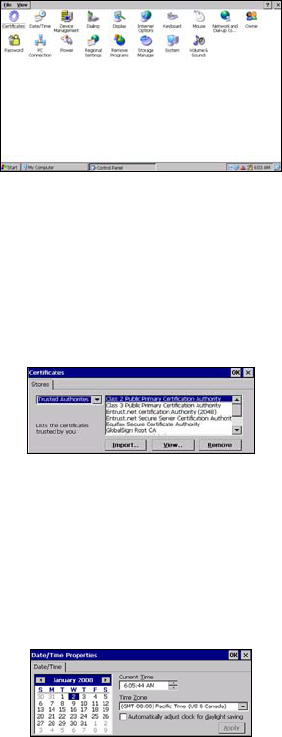
Double click “Control panel” folder in “My Computer” and the following interface will
appear.
4.1 Certificates (Optional)
Double click “Certificates” icon in “Control panel” and the following interface will
appear.
User can view & alter digital certificate of legal programs.
4.2 Date/time
Double click “Date/time” icon in “Control panel” and the following interface will
appear.
21
To display and set time, date and time zone of the current system. User can set the time,
date and time zone according to actual conditions. The application of this function is
similar to the “Time and date” setting in “Control panel” of PC.
NOTE: the “Time and Date” setting can also be opened by clicking directly the time in taskbar
on the desktop.
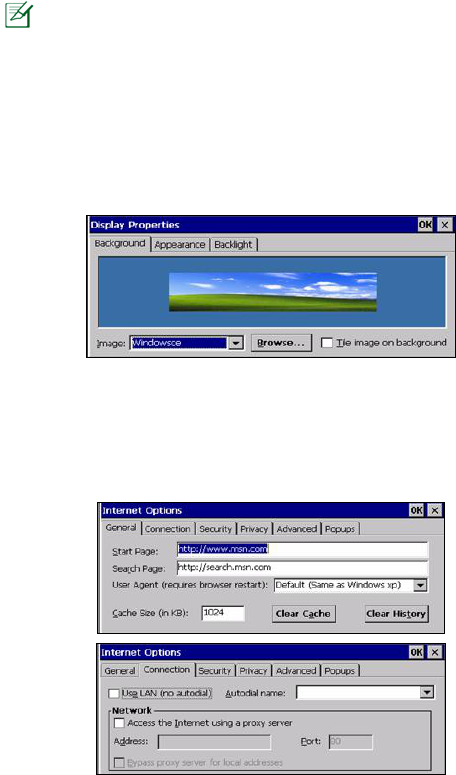
4.3 Display (Optional)
Double click “Display” icon in “Control panel” and the following interface will appear.
User can set different display setting like Background, Appearance & Backlight.
4.4 Internet options
Double click “Internet options” icon in “Control panel” and the following interface will
appear:
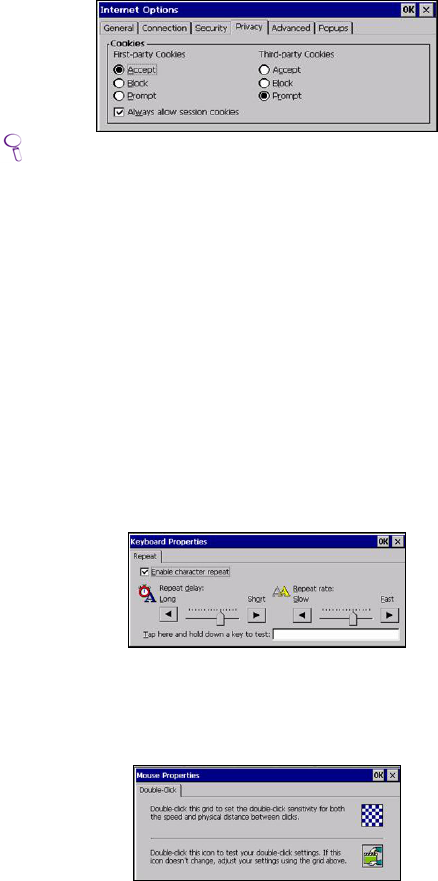
22
TIPS: Users are recommended to use the default and not to alter the network setting rashly. The
ex-works set defaults have been adjusted to the optimum status. Advanced level users can set upon
their conditions.
4.5 Keyboard
Double click “Keyboard” icon on “Control panel” and the following interface will
appear.
This is much the same as the function of “keyboard” in “Control panel” of PC. The
function is mainly used to adjust the repeat input of soft keyboard and the setting of
repeat delay time. A test dialog is available as shown below to test your setting.
The “Enable character repeat” in the interface is the choice box of “Enable character
repeat”; “Repeat delay” is for setting repeat rate. The white zone at the bottom is a zone
to test the two settings by clicking the zone and pressing some key.
4.6 Mouse (optional)
Double click “Mouse” icon in “Control panel” and the following interface will appear.
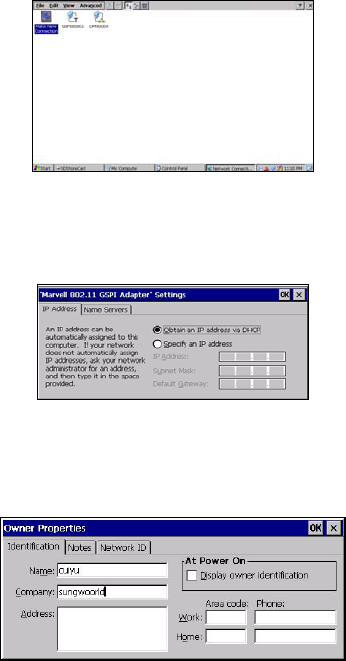
23
Double clicks the grid icon above to set the mouse double-click speed.
Double-click the icon below to test the mouse double-click setting.
4.7 Network and dial-up connections
Double click “Network and Dial-up connections” icon in “Control panel” and the
following interface will appear.
Double click and set your settings for internet, these settings are provided by your
internet service provider. Set your TCP IP setting as shown in below figure.
4.8 Owner
Double click “Owner” icon in “Control panel” and the following interface will appear.
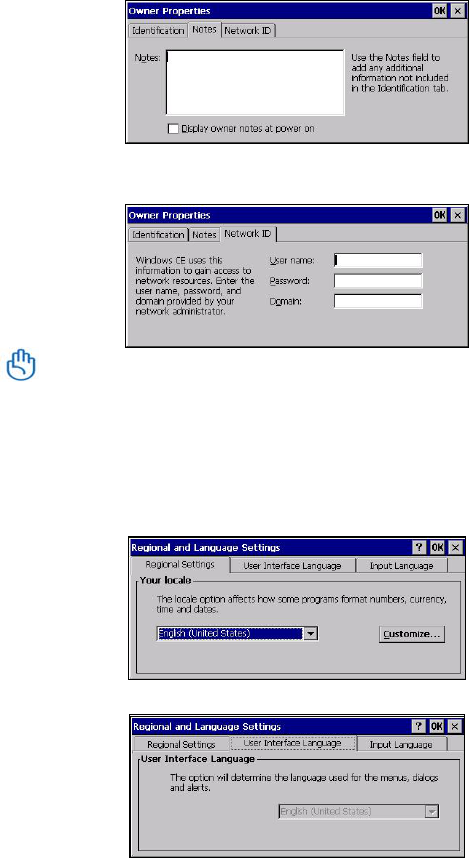
24
Set and display the owner properties information of the current system.
Use the “Notes” field to add any additional information not included in the options.
IMPORTANT: Windows CE uses this information to gain access to network resources, enter the
user name, password and domain provided by your network administrator.
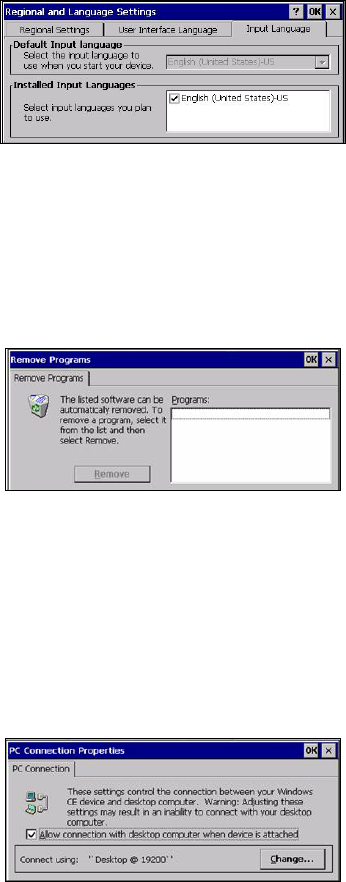
4.9 Regional settings
Double click “regional settings” icon in “Control panel” and the following interface will
appear.
Display the current regional settings and the region where the setting is.
25
“User interface language” and “input language” are default settings of the system.
4.10 Remove programs
Double click “Remove programs” icon in “Control panel” and the following interface
will appear.
Display the installed application programs in the current system and to uninstall the
installed application programs. In order to prevent user from deleting the system’s own
application software by mistake, none of the software of the system’s own appears in
the list.
4.11 PC connection (Optional)
Double click “PC connection” icon in control panel following and the following
interface will appear.
26
User can Enable/disable direct connection to the desktop computer. For connection with
desktop computer use USB.
TIP: The baud rate of the device & desktop computer must be the same.
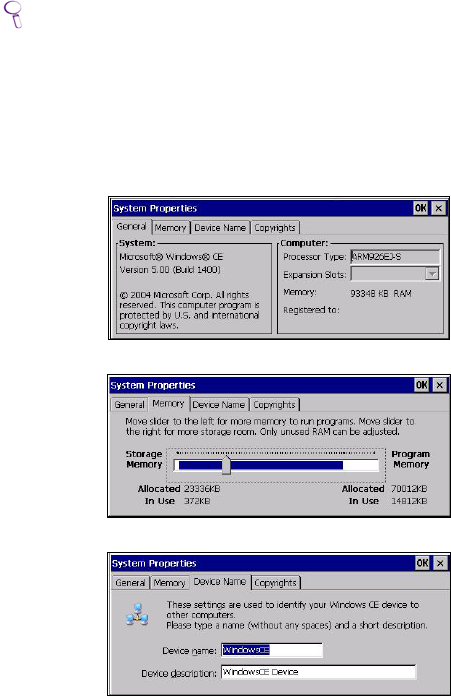
4.12 System
Double click “System” icon in “Control panel” and the following interface will appear.
Display the system properties of the system, e.g. process type, memory size, etc.
Memory size can be altered here. User can perform the operations following the
prompts on the tab.
27
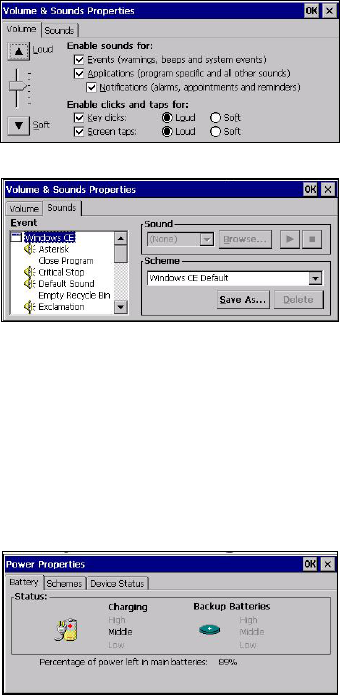
4.13 Volume & Sounds
Double click “Volume & sounds” icon in “Control panel” and the following interface
will appear.
Display and set the volume and sound scheme of the current user.
4.14 Power
Double click “Power” icon in “Control panel” and the following interface will appear.
“Percentage of power left in main batteries” is the display of percentage of power left in
main batteries.
28
NOTE: The planning of integral power of this Mini laptop is much the same as the “Power”
management in control panel of PC. Advanced level users can set upon their specific conditions and
general users can adopt the defaults.
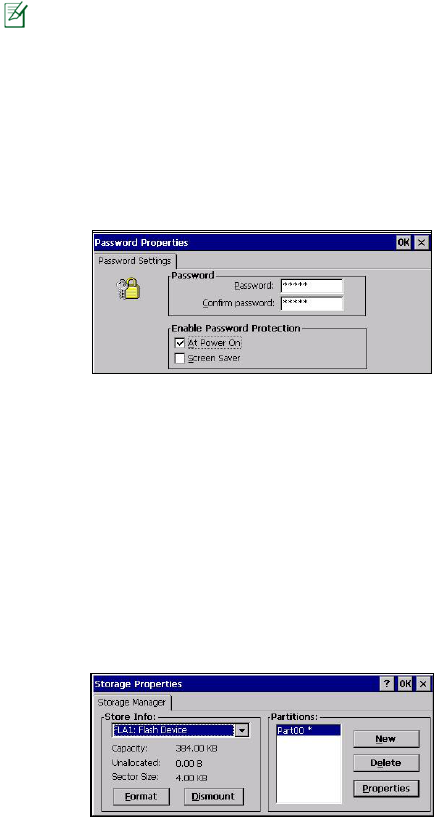
4.15 Password
Double click "Password" icon in "Control panel" and the following interface will
appear.
This is use to protect personal privacy and data security. Power on password protection
or screen saver password protection can be set. "Password" is for inputting password.
"Confirm password" is for confirming password (the passwords input into these two
boxes must be the same) "At power on "is password protection when it is power on
"Screen saver" is password protection for screen saver.
4.16 Storage Manager
Double click "Storage Manager" icon in "Control panel" and the following interface
will appear.
The main function is Format and delete storage device. in the “store info” list, you can
select a storage device and click the lower left “Format” button,at this time you have

29
the choice of equipment will be formatted, If the system prompted “unable to format
store” ,please click “Dismount” And then click “Format”.
If it is not necessary, do not choose to format storage devices
Disk format will be loss your data and disk drive
If at any time in the future you should need to dispose of this product please Note that:
Waste electrical products should not be disposed of with household waste. Please recycle
where facilities exist. Check with your Local Authority or retailer for recycling advice. (Waste
Electrical and Electronic Equipment Directive)
Changes or modifications not expressly approved by the party responsible for
compliance could void the user's authority to operate the equipment.
This equipment has been tested and found to comply with the limits for a Class
B digital device, pursuant to Part 15 of the FCC Rules. These limits are
designed to provide reasonable protection against harmful interference in a
residential installation. This equipment generates uses and can radiate radio
frequency energy and, if not installed and used in accordance with the
instructions, may cause harmful interference to radio communications.
However, there is no guarantee that interference will not occur in a particular
installation. If this equipment does cause harmful interference to radio or
television reception, which can be determined by turning the equipment off and
on, the user is encouraged to try to correct the interference by one or more of
the following measures:
-- Reorient or relocate the receiving antenna.
-- Increase the separation between the equipment and receiver.
-- Connect the equipment into an outlet on a circuit different from that to which
the receiver is connected.
-- Consult the dealer or an experienced radio/TV technician for help