Sunwin Technology SW618 GPO FLIGHT User Manual user manual
Shenzhen Sunwin Technology Co., Ltd. GPO FLIGHT user manual
user_manual
V3 | SEPT 2017
USER MANUAL
Flight_user_Manual EU - Sept 2017_v3.indd 1 07/09/2017 12:36

33
ENGLISH
Thanks for purchasing the Flight turntable player from GPO. This
retro-themed unit adds a touch of classic style to any room, while
still providing amazing audio quality through the built in speakers.
To get the most from your new turntable player, please read these
instructions carefully before use, and keep them in a safe place for
future reference.
Flight_user_Manual EU - Sept 2017_v3.indd 3 07/09/2017 12:36

4
Unpacking
This package contains:
1x Flight Turntable
1x Turntable Needle (tted)
1x Turntable Rubber Slip Mat (placed on the turntable)
1x DC Power Cable
1x RCA Cable
1x Manual
Carefully remove all of the contents from the packaging. Make sure you
retain and store this manual for future reference.
When choosing a location for the unit, avoid inclines, direct sunlight or
sources of heat and moisture.
Keep all of the ventilation holes clear, and do not place any equipment
on top of the unit as this can lead to damage.
Only remove the stylus guard from the stylus assembly during use.
Leaving the guard in place during storage will protect your stylus from
damage.
Flight_user_Manual EU - Sept 2017_v3.indd 4 07/09/2017 12:36
5
Features
1. 3-speed turntable (33, 45 or 78 RPM)
2. Belt drive and semi-automatic play tone arm
3. Ceramic stereo cartridge and jewel stylus
4. Built-in 45 RPM adapter
5. Aux-in, RCA Audio out and Headphone out functions
6. Built-in 2.1 speakers
7. Rechargeable lithium battery
8. Bluetooth functionality
9. USB playing, recording and segmentation recording
10. Cassette playing
11. Pitch adjustment
12. Treble and Bass adjustment
Flight_user_Manual EU - Sept 2017_v3.indd 5 07/09/2017 12:36
6
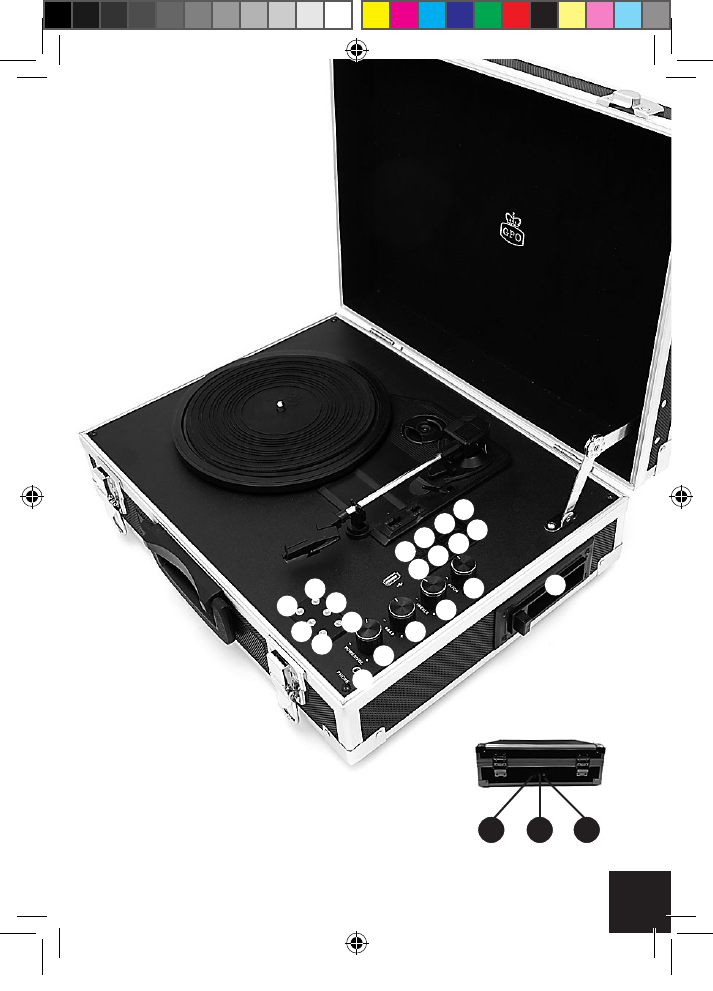
Location of Controls
1. Turntable Indicator Light
2. Aux-in Indicator Light
3. USB Indicator Light
4. Cassette Indicator Light
5. Stop Indicator Light
6. Bluetooth Indicator Light
7. Battery Power Indicator Light
8. Recording Indicator Light
9. Cassette Tape Slot
10. Pitch Adjustment
11. Treble Adjustment
12. Bass Adjustment
13. Power on/off and Volume
14. Headphone Jack
15. Play/Pause
16. Fast Forward and Next
17. Stop
18. Rewind and Previous
19. Record
20. Mode Select
21. DC Power Jack
22. RCA Audio Out Jack
23. Aux-in Jack
Flight_user_Manual EU - Sept 2017_v3.indd 6 07/09/2017 12:36
7
23 22 21
1
2
3
4
5
6
7
8
9
10
11
12
13
14
15
16
17
18
19
20
Flight_user_Manual EU - Sept 2017_v3.indd 7 07/09/2017 12:36
8
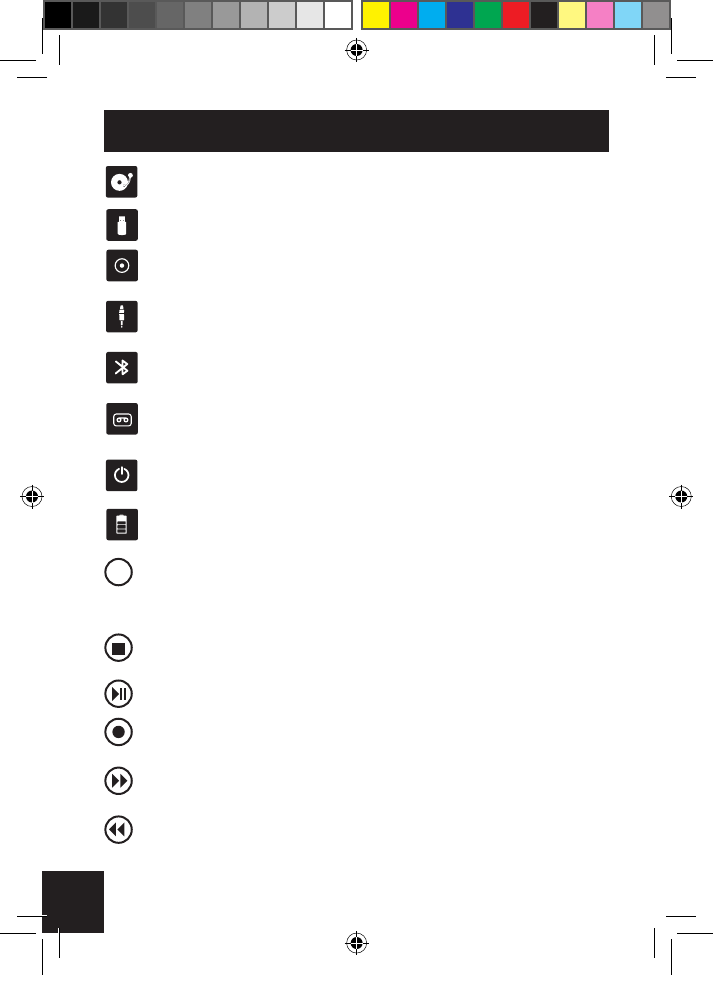
Mode Selection
Turntable Mode - play a vinyl record through the unit’s built-in
speakers
USB Mode - play MP3 les stored on an external USB drive
USB Record Mode - record your vinyl and cassette tape to MP3
les on an external USB drive
Aux-in Mode - play music from your music player, smartphone or
other device through the unit’s built in speakers
Bluetooth Mode - connect the unit to external Bluetooth-enabled
speakers
Cassette Mode - play a cassette tape through the unit’s built-in
speakers
Stop Indicator – stop music playing in USB Mode, and stop vinyl/
cassette tape recording in Record mode
Battery Level Indicator - display the current charge status of the
rechargeable battery
To select the Turntable, USB, Cassette, Aux-in or Bluetooth
mode, press the mode select button until the relevant indicator
light is illuminated.
Press to STOP music playing in USB mode. Press to STOP
vinyl/cassette tape recording in Record mode.
PLAY or PAUSE the music in USB mode.
Press to record your vinyl record and cassette tape, more
information in record section.
Play NEXT song in USB mode. Hold down for three seconds to
fast forward in USB mode.
Play PREVIOUS song in USB mode. Hold down for three
seconds to rewind in USB mode.
M
Flight_user_Manual EU - Sept 2017_v3.indd 8 07/09/2017 12:36

9
Unit Operation
Turntable Mode
1. Turn on the unit power
2. Select Turntable mode using the mode select button
3. Choose the correct speed setting, and place the vinyl record onto
the turntable
4. Place the tone arm into the correct position to begin playback
5. The turntable will stop automatically when the record has nished
Aux-in Play Mode
1. Turn on the unit power
2. Select Aux-in mode using the mode select button
3. Connect your chosen device to the unit’s aux-in jack using the c
able provided
4. Press the play/pause button to begin playback
USB Play Mode
1. Turn on the unit power
2. Select USB mode using the mode select button
3. Connect your USB device to the unit using the USB slot
4. Press the play/pause button to begin playback
Bluetooth Mode
1. Turn on the unit power
2. Select Bluetooth mode by holding the mode button down for three
seconds while in turntable, USB, Cassette or Aux-in mode
3. The Bluetooth indicator light will ash rapidly as the unit searches
for nearby Bluetooth-enabled devices.
4. When paired the blue light will ash shortly with a three second
interval.
Flight_user_Manual EU - Sept 2017_v3.indd 9 07/09/2017 12:36
10
5. If the devices fail to sync, please repeat points 1-4.
6. Hold down the stop button for three seconds to turn off Bluetooth
mode and move straight to turntable mode
Cassette Play Mode
1. Turn on the unit power
2. Select Cassette play mode using the mode select button
3. Insert your cassette tape in the cassette tape slot
4. The cassette will stop automatically when the tape has nished
Vinyl Record Mode
1. Insert a blank USB stick into the slot
2. Place the desired vinyl onto the turntable or cassette tape in the
cassette tape slot.
3. Press the record button on the control panel, the red light next to
record will begin to ash. Press the record button once to record the
vinyl in one track, press the record button twice to split the tracks.
4. Press the stop button to turn off recording.
Charging the Battery
The battery level indicator displays the current charge status of the
unit’s rechargeable battery.
Red: The unit needs to be charged
Green: The unit is charging
Blue: The unit has fully charged
RCA Audio Out
An RCA cable is included to connect your unit to external speakers.
Flight_user_Manual EU - Sept 2017_v3.indd 10 07/09/2017 12:36
11
Headphone Out
Headphones can be connected using the Headphone jack.
Pitch Adjustment
When the Pitch knob is centered on the middle line, the record player
plays at normal speed. When the LP speed is slower than expected,
you can turn right to adjust the speed. When the LP speed is faster
than expected, you can turn left to adjust the speed.
Treble/Bass Adjustment
You can rotate the Treble and Bass knob to adjust the treble or bass at
your desired level.
Flight_user_Manual EU - Sept 2017_v3.indd 11 07/09/2017 12:36
12
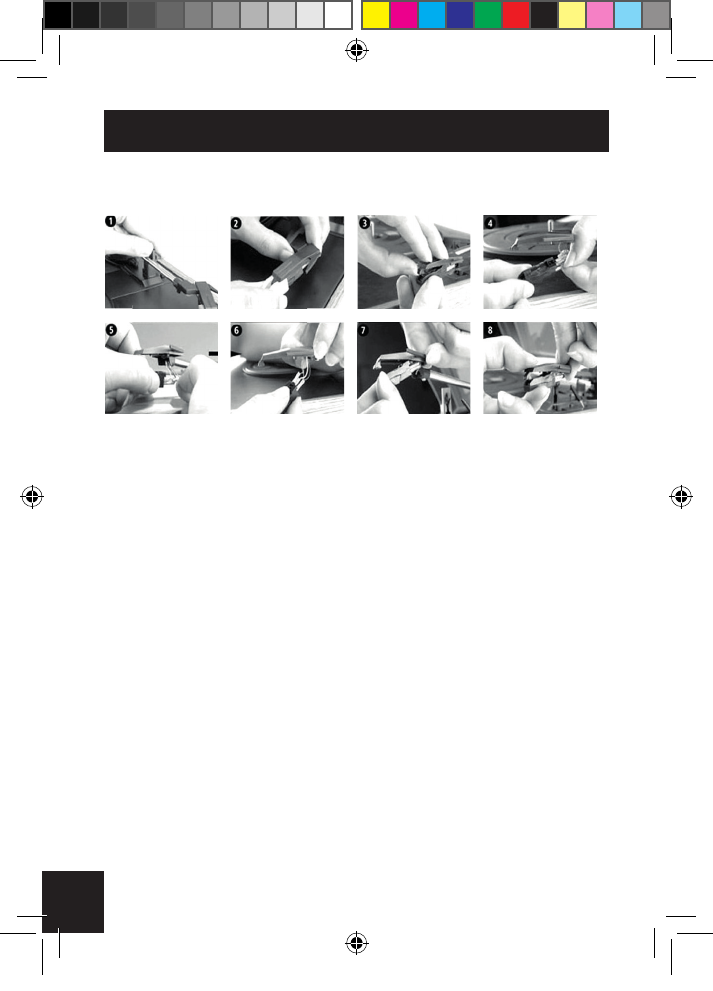
Replacing the Stylus
The unit’s stylus will need replacing regularly. To replace the stylus:
1. Push the arm lock to release the tone arm
2. Remove the cap from the cartridge to expose the needle
3. Carefully remove the cartridge from the socket
4. Completely remove the stylus needle from the cartridge
5. Carefully place a new stylus needle into the cartridge
6. Place the cartridge back into the socket
7. Put the cartridge cap back in place
8. Re-engage the arm lock
The turntable’s stylus needs to be replaced every 3-4 months for best
performance. To buy a replacement stylus, go to www.gporetro.com or
visit one of our stockists.
RCA Audio Out
Flight_user_Manual EU - Sept 2017_v3.indd 12 07/09/2017 12:36

13
Product Care
• Keep the unit clean, dry, and away from any potential sources of
splashing or dripping.
• Avoid areas with high levels of humidity – such as kitchens and
bathrooms, and those with extreme temperatures of 35°C or higher.
• Do not let any loose items fall into the unit.
• Always unplug the unit before cleaning.
• Take care when cleaning and wiping the unit’s plastic parts and
nish, and use only a dry dust cloth. The front panel can be cleaned
gently with a damp cloth and mild soap.
• Store the unit horizontally.
• Avoid condensation. If the unit is moved from a cold to a warmer
location, please wait 30 minutes before operation.
• Disconnect the power supply after use.
Product Support
For more advice or assistance, please visit www.gporetro.com.
Please note, for your personal safety you SHOULD NOT attempt to
open the unit’s casing. Opening the casing voids your warranty, and no
user serviceable parts are contained inside
Flight_user_Manual EU - Sept 2017_v3.indd 13 07/09/2017 12:36
FCCWarningStatement
Changesormodificationsnotexpresslyapprovedbythepartyresponsiblefor
compliancecouldvoidtheuser’sauthoritytooperatetheequipment.This
equipmenthasbeentestedandfoundtocomplywiththelimitsforaClassB
digitaldevice,pursuanttoPart15oftheFCCRules.Theselimitsaredesigned
toprovidereasonableprotectionagainstharmfulinterferenceinaresidential
installation.Thisequipmentgeneratesusesandcanradiateradiofrequency
energyand,ifnotinstalledandusedinaccordancewiththeinstructions,may
causeharmfulinterferencetoradiocommunications.However,thereisno
guaranteethatinterferencewillnotoccurinaparticularinstallation.Ifthis
equipmentdoescauseharmfulinterferencetoradioortelevisionreception,
whichcanbedeterminedbyturningtheequipmentoffandon,theuseris
encouragedtotrytocorrecttheinterferencebyoneormoreofthefollowing
measures:
‐‐ Reorientorrelocatethereceivingantenna.
‐‐ Increasetheseparationbetweentheequipmentandreceiver.
‐‐ Connecttheequipmentintoanoutletonacircuitdifferentfromthatto
whichthereceiverisconnected.
‐‐ Consultthedealeroranexperiencedradio/TVtechnicianforhelp.
This device complies with part 15 of the FCC Rules. Operation is
subject to the following two conditions:
(1) This device may not cause harmful interference, and
(2) this device must accept any interference received, including
interference that may cause undesired operation.