Superscan 19TVD3S User Manual HITACHI TV/DVD Manuals And Guides L0802711
SUPERSCAN TV/VCR or DVD Combo Manual L0802711 SUPERSCAN TV/VCR or DVD Combo Owner's Manual, SUPERSCAN TV/VCR or DVD Combo installation guides
User Manual: Superscan 19TVD3S 19TVD3S HITACHI TV/DVD - Manuals and Guides View the owners manual for your HITACHI TV/DVD #19TVD3S. Home:Electronics Parts:Hitachi Parts:Hitachi TV/DVD Manual
Open the PDF directly: View PDF ![]() .
.
Page Count: 51
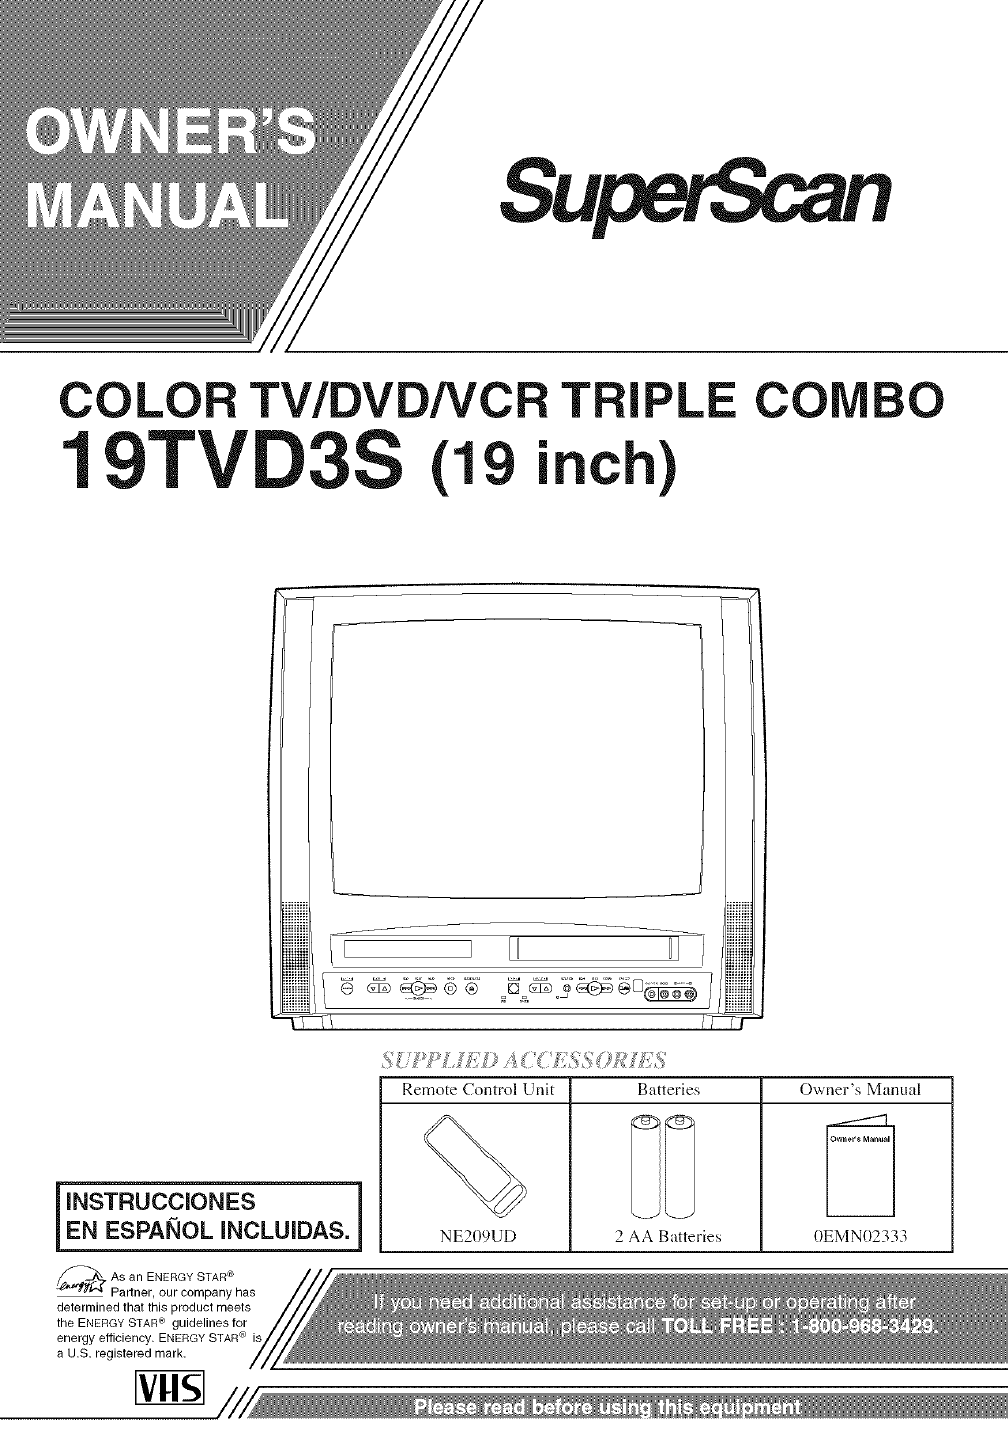
COLOR TV/DVDNC
19TV 3S(19 TRIPLE COM
inch)
O
I[ [I II
T/ /-_
INSTRUCCIONES J
EN ESPANOL INCLUIDAS.
As an ENERGY STAR ®
Partner, our company has
determined that this product meets
the ENERGY STAR ® guidelines for
energy efficiency. ENERGY STAR ® is
a U.S. registered mark.
,'_is' JJ Z 4 I;,_;_ MU::
Remote Control Unit
%
NE209UD
Batteries
2 AA Batteries
Owner's Manual
Owner'*Manual
0EMN02333
WARNING: TO REDUCE THE RISK OF FIRE OR ELECTRIC SHOCK, DO NOT EXPOSE THIS APPLIANCE
TO RAIN OR MOISTURE.
CAUTION: TO REDUCE THE RISK OF ELECTRIC
SHOCK, DO NOT REMOVE COVER (OR BACK).
NO USER SERVICEABLE PARTS INSIDE. REFER
SERVICING TO QUALIFIED SERVICE PERSON-
NEL.
The caution maddng is located on the rear of tile cabinet.
THIS SYMBOL INDICATES THAT DAN-
GEROUS VOLTAGE CONSTITUTING A
RISK OF ELECTRIC SHOCK IS PRESENT
WITHIN THIS UNIT.
THIS SYMBOL INDICATES THAT THERE
ARE IMPORTANT OPERATING AND
MAINTENANCE INSTRUCTIONS IN THE
LITERATURE ACCOMPANYING THE
APPLIANCE.
IMPORTANT SAFEGUARDS
l.Read instructions-All the safety and operating instructions
should be read belore the appliance is operated.
2.Retain lnstrtmetions-Thesalety and operating instructions
shoukl be retained fox"lhture reference.
3.Heed Warnings-All warnings on the appliance and in the
operating instructions should be adhered to.
4.FoBow Instructions-All operating and use irrstructions
should be l_ollowed.
5.Cleaning-Unplug TV/DVD/VCR ll"omthe wall outlet before
cleaning. Do not use liquid cleaners or aerosol cleaners. Use
a damp cloth tot cleaning.
EXCEPTION: A product that is meant for uninterrupted
service and, that for some specilic reason, such as the possi-
bility of the loss of an authorization code lior a CATV con-
verter, is not intended to be unplugged by the user for clean-
ing or any other pm_)ose, may exclude the relereuce to
unplugging the appliance in the cleaning description other-
wise required in iteln 5.
6.Attachments-Do not use attachlnents not recommended by
tire TV/DVD/VCR lnanulacturer as they lnay cause hazards.
7°Water and Moistm'e-Do not use this TV/DVD/VCR near
watel'qL_rexalnple, near a bath tub, wash bowl, kitchen sink,
or laundry tub, in a wet basement, or near a swimming pool,
and the like.
8°Aecessories-Do not place this TV/DVD/VCR on an unstable
cart, stand, tripod, brackeL or table. The TV/DVD/VCR may
fidl, causing serious injury to someone, and serious damage
to tire appliance. Use only with a cart, stand, tripod, bracket,
or table recommended by the manufacturer, or sold with the
TV/DVD/VCR. Any mounting of
the appliance should follow the PORTABLE_CARTWARNING
Hlanulacturer's instructions and _'_b.
shoL!ld use a 1YIOL!Utilrg accessory
recommended by the Hrarlu_acturer.
An appliance and cart combination
shoLddbe moved with care.Quick
stops, excessive force, and uneven
surfaces may cause the appliance
and cart combination to overturn.
AMEtJBLES- Cet appareil ne dolt SYMBOLE D'AVEFilISSEMENT POUR
6tre placd que sur Ulrmeuble (avec LESCOIvlPOSANTES
APPAREIL ET MEUBLE A ROULETTES
ou sans roulettes) recolnlnand_ par
le fabricaut. Si vous l'installez sur
LlUmetlble hroulettes, d@lacez les
deux ensembles avec prdcaution.
Uu arr6t brusque, l'utilisation
d'une lorce excessive et des sur-
faces irrdguli_res risquent de d&ta-
biliser l'ensemble et de le renverser.
9. Ventilation-Slots and openings in the cabinet and the back
or bottom are provided li_}rventilation and to ensure reliable
operation ol the TV/DVD/VCR and to protect it fl'om over-
heating, and these openings must not be blocked or cov-
ered. The openings should never be blocked by placing the
TV/DVD/VCR on a bed, sofa, rug, or other similar surlace.
This TV/DVD/VCR should never be placed near or over a
radiator or heat register. This TV/DVD/VCR should not be
placed in a builtqn installation such as a bookcase or rack
unless proper ventilation is provided or the manulacturer's
instructions have been adhered to.
10.Power Som'ces-This TV/DVD/VCR should be operated
only fl'om the type of power source indicated on the mark-
ing label. If you are not sure of the type of power supply to
your home, consult your appliance dealer or local power
company. For TV/DVD/VCRs intended to operate ll"om
battery power, or other sources, refer to the operating
instructions.
ll.Grotmding or Polarization-This TV/DVD/VCR is
equipped with a polarized alternating-current line plug(a
plug having one blade wider than the other). This plug will
fit into the power outlet only one way. This is a safety fea-
ture. If you are unable to insert the plug hilly into the out-
let, try reversing the plug. If the plug should still fail to lit,
contact your electrician to replace your obsolete outlet. Do
not deleat the salety purpose of the polarized plug.
12.Power-Cord Protection-Power-supply cords should be
routed so that they are not likely to be walked on or
pinched by items placed upon or against them, paying par-
ticular attention to cords at plugs, convenience receptacles,
and the point where they exit lrom the appliance.
- 2 - EN
IBI5
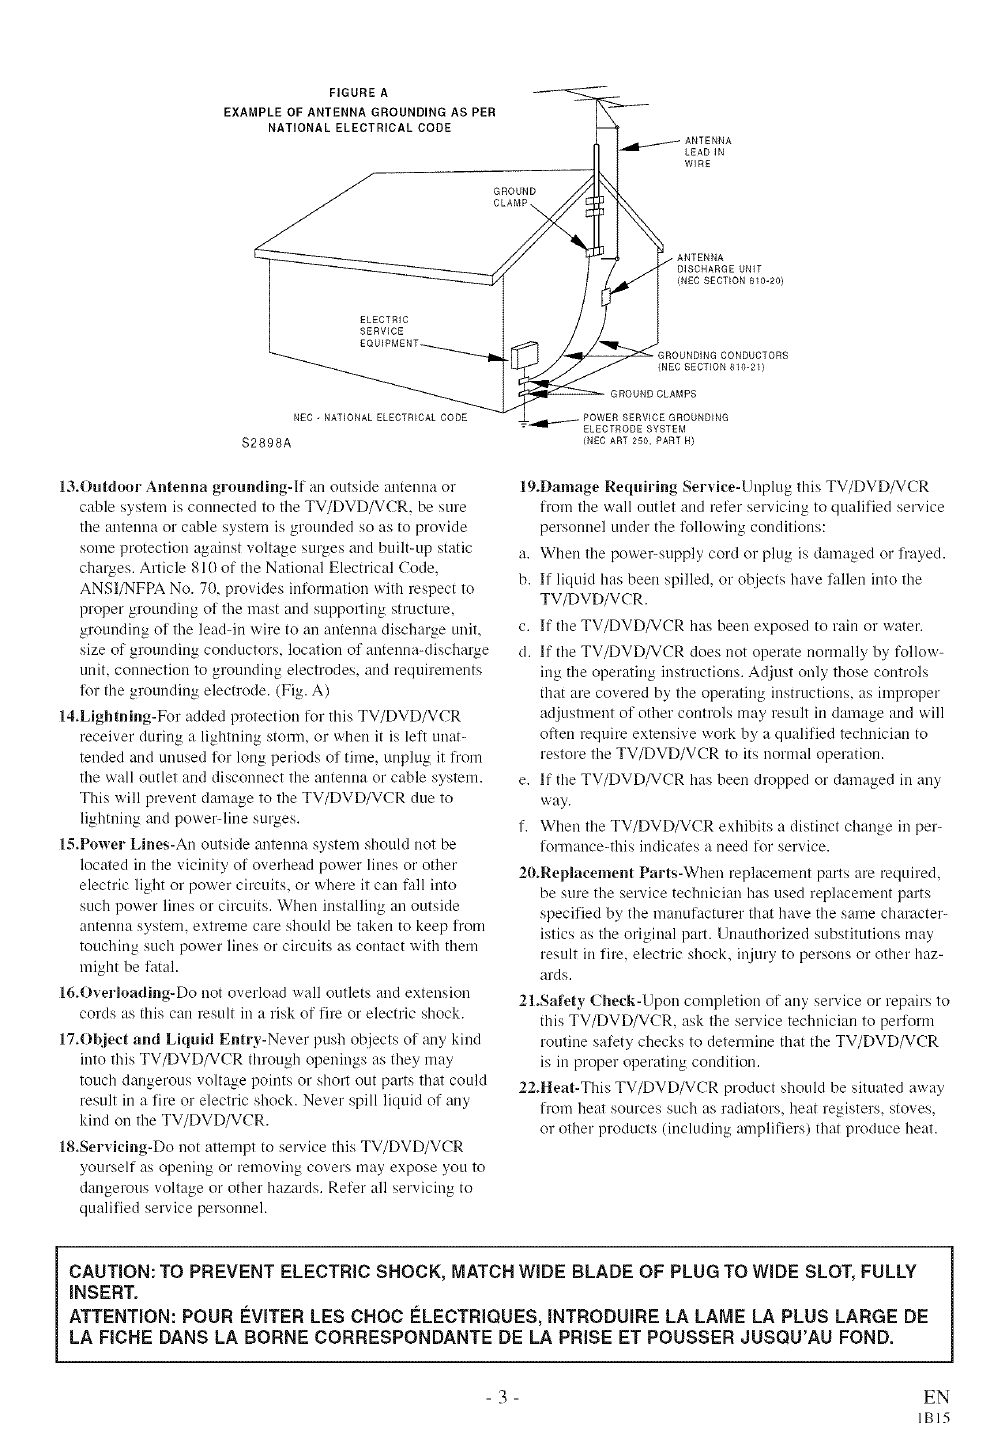
FIGURE A
EXAMPLE OF ANTENNA GROUNDING AS PER
NATIONAL ELECTRICAL CODE
GROUND
CLAMP\
LEADIN
WIRE
ELECTRIC
SERVICE
NEC -NATIONAL ELECTRICAL CODE
$2898A
13.Outdoor Antenna grounding-If an outside antenna or
cable system is connected to the TV/DVD/VCR, be sure
the antenua or cable system is grounded so as to provide
some protection against voltage stuges and built-up static
chaxges. Article 810 of the National Electrical Code,
ANSI/NFPA No. 70, provides int_)rmation with respect to
proper grounding of the mast and supporting structure,
grounding of the lea&in wire to an antenna discharge unit,
size of grounding conductors_ location of antenna-discharge
unit, connection to groundillg electrodes, and requirelnents
Dr the grounding electrode. (Fig. A)
14.Lightning-For added protection for this TV/DVD/VCR
receiver during a lightning storm, or when it is lell unat-
tended and unused lk}rlong periods ol time, unplug it fl'oln
the wall outlet and disconnect the antenna or cab]e systeln.
This will prevent damage to the TV/DVD/VCR due to
lightning and powel'-lille SUlges.
18.Power Lines-An outside antenna system should not be
located in the vicinity of overhead power lines or other
electric light or power circuits, or where it can fall into
such power lines or circuits. When installing an outside
antenna system, extreme care should be taken to keep irom
touching such power lines or circuits as contact with them
might be fatal.
16.Overloading-Do not overload wall outlets and extension
cords as this can result in a risl<_of fire or electric shocl<
17.Object and Liquid Entry-Never push ob,jects of any l<_ind
into this TV/DVD/VCR through openings as they may
touch dangerous voltage points or short out parts that could
result in a tire or electric shock. Never spill liquid of any
ldnd on the TV/DVD/VCR.
IS.Servicing-Do not attempt to service this TV/DVD/VCR
yourself as opening or removing covers may expose you to
dangerous voltage or other hazards. Re/er all servicing to
qualiiied service personnel.
. ANTENNA
DISCHARGE UNIT
INEC SECTION 810-20)
GROUNDING CONDUCTORS
(NEC SECTION 810-21)
GROUNDCLAMPS
POWER SERVICE GROUNDING
_-._I-_ ELECTRODE SYSTEM
(NEC ART 250, PART H)
19.Damage Requiring Service-Unplug this TV/DVD/VCR
from the wall outlet and reler servicing to qualilied service
personnel under the Rfllowing conditions:
a. When the powe>supply cord or plug is damaged or lrayed.
b. If liquid has been spilled, or oh,jectshave fallen into the
TV/DVD/VCR.
c. If the TV/DVD/VCR has been exposed to rain or water.
d. If the TV/DVD/VCR does not operate normally by follow-
lug the operating instructions. Ad,just only those controls
that are covered by the operating instructions, as improper
ad,justment of other controls may result in damage and will
often require extensive work by a qualilied technician to
restore the TV/DVD/VCR to its normal operation.
e. If the TV/DVD/VCR has been dropped or damaged in any
way.
f. When the TV/DVD/VCR exhibits a distinct change in per-
formance-this indicates a need for service.
20.Replacement Parts-When replacelnent parts are required,
be sure the service technician has used replacement parts
specified by the manufacturer that have the same character-
istics as the original part. Unauthorized substitutions lnay
result in lire, electric shock, in,juryto persons or other haz-
ards.
21.Safety Check-Upon completion of any service or repairs to
this TV/DVD/VCR, ask the service technician to pel'l_orln
routine salety checl<_sto determine that the TV/DVD/VCR
is in proper opel'adng condition.
22.Heat-This TV/DVD/VCR product should be situated away
from heat sources such as radiators, heat registers, stoves,
or other products (including amplifiers) that produce heat.
CAUTION: TO PREVENT ELECTRIC SHOCK, MATCH WIDE BLADE OF PLUG TO WIDE SLOT, FULLY
iNSERT.
ATTENTION: POUR €:VITER LES CHOC EILECTRIQUES, iNTRODUIRE LA LAME LA PLUS LARGE DE
LA FICHE DANS LA BORNE CORRESPONDANTE DE LA PRISE ET POUSSER JUSQU'AU FOND.
- 3 - EN
IBI5
IMPORTANT COPYRIGHT INFORMATION
Unauthorized copying, broadcasting, public perfor-
mance and lending of discs am prohibited.
This product incol])orates copyright protection tech-
nology that is protected by method claims of certain
U.S. patents and other intellectual propelly rights
owned by Macrovision Corporation gradother rights
owners. Use of this copyright protection technology
must be authorized by Macrovision Coll_oration,
gradis intended for home mid other limited viewing
uses only unless otherwise authorized by
Macrovision Cot]_oration. Reverse engineering or
disassembly is prohibited.
FCC WARNING- This equipment may gener-
ate or use radio frequency energy-. Changes or
modifications to this equipment may cause
harmful interference unless the modifications
are expressly approved in the instruction man-
ual. The user could lose the authority to oper-
ate this equipment if an unauthorized change
or modification is made.
LASER SAFETY
This unit employs a laser: Only a qualified service
person should remove the cover or attempt to ser-
vice this device, due to possible eye injuU.
CAUTION: USE OF CONTROLS OR ADJUST-
MENTS OR PERFORMANCE OF PROCE-
DURES OTHER THAN THOSE SPECIFIED
HEREIN MAY RESULT IN HAZARDOUS
RADIATION EXPOSURE.
CAUTION: VISIBLE AND INVISIBLE LASER
RADIATK)N WHEN ()PEN AND INTERLOCK
DEFEATED. DO NOT STARE INTO BEAM.
LOCATION: INSIDE, NEAR THE DECK
MECHANISM.
This Class B digital apparatus complies with
Canadian ICES-003.
Cet appareil num_rique de la classe Best con-
lbrme 'a la norme NMB-003 du Canada.
CAUTION: TO PREVENT ELECTRIC SHOCK,
MATCH WIDE BLADE OF PLUG TO WIDE
SLOT, FULLY INSERT.
ATTENTION: POUR I_VITER LES CHOC
I_LECTRIQUES, INTRODUIRE LA LAME LA
PLUS LARGE DE LA FICHE DANS LA
BORNE CORRESPONDANTE DE LA PRISE
ET POUSSER JUSQU'AU FOND.
RADIO-TV INTERFERENCE
This equipment has been tested and found to com-
ply with the limits for a Class B digital device, pur-
suant to Pat1 15 of the FCC Rules. These limits are
designed to provide reasonable protection against
harmful interference in a residential installation.
This equipment generates, uses, and ctm radiate
radio frequency energy and, if not installed and
used in accor&mce with the instructions, may cause
harmful interference to radio communications.
However, there is no guar_mtee that interference
will not occur in a pat_ticular installation. If this
equipment does cause harmful interference to
radio or television reception, which can be deter-
mined by turning the equipment off and on, the
user is encouraged to try to correct the interfer-
ence by one or more of the following measures:
1) Reorient or relocate the receiving antenna.
2) Increase the separation between the equipment
and receiver.
3) Connect the equipment into an outlet on a cir-
cuit different from tlmt to which the receiver is
connected.
4) Consult the dealer or an experienced radio/TV
technician for help.
- 4 - EN
IBI5
For safe operation and safisfacto Uperformance of
your TV/DVD/VCR, keep the following in mind
when selecting a place for its installation:
* Shield it from direct sunlight and keep it away from
soumes of intense heat.
®Avoid dusty or humid places.
,, Avoid places with insufficient ventilation for proper
heat dissipation. Do not block the ventilation holes at
the top gradbottom of the unit. Do not place the unit
on a call)et because this will block the ventilation
holes.
,, Install unit in a horizontal position.
*Avoid locations subject to strong vibration.
,, Do not place tlle TV/DVD/VCR nero strong magnetic
fields.
*Avoid moving TV/[)VD/VCR to locaions where
temperature differences are extreme.
,, Do not hgmdle the power cord with wet hands.
*Do not pull on the power cord when disconnecting
it from an AC wall outlet. Grasp it by the plug.
,, If, by accident, water is spilled on your unit, unplug
the power cord immediately and take the unit to an
Authorized Sel-vice Center for servicing.
®Do not put your fingers or objects into the
TV/DVD/VCR disc loading tray.
*Do not place anything directly on top of the unit.
Moisture condensation may occur inside the unit
when it is moved from a cold place to a warm place,
or after heating a cold room or under conditions of
high humidity. If a DVD is played in a TV/DVD/
VCR which has moisture, it may damage the DVD
and TV/[)VD/VCR. Therefore when condensation
occurs inside the unit, turn the POWER on _mdallow
at least 2 hours for the unit to dry out.
The following symbols below appear in some head-
ings and notes in this manual, with the following
meanings
ITv/w:R]
: Description refers to TV/VCR operation (in the
TV/VCR mode).
: Description refers to playback of DVD video discs
(in the DVD mode).
: Description refers to playback of audio CDs
(in the DVD mode).
: Description refers to playback of MP3 discs
(in the DVD mode).
: Description refers to the items to be set by the
QUICK mode (in the DVD mode).
A NOTE ABOUT RECYCLING
This product's packaging materials are recyclable and can be reused. Please dispose of any materials in
accordance with your local recycling regulations.
Batteries should never be thrown away or incinerated but disposed of in accordance with your local regula-
tions concerning chemical wastes.
The serial number of this product may be found on the back of the unit. No other TV/DVD/VCR has the same
serial number as yours. You should record the number and other vital information here and retain this book as
a permanent record of your purchase to aid identification in case of theft. Serial numbers are not kept on file.
Date of Purchase
Dealer Purchase from
Dealer Address
Dealer Phone No.
Model No.
Serial No.
- 5 - EN
IC29
[]IMPORTANT SAFEGUARDS ...2, 3
[] PRECAUTIONS ................ 4
LOCATION ................... 5
AVOID THE HAZARDS OF
ELECTRICAL SHOCK AND FIRE .5
WARNING .................... 5
SYMBOLS USED 1N THIS
MANUAL ..................... 5
[] TABLE OF CONTENTS .......... 6
[] FEATURES .................. 7, 8
[] OPERATING CONTROLS AND
FUNCTIONS. ............... 9, 10
[] PREPARATION FOR USE ....... H
ANTENNA/CABLE
CONNECTION ................ 11
CONNECTING TO EXTERNAL
INPUT JACKS ................ 12
INSTALLING THE BATTERIES .. 12
EXTERNAL INPUT MODE ...... 12
CONNECTING TO A STEREO
AMPLIFIER EQUIPPED WITH A
COAXIAL DIGITAL INPUT JACK
(DVD Sound only) ............. 13
CONNECTING TO A DOLBY
DIGITAL RECEIVER
(DVD Sound only) ............. 13
TV/VCR SECTION
[] SET UP FOR USE ............. 14
CHANNEL SET UP
FOR THE FIRST T1ME ......... 14
DELETING (OR ADDING)
CHANNEL ................... 14
CHANNEL SET UP AGAIN ...... 15
SELECTING THE LANGUAGE . .15
DAYLIGHT-SAVING TIME ...... 15
CLOCK SET UP
(AUTO /MANUAL) ......... 16. 17
[] TV OPERATION ............... 18
WATCHING A TV PROGRAM ... 18
DEGAUSSING ................ 18
PICTURE CONTROL ........... 18
CLOSED CAPTION SYSTEM .... 19
V-CHIP SET UP ............ 20. 21
[] MTS(Multi-Channel Teh, vision
sound)SYSTEM ................ 22
CHECKING THE SELECTED
MTS MODE .................. 22
MTS RECORDING/MONITOR
MODE ...................... 22
SELECTING THE MTS SYSTEM .23
[] VIDEO CASSETTE ............. 24
[]PLAYBACK ................... 2,5
NORMAL PLAYBACK ......... 25
TRACKING ADJUSTMENT ..... 25
SLOW MOTION .............. 25
PICTURE SEARCH ............ 25
STILL PICTURE .............. 25
VERTICAL HOLD CONTROL ...25
[] SPECIAL PLAYBACK .......... 26
RENTAL PLAYBACK .......... 26
AUTO REPEAT PLAYBACK ..... 26
[] SEARCH ..................... 27
ZERO RETURN ............... 27
TIME SEARCH ............... 27
INDEX SEARCH .............. 28
[] SPECIAL FEATURES .......... 28
REAL TIME TAPE COUNTER ...28
AUTO REWIND-EJECT ........ 28
[] RECORDING ................. 29
NORMAL RECORDING ........ 29
SKIPPING UNWANTED SCENES
DURING
RECORDING ................. 29
OTR (One Touch Recording) ...... 30
COPYING A VIDEO CASSETTE
(Requires a VCR or camcorder) ...30
[] TIMER ...................... 31
AUTOMATIC
TIMER RECORDING .......... 31
TIMER PROGRAM EXTENSION .32
HINTS FOR AUTOMATIC TIMER
RECORDING ................. 33
AUTO RETURN ............... 33
SLEEPT1MER ................ 33
[] (IN SCREEN DISPLAY ......... 34
[] CABLE CHANNEL
DESIGNATIONS .............. 34
DVD SECTION
[] ABOUT THE DISCS ............ 35
PLAYABLE DISCS ............ 35
DISC TYPES ................. 35
[] PLAYING A DISC .............. 36
BASIC PLAYBACK ............ 36
GENERAL FEATURES ......... 36
DISC MENU ................. 36
TITLE MENU ................. 36
RESUME .................... 37
PAUSE ...................... 37
STEP BY STEP PLAYBACK ..... 37
FAST FORWARD/REVERSE
SEARCH .................... 37
SLOW FORWARD /SLOW
REVERSE .................... 37
ZOOM ...................... 37
[] SEARCH FUNCTION. .......... 38
TRACK SEARCH ............. 38
TITLE /CHAPTER SEARCH .... 38
TIME SEARCH ............... 38
MARKER SETUP SCREEN ...... 38
[] SPECIAL PLAYBACK FUNCTION ...39
REPEAT ..................... 39
PROGRAM ................... 39
RANDOM PLAYBACK ......... 39
[] PLAYING A MP3 DISC .......... 40
MP3 PLAYBACK .............. 40
TRACK SELECTION ........... 40
PROGRAM ................... 40
RANDOM PLAYBACK ......... 40
[] CHANGING THE SETI[INGS .... 41
SUBTITLE LANGUAGE ........ 41
AUDIO LANGUAGE ........... 41
STEREO SOUND MODE ........ 41
CAMERA ANGLE ............. 41
BLACK LEVEL SETTING ....... 41
VIRTUAL SURROUND ......... 41
[] THE ON.SCREEN INFORMATION ...42
[] CHANGING THE DVD SETUP
ITEMS ....................... 43
LANGUAGE SETTING ......... 43
DISPLAY SETTING ............ 44
ALID10 SETTINGS ............ 44
PARENTAL CONTROL ......... 45
[] TROUBLESHOOT1NG GUIDE .46, 47, 48
[] MAINTENANCE ............... 49
DISC HANDLING ............. 49
[] SPEC1FICAIYONS . ............ 50
[] WARRANTY ........... Back Cover
- 6 - EN
IC29
[VCR Mode ]
,, Hi-Fisystem-The Hi-Fi stereo recording system
offers you excellent sound quality with a dynamic
range of 80dB, frequency response from 20Hz to
20kHz, and 0,005% wow and flutter,
=Rotary 4-head Record/Playback System-Four heads
ensure excellent picture quality and special effects playback.
®Index Search-Fast-iq)rwards to start of next recording.
,, Slow Motion-View recorded program at slower
than normal speed.
®infrared remote control
• Trimingual on screen tv/vcr setup display eelec-
table in English or Spanish or French
•Real time counter-This shows the elapsed recording
or playback time in hours, minutes, and seconds. The
"-" indication will appear when the tape is rewound
further than the tape counter position "0:00:00".
= 181 channel capability PLL frequency synthesiz-
er tuner with direct station entry-(A converter
may be necessary to view- scrambled cable chan-
nels.)
®Auto Clock Setting-Allows you to set the clock
function from a PBS broadcast station.
,, Closed caption system-You may view specially
labeled (cc) TV programs, movies, news, prere-
corded tapes, etc. with either a dialogue caption or
text display added to the program.
•Auto power on and off system-Automatically
turns on the TV/DVD/VCR when you insert the
cassette, turns off after auto-rewind, and ejects
when the beginning of the tape is reached.
•Auto rewind when the end of a tape is
reached-This function is not active when using
timer recording.
•2 Step picture search operation-You can view a
video program at a high speed or super high speed
in either a forwaN or reverse direction in LP and
SLP mode. For SP mode only high speed.
• Three different playback tape speeds : SP/LP/SLP
• Two different recording tape speeds : SP/SLP
,, Auto Head Cleaner-Autommically clem'_s video
heads as you insert or remove a cassette.
,, Zero Return-The tape returns to counter of
0:00:00 by rewinding or fast forwarding.
,, Still-"Freeze" the picture at mly time, for close
viewing of a particular scene.
= Digital Auto Tracking (DTR)-Automatically
adjusts the tracking for each tape you play.
,, Rental play mode-Improves playback picture
quality from worn tapes, such as rental tapes.
,, Auto repeat-Allows you to repeat the playing of a
tape indefinitely without pressing the PLAY button.
,, Time search-Let you set the TV/DVD/VCR to
adwmce the tape by entering the desired playback
time you want to skip.
®OTR (One Touch Recording)-Instmlt timed
recording from 30 to 480 mflmtes is possible at the
push of the REC/OTR button.
® 1 Year, 8events (including Daily and Weekly
Timer Recording)-The built-in timer allows you to
record up to 8 programs at different times on dif-
ferent chtumels up to 1 year in advmlce. The Daily
timer allows recordings to be made of daily broad-
casts, and the Weekly timer allows recording to be
made once a week up to the end of the tape.
®Auto return-After timer recording is finished, the
TV/DVD/VCR can return to the beginning of the
recording.
,, Sleep timer-Allows you to have the TV/DVD/VCR
automatically turn on or off at a desired time.
Timer Program Extension-Allow you to shift the
time schedule for automatic timer recording.
•, V-CHIP-Enables parents to prevent their children
from watching inappropriate material on TV.
A NOTE ABOUT RECYCLING
This product's packaging materials are recyclable and can be reused. Please dispose of any materials in
accordm_ce with your local recycling regulations.
Batteries should never be thrown away or incinerated but disposed of in accor&mce with your local regula-
tions concerning chemical wastes.
- 7 - EN
IC29
[DVD Mode ]
• Dolby Digital sound
This player c_m output a Dolby Digital Signal via
the coaxial digital audio jack.
•Still/fast/slow/step playback
Various playback modes are awfilable including still
pictures, fast forward/reverse, slow motion trod step
frames.
•Random playback for audio CD and MP3
This player can shuffle the order of tracks to play
them in r_mdom ordel:
•Program playback for audio CD and MP3
You cm'l program the order of tracks to play them in
troy desired order.
• DVD menus in adesired language
You can display DVD menus in a desired language,
if available on a DVD.
•Screen saver/Auto power-off functions
The screen saver program starts when there is no
input from the player for five mhmtes in the stop
mode. When the screen saver program is actiwlted
for 15 minutes, the power automatically turns off.
•Subtitles in adesired language
You can select a desired l_mguage for the display
subtitles, if that kmguage is available on a disc.
•Selecting acamera angle
You can select the desired camera angle, if a disc
contains sequences recorded from different m_gles.
• Choices for audio language and sound mode
You can select the desired audio language mid sound
mode, if different languages _md modes are available
on a disc.
•Parental lock
You can set the control level to limit playback of
discs which may not be suitable for children.
•Automatic detection of discs
This player automatically detects if the loaded disc is
DVD, audio CD or MP3 on disc.
•Playback MP3 disc
= On-screen display
Information about the current operation cgm be dis-
played on a TV screen, allowing you to confirm the
currently active functions (such as program play-
back), on the TV screen using the remote control.
•Search
Chapter search /Title search /Track search /Time
search
• Repeat
Chapter /Title /Track /Group /All /A-B
•Zoom
Magnified screen can be displayed.
•Marker
Marker allows the user to return to a specific scene
on a disc.
• Resume Play
User c_m resume playback from the pan at wlfich the
play was stopped.
• Virtual Surround Sound
• Bit rate indication
• DRC (Dynamic range control)
You can limit the dynamic range of the audio.
NOTE:
,, We do not recommend the use of universal remote controls, Not all of the funcfions may be controlled with
a universal remote control.
If you decide to use a universal remote control with this TV/VCR/DVD, please be aware that the code num-
ber given may not operate this TV/VCR/DVD. In this case, please call the mtmufacturer of the universal
remote control
- 8 - EN
IC29
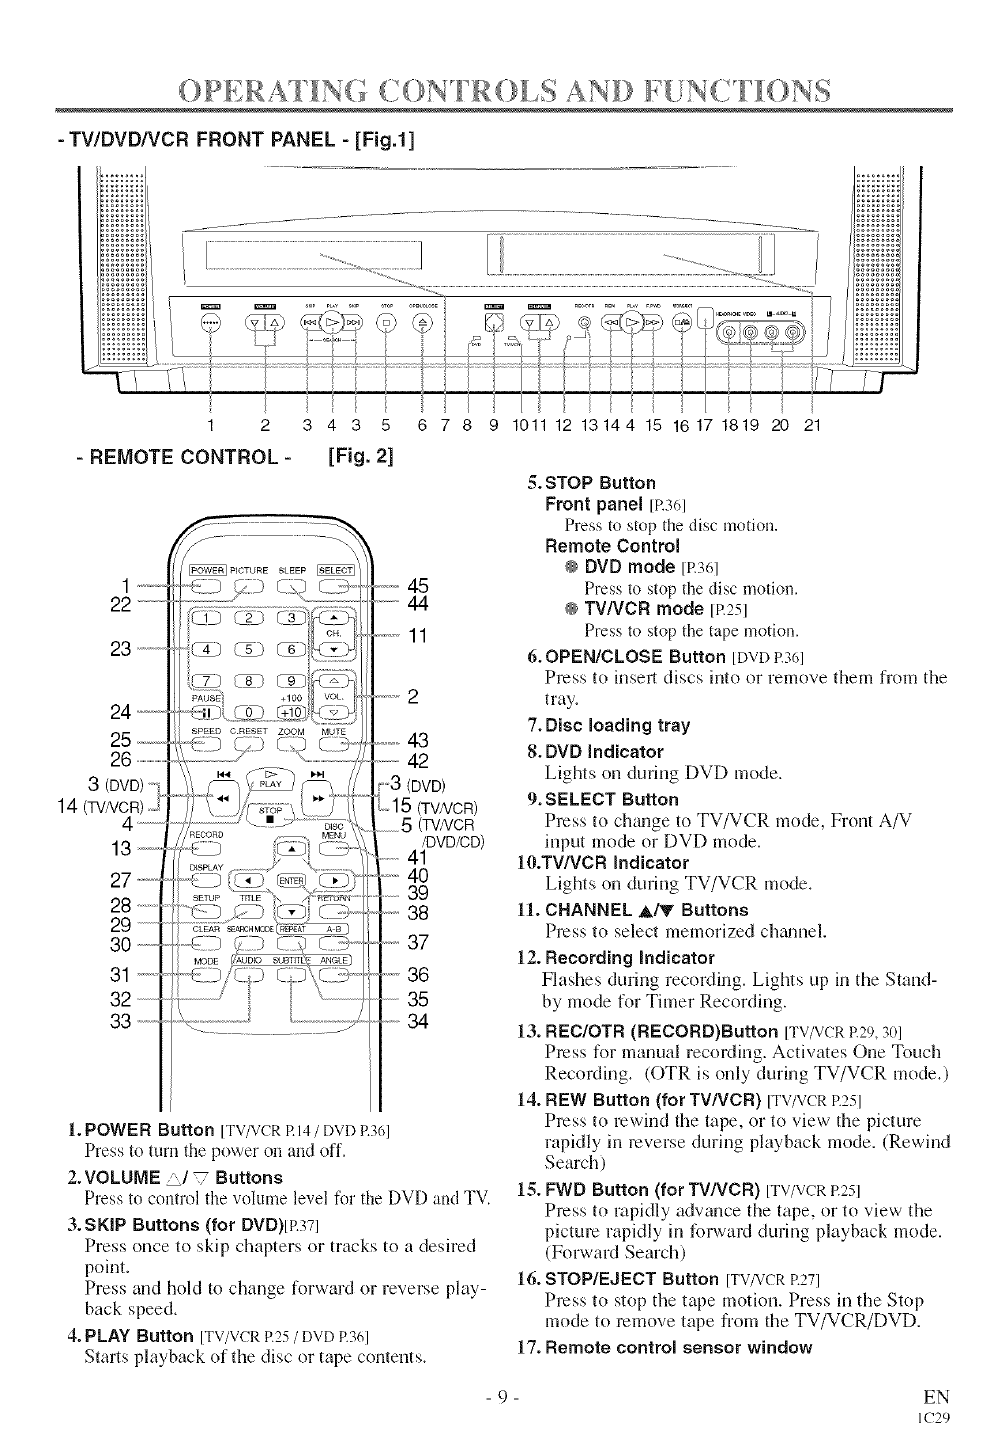
OPERAS lN( (. }N R .}[,S AND F[JNCTIONS
-TWDVD/VCR FRONT PANEL - [Fig.l]
1 2 343 5 678
-REMOTE CONTROL -[Fig. 2]
22--
23--
24 _-
3 (DVD)
14 (TV/VCR)
31
PICTURE SLEEP
p }/s os .................45
44
-,,,,-11
--2
43
42
(DVD)
(TV/VCR)
5 (TV/VCR
/DVD/CD)
41
40
39
38
37
36
35
34
1. POWE R Button [TV/VCRR14/DVD P.361
Press to mrn the power on and off.
2.VOLUME _/V Buttons
Press to control the volume level tbr the DVD and TV.
3.SKIP Buttons (for DVD)[P.37]
Press once to skip chapters or tracks to a desired
point.
Press and hold to change forward or reverse play-
back speed.
4. PLAY Button [TV/VCRR25/DVD R36]
Starts playback of the disc or tape contents.
9 1011 12 13144 15 16171819 20 21
5. STOP Button
Front panel [P.36]
Press to stop the disc motion.
Remote Control
@ DVD mode 1P.361
Press to stop the disc motion,
@ TV/VCR mode [R251
Press to stop the tape motion.
6.OPEN/CLOSE Button [DVDP.361
Press to insert discs into or remove them from the
tray.
7. Disc loading tray
8. DVD indicator
Lights on during DVD mode.
9.SELECT Button
Press to chmlge to TV/VCR mode, Front A/V
input mode or DVD mode.
10.TWVCR indicator
Lights on during TV/VCR mode.
11. CHANNEL _,/V Buttons
Press to select memorized ch_mnel.
12. Recording indicator
Flashes during recording. Lights up in the Stand-
by mode for Timer Recording.
13. REC/OTR (RECORD)Button [TV/VCRR29,30]
Press for manual recoNing. Activates One Touch
RecoNing. (OTR is only during TV/VCR mode.)
14. REW Button (for TV/VCR) [TV/VCRR25]
Press to rewind the tape, or to view the picture
rapidly in reverse during playback mode. (Rewind
Search)
15. FWD Button (for TV/VCR) [TV/VCRR251
Press to rapidly adwmce the tape, or to view the
picture rapidly in forward during playback mode.
(Forward Search)
16. STOP/EJECT Button [TV/VCRR271
Press to stop the tape motion. Press in the Stop
mode to remove tape from the TV/VCR/DVD.
17. Remote control sensor window
- 9- EN
IC29
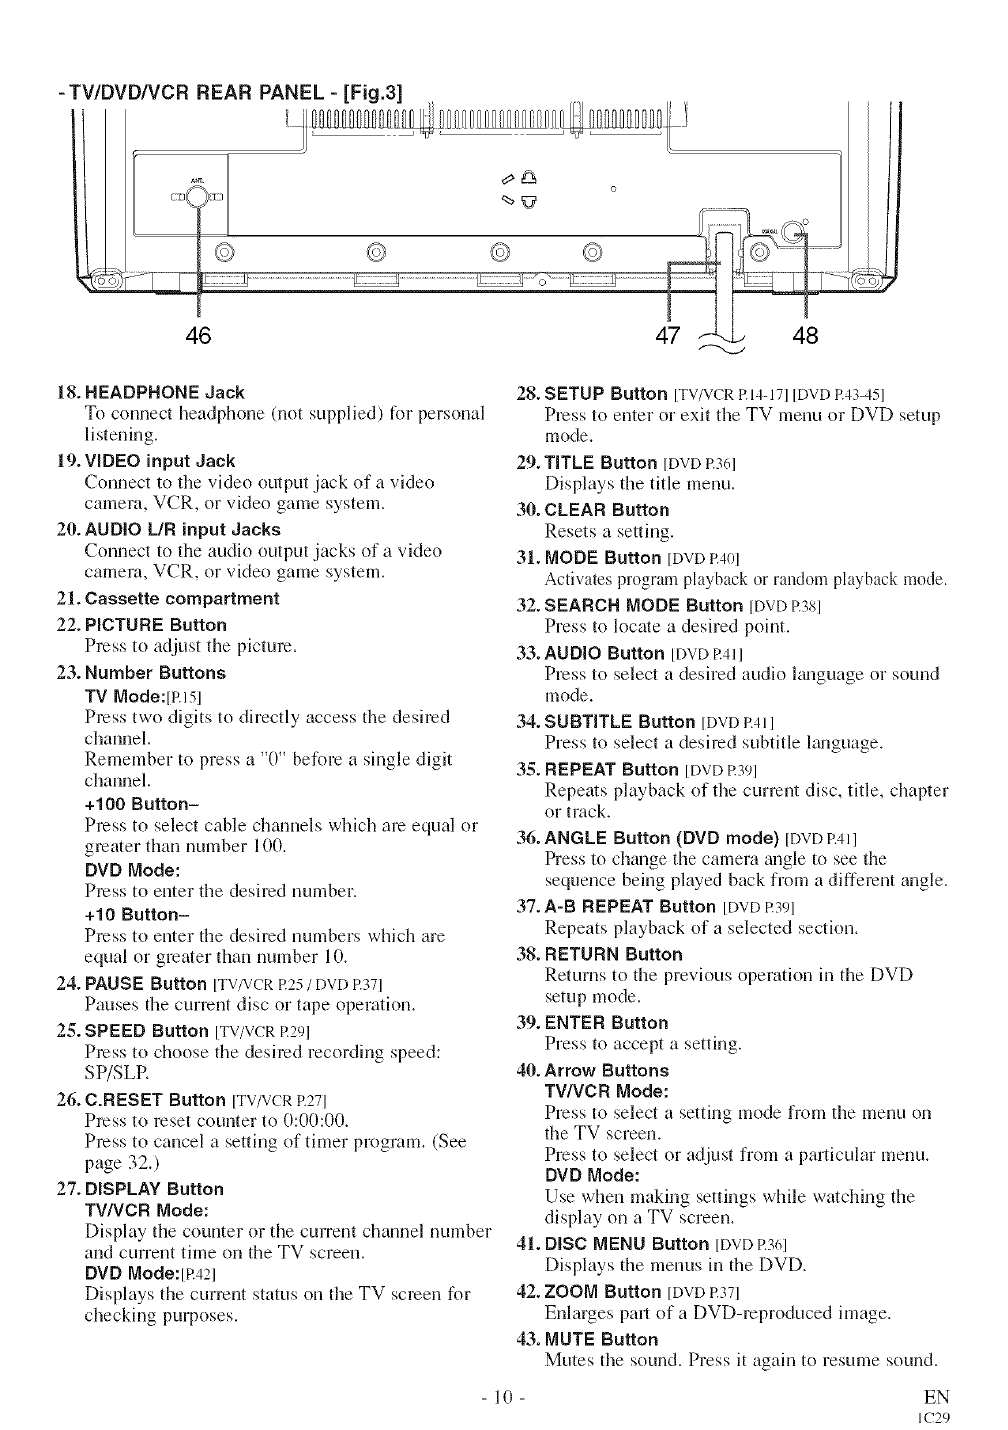
-TV/DVD/VCR REAR PANEL-[Fig.3]
46
18. HEADPHONE Jack 28.
To connect headphone (not supplied) for personal
listening.
19. VIDEO input Jack 29.
Connect to the video output jack of a video
camera, VCR, or video game system. 30.
20. AUDIO L/R input Jacks
Connect to the audio output jacks of a video 31.
camera, VCR, or video game system.
21. Cassette compartment 32.
22. PICTURE Button
Press to adjust the picture. 33.
23. Number Buttons
TV Mode:[P.151
Press two digits to directly access the desired 34.
channel.
Remember to press a "0" before a single digit 3,g.
channel.
+100 Button-
Press to select cable channels which are equal or
greater than number 100. 36.
DVD Mode:
Press to enter the desired number.
+10 Button- 37.
Press to enter the desired numbers which are
equal or greater than number 10. 38.
24. PAUSE Button [TV/VCR R25 /DVD R37]
Pauses the current disc or tape operation. 39.
25. SPEED Button [TV/VCRR29]
Press to choose the desired recording speed:
SP/SLR 40.
26. C.NESET Button [TV/VCRR27]
Press to reset counter to 0:00:00.
Press to cancel a setting of timer program. (See
page 32.)
27. DISPLAY Button
TV/VCR Mode:
Display the counter or the current channel number
and current time on the TV screen. 41.
DVD Mode:[R421
Displays the current status on the TV screen for 42.
checking puq_oses.
43.
SETUP Button [TV/VCRP.14-171[DVDP.43-451
Press to enter or exit the TV menu or DVD setup
mode.
TITLE Button [DVD P.361
Displays the title menu.
CLEAR Button
Resets a setting.
MODE Sutton [DVD P.401
Activates program playback or random playback mode.
SEARCH MODE Button [DVD R381
Press to locate a desired point.
AUDIO Button [DVD R411
Press to select a desired audio Emguage or sound
mode.
SUBTITLE Button [DVD R4]l
Press to select a desired subtitle Emguage.
REPEAT Button [DVD R391
Repeats playback of the current disc, title, chapter
or track.
ANGLE Button (DVD mode) [DVD P.411
Press to chm3ge the camera m3gle to see the
sequence being played back from a different angle.
A-B REPEAT Button [DVD R391
Repeats playback of a selected section.
RETURN Button
Returns to the previous operation m the DVD
setup mode.
ENTER Button
Press to accept a setting.
Arrow Buttons
TV/VCR Mode:
Press to select a setting mode from the menu on
the TV screen.
Press to select or adjust from a particular menu.
DVD Mode:
Use when making settings while watcldng the
display on a TV screen.
DISC MENU Button [DVD R3(q
Displays the menus in the DVD.
ZOOM Button [DVDR371
Enlarges pall of a DVD-reproduced hnage.
MUTE Button
Mutes the sound. Press it again to resume sound.
10 EN
IC29
44. SLEEP Button [TV/VCRP.331
Sets the Sleep Timer.
45. SELECT Button
Press to switch TV/VCR and DVD mode. You
can see the mode (TV/VCR or DVD) on the front
panel indbator.
46. ANT. in Jack
Connect to an antenna, cable system, or satellite
system.
47. Power cord
Connect to a standard AC outlet (120V/60Hz).
NOTE: Remove the power cord from the hook to
avoid breaking a wire before you connect
to a standard AC outlet.
48. COAXIAL digital audio out Jack
Connect to the digital input of _ul extenml Home
theater audio system (Not supplied)
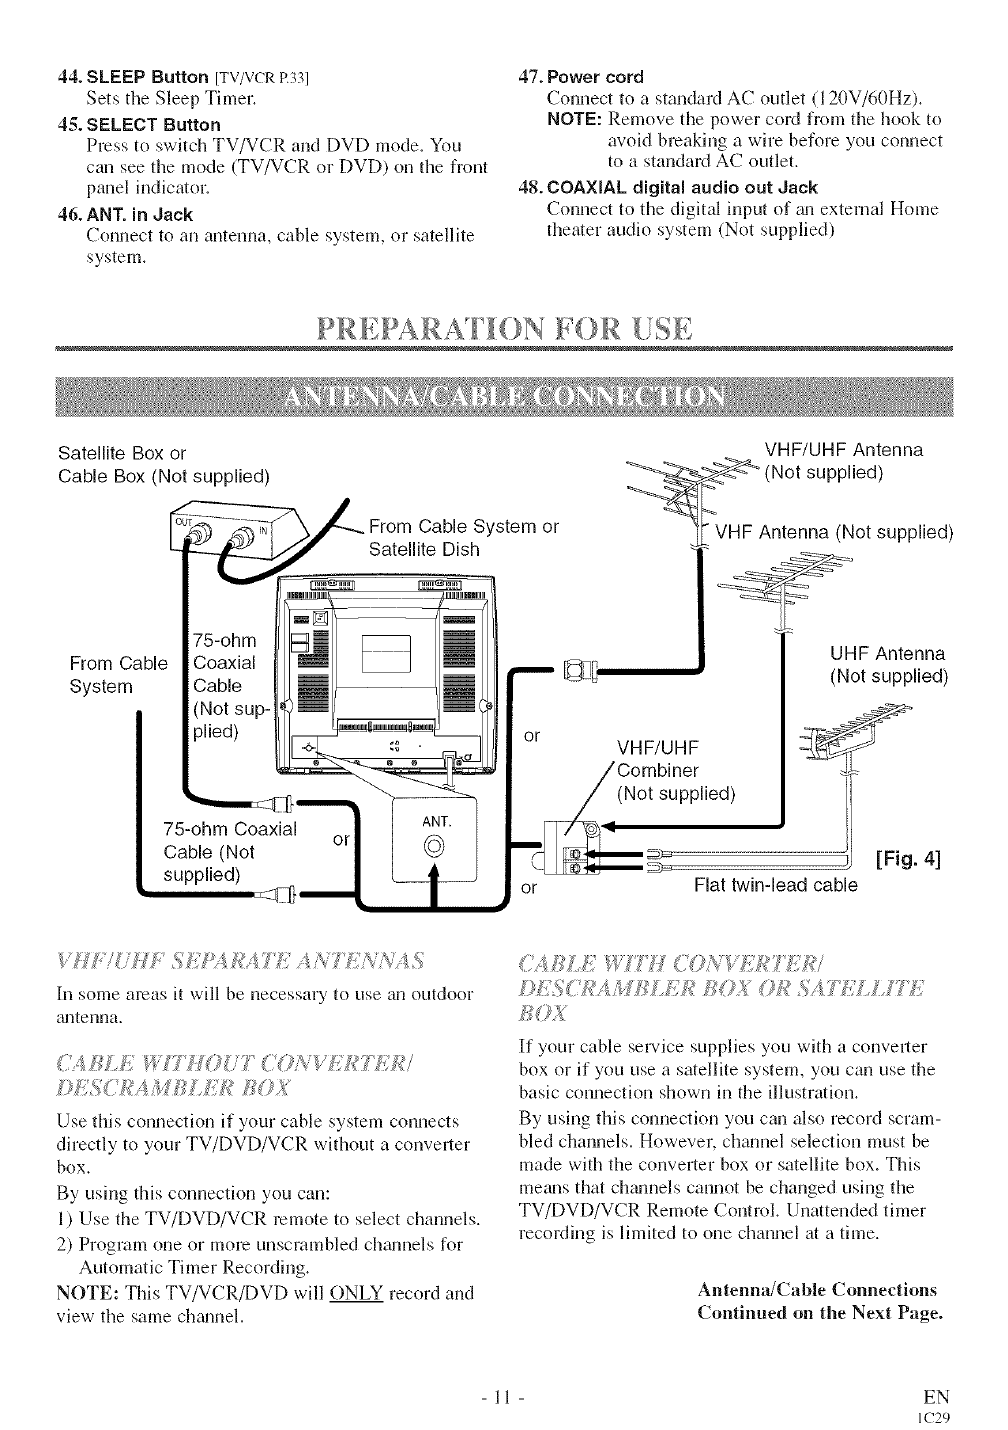
PR EPA RAT I0N IF0R [!S E
Satellite Box or
Cable Box (Not supplied)
75-ohm
From Cable Coaxial
System Cable
(Not sup-
plied)
75-ohm Coaxial
Cable (Not
supplied)
From Cable System or
Satellite Dish
o_ or
ANT.
or @
or
VHF/UHF Antenna
>_=_" (Not supplied)
VHF Antenna (Not supplied)
UHF Antenna
(Not supplied)
VHF/UHF
(Not supplied)
[Fig. 41
Flat twin-lead cable
[n some areas it will be necessary to use an outdoor
gultenna.
¢'41{_'EWTH0 77<'ONVE]{+TDITU
Use this connection if you] cable system connects
directly to your TV/DVD/VCR without a converter
box.
By using this connection you can:
1) Use the TV/DVD/VCR remote to select channels.
2) Program one or more unscrambled chgmnels for
Automatic Timer Recording.
NOTE: This TV/VCR/DVD will ONLY record and
view- the same ch_umel.
<2{];{EWITH <(?N_,_{kt TU,;7
DES(iJ_;_AM]{]E/_l_<>X0}¢SA77:£ L_7_:
If your cable service supplies you with a conve]ler
box or if you use a satellite system, you can use the
basic connection shown in the illustration.
By using this connection you can also record scram-
bled channels. However, channel selection must be
made with the converter box or satellite box. This
means that chmmels cannot be changed using the
TV/DVD/VCR Remote Control. Unattended timer
recording is limited to one channel at a time.
Antenna/Cable Connections
Continued on the Next Page.
11 EN
IC29
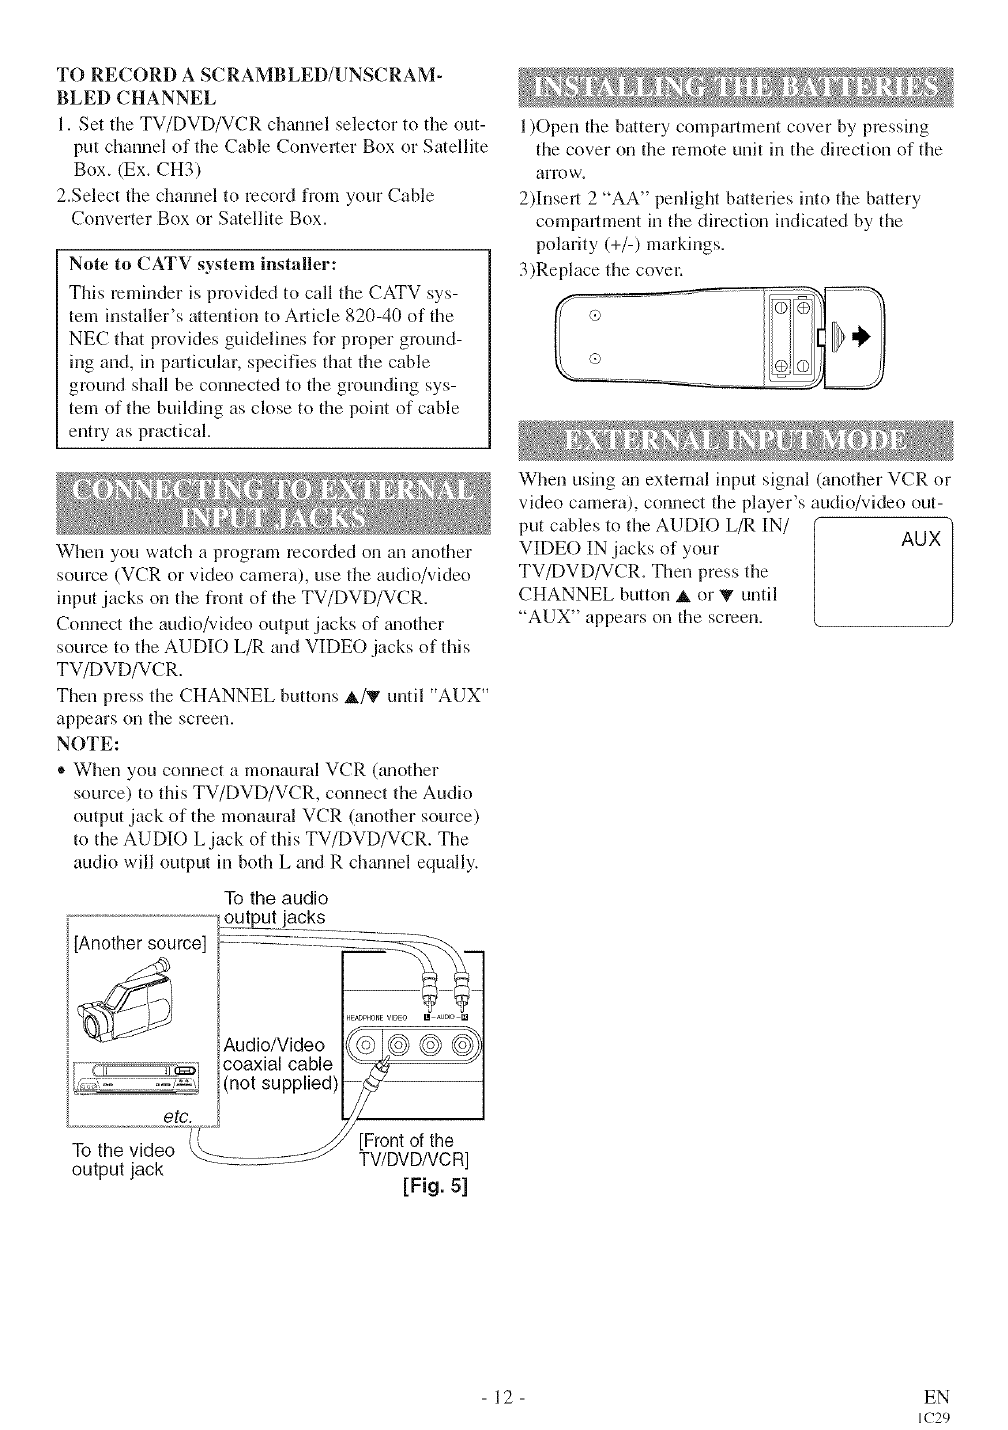
TO RECORD A SCRAMBLED/UNSCRAM-
BLED CHANNEL
1. Set the TV/DVD/VCR channel selector to the out-
put channel of the Cable Conveller Box or Satellite
Box. (Ex. CH3)
2.Select the channel to record fiom your Cable
Converter Box or Satellite Box.
Note to CATV system installer:
This reminder is provided to call the CATV sys-
tem installer's attention to Allicle 820-40 of the
NEC that provides guidelines for proper ground-
Jng and, in particular, specifies that the cable
ground shall be connected to the grounding sys-
tem of the building as close to the point of cable
entUas practical.
When you watch a program recorded on an another
source (VCR or video camera), use the audio/video
input jacks on the front of the TV/DVD/VCR.
Connect the audio/video output jacks of _mother
source to the AUDIO L/R and VIDE() jacks of this
TV/DVD/VCR.
Then press the CHANNEL buttons A/V until "AUX"
appears on the screen.
NOTE:
®When you connect a monaural VCR 0mother
source) to this TV/DVD/VCR, connect the Audio
output jack of the monaural VCR (another source)
to the AUDIO L jack of this TV/DVD/VCR. The
audio will output in both L and R ch_mnel equally.
[Another source]
etc.
output jack
To the audio
outp_u_qacks
Audio/Video
coaxial cable
(not supplied)
HgaD9HONE VIDEO [] _UDD []
Frontof the
TV/DVDNCR]
[Fig. 51
1)Open the battery compartment cover by pressing
the cover on the remote unit in the direction of the
afro w.
2)Insert 2 "AA" penlight batteries into the battery
compartment in the direction indicated by the
polarity (+/-) markings.
3)Replace the covel:
When using _mexternal input signal (another VCR or
video camera), connect the player's audio/video out-
put cables to the AUDIO L/R IN/ AUX
VIDE() IN jacks of your
TV/DVD/VCR. Then press the
CHANNEL button A or V until
"AUX" appears on the screen.
12 EN
IC29
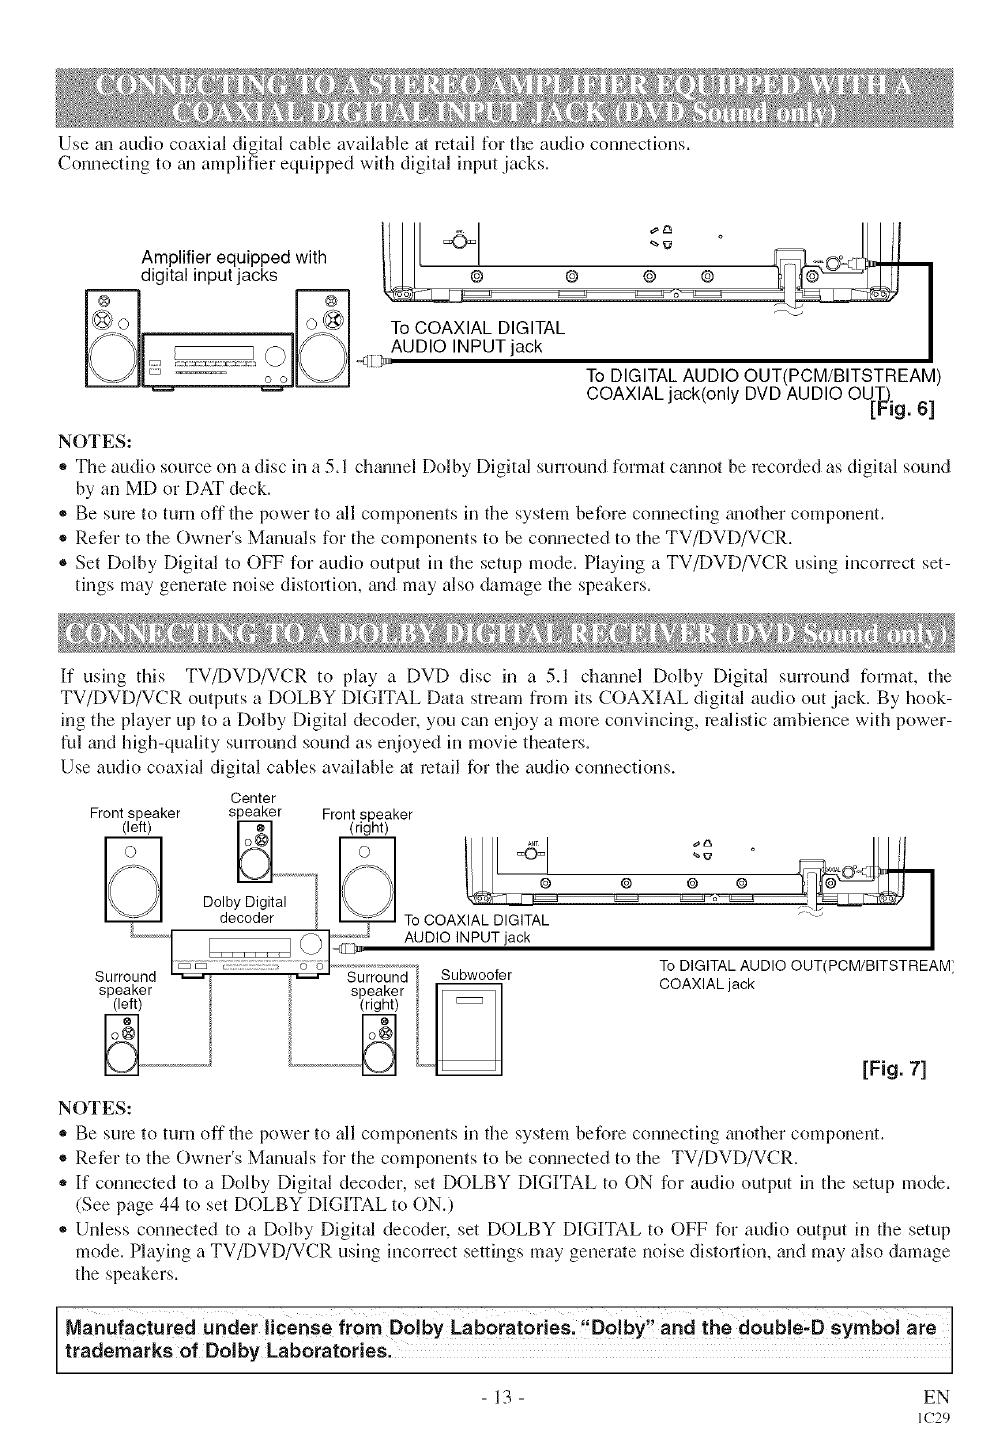
Use an audio coaxial digital cable available at retail for the audio connections,
Connecting to tm amplifier equipped with digital input jacks.
Amplifier equipped with
digital input jacks
To COAXIAL DIGITAL
AUDIO INPUTjack
<it _JL To DIGITALAUDIO OUT(PCM/BITSTREAM)
COAXIALjack(only DVDAUDIO OUT.)ig"[P 6]
NOTES:
,, The audio source on a disc in a 5.1 chgmnel Dolby Digital surround format cannot be recorded as digital sound
by an MD or DAT deck.
•Be sure to turn off the power to all components in the system before connecting tmother component.
,, Refer to the Owner's Manuals for the components to be connected to the TV/DVD/VCR.
®Set Dolby Digital to OFF for audio output in the setup mode. Playing a TV/DVD/VCR using incorrect set-
tings may generate noise distmlion, trod may also damage the speakers.
If using this TV/DVD/VCR to play a DVD disc in a 5.1 chmmel Dolby Digital surround format, the
TV/DVD/VCR outputs a DOLBY DIGITAL Data stream from its COAXIAL digital audio out jack. By hook-
ing the player up to a Dolby Digital decoder, you cgm enjoy a more convincing, realistic ambience with power-
ful mid high-quality surround sound as enjoyed in movie theaters.
Use audio coaxial digital cables available at retail for the audio connections.
Center
Front speaker speaker Front speaker
(left) _ (right)
I\ //I DolbyUigital IX //I I
decoder _ To COAX AL D,G TAL _'_ I
.............................._ , . To DIGITAL AUDIO OUT(PCM/BITSTREAM'
Surround _ _ Surround buowoorer COAXIAL ack '
speaker speaker _ l
NJI" _" _ _""'_ [Fig. 7]
NOTES:
,, Be sum to turn off the power to all components in the system before connecting another component.
•Refer to the Owner's Manuals for the components to be connected to the TV/DVD/VCR.
,, If connected to a Dolby Digital decoder, set DOLBY DIGITAL to ON for audio output in the setup mode.
(See page 44 to set DOLBY DIGITAL to ON.)
•Unless connected to a Dolby Digital decoder, set DOLBY DIGITAL to OFF for audio output in the setup
mode. Playing a TV/DVD/VCR using incorrect settings may generate noise distortion, and may also damage
the speakers.
Manufactured under license from Dolby Laboratories, Dolby and the double:D Symbol are
trademarks 0f Dolby Laboratories'
13 EN
IC29
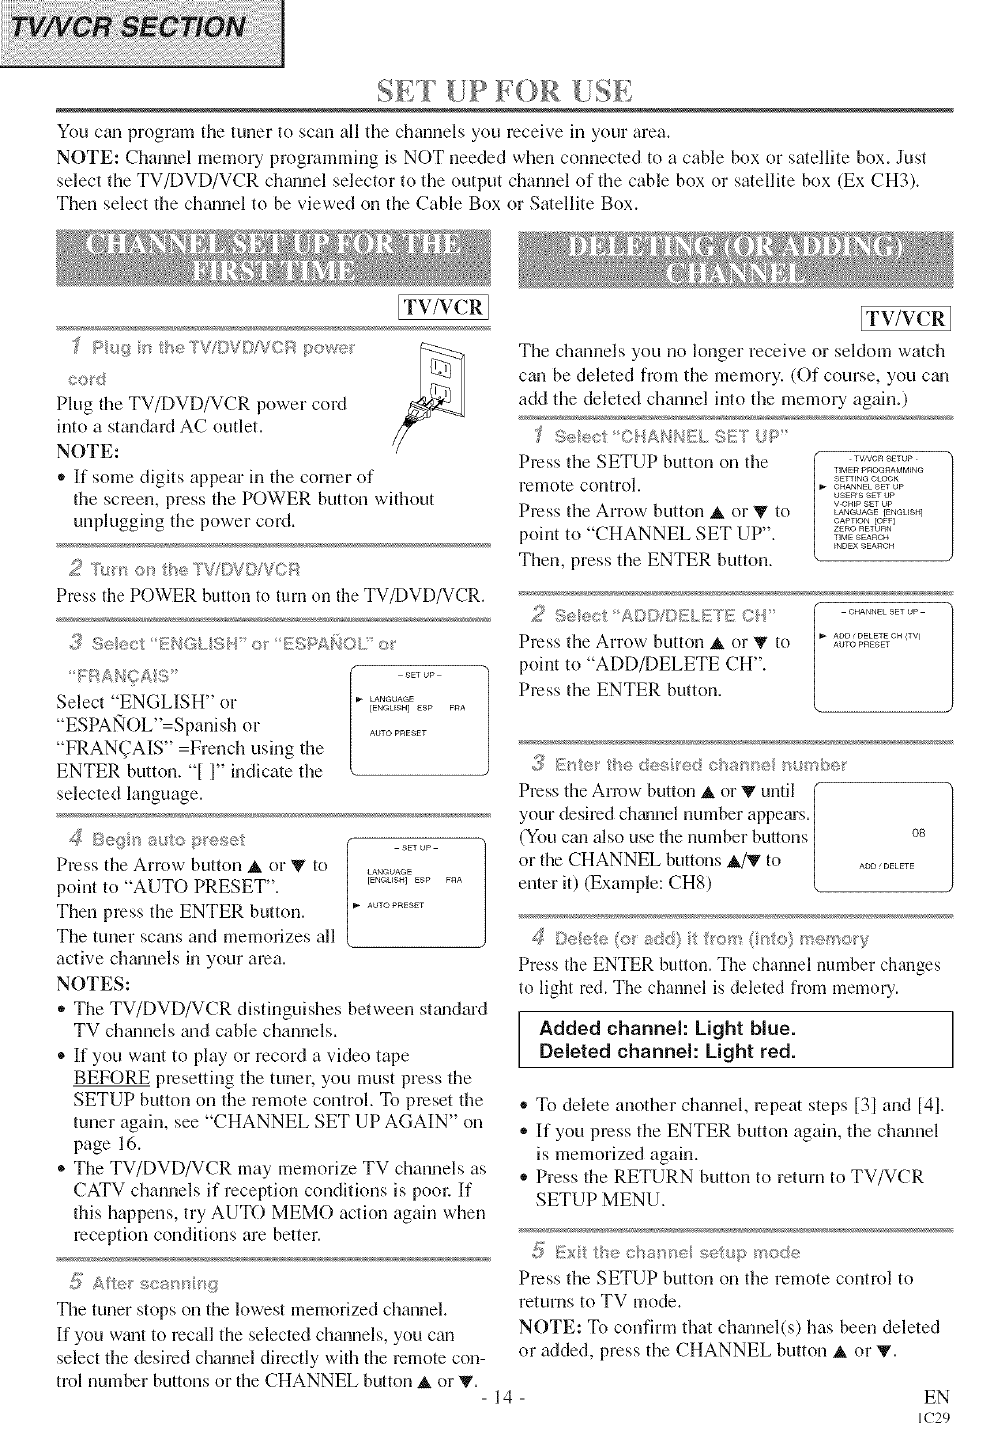
SET [JP FOR [fSE
You cgmprogram the tuner to scan all the channels you receive in your area.
NOTE: Channel memo Uprogramming is NOT needed when connected to a cable box or satellite box. Just
select the TV/DVD/VCR channel selector to the output channel of the cable box or satellite box (Ex CH3).
Then select the channel to be viewed on the Cable Box or Satellite Box.
[TV/VCR 1
ce_d
Plug the TV/DVD/VCR power cord
into a standard AC outlet.
NOTE:
,, If some digits appear in the corner of
the screen, press the POWER button without
unplugging the power cord.
Press the POWER button to turn on the TV/DVD/VCR.
3 Se_x) li:HGk$4' or [£!%P£_(IOLi of'
Select "ENGLISH" or
"ESPAlqOL"=Spanish or
"FRAN(TAIS" =French using the
ENTER button. "[ 1" indicate the
selected language.
sET up
LANGUAGe
[ENGUSH] ESP FRA
AOTO PRESET
_ _ _ "SET UP
>eg L'IO _s[ese
Press the Arrow button A nr _ tn LANGUAGE
point to "AUTO PRESET". _....... _......
Then press the ENTER button. _.........
The tuner scm_s and memorizes all
active chmmels in your area.
NOTES:
* The TV/DVD/VCR distinguishes between standard
TV ch_mnels a_d cable channels.
®If you want to play or record a video tape
BEFORE presetting the tuner, you must press the
SETUP button on the remote control. To preset the
tuner again, see "CHANNEL SET UP AGAIN" on
page 16.
®The TV/DVD/VCR may memorize TV channels as
CATV channels if reception conditions is pore: If
this happens, try AUTO MEMO action again when
reception conditions are better.
The tuner stops on the lowest memorized channel.
If you wtmt to recall the selected channels, you can
select the desired channel directly with the remote cnn-
trnl number buttons or the CHANNEL button A or V. -14-
[TV/VCR ]
The channels you no longer receive or seldom watch
can be deleted fiom the memory. (Of course, you c_m
add the deleted channel into the memory again.)
S_:ec O?ALIN_X, 91.N UP"
Press the SETUP button on the ............
TIM Elq PR©G_qAMM_NG
retnnte cnntrnl, SarnNG CroCK
CHANNEL SET Up
USER'S SET UP
V-GHtp SET lop
Press the Arrow button A or V to _._o_ t_._u_.]
GAPT[ON [OFF]
point to "CHANNEL SET UP". ,,.=_=o,
_NDE× SEARCH
Then, press the ENTER button.
2 Selec A©©IDELETB {2..I..............
ADD _ DELETE OH (IV)
Press the Arrow button _ or _ tn =_.o.==.=_
point to "ADD/DELETE CH".
Press the ENTER button.
._ _£'_er the des ted cSanr_,e _u_<be
Press the Arrow button _ or V until
your desired chtumel number appems.
(You can also use the number butons os
or the CHANNEL buttons _,/V to ...........
enter it) (Example: CH8)
,A,_;:..(> ;:_:SS}.....
Press the ENTER button. The channel number changes
to light red. The channel is deleted from melnory.
Added channel: Light blue.
Deleted channel: Light red.
* To delete another chtmnel, repeat steps [3] and [41.
* ]Ifyou press the ENTER button again, the chtmnel
is memorized again.
,, Press the RETURN button to return to TV/VCR
SETUP MENU.
-S Exi/: the cba me/ seup __ode
Press the SETUP button on the remote control to
returns to TV mode.
NOTE: To confirm that chmmel(s) has been deleted
or added, press the CHANNEL button A or V.
EN
IC29
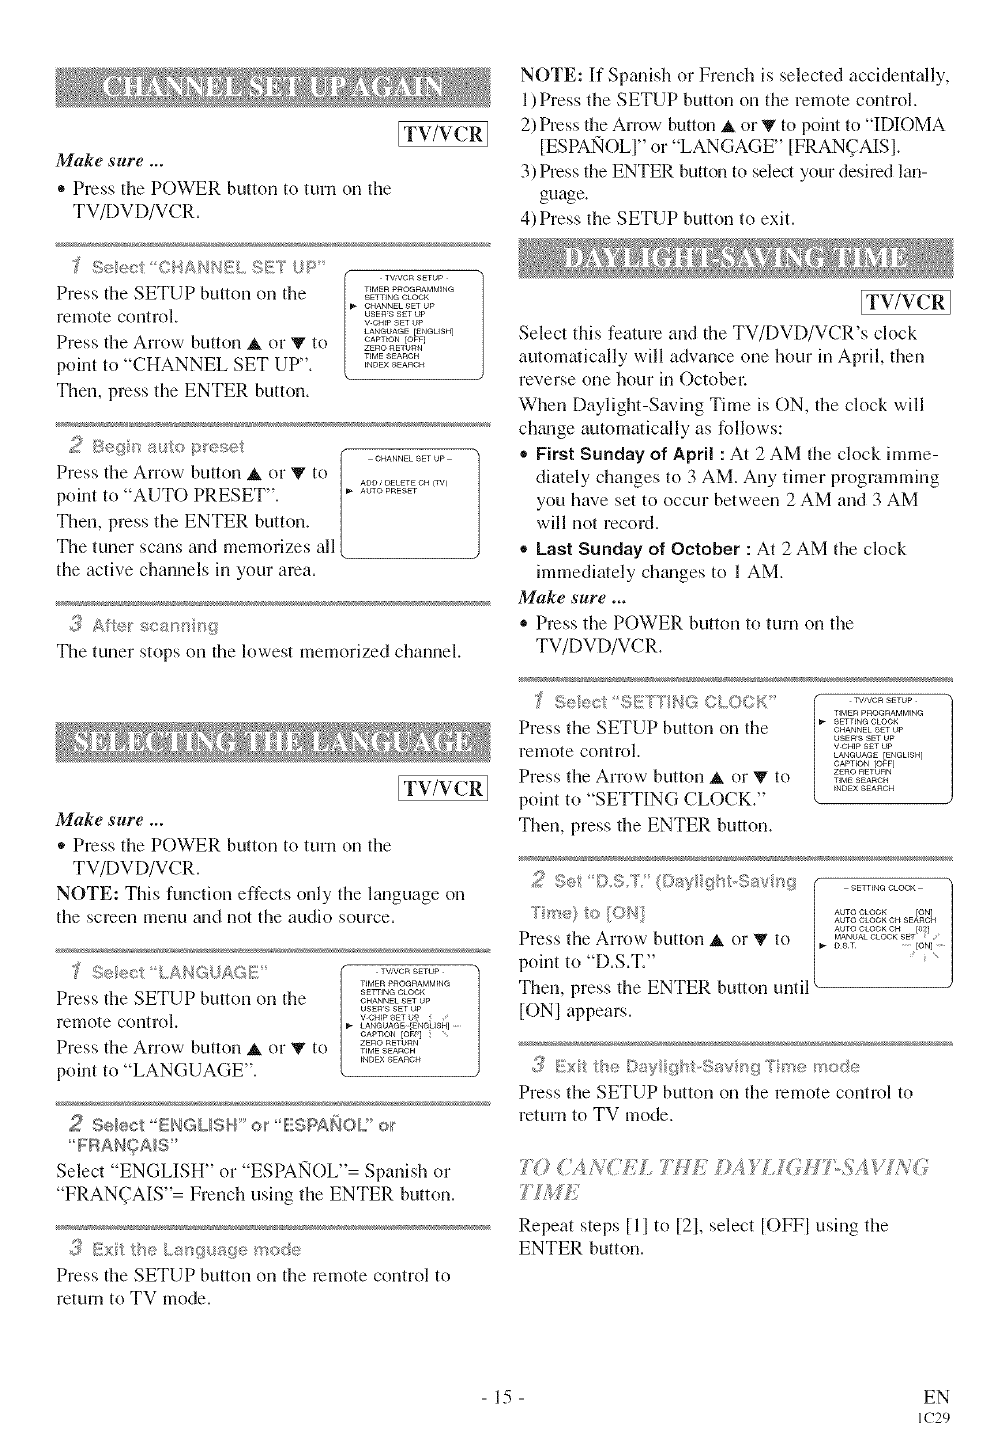
[TV/VCRI
Make sure ...
* Press the POWER button to turn on the
TV/DVD/VCR.
'f S÷ect O_-A{'4NELSE'! UP
Press the SETUP button on the
remote control.
Press the Arrow button it or V to
point to "CHANNEL SET UP".
Then, press the ENTER button.
f TVNCR SETUP
TIMERPROGRAMMING
SETTING OLOCK
CHANNEk SET UP
USEWS SET UP
V CHtP SET UP
_ANGUAGE [ENCUSH]
CAPTtON /OFF]
ZErO RETURN
TIMESEARCH
_NDEXSEAnCH
¢o._+
5eg' p ':_se I" ............
Press the,Arrow buttori it orY to | ............ <..,
point to AUTO PRESET". /...........
Then, press the ENTER button. /
The tuner scans and memorizes all (
the active channels in your area.
The tuner stops on the lowest memorized channel.
[TV/VCR 1
Make sure ...
,, Press the POWER button to turn on the
TV/DVD/VCR.
NOTE: This function effects only the language on
the semen menu and not the audio source.
J S®ec LAg_GJAGE'
Press the SETUP button on the
remote coritrol.
Press the Arrow button it or 'IVto
point to "LANGUAGE".
TV,VCR SETUP
TIMERpROat?AMMINQ
SETTING OLO¢tV
CHANNEk SET UP
USEt?'S SET UP
V-CHtPSETt,_ ; /
I_ _ANGUAGE [ENGliSH].
CAPTtON /OE_] i
ZEtqO RETURN
TIMESEARCH
_NDEXSEAROI_
Select ENGLI,,,H oil" _:::::,_f">ANOLor
Select ENGLISH cl ESPANOL = Spanish or
"FRAN(]AIS"= French using the ENTER button.
<5?_!!b_,_<_,I..._;9_,u:_4:le_<<_::'_'
Press the SETUP button ori the remote control to
return to TV mode.
NOTE: If Spanish or French is selected accidentally,
1)Press the SETUP button on the remote control.
2) Press the Arrow button it or V to point to "IDIOMA
[ESPAlqOLI" or "LANGAGE" [FRAN_AISI.
3) Press the ENTER button to select your desired lan-
guage.
4)Press the SETUP button to exit.
ITV/VCRI
Select this feature and the TV/DVD/VCR's clock
automatically will advance one hour in April, then
reverse one hour in Octobel:
When Daylight-Saving Time is ON, the clock will
chzmge automatically as follows:
,, First Sunday of April : At 2 AM the clock imme-
diately changes to 3 AM. Any timer programming
you have set to occur between 2 AM and 3 AM
will not record.
®Last Sunday of October : At 2 AM the clock
immediately ch_mges to 1 AM.
Make sure ...
Press the POWER button to turn on the
TV/DVD/VCR.
SeecI SE°'T*{GOLO©K" ...........
TIMER pIqOGRAMMING
Press the SETUP button on the ............GIqANNELSEW tip
UaER'S SET UP
remote control, vc._pserup
LAblG tiAG E [ENGLISH]
GAPT[©N /©FF]
Press the Arrow button it or _ to ,,_z_°RFti_"_o,
INDEX SEARCH
point to "SETTING CLOCK."
Then, press the ENTER button.
[ONI appears.
Press the SETUP bi.ltton on the remote coritrol to
return to TV irlode.
,#,_(.. vt sL7//£ ,/£4 FLIG//7oSA XI]gg,
Repeat steps [1]to [21, select [OFFI using the
ENTER button.
15 EN
IC29
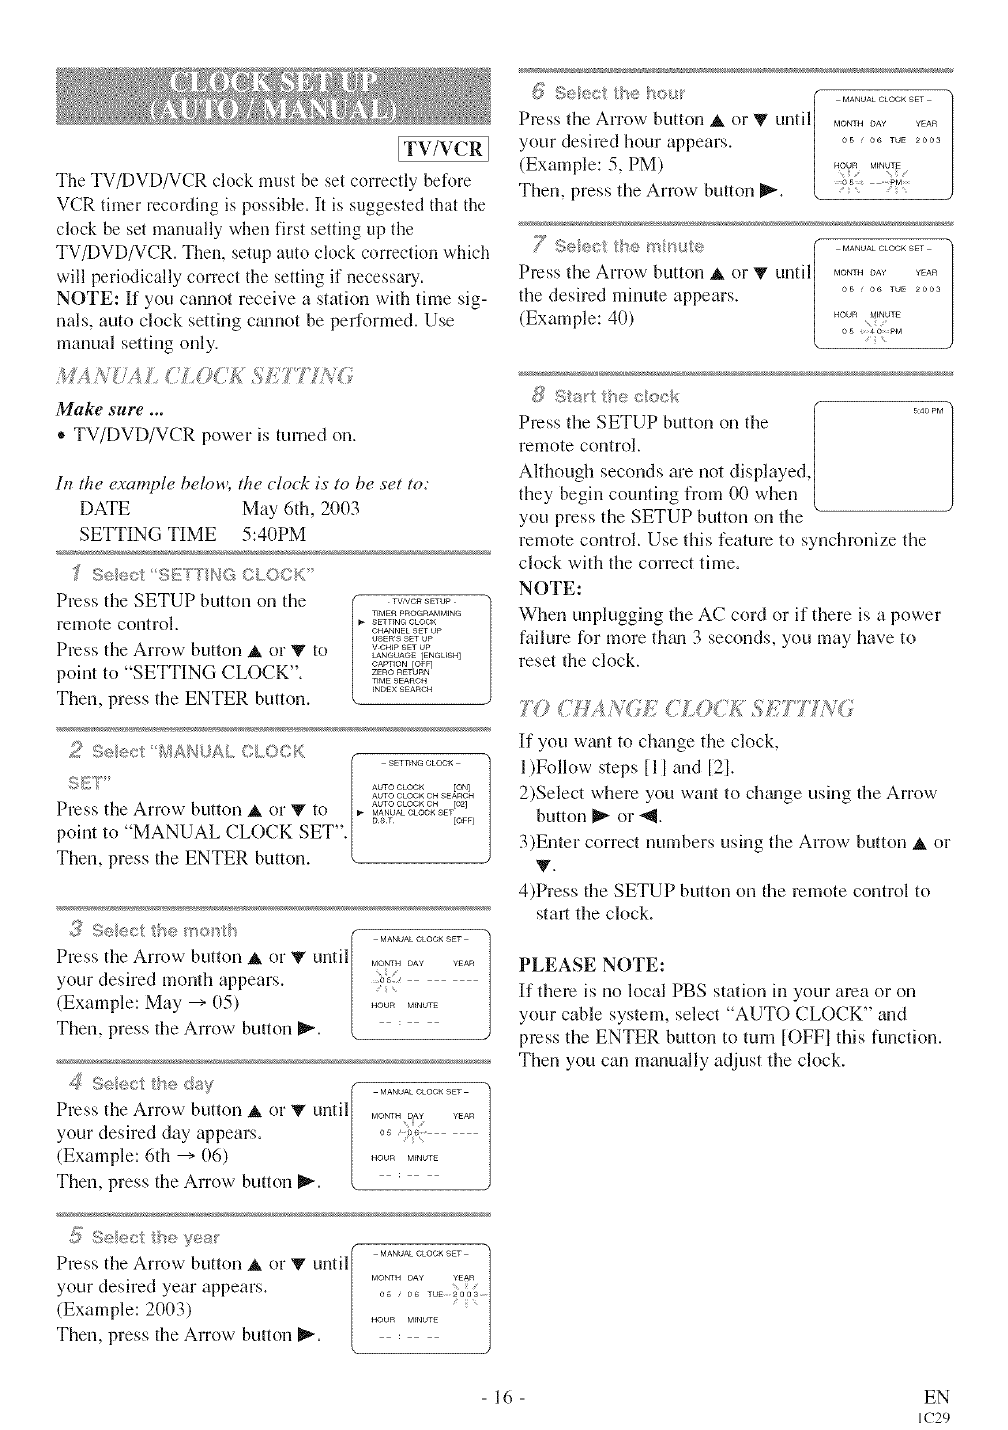
[TV/VCRI
The TV/DVD/VCR clock must be set correctly before
VCR timer recording is possible. It is suggested that the
clock be set manually when first setting up the
TV/DVD/VCR. Then, setup auto clock correction which
will periodically correct the setting if necessary.
NOTE: If you caunot receive a station with time sig-
nals, auto clock setting ctmnot be performed. Use
manual setting only.
/I#,4//,,/,4£ ;7;(7 ;7_;/";/';;YT"iV°
Make sure ...
• TV/DVD/VCR power is turned on.
ltz the example below, the clock is to be set to:
DATE May 6th, 2003
SETTING TIME 5:40PM
"_ Se_sA 9_!!7'[NG CLOC_C_
Press the SETUP button on the ............
TIM El:l pROGRAMMING
rellote control. . SEWENQOLOCK
CHANNEL SET UP
USER'S SE'r UP
Press the Arrow button A or '_' to v°_'_°_
LANGUAGE [ENGUSH]
CAPTI©N [OFF]
point to "SETTING CLOCK". ..........
T_MESEAROH
iNDEX S EARCIq
Then, press the ENTER button.
s:; ii®l_;I Y!ANUAL CLO3F[ SETTING CL©°I
{:i£!'}"" Au-ro°mc= [o=1
AUTO °LOCK ON SEARCH
Press the Arrow button A, or V to _0,oo_oo_o.=a=o_o_oo__,E<
DST [OFF]
point to "MANUAL CLOCK SET".
Then, press the ENTER button.
,2:_S®lecI tl'e '<os I' MANUAL OLOCl gET
Press the Arrow button A or V until ............
your desired month appears. i
(Example: May --->05) ..........
Then, press the Arrow button I_".
,I ,, I,, _j £ , <,, _i ½1 MANUAL CLOCK SiT
Press the Arrow button _ or _ until ..... o=.....
ii
your desired day appears. 0= , =.......
(Example: 6th --->06) ..........
Then, press the Arrow button I_".
MANUAL °LOOK SIT
Press the Arrow button A or V until MONTH DAy YEAR
your desired year appears. 0.....,_ _oo_......
i
(Example: 2003) ..........
Then, press the Arrow button I_".
1_ Selec the I_o_,_ ( ..............
Press the Arrow button _ or V until| ............
your desired hour appears. | .............
(Example: 5, PM) | .?q==,.q,_
Then, press the Arrow button I1_. [ ;_
7S®le I t ÷ ni!,_,t¢:, (..............
Press the Arrow button Aor V until, ............
the desired minute appears. 0............
(Example: 40) .... _,_._
0s i
£i/ Ssrt t'_s c!ock
Press the SETUP button on the ...... ]
/
remote control.
Although seconds are not displayed,
they begin counting from 00 when
you press the SETUP button on the
remote control. Use this feature to synchronize the
clock with the correct time.
NOTE:
When unplugging the AC cord or if there is a power
failure for more them 3 seconds, you may have to
reset the clock.
?Y? (;//XA/(/E _/_LOC£ S£7:'?Z_v<7
If you want to change the clock,
1)Follow steps [11 and [2].
2)Select where you want to chtmge using the Arrow
button _ or ",_.
3)Enter correct numbers using the Arrow button A or
V.
4)Press the SETUP button on the remote control to
start the clock.
PLEASE NOTE:
If there is no local PBS station in your area or on
your cable system, select "AUTO CLOCK" and
press the ENTER button to turn [OFFI this function.
Then you can manually adjust the clock.
16 EN
IC29
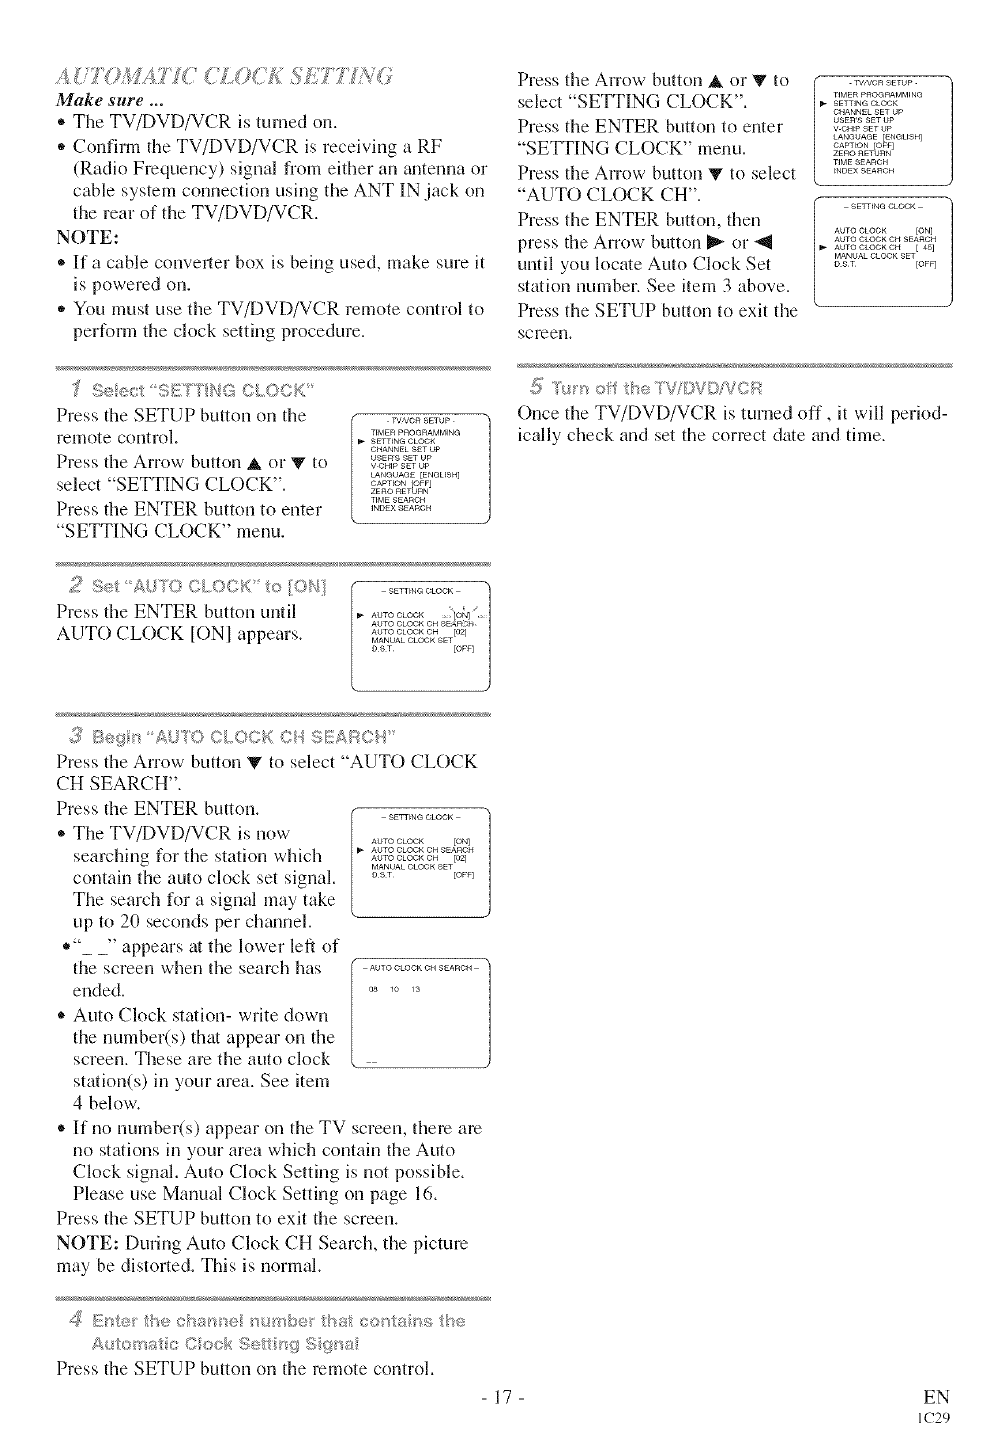
AJT OM4i TC(LO<£ SE?7 NO/
Make sure ...
• The TV/DVD/VCR is turned on.
• Confirm the TV/DVD/VCR is receiving a RF
(Radio Frequency) signal from either an zultenna or
cable system connection using the ANT IN jack on
the rear of the TV/DVD/VCR.
NOTE:
• If a cable conveller box is being used, make sure it
is powered on.
,, You must use the TV/DVD/VCR remote control to
perform the clock setting procedure.
"£ S® c SETTbG¢[OC_;'
Press tile SETUP button on the TVA/CR SETUp
remote control. TEMERPnOGRAMMING
SEWING ¢LOO_<
CHANNEL gET Up
Press the Arrow button A or V to vu_ER'ssE_°_o_,__T_
LANGUAGE [EblC_LFSH]
select "SETTING CLOCK". ....... _o_j
ZERO RETURN
T_ME SEARGH
Press the ENTER button to enter ,..........
"SETTING CLOCK" menu.
>,, A,,,_ <3 o,_,dt, K ,,, _,./,<
Press the ENTER button until
AUTO CLOCK tONI appears.
Press the Arrow- button A or V to
select "SETTING CLOCK".
Press the ENTER button to enter
"SETTING CLOCK" menu.
Press the Arrow button V to select
"AUTO CLOCK CH".
Press the ENTER button, then
press the Arrow button I_ or "ql
until you locate Auto Clock Set
station number. See item 3 above.
Press the SETUP button to exit the
screen,
rWVCR SETUP
TIMERPROGRAMMING
SE'rTING OLO¢_<
CHANNEL SET UP
USER'S SET UP
V CHtP SET UP
LANGUAGE [ENC_BSH]
CAPTtON [OFF]
ZERO RETURN
TIME SEARCH
_NDEXSEARCH
SETTING CLOOK
AUTO OLOOK [ON]
AUTO CLOCK OH SEARCH
AUTO CLOCK CH [ 45]
MANUALCLOCK SET
D ST [OFF]
5T*s'_ of heTVDV©!VOR
Once the TV/DVD/VCR is turned off, it will period-
bally check and set the correct date gradthne.
3 Be_ s A 'OC{OCKCqSEA%CI{
Press tile Arrow button _ to select "AUTO CLOCK
CH SEARCH".
Press the ENTER button. SEJ_[_N @ CLOCK
* The TV/DVD/VCR is now AUTO CLOCK [ON]
searching for the station which Au,o.................o_oo,<o,t<
MANUAL °LOGK SET
contain the auto clock set signal. °_' to<
The search for a signal may take
up to 20 seconds per charnel.
*"_ _" appears at the lower left of
the screen when the search has .................
ended. 0__0 1_
* Auto Clock station- write down
the number(s) that appear on the
screen. These are the auto clock
station(s) in your area. See item
4 below-.
* If no number(s) appear on the TV screen, there are
no stations in your area which contain the Auto
Clock signal. Auto Clock Setting is not possible.
Please use Manual Clock Setting on page 16.
Press the SETUP button to exit the screen.
NOTE: During Auto Clock CH Search, the picture
may be distorted. This is normal.
£_ s e thech8_ '® /sstc®ss_s he
£{ts<sa c C ssb; Se'/ sq S(ssa
Press tile SETUP button on the remote control.
17 EN
IC29
[ /7 _ _ TTV OPERAS l()N
[TV/VCR]
Press the POWER button to turn on tile
TV/DVD/VCR.
2 Se ec:t the chs_se '_4*>b®
Press the CHANNEL button A or V to select your
desired chmmel number or press the number on the
remote control.
Note for using the Number button on the remote
control:
®When selecting cable channels which am higher
than 99, press +100 first, then, press the last two
digits. (Example: to select channel 125, first press
'% 100" then press "2" zmd "5").
®You must precede single-digit channel numbers
with a zero (For example: 02, 03, 04 and so on).
Remember: If the TV/DVD/VCR is connected to a
cable box or satellite box, the TV/DVD/VCR must
be on CH3 or CH4, then the channel to be viewed
must be selected on the cable box or satellite box.
,3 As/_st so_ _d
Press the VOLUME button A or V
to adjust the volume.
VOLUME 20
IHHHHh..n
NOTES:
* If you press the CHANNEL button _ or vin the
DVD mode, you can chgmge the TV channels.
Even if you turn off the TV/DVD/VCR in the
DVD mode, when you turn it on again, it will go
into the TV/VCR mode.
[TV/VCR 1
Magnetism from nearby appliances and speakers
might affect the color of the TV picture.
If this happens, move this TV/VCR/DVD away from
the applhmce. If the color is still not correct, turn off
using the POWER button, unplug the power cord,
then plug it in again 30 minutes or so later.
[TV/VCRI
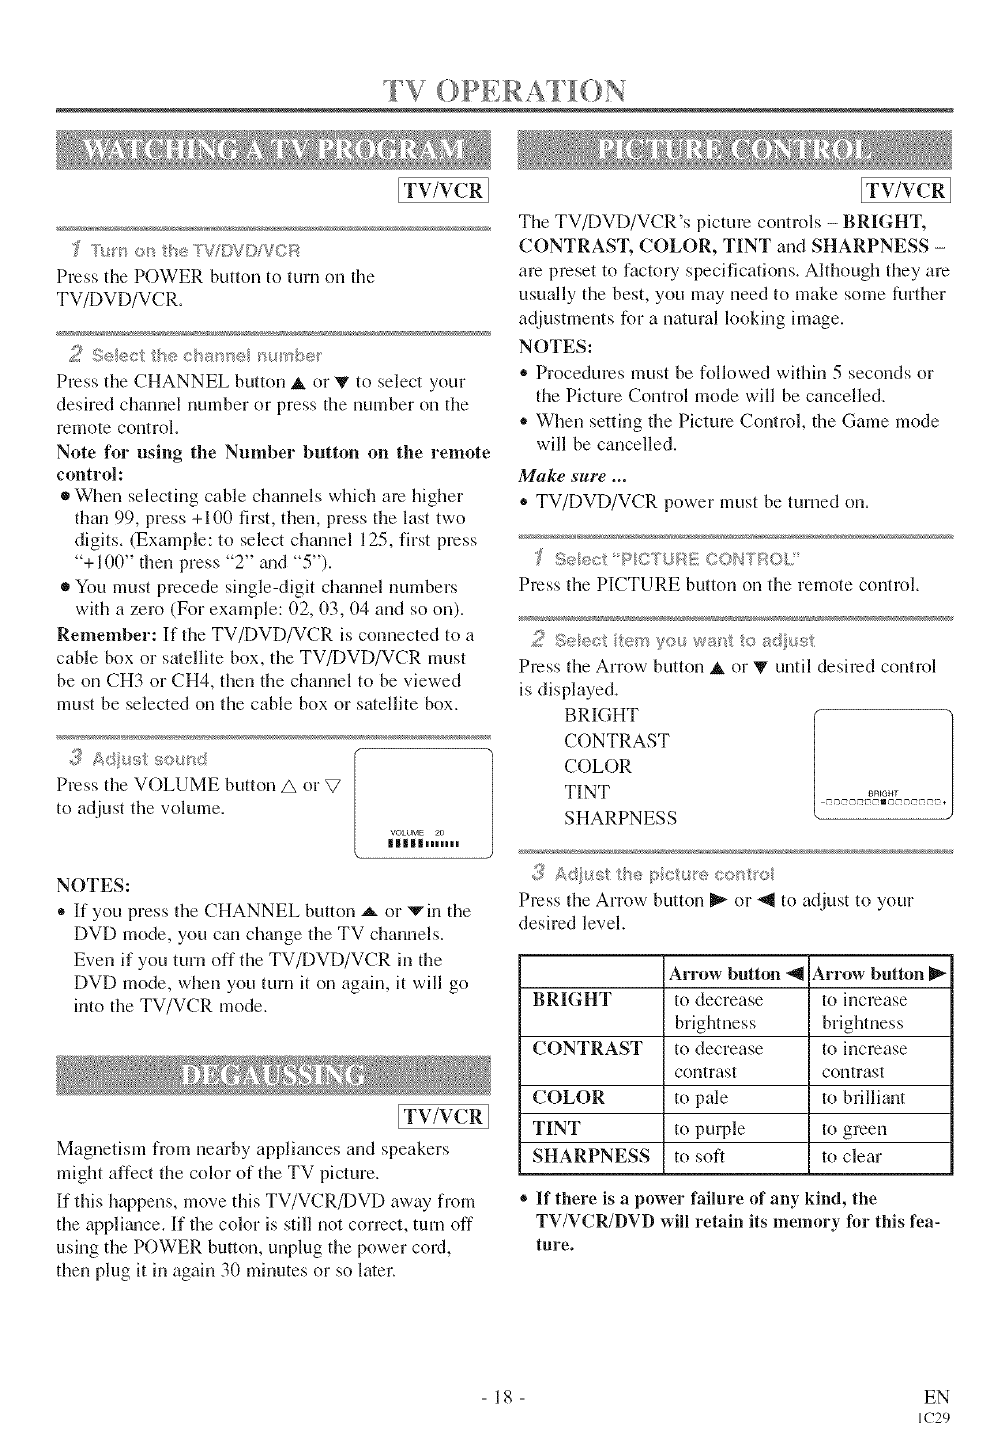
The TV/DVD/VCR's picture controls - BRIGHT,
CONTRAST, COLOR, TINT and SHARPNESS -
are preset to factory specifications. Although they are
usually the best, you may need to make some further
adjustments for a natural looking image.
NOTES:
• Procedures must be followed within 5 seconds or
the Picture Control mode will be cancelled.
• When setting the Picture Control, the Game mode
will be cancelled.
Make sure ...
• TV/DVD/VCR power must be turned on.
Press the PICTURE button on the remote control.
29eec _su wa_"_s adust
Press the Arrow button _ or V until desired control
is displayed.
BRIGHT
CONTRAST
COLOR
TINT
SHARPNESS
Press the Arrow button _ or _ to adjust to your
desired level.
Arrow button _11Arrow button
BRIGHT to decrease to increase
brightness brightness
CONTRAST to decrease to increase
contrast contrast
COLOR to pale to brilliant
TINT to purple to green
SHARPNESS to soft to clear
® If there is apower failure of any kind, the
TV/VCR/DVD will retain its memory for this fea-
ture.
18 EN
IC29
[TV/VCR]
You can view specially labeled (cc) TV programs,
movies, news, pre-recoMed tapes with either a dia-
logue caption or text display.
CAPTION mode: By choosing the caption mode, you
can watch dramas, movies and news while captioning
the dialogues _md the contents of news.
TEXT mode: By choosing the text mode, you can
watch half screen text information if you w_ult.
1-2: You may get these captions or text information
by selecting either "1" or "2". Caption "2" is used,
usually for a second language if available.
NOTE:
Not all programs are broadcast with closed captions.
Your television is designed to provide error free
closed captions from high quality _mtenna, cable mid
VCR signals. Conversely, poor quality signals are
likely to result in caption errors or no captions at all.
Common signal conditions which may cause captions
errors are listed below:
• Automobile ignition noise
,, Electric motor brush noise
• Weak snowy reception on TV screen
®Multiplex signal reception displaying picture
ghosts or airplane fluttec
• Playback of poorly recorded or worn VCR tapes.
NOTE:
If the TV/DVD/VCR displays a
black box on the TV screen, this ("
means that the TV/DVD/VCR is |
set to the TEXT mode. To clear |
screen, select [CAPTIONI l, [CAP-|
TION21 or [oFF]. k
Make sure ...
• TV/DVD/VCR power must be turned on.
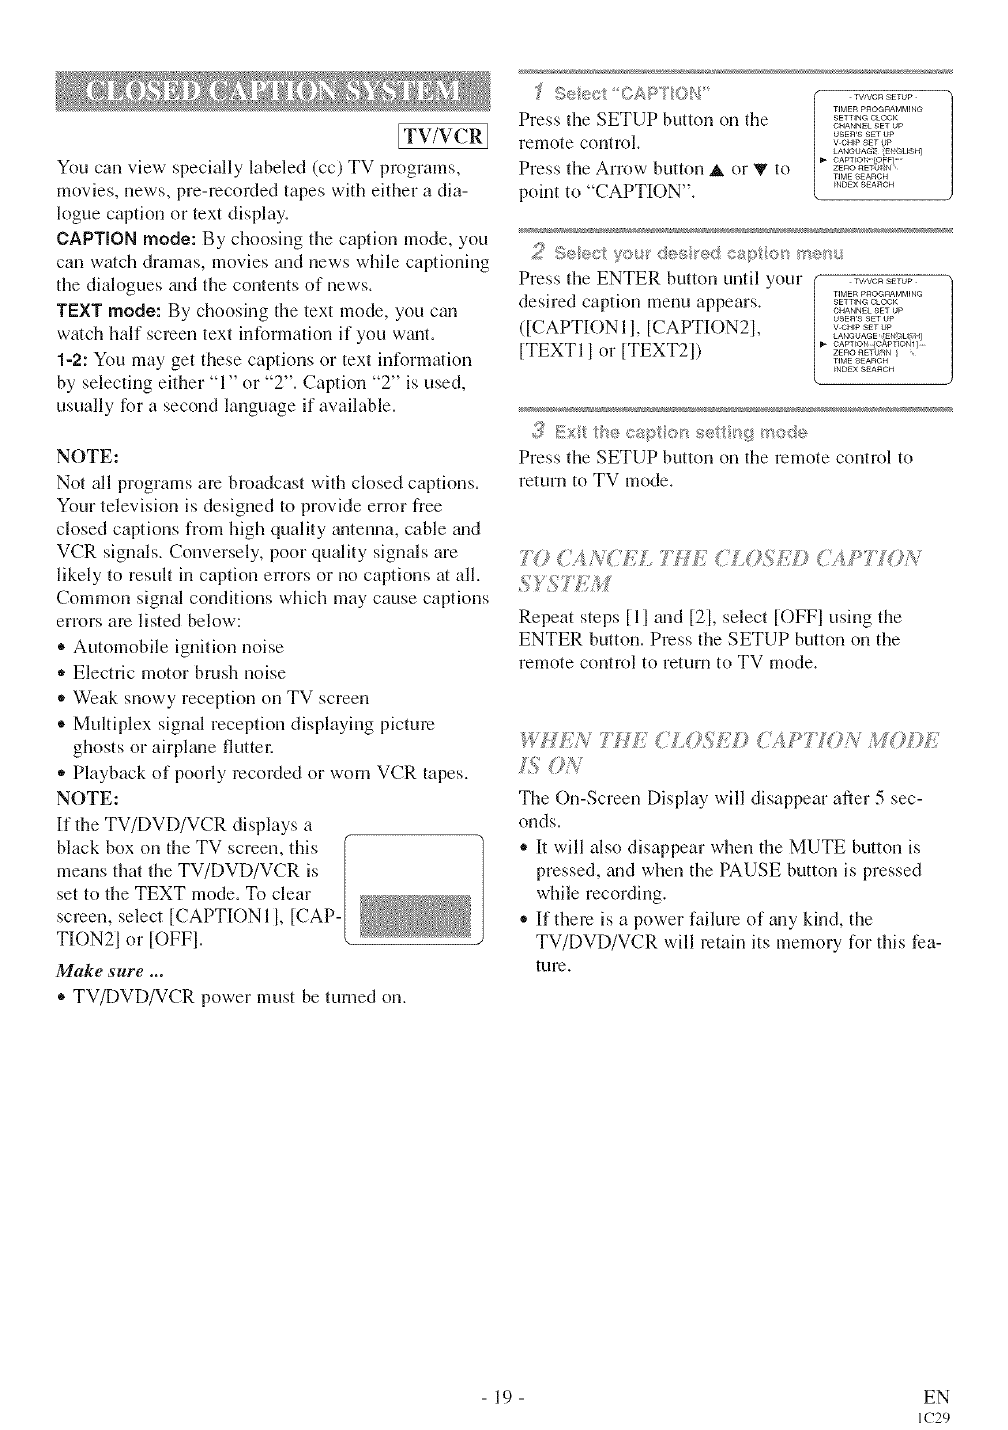
"£ .,,........
TIMER pROeRAMMIN@
Press the SETUP button on the .............
GIqANNEL SET UP
usEn's SET Up
remote control, v cH_psET up
LANGUAG Eh GL_SN]
O,_ PT_ON OFF ......
Press the Arrow button A or '_"to =.o_'o_.....
TIME ,qEARGH
point to "CAPTION". ...........
Press the ENTER button until your _,........
desired caption menu appears. ,_,,_...............o_oo,<
CHANNEL SET UP
usEn's SET UP
([CAPTION II, [CAPTION2I, v.........
LAblG/JAG E [EN_U b_]
[TEXTI 1 or [TEXT21) ..........=,o_,,_{........
riME SEARG_
_NDE×SEARCH
<'_Ex_ :bees> or_ ro:$e
Press the SETUP button on tile remote control to
return to TV mode.
,, , _ )
'_(} }4N(;'£'L _.£ "' =
Repeat steps [11and [21, select [OFFI using the
ENTER button. Press the SETUP button on the
remote control to return to WV ll]ode.
{E4LOSE© C2,,PTON 4 O¢>E
The On-ScreenDisplaywilldisappearafter5 sec-
onds.
• I/will also disappear when the MUTE button _s
pressed, and when the PAUSE button is pressed
while recording.
• If them is a power failure of any kind, the
TV/DVD/VCR will retain its memory for this fea-
ture.
19 EN
IC29
Make sure ...
• TV/DVD/VCR is turned on.
ITV/VCR]
_ Seect V©qPSE{TUR' TVfVGR SETUP
Press the SETUP button on the .................
SETTING CLOCK
CHANNEL SET UP
remote control, usea'sset up
V-CHtP SET UP
LANGUAGE {ENGMSH]
Press the Arrow button A or V to oAp,,o,[o<
ZERO RETURN
select "V-CHIP SET UP". ..........
INDEX SEARCH
Then, press the ENTER button.
4', _=F! eF Acoeg;5 c©<@ ACCdSS C©D8
!
Use the number buttons on the remote |
control to enter the access code. | _-r
• For the first trine set-up or in the L
event the TV/DVD/VCR has lost
power, enter tile default code of the numbers:
0000.
TV RATiNe
Press tile Arrow button A or V to _,_A_,_
CHANGE CODE
s. elect TV RATING .
Then, press the ENTER button.
/$ 5ockug'_V :_ograms
Press tile Arrow button A or V to
select "TV rating" that you wish to
block.
Press the ENTER button to turn it
[BLOCKI.
1
TV ¥[WEW] /
TV ¥7 [ ) [WEW] J
w G {wzw]
Tv p@( {WEW]
TV 14 ( [VIEW]
T_/ MA( [VIEW]
,,When you select the rating category and tmn it
[BLOCKI, the higher rating will turn [BLOCKI
automatically. Also, the lower rating will turn
[VIEWl automatically.
,, When you turn "TV-Y" to [VIEWl, tllen all ratings
will turn to [VIEWl automatically.
Selection Rating Category Explanations
TV-Y Appropriate for all children
TV-Y7 Appropriate for children seven and older
TV-G General Audience
TV-PG Parental Guidance suggested.
TV-I 4 Unsuitable for children under 14
TV-MA Mature audience only
_5' E×t t}_e V ©/*,p sett _g mode
Press the SETUP button on the remote control to
exit the screen.
V.dlJ/P 55_(7"{'7 S TB £A7 A<;5
Wllen you select the r*ings of TV-Y7,TV-PG,TV-14
or TV-MA you will have the option of selecting sub
rating categories.
Seect V_CI,{I::_S_::TUP'
Press the SETUP button on tile
remote control.
Press the Arrow button A or V to
select "V-CHIP SET UP". Then,
press the ENTER button.
TVNCR SETUP -
TIMER PROG_AMM_NC
SETTING CLOCK
CHANNEk SET UP
USEr'S SET UP
V-CHtP SET UP
LANGUAGE [ENeUSH]
CAPTEON [OF_]
ZERO RBTU_N
TIME SEARCH
_NDEX SEAnCH
_ D_t<_rAccess code ACCESS CODE
Use the number buttons on the
remote control to enter the access [
code. (Default code is 0000.)
¢'_¢ sS v chip SET UP
Press the Arrow button &or Y to 1,*........
MPAA RATING
.'elect TV RATING . o.........
Then, press the ENTER button.
_Seeet _g Sub,Rat r_g_#
Press the Arrow button V to select tile sub-rating you
wish to block. Then, press the ENTER button twice.
,, When you select [TV-Y7]:
Press the Arrow button _ or A to
select "FV" (Fantasy Violence).
Then, press tile ENTER button to
select [BLOCKI or [VIEW].
When you select [TV-PG], [TV-
141 or [TV-MA]:
Press the Arrow button _ or _ to
select "D"(Suggestive Dialog),
"L"(Coarse L_mguage),
"S"(Sexual Situation), or
"V"(Violence). Then, press the
f /
TV ¥7 [BLOCK]
FV [BLOCK]
TV p_ [BLOC_]
kD [BLOCK]
[BLOCK]
_/ [BLOGK]
[BLOCK]
ENTER button to select [BLOCKI or [VIEWI.
Note: Wllen you select [TV-MAI, "D" does not
appear on tile TV screen. "/
The sub-ratings which set to _ ¥ _,_w_
/
w Y7 ( ) [WEW]
[BLOCKI appears next to the rat- ,_ _ _,_
w pa [DLSV) [BLOCK]
in_ category ill the TV rating _Tv MA14{(DLSV)LBV) [BLOOK][BkOCK]
nIel*lU,
S ExttfeV_©hpset _gmode
Press tile SETUP button on tile remote control to
enter the setting and exit the screen.
- 20 - EN
IC29
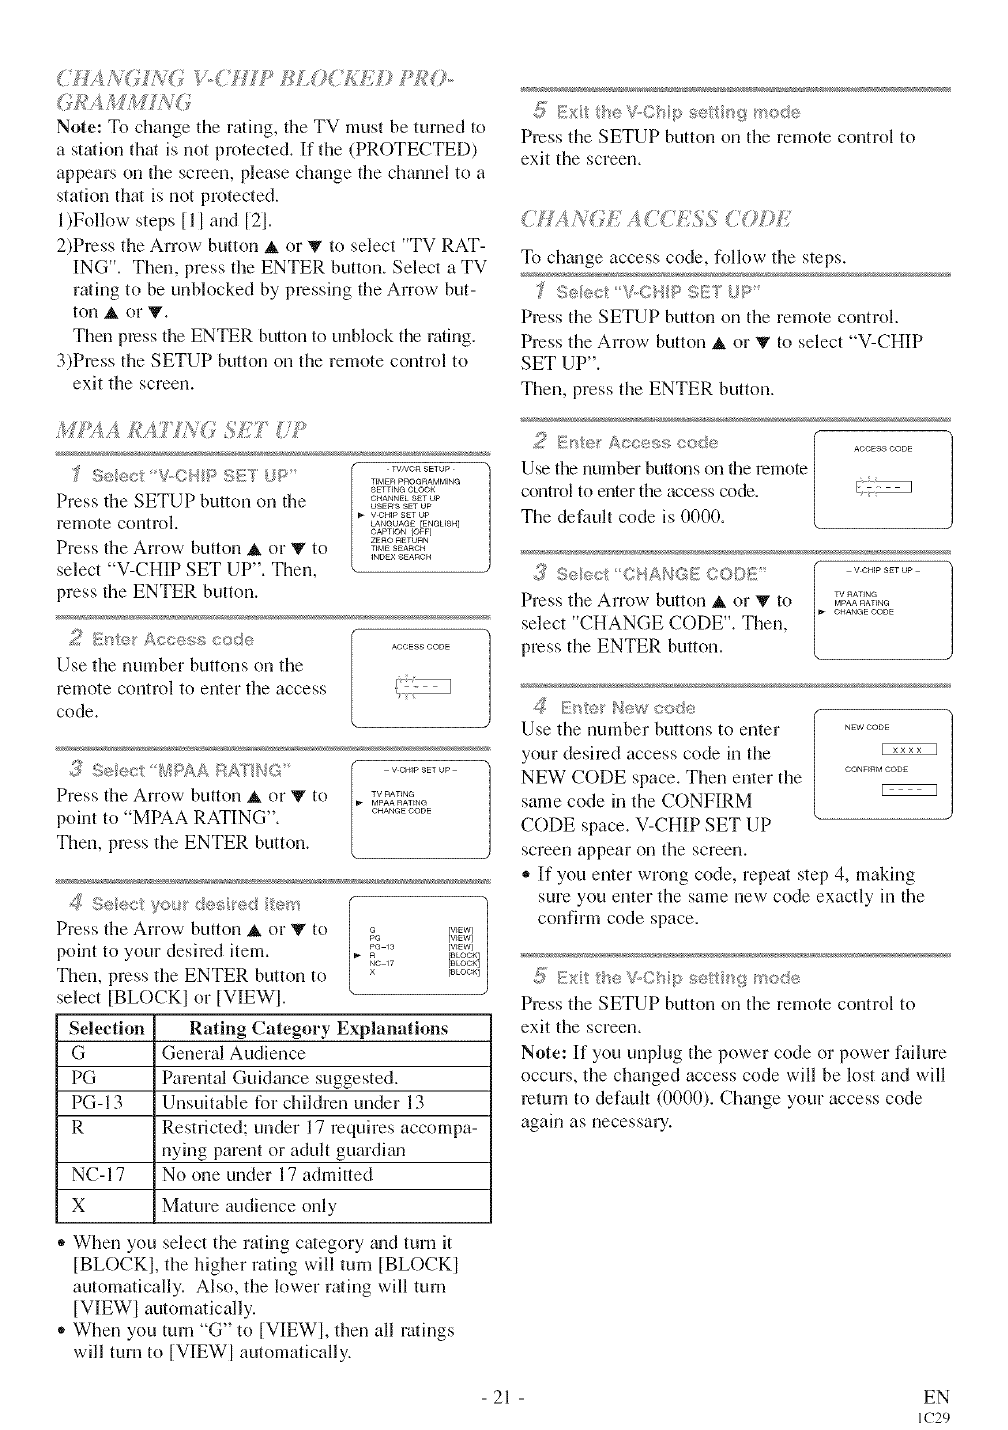
Note: To change the rating, file TV must be turned to
astation that is not protected. If the (PROTECTED)
appears on the screen, please change the channel to a
station that is not protected.
l)Follow steps [11 and [2].
2)Press the Arrow button A or V to select "TV RAT-
ING'L Then, press the ENTER button. Select aTV
rating to be unblocked by pressing the Arrow but-
ton A or V.
Then press the ENTER button to unblock the rating.
3)Press the SETUP button on the remote control to
exit the screem
A£AYL'V<_ f;iJ'
;f S®®ct V.CHP S_5"YUP.......... TIMER PROGRAMMING
SETTING 6LOC;K
Press the SETUP button on tile ............
USER'S SET UP
V OHm SET UP
remote control, c_Neume[ENeus.]
CAPTION [OFF]
ZEIqO RETUIqN
Press the Arrow button A or V to ,_,_o,
INDEX ,qEARG H
select "V-CHIP SET UP". Then,
press the ENTER button.
_X _'!H'{@ A<<e$ #')<_9 AOOESSOODE
Use the number buttons on the
remote control to enter the access s_
code.
,3 Seec B_puS_AP<<?T'NG ','.........
Press the Arrow buttol] A or Y to .......
MPAA PATEN@
point to "MPAA RATING". ..........
Then, press the ENTER button.
Press the Arrow button A, or V to } ]_ [w_]
[WEW]
[WEW]
point to your desired item. _ 13 [BLOCK]
NG 17 [BLOCK]
Then, press the ENTER button to [_oo,q
select [BLOCKI or [VIEW].
Selection Rating Category Explanations
G General Audience
PG Parental Guidance suggested.
PG-I 3 Unsuitable for children under 13
R Restricted; under 17 requires accompa-
nying parent or adult guardhm
NC-17 No one under 17 admitted
X Mature audience only
,, When you select the rating cmegory _md turn it
[BLOCK], the higher rating will turn [BLOCK]
automatically. Also, the lower rating will turn
[VIEWI automatically.
,, When you turn "G" to [VIEWI, then all ratings
will turn to [VIEWI automatically.
S: Ext theV.Chp settng mode
Press the SETUP button on the remote control to
exit the screen.
A<}EACdESS C0©£
To change access code, %llow the steps.
_ %eec * EF{;Pg¢'}a i_ ........
Press the SETUP button on tile remote control.
Press the Arrow button A or _ to select "V-CHIP
SET UP".
Then, press the ENTER button. I
Use the number buttons on the remote
control to enter tile access code.
The default code is 0000. / J..........
;I,,_,,__:;,CODU
TV RATING
Press the Arrow button _ or '_' to =_=_,_
OHANGE OODE
select "CHANGE CODE". Then,
press the ENTER button.
d< E'¢<÷_New code
Use the number buttons to enter ._wooo_
),our desired access code in the
NEW CODE space. Then enter the ...........
cEzzz_
same code in the CONFIRM
CODE space. V-CHIP SET UP
screen appear on the screen.
,, If you enter wrong code, repeat step 4, making
sure you enter the same new code exactly in the
confirm code space.
S: E×it the V.CHiI setti _g mode
Press the SETUP button on the remote control to
exit the screen.
Note: If you unplug the power code or power failure
occurs, the changed access code will be lost and will
return to default (0000). Ch_mge your access code
again as necessary.
21 EN
IC29
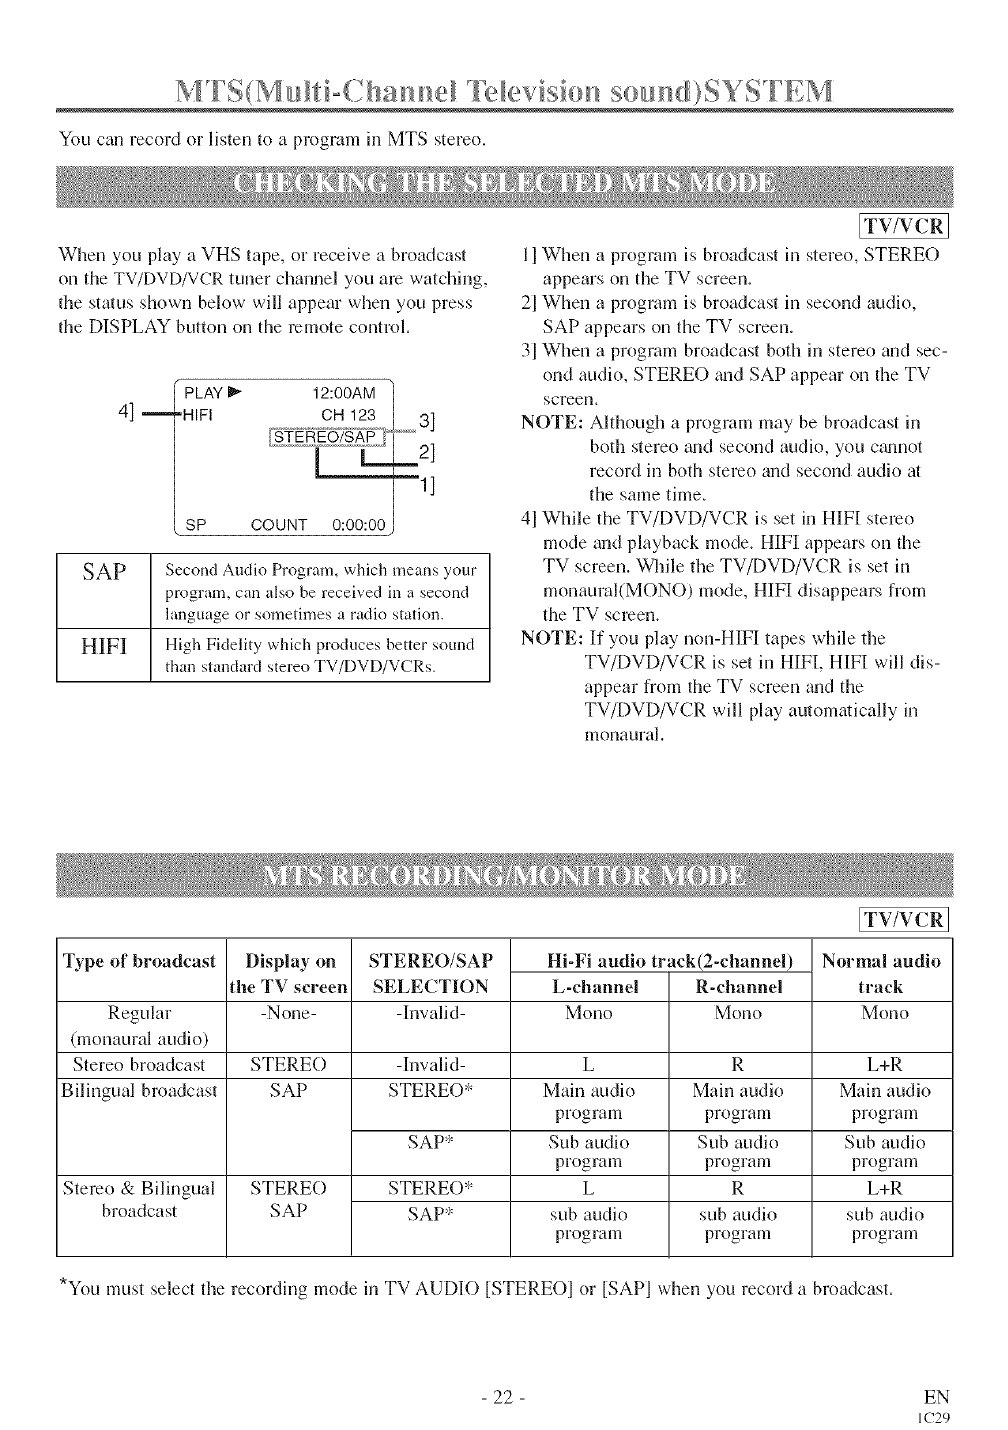
You can record or listen to a program in MTS stereo.
When you play a VHS tape, or receive a broadcast
on the TV/DVD/VCR tuner channel you are watching,
the status shown below will appear when you press
the DISPLAY button on the remote control.
4]m •PLAY _ 12:00AM
"HIFI OH 123 3]
m 2]
--1]
SP COUNT 0:00:00
SAP Second Audio Program, which means your
program, can also be received in a second
language or sometimes a radio station.
HIFI High Fidelity which produces better sound
than standard stereo TV/DVD/VCRs.
[TV/VCR]
II When a program is broadcast in stereo, STEREO
appears on the TV screen.
2] When a program is broadcast in second audio,
SAP appears on the TV screen.
3] When a program broadcast both in stereo and sec-
ond audio, STEREO _mdSAP appear on the TV
screen.
NOTE: Although a program may be broadcast in
both stereo _md second audio, you c_umot
record in both stereo and second audio at
the same time.
41While the TV/DVD/VCR is set in HIFI stereo
mode and playback mode. HIFI appears on the
TV screen. While the TV/DVD/VCR is set in
monaural(MONO) mode, HIFI disappears from
the TV screen.
NOTE: If you play non-HIFI tapes while the
TV/DVD/VCR is set in HIFI, HIFI will dis-
appear from the TV screen _mdthe
TV/DVD/VCR will play automatically in
monaural.
Type of broadcast Display on
the TV screen
-None-
STEREO/SAP
SELECTION
-Invalid-
Hi-Fi audio track(2-channel)
L-channel R-channel
Regular Mono Mono
(monaural audio)
Stereo broadcast STERE() -Invalid-
Bilingual broadcast SAP STEREO*
Stereo & Bilingual
broadcast
SAP*
STERE()*
SAP*
STERE()
SAP
L
Main audio
program
Sub audio
program
L
sub audio
program
R
Main audio
program
Sub audio
program
R
sub audio
program
[TV/VCR
Normal audio
track
Mono
L+R
Main audio
program
Sub audio
program
L+R
sub audio
program
*You must select the recording mode in TV AUDIO [STEREOI or [SAPI when you record a broadcast.
- 22 - EN
IC29
Make sure ...
®TV/DVD/VCR power must be turned on.
?YJ_._£/,£('T HU I M(?Dff
"7 .... <'_'::_>< rp
Press the SETUP button on the ...........
TI ME1:t pROGRAMMiNG
SErrlNQ CLOCK
lemote control. CHANNEL SET Up
_- USER'S SET UP
V-CHtp SET UP
Press the Arrow button A or V to _A,_OA__,_,_
CAPTEON [OFF]
ZERO RETURN
point to "USER'S SET UP". Then, •.........
_NDEX 8EAnOH
press the ENTER button.
,_ _ ,_,, _ J _ .... _ USER'S SET UP /
Press the Arrow button A or $' to _E,,A_ Eo<
point to"VCR AUDIO". ......... Eo<
AUTO RETURN [OFF] s
VCR AUDIO ...... Hig _
TV AUDIO D1EnSO]
._}_See,:/i' :] .... ....... -?
Press the ENTER button until ...... _om [
[HIFII appears. R......... _o_
AUTO RETURN /OF]
VCR AUDIO IH_FI] ......
TV AUDIO {ST:ER_©]
_$ To e_urs oTV _'_ode
Press the SETUP button on the remote control to
return to TV mode.
7'(} S£L£C7 MON(? M(?D£
[TV/VCR ]
You can chgmge the selection to "MONO" if you
want to listen to HIFI tapes in normal audio play-
back.
1) Press the SETUP button on the remote control.
Press the Arrow button & or _ to point to "USER'S
SET UP".Then, press the ENTER button.
2) Press the Arrow button A or V to point to
"VCR AUDIO".
3) Press the ENTER button until [MONOI appears.
4) Press the SETUP button on the remote control to
return to TV mode.
7(? ?£ CJg'.......
ISeec /2_i_E# {]_SE:T U_>
Press the SETUP button on the _,........
TIMER PROGRAMMING
remote control. SEW_N_CLOCk<
CHANNEL SET UP
uaEn'8 SET UP
Press the Arrow button & or $' to _o,_E,_
LANGLIAGE [_NGUSH]
CADTt©N {©FF]
point to "USER'S SET UP". ,,_EARCH
_NDEXSE_nCH
Seec:t TVAUDO
Press the Arrow button A or Y to
point to"TV AUDIO".
NOTES:
" Normally, "H][FF' should be selected for playback
with HIF[ sound.
" When you play non-HIF[ tapes, the TV/DVD/VCR
will play automatically in the monaural mode.
®The TV/DVD/VCR records automatically MTS
broadcasts in HIF[ stereo sound unless you select
SAP mode recording before you begin recording.
23
.3 Scoot [STEREO] [SAP] or [MONO]
Press tl_e ENTER button until [STEREOI, [SAPI, or
[MONO] appears.
/_ >.>ret_ to 'f,'Vmode
Press the SETUP button on the remote control to
return to TV mode.
NOTES:
You must select the recording mode,either TV
AUDIO [STEREOI or [SAP] when you record a
broadcast.
Refer to "MTS RECORDING/MONITOR
MODE".
" If you select second audio when second audio is
not
available, the TV/DVD/VCR will record normal
audio.
®The TV/DVD/VCR records automatically MTS
broadcasts in HIFI stereo sound unless you select
SAP mode recording before you begin recording.
EN
IC29
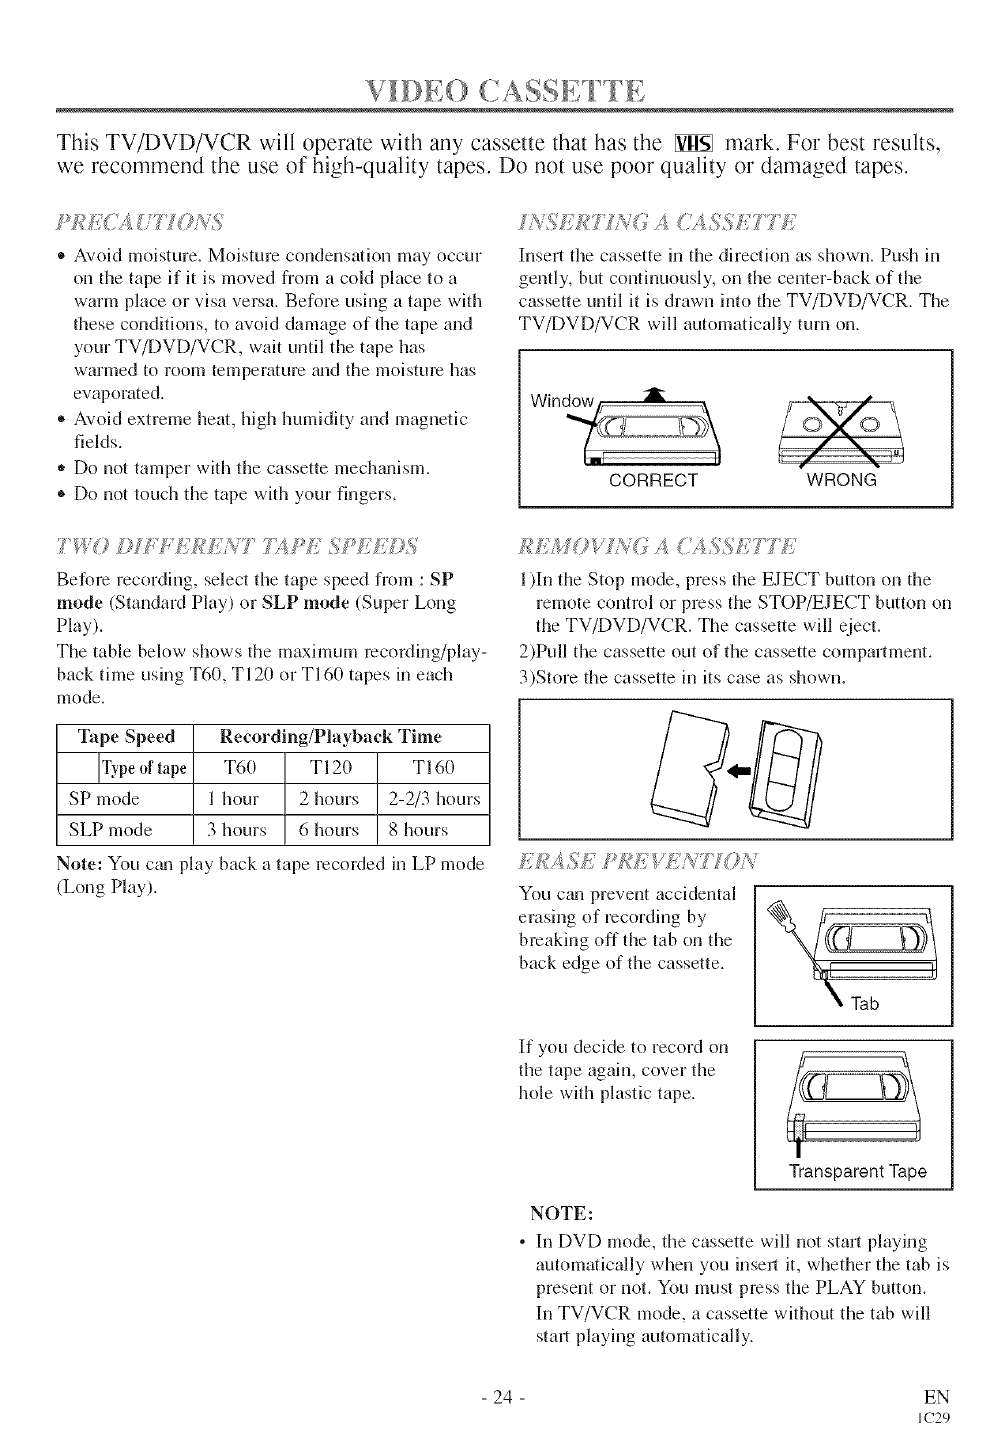
/:7(, ' 7
IOl, ) (.ASSE I [I .....
This TV!DVD!VCR will operate with any cassette that has the _ mark. For best results,
we recommend the use of high-quality tapes. Do not use poor quality or damaged tapes.
. Avoid moisture. Moisture condensation may occur
on the tape if it is moved from a cold place to a
warm place or visa versa. Before using a tape with
these conditions, to avoid damage of the tape and
your TV/DVD/VCR, wait until the tape has
warmed to room temperature gradthe moisture has
evaporated.
* Avoid extreme heat, high humidity and magnetic
fields.
o Do not tamper with the cassette mechgmism.
® Do not touch the tape with your fingers.
/NSt;W7 >_V(7A_',,_SSf{777:7
]{nsertthe cassette in the direction as shown. Push in
gently, but corithmously, on the ceriter-back of tile
cassette until it is drawn into the TV/DVD/VCR. The
TV/DVD/VCR will automatically turn on.
ii
CORRECT 'i%'J
WRONG
T+I4'Y) )17 DIT,DI_NT 7>¢s_fl SPII;C])5
Before recordhig, select the tape speed from : SP
mode (Standard Play) or SLP mode (Super Long
Play).
The table below shows the maximmn recording/play-
back time using T60, TI 2(1or T160 tapes in each
mode.
Tape Speed Recording/Playback Time
IType of T60 T120 T160
tape
SP mode 1 hour 2 hours 2-2/3 hours
SLP mode 3 hours 6 hours 8 hours
Note: You c_ul play back a tape recorded in LP mode
(Long Play).
Ii'EMOW?C<; A[;QSSETTDI
1)In the Stop mode, press the EJECT button oil the
remote control or press the STOP/EJECT button on
the TV/DVD/VCR. The cassette will eject.
2)Pull the cassette out of the cassette compartment.
3)Store the cassette in its case as shown.
KDIASI[ I*Rk:WIi)_77'ON
You cgmprevent accidental
erasing of recording by
bleaking off tile tab on tile
back edge of the cassette.
\ Tab
If you decide to record on
tile tape again, cover the
hole with plastic tape.
Transparent Tape
NOTE:
• In DVD mode, tile cassette will not start playing
automatically when you insel it, whether tile tab is
present or not. You must press tile PLAY button.
In TV/VCR mode, a cassette without the tab will
start playing automatically.
- 24 - EN
IC29
[TV/VCRI
Make sure ...
®TV/DVD/VCR power must be turned on.
If the erase-protection tab has been removed, the
TV/DVD/VCR will start playback automatically,
Press the PLAY button,
Press the STOP button when play-
/
back is completed.
NOTES:
* If you press the PLAY button (of the TV/VCR side)
in the DVD mode, you can stm_,the VCR playback.
"If you press the SELECT button in the VCR play-
back, it will stop and the mode will chzmge to the
DVD mode. Ill addition, the same thing happens if
you press with the DVD side PLAY button or the
OPEN/CLOSE button.
ITV/VCRI
During pause, press the FWD button to reduce the
playback speed. The TV/DVD/VCR mutes the sound
dm°ing slow motion. Press the PLAY button to return
to normal playback.
NOTE: If it is left in the Slow mode for more than
five minutes, the TV/DVD/VCR will automatically
go into the Stop mode.
ITV/VCRI
This feature is very useful in finding or skipping over
a pal_,icular scene on a tape. In this mode, the sound
will be muted.
l)You may view a video tape at a high speed in
either a forward or reverse direction by pressing
the EFWD or REW button during playback. (in the
SP /LP /SLP modes)
NOTE:
*If you press the EFWD or REW button on the
front pmlel in the DVD mode, the VCR forward
or reverse will starL Please press the STOP /
EJECT button once to stop it, twice to eject it.
2)Press it again and the TV/DVD/VCR will now search
in super high speed. (in the LP /SLP modes only)
NOTE:
-Tapes recoNed in the SP or LP mode will dis-
play a noise bar on the TV screen and the picture
may revert to Black and White. This is normal.
3)Press the PLAY button to return to normal speed.
[TV/VCR]
®Tracking adjustment will be set automatically
(Digital Tracking function) when you start play-
back.
-However when playing pre-mcorded tapes or tapes
recorded on units other than your own, noise lines
(black m_dwhite streaks) may appear on the play-
back picture. If this occurs, you can adjust the
tracking control mmmally by pressing the CHAN-
NEL button A. or V until the streaks disappear. To
return to the DTR function, stop the tape once and
start playback again.
-You cgm reduce the noise lines by pressing the
CHANNEL button A or V in slow mode, too.
Tracking adjustment in Slow mode will not be set
automatically.
ITV/VCRI
Youcan view a still pictureon theTV screenduringplayback
(theStill mode).Pressthe PAUSEbuttonduring playback.
Onlytapes recordedin the SLPmode willshowthe least
amountof lines.Pressthe PLAYbutton to returnto playback.
NOTES:
,, You can advance the picture one frame at a time by
pressing the PAUSE button during the Still mode.
•If it is left in the Pause mode for more than live
minutes, the TV/DVD/VCR will automatically
switch to the Stop mode.
25
ITV/VCRI
In the Pause/Still mode only, when the picture begins
to vibrate vertically, stabilize the picture by pressing
the CHANNEL button A or V.
NOTE:
[f there are video noise lines on the screen, see Tracking
Adjustment section. EN
IC29
SP/!]CIAI. PLAYBACI(
Make sure ...
. TV/DVD/VCR power must be turned on.
,, Insert a prerecorded tape.
[TV/VCR 1
This functkn_ enables you to improve the picture
quality wheu playing back worn cassettes such as
rented tapes.
TVfVC R SETUp
TIMER PROGRAMMING
Press the SETUP button on the .............
GblANNEL SF UP
remote control, vUSE"So_pas,SETup°'
LANOUAG[ [ENGLFSH]
CAPTION [OFF]
Press the Arrow button & or V to =,oR_,u,,
TIME SEARCH
point to "USER'S SET UP". ...........
Then, press the ENTER button.
.._ AEI'TAL/o jO_} .... ...... /
I
Press the Arrow button A or V to .... ....
RENTAL ........[ON] .......
point to "RENTAL". ............ o_:
AUTO RETURN tUFF]
VCR AUD_© [HIF_]
Press the ENTER button until tONI ....... _......
appears.
Press the SETUP button on the remote control to
return to the TV mode.
_) Sat p sybsck
Press the PLAY button to start playback. "RENTAL
PLAY _,_" appears.
®Once you select the Rental mode, it stays in effect
even after you tunl off the TV/DVD/VCR.
?]0 (}%/VCEL 7'M/( £E/C?XL £_:O:>E
Repeat steps [1] and [2], select [OFF] using tile
ENTER button on the remote control. Press the
SETUP button on the remote control to retunl to TV
mode.
If there is apower failure of any kind, the
tv/vcr/dvd will retain its memory l_r this feature.
[TV/VCR]
The TV/DVD/VCR has the auto repea function tha
allows you to repeat a tape indefinitely without
touching the PLAY button.
ALL REPEAT: Repeat playback from the beginning
to the end of the tape.
BLANK REPEAT: Repeat playback from the begin-
ning to a blank pair, which is blank for more than
10 seconds.
Press the Arrow button &. or Y to
point to "REPEAT PLAY".
Press the ENTER button repeatedly
until your desired selection [ALL]
or [BLANK] appears.
,, ....... , #
_: _;:_;;,e 'U:;sERS !51!? c,P ............
TIMER PRO@RAMMJNO
Press the SETUP button on the .............
CHANNEL SET UP
US_'S SF UP
renlote control. VCH_PSETUP
LANOUAGE [ENOUSH]
CAPTION iOFF]
Press the Arrow button & or _ to ==oRE_U=N
TIME SEARCH
_NDEXSEARCH
point to "USER'S SET UP".
Then, press the ENTER button.
9 !;)eec/;4,,,U' o' :_,,/t_,P,IW
USEr'S SET UP d
RENTAL © F
REPEAT PLAY jALL]
AUTO RETURN iOFF_
VCR AUDIO [Iq WI]
TV AUDIO [STEREO
Press the SETUP button on the remote control to
return to the TV mode.
_g Sts,:t p syback
Press the PLAY button to start the Repeat Play.
"REPEAT PLAY _-" appears.
* Once you select the Repeat Play mode, it stays in
effect even after you turn off the TV/DVD/VCR.
,, If the Rental mode is set [ONh the "RENTAL
PLAY t_'" display has priority.
7Y} t"/_ ?,(( £L Y/l!} £!i;_S T :_£A}" :AOib£
Repeat steps Eli and [21, select tUFF] using tile
ENTER button on the remote control. Press the
SETUP button on the remote control to retunl to TV
mode.
If there is apower failure of any kind, the
TV/DVD/VCR will retain its memory for this fea-
ture.
- 26 - EN
IC29
Make sure ...
, TV/DVD/VCR power must be turned on.
oInsert a tape.
[TV/VCR 1
This function allows you to search easily a beginning
point that you want to review by rewinding or fast
forwarding.
NOTE:
Zero Return WILL NOT work on a blank tape or a
bhmk portion of a tape.
Rewind or fast forwaN the tape to the beginning
point at which you w_mt to review.
Press the C.RESET button repeatedly.
._ Be{l _ record>g o psvback
Press the RECORD or PLAY button.
Press the STOP button when recording or playback is
completed.
Press the SETUP button on the ..........
T_qER PROGRAMMrNG
remote control, sErrENe CLOCK
CHANNEL SET UP
USER'S SET UP
Press the Arrow button A or V to _-o_,_o_
LANGUA@E [ENGLISH]
point to "ZERO RETURN". - _o,Fo_,E°_
TEMESEAROH
INDEX SEARCH
Then. press the ENTER button.
The counter will appear on the TV screen.
The tape will automatically stop when the counter
returns to 0:00:00.
This function will not operate in recording mode.
* This function is not operative when a cassette tape
is not inserted in the TV/DVD/VCR.
In the example below: To watch a program after 2
hour 50 minutes from the present position, in either
direction.
/_e_t a tape.
2 Seec 7'ME SEAF¢©94_ r,ode
Press the SETUP button on the ..........
TIMER PROGRAMMING
remote control, s_w_._c_oc_<
CHANNEL SET Up
tJSER'g SET UP
Press the Arrow button & or V to _o,,_o_
LANGUAGE [ENGUSH]
point to "TIME SEARCH". z_o......._,o.._°<
T_MESEARCH
INDEX SEARCH
Then. press the ENTER button.
Press the Arrow button _ or _ until (,,_a_o_
your desired time appears. [ :_t.....
(Example: "2:50" stands for 2 hours/
50 minutes) [
If 3ou wish to cancel the Time
Search at this point, press the SETUP button on the
remote control.
By pressing the Arrow button _ or _. the
TV/DVD/VCR will rewind or fast forward to tl_e
specified point.
The thne counts down as the searching progresses.
When 0:00 is reached, the tape will start playback
automatically.
_, , "!_ _ _'_s_ ¸ _
(,_ (, ,u< s_ ';r/_% '_/M/' S# 4£('1H f}'_,
[TV/VCR]
The Time Search function makes it possible to quick-
ly adwmce the tape to your desired position simply
by entering the exact amount of playback time you
want to skip.
NOTES:
,, Time Search can be set up to a maximum of 9
hours 50 minutes (9:5(I) by 10 minutes at a time.
Press the STOP/EJECT button on the TV/DVD/VCR
or the STOP button on the remote control. This will
delete the selected time.
- 27 - EN
IC29
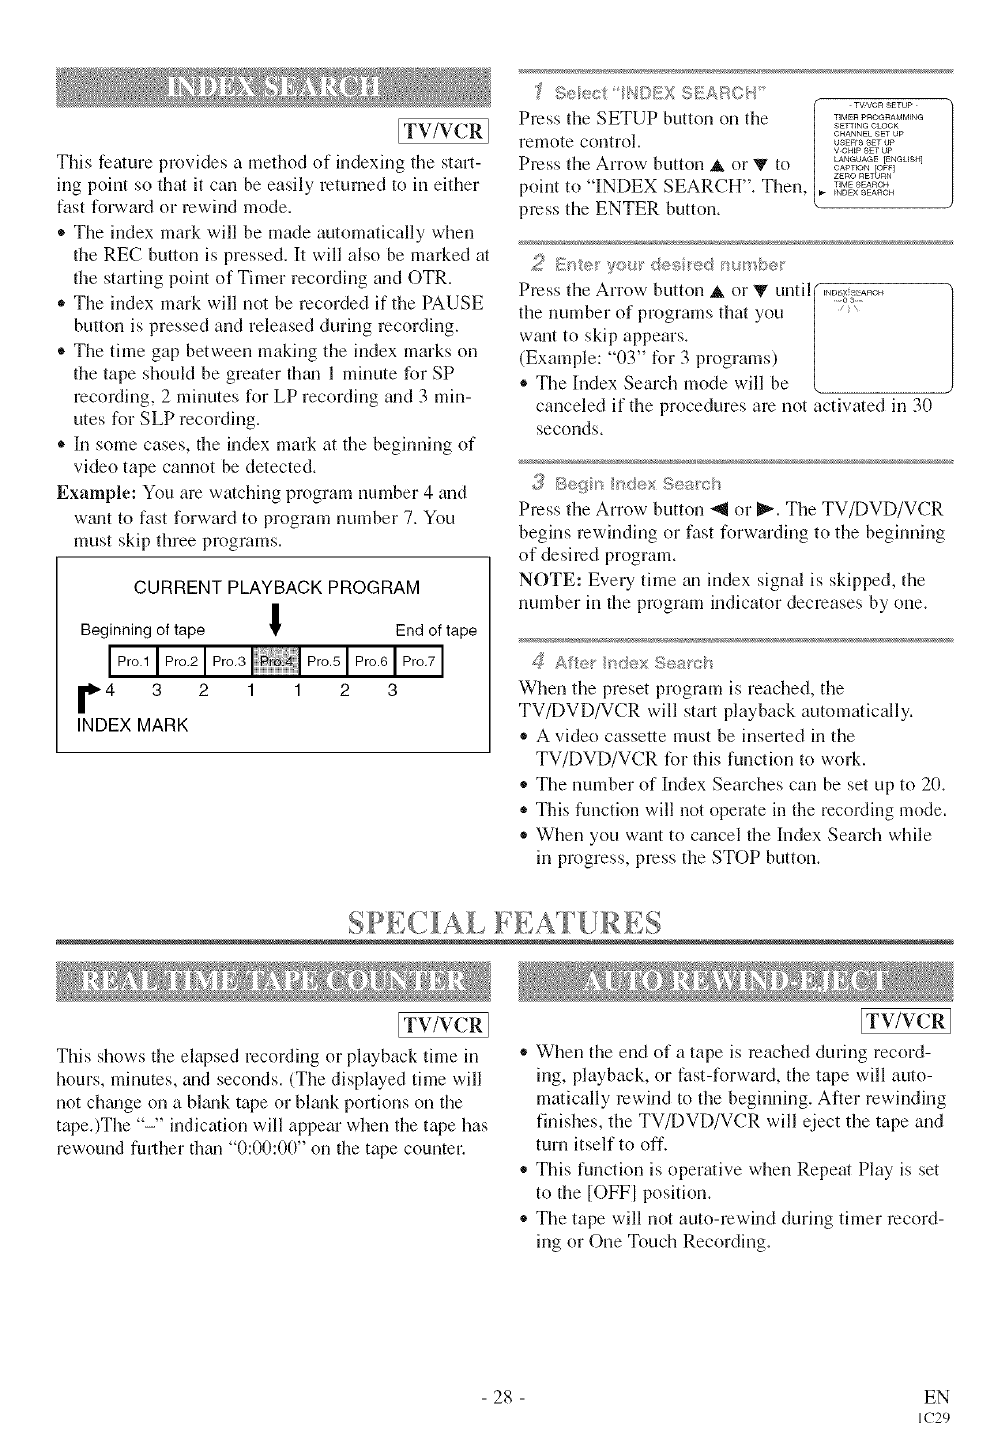
[TV/VCR 1
This feature provides a method of indexing the start-
ing point so that it can be easily returned to in either
fast forward or rewind mode.
* The index mark will be made automatically when
the REC button is pressed. It will also be marked at
the starting point of Timer recording and OTR.
,, The index mark will not be recorded if the PAUSE
button is pressed and released during recording.
®The time gap between making the index marks on
the tape should be greater thtm 1 minute for SP
recording, 2 minutes for LP recording grad3 min-
utes for SLP recording.
* In some cases, the index man at the beginning of
video tape cannot be detected.
Example: You am watching program number 4 and
wgmtto fast forward to program number 7. You
must skip three programs.
CURRENT PLAYBACK PROGRAM
m
Beginning of tape I End of tape
F4 3 2 1 1 2 3
INDEX MARK
TVf_/GR gETUp
Press the SETUP button on the ................
SETTING CLOCK
relnote control, o._ku,ea.ssetS_upUp
V-CHIp SET UP
LANGUAGE [ENGLISH]
Press the Arrow button at or V to o_,,o_Eom
ZERO RETURN
point to "INDEX SEARCH". Then. •.........
_NDE× SEARCH
press the ENTER button.
Press tile Arrow button at or V until I _o_#......
the number of programs that you / :
w_mt to skip appears. /
(Example: "03" for 3 programs) ]
® The Index Search mode will be {
canceled if the procedures are not activated in 30
seconds.
Press the Arrow button "_1or _. The TV/DVD/VCR
begins rewinding or fast forwarding to the beginning
of desired program.
NOTE: Every time an index signal is skipped, the
number in the program indicator decreases by one.
When tile preset program is reached, tile
TV/DVD/VCR will start playback automatically.
,, A video cassette must be inserted in the
TV/DVD/VCR for this function to woN.
* Tile nmnber of Index Searches can be set up to 20.
. This function will not operate in the recording mode.
,, When you want to crewel the Index Search while
in progress, press the STOP button.
SP :,C AL bEAI [ RES
[TV/VCR 1
This shows the elapsed recording or playback time in
hours, minutes, and seconds. (The displayed time will
not ch_mge on a bl_mktape or bhmk portions on the
tape.)The "-" indication will appear when the tape has
rewound fresher them "0:00:00" on the tape counter.
[TV/VCR ]
When the end of a tape is reached during record-
ing, playback, or fast-forward, the tape will auto-
matically rewind to the beghming. After rewinding
finishes, the TV/DVD/VCR will eject the tape and
turn itself to off.
This function is operative when Repeat Play is set
to the [OFFI position.
,, Tile tape will not auto-rewind during timer record-
ing or One Touch Recording.
28 EN
IC29
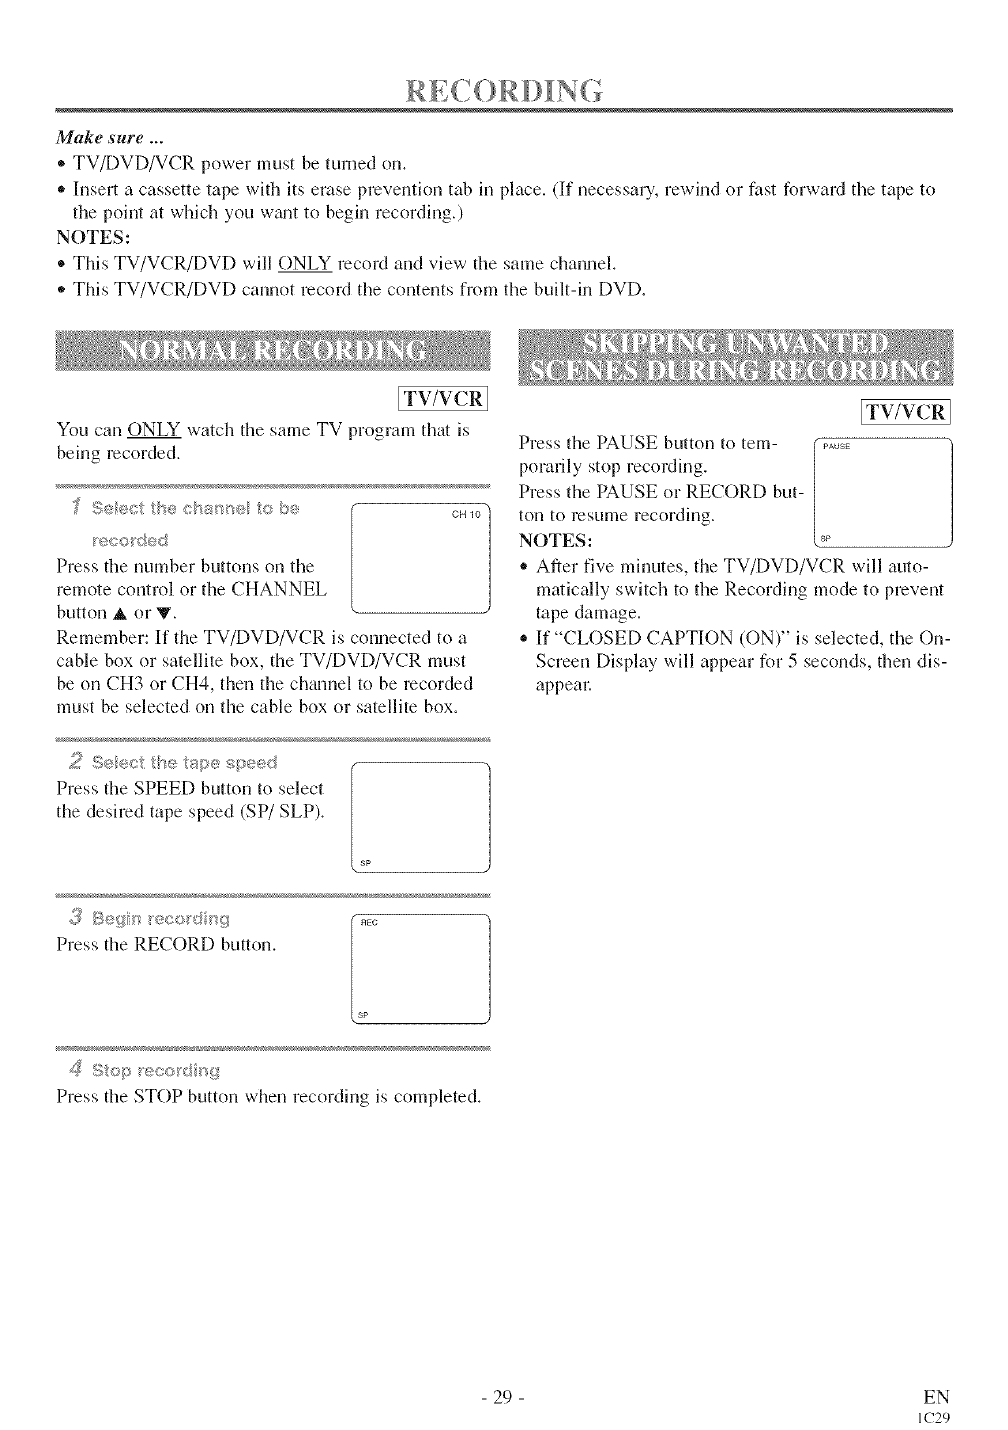
Make sure ...
• TV/DVD/VCR power must be turned on.
• Insert a cassette tape with its erase prevention tab in place. (If necessary, rewind or fast forward tile tape to
the point at which you wgmtto begin recording.)
NOTES:
®This TV/VCR/DVD will ONLY recoM and view tile same channel.
,, This TV/VCR/DVD cannot record tile contents from tile built-in DVD.
[TV/VCR 1
You can ONLY watch the same TV program that is
being recorded.
1
Press tile number buttons on the
remote control or the CHANNEL
button _. or Y.
Remember: If the TV/DVD/VCR is connected to a
cable box or satellite box, the TV/DVD/VCR must
be on CH3 or CH4, then the channel to be recorded
must be selected on the cable box or satellite box.
f
Press tile SPEED button to select [
the desired tape speed (SP/SLP). [
sp
Press tile RECORD button.
s
Press the STOP button when recording is completed.
ITv/vcRI
Press the PAUSE button to tem- (.....
/
porarily stop recording.
Press the PAUSE or RECORD but-
ton to resume recording.
NOTES: _
After five minutes, the TV/DVD/VCR will auto-
matically switch to the Recording mode to prevent
tape damage.
,_ If "CLOSED CAPTION (ON)" is selected, the On-
Screen Display will appear for 5 seconds, then dis-
appear.
29 EN
IC29
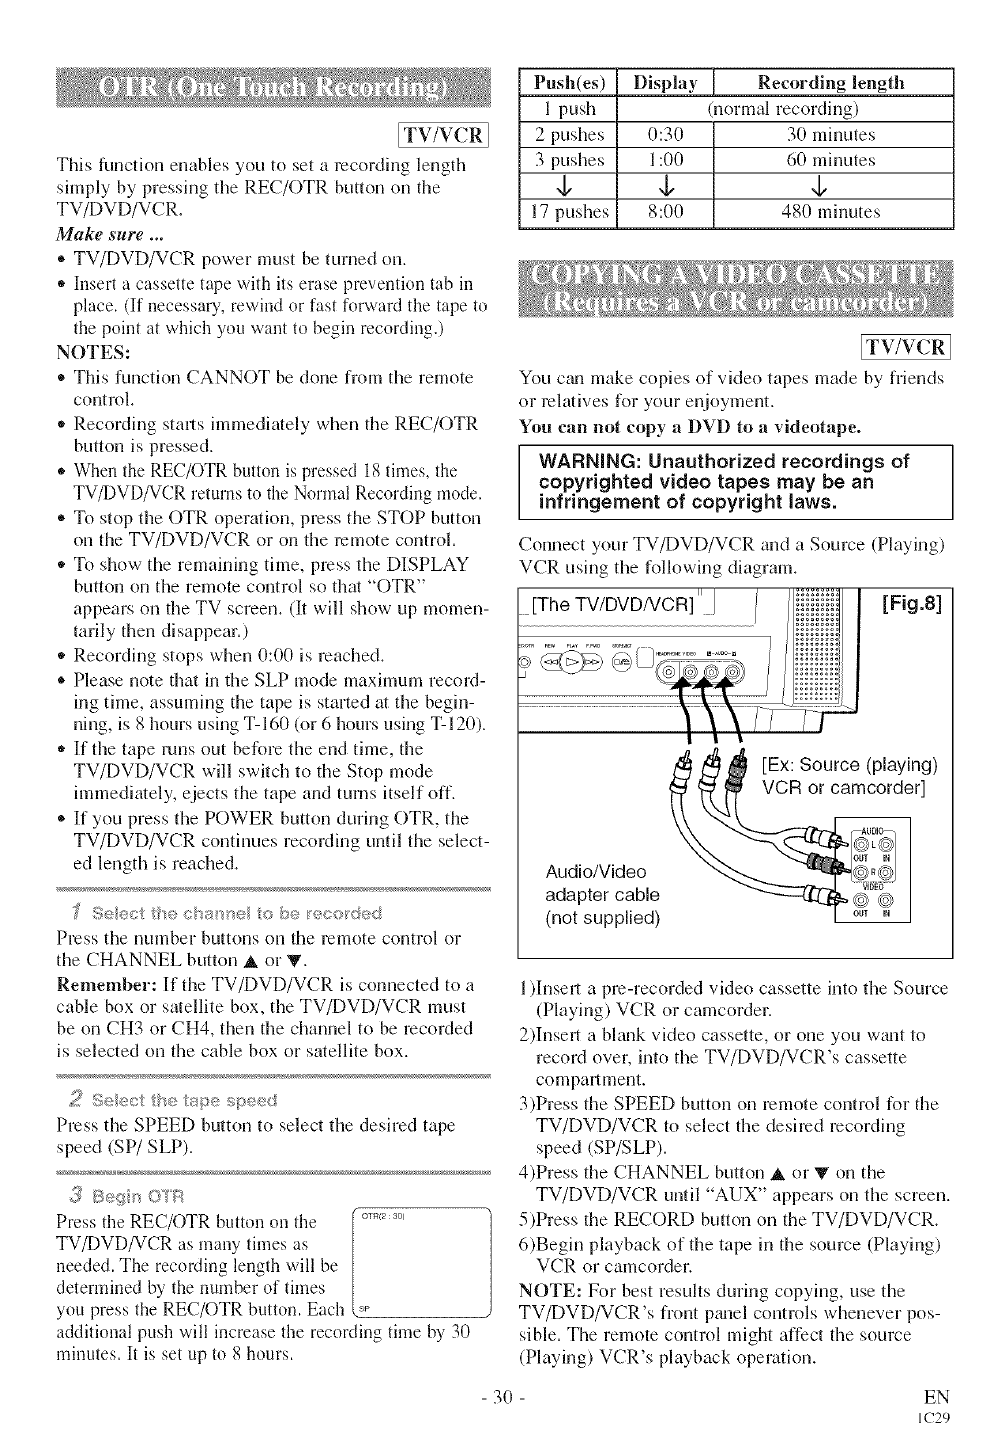
[TV/VCRI
This function enables you to set a recordhlg length
simply by pressing the REC/OTR button on the
TV/DVD/VCR.
Make sure ...
®TV/DVD/VCR power must be turned on.
• Insert a cassette tape with its erase prevention tab in
place. (If necessaU, rewind or fast forward the tape to
the point at which you want to begin recording.)
NOTES:
• This function CANNOT be done from the remote
control.
• Recording starts immediately when the REC/OTR
button is pressed.
• When the REC/(-)TR button is pressed 18 times, the
TV/DVD/VCR returns to the Normal Recording mode.
• To stop the OTR operation, press the STOP button
on the TV/DVD/VCR or on the remote control.
• To show the remaining time, press the DISPLAY
button on the remote control so that "OTR"
appears on the TV screen. (It will show up momen-
tarily then disappear.)
• Recording stops when 0:00 is roached.
®Please note flint in file SLP mode maximum record-
ing time, assuming the tape is started at the begin-
ning, is 8 hours using T-160 (or 6 hours using T-120).
•If the tape runs out befum the end time, the
TV/DVD/VCR will switch to the Stop mode
immediately, ejects the tape and turns itself off.
®If you press the POWER button during OTR, the
TV/DVD/VCR continues recording until the select-
ed length is reached.
Press the nmnber buttons on die reniote control or
the CHANNEL button A or V.
Remember: If the TV/DVD/VCR is connected to a
cable box or smellite box, the TV/DVD/VCR must
be on CH3 or CH4, then the channel to be recorded
is selected on the cable box or satellite box.
2 Seect {)*/e a!_pe _pee<J
Press the SPEED button to select the desired tape
speed (SP/SLP).
Press the REC/OTR button Ollthe [ o_....
TV!DVD/VCR as many times as /
needed. The recording length will be
determined by the number of times
you press the REC/OTR button. Each
additional push will increase the recording time by 30
minutes. It is set up to 8 hours.
Push(es) Display Recording length
I push (normal recording)
2 pushes (1:3(I 3(1minutes
3 pushes 1:00 60 minutes
,b ,b ,b
17 pushes 8:(10 480 minutes
[TV/VCRI
You c_m make copies of video tapes made by friends
or relatives for your enjoyment.
You can not copy a DVD to avideotape.
WARNING: Unauthorized recordings of
copyrighted video tapes may be an
infringement of copyright laws.
Connect your TV/DVD/VCR mad a Source (Playing)
VCR using the folMwing diagram.
[Fig.8]
[Ex: Source (playing)
VCR or camcorder]
Audio/Video
adapter cable
(not supplied)
1)Insert a pro-recorded vkleo cassette into the Source
(Playing) VCR or camcorder.
2)][nseri a blank video cassette, or one you wmlt to
record over, into the TV/DVD/VCR's cassette
compartment.
3)Press the SPEED button on remote control for the
TV/DVD/VCR to select the desired recording
speed (SP/SLP).
4)Press the CHANNEL button A or V on the
TV/DVD/VCR until "AUX" appears on the screen.
5)Press the RECORD button on the TV/DVD/VCR.
6)Begin playback of the tape in the source (Playing)
VCR or camcorder.
NOTE: For best results during copying, use the
TV/DVD/VCR's front pgmel controls whenever pos-
sible. The remote control might affect the source
(Playing) VCR's playback operation.
30 EN
IC29
[TV/VCRI
You may set the TV/DVD/VCR to start and end a
recording while you are away. You can set 8 pro-
grams to record on specific days, daily or weekly
within a 1 year period.
lit the example below, the timer is being set to record:
DATE: July 4th, 2003
SETTING TIME: from 7:30PM to 8:50PM
CHANNEL: CH61
TAPE SPEED: SP
Make sure ...
• If a cable box or satellite box is connected with the
TV/DVD/VCR you will be limited to record only one
channel. And the channel selector on the
TV/DVD/VCR must be selected to the output channel
of the box CH 3 or CH 4 and then the actual channel
to be recorded must be selected on the box.
• Clock must be set to the correct time and date
before setting the timer.
® TV/DVD/VCR power must be turned on to set.
,, Insert a cassette tape with its erase prevention tab
in place. (If necessary, rewind or fast forward the
tape to the point at wlfich you want to begin
recording.)
® The chamM you want to record is properly set in
advzmce. (See page 15.)
Avoid over lap of programs ...
Them is a chance that a program will not be record-
ed. when programs overlap;
• The program with an earlier start has priority.
• Once the earliest program finishes, the overlapping
programs will begin recording in sequence.
• The illustration below demonstrates the sequence
of mcoNings.
Program 1 10:00AM - 11:00AM
Program 2 9:00AM - 10:00AM
Program 3 9:30AM - 12:00PM
RecordingSequon¢o
Program 1 _l
10:00AM-II:00AM II
Program 2
9:00AM-10:00AM i=
Program 3_ I ,
9:30AM-12:00PM i [=
9:00AM 10:00AM 11:00AM
"Regord/ng period Is SHADED
12:00PM
}f Seect _[ _v!_R RROGRA/'¢_/7{/'_}G
Press the SETUP button on the ..........
T_MER pI:tOGRAMMING
remote control. SETTINGCLOCK
CHANNEL SET UP
US E R'*q SET UP
Confirm "TIMER PROGRAM- _.........
LANGUAGE [ENGLISH]
CAPT]©N [OFF]
MING" is pointed by pressing the .,_o.
INI)E× SEARCH
Arrow button A. And press the
ENTER button.
®If you have not yet set the clock, "MANUAL
CLOCK SET" appears. If so, follow stops [31 to
[81 on page 16. Then set the timer recording.
{(_ Set tb¢e c anise _umbe
Press the Arrow button A or '_" until( ................
the desired chmmel number °" _ _E?__° |
appears. (Example: CH61) [:::_:lf:i:: ::: ::: :::: ::/
Then, press the Arrow button _. :: :,:: :: ::: ::: x|
Remember: If the TV/DVD/VCR is _ '""J
connected to a cable box or satellite box, the
TV/DVD/VCR must be on CH3 or CH4, then the
ch_umel to be recorded is selected on the cable box or
satellite box.
31
/_ Seect once eve'y day o_ weeky eco_q sg
For once recording : o. _..........
Press the Arrow- button A (up)
until the desired (late appears.
(Example: "7/04" for July 4th).
Then, press the Arrow button I_'. ': :
For every day recording : To record a TV program
at the same time on the same channel every day.
(Example: Monday through Sunday) ................ "
]
Press the Arrow button V (down) ............ ]
until "EVRY DAY" appears. :::i::: :!:: ::: :: /
Then, press the Arrow button _.
For weekly recording : To record a TV program at
the same time on the same chamwl ever Tweek,
(Example: every Motzday)
Press the Arrow button V (down)
until "EVRY" and your desired
day of the week appear togethm:
Then, press the Arrow button _.
TIMER PROGRAMMING /
CH D;,T_ BEG_N END
X {X }X :!: X: X
• 64 BVRy MON. :
/: A : :
/>- <
EN
IC29
Press the Arrow button A or V until[ ..........
thedesiredhourappears, [:: :i::: ::::::/
(Example: 7, PM ,to," 7:. 0PM) ,1":: :i:: ::/
Then, press the Arrow button _. ( :: :;::::: ;:: ::: ::)
l
Press the Arrow button _. or V until[ :: :!::::: ::: ::: ::/
tile desired mhmte appears. [. ;i _ _n,:;:;;_, /
(Example: °°30" for 7:30PM) [!! !!!! !ii/
Then, press tile Arrow button _ k ' : J
Press tile Arrow button A orV until| °" ?f. ?_" .E_ /
tile desired hour appears. [:: 2: ::: ::: ::;:/
I_ 61 7,134 FRI 7:3OPM _:2,9 M ]
(Example:"S,PM" forS: OPM) [ii iliii i:ii
Then, press tile Arrow button m_'. k _ : J
Presstile Arrow button Aor V
until the desired minute appears.
(Example: "50" for 8:50PM)
Then, press tile Arrow button _.
Press tile Arrow button A or ?
until tile desired tape speed
appears. (Example: SP)
Press the ENTER or RETURN button. The program
is now completed.
* To set another program, repeat steps [2] to [10].
®Press the SETUP button on the remote control to
retum to original mode.
"_;_ Set the tm®_
Press the POWER button to set automatic timer
recording. The RECORDING indicator lights up.
• You must turn off the TV/DVD/VCR to actiwtte
automatic timer recording.
If power is not turned off _mdyou continue watch-
ing TV, "TIMER REC STANDBY" starts flashing
on tile TV screen 2 minutes before tile programmed
start time.
[TV/VCR I
To shift the time schedule of an automatic timer
recording.
l)Press the POWER button.
2)Repeat step [11 on page 31.
3)Press the RECORD button and select the desired
program using tile Arrow button A or _.
4)Press tile RECORD button again.
Each additional push will shift forward tile
begin/end time for recording by 10 minutes. When
the mcoNing is already in progress, each additional
push will shift forward tile end time only. If you
wtmt to cancel while setting, press the PAUSE but-
ton on the remote control. The recording time
returns to the original time.
NOTE: When you shift forward the time schedule
during recording, tile recording speed will automati-
cally be set to the SLP mode.
5)Press the ENTER or RETURN button to exit the
setting menu. Then press the SETUP button on tile
remote control to return to original mode.
T(? CO££E4 T A PRO<i£ASf
®While setting aprogram; press the Arrow button
_1 to go back one step _mdenter the correct num-
bers using tile Arrow button A or V.
®After setting a program;
l)Press the POWER button.
2)Repeat steps [11 - [21 on page 31.
3)Press the Arrow button _ (or press the Arrow
button "_ to go back one step) until the par_ you
want to correct begins flashing, then make the
changes pressing tile Arrow button _ or _.
4)Press the POWER button to set automatic timer
recording.
T(? CANCEL AN A _,'!Y?4 £,'_;,'_'C 'Y'54_£{'£
,_After setting aprogram;
l)Press the POWER button.
2)Repeat steps [11_ [21 on page 31 and select a
program you want to cancel.
3)Press the C.RESET button.
4)Press tile SETUP button on tile remote control to
return to TV mode.
* While recording is in progress;
l)Press the POWER button.
2)Press the STOP/EJECT button on tile
TV/DVD/VCR.
32 EN
IC29
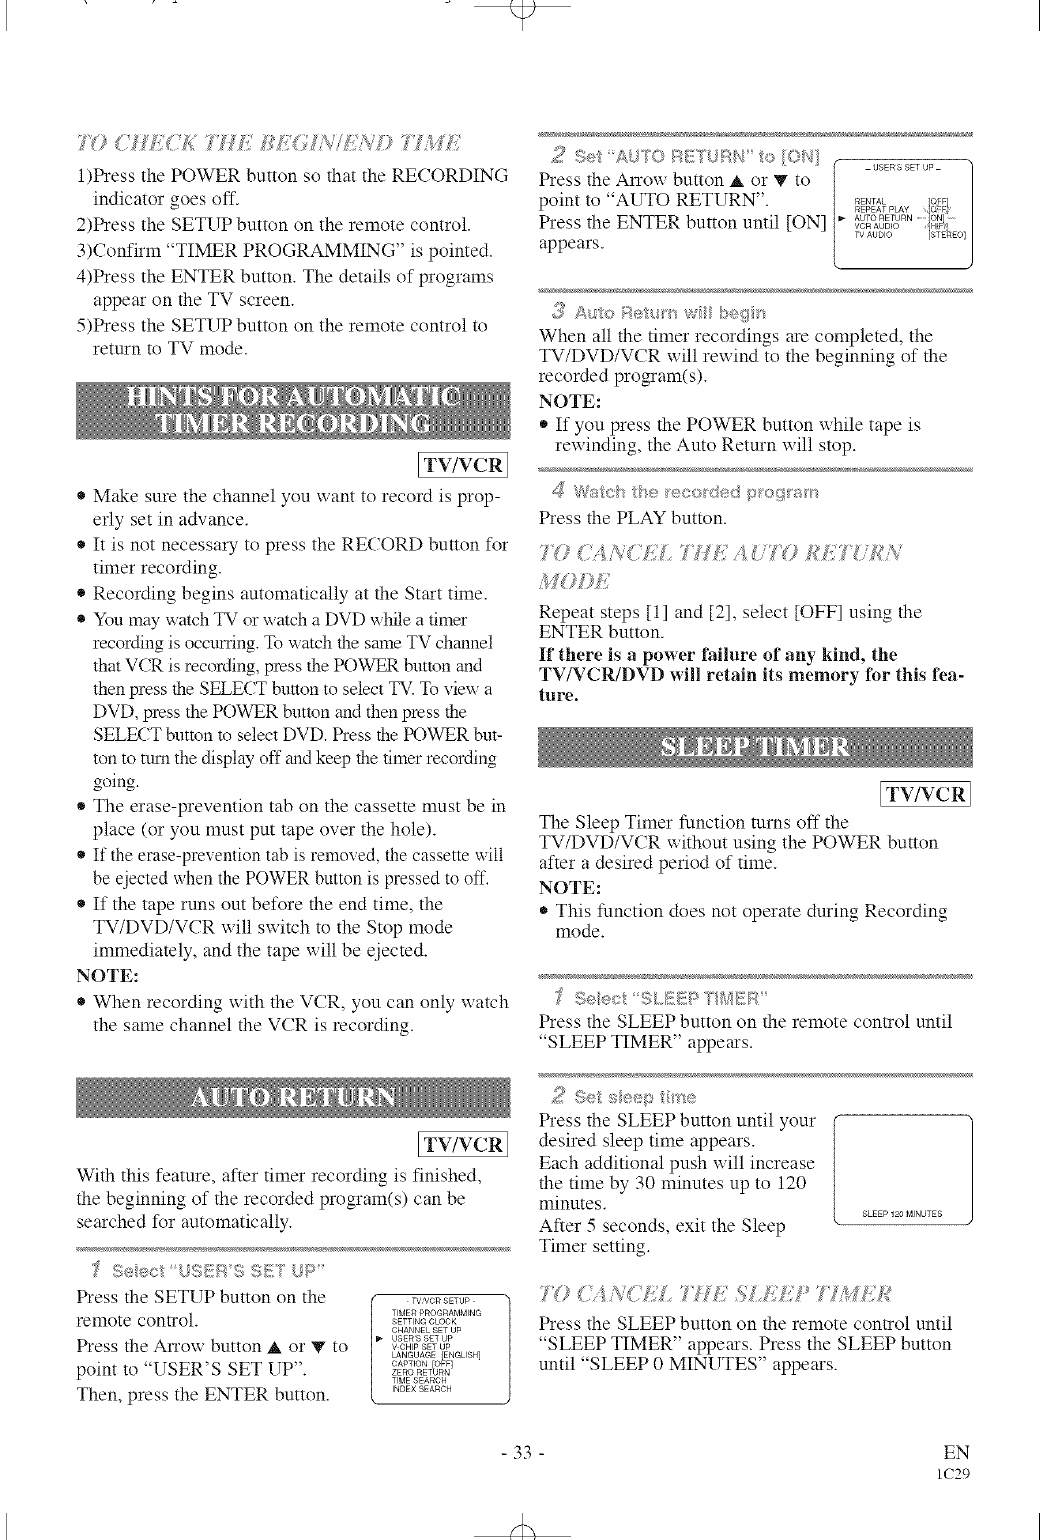
1)Press the POWER button so that the RECORDING
indicator goes off.
2)Press the SETUP button on the remote control.
3)Confirm "TIMER PROGRAMMING" is pointed.
4)Press the ENTER button. The details of programs
appear on the TV screen.
5)Press the SETUP button on the remote control to
return to TV mode.
[TV/VCR I
* Make sure the channel you want to record is prop-
erly set in advance.
, It is not necessary to press the RECORD button for
timer recording.
, Recording begins automatically at the Start time.
® You may watch TV or watch a DVD while a timer
recording is occtm'ing. To watch the same TV channel
that VCR is recording, press the POWER button and
then press the SELECT button to select TV. To view a
DVD, press the POWER button and then press the
SELECT button to select DVD. Press the POWER but-
ton to tttrn the display off and keep the timer recording
going.
* The erase-prevention tab on the cassette must be in
place (or you must put tape over the hole).
* If the erase-prex enrich tab is removed, the cassette will
be ejected when the POWER button is pressed to off.
* If the tape runs out before the end time, the
TV/DVD/VCR will switch m the Stop mode
immediately, and the tape will be eiected.
NOTE:
* When recording with the VCR, you can only watch
the same channel the VCR is recording.
[TV/VCR I
With this feature, after timer recording is finished,
the beginning of the recorded program(s) can be
searched for automatically.
J Seect U'Sg {,i SE'_ U :_'
Press the SETUP button on the TVVCRSETUP
remote control. TIMERPROGRAMMINGsETTINGCLOCK
CHANNEL SET UP
USERS SET UP
LANGUAGE {ENGLISH]
Press the AlTo,, button A t_ " to ..........
point to "USER'S SET l_p . =RoOAP_'O"RFOR"[O<
TIME SEARCH
INDEX SEARCH
Then, press the ENTER button.
_{¢Se AW_O 8,,, ;_.... 4> ION
_' _*_ _!/_ / _ (USER S SET UP q
Press the An'm_ button A or V to /
point to "AUTO RETURN". /" _E"TAL IOFFI
/
REPEAT PLAY {Q=E
VCR AUDIO /H_]r] /
AUTO RETURN ION
Press the ENTER button until [ON] ....... [......
appears. ]J
._ Auto Bet__ w beg
When all the timer recordings are completed, the
TV/DVD/VCR will rewind to the beginning of the
recorded program(s).
NOTE:
* If you press the POWER button while tape is
rewinding, the Auto Return will stop.
Press the PLAY button.
's_' ,'IVY+<..7 Lg..........._.'7'I' ' &£',v
M},¢{
Repeat steps [1] and [2], select [OFF] using the
ENTER button.
If there is a power failure of any kind, the
TV/VCR/DVD will retain its memory for this fea-
ture.
ITV/VCR ]
The Sleep Timer function turns off the
TV/DVD/VCR x_ithout using the POWER button
after a desired period of time.
NOTE:
This function does not operate during Recording
mode.
.See:: SLEE:_yMER,.
Press the SLEEP button on the remote control until
"SLEEP TIMER" appears.
Press the SLEEP button until your
desired sleep time appears.
Each additional push will increase
the time by 30 minutes up to 120
minutes. SLEEP 120 MINUTES
After 5 seconds, exit the Sleep
Timer setting.
Press the SLEEP button on the remote control until
"SLEEP TIMER" appears. Press the SLEEP button
until "SLEEP 0 MINUTES" appems.
- 33 - EN
IC29
&
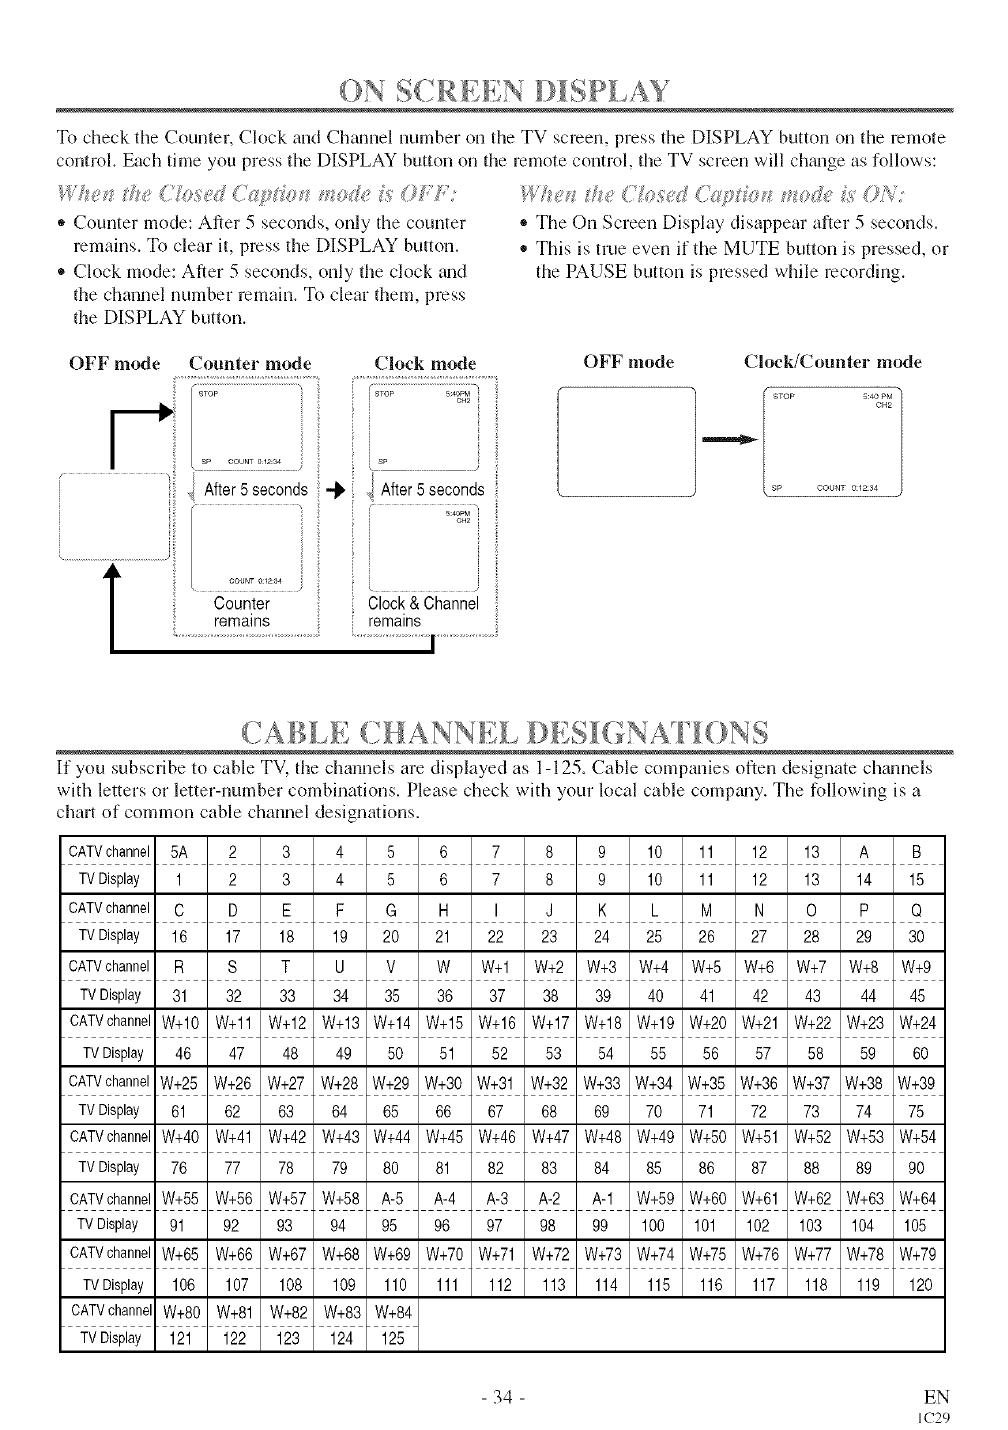
ON S£RE .,H D[SP[,AY
To check the Counter, Clock and Channel number t)ll the TV screen, press tile DISPLAY button on tile remote
control. Each time you press the DISPLAY button on tile remote control, the TV screen will chmlge as follows:
,, Counter mode: After 5 seconds, only the counter
remains. To clear it, press the DISPLAY button.
* Clock mode: After 5 seconds, only the clock tuld
the chmmel number remain. To clear them, press
the DISPLAY button.
,, The On Screen Display disappear after 5 seconds.
* This is true even if the MUTE button is pressed, or
the PAUSE button is pressed while recording.
OFF mode Counter mode Clock mode OFF mode
4 After5 seconds ii"_ v! After5 seconds
i
Counter Clock& Channel
remains remains
Clock/Counter mode
[ Sp COUNT 0:12:34
(.HANN I DESK NA [ ONS
If you subscribe to cable TV, the channels are displayed as 1-125. Cable companies often designate channels
with letters or letter-number combinations. Please check with your local cable comDmy. The fffllowing is a
chart of common cable channel designations.
CATVchannel 5A 2 3 4 5 6 7 8 9 10 11 12 13 A B
TVDisplay 1 2 3 4 5 6 7 8 9 10 11 12 13 14 15
CATVchannel C D E F G H I J K L M N O P Q
TVDisplay 16 17 18 19 20 21 22 23 24 25 26 27 28 29 30
CATVchannel R S T U V W W+I W+2 W+3 W+4 W+5 W+6 W+7 W+8 W+9
TVDisplay 31 32 33 34 35 36 37 38 39 40 41 42 43 44 45
CATVchannelW+10 W+11 W+12 W+13 W+14 W+15 W+16 W+17 W+18 W+19 W+20 W+21 W+22 W+23 W+24
TVDisplay 46 47 48 49 50 51 52 53 54 55 56 57 58 59 60
CATVchannelW+25 W+26 W+27 W+28 W+29 W+30 W+31 W+32 W+33 W+34 W+35 W+36 W+37 W+38 W+39
TVDisplay 61 62 63 64 65 66 67 68 69 70 71 72 73 74 75
CATVchannelW+40 W+41 W+42 W+43 W+44 W+45 W+46 W+47 W+48 W+49 W+50 W+51 W+52 W+53 W+54
TVDisplay 76 77 78 79 80 81 82 83 84 85 86 87 88 89 90
CATVchannelW+55 W+56 W+57 W+58 A-5 A-4 A-3 A-2 A-1 W+59 W+60 W+61 W+62 W+63 W+64
TVDisplay 91 92 93 94 95 96 97 98 99 100 101 102 103 104 105
CATVchannelW+65 W+66 W+67 W+68 W+69 W+70 W+71 W+72 W+73 W+74 W+75 W+76 W+77 W+78 W+79
TVDisplay 106 107 108 109 110 111 112 113 114 115 116 117 118 119 120
CATVchannelW+80 W+81 W+82 W+83 W+84
TVDisplay 121 122 123 124 125
- 34 - EN
IC29
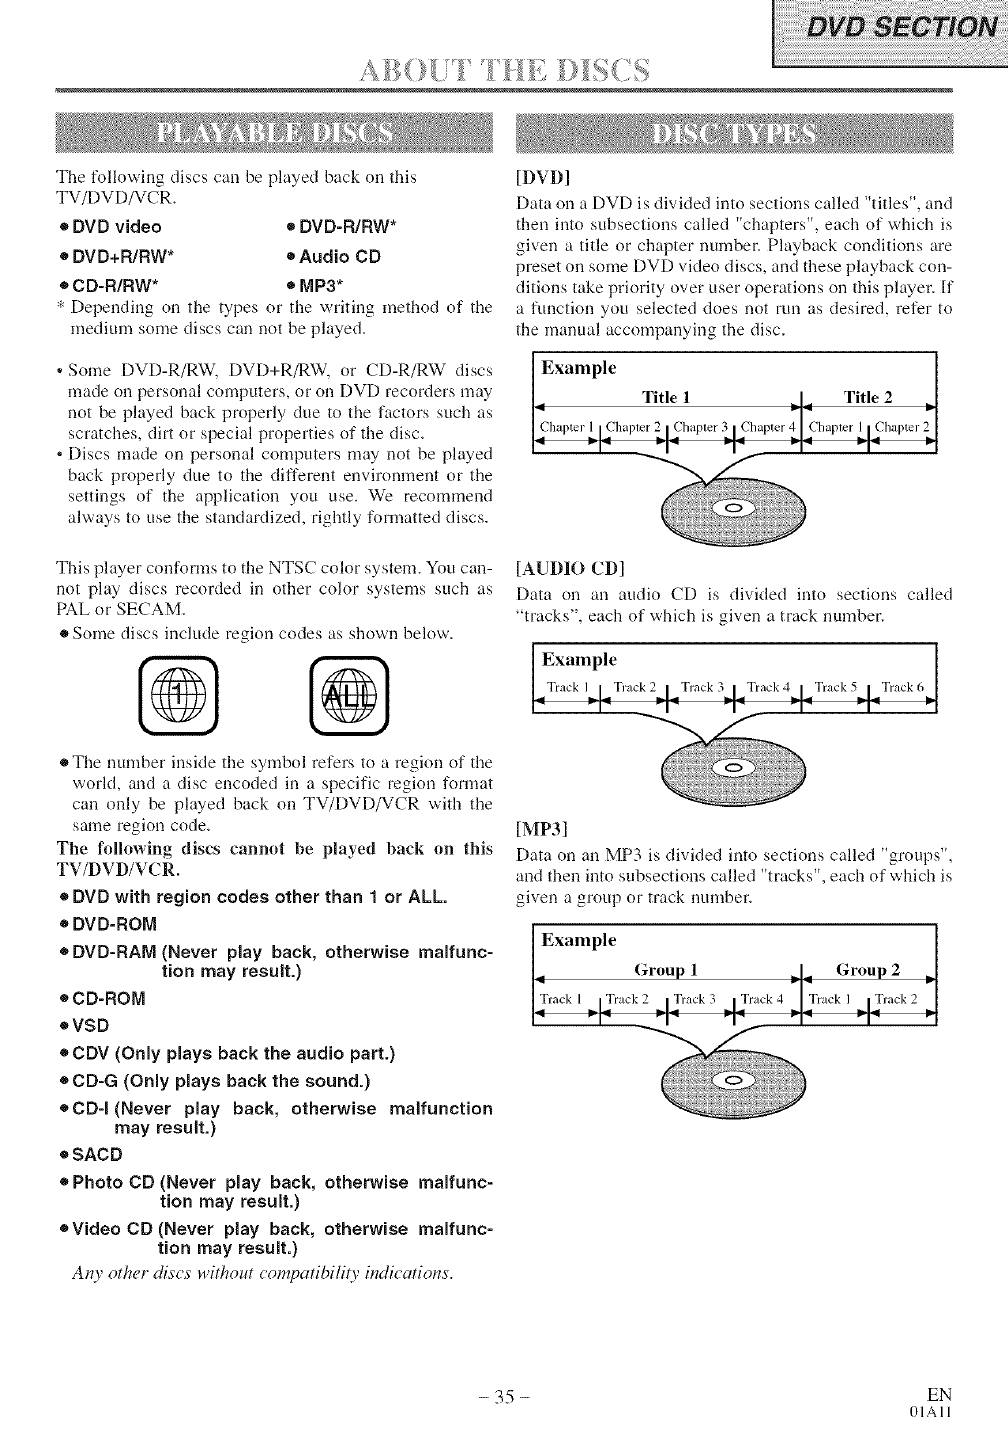
.... _ _ ..........
The %llowing discs can be played back on this
TV/DVD/VCR.
• DVD video • DVD-RIRW*
e DVD+RIRW* e Audio CD
• CD-R/RW* • MP3*
•Depending on the types or the writing method of the
medium some discs can not be played.
, Some DVD-R/RW, DVD+R/RW, or CD-R/RW discs
made on personal computers, or on DVD recorders may
not be played back properly due to the factors such as
scratches, dirt or special properties of the disc.
• Discs made on personal computers may not be played
back properly due to the different environment or the
settings of the application you use. We recommend
always to use the standardized, rightly formatted discs.
This player corfforms to the NTSC color system. You can-
not play discs recorded in other color systems such as
PAL or SECAM.
®Some discs include region codes as shown below.
®The number inside the symbol refers to a region of the
world, and a disc encoded in a specific region format
can only be played back on TV/DVD/VCR with the
same region code.
The following discs cannot be played hack on this
TV/DVD/VCR.
*DVD with region codes other than 1 or ALL.
e DVD-ROM
®DVD-RAM (Never play back, otherwise malfunc-
tion may result.)
4,CD-ROM
eVSD
®CDV (Only plays back the audio part.)
®CD-G (Only plays back the sound.)
®CD-I(Never play back, otherwise malfunction
may result.)
4,SACD
®Photo CD (Never play back, otherwise malfunc-
tion may result.)
eVideo CD (Never play hack, otherwise malfunc-
tion may result.)
Any other discs without compatibility indications'.
[DVD]
Data on a DVD is divided into sections called "titles", and
then into subsections called "chapters", each of which is
given a title or chapter number. Playback conditions are
preset on some DVD video discs, and these playback con-
ditions take priority over user operations on this player. If
a function you selected does not run as desired, refer to
the manual accompanying the disc.
Example
Title 1_1. Title 2
[AUDIO CD]
Data on an audio CD is divided into sections called
"tracks", each of which is given a track number.
[MP3]
Data on an MP3 is divided into sections called "groups",
and then into subsections called "tracks", each of which is
given a group or track number.
- 35 - EN
01All
• Turn on tile power of amplifier and rely other com-
ponents, if necessary.
®The power will turn on.
c,sd r_q Way
3Pace bec ose'_8_;c < he ray, w_h be
dP'u_!;s he PLAY buto,_
• The tray will close automatically, and playback will
then start from tile first chapter or track of the disc.
If the playback does not start automatically, press
the PLAY button.
• When you playback the DVD which a title menu is
recorded, it may appear on the screen, l[n this case,
refer to "TITLE MENU".
5 :_'_{s£,s/'eSTOI/,:A s Is..... p!syLa R,
DVD may contain menus to navigate the disc and
access special features. Press the appropriate number
buttons or use the Arrow buttons (V/A/_II_) to high-
light your selection in the DVD main menu and press
the ENTER button to confirm.
NOTES
• Select DVD mode by pressing the SELECT button on
the remnte control. Then, operate the DVD functions.
• Unless stated, all operations described are based on
remote contrnl use. Some operations cml be carried
out using the menu bar on the TV screen.
J Pess the DISC MEMOb_.tte,:
The DVD main menu will appear.
2_thefeat e s_sotav_ she _ sytbo
m_y spies or,,the "_Vse_e®_s
{_ fd_or_e_, says ab®o_ hedsc s_,do
asgusge, subt e op o s oss_,ff@*s o/qse
ttesr!do?e_'op o_qsw appes_'fo_ seeo,
to,t_
4P*esstheA/ owl tto_si'_/,A!<I&_,}to
seect s_ ter_ a_d the EH'YERbutto_ to
oosf qlseecter,
NOTES
When the DVD mode has been switched to the
TV/VCR mode, the DVD mode shuts down first a_d
then TV picture _mdsound appears in about 4 seconds.
Similarly, when the POWER button is pressed to turn
off in the DVD mode, this mode shuts down irst and
then the TV/DVD/VCR's power is turned off.
A prohW_ted mnn ma) appear at(
the top-right on the TV screen dur- /
ing operation, warning that a pro-/
hinted operation has been encoun- /
tered by the DVD or the disc. k
®With DVDs that use titles for playback program sig-
nals, playback may start from the second title, or it
may skip these titles.
®During the playback of a two layered disc, pictures
may stop for a moment. This happens when the Ist
layer switches to the 2nd layer. This is not a mal-
funcfion.
Pess theTYLE button
The title menu will appear.
2_ be esu_e s_,otaw_ s=be _ syrbo
_'_"_ayappea_ or_ tse T%_ sc_:ees
3Pes$ He A ow b st/o_ss ('®/A </> } to
seec ass and/be ENIE{_ b(/tos o
cos_ _'nse ec( On
61£Z/_VG '{'7Pi /UY_{%'£56 SSSN
For DVD-Vs
* Press the DISC MENU bulon to call up fl_eDVD menu.
* Press the TITLE button to call up the title menu.
NOTE
®Contents of menus and corresponding menu opera-
tions may vaUbetween discs. Refer to the manual
accompanying the disc for details.
- 36 - EN
01All
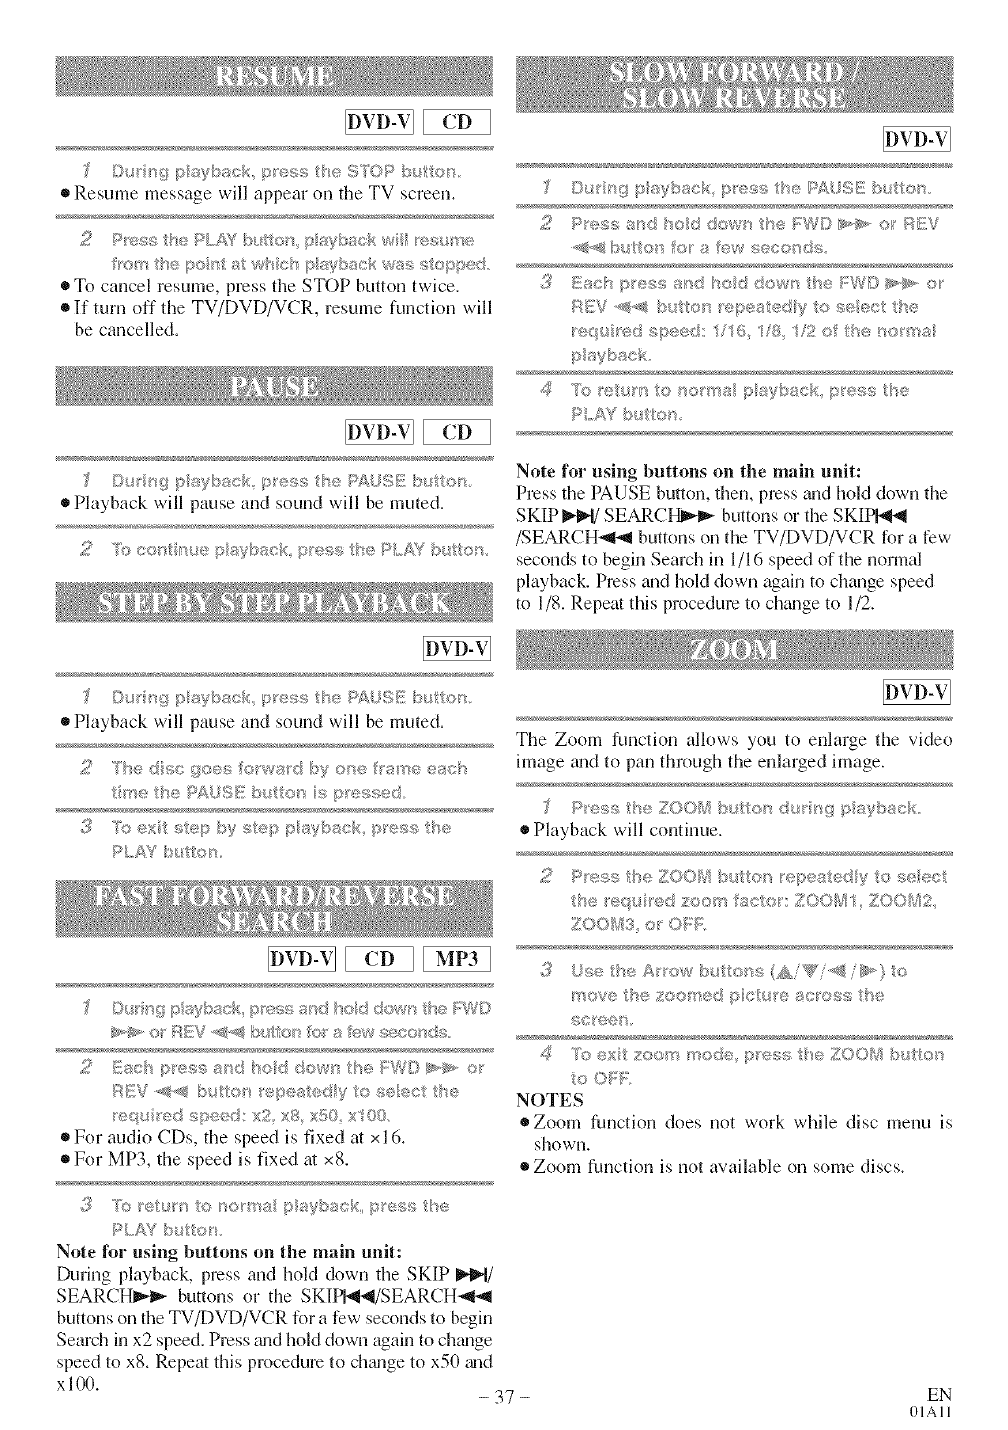
©_srsgpsybackp_'esstie S7'©Pb_;_o_
®ResumemessagewillappearontheTVscreen.
_ei!st_,_poe atwb c_'_p aTbsck w_.'.÷;¢topp_;d.
• To cancel resume, press the STOP button twice.
• If turn off the TV/DVD/VCR, resume function will
be cancelled.
Oln:'9 ,.,.,.,.._.u ,,,_, PAUSE _" r
® Playbackwillpauseand sound willbe muted.
Note for using buttons on the main unit:
Press the PAUSE button, flaen, press and hold down the
SKIP I_¢N/SEARCt_ buttons or the SKIP_
/SEARCH_I',_ buttons on the TV/DVD/VCR for a few
seconds to begin Search in 1/16 speed of the normal
playback. Press and hold down again to change speed
to 1/8. Repeat this procedure to chgmge to 1/2.
©_/A 4i_:playback p_ess tls,;s,PAUSI'!} but o_s
Playback will pause and sound will be muted.
t_e the PAL)S_I[!butte _sp 'es_/_:_d
3 "L:,_ext _4ep by step pa back press the
PLAYb_ tols
_.-_-o" ;IEV-@._b.,l:oho" a .w ..............,,.
_; _:....c,........s_'J";;_ddows tBe {_WI}¢_@,,.':_
"e;t. _'_;'(:.....'"" ' v_, gq( XJo)}
®For audio CDs, the speed is fixed at x I I,
®For MP3, the speed is fixed at x8.
3R_ eh,mI'e '. "
I'_.,/.chp _yb _'<,p'c:q,_he
PLAY :_ to'.
Note lbr using buttons on the main unit:
During playback, press and hold down the SKIP _t/
SEARCHI_ buttons or the SKIP_I/SEARCH_
buttons on the TV/DVD/VCR for a few seconds to begin
Search in x2 speed. Press a_d hold down again to ch_mge
speed to xS. Repeat this procedure to chtmge to x50 tu_d
xl00. - 37 -
The Zoom function allows you to enlarge the video
image _md to pan through the enlarged image.
®Playback will continue.
tBe _'eq_,{'adzoe_"_facto':1_00_11 ZOO_v'i2
ZOOI_:_:3,o O_':F:
'_'_ovethe zoo_';"@dp c _® :sc/oss h_::
scee_
d"T'..,., "'0""¢
oO_:F;:
NOTES
®Zoom function does not work while disc menu is
shown.
Zoom function is not available on some discs.
EN
OIAll

SE AR H N C T ON
EEE3 EEE3
There are three ways to begin playback on _m Audk)
CD at a specific Track.
Using the Number buttons on the remote control
c!es e<:_%sck umb@"
®Playback will start at the selected track.
®For single digit tracks (1-9), press a single number
(eg. track 3, press 3).
• To play track 26, press +10, 2, 6.
'ee_ s!_s{C©:_{£c{_ ®dspaV se
2W_P_ 30 sece_<s e_s e_' s _ esi_ed 9so
s_eu£ g_tse q_,s'_be butonso_s be
ersote co_ o
Playback will stall at the specified time.
Press the CLEAR button to erase tile incorrect input.
Using the SEARCH MODE button
Pens/'<; ......4 AM_.A,_:,, Use markers to nlenlorise your favorite places on a
* The track search display appears, disc.
2Wt_4n 36 seconds _!seec a des_ed sck
s(_mbe using _se Nu shed but_o_ss on be
®For single digits press 0 first.
Playback will start at the selected track.
Using the SKIP I_ _l_t buttons
Dining playback, press the SKIP _ button to move
the next track, Press it repeatedly to skip subsequent
tracks, Press the SKIP _ button to go back to begin-
ning of the current track, Press it repeatedly to go to
the previous tracks,
®If the SKIP button is pressed while the playback is
paused, the playback will be paused again after skip-
ping to the next track.
NOTE
The SKIP _ _ buttons are not available when
playback is stopped,
P_es,,sthe SEA_C , _SO©E butto_ <:,_ce for
lhe©haper_:_es_ch wee o_ _he_te
ses_cbdu ngpsyback
5
t_eNs._rr@_e buso_so tBe_e_oeco_e
Playback will start at the selected Chapter or Track.
Press tile CLEAR button to erase the incorrect input.
®For single digits press 0 first.
{CD: '_'ee'( '_ses}d!,/' 9_>{ysa<<;
The display screen and Markers will appear on the
TV screen.
/ x . ,A g.,g v *a ,_ ;, /_ .
2, 3 4,5_6,7 8 9, o 18a°,< ÷ su_'e{'a{, :
The Title or Track and elapsed playing time will
appear in tile TV screen.
NOTES
®Opening tile disc tray or taming off the power and
press tile ENTER button will erase all Markers.
To clear a marker, using the Arrow- buttons (_/_),
position tile cursor on to the marker number to be
cleared a_cl press the CLEAR button.
You cma mark up to 10 points,
- 38 - EN
01All

SPE(]AI. PI.AYBACH F IN J [K)N
REPEAT is available only during playback.
BEF+£.4T "T'ITL£!_/ 0_7¢P 7"_)_
• The repeat mode changes as described below every
time you press the button.
[] CHAPTER "'''''_ [] TITLE "''"""_ [] OFF /
NOTES
o Repeat Title/Chapter is not available with some
scenes.
®The REPEAT setting will be cleared when moving
to other title or chapter.
BEPE/_ "_;4C'K
R;,;so va _, he r,_;.peai'u_c ou_ press bc.
_%{iP/£ATb_>t';>_'rdut <d}p _4/b_ck
• The repeat mode ch_mges as described below every
time you press the button.
[] TRACK """"''"_ [] ALL ""'''"_ [] OFF ]
currint track repeat) (entire disc repeat) (repiat off)l
NOTES
®Repeat setting will be cleared when moving to other
track.
®Repeat playback does not function during repeat A-B
playback.
Presshe F_NSI£A'[A..Ii._b_ o_ a o_xr:ho
[] A- appears briefly on the TV screen.
£ P®sstseBSPE£1 A,@bu osaos_'_alyou_
chosen esd pen'{
[] A-B appears briefly on the TV screen, _md the
repeat sequence begins.
BbutRo/q
NOTES
®The repeat A-B section can only be set within the cur-
rent title (for DVDs), or current track (for audio CDs).
Repeat A-B is not available with some scenes in DVD.
To cancel the A point which was set, press the
CLEAR button.
Repeat A-B playback does not function during title,
chapter, track or all repeat playback.
-39-
You may determine the order in which tracks will play.
The PROGRAM screen will appear.
_aok he_ p_ess he
_;K'I'_?S bttos
®Press the CLEAR buttonto
erase the most recently entered
program.
_:,.p,.,,_,ores2_. you hsve seesed ;_ 1he
_'_ck_ yo_ w_sot topay o thr;p ovram.
d P:'ess s'hePLA'4_ ix, ton o /:ay pto-
g_mm_:d t_acks,
NOTES
While the program is being played back, the STOP
works as follows.
Press the STOP button once and then the PLAY but-
ton again, playback will restarJ from the point where
the STOP button was pressed. (Program continued)
Press the STOP button twice _uldfllen the PLAY button
again, playback will restful from the track in the usu_d
way. (Program cletu'ed)
Up to 99 programs can be entered.
If you like to repeat the current track in the program.
press the REPEAT button repeatedly until []
TRACK appears during playback. If you like to
repeat the entire £pgram press the REPEAT button
repeatedly until I_1 ALL appears during playback.
This shufiqes the playing order of tracks instead of
playback in the sequence.
s ¢:opmode p_es_ be//ODEb4 or_wc_>
®RANDOM screen appears.
2Pt'e<_,_sxtke P_C'Flx/t_o_to sSs_tsndom pts_bsck
NOTE
®If you like to repeat tile current track in the random
selection, press the REPEAT button repeatedly until
[] TRACK appears during playback. If you like to
repeat the entire random selection press the
REPEAT button repeatedly until [] ALL appears
during playback.
EN
OIAll
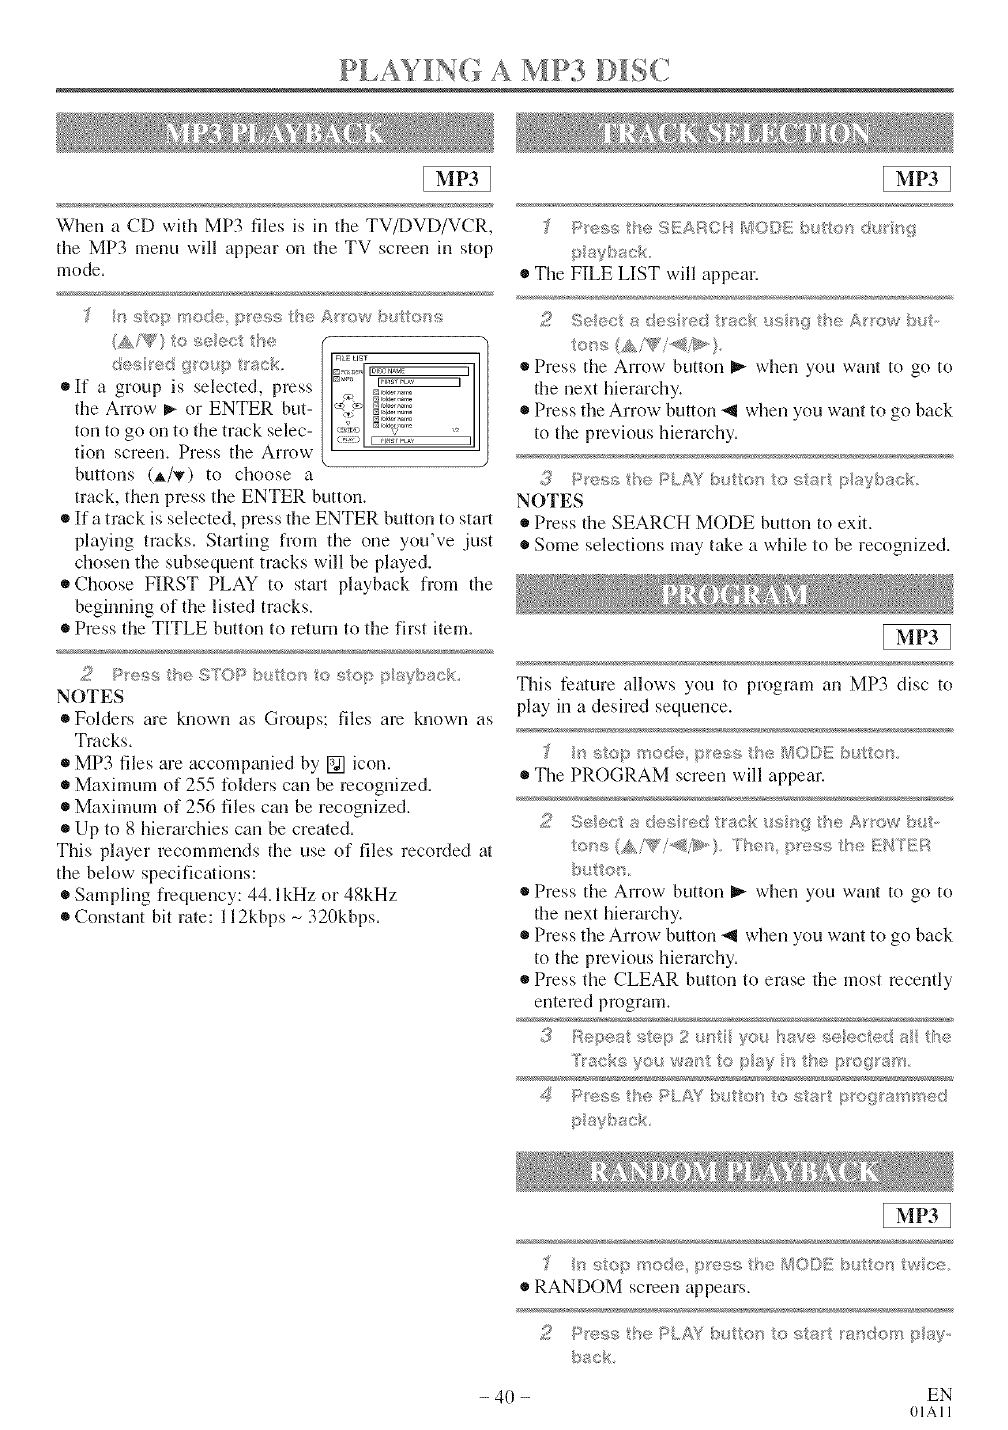
P .AY NG A MP3 DISC
When a CD with MP3 files is in the TV/DVD/VCR,
the MP3 menu will appear on the TV screen in stop
mode.
(A,/sg'} t® se®ct be
des_÷d 9_®uq:__'ack.
• If a group is selected, press
the Arrow _,- or ENTER but-
ton to go on to the track selec-
tion screen. Press the Arrow
buttons (A/v) to choose a
,_ IN bklo name
_,r N folder ,'_rr_
v N r_l,lo,,_,,,
track, then press the ENTER button.
• If a track is selected, press the ENTER button to start
playing tracks. Starting from the one you've just
chosen the subsequent tracks will be played.
• Choose FIRST PLAY to start playback from the
beginning of the listed tracks.
®Press the TITLE button to return to the first item.
2P>','4;she 9%_OPbu on c, _;tc@p_Wbsc
NOTES
• Folders are known as Groups; files am known as
Tracks.
®MP3 files are accompwfied by [] icon.
®Maximum of 255 folders can be recognized.
®Maximum of 256 files can be recognized.
• Up to 8 hierarchies can be created.
This player recommends the use of files recorded at
the below specifications:
• Sampling frequency: 44. l kHz or 48kHz
• Constant bit rate: 112kbps _ 320kbps.
i:_ >>;k
®The FILE LIST will appeal.
2Seect a des[_®dt}'acR <_sHgthe A_ow but
to_s (AiV'i'@>.}
Press the Arrow button _ when you want to go to
the next hierarchy.
Press the Arrow button -_1when you wzmtto go back
to the previous hierarchy.
3Pre,p; he PLAY b,_ /or_ 4:_:_;/:sr/?/s:@b_c_<
NOTES
Press the SEARCH MODE button to exit.
Some selections may take a while to be recognized.
This feature allows you to program an MP3 disc to
play in a desired sequence.
'_ _:;<:,pmode, _e_::_s:he _8013Eb_ <:_u
The PROGRAM screen will appean
to_¢s,_i'".'f_'i'_>)."fher_p_er_s theKNfER
Press the Arrow button _ when you want to go to
the next hierarchy.
Press the Arrow button -_1when you wzmtto go back
to the previous hieramhy.
®Press the CLEAR button to erase the most recently
entered program.
Ztacks you w_;_t to pay the p_oWs'_
@
.'_ F'tess BePLSi'/bu os osal ptog_amsed
p a?back
E9 3
p ;,,>,: },. _s bI._$O'I tW CO-.
• RANDOM screen appears.
2 >"_" ;'"_" >Y
- 40 - EN
01All

CHAN(IING SETTINGS
The DVD allows you to select a language for subtitles
during DVD disc (if available) playback.
P<_<_s the SUBT/T/ E BuRo_ _;/_,__K_p ayDack,
s®ecR!/ou_des_edsubt e ang_;age
• Tile st@title lmlguage will be displayed on tile dis-
play bar at the top of the screen.
buto_ }'epesedyu_ OFF appeals
NOTES
• Some discs allow audio language settinjsubtitle hmguage
setting on the disc menu. (Operation varies between discs,
so refer to the manual accompanying the disc.)
• If the desired language is not shown after pressing
the SUBTITLE button several times, the disc does
not have subtitles in thai language.
• If you choose a Language thai has a 3 letter language
code, the code will be displayed eve Utime you
change the Subtitle language setting. If you choose
any other languages, '---' will be displayed instead.
(Refer to page 43.)
The TV/DVD/VCR allows you to select a language
during [)Vll) disc (if multi language available) play-
back.
Some DVD discs contain scenes which have been shot
simultaneously from various angles. You can chgmge
the camera gmgle when the (_) icon appears on the
screel_L
P_eas 8qe ANGLE b!_tR;>_ d_.ll _g F_syb_a< _"
The selected _mgle will be displayed on the display
bar at the top of the screen.
2P_ess be ANGLE b(S'_en _epea_edy e
aeec/yeus de<_ _'e_ ange
Adjust the Black Level Settings to make the black
parts of the picture brighter.
d r_9 l/;_ayba)k
2 /::%eashe ENTEB s<$te_s o sw{cs 0_;:_::
ON: Makes the dark paris brighter.
OFF: Shows the original picture as recorded.
_ Pr,_:_ _'u?/;_O(/;_! b_ _u_wee or/_:
RETUGH butto_q oel<
)_ P_'essk/s®ALDtO b_tiers d*,_s:i__gplayback
you_ _es e8 lasgusge
NOTE
Pressing the AUDIO button may not work on some
DVDs with multiple audio l_mguages (e.g. DVDs
which allow audio lm'_gnagesetting on the disc menu).
P_esstheAU©/Ob tte> es:_sedlyd_._i g
paybs<:kto_;eec be weeB STEREO L,Cq
o_' BC/,
•STEREO -both right and left chalmels are active (stereo)
L-CH - only left chgumel is active
R-CH - only right channel is active
NOTE
If the Virtual Surround setting is ON, the sound mode
will be fixed to STEREO, and can not be changed.
-41 -
You cm_e@oy stereophonic visual space on your exist-
ing stereo system.
Pe_s he 140[;E D_, on wee (OD/[/IP3:
oce) d_ i_'_gplsyback=
2P®ss t_eENTE_ b_ t:ostusetit'i (Nat_ _al
ei'ecQe'2{Emp'taszede_ec o OSR
_,_5 P'eas/Be MODE o/'//:/EIUBN b_,_tos_ ® ext
NOTE
Virtual Surround will not be effective when the sys-
tem is in external input, tuner, or VCR mode.
It becomes effective only during DVD-VIDEO,
CD, or MP-3 playback.
eWhen using the digital audio out (COAXIAL), the
ViF,ual Surround will not be effective.
NOTE (for CD play only)
Vh_,ual Surround will not be effective if the sound
mode is set to something other thgm STERE().
EN
(HAll
You can check the infnnnation abnut the current disc by pressing the DISPLAY buttnn nn the remote cnntrnl.
For DVD-Vs
_'The elapsed and relnainil_lg [ "[
playing time of the current [ss ................ _-1
chapter will be displayed. _----_ .........
•Tile elapsed guld remahling playhlg time of tile cur-
rant title will be displayed.
The BIT RATE _md the current repeat setting will be
displayed.
®If you are playing a dual layered disc, the layer num-
ber will also be displayed (L0: Layer 0 is playing.
LI: Layer I is playing).
For audio CDs
,,-:.>,,,.<:_ bl.io_ d_''_q ay}:ack
o s_ow Ise ct '>_./'_tTsck.
The elapsedand remainingplayingtime of the cur-
rent track will be displayed.
The elapsedand remainingph@ng thne of the cur-
rent total track will be displayed.
£_ Pre,qs he DSP/.,A7 b_._/<:,_ ag_/q o _xi he
For MP3
The name of thefilecurrentlyin playwillbe dis-
played.
_md tt_¢_p %/__ck staus _ I>:,top ott_e
f;©tl;;(7_:S.
[] will be displayed when repeat play has been
selected.
[_T - Mdicates Track repeat
[] G - indicates Group (folder) repeat
[] A - indicates Disc repeat
£_ Pre,qs he DSPLA7 b_._/<:,_ ag_/q o exi he
- 42 - EN
01All
H AN NG T H E D V D S ET U P EM S
Language options are not awlilable with some discs.
.<,;> ........ _,, I ,dJ,._ '
...... @, ;;._.....
_¢ode _o _st >;:"DVD .;d!LJ- _<_>4
If the menu does not appear, press the PLAY button,
the STOP button, then the SETUP button twice.
2P_;s8 t'w;_Af'_oybt_tto_t>. 0 s®ect COS-
YOM; he_ p,_;;_ssth6 Fi'NTEI;_b_tJots.
CUSTOM mode will appear.
LANOtJ/}<T_E,t'_e;_p ',._?ss:the [{!I,J?'BRbu So_;
_0
,<.J +
AUDIO ORIGINAL
SUBTITLE OFg
d P,,::s.<;tI,_,_A_row b;.tto>,_(AiWO to s_.,._>ctI-_e
_)xi I_m;>_;,ho pro_ssthe I!!NT[!_;Rb4t_o_'_.
AUDIO:
® SetstheaudioEmguage.
SUBTITLE:
®Sets the subtitle language.
DISC MENU:
®Sets the language for DVD menu.
5 Pre_s _;heArow <_ o,,'_s(&i'W'}o £eec a
®If OTHER is selected on the AUDIO, SUBTITLE or
DISC MENU screen, press four-digit number to
enter the code for the desired language. (Refer to the
Emguage code list below.)
Only the languages supported by the disc c_m be
selected.
NOTE
Language SettingforAudio and Subtitleisnotavail-
ablewithsome discs.Then use theAUDIO and the
SUBTITLE buttons. Details are on page 41,
fYh Ch/Ah_'2E LHE _U SORE;_U MEHUS
You can access the TV/VCR SETUP menu by pressing
the SETUP button from the DVD mode. Refer to
"Selecting the Language" on page 15 to chtmging the
on-screen menus.
®In case of selecting from the DVD mode, you cannot
select "CHANNEL SET UP", "V-CHIP SET UP",
"CAPTION", "TIME SEARCH", or "INDEX
SEARCH" menus.
Language Code
A=B
Abkhazian 4748
Afar 4747
Afrikaans 4752
Albanian 6563
Amharic 4759
Arabic 4764
Armenian 5471
Assamese 4765
Aymara 4771
Azerbaijani 4772
Bashkir 4847
Basque 5167
Bengali;Bangla 4860
Bhutani 5072
Bihari 4854
Bislama 4855
Breton 4864
Bulgarian 4853
Burmese 5971
Byelorussian 4851
C=E
Cambodian 5759
Catalan 4947
Chinese [CHI] 7254
Corsican 4961
Croatian 5464
Czech 4968
Danish [DAN] 5047
Dutch [DUT] 6058
English [ENG] 5160
Esperanto 5161
Estonian 5168
F-H
Faroese 5261
Fiji 5256
Finnish [FIN] 5255
French [FRE] 5264
Frisian 5271
Galician 5358
Georgian 5747
German [GER] 5051
Greek [GRE] 5158
Greenlandic 5758
Guarani 5360
G ujarati 5367
Hausa 5447
Hebrew 5569
Hindi 5455
Hungarian [HUN] 5467
i=K
Icelandic [ICE] 5565
Indonesian 5560
Interlingua 5547
Interlingue 5551
Inupiak 5557
Irish [IRI] 5347
Italian [ITA] 5566
Japanese [JPN] 5647
Javanese 5669
Kannada 5760
Kashmiri 5765
Kazakh 5757
Kinyarwanda 6469
Kirghiz 5771
Kirundi 6460
Korean [KOR] 5761
Kurdish 5767
Language Code
L=N
Laothian 5861
Latin 5847
Latvian;Lettish 5868
Lingala 5880
Lithuanian 5868
Macedonian 5957
Malagasy 5953
Malay 5965
Malayalam 5958
Maltese 5966
Maori 5955
Marathi 5964
Moldavian 5981
Mongolian 5960
Nauru 6047
Nepali 6051
Norwegian [NOR] 6061
O-R
Occitan 6149
Oriya 6164
Oromo(Afan) 6159
Panjabi 6247
Pashto;Pushto 8265
Persian 5247
Polish 6258
Portuguese [POR] 6266
Quechua 6367
Rhaeto-Romance 8459
Romanian [RUM] 6461
Russian [RUS] 6467
S
Samoan 6559
Sangho 6553
Sanskrit 8547
Scots Gaelic 5350
Serbian 6564
Serbo-Oroatian 8554
Sesotho 6566
Setswana 6660
Shona 6560
Sindhi 6550
Singhalese 6555
Siswat 6565
Slovak 6557
Slovenian 6558
Somali 6561
Spanish [SPA] 5165
Sundanese 6567
Swahili 6569
Swedish [SWE] 6568
T
Tagalog 6658
Tajik 6653
Tamil 6647
Tatar 6666
Telugu 6651
Thai 6654
Tibetan 4861
Tigrinya 6655
Tonga 6661
Tsonga 6665
Turkish FUR] 6664
Turkmen 6657
Twi 6669
U-Z
Ukrainian 6757
Urdu 6764
Uzbek 6772
Vietnamese 6855
Volapuk 6861
Welsh 4971
Wolof 6961
Xhosa 7054
Yiddish 5655
Yoruba 7161
Zulu 7267
If you choose a Language that has a 3 letter language
code, the code will be displayed every time you change
the Audio or Subtitle language setting on page 41. If
you choose any other languages, '---' will be displayed
instead. (3 letter language code is written in bracket.)
- 43 - EN
01All
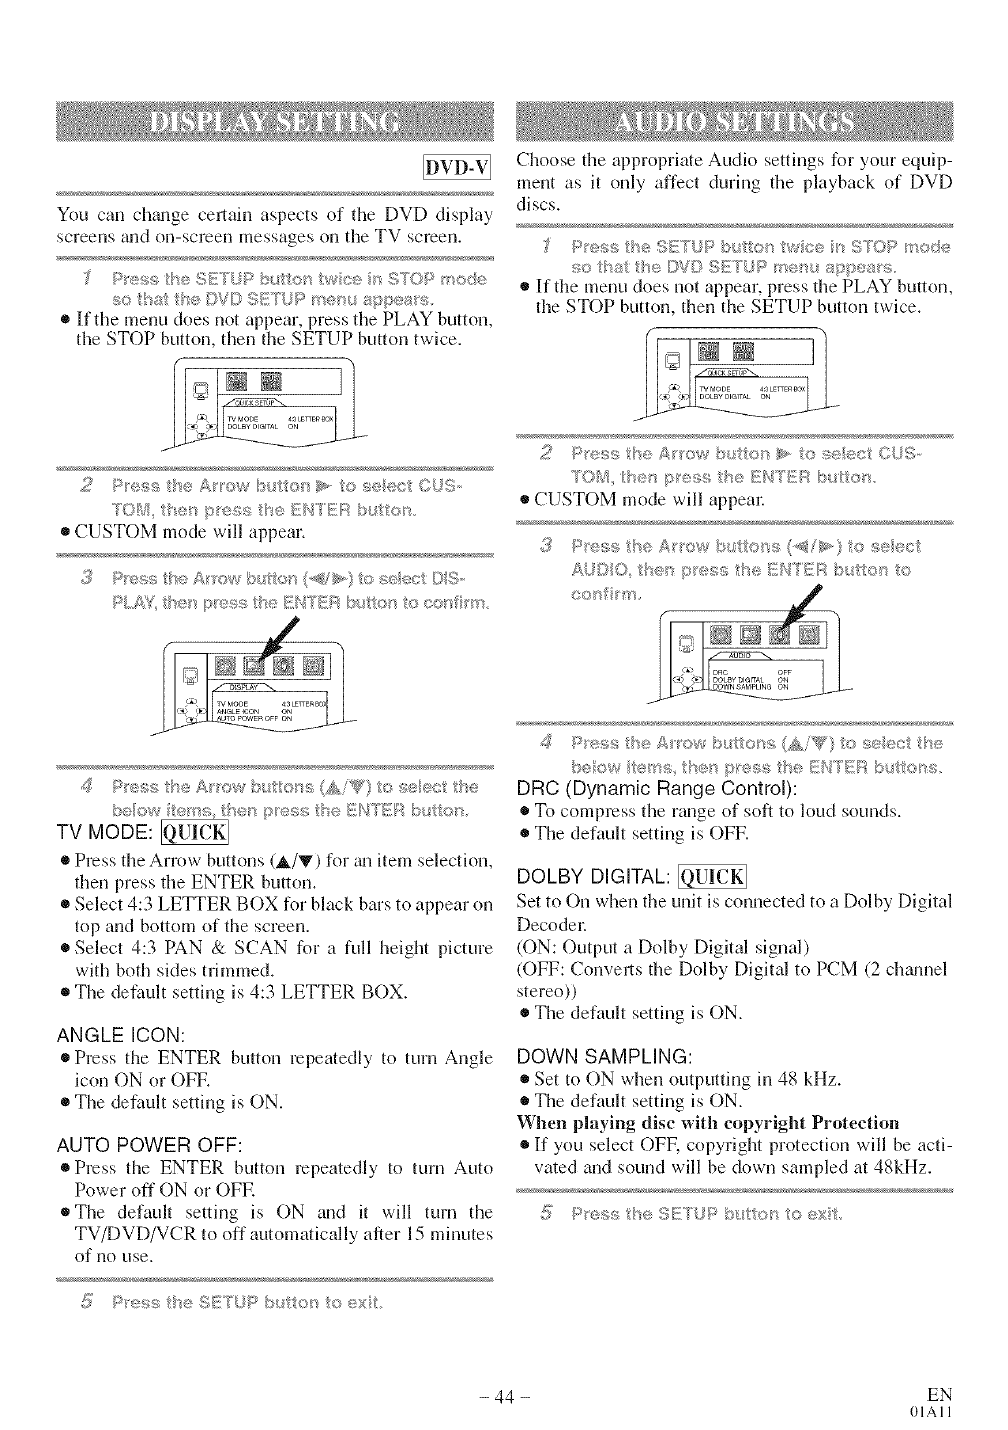
You can chgmge cel!ain aspects of the DVD display
screens tlll(] on-scl°cen messages on the TV screen.
;_ P_'<,s_ lhu !!},ETUP}>_e_ w<e > STOP 'node
so that the DVD SETUP '>em_ appems,
• If the menu does not appear, press the PLAY button,
the STOP button, then the SETUP button twice.
Choose the appropriate Audio settings for your equip-
ment as it only affect during the playback of DVD
discs.
Pess heSETUPb {{at wee sSroP_®de
so {ha se [}'7© SESUF _mere, sppea_%
• If the menu does not appear, press the PLAY button,
the STOP button, then the SETUP button twice.
• CUSTOM mode will appear.
PM7 t}'es :>es,,;tse ENTER _,lt< o c<,ffcm
4 P_ess the A /'_>/>'bu e_ss {sAi_ _} to sete< t the
beew te e_}; the_ p_'ese the EN!_'_EA by tto}_
TV MODE:
Press the Arrow buttons (_/Y) for gm item selection,
fl]en press the ENTER button.
Select 4:3 LETTER BOX for black bars to appear on
top and bottom of the screen.
Select 4:3 PAN & SCAN for a full height picture
with both sides trimmed.
®The defimlt setting is 4:3 LETTER BOX.
ANGLE ICON:
Press the ENTER button repeatedly to turn Angle
icon ON or OFR
The default setting is ON.
AUTO POWER OFF:
Press the ENTER button repeatedly to turn Auto
Power off ON or OFE
• The default setting is ON and it will turn the
TV/DVD/VCR to off automatically after 15 minutes
of no use.
_" Px>,';<,/I'veSETUP l:_c_/o_qo
®CUSTOM mode will appem:
#,__'>"',_ "' ,s the I:_{',VI'E}:_:x,£ex o
,SO
4 P_'ess the A'ow bL_tte_>; (Aiqg} to select t_e
beow terns the_ pess t_e li!:%ITI!{iAb,_ttehs
DRC (Dynamic Range Control):
To compress the range of soft to loud sounds.
The default setting is OFF.
DOLBY DIGITAL:
Set to On when the unit is connected to a Dolby Digital
Decode_:
(ON: Output a Dolby Digital signal)
(OFF: Converts the Dolby Digital to PCM (2 chwmel
stereo))
The default setting is ON.
DOWN SAMPLING:
Set to ON when outputting in 48 kHz.
The default setting is ON.
When playing disc with copyright Protection
If you select OFF, copyright protection will be acti-
vated and sound will be down sampled at 48kHz.
- 44 - EN
01All
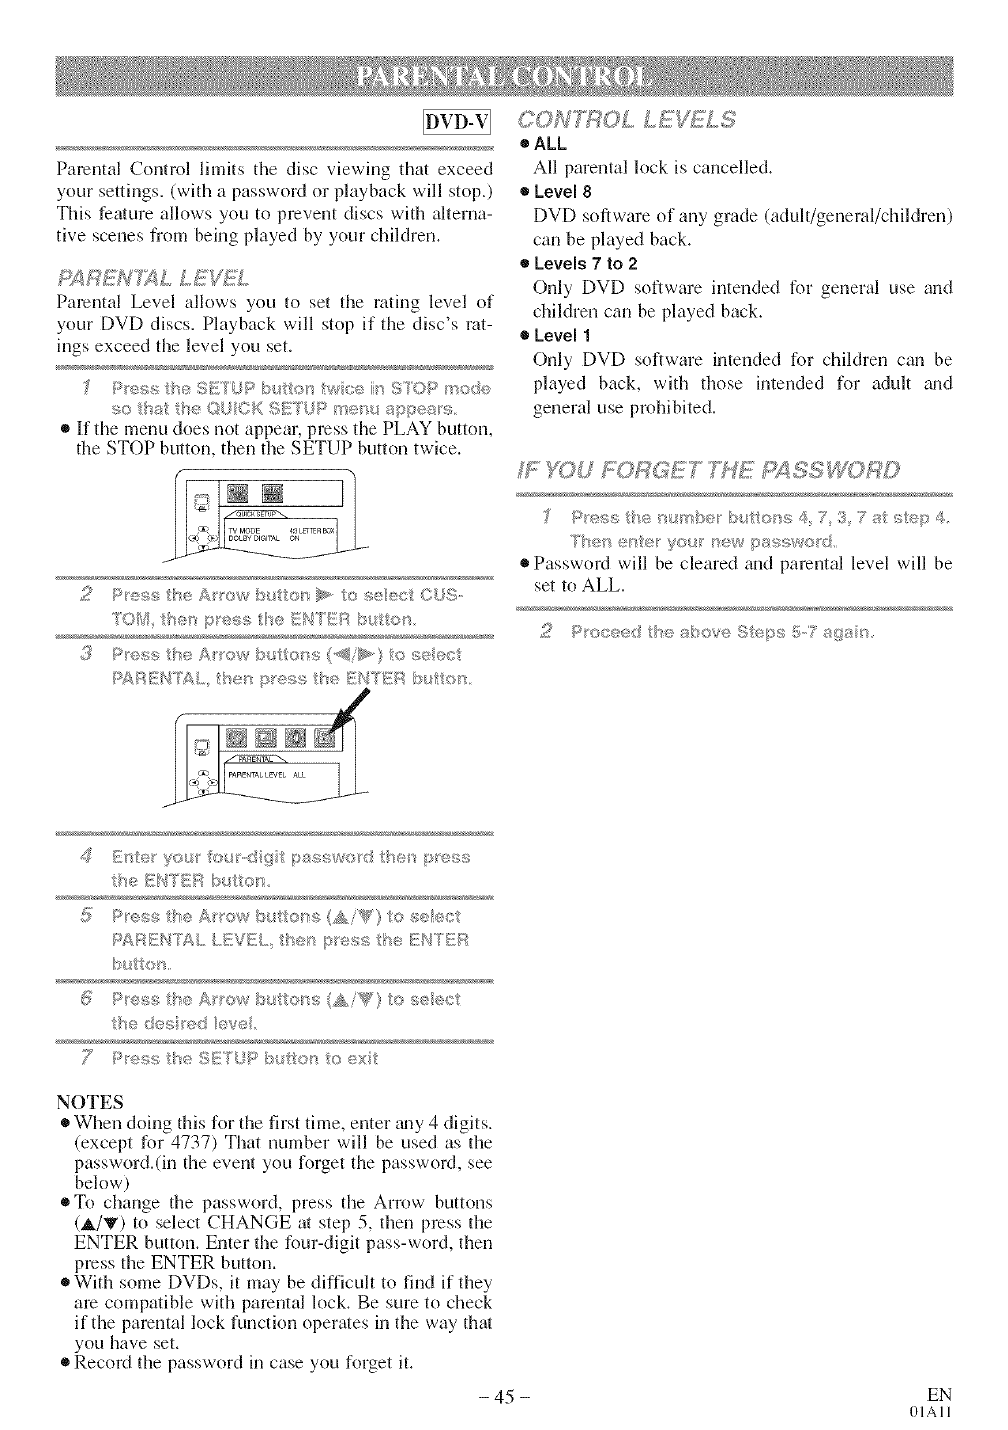
ParentalControllimitsthediscviewingthatexceed
yoursettings.(withapasswordorplaybackwillstop.)
Thisfeatureallowsyoutopreventdiscswithalterna-
tivescenesfrombeingplayedbyyourchildren.
PAR£:N7XL LEVEL
Parental Level allows you to set the rating level of
your DVD discs. Playback will stop if the disc's rat-
ings exceed the level you set.
P_,ss I've SET/_P' _,_x_ wc'e U_OP mode
_o t_st th_ ©UCK SI{TL)P m÷m._ app@_ s
•If the menu does not appear, press the PLAY button,
the STOP button, then the SETUP button twice.
2Pesg: tse A_'ow > items_,, to seect (}US,,
70_4 the_ pues{_,tse/:_HTt'£i[:%b_ttos
3Pess the A/'/'ew b_4t!,ot_s(_/_)*,) to _i_eeLI
Pg_RENT£L,, the_ i:ness the I!]N'I'EI butto_
(/;ONTROL LE_TLS
oALL
All parental lock is cancelled.
_,Level 8
DVD software of any grade (adult/general/children)
can be played back.
• Levels 7to 2
Only DVD software intended for general use and
children can be played back.
_,Level 1
Only DVD software intended for children can be
played back, with those intended for adult grad
general use prohibited.
IF _SU FORGET _E PgS,SS RD
P_'ess tile ¢-P+_be}' b/ /:;o_'s 4 7 3 7 at t, ep 4
Password w-ill be cleared and parental level will be
set to ALL.
NOTES
When doing this for the first time, enter gray 4 digits.
(except for 4737) That number will be used as the
password.(in the event you forget the password, see
below)
To change the password, press the Arrow buttons
(_./V) to select CHANGE at step 5, then press the
ENTER button. Enter the four-digit pass-word, then
press the ENTER button.
* With some DVDs, it may be difficult to find if they
are compatible with parental lock. Be sure to check
if the parental lock function operates in the way that
you have set.
Record the password in case you forget it.
- 45 - EN
01All
_ I ¸¸¸ _ ..... _ _ _ ' T
If tile TV/DVD/VCR does not perform properly when operated as instructed in this Owner's Manual, check
tile player, consulting tile following checklist.
PROBLEM CORRECTIVE ACTION
No powel: ,, Make sum the power plug is connected to an AC outlet.
®Make sum the power is turned on.
The TV/DVD/VCR does not ,, Check if the power plug is connected to an AC outlet.
respond to the remote control. * Check the batteries in the remote control.Make sum batteries are
placed in tile correct direction.
,, Aim tile remote control directly at tile remote control sensol: If nec-
essary, remove all the obstacles between the sensor and the remote.
,, You have to be within 23 feet of the TV/DVD/VCR.
,, Check if the correct mode is selected. If not switch tile mode by
pressing the SELECT button on the remote conm)l,whichever you need.
TV/VCR Mode]
Sometimes a perform_mce problem can be easily solved by checking seemingly apparent but often overlooked
)ossibilities. Before arranging for service, check these items. It could save your time and money.
PROBLEM
No picture and sound.
No picture or poor picture on
TV/DVD/VCR.
No sound or poor sound.
Bars On Screen
Picture Distorted or Blurred
Picture Rolls Vertically
Lines or Streaks in Picture
No Color
Poor Reception on Some Channels
Ghosts in Picture
Weak Picture
Sound OK, Picture Poor
If you forget your V-Chip password
CORRECTIVE ACTION
• Make sure the AC cord is connected to an AC outlet.
• Check antenna connection.
• Press the SELECT button on the remote control to select TV mode.
Then try other TV feature.
• Let the TV/DVD/VCR program its tuner memory.
• Adjust direction or replace antenna.
• Adjust picture controls.
• Adjust volume control on remote control or main unit.
• Press the MUTE button to restore sound.
• If outside antenna is being used, check for broken wire.
• Check for local interference.
• Try a new channel, if OK, then possible station trouble.
• If outside antenna is being used, check for broken wire.
• Try a new channel, if OK, then possible station trouble.
• If outside antenna is being used, check for broken wire.
• Check for local interference.
• Try a new channel, if OK, then possible station trouble.
• Is antenna connected to terminal on tile back of the set'?
• If outside antenna is being used, check for broken wire.
• Adjust COLOR control.
• Try a new channel, if OK, then possible station trouble.
• Is antenna connected to terminal on tile back of tile set'?
• If outside antenna is being used, check for broken wire.
• Check for local interference.
• Try a new ch_umel, if OK, then possible station trouble.
• Is antenna connected to terminal on tile back of tile set'?
• If outside antenna is being used, check for broken wire.
• Adjust CONTRAST & BRIGHT control.
• Try a new channel, if OK, then possible station trouble.
• Is antenna connected to terminal on tile back of the set'.>
• If outside antenna is being used, check for broken wire.
• Check for local interference.
• Adjust CONTRAST & BRIGHT control.
• Unplug the power code gradplug it in again. This will set the V-Chip
password to default (0000).
- 46 - EN
01All
PROBLEM
Picture OK, Sound Poor
Timer recording is not possible.
Cannot go into Record mode.
Playback picture is partially noisy.
No picture but the audio is OK in
playback.
No operation by infrared Remote
Control.
Video or color fades in and out
when making a copy of a video tape.
Different color marks on screen.
CORRECTIVE ACTION
,_Try a new channel, if OK, then possible station trouble.
• Check for local interference.
• Make sure the timer recording is set correctly.
,_Make sum the power is off.
• Make sum the TV/DVD/VCR clock is set correctly.
,_Make sum the tape has an erase-prevention tab. If need, cover the
hole with plastic tape.
• Adjust tracking control for a better picture using the CHANNEL
button A or V on the TV/DVD/VCR.
'_ Head cleaning may be necessary. Refer to "AUTO HEAD
CLEANING" on page 49.
'_ Make sure the AC cord is connected to _mAC outlet.
• Check batteries in remote control.
®You can not copy a copyrighted video tape. You are experiencing
copy guard protection.
®Magnetism from nearby appliances grad unshielded speaker sytems
might affect the color of the TV picture. Move the TV/DVD/VCR
away from the appliances, the TV/DVD/VCR can repair itself auto-
matically. If you wgmt to repair immediately, turn off using the
POWER button, unplug the power cord, then plug it in again after 30
minutes.
CLOSED CAPTION PROBLEM
My TV/DVD/VCR is showing
captions that are misspelled.
My TV/DVD/VCR will not show
the text dialogue
in its entirety or there is a delay of
what is being said.
My captions are scrambled with
white boxes on the TV screen.
My program guide listed a TV show
as being closed captioned but none
of the captions were displayed.
My prerecorded vide() tape does not
show any captions. The tape box
mentions it being closed captioned.
My TV screen shows a black box
on certain channels.
POSSIBLE REMEDY
• You are watching a live broadcast and spelling errors made by the
closed captioning production company may pass through uncorrected.
A prerecorded program will not show any misspelled words because
of the normal time available for editing the captions.
• Captions that are delayed a few seconds behind the actual
are common for live broadcast. Most captioning production
comp_mies can display a dialogue to a maximum of 220 words
per minute. If a dialogue exceeds that rate, selective editing is used
to insure that the captions remain up-to-date with the currant
TV screen dialogue.
• Interference caused by building, power lines, thunderstorms, etc.
may cause scrambled or incomplete captions to appeal:
• Broadcasters may at times use a time compression process to speed
up the actual program so that additional advertising time ctm be
given. Since the decoder cannot read the compressed information.
captions will be lost.
• The video tape was either an illegal copy or the tape duplicating
company accidentally left out the captioning signals during the
copying process.
• You are in the TEXT mode. Select CAPTION mode to CAPTION
[OFFI,
- 47 - EN
01All
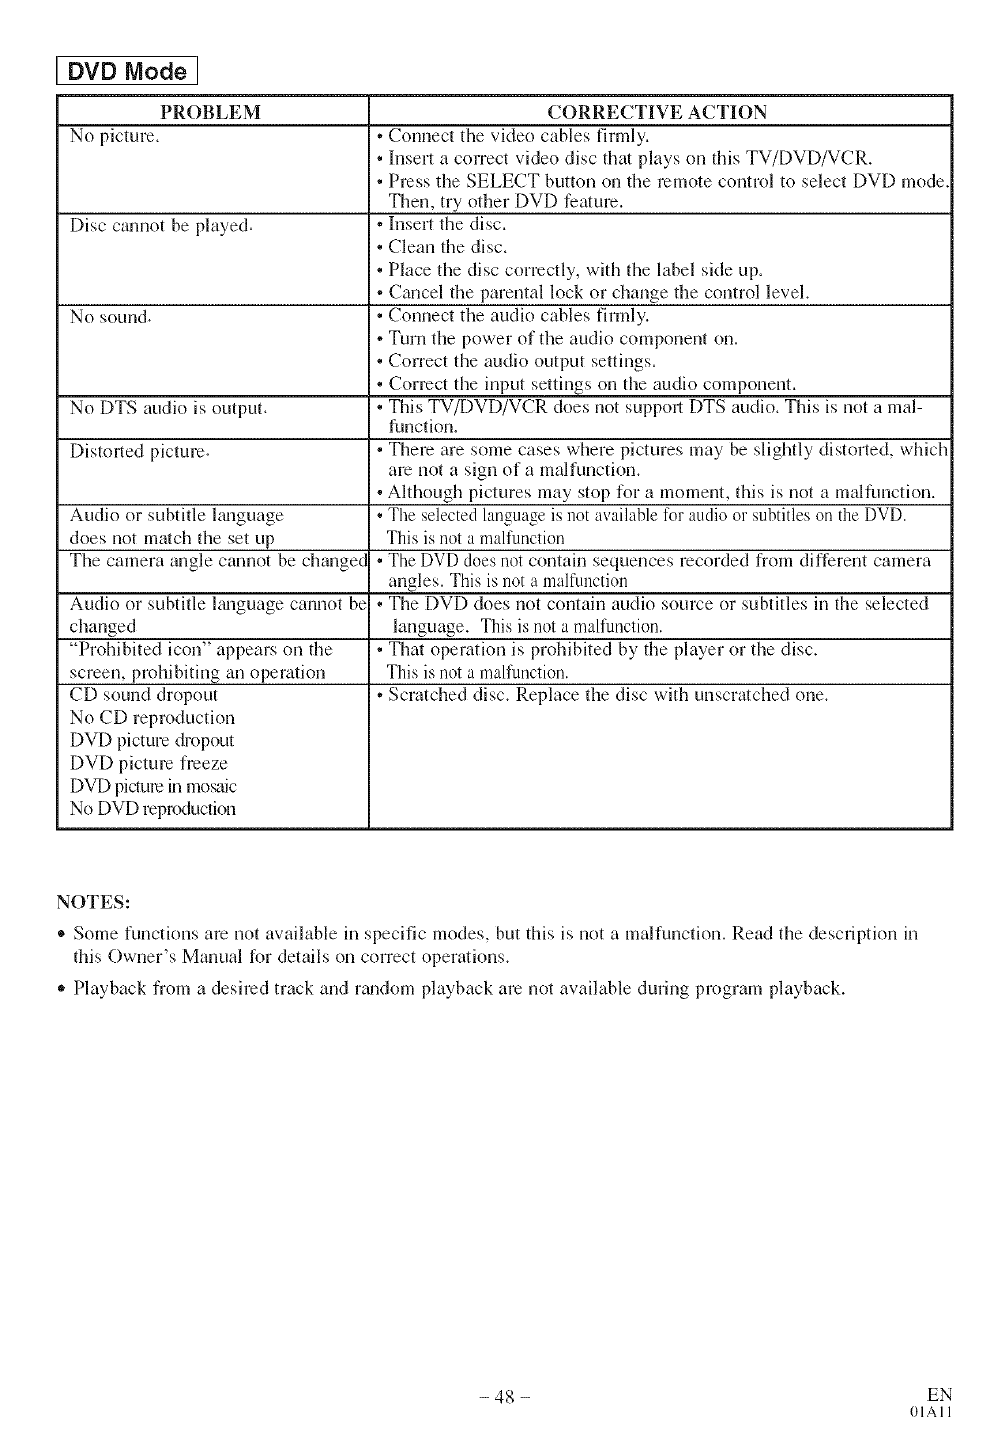
DVD Mode ]
PROBLEM
No picture,
Disc cmmot be played.
No sound.
No DTS audio is output.
Distorted picture.
Audio or subtitle lmaguage
does not match the set up
The camera angle cannot be change(
Audio or subtitle lmlguage cannot be
changed
"Prohibited icon" appears on the
screen, prohibiting an operation
CD sound dropout
No CD reproduction
DVD picture dropout
DVD pictum freeze
DVD picture in mosaic
No DVD reproduction
CORRECTIVE ACTION
=• Connect the video cables firmly.
• ]Insert a correct video disc that plays on this TV/DVD/VCR.
i • Press the SELECT button on the remote control to select DVD mode.
Then, try other DVD feature.
=• Insert the disc.
• Clean the disc.
• Place the disc correctly, with the label side up.
=* Cancel the parental lock or change the control level.
• Connect the audio cables firmly.
• Turn the power of the audio component on.
• Correct the audio output settings.
• Correct the input settings on the audio component.
• This TV/DVD/VCR does not suppol_,DTS audio. This is not a mal-
function.
• Them are some cases where pictures may be slightly distorted, which
am not a sign of a malfunction.
• Although pictures may stop for a moment, this is not a malfunction.
• The selected language is not available l\)r audio or subtitles on the DVD.
This is not a malfunction
I• The DVD does not conta n sequences recorded from different camera
angles. This is not a malfunction
!• The DVD does not contain audio source or subtitles in the selected
language. This is not a malfunction.
i • That operation is prohibited by the player or the disc.
This is not a malfunction.
=• Scratched disc. Replace the disc with unscratched one.
NOTES:
®Some functions are not available in specific modes, but this is not a malfunction. Read the description in
this Owner's Manual for details on correct operations.
• Playback from a desired track and rgmdom playback are not available during program playback.
- 48 - EN
01All
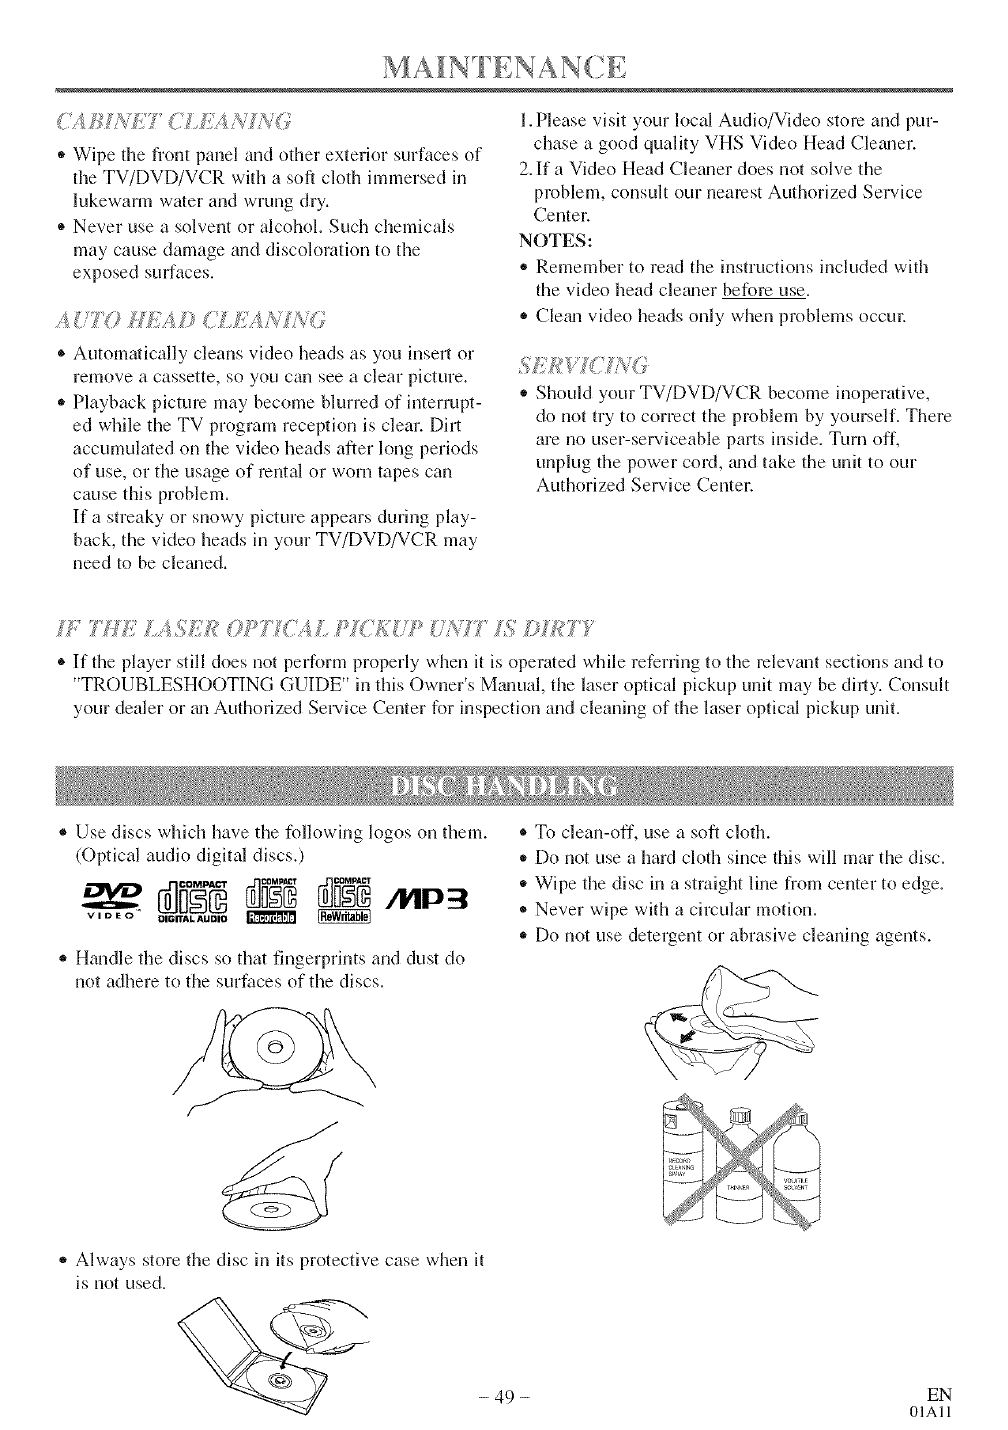
*Wipe the front panel and other exterior surfaces of
the TV/DVD/VCR with a soft cloth immersed in
lukewarm water and wrung dry.
® Never use a solvent or alcohol. Such chemicals
may cause damage and discoloration to the
exposed surfaces.
,4 :T6_/,_,_s;,_/,_ (I LiY, Us,;/',[_
®Automatically cleans video heads as you insert or
remove a cassette, so you can see a clear picture.
,, Playback picture may become blurred of interrupt-
ed while the TV program reception is clear. Dirt
accumulated on the video heads after long periods
of use, or the usage of rental or worn tapes can
cause this problem.
If a streaky or snowy picture appears during play-
back, the video heads in your TV/DVD/VCR may
need to be clelmed.
1.Please visit your local Audio/Video store and pur-
chase a good quality VHS Video Head Clelmer.
2. If a Video Head Cleaner does not solve the
problem, consult our nearest Authorized Service
Center.
NOTES:
* Remember to read the instructions included with
the video head cle_mer before use.
,, Clelm video heads only when problems occm:
*Should your TV/DVD/VCR become inoperative,
do not try to correct the problem by yourself. There
are no user-serviceable parts inside. Turn off,
unplug the power cord, lind take the unit to our
Authorized Service Center.
/" 7Mf:i (? L ZU/ i :U/W7 L">
®If the player still does not perform properly when it is operated while referring to the relevant sections and to
"TROUBLESHOOTING GUIDE" in this Owner's Mmmal, the laser optical pickup unit may be dhly. Consult
your dealer or im Authorized Service Center for inspection and cleaning of the laser optical pickup unit.
®Use discs which have the following logos on them.
(Optical audio digital discs.)
*Handle the discs so that fingerprints and dust do
not adhere to the surfaces of the discs.
®To clean-off, use a soft cloth.
*Do not use a hard cloth since this will mar the disc.
*Wipe the disc in a straight line from center to edge.
*Never wipe with a circular motion.
,, Do not use detergent or abrasive cleaning agents.
*Always store the disc in its protective case when it
is not used.
- 49- EN
01All
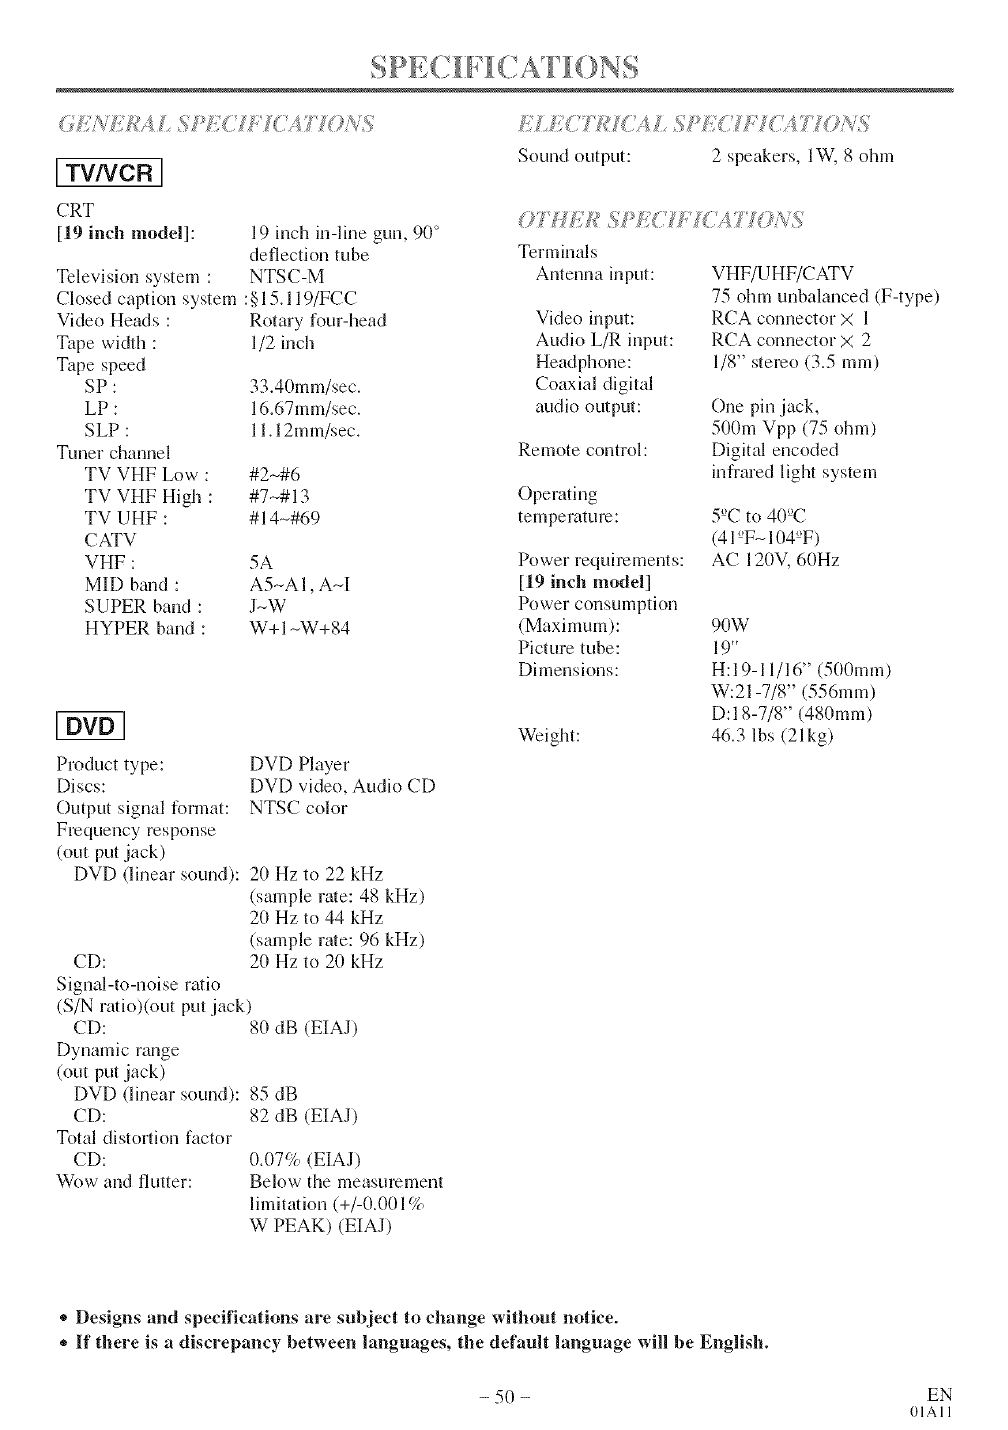
[ TV/VCR ]
CRT
[19 inch model]:
Television system :
Closed caption system
Video Heads :
Tape width :
Tape speed
SP:
LP:
SLP :
Tuner channel
TV VHF Low :
TV VHF High :
TV UHF :
CATV
VHF :
MID braid :
SUPER band :
HYPER band :
19 inch in-line gun, 90°
deflection tube
NTSC-M
:§15.119/FCC
Rotary four-head
1/2 inch
33.40mm/sec.
16.67mm/sec.
11.12mm/sec.
#2N#6
#7,--#13
#14-#69
5A
A5-AI, A-I
J-W
W+ 1-W+ 84
Product type:
Discs:
Output signal format:
Frequency response
(out put jack)
DVD (linear sound):
CD:
Signal-to-noise ratio
DVD Player
DVD video, Audio CD
NTSC color
20 Hz to 22 kHz
(sample rate: 48 kHz)
20 Hz to 44 kHz
(sample rate: 96 kHz)
2(1Hz to 20 kHz
(S/Nratio)(out putjack)
CD:
Dynamic range
(out put jack)
DVD (linear sound):
CD:
Total distortion factor
CD:
Wow and flutter:
80 dB (EIAJ)
85 dB
82 dB (EIAJ)
0.07% (EIAJ)
Below the measurement
limitation (+/-0.001%
W PEAK) (EIA])
ELECJT{ S >EgJE/g ;470N%
Sound output: 2 speakers, lW, 8 ohm
07 HE]_ SPEg H T<;4,770NS
Terminals
Antenna input:
Video input:
Audio L/R input:
Headphone:
Coaxial digital
audio output:
Remote control:
Operating
temperature:
Power requirements:
[19 inch model]
Power consumption
(Maximum):
Picture tube:
Dimensions:
Weight:
VHF/UHF/CATV
75 ohm unbalanced (F-type)
RCA connector X 1
RCA connector X 2
1/8" stereo (3.5 ram)
One pin jack,
500m Vpp (75 ohm)
Digital encoded
infrared light system
5°C to 40°C
(41°FN104°F)
AC 120V, 60Hz
90W
19"
H:I 9-11/16" (50(Imm)
W:21-7/8" (556mm)
D:I 8-7/8" (480mm)
46.3 lbs (21kg)
,, Designs and specifications are subject to change without notice.
+ ff there is a discrepancy between languages, the default language will be English.
- 50 - EN
01All

Your Home
For repair- in your home -of all major brand appliances,
lawn and garden equipment, or heating and cooling systems,
no matter who made it, no matter who sold it!
For the replacement parts, accessories and
owner's manuals that you need to do-it-yourself,
For Sears professional installation of home appliances
and items like garage door openers and water heaters,
1-800-4-MY-HOME ® (1-800-469-4663)
Call anytime, day or night (U.S.A. and Canada)
www.sears.oom www,sears.ca
Our Home
For repair of carry-in items like vacuums, lawn equipment,
and electronics, call or go on-line for the location of your nearest
Sears Parts & Repair Center.
1-800-488-1222
Call anytime, day or night (U.S.A. only)
www.sears,com
To purchase a protection agreement on a product serviced by Sears:
1-800-827-6655 (U.S.A.) 1-800-361-6665 (Canada)
Para pedir servicio de reparacidn
a domicilio, y para ordenar piezas:
1-888-SU-HOGAR _
(1-888-784-6427)
Au Canada pour service en frangais:
1-800-LE-FOYER Mc
(1-800-533-6937)
www.sears.ca
SEARS
® TM SM
Registered Trademark /Trademark /Service Mark ol Sears, Roebuck and Co.
TM SM
Mama Registrada /Mama de F&bdca /Mama de Servicio de Sears, Roebuck and Co.
MC MD
Marque de commerce /Marque depos_e de Sears, Roebuck and Co. _ Sears, Roebuck and Co.
90 Day Full Warranty
If this (product) experiences any failure due to a defect in material or workmanship within 90 days from the date
of purchase, return it to your nearest Sears Parts & Repair Center, and Sears will repair it free of charge.
After 90 days and until one (1) year from the date of purchase, Sears will replace defective parts free of charge.
You pay for labor.
After 90 days and until two (2) years from the date of purchase, Sears will replace the Picture Tube if it is defec-
tive. You pay for labor.
This warranty applies only if this (product) is used for private household purposes.
This warranty gives you specific legal rights, and you may also have other rights which vary from state to state.
Sears, Roebuck and Co., Dept. 817WA, Hoffman Estates, IL 60179
For the location of aSears Service Center in your area : 1-800-488-1222
Printed in China 0EMN02333
TD860HL _'_'_'_
