Suprema BIOSTATIONMFTC FINGERPRINT SYSTEM User Manual
Suprema Inc. FINGERPRINT SYSTEM
UserManual.wiki
>
Suprema
>
BIOSTATIONMFTC User Manual
User manual
Navigation menu
Upload a User Manual
Namespaces
Wiki Guide
HTML
PDF
Info
Views
User Manual
Discussion / Help
Navigation

![18ⒸCopyright 2006 Suprema Inc.Enter Admin MenunPress ESC key to enter Admin menu from the initial display.nEnter master password and press OK key.l[Note] As there’s no master password enrolled in a device by factory default, you can enter Admin menu just by pressing OK key. For security reason, set a master password right after the product installation. Please refer to <Change master PW> to see how to set a master password.nInstead of entering master password, administrator can place his/her finger to enter Admin menu. l[Note] “Master password”is a unique password of the device, different from the PIN (user password) of an administrator. It is necessary to enter master PW or place a finger. It is not possible to enter Admin menu by entering his/her PIN.nIf the master password is entered successfully, initial Admin menu appears on display.▼T&AAdmin fingerprint or master passwordOK ESCDeviceUserModeDisplayLogNetworkFor Administrators -Basic Functions](https://usermanual.wiki/Suprema/BIOSTATIONMFTC/User-Guide-928230-Page-19.png)
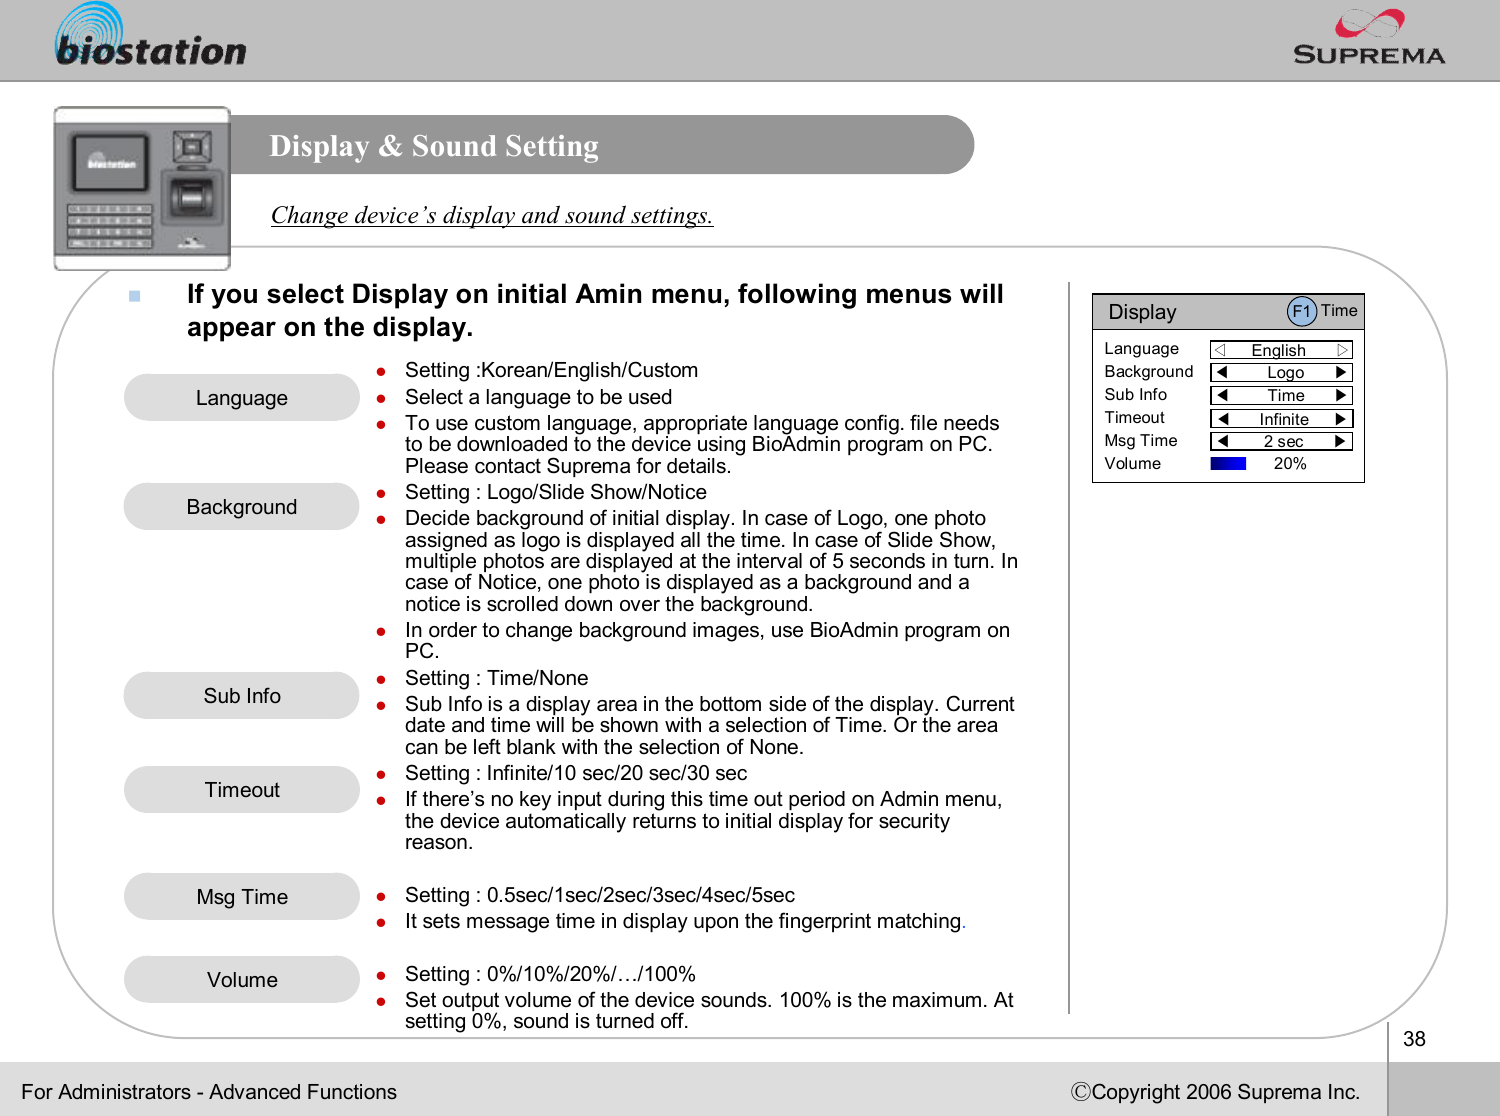
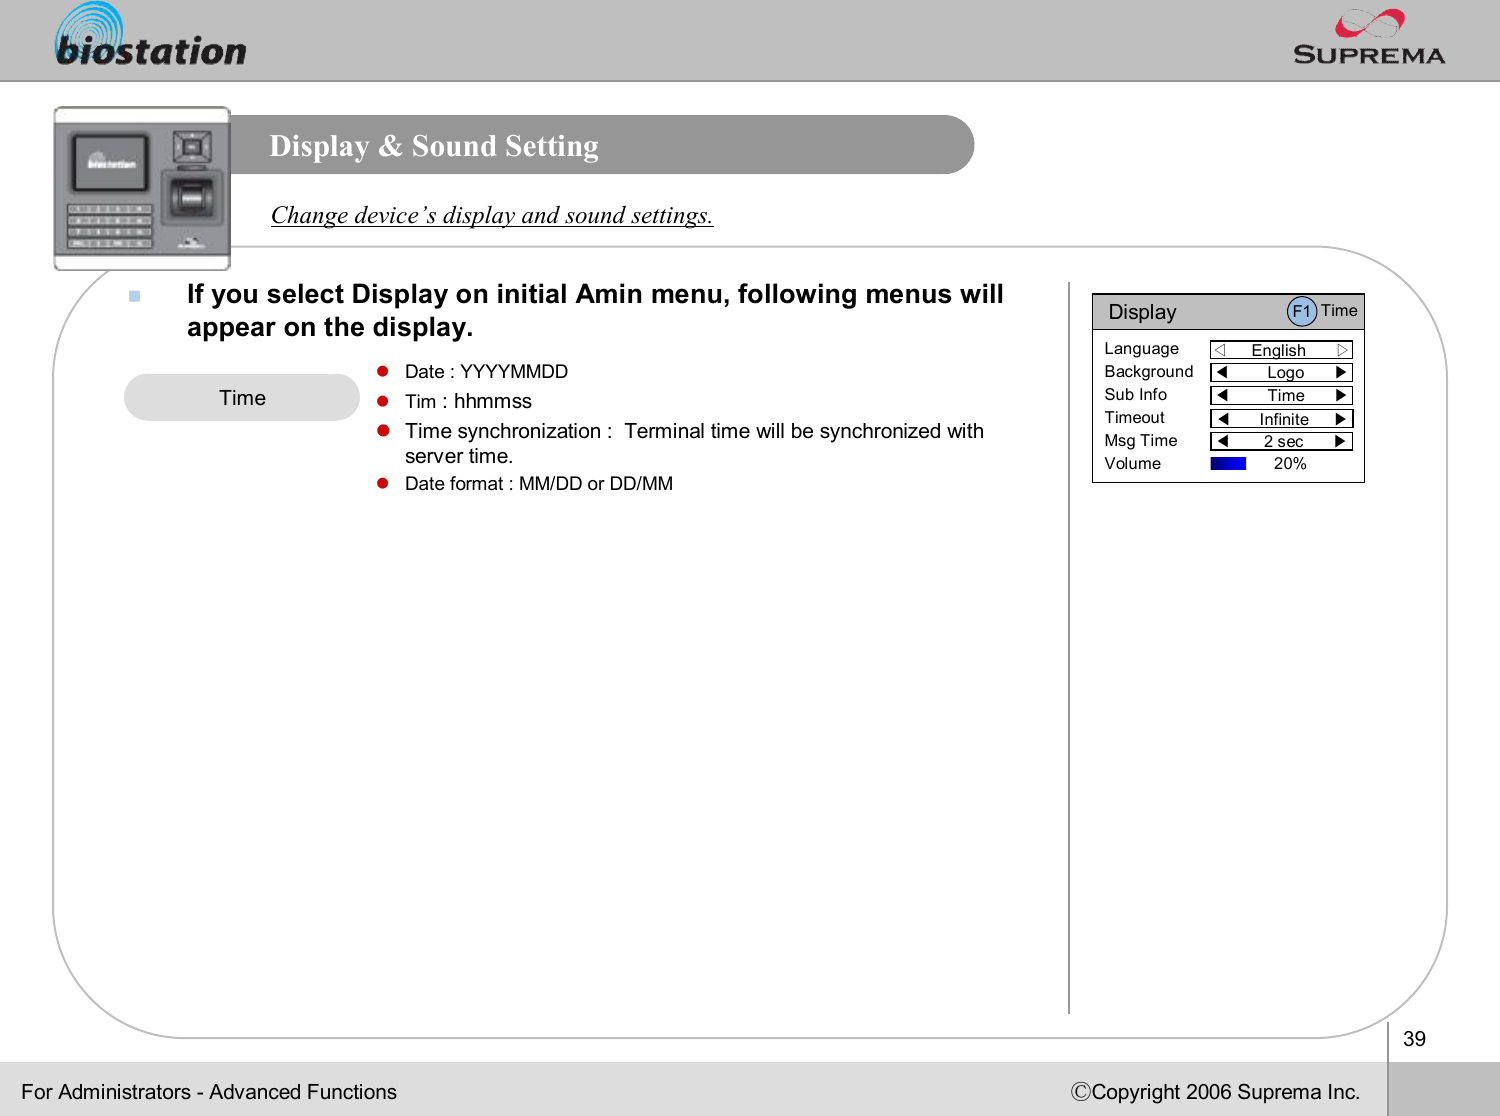
![19ⒸCopyright 2006 Suprema Inc.Using Admin MenunMain functions of initial Admin menu are as follows. For the entire Admin menu list, refer to <List of Admin menu>.lUser : user management such as user enroll/delete/edit.lMode : set device’s operating mode and different settingslDisplay : set device’s language, background, sound volume, etc.lLog : check the access and attendance event records.lDevice: set various settings for finger scan, I/O ports, door relay, etc.lNetwork : set interface such as TCP/IP, RS232, RS485, USB, Secure I/O, etc.nTo enter a desired submenu from initial Admin menu, move to the desired menu using a navigation key and press OK key. nIn a submenu, you can move to desired item using up/down navigation key. To change settings of each item, use left/right navigation key. lIf you press OK key, changed setting is applied and move to the previous menu. If you press ESC key, changed setting is not applied and move to the previous menu. nPress F4 key anytime in Admin menu to exit from Admin menu and move to initial display.l[Note] For security reasons, the display will automatically return to the initial display after a certain time period without any key input in Admin menu. If you do not want this function or want to change the time period, refer to <Display and sound setting>.For Administrators -Basic Functions](https://usermanual.wiki/Suprema/BIOSTATIONMFTC/User-Guide-928230-Page-20.png)
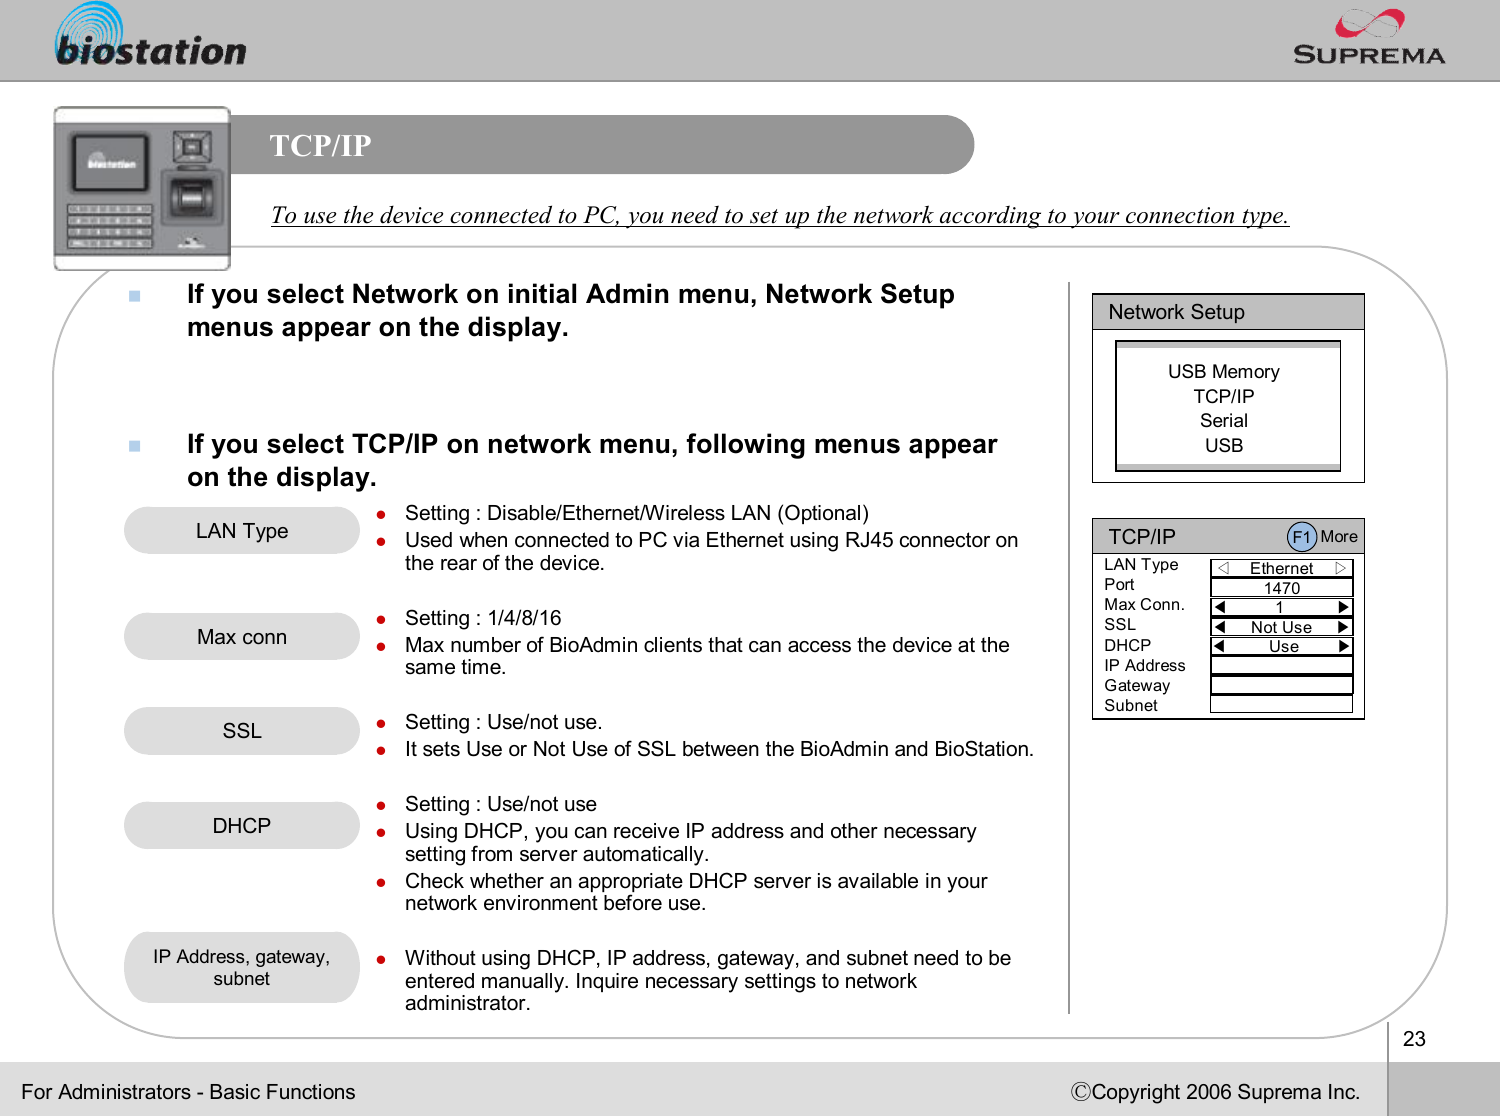
![27ⒸCopyright 2006 Suprema Inc.USBnIf you select USB on network submenu, USB setting menu appears on the display. USB lSetting : Enable/DisablelUsed to connect the mini USB port on the bottom of the device tothe USB port of PC.l[Note] For security reasons, USB is set as Disable by the factory default. When you connect device to PC using USB, the setting should be changed to Enable in advance. USB◁Disable ▷USB PortFor Administrators -Basic FunctionsTo connect the BioStation to the USB port of host PC, enable theUSB communication.](https://usermanual.wiki/Suprema/BIOSTATIONMFTC/User-Guide-928230-Page-28.png)
![34ⒸCopyright 2006 Suprema Inc.Delete UsernIf you want to delete the user, press F3 key at Edit User menu. nPress OK key to confirm the deletion of the user.l[Note] Deleted user info can’t be retrieved unless the info remains in BioAdmin software on PC. Delete user from device while checking currently enrolled user info.Edit UserDo you want to delete this user?OK ESCF1 MoreFor Administrators -Basic Functions](https://usermanual.wiki/Suprema/BIOSTATIONMFTC/User-Guide-928230-Page-35.png)
![35ⒸCopyright 2006 Suprema Inc.Delete All UsersnBack to User Management menu, select Delete All User to delete all users in the device.nPress OK key to confirm the deletion of all users.l[Note] Once all users are deleted, deleted user info cannot be retrieved unless the info remains in BioAdmin software on PC. l[Note] The data of administrators who is operating the menu is also deleted by this operation. Therefore, in order to enter Admin menu again, you should remember the master password before deleting all users.Delete all user currently enrolled in device. User ManagementDo you want to delete all users?OK ESCFor Administrators -Basic Functions](https://usermanual.wiki/Suprema/BIOSTATIONMFTC/User-Guide-928230-Page-36.png)

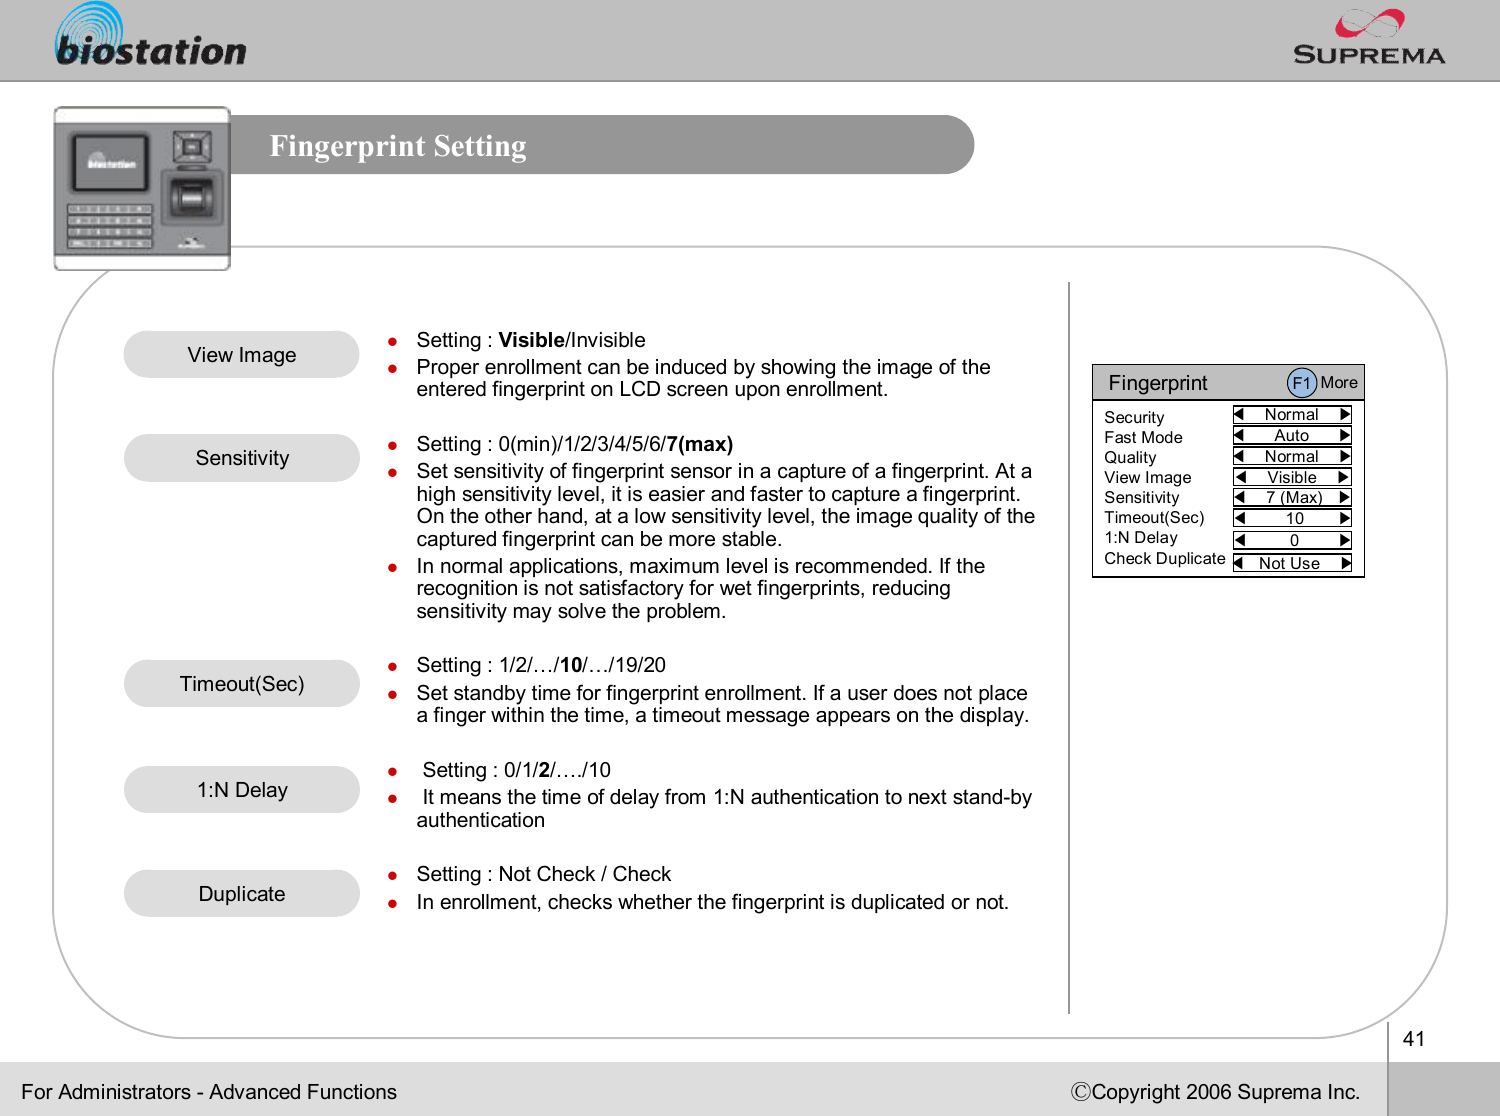
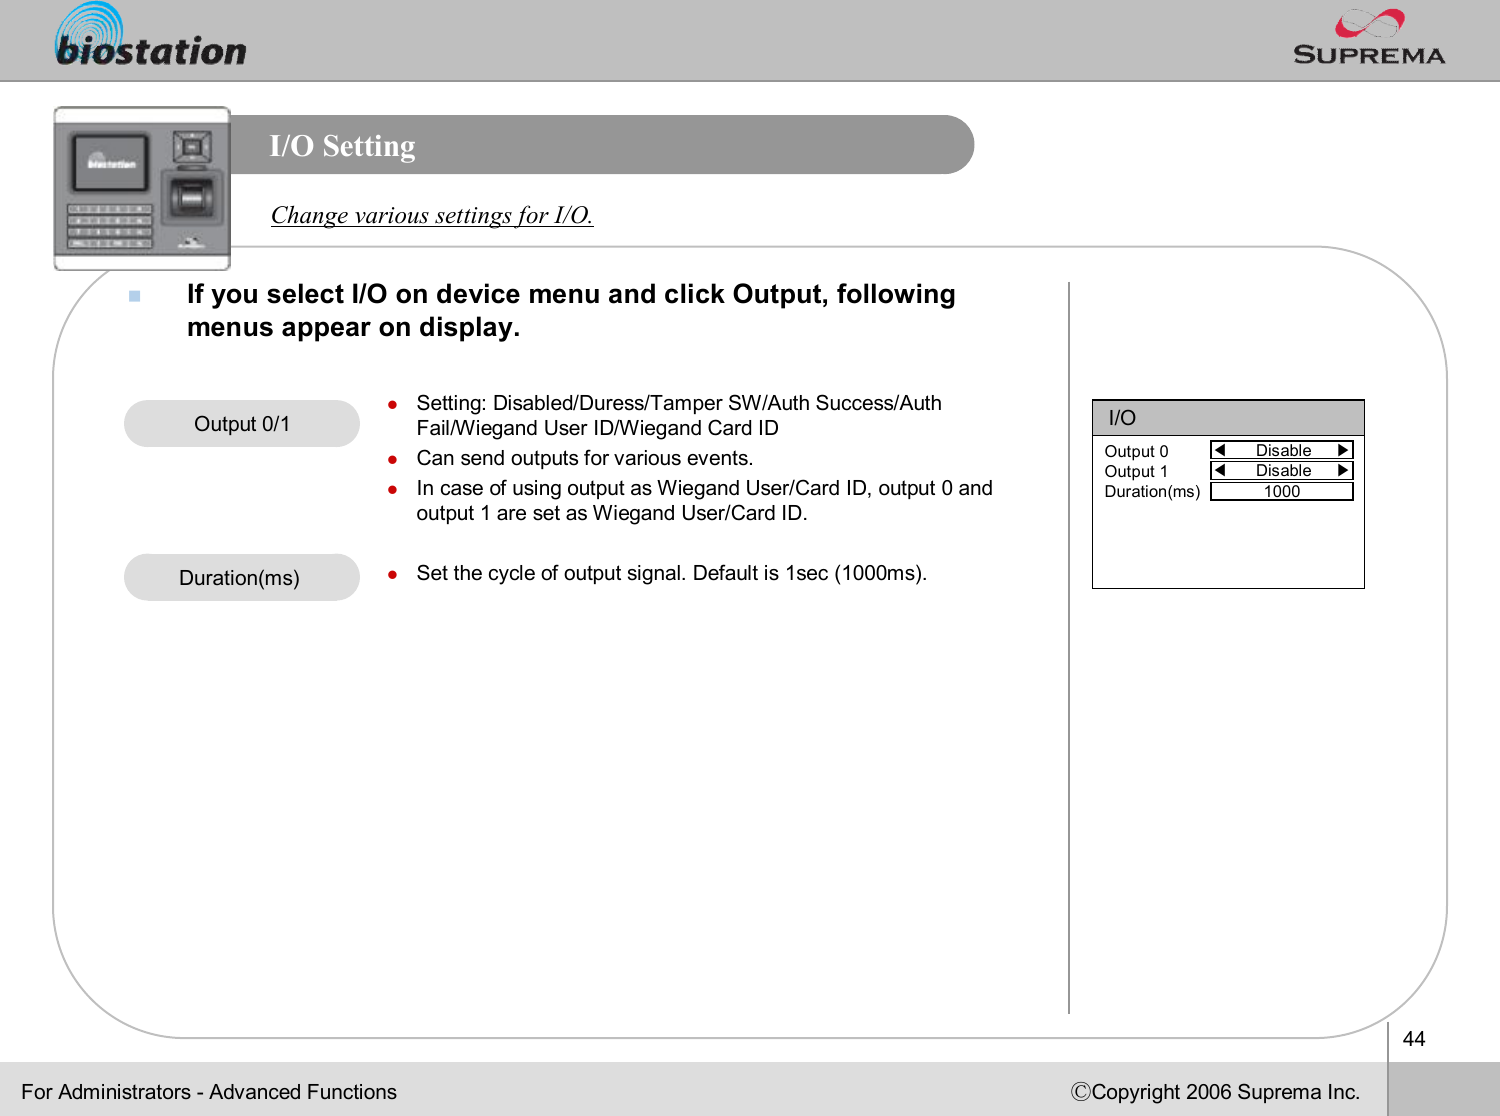
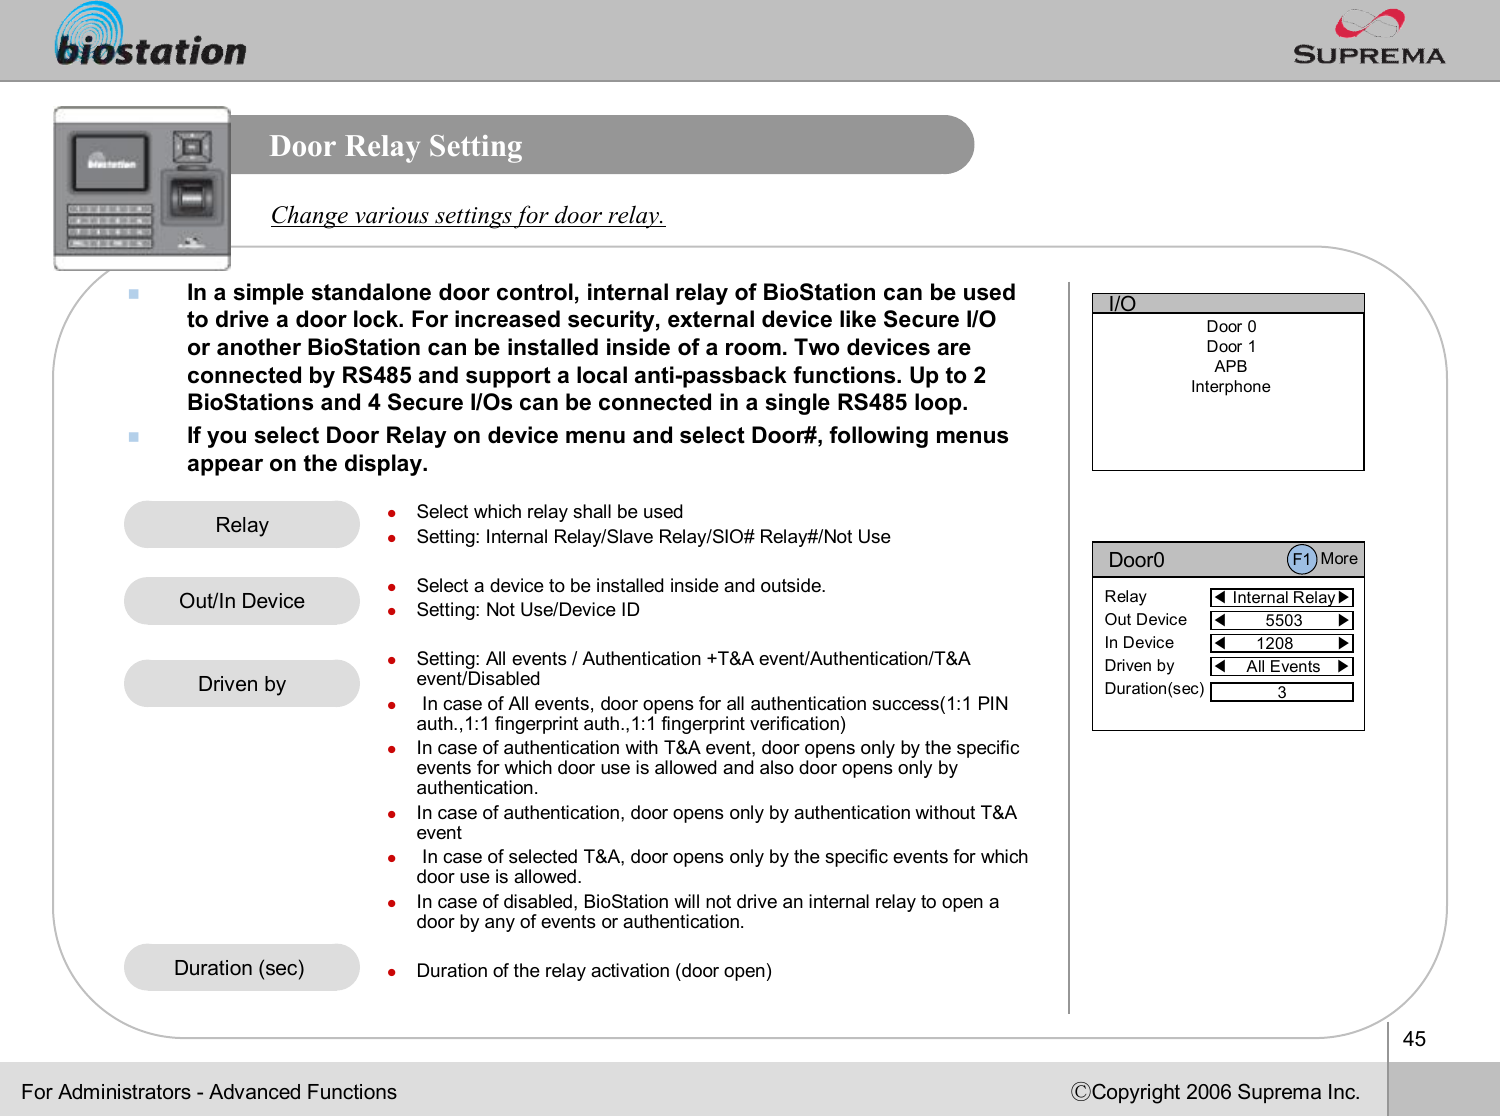
![43ⒸCopyright 2006 Suprema Inc.I/O SettingnIf you select I/O on device menu and click Input, following menus appear on display.Change various settings for I/O.lSetting : Disabled/Exit/Wiegand User ID/Wiegand Card ID/Generic Input/Emergency Open/Alarm Off/Reset/Lock SystemlIn case of using the input port for RTE(exit button), select Exit.lIn case of using input as Wiegand User/Card ID, input 0 and input 1 are set as Wiegand User/Card ID. lGeneric Input : general input. Can be configured with output.lEmergency Open : All relays for doors are turned on for door openlAlarm Off : All relays are turned off to release alarmlReset : System resetlLock System : the device gets locked. Can be relasedwith master password only.lMinimum duration of input signal to decide validitylSet N/O (Normal Open) or N/C (Normal Close)lSetting : None/Lock System/Generic Input/Emergency Open/Alarm Off/ResetlTamper switch is turned on when a housing(case) of BioStation isopened. If the setting is in “Lock System”, the device is automatically locked when a tamper switch is on for security.l[Note] Once BioStation is locked, lock can be released only whenthe master password is entered. It cannot be released by administrator’s fingerprint.Input 0/1Input Type 0/1Duration 0/1(ms) Tamper S/WFor Administrators -Advanced FunctionsI/O◀Disable ▶Input 0Duration0(ms)Input Type 0Input 1Duration1(ms)Input Type 1Tamper SW0◀N/O ▶◀Disable ▶0◀N/O ▶◀None ▶I/OInputOutput](https://usermanual.wiki/Suprema/BIOSTATIONMFTC/User-Guide-928230-Page-44.png)
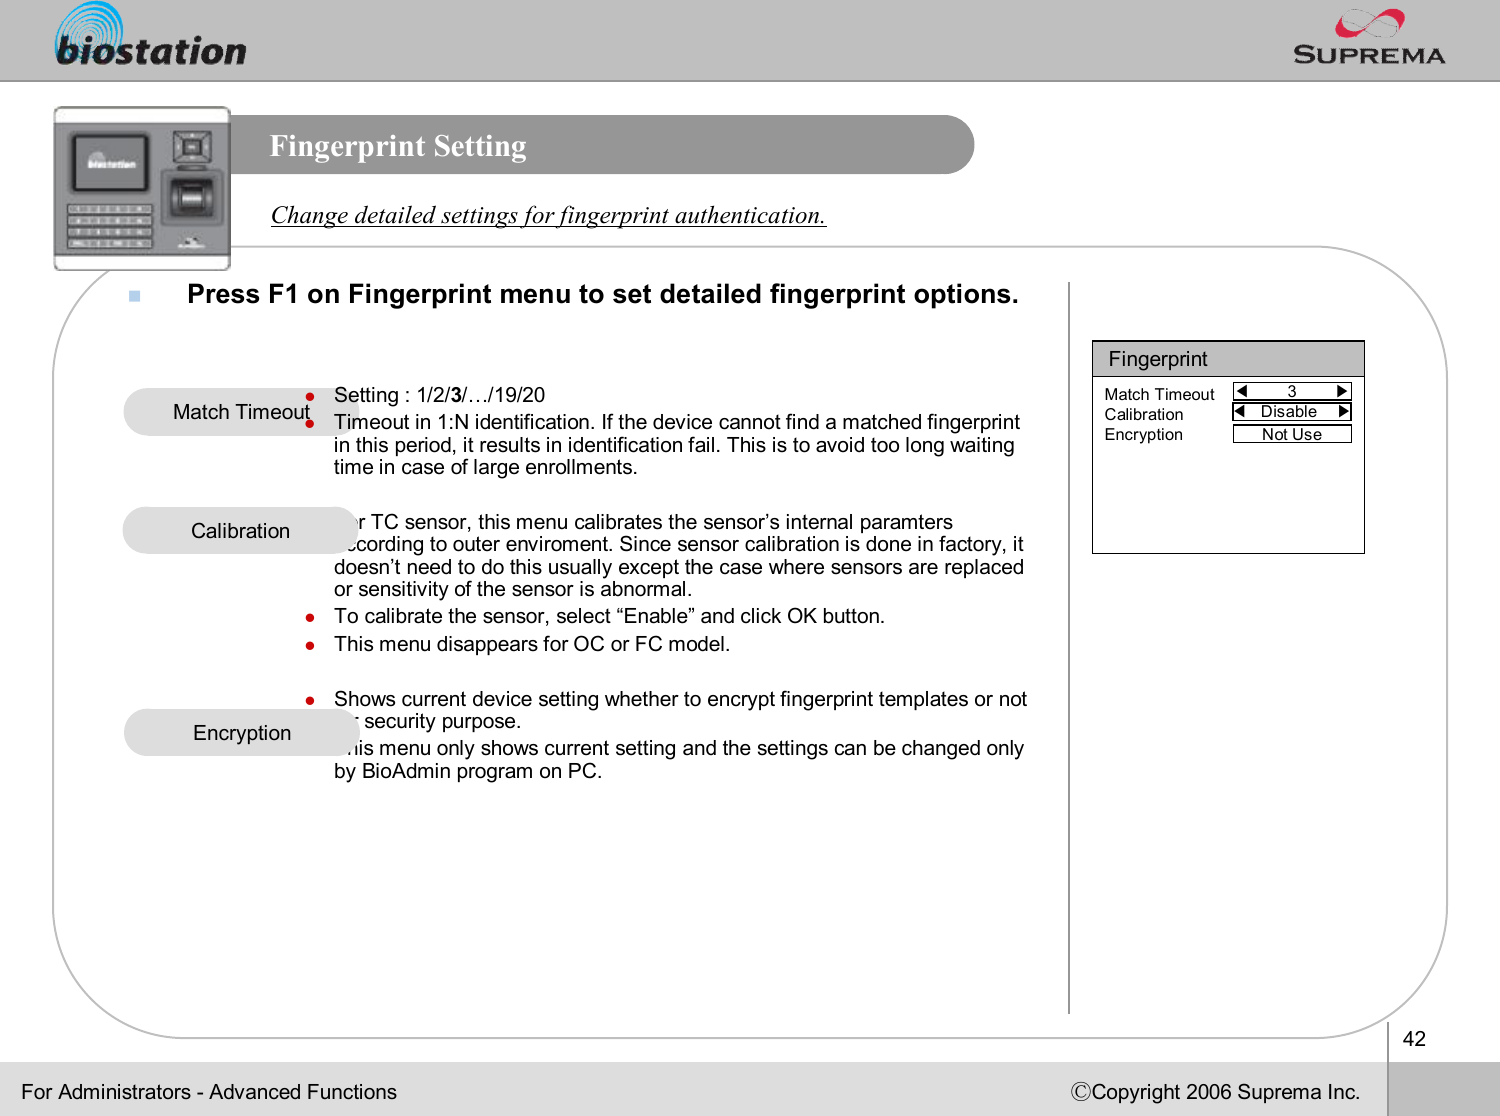
![51ⒸCopyright 2006 Suprema Inc.Change Master PasswordnIf you select Master Password on device menu, Master Password menus appear on the display. nEnter current master password to “Current”and a new master password to “New”& “New (again)”. Then press OK key to confirm. lDefault password is blank (no need to type). l[Note] With this master password, one can enroll or delete usersand change settings of BioStation. Please be careful not to disclose master password except Administrators. nWhen you forget master passwordlIf there is a user enrolled as administrator : you can enter Admin menu using administrator’s fingerprint and return the password as blank by selecting the Factory Default on Device menu. However, in this case, other settings of the device also return to defaults.lIf there’s no user enrolled as administrator : contact the dealer you purchased the device.Master PasswordCurrentNewNew(Again)Change master PW.For Administrators -Advanced Functions](https://usermanual.wiki/Suprema/BIOSTATIONMFTC/User-Guide-928230-Page-52.png)
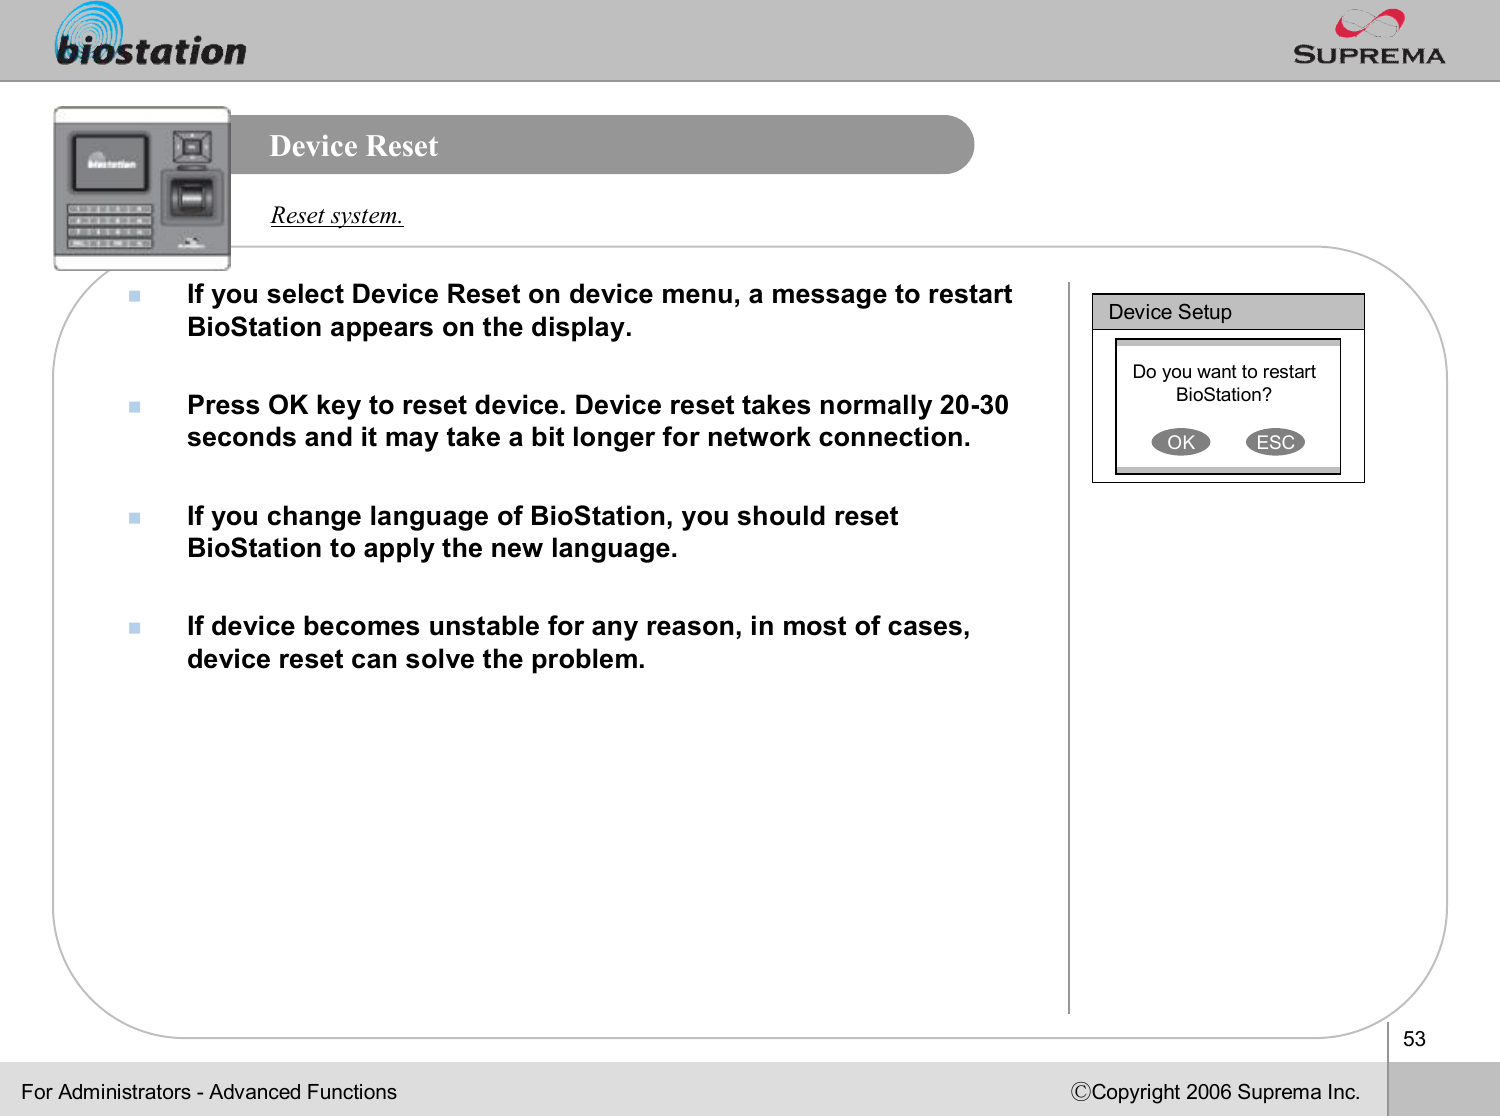
![54ⒸCopyright 2006 Suprema Inc.Factory DefaultnIf you select Factory Default on device menu, a message to reset to default appears on the display.nPress OK key to change system’s various settings as factory defaults.l[Note] Be sure that various settings, background, sounds and notice will be deleted.nUser info and log data are not deleted. To delete user info, refer to <Delete All Users>. To delete log data, refer to <Delete Entire Log>.Restore device’s all settings to factory defaults. Device SetupDo you want to reset to default?OK ESCFor Administrators -Advanced Functions](https://usermanual.wiki/Suprema/BIOSTATIONMFTC/User-Guide-928230-Page-55.png)
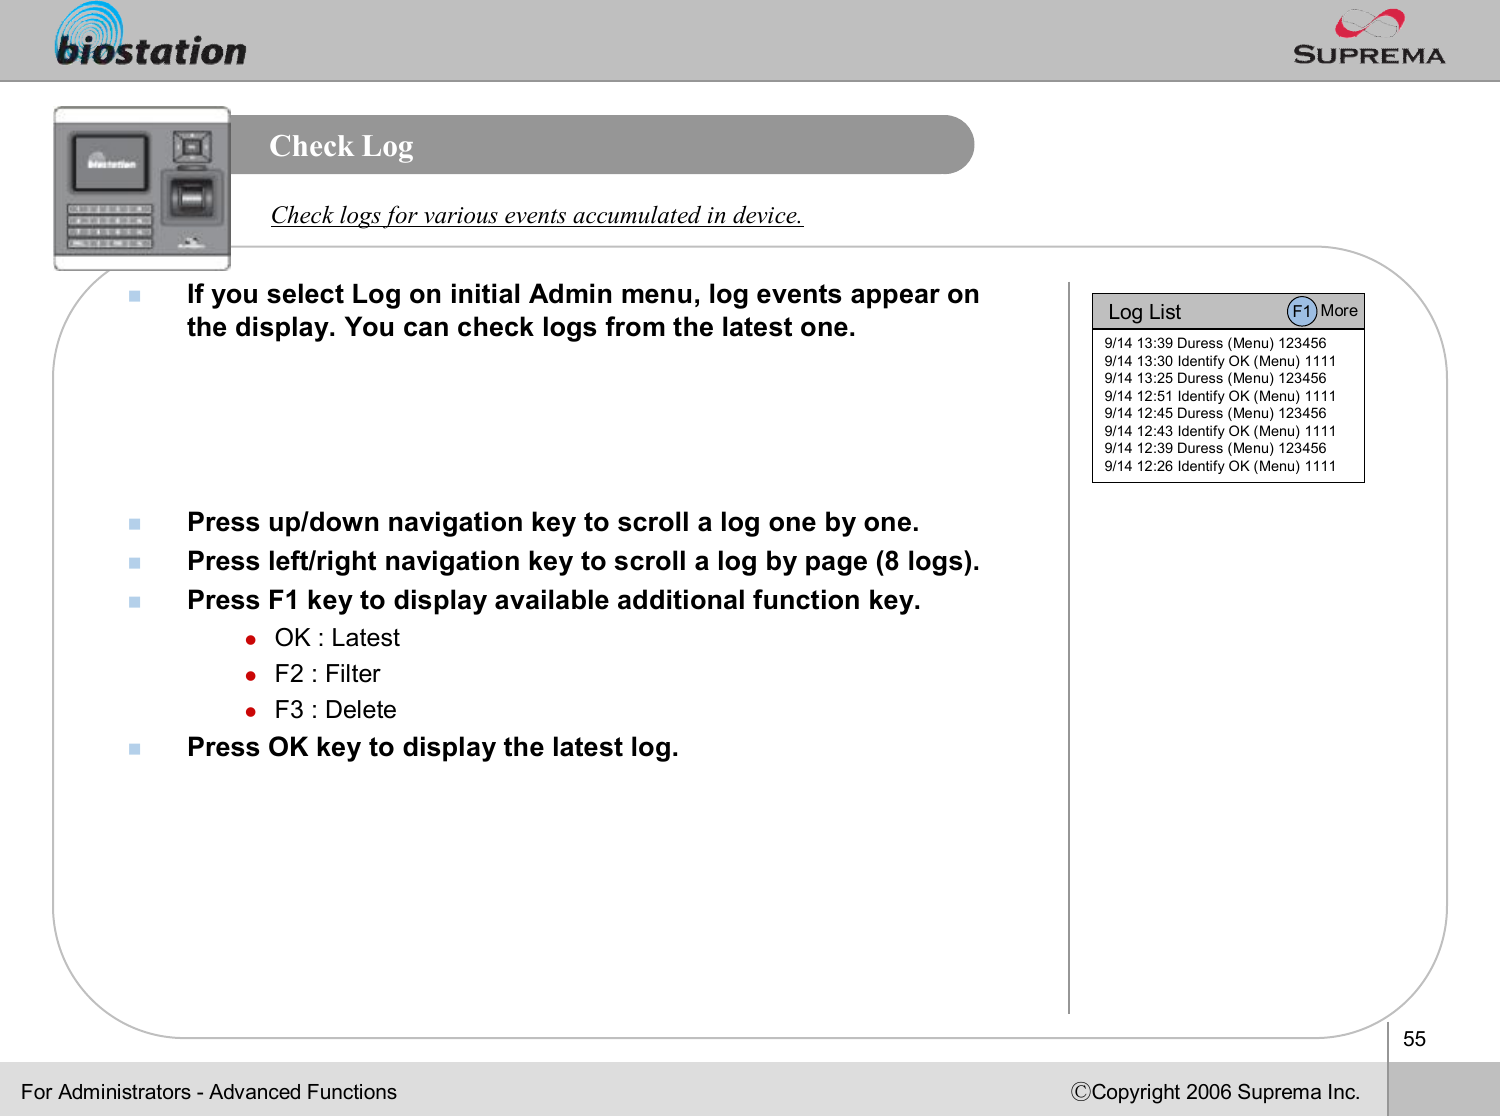

![57ⒸCopyright 2006 Suprema Inc.Delete Entire LognIf you press F3 on log list screen, a message to delete all logsappears on the display.nPress OK key to delete all logs.l[Note] Be sure that a deleted log can not be retrieved unless itremains in BioAdmin program on PC. Delete entire event logs accumulated in device.For Administrators -Advanced FunctionsLog ListDo you want to delete all logs?OK ESCF1 More](https://usermanual.wiki/Suprema/BIOSTATIONMFTC/User-Guide-928230-Page-58.png)
![58ⒸCopyright 2006 Suprema Inc.USB MemorynIf you select USB Memory on Network menu, following menus appear on the display. nWhen you are using wireless LAN, the wireless LAN is automatically disconnected in this menu. When you go out of this menu, wireless LAN is reconnected.How to use USB memory to transfer user information, log data, and various settings of device. For Administrators -Advanced FunctionslTransfer the user information and various settings from the virtual terminal of USB memory to the connected BioStation. At the same time, transfer the log data from the connected BioStation to thevirtual terminal of USB memory. l[Note] Synchronize menu erases the current user information and various settings of the device and overwrite with the information and settings on USB memory. lUseful in transferring the data from BioAdmin program to device.lEnabled only when the USB memory has a virtual terminal with thesame device ID as that of the connected BioStation. lCreate a virtual terminal on USB memory with the same device ID.Export the user information, log data, and various settings of the connected device to the virtual terminal on USB memory. lIt may take a few minutes depending on the size of the user information and log data to export. lTo synchronize or import virtual terminal, you need to create a virtual terminal first on the USB memory by using Export VirtualTerminal menu. lThis menu is enabled only when a USB memory is connected to BioStation.SynchronizeExport Virtual TerminalUSB MemorySynchronizeExport Virtual TerminalImport Virtual Terminal Firmware UpgradeInitializeRefresh](https://usermanual.wiki/Suprema/BIOSTATIONMFTC/User-Guide-928230-Page-59.png)
![59ⒸCopyright 2006 Suprema Inc.USB MemoryHow to use USB memory to transfer user information, log data, and various settings of device. For Administrators -Advanced FunctionslApply the user information and various settings in USB memory tothe connected device. lImport starts by selecting the an ID of the virtual terminals onUSB memory. l[Note] This menu erases the current user information and varioussettings of the device and overwrite with the information and settings on USB memory. lUsed to transfer the user information and various settings from one device to another.lUseful in periodical back up and restoration of device information. lThis menu is enabled only when the connected USB memory has a virtual terminal. lUpgrade the firmware of the connected device with the firmware file stored on USB memory. lFirmware upgrade starts by selecting one of the firmware files stored on the root directory of USB memory. lUpon finishing the firmware upgrade, device automatically restarts. lThis menu is enabled only when a firmware file exists in the root directory of USB memory. lDelete all virtual terminals on USB memory. lThis menu is enabled only when a USB memory is connected to BioStation.lRefresh the connection of the USB memory and the stored information on the connected USB memory. Import Virtual TerminalFirmware UpgradeInitializeRefreshUSB MemorySynchronizeExport Virtual TerminalImport Virtual Terminal Firmware UpgradeInitializeRefresh](https://usermanual.wiki/Suprema/BIOSTATIONMFTC/User-Guide-928230-Page-60.png)