Suzhou Switek Electronics and Technology KI4101 IP OVER KVM User Manual
Suzhou Switek Electronics & Technology Co., Ltd. IP OVER KVM Users Manual
Users Manual
1
KI-4101 Quick Installation Guide
1. Hardware Specifications
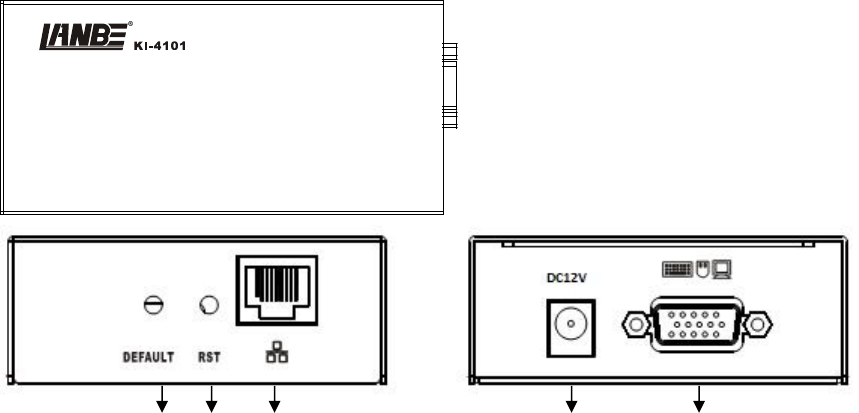
KI-4101 Product view:
2 1 3 4 5
1.Reset:
Press this button to restart KI-4101 device
2.Restore factory settings button:
Long press button for 5 seconds KI -4101 ( IP address, user name , login password) can return to the
factory default settings
3.Network interface:
Can access the WAN ( wide area network ) or LAN ( Local Area Network) with 1000M
4.Power indicator:
After the power is turned on,his indicator lights
5.Power port:
Used to access DC12V 1A power supply
6.Signal input ports:
Graphics connection through DB15 cable and PC / server
2. Packing List
KI-4101 IP-KVM switch
Power adapter
Quick installation guide
User manual
Check to make sure that all the components are present and that nothing was damaged in shipping. If
you encounter a problem, contact your dealer.
2
Read this manual thoroughly and follow the installation and operation procedure carefully to prevent
any damage to the unit, and/or any of the devices that connect to it.
3. Installation Steps
BEFORE INSTALLATION
1.Make sure that power to all the devices you will be connecting up have been turned off.
2.To prevent damage to your installation, make sure that all devices on the installation are properly
grounded.
INSTALLATION
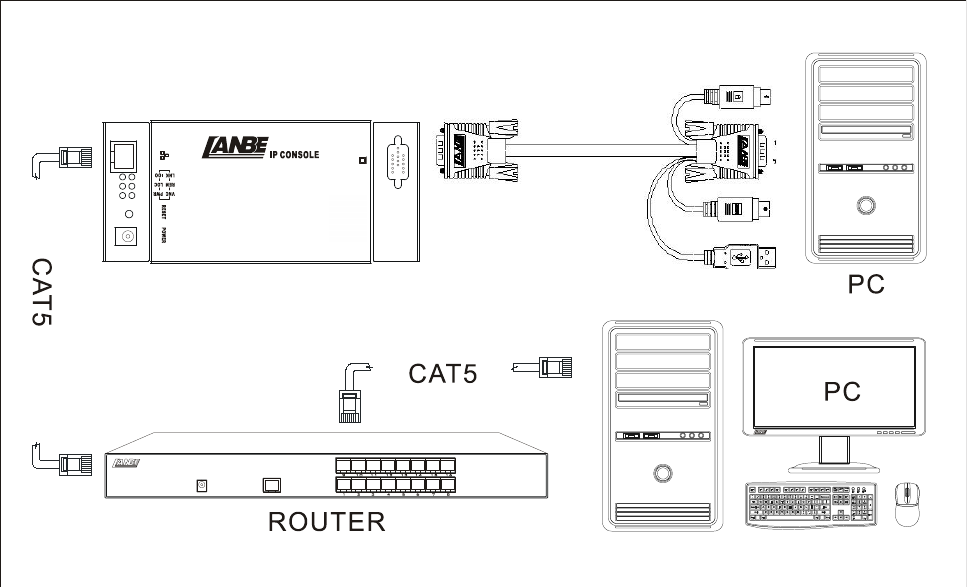
1.Using end of KVM cable to connect PS2 keyboard,PS2 mouse and monitor port on panel and other end
of KVM cable to connect corresponding port of controlled computer.
2.Using one end of crystal head of CAT5 UTP to plug RJ45 port on the switch panel.
3.Using other end of crystal head of CAT5 UTP to plug router or network interface which control PC in
the LAN
This completes the installation, and you can turn on the power to the computers.
4. Installation Diagram
Remark:
1. default user name:admin ; password:admin; default IP address is:192.168.0.10.
2. product can be stored up to 50 user names and 5 user names can on line at the same time

3
3. log save up to 1000
5. Software Specification and installation
1.Software was burned in the CD attached with product.
2.Install as following steps:
Find the folder “IP KVM” and install it successfully; then connect well all the devices;
Plug in the product and connect to network, the default IP address is:192.168.0.10. Using one PC which in
the same network segment and enter “http://192.168.0.10”in the browser and hit ENTER to access.
Mouse settings
Windows XP, Windows 2003 and Windows 2008 Settings
To configure KVM target servers running Microsoft. Windows XP. operating system, Windows 2003.
operating system or Windows 2008. operating systems:
i. Choose Start > Control Panel > Mouse
ii. Click the Pointer Options tab
iii. In the Motion group
iv. Set the mouse motion speed setting to exactly the middle speed
v. Disable the "Enhance pointer precision" option
vi. Disable the Snap To option
vii. Click OK
Windows 7 and Windows Vista Settings
To configure KVM target servers running Windows Vista operating system:
1、Choose Start > Settings > Control Panel > Mouse
2、Select "Advanced system settings" from the left navigation panel. The System Properties dialog opens;
3、Click the Pointer Options tab;
4、In the Motion group:
5、Set the mouse motion speed setting to exactly the middle speed;
6、Disable the "Enhanced pointer precision" option;
7、Click OK
To configure KVM target servers running Windows 7. operating system:
Choose Start > Control Panel > Hardware and Sound > Mouse;
Click the Pointer Options tab;
In the Motion group:
Set the mouse motion speed setting to exactly the middle speed;

4
Disable the "Enhanced pointer precision" option;
Click OK
Windows 2000 Settings
To configure KVM target servers running Microsoft. Windows 2000. operating system:
i. Choose Start > Control Panel > Mouse;
ii. Click the Motion tab;
iii. Set the acceleration to None;
iv. Set the mouse motion speed setting to exactly the middle speed;
v. Click OK
To configure KVM target servers running Linux. (graphical user interface):
i. Choose Main Menu > Preferences > Mouse. The Mouse Preferences dialog appears;
ii. Click the Motion tab;
iii. Within the Speed group, set the Acceleration slider to the exact center;
iv. Within the Speed group, set the Sensitivity towards low;
v. Within the Drag & Drop group, set the Threshold towards small;
vi. Close the Mouse Preferences dialog;
Note: If these steps do not work, issue the xset mouse 1 1 command as described in the Linux command line
instructions.
To configure KVM target servers running Linux (command line)::
i. Set the mouse acceleration to exactly 1 and set the threshold to exactly 1. Enter this command: xset
mouse 1 1. This should be set for execution upon login;
To configure Red Hat servers using USB CIMs:
i. Locate the configuration file (usually /etc/modules.conf ) in your system;
Using the editor of your choice, make sure that the alias usb-controller line in the modules.conf file is as
follows:
alias usb-controller usb-uhci
Note: If there is another line using usb-uhci in the /etc/modules.conf file, it needs to be removed or commented
out;
ii. Save the file;
iii. Reboot the system in order for the changes to take effect.
Linux Settings (for Standard Mouse Mode)
Note: The following settings are optimized for Standard Mouse mode only;
To configure KVM target servers running Linux. (graphical user interface):
i. Red Hat 5 users, choose Main Menu > Preferences > Mouse,
Red Hat 4 users, choose System > Preferences > Mouse. The Mouse Preferences dialog appears;
ii. Click on the Motion tab;
iii. Within the Speed group, set the Acceleration slider to the exact center;
iv. Within the Speed group, set the Sensitivity towards low;
v. Within the Drag & Drop group, set the Threshold towards small;
vi. Close the Mouse Preferences dialog.

5
Note: If these steps do not work, issue the xset mouse 1 1 command as described in the Linux command line
instructions;
SUSE Linux 10.1 Settings
Note: Do not attempt to synchronize the mouse at the SUSE Linux. login prompt. You must be connected to
the target server to synchronize the mouse cursors.
To configure the mouse settings:
Choose Desktop > Control Center. The Desktop Preferences dialog appears;
Click Mouse. The Mouse Preferences dialog appears;
Open the Motion tab;
Within the Speed group, set the Acceleration slider to the exact center position;
Within the Speed group, set the Sensitivity slider to low;
Within the Drag & Drop group, set the Threshold slider to small;
Click Close.
Sun Solaris Settings
To configure KVM target servers running Sun. Solaris.:
1. Set the mouse acceleration value to exactly 1 and the threshold to exactly 1. This can be performed from:
The graphical user interface。
To configure the mouse settings (Sun Solaris 10.1):
2. Choose Launcher. Application Manager - Desktop Controls opens。
3. Choose Mouse Style Manager. The Style Manager - Mouse dialog appears。
4. Set the Acceleration slider to 1.0。
5. Set the Threshold slider to 1.0。
6. Click OK。
a) IBM AIX 5.3 Settings
Follow these steps to configure KVM target servers running IBM. AIX. 5.3。
To configure the mouse:
i. Go to Launcher
ii. Choose Style Manager。
iii. Click Mouse. The Style Manager - Mouse dialog appears。
iv. Use the sliders to set the Mouse acceleration to 1.0 and Threshold to 1.0。
v. Click OK。
6
WEB server operation
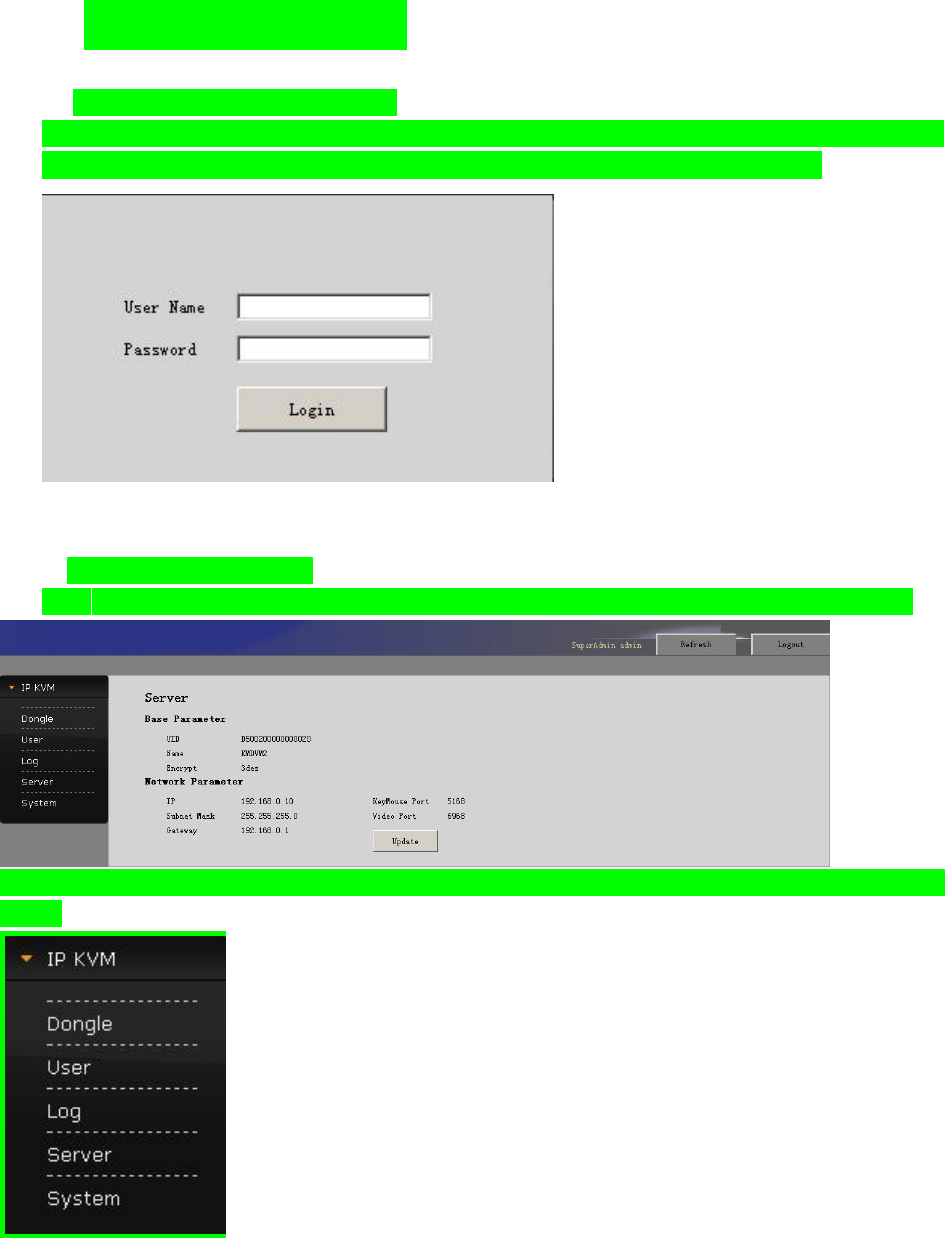
i. Login and using of WEB Server
Enter “http://192.168.0.10”in browser and click ENTER to access and will appear below login interface.
The default user name is admin, and password is admin. Password can be revised after login.
ii. Operation instructions
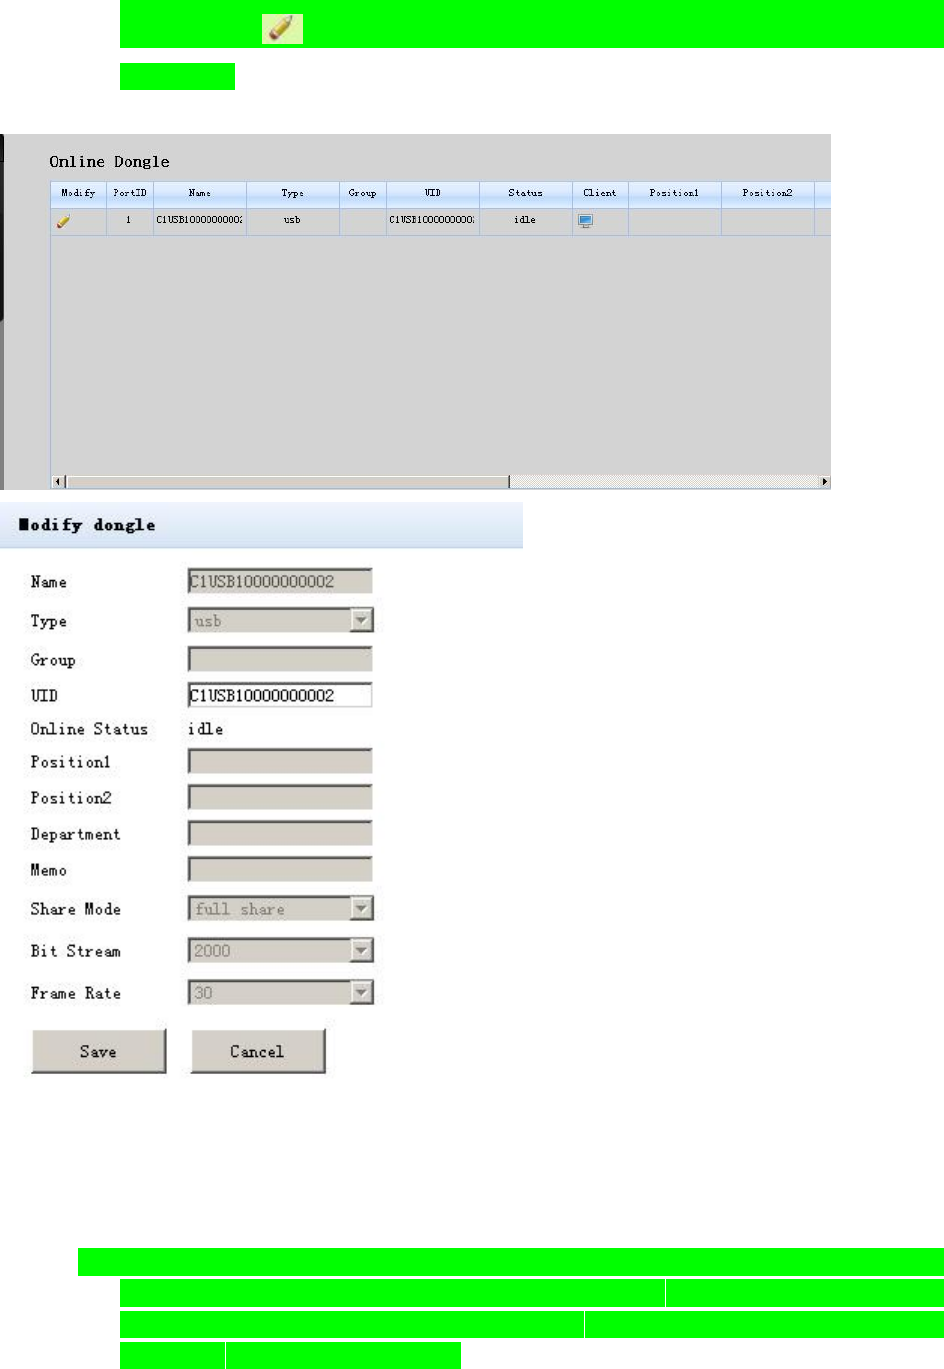
After login, the main interface will appear as below. Users can operate base on corresponding authority.
Five function options on the function line of the left of main interface: Console, User, Log, Network, and
System
.
7
Console: Click on the left to modify equipment description or register information, as
below picture.
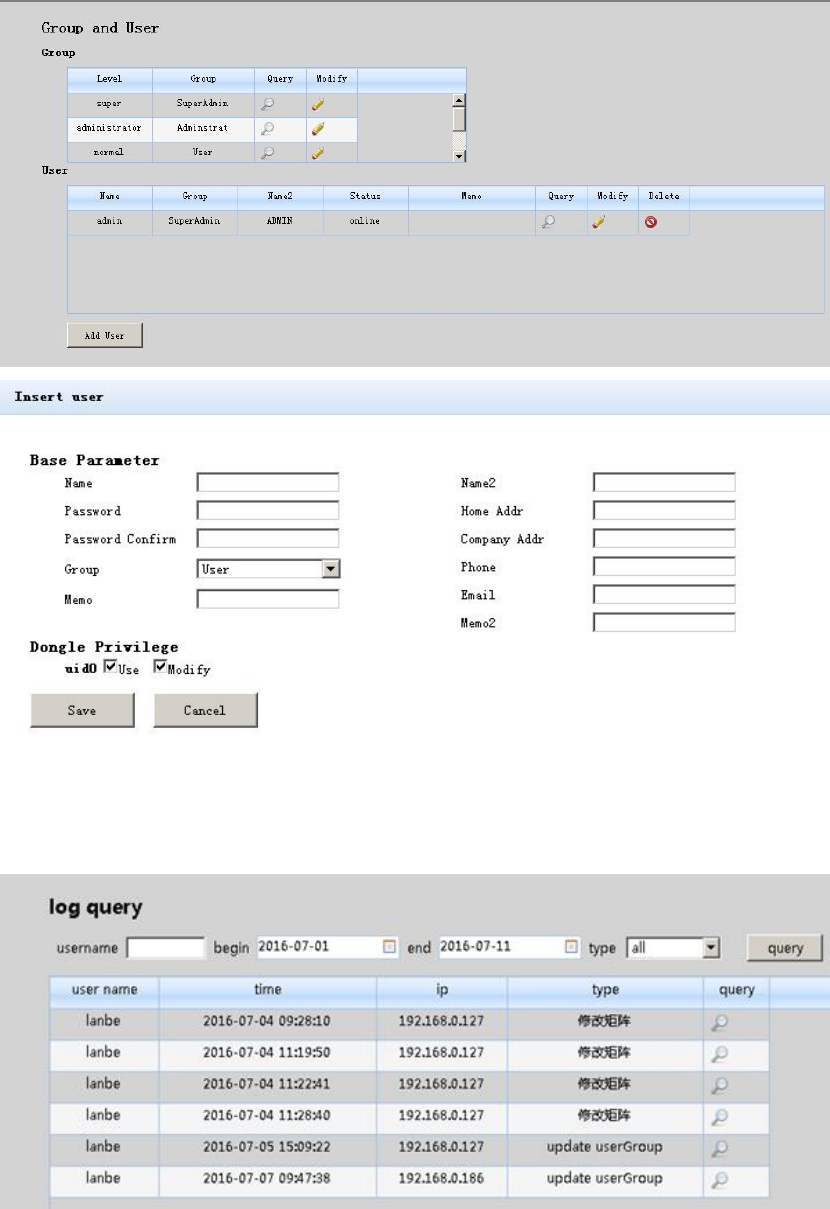
User: Mainly for user management, include three grade: Super Administrator (only one and
couldn’t be deleted), Administrator, User. User system include three group which can be made
base on actual using condition. Higher grade user can add, delete or modify lower grade user. It
can be done by modify as below picture.
8
Log: Support many kinds of log query and log detail as below.
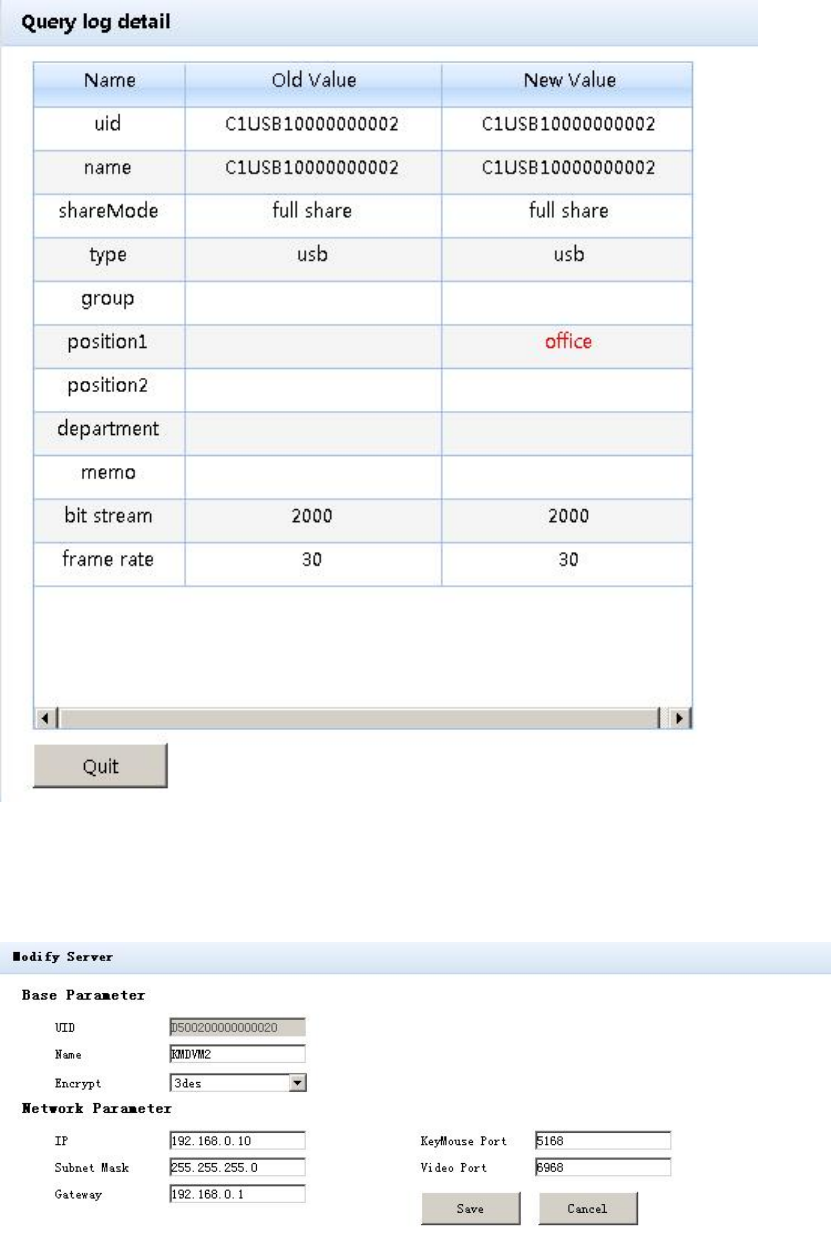
9
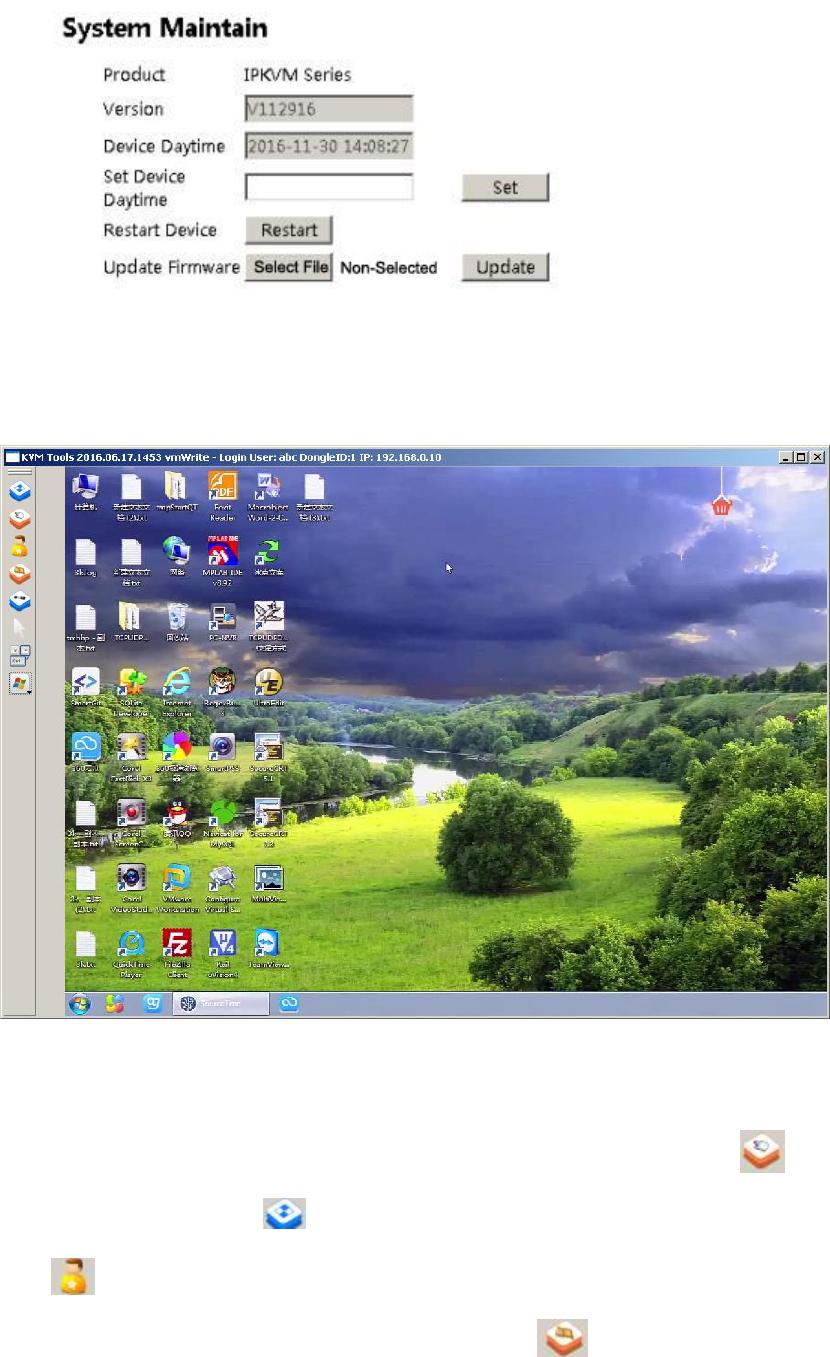
Network: Some information of server like IP address, UID, name, etc, which can be modified.
System: Time setting and online update of equipment system
10
Login
After loin Console interface, click “”image in dongle interface for KVM session, as below.
International standard DES is used in this software to encrypt user data, to avoid data leakage and
guarantee security.
After login, system will automatically calibrate mouse. If it fail, please click “ ”image on left to
operate manually. Click “ ”can make display in full screen. If the mouse doesn’t work, please click
“ ”to get control authority in idle period of equipment and authority.
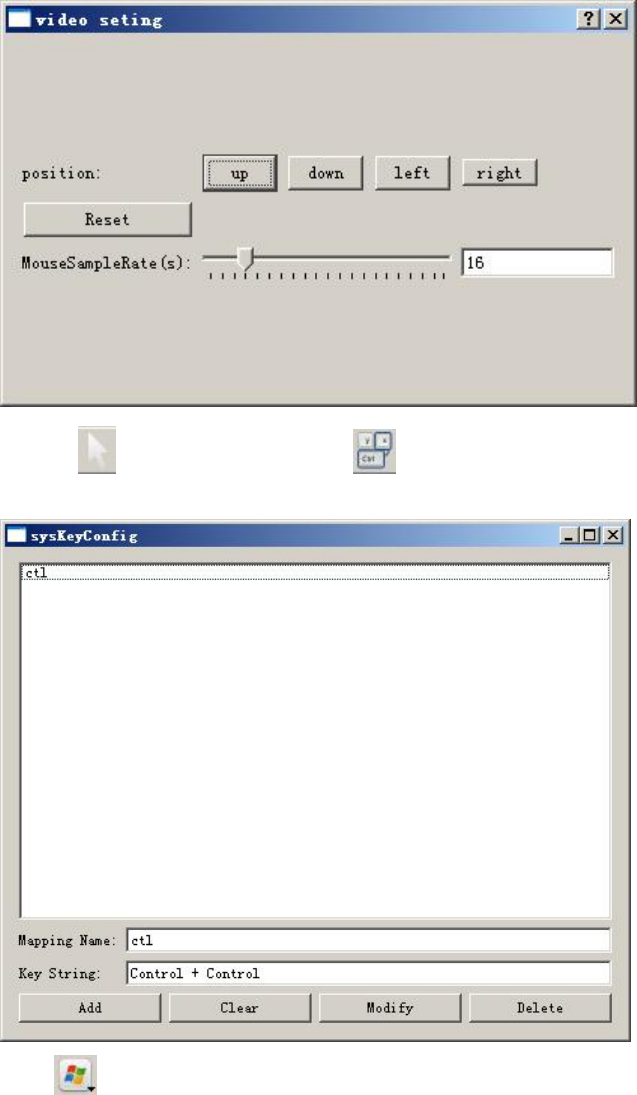
Adjusting display area of screen can be done by clicking “ ”, set as below picture. The screen can be
moved around or reset to initial setting. It can also be used when display shows abnormal.
11
Click “ ”can hide local mouse. “ ”is remote hotkey editing button, click for a popup to add
hotkey as below picture.
Click“ ”can choose remote shortcut key directly to operate the controlled machine.

12
6. Specification
Product number KI-4101
Control port
keyboard
RJ45 port x 1
mouse
video
Input port
keyboard HD15F/integration port x 1
(VGA video,USB mouse/keyboard, PS/2mouse/keyboard)
mouse
video
Power supply port DC-5.5*2.1
Reset network re-connect
Default Initialize IP module default IP address, administrator name and
initial password
LED indicator Power indicator
Max resolution 1920 x 1080@60Hz
Power Supply DC 12V 1000mA
Operating temperature 0-50˚C
Storage temperature -20℃-60℃
Housing metal
Weight 0.5KG
Dimensions(L x W x H ) 162*78*30mm
This equipment has been tested and found to comply with the limits for a
Class B digital device, pursuant to Part 15 of the FCC Rules. These limits are
designed to provide reasonable protection against harmful interference in a
residential installation. This equipment generates, uses and can radiate radio
frequency energy and, if not installed and used in accordance with the
instructions, may cause harmful interference to radio communications.
However,
there is no guarantee that interference will not occur in a particular installation.
If this equipment does cause harmful interference to radio or television reception,
which can be determined by turning the equipment off and on, the user is
encouraged to try to correct the interference by one or more of the following
measures:
-- Reorient or relocate the receiving antenna.
-- Increase the separation between the equipment and receiver.
-- Connect the equipment into an outlet on a circuit different
from that to which the receiver is connected.
-- Consult the dealer or an experienced radio/TV technician for help
This device complies with Part 15 of the FCC Rules. Operation is subject to the following two conditions:
(1) This device may not cause harmful interference,
and (2) this device must accept any interference received,
including interference that may cause undesired operation.
The users manual or instruction manual for an intentional or unintentional radiator shall caution
the user that changes or modifications not expressly approved by the party responsible for
compliance could void the user's authority to operate the equipment. In cases where the manual is
provided only in a form other than paper, such as on a computer disk or over the Internet, the
information required by this section may be included in the manual in that alternative form,
provided the user can reasonably be expected to have the capability to access information in that
form.