Swann Communications SWADS-446CAM IP Camera User Manual Manual
Swann Communications Pty Ltd IP Camera Manual
Contents
- 1. Manual
- 2. Addendum
Manual
1 2 3
4 5 6
7 8 9
1
CConnecting the Camera (ADS-446) DConnecting the Camera (ADS-456) ENetwork LAN Connection (optional)
QH446_456CAM201213E | © Swann 2014
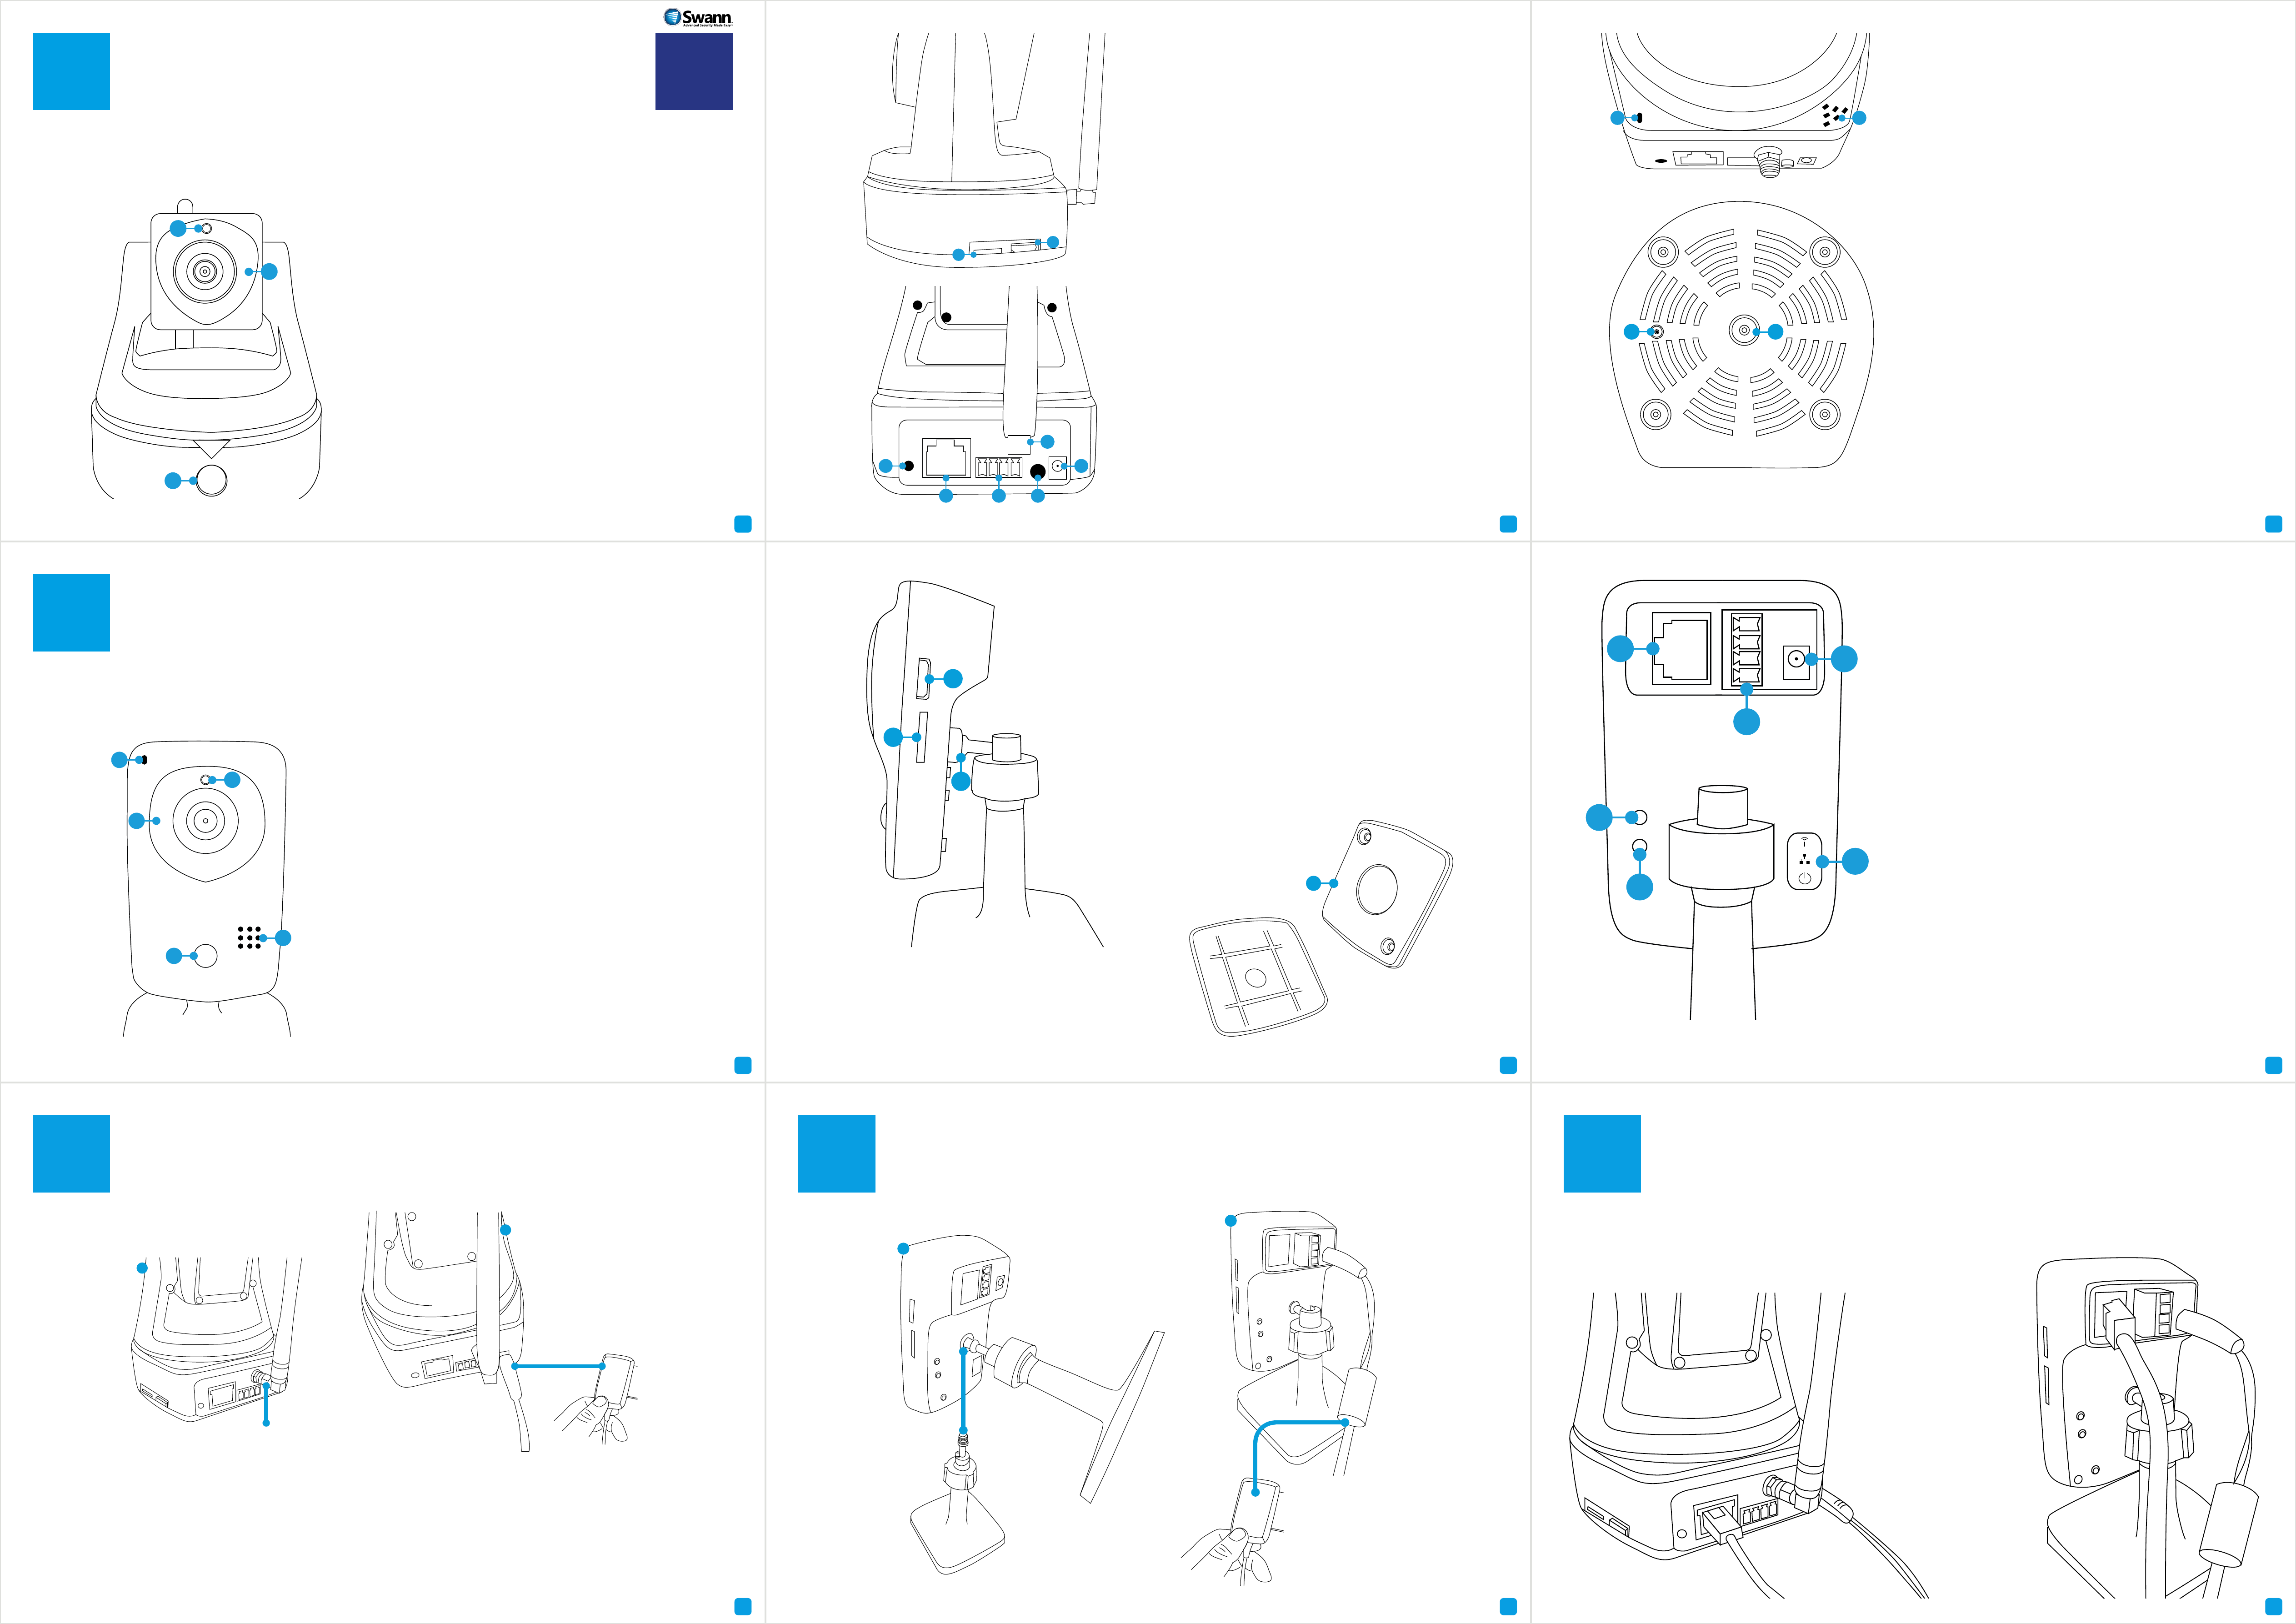
AGetting to know your Camera (ADS-446) EN
Congratulations on the purchase of your SwannCloud camera. This quick start guide will assist you on
getting your camera up and running as soon as possible. We recommend that you connect everything and
give it a try before you do a permanent installation, to make sure nothing was damaged during shipping.
A) Light Sensor - Detects the amount of
light available and turns on the IR LEDs
when necessary.
B) IR (Infrared) LEDs -
The camera will use
these in low-light conditions to generate
a black and white image, even in total
darkness.
C) PIR (Passive infrared) Sensor - This
is an electronic sensor that measures
infrared light radiating from objects in its
field of view.
A) Micro-SD Card Slot - Inserting a Mi-
cro-SD card allows you to capture a series
of snapshots and video files directly to the
card, as well as setting an alarm schedule
so it records when it has detected motion.
This is optional and is recommended for
advanced users only.
B) Mini HDMI -
Connect a mini HDMI cable
so you can see the live view image on your
HDTV.
A) Microphone - Allows the camera to hear
nearby sounds and stream them with the
video.
B) Speaker -
The various alerts and alarms
will be heard from here.
C) Reset -
When pressed and held for
more than 10 seconds when the power is
disconnected and reconnected, all settings
will revert to the factory defaults.
D) Bracket Mount -
The provided mounting
bracket connects here.
BGetting to know your Camera (ADS-456)
Congratulations on the purchase of your SwannCloud camera. This quick start guide will assist you on
getting your camera up and running as soon as possible. We recommend that you connect everything and
give it a try before you do a permanent installation, to make sure nothing was damaged during shipping.
A) Microphone - Allows the camera to hear
nearby sounds and stream them with the
video.
B) Light Sensor - Detects the amount of
light available and turns on the IR LEDs
when necessary.
C) IR (Infrared) LEDs -
The camera will use
these in low-light conditions to generate
a black and white image, even in total
darkness.
D) Speaker -
The various alerts and alarms
will be heard from here.
E) PIR (Passive infrared) Sensor - This
is an electronic sensor that measures
infrared light radiating from objects in its
field of view.
A) Micro-SD Card Slot - Inserting a Mi-
cro-SD card allows you to capture a series
of snapshots and video files directly to the
card, as well as setting an alarm schedule
so it records when it has detected motion.
This is optional and is recommended for
advanced users only.
B) Mini HDMI -
Connect a mini HDMI cable
so you can see the live view image on your
HDTV.
C) Bracket Mount -
The provided camera
stand connects here.
A) RJ45 (Ethernet) - For a wired connection,
connect this to a spare port on your router.
B) Alarm I/O Block -
For connecting external
alarms and sensors.
C) Power Socket - Connect the power
adapter here.
D) Reset -
When pressed and held when the
power is disconnected and reconnected, all
settings will revert to the factory defaults.
E) WPS Button - When pressed and held
for 3-5 seconds allows for wirelessly
connecting to a WPS enabled router.
F) The LEDs are described from top to
bottom -
Wi-Fi LED - This LED will light up when the
camera is connected to your Wi-Fi network.
LAN LED - This LED will light up when the
camera is connected to your network using
the Ethernet cable.
Power LED - This LED indicates that the
camera is turned on.
A
B
C
B
A
C
D
H
E G
F
C) WPS Button - When pressed and held
for 3-5 seconds, allows for wirelessly
connecting to a WPS enabled router.
D) RJ45 (Ethernet) - For a wired connection,
connect this to a spare port on your router.
E) Alarm I/O Block -
For connecting external
alarms and sensors.
F) Wi-Fi Antenna - The included Wi-Fi
antenna connects here.
G) Audio Out - This feature has not been
enabled but it may in future updates.
H) Power Socket - Connect the power
adapter here.
A B
C D
A
B
C
D
E
B
A
C
D) Mounting Plate -
Underneath the
camera stand is a mounting plate. You
can use this to mount the camera to a
wall or ceiling.
D
A
D
E
F
C
B
1
2
First thing to do is to screw
the provided Wi-Fi antenna
into the antenna socket
located on the camera. Use a
clockwise motion to connect.
It is recommended to leave the
antenna in a vertical position
for best reception.
Now connect the supplied
power adapter to the power
input on the camera.
1
2
Now connect the
supplied power adapter
to the power input on
the camera.
Screw the camera stand
to the bracket mount
located on the camera.
Use a clockwise motion
to connect. Adjust the
stand accordingly.
Even though both models primarily connect to your home network wirelessly, they can also connect to
your router using the supplied LAN cable. The main advantage of a LAN connection is that you don’t get
disconnections or dropouts as you would with a wireless connection.
10 11 12
13 14 15
16 17 18
QSCLOUD150113E | © Swann 2014
A
Have a Smartphone or Tablet? With the free SwannCloud app, you can turn your iOS or Android
mobile device into a monitoring centre for your camera. Have the peace of mind that you can mon-
itor your home at any time from any place. With “SwannLink” Peer to Peer technology, connecting
your mobile device to your camera is so easy - there’s no need to fiddle around with complicated
network configurations. Best of all, it only takes minutes to get it up and running!
To download the SwannCloud app, go to your relevant app
store and type in the following - “SwannCloud” for Handsets
and Tablets. Follow the on-screen instructions for installa-
tion and accept any license requirements that may appear.
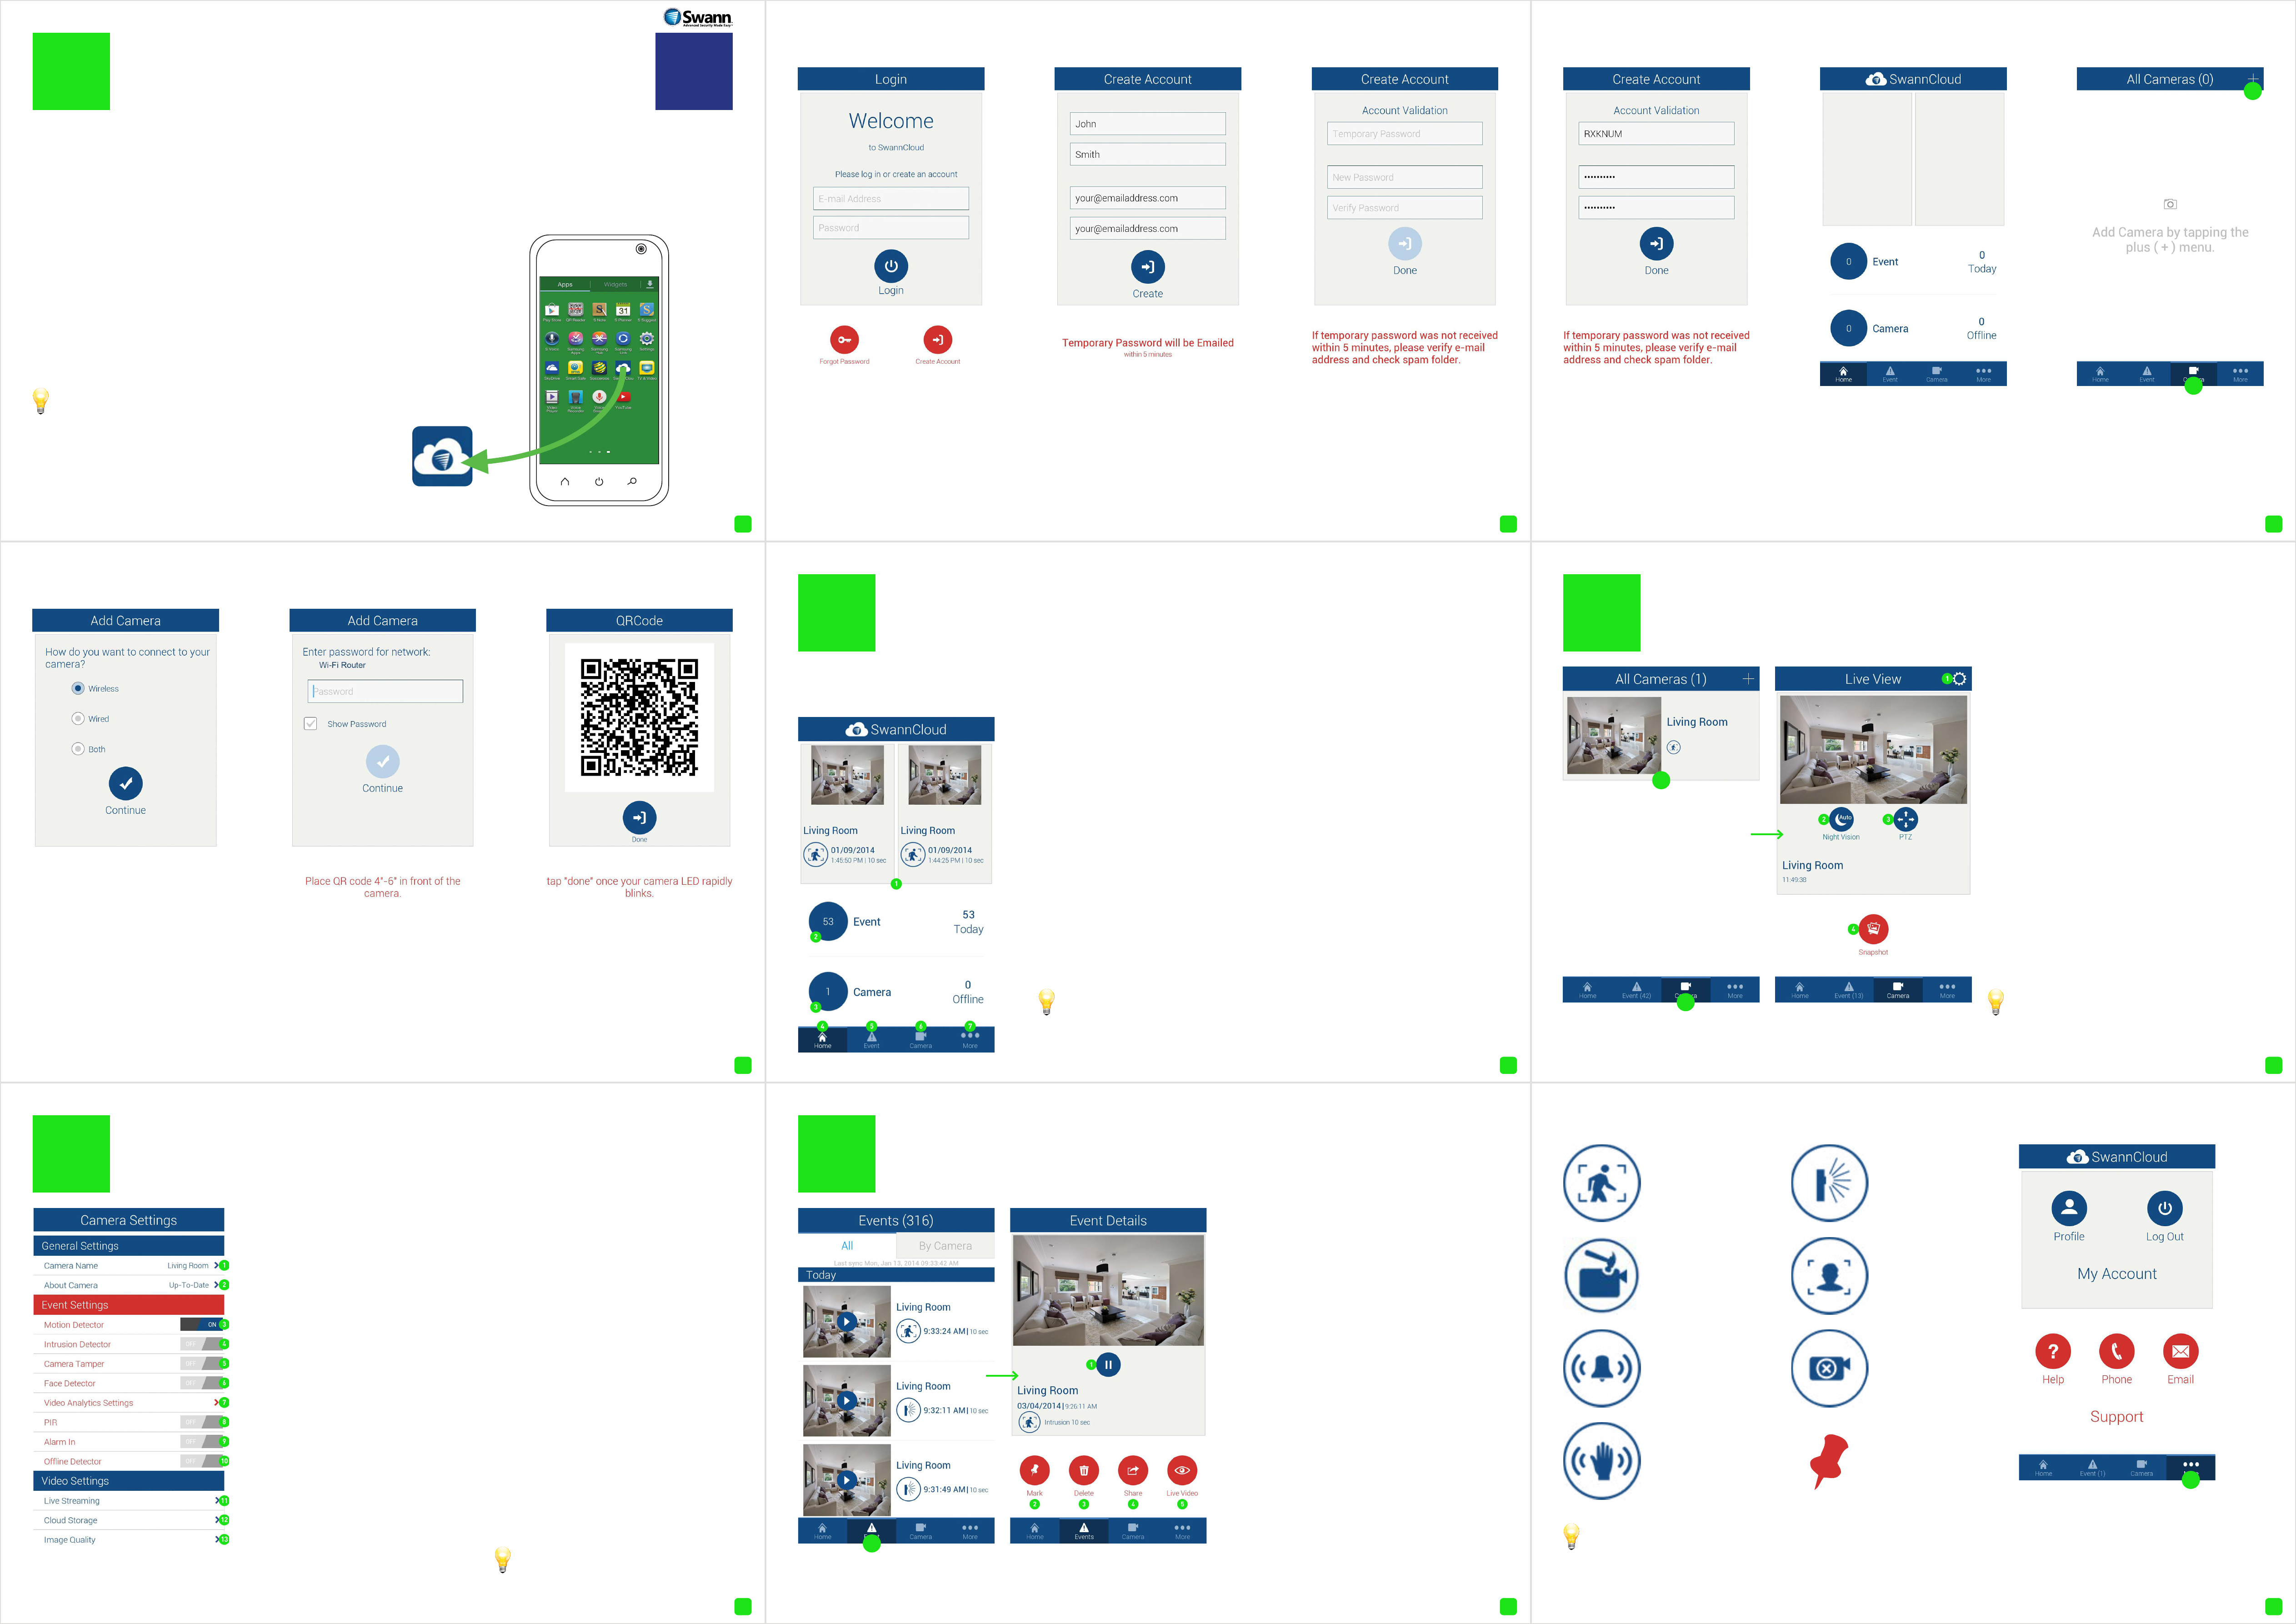
The SwannCloud Mobile App EN
After downloading and installing SwannCloud
onto your Handset or Tablet, locate the app
and tap the icon to run.
The screenshots used on this page are
from the Android version of SwannCloud. The
functions, buttons and overall look and feel
are identical for the iOS version. The app is
continually being tweaked and improved, so
the following screenshots may differ slightly.
123
Tap “Create Account” to
create a new account.
Input your first name, sur-
name and email address.
Tap “Create” to send a
temporary password to
your email address.
BUsing SwannCloud
Wow, that was easy! Start getting yourself familiar with the controls and impress your family and
friends. A description of the various buttons and functions can be found below.
1. SwannCloud will always dis-
play the last two events that
have occurred on the home
screen.
2. This displays how many
events have occurred in total
and for the day. Events occur
whenever motion or an intru-
sion has occurred. Tap this to
go to events.
3. This displays the amount of
cameras that have been reg-
istered to your account. It also
displays if a camera is offline.
Tap this to go to the camera list.
4. Tap this to go to the home
screen.
5. Tap this to access the event
screen. Each event is recorded
as a 10 second video file.
6. Tap this to access the cam-
era list. Tap a camera to view a
live stream.
7. Tap this to access your pro-
file, to log out of the app, to ac-
cess the user manual and to
contact Swann Help Desk.
The PTZ function requires a PTZ camera to be connected.
Use the volume buttons on your mobile device to increase or de-
crease the volume level.
To view a full image of the video
stream, tilt your mobile device hori-
zontally.
Input the temporary pass-
word (which is case sen-
sitive), input a new pass-
word and again to confirm,
then tap “Done”.
After a short moment,
your account will be cre-
ated.
Input the password for
your Wi-Fi network then
tap “Continue”. A QR code
will appear, this contains
all the network settings.
Hold your mobile device
towards the camera lens
to scan the QR code. When
you hear a short beep
beep, tap “Done” to finish.
CViewing your Camera
To view a live stream from your cam-
era, tap the “Camera” button then tap
the name of the camera.
1. Tap this to enter camera settings.
This will be covered in greater detail
in the user manual that is available on
our web site (www.swann.com.au).
2. Tap this to turn night vision on or off
or to leave it on auto.
3. Tap this to control a pan & tilt camera
(only available on the ADS-446 model).
4. Tap this to take a snapshot of the live
video stream. Snapshots are stored lo-
cally on your mobile device.
EViewing Events
To playback an event full screen, tilt your mobile
device horizontally. Events that haven’t been played
will be displayed in bold on the events list.
To view an event that has occurred,
tap the “Event” button. All events that
have occurred to date will appear.
Scroll up or down to find the event that
you would like to play. When you have
selected an event, it will automatically
play. To select a different event tap the
“Home” button then tap the “Event”
button again.
1. Tap this to pause playback. Tap again
to resume playback.
2. Tap to mark this particular event.
Marking an event will prevent it from
being deleted. A red pin icon will ap-
pear on events that are marked.
3. Tap this to delete the event.
4. Tap this to share the event with oth-
er apps on your device, e.g. email or
saving to a new location.
5. Tap this to view a live stream from
the camera.
The event icons represent
the type of event that has
occurred.
Each event that occurs is
10 seconds long. This is the
maximum length.
Status Icons
This icon repre-
sents that an in-
trusion has oc-
curred.
This icon rep-
resents motion
detected by the
PIR sensor.
This icon repre-
sents someone
has tampered
with the camera.
This icon repre-
sents that facial
detection has
occurred.
This icon repre-
sents an alarm
event has oc-
curred.
This icon repre-
sents that the
camera is of-
fline.
This icon repre-
sents that mo-
tion detection
has occurred.
My Account
Tap “More” to access your pro-
file. You can update your account
name, change password or logout
of the app. You can also access the
user manual and contact Swann
Help Desk.
456
789
DCamera Settings
1. Tap this to give the camera a
relevant name.
2. If there is an update available,
you will be notified when you start
the app.
3. Motion detection will be ena-
bled by default.
4. Slide this to the ON position to
enable intrusion detection.
5. Slide this to the ON position to
enable camera tampering.
6. Slide this to the ON position to
enable face detection.
7. Tap this to change settings for
sensitivity, to change the motion
detection area, and to set the in-
trusion direction.
8. Tap this to enable the PIR sen-
sor on the camera.
9. Slide this to the ON position if
you are connecting an alarm to
the camera.
10. Slide this to the ON position
if you would like the app to alert
you if the camera is no longer be-
ing detected.
11. Tap this to change video set-
tings for live view. Adjusting the
frame rate and bit rate may help
if you’re having problems when
viewing a live stream.
12. Tap this to change video set-
tings for cloud storage. All events
are saved to the cloud and not on
your mobile device.
13. Tap this to adjust brightness,
contrast, sharpness and satura-
tion.
Please have a look at the user
manual for more information.
Check your email, you
should have received your
temporary password.
Tap “Camera” then tap
“+” to add your camera.
Select how you would
like to have the cam-
era connected. If you se-
lect “Wired”, you will be
taken directly to the QR
code (step 9). If you select
“Wired” or “Both”, you will
be requested to input the
password for your Wi-Fi
network. Tap “Continue”.
This pin icon
will appear on
events that have
been marked.