01_es_cover 2000 2010 2040 2160 2170 Burnisher Operator And Parts Manual
2013-10-07
: Sweepscrub 2000-2010-2040-2160-2170 Burnisher Operator And Parts Manual 2000-2010-2040-2160-2170_Burnisher_Operator_and_Parts_Manual 862 file product_file
Open the PDF directly: View PDF ![]() .
.
Page Count: 29
ENGLISH - ESPAÑOL
2000/2010/2030
2040/2160/2170
Floor Machine
Máquina para pisos
Operator and Parts Manual
Manual del Operador y Piezas
607644
Rev. 06 (12-05)
Model No.:
609671 -- 2000 (120V/60HZ)
609622 -- 2010 (120V/60HZ) HD
609784 -- 2010 (240V/50HZ) HD
609621 -- 2010 (230V/60HZ) HD
613739 -- 2010 (220V/60HZ) HD
609672 -- 2030 (120V/60HZ)
609624 -- 2040 (120V/60HZ) HD
609786 -- 2040 (230V/50HZ) HD
609664 -- 2040 (220V/60HZ) HD
613738 -- 2040 (220V/60HZ) HD
607642 -- 2160 (120V/60HZ) DS
607643 -- 2170 (120V/60HZ) DS
609665 -- 2170 (230V/60HZ) DS
Home
Find...
Go To..
OPERATION
2Tennant 2000/2010/2030/2040/2160/2170 (12--05)
This manual is furnished with each new model.
It provides necessary operation and maintenance
instructions and an illustrated parts list.
Read this manual completely and understand the
machine before operating or servicing it.
Use the illustrated Parts Lists to order parts. Before
ordering parts or supplies, be sure to have your
machine model number and serial number handy.
Parts and supplies may be ordered by phone or mail
from any authorized parts and service center,
distributor or from any of the manufacturer’s
subsidiaries.
This machine will provide excellent service. However,
the best results will be obtained at minimum costs if:
SThe machine is operated with reasonable care.
SThe machine is maintained regularly - per the
machine care instructions provided.
SThe machine is maintained with manufacturer
supplied or equivalent parts.
PROTECT THE ENVIRONMENT
Please dispose of packaging materials,
old machine components such as
batteries, hazardous fluids such as
antifreeze and oil, in a safe
environmentally way according to your
local waste disposal regulations.
Always remember to recycle.
Tennant Company
PO Box 1452
Minneapolis, MN 55440
Phone: (800) 553--8033 or (763) 513--2850
www.tennantco.com
Specifications and parts are subject to change without notice.
E1997, 1999, 2000, 2002, 2004, 2005 Tennant Company.
All rights reserved. Printed in U.S.A.
MACHINE DATA
Please fill out at time of installation for future reference.
Model No.-
Install. Date -
Serial No.-
Home
Find...
Go To..

OPERATION
Tennant 2000/2010/2030/2040/2160/2170 (12--04) 3
TABLE OF CONTENTS (ESPAñOL ÍNDICE....11
SAFETY PRECAUTIONS 4....................
GROUNDING INSTRUCTIONS 5...........
SAFETY LABEL 5............................
MACHINE COMPONENTS 6...................
MACHINE SETUP 6..........................
INSTALLING PAD DRIVER / PAD / BRUSH 6
MACHINE OPERATION 7.....................
OPERATING MACHINE 7..................
OPERATING THE OPTIONAL
SOLUTION TANK 8.......................
CLEANING CARPETS 8...................
MACHINE MAINTENANCE 8..................
TRANSPORTING MACHINE 8.................
STORING MACHINE 9........................
RECOMMENDED STOCK ITEMS 9.............
TROUBLE SHOOTING 9......................
SPECIFICATIONS 10..........................
MACHINE DIMENSIONS 10....................
ELECTRICAL DIAGRAMS 22...................
PARTS LIST 24...............................
HANDLE GROUP 24.......................
BASE GROUP 26..........................
REPLACEMENT BRUSHES AND
PAD DRIVER GROUP 28...................
OPTIONS 29..................................
SOLUTION TANK GROUP 29................
Home
Find...
Go To..

OPERATION
4Tennant 2000/2010/2030/2040/2160/2170 (12--04)
SAFETY PRECAUTIONS
This machine is intended for commercial use only.
It is designed exclusively to scrub floors in an
indoor environment and is not constructed for any
other use. Use only recommended pads/brushes
and commercially available floor cleaners and
waxes intended for machine application.
All operators must read, understand and practice
the following safety precautions.
The following warning alert symbol and the “FOR
SAFETY” heading are used throughout this manual as
indicated in their description:
WARNING: To warn of hazards or unsafe
practices which could result in severe personal
injury or death.
FOR SAFETY: To identify actions which must be
followed for safe operation of equipment.
Failure to follow these warnings may result in
personal injury, electrical shock, fire or explosion.
WARNING: Fire Or Explosion Hazard:
-- Never Use Flammable Liquids Or Operate
Machine in Or Near Flammable Liquids,
Vapors Or Combustible Dusts.
This machine is not equipped with an explosion
proof motor. The electric motor will spark upon
start up and during operation which could cause a
flashfireorexplosionifmachineisusedinanarea
where flammable vapors/liquids or combustible
dusts are present.
WARNING: Electrical Hazard. Do Not Operate
With Damaged Power Cord. Do Not Modify Plug.
Unplug Power Cord Before Servicing Machine
If the supply cord is damaged or broken, it must
be replaced by the manufacturer or it’s service
agent or a similarly qualified person in order to
avoid a hazard.
WARNING: Electrical Shock Hazard.
Do Not Use Outdoors. Do Not Expose to Rain.
Store Indoors.
The following information signals potentially
dangerous conditions to the operator or
equipment:
FOR SAFETY:
1. Do not operate machine:
-- With flammable liquids or near flammable
vapors as an explosion or flash fire may
occur.
-- Unless trained and authorized.
-- Unless operator manual is read and
understood.
-- Unless cord is properly grounded.
-- With damaged cord or plug.
-- If not in proper operating condition.
-- In outdoor areas.
-- In standing water.
-- With the use of an extension cord.
2. Before starting machine:
-- Make sure all safety devices are in place
and operate properly.
-- Remove loose objects on floor to prevent
dangerous projectiles if struck by spinning
pad.
-- Place wet floor signs as needed.
3. When using machine:
-- Stay clear of spinning pad.
-- Do not pull machine by plug or cord.
-- Do not run machine over cord.
-- Do not pull cord around sharp edges or
corners.
-- Do not close doors on cord.
-- Do not unplug by pulling on cord.
-- Do not stretch cord.
-- Do not handle plug with wet hands.
-- Keep cord away from heated surfaces.
-- Follow mixing and handling instructions
on chemical containers.
-- Never activate the power when the handle
is in the upright position.
-- Do not release handles until pad comes to
a complete stop.
-- Go slow on inclines and slippery surfaces.
-- Wear non-slip shoes.
-- Report machine damage or faulty
operation immediately.
-- Never allow children to play on or around.
4. Before leaving or servicing machine:
-- Turn off machine.
-- Unplug cord from wall outlet.
5. When servicing machine:
-- Unplug cord from wall outlet.
-- Avoid moving parts. Do not wear loose
jackets, shirts, or sleeves.
-- Use manufacturer supplied or approved
replacement parts.
Home
Find...
Go To..
OPERATION
Tennant 2000/2010/2030/2040/2160/2170 (12--05) 5
-- All repairs must be performed by a
qualified service person.
-- Do not modify the machine from its
original design.
6. When transporting machine:
-- Get assistance when lifting machine.
-- Unplug cord from wall outlet.
-- Use tie--down straps to secure machine to
truck or trailer.
GROUNDING INSTRUCTIONS
Machine must be grounded. If it should
malfunction or breakdown, grounding provides a
path of least resistance for electrical current to
reduce the risk of electrical shock. This machine
is equipped with a cord having an
equipment--grounding conductor and grounding
plug. The plug must be plugged into an
appropriate outlet that is properly installed in
accordance with all local codes and ordinances.
Do not remove ground pin; if missing, replace
plug before use.
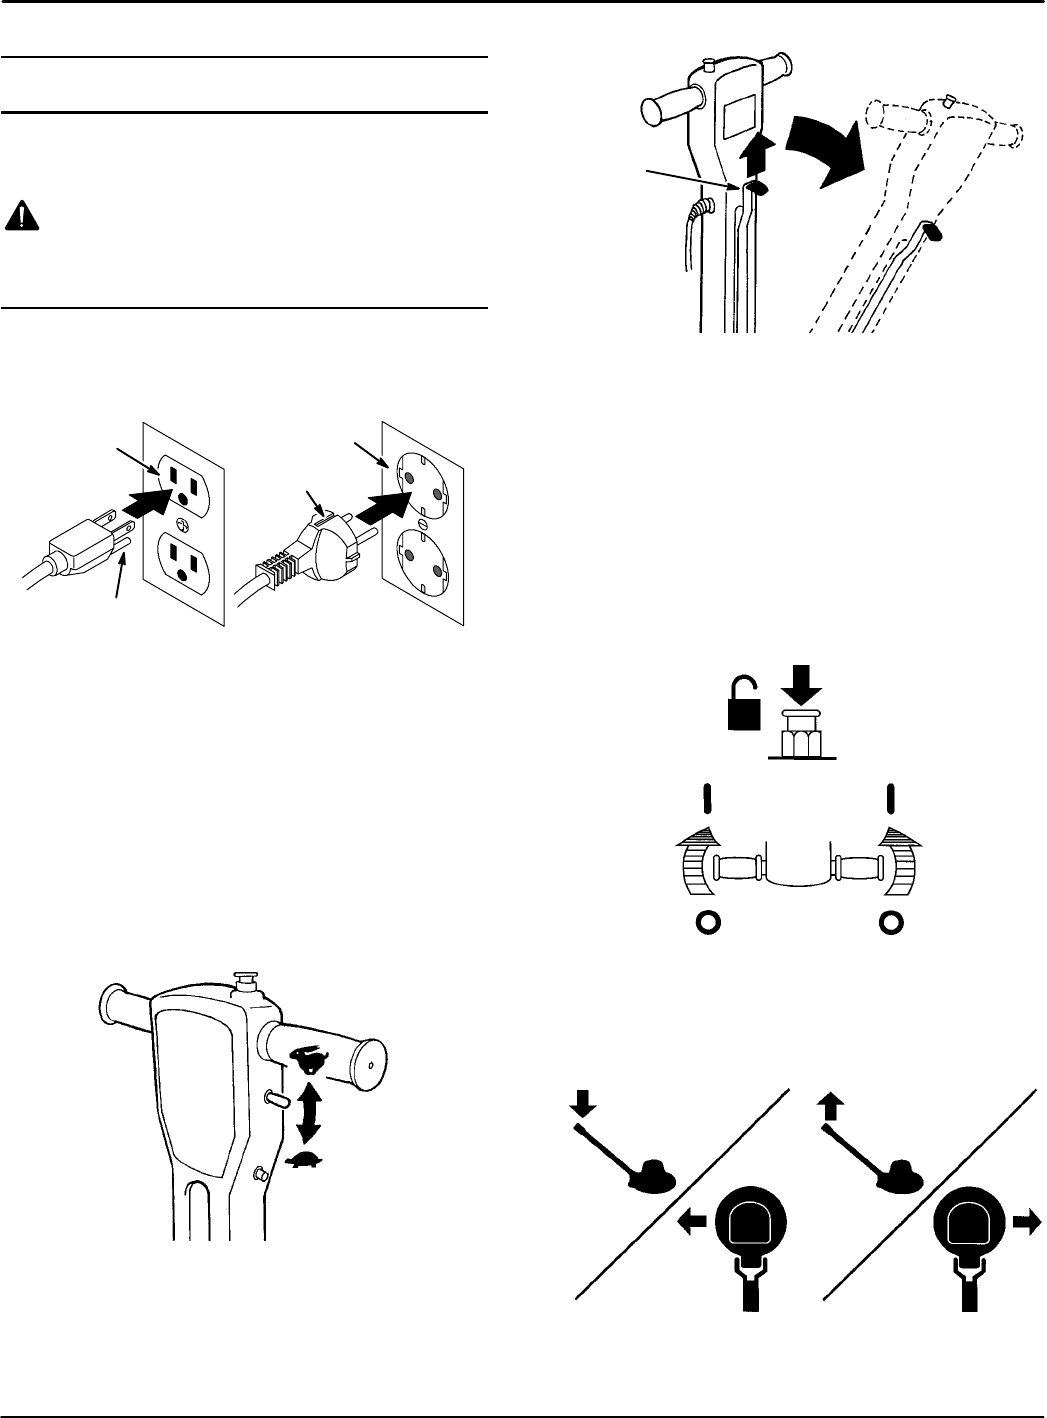
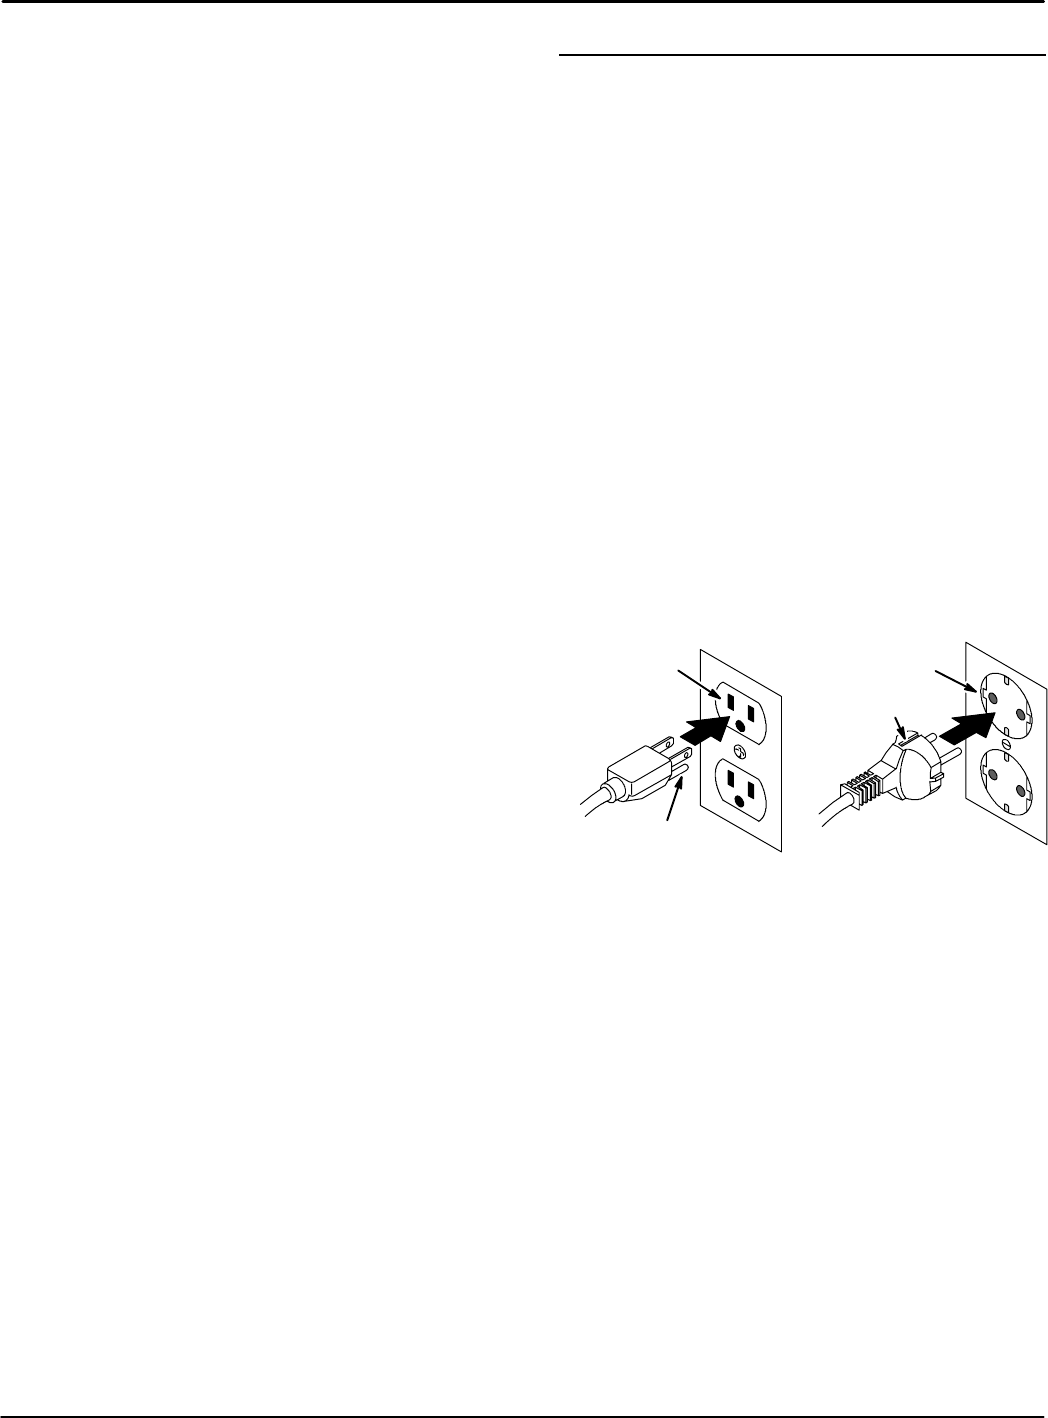
(120V models): This machine is for use on a
nominal 120--volt circuit and has a grounding
attachment plug that looks like the plug illustrated
in the sketch. Make sure that the machine is
connected to an outlet having the same
configuration as the plug. No adaptor should be
used with this machine.
Grounded Outlet
Grounding
Edge/hole
Grounded
3HoleOutlet
Ground Pin
(120V) (220V/230V/240V)
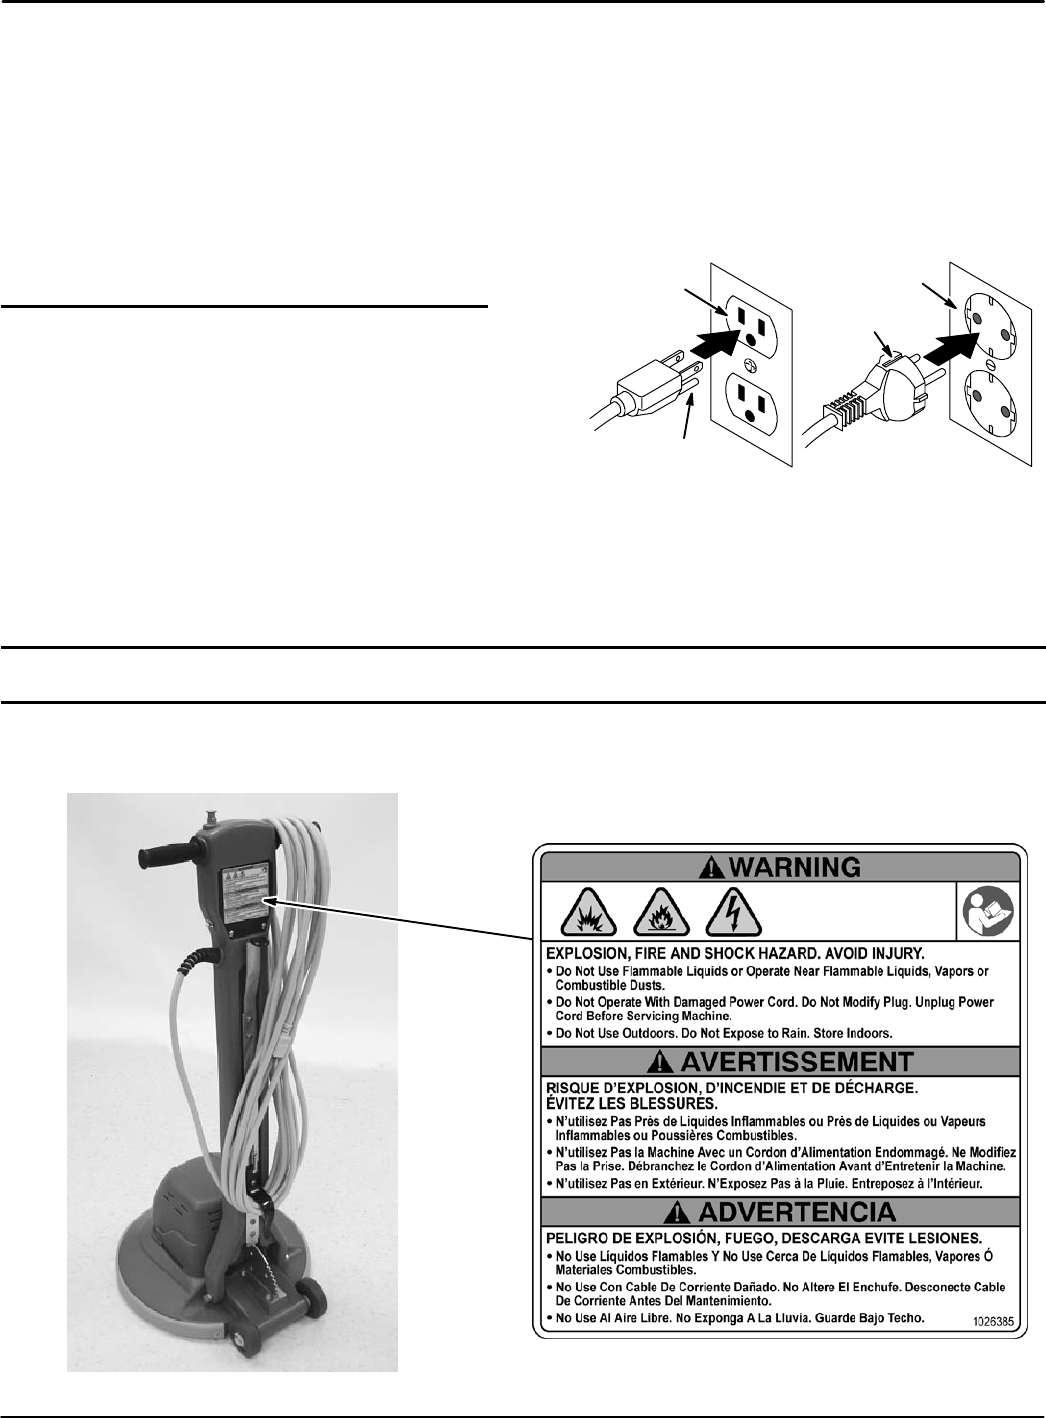
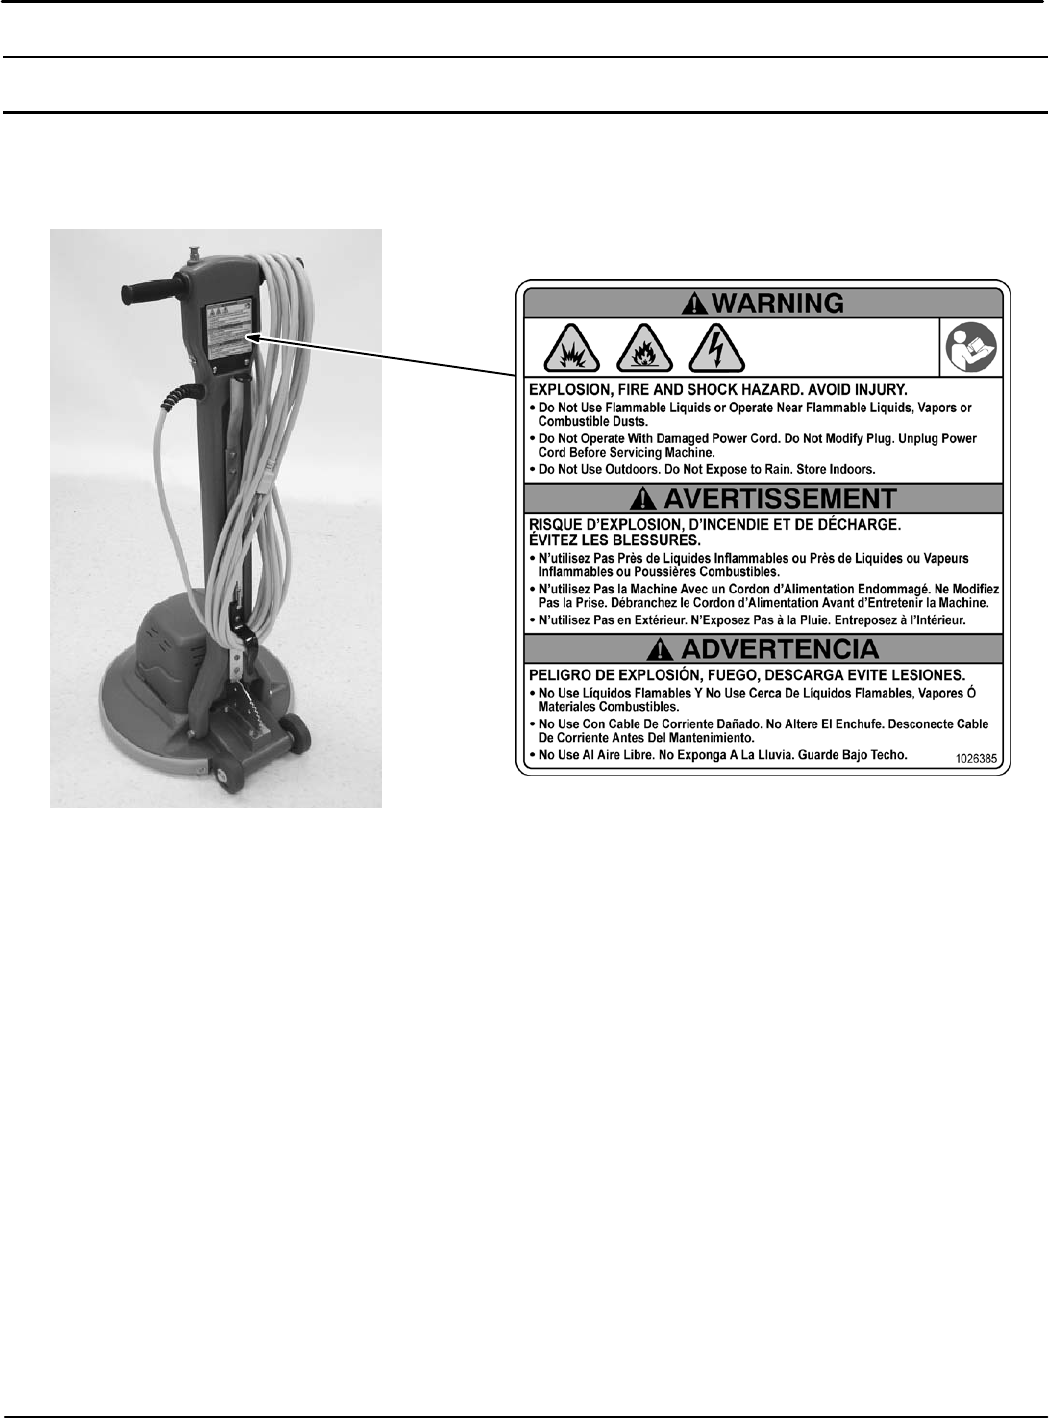
SAFETY LABEL
The safety label appears on the machine in the location indicated. Replace label if it is missing or becomes damaged
or illegible.
WARNING LABEL -- LOCATEDONBACK
SIDE OF MACHINE HANDLE.
Home
Find...
Go To..
OPERATION
6Tennant 2000/2010/2030/2040/2160/2170 (12--05)
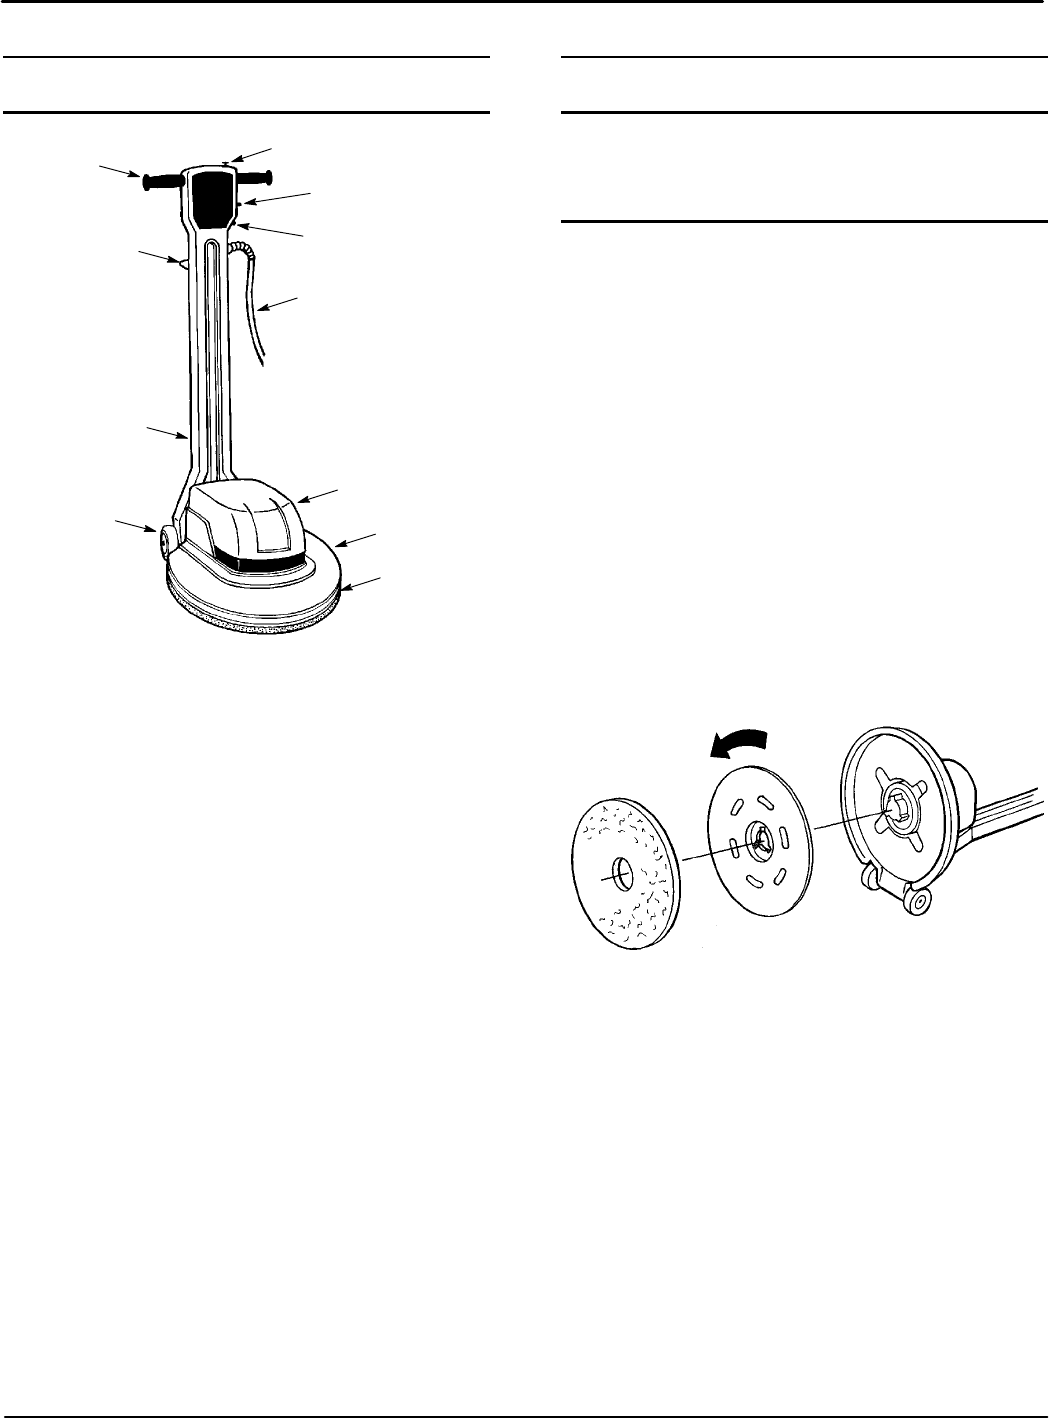
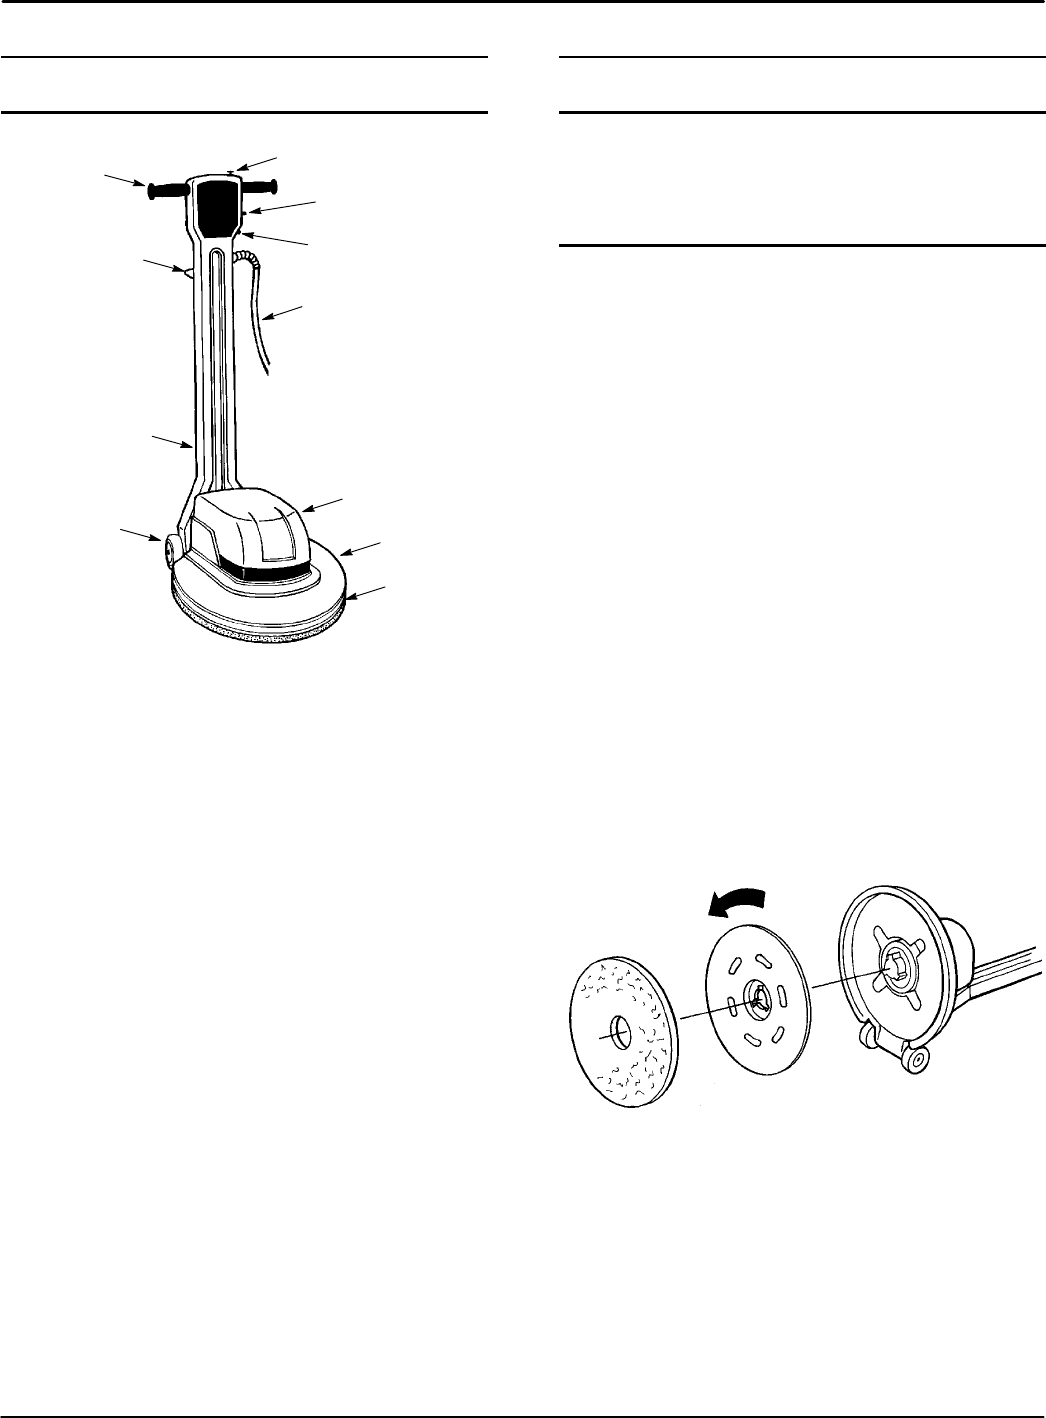
MACHINE COMPONENTS
1
2
3
4
5
8
11
10
7
6
9
1. Power ON/OFF Twist Grips
2. Handle Height Adjustment Lever
3. Safety Lock Button
4. Speed Select Switch (Dual Speed Model)
5. Circuit Breaker Reset Button
6. Power Cord Hook
7. 15m (50 ft.) Power Cord
8. Motor Cover
9. Transport Wheels 102mm (4 in.)
10. Scrub Head Base
11. Bumper
MACHINE SETUP
Carefully check carton for signs of damage. Report
damages at once to carrier.
INSTALLING PAD DRIVER / PAD / BRUSH
FOR SAFETY: Before leaving or servicing
machine, unplug cord from wall outlet.
ATTENTION: If cleaning carpets, refer to the
“CLEANING CARPETS” section in this manual.
1. With the handle in the upright position carefully tilt
the machine backwards and rest the handle on the
floor.
2. Position pad on pad driver. If machine is equipped
with plastic centerlock, secure pad with lock.
NOTE: Consult your authorized distributor for pad and
brush recommendations. Use only manufacturer
supplied or approved pad drivers and brushes.
3. Position the pad driver/brush on the drive motor
hub and turn it counter-clockwise to engage
(Figure 1).
Pad Driver
Pad
OR
Brush
FIG. 1
4. Return machine to the upright position.
Home
Find...
Go To..
OPERATION
Tennant 2000/2010/2030/2040/2160/2170 (12--05) 7
MACHINE OPERATION
FOR SAFETY: Do not operate machine, unless
operator manual is read and understood.
WARNING: Fire or Explosion Hazard. Never
Operate Machine In Or Near Flammable Liquids,
Vapors Or Combustible Dusts.
OPERATING MACHINE
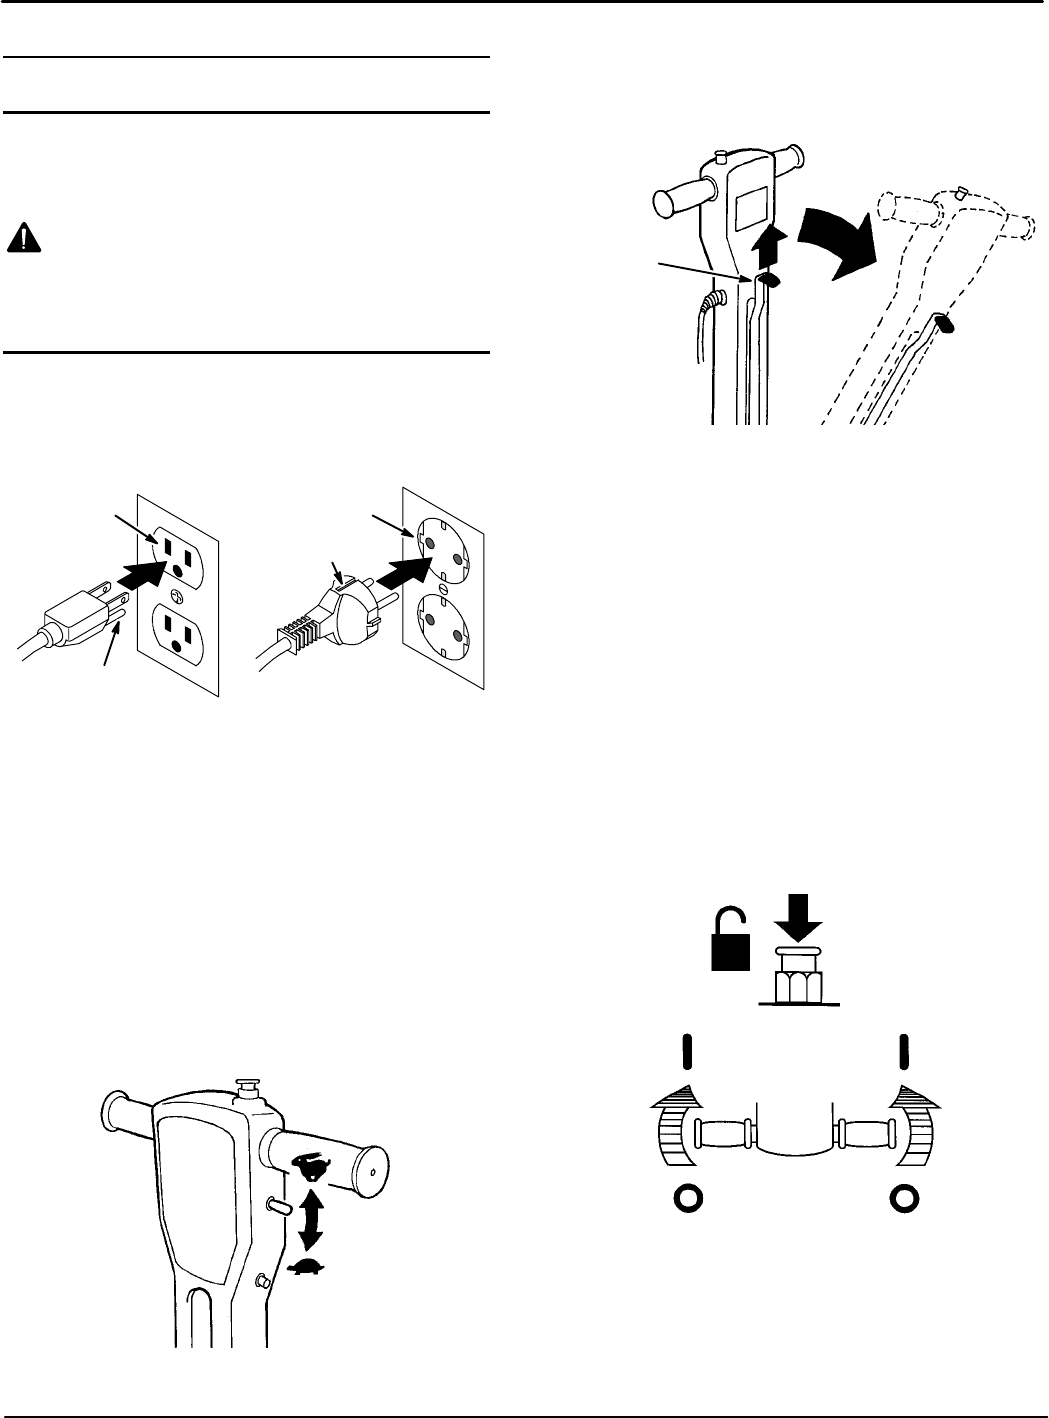
1. Plug the power cord into a grounded wall outlet
(Figure 2).
Grounded Outlet
Grounding
Edge/hole
Grounded
Ground Pin
(120V) (220V/230V/240V)
3HoleOutlet
FIG. 2
FOR SAFETY: Electrical hazard. Do not operate
machine unless cord is properly grounded. Do not
operate machine with damaged cord or plug. Do
not operate machine with the use of an extension
cord.
2. For Dual Speed Models, select the appropriate
motor speed.Position the speed select switch
downward (185rpm) for scrubbing, stripping and
carpet cleaning. Position the speed select switch
upward (300rpm) for spray buffing (Figure 3).
300rpm
185rpm
Speed
Select
Switch
FIG. 3
3. Lower the handle to a comfortable operating
height by pulling the handle height adjustment
lever upward. Release lever to engage handle
(Figure 4).
Handle
Height
Adjustment
Lever
FIG. 4
4. Before starting the machine, hold the handle so
the machine base is parallel to floor. This will
reduce the abrupt jolt when starting the machine.
NOTE: For first time users, practice with a polishing
pad which is less aggressive.
5. To begin scrubbing, hold the handles firmly,
depress the safety lock button and twist handle
grips forward. Release the safety lock button once
machine starts (Figure 5).
ATTENTION: Use caution when starting out, the
machine will jolt when the twist grips are turned.
Safety Lock
Button
FIG. 5
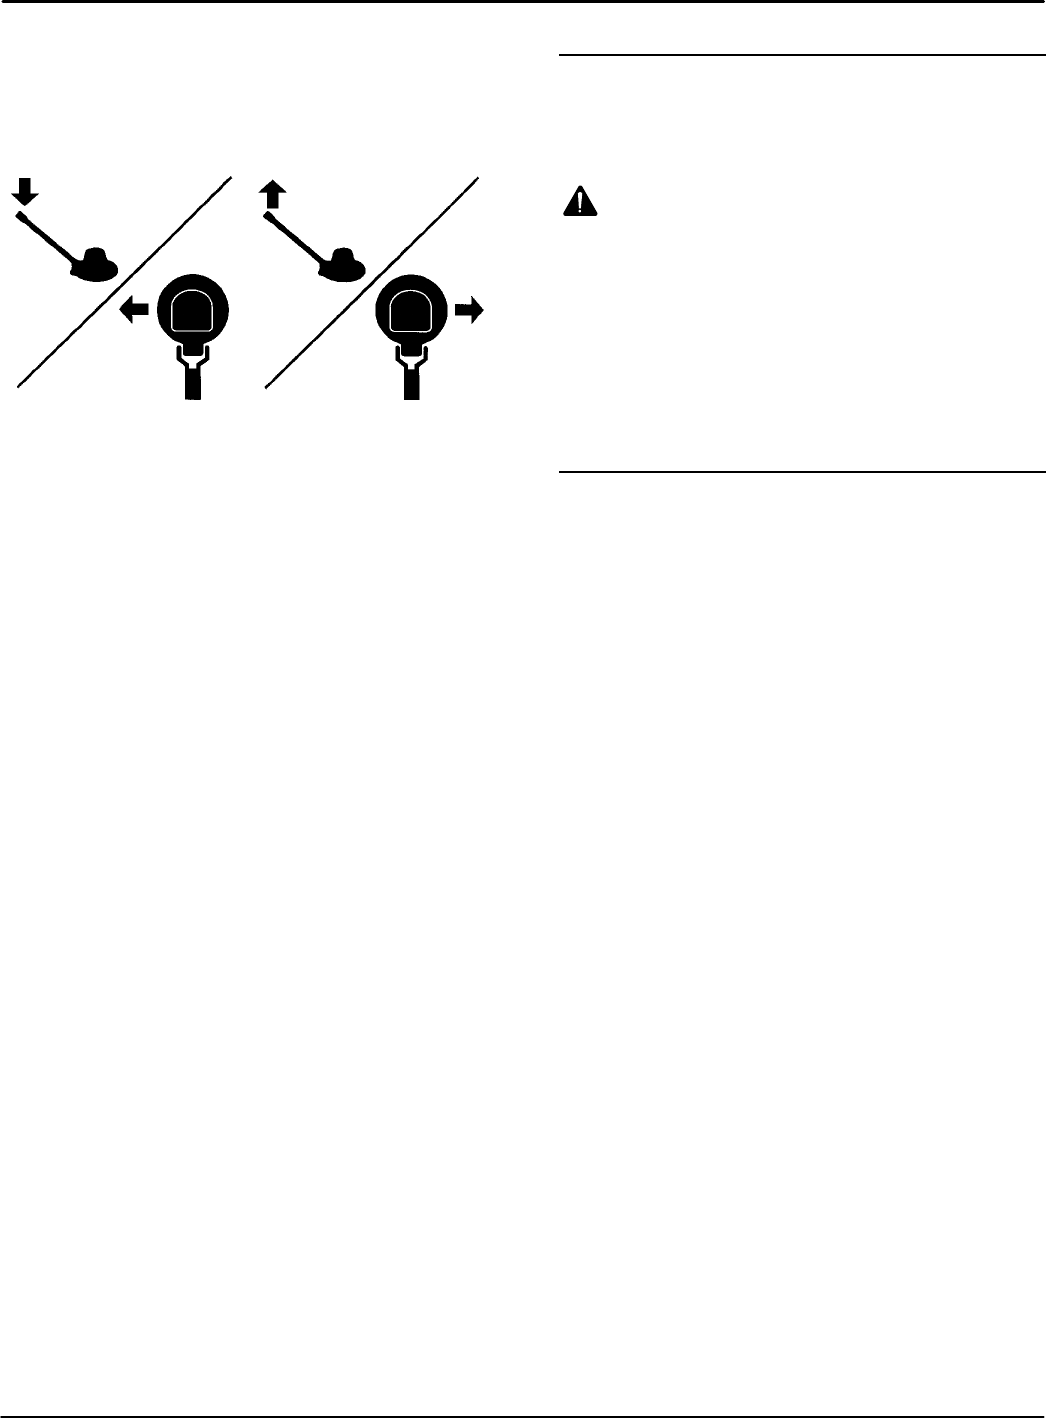
6. To move the machine left (A), slightly lower the
handle. To move right (B), slightly raise the
handle. Operate the machine with a side to side
motion (Figure 6).
AB
FIG. 6
Home
Find...
Go To..
OPERATION
8Tennant 2000/2010/2030/2040/2160/2170 (09--06)
NOTE: When pad becomes soiled, remove pad and
turn over to expose clean side. Remove and wash pad
after both sides become soiled.
7. To stop machine, rotate the twist grips backwards
and hold handles firmly until machine comes to a
complete stop. The safety lock button will
automatically engage.
FOR SAFETY: When using machine, do not
release handles until pad comes to a complete
stop.
NOTE: The machine’s circuit breaker may trip under
conditions of excessive overload. Change to a less
aggressive pad/brush and periodically check pad for
soil build--up. To reset circuit breaker switch, wait 15
seconds and press the reset button located on the
handle.
8. Do not operate the machine in the same spot for a
long period of time. Floor damage may result.
9. To maneuver over thresholds and floor grates,
stop the machine and tilt it back on the transport
wheels.
10. When machine is not in use, do not leave machine
standing on the pad/brush. Pad/brush damage
may result.
11. When done scrubbing perform the following
machine maintenance procedures.
OPERATING THE OPTIONAL SOLUTION TANK
1. Fill the solution tank with a recommended solution.
WARNING: Fire or Explosion Hazard.
Never Use Flammable Liquids.
FOR SAFETY: When using machine, follow mixing
and handling instructions on chemical containers.
2. Lower handle to working position. Pull the solution
control knob to disperse solution to the pad/brush.
CLEANING CARPETS
Shampoo carpet brush required. Do not use a brush
that is intended for hard floors; personal injury and
carpet damage may result. Order Shampoo Carpet
Brush p/n 604989--17”, 607463--20” or consult your
distributor or dealer for recommendations.
Before operating the machine on carpet, the carpet
must be presprayed with an approved cleaning
solution. The solution will act as a lubricant to allow
the shampoo brush to spin with little resistance.
FOR SAFETY: To avoid a jolt when starting the
machine on carpet, use a recommended shampoo
carpet brush and prespray the carpet.
When using the Dual Speed model to clean
carpets, do not operate machine at high speed;
personal injury may result.
For best cleaning results allow the presprayed
cleaning solution to ”dwell” on the carpet for
approximately 10--12 minutes before scrubbing. Using
only a shampoo carpet brush, operate the machine at
a gradual, steady pace.
After scrubbing, while carpet is still wet, use an
extractor or wet--vacuum to pick up suspended soil
and foam. Then vacuum carpet when it’s completely
dry.
MACHINE MAINTENANCE
WARNING: Electrical hazard. Unplug Power
Cord Before Servicing Machine
1. Remove and clean the pad driver/brush after each
use.
2. Clean the machine base after each use.
3. If equipped, rinse solution tank and solution supply
hose with clear water.
4. Inspect power cord for damage after each use. If
worn or damaged, replace immediately.
5. Wipe the power cord with damp cloth and neatly
coil it around cord hook and handle after each use.
6. Periodically check that all bolts and nuts are tight.
7. Every 250 hours of operation, check the motor for
carbon brush wear. Replace brushes when worn
to a length of 1 cm (0.38 in) or less. Contact an
Authorized Service Center for carbon brush
inspection.
FOR SAFETY: When servicing machine, all repairs
must be performed by a qualified service person.
TRANSPORTING MACHINE
1. Unplug the power cord and remove the pad from
the machine. Neatly coil the cord around the cord
hook and handle to prevent cord damage.
2. Load the machine using a recommended loading
ramp or carefully lift the machine with adequate
assistance.
FOR SAFETY: When transporting machine, get
assistance when lifting machine.
3. Secure machine with tie--down straps when
transporting by vehicle.
Home
Find...
Go To..
OPERATION
Tennant 2000/2010/2030/2040/2160/2170 (12--04) 9
STORING MACHINE
1. Remove brush/pad driver from machine and neatly
coil cord around cord hook and handle.
2. Store machine in a dry area in the upright position.
WARNING: Electrical Shock Hazard.
Do Not Use Outdoors. Do Not Expose to Rain.
Store Indoors.
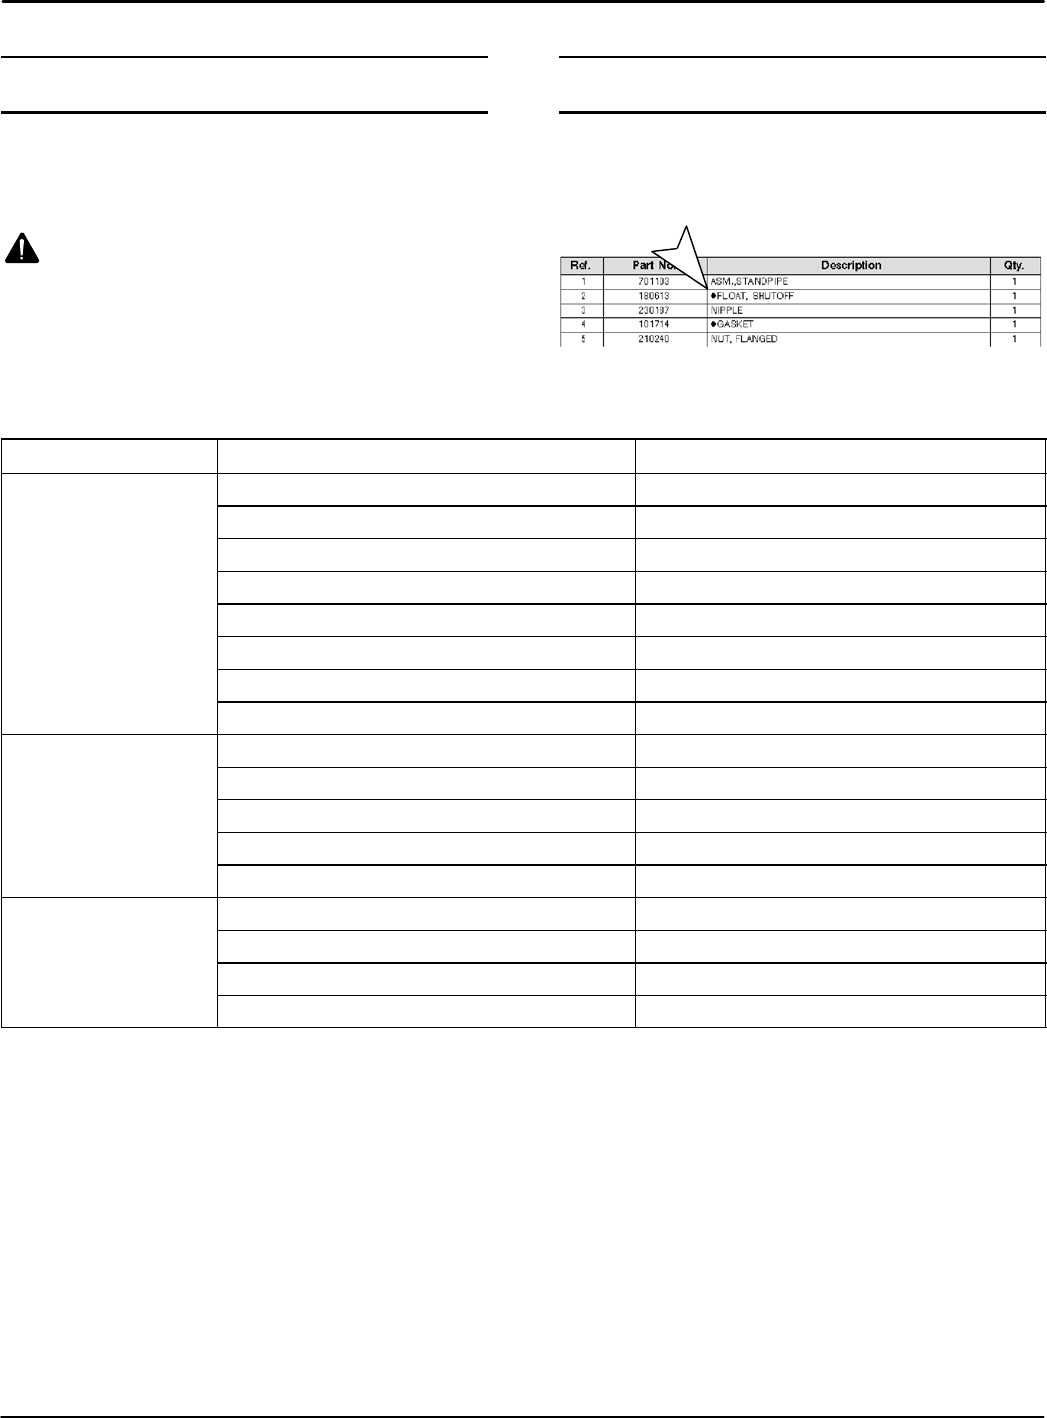
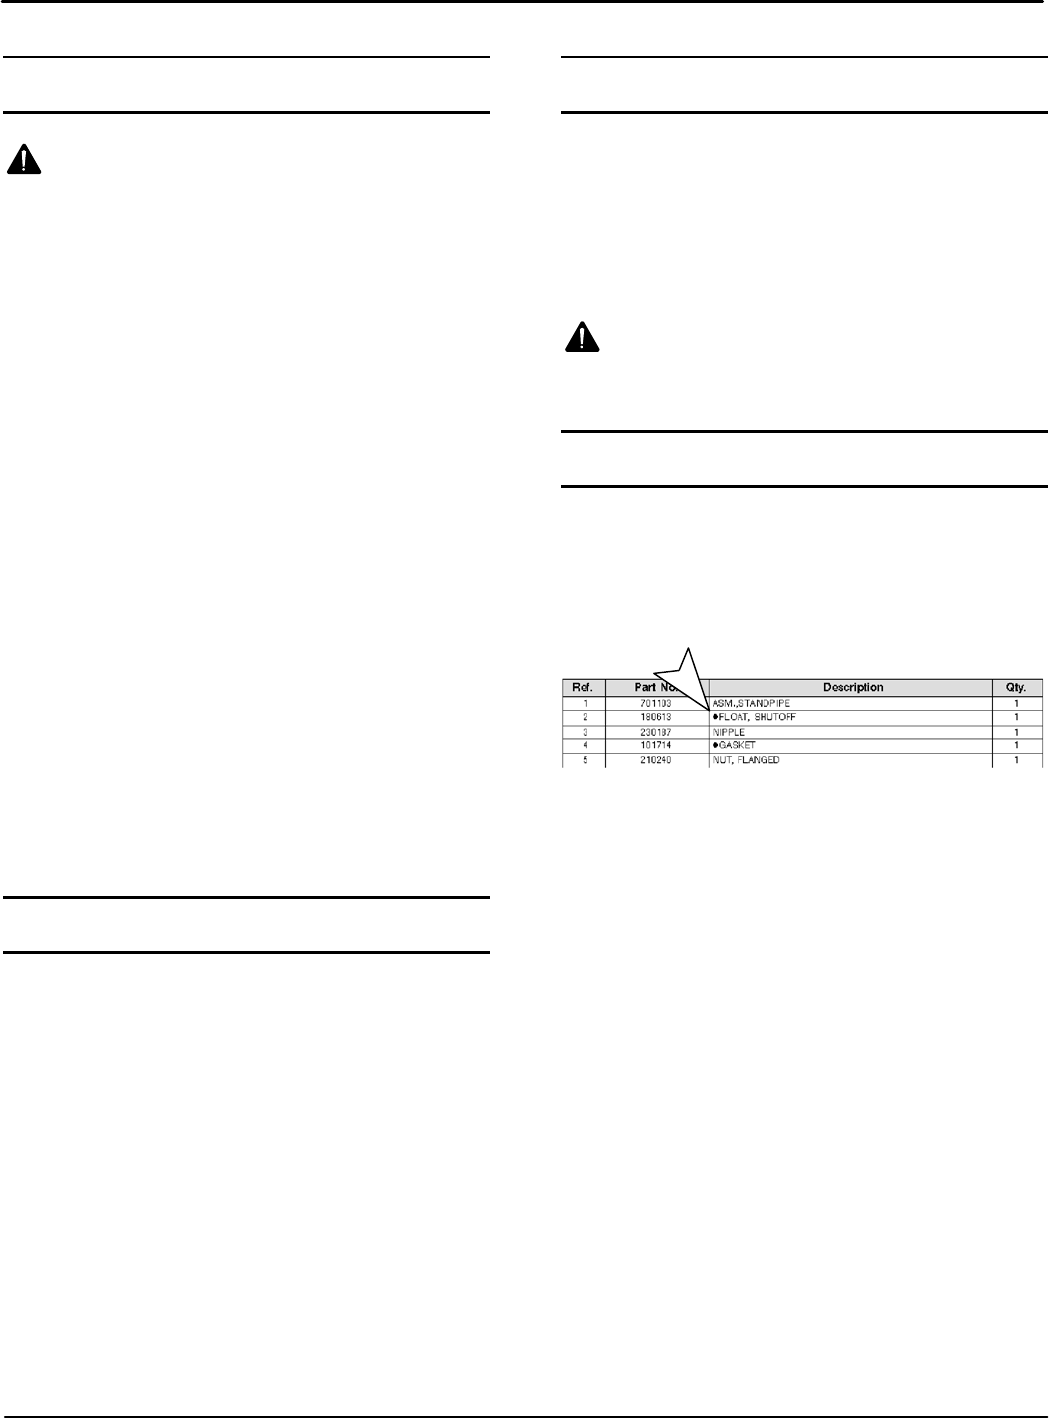
RECOMMENDED STOCK ITEMS
Refer to the Parts List Manual for recommended stock
items. Stock Items are clearly identified with a bullet
preceding the parts description. See example below:
TROUBLE SHOOTING
PROBLEM CAUSE SOLUTION
Machine does not
operate. Faulty power cord. Contact Service Center.
Tripped circuit breaker. Reset circuit breaker on machine.
Tripped building circuit breaker. Reset circuit breaker in building.
Faulty machine wiring. Contact Service Center.
Faulty ON/OFF twist grip switch. Contact Service Center.
Faulty motor. Contact Service Center.
Capacitor burned out (Single speed models). Contact Service Center.
Rectifier burned out (Dual speed models). Contact Service Center.
Machine operates
with a wobble or jerky
motion.
Soiled Pad. Replace Pad.
Improper pad/brush for application. Change to proper pad/brush.
Pad driver/brush not installed correctly. Remove and reinstall pad driver/brush.
Pad/brush unevenly worn. Replace pad/brush.
Pad not properly centered on pad driver. Remove and reinstall pad.
Machine circuit
breaker trips
continuously.
Heavily soiled pad/brush. Clean or replace pad/brush.
Improper pad/brush for application. Change to proper pad/brush.
Defective circuit breaker. Contact Service Center.
Worn carbon brushes in motor. Contact Service Center.
Home
Find...
Go To..
OPERATION
10 Tennant 2000/2010/2030/2040/2160/2170 (12--05)
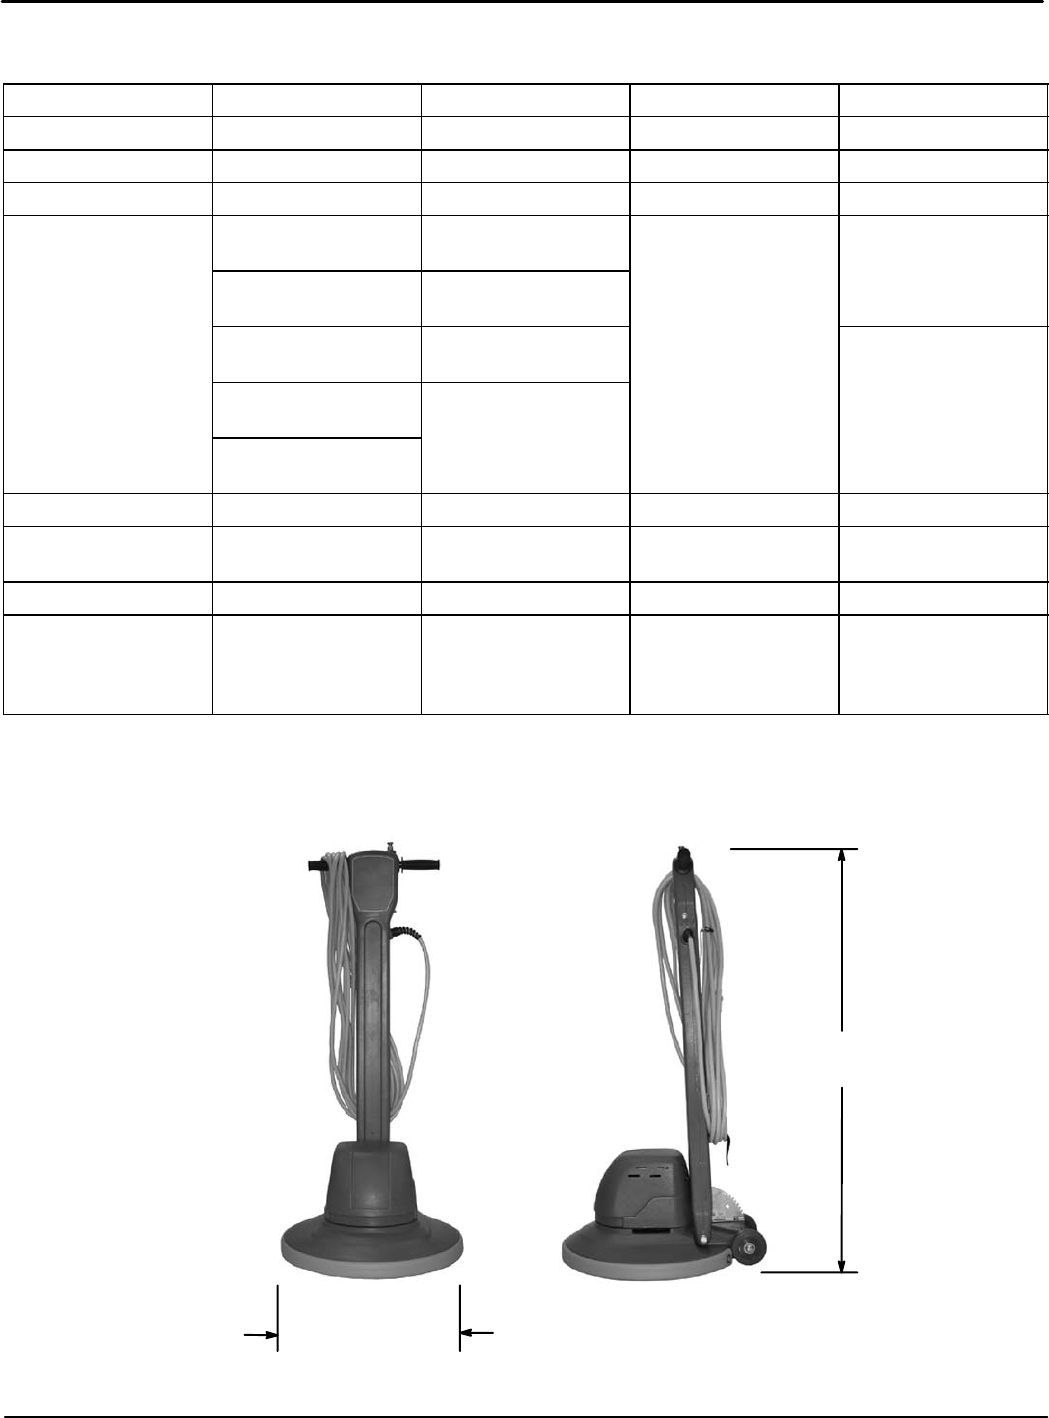
SPECIFICATIONS
MODEL 2000/2010 2030/2040 2160 2170
WIDTH 450mm (17.75 in) 530mm (20.75 in) 450mm (17.75 in) 530mm (20.75 in)
HEIGHT 1220mm (48 in) 1220mm (48 in) 1220mm (48 in) 1220mm (48 in)
WEIGHT 43Kg (95 lbs) 43Kg (95 lbs) 43Kg (95 lbs) 43Kg (95 lbs)
DRIVE MOTOR 120V, 1 hp 12A, 60Hz
(2000)
120V, 1 hp 12A, 60Hz
(2030)
120V, 1.5 hp 12A, 60Hz 120V, 1.5 hp 12A, 60Hz
120V, 1.5 hp 12A, 60Hz
(2010)
120V, 1.5 hp 12A, 60Hz
(2040)
230V, 1.1 kW, 7A,
50Hz (2010)
230V, 1.1 kW, 7A,
50Hz (2040)
230V, 1.1kW, 7A, 60Hz
230V, 1.1 kW, 7A,
60Hz (2010)
220V, 1.1 kW, 7A,
60Hz (2040)
220V, 1.1 kW, 7A,
60Hz (2010)
PAD/BRUSH SPEED 175 RPM 175 RPM 185/330 RPM 185/330 RPM
POWER CORD
LENGTH
15M (50 ft) 15M (50 ft) 15M (50 ft) 15M (50 ft)
BRUSH/PAD DIA. 430mm (17 in) 510mm (20 in) 430mm (17 in) 510mm (20 in)
DECIBEL RATING AT
OPERATOR’S EAR,
INDOORS ON TILE
FLOOR
<70dB(A) <70dB(A) 71dB(A) At Low Speed
73dB(A) At High Speed
71dB(A) At Low Speed
73dB(A) At High Speed
*Specifications may change without notice.
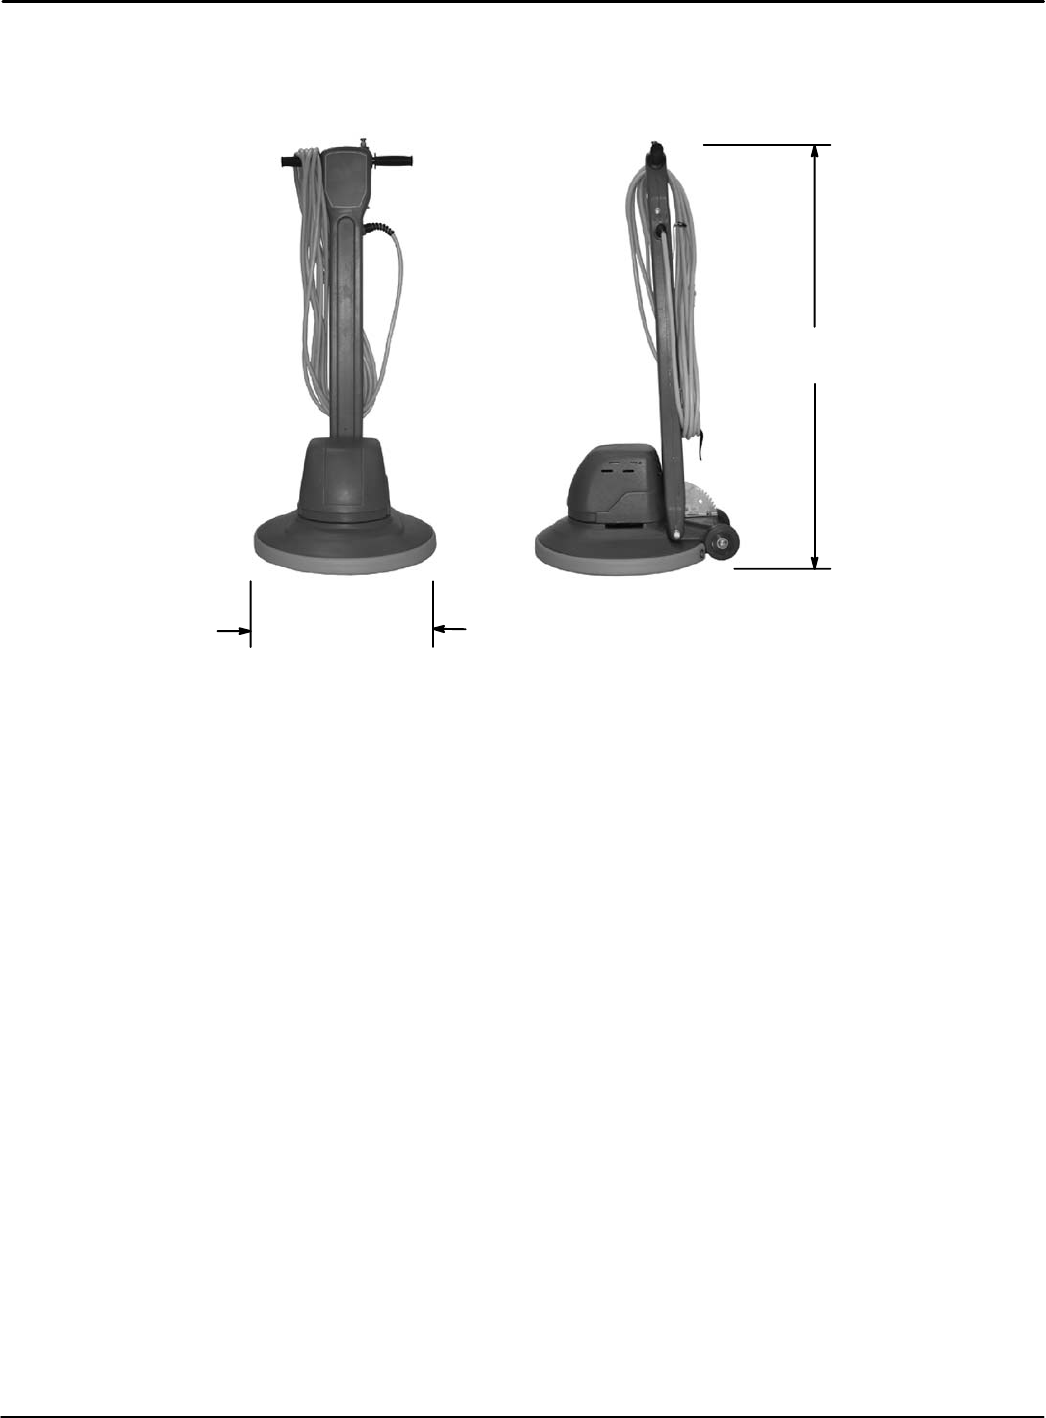
1220 mm
(48 in)
MACHINE DIMENSIONS
527 mm (20.75 in)
50 cm
(
20 in
)
models
450 mm (17.75 in)
43 cm (17 in) models
Home
Find...
Go To..
OPERACIÓN
11
Tennant 2000/2010/2030/2040/2160/2170 (12--05)
Este manual se proporciona con cada nuevo modelo.
Proporciona instrucciones necesarias de
mantenimiento y lista ilustrada de piezas.
Antes de operar o prestar servicio a la máquina,
lea completamente este manual y entienda la
máquina.
Para ordenar piezas use las Listas Ilustradas de las
Piezas. Asegúrese de tener listo el número de modelo
y de serie de la máquina, antes de ordenar piezas o
suministros. Las piezas y suministros pueden
ordenarse por teléfono o por correo de cualquier
centro autorizado de piezas y servicio, distribuidor o
de cualquiera de las subsidiarias del fabricante.
Esta máquina proporcionará un servicio excelente. Sin
embargo, los mejores resultados se obtienen a un
costo mínimo si:
SLa máquina se opera con un cuidado razonable.
SLa máquina se mantiene con regularidad, según las
instrucciones de mantenimiento provistas.
SLa máquina se mantiene con las piezas provistas
por el fabricante o equivalentes.
PROTECCIÓN DEL MEDIO
AMBIENTE
Deseche el material de embalaje, los
componentes usados de la máquina
como las baterías y los líquidos
peligrosos como el anticongelante y el
aceite, de forma segura para el medio
ambiente, de acuerdo con las
normativas o disposiciones locales.
No olvide reciclar.
DATOS DE LA MÁQUINA
Por favor complete en el momento de la instalación,
para referencia futura.
No. de modelo --
Fechadeinstalación--
Nº de Serie--
ÍNDICE
MEDIDAS DE SEGURIDAD 12..................
INSTRUCCIONES PARA REALIZAR
LA TOMA DE TIERRA 13...................
ADHESIVO DE SEGURIDAD 14.................
COMPONENTES DE LA MÁQUINA 15...........
PREPARACIÓN DE LA MÁQUINA 15............
INSTALACIÓN DEL MANDO EN LA BASE 15..
OPERACIÓN DE LA MÁQUINA 16..............
UTILIZACIÓN DE LA MÁQUINA 16...........
UTILIZACIÓN DEL DEPÓSITO OPCIONAL
DE DISOLUCIÓN 17........................
LIMPIEZA DE ALFOMBRAS 17..............
MANTENIMIENTO DE LA MÁQUINA 18.........
TRANSPORTE DE LA MÁQUINA 18.............
ALMACENAMIENTO DE LA MÁQUINA 18.......
STOCK RECOMENDADO DE REPUESTOS 18...
LOCALIZACIÓN DE AVERÍAS 19...............
ESPECIFICACIONES 20.......................
DIMENSIONES DE LA MÁQUINA 21............
DIAGRAMAS ELECTRICAS 22.................
LISTA DE PIEZAS 24..........................
GRUPO DEL ASA 24.......................
GRUPO BASE 26..........................
CEPILLO DEL REEMPLAZO Y GRUPO DEL
MANDO DE LA ALMOHADILLA 28...........
OPCIONES 29................................
GRUPE DEL DEPÓSITO DE DISOLUCIÓN 29.
Home
Find...
Go To..

OPERACIÓN
12 Tennant 2000/2010/2030/2040/2160/2170 (12--04)
MEDIDAS DE SEGURIDAD
Esta máquina está destinada al uso comercial.
Está diseñada exclusivamente para fregar suelos
en recintos cerrados y no debe utilizarse para
ningún otro uso. Utilice únicamente los cepillos,
almohadillas y limpiadores de suelos específicos
recomendados para máquinas disponibles en el
mercado.
Todos los operarios deben leer, comprender y
cumplir las siguientes medidas de seguridad:
A lo largo de todo el manual se utilizan los siguientes
símbolos de advertencia y encabezados “PARA SU
SEGURIDAD” descritos a continuación:
ADVERTENCIA: Advierte sobre riesgos o
prácticas inseguras que podrían provocar
lesiones personales graves o fatales.
PARA SU SEGURIDAD: Identifica las operaciones
que debe realizar para una utilización segura del
equipo.
El no cumplimiento de estas advertencias puede
causar lesiones personales, descargas eléctricas,
incendios y explosiones.
ADVERTENCIA: Peligro de incendio o
explosión:
-- Nunca utilice líquidos inflamables ni haga
funcionar la máquina en las proximidades de
líquidos, vapores o polvos inflamables.
Esta máquina no está equipada con motor a
prueba de explosión. El motor eléctrico emite
chispas al arrancar y durante el funcionamiento lo
que podría causar un fuego explosivo o explosión
si la máquina se usa en una área donde están
presentes vapores/líquidos inflamables o polvos
combustibles.
ADVERTENCIA: Peligro eléctrico. No opere
con un cordón eléctrico dañado. No modifique el
enchufe. Desenchufe el cordón eléctrico antes de
reparar la máquina.
Si el cordón del suministro se daña o se rompe,
debe ser reemplazado por el fabricante o su
agente de servicio o una persona similarmente
calificada para evitar un riesgo.
ADVERTENCIA: Peligro choque eléctrico. No
use al aire libre. No exponga a la lluvia. Almacén
bajo techo.
La siguiente información indica las condiciones
potencialmente peligrosas para el operario o
equipo:
PARA SU SEGURIDAD:
1. No utilice la máquina:
-- Con líquidos inflamables o cerca de gases
inflamables, ya que podría provocar
explosiones o llamaradas.
-- Salvo que esté debidamente formado y
autorizado.
-- Salvo haber leído y comprendido el
manual del operario.
-- A menos que el cordón se conecte
apropiadamente a tierra.
-- Con un cordón o enchufe dañados.
-- Si la máquina no funciona correctamente.
-- En áreas al aire libre.
-- En agua estancada.
-- Con el uso de una extensión de cordón.
2. Antes de arrancar la máquina:
-- Asegúrese de que todos los dispositivos
de seguridad se encuentren en su lugar y
funcionen correctamente.
-- Quite objetos sueltos en suelo para
prevenir proyectiles peligrosos si son
golpeados por la almohadilla giratoria.
-- Coloque señales de piso húmedo según
se necesite.
3. Al utilizar la máquina:
-- Aléjese de la almohadilla giratoria.
-- No tire de la máquina por el enchufe o el
cordón.
-- No pase la máquina encima del cordón.
-- Evite pasar el cable por bordes agudos o
esquinas.
-- No cierra las puertas sobre el cordón.
-- No desenchufe tirando del cordón.
-- No estire el cordón.
-- No maneje el enchufe con las manos
húmedas.
-- Mantenga el cordón lejos de las
superficies calientes.
-- Siga las instrucciones de mezcla y
manipulación indicadas en los depósitos
para los productos químicos.
-- Nunca active la potencia cuando la manija
esté en posición vertical.
-- No suelte las manijas hasta que la
almohadilla se detenga completa.
-- Conduzca despacio en pendientes y
superficies resbaladizas.
Home
Find...
Go To..
OPERACIÓN
13
Tennant 2000/2010/2030/2040/2160/2170 (12--04)
-- Utilice calzado antideslizante.
-- Informe inmediatamente de las averías de
la máquina o si el funcionamiento no es
correcto.
-- No permita nunca que los niños jueguen
encima o alrededor de la máquina.
4. Antes de abandonar o revisar la máquina:
-- Apague la máquina.
-- Desenchufe cordón del tomacorriente de
la pared.
5. Al revisar la máquina:
-- Desenchufe cordón del tomacorriente de
la pared.
-- Evite las partes en movimiento. No utilice
chaquetas, camisas o mangas sueltas.
-- Utilice repuestos suministrados o
aprobados por el fabricante.
-- Todas las reparaciones deben ser
realizadas por personal técnico
cualificado.
-- No modifique el diseño original de la
máquina.
6. Al transportar la máquina:
-- Pida ayuda para levantar la máquina.
-- Desenchufe cordón del tomacorriente de
la pared.
-- Utilice las cintas para fijar la máquina al
camión o remolque.
INSTRUCCIONES PARA REALIZAR LA TOMA
DE TIERRA
La máquina debe estar conectada a una toma de
tierra. En caso de funcionamiento incorrecto o
avería de la máquina, la toma de tierra
proporciona el camino de menor resistencia a la
corriente eléctrica reduciendo de este modo el
riesgo de descarga eléctrica. La máquina está
equipada con un cable y enchufe con toma de
tierra. Conecte el enchufe en un enchufe
apropiado correctamente instalado de acuerdo
con los códigos y ordenanzas locales. No extraer
la clavija de conexión a tierra; si falta, reemplazar
el enchufe antes de usar.
(modelo 120V): Este artefacto es para usar en un
circuito nominal de 120 voltios y tiene un enchufe
de aditamento para conectar a tierra que se
parece al enchufe ilustrado en la figura.
Asegurarse que el artefacto esté conectado a un
tomacorrientes con la misma configuración que el
enchufe. No se debe usar un adaptador con este
artefacto.
(120V) (220V/230V/240V)
Enchufe
Conectado
a Tierra
(3 Orificios)
Clavija De Conexion a
Tierra
Enchufe
Conectado
aTierra
Masa borde/orificio
Home
Find...
Go To..
OPERACIÓN
14 Tennant 2000/2010/2030/2040/2160/2170 (12--05)
ADHESIVO DE SEGURIDAD
La adhesivo de seguridad aparece en la máquina en la localización indicada. Sustituya el adhesivo si se ha
desprendido, o está deteriorado o son ilegible.
ETIQUETA DE ADVERTENCIA -- UBICADA EN
EL REVERSO DE LA MANIJA DE LA MÁQUINA.
Home
Find...
Go To..
OPERACIÓN
15
Tennant 2000/2010/2030/2040/2160/2170 (12--05)
COMPONENTES DE LA MÁQUINA
1
2
3
4
5
8
11
10
7
6
9
1. Empuñaduras de torsión eléctricas
Encendido/Apagado
2. Palancadeajustedealturadelamanija
3. Botón de calce de seguridad
4. Interruptor del selector de velocidad
5. Botón de regraduación del interruptor de circuitos
6. Gancho para el cable eléctrico
7. 15m (50 pies) Cable eléctrico
8. Caja del Motor
9. Ruedas de transporte de 102mm (4 pulg.)
10. Base del cabezal de limpieza
11. Paragolpes
PREPARACIÓN DE LA MÁQUINA
Controle cuidadosamente si la caja presenta signos de
deterioro. Si existieran desperfectos, informe
inmediatamente al transportista.
INSTALACIÓN DEL MANDO EN LA BASE
PARA SU SEGURIDAD: Antes de dejar o prestar
servicio a la máquina, desenchufar el cordón del
tomacorrientes de la pared.
ATENCIÓN: Refiérase a la sección de “LIMPIEZA
DE ALFOMBRAS” de este manual en caso de
limpieza de alfombras.
1. Con la manija en posición vertical incline
cuidadosamente la máquina hacia atrás y deje la
manija apoyada sobre el piso.
2. Instale la almohadilla sobre el impulsor de la
almohadilla. Si la máquina tenga un cierre central
plastico, fijar la almohadilla con el cierre central.
NOTA: Consulte a su distribuidor autorizado el tipo de
cepillo/almohadilla recomendado para sus
necesidades. Utilice únicamente impulsores de las
almohadillas y cepillos suministrados y homologados
por el fabricante.
3. Coloque el impulsor de la almohadilla/cepillo sobre
el cubo del motor de impulsión y gírelo en sentido
contrario al de las agujas del reloj para
inmovilizarlo (Figura 1).
FIG. 1
4. Devuelva la máquina a la posición vertical.
Home
Find...
Go To..
OPERACIÓN
16 Tennant 2000/2010/2030/2040/2160/2170 (12--05)
OPERACIÓN DE LA MÁQUINA
PARA SU SEGURIDAD: No utilice la máquina
salvo que el operario haya leído y comprendido el
manual de instrucciones.
ADVERTENCIA: Peligro de incendio o
explosión. NUNCA haga funcionar la máquina
sobre o en las proximidades de líquidos, vapores
o polvos inflamables.
UTILIZACIÓN DE LA MÁQUINA
1. Enchufe el cable eléctrico en una toma de la
pared con toma de tierra (Figura 2).
(120V) (220V/230V/240V)
Enchufe
Conectado
aTierra
(3 Orificios)
Clavija De Conexion a
Tierra
Enchufe
Conectado
aTierra
(3 Orificios)
Masa borde/orificio
FIG. 2
PARA SU SEGURIDAD: Peligro eléctrico. No
operar la máquina a menos que la máquina esté
bien conectada a tierra. No operar la máquina con
un cordón o enchufe dañado. No operar la
máquina con el uso de un cordón de extensión.
2. Para los modelos de dos velocidades seleccione
la velocidad deseada del motor. Coloque el
conmutador de selección de velocidad en posición
baja (185 rpm) para limpiar, pelar y lavar
alfombras. Coloque el conmutador de selección
de velocidad en posición alta (300 rpm) para
lustrado por rociado (Figura 3).
300rpm
185rpm
FIG. 3
3. Baje el mando hasta la altura de funcionamiento
deseada tirando de la palanca de ajuste de la
altura del mando. Suelte la palanca para
inmovilizar el mando (Figura 4).
Palanca de
ajuste de
altura de la
manija
FIG. 4
4. Antes de arrancar la máquina, sujete el mando de
modo que la base de la máquina esté paralela al
suelo. Esto reducirá el desplazamiento
incontrolado al arrancar la máquina.
NOTA: Es aconsejable que los operarios que utilicen
la máquina por primera vez practiquen con la
almohadilla de abrillantado que es menos agresiva.
5. Para comenzar a pulir, sujete las manijas
firmemente, oprima el botón de calce de
seguridad y gire las empuñaduras de la manija
hacia adelante. Suelte el botón de calce de
seguridad una vez que arranca la máquina
(Figura 5).
ATENCIÓN: Extreme las precauciones las
primeras veces que utilice la máquina. La
máquina puede dar fuertes sacudidas si no se
utiliza correctamente.
FIG. 5
Home
Find...
Go To..
OPERACIÓN
17
Tennant 2000/2010/2030/2040/2160/2170 (12--04)
6. Para desplazar la máquina hacia la izquierda (A),
baje ligeramente el mando. Para desplazarla hacia
la derecha (B), eleve ligeramente el mando.
Desplace la máquina con movimientos laterales
(Figura 6).
AB
FIG. 6
NOTA: Cuando la almohadilla se ensucia, extraiga la
almohadilla y revierta para exponer el lado limpio.
Extraiga y lave la almohadilla después que ambos
lados estén sucios.
7. Para detener la máquina. gire las empuñaduras
del mango hacia atrás y sujete firmemente las
manijas hasta que la máquina se detenga
completamente. El botón de calce de seguridad se
engancha automáticamente.
PARA SU SEGURIDAD: Al utilizar la máquina, no
suelte los mandos hasta que la almohadilla se
haya detenido totalmente.
NOTA: El interruptor de circuito de la máquina puede
activarse bajo condiciones de sobrecarga excesiva.
Cambie a una almohadilla/cepillo menos agresivo e
inspeccione periódicamente la almohadilla por
acumulación de suciedad. Para regraduar el
conmutador del interruptor de circuito, espere 15
segundos y oprima el botón de regraduación ubicado
en la manija.
8. No utilice la máquina en el mismo lugar durante
mucho tiempo. Podría deteriorar el suelo.
9. Para maniobrar sobre umbrales y rejillas, detenga
la máquina e inclínela hacia atrás hasta situarla
sobre las ruedas de transporte.
10. No deje la máquina vertical sobre el
cepillo/almohadilla cuando no la utilice. Podría
deteriorar el cepillo o la almohadilla.
11. Una vez finalizada la operación de fregado, realice
las siguientes operaciones de mantenimiento de la
máquina.
UTILIZACIÓN DEL DEPÓSITO OPCIONAL
DE DISOLUCIÓN
1. Llene el depósito de disolución con la disolución
recomendada.
ADVERTENCIA: Peligro de incendio o
explosión. No utilizar NUNCA líquidos
inflamables.
PARA SU SEGURIDAD: Siga las instrucciones de
mezcla y manipulación indicadas en los envases
de los productos químicos cuando utilice la
máquina.
2. Baje el mando hasta la posición de trabajo. Tire de
la palanca de control de la disolución para dirigir la
disolución hacia el cepillo/almohadilla.
LIMPIEZA DE ALFOMBRAS
Se requiere un cepillo para aplicar champú a la
alfombra. No use un cepillo para pesos duros ya que
puede resultar en lesiones y daños a la alfombra.
Ordene Shampoo Carpet Brush n/p 604989--17”,
607463--20” o consulte con su distribuidor o
concesionario para las recomendaciones.
Antes de usar la máquina en alfombras, la alfombra
debe prerrociarse con una solución aprobada de
limpieza. La solución actuará como un lubricante para
permitir que el cepillo para champú gire con poca
resistencia.
PARA SU SEGURIDAD: Para evitar una sacudida
al arrancar la máquina en la alfombra, use un
cepillo recomendado para aplicar champú a las
alfombras y prerrocíe la alfombra.
Al usar el modelo Dual Speed para limpiar
alfombras, no haga funcionar la máquina a alta
velocidad; pueden resultar lesiones personales.
Para obtener los mejores resultados de limpieza
permita que la solución limpiadora prerrociada
permanezca en la alfombra durante 10--12 minutos
antes de limpiar. Usando sólo un cepillo para aplicar
champú a la alfombra, haga funcionar la máquina a un
paso gradual, consistente.
Después de limpiar y mientras la alfombra está
todavía húmeda, use un extractor o aspiradora para
líquidos para aspirar suciedad y espuma en
suspensión. Cuando la alfombra está totalmente seca
pase la aspiradora.
Home
Find...
Go To..
OPERACIÓN
18 Tennant 2000/2010/2030/2040/2160/2170 (12--04)
MANTENIMIENTO DE LA MÁQUINA
ADVERTENCIA: Peligro eléctrico.
Desenchufe el cordón eléctrico antes de reparar la
máquina.
1. Retire y limpie el impulsor de la almohadilla/cepillo
después de cada uso.
2. Limpie la base de la máquina después de cada
uso.
3. Si está equipado, aclare el tanque de la solución y
la manguera de fuente de la solución con agua
clara.
4. Compruebe si el cable eléctrico está deteriorado
después de cada uso. En caso de estar
deteriorado, sustitúyalo inmediatamente.
5. Limpie con un paño húmedo el cable eléctrico y
enróllelo cuidadosamente alrededor del mando y
colóquelo en su gancho después de cada uso.
6. Controle periódicamente que todos los pernos y
tuercas estén bien apretados.
7. Controle el desgaste de las escobillas de carbono
del motor cada 250 horas de utilización. Sustituya
los cepillos cuando la longitud de sus cerdas sea
igual o inferior a 1 cm (0.38 pulg.) debido al
desgaste. Para la inspección de las escobillas de
carbón consulte con su Centro Autorizado de
Servicio.
PARA SU SEGURIDAD: Al reparar máquina, todas
las reparaciones se deben realizar por una
persona cualificadad para el servicio.
TRANSPORTE DE LA MÁQUINA
1. Desenchufe el cordón eléctrico y extraiga la
almohadilla de la máquina. Enrolle prolijamente el
cordón alrededor del gancho del cordón y el
mango.
2. Guarde la máquina en posición vertical en un
lugar seco.
PARA SU SEGURIDAD: Al transportar máquina,
obtenga asistencia al levantar la máquina.
3. Asegure la máquina con las bandas de amarre
cuando sea transportada por camión.
ALMACENAMIENTO DE LA MÁQUINA
1. Retire de la máquina el impulsor del
cepillo/almohadilla y enrolle cuidadosamente el
cable alrededor del mando y colóquelo en su
gancho.
2. Almacene la máquina en un área seca en la
posición vertical con la manija colocada en
posición vertical o plegada.
ADVERTENCIA: Peligro choque eléctrico. No
use al aire libre. No exponga a la lluvia. Almacén
bajo techo.
STOCK RECOMENDADO DE REPUESTOS
Consulte el manual de repuestos para saber qué
repuestos conviene tener en stock. Los repuestos que
debe tener en almacén se identifican fácilmente por la
marca que precede a la descripción de las piezas.
Consulte el siguiente ejemplo:
Home
Find...
Go To..

OPERACIÓN
19
Tennant 2000/2010/2030/2040/2160/2170 (10--02)
LOCALIZACIÓN DE AVERÍAS
PROBLEMA CAUSA SOLUCIÓN
La máquina no
funciona. Cable eléctrico defectuoso. Contactar con el Servicio Técnico
Cortacircuitos activado. Reajustar el cortacircuitos de la máquina.
Cortacorrientes del edificio activado. Reajustar el cortacircuitos del edificio.
Cableado de la máquina defectuoso. Contactar con el Servicio Técnico
Interruptor de la palanca de Apagado/
Encendido defectuoso. Contactar con el Servicio Técnico
Motor defectuoso. Contactar con el Servicio Técnico
Condensador quemado (Modelos de una
velocidad). Contactar con el Servicio Técnico
Rectificador quemado (Modelos de dos
velocidades). Contactar con el Servicio Técnico
La máquina se
desplaza con un
movimiento oscilante
y brusco.
Almohadilla sucia. Sustituir almohadilla.
Cepillo/almohadilla incorrecta para la
aplicación. Sustituir por el cepillo/almohadilla correcto.
Impulsor de la almohadilla/cepillo mal
instalado. Extraer y volver a instalar el impulsor de la
almohadilla/cepillo.
Desgaste irregular del cepillo/almohadilla. Sustituir cepillo/almohadilla.
Almohadilla descentrada. Extraer y volver a instalar la almohadilla.
El cortacircuitos de la
máquina se activa
constantemente.
Heavily soiled pad/brush. Limpiar o sustituir el cepillo/almohadilla.
Cepillo/almohadilla incorrecta para la aplica-
ción. Sustituir por el cepillo/almohadilla correcto.
Cortacircuitos defectuoso. Contactar con el Servicio Técnico
Cepillos de carbono del motor gastados. Contactar con el Servicio Técnico
Home
Find...
Go To..

OPERACIÓN
20 Tennant 2000/2010/2030/2040/2160/2170 (12--04)
ESPECIFICACIONES
MODELO 2000/2010 2030/2040 2160 2170
ANCHURA 450mm (17.75 pulg.) 530mm (20.75 pulg.) 450mm (17.75 pulg.) 530mm (20.75 pulg.)
ALTURA DE LA
MÁQUINA
1220mm (48 pulg.) 1220mm (48 pulg.) 1220mm (48 pulg.) 1220mm (48 pulg.)
PESO 43Kg (95 lbs) 43Kg (95 lbs) 43Kg (95 lbs) 43Kg (95 lbs)
MOTOR IMPULSOR 120V, 1 hp 12A,
60Hz(2000)
120V, 1 hp 12A,
60Hz(2030)
120V, 1.5 hp 12A, 60Hz 120V, 1.5 hp 12A, 60Hz
120V, 1.5 hp 12A,
60Hz (2010)
120V, 1.5 hp 12A,
60Hz (2040)
240V, 1.1 kW, 7A,
50Hz (2010)
230V, 1.1 kW, 7A,
50Hz (2040)
230V, 1.1kW, 7A, 60Hz
230V, 1.1 kW, 7A,
60Hz (2010)
220V, 1.1 kW, 7A,
60Hz (2040)
220V, 1.1 kW, 7A,
60Hz (2010)
VELOCIDAD DEL
CEPILLO/ALMOHADILLA
175 RPM 175 RPM 185/330 RPM 185/330 RPM
LONGITUD DEL CABLE
ELÉCTRICO
15M (50 pies) 15M (50 pies) 15M (50 pies) 15M (50 pies)
DIÁMETRO DEL CEPILLO/
ALMOHADILLA
430mm (17 pulg.) 510mm (20 pulg.) 430mm (17 pulg.) 510mm (20 pulg.)
NIVEL DE RUIDO (EN DE-
CIBELIOS) A LA ALTURA
DEL OPERARIO, EN RE-
CINTO CERRADO CON
SUELO DE BALDOSA
<70dB(A) <70dB(A) 71dB(A) A La Velocidad
Baja
73dB(A) En La Velocdad
alta
71dB(A) A La Velocidad
Baja
73dB(A) En La Velocdad
alta
Especificaciones sujetas a modificaciones sin aviso previo.
Home
Find...
Go To..
OPERACIÓN
21
Tennant 2000/2010/2030/2040/2160/2170 (12--05)
1220 mm
(48 pulg.)
DIMENSIONES DE LA MÁQUINA
530 mm (20.75 pulg.)
modelo 20 pulg.
Home
Find...
Go To..
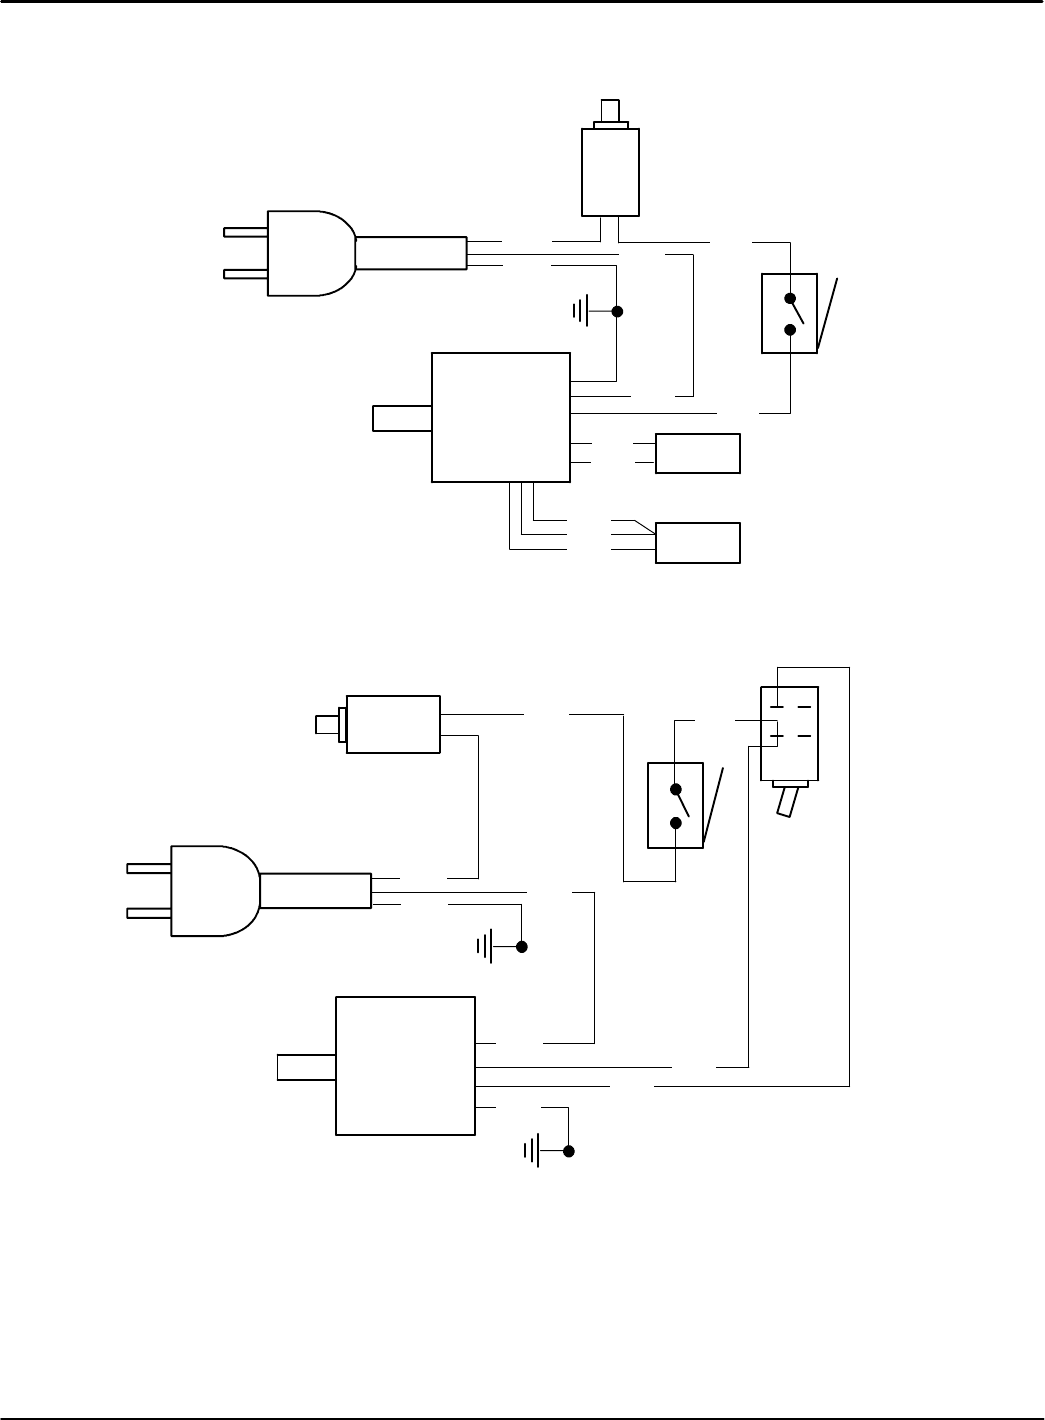
ELECTRICAL DIAGRAMS
DIAGRAMAS ELECTRICAS
Tennant 2000/2010/2030/2040/2160/2170 (12--04)
22
DUAL SPEED -- 120V
SINGLE SPEED -- 120V
120V
15A
BLK
GRN
BLK
WHT
MOTOR
BLK
WHT
BLK WHT
GRN
WHT
15A
CIRCUIT
BREAKER
RED
GRN
BLK
BLK
START CAPACITOR
RUN CAPACITOR
MOTOR
CIRCUIT
BREAKER
DUAL
SPEED
SWITCH
SWITCH
SWITCH
BLK
MODELOS DE DOS VELOCIDADES
120V
MODELOS DE UNA VELOCIDAD
WHT
BLK
WHT
RED
RED
Home
Find...
Go To..
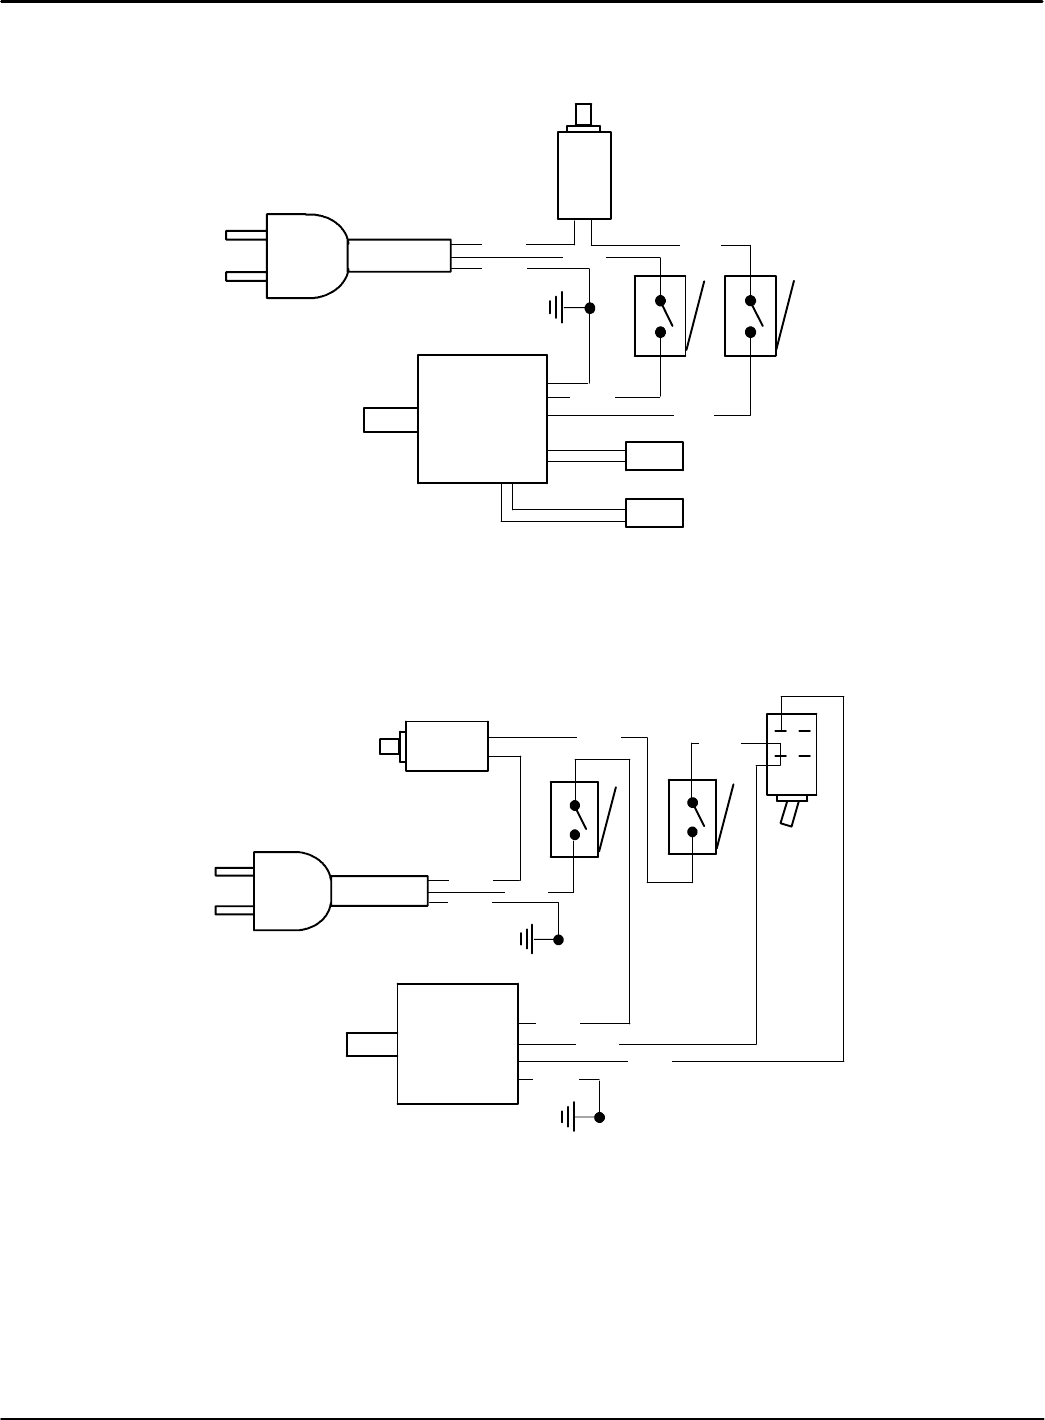
ELECTRICAL DIAGRAMS
DIAGRAMAS ELECTRICAS
23
Tennant 2000/2010/2030/2040/2160/2170 (09--02)
DUAL SPEED -- 230V
SINGLE SPEED -- 220V/230V/240V
BRN BLU
GRN
WHT
12A
RED
GRN
BLK
230V
BRN
12A
BLK
BLU
BLK
WHT
MOTOR
GRN
240V
START CAPACITOR
RUN CAPACITOR
CIRCUIT
BREAKER
SWITCH
SWITCH
220V
MOTOR
CIRCUIT
BREAKER
SWITCH
SWITCH
DUAL
SPEED
SWITCH
MODELOS DE UNA VELOCIDAD
MODELOS DE DOS VELOCIDADES
230V
BLK BLK
Home
Find...
Go To..
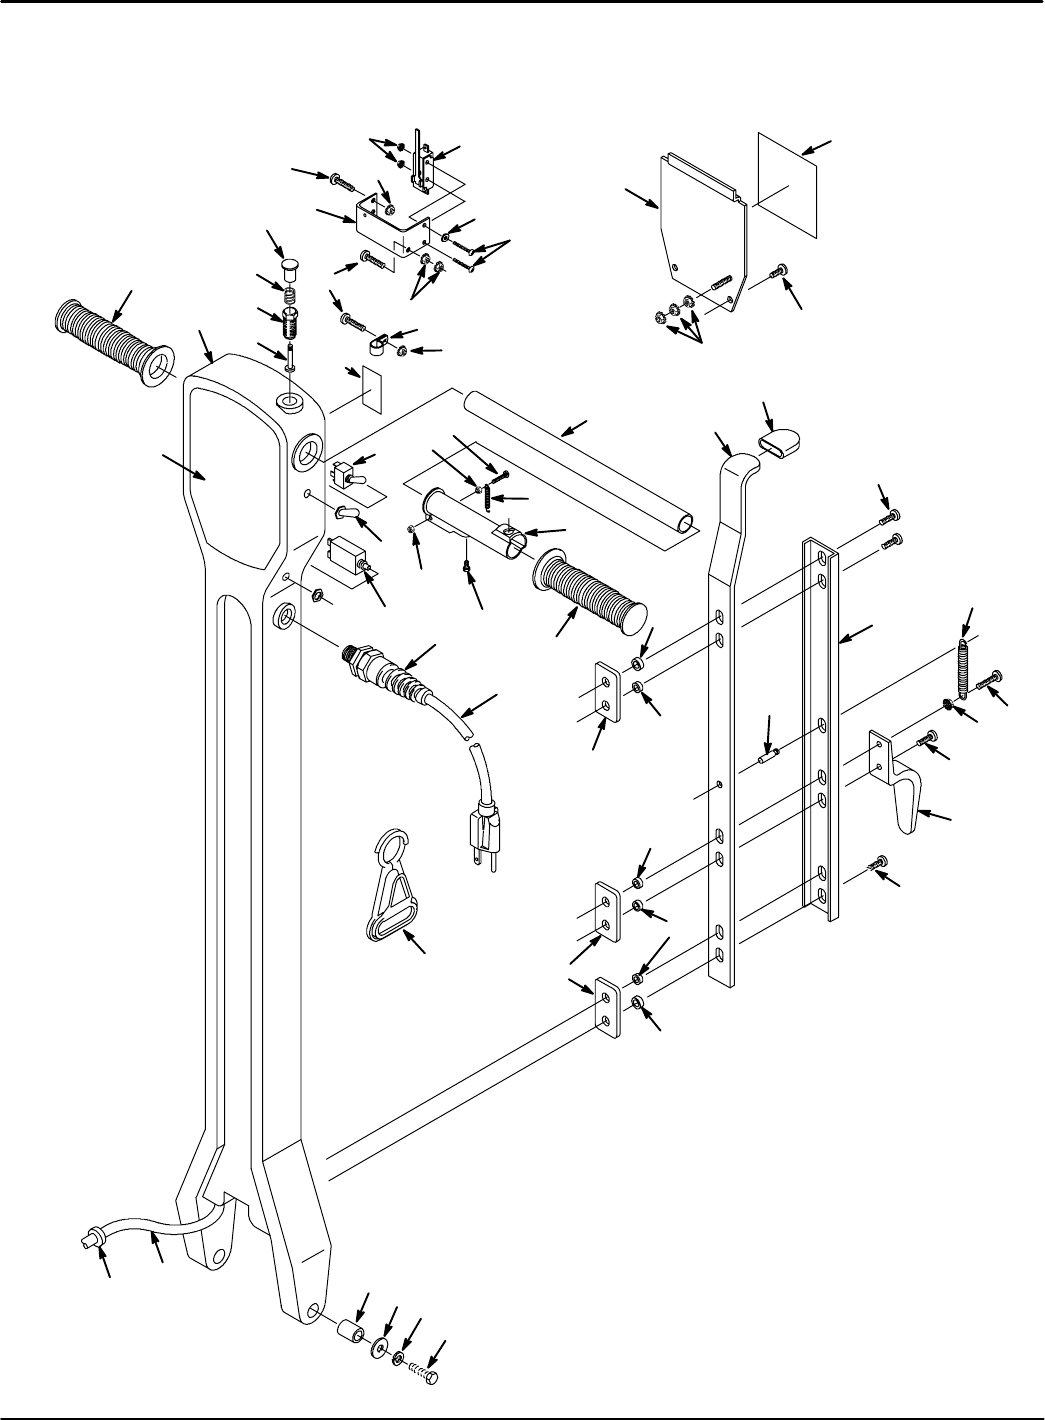
PARTS LIST
LISTA DE PIEZAS
Tennant 2000/2010/2030/2040/2160/2170 (12--05)
24
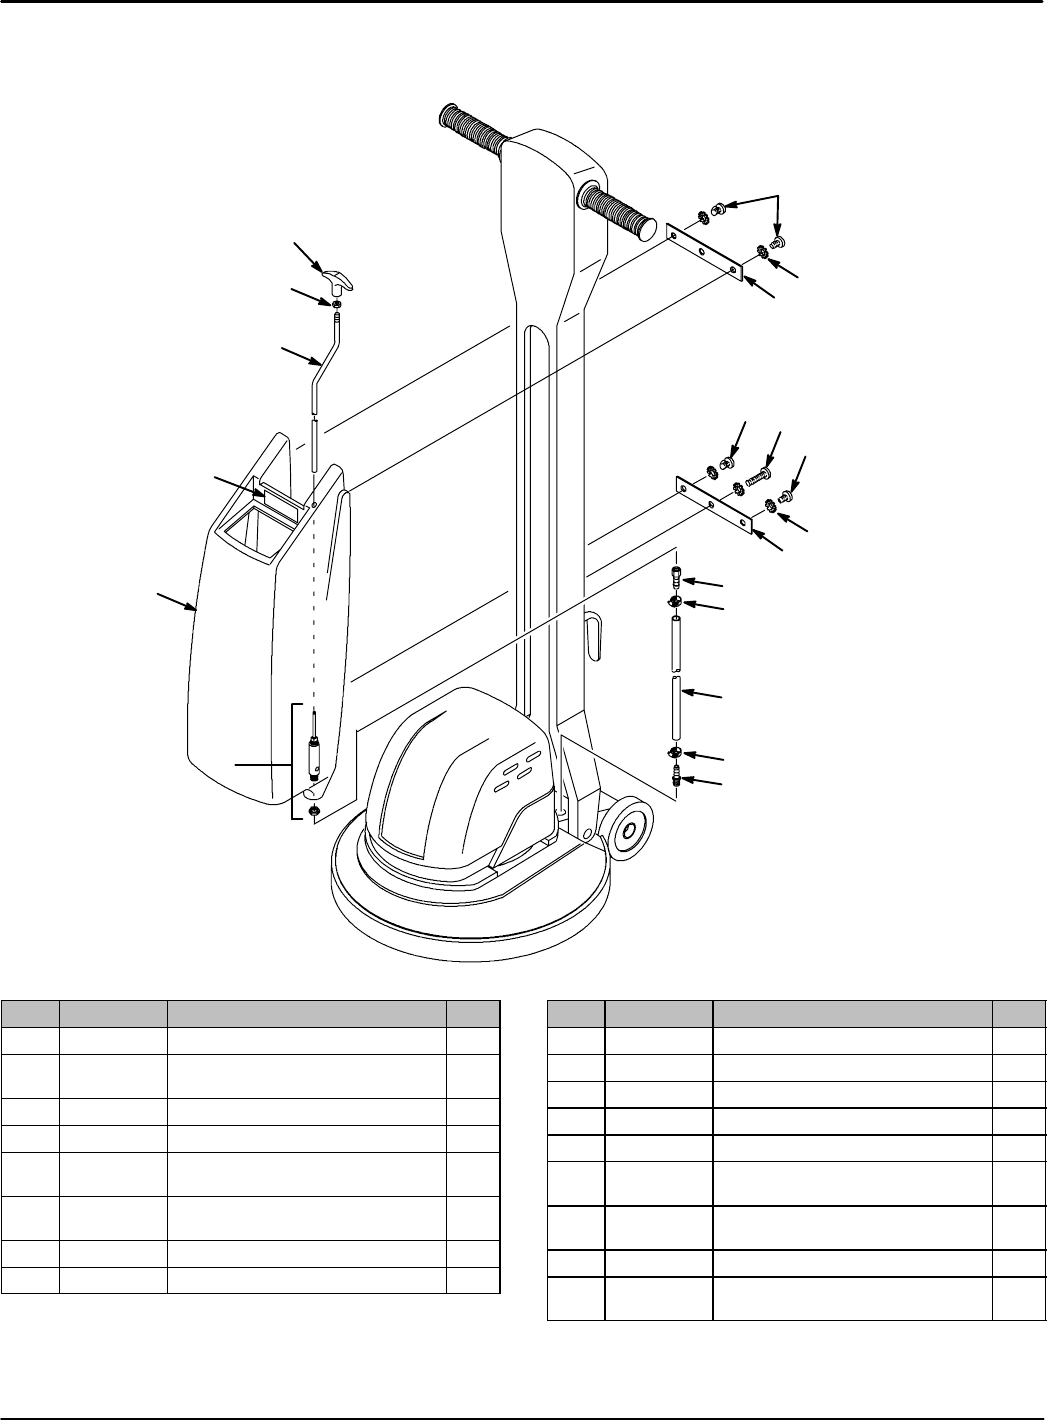
HANDLE GROUP
GRUPO DEL ASA
1
2
3
7
6
5
415
10
20
8
10
14
13
10
12
11
22 23
24
21
22
27
28
1
26
25
16
17
18
10
33
34
38
39
40
41
31
30
29 37
37
35
30
30
31
29
43 42
32
9
19
44
45 46 47
36
49
48
50
37
Home
Find...
Go To..
51 & 52

PARTS LIST
LISTA DE PIEZAS
Tennant 2000/2010/2030/2040/2160/2170 (12--05) 25
HANDLE GROUP
GRUPO DEL ASA
REF PART # DESCRIPTION QTY.
1200823 GRIP, HANDLE TUBE 2
2607637 HANDLE, RM--TL
(2000/2010/2030/2040) 1
607692 HANDLE, RM--TL DUAL SPD
(2160/2170) 1
3608121 DECAL, TENNANT 2000 1
609058 DECAL, TENNANT 2010
STD HANDLE 1
609059 DECAL, TENNANT 2030 1
608123 DECAL, TENNANT 2040
STD HANDLE 1
609148 LABEL, MODEL (2160) TENNANT 1
609149 DECAL, 2170DS TENNANT
STD HDL 1
4230856 PIN, LOCK RELEASE 1
5230857 SOCKET, LOCK 1
6140401 SPRING, LOCK BUTTON 1
7230855 BUTTON, LOCK RELEASE 1
8140900 SCREW, TRS, #10--24X0.75 PHL SS 2
9230854 BRACKET, SWITCH 1
10 140519 NUT, HEX LOCK, #10--24 KEP SS 8
11 140539 NUT, HEX LOCK, #6--32 KEP SS 2
12 1013132 DSWITCH, LEVER, SNAP ACTION
(120V) 1
DSWITCH, LEVER, SNAP ACTION
(220V/230V/240V) 2
13 140032 WASHER, #6 FLT SS 1
14 140829 SCREW, PAN #06--32X1.00 PHL SS
(120V)
2
140830 SCREW, PAN, #06--32X1.62 PHL ZN
(220V/230V/240V) 2
15 140328 CLAMP, CABLE, NYL, 0.38D, BLACK 1
∇16 9001922 PLATE, HANDLE REAR W/ LABEL 1
Y17 1026385 LABEL, WARNING 1
18 140197 SCREW, TRS, #10--24X0.38 PHL SS
SEM 2
19 140823 SCREW, TRS, #10--24X0.62 PHL SS 2
20 230853 TUBE, RND, 00.88D 00.76B 15.0L
STL 1
21 603487AM DCIRCUIT BREAKER, 15.0A (120V) 1
130670AM DCIRCUIT BREAKER, 12.0A
(220V/230V/240V) 1
1006477 DCIRCUIT BREAKER, 17A (120V)
(DUAL SPD MODELS) 1
∇ASSEMBLY / CONJUNTO
YINCLUDED IN ASSEMBLY / INCLUIDO EN EL CONJUNTO
DRECOMMENDED STOCK ITEMS / ARTICULOS RECOMENDADOS PARA
MANTENER EN EXISTENCIA
REF PART # DESCRIPTION QTY.
22 28990 NUT, 8--32 LOCK NY--INSERT SS 2
23 6010.16 SCREW, PAN, #08--32X1.00 1
24 600987 SPRING EXT .25X1.25X.026 MW 1
25 100355 SLEEVE, LOCKING, GRIP, HANDLE 1
26 01697 SCREW, HEX .25--20X0.62 SS 1
27 602849 DSTRAINRELIEF, CORD, ELE
.05NPT BLK NYL (120V) 1
130167 DSTRAINRELIEF, CORD, ELE
.05NPT BLK NYL (220V/230V/240V) 1
28 602747 DCORD, 14/3X50’ YELLOW ST
(120V) 1
600324 DCORD, ELE, 3X1.5MM2X15M BLK
(220V/230V/240V) 1
29 230852 PLATE, BACKING 3
30 140147 SLEEVE, P/M, 0.440D 0.255B 0.21L
STL PLT 4
31 140146 SLEEVE, P/M, 0.500D 0.255B 0.21L
STL PLT 2
32 140604 PIN, GROOVE 0.254X0.75L TYPE G
ZN 1
33 611141 HANDLE, LATCH 1
34 200821 GRIP, LATCH, HDL, 1.62X1.25X1
BLK 1
35 602750 HOOK, CORD 1
36 140235 SCREW, HEX .50--13X2.00 SS 2
37 140864 SCREW, TRS, .25--20X0.75 PHL SS 5
38 230859 CHANNEL, LATCH HANDLE 1
39 140402 SPRING, HANDLE LATCH 1
40 140881 SCREW, TRS, .25--20X1.00 ZN 1
41 140524 NUT, 1/4--20 KEP ZN 1
42 130204 CORD, 14/3X57 BLK SJTO HANDLE
(SINGLE SPD & HD MODELS) 1
130203 CORD, 14/4X57 BLK HANDLE
(DUAL SPD MODEL) 1
43 130141 STRAINRELIEF, BUSHING, SR7L--2 1
44 130176 DCLIP, CORD STRAIN--RELIEF
YELLOW (BELT) (OPTIONAL) 1
45 140148 SLEEVE, P/M 0.625D 0.507B 1.40L
STL PLT 2
46 3148.816 WASHER, FLAT, 0.52B 0.88D .06
STL ZN 2
47 140024 WASHER, LOCK 0.50 SS 2
48 130726 DSWITCH, TOGGLE
(DUAL SPD MODELS) 1
49 130990 DBOOT,RBR,SWITCHBLACK
(DUAL SPD MODELS) 1
50 120675 DECAL, POLY--SPDSHN OPRTN/
DS (DUAL SPD MODELS) 1
Home
Find...
Go To..
51 605094 COLLAR 2
52 140859 SET SCREW 2
222648
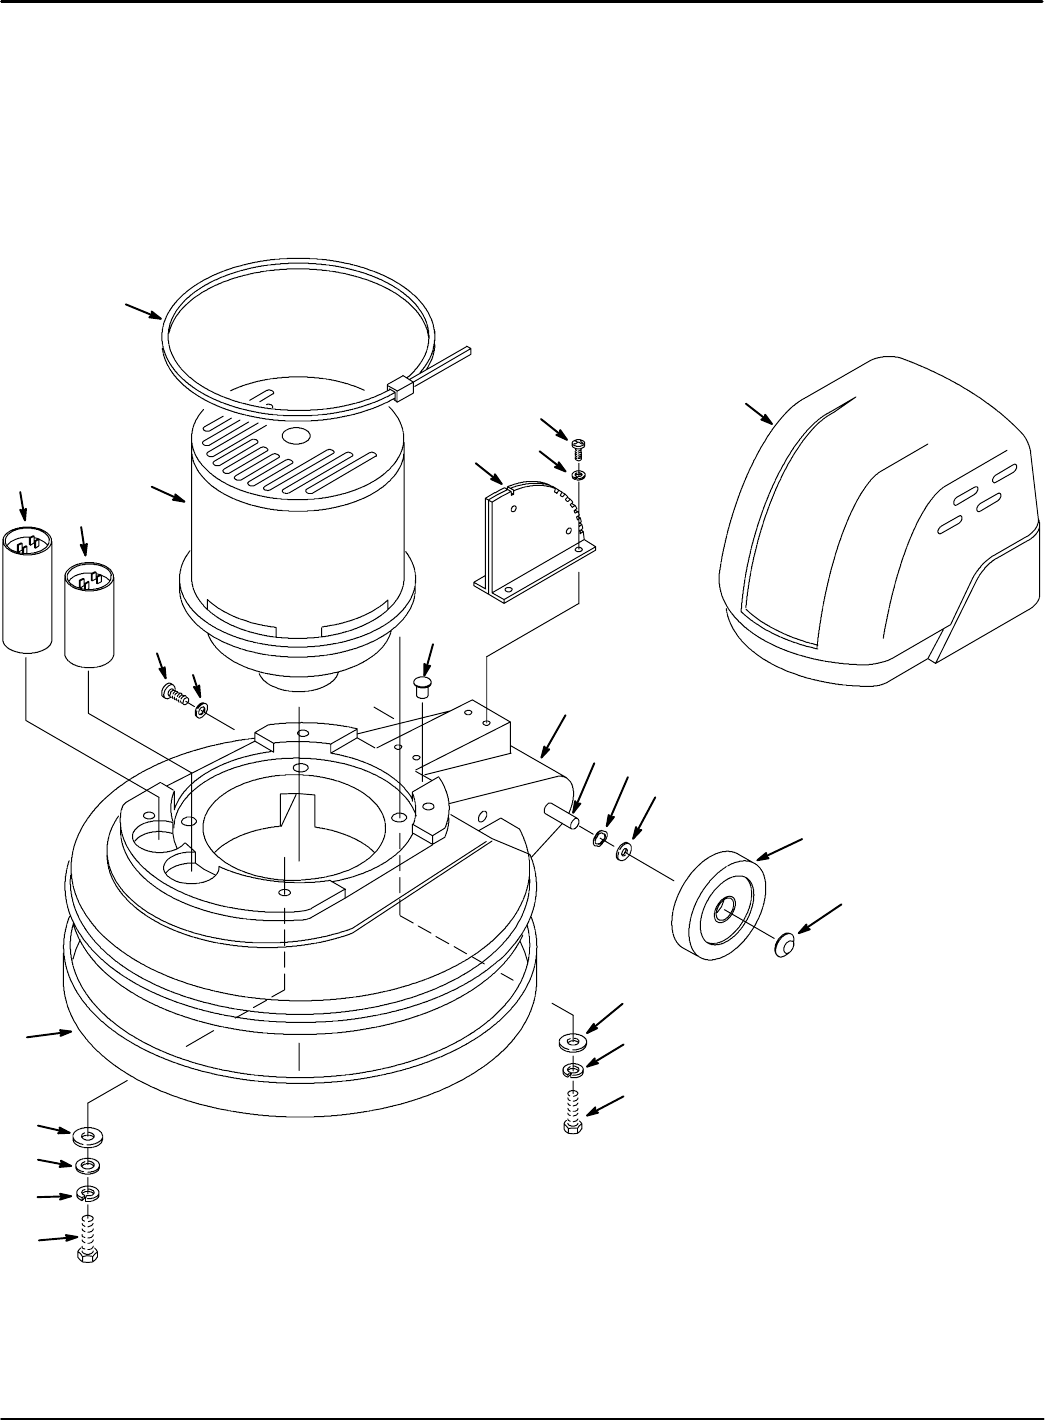
PARTS LIST
LISTA DE PIEZAS
Tennant 2000/2010/2030/2040/2160/2170 (12--05)
26
BASE GROUP
GRUPO BASE
7
4
3
2
1
5
6
25
12
11
14
13
22
23
24
15
16 17 18
19
20
21
10
8
9
Home
Find...
Go To..

PARTS LIST
LISTA DE PIEZAS
Tennant 2000/2010/2030/2040/2160/2170 (12--05) 27
BASE GROUP
GRUPO BASE
REF PART # DESCRIPTION QTY.
1579212 SCREW, HEX, .25--20X2.00 SS 4
2140016 WASHER, LOCK, 0.25 SS 4
3140000 WASHER, FLAT, 0.28B 0.62D .04 SS 4
4602543 BUMPER, 17” S/SHINE
(17” MODELS) 1
602545 BUMPER, 20” F/M (20” MODELS) 1
5140852 SCREW, #12X3/4 SHTMETL PNPL
SS (17” MODELS) 2
140824 SCREW, TRS, .25--20X0.62 PHL SS
(20” MODELS) 2
6019680127 WASHER, FLT (17” MODELS) 2
140003 WASHER, 1/4X1 FNDR SS
(20” MODELS) 2
∇79001248 KIT, MOTOR, ELE, 110V, 1.0HP
(2000/2030)
1
Y1020409 COUPLING, MOTOR 1
Y1020410 GEARBOX, 10:1, IMPERIAL 1
Y81017276 DCAPACITOR, 50uF, IMPERIAL
(RUN) 1
Y91017274 DCAPACITOR, 450uF, IMPERIAL
(START) 1
Y10 222809 TIE, CABLE, NYL, 29.8L .30W
9.0 MAX D 1
∇79001189 KIT, MOTOR, ELE, 110V 1.5HP
(2010/2040)
1
Y1020409 COUPLING, MOTOR 1
Y1020410 GEARBOX, 10:1, IMPERIAL 1
Y81017275 DCAPACITOR, 60uF, IMPERIAL
(RUN) 1
Y91017274 DCAPACITOR, 450uF, IMPERIAL
(START) 1
Y10 222809 TIE, CABLE, NYL, 29.8L .30W
9.0 MAX D 1
∇7130494 MOTOR, ELE, 120VAC 1.50HP
(2160/2170)
1
Y190742 DCARBON BRUSH CARD ASM. 1
22117 DMOTOR, BRUSH, ELE, REPLMT 4
190753 DRECTIFIER, 60A/600V 1
190744 DSPEED CONTROL, 120V
DUAL SPEED 1
515021 DHOLDER 1
∇ASSEMBLY / CONJUNTO
YINCLUDED IN ASSEMBLY / INCLUIDO EN EL CONJUNTO
DRECOMMENDED STOCK ITEMS / ARTICULOS RECOMENDADOS PARA
MANTENER EN EXISTENCIA
REF PART # DESCRIPTION QTY.
∇7600807 MOTOR, 1--1/2HP 230V/50HZ
(2010/2040) / 613738--2040 1
∇7600808 MOTOR, 1.5HP 230V/60HZ
(2010/2040) 1
Y8605286 DMOTOR CAPACITOR 20 MFD,
RUN (SILVER) (2010/2040) 1
Y9130762 DCAPACITOR, 120V
START (BLACK) (2010/2040) 1
∇7130488 MOTOR, 230V--DS 10;1
(DUAL SPD 2170 MODEL) 1
Y600281 DASM BRUSH CARD 1
190311 DBRUSH CARBON
(MOTOR REQUIRES 4) 4
190312 DRECTIFIER 1
190745 DCONTROL, SPEED 230V
DUAL SPEED 1
11 140015 WASHER, LOCK, SPLT, 0.31 SS 4
12 140226 SCREW, HEX, .31--18X0.62 SS 4
13 607635 COVER,MTR,RM--TL 1
14 611133 PLATE LATCH 1
15 607641 BASE, 17” RM--TL (2000/2010/2160) 1
607633 BASE, 20” RM--TL (2040/2130/2170) 1
16 608909 AXLE, 1/2DIAX10.040 1
17 4252 WASHER, 1/2 COMPRESSION ZN 2
18 3148.816 WASHER, FLAT, 0.52B 0.88D .06,
STL ZN 2
19 103066 DWHEEL, 4.0D 1.50W .50B GRAY 2
20 103019 CAP, HUB, WHEEL, 0.51D SS 2
21 140027 WASHER, FLAT, 0.35B 0.75D .04 SS 4
22 140003 WASHER, 1/4X1 FNDR SS
(SINGLE SPD & HD MODELS) 8
140046 WASHER, 1.00X.392X.090 SS
(DUAL SPD MODELS) 4
23 140016 WASHER, LOCK 0.25 SS
(SINGLE SPD & HD MODELS) 4
140015 WASHER, LOCK SPLT 0.31 SS
(DUAL SPD MODELS) 4
24 140212 SCREW, HEX, .25--20X1.50 SS
(SINGLE SPD & HD MODELS) 4
140216 SCREW, HEX, .31--18X1.50 SS
(DUAL SPD MODELS) 4
25 130198 PLUG, PRY OUT .500 OD -- BLACK 1
Home
Find...
Go To..
PARTS LIST
LISTA DE PIEZAS
Tennant 2000/2010/2030/2040/2160/2170 (12--05)
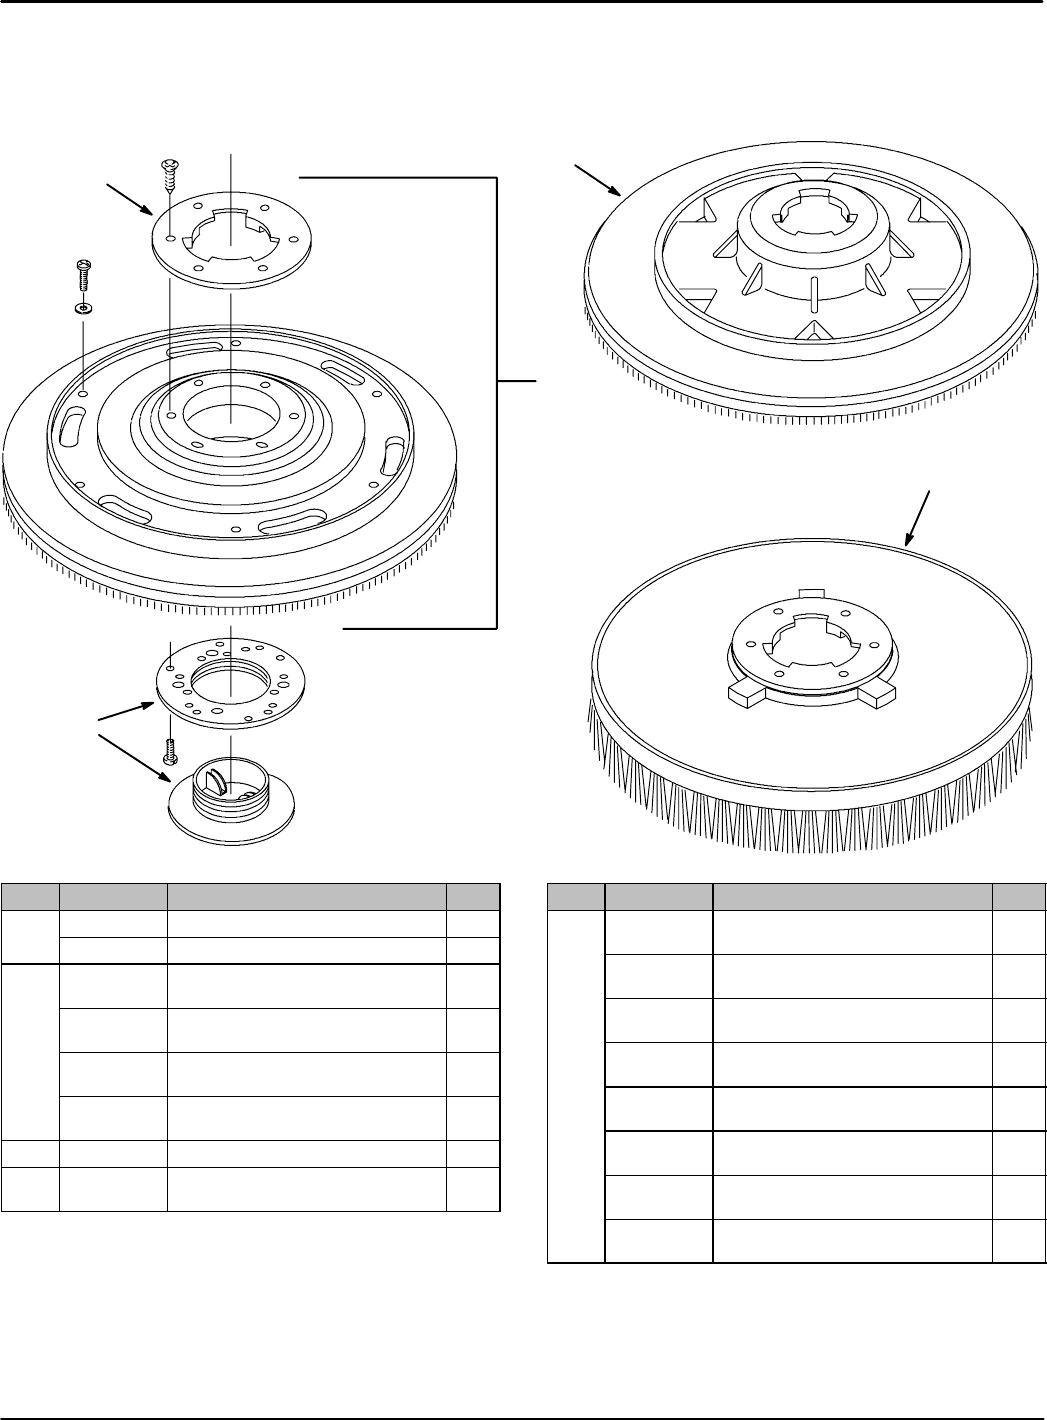
28
REPLACEMENT BRUSHES AND PAD DRIVER GROUP
CEPILLO DEL REEMPLAZO Y GRUPO DEL MANDO DE LA ALMOHADILLA
2
3
5
4
1
REF PART # DESCRIPTION QTY.
11035472 PAD DRIVER 17” (STD.) 1
1035476 PAD DRIVER 20” (STD.) 1
∇2605124 PAD HOLDER ASSY & C PLATE 17”
SINGLE SPD & HD MODELS (OPT.) 1
605123 PAD HOLDER ASSY & C PLATE 20”
SINGLE SPD & HD MODELS (OPT.) 1
603537 PAD DRIVER ASM 17” DUAL
SPEED (15” PAD) (OPTIONAL) 1
605225 PAD DRIVER ASM 20” DUAL
SPEED (OPTIONAL) 1
Y3603539 PLATE CLUTCH 1
4603538 DLOCK CENTER GRAY
(OPTIONAL) 1
∇ASSEMBLY / CONJUNTO
YINCLUDED IN ASSEMBLY / INCLUIDO EN EL CONJUNTO
DRECOMMENDED STOCK ITEMS / ARTICULOS RECOMENDADOS PARA
MANTENER EN EXISTENCIA
REF PART # DESCRIPTION QTY.
5240255 BRUSH, 17” DYNASCRUB
W/CLTCHPLT (OPTIONAL) 1
240257 BRUSH, DYNASCRUB 20”
W/CLPT&RISR (OPTIONAL) 1
240256 BRUSH, STR/GRIT SCRUB/STRIP
17” (OPTIONAL) 1
240258 BRUSH, STR/GRIT SCRUB/STRIP
20” (OPTIONAL) 1
604989 BRUSH, 15” ADJUST--A--GLIDE,
FOR CARPET (OPTIONAL) 1
607463 BRUSH, ADJUST--A--GLIDE,
18” DIA, FOR CARPET (OPTIONAL) 1
1019262 BRUSH, POLY, 17” HARD FLOOR
(OPTIONAL) 1
1019263 BRUSH, POLY, 20” HARD FLOOR
(OPTIONAL) 1
Home
Find...
Go To..
OPTIONS
OPCIONES
29
Tennant 2000/2010/2030/2040/2160/2170 (12--05)
SOLUTION TANK GROUP
GRUPE DEL DEPÓSITO DE DISOLUCIÓN
1
2
3
4
14
6
7
8
9
6
6
8
7
10
11
12
11
13
5
REF PART # DESCRIPTION QTY.
∇190123 KIT,TANK,SOLTN,HAWKGRAY 1
Y1240194 KNOB, TEE, 5/16--18 FEMALE
THREAD BLACK 1
Y2140548 NUT 5/16 FINJAM SS 1
Y3230399 ROD, VALVE SOLUTION TANK 1
Y4611864 TANK, SOLUTION RM--HG
(RM--CO) 1
Y∇5700197 VALVE ASSY, SOLTN,
W/NUT&O--RING 1
Y210216 VALVE, W/ NUT&ORING 1
Y210218 O--RING SEAL FOR VALVE 1
∇ASSEMBLY / CONJUNTO
YINCLUDED IN ASSEMBLY / INCLUIDO EN EL CONJUNTO
DRECOMMENDED STOCK ITEMS / ARTICULOS RECOMENDADOS PARA
MANTENER EN EXISTENCIA
REF PART # DESCRIPTION QTY.
Y6140885 SCREW, TRS, .25--20X0.50 PHL SS 4
Y7140052 WASHER, LOCK, EXT, 0.25 SS 5
Y8230475 BRACKET, SOLUTION TANK 2
Y9140881 SCREW, TRS, .25--20X1.00 ZN 1
Y10 150511 FITTING, BRS, STR, PF04/BM06 1
Y11 43844 CLAMP, HOSE, WORMDRIVE,
0.25--0.62D, .31W 2
Y12 606667 HOSE, PVC, WIR, 0.38ID 0.62OD
10.0L 1
Y13 150516 FITTING, BRS, STR, BM06/PM04 1
Y14 610722 LABEL, HZRD
(FLAMMABLE SOLUTION) 1
Home
Find...
Go To..
