Pioneer Eclipse 225bu Floor Burnisher Operators Manual
2017-01-09
: Sweepscrub Pioneer-Eclipse-225Bu-Floor-Burnisher-Operators-Manual pioneer-eclipse-225bu-floor-burnisher-operators-manual 1966 file product_file
Open the PDF directly: View PDF ![]() .
.
Page Count: 20
Floor Burnisher
PE225BU
Operator’s Manual

FOR YOUR SAFETY
DO NOT store or use gasoline or other flammable vapors and liquids in the
vicinity of this or any other appliance.
Record This Important Information
Date of Purchase
Purchased From
Address
City State Zip
Phone Contact
Machine Model
Machine Serial Number
Important Phone Numbers
Medical Emergency
Police
Fire Department
WARNING!: The Products sold with this Manual contain or may contain chemicals that
are known to certain governments (such as the State of California, as identied in its
Proposition 65 Regulatory Warning Law) to cause cancer, birth defects or other reproductive harm.
In certain locations (including the State of California) purchasers of these Products that place them
in service at an employment job site or a publicly accessible space are required by regulation
to make certain notices, warnings or disclosures regarding the chemicals that are or may be
contained in the Products at or about such work sites. It is the purchaser’s responsibility to know
the content of, and to comply with, any laws and regulations relating to the use of these Products
in such environments. The Manufacturer disclaims any responsibility to advise purchasers of any
specic requirements that may be applicable to the use of the Products in such environments.

In this Operation Manual you will find three statements that you must read and observe
to ensure safe operation of this machine.
DANGER! indicates that the possibility of severe bodily injury or death can occur if
DANGER! statements are ignored. Read and observe all DANGER! statements
included in the Operation Manual and attached to the machine.
WARNING! indicates that the possibility of bodily injury to the operator and other
people can occur if WARNING! statements are ignored. Read and observe all
WARNING! statements included in the Operation Manual and attached to the
machine.
CAUTION! indicates that the possibility of damage to the machine or other property
can occur if CAUTION! statements are ignored. Read and observe all CAUTION!
statements included in the Operation Manual and attached to the machine.
Safety Precautions..............................................................4
Technical Specifications......................................................5
Operator Responsibility.......................................................6
Machine Preparation...........................................................6
Unpacking the Machine..........................................6
Transporting the Machine.......................................6
Grounding Instructions..........................................7
Extension Cords.....................................................7
Machine Components.........................................................8
Operator Handle Grips...........................................9
Switch Levers.........................................................9
Switch Lever Safety Lock......................................9
Handle Release Lever............................................9
Cord Hook..............................................................9
Power Cord.............................................................9
How to Operate the Machine.............................................10
Installing / Replacing a Pad.................................10
Operation..................................................10
After Use...............................................................10
Scheduled Maintenance...................................................11
Machine Troubleshooting..................................................11
Parts Manual & Warranty...................................................12
Electrical Schematic.............................................13
Main Assembly.....................................................14
Handle Assembly.................................................16
Manufacturer’s Warranty...................................................18
3
Table of Contents
***This product is intended for commercial use only***

4
Safety Precautions
Anyone operating the machine should read the
following carefully and be informed of potentially
dangerous operating conditions. Operators should
be familiar with the location and use of all safety
devices on the machine. DO NOT use the machine
if it is not in proper operating condition, and report
any damage or operation faults immediately.
DANGER! Failure to read the Owner’s Manual prior to
operating or attempting any service or maintenance
procedure to your machine could result in injury to
you or to other personnel; damage to the machine or
to other property could occur as well. You must have
training in the operation of this machine before using it.
If you or your operator(s) cannot read English, have this
manual explained fully before attempting to operate this
machine.
DANGER! This machine has parts, including the pad
assemblies, that can cause severe injury if these parts
are contacted while they are moving. DO NOT allow
any part of the body or clothing to come in contact
with these parts while they are moving. DO NOT try
to change attachments while the machine is running.
DO NOT allow other people to come near the machine
while it is in operation. DO NOT allow machine to run
unattended. DO NOT leave the machine in a place
where unauthorized or untrained personnel could use
the machine. DO NOT run the machine with the pad
off center, damaged, or missing. DO NOT operate the
machine if the machine has loose parts.
DANGER! Injury can occur to the eyes and body while
using the machine. Safety goggles, safety shoes, and
safety clothing are recommended while operating the
machine.
DANGER! Operating a machine that is not completely
or fully assembled could result in injury or property
damage. DO NOT operate this machine until it is
completely assembled. Inspect the machine carefully
before operation.
DANGER! Electrocution could occur if maintenance and
repairs are performed on a unit that is not disconnected
from the power source. Disconnect the power supply
before attempting any maintenance or service. Always
remove the electrical plug from the electrical outlet
before changing the brush, pad or other attachment and
before leaving the machine.
DANGER! Using a machine with a damaged power
cord could result in an electrocution. DO NOT use the
machine if the power cord is damaged. DO NOT use the
electrical cord to move the machine.
WARNING! Machine vibration may cause tingling or
numbness in the fingers and hands. Gloves are
recommended to reduce machine vibration. If tingling
or numbness persists, shut off the machine. If vibration
is caused by loose parts, adjust or tighten these parts
before using the machine again.
WARNING! Modifications or alterations to this machine
can lead to personal injury or damage to the machine.
DO NOT make unauthorized modifications or alterations
to this machine. Amano Pioneer Eclipse assumes
no liabilities for injury or damage resulting from an
unauthorized modification or alteration to the machine.
Any unauthorized modification or alteration to this
machine voids all warranties.
WARNING! Electrical components of this machine can
“short-out” if exposed to water or moisture. Keep the
electrical components of the machine dry. Wipe the
machine down after each use. For storage, keep the
machine in a dry building.
WARNING! Always use a three-wire electrical system
connected to the electrical ground. For maximum
protection against electric shock, use a circuit that is
protected by a ground fault interrupter. Consult your
electrical contractor.
WARNING! To prevent damage to the power cord, DO
NOT let the pad, pad driver or wheels touch the power
cord when the machine is running. Always lift the cord
over the machine. DO NOT pull the power cord to move
the machine.
WARNING! Operating a machine without observing all
labels and instructional information could result in injury
or damage. Read all machine labels before attempting
to operate. Make sure all of the labels and instructional
information are attached or fastened to the machine.
Get replacement labels and decals from your authorized
distributor.
WARNING! Machine vibration may cause tingling or
numbness in the fingers and hands. Gloves are
recommended to reduce machine vibration. If tingling
or numbness persists, shut off the machine. If vibration
is caused by loose parts, adjust or tighten these parts
before using the machine again.
WARNING! Use of this machine as a step or furniture
could result in injury or damage. DO NOT use this
machine as a step or furniture. DO NOT ride on this
machine.
WARNING! To avoid injury keep hands, feet and loose clothing
away from all moving parts of this machine.
WARNING! Any alterations or modifications of this
machine could result in damage to the machine or
injury to the operator or other bystanders. Alterations or
modifications not authorized by the manufacturer voids
any and all warranties and liabilities.
CAUTION! The machine is heavy. Get assistance before
attempting to transport or move it.

Technical Specifications:
Description 225BU20
Voltage (V) 120
Frequency (Hz) 60
Current (A) 15
Pad / Brush Speed 1500 rpm
Power 1.5 hp (1.1 kW)
Pad Size 20” (51 cm)
Cord 14/3 Yellow
Cord Length 50’ (15 m)
Height w/ Handle 49” (125 cm)
Width 20” (51 cm)
Length 32” (81.5 cm)
Weight w/ cord 76 lbs (35 kg)
Handle Tube Tubular Steel
Main Frame Welded Steel
Sheet Metal
5
6
This Machine is Manufactured for
Commercial use only.
This machine is designed and manufactured for
indoor use on hard floor surfaces. Amano Pioneer
Eclipse Corporation (APEC) does not recommend
use of this machine in any environment other than an
indoor environment. This floor machine is designed
and manufactured for commercial floor use only. This
machine is designed to clean most modern types of
floors including composition tile, stone, marble, terrazzo,
and resilient floor covering, and some coated wood
floors.
Operator Responsibility
The operator is responsible for performing the
recommended daily maintenance and checkups of the
machine to keep it in good working condition. The
operator must inform the service mechanic or supervisor
when recommended maintenance procedures are
required as prescribed in the “MAINTENANCE” section
of this manual.
FOR SAFETY: DO NOT operate machine before
reading and understanding the operation manual.
Keep your machine regularly maintained by following the
maintenance information in this manual. Order parts and
supplies only from an Authorized Amano Pioneer Eclipse
Distributor. Use the parts illustration section of your
manual when ordering parts.
During and after operation, perform the recommended
daily and hourly procedures outlined in the Maintenance
Chart.
Machine Preparation
Unpacking the Machine
When the machine is delivered, carefully inspect the
shipping carton and the machine for damage. Unpack
the machine with caution. If damage is evident, save the
shipping carton so that it can be inspected. Contact the
Amano Pioneer Eclipse Customer Service Department.
Transporting the Machine
To transport the machine, follow this procedure:
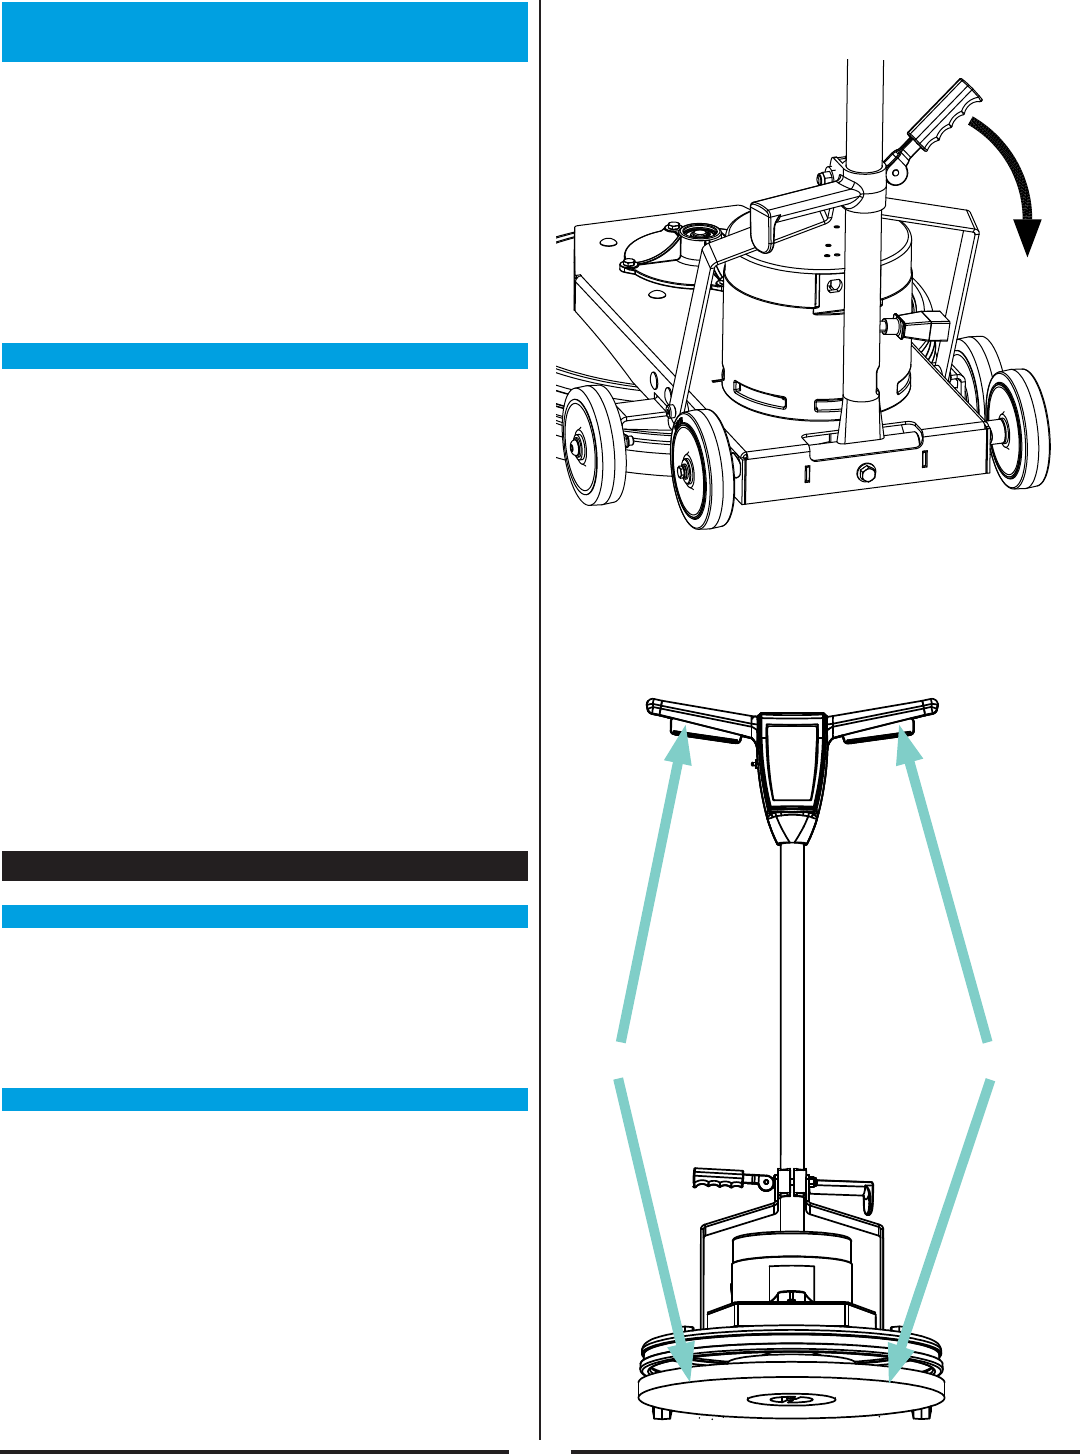
1. Raise and lock the handle in the upright position. To
lock the handle, push down on the handle release
lever (See Figure 1).
2. Unplug the machine from wall outlet and wrap cord
around the handle and cork hook.
3. To pick up the machine, using two people, lift and
place in cargo area (See Figure 2).
WARNING! The machine is heavy, 76 lbs (35 kg).
To avoid injury or damage to the machine use a
firm grip and proper lifting technique. Always use
two people when lifting this machine.
Person #1Person #2
Figure 2
Figure 1
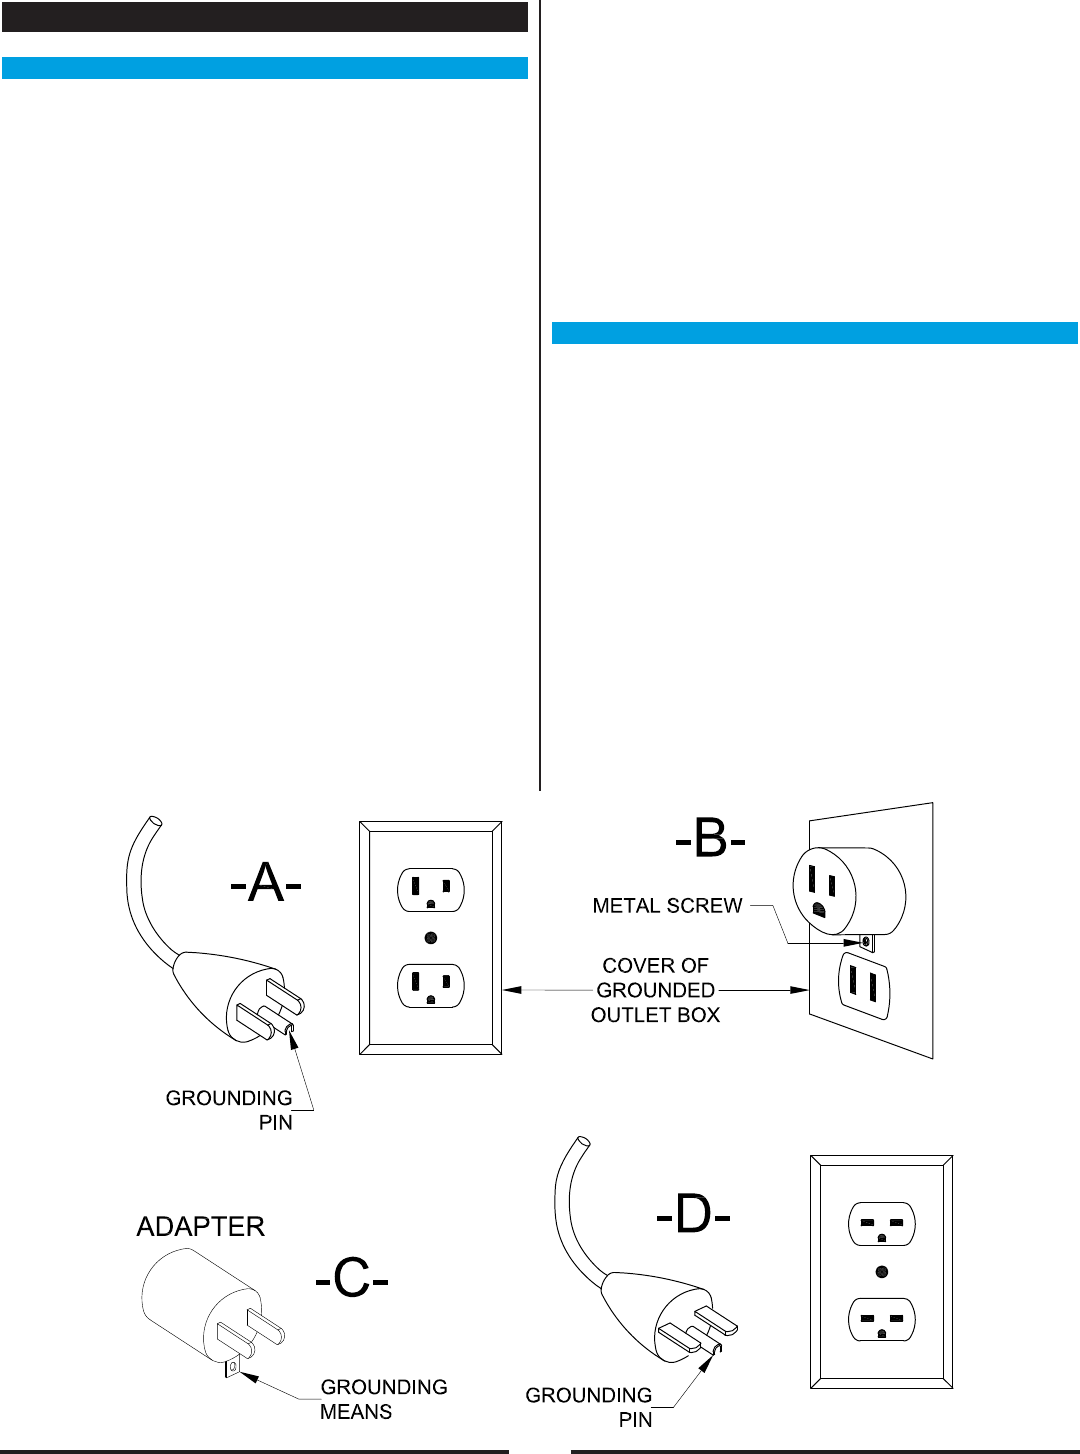
Grounding Instructions
120 Volt Machines
This product must be grounded while in use to protect
the operator from electrical shock. The machine is
provided with a three-conductor cord and a three contact
grounding attachment plug to the t the proper grounding
type receptacle. The green (or green and yellow)
conductor in the cord is the grounding wire. NEVER
connect this wire to other than the grounding pin of the
attachment plug. If it should malfunction or breakdown,
grounding provides a path of least resistance for electric
current to reduce the risk of electrical shock. This
product is equipped with a cord having an equipment-
grounding conductor and grounding plug. The plug must
be inserted into an appropriate outlet that is properly
installed and grounded in accordance with all local codes
and ordinances.
WARNING: Improper connection of the equipment-
grounding conductor can result in a risk of electric shock.
Check with a qualied electrician or service person if
you are in doubt as to whether the outlet is properly
grounded. DO NOT modify the plug provided with the
product - if it will not t the outlet, have a proper outlet
installed by a qualied electrician.
This product is for use on a nominal 120 volt circuit
and has a grounding attachment plug that looks like
the plug illustrated as (A) in the sketch. Make sure that
the machine is connected to an outlet having the same
conguration as the plug. No adapter should be used
with this product.
WARNING: To prevent possible electric shock, protect
the machine from rain. Keep the machine in a dry
building.
WARNING: To prevent possible electric shock, always
use a 3-wire electrical system connected to the electrical
ground.
WARNING: DO NOT cut, remove or break the ground
pin. If the outlet does not t the plug, consult your
electrical contractor.
WARNING: Have worn, cut or damaged cords replaced
by an authorized service person.
Extension Cords
Use only an approved extension cord with three
conductors, a plug with three terminals, and a connector
body with three holes. The machine has a power cord
with wire size 12 AWG (AWG means American Wire
Gauge).
WARNING: If you use an extension cord, use an
extension cord with minimum wire size 12 AWG. DO
NOT use an extension cord longer than 50 feet. DO NOT
join two extension cords.
7
Figure 3
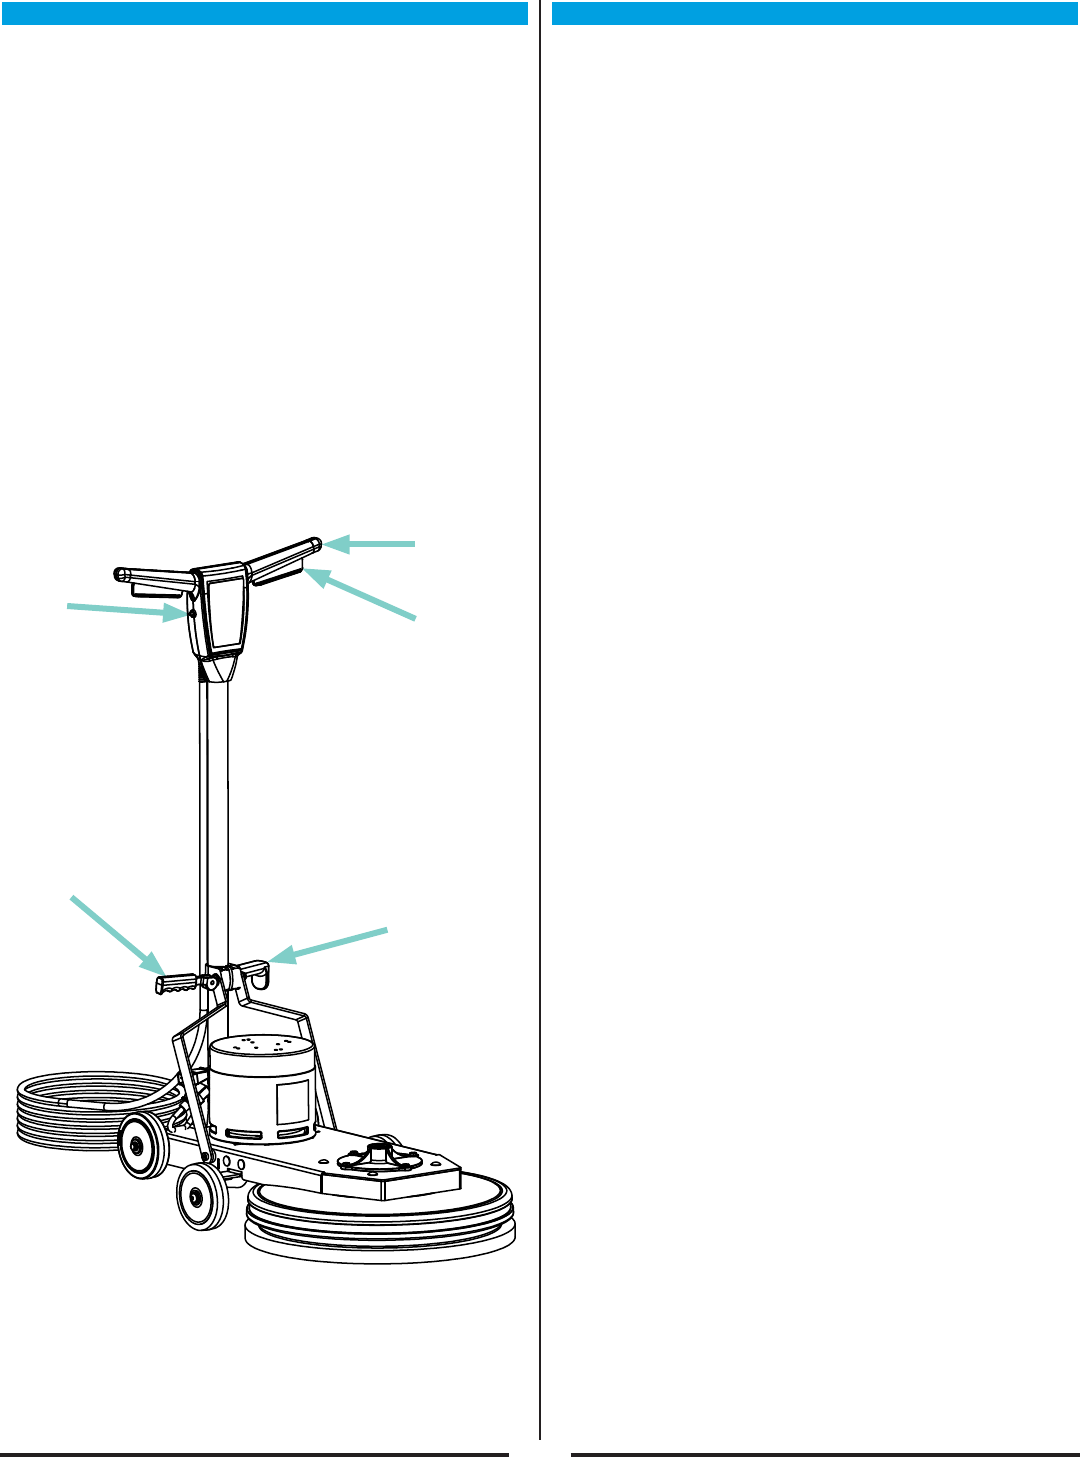
8
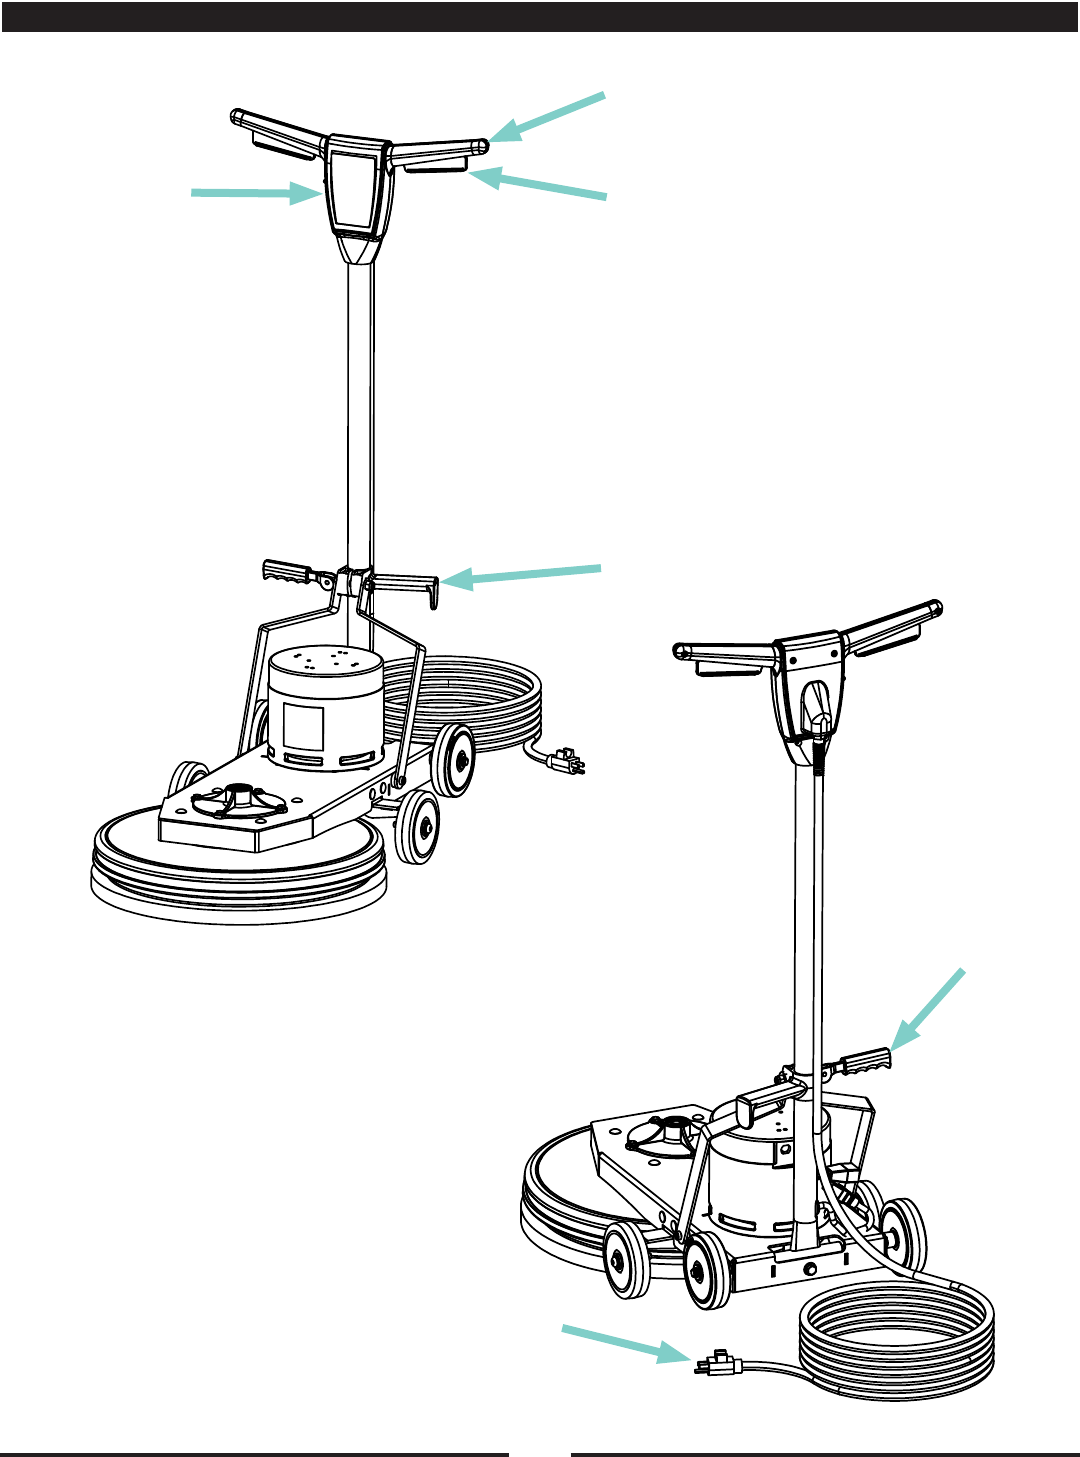
Power Cord
Operator
Handle
Grips
Handle
Release
Lever
Cord Hook
Switch Lever
Safety Lock Switch Levers
Machine Components
9
Operator Handle Grips
Use the operator handle grips to operate and move
the machine. The switch levers on the underside of
the handle grips, turn the motor on and off. Locate the
handle grips in a comfortable operating position and
lock the handle release lever in place. While operating
the machine, slightly raising or lowering the operators
handle will help the operator control the machine.
Switch Levers
The switch levers activate the switch module to turn the
motor on and off. The switch module will not activate
unless the switch lever safety lock is pressed first. To
operate the machine, only one switch lever has to be
engaged. This allows the operator to alternate hands
while using the machine. To stop the motor from turning,
release the switch levers.
Switch Lever Safety Lock
The switch lever safety lock is to prevent someone
from accidentally turning the machine on. To turn the
machine on, always make sure the handle is lowered in
the operators position and the handle release lever is
locked. Push and hold the switch lever safety lock with
one hand, while engaging one of the switch levers. Once
the machine has started, the switch lever safety lock can
be released.
Handle Release Lever
This handle is used to release or lock the operators
handle. Pulling up on the lever will allow the handle to
move freely. Pushing down on the lever, horizontally,
will lock the handle in place. The handle should always
be locked while in use, as well as during transport or
storage.
Cord Hook
To prevent the cord from being damaged while not is
use, wrap the cord around the cord hook and the top of
the operators handle.
Power Cord
Use only the supplied power cord with this machine. The
power cord is sized to be used with this machine. To
attach the power cord to the machine, insert plug on the
back of handle into the female receptacle of the power
cord. Properly align the plug pins with the holes of the
receptacle, push together and twist to lock the cords in
place.
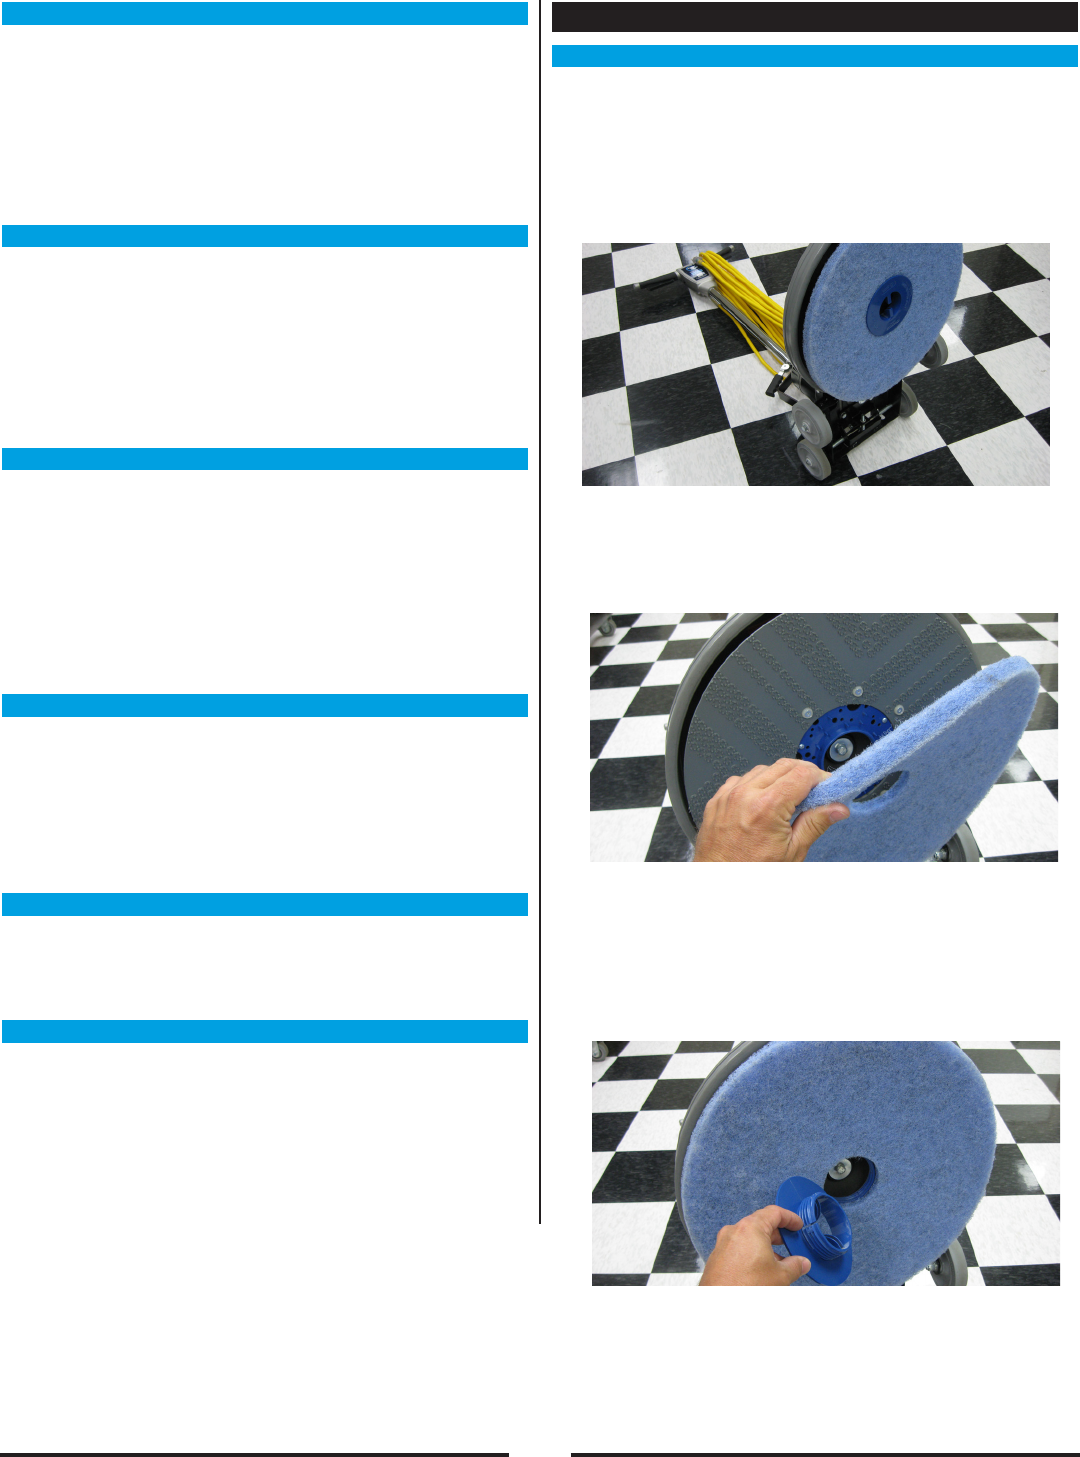
How to Operate the Machine
Installing the Pad
CAUTION! Using the wrong pad on this machine
can overload the motor.
1. Place the handle in the upright (vertical) positions
and lock the handle release lever (See Figure 1).
2. Tilt the machine back on the transport wheels and let
the handle rest on the floor (See Figure 4).
3. Remove the pad retainer in the center of the pad
holder by holding the pad secure with one hand and
turn the pad retainer counter-clockwise to remove
4. Remove the pad from the pad holder.
5. Check the pad holder for any damage or warpage.
6. Align the center hole of the new pad with the pad
guide on the pad holder.
7. Holding the pad secure with one hand, insert the
pad retainer through the hole on the pad and rotate
clockwise until tight.
8. Using the handle, carefully lift the unit to its standing
position.
Figure 4
Figure 5
Figure 6
10
Operation
1. Unwrap the power cord and plug it into the properly
grounded outlet.
2. Pull up on the handle release lever (5). Move the
operator handle (4) downward until your arms are
almost straight. Push down on the handle release
lever (5) to lock it in place.
3. Lift up on the operator handle (4) until the driver if flat
against the floor.
WARNING! Be prepared to control the machine as
soon as the motor starts.
CAUTION! Immediately start moving the machine
back and forth. Keep the machine moving while the
motor is running to avoid damage to the floor.
4. Hold one of the operator handle grips (1) firmly, push
the switch lever safety lock (2) and the compress the
switch lever (3) to start the motor.
Note: When the switch levers (3) are released, the
machine shuts off immediately.
After Use
1. Place the operators handle (4) in the upright (vertical)
position and unplug the power cord. Wrap the power
cord around the operator hand grips (1) and the cord
hook (6).
2. Tilt the machine back and remove the pad driver from
the machine. NEVER store the machine with the pad
driver on the machine.
3. Wipe the entire machine with a clean, damp cloth.
4. Inspect the entire machine and all accessories for
damage. Perform any required maintenance or
repairs before storage.
5. Store the machine in a clean, dry place with the
operator handle (4) locked in the upright position.
6
3
5
2
1
Figure 7
4

11
Machine Troubleshooting
Problem Possible Cause Solution
Check the main power supply (building circuit breaker).
Check the cord connection at the wall outlet
Switch lever safety lock not depressed Hold in the switch lever safety lock and then engage switch levers.
Bad connection Check the motor and cord interlock connections.
Defective motor start switch Contact an authorized APEC Distributor.
Using extension cord with wire smaller than 12/3. Replace with a 12/3 extension cord.
Using more than one extension cord. Only use one 50ft 12/3 extension cord.
Bad motor run capacitor Contact an authorized APEC Distributor.
Handle is not locked Push down on handle release lever to lock handle.
Defective handle switch Contact an authorized APEC Distributor.
Eliminate extension cord & locate a power source closer to work site.
Have voltage checked by a qualified electrican.
Not on a dedicated circuit Make sure there is no other items using power on the circuit.
Try a different pad that is less aggressive.
DO NOT add weight to machine. Remove any excess weight added to machine.
Bad connection Contact an authorized APEC Distributor.
Handle is not locked Push down on handle release lever to lock handle.
Defective motor Contact an authorized APEC Distributor.
Defective pad One side is more dense than the other. Replace pad.
Warped or damaged padholder Replace.
Pad not installed properly / not centered Remove and install properly.
The floor was not cleaned before buffing. Scrub and clean the floor.
Clean the pad or replace with a new clean pad.
There floor does not shine Use the appropriate pad for the job.
Poor Performance There are lines on the floor
Machine vibrates during
operation
Machine will not start
No power
Motor runs sluggish
Low voltage
Fuse / circuit breaker
repeatedly trips
Low voltage
Motor is overloaded
Scheduled Maintenance
Daily Monthly Every 6
Months
Check for loose or lost fasteners l
Inspect cords and connections l
Inspect pad holder for damage l
Clean the machine and accessories l
Check machine wiring for fray or cut l
Check the carbon brushes of motor l
Operation
Interval
These items must be performed with the proper tools and training. Contact an Amano
Pioneer Eclipse Factory Certified Technician unless you have the proper equipment and
technical proficiency.

12
PE225BU
Floor Burnisher
Parts Manual
Notes:
________________________________________________
________________________________________________
________________________________________________
________________________________________________
________________________________________________
________________________________________________
________________________________________________
________________________________________________
________________________________________________
________________________________________________
________________________________________________
________________________________________________
________________________________________________
________________________________________________
________________________________________________
________________________________________________
________________________________________________
________________________________________________
________________________________________________
________________________________________________
________________________________________________
________________________________________________
________________________________________________

13
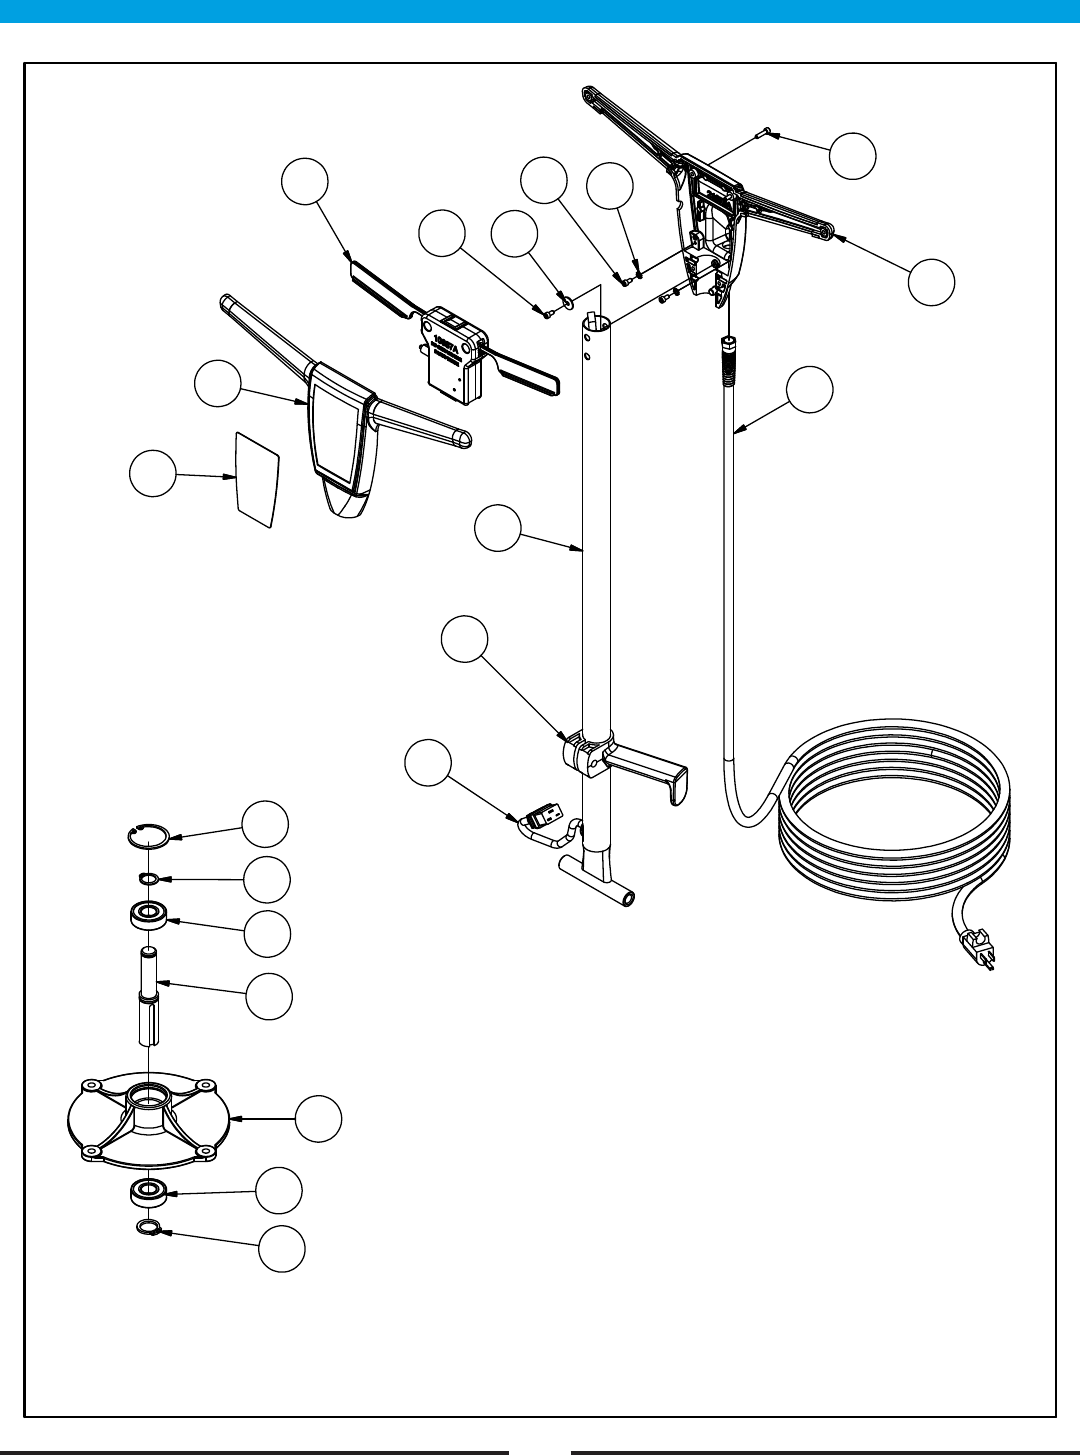
Electrical Schematic - 120V

Main Assembly
14
RF065200 09/13/16
45
10
7
8
32
44
39
47
16
10
9
14
11
18
6
624
38
14
36
26
14
15
37
9
11
27
16
25 1
23
35
22
46
14
34
4
25
30
20
6
12
17
21
31
41
7
8
2
42
40
29
35
23
32 78124
5
3
33
12
13
28
19
43
12
13
33

Main Assembly (continued)
15
Item Ref. No. Description Qty
1 39857A WHEEL 5 POLISHER 2
2 MP236800 KEY, 3/16 X 1 7/8 1
3 56109699 CAM ASSY WITH GRIP 1
4 920342 NUT ESNA 3/8-16 1
5 980349 WASHER WEAR CAM 1
6 NB3265 NUT, LOCK, 5/16”-18, NC 10
7 NB6110 WASHER, LOCK, 1/4” 6
8 NB3350 WASHER, FLAT, 1/4” 6
9 NB6851 SCREW, CAP, HH, 3/8-16 X 3/4 4
10 NB9267 WASHER, FLAT, 5/16” 8
11 MX1075 WASHER, LOCK, 3/8” 4
12 NB6111 WASHER, LOCK, 5/16” 6
13 NB9505 WASHER, FLAT, 5/16” X 1 1/2” 2
14 MX1080 WASHER, FLAT, 3/8 7
15 NB3267 NUT, LOCK, 3/8”, NC 2
16 80026A BOLT SHOULDER 3/8 X 1/2 2
17 MP478000 SHROUD, 20”, W/BUMPER, ASM. 1
18 MP502300 FRAME, 225BU, WELDMENT 1
19 MP474000 HANDLE, 225FP, ASM. 1
20 MP504000 PADHOLDER, 20”, MALISH, W/
KEYED RISER 1
21 MP503600 STANDOFF, NYLON, .75 DIA. X
1.25 L 4
22 MP503900 AXLE, REAR, .50 DIA. X 15.43 L 1
23 MP503800 SPACER, WHEEL, 1” OD X .5” ID
X .75 L 2
24 MP502800 BRACKET, SUPPORT, HANDLE 2
Item Ref. No. Description Qty
25 MP503700 SPACER, PIVOT, NYLON,1” OD X
.38” ID X .315 L 2
26 MP503000 BRACKET, WHEEL, WELDMENT 2
27 MP504500 BRACKET, ADJUSTMENT, BELT,
ASM 1
28 MP503400 PULLEY, 1.5” DIA., 10 GROOVE,
J SECTION 1
29 MP503300 PULLEY, 3.5” DIA., 10 GROOVE,
J SECTION 1
30 MP504300 BELT, 36”, J SECTION, 10
GROOVE 1
31 NB073200 BOLT, CARRIAGE, 5/16-18 X 2 ,
ZINC 4
32 NB019100 BOLT, HEX, 1/4-20 X 3/4, GD 5 2
33 NB9745 SCREW, CAP, 5/16”-18 X 3/4” 2
34 NB073300 BOLT, HEX, TAP, 3/8-16 X 3 1/2 1
35 80295A WASHER BOWED .516ID X
1.06OD 2
36 MP060800 WHEEL, 5”, PERFORMA, FLAT
TREAD, DELRIN 2
37 NB5000 BOLT, CARRIAGE, 5/16 X 1 4
38 NB073100 SCREW, BH, 3/8-16 X 2 1/2, SS 2
39 MP504100 MOTOR, 1.5HP, 115V, 3200RPM 1
39A MP504700 COVER, BRUSH, MOTOR, RE-
PLACEMENT 1
40 NB6530 SCREW, CAP, HH, 1/4-20 X 1 4
41 NB3275 NUT, LOCK, 1/4” 4
42 MP504600 HOUSING, BEARING, SPINDLE,
FRONT, ASM. 1
43 MP504400 DECAL, HANDLE, 225BU 1
44 MP498300 DECAL, APEC, 3” 1
45 MP007300 DECAL, KEEP HANDS/FEET
(TRILING) WHITE 1
46 SN009800 TAG, SERIAL, 225BU20 1
47 915044 KEY 3/16 X 3/16 X 1 1
16
Handle Assembly
RF065300 11/29/16
1
4
2
10
3
11
9
7
8
7
6
5
18
16
14
13
14
15
17
12

Handle Assembly (continued)
17
Item Ref. No. Description Qty
1 61373A HANDLE TUBE 1
2 40789A CORD INTERCONNECT 1
3 21075A HANDLE, REAR - CFP 1
4 50781A CLAMP HANDLE C2K 1
5 21074A HANDLE, FRONT - CFP 1
6 10687A INTERLOCK ASM. 1
7 80290A SCREW, 10-32 UNF X .375 3
8 80291A WASHER, FLAT, #10 1
9 980603 WASHER, LK 10 EXT 2
Item Ref. No. Description Qty
10 MP476300_A CORD, POWER, 14/3 , YELLOW 1
11 80284A SCREW, 10-32 UNF X .75 6
12 MP504400 DECAL, HANDLE, 225BU 1
13 MP504200 HOUSING, BEARING, SPINDLE,
FRONT
1
14 902567 BEARING BALL DOUBLE
SEALED
2
15 167312 RING, RETAINER, INTERNAL 1
16 NB018500 RING, RETAINER, 3/4”,
C-STYLE, HD
1
17 NB070200 RING, RETAINING, EXT 1
18 MP503500 SHAFT, SPINDLE, FRONT 1

TO QUALIFY FOR THIS WARRANTY
(1) Machine must be registered at the time of purchase on a form
provided by Amano Pioneer Eclipse Corporation. Your Amano
Pioneer Eclipse Corporation Distributor is responsible for the
registration of your machine. Please cooperate with your
Distributor in supplying necessary information on the card.
(2) The machine must have been purchased from Amano Pioneer
Eclipse Corporation or an authorized Amano Pioneer Eclipse
Corporation Distributor.
(3) This warranty extends to the original purchaser only and is not
transferable to subsequent owners.
TIME PERIODS
(1) ONE (1) YEAR WARRANTY - For the PE225BU
Warranted to be free from defects in material and workmanship
for a period of one (1) year from the date of purchase by the
original owners. (See Exclusions.)
EXCLUSIONS (Not Covered by Warranty)
(1) Parts that fail through normal wear by reason of their
characteristics (cords, motor brushes, wheels, pad holder, belt,
skirt, or other consumable parts).
(2) This warranty does not extend to parts affected by misuse,
neglect, abuse or improper maintenance. All defective parts
must be returned to the distributor for credit.
THE OBLIGATION OF AMANO PIONEER ECLIPSE
CORPORATION
(1) The obligation of Amano Pioneer Eclipse Corporation under this
warranty is limited to repairing or replacing, at its option, any
part which is proven to be defective in material or workmanship
under normal use for the applicable period stated above.
(2) Warranty repairs will be made by your Amano Pioneer Eclipse
Corporation Distributor without charge for parts and labor. They
will be compensated with a warranty labor rate of $45.00 per
hour, for the first year of ownership.
(3) Parts repaired or replaced under this warranty are warranted
only during the balance of the original warranty period. All
defective parts replaced under these warranties become the
property of Amano Pioneer Eclipse Corporation.
WARRANTY SERVICE
To obtain warranty service, take your machine and proof of
purchase to any authorized Amano Pioneer Eclipse Corporation
Distributor. Amano Pioneer Eclipse Corporation will not reimburse
expenses for service calls or travel. For the Distributor in your
area, call Amano Pioneer Eclipse Corporation Customer Service
Department at 1-800-367-3550 or 1-336-372-8080. If you are
dissatisfied with the service that you receive, call or email Amano
Pioneer Eclipse Corporation Customer Service Department at
apeccs@pioneer-eclipse.com for further assistance.
INSTRUCTIONS AND CONDITIONS FOR WARRANTY
REIMBURSEMENT
l Order replacement part: Orders will be processed and charged,
as normal procedure.
l Call Amano Pioneer Eclipse Corporation for R/A number.
l You will need the Engine Serial Number, Machine Serial
Number, and the Machine Model Number.
l Parts must be returned, accompanied with the R/A number to
be eligible for warranty credit.
l All Warranty Parts will be shipped prepaid UPS Ground, any
other method will be at the recipients expense.
l Freight on any Warranty Part after 30 days must be paid for by
the Purchaser.
l Warranty labor rate is $45.00 per hour.
l Credit will be issued upon completion of the above steps, at the
above rates.
DISCLAIMER OF CONSEQUENTIAL
AMANO PIONEER ECLIPSE CORPORATION DISCLAIMS ANY
RESPONSIBILITY FOR LOSS OF USER TIME OF THE AMANO
PIONEER ECLIPSE CORPORATION MACHINE OR ANY OTHER
INCIDENTAL OR CONSEQUENTIAL DAMAGE EXCEPT AS
STATED IN THE WARRANTY APPLICABLE TO EACH MACHINE.
EXCEPT AS STATED IN SUCH WARRANTIES, THE COMPANY
DOES NOT OTHERWISE WARRANT ANY MACHINE AND NO
WARRANTY, EXPRESS, IMPLIED OR STATUTORY IS MADE BY
THE COMPANY.
Copyright 2016 Amano Pioneer Eclipse Corporation
Limited Warranty
PE225BU
18
LT075600_A; 092116

19

Amano Pioneer Eclipse Corporation
1 Eclipse Rd l PO Box 909
Sparta, North Carolina 28675 l USA
www.pioneereclipse.com
+1-336-372-8080
1-800-367-3550
Fax +1-336-372-2913
© 2016 Amano Pioneer Eclipse Corporation
LT075600
225BU_A
