Sweepscrub Powr Flite Pf1886 1887 Vacuum Operators Manual User
2017-11-10
User Manual: Sweepscrub Powr-Flite-Pf1886-1887-Vacuum-Operators-Manual powr-flite-pf1886-1887-vacuum-operators-manual 2530 file product_file sweepscrub
Open the PDF directly: View PDF ![]() .
.
Page Count: 8

Model PF1886 - PF1887 Upright Vacuums
IRONSIDE
Save These Instructions
MV25 6/2008
OPERATING
INSTRUCTIONS
CONGRATULATIONS
YOU HAVE JUST ACQUIRED A HIGH QUALITY VACUUM
CLEANER. PLEASE READ THIS MANUAL CAREFULLY, BEFORE
OPERATING YOUR NEW VACUUM CLEANER. KEEP MANUAL
ON HAND FOR FURTHER REFERENCES.
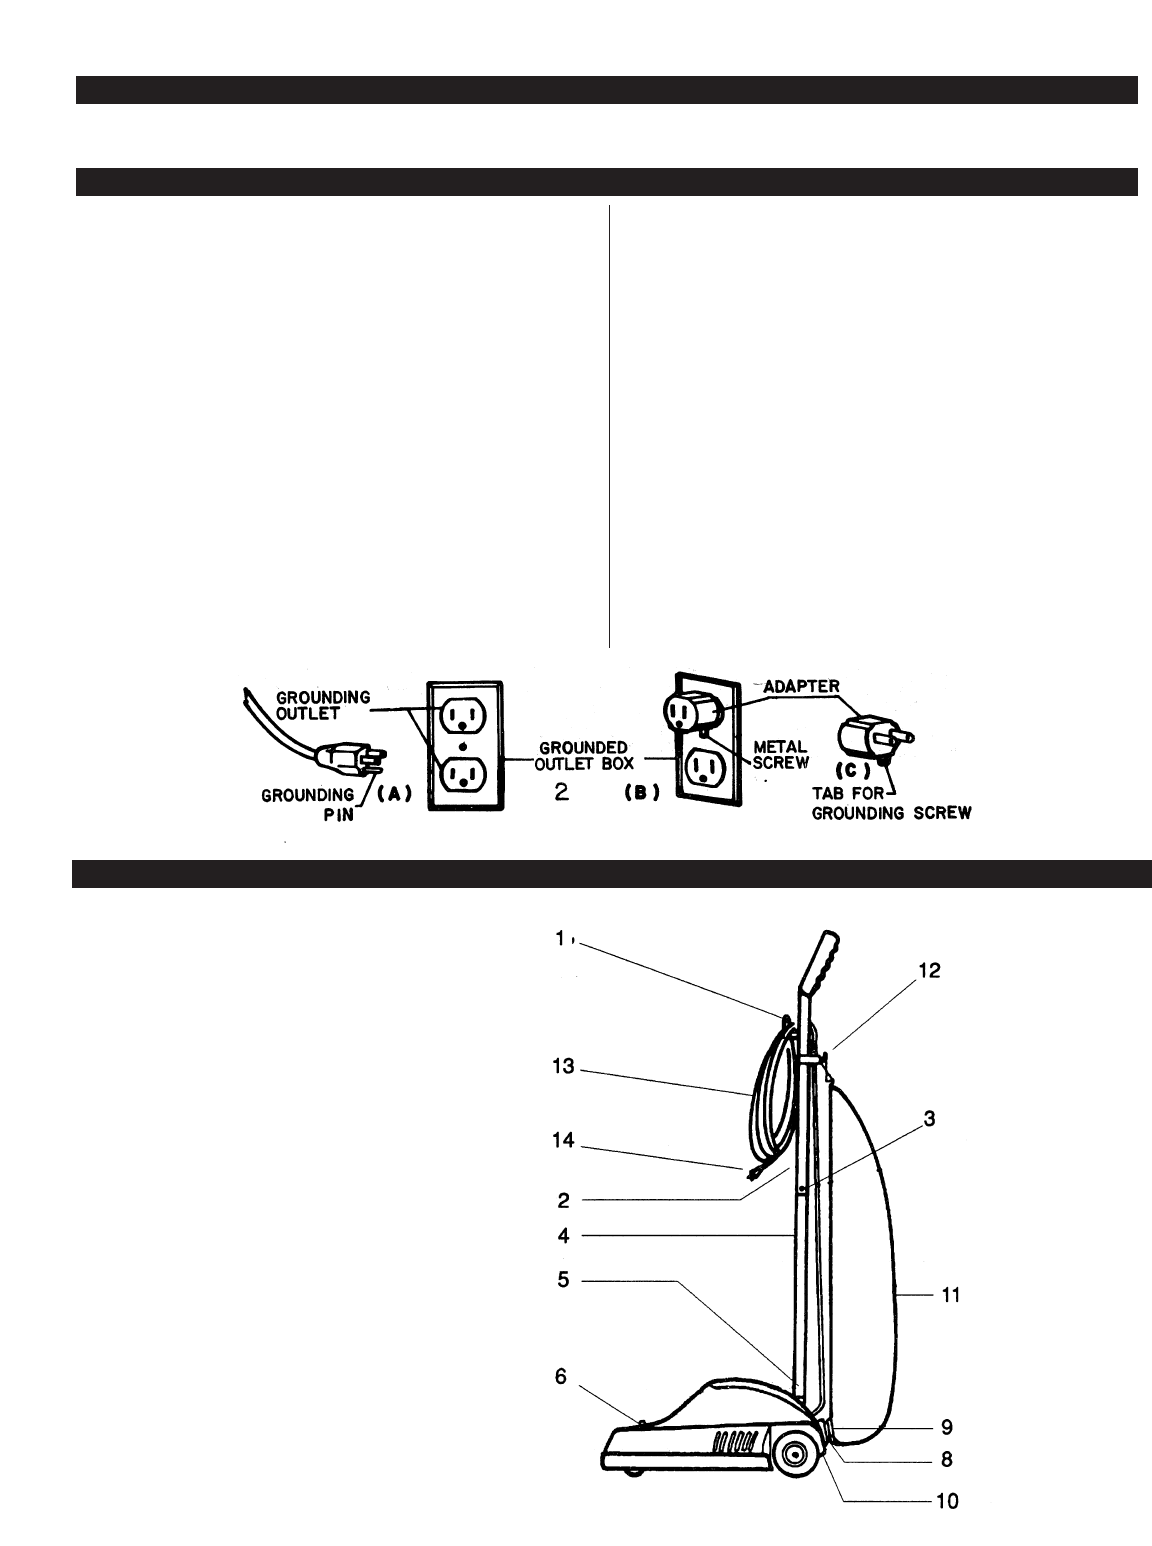
1. Cord hook
2. Upper handle tube
3. Nut & Bolt
4. Lower handle tube
5. Nut & Bolt
6. Height Adjustment
8. Bag inlet
9. Bag support
10. Handle release pedal
11. Bag
12. Spring bag hook
13. 50 foot line cord
14 . 3 wire grounded plug.
GENERAL DIAGRAM
– 2 –
*WHEN USING AN ELECTRICAL UPRIGHT VACUUM CLEANER, BASIC PRECAUTIONS SHOULD BE FOLLOWED, INCLUDING THE FOLLOWING: *READ ALL INSTRUCTIONS BEFORE USING VACUUM.
SAVE THESE INSTRUCTIONS FOR FUTURE REFERENCE
.
WARNING
IMPORTANT SAFETY INSTRUCTIONS
To reduce risk of fire, electric shock, or injury:
• Do not use outdoors or on wet surfaces.
• Do not leave vacuum cleaner unattended when plugged in. Turn off the switch and unplug
the electrical cord when not in use and before servicing.
• Do not allow to be used as a toy. Close attention is necessary when used by or near children.
• Use only as described in this manual . Use only manufacturer’s recommended attachments.
• Do not use with damaged cord or plug. If vacuum cleaner is not working as it should, has
been dropped damaged, left outdoors, or dropped into water, return it to a service center
before using.
• Do not pull or carry by cord, use cord as a handle, close a door on cord, or pull a cord
around sharp edges or corners. Do not run vacuum cleaner over cord. Keep
cord away from heated surfaces.
• Do not use extension cords or outlets with inadequate current carrying capacity.
• Turn off all controls before unplugging.
• Do not handle plug or vacuum cleaner with wet hands.
• Do not put any objects into openings. Do not use with any opening blocked, keep free of
dust, lint, hair, and anything that may reduce airflow.
• This vacuum cleaner creates suction and contains a revolving brush roll. Keep hair, loose
clothing, fingers, and all parts of body away from openings and moving parts.
• Do not pick up anything that is burning or smoking, such as cigarettes, matches or hot
ashes. Do not use without dust bag in place. Use extra care when cleaning on stairs.
Do not use to pick up flammable or combustible liquids such as gasoline, or use in areas
where they may be present.
• Store your cleaner indoors in a cool, dry area.
• Do not unplug by pulling on cord. To unplug, grasp the plug, NOT THE CORD.
THESE MODELS ARE GROUNDED, CONNECT TO A PROPERLY GROUNDED OUTLET ONLY - SEE
GROUNDING INSTRUCTIONS.
GROUNDING INSTRUCTIONS
This appliance must be grounded. If it should malfunction or breakdown, grounding provides
a path of least resistance for electric current to reduce the risk of shock. This appliance is
equipped with a cord having an equipment-grounding conductor and grounding plug. The
plug must be inserted into an appropriate outlet that is properly installed and grounded in
accordance with all local codes and ordinances.
WARNING - Improper connection of the equipment-grounding conductor can result in a risk
of electric shock. Check with a qualified electrician or service person if you are in doubt as to
whether the outlet is properly grounded. Do not modify the plug provided with the appliance
- if will not fit the outlet, have a proper outlet installed by a qualified electrician.
This appliance is for use on a normal 120 volt circuit, and has a grounded plug that looks like
the plug illustrated in sketch A. A temporary adapter that looks like the adapter illustrated in
fig B and C may be used to connect this plug to a 2-pole receptacle as shown in fig B if a
properly grounded outlet is not available. The temporary adapter should be used only until a
properly grounded outlet (fig A) can be installed by a qualified electrician, The green colored
rigid ear, lug, or the like extending for the adapter must be connected to a permanent ground
such as a properly grounded outlet box cover. Whenever the adapter is used, it must be held
in place by a metal screw.
Note: In Canada, the use of a temporary adapter is not permitted by the
Canadian Electrical Code
– 3 –
HOW TO ASSEMBLE
CAUTION: Fully assemble the unit before using.
Hardware Package: The package contains two nuts and bolts, one screw
and one spring
Step 1: Assemble Lower Handle
Attach lower handle over socket, align holes and fasten with bolt
and internally threaded nut provided in hardware package
Step 2: Attach Upper Handle
Place upper handle over lower handle align holes and fasten with
bolt and internally threaded nut included In hardware package
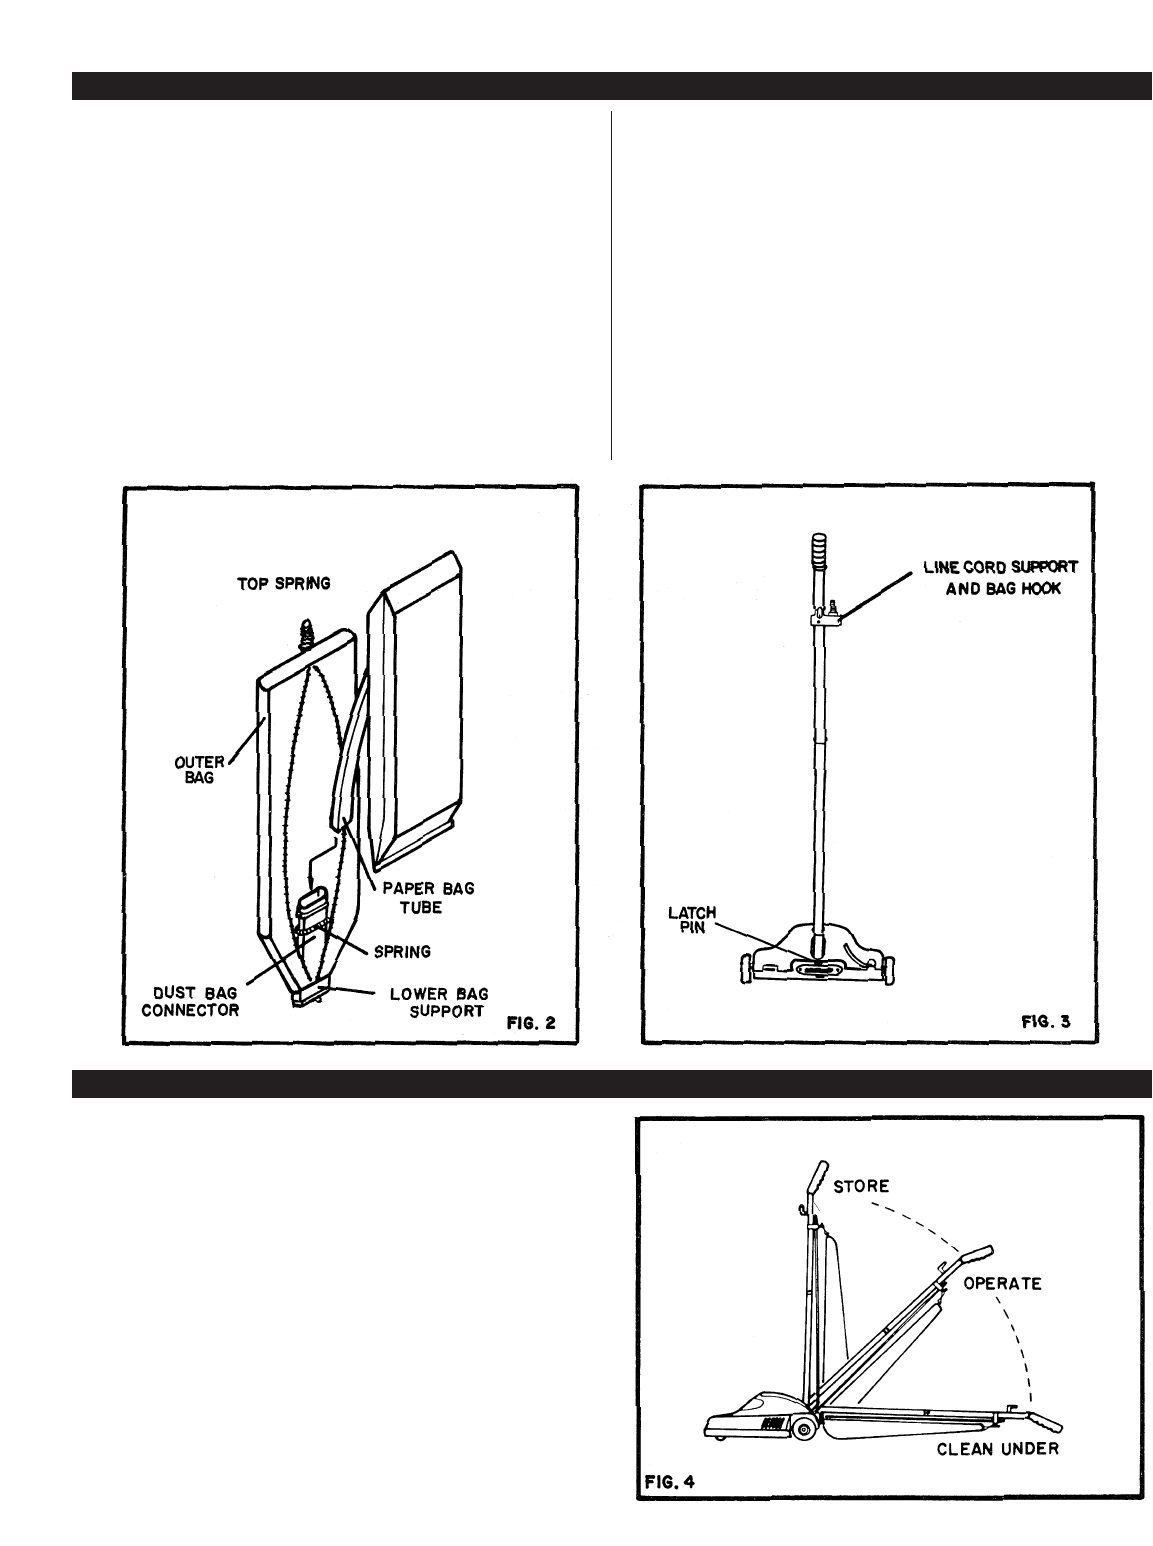
Step 3: Install Line Cord Support and Bag Hook Attach spring bag hook
to rear upper handle tube. Insert fitting end into rectangular hole.
Align holes and fasten with screw provided in hardware package.
Step 4: Bag Assembly (Model PF1886EC - PF1887EC only) Open zipper of
outer bag cover Attach spring around dust bag connector
located inside paper bag cover ( See Fig 2 ) Slide paper bag tube
over connector and roll spring up to hold bag. Be sure zipper
printing on paper aligns - up with zipper on paper bag cover.
Step 5: Install Outer Bag to Upright Vacuum
Hold bag and lower bag support with both hands with the lower
bag support tab pointing down. Put the tab into the adapter
retainer and push the lower bag support toward the vacuum.
Turn the bag latch around the latch pin. ( See Fig 3 )
HOW TO USE
1. Remove electrical cord from hook and plug into
electrical outlet
2. Slide height adjustment to the desired setting
3. Press the handle release pedal and pull the handle to the
desired position, the unit will turn on automatically when
handle is pulled down. To clean under, press the pedal
again and lower the handle
4. Vacuum slowly with forward and backward strokes,
covering small areas at a time. The time required to clean
the carpet will depend on type of carpet and amount of dirt
5. The unit will turn off automatically when the handle is
returned to the vertical position
HOW TO CLEAN CLOTH VACUCIDE BAG ( Model PF1886VC - PF1887VC)
Disconnect unit from electrical outlet before cleaning.
1. Unhook spring from hook
2. Turn knob and release bag support from bag support guide
3. Release bag closing clip from Permanent Bag. Still holding the bag. put
the opening in a plastic bag and shake well toempty it
4. Insert bag closing clip to Permanent Bag
5. Hold Permanent Bag on back of unit with printing facing handle tube.
Slide lower bag support into slots of bag support guide. Push bag
support towards inlet and turn knob to fasten Insert spring onto hook
CAUTION: Be sure to clean fan chamber
every time you empty permanent bag.
– 4 –
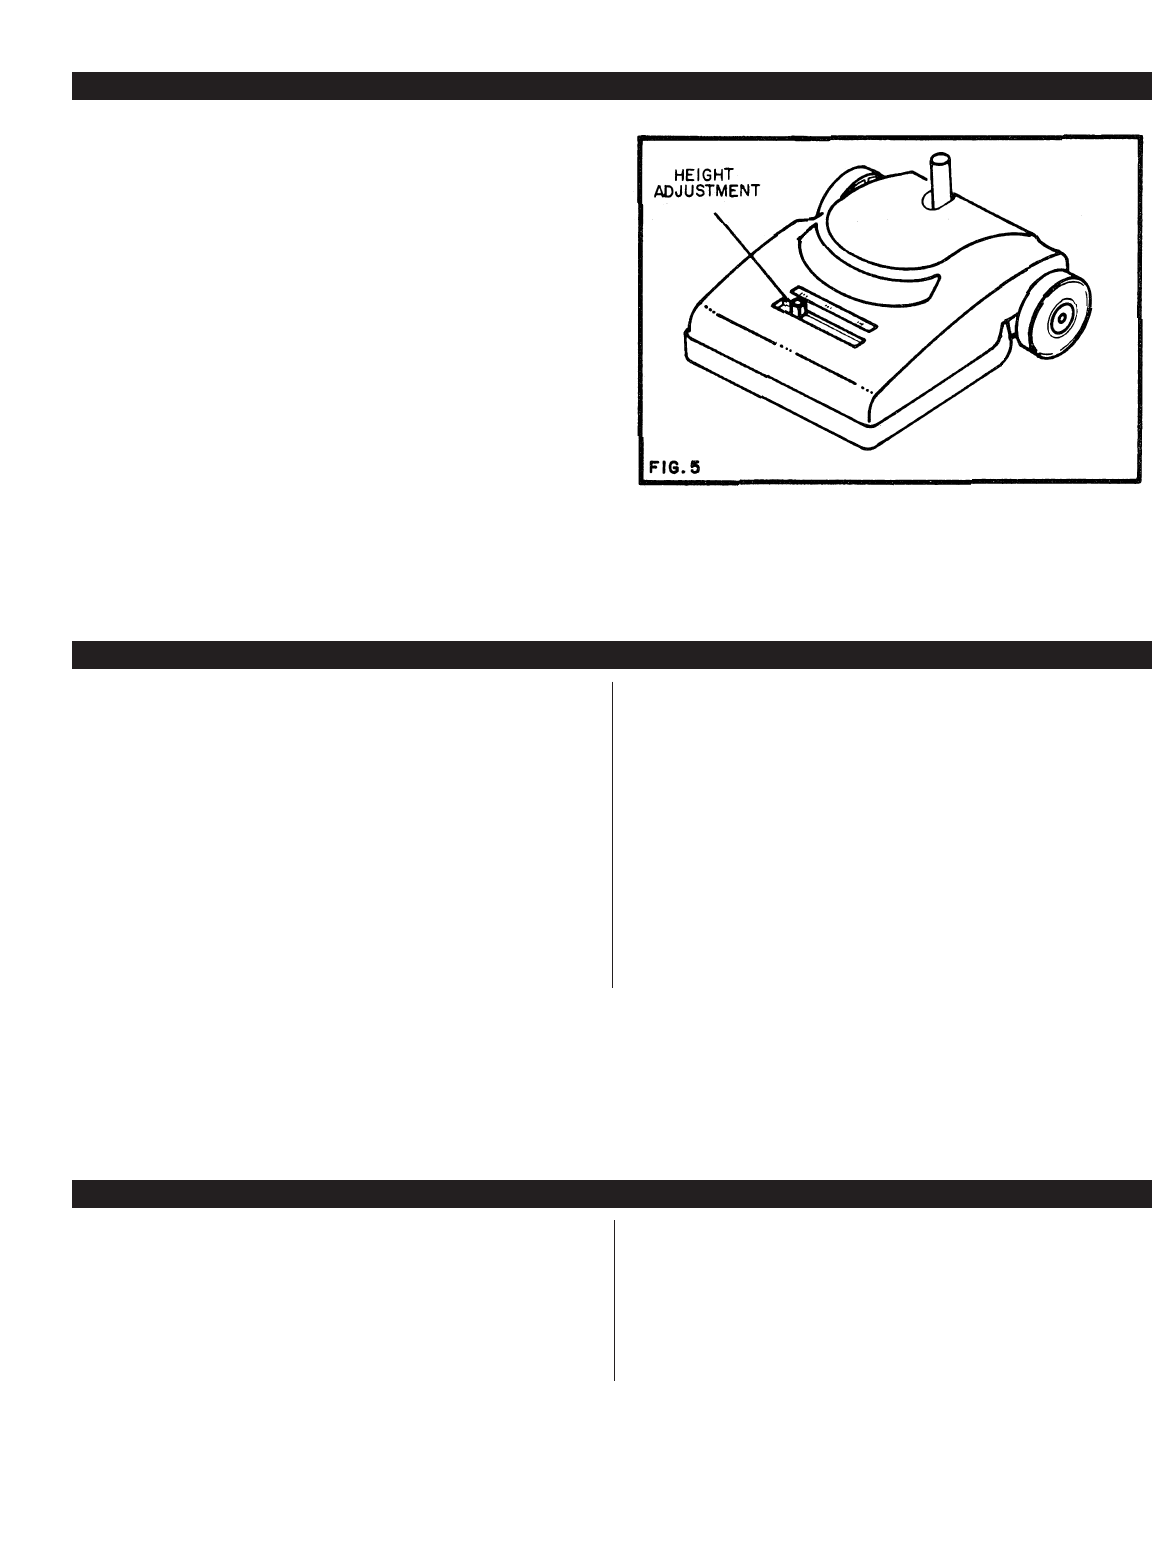
HEIGHT ADJUSTMENT
HOW TO MAINTAIN
The front of the cleaner has a continuous height adjustment
which raises or lowers the cleaner base to match the type of
carpet. With the cleaner cord unplugged, set the adjustment
according to your specific needs ( Fig 5 ).
While the cleaner is off and disconnected from the outlet, tilt
the cleaner back to remove weight from the front wheels,
and adjust the setting.
Plug the cleaner into electrical outlet, press the handle
release, lower handle and pass the cleaner over the carpet. If
the cleaner is difficult to push, follow the procedure and test
the cleaner at the next height setting until the unit is comfort-
able to move. The brush roll must make contact with the car-
pet for effective cleaning.
HOW TO CHANGE DISPOSABLE PAPER BAG: (Model PF1886EC
- PF1887EC)
Disconnect unit from electrical outlet before changing bag.
Change the dust bag frequently. Some fine particles can restrict
airflow very quickly and will decrease performance even
before the bag appears to be full. For that reason, when vacu-
uming carpet freshners or cleaners, powder, plaster dust. or
similar fine substances. the bag may need to be changed more
often. ( Bag part number 265PB, 3 PK, 266PB, 9 PK).
1.Unzip the outer bag. Roll spring down to release paper bag
tube from dust bag connector
2. Put a new paper bag in the vacuum cleaner Slide paper bag
tube over connector and roll spring up to hold bag Be sure
zipper printing on paper aligns-up with zipper on paper bag
cover. Tuck dust bag into permanent outer bag Make sure
dust bag is fully extended in the bag cover, zip the bag cover
CAUTION: Be sure to clean impeller chamber every time you
change the disposable paper bag. Do not attempt to empty and
reuse your paper bag when full.
– 5 –
HOW TO REPLACE BRUSH ROLL BELT
NOTE: Turn off the switch and unplug the electrical cord before replac-
ing belt Belt can become hot during normal use To prevent injury, avoid
touching the belt and motor nut when it is hot.
CAUTION: Improper installation of the brush roll or brush
roll belt could cause carpet cleaner damage .
1. Push handle release and lower handle; push the height setting to the
lowest position Turn the vacuum cleaner so the underneath side and
brush roll face toward you (Fig 6)
2. Remove retainer bar by pushing downward on the right end, until it
unhooks. Release other end
CAUTION: While pushing one end of retainer bar,
hold the machine down to avoid tilting.
3. Remove bottom plate and fan cover by lifting off from motor ( Fig 7)
4. Remove belt from motor nut. Pull brush roll up, remove belt from brush
roll and change with a new belt
5. Insert brush roll making sure the tabs on the edge of bearing support
are facing upward. Bristles on brush roll must form a “V” 1 facing
toward you
6. Twist the belt towards the right and place around motor nut. The higher
end of the belt must be on the right side and the lower end on the left
side, as shown in the drawing below ( Fig 8 ) Rotate brush to ensure
belt is positioned correctly
HOW TO REPLACE MOTOR
IMPORTANT: Disconnect machine before replacing motor.
1. Detach bag ( 1 )
2. Remove screw ( 2 ) and nut ( 3 ) at bottom of handle tube
3. Press the handle release pedal ( 9 ) and pull handle down to horizontal
position
4. Remove handle tube from socket
5. Remove screw ( 6 )
6. Remove height adjusment knob ( 7 )
7. Turn machine upside down ( Fig. 10 )
8. Remove cover springs ( 8 )
9. Remove retainer bar ( 19 )
10.Remove bottom plate ( 10 )
11.Remove fan cover ( 11 )
12.Remove belt ( 12 )
13.Hold vacuum cleaner from the motor cover and turn to the upright
position. Remove motor cover
14.Remove baffles from motor ( 13, 14 )
15.Remove screws ( 15, 16, 17, 18 )
16.Disconnect cord from switch
17.Disconnect connector
18.Remove motor ( Fig 11 )
19.Install new motor
To assemble machine follow above steps in a reverse order.

– 6 –
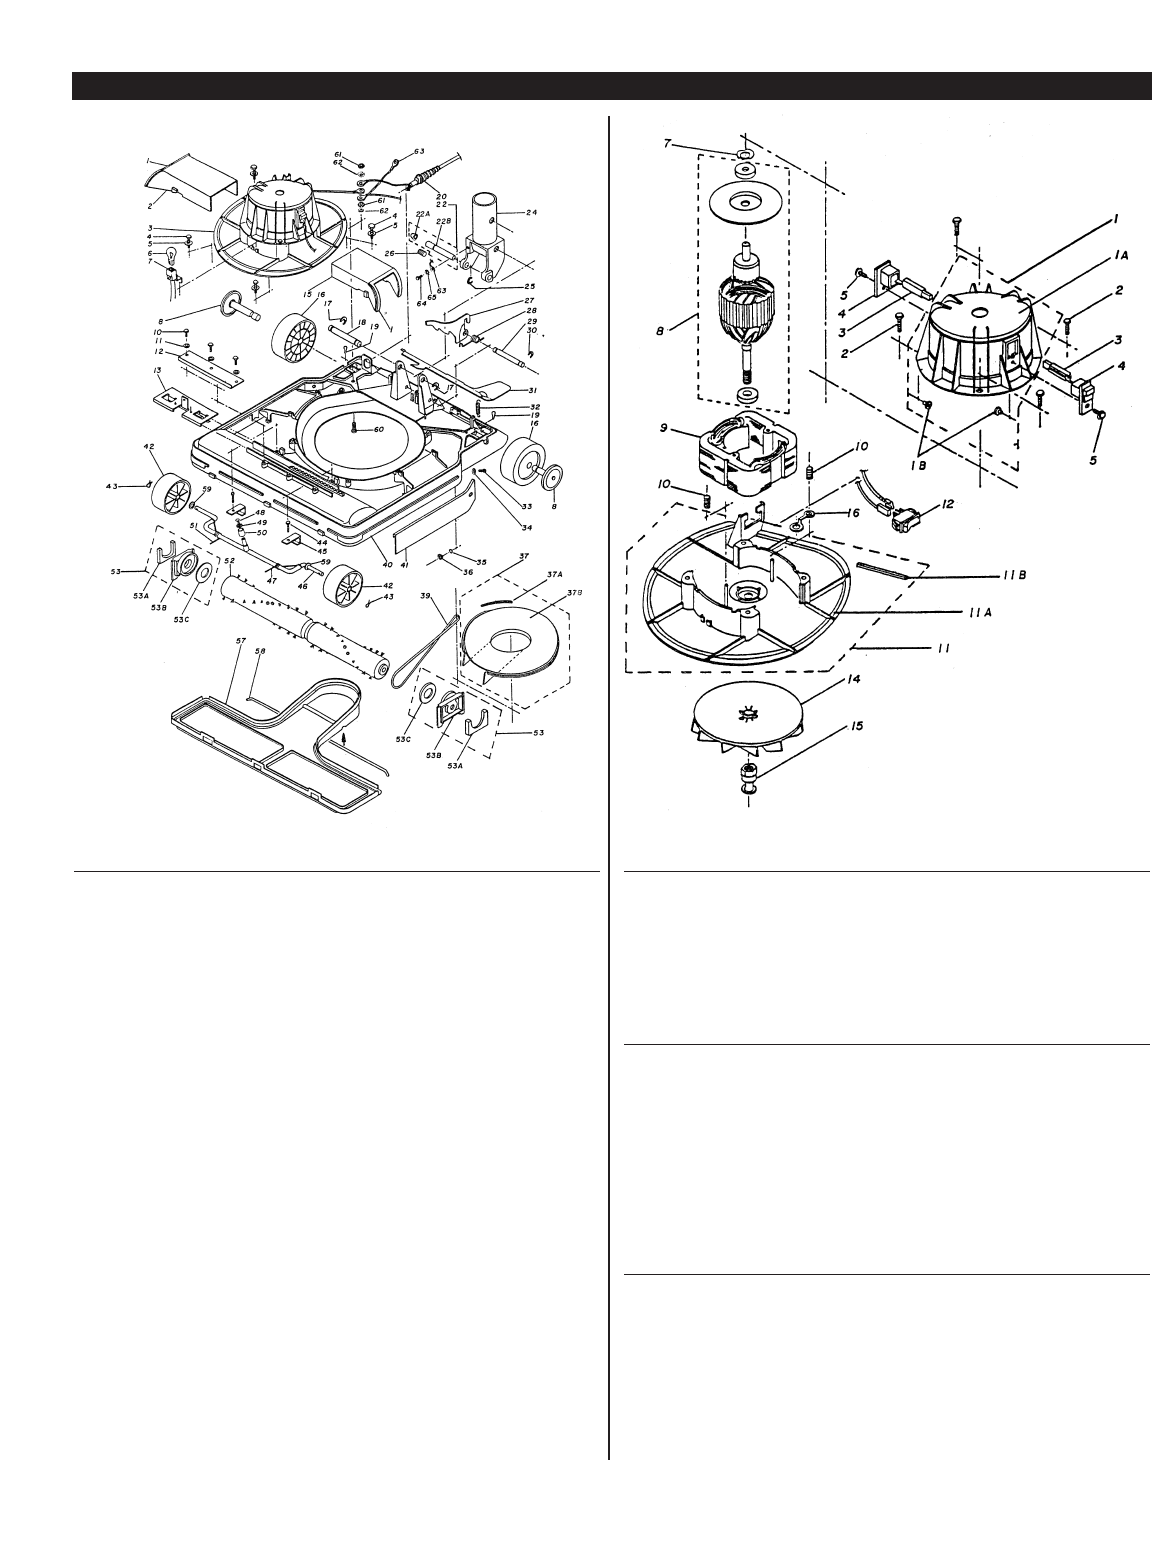
Model PF1886 - PF1887 Internal Parts
ref. # order # description
1 MV43 Handle Grip
2A 2A-0455-7 Line Cord Assembly,2W*
2A M1377 Line Cord Assembly, 3W
3 MV22 Cord Retainer
4 MV44 Screw Type “A” #8 x 1/2
5 MV45 Pop Rivet 5/32 x 1/4
6MV19 Cord Hook
7MV47 Upper Handle
8 MV17 Handle Nut, spacer and screw (old style)
MV17A Handle Nut Only (new style)
9MV16A Screw Mach #10-32x (new style)
10 MV48 Lower Handle
11X8238 Screw Type B# 6x3/8
12 MV50 Wheel Height Knob
13 17-2486-3 Label Height Adjustment
14 37-0136-4 Felt
17 MV62 12" Hood
MV97 16" Hood
MV105 16" Hood Dirt Cup Model
18 MV07 Hood Spring
19 02-0037-8 Nut #10-32
20 04-0271-9 Star Washer # 10 x .204
21 MV51 Bag Support
22 MV52 Screw # 1 0-32x5/8
23 MV53 Ball
24 MV54 Bag Knob Spacer
25 MV55 Bag Knob
26 MV56 Screw # 10-32 x 3/4
26 MV56 Screw # 10-32 x 3/4
ref. # order # description
27 01-0154-3 Screw Type B # 6X5 5/16
28 MV57 Knob Spring
29 G825 Blue Cloth Bag Vacucide
G828 Blue TiTex Bag
30C W2390 Garter Spring
30D MV61 Zipper Bag Hose
31 265PB Paper Bag 3 pak
32 W2363 Chrome Bag Slide
33 MV82 Hex Nut 8-32
36A L83 Bag Gasket
Dirt Cup Bag Assembly
1MV76 Bag spring
2 MV77 Bag clip
3 MV78 Bag
4 MV93 Cup frame with gasket
5 MV80 Screw 8/32 c 3/8
6MV81 Flat washer
7MV82 Hex nut 8/32
8MV83 Clamp
9 MV84 Cup gasket
10 MV85 Cup assembly
11 MV86 Upper hose seal
12 MV87 Exhaust hose
13 MV88 Cable tie
14 MV89 Dust cup bellows
15 MV90 Bag coupling gasket assembly
15A MV91 Bag coupling
15B MV92 Bag coupling gasket
* call for pricing and availability
Dirt Cup Bag Assembly
– 7 –
ref. # order # description
2 MV70 right air duct
8 MV12 rear axle-hub assembly
15 MV71 left air duct
16 MV06 rear wheel
17 MV30 c-washer 5/16
18 MV31 socket bolt
22 MV46 switch actuator assembly
24 MV20 tube socket
27 MV32 handle cam
28 MV33 cam spring
29 MV34 cam bolt
30 MV30 c-washer 5/16
31 MV36 handle release pedal
32 MV37 spring
37 MV15 fan cover assembly
39 MV05 belt
40 MV41 12" chassis
MV95 16" chassis
MV106 12" chassis dirt cup
MV107 16" chassis dirt cup
41 MV58 12" bumper
MV96 16" bumper
42 MV38 front wheel
43 MV39 cotter pin
44 MV74 screw
45 MV75 axle detainer
46 MV60 front axle assembly
47 MV65 left front axle spring
48 MV67 rivet
49 MV68 axle washer
50 MV69 axle bushing
51 MV66 right front axle spring
ref# order description
52 MV11A 12" brush roll assembly
MV73 16" brush roll assembly
53 MV13 bearing support assembly
53 MV13A bearing support assy right side (10/99)
57 MV23 12" bottom plate
MV94 16" bottom plate
58 MV08 bottom plate retainer
NOT ILLUSTRATED
MV40 strain relief
MV03 motor pack
MV04 rocker switch large
MV04A rocker switch small
MV07 hood spring
MV16 handle screw
MV17 handle nut
MV19 cord hook
MV22 cord retainer
MV24 line cord assembly
MOTOR HOUSING
1A MV64 motor cover
3 MV63 carbon brush with spring
4MV21 brush holder support
8 MV10 armature assembly
9 MV09 field assembly
11 MV27 motor base with gasket
11B MV49 motor base gasket
14 MV02 fan
15 MV01 belt pulley nut
Model PF1886 -PF1887 Internal Parts
MOTOR HOUSING
BASE HOUSING

A Tacony Company
Ft. Worth, TX 76140
1-800-880-2913
The Powr-Flite Limited Warranty
The manufacturer warrants to the original purchaser that products manufactured are free from defects, provided such goods are
installed, operated and maintained in accordance with written manuals or other instructions for a period of 1 year from date of pur-
chase on workmanship, motor, and parts, 2 years on fan, switch, and yoke, 5 years on meatal chassis. In case you, as our customer,
meet any trouble with your machine, contact a Powr-Flite representative, who will be happy to be of service to you and will take care
of any warranty issues.
