Sybase 12 4 2 Users Manual
12.4.2 to the manual cb1f3fcf-0ec0-4059-a553-62af3cd7f235
2015-02-02
: Sybase Sybase-12-4-2-Users-Manual-490640 sybase-12-4-2-users-manual-490640 sybase pdf
Open the PDF directly: View PDF ![]() .
.
Page Count: 536 [warning: Documents this large are best viewed by clicking the View PDF Link!]

Administration and Performance Guide
Adaptive Server® IQ
12.4.2

DOCUMENT ID: 38152-01-1242-01
LAST REVISED: April 2000
Copyright © 1989-2000 by Sybase, Inc. All rights reserved.
This publication pertains to Sybase database management software and to any subsequent release until otherwise indicated in new
editions or technical notes. Information in this document is subject to change without notice. The software described herein is furnished
under a license agreement, and it may be used or copied only in accordance with the terms of that agreement.
To order additional documents, U.S. and Canadian customers should call Customer Fulfillment at (800) 685-8225, fax (617) 229-9845.
Customers in other countries with a U.S. license agreement may contact Customer Fulfillment via the above fax number. All other
international customers should contact their Sybase subsidiary or local distributor. Upgrades are provided only at regularly scheduled
software release dates. No part of this publication may be reproduced, transmitted, or translated in any form or by any means, electronic,
mechanical, manual, optical, or otherwise, without the prior written permission of Sybase, Inc.
Sybase, the Sybase logo, ADA Workbench, Adaptable Windowing Environment, Adaptive Component Architecture, Adaptive Server,
Adaptive Server Anywhere, Adaptive Server Enterprise, Adaptive Server Enterprise Monitor, Adaptive Server Enterprise Replication,
Adaptive Server Everywhere, Adaptive Server IQ, Adaptive Warehouse, AnswerBase, Anywhere Studio, Application Manager,
AppModeler, APT Workbench, APT-Build, APT-Edit, APT-Execute, APT-FORMS, APT-Translator, APT-Library, Backup Server,
ClearConnect, Client-Library, Client Services, Data Pipeline, Data Workbench, DataArchitect, Database Analyzer, DataExpress,
DataServer, DataWindow, DB-Library, dbQueue, Developers Workbench, Direct Connect Anywhere, DirectConnect, Distribution
Director, E-Anywhere, E-Whatever, Embedded SQL, EMS, Enterprise Application Server, Enterprise Application Studio, Enterprise
Client/Server, Enterprise Connect, Enterprise Data Studio, Enterprise Manager, Enterprise SQL Server Manager, Enterprise Work
Architecture, Enterprise Work Designer, Enterprise Work Modeler, EWA, Gateway Manager, ImpactNow, InfoMaker, Information
Anywhere, Information Everywhere, InformationConnect, InternetBuilder, iScript, Jaguar CTS, jConnect for JDBC, KnowledgeBase,
MainframeConnect, Maintenance Express, MAP, MDI Access Server, MDI Database Gateway, media.splash, MetaWorks, MySupport,
Net-Gateway, Net-Library, NetImpact, ObjectConnect, ObjectCycle, OmniConnect, OmniSQL Access Module, OmniSQL Toolkit,
Open Client, Open ClientConnect, Open Client/Server, Open Client/Server Interfaces, Open Gateway, Open Server, Open
ServerConnect, Open Solutions, Optima++, PB-Gen, PC APT Execute, PC DB-Net, PC Net Library, Power++, power.stop, PowerAMC,
PowerBuilder, PowerBuilder Foundation Class Library, PowerDesigner, PowerDimensions, PowerDynamo, PowerJ, PowerScript,
PowerSite, PowerSocket, Powersoft, PowerStage, PowerStudio, PowerTips, Powersoft Portfolio, Powersoft Professional, PowerWare
Desktop, PowerWare Enterprise, ProcessAnalyst, Report Workbench, Report-Execute, Replication Agent, Replication Driver,
Replication Server, Replication Server Manager, Replication Toolkit, Resource Manager, RW-DisplayLib, RW-Library, S Designor, S-
Designor, SDF, Secure SQL Server, Secure SQL Toolset, Security Guardian, SKILS, smart.partners, smart.parts, smart.script, SQL
Advantage, SQL Anywhere, SQL Anywhere Studio, SQL Code Checker, SQL Debug, SQL Edit, SQL Edit/TPU, SQL Everywhere, SQL
Modeler, SQL Remote, SQL Server, SQL Server Manager, SQL SMART, SQL Toolset, SQL Server/CFT, SQL Server/DBM, SQL
Server SNMP SubAgent, SQL Station, SQLJ, STEP, SupportNow, Sybase Central, Sybase Client/Server Interfaces, Sybase Financial
Server, Sybase Gateways, Sybase MPP, Sybase SQL Desktop, Sybase SQL Lifecycle, Sybase SQL Workgroup, Sybase User Workbench,
SybaseWare, Syber Financial, SyberAssist, SyBooks, System 10, System 11, System XI (logo), SystemTools, Tabular Data Stream,
Transact-SQL, Translation Toolkit, UNIBOM, Unilib, Uninull, Unisep, Unistring, URK Runtime Kit for UniCode, Viewer, Visual
Components, VisualSpeller, VisualWriter, VQL, WarehouseArchitect, Warehouse Control Center, Warehouse Studio, Warehouse
WORKS, Watcom, Watcom SQL, Watcom SQL Server, Web Deployment Kit, Web.PB, Web.SQL, WebSights, WebViewer, WorkGroup
SQL Server, XA-Library, XA-Server and XP Server are trademarks of Sybase, Inc. 9/99
Unicode and the Unicode Logo are registered trademarks of Unicode, Inc.
All other company and product names used herein may be trademarks or registered trademarks of their respective companies.
Use, duplication, or disclosure by the government is subject to the restrictions set forth in subparagraph (c)(1)(ii) of DFARS 52.227-7013
for the DOD and as set forth in FAR 52.227-19(a)-(d) for civilian agencies.
Sybase, Inc., 6475 Christie Avenue, Emeryville, CA 94608.

Contents
iii
About This Book ........................................................................................................................ xvii
CHAPTER 1 Overview of Adaptive Server IQ System Administration ............ 1
Introduction to Adaptive Server IQ ................................................... 1
System administration tasks............................................................. 2
Security overview ............................................................................. 3
Types of users........................................................................... 4
Granting permissions ................................................................ 4
Tools for system administration........................................................ 4
The database server ........................................................................ 5
Catalogs and IQ ............................................................................... 5
The IQ Store.............................................................................. 6
The Temporary Store ................................................................ 6
The Catalog Store ..................................................................... 6
Concurrent operations...................................................................... 7
Stored procedures............................................................................ 7
Adaptive Server IQ stored procedures ...................................... 8
Adaptive Server Enterprise system and catalog procedures .... 9
Catalog stored procedures ...................................................... 11
System tables and views................................................................ 12
Commands and Functions ............................................................. 16
Types of SQL statements........................................................ 16
Functions................................................................................. 16
Message logging ............................................................................ 17
The utility database ........................................................................ 18
Compatibility with earlier versions.................................................. 19
CHAPTER 2 Running Adaptive Server IQ ........................................................ 21
Starting the database server .......................................................... 21
Server command lines ................................................................... 22
Starting the server on UNIX ........................................................... 23
Using the startup utility ............................................................ 24
Typing the server startup command........................................ 25

Contents
iv
Starting the server on Windows NT ............................................... 26
Starting the server from the NT Start menu ............................ 26
Typing the server startup command........................................ 26
Running the server outside the current session...................... 27
Using command-line switches........................................................ 28
Naming the server and databases .......................................... 31
Controlling performance from the command line .................... 33
Controlling permissions from the command line ..................... 36
Setting a maximum Catalog page size.................................... 37
Setting up a client/server environment.................................... 38
Starting a server in forced recovery mode .............................. 40
Starting a server from DBISQL................................................ 40
Starting multiple servers or clients on the same machine ....... 41
Monitoring server activity ............................................................... 41
Stopping the database server ........................................................ 43
Who can stop the server? ....................................................... 45
Shutting down operating system sessions .............................. 45
Starting and stopping databases.................................................... 46
Starting the asiqdemo database .................................................... 47
Starting and stopping Sybase Central............................................ 48
Connecting a plug-in ............................................................... 49
Stopping Sybase Central......................................................... 50
Introduction to connections ............................................................ 50
How connections are established............................................ 51
Connection parameters specify connections........................... 52
Connection parameters are passed as connection strings ..... 52
Connection parameters are passed as connection strings ..... 53
Simple connection examples ......................................................... 53
Connecting to a database from DBISQL................................. 54
Connecting to other databases from DBISQL......................... 56
Connecting to an embedded database ................................... 57
Connecting using a data source.............................................. 59
Connecting to a server on a network....................................... 60
Using default connection parameters...................................... 61
Connecting from Adaptive Server IQ utilities........................... 62
Working with ODBC data sources.................................................. 63
DSNs and FILEDSNs.............................................................. 64
Creating and editing ODBC data sources ...................................... 65
Configuring ODBC data sources............................................. 67
Creating a File Data Source........................................................... 71
Using ODBC data sources on UNIX .............................................. 72
Connection parameters.................................................................. 73
Connection parameter priorities .............................................. 76
How Adaptive Server IQ makes connections................................. 77

Contents
v
Steps in establishing a connection.......................................... 77
Locating the interface library ................................................... 78
Assembling a list of connection parameters............................ 79
Locating a server..................................................................... 81
Locating the database............................................................. 83
Server name caching for faster connections ........................... 84
Interactive SQL connections ................................................... 85
Connecting from other databases .................................................. 85
Using an integrated login ............................................................... 86
Using integrated logins............................................................ 87
Security concerns: unrestricted database access ................... 90
Setting temporary public options for added security ............... 91
Network aspects of integrated logins ...................................... 92
Creating a default integrated login user .................................. 92
Troubleshooting startup, shutdown, and connections.................... 93
What to do if you can’t start Adaptive Server IQ...................... 93
What to do if you can’t connect to a database......................... 95
Stopping a database server in an emergency (UNIX)............. 96
Resolving problems with your DBISQL window on UNIX........ 96
CHAPTER 3 Working with Database Objects .................................................. 99
Building Your Adaptive Server IQ Databases ................................ 99
Designing your database......................................................... 99
Tools for working with database objects ............................... 100
A step-by-step overview of database setup .......................... 101
Extending data definition privileges....................................... 103
Selecting a device type ......................................................... 104
Allocating space for databases ............................................. 104
Working with databases ............................................................... 106
Creating a database.............................................................. 107
Adding dbspaces................................................................... 114
Dropping dbspaces ............................................................... 116
Dropping a database............................................................. 118
Working with tables ...................................................................... 118
Creating tables ...................................................................... 118
Altering tables........................................................................ 123
Dropping tables ..................................................................... 124
Creating primary and foreign keys ........................................ 125
Table information in the system tables.................................. 127
Working with views....................................................................... 127
Creating views....................................................................... 128
Using views ........................................................................... 129
Modifying views..................................................................... 130
Permissions on views............................................................ 130

Contents
vi
Deleting views ....................................................................... 131
Views in the system tables.................................................... 131
Working with indexes ................................................................... 132
Introduction to indexes .......................................................... 132
Creating indexes ................................................................... 133
Indexes in the system tables................................................. 133
Removing indexes................................................................. 134
CHAPTER 4 Adaptive Server IQ Indexes ........................................................ 135
Overview of indexes..................................................................... 135
Adaptive Server IQ index types............................................. 135
Benefits over traditional indexes ........................................... 137
Creating Adaptive Server IQ indexes........................................... 138
The CREATE INDEX statement............................................ 138
Creating an index with Sybase Central ................................. 139
Creating indexes concurrently............................................... 139
Choosing an index type................................................................ 140
Number of unique values in the index................................... 141
Types of queries.................................................................... 141
Indexing criteria: disk space usage ....................................... 143
Data types in the index.......................................................... 143
Combining index types.......................................................... 144
Adaptive Server IQ index types.................................................... 144
Default column index............................................................. 145
The Low_Fast (LF) index type............................................... 145
The High_Group (HG) index type.......................................... 146
The High_Non_Group (HNG) index type .............................. 148
Optimizing performance for ad hoc joins............................... 149
Selecting an index................................................................. 150
Adding column indexes after inserting data ................................. 151
Using join indexes ........................................................................ 151
Join indexes improve query performance ............................. 151
How join indexes are used for queries .................................. 152
Relationships in join indexes................................................. 152
When a join becomes ad hoc................................................ 152
Join hierarchy overview......................................................... 152
Columns in the join index ...................................................... 153
The join hierarchy in query resolution ................................... 154
Multiple table joins and performance..................................... 156
Steps in creating a join index ................................................ 157
Synchronizing join indexes.................................................... 158
Defining join relationships between tables ............................ 159
Issuing the CREATE JOIN INDEX statement ....................... 162
Creating a join index in Sybase Central ................................ 164

Contents
vii
Types of join hierarchies ....................................................... 164
Modifying tables included in a join index............................... 167
Inserting or deleting from tables in a join index ..................... 168
Table versioning controls access to join indexes .................. 169
Estimating the size of a join index................................................ 169
CHAPTER 5 Moving Data In and Out of Databases....................................... 171
Import and export overview.......................................................... 171
Import and export methods ................................................... 171
Input and output data formats ............................................... 172
Permissions for modifying data ............................................. 173
Scheduling database updates............................................... 173
Exporting data from a database ................................................... 174
Using output redirection ........................................................ 174
NULL value output................................................................. 175
Bulk loading data using the LOAD TABLE statement.................. 175
Interpreting notification messages......................................... 187
Memory message.................................................................. 187
Main IQ Store blocks messages............................................ 188
IQ Temporary Store blocks message.................................... 188
Main buffer cache activity message ...................................... 188
Temporary buffer cache message......................................... 189
Controlling message logging ................................................. 189
Using the INSERT statement ....................................................... 190
Inserting specified values row by row .......................................... 190
Inserting selected rows from the database .................................. 191
Inserting from a different database........................................ 192
Importing data interactively .......................................................... 195
Inserting into tables of a join index............................................... 195
Inserting into primary and foreign key columns............................ 196
Partial-width insertions ................................................................. 197
Partial-width insertion rules ................................................... 198
Converting data on insertion ........................................................ 202
Inserting data from pre-Version 12 Adaptive Server IQ ........ 204
Load conversion options ....................................................... 204
Column width issues ............................................................. 208
Using the ASCII conversion option........................................ 208
The DATE Option.................................................................. 210
The DATETIME conversion option........................................ 212
Working With NULLS ............................................................ 215
Other factors affecting the display of data.................................... 216
Matching Adaptive Server Enterprise data types ......................... 217
Unsupported Adaptive Server Enterprise data types ............ 217
Adaptive Server Enterprise data type equivalents ................ 218

Contents
viii
Handling conversion errors on data import ........................... 220
Tuning bulk loading of data .......................................................... 221
Improving load performance during database definition ....... 221
Setting server startup options................................................ 222
Adjusting your environment at load time ............................... 222
Reducing Main IQ Store space use in incremental loads...... 223
Changing data using UPDATE..................................................... 224
Deleting data................................................................................ 225
Importing data by replication ........................................................ 226
CHAPTER 6 Using Procedures and Batches.................................................. 229
Overview of procedures ............................................................... 229
Benefits of procedures ................................................................. 230
Introduction to procedures ........................................................... 230
Creating procedures.............................................................. 231
Calling procedures ................................................................ 232
Dropping procedures............................................................. 232
Permissions to execute procedures ...................................... 233
Returning procedure results in parameters........................... 233
Returning procedure results in result sets............................. 234
Introduction to user-defined functions.......................................... 235
Creating user-defined functions ............................................ 235
Calling user-defined functions............................................... 236
Dropping user-defined functions ........................................... 237
Permissions to execute user-defined functions..................... 237
Introduction to batches................................................................. 238
Control statements ....................................................................... 239
Using compound statements................................................. 240
Declarations in compound statements .................................. 241
Atomic compound statements............................................... 242
The structure of procedures ......................................................... 243
SQL statements allowed in procedures................................. 243
Declaring parameters for procedures.................................... 244
Passing parameters to procedures ....................................... 245
Passing parameters to functions........................................... 245
Returning results from procedures............................................... 246
Returning a value using the RETURN statement.................. 246
Returning results as procedure parameters.......................... 247
Returning result sets from procedures .................................. 249
Returning multiple result sets from procedures..................... 250
Returning variable result sets from procedures..................... 250
Using cursors in procedures ........................................................ 251
Cursor management overview .............................................. 252
Cursor positioning ................................................................. 252

Contents
ix
Using cursors on SELECT statements in procedures ........... 253
Errors and warnings in procedures .............................................. 255
Default error handling in procedures ..................................... 256
Error handling with ON EXCEPTION RESUME.................... 258
Default handling of warnings in procedures .......................... 260
Using exception handlers in procedures ............................... 261
Nested compound statements and exception handlers ........ 263
Using the EXECUTE IMMEDIATE statement in procedures ....... 264
Transactions and savepoints in procedures................................. 265
Some tips for writing procedures.................................................. 265
Check if you need to change the command delimiter ........... 265
Remember to delimit statements within your procedure ....... 266
Use fully-qualified names for tables in procedures................ 266
Specifying dates and times in procedures............................. 266
Verifying procedure input arguments .................................... 267
Statements allowed in batches .................................................... 267
Using SELECT statements in batches .................................. 268
Calling external libraries from procedures.................................... 268
Creating procedures and functions with external calls .......... 269
External function declarations ............................................... 270
How parameters are passed to the external function............ 271
Special considerations when passing character types.......... 272
CHAPTER 7 Ensuring Data Integrity .............................................................. 273
Data integrity overview................................................................. 273
How data can become invalid ............................................... 273
Integrity constraints belong in the database.......................... 274
How database contents get changed.................................... 275
Data integrity tools................................................................. 275
SQL statements for implementing integrity constraints ......... 276
Using table and column constraints ............................................. 277
Using UNIQUE constraints on columns or tables.................. 277
Using IQ UNIQUE constraint on columns ............................. 278
Using CHECK conditions on columns................................... 278
Column CHECK conditions from user-defined data types .... 279
Working with column constraints in Sybase Central ............. 280
Using CHECK conditions on tables....................................... 280
Modifying and deleting CHECK conditions............................ 280
Declaring entity and referential integrity....................................... 281
Enforcing entity integrity........................................................ 282
If a client application breaches entity integrity....................... 282
Primary keys enforce entity integrity ..................................... 283
Declaring referential integrity................................................. 283
How you define foreign keys ................................................. 284

Contents
x
Referential integrity is unenforced......................................... 284
Integrity rules in the system tables............................................... 285
CHAPTER 8 Transactions and Versioning ..................................................... 287
Overview of transactions and versioning ..................................... 287
Introduction to transactions ................................................... 287
Introduction to concurrency................................................... 290
Introduction to versioning ...................................................... 291
Versioning prevents inconsistencies ............................................ 299
How locking works ....................................................................... 299
Locks for DML operations ..................................................... 299
Locks for DDL operations...................................................... 300
Primary keys and locking ...................................................... 302
Isolation levels.............................................................................. 302
Checkpoints, savepoints, and transaction rollback ...................... 303
Checkpoints........................................................................... 304
Savepoints within transactions.............................................. 305
Rolling back transactions ...................................................... 307
System recovery.................................................................... 307
How transaction information aids recovery ........................... 308
Performance implications............................................................. 309
Overlapping versions and deletions ...................................... 310
Cursors in transactions ................................................................ 311
Cursors and versioning ......................................................... 312
Cursor sensitivity................................................................... 312
Cursor scrolling ..................................................................... 312
Hold cursors .......................................................................... 313
Positioned operations............................................................ 313
Cursor command syntax and examples................................ 313
Controlling message logging for cursors............................... 313
CHAPTER 9 International Languages and Character Sets ........................... 315
Introduction to international languages and character sets.......... 315
Adaptive Server IQ international features ............................. 315
Using the default collation ..................................................... 316
Character set questions and answers................................... 316
Understanding character sets in software.................................... 317
Pieces in the character set puzzle......................................... 317
Language issues in client/server computing ......................... 318
Code pages in Windows and Windows NT ........................... 319
Multibyte character sets ........................................................ 321
Sorting characters using collations........................................ 322
International aspects of case sensitivity................................ 322

Contents
xi
Understanding locales.................................................................. 323
Introduction to locales ........................................................... 323
Understanding the locale language....................................... 324
Understanding the locale character set................................. 325
Understanding the locale collation label................................ 328
Setting the SQLLOCALE environment variable .................... 328
Understanding collations.............................................................. 328
Displaying collations.............................................................. 328
Supplied collations ................................................................ 329
ANSI or OEM?....................................................................... 331
Notes on ANSI collations....................................................... 332
Notes on OEM collations....................................................... 334
Using multibyte collations...................................................... 336
Understanding character set translation ...................................... 336
Character translation for database messages....................... 336
Connection strings and character sets .................................. 338
Avoiding character-set translation......................................... 338
Collation internals......................................................................... 339
Comment lines ...................................................................... 340
The title line........................................................................... 340
The collation sequence section............................................. 341
The Encodings section .......................................................... 342
The Properties section .......................................................... 343
International language and character set tasks ........................... 344
Finding the default collation................................................... 344
Configuring your character set environment ......................... 344
Determining locale information.............................................. 345
Setting locales....................................................................... 346
Creating a database with a named collation ......................... 346
Starting a database server using character set translation ... 348
Using ODBC code page translation ...................................... 348
Character set translation for Sybase Central and DBISQL ... 349
Creating a custom collation ................................................... 349
Creating a database with a custom collation......................... 351
Compatibility issues ..................................................................... 351
Performance issues ..................................................................... 352
CHAPTER 10 Managing User IDs and Permissions........................................ 353
An overview of database permissions.......................................... 353
DBA authority overview ......................................................... 354
RESOURCE authority overview............................................ 355
Ownership permissions overview.......................................... 355
Table and views permissions overview ................................. 355
Group permissions overview ................................................. 356

Contents
xii
Managing individual user IDs and permissions............................ 356
Creating new users ............................................................... 357
Changing a password............................................................ 357
Granting DBA and resource authority ................................... 358
Granting permissions on tables and views............................ 359
Granting users the right to grant permissions ....................... 360
Granting permissions on procedures .................................... 361
Revoking user permissions ................................................... 362
Managing groups ......................................................................... 363
Creating groups..................................................................... 363
Granting group membership to users.................................... 364
Permissions of groups........................................................... 365
Referring to tables owned by groups..................................... 365
Groups without passwords.................................................... 366
Special groups....................................................................... 367
Database object names and prefixes........................................... 367
Using views and procedures for extra security ............................ 369
Using views for tailored security............................................ 370
Using procedures for tailored security................................... 371
How user permissions are assessed ........................................... 372
Managing the resources connections use.................................... 372
Users and permissions in the system tables................................ 374
CHAPTER 11 Backup and Data Recovery ........................................................ 377
Backup protects your data ........................................................... 377
Backing up your database............................................................ 378
Types of backups .................................................................. 378
Selecting archive devices...................................................... 380
Preparing for backup............................................................. 381
Concurrency and backups..................................................... 383
The BACKUP statement........................................................ 383
Backup Examples.................................................................. 388
Recovery from errors during backup..................................... 389
After you complete a backup................................................. 390
Performing backups with non-Sybase products.................... 390
Performing system-level backups ................................................ 391
Shutting down the database.................................................. 391
Backing up the right files ....................................................... 392
Restoring from a system-level backup .................................. 392
Validating your database.............................................................. 393
Interpreting results................................................................. 394
Concurrency issues for sp_iqcheckdb................................... 395
Restoring your databases ............................................................ 396
Before you restore................................................................. 396

Contents
xiii
The RESTORE statement..................................................... 399
Restoring in the correct order................................................ 403
Renaming the transaction log after you restore .................... 405
Validating the database after you restore.............................. 406
Restore requires exclusive write access ............................... 406
Displaying header information............................................... 407
Recovery from errors during restore ..................................... 408
Using Symbolic Links (UNIX Only)........................................ 408
Unattended backup...................................................................... 409
Getting information about backups and restores ......................... 410
Locating the backup log ........................................................ 410
Content of the backup log ..................................................... 411
Maintaining the backup log.................................................... 412
Viewing the backup log in Sybase Central............................ 412
Recording dbspace names.................................................... 412
Determining your data backup and recovery strategy.................. 413
Scheduling routine backups .................................................. 414
Designating Backup and Restore Responsibilities................ 415
Improving performance for backup and restore .................... 415
CHAPTER 12 Managing System Resources .................................................... 419
Introduction to performance terms ............................................... 419
Designing for performance.......................................................... 419
Overview of memory use ............................................................. 420
Paging increases available memory...................................... 420
Utilities to monitor swapping.................................................. 421
Server memory...................................................................... 421
Managing buffer caches........................................................ 422
Determining the sizes of the buffer caches ........................... 422
Setting buffer cache sizes ..................................................... 427
Specifying page size ............................................................. 429
Saving memory ..................................................................... 431
Optimizing for large numbers of users .................................. 432
Platform-specific memory options ......................................... 434
Other ways to get more memory........................................... 438
The process threading model....................................................... 439
Insufficient threads error........................................................ 440
IQ options for managing thread usage.................................. 440
Balancing I/O................................................................................ 441
Raw I/O (on UNIX operating systems) .................................. 441
Using disk striping ................................................................. 442
Internal striping...................................................................... 443
Using multiple dbspaces ....................................................... 445
Strategic file locations ........................................................... 446

Contents
xiv
Working space for inserting, deleting, and synchronizing ..... 447
Options for tuning resource use ................................................... 448
Restricting concurrent queries............................................... 448
Limiting a query’s memory use.............................................. 449
Limiting queries by rows returned ......................................... 449
Forcing cursors to be non-scrolling ....................................... 449
Limiting the number of cursors.............................................. 450
Limiting the number of statements ........................................ 450
Lowering a connection’s priority ............................................ 450
Prefetching cache pages....................................................... 450
Optimizing for typical usage .................................................. 451
Other ways to improve resource use ........................................... 451
Restricting database access ................................................. 451
Disk caching.......................................................................... 451
Using RAM disk..................................................................... 452
Indexing tips................................................................................. 452
Picking the right index type ................................................... 452
Using join indexes ................................................................. 453
Allowing enough disk space for deletions ............................. 453
Managing database size and structure ........................................ 454
Managing the size of your database ..................................... 454
Denormalizing for performance............................................. 454
Denormalization has risks ..................................................... 455
Disadvantages of denormalization ........................................ 455
Performance benefits of denormalization.............................. 455
Deciding to denormalize........................................................ 456
Improving your queries................................................................. 456
Tips for structuring queries.................................................... 456
Planning queries.................................................................... 457
Setting query optimization options ........................................ 458
Network performance................................................................... 459
Improving large data transfers............................................... 459
Isolate heavy network users.................................................. 460
Put small amounts of data in small packets .......................... 461
Put large amounts of data in large packets........................... 462
Process at the server level.................................................... 463
CHAPTER 13 Monitoring and Tuning Performance......................................... 465
Viewing the Adaptive Server IQ environment .............................. 465
Getting information using stored procedures ........................ 465
Monitoring the buffer caches........................................................ 467
Starting the buffer cache monitor .......................................... 467
Stopping the buffer cache monitor ........................................ 472
Examining and saving monitor results................................... 472

Contents
xv
Examples of monitor results .................................................. 473
Avoiding buffer manager thrashing .............................................. 476
Monitoring paging on Windows NT systems ......................... 477
Monitoring paging on UNIX systems..................................... 477
System utilities to monitor CPU use............................................. 479
CHAPTER 14 Adaptive Server IQ as a Data Server......................................... 481
Client/server interfaces to Adaptive Server IQ ............................. 481
Configuring IQ Servers with DSEDIT .................................... 483
Sybase applications and Adaptive Server IQ........................ 488
Open Client applications and Adaptive Server IQ................. 488
Setting up Adaptive Server IQ as an Open Server ...................... 489
System requirements ............................................................ 489
Starting the database server as an Open Server.................. 489
Configuring your database for use with Open Client............. 490
Characteristics of Open Client and jConnect connections........... 491
Servers with multiple databases............................................ 493
Index ........................................................................................................................................... 495

xvi
xvii
About This Book
This book, Adaptive Server IQ Administration and Performance Guide,
presents administrative concepts and procedures and performance tuning
recommendations for Sybase Adaptive Server IQ, a high-performance
decision support server designed specifically for data warehouses and data
marts.
Audience
This guide is for system and database administrators or for anyone who
needs to set up or manage Adaptive Server IQ or understand performance
issues. Familiarity with relational database systems and introductory user-
level experience with Adaptive Server IQ is assumed.
How to use this book
The following table shows which chapters fit a particular interest or need.

Related documents
xviii
Table 1: Guide to using this book
Related documents
Documentation for Adaptive Server IQ:
•Introduction to Adaptive Server IQ
Read and try the hands-on exercises if you are unfamiliar with Adaptive
Server IQ, with the Sybase Central database management tool, or with
Interactive SQL.
To learn how to... Read this chapter...
Understand the role of an Adaptive
Server IQ administrator
Chapter 1, “Overview of Adaptive
Server IQ System Administration”
Start and stop an IQ database server,
and set up user connections
Chapter 2, “Running Adaptive Server
IQ”
Create an Adaptive Server IQ database Chapter 3, “Working with Database
Objects”
Select Adaptive Server IQ indexes Chapter 4, “Adaptive Server IQ
Indexes”
Load data into your database Chapter 5, “Moving Data In and Out
of Databases”
Create procedures and batches Chapter 6, “Using Procedures and
Batches”
Add users and assign them privileges Chapter 10, “Managing User IDs and
Permissions”
Specify constraints on the data in your
tables
Chapter 7, “Ensuring Data Integrity”
Understand how transactions work Chapter 8, “Transactions and
Versioning”
Set up your database for the language
you work in
Chapter 9, “International Languages
and Character Sets”
Back up and restore databases Chapter 11, “Backup and Data
Recovery”
Tune Adaptive Server IQ for
maximum performance
Chapter 12, “Managing System
Resources”; see also performance
tuning hints for specific features in all
chapters
Monitor and tune performance Chapter 13, “Monitoring and Tuning
Performance”

About This Book
xix
•Adaptive Server IQ Reference Manual
Read for a full description of the SQL language, utilities, stored
procedures, data types, and system tables supported by Adaptive Server
IQ.
•Adaptive Server IQ Troubleshooting and Error Messages Guide
Read to solve problems, perform system recovery and database repair, and
understand error messages, which are referenced by by SQLCode,
SQLState and message text.
•Adaptive Server IQ Installation and Configuration Guide
Read the edition for your platform before and while installing Adaptive
Server IQ, when migrating to a new version of Adaptive Server IQ, or
when configuring Adaptive Server IQ for a particular platform.
•Adaptive Server IQ Multiplex User’s Guide
Read if you are using the multiplex feature, which lets you manage a very
large data warehouse consisting of a write server and multiple query
servers.
•Adaptive Server IQ Release Bulletin
Read just before or after purchasing Adaptive Server IQ for an overview
of new features. Read for help if you encounter a problem.
Note Because Adaptive Server IQ is an extension of the Adaptive Server
Anywhere product, IQ and Anywhere support many of the same features. The
IQ documentation set refers the reader to Anywhere documentation where
appropriate.
Documentation for Adaptive Server Anywhere:
•Adaptive Server Anywhere User’s Guide
Intended for all users of Adaptive Server Anywhere, including database
administrators and application developers, this book describes in depth
how to use Adaptive Server Anywhere.
•Adaptive Server Anywhere Programming Interfaces
Intended for application developers writing programs that directly access
the ODBC, Embedded SQL, or Open Client interfaces, this book describes
how to develop applications for Adaptive Server Anywhere.

Related documents
xx
1
CHAPTER 1 Overview of Adaptive Server IQ
System Administration
About this chapter This chapter provides a brief introduction to Adaptive Server IQ and an
overview of IQ system administration.
Introduction to Adaptive Server IQ
Adaptive Server IQ is a high-performance decision support server
designed specifically for data warehousing. This cross-platform product
runs on Windows NT as well as on Sun Solaris (SPARC), HP 9000/800
HP-UX, IBM RISC System/6000 AIX, Silicon Graphics IRIX, and
Compaq Tru64 systems.
Adaptive Server IQ is part of the Adaptive Server family that includes
Adaptive Server Enterprise for enterprise transaction and mixed
workload environments and Adaptive Server Anywhere, a small
footprint version of Adaptive Server often used for mobile and
occasionally connected computing.
Sybase database
architecture Sybase database architecture provides a common code base for Adaptive
Server IQ and Adaptive Server Anywhere, with workload optimized data
stores. You use the IQ Store for data warehousing. You can also use
Adaptive Server Anywhere for transaction processing. These products
share a common command syntax and user interface, allowing easier
application development and user access.

System administration tasks
2
Rapid access to many
data sources Adaptive Server IQ can integrate data from diverse sources—not just IQ
databases, but other databases in the Adaptive Server family, as well as non-
Sybase databases and flat files. You can import this data into your IQ database,
so that you can take advantage of IQ's rapid access capabilities. You can also
query other databases directly, using Adaptive Server IQ's remote data access
capabilities.
Note Some of these capabilities are currently available on Windows NT only.
See your Adaptive Server IQ Installation and Configuration Guide for more
information.
Data warehousing and
Adaptive Server IQ Data warehouses are collections of data designed to allow business analysts
to analyze information. They are typically distinct from production databases,
to avoid interrupting daily operations. Data warehouses are often used as data
stores on which to build decision support systems (DSS). A decision support
system is a software application designed to allow an organization to analyze
data in order to support business decision making.
All of Adaptive Server IQ's capabilities are designed to facilitate DSS
applications. A unique indexing system speeds data analysis. Query
optimization gives you rapid responses, even when results include thousands
or millions of rows of data. Concurrent data access for multiple query users,
and the ability to update the database without interrupting query processing,
provide the 24–hour, 7–day access that users expect.
Learning more about
Adaptive Server IQ This book explains how you manage an Adaptive Server IQ system, and gives
pointers for tuning your system for maximum performance. It is intended for
database administrators, and others who need to understand performance
issues. You may also want to refer to the other documentation described in
“About This Book”:
System administration tasks
Typically, the database administrator (DBA) is responsible for the tasks listed
on the left side of the following table. Look at the right side of the table to see
where these tasks are explained in this or other manuals.

CHAPTER 1 Overview of Adaptive Server IQ System Administration
3
Table 1-1: Administrative tasks
Security overview
The DBA is responsible for maintaining database security. Adaptive Server IQ
provides security controls by means of the privileges you can assign to users.
If you want to know how to... Look in...
Install and configure Adaptive Server
IQ for your platform
Adaptive Server IQ Installation and
Configuration Guide
Start and stop the database server, and
set up user connections
Chapter 2, “Running Adaptive Server
IQ”
Create an Adaptive Server IQ database Chapter 3, “Working with Database
Objects”
Determine appropriate indexes for
your users' queries
Chapter 4, “Adaptive Server IQ
Indexes”
Load data into your database Chapter 5, “Moving Data In and Out
of Databases”
Add users and assign them privileges Chapter 10, “Managing User IDs and
Permissions”
Ensure the integrity of data in your
tables
Chapter 7, “Ensuring Data Integrity”
Understand how transactions impact
concurrency
Chapter 8, “Transactions and
Versioning”
Set up your database for the language
you work in
Chapter 9, “International Languages
and Character Sets”
Back up and restore databases Chapter 11, “Backup and Data
Recovery”
Tune Adaptive Server IQ for
maximum performance
Chapter 12, “Managing System
Resources”; see also performance
tuning hints for specific features in all
chapters
Monitor IQ performance Chapter 13, “Monitoring and Tuning
Performance”
Set up and manage a multiplex
configuration
Adaptive Server IQ Multiplex User’s
Guide

Tools for system administration
4
Types of users
Adaptive Server IQ recognizes three categories of users for each IQ database:
• The database administrator, or DBA, has complete authority to perform all
operations on that database. This guide is addressed primarily to the DBA,
who typically carries out most administrative tasks.
• The user who creates a particular database object is its owner, and can
perform any operation on that object.
• All other users are considered public users. The owner of an object is
considered a public user for objects owned by other users.
Granting permissions
Except for the DBA, who can perform any task, users must be granted the
authority to perform specific tasks. For example, you need the proper authority
to:
• Connect to a database.
• Create database objects, such as a database, table, or index.
• Alter the structure of database objects.
• Insert or delete data.
• Select (view) data.
• Execute procedures.
The DBA can grant any type of authority to any user. Sometimes other users
can grant authority as well. For more information on what users can do, and
how the DBA manages users, see Chapter 10, “Managing User IDs and
Permissions”.
Tools for system administration
To help you manage your database, Adaptive Server IQ provides two primary
tools:

CHAPTER 1 Overview of Adaptive Server IQ System Administration
5
•Sybase Central is an application for managing Sybase databases. It helps
you manage database objects and perform common administrative tasks
such as creating databases, backing up databases, adding users, adding
tables and indexes, and monitoring database performance. Sybase Central
has a Java-based graphical user interface, and can be used with any
operating system that allows graphical tools.
•DBISQL, also called Interactive SQL, is an application that allows you to
enter SQL statements interactively and send them to a database. DBISQL
has a window-like user interface on all platforms.
The Introduction to Adaptive Server IQ explains how to use Sybase Central
and DBISQL to perform simple administrative tasks. If you are not already
familiar with these tools, you should read about them in the Introduction to
Adaptive Server IQ and use the tutorials provided there.
In addition to these tools, Adaptive Server IQ provides a number of stored
procedures that perform system management functions. See “Stored
procedures” for more information. You can also create your own procedures
and batches.
A few administrative tasks, such as selecting a collation, rely on command-line
utilities. These utilities are discussed in other chapters of this book, and
described in the Adaptive Server IQ Reference Manual.
The database server
The database server is the “brain” of your Adaptive Server IQ system. Users
access data through the database server, never directly. Requests for
information from a database are sent to the database server, which carries out
the instructions.
Catalogs and IQ
An Adaptive Server IQ database is a joint data store consisting of three parts:
• The permanent IQ Store
• The Temporary Store

Catalogs and IQ
6
• The Catalog Store
When you create an IQ database, all three stores are created automatically. You
create IQ databases using the procedures described in Chapter 3, “Working
with Database Objects”.
The IQ Store
The IQ Store is the set of Adaptive Server IQ tables. You can have one or more
permanent IQ Stores, each in a separate database. Each IQ Store includes a set
of tables that organize your data. The table data is stored in indexes, which are
structured so as to allow rapid response to various types of analytical queries
on very large quantities of data.
The Temporary Store
The Temporary Store consists of a set of temporary tables. The database
server uses them for sorting and other temporary processing purposes; you
cannot store your data in them directly.
The Catalog Store
The Catalog Store contains all of the information required to manage an IQ
database. This information, which includes system tables and stored
procedures, resides in a set of tables that are compatible with Adaptive Server
Anywhere. These tables contain the metadata for the IQ database. Metadata
describes the layout of the IQ tables, columns, and indexes. The Catalog Store
is sometimes referred to simply as the Catalog.
Adaptive Server Anywhere and Adaptive Server IQ
The Catalog Store closely resembles an Adaptive Server Anywhere store.
Adaptive Server Anywhere is a relational database system that can exist with
or without IQ. You may have Adaptive Server Anywhere-style tables in your
Catalog Store along with your IQ tables, or you may have a separate Adaptive
Server Anywhere database.

CHAPTER 1 Overview of Adaptive Server IQ System Administration
7
Anywhere tables have a different format than IQ tables. While the commands
you use to create objects in an Anywhere database are the same as those for an
IQ Store, there are some differences in the features you can specify in those
commands. Always use the command syntax in this book or the Adaptive Server
IQ Reference Manual for operations in the IQ Store.
This book explains how you manage your IQ Store and its associated Catalog
Store. If you have an Anywhere database, or if you have Anywhere-style tables
in your Catalog Store, see the Adaptive Server Anywhere documentation for
details of how to create, maintain, and use them.
Concurrent operations
Adaptive Server IQ allows multiple users to query a database at the same time,
while another user inserts or deletes data, or backs up the database. Changes to
the structure of the database, such as creating, dropping, or altering tables,
temporarily exclude other users from those tables, but queries that only access
tables elsewhere in the database can proceed.
Adaptive Server IQ keeps your database consistent during these concurrent
operations by maintaining multiple versions of table data. To understand this
approach, see Chapter 8, “Transactions and Versioning”.
Stored procedures
Adaptive Server IQ stored procedures help you manage your system. Stored
procedures give you information about your database and users, and carry out
various operations on the database. This section briefly describes the stored
procedures. For more information, see the Adaptive Server IQ Reference
Manual.
A stored procedure typically operates on the database in which you execute it.
For example, if you run the stored procedure sp_addlogin in the asiqdemo
database, it adds a user to asiqdemo.

Stored procedures
8
You can also create your own stored procedures. See Chapter 6, “Using
Procedures and Batches” for details.
Note Statements shown in examples generally use the asiqdemo database, a
sample database installed as part of Adaptive Server IQ. For a diagram of this
database’s structure, see Introduction to Adaptive Server IQ.
Adaptive Server IQ stored procedures
The following procedures work specifically on the IQ Store. They are owned
by the DBA user ID.
Note Stored procedures that produce size information assume that the database
was created with the default block size, as described in “Block size”. If a
database was created with a non-default block size, the output from the
following stored procedures is inaccurate: sp_iqestjoin, sp_iqestdbspaces,
sp_iqestspace.

CHAPTER 1 Overview of Adaptive Server IQ System Administration
9
Table 1-2: Stored Procedures for the IQ Store
Adaptive Server Enterprise system and catalog procedures
Adaptive Server Enterprise provides system and catalog procedures to carry
out many administrative functions and to obtain system information. Adaptive
Server IQ has implemented support for some of these procedures.
Procedure name Purpose
sp_iqcheckdb Checks the validity of the current
database and repairs indexes
sp_iqcommandstats Gives statistics on execution of
various commands
sp_iqdbsize Gives the size of the current database
sp_iqdbstatistics Reports results of the most recent
sp_iqcheckdb
sp_iqestjoin Estimates the space needed to create
join indexes for the tables you specify
sp_iqestdbspaces Estimates the number and size of
dbspaces needed for a given total
index size
sp_iqestspace Estimates the amount of space needed
to create a database, based on the
number of rows in the underlying
database tables.
sp_iqindex Lists indexes and information about
them. Omitting the parameter lists all
indexes in the database. Specifying the
table_name parameter lists indexes for
this table only.
sp_iqindexsize Gives the size of the specified index
sp_iqjoinindexsize Gives the size of the specified join
index
sp_iqstatus Displays miscellaneous status
information about the database
sp_iqtable Lists tables and information about
them. Omitting the parameter lists all
tables in the database. Specifying the
table_name parameter lists columns
for this table only.
sp_iqtablesize Gives the size of the specified table

Stored procedures
10
System procedures are built-in stored procedures used for getting reports from
and updating system tables. Catalog stored procedures retrieve information
from the system tables in tabular form.
Note While these procedures perform the same functions as they do in
Adaptive Server Enterprise and pre-Version 12 Adaptive Server IQ, they are
not identical. If you have preexisting scripts that use these procedures, you may
want to examine the procedures. To see the text of a stored procedure, run
sp_helptext
procedure_name
You may need to reset the width of your DBISQL output to see the full text, by
clicking Command→Options and entering a new Limit Display Columns
value.
Adaptive Server Enterprise system procedures
The following Adaptive Server Enterprise system procedures are provided in
Adaptive Server IQ. These stored procedures perform important system
management tasks.
System procedure Description
sp_addgroup Adds a group to a database
sp_addlogin Adds a new user account to a database
sp_addmessage Adds user-defined messages to
SYSUSERMESSAGES for use by stored
procedure PRINT and RAISERROR calls
sp_addtype Creates a user-defined data type
sp_adduser Adds a new user to a database
sp_changegroup Changes a user’s group or adds a user to a
group
sp_dboption Displays or changes database options
sp_dropgroup Drops a group from a database
sp_droplogin Drops a user from a database
sp_dropmessage Drops user-defined messages
sp_droptype Drops a user-defined data type
sp_dropuser Drops a user from a database
sp_getmessage Retrieves stored message strings from
SYSMESSAGES and
SYSUSERMESSAGES for PRINT and
RAISERROR statements.

CHAPTER 1 Overview of Adaptive Server IQ System Administration
11
Adaptive Server Enterprise catalog procedures
Adaptive Server IQ implements all the Adaptive Server Enterprise catalog
procedures with the exception of the sp_column_privileges procedure. The
implemented catalog procedures are described in the following table.
The following list describes the supported Adaptive Server Enterprise catalog
procedures.
Catalog stored procedures
In addition to the Adaptive Server Enterprise Catalog stored procedures, there
are other system and catalog stored procedures. The following table lists the
ones you are most likely to use. For a complete list, see Chapter 14, “System
Procedures” in Adaptive Server IQ Reference Manual.
sp_helptext Displays the text of a system procedure or
view
sp_password Adds or changes a password for a user ID
System procedure Description
Catalog procedure Description
sp_column_privileges Unsupported
sp_columns Returns the data types of the specified column
sp_fkeys Returns foreign key information about the
specified table
sp_pkeys Returns primary key information for a single
table
sp_special_columns Returns the optimal set of columns that
uniquely identify a row in a table
sp_sproc_columns Returns information about a stored procedure’s
input and return parameters
sp_stored_procedures Returns information about one or more stored
procedures
sp_tables Returns a list of objects that can appear in a
FROM clause
Procedure name Purpose
sp_remote_columns List remote tables columns and their
data types
sp_remote_tables List tables on a remote server

System tables and views
12
System tables and views
Adaptive Server IQ system tables contain all of the information the database
server needs to manage your IQ system. The system tables reside in the Catalog
Store, and are sometimes called catalog tables. For some system tables there
are also views that make it easier to display the information in the table. The
SYS user ID owns the system tables.
Among the information in the system tables is:
• Database characteristics
• Table characteristics, including table definitions and information about the
size and location of each table
• Information about indexes
• Current settings for database and DBISQL options
System tables include:
sp_servercaps Display information about a remote
server’s capabilities
Procedure name Purpose
System table Description
DUMMY A table with exactly one row, useful
for extracting information from the
database
SYSARTICLE Describes an article in a SQL Remote
publication
SYSARTICLECOL Describes columns in each article in a
SQL Remote publication
SYSCOLLATION Contains the complete collation
sequences available to Adaptive
Server IQ
SYSCOLLATIONMAPPINGS Lists the collation sequences available
in Adaptive Server IQ and their GPG
and JDK mappings
SYSCOLUMN Describes each column in every table
or view

CHAPTER 1 Overview of Adaptive Server IQ System Administration
13
SYSDOMAIN Lists the number, name, ODBC type,
and precision of each predefined data
type
SYSFILE Lists operating system files and
dbspace names for the database
SYSFKCOL Associates each foreign key column
with a primary key column
SYSFOREIGNKEY Contains general information about
each foreign key
SYSGROUP Describes a many-to-many
relationship between groups and
members
SYSINDEX Describes indexes in the database
SYSINFO Describes database characteristics
SYSIQBACKUP Lists backups and restores
SYSIQCOLUMN Lists information on columns in every
table or view in the IQ Store
SYSIQFILE Lists information on operating system
files for the database
SYSIQINDEX Lists internal information on indexes
in the database
SYSIQINFO Lists additional database
characteristics
SYSIQJINDEX Describes join indexes in the database
SYSIQJOINIXCOLUMN Describes columns that participate in
join indexes
SYSIQJOINIXTABLE Lists the tables that participate in each
join index in the database
SYSIQTABLE Describes each table or view in the IQ
Store
SYSIXCOL Describes each index for each column
in the database
SYSJAR Describes each jar file associated with
the database
SYSJARCOMPONENT Describes each jar component
associated with the database
SYSJAVACLASS Contains all information related to
Java classes
System table Description

System tables and views
14
System views present the information from their corresponding system tables
in a more readable format. In some cases, they omit password information so
that they can be accessible to all users. System views include:
SYSLOGIN Lists User Profile names that can
connect to the database with an
integrated login
SYSOPTION Lists current SET OPTION settings
for all users including the PUBLIC
user
SYSPROCEDURE Describes each procedure in the
database
SYSPROCPARM Describes each parameter to every
procedure in the database
SYSPROCPERM Lists each user granted permission to
call each procedure in the database
SYSPUBLICATION Describes each SQL Remote
publication
SYSREMOTETYPE Contains information about SQL
Remote
SYSREMOTEUSER Describes user IDs with REMOTE
permissions and the status of their
SQL Remote messages
SYSSQLSERVERTYPE Contains information relating to
compatibility with Adaptive Server
Enterprise
SYSSUBSCRIPTION Relates each user ID with REMOTE
permissions to a publication
SYSTABLE Describes one table or view in the
database
SYSTABLEPERM Describes permissions granted on
each table in the database
SYSSQLSERVERTYPE Contains information on compatibility
with Adaptive Server Enterprise
SYSUSERMESSAGES Lists user-defined error messages and
their creators
SYSUSERPERM Lists characteristics of each user ID.
Because it contains passwords, you
need DBA permissions to select from
this table
SYSUSERTYPE Describes each user-defined data type
System table Description

CHAPTER 1 Overview of Adaptive Server IQ System Administration
15
For a complete description of system tables and views and their contents, see
the Adaptive Server IQ Reference Manual.
System view Description
SYSCATALOG Lists all tables and views from
SYSTABLE
SYSCOLAUTH Presents column update permission
information from SYSCOLPERM
SYSCOLUMNS Presents a readable version of the table
SYSCOLUMN
SYSFOREIGNKEYS Presents foreign key information from
SYSFOREIGNKEY and SYSFKCOL
SYSGROUPS Presents group information from
SYSGROUP
SYSINDEXES Presents index information from
SYSINDEX and SYSIXCOL
SYSOPTIONS Displays option settings contained in
the table SYSOPTION
SYSPROCPARMS Lists all the procedure parameters
from SYSPROCPARM
SYSREMOTEUSERS Lists the information in
SYSREMOTEUSER
SYSTABAUTH Presents table permission information
in SYSTABLEPERM
SYSUSERAUTH Displays all the information in the
table SYSUSERPERM except for user
numbers. Because it contains
passwords, this system view does not
have PUBLIC select permission
SYSUSERLIST Presents all information in
SYSUSERAUTH except for
passwords
SYSUSEROPTIONS Display effective permanent option
settings for each user
SYSUSERPERMS Contains exactly the same information
as the table SYS.SYSUSERPERM
except the password is omitted
SYSVIEWS Lists views and their definitions

Commands and Functions
16
Commands and Functions
All Adaptive Server IQ commands are SQL statements. SQL stands for
Structured Query Language, a language commonly used in database
applications. Adaptive Server IQ SQL uses the same syntax as Adaptive Server
Anywhere SQL; the only differences are for certain product capabilities that
are supported only for IQ or for Anywhere. Adaptive Server IQ SQL also offers
a high degree of compatibility with Transact-SQL, the SQL dialect used by
Adaptive Server Enterprise.
This section introduces the types of commands and functions you can use.
Other chapters of this book tell you about the commands you use to perform
various administrative tasks. For complete details of supported commands and
functions, see the Adaptive Server IQ Reference Manual.
Types of SQL statements
You use three basic types of SQL statements:
• DDL (Data Definition Language) statements let you define and modify
your database schema and table and index definitions. Examples of DDL
statements include CREATE TABLE, CREATE INDEX, ALTER TABLE, and
DROP.
• DML (Data Manipulation Language) statements let you query your data,
and move data into and out of the database. Examples of DML statements
include SELECT, SET, and INSERT.
• Program control statements control the flow of program execution. They
do not operate directly on your IQ tables. Examples include IF, CALL, and
ROLLBACK.
Functions
Functions return information from the database. They are allowed anywhere an
expression is allowed. Adaptive Server IQ provides functions that:
• Aggregate data (for example, AVG, COUNT, MAX, MIN, SUM)
• Manipulate numeric data (for example, ABS, CEILING, SQRT,
TRUNCATE)
• Manipulate string data (for example, LENGTH, SOUNDEX, UCASE)

CHAPTER 1 Overview of Adaptive Server IQ System Administration
17
• Manipulate date and time data (for example, TODAY, DATEDIFF,
DATEPART, MINUTES)
• Convert retrieved data from one format to another (CAST, CONVERT)
Message logging
A message log file exists for each database. The default name of this file is
dbname.iqmsg. The message log file is created when the database is created.
By default, Adaptive Server IQ logs all messages in the message log file,
including:
• Error messages
• Status messages
• Insert notification messages
You can examine this file as you would any other text file. At the start of the
file you see output like the following:
2000-03-07 17:20:50 0000 OpenDatabase Completed
2000-03-07 17:20:50 0000 IQ cmd line srv opts:
2000-03-07 17:20:50 0000 DB: r/w, Buffs=1913, Pgsz=4096/512blksz/8bpc
2000-03-07 17:20:50 0000 DB: Frmt#: 23F/2T/1P (FF: 03/18/1999)
2000-03-07 17:20:50 0000 DB: Versn: 12.4.2/(32bit mode)/MS Windows NT 4.0/EBF
0000/Mar 02 2000, 02:17:37 2000-03-07 17:20:50 0000 DB: Name: C:\Program
Files\Sybase\ASIQ12\scripts\asiqdemo.db
The fourth line of the file contains version information:
Figure 1-1: Version string in message log

The utility database
18
The date and time of the software build appears in the version string in ISO
datetime format: YYYY-MM-DD hh:mm:ss where
The message log continues to exist until you drop the database. If your message
log ever becomes too large, you can archive it while no users are connected to
the database, and then create a new, empty dbname.iqmsg file before allowing
another user to connect.
The utility database
The utility database is essentially a database that never holds data. The database
server uses it at times when it needs a database to connect to, but either no real
database exists, or none should be running. Adaptive Server IQ installation
creates the utility database automatically.
Be sure you do not delete this database. You need it to do any of these things:
• Start the database server using the START ENGINE command with no
database specified
• Create or drop a database when you have no other database to connect to
• Start the database server or connect to a database when any other databases
you have are either corrupt or unavailable due to media failure
• Restore a database
By default, the utility database has the user ID dba and the password sql. You
can change these to other values during installation, or later by editing the
connection parameters in the util_db.ini file in your executable directory.
YYYY 4-digit year
MM 2-digit month number (0-12)
DD 2-digit day of month number (0-31)
hh 2-digit numbmer of complete hours that have passed since
midnight (00-23)
mm 2-digit number of complete minutes that have passed since
the start of the hour (00-59)
ss 2-digit number of complete seconds that have passed since
the start of the minute (00-59)

CHAPTER 1 Overview of Adaptive Server IQ System Administration
19
For more information on the utility database, see Chapter 3, “Configuring
Client/Server Communications” in your Adaptive Server IQ Installation and
Configuration Guide.
Compatibility with earlier versions
Version 12 of Adaptive Server IQ differs markedly from earlier versions of IQ.
It offers many important new features, including the ability to update the
database concurrently with query use, Transact-SQL and Java support,
additional query and view support, and better front end support. It offers
syntactic compatibility with Adaptive Server Anywhere, allowing Anywhere
users to build on their existing knowledge base as they begin to use IQ. It also
includes a new, more efficient database format.
These last two features have special implications for users migrating from pre-
version 12 Adaptive Server IQ. When you migrate to version 12, you must:
• Examine any scripts, applications, and procedures for differences in
syntax, and make the necessary changes.
• Reload your IQ database, using the special migration procedure.
See the Adaptive Server IQ Installation and Configuration Guide and the
Adaptive Server IQ Release Bulletin for your platform for migration details.

Compatibility with earlier versions
20
21
CHAPTER 2 Running Adaptive Server IQ
About this chapter Three steps are required for you to start using Adaptive Server IQ:
• The database server must be started.
• The database must be started.
• You must connect to the database.
Adaptive Server IQ gives you great flexibility in performing these three
steps. This chapter explains various options for accomplishing each of
these steps, and gives suggestions for which to choose, depending on your
situation.
With Adaptive Server IQ you will run in a client/server environment, in
which many users can connect to a database server across a network. You
may have multiple databases on a given database server. Likewise, you
may be able to connect to more than one database server. The server
startup and connection options you choose must take into account these
factors.
Starting the database server
The first step in running Adaptive Server IQ is to start the database server.
You can start the server in all of these ways:
• Type a server startup command at the operating system prompt. See
“Server command lines” on page 22, as well as the section specific to
your operating system.
• Start the server from the Windows NT Start menu. See “Starting the
server from the NT Start menu” on page 26.
• Start the server with the Sybase-provided utility, start_asiq, that runs
the server as a UNIX background process. See “Starting the server on
UNIX” on page 23.

Server command lines
22
• Start the server and the sample database with a Sybase-provided
configuration file. See “Starting the asiqdemo database” on page 47.
• Place a server startup command in a shortcut or desktop icon.
• Include a server startline in an ODBC data source. See “Creating and
editing ODBC data sources” on page 65.
• Include a server startline in a utility command.
• Issue a SQL command from Interactive SQL to start an additional server.
See “Starting a server from DBISQL” on page 40.
Note If you will be using remote data access capabilities to insert data from
other databases or to issue queries to other databases, see the Adaptive Server
IQ Release Bulletin for Windows NT for special startup requirements.
Server command lines
The general form for the server command line is as follows:
asiqsrv12 [
server-switches
] [
database-file
[
database-switches
]
, ...
]
The elements of this command line are as follows:
•server-switches include the database server name and other options that
control the behavior of the server, for all databases that are running on that
server.
•database-file is the file name of the Catalog Store. You can omit this
option, or enter one or more database file names on the command line.
Each of these databases is loaded and available for applications. If the
starting directory contains the database file, you do not need to specify the
path; otherwise, you must specify the path. If you do not specify a file
extension in database-file, the extension .db is assumed.
•database-switches are options that you can specify for each database file
you start, that control certain aspects of its behavior.
In examples throughout this chapter where there are several command-line
options, we show them for clarity on separate lines, as they could be written in
a configuration file. If you enter them directly on a command line, you must
enter them all on one line (that is, without any carriage returns).

CHAPTER 2 Running Adaptive Server IQ
23
You can choose from many command-line options or switches to specify such
features as permissions required to start a database or stop the server, and the
network protocols to use. The command-line switches are one means of tuning
Adaptive Server IQ behavior and performance.
There are slight variations in the basic command for different operating
systems, as well as a startup utility that runs this command automatically. See
the sections that follow for details.
Starting the server on UNIX
This section describes two methods for starting the database server that are
specific to UNIX platforms:
• Use the startup utility start_asiq. This is the preferred method.
• Enter the server startup command and the appropriate parameters (see
below).
You can also use any of the generic methods described elsewhere in this
chapter, provided that you set startup parameter defaults for each platform to
the settings used in start_asiq. These settings are listed in the Adaptive Server
IQ Installation and Configuration Guide.
Normally, you should always use the start_asiq utility to start the server on
UNIX platforms. If you do not, among the tasks you must do which the utility
normally does for you are:
• Remove all limits, and then set limits on the stack size and descriptors. To
do so, go to the C shell and issue these commands:
% unlimit
% limit stacksize 8192
% limit descriptors 4096
Note Be aware that unlimit affects soft limits only. You must change any
hard limits by setting kernel parameters.
• Set all server parameters appropriately in the asiqsrv12 command.

Starting the server on UNIX
24
Note the server
starting directory Note what directory you are in when you start the server. The server startup
directory determines the location of any database files you create with relative
pathnames. If you start the server in a different directory, Adaptive Server IQ
cannot find those database files.
Any server startup scripts should change directory to a known location before
issuing the server startup command.
Using the startup utility
For most situations, the easiest way to start a database server on UNIX is by
using the startup script that Sybase provides. Using this script ensures that all
required parameters are set correctly, except in special situations described
later in this chapter.
❖To start the server on UNIX using the startup utility:
1 Change to a writable directory.
2Run the start_asiq utility at the system prompt. The simple form of this
command is:
start_asiq
servername
[
database
]
You can also include server switches or database switches, as discussed in the
next section.
This command starts the named server as a background process, starts the
named database if you specify it, and sets all required startup options. Once the
server starts, it sends a message to the window or console where you started the
server indicating that the server is running. It also displays the version of the
Open Client communications library that is in use, and “possible problems”
messages on failure to start. This message is saved in the stderr log. After that,
all server messages go to the server log. The server log is in
$ASLOGDIR/servername.nnn.svrlog, where nnn is the number of times the
server has been started. See Chapter 1, “Environment Variables and Registry
Entries” in Adaptive Server IQ Reference Manual for a description of
$ASLOGDIR and other environment variables you may need to set.
The start_asiq command displays messages as to whether the server started or
not, and
The start_asiq utility also adds the appropriate library path to the environment
and sets parameters that govern Adaptive Server IQ. Parameter settings vary
by platform. See your Adaptive Server IQ Installation and Configuration
Guide for a list of parameter settings for your platform.

CHAPTER 2 Running Adaptive Server IQ
25
For an explanation of commonly used startup parameters, see “Using
command-line switches” on page 28.
Typing the server startup command
You can also start the database server by entering the following command at
the UNIX prompt:
asiqsrv12 [
server-switches
] [
database-file
[
database-switches
]]
This command starts the specified database:
• On the specified server, if one is named in the startup command.
• On the server associated with this database, if the startup parameters
specify a data source.
• On the local server, if one is running and no other server is specified.
See “Using command-line switches” on page 28 for a description of
commonly used startup parameters.
Note To start the server without starting any database, you omit the database
file from the asiqsrv12 command and specify a servername. For ease of use,
however, it is preferable to start the database and server together, by specifying
the database name when you start the server. The server takes its name from the
database name by default, or you can specify a different name for the server.
See “Naming the server and databases” on page 31 for more information on
server and database names.
If you omit the database name, you must name the server explicitly using the
-n server switch. This method is appropriate when you are creating or restoring
a database. It is also used when you only want to control the starting and
stopping of the server, leaving database use to client software.
When you start the server with the asiqsrv12 command, it does not run in the
background, and messages do not automatically go to the server log. However,
if your include the -o
filename
server switch, messages are sent to the named
file in addition to the server window.

Starting the server on Windows NT
26
Starting the server on Windows NT
This section describes methods for starting the database server that are specific
to Windows NT systems. You can also use any of the generic methods
described elsewhere in this chapter.
Note the server
starting directory Be sure to make note of what directory you are in when you start the server.
The location of any database files you create with relative pathnames depends
on the server startup directory. If you start the server in a different directory,
Adaptive Server IQ looks for those database files in the new startup directory.
Any server startup scripts should change directory to a known location before
issuing the server startup command.
Starting the server from the NT Start menu
The easiest way to start the server on NT is from the Start menu.
Click Start on the Task bar, and select Programs → Sybase → Adaptive Server
IQ 12.
From here, you can start the sample database, Sybase Central, Interactive SQL,
and the ODBC Administrator.
You can also place databases of your own in the Program group.
Typing the server startup command
You can use a Program Manager icon to hold a command line, or enter the
following command at the system command prompt:
asiqsrv12 [
server-switches
] [
path\database-file
[
database-switches
]]
You must either enter the database-file or include the servername as one of the
server-switches.
This command starts the specified database:
• On the specified server, if one is named in the startup command
• On the server associated with this database, if the startup parameters
specify a data source
• On the local server, if one is running and no other server is specified

CHAPTER 2 Running Adaptive Server IQ
27
See “Using command-line switches” on page 28 for a description of
commonly used startup parameters.
Note To start the server without starting any database, you omit the database
file from the asiqsrv12 command and specify a servername. See “Naming the
server and databases” on page 31 for a discussion of why it is preferable to
include both the database and server in the startup command.
If you supply no switches and no database file on Windows NT, a dialog box
is displayed, allowing you to use a Browse button to locate your database file.
To start the server in a separate session, use the Windows NT start command:
start asiqsrv12 [
server-switches
]
database
[
database-switches
]
Running the server outside the current session
When you log on to a computer using a user ID and a password, you establish
a session. When you start a database server, or any other application, it runs
within that session. When you log off the computer, all applications associated
with the session terminate.
In a production environment, IQ database servers must be available all the
time. To make this easier, you can run Adaptive Server IQ in such a way that,
when you log off the computer, the database server remains running. The way
you do this depends on your operating system.
• Windows NT service You can run the Windows NT database server
as a service. This has many convenient properties for running high
availability servers.
• UNIX daemon You can run the UNIX database server as a daemon by
using the -ud command-line option, enabling the database server to run in
the background, and to continue running after you log off.

Using command-line switches
28
Running the UNIX database server as a daemon
To run the UNIX database server in the background, and enable it to run
independently of the current session, you run it as a daemon.
Note Do not use ’&’ to run the database server in the background. It will not
work. You must instead run the database server as a daemon.
❖To run the UNIX database server as a daemon:
•Use the -ud command-line option when starting the database server. For
example:
start_asiq -ud asiqdemo.db
Running the server as a Windows NT service
You can run the server as a service under Windows NT. This allows it to keep
running even when you log off the machine. For details of this and other NT-
specific features, see the Adaptive Server IQ Installation and Configuration
Guide.
Using command-line switches
You use command-line switches to define your Adaptive Server IQ
environment.
This section describes some of the most common command-line switches, and
points out when you may wish to use them. Switches described in this chapter
include:
For this switch See this section
-c “Catalog Store cache size”
-gb “Other performance-related switches” (Windows NT
only)
-gc “Checkpoint interval”
-gd “Controlling permissions from the command line”
-gk “Controlling permissions from the command line”
-gm “Concurrent users”
-gn “Controlling performance from the command line”

CHAPTER 2 Running Adaptive Server IQ
29
Some of the values you can set with command-line switches can also be
changed with the SET OPTION command. For details of this command and its
options, and for a complete list of command-line switches and full reference
information on them, see the Adaptive Server IQ Reference Manual.
Displaying command-
line options To display all of the available command-line options, enter one of the
following commands at the operating system prompt:
• On UNIX systems, enter:
asiqsrv12 -h
• On Windows NT systems, enter:
asiqsrv12 /?
Case sensitivity Command-line parameters are case sensitive.
Using configuration
files If you use an extensive set of command-line options, you can store them in a
configuration file, and invoke that file on a server command line. Specify
switches in the configuration file as you would on the command line, with
these exceptions:
• You can enter switches on multiple lines.
• You must not include either single or double quotes in a configuration file.
-gp “Setting a maximum Catalog page size”
-gr “Recovery time”
-gu “Controlling permissions from the command line”
-iqgovern “Concurrent queries”
-iqmc “Buffer caches and physical memory”
-iqtc “Buffer caches and physical memory”
-iqsmem “Unwired memory” (AIX, Compaq Tru64 UNIX, and
HP UNIX only)
-iqwmem “Wired memory” (Compaq Tru64 UNIX, HP UNIX,
and Sun UNIX only)
-n “Naming the server and databases”
-p “Other performance-related switches”
-ti “Setting the default client timeout”
-tl “Setting the default network timeout”
-x “Selecting communications protocols”
-z “Debugging network communications startup
problems”
For this switch See this section

Using command-line switches
30
For example, the following configuration file starts the database mydb.db, on
the database server named Elora, with a Catalog cache size of 16MB, TCP/IP
as a network protocol and a specified port number, user connections limited to
10, and a Catalog page size of 4096 bytes.
-n Elora
-c 16M
-x tcpip(port=2367
-gm 10
-gp 4096
path\mydb.db
If you name the file mydb.cfg, you could use these command-line options as
follows:
asiqsrv12 @mydb.cfg
In examples throughout this chapter where there are several command-line
options, we show them for clarity on separate lines as they could be written in
a configuration file. If you enter them directly on a command line, you must
enter them all on one line.
Note When you stop the server with the DBSTOP command, you need to
specify the same parameters as when you started the server. Using a
configuration file to start the server ensures that you will be able to find these
parameters when you need them.
Required command-
line switches While most of the command-line switches described in the sections that follow
are optional, you must specify the -n, -c, -gp, and -gm switches to run Adaptive
Server IQ effectively.
For this release, recommended server startup values are:
asiqsrv12 -n
servername
-c 16M -gc 6000 -gd all -gm 10
-gp 4096 -gr 6000 -ti 4400 -tl 300
database
If you use TCP/IP to connect to the server, you should include network
connection parameters as well. If you start the server without the parameter -x
’tcpip(port=nnnn)’ set, then the server uses the default TCP/IP port number 2638.
On UNIX platforms, if you start the database server with the start_asiq
command, these parameters are included automatically with values shown
above, along with others specific to your platform. You can override these
values and include other parameters by specifying them on the start_asiq
command line.

CHAPTER 2 Running Adaptive Server IQ
31
Configuration file for
the sample database The asiqdemo.cfg file, which you use to start the sample database, sets startup
parameters to the recommended defaults. You can also use this file as a
template for your own configuration files. Chapter 3, “Running and
Connecting to Servers”, Introduction to Adaptive Server IQ gives an example
of the sample database configuration file. This file is found in
demo/asiqdemo.cfg in your installation directory.
A note about defaults In the discussion of individual server options that follows, “default” means the
value that applies if you start the server with the asiqsrv12 command, or from
the Windows NT Start menu, and do not specify a different value.
If you start the server with the start_asiq UNIX startup utility, or with
asiqdemo.cfg or your own configuration file, many of these options are set to
other values.
Naming restrictions Do not use hyphenated names or reserved words for database names, user
identifiers or server names, even enclosed in quotation marks. For example, the
following are not allowed:
grant
june-1999-prospects
"foreign"
For a complete list of reserved words (keywords), see the Adaptive Server IQ
Reference Manual.
Naming the server and databases
You can use the -n command-line option as a database switch (to name the
database) or as a server switch (to name the server). The server switch is
required if you do not supply a database.
The server and database names are among the connection parameters that client
applications can use when connecting to a database. On Windows NT, the
server name appears on the desktop icon and on the title bar of the server
window.
Default names If no server name is provided, the default server name is the name of the first
database started.
The default database name is the root of the Catalog Store file name (the file
name without a directory path or the .db extension). For example, in the
following command line the first database is named mydb, the second database
is sample, and the server is named mydb.

Using command-line switches
32
asiqsrv12 mydb.db sample.db
Naming databases You can name databases by supplying a -n switch following the database file.
For example, the following command line starts a database and names it:
asiqsrv12 mydb.db -n MyDB
Naming a database lets you use a nickname in place of a file name that may be
difficult to remember.
Naming the server You name the server by supplying a -n switch before the first database file. For
example, the following command line starts a server named Cambridge_sample
and the sample database on that server:
asiqsrv12 -n Cambridge_sample sample.db -gm 10 -gp 4096
Putting the host name, in this case Cambridge, at the start of the server name is
a useful convention. It is especially important in a multiuser, networked
environment where shared memory will be used for local database
connections. This convention ensures that all users will be able to connect to
the correct database, even when other databases with the same name have been
started on other host systems.
To allow Adaptive Server IQ to locate the server no matter what character set
is in use, include only seven-bit ASCII (lower page) characters in the server
name. For more information on character sets, see Chapter 9, “International
Languages and Character Sets”
Specifying a server name lets you start a database server with no database
loaded. The following command starts a server named Galt with no database
loaded:
asiqsrv12 -n Galt -gm 10 -gp 4096
Note Although you can start a server by relying on the default server name, it
is better to include both the server name and the database name, and to make
the two names different. This approach helps users distinguish between the
server and the databases running on it. You must specify the server name in
order to start the server without starting a specific database.
For information about starting databases on a running server, see “Starting and
stopping databases”.
Case sensitivity and
naming conventions Server names and database names are case insensitive on Windows NT, and
case sensitive on UNIX.

CHAPTER 2 Running Adaptive Server IQ
33
You should adopt a set of naming conventions for your servers and databases,
as well as for all other database objects, that includes a case specification.
Enforcing naming conventions can prevent problems for users.
Controlling performance from the command line
Several command-line options can affect database server performance. Most of
the switches described in this section control resources for operations on the IQ
Store, which can have a major impact on performance. Switches that affect
only the resources available for operations on the Catalog Store may have a
minor impact on overall performance. If you need to specify switches that
affect the Catalog Store only, see the Adaptive Server IQ Reference Manual for
more information.
Performance tuning suggestions are given throughout this guide. See Chapter
12, “Managing System Resources” for a full discussion of how Adaptive
Server IQ uses memory, disk, and processors, the effect of user connections on
resource use, and options you can set to control resource use.
Some platform-specific tuning suggestions are presented in this guide. See also
the Adaptive Server IQ Installation and Configuration Guide for your
platform.
Setting memory switches
Adaptive Server IQ uses memory for a variety of purposes:
• Buffers for data read from disk to resolve queries
• Buffers for data read from disk when loading from flat files
• Overhead for managing connections, transactions, buffers, and database
objects
The switches discussed below, as well as other options you can set once the
server is running, determine how much memory is available for these purposes.
IQ buffer cache sizes Normally, you set the buffer cache size for the IQ main and temporary stores
using the SET OPTION command to set the Main_Cache_Memory_MB and
Temp_Cache_Memory_MB options. If you set IQ buffer cache sizes higher than
your system will accommodate, however, Adaptive Server IQ cannot open the
database.

Using command-line switches
34
To override these settings for the current server session, specify the server
startup options -iqmc (main cache size) and -iqtc (temp cache size) to open the
database and reset the defaults. The default sizes are 8MB for the main cache
and 4MB for the temporary cache, which are too low for any active database
use.
Concurrent users Your license sets the absolute number of concurrent users. However, you must
also set the -gm switch. This required switch lets you limit the number of
concurrent user connections on a particular server.
The -gn switch sets the number of execution threads that will be used for the
Catalog Store and connectivity while running with multiple users. It applies to
all operating systems and servers.
On Windows NT you need to specify this parameter in the asiqsrv12 command.
To calculate its value use the following formula:
gn_value
=
gm_value
- (( 2 *
num_CPUs
) + 10)
Specify a minimum of 25.
On UNIX platforms, the start_asiq utility sets this parameter. See the Adaptive
Server IQ Installation and Configuration Guide for your platform for more
information.
There may be times when you want to tune performance for a particular
operation by limiting the number of user connections to fewer than your license
allows. Alternatively, you may want to use the -iqgovern switch to control
query use; see “Concurrent queries.”
Concurrent queries The -iqgovern switch lets you specify the number of concurrent queries on a
particular server. This is not the same as the number of connections, which is
controlled by your license. By specifying the -iqgovern switch, you can help IQ
optimize paging of buffer data out to disk, and avoid overcommitting memory.
The default value of -iqgovern is (2 x the number of CPUs) +10.
Wired memory The -iqwmem switch creates a pool of “wired” memory on certain UNIX
platforms only. This memory is locked down so that it cannot be paged. Wired
memory can improve performance on Tru64, HP and Sun platforms. Specify
this switch as the number of megabytes of wired memory.
Warning! Use this switch only if you have enough memory to dedicate some
of it for this purpose. Otherwise, you can cause serious performance
degradation.

CHAPTER 2 Running Adaptive Server IQ
35
Unwired memory The -iqsmem switch creates a memory pool to increase total available memory.
This switch is available on all UNIX platforms, but is required in some cases:
• On HP systems use -iqsmem if you want to use more than 2GB of memory.
The value should be between 500 and 1400MB.
• On AIX systems always use -iqsmem. The value for -iqsmem should be
between 356 and 2560; otherwise, the server aborts.
Specify this switch as the number of megabytes of memory. The maximum
value for -iqsmem is 2000. For example, to add 1GB of unwired memory you
specify:
-iqsmem 1000
Number of processing
threads Use the -iqmt switch to set the number of processing threads that Adaptive
Server IQ can use. Adaptive Server IQ assigns varying numbers of kernel
threads to each user connection, based on the type of processing being done by
that process, the total number of threads available, and the setting of various
options. Increasing the number of threads can improve performance.
Catalog Store cache
size Use the -c switch to set the amount of memory in the cache for the Catalog
Store. The default initial cache size is computed based on the amount of
physical memory, the operating system, and the size of the database files. On
Windows NT, the database server takes additional cache for the Catalog when
the available cache is exhausted.
For many Adaptive Server IQ and Java applications, you need to raise the size
of the Catalog cache above the default value of 2MB. Any cache size less than
10000 is assumed to be in KB (1K =1024 bytes); any cache size 10000 or
greater is assumed to be in bytes. You can also specify the cache size as nK or
nM.
Both start_asiq and the asiqdemo.cfg configuration file set this parameter to
16MB.
Note The cache size for the IQ Store does not rely on the Catalog cache size.
See “IQ buffer cache sizes.”
Setting switches that affect timing
Checkpoint interval Adaptive Server IQ uses checkpoints to generate reference points and other
information that it needs to recover databases. Use the -gc switch to set the
maximum desired length of time (in minutes) that the database server will run
without doing a checkpoint. The default value is 60 minutes.

Using command-line switches
36
When a database server is running with multiple databases, the checkpoint time
specified by the first database started will be used unless overridden by this
switch. If a value of 0 is entered, the default value of 60 minutes is used.
Recovery time The -gr parameter lets you set the maximum number of minutes that the
database server will take to recover from system failure. When a database
server is running with multiple databases, the recovery time specified by the
first database started will be used unless overridden by this switch.
Other performance-related switches
Several switches help you tune network performance. They include -gb
(database process priority on Windows NT), and -p (maximum packet size).
Controlling permissions from the command line
Some command-line options control the permissions required to carry out
certain global operations.
Starting and stopping
databases The -gd option allows you to limit the users who can start a database on a
running server to those with a certain level of permission in the database to
which they are already connected:
•DBA (the default) —Only the DBA can start an extra database.
•ALL—Any user can start and stop databases.
•NONE—No one can start or stop a database on a running server.
Sybase recommends that only the DBA be allowed to start and stop production
databases.
Note If you do not set -gd ALL when you start the server, only the DBA can
start additional databases on that server. This means that users cannot connect
to databases that are not already started, either at the same time as the server,
or since then by the DBA.
Creating and deleting
databases The -gu option allows you to limit the users who can stop the server to users
with a certain level of permission in the database to which they are connected.
•DBA—Only the DBA can create and drop databases.
•ALL (default)—Any user can create and drop databases.
•NONE—No user can create or drop a database.

CHAPTER 2 Running Adaptive Server IQ
37
•UTILITY_DB—Only those users who can connect to the utility_db database
can create and drop databases. See “The utility database” on page 18 for
information.
Stopping the server The -gk option limits the users who can shut down a server to those with a
certain level of permission in the database.
•DBA (default) —Only the DBA can stop the server.
•ALL (default)—Any user can stop the server.
•NONE—No user can shut down the server with the STOP ENGINE
command.
Setting a maximum Catalog page size
The database server cache is arranged in pages, which are fixed-size areas of
memory. Since the server uses a single cache for the Catalog Store until it is
shut down, all Catalog pages must have the same size.
A Catalog file is also arranged in pages, of size 1024, 2048, or 4096 bytes.
Every database page must fit into a cache page.
You use the -gp option to set the Catalog page size explicitly. By setting -gp to
the maximum size, 4096, you maximize the number of columns per table that
Adaptive Server IQ can support.
By default, the server page size is the same as the largest page size of the
databases on the command line. The -gp option overrides this default. Once the
server starts, you cannot load a database with a larger Catalog page size than
the server. Unless you specify -gp , an attempt to load a database file with a
Catalog page size larger than the databases started on the command line will
fail.
If you use larger page sizes, remember to increase your cache size. A cache of
the same size will accommodate only a fraction of the number of the larger
pages, leaving less flexibility in arranging the space.
Note The -gp option and the page sizes listed here apply to the Catalog Store
only. You set the page size for the IQ Store in the IQ PAGE SIZE parameter of
the CREATE DATABASE command. See “Choosing an IQ page size” for more
information.

Using command-line switches
38
Setting up a client/server environment
Three switches can help you set up your client/server environment.
•-x specifies communication protocol options.
•-tl sets the network connection timeout.
•-ti sets the client connection timeout.
See the sections that follow for details.
Selecting communications protocols
Any communications between a client application and a database server
require a communications protocol. Adaptive Server IQ supports a set of
communications protocols for communications across networks and for same-
machine communications.
The database server supports the following protocols:
•Shared memory is used for same-machine communications, and is loaded
by default (unless the -hs parameter is specified on startup).
•TCP/IP is supported on all platforms.
•IPX is supported on Windows NT (client and server) and Windows 95
(client only).
•NetBIOS is supported on Windows NT (client and server) and Windows
95 (client only).
•Named pipes is supported on Windows NT only. Named Pipes is provided
for same machine communications to and from Windows 3.x client
applications using ODBC or Embedded SQL.
Specifying protocols By default, the database server starts up all available protocols. You can limit
the protocols available to a database server by using the –x command-line
switch. At the client side, many of the same options can be controlled using the
CommLinks connection parameter.
The following command starts a server using the TCP/IP protocol:
asiqsrv12 -x "tcpip"
The quotes are not strictly required in this example, but are needed if there are
spaces in any of the arguments to –x. If you omit this switch and you are using
TCP/IP, or if you do not specify a port number, the default port 2638 is used.

CHAPTER 2 Running Adaptive Server IQ
39
Additional parameters can be added to tune the behavior of the server for each
protocol. For example, the following command line instructs the server to use
two network cards, one with a specified port number. This command must be
entered all on one line, even though it appears on multiple lines here.
asiqsrv12
-x "tcpip(MyIP=192.75.209.12:2367,192.75.209.32)"
-gm 10 -gp 4096
path\asiqdemo.db
For detailed descriptions of network communications parameters that can
serve as part of the –x switch, see “Network communications parameters” in
the Adaptive Server IQ Reference Manual.
Limiting inactive connections
Adaptive Server IQ uses two parameters, -tl and -ti, to determine when it should
close user connections.
Setting the default
network timeout A liveness packet is sent periodically across a client/server TCP/IP or IPX
communications protocol to confirm that a connection is intact. If the server
runs for a liveness timeout period (default 2 minutes) without detecting a
liveness packet, the communication is severed. The server drops any
connections associated with that client. There is no warning. All activity that
falls within any open transaction is rolled back.
The –tl switch on the server sets the liveness timeout, in seconds, for all clients
that do not specify a –tl switch when they connect. Liveness packets are sent at
an interval of the (liveness timeout)/4.
You may want to set a higher value for this switch at the server level. Many
users, especially those who have used earlier versions of Adaptive Server IQ,
will not expect to be disconnected after only 2 minutes of inactivity.
Try setting the liveness timeout to 300, together with the recommended value
for –ti discussed in the next section. Set this switch as follows:
-tl 300
If this value does not work well, try -tl 1200, which sets the liveness timeout to
20 minutes.
Note Users who are running a client and server on the same machine do not
experience a liveness timeout.

Using command-line switches
40
Setting the default
client timeout Adaptive Server IQ disconnects client connections that have not submitted a
request for the number of minutes you specify with the -ti switch. By
disconnecting inactive connections, this option frees any locks those
connections hold. The default is 240 (4 hours). Raising this to the
recommended value, 4400 (about 73 hours), lets you start long runs at the
beginning of a weekend, for example, and ensure that any interim results will
not be rolled back.
Starting a server in forced recovery mode
Should you need to restart your server after a failure, you can usually do so
using the same startup options as usual.
On rare occasions, you may need to supply startup options to force recovery or
to recover leaked storage. To start the server with these options, see the chapter
“System Recovery and Database Repair” in the Adaptive Server IQ
Troubleshooting and Error Messages Guide.
Starting a server from DBISQL
If you are already connected to a running database server, you can start a new
server from DBISQL. Use the START ENGINE command to start a named
server from DBISQL.
Note This method is not recommended for most situations. If you use it be sure
you are starting the server on the system you intend, that you include
appropriate server parameters in the STARTLINE, and that environment
variables are set appropriately on the system where the server will start.
Example The following DBISQL command, entered on one line, starts a database server,
names it jill_newserv, and specifies the network connection, number of
connections, and Catalog page size.
START ENGINE AS jill_newserv
STARTLINE ’asiqsrv12 -x tcpip(port=5678) -gm 10 -gp
4096’

CHAPTER 2 Running Adaptive Server IQ
41
Starting multiple servers or clients on the same machine
In a production environment, it would be unusual to have more than one server
running on the same system. In a development environment, however, this
situation can occur.
If you are running more than one server or client on the same UNIX machine,
and shared memory is enabled, you must take certain precautions to prevent
users from connecting to the wrong server. To avoid conflicts when using
shared memory, consider doing one or more of the following:
• Create a temporary directory dedicated to each server. Make sure that each
client uses the same temporary directory as its server by setting the
ASTMP environment variable explicitly on both systems. For details
about setting environment variables, see the Adaptive Server IQ Reference
Manual.
• Create a data source name in the .odbc.ini file (on UNIX) for each server
and provide detailed connection information. For details, see the Adaptive
Server IQ Installation and Configuration Guide.
• Use connection strings that specify explicit parameters instead of relying
on defaults.
• Confirm connections by issuing the following command:
SELECT "database name is" = db_name(),
"servername_is" = @@servername
Monitoring server activity
It may be helpful, especially for new users, to monitor server activity. Using
commands appropriate for your platform, you can direct Adaptive Server IQ to
capture server activity in a log file.
Unix server log file When you start a server on a UNIX system with the start_asiq utility, server
activity is logged in an ASCII text file placed in the directory defined by
$ASLOGDIR. (If $ASLOGDIR is not defined, it defaults to $ASDIR/logfiles.)
The log file name has this format:
your_server_name.###.srvlog
Each time you start the server, the number is incremented. For example, your
directory may look like this:

Monitoring server activity
42
demo.001.srvlog demo.002.srvlog
janedemo.001.srvlog
For information about your most recent session, choose the log with the largest
number for the desired server. Issue a tail –f command to view the log contents.
For example:
% tail -f demo.002.srvlog
When you run start_asiq, specify the –z option to enhance the log file with
additional information about connections. This will help new users or those
troubleshooting connection problems.
On UNIX systems, there are two ways to check if a particular server is running:
• Log into the machine where the server was started, and issue the
command:
% ps -eaf | grep asiqsrv12
maryc 24836 25554 0 Feb 09 - 17:36
asiqsrv12 -c 16m -gc 6000 -gd all
-gr 6000 -gm 10 -gp 4096 -ti 4400
-tl 300 -iqmt 450 -iqsmem 2560
@fnma.cfg asiqdemo.db
janed 28932 38122 0 11:39:24 - 2:10
asiqsrv12 -c 16m -gc 6000 -gr 6000
-gm 10 -gp 4096 -ti 4400
-tl 300 -iqsmem 2560 -n janedemo -gd all
-iqmt 256 -x tcpip(port=1872)
•Use the stop_asiq utility, described in the following section, which
displays all Adaptive Server IQ processes running.
On Windows systems, look in the system tray for one or more Adaptive Server
IQ icons. Place the cursor over each icon and read the server name.
Windows server log
file On Windows systems, use the -o parameter on the asiqserv12 startup command
to create a log file of server activity. For example, to save output to a file named
results, start the server as follows:
asiqsrv12 -o results

CHAPTER 2 Running Adaptive Server IQ
43
Stopping the database server
The preferred ways to stop the database server are:
• In UNIX, use the stop_asiq utility. For details, see “Example — Stop a
server with stop_asiq”.
Note that when stop_asiq is used, the following message appears:
"Please note that ’stop_asiq’ will shutdown a server
completely without regard for users connections or load
processes status. For a finer level of detail the utility ’dbstop’
has the options to control whether a server is stopped based on
active connections."
• In Windows NT, click Shutdown on the database server display or right-
click the IQ icon in the system tray and select Exit.
Normally, you should not shut down a server while it is still connected to one
or more clients. If you try this, you get a warning that any uncommitted
transactions will be lost. Disconnect or close all the clients and try again.
You can also stop the database server in the following ways:
• At the operating system command line, issue the DBSTOP command with
appropriate parameters. Use the same parameters as when you started the
server. Without the proper connection parameters DBSTOP doesn't know
how to connect to the server to tell it to shutdown. For details on using
DBSTOP, see Chapter 4, “Database Administration Utilities” in the
Adaptive Server IQ Reference Manual.
• In a DBISQL window or command file, issue the STOP ENGINE
command to stop a named database server.
• In UNIX, in the window where the database server was started, type:
q
This command does not work if you have redirected input to a different
device.

Stopping the database server
44
Example — Stop a
server with stop_asiq The following example uses the stop_asiq utility on UNIX systems to shut
down an Adaptive Server IQ server and close all user connections to it.
When you issue the stop_asiq command, Adaptive Server IQ lists all the
servers owned by other users, followed by the server(s) you own. It then asks
if you want to stop your server. For example:
% stop_asiq
Checking system for ASIQ 12 Servers ...
The following 3 server(s) are owned by other users.
## Owner PID Started CPU_Time
-- --------- ----- -------- -------- -----------------------
hsin 19895 Mar.21 1:33
asiqsrv12 -c 16m -gd all -gm 10 -gn 25 -gp 4096 -ti 4400 -tl 300
-n hsin -x tcp
qadaily 24754 01:25:07 1286:53
asiqsrv12 -gn 25 @/express1/qa/daily/engine/new.cfg asiqdemo.db
-o /express1/qa
washburn 28350 Apr.11 0:20
asiqsrv12 -gn 25 @asiqdemo.cfg -o
/express1/users/washburn/mysybase12.4.0/asiq1
The following 1 server(s) are owned by ’janed’
## Owner PID Started CPU_Time
-- --------- ----- -------- -------- -----------------------
1: janed 2838 15:11:37 0:07
asiqsrv12 -c 16m -gd all -gm 10 -gn 25 -gp 4096 -ti 4400 -tl 300 @asiqdemo.cfg
--
Please note that ’stop_asiq’ will shutdown a server completely
without regard for users connections or load processes status.
For a finer level of detail the utility ’dbstop’ has the options
to control whether a server is stopped based on active connections.
Do you want to stop the server displayed above <Y/N>?
To shut down the server, type Y (yes). Messages like the following display:
Shutting down server (2838) ...
Checkpointing server (2838) ...
Server shutdown.
To leave the server running, type N (no). You return to the system prompt and
IQ does not shut down the server.

CHAPTER 2 Running Adaptive Server IQ
45
If no running servers were started by your user ID, Adaptive Server IQ
displays information about servers run by other users, then a message like the
following:
There are no servers owned by ’janed’
Example —Stop a
server from DBISQL The following example stops a server from DBISQL:
STOP ENGINE Ottawa UNCONDITIONALLY
The optional keyword UNCONDITIONALLY specifies that the database server
will be stopped even if there are connections to it.
Note You can stop a server from DBISQL if you are connected as DBA to one
of the databases running on that server (including the utility_db database), or if
the server was started with the -gk ALL option.
Who can stop the server?
When you start a server, you can use the -gk option to set the level of
permissions required for users to stop the server. The default level of
permissions required is DBA, but you can also set the value to ALL or NONE. If
you set it to NONE, even the DBA cannot execute STOP ENGINE. In a
production environment, Sybase strongly recommends that only the DBA be
allowed to stop the database server.
Interactively, of course, anyone at the machine where the server was started can
click Shutdown (NT only) or type q on the server window.
Shutting down operating system sessions
Always stop the database server explicitly before closing the operating system
session.
If you close an operating system session where a database server is running, or
if you use an operating system command to stop the database server (other than
the UNIX command shown in the previous section), the server shuts down, but
not cleanly. Next time the database is loaded, recovery happens automatically.
For information on system recovery, see Adaptive Server IQ Troubleshooting
and Error Messages Guide.

Starting and stopping databases
46
Examples of commands that do not stop a server cleanly include:
• Stopping the process in the Windows NT Task Manager Processes
window.
• Using a UNIX kill command.
Starting and stopping databases
You can start databases when you start the server, or after the server is running.
To start a database when you start the server, see “Starting the database server”
on page 21 for details.
A database server can have more than one database in use at a time. However,
it is more common to run one database per server, especially in a production
environment.
Starting a database on
a running server There are several ways to start a database on a running server.
• To start a database from DBISQL or Embedded SQL, use the START
DATABASE statement. For a description, see the chapter “SQL
Statements” in the Adaptive Server IQ Reference Manual.
• To start and connect to a database from DBISQL or Sybase Central, use a
data source that specifies the database file. See “Working with ODBC data
sources”.
• To start and connect to a database when you start DBISQL from a system
command prompt, include the parameter “DBF=
db-file
” in the connection
parameters. See “Connecting to a database from DBISQL”.
• To start a database from Sybase Central, see Chapter 4, “Managing
Databases with Sybase Central” in Introduction to Adaptive Server IQ
• To start an embedded database, while connected to a server, connect to a
database using a DBF parameter. This parameter specifies a database file
for a new connection. The database file is loaded onto the current server.
Page size limitations The server holds database information in memory using pages of a fixed size.
Once a server has been started, you cannot load a database that has a larger
Catalog page size or IQ page size than the server. For this reason, you should
always set the Catalog page size to its maximum value, 4096 bytes, with the
-gp switch.

CHAPTER 2 Running Adaptive Server IQ
47
Permission limitations The -gd server command-line option determines the permission level required
to start databases. By default, this option is set to DBA, so that only users with
database administrator privileges can start IQ databases. However, you can
also set this option to ALL or NONE. ALL means that all users can start a
database. NONE means that no users, including the DBA, can start a database.
Stopping a database You can stop a database in the following ways:
• Disconnect from a database started by a connection string. The database
stops automatically when the last user disconnects from it, unless you
explicitly set the AUTOSTOP connection parameter to NO.
• From DBISQL or Embedded SQL, use the STOP DATABASE statement.
For information, see the Adaptive Server IQ Reference Manual.
Starting the asiqdemo database
You can start the server and the asiqdemo database easily, using the
configuration file that Adaptive Server IQ provides. This configuration file,
called asiqdemo.cfg, contains all the parameters necessary to start the sample
database.
❖To start the server and asiqdemo database on UNIX operating systems:
• From a command line, type the following command:
%cd $ASDIR/demo
%start_asiq @asiqdemo.cfg asiqdemo
These commands use the configuration file asiqdemo.cfg that is created
automatically at installation. You can edit this file to change the parameters you
use to start the sample database. For example, the server name in this file is
hostname_asiqdemo. You can rename the server to a unique name of your
choice, like janed_server.
❖To start the server and asiqdemo database on a Windows NT system:
• Click Start on the Taskbar, and select Programs→Adaptive Server IQ
12.0→ Sample Database.
Behind the scenes The command that executes when you perform these steps is:
path\win32\asiqsrv12 @demo\asiqdemo.cfg
demo\asiqdemo.db

Starting and stopping Sybase Central
48
where path is your Adaptive Server IQ installation directory,
demo\asiqdemo.cfg specifies the configuration file, and demo\asiqdemo.db is
the sample database file. The asiqsrv12 command starts the server in a
dedicated window. You can start database servers by entering this command at
a system command prompt, as described elsewhere in this chapter.
Starting and stopping Sybase Central
If your system supports a graphical user interface, you will use Sybase Central
to perform many administrative tasks. This guide gives summary instructions
for using Sybase Central. For more information, see the Introduction to
Adaptive Server IQ, or use the online help available within Sybase Central.
Starting Sybase
Central on UNIX
Systems
To start Sybase Central, change directory to $SYBASE/sybcentral and type:
% scjview
If you have added $SYBASE/asiq12/bin or $SYBASE/bin to your path, as
instructed at the end of the installation, you can issue the scjview command
from any directory.
Starting Sybase
Central on Windows
NT Systems
To start Sybase Central, select Start→Programs→Adaptive Server IQ
12→Sybase Central Java Edition.
The main Sybase Central window appears.
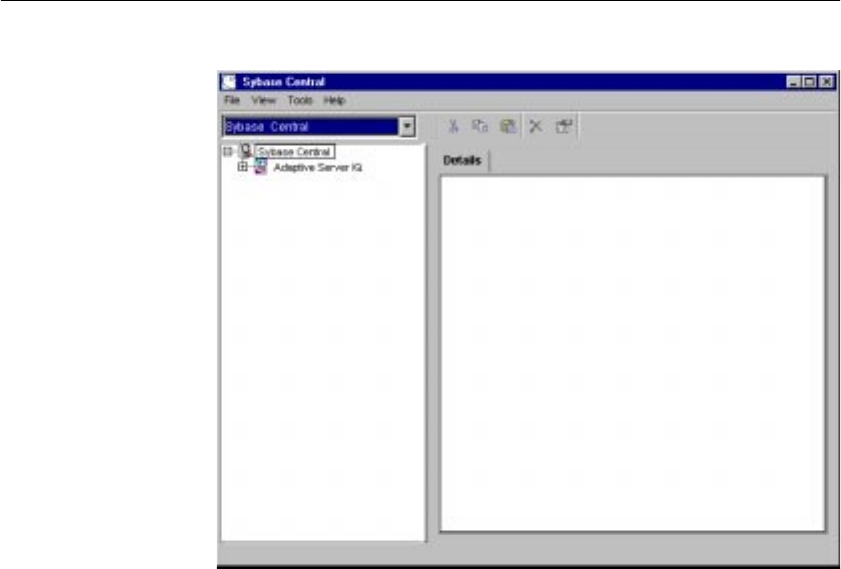
CHAPTER 2 Running Adaptive Server IQ
49
Figure 2-1: The Sybase Central Hierarchy
Plug-ins for Sybase Central, such as the Adaptive Server IQ database
management system, occupy the first level in the Sybase Central hierarchy
after the root level. A plug-in is a graphical tool for managing a particular
product. When you install the product, you can also install its Sybase Central
plug-in. When you next start Sybase Central, the new product automatically
“plugs in” to Sybase Central and appears in the main window.
The right panel displays the contents of the container that has been selected in
the left panel.
Connecting a plug-in
If you do not see the plug-in for Adaptive Server IQ in the main Sybase Central
window, you can connect to it manually.
❖Connecting to a plug-in
1 Select Tools → Adaptive Server IQ 12.
2 If you do not see Adaptive Server IQ on the Connect Menu, select Tools
→ Plug-ins.

Introduction to connections
50
3 If Adaptive Server IQ (ASIQ) is listed, select Register. If not, select Load.
Use the Browse button to find and select the file ASIQPlugin.jar. Click
OK.
Stopping Sybase Central
To stop Sybase Central, select File → Exit.
Introduction to connections
The remainder of this chapter describes how client applications connect to
databases. It contains information about connecting to databases from ODBC
applications and application development systems, as well as from Embedded
SQL applications.
Any client application that uses a database must establish a connection to that
database before any work can be done. The connection forms a channel
through which all activity from the client application takes place. For example,
your user ID determines permissions to carry out actions on the database—and
the database server has your user ID because it is part of the request to establish
a connection.
This sounds simple, but some client tools may not clearly indicate connection
status, and a failed command is your first indication that the connection does
not exist. For a novice user, a quick way to confirm the connection is by a
simple select db_name().
The syntax is:
select db_name()
to display the current database, or
select db_name([
database_id
])
to display any database you specify.
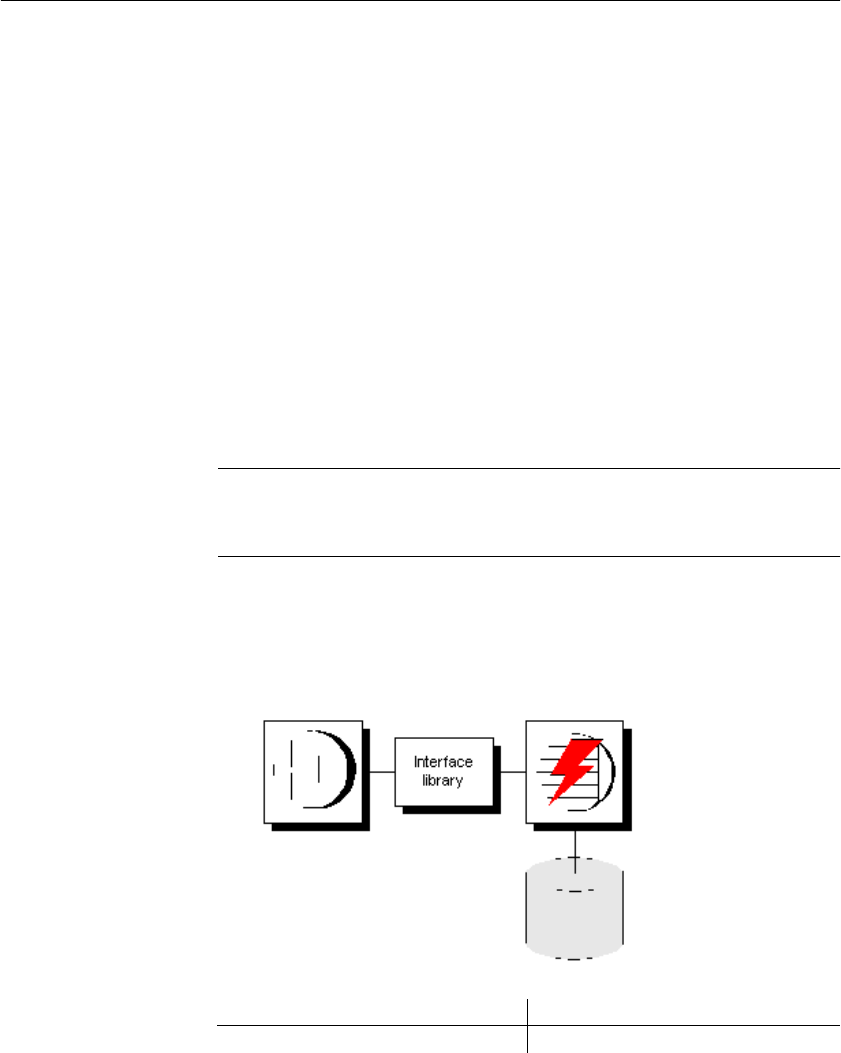
CHAPTER 2 Running Adaptive Server IQ
51
How connections are established
To establish a connection, the client application calls functions in one of the
supported interfaces. Adaptive Server IQ supports the following interfaces:
•ODBC — ODBC connections are discussed in this chapter.
•Embedded SQL — Embedded SQL connections are discussed in this
chapter.
•Sybase Open Client — Open Client connections are not discussed in this
chapter. For information on connecting to IQ from Open Client
applications, see Chapter 14, “Adaptive Server IQ as a Data Server”
•JDBC — JDBC connections are not discussed in this chapter. For
information on connecting via JDBC, see Chapter 4, “Managing
Databases with Sybase Central” in Introduction to Adaptive Server IQ. To
create JDBC data sources, see the chapter entitled “Data Access Using
JDBC” in the Adaptive Server Anywhere User’s Guide.
Note JDBC provides the link between the execution of Java objects and
database operations. For a description of Java support in Adaptive Server IQ,
see “Enabling Java in the database” on page 113.
The interface uses connection information included in the call from the client
application, perhaps together with information held on disk in a file data
source, to locate and connect to a server running the required database. The
following figure is a simplified representation of the pieces involved.
Learning about
connections If you want ... Consider reading ...
Some examples to get started quickly “Simple connection examples”

Introduction to connections
52
Connection parameters specify connections
When an application connects to a database, it uses a set of connection
parameters to define the connection. Connection parameters include
information such as the server name, the database name, and a user ID.
A keyword-value pair, of the form parameter=value, specifies each connection
parameter. For example, you specify the password connection parameter for
the default password as follows:
Password=sql
Connection parameters are passed as connection strings
Connection parameters are assembled into connection strings. In a connection
string, a semicolon separates each connection parameter, as follows:
ServerName=host_asiqdemo;DatabaseName=asiqdemo
Representing
connection strings This chapter has many examples of connection strings, represented in the
following form:
parameter1
=
value1
parameter2
=
value2
...
This is equivalent to the following connection string:
parameter1
=
value1
;
parameter2
=
value2
A conceptual overview “Connection parameters specify
connections”
To create data sources “Working with ODBC data sources”
To see an in-depth description of how
connections are established
“Working with ODBC data sources”
To add users and grant them permissions “How Adaptive Server IQ makes
connections”
To diagnose network-specific connection
issues
“Troubleshooting network
communications” in the Adaptive Server
IQ Troubleshooting and Error Messages
Guide
To learn about character set issues
affecting connections
“Connection strings and character sets”
on page 338
If you want ... Consider reading ...

CHAPTER 2 Running Adaptive Server IQ
53
You must enter a connection string on a single line, with the parameter settings
separated by semicolons.
Connection parameters are passed as connection strings
Connection parameters are passed to the interface library as a connection
string. This string consists of a set of parameters, separated by semicolons.
In general, the connection string built up by an application and passed to the
interface library does not correspond directly to the way a user enters the
information. Instead, a user may fill in a dialog box, or the application may read
connection information from an initialization file.
Certain Adaptive Server IQ utilities accept a connection string as the -c
command-line option and pass the connection string on to the interface library
without change. For example, the following is a typical Collation utility
(dbcollat) command line for Windows NT systems. It should be entered all on
one line.
dbcollat -c "uid=DBA;pwd=SQL;dbn=asiqdemo"
c:\temp\asiqdemo.col
Note DBISQL processes the connection string internally. It does not simply
pass on the connection parameters to the interface library. Do not use
Interactive SQL to test command strings from a command prompt.
Simple connection examples
Although the connection model for Adaptive Server IQ is configurable, and
can become complex, in many cases connecting to a database is very simple.
This section describes some simple cases of applications connecting to an
Adaptive Server IQ database. When you are getting started, this section may be
all you need, for example, if you are running the asiqdemo sample database on
a local server and are not connected to a network. However, in most IQ
environments, in order to ensure that you can connect and disconnect properly,
a very complete set of connection parameters is essential.

Simple connection examples
54
For steps in connecting to a database using Sybase Central, see the Introduction
to Adaptive Server IQ. For more detailed information on available connection
parameters and their use, see “Connection parameters” on page 73.
Connecting to a database from DBISQL
Many examples and exercises throughout the documentation start by
connecting to the sample database from Interactive SQL, also called DBISQL.
Here is how to carry out this step.
Note To avoid ambiguity, specify connection parameters for DBISQL instead
of relying on defaults. You can specify connection parameters in a command
line or an initialization file such as .odbc.ini or odbc.ini. For a complete list, see
Chapter 3, “Connection and Communication Parameters” in Adaptive Server
IQ Reference Manual.
If more than one database is started on a server, for example, you should
specify the database name. In a network with subnets, specify the CommLinks
parameter with protocol options including the host number.
In the .odbc.ini file, you must use the long form of each parameter. For
example, use DatabaseFile instead of DBF.
If your parameters are incomplete or incorrect, you may see an error such as
Database name required to start engine
❖To connect from a UNIX system:
1 Make sure that your PATH and other environment variables are correctly
set, as described in Chapter 1, “File Locations and Installation Settings” in
the Adaptive Server IQ Reference Manual.
2 To ensure that the sample database is loaded on a running server, at the
UNIX prompt enter:
ps -eaf | grep asiqdemo
If you need to start the sample database, enter:
cd $ASDIR/demo
start_asiq @asiqdemo.cfg asiqdemo
3 If you have not already done so, change to your home directory ($HOME)
and issue the following command to copy the terminfo extension file
default.tix into it:

CHAPTER 2 Running Adaptive Server IQ
55
% cp $SYBASE/asiq12/tix/default.tix
This file controls key sequences for DBISQL and improves the command
window display. For more information, see Chapter 6, “Getting Started
with DBISQL” in Introduction to Adaptive Server IQ.
4 Start DBISQL by entering
dbisql -c
"uid=DBA;pwd=SQL;eng=
servername
;links=tcpip"
at the command line. Make sure that the value supplied for the servername
is the same server name that was supplied in the start_asiq command to
start the server.
The –c parameter specifies connection parameters. You can also specify
these parameters in a data source, as described later in this chapter.
Note links=tcpip (or CommLinks=tcpip) is only required if you use
TCP/IP to connect to the database. If you use the shared memory port to
connect to a local database you can omit the links parameter; however,
it is always safer—and required on some platforms—to include complete
network parameters.
To connect to a database on a foreign host, you must add the host. For
example:
dbisql -c "uid=DBA;pwd=SQL;eng=SERV1_asiqdemo;
links=tcpip(host=
SERV2
)"
If the host was started with a non-default port number (not 2638) then the
port number must be added also. For example:
dbisql -c "uid=DBA;pwd=SQL;eng=SERV1_asiqdemo;
links=tcpip(host=SERV2;port=1234)"
If you prefer, use this alternate form of the links clause, which has the same
result:
links=tcpip(host=SERV2:1234)"
❖To connect from a Windows NT system
1 Select Start → Προγραµσ → Sybase Adaptive Server IQ 12 →
Interactive SQL, or at the NT command prompt enter
dbisql

Simple connection examples
56
You can include the -c parameter to specify connection parameters in the
dbisql command, as described in the procedure above for connecting to
UNIX. If you omit these parameters, the DBISQL logon window appears.
2 Enter the user ID
DBA
and the password
SQL
This is the default user ID and password for Adaptive Server IQ databases
when they are created.
3 Click the Database tab and type the server name (for example,
“hostname_asiqdemo” for the asiqdemo database).
4 If you use TCP/IP to connect to databases, on the Network tab, click on
TCPIP. (If you use the shared memory port for connecting, skip this step.)
If your database is on a remote machine, you must add host information in
the space beside TCPIP by typing “host=servername:nnnn” where
servername is the name of your system and nnnn is your port number. (The
default port number is 2638, but if the host was started with a different
number, use that instead.)
5 Click OK to connect to the database.
6 After you connect to the database, the DBISQL window appears. The
DBISQL window displays the database name, user ID, and server name
for the connection on its title bar. The words “Connected to database”
appear in the Statistics window along with a message displaying the
collation sequence used by the database.
You can connect to any database server that is already running in the same
manner. You can also specify a non-default character set and language.
For more information on using DBISQL, see the chapter “Getting Started with
DBISQL” in the Introduction to Adaptive Server IQ.
Connecting to other databases from DBISQL
The following procedure shows how to connect to a running database from
DBISQL.

CHAPTER 2 Running Adaptive Server IQ
57
❖To connect to a database from DBISQL on UNIX:
1 Start the server and the database by typing at a system command prompt:
start_asiq
dbname
2 Start DBISQL by typing at a system command prompt:
dbisql -c
"uid=userID;pwd=password;eng=
dbname
;links=tcpip"
For example, to connect to the sample database you would enter:
dbisql -c
"uid=DBA;pwd=SQL;eng=asiqdemo;links=tcpip"
The –c parameter specifies connection parameters. See “Connection
parameters” for more about connection parameters.
To connect to a system on a foreign host, you must add the host:
dbisql -c "uid=DBA;pwd=SQL;eng=
dbname
;
links=tcpip(host=
hostname
"
If the host was started with a non-default port number (not 2638) then the
port number must be added as well:
dbisql -c "uid=DBA;pwd=SQL;eng=anotherdb;
links=tcpip(host=
hostname
;port=
nnnn
)"
Connecting to an embedded database
An embedded database, designed for use by a single application, runs on the
same machine as the application and is largely hidden from the application
user.
When an application uses an embedded database, the database server is
generally not running when the application connects. In this case, you can start
the database using the connection string, and by specifying the database file in
the DatabaseFile (DBF) parameter of the connection string.
Using the DBF
parameter The DBF parameter specifies which database file to use. The database file
automatically loads onto the default server, or starts a server if none is running.
The database unloads when there are no more connections to the database
(generally when the application that started the connection disconnects). If the
connection started the server, it stops once the database unloads.

Simple connection examples
58
The following connection parameters show how to load the sample database as
an embedded database:
dbf=path\asiqdemo.db
uid=dba
pwd=sql
where path is the name of your Adaptive Server IQ installation directory.
Using the Start
parameter The following connection parameters show how you can customize the startup
of the sample database as an embedded database. This is useful if you wish to
use command-line options, such as the cache size:
Start=asiqsrv12 -gm 10 -gp 4096 -c 8M
dbf=path\asiqdemo.db
uid=dba
pwd=sql
Extra cache needed for Java
If you are using Java in an embedded database, you should use the start line to
provide more than the default cache size. For development purposes, a cache
size of 8 MB is sufficient.
Example: connecting
from DBSQL In this example, the sample database is an embedded database within DBSQL.
❖To connect to an embedded database from DBSQL in Windows NT:
1 Start DBISQL with no databases running. You can use either of the
following ways:
• From the Windows NT Start menu, choose Sybase→Adaptive Server
Anywhere →Interactive SQL.
•Type
dbisql at a system command prompt.
When DBISQL starts, it is not connected to any database.
2 Type CONNECT in the command window, and press F9 to execute the
command. The connection dialog appears.
3 If you have an ODBC data source for your database, select that data
source.
4Enter
DBA as the user ID and SQL as the password. Then click the Database
tab. Enter the full path of the sample database in the Database File field.
For example, if your installation directory is c:\sybase\asiq12 you should
enter the following:
c:\sybase\asiq12\asiqdemo.db

CHAPTER 2 Running Adaptive Server IQ
59
5 Leave all other fields blank, and click OK. Adaptive Server IQ starts up
and loads the sample database, and DBISQL connects to the database.
Connecting using a data source
You can save sets of connection parameters in a data source. Data sources can
be used by ODBC and Embedded SQL applications like DBISQL. You can
create data sources from the ODBC Administrator; see “Creating and editing
ODBC data sources” for details.
The following procedure shows how to connect to the sample database from
DBISQL using a data source.
❖To connect using a data source:
1 Start DBISQL with no databases running.
• On UNIX, type dbisql at a system command prompt.
• On Windows NT, from the Start menu choose Programs→Sybase →
Adaptive Server IQ 12.0 → Interactive SQL.
2Enter
DBA as the user ID and SQL as the password.
3 Specify the data source. On Windows NT, you can select from the drop-
down list of ODBC data sources; for the sample database, select ASIQ12
Sample. On UNIX you must enter it in the ODBC Data Source field.
4 For the sample database, leave all other fields blank, and click OK.
Adaptive Server IQ starts up and loads the sample database, and
Interactive SQL connects to the database. For other databases you may
need to provide additional information, depending on your data source.
Note You can also specify the data source name by including the dsn
connection parameter in the dbisql command, as follows:
dbisql -c "dsn=ASIQ12 Sample"
The asiqdemo data
source The asiqdemo data source holds a set of connection parameters, including the
database file and a Start parameter to start the sample database. The server
name in this data source is “hostname_asiqdemo” where hostname represents
your system name.
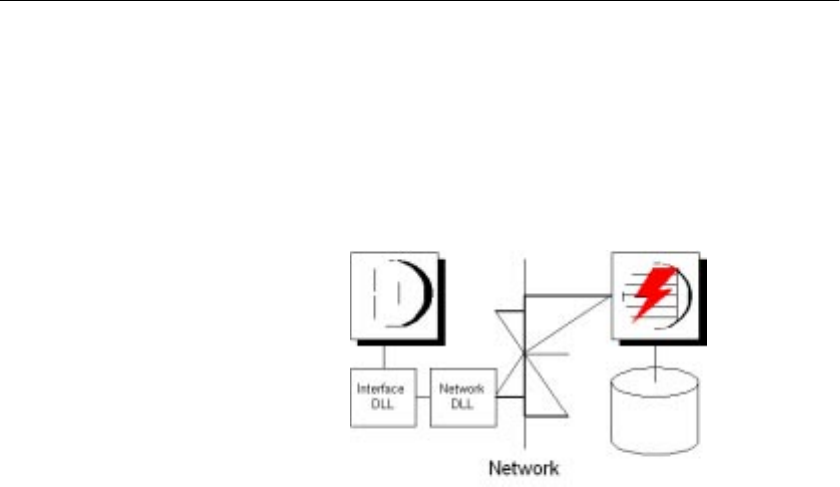
Simple connection examples
60
Connecting to a server on a network
To connect to a database running on a network server somewhere on a local or
wide area network, the client software must be able to locate the database
server. Adaptive Server IQ provides a network library (a DLL or shared
library) that handles this task.
Network connections occur over a network protocol. Several protocols are
supported, including TCP/IP, IPX, and NetBIOS.
Specifying the server Adaptive Server IQ server names are unique on a local domain for a given
network protocol. The following connection parameters provide a simple
example for connecting to a server running elsewhere on a network:
eng=
svr_name
dbn=
db_name
uid=
user_id
pwd=
password
CommLinks=all
The client library first looks for a local server of the given name, and then looks
on the network for a server of the specified name.
The above example finds any server started using the default port number.
However, you can start servers using other port numbers by providing more
information in the CommLinks parameter. For information on this parameter,
see Chapter 3, “Connection and Communication Parameters” in Adaptive
Server IQ Reference Manual.
Specifying the
protocol If several protocols are available, you can tell the network library which ones
to use. The following parameters use only the TCP/IP protocol:
eng=
svr_name
dbn=
db_name
uid=
user_id
pwd=
password
CommLinks=tcpip

CHAPTER 2 Running Adaptive Server IQ
61
The network library searches for a server by broadcasting over the network,
which can be a time-consuming process. Once the network library locates a
server, the client library stores its name and network address in a file. Users
should never need to use this file directly. Adaptive Server IQ reuses this entry
for subsequent connection attempts, which can be many times faster than a
connection that is achieved by broadcast.
Many other connection parameters are available to assist Adaptive Server IQ
in locating a server efficiently over a network. For more information see
“Network communications parameters” in the Adaptive Server IQ Reference
Manual.
To see how you can include connection parameters in an ODBC data source,
see “Creating and editing ODBC data sources”.
Note In a subnetted network environment, it is possible to have multiple
servers with the same name and port number running on different nodes in
different subnets. This is true because in most situations, routers are not
programmed to pass broadcast messages between subnets. If you are running
in a subnetted environment, it is always safest to use specific host, port
numbers, and server names to guarantee that you are connecting to the proper
server and database. This is particularly true when using default connection
parameters, and is required on AIX platforms.
Using default connection parameters
You can leave many connection parameters unspecified, and instead use the
default behavior to make a connection.
Note Be extremely cautious about relying on default behavior in production
environments, especially if you distribute your application to customers who
may install other Adaptive Server IQ or Adaptive Server Anywhere
applications on their machine.
Default database
server If you are connecting to a database on your local server, and more than one
database has been started on that server, you need to specify the database you
wish to connect to, but you can leave the server as a default:
dbn=
db_name
uid=
user_id

Simple connection examples
62
pwd=
password
Note Do not use these parameters if more than one local server is running, or
you may connect to the wrong server.
Default database If more than one server is running, you need to specify which one you wish to
connect to. If only one database has been started on that server, you do not need
to specify the database name. The following connection string connects to a
named server, using the default database:
eng=
server_name
uid=
user_id
pwd=
password
No defaults The following connection string connects to a named server, using a named
database:
eng=
server_name
dbn=
db_name
uid=
user_id
pwd=
password
For more information about default behavior, see “How Adaptive Server IQ
makes connections”.
Connecting from Adaptive Server IQ utilities
Adaptive Server IQ database utilities that communicate with the server (rather
than acting directly on database files) do so using Embedded SQL. They follow
the procedure outlined in “How Adaptive Server IQ makes connections” when
connecting to a database.
How database utilities
obtain connection
parameter values
Many of the administration utilities obtain the connection parameter values by:
1 Using values specified on the command line (if there are any). For
example, the following command starts the collation utility on the sample
database on the default server, using the user ID DBA and the password SQL
and the asiqdemo.col collation file:
dbcollat -c "uid=DBA;pwd=SQL;dbn=asiqdemo"
c:\temp\asiqdemo.col

CHAPTER 2 Running Adaptive Server IQ
63
2 Using the SQLCONNECT environment variable settings if any command
line values are missing. Adaptive Server IQ database utilities do not set
this variable automatically. For a description of the SQLCONNECT
environment variable, see Chapter 1, “Environment Variables and
Registry Entries,” in Adaptive Server IQ Reference Manual.
3 Prompting you for a user ID and password to connect to the default
database on the default server, if parameters are not set in the command
line or the SQLCONNECT environment variable.
For a description of command-line switches for each database utility, see
Chapter 4, “Database Administration Utilities” in the Adaptive Server IQ
Reference Manual.
Working with ODBC data sources
You can store a set of Adaptive Server IQ connection parameters as a data
source. Data sources are required to use applications that connect using the
Open Database Connectivity (ODBC) interface.
Microsoft Corporation defines the ODBC interface, which is a standard
interface for connecting client applications to database management systems in
the Windows and Windows NT environments. Many client applications,
including application development systems, use the ODBC interface to access
a wide range of database systems.
Although data sources are especially designed for Windows and Windows NT,
Adaptive Server IQ allows you to create and use them on UNIX servers as well.
This allows ODBC–based client applications to connect to databases on UNIX
servers.
When you connect to a database using ODBC, you use an ODBC data source.
The data source contains a set of connection parameters. You need an ODBC
data source on the client computer for each database you will connect to.
If you have a data source, your connection string can simply name the data
source to use.
Embedded SQL can
use data sources Embedded SQL applications such as Interactive SQL and the other Adaptive
Server IQ database administration utilities can also use ODBC data sources,
even though they are not ODBC applications.

Working with ODBC data sources
64
DSNs and FILEDSNs
You specify a data source either as a DSN (data source name) or as a FileDSN
(file data source name).
You can reference a data source in the Windows NT registry using the DSN
connection parameter:
DSN=
my data source
You can reference a data source held in a file using the FileDSN connection
parameter:
FileDSN=
mysource
.dsn
DSNs and FileDSNs differ only in how they are stored, and how you create
them. With the exception of encrypted passwords, you can put identical
connection information in them. You can use both DSNs and FileDSNs on any
platform.
Where DSNs and
FileDSNs are stored A DSN, or Data Source Name, is stored in the file odbc.ini and in the registry
on Windows NT systems. On UNIX platforms it is stored in the odbc.ini file
only.
A FileDSN, or File Data Source Name, is always stored on a file on all
platforms.
File data sources can
be distributed File data sources can easily be distributed to end users, so that connection
information does not have to be reconstructed on each machine. It can be sent
via email, for example, but is not stored automatically in any public place. If
the file is placed in the default location for file data sources, it is picked up
automatically by ODBC. In this way, managing connections for many users
can be made simpler.
Note Because DSNs are stored in the NT registry, they are public information.
For this reason you should not put a password in a DSN, unless you encrypt it.
If you want to store your password in your data source, use a File DSN.
How you create DSNs
and FILEDSNs To create DSNs on NT systems, use the ODBC Administrator; do not edit
odbc.ini directly. See “Creating and editing ODBC data sources” for details.
To create File DSNs on Windows NT systems, use the ODBC Administrator.
See “Creating and editing ODBC data sources”.

CHAPTER 2 Running Adaptive Server IQ
65
To create or edit DSNs or File DSNs on UNIX systems, use a text editor. For
DSNs you can edit the .odbc.ini file directly. For File DSNs, create a file with
the name you choose, using the file extension .dsn.
Note Sybase recommends that, to avoid ambiguity, you be as specific as
possible in creating ODBC and other data sources, whether you create them
using the ODBC Administrator, or by editing odbc.ini, .odbc.ini, or .dsn files
directly. If more than one database is started on a server, for example, you
should specify the database name, and in a network with subnets, specify the
CommLinks parameter including the host number when editing files; include
the host number in the network protocol options on the Network tab in the
ODBC Administrator.
If connection parameters are incomplete or incorrect, you may see an error
such as
Database name required to start engine
For a complete list of connection parameters, see Chapter 3, “Connection and
Communication Parameters” in Adaptive Server IQ Reference Manual.
Examples of
connection strings
using data sources
The following connection string specifies an ODBC Data Source Name and a
user ID.
DSN=ASIQ sample;uid=DBA
The following connection string specifies a File Data Source Name, with a user
ID and password.
FILEDSN=ASIQ on UNIX;uid=DBA;pwd=SQL
Creating and editing ODBC data sources
You need an ODBC data source on the client computer for each database you
wish to connect to. You probably already have an odbc.ini file on your system.
On Windows NT, the ODBC Administrator provides a central place for
managing ODBC data sources. The following procedure uses the ODBC
Administrator to add a new data source to your existing odbc.ini, or creates a
new file if necessary.
To create ODBC data sources on UNIX systems, see also “Using ODBC data
sources on UNIX”.

Creating and editing ODBC data sources
66
❖To create an ODBC User Data Source:
1 Select Settings → Control Panel → ODBC or Select Programs → Sybase
→ Adaptive Server IQ → ODBC Administrator
2 In the ODBC Data Source Administrator, click Add on the User DSN tab.
3 Select the Adaptive Server IQ 12 from the list of drivers and click Finish.
4 In the Adaptive Server IQ ODBC Configuration box, type the Data Source
Name.
5 Now click the Login tab. Type the User ID and Password for your
database. For example, use “DBA” and “SQL”.
6 Click the Database tab. If the data source is on your local machine, type a
Start line and Database file, including the path.
7 If the data source is on a remote system, click the Network tab. Click the
box for the appropriate protocol and specify the options beside the box.
For example, to connect to a server on system PUSHKIN using TCP/IP
protocol and port 1870, you would click TCP/IP and type:
host=pushkin:1870
You could also use the host network address. For example:
host=157.133.66.75:1870
8 Click OK when you have finished defining your data source.
The ODBC Data Source Administrator returns you to the User DSN tab.
For details of the ODBC configuration box and its tabs, see “Configuring
ODBC data sources” on page 67
Note When specifying network connections, you need a different
systemname:port# combination for each database server. The port number
must match the one you started the server with.
❖To test an ODBC Data Source
To test your data source, you must first start the database.
1 Start the database. For example, to start the Sample Database, select Start
→ Programs → Sybase → Adaptive Server IQ 12 → Start ASIQ Demo
Database.
2 In the ODBC Data Source Administrator, select your new data source from
the list of User Data Sources.

CHAPTER 2 Running Adaptive Server IQ
67
3 Click Configure.
4 On the ODBC Configuration dialog box, click Test Connection.
If you cannot access the Data Source, check that you have filled out the
various tabs with correct file and pathnames.
To edit a data source, select one from the list in the ODBC administrator
window and click Configure.
If you need to access Windows NT across a network in order to create an
ODBC data source, see the Adaptive Server IQ Installation and Configuration
Guide.
Configuring ODBC data sources
This section describes the meaning of each of the options on the ODBC
configuration dialog box, organized by tab.
ODBC tab
Data source name The Data Source Name is used to identify the ODBC
data source. You can use any descriptive name for the data source (spaces are
allowed) but it is recommended that you keep the name short, as you may need
to enter it in connection strings.
For more information, see the DataSourceName connection parameter in the
Adaptive Server IQ Reference Manual.
Description You can enter an optional longer description of the Data
Source.
Translator Choose Adaptive Server IQ 12.0 Translator if your database
uses an OEM code page. If your database uses an ANSI code page, which is
the default, leave this unchecked.
Isolation level The isolation level for an IQ data source is always
effectively 3. However, the default Catalog Store isolation level is 0.
For more information, see “Isolation levels” on page 302.

Creating and editing ODBC data sources
68
Microsoft applications (keys in SQL Statistics) Check this box if you
wish foreign keys to be returned by SQL statistics. The ODBC specifications
states that primary and foreign keys should not be returned by SQL statistics,
however, some Microsoft applications (such as Visual Basic and Access)
assume that primary and foreign keys are returned by SQL statistics.
Delphi applications Check this box to improve performance for Borland
Delphi applications. When this option is checked, one bookmark value is
assigned to each row, instead of the two that are otherwise assigned (one for
fetching forwards and a different one for fetching backwards).
Delphi cannot handle multiple bookmark values for a row. If the option is
unchecked, scrollable cursor performance can suffer since scrolling must
always take place from the beginning of the cursor to the row requested in order
to get the correct bookmark value.
Prevent Driver Not Capable errors The Adaptive Server Anywhere
ODBC driver returns a
Driver not capable
error code because it does not support qualifiers. Some ODBC applications do
not handle this error properly. Check this box to disable this error code,
allowing such applications to work.
Delay AutoCommit until statement close Check this box if you wish the
Adaptive Server Anywhere ODBC driver to delay the commit operation until
a statement has been closed.
Describe cursor behavior Select how often you wish a cursor to be re-
described when a procedure is executed or resumed.
Test Connection Tests if the information provided will result in a proper
connection. In order for the test to work a user ID and password must have been
specified.

CHAPTER 2 Running Adaptive Server IQ
69
Login tab
Use integrated login Connects using an integrated login. The User ID and
password do not need to be specified. To use this type of login users must have
been granted integrated login permission. The database being connected to
must also be set up to accept integrated logins. Only users with DBA access
can administer integrated login permissions.
For more information, see “Using integrated logins” on page 87.
User ID Provide a place for you to enter the User ID for the connection.
Password Provides a place for you to enter the password for the
connection.
Encrypt password Check this box if you wish the password to be stored
in encrypted form in the profile.
For more information, on User ID, Password, and Encrypt password, see the
chapter “Connection and Communication Parameters” in the Adaptive Server
IQ Reference Manual.
Database tab
Server name Provides a place for you to enter the name of the IQ server.
Start line Enter the server that should be started. Only provide a Start Line
parameter if a database server is being connected to that is not currently
running. For example:
C:\Program Files\Sybase\ASIQ12\win32\asiqsrv12.exe
-gm 10 -gp 4096 -c 8M
dbf=path\asiqdemo.db
uid=DBA pwd=SQL
Database name Provides a place for you to enter the name of the Adaptive
Server IQ database that you wish to connect to.
Database file Provides a place for you to enter the full path and name of
the Adaptive Server IQ database file on the server machine. You can also click
Browse to locate the file. For example:
C:\Program Files\Sybase\ASIQ12\demo\asiqdemo.db
Automatically shut down database after last disconnect Selecting this
will cause the automatic shutdown of the server after the last user has
disconnected.

Creating and editing ODBC data sources
70
For more information on the parameters in the Database tab, see the
EngineName, StartLine, DatabaseName, DatabaseFile, and AutoStop
connection parameters in the chapter “Connection and Communication
Parameters” in the Adaptive Server IQ Reference Manual.
Network tab
Select the network protocol and specify any protocol specific options
where necessary The TCP/IP, IPX, and NetBIOS check boxes specifies
what protocol or protocols the ODBC DSN will use to access a network
database server. In the adjacent boxes, you may enter communication
parameters that establish and tune connections from your client application to
a database.
For a TCP/IP example, see “To create an ODBC User Data Source:” on page
66. For more information see the CommLinks connection parameter, and
Network communications parameters, in the chapter “Connection and
Communication Parameters” in the Adaptive Server IQ Reference Manual.
Encrypt all network packets Enables encryption of packets transmitted
from the client machine over the network. By default, network encryption
packets is set to OFF.
Liveness timeout A liveness packet is sent across a client/server to
confirm that a connection is intact. If the client runs for the liveness timeout
period without detecting a liveness packet, the communication will be severed.
This parameter works only with network server and TCP/IP or IPX
communications protocols. The default is 120 seconds.
Buffer size Set the maximum size of communication packets, in bytes.
Buffer space Indicates the amount of space to allocate on startup for
network buffers, in kilobytes.
For more information on the Encryption, LivenessTimeout, CommBufferSize
and CommBufferSpace connection parameters, see the Adaptive Server IQ
Reference Manual.
Advanced tab
Connection name The name of the connection that is being created.
Character set The name of the character set.
Allow multiple record fetching Enables multiple records to be retrieved
at one time instead of individually. By default, multiple record fetching is
allowed.

CHAPTER 2 Running Adaptive Server IQ
71
Display debugging information in a log file The name of the file in
which the debugging information is to be saved.
Additional connection parameters Enter any additional switches here.
Parameters set throughout the remainder of this dialog take precedence over
parameters typed here.
Creating a File Data Source
Data sources are stored in the system registry. File data sources are an
alternative, which are stored as files. File data sources typically have the
extension .dsn. They consist of sections, each section starting with a name
enclosed in square brackets. DSN files are very similar in layout to
initialization files.
Creating a file data
source from the
ODBC Administrator
On Windows NT systems, you can create a file data source using the following
procedure.
❖To create an ODBC file data source:
1 Select Settings→Control Panel, and then click the ODBC icon to start the
ODBC Administrator.
2 From the File DSN tab, click Add.
3 Select Adaptive Server IQ 12 from the list of drivers, and click Next.
4 Follow the instructions to create the data source.
Creating a file data
source using a text
editor
A file data source is a text file, so it can be edited using any text editor. On
UNIX systems you must use a text editor to create file data sources. One
limitation to using a text editor is that you cannot store encrypted passwords in
the file.
Example of a file data
source [Sample File Data Source]
ENG = asiqdemo
DBA = DBA
PWD = SQL

Using ODBC data sources on UNIX
72
Using ODBC data sources on UNIX
On UNIX operating systems, ODBC data sources are held in a file named
.odbc.ini. When creating a .odbc.ini file on any UNIX system, you must use the
long form of each identifier, for example:
[My Data Source]
EngineName=myserver
CommLinks=tcpip
UserID=DBA
Password=SQL
Network communications parameters are added as part of the CommLinks
parameter. For a complete list, see “Connection parameters” on page 73.
References to ODBC functions are resolved at run time. The database server
looks for the .odbc.ini file in:
1 The directory specified by the ODBCHOME environment variable
2 The directory specified by the HOME environment variables
3The path
The database server ignores the ODBC_HOME, ODBC_INI and ODBCINI
environment variables.
Note On UNIX systems, Adaptive Server IQ installation installs only the
ODBC driver, and not the driver manager. The name of the driver file includes
an operating system-specific extension, for example, so for Solaris systems.
For example, on a Sun Solaris system, if you are using an ODBC application
that uses libodbc.so (libodbc.so.1) or libodbcinst.so (libodbcinst.so.1), simply
create symbolic links for these that point to $SYBASE/asiq12/lib/dbodbc6.so.1.
If you are creating a custom ODBC application, you can link directly to
dbodbc6.so.
If Adaptive Server IQ does not detect the presence of an ODBC driver
manager, it will use ~/.odbc.ini for data source information. Otherwise, it will
query the driver manager for data source information.

CHAPTER 2 Running Adaptive Server IQ
73
Connection parameters
Adaptive Server IQ connection parameters are listed in the following table. For
a full description of each of these connection parameters, see Chapter 3,
“Connection and Communication Parameters” in the Adaptive Server IQ
Reference Manual.
Parameter Short
form Argument Description
AutoPreCommit AutoPreC
ommit
Yes/No Force each statement to
commit before
execution
AutoStop Astop Yes/No Prevent a database from
being unloaded as soon
as there are no more
open connections.
(Embedded databases)
CommAutoStop CAstop Yes/No Unload network
communications ports
as soon as there are no
more open connections
from the client machine.
CommBufferSize CBSize Integer Set the maximum size of
communication packets,
in bytes.
CommBufferSpace CBSpace Integer Specify the amount of
space to allocate on
startup for network
buffers, in kilobytes.
CommLinks Links String Specify network
communications links.
ConnectionName * CON String Name a connection to
make switching to it
easier in multi-
connection applications.
DatabaseFile DBF String Identify a database file
to load and connect to
(for embedded
databases).
DatabaseName DBN String Identify a loaded
database to which a
connection needs to be
made.

Connection parameters
74
DatabaseSwitches DBS String Provide database-
specific switches when
starting a database.
DataSourceName ** DSN String Tell the ODBC driver
manager where to look
in odbc.ini to find
ODBC data source
information.
Debug DBG Boolean Provide diagnostic
information on
communications links
on startup.
DisableMultiRowFetch DMRF Boolean Turn off multi-record
fetches across the
network.
EngineName ENG String Identify server to
connect to
EncryptedPassword ENP Encrypted
string
Provide a password, and
store it in an encrypted
fashion in a data source.
Encryption ENC Boolean Encrypt packets
transmitted from the
client machine over the
network.
EngineName / ServerName ENG String Name of the database
server.
FileDataSourceName FILEDSN String Provide a file data
source name for the
connection.
Integrated INT Yes/No Enable integrated
logins. For a client
application to use an
integrated login, server
must be running with
LOGIN_MODE database
option set to Mixed or
Integrated.
LivenessTimeout LTO Integer Control the termination
of connections when
they are no longer intact.
Parameter Short
form Argument Description

CHAPTER 2 Running Adaptive Server IQ
75
* Not supported in ODBC connections
** Verbose form of keyword not supported in DSN and FILEDSN connection
parameters
Notes • Boolean (true or false) arguments are either YES, ON, 1, or TRUE if true,
or NO, OFF, 0, or FALSE if false.
• Connection parameters and their values are case insensitive.
• The connection parameters used by the interface library can be obtained
from the following places (in order of precedence):
• Connection string
• SQLCONNECT environment variable
• Data sources
• The server name must be composed of characters in the range 1 to 127 of
the ASCII character set. There is no such limitation on other parameters.
For more information on the character set issues, see “Connection strings
and character sets”.
• The following rules govern the priority of parameters:
Logfile LOG String Send client error
messages and
debugging messages to
a file.
Password ** PWD String Provide a password for
the connection
ServerName ENG String Specify server to
connect to
StartLine Start String Start a database server
running from an
application (for
embedded databases).
Unconditional UNC Yes/No Stop a server even if
connections are active
Userid ** UID String User ID with which you
log on to the database
Parameter Short
form Argument Description

Connection parameters
76
• The entries in a connection string are read left to right. If the same
parameter is specified more than once, the last one in the string
applies.
• If a string contains a DSN or FILEDSN entry, the profile is read from
the configuration file, and the entries from the file are used if they are
not already set. For example, if a connection string contains a data
source name and sets some of the parameters contained in the data
source explicitly, then in case of conflict the explicit parameters are
used.
Connection parameter priorities
Connection parameters often provide more than one way of accomplishing a
given task. This is particularly the case with embedded databases, where a
database server is started by the connection string.
For example, if your connection starts a database, you can specify the database
name using the DBN connection parameter or using the DBS parameter.
Here are some recommendations and notes for situations where connection
parameters conflict:
• Specify database files using DBF You can specify a database file on
the Start parameter or using the DBF parameter. DBF is recommended.
• Specify database names using DBN You can specify a database
name on the Start parameter, the DBS parameter, or using the DBN
parameter. DBN is recommended.
• Use the Start parameter to specify cache size Even though you
use the DBF connection parameter to specify a database file, you may still
want to tune the way in which it starts. You can use the Start parameter to
do this.
For example, if you are using the Java features of Adaptive Server IQ, you
should provide additional cache memory for the Catalog Store on the Start
parameter. The following sample set of embedded database connection
parameters describes a connection that may use Java features:
DBF=path\asademo.db
DBN=Sample
ENG=Sample Server
UID=DBA
PWD=SQL
Start=asiqsrv12 -c 8M

CHAPTER 2 Running Adaptive Server IQ
77
How Adaptive Server IQ makes connections
This section describes how the interface libraries establish connections.
Who needs to read
this section? In many cases, establishing a connection to a database is straightforward using
the information presented in the preceding sections of this chapter. However, if
you are having problems establishing connections to a server, you may need to
understand how Adaptive Server IQ establishes connections in order to resolve
your problems.
Note If you have no problem establishing connections to your database, you
do not need to read this section.
The software follows exactly the same procedure for each of the following
types of client application:
• Any ODBC application using the SQLDriverConnect function, which is the
common method of connection for ODBC applications. Many application
development systems, such as Sybase PowerBuilder and Power++, belong
to this class of application.
• Any client application using Embedded SQL and using the recommended
function for connecting to a database (db_string_connect).
The SQL CONNECT statement is available for Embedded SQL
applications and in Interactive SQL. It has two forms: CONNECT AS... and
CONNECT USING... . All the database administration tools, including
utilities and Interactive SQL, use db_string_connect.
Steps in establishing a connection
To establish a connection to Adaptive Server IQ, the client application carries
out the following steps:
1Locate the interface library. The client application must locate the ODBC
driver or Embedded SQL interface library.
2Assemble a list of connection parameters. Connection parameters may be
provided in several places, such as data sources, a connection string
assembled by the application, and an environment variable. The ODBC
driver or Embedded SQL interface library assembles the parameters into a
single list.

How Adaptive Server IQ makes connections
78
3Locate a server. Using the connection parameters, the ODBC driver or
Embedded SQL interface library must locate a database server on your
machine or over a network.
4Locate the database. Once it locates the server, the ODBC driver or
Embedded SQL interface library must locate the database you are
connecting to.
The following sections describe each of these steps in detail.
Locating the interface library
The client application makes a call to one of the Adaptive Server IQ interface
libraries. In general, the location of this DLL or shared library is transparent to
the user. Here we describe how the library is located, in case of problems.
ODBC driver location For ODBC, the interface library is also called an ODBC driver. An ODBC
client application calls the ODBC driver manager, and the driver manager
locates Adaptive Server IQ’s driver.
The ODBC driver manager looks in the supplied data source in the odbc.ini file
or registry to locate the driver. When you create a data source using the ODBC
Administrator, Adaptive Server IQ fills in the current location for your ODBC
driver.
Embedded SQL
interface library
location
Embedded SQL applications call the interface library by name. The name of
the Adaptive Server IQ Embedded SQL interface library is as follows:
•Windows NT: dblib6t.dll
•UNIX: dblib6 with an operating system-specific extension.
The locations that are searched depend on the operating system:
• On Windows NT, the client application looks for files in the current
directory, in the system path, and in the Windows and Windows\system
directories.
• On UNIX, the client application looks for files in the system path and the
user path.
When the library is
located Once it locates the interface library, the client application passes a connection
string to it. The interface library uses the connection string to assemble a list of
connection parameters, which it uses to establish a connection to a server.
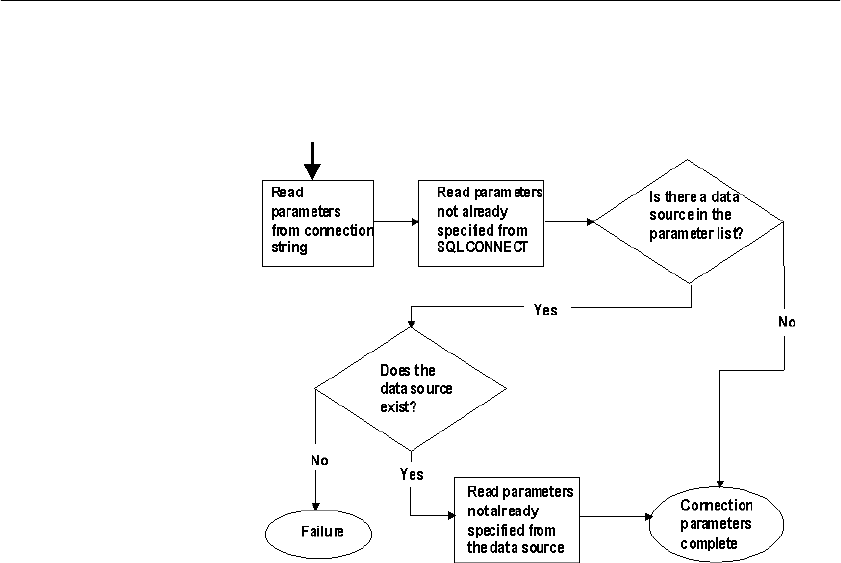
CHAPTER 2 Running Adaptive Server IQ
79
Assembling a list of connection parameters
The following figure illustrates how the interface libraries assemble the list of
connection parameters they will use to establish a connection.
Notes Key points from the figure are as follows:
•Precedence — Parameters held in more than one place are subject to the
following order of precedence:
Connection string > SQLCONNECT > profile
That is, if a parameter is supplied both in a data source and in a connection
string, the connection string value overrides the data source value.
•Failure — Failure at this stage occurs only if you specify in the connection
string or in SQLCONNECT a data source that does not exist in the client
connection file.
•Common parameters — Depending on other connections already in use,
some connection parameters may be ignored. These include the following:
•AutoStop Ignored if the database is already loaded.
•CommLinks The specifications for a network protocol are ignored if
another connection has already set parameters for that protocol.
•CommBufferSize Ignored if another connection has already set this
parameter.

How Adaptive Server IQ makes connections
80
•CommBufferSpace Ignored if another connection has already set this
parameter.
•Unconditional Ignored if the database is already loaded or if the server
is already running.
The interface library uses the completed list of connection parameters to
attempt to connect.
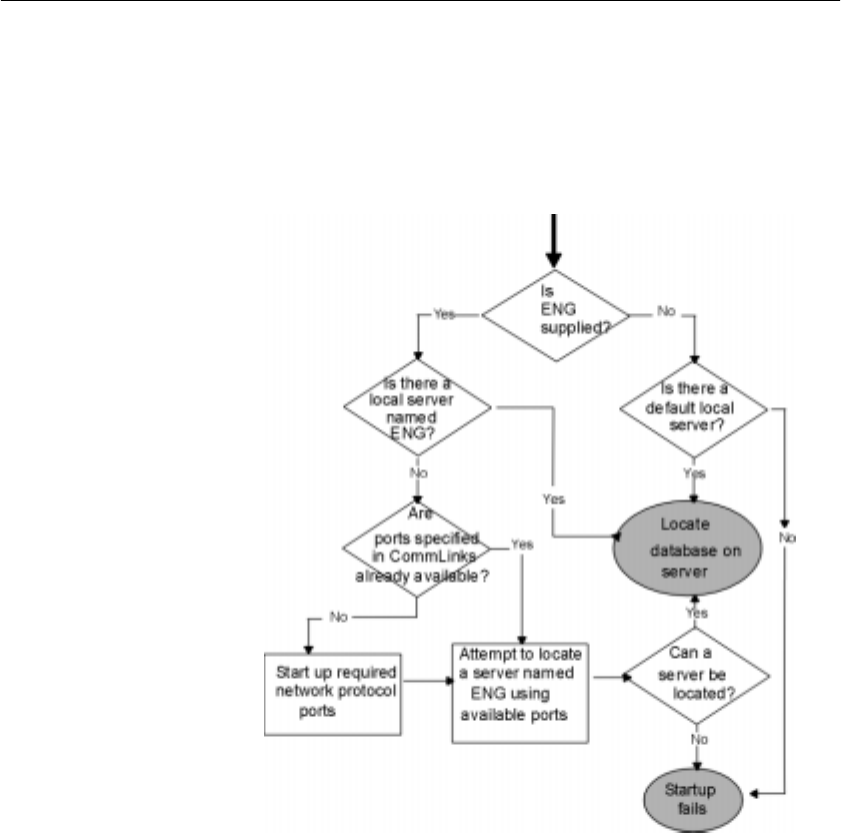
CHAPTER 2 Running Adaptive Server IQ
81
Locating a server
The next step in establishing a connection is to attempt to locate a server. If the
connection parameter list includes a server name (ENG parameter), the
interface library carries out a search first for a database server of that name,
followed by a search over a network. If no ENG parameter is supplied, the
interface library looks for a default server.
If the interfaces library locates a server, it tries to locate or load the required
database on that server. For information, see “Locating the database” on page
83.
Notes • For local connections, locating a server is simple. For connections over a
network, you can use the CommLinks parameter to tune the search in many
ways by supplying network communication parameters.

How Adaptive Server IQ makes connections
82
• The network search involves a search over one or more of the protocols
that Adaptive Server IQ supports. For each protocol, the network library
starts a single port. All connections over that protocol at any one time use
a single port.
• You can specify a set of network communication parameters for each
network port in the argument to the CommLinks parameter. Since these
parameters are used only when the port first starts, the interface library
ignores any connection parameters specified in CommLinks for a part
already started.
• Each attempt to locate a server (the local attempt and the attempt for each
network port) involves two steps. First, the interfaces library looks in the
server name cache to see if a server of that name is available. Second, it
uses the available connection parameters to attempt a connection.
• The default server is the first one started on a machine. This server gains
use of the shared memory port.

CHAPTER 2 Running Adaptive Server IQ
83
Locating the database
If the interfaces library successfully locate a server, it then tries to locate the
database. For example:
Notes • If you rely on the DBF parameter, the DBF path must either be an absolute
path, or relative to where the server was started, in order for Adaptive
Server IQ to find the database it specifies. For example, if you specify
../foo/asiqdemo, it looks in the directory above where the server is, and
then in foo.
• The default database is the one started with the server.

How Adaptive Server IQ makes connections
84
Server name caching for faster connections
The network library looks for a database server on a network by broadcasting
over the network using the CommLinks connection parameter.
Tuning the broadcast The CommLinks parameter takes as argument a string that lists the protocols to
use and, optionally for each protocol, a variety of network communication
parameters that tune the broadcast.
For a complete listing of network communications parameters, see Chapter 3,
“Connection and Communication Parameters” in the Adaptive Server IQ
Reference Manual.
Caching server
information Broadcasting over large networks to search for a server of a specific name can
be time-consuming. To speed up network connections (except for the first
connection to a server), when a server is located, the protocol it was found on
and its address are saved to a file.
The server information is saved in a file named asasrv.ini, in your Adaptive
Server IQ executable directory. The file contains a set of sections, each of the
following form:
[Server name]
Link=protocol_name
Address=address_string
How the cache is
used When a connection specifies a server name, and a server with that name is not
found, the network library looks first in the server name cache to see if the
server is known. If there is an entry for the server name, an attempt is made to
connect using the link and address in the cache. If the server is located using
this method, the connection is much faster, as no broadcast is involved.
If the server is not located using cached information, the connection string
information and CommLinks parameter are used to search for the server using
a broadcast. If the broadcast is successful, the server name entry in the named
cache is overwritten.
Note If a server name is held in the cache, the cache entry is used before the
CommLinks string.

CHAPTER 2 Running Adaptive Server IQ
85
Interactive SQL connections
The Interactive SQL (DBISQL) utility has a different behavior from the default
Embedded SQL behavior when a CONNECT statement is issued while already
connected to a database. If no database or server is specified in the CONNECT
statement, Interactive SQL connects to the current database, rather than to the
default database. This behavior is required for database restarting operations.
For an example, see “CONNECT statement” in the Adaptive Server IQ
Reference Manual.
Connecting from other databases
You can access data in Adaptive Server IQ tables as a foreign data source from
Adaptive Server Enterprise. To take advantage of this feature, you use the
Component Integration Services (CIS) interface, which makes data from
distributed, heterogeneous sources available to clients.
With CIS in place, you define “proxy tables” in Adaptive Server Enterprise that
represent your Adaptive Server IQ tables. You can then query the proxy tables
from Adaptive Server Enterprise. For details, see Component Integration
Services User’s Guide for Adaptive Server Enterprise and OmniConnect.
CIS and Adaptive Server IQ offer several other ways for you to connect to
other databases and share data, so that user applications can access your entire
data warehouse through a common interface. Using CIS, you can:
• Access data in an Adaptive Server Enterprise database.
• Access data in Adaptive Server IQ and Adaptive Server Anywhere
databases on other database servers.
• Access other foreign data sources, including other vendors' relational
databases, Excel spreadsheet data, and text files.
• Join tables in separate Adaptive Server IQ databases.
Note Use of these features is currently supported on Windows NT systems
only.

Using an integrated login
86
Using an integrated login
The integrated login feature allows you to maintain a single user ID and
password for both database connections and operating system and/or network
logins. This section describes the integrated login feature.
Operating systems
supported Integrated login capabilities are available for the Windows NT server only. It
is possible for Windows 95, Windows 98, and Windows NT clients to use
integrated logins to connect to a network server running on Windows NT.
Benefits of an
integrated login An integrated login is a mapping from one or more Windows NT user profiles
to an existing user in a database. A user who has successfully navigated the
security for that user profile and logged in to their machine can connect to a
database without providing an additional user ID or password.
To accomplish this, the database must be enabled to use integrated logins and
a mapping must have been granted between the user profile used to log in to
the machine and/or network, and a database user.
Using an integrated login is more convenient for the user and permits a single
security system for database and network security. Its advantages include:
• When connecting to a database using an integrated login, the user does not
need to enter a user ID or password.
• If you use an integrated login, the user authentication is done by the
operating system, not the database: a single system is used for database
security and machine or network security.
• Multiple user profiles can be mapped to a single database user ID.
• The name and password used to log in to the Windows NT machine do not
have to match the database user ID and password.
Warning! Integrated logins offer the convenience of a single security system
but there are important security implications which database administrators
should be familiar with.
For more information about security and integrated logins, see “Security
concerns: unrestricted database access”.

CHAPTER 2 Running Adaptive Server IQ
87
Using integrated logins
Several steps must be implemented in order to connect successfully via an
integrated login.
❖To use an integrated login:
1 Enable the integrated login feature in a database by setting the value of the
LOGIN_MODE database option to either Mixed or Integrated (the option
is case insensitive), in place of the default value of Standard. This step
requires DBA authority).
2 Create an integrated login mapping between a user profile and an existing
database user. This can be done using a SQL statement.
3 Connect from a client application in such a way that the integrated login
facility is triggered.
Each of these steps is described in the sections below.
Enabling the integrated login feature
The LOGIN_MODE database option determines whether the integrated login
feature is enabled. As database options apply only to the database in which they
are found, different databases can have a different integrated login setting even
if they are loaded and running within the same server.
The LOGIN_MODE database option accepts one of following three values
(which are case insensitive).
• Standard This is the default setting, which does not permit integrated
logins. An error occurs if an integrated login connection is attempted.
• Mixed With this setting, both integrated logins and standard logins are
allowed.
• Integrated With this setting, all logins to the database must be made
using integrated logins.
Warning! Setting the LOGIN_MODE database option to Integrated restricts
connections to only those users who have been granted an integrated login
mapping. Attempting to connect using a user ID and password generates an
error. The only exception to this are users with DBA authority (full
administrative rights).

Using an integrated login
88
Example The following SQL statement sets the value of the LOGIN_MODE database
option to Mixed, allowing both standard and integrated login connections:
SET OPTION "PUBLIC".LOGIN_MODE = Mixed
Creating an integrated login
User profiles can only be mapped to an existing database user ID. When that
database user ID is removed from the database, all integrated login mappings
based on that database user ID are automatically removed.
A user profile does not have to exist for it to be mapped to a database user ID.
More than one user profile can be mapped to the same user ID.
Only users with DBA authority are able to create or remove an integrated login
mapping.
An integrated login mapping is made either using a wizard in Sybase Central
or a SQL statement.
❖To map an integrated login from Sybase Central:
1 Connect to a database as a user with DBA authority.
2 Open the Integrated Logins folder for the database, and double-click Add
Integrated Login. The Integrated Login wizard is displayed.
3 On the first page of the wizard, enter the name of the system (computer)
user for whom the integrated login is to be created. You can either select a
name from the list or enter a name.
Also, select the database user ID this user maps to. The wizard displays the
available database users. You must select one of these. You cannot add a
new database user ID.
4 Follow the remaining instructions in the Wizard.
❖To map an integrate login using a SQL statement:
• The following SQL statement allows Window NT users dmelanso and
bhay to log in to the database as the user DBA, without having to know or
provide the DBA user ID or password.
GRANT INTEGRATED LOGIN
TO dmelanso, bhay
AS USER DBA

CHAPTER 2 Running Adaptive Server IQ
89
Connecting from a client application
A client application can connect to a database using an integrated login in one
of the following ways:
• Set the INTEGRATED parameter in the list of connection parameters to
yes.
• Specify neither a user ID nor a password in the connection string or
connection dialog. This method is available only for Embedded SQL
applications, including the Adaptive Server IQ administration utilities.
If INTEGRATED=yes is specified in the connection string, an integrated login
is attempted. If the connection attempt fails and the LOGIN_MODE database
option is set to Mixed, the server attempts a standard login.
If an attempt to connect to a database is made without providing a user ID or
password, an integrated login is attempted. The attempt succeeds or fails
depending on whether the current user profile name matches a integrated login
mapping in the database.
Interactive SQL
Examples For example, a connection attempt using the following Interactive SQL
statement will succeed, providing the user has logged on with a user profile
name that matches a integrated login mapping in a default database of a server:
CONNECT USING ’INTEGRATED=yes’
The following DBISQL statement.
CONNECT
can connect to a database if all the following are true:
• A server is currently running.
• The default database on the current server is enabled to accept integrated
login connections.
• An integrated login mapping has been created that matches the current
user's user profile name.
• If the user is prompted with a dialog box by the server for more connection
information (such as occurs when using the DBISQL utility), the user
clicks OK without providing more information.
Integrated logins via
ODBC A client application connecting to a database via ODBC can use an integrated
login by including the Integrated parameter among other attributes in its Data
Source configuration.

Using an integrated login
90
Setting the attribute ’Integrated=yes’ in an ODBC data source causes database
connection attempts using that DSN to attempt an integrated login. If the
LOGIN_MODE database option is set to Standard, the ODBC driver prompts
the user for a database user ID and password.
Security concerns: unrestricted database access
The integrated login features works by using the login control system of
Windows NT in place of the system Adaptive Server IQ uses to control access
to the database. Essentially, you pass through the database security if you can
log in to the machine hosting the database, and if other conditions outlined in
this chapter are met.
If you successfully log in to the Windows NT server as “dsmith”, you can
connect to the database without any further proof of identification provided
there is either an integrated login mapping or a default integrated login user ID.
When using integrated logins, database administrators should give special
consideration to the way Windows NT enforces login security in order to
prevent unwanted access to the database.
In particular, be aware that by default a "Guest" user profile is created and
enabled when Windows NT Workstation or Server is installed.
Warning! Leaving the user profile Guest enabled can permit unrestricted
access to a database being hosted by that server.
If the Guest user profile is enabled and has a blank password, any attempt to
log in to the server will be successful. It is not required that a user profile exist
on the server, or that the login ID provided have domain login permissions.
Literally any user can log in to the server using any login ID and any password:
they are logged in by default to the Guest user profile.
This has important implications for connecting to a database with the
integrated login feature enabled.
Consider the following scenario, which assumes the Windows NT server
hosting a database has a "Guest" user profile that is enabled with a blank
password.

CHAPTER 2 Running Adaptive Server IQ
91
• An integrated login mapping exists between the user dsmith and the
database user ID DBA. When the user dsmith connects to the server with
her correct login ID and password, she connects to the database as DBA, a
user with full administrative rights.
• But anyone else attempting to connect to the server as "dsmith" will
successfully log in to the server regardless of the password they provide
because Windows NT will default that connection attempt to the "Guest"
user profile. Having successfully logged in to the server using the "dsmith"
login ID, the unauthorized user successfully connects to the database as
DBA using the integrated login mapping.
Note Disable the “Guest” user profile for security. The safest integrated login
policy is to disable “Guest” on any Windows NT machine hosting an Adaptive
Server IQ database This can be done using the Windows NT User Manager
utility.
Setting temporary public options for added security
Setting the value of the LOGIN_MODE option for a given database to Mixed
or Integrated using the following SQL statement permanently enables
integrated logins for that database.
SET OPTION Public.LOGIN_MODE = Mixed
If the database is shut down and restarted, the option value remains the same
and integrated logins are still enabled.
Changing the LOGIN_MODE option temporarily will still allow user access
via integrated logins. The following statement will change the option value
temporarily:
SET TEMPORARY OPTION "Public".LOGIN_MODE = Mixed
If the permanent option value is Standard, the database will revert to that value
when it is shut down.
Setting temporary public options can be considered an additional security
measure for database access since enabling integrated logins means that the
database is relying on the security of the operating system on which it is
running. If the database is shut down and copied to another machine (such as a
user's machine) access to the database reverts to the Adaptive Server Anywhere
security model and not the security model of the operating system of the
machine where the database has been copied.

Using an integrated login
92
For more information on using the SET OPTION statement see Chapter 9, “SQL
Statements” in Adaptive Server IQ Reference Manual.
Network aspects of integrated logins
If the database is located on a network server, then one of two conditions must
be met for integrated logins to be used:
• The user profile used for the integrated login connection attempt must
exist on both the local machine and the server. As well as having identical
user profile names on both machines, the passwords for both user profiles
must also be identical.
For example, when the user jsmith attempts to connect using an integrated
login to a database loaded on network server, identical user profile names
and passwords must exist on both the local machine and application server
hosting the database. jsmith must be permitted to log in to both the local
machine and the server hosting the network server.
• If network access is controlled by a Microsoft Domain, the user attempting
an integrated login must have domain permissions with the Domain
Controller server and be logged in to the network. A user profile on the
network server matching the user profile on the local machine is not
required.
Creating a default integrated login user
A default integrated login user ID can be created so that connecting via an
integrated login will be successful even if no integrated login mapping exists
for the user profile currently in use.
For example, if no integrated login mapping exists for the user profile name
JSMITH, an integrated login connection attempt will normally fail when
JSMITH is the user profile in use.
However, if you create a user ID named Guest in a database, an integrated login
will successfully map to the Guest user ID if no integrated login mapping
explicitly identifies the user profile JSMITH.
The default integrated login user permits anyone attempting an integrated login
to successfully connect to a database if the database contains a user ID named
Guest. The permissions and authorities granted to the newly-connected user are
determined by the authorities granted to the Guest user ID.

CHAPTER 2 Running Adaptive Server IQ
93
Troubleshooting startup, shutdown, and connections
See the sections that follow for help in resolving problems with your database
server, connections, and DBISQL. For other troubleshooting hints, see the
Adaptive Server IQ Troubleshooting and Error Messages Guide.
What to do if you can’t start Adaptive Server IQ
This section describes some common problems when starting the database
server.
Ensure that your files are valid
The server will not start if the existing transaction log is invalid. For example,
during development, you may replace a database file with a new version,
without deleting the transaction log at the same time. This causes the
transaction log file to be different from the database, and results in an invalid
transaction log file.
The same is true for the IQ Temporary Store file.
Ensure that you have sufficient disk space for your temporary file
Adaptive Server IQ uses a temporary file to store information while running.
This file is stored in the directory pointed to by the TMP or TEMP environment
variable, or the ASTMP environment variable on UNIX. On Windows NT, this
directory is typically c:\temp. On UNIX, if more than one database server is
running on the same machine, each user needs a separate temporary directory;
typically this directory is set to /tmp/.userid.
If you do not have sufficient disk space available to the temporary directory,
you will have problems starting the server.

Troubleshooting startup, shutdown, and connections
94
Ensure that network communication software is running
Appropriate network communication software must be installed and running
before you run the database server. If you are running reliable network software
with just one network installed, this should be straightforward. If you
experience problems, if you are running non-standard software, or if you are
running multiple networks, read the discussion of network communication
issues in the Adaptive Server IQ Installation and Configuration Guide. You
should also refer to your network vendor’s documentation.
You should confirm that other software that requires network communications
is working properly before running the database server.
For example, if you are running under the TCP/IP protocol, you may want to
confirm that ping and telnet are working properly. The ping and telnet
applications are provided with many TCP/IP protocol stacks.
If you are using NetBIOS under Windows NT you may want to confirm that
the chat or winpopup application is working properly between machines
running client and database server software.
Check environment variables
In order to start the server, certain environment variables must be set properly.
On Windows NT, the installation procedure sets any environment variables you
need automatically. On UNIX, you must set these variables. While it is unlikely
for these settings to change, you should check to be sure they are correct if you
are unable to start the server. See Chapter 1, “File Locations and Installation
Settings” in Adaptive Server IQ Reference Manual for information on
environment variable settings.
Debugging network communications startup problems
If you are having problems establishing a connection across a network, you can
use debugging options at both client and server to diagnose problems. On the
server, you use the -z command-line option. The startup information appears
on the server window (or the server log, if you start the server with start_asiq).
You can use the -o
filename
option to log the results to an output file if you start
the server with asiqsrv12.

CHAPTER 2 Running Adaptive Server IQ
95
What to do if you can’t connect to a database
If you are unable to connect to an Adaptive Server IQ database, check the items
described below.
• Check that you have entered your data source name correctly, or that you
have selected the correct server name for a JDBC connection.
• Check that your data source (DSN or FILEDSN) contains the correct
server name, database, network parameters, and any other connection
information you expect.
• On Windows NT, select Settings→Control Panel → ODBC
Administrator, then select the User DSN tab and select the source
name for the server you want.
• On UNIX, check your .odbc.ini file
• Check that the database server you want is running.
• On Windows NT, select Settings→Control Panel → ODBC to open
the ODBC Administrator, then select the User DSN tab, highlight the
source name for the server you want, and click Configure→Test
Connection. If that server is running, you see a Connection Successful
message.
• On UNIX, enter the following at the system prompt, substituting the
name of your database server for asiqdemo:
ps -eaf | grep asiqdemo
• Check that any connection parameters you enter on the command line are
correct.
• If you are connecting to a database that is not running, check that the server
was started with the -gd ALL switch. If not, then only the DBA can start
databases on that server, by first connecting to the utility_db database and
then issuing a START DATABASE command for the desired database.
• Check that you have permission to use the database for the requested
operation. The DBA or database owner must grant you CONNECT
permission; see “Managing individual user IDs and permissions”.
• If you are having problems establishing a connection across a network,
you can use debugging options at both client and server to diagnose
problems. On the server, you use the -z command-line option. The startup
information appears on the server window: you can use the -o option to log
the results to an output file.

Troubleshooting startup, shutdown, and connections
96
• Check that all of the files exist for the database you have requested. At a
minimum, there must be an IQ Store (dbname.iq), a Catalog Store
(dbname.db), an IQ Temporary Store (dbname.iqtmp), a transaction log
(dbname.log This may be missing if the database is newly created and has
not been modified.), and a message file (dbname.iqmsg). The names
shown here in parentheses are the default format; yours may be different.
• Check that any restores have completed successfully.
See also “How Adaptive Server IQ makes connections”.
Stopping a database server in an emergency (UNIX)
Always try first to stop the server using the methods described in “Stopping the
database server”. If you are unable to stop it using those methods, and if you
started the database server as a batch or background process (using start_asiq),
try the following:
1 If possible, you should make sure that no users are connected to the
database.
2 At the UNIX prompt, enter the following command:
kill -hup
pid
where pid is the process id of the database server you are stopping.
See also Adaptive Server IQ Troubleshooting and Error Messages Guide.
Resolving problems with your DBISQL window on UNIX
The interactive DBISQL utility on UNIX uses character-based windows.
These windows rely on line-drawing characters that are part of the ASCII
character set, and some other character sets as well. The ability of DBISQL to
display these windows correctly depends on the type of terminal you use, and
the character set translation your operating system uses. If your windows
appear to be drawn with accented characters rather than line-draw characters,
you can still use them to enter commands and receive output as described
throughout this book.
DBISQL uses function keys for many operations. Some UNIX windowing
environments may not support these function keys, unless you make some
adjustments.

CHAPTER 2 Running Adaptive Server IQ
97
For help in improving the appearance of DBISQL windows, or if you are
unable to use function keys in DBISQL, see the Chapter 6, “Getting Started
with DBISQL” in Introduction to Adaptive Server IQ.

Troubleshooting startup, shutdown, and connections
98

99
CHAPTER 3 Working with Database Objects
About this chapter This chapter describes the mechanics of creating, altering, and deleting
database objects such as tables, views, and indexes. The SQL statements
for carrying out these tasks are called the Data Definition Language
(DDL).
The definitions of the database objects form the database schema. You can
think of the schema as an empty database.
Procedures are also database objects, but are discussed in Chapter 6,
“Using Procedures and Batches”
Note Remember that Adaptive Server IQ consists of both a Catalog Store
and an IQ Store. This chapter explains how you create both stores, and the
objects in your IQ Store. Tables created in the Catalog Store have the
characteristics of Adaptive Server Anywhere tables. If you want to create
tables in the Catalog Store, you need to refer to the Adaptive Server
Anywhere documentation.
Building Your Adaptive Server IQ Databases
This section introduces you to the steps involved in creating a database,
and the tools you use. It also explains decisions you need to make about
where to store the data, how much space it will require, and who will be
able to define or modify database objects.
Designing your database
It's important to design your database before you actually create it. The
right database design can make a major difference in the usefulness of
your data, and the speed with which you can retrieve it.

Building Your Adaptive Server IQ Databases
100
Sybase WarehouseArchitect helps you design your database.
WarehouseArchitect is a component of Sybase Warehouse Studio, an
integrated platform for designing and managing a data warehouse.
No matter what design tool you use, it is generally the database administrator
(DBA) who designs the database and defines its contents. To create an effective
design, the DBA needs to work with individuals throughout your organization
to understand how data will be used. The DBA also needs to understand the
concepts underlying IQ databases.
An Adaptive Server IQ database is a relational database that is optimized for
use as a data warehouse. As a relational database, it consists of a set of related
tables that organize the data; as a data warehouse, it provides efficient access
to very large sets of data by means of indexes.
When you create a database, you specify the structure of these tables, the types
of data allowed in them, the relationships among tables, the indexes that store
the table data, and views that control who has access to the data. Before using
the procedures in this chapter to create an IQ database, be sure you understand
the relational database and data warehousing concepts described in
Introduction to Adaptive Server IQ.
Tools for working with database objects
Adaptive Server IQ includes two utilities for working with database objects:
Sybase Central and DBISQL. In addition, Warehouse Architect can be used for
designing and creating whole data warehouses.
Using Sybase Central to work with database objects
Sybase Central is the primary tool for working with database objects on
windowing systems. You can use Sybase Central to create, modify, and delete
all kinds of database objects, including tables, procedures, views, indexes,
users and groups.
If you use the Adaptive Server IQ multiplex feature, Sybase strongly
recommends that you use Sybase Central to create and modify database
objects. In a multiplex, Sybase Central is important for creating databases and
dbspaces and for starting up and shutting down databases. DML and DDL
statements are the same for multiplex and non-multiplex Adaptive Server IQ
databases, except that the DDL must be in simplex mode. For more
information about the multiplex feature, see Adaptive Server IQ Multiplex
User’s Guide.

CHAPTER 3 Working with Database Objects
101
This chapter is concerned with the SQL statements for working with database
objects. If you are using Sybase Central, these SQL statements are generated
for you. The primary source of information about Sybase Central is the Sybase
Central online Help. This chapter gives only brief pointers for tasks that you
can carry out using Sybase Central.
For an introduction to using Sybase Central, see “Managing Databases with
Sybase Central” in Introduction to Adaptive Server IQ.
Using DBISQL to work with database objects
Interactive SQL (DBISQL) is a utility for entering SQL statements. If you are
using DBISQL to work with your database schema, instead of executing the
SQL statements one at a time, build up the set of commands in a DBISQL
command file. Then you can execute this file in DBISQL to build the database.
If you use a tool other than DBISQL, all the information in this chapter
concerning SQL statements still applies.
DBISQL command file A DBISQL command file is a text file with semicolons placed at the end of
commands as shown below.
CREATE TABLE t1 ( .. );
CREATE TABLE t2 ( .. );
CREATE LF INDEX i2 ON t2 ( .. );
..
A DBISQL command file usually carries the extension .sql. To execute a
command file, either paste the contents of the file into the DBISQL command
window (if the file has less than 500 lines) or enter a command that reads the
file into the command window. For example, the command:
read makedb
reads the DBISQL commands in the file makedb.sql.
For more information about reading a file into the command window, see the
READ statement in the Adaptive Server IQ Reference Manual.
A step-by-step overview of database setup
Creating an IQ database is part of a larger setup process that begins with
installation and ends when your database is available to users. This section
summarizes the steps in setting up an IQ database and the objects in it.

Building Your Adaptive Server IQ Databases
102
Multiplex users: The following steps are for creating a non-multiplex
database. To create a multiplex database, see the Adaptive Server IQ Multiplex
User’s Guide.
❖To set up an IQ database:
1 Install and configure Adaptive Server IQ.
This step creates the database server and the asiqdemo database, and
allows you to create your first database when you have no other database
to connect to. See the Adaptive Server IQ Installation and Configuration
Guide for your platform for details.
2 Create an IQ database.
This step creates both the IQ Store and the Catalog Store. Use the CREATE
DATABASE statement or the Sybase Central Create Database Wizard. See
“Working with databases” on page 106.
3 Create the tables in your IQ database.
Use the CREATE TABLE statement or the Sybase Central table editor. See
“Working with tables” on page 118
4 Create indexes for the tables.
Use the CREATE INDEX statement or the Sybase Central Index Wizard.
You can also create certain indexes automatically when you create your
tables. See Chapter 4, “Adaptive Server IQ Indexes.”
5 Load data into the tables.
Use the LOAD TABLE statement to bulk load data from files, or use the
INSERT statement to extract rows of data from an existing database. See
Chapter 5, “Moving Data In and Out of Databases.”.
6 Create join indexes as needed, to improve performance of queries that join
data from multiple tables.
To create a join index, use the CREATE JOIN INDEX statement, or the
Sybase Central Add JoinIndex Wizard. See Chapter 4, “Adaptive Server
IQ Indexes.”
Scheduling data definition tasks
Once the database exists and other users have access to it, follow these
guidelines when you need to perform additional data definition operations,
such as adding or modifying tables or indexes.

CHAPTER 3 Working with Database Objects
103
You will probably want to schedule data definition operations for times when
database usage is low. All other users are blocked from reading or writing to a
table while you are creating or altering that table, although for a brief time only.
If the table is part of a join index, users cannot read or write to any of the tables
in the join index until the data definition operation is complete. For more
information on concurrency rules during data definition, see “Locks for DDL
operations”.
When you are ready to perform data definition tasks:
1 Make sure that all users disconnect from the database.
2 Back up the database, as described in Chapter 11, “Backup and Data
Recovery”.
3 Do the data definition task.
Note For a multiplex database, you must perform the data definition task
on the write server in simplex mode, and then shut it down and bring it up
in multiplex mode before backing up the database. See the Adaptive Server
IQ Multiplex User’s Guide for details before data definition.
4 Back up the database again.
5 Allow users to connect to the database.
Extending data definition privileges
In order to perform data definition tasks, you must have the appropriate
authority.
• With DBA authority, you can perform all data definition tasks. You also
can grant authority to other users to perform specific tasks. This includes
the ability to grant DBA authority to other users.
• To create any database object, you need resource authority for that type of
object.
• When you create an object you become its owner. The owner of an object
automatically has authority to perform all operations on that object, and to
grant other users authority to update the information in a table.

Building Your Adaptive Server IQ Databases
104
The DBA and object owners can grant authority to individual users and to
groups of users. For complete information, see Chapter 10, “Managing User
IDs and Permissions” You can also use the -gu command-line option to set the
permission level required to create or delete a database.
Selecting a device type
You store databases and database objects on devices. On all platforms, these
devices can be operating system files. They can also be portions of a disk,
called raw partitions. When you create a database, Adaptive Server IQ
determines automatically whether it is a raw partition or a disk file.
In a production environment, raw partition installations may provide increased
processing performance and better recovery capabilities. File systems, on the
other hand, make it easier to manage your devices, and may be preferable in a
development environment.
Note The Catalog Store and the transaction log cannot be on a raw partition.
Allocating space for databases
All Adaptive Server IQ databases are preallocated, whether they reside in a file
system or a raw partition.
Each database includes multiple dbspaces. A dbspace is a logical name for a
database file. The Catalog Store, the IQ Store, and the Temporary Store all
consist of dbspaces. The first dbspace for each store is created automatically
when you create the database. You can create additional dbspaces as needed.
When you create and load a table, Adaptive Server IQ distributes the data
among all existing dbspaces in that store with any room available. You cannot
control how data is distributed among the dbspaces within a store. Once an IQ
dbspace is full, you cannot extend it, and you cannot redistribute the data it
holds to other dbspaces. You also cannot make dbspaces smaller once you
create them.
When to create
dbspaces When possible, create all dbspaces when you create the database, rather than
adding them gradually as old ones become full. This approach ensures that
your dbspaces will be filled more evenly, and thus helps improve disk I/O.

CHAPTER 3 Working with Database Objects
105
Space requirements
for IQ Stores The amount of data, and the number and types of indexes you create, determine
how much space you need in your IQ database. If you run out of space when
loading or inserting into a database, Adaptive Server IQ prompts you to create
another dbspace, and then continues the operation after you add the dbspace.
Space requirements
for Temporary Stores In addition to any temporary tables you define explicitly, Adaptive Server IQ
uses the Temporary Store as a temporary result space for sorts, hashes, and
bitmaps during loads and deletions. The types of queries issued, the degree of
concurrent use, and the size of your data, all determine how much space you
need for your Temporary Store.
Estimating space and dbspaces required
To avoid difficulties when a database or a particular dbspace is full, you should
estimate the amount of space and dbspaces you need before you create the
database and the objects in it. Adaptive Server IQ provides stored procedures
that you can run to estimate how much space and how many dbspaces your
databases will require. See the Adaptive Server IQ Reference Manual for
syntax and usage notes for each procedure.
Running the procedures in the sequence that follows can help you avoid
running out of space for your objects.
1 Run the stored procedure sp_iqestspace to estimate the amount of space
you will need to create a database, based on the number of rows in the
underlying database tables. Run the procedure once for each table that you
plan to create, as follows:
sp_iqestspace
table_name
,
rows
[,
iqpagesize
]
The amount of space needed by each table is returned as “RAW DATA
index_size”.
2 Add totals under “RAW DATA index_size” for all tables together.
3 Run the stored procedure sp_iqestjoin to estimate the amount of additional
space required to create join indexes on tables that you want to join
frequently. Run the procedure once for each pair of tables, as follows:
sp_iqestjoin
table1
,
table1rows
,
table2
,
table2rows
[,
relation
] [,
iqpagesize
] ...
sp_iqestjoin suggests different index sizes depending on your queries.

Working with databases
106
Each time you run sp_iqestjoin, select one of the suggested index sizes. If
you know you will always join the tables with exact one-to-one matches,
use the “Min Case index_size”. If you anticipate occasional one-to-many
joins, use the “Avg Case index_size”. If you anticipate using numerous
one-to-many joins, use the “Max Case index_size”.
4 Total the index_sizes you selected for all table pairs.
5 Add the join space total from step number 4 to the table space total from
step number 2, doing a separate calculation for minimum and maximum
join space.
6 Run the stored procedure sp_iqestdbspaces to determine how many
dbspaces to create from the given space and what size they should be. Use
the minimum and maximum total index sizes calculated in step number 5
as the minsize and maxsize parameters for this procedure, as follows:
sp_iqestdbspaces (
dbsize
[,
iqpagesize
]
[,
minsize
] [,
maxsize
] ...
All these calculations are estimates. Results vary based on the columns and
indexes you create for your database. For more information on these stored
procedures, see the Adaptive Server IQ Reference Manual.
Working with databases
Some application design systems, such as Sybase WarehouseArchitect, contain
facilities for creating database objects. These tools construct SQL statements
that are submitted to the server, typically through its ODBC interface. If you
are using one of these tools, you do not need to construct SQL statements to
create tables, assign permissions, and so on.
This chapter describes the SQL statements for defining database objects. You
can use these statements directly if you are building your database from an
interactive SQL tool, such as DBISQL. Even if you are using an application
design tool, you may want to use SQL statements to add features to the
database if they are not supported by the design tool.
For more advanced use, database design tools such as Sybase Warehouse
Architect provide a more thorough and reliable approach to developing well-
designed databases.

CHAPTER 3 Working with Database Objects
107
Creating a database
When you create a database, the database server creates the following four
dbspaces:
The SYSTEM dbspace contains the system tables, which hold the schema
definition as you build your database. It also holds a separate checkpoint log,
rollback log, and optionally a write file, transaction log, and transaction log
mirror, for the Catalog Store.
Note In addition to these database files, the database server also uses a
temporary file to hold information needed during a session. This temporary file
is not the same as the Temporary IQ Store, and is not needed once the database
server shuts down. The file has a server-generated name with the extension
.tmp. Its location is determined by the TEMP environment variable, or the
ASTMP environment variable on UNIX.
You create a database using either the CREATE DATABASE statement or Sybase
Central. Once the database is created, you can connect to it and build the tables
and other objects that you need in the database.
Before you create
your database In order to create a database, you must:
• Start the database server
• Start either Sybase Central or DBISQL
To create a database in DBISQL, you need to connect to an existing database,
or else start the utility database, a phantom database with no database files and
no data. You must start the utility database before creating new databases if no
databases are built yet. For information on the utility database and its security,
see the Adaptive Server IQ Installation and Configuration Guide.
If you are creating an IQ database for the first time, see the Introduction to
Adaptive Server IQ for assistance.
dbspace name Contents Default operating
system file name
IQ_SYSTEM_MAIN Main (permanent) IQ
Store file
dbname.iq
IQ_SYSTEM_TEMP Temporary IQ Store file dbname.iqtmp
IQ_SYSTEM_MSG Message log file dbname.iqmsg
SYSTEM Catalog Store file dbname.db

Working with databases
108
Locating and moving
database files When you create a database, you specify its location. Before you do so,
consider whether you will ever need to move the database.
In order to move a database, it is crucial that you have all of the files you need,
that they be in a consistent state when you move them, and that no users are
connected to the database. Because it is difficult to achieve these conditions,
you should avoid copying a database unless absolutely necessary. Instead, if
you must move a database, use the BACKUP command to make a full backup,
and then use the RESTORE command with the RENAME option to restore the
backup. See Chapter 11, “Backup and Data Recovery” for more information.
Warning! The database file and the transaction log file must be located on the
same physical machine as the database server. Locating database files and
transaction log files on a network drive can lead to poor performance and data
corruption.
If your IQ requirements are large and complex enough that you need multiple
physical systems, consider using the Adaptive Server IQ Multiplex feature. See
the Adaptive Server IQ Multiplex User’s Guide for details.
Database file
compatibility Adaptive Server IQ servers cannot manage databases created with versions
prior to Adaptive Server IQ 12.0; likewise, old servers cannot manage new
databases.
Using Sybase Central
to create an IQ
database
To create an IQ database in Sybase Central, click the Utilities folder in the left
panel, then double-click Create Database in the right panel to start the Create
Database Wizard. The Create Database Wizard leads you through the process.
If you need more information, see “Managing Databases with Sybase Central”
in the Introduction to Adaptive Server IQ, or see the Sybase Central online
help.
Using Sybase Central
to create a multiplex
IQ database
To create a multiplex IQ database in Sybase Central, you use the Create
Multiplex Wizard. Be sure that you have set up the multiplex environment
correctly before running Create Multiplex. See the Adaptive Server IQ
Multiplex User’s Guide for instructions.
Using the CREATE
DATABASE statement You can use the CREATE DATABASE statement to create IQ databases. You
must specify the filename for Catalog Store and the IQ PATH. All other
parameters are optional. If you use all of the defaults, your database has these
characteristics:

CHAPTER 3 Working with Database Objects
109
• Case sensitive (CASE RESPECT).’ABC’ compares NOT EQUAL to
‘abc’. Note that the default login is now user ID DBA and password SQL
(uppercase). Passwords are case sensitive for a case-sensitive database,
and case-insensitive for a case-insensitive database. Usernames are always
case insensitive.
• Catalog page size of 2048 bytes (PAGE SIZE 2048).
• When comparing two character strings of unequal length, IQ treats the
shorter one as if it were padded with blanks to the length of the longer one,
so that ‘abc’ compares equal to ‘abc‘ (BLANK PADDING ON).
• Incompatible with Adaptive Server Enterprise.
• IQ page size is 64KB (IQ PAGE SIZE 65536).
• IQ message file and IQ Temporary Store are in the same directory as the
Catalog Store. See also “Using relative pathnames”.
• For a raw device, IQ SIZE and TEMPORARY SIZE are the maximum size
of the raw partition. For operating system files, see the discussion of this
parameter below.
• IQ Temporary Store size is half the IQ size.
• jConnect JDBC driver is enabled (JCONNECT ON).
• The collation sequence ISO_BINENG is used. The collation order is the
same as the order of characters in the ASCII character set. In a case-
sensitive database, all uppercase letters precede all lowercase letters (for
example, both 'A' and 'B' precede 'a').
• Java is enabled (JAVA ON).
Note Either CREATE DATABASE commands must include CASE IGNORE, or
else connections to newly created databases must be made with case-sensitive
userid/password combinations.
For a full description of all parameters, see the CREATE DATABASE statement
in the Adaptive Server IQ Reference Manual. Following are several examples
of creating an IQ database.
Using relative
pathnames You can create a database using a relative or fully qualified pathname for each
of the files for the database. Sybase recommends that you create databases with
relative pathnames.
If your database is on UNIX, you can define a symbolic link for each pathname,
as described in the Adaptive Server IQ Reference Manual.

Working with databases
110
If you omit the directory path, Adaptive Server IQ locates the files as follows:
• The Catalog Store is created relative to the working directory of the server.
• The IQ Store is created relative to the working directory of the server.
• The Temporary Store is created in the same directory as the IQ Store,
unless it is on a raw device. (This also occurs if you do not specify any file
name.)
• The Message Log is created in the same directory as the IQ Store, unless
it is on a raw device. (This also occurs if you do not specify any file name.)
The Message Log cannot be on a raw partition.
• The Transaction Log is created in the same directory as the Catalog Store.
(This also occurs if you do not specify any file name.) However, you
should place it on a different physical device from the Catalog Store and
IQ Store, on the same physical machine.
Note You must start the database server from the directory where the database
is located, for any database created with a relative pathname.
Specifying an IQ
PATH The required IQ PATH parameter tells Adaptive Server IQ that you are creating
an IQ database, not an Anywhere database. You specify the location of your IQ
Store in this parameter. It is preferable to use a relative pathname. When you
do, the IQ Store is created relative to the directory where the server was started,
which can change the next time the server is started.
Choose a location for your database carefully. Although you can move an IQ
database or any of its files to another location, to do so you must restore the
entire database. A full restore is a time-consuming process, during which users
cannot be connected to the database.
You can add space on a different drive, as described in “Adding dbspaces” but
you can only use this additional space for new data. You cannot readily move
a particular table, index, or rows of data from one location to another. You
would need to drop the table or index, recreate it, and reload it; or you would
need to delete those rows, and reinsert them.
Example The following statement creates an IQ database called company.db. This
database consists of four NT files:
• The Catalog Store is in company.db, in the directory where the server was
started (in this case, c:\company)
• The IQ Store is in c:\company\iqdata\company.iq

CHAPTER 3 Working with Database Objects
111
• The Temporary Store is in c:\company\company.iqtmp
• The IQ message log file is in c:\company\company.iqmsg
CREATE DATABASE ’company.db’
IQ SIZE 20
IQ PATH ’c:\\company\\iqdata\\company.iq’
Example The following statement creates an IQ database called company.db. This
database consists of four UNIX files:
• The Catalog Store is in company.db, in the directory where the server was
started (in this case, /disk1/company)
• The IQ Store is in /disk1/company/iqdata/company.iq
• The Temporary Store is in /disk1/company/iqdata/company.iqtmp
• The IQ message log file is in /disk1/company/iqdata/company.iqmsg
CREATE DATABASE ’company.db’
IQ SIZE 20
IQ PATH ’/disk1/company/iqdata/company.iq’
Choosing an IQ page size
You set a page size for the IQ Store with the IQ PAGE SIZE option. This option
determines memory and disk use. The IQ PAGE SIZE must be a power of 2,
from 65536 to 524288 bytes. The IQ page size is the same for all dbspaces in
the IQ Store.
To obtain the best performance, Sybase recommends the following minimum
IQ page sizes:
• 64 KB (IQ PAGE SIZE 65536) for databases whose largest table contains
up to 1 billion rows. Note that this is the default IQ page size, and the
absolute minimum for a new database.
• 128 KB (IQ PAGE SIZE 131072) for databases whose largest table contains
more than 1 billion rows and fewer than 4billion rows.
• 256 KB (IQ PAGE SIZE 262144) for databases whose largest table contains
more than 4 billion rows.
Multiuser environments, and systems with memory constraints, both benefit
from an IQ page size of at least 64KB, as this size minimizes paging.

Working with databases
112
Adaptive Server IQ stores data on disk in compressed form. It uncompresses
the data and moves data pages into memory for processing. The IQ page size
determines the amount of disk compression and the default I/O transfer block
size for the IQ Store. For most applications, this default value is best. For a
complete explanation of how the page size and related options affect resource
use and performance, see Chapter 12, “Managing System Resources”
Specifying the size of your database
When you create a database, you set the size in MB of the initial IQ database
file (the IQ_SYSTEM_MAIN dbspace). This value is defined in the IQ SIZE
parameter.
• For raw partitions, you do not specify IQ SIZE; Adaptive Server IQ
determines the size of the raw device and sets IQ SIZE to that value.
• For operating system files you can rely on the defaults listed below; or
specify a value based on the size of your data, from the required minimum
listed below up to a maximum of 128GB, in 1MB increments.
Table 3-1: Default and minimum sizes of IQ and Temporary Stores
Choosing a Catalog page size
You can select a page size for the Catalog Store, with the PAGE SIZE option.
You should always use 4096 for this option. Each database server can support
only one Catalog page size. If you start additional databases on a server, each
one acquires the Catalog page size of the first database opened on that server.
By always setting this value at 4096 (4KB), you ensure that you will always
have an adequate page size for the Catalog.
IQ page
size Default size
of IQ Store
Default size
of
Temporary
Store
Minimum
IQ Store
size when
specified
explicitly
Minimum
Temporary
Store size
when
specified
explicitly
65536 4096000 2048000 4MB 2MB
131072 8192000 4096000 8MB 4MB
262144 16384000 8192000 16MB 8MB
524288 32768000 16384000 32MB 16MB

CHAPTER 3 Working with Database Objects
113
Choosing a block size for your database
Example The following statement creates a large database on a UNIX raw partition with
a Catalog PAGE SIZE of 4KB, and an IQ PAGE SIZE of 128KB. By default, the
IQ Store size is 8MB and the Temporary Store is 4MB.
CREATE DATABASE ’company’ IQ PATH ’/dev/rdsk/c2t6d0s3’
PAGE SIZE 4096
IQ PAGE SIZE 131072
Enabling Java in the database
By default, Java support is ON for IQ databases. It can be turned off with the
JAVA OFF option. With Java ON:
• You can write a Java procedure that accesses tables in the Catalog Store or
the IQ Store. These queries are processed like any other query.
• You cannot use a Java-based user-defined function within a query to an IQ
table, but you can use it on Catalog Store tables.
• Windows NT users can also use Java-based user-defined functions in
queries on tables in an Adaptive Server Anywhere database, or queries to
IQ tables from an Adaptive Server Anywhere database, using the remote
access capabilities described in the Adaptive Server IQ Installation and
Configuration Guide.
• You cannot store Java data in an IQ table. If you attempt to create an IQ
column of type Java, you receive an error, and you may cause the database
server to fail.
Additional support for Java will be provided in a subsequent release. For
information on Java support in Adaptive Server Anywhere, see Part 3, “Java in
the Database” in the Adaptive Server Anywhere User’s Guide. The chapter
entitled “Data Access Using JDBC” is particularly relevant for IQ users.

Working with databases
114
Adding dbspaces
When you create a database, it has only one file for storing permanent IQ data,
one file for storing Catalog data, and one file each for the IQ message log and
the Temporary Store. Each of these files is a dbspace, as described in “Creating
a database”. Initially, the definitions of all IQ database objects go into the
SYSTEM dbspace (the Catalog Store), and all IQ data is placed in the
IQ_SYSTEM_MAIN dbspace (the IQ Store). Each dbspace has a maximum size
of 128GB, depending on file size limits of your operating system and version.
On some platforms you must enable large file system files to reach this
maximum.
You can only specify SIZE for the IQ Store and IQ Temporary Store, not for the
Catalog Store.
In the large databases typical of a data warehouse, you will need to add
dbspaces to any database. You create a new database file—a dbspace—using
the CREATE DBSPACE statement, or the Sybase Central Add Dbspace Wizard.
A new dbspace can be on the same or a different disk drive as the existing
dbspaces. You must have DBA authority to create new dbspaces.
When you create a new dbspace, it has no contents. When you create tables and
indexes and load them, Adaptive Server IQ distributes the data as equally as
possible among any existing dbspaces that are not already full. This technique
optimizes performance.
Because Adaptive Server IQ fills dbspaces in this way, you cannot specify that
a particular IQ table be loaded into a particular dbspace. You can only indicate
the IQ Store as the dbspace IQ_SYSTEM_MAIN, and the Temporary Store as the
dbspace IQ_SYSTEM_TEMP. The only way to control the location of a table
within the IQ Store is to completely fill any existing IQ Store dbspaces, then
define a new dbspace, and create and load the tables you want in it.
Note This behavior differs from that of Adaptive Server Anywhere, which
allows you to place tables in a particular dbspace.
How the number of
dbspaces affects
resource use and
performance
There is an absolute maximum of 2,048 dbspaces per IQ database, plus a
maximum of 12 dbspaces for the Catalog Store. However, you should never
allow a situation where you come close to the maximum. Increasing the
number of dbspaces has no real impact on memory use or performance.
Note On HP and AIX platforms, your use of overlapped I/O improves when
you divide data among more dbspaces.

CHAPTER 3 Working with Database Objects
115
When data is stored on raw partitions, you can have one dbspace per drive.
When data is stored in a file system, you can take advantage of striping in the
storage system. If you use operating system or hardware striping on a multiuser
system, your stripe size should be a minimum of 1MB, or the highest size
possible. In any case, your stripe size should be several times your IQ page
size.
For more information on disk striping and use of multiple dbspaces, see
“Balancing I/O”.
Before adding any more dbspaces you may want to estimate your space
requirements. See “Estimating space and dbspaces required” for details of how
to estimate space. For the most efficient resource use, make your dbspaces
small enough to fit on your backup media, and large enough to fill up the disk.
Example The following command creates a new dbspace called library in the file
library.iq in the same directory as the IQ_SYSTEM_MAIN dbspace:
CREATE DBSPACE library
AS ’library.iq’
Creating a dbspace in
Sybase Central
❖To create a dbspace in Sybase Central:
1 Connect to the database.
2 Click the Dbspaces folder for that database.
3 Double-click Add Dbspace in the right panel.
4 Enter the dbspace name.
5 Click the type of data to be stored in this Dbspace: IQ or IQ temporary.
6 Enter the filename, and optionally the size of the dbspace.
7 Click OK to create the dbspace.
Issuing checkpoints
for cleaner recovery After you add or drop a dbspace, it's a good idea to issue a CHECKPOINT. In
the event system recovery is needed, it begins after the most recent checkpoint.

Working with databases
116
Reserving space for
DDL commands In the event that you run out of space to perform an operation, you will see a
message telling you to more space. In addition to space for the new dbspace
itself, you also need a small amount of space to issue the ADD DBSPACE
command. To ensure that you have the space for this and related DDL
commands, set the options MAIN_RESERVED_DBSPACE_MB and
TEMP_RESERVED_DBSPACE_MB. Do not wait until you have run out of
space to set these options. See the “Database Options” chapter of the Adaptive
Server IQ Reference Manual for option details.
Dropping dbspaces
You can issue a DROP DBSPACE command to remove a database file. In order
to drop a dbspace, the following must be true:
• It must not contain any data. Adaptive Server IQ does not allow you to
drop a dbspace unless it is empty.
• It must be the last one added. (After you drop the last dbspace, the next
most recently added dbspace becomes the last one, and can be dropped.)
• It must not be one of the four initial dbspaces, SYSTEM,
IQ_SYSTEM_MAIN, IQ_SYSTEM_TEMP, and IQ_SYSTEM_MSG. These
dbspaces can never be dropped.
Because of the way Adaptive Server IQ fills dbspaces with data, it is unlikely
that you will be able to drop the last dbspace, especially if disk striping is in
use. You also cannot empty a dbspace by truncating the tables in it, as even an
empty table takes some space. The only way to completely remove a table and
its data is with a DROP TABLE statement (or by dropping the table in Sybase
Central).
If you drop or truncate a table while other users are reading from it, the normal
rules of table versioning apply, that is, old table versions remain until readers'
transactions complete; see Chapter 8, “Transactions and Versioning” for
details.
To find out whether you can drop a particular dbspace, run the stored procedure
sp_iqstatus. Look at the DB Blocks value, which tells you the block numbers
each dbspace includes. Compare this value to the Main IQ Blocks Used (or
Temporary IQ Blocks Used), to see whether the Max Block # is in the dbspace.
If it is, you cannot drop this dbspace.

CHAPTER 3 Working with Database Objects
117
Name Value
=======================================================
Adaptive Server IQ (TM) Copyright (c) 1992-2000 by Sybase, Inc. All rights
reserved.
Version: 12.4.2/(32bit mode)/Sun_svr4/OS 5.6/EBF 0000
Time Now: 2000-03-14 12:05:54.288
Build Time: Sat Mar 11, 2000 21:39:55 EST
File Format: 23 on 03/18/1999
Catalog Format: 2
Stored Procedure Revision: 1
Page Size: 131072/8192blksz/16bpp
Number of DB Spaces: 8
Number of Temp Spaces: 2
DB Blocks: 1-12132344 IQ_SYSTEM_MAIN
DB Blocks: 12545280-24677623 mydb_2
DB Blocks: 25090560-37222903 mydb_3
DB Blocks: 37635840-49768183 mydb_4
DB Blocks: 50181120-62313463 mydb_5
DB Blocks: 62726400-74858743 mydb_6
DB Blocks: 75271680-87404023 mydb_7
DB Blocks: 87816960-99949303 mydb_8
Temp Blocks: 1-8823288 IQ_SYSTEM_TEMP
Temp Blocks: 9408960-18232247 mydb_tmp2
Create Time: 1999-12-30 19:10:55.231
Update Time: 2000-03-14 09:52:13.609
Main IQ Buffers: 11174, 1400Mb
Temporary IQ Buffers: 15165, 1900Mb
Main IQ Blocks Used: 43515029 of 97058752, 44%=331Gb, Max
Block#: 95065709
Temporary IQ Blocks Used: 610 of 17646576, 0%=4Mb, Max Block#: 0
Main Reserved Blocks Available: 1280 of 1280, 100%=10Mb
Temporary Reserved Blocks Available: 1280 of 1280, 100%=10Mb
Memory: Current: 3351mb, Max: 3384mb
Main IQ Buffers: Used: 11172, Locked: 0
Temporary IQ Buffers: Used: 38, Locked: 0
Main IQ I/O: I: L88043944/P495510 O:
C760342/D761393/P736587 D:24753 C:65.9
Temporary IQ I/O: I: L16515025/P1222153 O:
C2609951/D3838862/P1228941
D:2609913 C:46.3
Old Versions: 1 = 59Gb
Active Txn Versions: 0 = C:0Mb/D:0Mb

Working with tables
118
Dropping a database
Dropping a database deletes all tables and data from disk, including the
transaction log that records alterations to the database. It also drops all of the
dbspaces associated with the database.
To drop a database, use the following statement:
DROP DATABASE
dbname
You must specify the database name and its pathname exactly as they were
specified when the database was created.
For example, on a Windows NT system:
DROP DATABASE ’c:\sybase\data\mydb.db’
The database must be stopped before you can drop it. If the connection
parameter AUTOSTOP=no is used, you may need to issue a STOP DATABASE
statement.
Working with tables
When you create a database, the only tables in it are the system tables, which
hold the database schema.
This section describes how to create, alter, and delete tables from a database.
The examples can be executed in DBISQL, but the SQL statements are
independent of the administration tool you are using.
You may want to create command files containing the CREATE TABLE and
ALTER TABLE statements that define the tables in your database. The command
files allow you to re-create the database when necessary. They also let you
create tables in a standardized way, which you can copy and revise.
Creating tables
Creating tables in
Sybase Central Sybase Central provides a tool called the table editor. In the table editor, you
can create a table definition by filling out a spreadsheet-like form.
❖To create a table using Sybase Central:
1 Connect to the database.

CHAPTER 3 Working with Database Objects
119
2 Click the Tables folder for that database.
3 Double-click Add Table in the right panel.
4 Enter a Name for the table.
5 To create an IQ table, skip this step. To create a table in the Catalog Store,
double-click the Advanced Table Properties icon, and select SYSTEM
from the DB space dropdown list.
6 Enter the columns you want and their data types and other attributes in the
Table Editor.
7 Click OK to create the table.
SQL statement for
creating tables The SQL statement for creating tables is CREATE TABLE.
This section describes how to use the CREATE TABLE statement. The examples
in this section use the sample database. To try the examples, run DBISQL and
connect to the sample database with user ID DBA and password SQL.
For information on connecting to the sample database from DBISQL, see
“Connecting to a database from DBISQL”.
You can create tables with other tools in addition to DBISQL. The SQL
statements described here are independent of the tool you are using.
Example The following statement creates a new, permanent IQ table to describe
qualifications of employees within a company. The table has columns to hold
an identifying number, a name, and a type (say technical or administrative) for
each skill.
CREATE TABLE skill (
skill_id INTEGER NOT NULL,
skill_name CHAR( 20 ) NOT NULL,
skill_type CHAR( 20 ) NOT NULL
)
You can execute this command by typing it into the DBISQL command
window, and pressing the execute key (F9).
• Each column has a data type. The skill_id is an integer (like 101), the
skill_name is a fixed-width CHARACTER string containing up to 20
characters, and so on.
• The phrase NOT NULL after their data types indicates that all columns in
this example must contain a value.
• In general, you would not create a table that has no primary key. To create
a primary key, see “Creating primary and foreign keys” on page 125.

Working with tables
120
By internally executing the COMMIT statement before creating the table,
Adaptive Server IQ makes permanent all previous changes to the database.
There is also a COMMIT after the table is created.
For a full description of the CREATE TABLE statement, see “CREATE TABLE
statement” in the Adaptive Server IQ Reference Manual. For information about
building constraints into table definitions using CREATE TABLE, see Chapter
7, “Ensuring Data Integrity”.
Specifying data types When you create a table, you specify the type of data that each column holds.
You can also define customized data types for your database. In the Adaptive
Server IQ Reference Manual, see “SQL Data Types” for a list of supported data
types, or see the CREATE DOMAIN statement for details on how to create a
customized data type.
Types of tables
Adaptive Server IQ recognizes four types of tables:
• Base tables
• Local temporary tables
• Global temporary tables
• Join virtual tables
Base tables are
permanent Base tables are sometimes called main or permanent tables, because they are
stored in the main IQ Store, and are a permanent part of the database, until you
drop them explicitly. Base tables and the data in them are accessible to all users
who have the appropriate permissions. The CREATE TABLE statement shown
in the previous example creates a base table.
Creating temporary
tables There are two types of temporary tables, global and local.
You create a global temporary table, using the GLOBAL TEMPORARY option
of CREATE TABLE, or by specifying in the Sybase Central table editor that this
is a temporary table. When you create a global temporary table, it exists in the
database until it is explicitly removed by a DROP TABLE statement.
A database contains only one definition of a global temporary table, just as it
does for a base table. However, each user has a separate instance of the data in
a global temporary table. Those rows are visible only to the connection that
inserts them. They are deleted when the connection ends.
To select into a temporary table, use syntax like the following:
SELECT * INTO #TableTemp FROM lineitem

CHAPTER 3 Working with Database Objects
121
WHERE l_discount < 0.5
You declare a local temporary table for your connection only, using the
DECLARE LOCAL TEMPORARY TABLE statement. A local temporary table
exists until the connection ends, or within a compound statement in which it is
declared. The table and its data are completely inaccessible to other users.
See “Versioning of temporary tables” for versioning information on local
temporary tables.
Dropping and altering
global temporary
tables
You drop a global temporary table just as you would a base table, with the
DROP TABLE statement, or with the Sybase Central table editor. You cannot
drop or alter a global temporary table while other connections are using the
table it.
Placement of tables Adaptive Server IQ creates tables in your current database. If you are
connected to an IQ database, tables are placed as follows:
Table 3-2: Table placement
Join virtual tables A Join Virtual Table is a denormalized table that looks like a regular table; it
has a name, columns, rows, and indexes. Adaptive Server IQ creates Join
Virtual Tables as a result of a Create Join Index for internal processing
purposes and deletes them when you do a Drop Join Index. You cannot create,
modify, or delete Join Virtual Tables, but you may see error messages related
to them if you try to use or modify them. Sybase suggests that you ignore all
Join Virtual Tables.
Automatic index creation for IQ tables
You can automate indexing for certain columns by creating a table with either
PRIMARY KEY or UNIQUE as a single-column constraint. These options cause
Adaptive Server IQ to create an HG index for the column that enforces
uniqueness.
Type of table Permitted placement Default placement
Permanent Main IQ Store or Catalog
Store
Main IQ Store
Global temporary Temporary IQ Store or
Catalog Store
Temporary IQ Store
Local temporary Temporary IQ Store or
Catalog Store; only visible
to user who creates it
Temporary IQ Store

Working with tables
122
If you use the ALTER TABLE command to add a UNIQUE column to an existing
table, or to designate an existing column as UNIQUE, an HG index is created
automatically.
For complete information on IQ indexing, see Chapter 4, “Adaptive Server IQ
Indexes”
Optimizing storage and query performance
When you create a permanent table in an IQ database, Adaptive Server IQ
automatically stores it in a default index that facilitates a type of query called
a projection.
Adaptive Server IQ optimizes this structure for query performance and storage
requirements, based on these factors:
•The
IQ UNIQUE option of CREATE TABLE.
• The data type of the column and its width
•The
IQ PAGE SIZE option of CREATE DATABASE
See the following table for implications of IQ UNIQUE.
Table 3-3: Effect of IQ UNIQUE
Difference between
UNIQUE and IQ
UNIQUE
IQ UNIQUE (
count
) gives an approximation of the number of distinct values that
can be in a given column. Each distinct value can appear many times. For
example, in the employee table, a limited set of distinct values could appear in
the state column, but each of those values could appear in many rows.
IQ UNIQUE 256 or
less IQ UNIQUE 65536 or
less IQ UNIQUE unspecified
or greater than 65536
Storage optimized for
small number of unique
values
Storage optimized for
medium number of
unique values
Storage optimized for large
number of unique values
Faster query
performance, less main
IQ Store space required
Faster query performance,
less main IQ Store space
required
Queries may be slower
Need a small amount of
extra cache for IQ
Temporary Store
Need extra cache for IQ
Temporary Store. The
amount depends on the
number of unique values
and the data type.
No extra cache needed
Loads may be slower Loads may be slower Loads are faster

CHAPTER 3 Working with Database Objects
123
By contrast, when you specify UNIQUE or PRIMARY KEY, each value can occur
only once in that column. For example, in the employee table, each value of
ss_number, the employee’s social security number, can occur just once
throughout that column. This uniqueness extends to NULL values. Thus, a
column specified as UNIQUE must also have the constraint NOT NULL.
Altering tables
This section describes how to change the structure of a table using the ALTER
TABLE statement.
Example 1 The following command adds a column to the skill table to allow space for an
optional description of the skill:
ALTER TABLE skill
ADD skill_description CHAR( 254 )
Example 2 The following statement changes the name of the skill_type column to
classification:
ALTER TABLE skill
RENAME skill_type TO classification
Example 3 The following statement deletes the classification column.
ALTER TABLE skill
DELETE classification
Example 4 The following statement changes the name of the entire table:
ALTER TABLE skill
RENAME qualification
These examples show how to change the structure of the database. The ALTER
TABLE statement can change many characteristics of a table—foreign keys can
be added or deleted, and so on. However, you cannot use MODIFY to change
table or column constraints. Instead, you must DELETE the old constraint and
ADD the new one. In all these cases, once you make the change, stored
procedures, views, and any other item referring to this column will no longer
work.
For a complete description of the ALTER TABLE command, see Adaptive
Server IQ Reference Manual. For information about building constraints into
table definitions using ALTER TABLE, see Chapter 7, “Ensuring Data
Integrity”

Working with tables
124
Altering tables in
Sybase Central The property sheets for tables and columns display all the table or column
attributes. You can alter a table definition in Sybase Central by displaying the
property sheet for the table or column you wish to change, altering the property,
and clicking OK to commit the change.
Altering tables in a
join index You cannot ADD, DROP or MODIFY a base table column that participates in a
join condition of a join index. To alter joined columns, you must first drop the
join index, alter the table, and then recreate the join index. See “Using join
indexes” for complete information on join indexes.
Dropping tables
The following DROP TABLE statement deletes all the records in the skill table
and then removes the definition of the skill table from the database
DROP TABLE skill
Like the CREATE statement, the DROP statement automatically executes a
COMMIT before and after dropping the table. This makes permanent all
changes to the database since the last COMMIT or ROLLBACK.
The DROP statement also drops all indexes on the table, except if any column
in the table participates in a join index.
If you only want to remove data rows but not the table itself, use the
TRUNCATE TABLE statement. If you truncate a table while other users are
reading from it, the normal rules of table versioning apply, that is, old table
versions remain until readers' transactions complete; see Chapter 8,
“Transactions and Versioning” for details.
DROP TABLE and TRUNCATE TABLE are very fast, taking only seconds to
occur. The size of the data does not effect the speed of the operation.
For a full description of the DROP statement, see Adaptive Server IQ Reference
Manual.
❖To drop a table in Sybase Central:
1 Connect to the database.
2 Click the Tables folder for that database.
3 Right-click the table you wish to delete, and select Delete from the pop-up
menu.

CHAPTER 3 Working with Database Objects
125
Creating primary and foreign keys
The CREATE TABLE and ALTER TABLE statements allow many attributes of
tables to be set, including column constraints and checks. This section shows
how to set table attributes using the primary and foreign keys as an example.
Creating a primary
key The following statement creates the same skill table as before, except that a
primary key is added:
CREATE TABLE skill (
skill_id INTEGER NOT NULL,
skill_name CHAR( 20 ) NOT NULL,
skill_type CHAR( 20 ) NOT NULL,
primary key( skill_id )
)
The primary key values must be unique for each row in the table which, in this
case, means that you cannot have more than one row with a given skill_id. Each
row in a table is uniquely identified by its primary key.
Columns in the primary key are not allowed to contain NULL. You must
specify NOT NULL on the column in the primary key.
Note Adaptive Server IQ does not enforce multi-column primary keys. You
must specify the keyword UNENFORCED when you define a multi-column
primary key.
Creating a primary
key in Sybase Central
❖To create a primary key in Sybase Central:
1 Connect to the database.
2 Click the Tables folder for that database.
3 Right-click the table you wish to modify, and select Properties from the
pop-up menu to display its property sheet.
4 Click the Columns tab, select the column name, and either click Add to
Key or Remove from Key.

Working with tables
126
For more information, see the Sybase Central online Help.
Note Multi-column primary keys are not enforced, and require the keyword
UNENFORCED. Primary key column order is based on the order of the columns
during table creation. It is not based on the order of the columns as specified in
the primary key declaration.
Creating unenforced
foreign keys You can create a table named emp_skill, which holds a description of each
employee’s skill level for each skill in which they are qualified, as follows:
CREATE TABLE emp_skill(
emp_id INTEGER NOT NULL,
skill_id INTEGER NOT NULL,
"skill level" INTEGER NOT NULL,
PRIMARY KEY( emp_id, skill_id ) UNENFORCED,
FOREIGN KEY REFERENCES employee UNENFORCED,
FOREIGN KEY REFERENCES skill UNENFORCED
)
The emp_skill table definition has a primary key that consists of two columns:
the emp_id column and the skill_id column. An employee may have more than
one skill, and so appear in several rows, and several employees may possess a
given skill, so that the skill_id may appear several times.
The emp_skill table also has two foreign keys. The foreign key entries indicate
that the emp_id column must contain a valid employee number from the
employee table, and that the skill_id must contain a valid entry from the skill
table.
A table can only have one primary key defined, but it may have as many
foreign keys as necessary.
Note Adaptive Server IQ does not enforce foreign keys or multi-column
primary keys. You must specify the keyword UNENFORCED when you add or
delete these constraints. They can be useful, nonetheless, because they provide
information that Adaptive Server IQ uses to optimize queries, and to define the
underlying relationship between joined columns.
For more information about valid strings and identifiers, see the chapter “SQL
Language Elements” in the Adaptive Server IQ Reference Manual.
Creating an
unenforced foreign
key in Sybase Central
Each foreign key relationship relates a primary key in one column to a column
in another table, which becomes the foreign key.

CHAPTER 3 Working with Database Objects
127
❖To create an unenforced foreign key in Sybase Central:
1 Connect to the database.
2 Click the Tables folder for that database.
3 Click the table holding the primary key, and drag it to the foreign key table.
4 When the primary key table is dropped on the foreign key table, the
Foreign Key Wizard is displayed, which leads you through the process of
creating the foreign key.
For more information, see the Sybase Central online Help.
For more information about using primary and foreign keys, see Chapter 7,
“Ensuring Data Integrity”
Table information in the system tables
All the information about tables in a database is held in the system tables. The
information is distributed among several tables. For more information, see
“System Tables” in Adaptive Server IQ Reference Manual.
You can use Sybase Central or DBISQL to browse the information in these
tables. Type the following command in the DBISQL command window to see
all the columns in the SYS.SYSTABLE table:
SELECT *
FROM SYS.SYSTABLE
❖To display the system tables in Sybase Central:
1 Connect to the database.
2 Right-click the database, and select Filter Objects from the pop-up menu.
3 Select SYS and OK.
4 When you view the database tables or views with Show System Objects
checked, the system tables or views are also shown.
Working with views
Views are computed tables. You can use views to show database users exactly
the information you want to present, in a format you can control.

Working with views
128
Similarities between
views and base tables Views are similar to the permanent tables of the database (a permanent table is
also called a base table) in many ways:
• You can assign access permissions to views just as to base tables.
• You can perform SELECT queries on views.
• You can perform INSERT and DELETE operations on some views.
• You can create views based on other views.
Differences between
views and permanent
tables
There are some differences between views and permanent tables:
• You cannot create indexes on views.
• You cannot perform INSERT, DELETE, and UPDATE operations on all
views.
• You cannot assign integrity constraints and keys to views.
• Views refer to the information in base tables, but do not hold copies of that
information. Views are recomputed each time you invoke them.
Benefits of tailoring
access Views are used to tailor access to data in the database. Tailoring access serves
several purposes:
• Improved security By not allowing access to information that is not
relevant.
• Improved usability By presenting users and application developers
with data in a more easily understood form than in the base tables.
• Improved consistency By centralizing in the database the definition
of common queries.
Creating views
A SELECT statement operates on one or more tables and produces a result set
that is also a table: just like a base table, a result set from a SELECT query has
columns and rows. A view gives a name to a particular query, and holds the
definition in the database system tables.
Example Suppose that you frequently need to list the number of employees in each
department. You can get this list with the following statement:
SELECT dept_ID, count(*)
FROM employee
GROUP BY dept_ID
You can create a view containing the results of this statement as follows:

CHAPTER 3 Working with Database Objects
129
CREATE VIEW DepartmentSize AS
SELECT dept_ID, count(*)
FROM employee
GROUP BY dept_ID
The information in a view is not stored separately in the database. Each time
you refer to the view, the associated SELECT statement is executed to retrieve
the appropriate data.
On one hand, this is good because it means that if someone modifies the
employee table, the information in the DepartmentSize view will be
automatically up to date. On the other hand, complicated SELECT statements
may increase the amount of time SQL requires to find the correct information
every time you use the view.
❖To create a view in Sybase Central:
1 Connect to the database.
2 Click the Views folder for that database.
3 Double-click Add View.
4 Enter the tables and columns to be used. For instance, to create the same
view as in the SQL example shown above, enter employee and dept_ID.
5 From the File menu select Execute Script and from the File menu select
Close.
For more information, see the Sybase Central online Help.
Using views
When you use views, you need to be aware of certain restrictions, both on the
SELECT statements you can use to create them, and on your ability to insert
into, delete from, or update them.
Restrictions on
SELECT statements There are some restrictions on the SELECT statements that you can use as
views. In particular, you cannot use an ORDER BY clause in the SELECT query.
A characteristic of relational tables is that there is no significance to the
ordering of the rows or columns, and using an ORDER BY clause would impose
an order on the rows of the view. You can use the GROUP BY clause,
subqueries, and joins in view definitions.
To develop a view, tune the SELECT query by itself until it provides exactly the
results you need in the format you want. Once you have the SELECT query just
right, you can add a phrase in front of the query to create the view. For example:

Working with views
130
CREATE VIEW
viewname
AS
Inserting and deleting
on views UPDATE, INSERT, and DELETE statements are allowed on some views, but not
on others, depending on their associated SELECT statement.
You cannot update, insert into or delete from views in the following cases:
• Views containing aggregate functions, such as COUNT(*)
• Views containing a GROUP BY clause in the SELECT statement
• Views containing a UNION operation
In all these cases, there is no way to translate the UPDATE, INSERT, or DELETE
into an action on the underlying tables.
Modifying views
You can modify a view using the ALTER VIEW statement. The ALTER VIEW
statement replaces a view definition with a new definition; it does not modify
an existing view definition.
The ALTER VIEW statement maintains the permissions on the view.
Example For example, to replace the column names with more informative names in the
DepartmentSize view described above, you could use the following statement:
ALTER VIEW DepartmentSize
(Dept_ID, NumEmployees)
AS
SELECT dept_ID, count(*)
FROM Employee
GROUP BY dept_ID
Permissions on views
A user may perform an operation through a view if one or more of the
following are true:
• The appropriate permission(s) on the view for the operation has been
granted to the user by a DBA.
• The user has the appropriate permission(s) on all the base table(s) for the
operation.

CHAPTER 3 Working with Database Objects
131
• The user was granted appropriate permission(s) for the operation on the
view by a non-DBA user. This user must be either the owner of the view
or have WITH GRANT OPTION of the appropriate permission(s) on the
view. The owner of the view must be either:
• a DBA, or
• a non-DBA, but also the owner of all the base table(s) referred to by
the view, or
• a non-DBA, and not the owner of some or all of the base table(s)
referred to by the view, but the view owner has SELECT permission
WITH GRANT OPTION on the base table(s) not owned and any
other required permission(s) WITH GRANT OPTION on the base
table(s) not owned for the operation.
Instead of the owner having permission(s) WITH GRANT OPTION
on the base table(s), permission(s) may have been granted to
PUBLIC. This includes SELECT permission on system tables.
UPDATE permissions can be granted only on an entire view. Unlike tables,
UPDATE permissions cannot be granted on individual columns within a view.
Deleting views
To delete a view from the database, you use the DROP statement. The
following statement removes the DepartmentSize view:
DROP VIEW DepartmentSize
Dropping a view in
Sybase Central To drop a view in Sybase Central, right-click the view you wish to delete and
select Delete from the pop-up menu.
For more information, see the Sybase Central online Help.
Views in the system tables
All the information about views in a database is held in the system table
SYS.SYSTABLE. The information is presented in a more readable format in
the system view SYS.SYSVIEWS. For more information about these, see
Adaptive Server IQ Reference Manual.

Working with indexes
132
You can use DBISQL to browse the information in these tables. Type the
following statement in the DBISQL command window to see all the columns
in the SYS.SYSVIEWS view:
SELECT *
FROM SYS.SYSVIEWS
To extract a text file containing the definition of a specific view, use a statement
such as the following:
SELECT viewtext FROM SYS.SYSVIEWS
WHERE viewname = ’DepartmentSize’;
OUTPUT TO viewtext.sql
FORMAT ASCII
Working with indexes
Performance is a vital consideration when designing and creating your
database. Adaptive Server IQ indexes dramatically improve the performance
of database searches over searches in traditional relational databases. Even
within Adaptive Server IQ, however, it is important to choose the right indexes
for your data, to achieve the greatest performance, and to make best use of
memory, disk, and CPU cycles.
Introduction to indexes
All IQ database columns with data need an index. When you create a database
in an IQ store, a default index is created automatically on every column of
every table. You can also choose from several other index types:
• Four column index types optimize specific types of queries on the indexed
column.
• Join indexes optimize queries that relate columns from two or more tables.
You will almost certainly want to supplement the default indexing by selecting
one or more indexes for many of the columns in your database. You will also
want to define join indexes for any table columns that are joined in a consistent
way in user queries. Select indexes based on the size of your database, the disk
space available, and the type of queries users submit.

CHAPTER 3 Working with Database Objects
133
Indexes are created on a specified table, or on a set of tables for join indexes.
You cannot create an index on a view.
Creating indexes
You can create column indexes in three ways:
• With the CREATE INDEX command
• With the Add Index option in Sybase Central
• With the UNIQUE or PRIMARY KEY column constraint of CREATE TABLE,
which creates a unique index automatically.
You can create a join index in two ways:
• With the CREATE JOIN INDEX statement
• With the Join Index Editor in Sybase Central
See Chapter 4, “Adaptive Server IQ Indexes” for details on selecting and
creating indexes. See the Adaptive Server IQ Reference Manual for command
syntax.
Indexes in the system tables
Information on indexes is in the system tables SYSINDEX, SYSIQINDEX,
SYSIXCOL, and for join indexes, SYSIQJINDEX. See the Adaptive Server IQ
Reference Manual for a description of these tables. See Introduction to
Adaptive Server IQ for an explanation of how to browse system tables in
DBISQL and in Sybase Central.
Displaying indexes
using stored
procedures
You can also use the stored procedure sp_iqindex to display a list of indexes and
information about them. For example, to list the indexes in the sales_order
table, issue the command:
sp_iqindex ’sales_order’
The following information displays. (A remarks column also appears, but is not
shown here.)
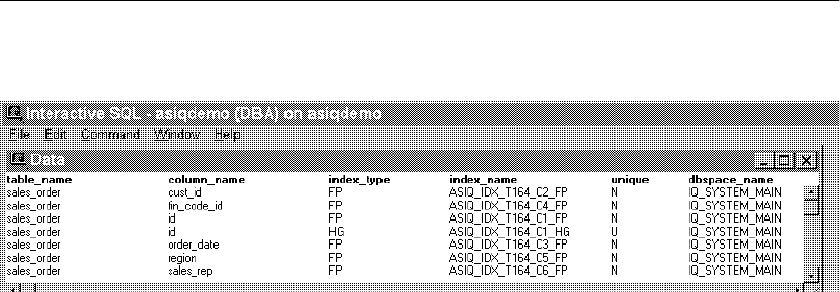
Working with indexes
134
Figure 3-1: sp_iqindex results
If you omit the table name from the command, sp_iqindex displays this
information for all tables in the database.
Removing indexes
If a column index or join index is no longer required, you can remove it from
the database using the DROP statement. You can also drop indexes in Sybase
Central by clicking the table name, right-clicking to display options, and
clicking the Delete option. Before you drop a join index, see “Modifying tables
included in a join index” for special requirements.
135
CHAPTER 4 Adaptive Server IQ Indexes
About this chapter This chapter describes the Adaptive Server IQ index types. It explains
how you create an index, and provides information to help you decide
what index types are best suited for the way you use the data in your
database. It also includes performance and resource issues related to
indexing.
Overview of indexes
Indexes are used to improve data retrieval performance. Traditional
indexes use a B-tree index strategy to point to the data records. That
strategy is valuable only if many unique data values are used to filter down
to a very small set of records, as with columns of order numbers or
customer names, as you would encounter in a transaction processing
system.
Adaptive Server IQ indexes actually represent and store the data so that
the data can be used for processing queries. This strategy is designed for
the data warehousing environment, in which queries typically examine
enormous numbers of records, often with relatively few unique values,
and in which aggregate results are commonly required.
Adaptive Server IQ index types
When you load data into a table, Adaptive Server IQ stores data by column
rather than by row, for each column in the table. The column orientation
gives IQ indexes important advantages over traditional row-based
indexing. Column storage structures your data according to the attributes
you are interested in tracking. In a data warehousing environment, usually
you want to look at specific attributes of thousands or millions of rows of
data, rather than complete, single rows of data that typically are the focus
in transaction processing. Column storage optimizes your ability to
perform selections or calculations on the attributes you care about.

Overview of indexes
136
The default column storage structure that Adaptive Server IQ creates for each
column is actually an index optimized for storing and projecting data.
Depending on the size of your database, the disk space available to you, and
the type of queries your users submit, you will almost certainly want to
supplement this default index with one or more of the Adaptive Server IQ
bitwise index types. You can choose from four column index types. The
column indexes you define are created as part of each individual table.
Besides the column indexes, Adaptive Server IQ also allows you to define join
indexes. Join indexes are optimized for joining related tables. You may want to
create a join index for any set of columns that your users commonly join to
resolve queries. Column indexes underlie any join indexes involving those
columns.
The first half of this chapter discusses column indexes. The second half of this
chapter discusses join indexes; see “Using join indexes” for details.
A default index that optimizes projections is created by Adaptive Server IQ
for all columns.
When a column is designated as either a PRIMARY KEY or UNIQUE, Adaptive
Server IQ creates a High_Group index for it automatically.
To achieve maximum query performance, however, you should choose one or
more additional index types for most columns that best represent the
cardinality and usage of column data:
• Low_Fast or LF A value-based bitmap for processing queries on low-
cardinality data (recommended for up to 1,000 distinct values, but can
support up to 10,000)
• High_Group or HG An enhanced b-tree index to process equality and
group by operations on high-cardinality data (recommended for more than
1,000 distinct values)
• High_Non_Group or HNG A non value-based bitmap index ideal for
most high-cardinality DSS operations involving ranges or aggregates
Select column indexes according to the type of data in the column and your
intended operations for the column data. In general, you can use any index or
combination of indexes on any column. However, there are some exceptions.

CHAPTER 4 Adaptive Server IQ Indexes
137
To take advantage of the High_Non_Group index types for columns with
nonintegral numeric data, use the NUMERIC or DECIMAL data types, which
support up to 254 digits to the left or right of the decimal point. Be aware that
some index types are incompatible, and that creating indexes you don’t need
wastes a lot of disk space. Read the sections that follow for details on how to
select an index.
How Adaptive Server
IQ uses indexes You may also want to define additional indexes on your columns for best
performance. Adaptive Server IQ uses the fastest index available for the
current query or join predicate. If you do not create the correct types of indexes
for a column, Adaptive Server IQ can still resolve queries involving the
column, but response may be slower than it would be with the correct index
type(s).
If multiple indexes are defined on a particular column, Adaptive Server IQ
builds all the indexes for that column from the same input data.
Adding and dropping
indexes If you discover later that an additional index is needed, you can always add
indexes. However, it is much faster to create all the appropriate indexes before
you insert any data.
You can drop any optional index if you decide that you do not need it. See the
DROP INDEX command in the Adaptive Server IQ Reference Manual for more
information on dropping indexes. You cannot drop automatically created
indexes using DROP INDEX. The only way to remove the default index is to use
ALTER TABLE (or the Sybase Central Table Editor) to drop the column, or to
drop the table. The only way to remove an automatically created HG index is
by using ALTER TABLE (or the Sybase Central Table Editor) to drop the column
or the PRIMARY KEY or UNIQUE constraint, or by dropping the table.
Benefits over traditional indexes
Adaptive Server IQ indexes offer these benefits over traditional indexing
techniques:
• Index sizes remain small. The entire database can be fully indexed and
made available for ad hoc queries in the same space that would be needed
to store the raw data. Most traditional databases need three times as much
space.
• Queries are resolved by efficiently combining and manipulating indexes
on only the relevant columns. This avoids time-consuming table scans.
• I/O is minimized, eliminating potential bottlenecks.

Creating Adaptive Server IQ indexes
138
• Because indexes are compact, more data can be kept in memory for
subsequent queries, thereby speeding throughput on iterative analysis.
• Tuning is data-dependent, allowing data to be optimized once for any
number of ad hoc queries.
Creating Adaptive Server IQ indexes
You can create a column index explicitly using either the CREATE INDEX
statement or Sybase Central. These two methods are discussed in the sections
that follow.
The CREATE INDEX statement
To create an Adaptive Server IQ column index, use this syntax:
CREATE [ UNIQUE ] [
index-type
] INDEX
index-name
... ON [
owner
.]
table-name
... (
column-name
)
... [ { IN | ON }
dbspace-name
]
... [ NOTIFY
integer
]
If you do not specify an index-type, Adaptive Server IQ creates an HG index.
Several front-end tools create an HG index automatically for this reason.
Examples The first example creates a High_Non_Group (HNG) index called ship_ix on
the ship_date column of the sales_order_items table.
CREATE HNG INDEX ship_ix
ON dbo.sales_order_items (ship_date)
The second example creates a Low_Fast index called sales_order_region on the
region column of the sales_order table.
CREATE LF INDEX sales_order_region
ON dbo.sales_order (region)
By default, after every 100,000 records are inserted and loaded into indexes,
you receive a progress message. To change the number of records, specify the
NOTIFY option of CREATE INDEX. To prevent these messages, specify NOTIFY
0.

CHAPTER 4 Adaptive Server IQ Indexes
139
You can use the keywords BEGIN PARALLEL IQ and END PARALLEL IQ to
delimit any number of CREATE INDEX statements that you want to execute as
a group at the same time. These keywords can only be used when creating
indexes on IQ tables, not temporary tables or Adaptive Server Anywhere
tables. Note that, if one of these CREATE INDEX statements fails, all of them
roll back. For more information, see the Adaptive Server IQ Reference Manual.
Note You cannot place an index in a particular dbspace. Adaptive Server IQ
always places an index in the same type of dbspace (IQ Store or Temporary
Store) as its table. When you load the index, the data is spread across any
database files of that type with room available. The
dbspace-name
option of
CREATE INDEX is ignored for IQ indexes, and is provided for compatibility
with Adaptive Server Anywhere.
Creating an index with Sybase Central
To create a column index using Sybase Central, follow these steps.
❖To create an index with Sybase Central:
1 Connect to the database.
2 Select the table in which the column appears.
3 Open the Indexes folder.
4 Double-click the Add Index icon, enter a name for the index, and click
Next.
5 Select an index type. A High Group is created if you do not click another
index type.
6 Optionally set the number of records added before each notification
message, and click Next.
7 Select the column you want to index, and click Next.
8 Enter attributes for the index as appropriate, and click Finish to create the
index.
Creating indexes concurrently
In some cases, you can create more than one column index at the same time:

Choosing an index type
140
•Each CREATE INDEX statement can create only one index.
• Each connection can create only one index at a time.
• If two connections issue CREATE INDEX statements on the same table, the
first statement works; the other gets an error saying that only 1 writer is
allowed.
• If two connections issue CREATE INDEX statements on different tables,
both proceed in parallel
• If two connections issue CREATE INDEX statements on different tables but
both tables participate in the same join index, then only one CREATE
INDEX works; the other gets an error saying that only 1 writer is allowed.
Choosing an index type
The set of indexes you define for any given column can have dramatic impact
on the speed of query processing. There are four main criteria for choosing
indexes:
• Number of unique values
• Types of queries
• Disk space usage
• Data types
Use the recommendations for all criteria in combination, rather than
individually. Remember also that all columns are automatically stored in a way
that facilitates fast projections. To decide on additional indexes, look closely at
the data in each column. Try to anticipate the number of unique and total
values, the query results users will want from it, and whether the data will be
used in ad hoc joins or join indexes.
For details of index types, and criteria to use for choosing the correct types, see
the sections that follow.

CHAPTER 4 Adaptive Server IQ Indexes
141
Number of unique values in the index
Adaptive Server IQ indexes are optimized according to the number of unique
(distinct) values they include. When this number reaches certain levels, choose
indexes according to the recommendations in Table 4-1.
Table 4-1: Consideration order
Columns for which you specify IQ UNIQUE 65536 or less are automatically
placed in a form of the default index that is optimized for reduced storage, and
improved performance for certain types of queries.
Here are some examples of columns with different numbers of unique values:
• Columns that hold marital status will have just a few unique values (single,
married, NULL)
• Columns that hold state or province names will have fewer than 100
unique values
• Columns that hold date data probably have more than 100 but fewer than
65536 unique values
• Columns that hold account numbers or social security numbers may have
thousands or millions of unique numbers
Types of queries
You should know in advance how data in the columns will generally be
queried. For example:
• Will the column be part of a join predicate?
• If the column has a high number of unique values, will the column be used
in a GROUP BY clause, be the argument of a COUNT DISTINCT, and/or be
in the SELECT DISTINCT projection?
Number of Unique Values Recommended Index Type
Below 1,000 LF
1000 and over HG and/or HNG

Choosing an index type
142
Often, the type of data in a column gives a good indication how the column will
be used. For example, a date column will probably be used for range searches
in WHERE clauses, and a column that contains prices or sales amounts will
probably be used in the projection as an argument for aggregate functions
(SUM, AVG, and so on).
Note Adaptive Server IQ can still resolve queries involving a column indexed
with the wrong index type, although it may not do so as efficiently.
This table shows recommended index types based on the query. The index that
is usually fastest for each query is listed first, the slowest last. These
recommendations should not be your only criteria for picking an index type.
You should also consider the number of unique values and disk space. See the
other tables in this section.
Table 4-2: Query type/index
Note While HNG is recommended, in certain cases LF or HG is faster, and is
often used in place of HNG. HNG tends to give consistent performance, while
the performance of LF or HG with ranges depends on the size of the range
selected.
Type of Query Usage Recommended Index Type
In a SELECT projection list Default
In calculation expressions such as
SUM(A+B)
Default
As AVG/SUM argument High_Non_Group, Low_Fast,
High_Group, Default
As MIN/MAX argument LF, HG, HNG
As COUNT argument LF, HG
As COUNT DISTINCT, SELECT DISTINCT
or GROUP BY argument.
LF, Default
If field does not allow duplicates HG
Columns used in ad hoc join Default, HG, LF,
Columns used in a join index HG, LF
As LIKE argument in a WHERE clause Default
As IN argument HG, LF
In equality or inequality (=, <>) HG, LF
In range predicate in WHERE clause (>, <,
>=, <=, BETWEEN
LF or HNG

CHAPTER 4 Adaptive Server IQ Indexes
143
These estimates are generally valid; however, other factors can take
precedence:
• For range predicates, the number of unique values is a more important
factor.
• With the set functions COUNT, COUNT DISTINCT, SUM, MIN, MAX, and
AVG, in order to use any index other than the default, the entire query must
be resolvable using a single table or join index.
•BIT data, and VARCHAR data greater than 255 bytes, can only be used in
the default index.
Indexing criteria: disk space usage
The following table provides estimates of the amount of space each index uses
compared to the amount of column data from the source database or flat file.
Table 4-3: Index disk space usage
For LF and HG indexes, the index size depends on the number of unique values.
The more unique values, the more space the index takes.
Data types in the index
Only the default index supports the following data types:
•BIT data
Type of index Estimated space
versus raw data Comments
Default Smaller than or equal to If the number of distinct values is
less than 255, this index uses
significantly less space than the raw
data
High_Group Smaller than up to 2
times larger
As the number of distinct values
decreases (that is, the number of
entries per group increases), the
space used decreases in proportion
to the size of the raw data
High_Non_Group Smaller than or equal to Smaller than the raw data in most
cases
Low_Fast Smaller than up to 2
times larger
Same as High_Group

Adaptive Server IQ index types
144
•VARCHAR data with more than 255 bytes
HNG indexes do not allow FLOAT, REAL, or DOUBLE data.
All other data types are supported in all index types.
If you try to create an index on a column that contains VARCHAR data greater
than 255 bytes, you get this error message:
An index cannot be created on a varchar column greater
than 255 characters.
Combining index types
If a column is going to be used in more than one type of query, multiple column
index types might be appropriate. The following table shows which index types
make good combinations.
Table 4-4: Mix of valid indexes
Note The High_Group index in Adaptive Server IQ Version 12.0 differs from
earlier versions. For some columns you may want both High_Group and
High_Non_Group; previously, it did not make sense to have both.
Adaptive Server IQ index types
This section explores in depth the reasons you might use each of the column
index types.
Add Index
Existing Index HG HNG LF
HG -12
HNG 1-1
LF 21-
1 = A reasonable combination
2 = An unlikely combination

CHAPTER 4 Adaptive Server IQ Indexes
145
Default column index
For any column that has no index defined, or whenever it is the most effective,
query results are produced using the default index. This structure is fastest for
projections, but generally is slower than any of the three column index types
you define for anything other than a projection. Performance is still faster than
most RDBMSs since one column of data is fetched, while other RDBMSs need
to fetch all columns which results in more disk I/O operations.
Projections on few rows
If a column is used only in projections, even if some of the queries return a
small number of rows, Low_Fast and High_Non_Group indexes are redundant
because the default structure is equally as fast for projecting a small number of
rows.
The Low_Fast (LF) index type
This index is ideal for columns that have a very low number of unique values
(under 1,000) such as sex, Yes/No, True/False, number of dependents, wage
class, and so on. LF is the fastest index in Adaptive Server IQ.
When you test for equality, just one lookup quickly gives the result set. To test
for inequality, you may need to examine a few more lookups. Calculations such
as SUM, AVG, and COUNT are also very fast with this index.
As the number of unique values in a column increases, performance starts to
degrade and memory and disk requirements start to increase for insertions and
some queries. When doing equality tests, though, it is still the fastest index,
even for columns with many unique values.
Recommended use
Use an LF index when:
• A column has fewer than 1,000 unique values.
• A column has fewer than 1,000 unique values and is used in a join
predicate.
Never use an LF index for a column with 10,000 or more unique values.

Adaptive Server IQ index types
146
Advantages and disadvantages of Low_Fast
The following table lists advantages and disadvantages of Low_Fast indexes.
Table 4-5: LF advantages/disadvantages
Comparison with other indexes
HNG
/
HG
The main factor to consider is the number of unique values within
a column. Use LF if the number is low.
Additional indexes
The High_Non_Group index type may also be appropriate for a Low_Fast
column.
Note It is almost always best to use an LF index if the number of unique values
is low (less than 1,000). Consider this index first, if the column appears in the
WHERE clause. Only when the number of unique values is high should other
indexes (HG and HNG) be considered. For range queries with a high number of
unique values, also consider having an HNG index.
The High_Group (HG) index type
The High_Group index is commonly used for join columns with integer data
types. It is also more commonly used than High_Non_Group because it
handles GROUP BY efficiently.
Recommended use
Use an HG index when:
• The column will be used in a join predicate
• A column has more than 1000 unique values
Advantages Disadvantages
This index is fast, especially for single
table SUM, AVG, COUNT, COUNT
DISTINCT, MIN, and MAX operations.
Can only be used for a maximum of
10,000 unique values.
Cannot use this index if data in your
columns is BIT, or VARCHAR > 255
bytes.

CHAPTER 4 Adaptive Server IQ Indexes
147
Advantages and disadvantages of High_Group
The following table lists advantages and disadvantages of High_Group
indexes.
Table 4-6: HG advantages/disadvantages
Comparison with other indexes
LF The determining factor is the number of unique values. Use High_Group
if the number of unique values for the column is high. Use Low_Fast if the
number of unique values is low.
HNG The determining factor is whether the column is a join column, and/or
whether GROUP BY may be processed on the column. If either of these is true,
use High_Group, either alone or in combination with High_Non_Group.
Otherwise, use High_Non_Group to save disk space.
Additional indexes
In some cases, a column that meets the criteria for a High_Group index may be
used in queries where a different type of index may be faster. If this is the case,
create additional indexes for that column.
Automatic creation of High_Group index
Adaptive Server IQ creates a High_Group index by default whenever you issue
a CREATE INDEX statement without specifying an index type.
Adaptive Server IQ automatically creates a High_Group index for any column
with a UNIQUE or PRIMARY KEY constraint.
Advantages Disadvantages
Quickly processes queries with
GROUP BY.
This index needs additional disk space
compared to the HNG index (it can take up
as much as three times more space than raw
data).
This index facilitates join index
processing. It is one of indexes
recommended for columns used in join
relationships. LF is the other.
This index type takes the longest time to
populate with data, and to delete.
Cannot use this index if data in your
columns is BIT, or VARCHAR > 255 bytes.

Adaptive Server IQ index types
148
However, because multi-column primary keys are always unenforced, the
automatically created High_Group index for a multi-column primary key is a
phantom index: it includes all of the key columns, but does not contain any
data. This structure is used for query optimization, but not for resolving
queries. You need to create explicitly an HG (or LF) index on any multi-column
primary key columns that will be used in a join predicate.
The High_Non_Group (HNG) index type
Add an HNG index when you need to do range searches.
An HNG index requires approximately three times less disk space than an HG
index requires. On that basis alone, if you do not need to do group operations,
use an HNG index instead of a HG index.
Conversely, if you know you are going to do queries that a HG index handles
more efficiently, or if the column is part of a join and/or you want to enforce
uniqueness, use a HG index.
Note Using the HNG index in place of a HG index may seriously degrade
performance of complex ad-hoc queries joining four or more tables. If query
performance is important for such queries in your application, choose HG
instead of HNG.
Recommended use
Use an HNG index when:
• The number of unique values is high (greater than 1000)
• You don't need to do GROUP BY on the column
Advantages and disadvantages of High_Non_Group
See the following table for advantages and disadvantages of using a
High_Non_Group index.

CHAPTER 4 Adaptive Server IQ Indexes
149
Table 4-7: HNG advantages/disadvantages
Comparison to other indexes
•HNG needs less disk space than HG but can't perform GROUP BY
efficiently.
• In choosing between LF and HNG, the determining factor is the number of
unique values. Use HNG when the number of unique values is greater than
1000.
Additional indexes
The High_Group index is also appropriate for an HNG column.
Optimizing performance for ad hoc joins
To gain the fastest processing of ad hoc joins, create a Low_Fast or
High_Group index on all columns that may be referenced in:
•WHERE clauses of ad hoc join queries
•HAVING clause conditions of ad hoc join queries outside of aggregate
functions
For example:
SELECT n_name, sum(l_extendedprice*(1-l_discount))
AS revenue
FROM customer, orders, lineitem, supplier,
nation, region
WHERE c_custkey = o_custkey
AND o_orderkey = l_orderkey
Advantages Disadvantages
Due to compression algorithms used,
disk space requirements can be
reduced without sacrificing
performance.
This index is not recommended for GROUP
BY queries.
If the column has a high number of
unique values, this is the fastest index,
with few exceptions described below.
Index not possible if uniqueness enforced.
Cannot use this index if data in your
columns is FLOAT, REAL, DOUBLE, BIT, or
VARCHAR > 255 bytes.

Adaptive Server IQ index types
150
AND l_suppkey = s_suppkey
AND c_nationkey = s_nationkey
AND s_nationkey = n_nationkey
AND n_regionkey = r_regionkey
AND r_name = ’ASIA’
AND o_orderdate >= ’1994-01-01’
AND o_orderdate < ’1995-01-01’
GROUP BY n_name
HAVING n_name LIKE "I%"
AND SUM(l_extendedprice*(1-l_discount)) > 0.50
ORDER BY 2 DESC
All columns referenced in this query except l_extendedprice and l_discount
should have an LF or HG index.
Selecting an index
Here is a quick chart that summarizes how to select an index type.
Criteria to identify Index to select
Note indexes created automatically on all columns. Default index
Note indexes created automatically on columns with
UNIQUE or PRIMARY KEY constraint.
HG with UNIQUE
enforced
Identify all columns used in a join predicate and choose
the index type depending on the number of unique values.
HG
or
LF
Identify columns that contain a low number of unique
values and do not already use multiple indexes.
LF
Identify columns that have a high number of unique
values and that are part of a GROUP BY clause in a select
list in a SELECT DISTINCT or DISTINCT COUNT.
HG
Identify columns that may be used in the WHERE clause
of ad hoc join queries that do not already have HG or LF
indexes.
HG
or
LF
Identify columns that have a high number of unique
values and that will not be used with GROUP BY,
SELECT DISTINCT or DISTINCT COUNT.
HNG
Look at any remaining columns and decide on additional
indexes based on the number of unique values, type of
query, and disk space. Also, for all columns, be sure that
the index types you select allow the data type for that
column.

CHAPTER 4 Adaptive Server IQ Indexes
151
Adding column indexes after inserting data
When you create an additional column index, the CREATE INDEX command
creates the new index as part of the individual table and as part of any join
indexes that include the column.
If the existing column indexes in the individual table already contain data, the
CREATE INDEX statement also inserts data into the new index from an existing
index. This ensures data integrity among all the column indexes for columns
within an individual table. Data is also inserted and synchronized
automatically when you add an index to previously loaded tables that are part
of a join index. For information on synchronization, see “Synchronizing join
indexes”.
This capability is useful if you discover that a column needs an additional index
after you have already inserted data. This allows you to add the index without
having to start over.
Note Inserting data from an existing index can be slow. It is always faster to
create all the appropriate indexes before you insert data, then insert into all of
them at once, with either the LOAD TABLE or INSERT statement.
Using join indexes
If you know that certain tables in the same database will typically be joined in
a consistent way, you should create a join index for those tables. When you
create a join index, Adaptive Server IQ produces a new internal structure that
relates table columns. It represents two or more tables, including the inner, left
outer, and right outer rows.
Join indexes improve query performance
Join indexes provide better query performance than when table joins are first
defined at query time (ad hoc joins). However, they require more space and
time to load. To load a join index, you must first load the underlying tables, and
then load the join index.

Using join indexes
152
How join indexes are used for queries
After you create a join index, its use is determined by the criteria of the
SELECT statement. If a join index exists that joins the tables in the FROM
clause by the relationship specified in the WHERE clause, or if a join index
exists that is based on ANSI join syntax for natural or key joins, the join index
is used to speed up queries. Otherwise, ad hoc joins between indexes on the
individual tables are performed at query time. If there is a join index for a
subset of tables in the SELECT, Adaptive Server IQ uses it to speed up the
resulting ad hoc join.
Relationships in join indexes
Adaptive Server IQ join indexes support one-to-many join relationships. A
simple example of a one-to-many relationship is a sales representative to a
customer. A sales representative can have more than one customer, but a
customer has only one sales representative.
There can be multiple levels of such relationships. However, you always
specify join relationships between two tables, or between a table and a lower
level join. The table that represents the “many” side of the relationship is called
the top table. See “Join hierarchy overview” below for details.
When a join becomes ad hoc
If there is no join index that handles all of the reference tables involved in a
query, the query is resolved with an ad hoc join. Because you cannot create a
join index to represent a many-to-many join relationship, you can only issue ad
hoc queries against such a relationship. Ad hoc queries provide flexibility at the
expense of performance. If you have sufficient space for the join indexes, and
you do not require many-to-many relationships, create join indexes whenever
performance is critical.
Join hierarchy overview
All join relationships supported by Adaptive Server IQ must have a hierarchy.
Think of a join hierarchy as a tree that illustrates how all the tables in the join
are connected.
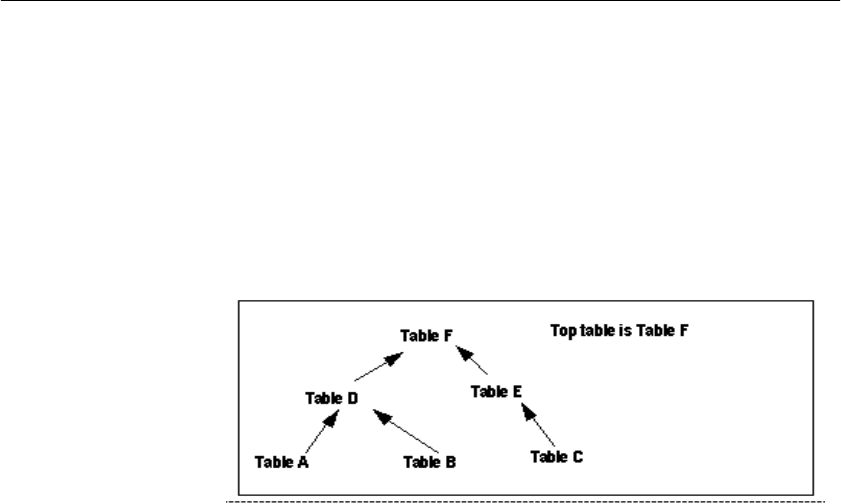
CHAPTER 4 Adaptive Server IQ Indexes
153
Adaptive Server IQ join hierarchies have one table at the top of the tree where
the join ends. This table, known as the top table, does not connect to any other
tables, although other tables connect to it. The top table always represents the
“many” side in a one-to-many relationship.
Depending on the complexity of the join, there could be a straight line of tables
down to the bottom of the tree and the beginning of the join, or there could be
many branches off to the side as you move down the tree. The following figure
shows a join hierarchy with two branches.
Figure 4-1: Hierarchy of a join relationship
In a join hierarchy:
• A table can occur only once
• A table can only connect out once (one arrow leaving it)
• All tables must be connected
Columns in the join index
Suppose that you joined Tables A through E in a join index called ABCDE. If
each table has two columns of data, expect the join index to have a total of
fourteen columns. Adaptive Server IQ creates an additional column, the
ROWID column, for each of the joined tables except the top table. In this case,
there are ten columns (two from each of the five tables), plus four ROWID
columns.
You can use the NOTIFY option of the LOAD TABLE or INSERT statement to
receive notification messages when you insert into a column index. In these
messages, the name of each column in a join index, including the ROWID
column, is identified.

Using join indexes
154
You can set the frequency of these messages with the NOTIFY_MODULUS
option, and override the option value in either the CREATE DATABASE or
LOAD TABLE command. For examples of these messages, see “Interpreting
notification messages” on page 187.
The join hierarchy in query resolution
Adaptive Server IQ can use the same join index to resolve a query that involves
the full join relationship specified in the join index, or a query that involves any
contiguous subset of that relationship; you do not have to create separate join
indexes for the subset relationships.
For example, assume that join index ABCDEF joins the tables illustrated in
Figure 4-1. Adaptive Server IQ can use join index ABCDEF to resolve any
queries that involve:
• The entire relationship
•Table
A to Table D
•Table A to Table D to Table F
•Table B to Table D
•Table B to Table D to Table F
•Table D to Table F
•Table C to Table E
•Table E to Table F
•Table
C to Table E to Table F
However, Adaptive Server IQ cannot use join index ABCDEF to resolve queries
against, for example, Table E to Table D.
One-to-many relationship
In a one-to-many join relationship, one row in one table potentially matches
with one or more rows in another table, and there is not more than one row in
the first table that matches with the same row(s) in the second table. For this to
be true, the values in the join column in the first table must be unique.
It is possible that either table has no match on the other table. This constitutes
an outer join and is fully supported. For more information, see the Introduction
to Adaptive Server IQ.

CHAPTER 4 Adaptive Server IQ Indexes
155
If the join column is made up of more than one column, the combination of the
values must be unique on the “one” side. For example, in the asiqdemo
database, the id in the customer table and the cust_id in the sales_order table
each contain a customer ID. The customer table contains one row for each
customer and, therefore, has a unique value in the id column in each row. The
sales_order table contains one row for each transaction a customer has made.
Presumably, there are many transactions for each customer, so there are
multiple rows in the sales_order table with the same value in the cust_id
column.
So, if you join customer.id to sales_order.cust_id, the join relationship is one-
to-many. As you can see in the following example, for every row in customer,
there are potentially many matching rows in sales_order.
select sales_order.id, sales_order.cust_id,
customer.lname
from sales_order, customer
where sales_order.cust_id = customer
id cust_id id lname
2583,101,101,’Devlin’
2001,101,101,’Devlin’
2005,101,101,’Devlin’
2125,101,101,’Devlin’
2206,101,101,’Devlin’
2279,101,101,’Devlin’
2295,101,101,’Devlin’
2002,102,102,’Reiser’
2142,102,102,’Reiser’
2318,102,102,’Reiser’
2338,102,102,’Reiser’
2449,102,102,’Reiser’
2562,102,102,’Reiser’
2585,102,102,’Reiser’
2340,103,103,’Niedringhaus’
2451,103,103,’Niedringhaus’
2564,103,103,’Niedringhaus’
2587,103,103,’Niedringhaus’
2003,103,103,’Niedringhaus’
2178,103,103,’Niedringhaus’
2207,103,103,’Niedringhaus’

Using join indexes
156
2307,103,103,’Niedringhaus’
Warning! If the one-to-many relationship is incorrect, the join cannot be
synchronized until you remove the extra rows from the “one” table. If you try
to synchronize, you get a Duplicate Row error, and the transaction rolls back.
When you create a join index, you use ANSI FULL OUTER join syntax.
Adaptive Server IQ stores the index as a full outer join. Later, when you issue
queries against the columns in a join index, you can specify inner, left outer,
and right outer join relationships as well as full outer joins. Adaptive Server IQ
uses only the parts of the join index needed for a given query.
Multiple table joins and performance
Here are rules for multiple table joins:
• A table can be on the “one” side of a one-to-many relationship just once.
For example, you cannot have a join index or a join query where Table A
is joined to Table B in a one-to-many relationship, and Table A is joined
to Table C in a one-to-many relationship. You need to create separate join
indexes for each of these relationships.
• A table can appear in the relationship hierarchy only once. So, for
example, you cannot predefine a join relationship query where Table A is
joined to Table B, Table B is joined to Table C, and Table C is joined to
Table A. You can use predefined joins to query on the Table A to Table B
and the Table C to Table A relationships separately. To do so, create a
separate join index for each of these relationships.
• A table can be joined to another table, or to a join definition. For example,
you can create a join index that joins Table A to Table B, or a join index
that joins Table C to the join of Tables A and B.
• The top table in the hierarchy is the “many” side of a one-to-many
relationship with the rest of the hierarchy.
In some circumstances, you may want to create a separate join index for a
subset of the join relationship. If the top table in the subset of the join index has
a significantly smaller number of rows than the top table in the full join index,
a query on the subset may be faster than the same query on the full join index
if only tables in the subset are used in the query.

CHAPTER 4 Adaptive Server IQ Indexes
157
Of course, this approach requires more disk space to build an additional join
index and more index building time (not to mention increased maintenance). In
the case of a subset join index, the additional join index repeats a subset of the
information already in the full join index. You must decide whether the query
speed or disk space usage of your application is more important for this
particular join relationship.
Steps in creating a join index
In order to create a join index you must perform all of the following steps:
1 Create the tables involved in the join index, using the CREATE TABLE
command, or using Sybase Central.
2 Identify the join condition that relates specific pairs of columns in the
underlying tables involved in any one join. Where the relationship is based
on a key join, you must define join conditions as referential integrity
constraints—primary and foreign key declarations—in the CREATE
TABLE commands in step 1, or in ALTER TABLE commands.
3 Create column indexes for the tables being joined.
When Adaptive Server IQ creates a join index between tables, the IQ
column index types and data types already defined on the single tables are
used in the join index.
4 Load the data into the tables, using the LOAD TABLE command. You also
can add data to existing tables using the INSERT INTO command.
Note You must insert into the column index of each table in the join index
as a single-table insert, rather than into the join index itself. This approach
conforms to ANSI rules for prejoined data.
5 Create the join index by issuing the CREATE JOIN INDEX command, or in
Sybase Central with the Add JoinIndex Wizard. You specify the join
hierarchy as part of this step, as described in “Join hierarchy overview”.
Note If data exists in the join tables, a synchronize occurs automatically.
6 Depending on the order in which you perform these steps, you may need
to synchronize the tables in the join index, as described below. If data
exists in the join tables, synchronization occurs automatically.

Using join indexes
158
The index remains unavailable until all steps are complete. However, you can
adjust the order of some steps, depending on the needs of your site:
• You can combine steps 1 and 2 by defining relationships when you create
the table.
• You can load the data either before or after you create the join index. If you
load the data into the underlying column indexes after you create the join
index, you must perform the synchronization step.
Privileges needed to create a join index
You must be the owner of a table or the DBA to create, alter, or synchronize a
join index that includes that table. If you are not the DBA, you need to be the
owner of the table and have RESOURCE authority in order to create a join
index.
For details on inserting and deleting data, see Chapter 5, “Moving Data In and
Out of Databases” For complete syntax of the CREATE TABLE, ALTER TABLE,
LOAD TABLE, INSERT INTO, and SYNCHRONIZE commands, see the Adaptive
Server IQ Reference Manual. The sections that follow give details on other
steps in creating a join index.
Synchronizing join indexes
The data in join index tables must be synchronized before you can use a join
index. Synchronization ensures that the data is loaded in the correct order for
the joins.
Synchronization occurs automatically when you create the join index.
Synchronizing before completing the transaction that loads or inserts data also
makes tables available immediately for all readers. Once data is loaded,
however, you must synchronize the join index explicitly, with one exception:
the join index is synchronized automatically when changes are made to the top
table of the join hierarchy.
To synchronize explicitly, issue the following command:
SYNCHRONIZE JOIN INDEX [
join-index-name
[,
join-index-name
]
If you omit the index names, Adaptive Server IQ synchronizes all join indexes.

CHAPTER 4 Adaptive Server IQ Indexes
159
Performance hints for synchronization
Synchronization can be time-consuming. To improve performance, try these
suggestions:
• Schedule synchronization during off-peak hours.
• Synchronize join indexes individually rather than all at once.
• Synchronize after executing an entire set of insertions and deletions. It is
not a good idea to synchronize after every insertion or deletion, as the time
it takes to update a join index depends significantly on the order of the
updates to the tables. Synchronizing sets of updates allows Adaptive
Server IQ to pick the optimal order for applying the table changes to the
join index.
Defining join relationships between tables
When you create a join index, you must specify the relationship between each
related pair in the join. A related pair is always two tables, however, you can
also specify a relationship by relating a table to another join relationship.
Depending on the relationship, you specify it either once or twice:
•Key joins relate the primary key of one table to a foreign key in another
table. For key joins you must specify a PRIMARY KEY and FOREIGN KEY
when you create or alter the underlying tables, using the CREATE TABLE
or ALTER TABLE command.
• For all joins, you specify the relationship when you create the join index,
using the CREATE JOIN INDEX command. The join is defined by the order
in which you list the tables, by the columns you specify, and by the join
type: key join, natural join, or ON clause join.
Rules for join relationships are:
• Each pair of tables in a join relationship must have at least one join
column.
• The join column must exist in both tables.
• A pair of tables can have more than one join column, as long as they have
the same number of columns and the join column holds the same position
in each table list when you specify it. The order of the lists for the two
tables determines how the columns are matched.

Using join indexes
160
Using foreign references
Adaptive Server IQ uses foreign keys to define the relationships among
columns that will be used in join indexes, and to optimize queries. However,
Adaptive Server IQ does not enforce foreign key constraints. For this reason,
when you specify a primary key-foreign key relationship, you must include the
UNENFORCED keyword.
Adaptive Server IQ does not support key join indexes based on multicolumn
foreign keys.
Examples of join relationships in table definitions
The following example shows how you specify the join relationship by means
of primary and foreign keys. In this case, one customer can have many sales
orders, so there is a one-to-many relationship between the id column of the
customer table (its primary key) and the cust_id column of the sales_order
table. Therefore, you designate cust_id in sales_order as a FOREIGN KEY that
references the id column of the customer table.
The first example creates the customer table, with the column id as its primary
key. To simplify the example, other columns are represented here by ellipses
(...).
CREATE TABLE DBA.customer
( id integer NOT NULL,
...
PRIMARY KEY (id),)
Then you create the sales_order table with six columns, specifying the column
named id as the primary key. You also need to add a foreign key relating the
cust_id column of the sales_order table to the id column of the customer table.
You can add the foreign key either when you create the table or later. This
example adds the foreign key by including the REFERENCES clause as a
column constraint in the CREATE TABLE statement.
CREATE TABLE DBA.sales_order
(id integer NOT NULL,
cust_id integer NOT NULL
REFERENCES DBA.customer(id) UNENFORCED,
order_date date NOT NULL,
fin-code-id char(2),
region char(7),
sales_rep integer NOT NULL,
PRIMARY KEY (id),)

CHAPTER 4 Adaptive Server IQ Indexes
161
Alternatively, you could create the table without the REFERENCES clause, and
then add the foreign key later, as is done in the following ALTER TABLE
statement:
ALTER TABLE DBA.sales_order
ADD FOREIGN KEY ky_so_customer (cust_id)
REFERENCES DBA.customer (id) UNENFORCED
Specifying the join type when creating a join index
The join type is always FULL OUTER, the keyword OUTER being optional. You
also need to do one of the following:
• If you are joining equivalent columns with the same name from two tables,
you specify that it is a NATURAL JOIN.
• If you are joining columns based on keys, you must also have specified the
relationship in the underlying tables as a FOREIGN KEY that references a
PRIMARY KEY.
• If you are joining equivalent values (an equijoin) in columns from two
tables, you specify an ON clause.
These rules conform to ANSI syntax requirements.
Specifying relationships when creating a join index
For non-key joins, the order in which you specify tables when you create the
join index determines the hierarchy of the join relationship between the tables.
The CREATE JOIN INDEX statement supports two ways to specify the join
hierarchy:
• List each table starting with the lowest one in the hierarchy, and spell out
the join relationship between each pair of tables. The last table in the list
will be the top table in the hierarchy. For example, in Figure 4-1 on
page 153, F is the top table, E is below it, and C is at the bottom of the
hierarchy. You could specify the join hierarchy for these three tables as
follows:
C FULL OUTER JOIN E FULL OUTER JOIN F

Using join indexes
162
• Use parentheses to control the order in which the join relationships are
evaluated. Parentheses control evaluation order just as they do in
mathematics, that is, innermost pairs are evaluated first. With this method
you start with the top table in the outermost set of parentheses, then any
intermediate levels, and include the lowest two levels in the innermost
parentheses. Using this method, you would specify the same three tables
as follows:
(F FULL OUTER JOIN (C FULL OUTER JOIN E))
Note that the lowest level table appears first in the innermost parentheses,
just as it does in the first method.
Note While you can join these three tables in the way described here, in order
to create the complete hierarchy shown in Figure 4-1 you would need to use
key joins. See “Types of join hierarchies” for more information.
When you create a join index, a message in the log identifies the top table in
the join. For example,
[20691]: Join Index ’join_on_tabletable’ created from the following join
relations:
[20694]: Table Name Relationship
[20697]: ------------------------------------------------------------------
[20696]: 1. join_on_table_a joined to ’join_on_table_b’ One >> Many
[20692]: The ultimate/top table is join_on_table_b
[20697]: ------------------------------------------------------------------
Issuing the CREATE JOIN INDEX statement
To create a join index, issue the CREATE JOIN INDEX statement. Here is a
summary of the syntax for this command:
CREATE JOIN INDEX
join-index-name
FOR
join-clause
The parameters of this command are:
join-clause
:
[ ( ]
join-expression
join-type
join-expression
[ ON
search-condition
] [ ) ]
join-expression
:
{
table-name
|
join-clause
}
join-type
:
[ NATURAL ] FULL [ OUTER ] JOIN

CHAPTER 4 Adaptive Server IQ Indexes
163
search-condition
:
[ ( ]
search-expression
[ AND
search-expression
] [ ) ]
•The join-clause can be expressed either with or without parentheses.
•The
ON clause can reference only two tables. One must be the current one,
and the other can be any one table in the current join tree.
• All join predicates must be equijoins; that is, the search_expression must
indicate that the value in column_1 equals the value in column_2. No
single-variable predicates, intracolumn comparisons, or non-equality joins
are permitted in the ON clause.
• To specify a multicolumn join, you include more than one predicate
linking the two tables, and connect them with logical AND.
• You cannot connect join predicates with logical OR.
• The keyword NATURAL can replace the ON clause, when you are pairing
columns from a single pair of tables by name.
Example 1: Key join Here is an example of how you create a join index for the key join between the
sales_order table and the customer table. Remember that this is a key join,
based on the foreign key ky_so_customer which relates the cust_id column of
sales_order to the primary key id of the customer table. You can give the index
any name you want. This example names it ky_so_customer_join to identify the
foreign key on which the key join relies.
CREATE JOIN INDEX ky_so_customer_join
FOR customer FULL OUTER JOIN sales_order
Example 2: ON clause
join The next example shows how you could create a join index for the same two
tables using an ON clause. You could use this syntax whether or not the foreign
key existed.
CREATE JOIN INDEX customer_sales_order_join
FOR customer FULL OUTER JOIN sales_order
ON customer_id=sales_order.cust_id
Example 3: Natural
join To create a natural join, the joined columns must have the same name. If you
created a natural join on the tables in previous examples, you would not get the
expected results at all. Instead of joining the id column of customer to the
cust_id column of sales_order, the following command would join the
dissimilar id columns of the two tables:
CREATE JOIN INDEX customer_sales_order_join
FOR customer NATURAL FULL OUTER JOIN sales_order

Using join indexes
164
A natural join between the id columns of sales_order and sales_order_items
makes more sense. In this case, the columns with the same name should contain
matching values. The command to create a join index based on a natural join
between these two tables is:
CREATE JOIN INDEX sales_order_so_items_join
FOR sales_order NATURAL FULL OUTER JOIN
sales_order_items
Creating a join index in Sybase Central
To create a join index in Sybase Central, follow these steps.
❖To add a join index in Sybase Central:
1 Select the Join Indexes folder in the left panel of the Sybase Central
window.
2 Double-click the Add Join Index object in the right panel to open the Join
Index editor.
3 Highlight <Unnamed> in the Name box and enter a name for the index.
4 From the Left Table Name dropdown, select a table name. Repeat for the
Right Table Name.
5 Select a Join Type from the dropdown. If you select a type other than
Natural, specify the Join Columns.
6 Click Advanced Properties to add a comment.
7 If you are only joining two tables, click Save and Commit.
8 To join more than two tables, click Add Row. In the new row that appears,
enter the next table to join in the Right Table Name column. Then click
Save and Commit.
Types of join hierarchies
Adaptive Server IQ supports two different types of join hierarchies:
• Linear joins
• Star joins
You create join indexes or ad hoc joins for both linear and star joins.

CHAPTER 4 Adaptive Server IQ Indexes
165
Linear joins
You can think of a linear join as a tree with no branches. Each table in the
hierarchy is related to the table above it, until you reach the top table. In
Figure 4-1 on page 153. Tables A, D, and F constitute a linear join hierarchy.
Tables C, E, and F form another linear join hierarchy.
In a linear join, each pair of tables represents a one-to-many relationship, in
which the lower table of the pair is the “one” side, and the higher table of the
pair is the “many” side. Linear join hierarchies can rely on any of the
underlying join conditions: key join, natural join, or ON clause join.
Star joins
You can picture a star join as a structure with many branches, in which each
branch is directly related to one table in the middle. In Figure 4-1, Tables D, F,
and E form a very simple star join. More commonly, Table F would be at the
center of many tables, each of which is joined to Table F.
In a star join, multiple tables are related to one table at the center of the join, in
a one-to-many relationship. The one table at the center of the join represents
the “many” side of the relationship, while each of the tables around it represent
the “one” side of the relationship. Each table on the “one” side holds a set of
values with its own unique primary key. A foreign key in the table on the
“many” side of the relationship relates that table to the primary key of the table
on the “one” side of the relationship.
The “many” table at the center of the star is sometimes called the fact table.
The “one” tables related to it are called the dimension tables.
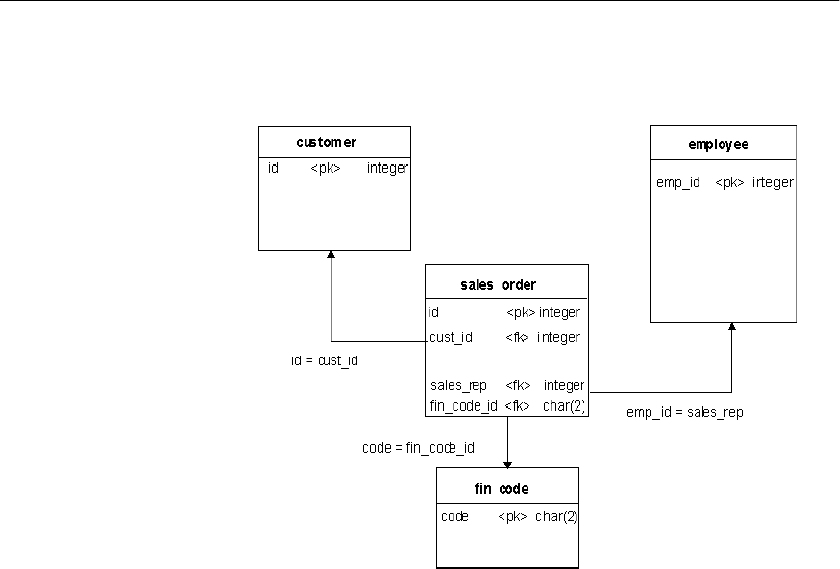
Using join indexes
166
Example In the sample database used throughout this book, the sales_order table
contains three foreign keys, each of which is related to the primary key of
another table.
You can create this table using the following commands:
CREATE TABLE "DBA"."sales_order"(
(
"id" integer NOT NULL,
"cust_id" integer NOT NULL
REFERENCES "DBA"."customer" ("id")
UNENFORCED,
"order_date" datetime NOT NULL,
"fin_code_id" char(2) NULL
REFERENCES "DBA"."fin_code" ("code")
UNENFORCED,
"region" char(7) NULL,
"sales_rep" integer NOT NULL
REFERENCES "DBA"."employee" ("emp_id")
UNENFORCED,
PRIMARY KEY ("id"),
);
As shown in the figure, the sales_order table is at the center of the star join.
Each of its foreign key columns can contain many instances of the primary key
it refers to. For example, if you enter:

CHAPTER 4 Adaptive Server IQ Indexes
167
SELECT sales_rep FROM sales_order
WHERE sales_rep = 299
the results show 20 rows with 299 in the sales_rep column.
However, if you enter:
SELECT emp_id FROM employee
WHERE emp_id = 299
the results show only one row with 299 in the emp_id column.
Note Query optimizations for star joins rely on the underlying primary key-
foreign key relationships. Because Adaptive Server IQ does not enforce
foreign keys, in order for your query results to be exactly as expected, your
application needs to ensure that data inserted into or deleted from the database
does not violate the primary key-foreign key relationship.
To declare a foreign key, see “Creating primary and foreign keys” on page 125.
For other information on foreign keys, see “Declaring entity and referential
integrity” on page 281.
Modifying tables included in a join index
Once you have created a join index, you are restricted in the types of changes
you can make to the join index and its underlying tables and indexes.
You cannot drop any table that participates in a join index. Likewise, you
cannot use ALTER TABLE to add, drop, or modify a column that participates in
a join index. In both cases, you must first drop the join index. Then you can
either drop the table, or modify any columns that participate in the join index.
You can add columns to the tables that participate in a join index. However,
there are restrictions on inserting data into these columns, as described in the
next section.
You can drop indexes on columns not involved in the join relationship, and you
can add, drop or modify nonjoined columns of tables in a join index. However,
you cannot drop either the indexes on a join column or the join column itself.
You need at least one index on a column involved in a predefined join
relationship. It is highly desirable to have either an HG or LF index on all
columns that are part of a join index.

Using join indexes
168
Adaptive Server IQ automatically applies the changes to the join index at the
same time as it changes the base table. You do not need to synchronize the join
index after any ALTER TABLE on nonjoined columns.
Other restrictions on ALTER TABLE for join indexes include the following:
• You cannot rename a column into or out of a NATURAL join condition.
• You cannot add a column that would participate in a previously specified
NATURAL join.
• You cannot drop a PRIMARY KEY/FOREIGN KEY relationship if it matches
a join condition that is in use in a join index.
• You cannot drop a NOT NULL constraint from a column that participates in
a join condition.
• You cannot modify the data type of a column that participates in a join
condition.
Inserting or deleting from tables in a join index
You always insert or load into, or delete from, the underlying tables, not the
join index itself. When you first create the join index, Adaptive Server IQ
synchronizes the joined tables automatically, whether or not you have
previously loaded data into the tables.
If you insert into or delete from a table that participates in an existing join
index, you must synchronize the join index explicitly, unless you are updating
the top table in the join hierarchy. If you insert rows and then delete them
before the synchronization takes place, Adaptive Server IQ optimizes
synchronization to omit the insertions.
You cannot perform partial-width inserts to tables that participate in a join
index. If you need to add columns to a table in a join index, you must do one
of the following:
• Drop the join index, do the partial-width insert, and then recreate the join
index.
• Load or insert into all columns of the table.

CHAPTER 4 Adaptive Server IQ Indexes
169
Table versioning controls access to join indexes
Any table is only available for write use to a single user at any given time. For
join indexes, this means that when one user is updating any table in a join
index, no one else can update any of the tables in that index. All the joined
tables remain unavailable until the first user’s transaction is committed and you
have synchronized the tables with the SYNCHRONIZE command.
Other users receive the following error while the join index tables are in use:
Cannot write to this table in current transaction.
Another user has write mode access.
Their current transactions cannot write to any of the join index tables; they
must begin a new transaction to write to those tables.
For more information on versioning, see Chapter 8, “Transactions and
Versioning”
Estimating the size of a join index
Adaptive Server IQ provides a stored procedure, sp_iqestjoin, to help you
estimate the size of a join index.
You run this procedure for each pair of tables being joined. Each time you run
the procedure, you must supply the following parameters:
• Name of the first table to be joined
• Number of rows in the first table
• Name of the second table to be joined
• Number of rows in the second table
• Relationship (default is one-to-many)
• IQ page size (default is 65536 bytes, or 64KB)
Many factors affect the size of a join index, especially the number of outer joins
it includes. For this reason, the procedure offers you three types of results. If
you know you will always join the tables with exact one-to-one matches, use
the “Min Case index_size.” If you anticipate occasional one-to-many joins, use
the “Avg Case index_size.” If you anticipate using numerous one-to-many
joins, use the “Max Case index_size.”

Estimating the size of a join index
170
These calculations should give you an idea of how much disk space you need
for the join index. The results include the segment size in bytes, and the number
of blocks. The procedure also tells you how long it will take to create the join
index.
If you want to know the actual size of an existing join index, you use a different
stored procedure, sp_iqjoinindexsize.
See the Adaptive Server IQ Reference Manual for syntax details of all stored
procedures.
171
CHAPTER 5 Moving Data In and Out of
Databases
About this chapter This chapter describes several methods of moving data into and out of
your database, and explains when you should use each of them. It also
discusses conversion issues for data inserted from other types of
databases.
Import and export overview
Adaptive Server IQ lets you import data from flat files, or directly from
database tables. You can also enter specified values directly into the
database. Export of data to other formats, such as spreadsheet program
formats, is available from the DBISQL utility.
An Adaptive Server IQ table is a logical table; it does not contain data. All
the information needed to resolve queries, including data, is contained in
the Adaptive Server IQ indexes. When you insert data into the columns in
an IQ table, you are not actually adding data to the columns in the table,
but rather to the column indexes. You build indexes by inserting data on a
table-by-table basis.
Import and export methods
Adaptive Server IQ offers you a choice of methods for adding, changing,
or deleting data.
• For efficient bulk loading of tables from flat files, use the SQL
statement LOAD TABLE.
• To insert specified values into a table row by row, use the SQL
statement INSERT with the VALUES option.
• To insert rows selected from a database, use the SQL statement
INSERT with a SELECT statement clause.

Import and export overview
172
• To remove specific rows from a table, use the DELETE statement.
• To change existing rows in a table, you can also use the UPDATE
statement.
From DBISQL you can export data to another database in a variety of formats,
or produce a text file as output. See the next section for a list of formats and
how to select them. You can also redirect the output of any command.
Input and output data formats
The LOAD TABLE statement imports text files with one row per line. Both
ASCII and binary input files are supported, with either fixed-length fields or
variable-length fields ended by a delimiter.
The INSERT statement moves data into an Adaptive Server IQ table either from
a specified set of values, or directly from tables.
Interactive SQL supports the following output file formats:
File Format Description
ASCII A text file, one row per line, with values separated by a
delimiter. String values are optionally enclosed in
apostrophes (single quotes). This is the same as the format
used by LOAD TABLE
DBASEII DBASE II format
DBASEIII DBASE III format
DIF Data Interchange Format
FIXED Data records are in fixed format with the width of each
column either the same as defined by the column’s type or
specified as a parameter
FOXPRO FoxPro format
LOTUS Lotus workspace format
SQL Interactive SQL INPUT statement required to recreate the
information in the table
TEXT TEXT format file that prints the results in columns with the
column names at the top and vertical lines separating the
columns. This format is similar to that used to display data in
the Interactive SQL data window
WATFILE WATFILE format.

CHAPTER 5 Moving Data In and Out of Databases
173
Specifying an output format for Interactive SQL
You can set the DBISQL output format in three ways:
• Select Command → Options from the DBISQL menu bar, and then choose
an Output Format from the dropdown list. To make this the default output
format, click Permanent.
• Specify the DBISQL option, OUTPUT_FORMAT, to set the default output
format.
For syntax details see the Adaptive Server IQ Reference Manual.
Permissions for modifying data
You can only execute data modification statements if you have the proper
permissions on the database tables you want to modify. The database
administrator and the owners of database objects use the GRANT and
REVOKE statements to decide who has access to which data modification
functions.
To insert data, you need INSERT permission for that table or view. To delete
data, you need DELETE permission for that table or view. To update data, you
need UPDATE permission. The DBA can insert into or delete from any table.
The owner of a table has INSERT, DELETE, and UPDATE permission on it.
Permissions can be granted to and revoked from individual users, groups, or
the public group. For more information on permissions, see Chapter 10,
“Managing User IDs and Permissions”.
Scheduling database updates
Multiple users can query a database table while one user inserts data into that
table. Multiple users can update the database concurrently, as long as they are
inserting into or deleting from different tables.
When you allow concurrent use of the database during updates, you pay a
penalty in performance and disk use. For an explanation of how Adaptive
Server IQ handles concurrency issues, see Chapter 8, “Transactions and
Versioning” For other suggestions on improving load performance, see
“Tuning bulk loading of data”

Exporting data from a database
174
Exporting data from a database
This section tells how to export data from an Adaptive Server IQ database.
Note To export IQ data from your database in this version of Adaptive Server
IQ, Sybase recommends that you use the method described in this chapter. You
may also export data by using a front end tool, written by you or a third party,
that effectively queries the IQ database and formats the data as desired.
If you need to export tables (other than your system tables) from your Catalog
Store, use the method in this chapter, or see the Adaptive Server Anywhere
Reference Guide for other ways to unload data.
Using output redirection
Output redirection can be used to export query results.
You can redirect the output of any command to a file or device by putting the
># redirection symbol anywhere on the command. The redirection symbol
must be followed by a file name. (In a command file, the file name is then
followed by the semicolon used as statement terminator.) The file is placed
relative to the directory where DBISQL was started.
In this example, output is redirected to the file empfile:
SELECT *
FROM employee
># empfile
Do not enclose the file name in quotation marks.
Output redirection is most useful on the SELECT statement. Use the
OUTPUT_FORMAT option to control the format of the output file and the
OUTPUT_LENGTH option to control truncation. For example, the following
commands set the format to ASCII text and does not truncate column contents:
SET OPTION OUTPUT_FORMAT = ‘text’
SET OPTION OUTPUT_LENGTH = 0
Use two > characters in a redirection symbol instead of one (for example, >>#),
to append the output to the specified file instead of replacing the contents of the
file. Headings are included in the output from the SELECT statement if the
output starts at the beginning of the specified file and the output format
supports headings.

CHAPTER 5 Moving Data In and Out of Databases
175
Redirecting output
and messages The >& redirection symbol redirects all output including error messages and
statistics for the command on which it appears. For example:
SELECT *
FROM employee
>& empfile
Do not enclose the file name in quotation marks.
This example outputs the SELECT statement to the file empfile, followed by the
output from the SELECT statement and some statistics pertaining to the
command.
The >& redirection method is useful for getting a log of what happens during
a READ command. The statistics and errors of each command are written
following the command in the redirected output file.
NULL value output
The most common reason to extract data is for use in other software products.
The other software package may not understand NULL values, however.
The DBISQL option NULLS allows you to choose how NULL values are
output. Alternatively, you can use the IFNULL function to output a specific
value whenever there is a NULL value.
For information on setting DBISQL options, see “SET OPTION statement” in
Adaptive Server IQ Reference Manual.
Bulk loading data using the LOAD TABLE statement
The LOAD TABLE statement is used for efficient importing of data from a text
or binary file into an existing database table. It loads data into any column
indexes you have defined, as well as any created automatically.
In order to use the LOAD TABLE statement, you need INSERT permission on
the table.
See the description of the ON FILE ERROR load option for what happens when
errors occur during a load.

Bulk loading data using the LOAD TABLE statement
176
Using command files
to load data To load large amounts of data, most users create command files. To create a
command file, follow the instructions in the chapter entitled “Getting Started
with DBISQL” in the Introduction to Adaptive Server IQ.
Transaction
processing and LOAD
TABLE
When you issue the LOAD TABLE statement for an IQ table, a savepoint occurs
automatically before the data is loaded. If the load completes successfully,
Adaptive Server IQ releases the savepoint. If the load fails, the transaction rolls
back to the savepoint. This approach gives you flexibility in committing
transactions. For example, if you issue two LOAD TABLE commands, you can
ensure that either both commit or neither.
When you issue LOAD TABLE for a Catalog Store table, there is no automatic
savepoint. If the load succeeds, it commits automatically. If the load fails, it
rolls back. You cannot roll back a successful load of a Catalog Store table.
For more information on transaction processing, see Chapter 8, “Transactions
and Versioning”.
Summary of LOAD
TABLE syntax The basic form of the LOAD TABLE statement is:
LOAD TABLE [
owner
].
table-name
[ (
load
-
specification
, ... ) ]
FROM ’
filename
-
string
’, ...
[ FORMAT { ’ascii’ | ’binary’ } ]
... [ DELIMITED BY
string
]
... [ STRIP { ON | OFF } ]
... [ QUOTES { ON | OFF } ]
... [ ESCAPES { ON | OFF } ]
[ ESCAPE CHARACTER character ]
[ WITH CHECKPOINT ON|OFF ]
... [
load-options
]
Load specification The load-specification does the following:
• Lists each column to be loaded and describes the data in it. A column can
contain fixed-length data, variable-length characters delimited by a
separator, or data that uses a binary prefix to represent the number of bytes
being read.
• Specifies FILLER format for any fields you want to skip.
The syntax for load-specification is as follows:
load-specification
:
{
column-name
[
column-spec
] |
FILLER (
filler-type
) }

CHAPTER 5 Moving Data In and Out of Databases
177
For each column, you can specify a column-spec. If you omit this option, the
format information in the load-options applies to this column. The column-
spec and load-options format information tell Adaptive Server IQ what type
of data to expect, and how to convert it into a compatible data format if
necessary.
Syntax for the column-spec is:
column-spec
:
{ ASCII (
input-width
) |
BINARY [ WITH NULL BYTE ] |
PREFIX { 1 | 2 | 4 } |
’
delimiter-string
’ |
DATE (
input-date-format
) |
TIME (
input-time-format
) |
DATETIME (
input-datetime-format
) }
[ NULL ( { BLANKS | ZEROS | ’
literal
’, ... } ) ]
You can specify the following types of data in the column-spec:
• Data with bytes of fixed length. Although specified by the keyword
ASCII, any 8-bit characters may be used, and for 16-bit character sets, two
8-bit characters are used for each 16-bit character. No code conversion is
performed for char and varchar fields except truncation, blank stripping,
or blank padding. ASCII is also used to fill numeric data, time, and date-
time fields. In each case, the conversion is the same if the value were first
inserted as a character field, then cast to the data type of the column in the
table. The input-width value is an integer value indicating the fixed width
in bytes of the input field in every record.
• Binary fields that use a number of PREFIX bytes (1, 2, or 4) to specify the
length of the binary input. The BINARY keyword indicates that data is
already converted to the internal form (except for when the byte-order load
option is specified.
• Variable-length characters delimited by a separator. You specify the
delimiter-string as a string of one to four ASCII characters, or any 8–bit
hexadecimal ASCII code that represents a single, non-printing character.
The delimiter-string must be enclosed in single quotes. For example, you
specify:
• '\x09' to represent a tab as the terminator.
• '\x00' for a null terminator (no visible terminator as in “C” strings).
• '\x0a' for a newline character as the terminator. You can also use the
special character combination of \n for newline.

Bulk loading data using the LOAD TABLE statement
178
•DATE, TIME, DATETIME or TIMESTAMP string as ASCII characters. You
must define the input-date-format or input-datetime-format of the string
using one of the corresponding formats for the date and datetime data types
supported by Adaptive Server IQ. For information about these, see the
Adaptive Server IQ Reference Manual.
Note The column-spec is for IQ tables only. If you specify a column-spec for
a Catalog Store table, you get an error.
The NULL portion of the column-spec indicates how to treat certain input
values as NULL values when loading into the table column. These characters
can include BLANKS, ZEROS, or any other list of literals you define. When
you specify a NULL value or read a NULL value from the source file, the
destination column must be able to contain NULLs.
The FILLER clause indicates you want to skip over a specified field in the
source input file. For example, there may be characters at the end of rows or
even entire fields in the input files that you do not want to add to the table. As
with the column-spec definition, FILLER allows you to specify ASCII fixed
length of bytes, variable length characters delimited by a separator, and binary
fields using PREFIX bytes. FILLER clause syntax is as follows:
FILLER (
filler-type
)
filler-type
:
{
input-width
| PREFIX { 1 | 2 | 4 } | ’
delimiter-string
’ }
For more information on how to use data conversion options, see “Converting
data on insertion”.
Specifying files to load You specify one or more files from which to load data. In the FROM clause, you
specify each filename-string, and separate multiple strings by commas.
The files are read one at a time, and processed in a left-to-right order as
specified in the FROM clause. Any SKIP or LIMIT value only applies in the
beginning of the load, not for each file.
If a load cannot complete, for example due to insufficient memory, the entire
load transaction is rolled back.
filename-string The filename-string is passed to the server as a string.
The string is therefore subject to the same formatting requirements as other
SQL strings. In particular:

CHAPTER 5 Moving Data In and Out of Databases
179
• If a backslash (\) precedes the characters n, x, or \ it is considered an
escape character. For this reason, to indicate directory paths in Windows
NT systems, you must represent the backslash character by two
backslashes if the next character is any of those listed. (It is always safe to
double the backslashes.) Therefore, the statement to load data from the file
c:\newinput.dat into the employee table is:
LOAD TABLE employee
FROM ’c:\\newinput.dat’ ...
• The pathname is relative to the database server, not to the client
application. If you are running the statement on a database server on some
other computer, the directory name refers to directories on the server
machine, not on the client machine. The input file for the load must be on
the server machine.
Named pipes The file specification can be a named pipe. When you load from a named pipe
(or FIFO) on Windows NT, the program writing to the pipe must close the pipe
in a special way. The pipe writer must call FlushFileBuffers( ) and then
DisconnectNamedPipe( ). (If you do not, Adaptive Server IQ reports an
exception from hos_io::Read( ).) This issues a PIPE_NOT_CONNECTED
error, which notifies Adaptive Server IQ that the pipe was shut down in an
orderly manner rather than an uncontrolled disconnect. See Microsoft
documentation for details on these calls.
Specifying table-wide
format options You can specify several options that describe the format of input data.
FORMAT option You can specify a default format for table columns, which
applies if you omit the column-spec. The same formats that can appear in the
column-spec can appear here. If you also omit the FORMAT load option, the file
is assumed to be binary.
DELIMITED BY option If you omit a column delimiter in the column-spec
definition, the default column delimiter character is a comma. You can specify
an alternative column delimiter by providing a string consisting of one to four
ASCII characters, or the hexadecimal representation for a character. The same
formatting requirements apply as to other SQL strings. In particular, to specify
tab-delimited values use the hexadecimal ASCII code of the tab character (9),
as follows:
...DELIMITED BY ’\x09’ ...
To use the newline character as a delimiter, you can specify either the special
combination '\n' or its ASCII value '\x0a'.

Bulk loading data using the LOAD TABLE statement
180
STRIP option With STRIP turned on (the default), trailing blanks are
stripped from values before they are inserted. This is effective only for
VARCHAR data. To turn the STRIP option off, enter the clause as follows:
...STRIP OFF ...
Trailing blanks are stripped only for non-quoted strings. Quoted strings retain
their trailing blanks. If you don’t require blank sensitivity, you may use the
FILLER option allows you to be more specific in the number of bytes to strip
instead of just all the trailing spaces.
This option does not apply to ASCII fixed-width inserts. For example, the
STRIP option in the following statement is ignored:
LOAD TABLE dba.foo (col1 ascii(3), col2 ascii(3))
FROM foo_data QUOTES OFF ESCAPES OFF STRIP ON
QUOTES option Currently, you must specify QUOTES OFF. With quotes
off, Adaptive Server IQ does not strip off apostrophes (single quotes) or
quotation marks (double quotes). When it encounters these characters in your
input file, it treats them as part of the data.
With quotes off, you cannot include column delimiter characters in column
values.
ESCAPES option Currently, you must specify ESCAPES OFF. The default
of ESCAPES ON is provided for compatibility with Adaptive Server
Anywhere; this option may be supported in a future version. With ESCAPES
turned on, if you omit a column-spec definition for an input field, characters
following the backslash character are recognized and interpreted as special
characters by the database server. Newline characters can be included as the
combination \n, and other characters can be included in data as hexadecimal
ASCII codes, such as \x09 for the tab character. A sequence of two backslash
characters ( \\ ) is interpreted as a single backslash.
Example The following UNIX example specifies a BLOCK FACTOR of 50,000 records
along with the PREVIEW option:
LOAD TABLE lineitem
(l_shipmode ASCII(15),
l_quantity ASCII(8),
FILLER(30))
FROM ’/d1/MILL1/tt.t’
BLOCK FACTOR 50000 PREVIEW ON
Specifying load
options You can specify a wide range of load options. These options tell Adaptive
Server IQ how to interpret and process the input file, and what to do when
errors occur.

CHAPTER 5 Moving Data In and Out of Databases
181
You can specify load options in any order. Syntax for load-options is as
follows:
[ { BLOCK FACTOR
number
| BLOCK SIZE
number
} ]
... [ BYTE ORDER { NATIVE | HIGH | LOW } ]
... [ LIMIT
number-of-rows
]
... [ NOTIFY
number-of-rows
]
... [ ON FILE ERROR { ROLLBACK | FINISH | CONTINUE} ]
... [ PREVIEW { ON | OFF } ]
... [ ROW DELIMITED BY ’
delimiter-string
’ ]
... [ SKIP
number-of-rows
]
... [ START ROW ID
number
]
... [ UNLOAD FORMAT ]
Each of these options is described briefly below. For details of all options of
the LOAD TABLE statement, see the Adaptive Server IQ Reference.
BLOCK FACTOR option Specifies blocking factor, or number of records
per block, used when a source was created. This option is not valid for
insertions from variable length input fields; use the BLOCK SIZE option
instead. However, it does affect all file inserts (including from disk) with fixed
length input fields, and it can affect performance dramatically.
The default setting for BLOCK FACTOR is 10,000. Higher block factors
generally improve the speed of I/O operations. However, consider the
following when setting this option:
• If your source is a disk file, memory considerations will determine the best
setting for your system.
• If your source is a tape, either use the same blocking factor that was used
when creating the tape (for best performance) or a blocking factor that is
evenly divisible into it.
• Adaptive Server IQ rejects the insert operation if you specify a BLOCK
FACTOR of zero.
• You cannot specify BLOCK FACTOR along with BLOCK SIZE or with any
variable-width input fields.
ESCAPE CHARACTER option Specifies an alternative escape character.
The default escape character for characters stored as hexadecimal codes and
symbols is a backslash (\), so that \x0A is the linefeed character, for example.
This can be changed using the ESCAPE CHARACTER clause. For example, to
use the exclamation mark as the escape character, you would enter:
... ESCAPE CHARACTER ’!’

Bulk loading data using the LOAD TABLE statement
182
Only one single-byte character can be used as an escape character.
Note Because you must specify ESCAPES OFF in this version of Adaptive
Server IQ, the ESCAPE CHARACTER option has no effect. It is provided for
compatibility with Adaptive Server Anywhere.
WITH CHECKPOINT ON clause If this option is set to ON, a checkpoint is
issued when the LOAD TABLE statement completes and is logged. In the event
recovery is required, it is guaranteed even if the data file is then removed from
the system.
If WITH CHECKPOINT ON is not specified, the file used for loading must be
retained in case recovery is required.
BLOCK SIZE option Specifies the default size in bytes in which input
should be read. This option only affects variable-length input data read from
files; it is not valid for fixed-length input fields. It is similar to BLOCK
FACTOR, but there are no restrictions on the relationship of record size to block
size. You cannot specify this option along with the BLOCK FACTOR option.
The default setting for BLOCK SIZE is 500,000, which is high enough for input
from disk files. For tape files, you should specify the same block size that was
used when creating the tape. You cannot specify BLOCK SIZE along with
BLOCK FACTOR or with any fixed width input fields.
Example The following UNIX example specifies a BLOCK SIZE of 200,000 bytes:
LOAD TABLE mm
(l_orderkey ’\x09’,
l_quantity ’\x09’,
l_shipdate DATE(’YYYY/MM/DD’))
FROM ’/d1/MILL1/tt.t’
BLOCK SIZE 200000
BYTE ORDER option Specifies the byte ordering during reads. This
option applies to all binary input fields, including those defined as PREFIX 2
or PREFIX 4. If none are defined, this option is ignored. Adaptive Server IQ
always reads prefix binary data in the format native to the machine it is running
on (default is NATIVE). You can also specify:
•HIGH when multibyte quantities have the high order byte first (for big
endian platforms like Sun, IBM AIX, HP, and Silicon Graphics IRIX).
•LOW when multibyte quantities have the low order byte first (for little
endian platforms like DEC ALPHA, and Windows NT).
Example Here is a Windows NT example:

CHAPTER 5 Moving Data In and Out of Databases
183
LOAD TABLE nn
(l_orderkey,
l_quantity ASCII(PREFIX 2),
FILLER(2),
FROM ’C:\\iq\archive\\mill.txt’
BYTE ORDER LOW
LIMIT option Specifies the maximum number of rows to insert into the
table. The default is 0 for no limit.
LIMIT works together with the SKIP option. SKIP indicates where to begin
reading from the input file, and LIMIT specifies how many of those rows to
insert. SKIP takes precedence over LIMIT. If you specify multiple input files,
these options only affect the first file. The following table shows how these
options work together:
Table 5-1: SKIP and LIMIT insert options
Here is a Windows NT example. In this case, no rows are skipped, and up to
1,000,000 rows are inserted.
LOAD TABLE lineitem
(l_shipmode ASCII(15),
l_quantity ASCII(8),
FILLER(30))
FROM ’C:\\iq\archive\\mill.txt’
BLOCK FACTOR 1000
PREVIEW ON
LIMIT 1000000
NOTIFY option Specifies that you be notified with a message each time
the specified number of rows is inserted successfully into the table. The default
is every 100,000 rows. Very frequent notifications can slow down your insert
operation. To turn off NOTIFY entirely, set NOTIFY = 0. See “Interpreting
notification messages” for an explanation of messages.
ON FILE ERROR option Specifies the action Adaptive Server IQ takes
when an input file cannot be opened, either because it does not exist or because
you have incorrect permissions to read the file. For all other reasons or errors,
it aborts the entire insertion. You can specify one of the following:
If the SKIP value is And the LIMIT
value is Then IQ does this
0 5 Reads 5 rows and inserts 5 rows.
20 5 Reads 25 rows and inserts 5 rows.
10 5 Reads 10 rows and inserts 5 rows. If the input file
has only 8 rows, then zero rows are inserted.

Bulk loading data using the LOAD TABLE statement
184
•ROLLBACK aborts the entire transaction (the default).
•FINISH finishes the insertions already completed and ends the load
operation.
•CONTINUE returns an error but only skips the file to continue the load
operation. You cannot use this option with partial-width inserts.
PREVIEW option Displays the layout of input into the destination table
including starting position, name, and data type of each column. Adaptive
Server IQ displays this information at the start of the load process. If you are
writing to a log file, this information is also included in the log.
This option is especially useful with partial-width inserts. It can help you
diagnose failed or skewed insertions due to incompatible data types, or
destination column alignment that does not match source columns. Look at the
expected column data type and starting position information to determine if
you need to use an insert conversion option on a column and/or where and how
much filler to use.
Note PREVIEW ON helps you determine if a load is correct. It does not stop
the load from occurring.
ROW DELIMITED BY option Specifies a string up to 4 bytes in length that
indicates the end of an input record. You can use this option only if all fields
within the row are any of the following:
• Delimited with column terminators
• Data defined by the DATE or DATETIME column-spec options
• ASCII fixed length fields
The row delimiter can be any string of from 1 to 4 8-bit codes, including any
combination of printable characters, and/or any 8–bit hexadecimal code that
represents a non-printing character. For example, you specify \x09 to represent
a tab as the terminator. For a null terminator (no visible terminator as in “C”
strings), you specify \x00.
To use the newline character as a row delimiter, you can specify either the
special combination '\n' or its ASCII value '\x0a'.

CHAPTER 5 Moving Data In and Out of Databases
185
You cannot use this option if any input fields contain binary data. With this
option, a row terminator causes any missing fields to be set to NULL. All rows
must have the same row delimiters, and it must be distinct from all column
delimiters. The row and field delimiter strings cannot be an initial subset of
each other. For example, you cannot specify “*” as a field delimiter and “*#”
as the row delimiter, but you could specify “#” as the field delimiter with that
row delimiter.
If a row is missing its delimiters, Adaptive Server IQ returns an error and rolls
back the entire load transaction. The only exception is the final record of a file
where it rolls back that row and returns a warning message.
On Windows NT, a row delimiter is usually indicated by the newline character
followed by the carriage return character. You may need to specify this as the
delimiter-string for either this option or FILLER.
Example The following Windows NT example sets the column delimiter for the
l_orderkey column to tab, and the row delimiter to newline (\x0a) followed by
carriage return (\x0d):
LOAD TABLE mm
(l_orderkey ’\x09’,
l_quantity ASCII(4),
FILLER(6),
l_shipdate DATE(’YYYY/MM/DD’))
FROM ’C:\\iq\\archive\\mill.txt’
ROW DELIMITED BY ’\x0a\x0d’
SKIP option Lets you define a number of rows to skip at the beginning of
the input file(s) for this load. The default is 0. This option works in conjunction
with the LIMIT option, and takes precedence over it.
In this UNIX example, Adaptive Server IQ reads 9,000 rows from the input
file, skips the first 5,000, and loads the next 4,000. If there are only 8,000 rows
in the input file, then only 3,000 rows are loaded.
LOAD TABLE lineitem(
l_shipmode ASCII(15),
l_quantity ASCII(8),
FILLER(30))
FROM ’/d1/MILL1/tt.t’
BLOCK FACTOR 1000
LIMIT 4000
SKIP 5000
PREVIEW ON

Bulk loading data using the LOAD TABLE statement
186
START ROW ID option Specifies the id number of a row in the table
where insertions should begin. This option is used for partial-width insertions,
which insert into a subset of the columns in the table. If you are inserting data
into an existing row, you must define the format of each input column with a
column-spec, and use START ROW ID to identify the row where you want to
insert it. The default is 0, which causes data to be inserted in a new row
wherever there is space in the table. Be sure to read “Partial-width insertions”
before using this option and performing partial-width inserts.
UNLOAD FORMAT option Specifies that the data in the input file is in the
format produced by the UNLOAD command in Adaptive Server IQ 11.5.1,
specifically for upgrading to Adaptive Server IQ 12.x. This format places
certain restrictions on other load options you specify:
• The format in the column specifications must be BINARY, the default.
Specifying ASCII, PREFIX, FILLER, or string-delimiter causes an error.
• You must not use the load options DELIMITED BY and ROW DELIMITED
BY.
• To allow NULLs in the data you must specify BINARY WITH NULL BYTE
in the column specification. You cannot include NULL in the column-spec
in any other way.
• For the sake of consistency with the data being loaded, you can specify
BINARY WITH NULL BYTE even when loading into a table column that
does not allow NULLs (as specified in CREATE TABLE or ALTER TABLE).
However, if you try to load any data into a column that does not allow
NULLs, you receive an error.
See the Adaptive Server IQ Installation and Configuration Guide for more
information on upgrading.
LOAD TABLE adds
rows The LOAD TABLE statement appends the contents of the file to the existing
rows of the table; it does not replace the existing rows in the table, unless you
specify the START ROW ID load option. See “Partial-width insertions” for
examples of how you use this option to insert data into existing rows.
If you want to empty out an existing table and reload it, you can use the
TRUNCATE TABLE statement to remove all the rows from a table.
Simple LOAD TABLE
Example The following statement loads the data from the file dept.txt into all columns
of the department table. This example assumes that no explicit data conversion
is needed, and that the width of input columns matches the width of columns
in the department table.
LOAD TABLE department
FROM ’dept.txt’

CHAPTER 5 Moving Data In and Out of Databases
187
Interpreting notification messages
By default, Adaptive Server IQ displays information about your database
during insert and load operations.
The statistics in these messages indicate when you need to perform
maintenance and optimization tasks, such as adding more dbspaces. The
messages also report on the progress of the load. This section explains each
notification message.
At the start of the insert is a description of the operation, such as this one:
In table ’partsupp’, the full width insert
of 5 columns will begin at record 1.
1998-07-28 13:03:47 0002 Insert Started:
1998-07-28 13:03:47 0002 partsupp
1998-07-28 13:03:48 0002 [20270]:
=n*** File: /remote/rip/tpcd_data/scale_1/partsupp.tbl
Each time it inserts the number of records specified in the NOTIFY load option,
Adaptive Server IQ sends a message like this:
1998-07-28 13:03:49 0002 [20897]: 100000 Records, 2
Seconds
Mem: 469mb/M470
Main Blks: U63137/6%, Buffers: U12578/L7
Temporary Blks: U273/0%, Buffers: U1987/L1960
Main I: L331224/P22 O: D25967/P7805 C:D0
Temporary I: L25240/P8 O: D4749/P0 C:D0
The first line shows how many rows Adaptive Server IQ has read since the last
notification message, and the number of seconds taken reading them. Even if
Adaptive Server IQ reads the same number of messages each time, the amount
of time will vary depending on the data read (for example, how many data
conversions are required). Reported time intervals smaller than 1 second are
usually reported as “0 Secs”.
Memory message
This message displays memory usage information:
Mem: 469mb/M470

Bulk loading data using the LOAD TABLE statement
188
Table 5-2: Memory messages
Main IQ Store blocks messages
This line describes the permanent (main) IQ Store:
Main Blks: U63137/6%, Buffers: U12578/L7
Table 5-3: Main blocks
IQ Temporary Store blocks message
This message provides similar information to the Main IQ Store Blocks
message explained above.
Temporary Blks: U273/0%, Buffers: U1987/L1960
Main buffer cache activity message
This line displays information about the main buffer cache.
Main I: L331224/P22 O: D25967/P7805 C:D0
Item Description
Mem: # mb Current memory being used by this Adaptive Server IQ
server, in megabytes.
M# mb The maximum number of megabytes used by this IQ
server since it was started.
Item Description
U# Number of blocks in use.
#% Percentage of database filled.
Buffers:
U#
Number of buffers in use.
Note: This value will grow to maximum number of buffers that fit in
the main buffer cache. The number increments whenever a buffer is
allocated, but only decrements when a buffer is destroyed, not when it
is unlocked or flushed. When it decreases, you have hit the current limit
of virtual memory available and new memory is coming from buffer
cache or you have an error and insert has been rolled back and restarted.
L# Number of locked buffers. This number increments whenever you
request a buffer. If you exceed the maximum while running a script, the
command that exceeds it will fail and subsequent commands may
complete incorrectly.

CHAPTER 5 Moving Data In and Out of Databases
189
Table 5-4: Main IQ Store file message
In general, assuming the buffer cache is full, you should have between 10 and
1000 logical reads per physical read. A lower value indicates excessive
thrashing in the buffer manager. More than 1000 times larger can indicate that
you may be overallocating memory to your buffer cache. If either of these
conditions exists, see Chapter 12, “Managing System Resources” for
information on setting buffer cache sizes, or Chapter 13, “Monitoring and
Tuning Performance” for information on using the IQ performance monitor.
Temporary buffer cache message
These lines display information about the Temp buffer cache.
Temporary I: L25240/P8 O: D4749/P0 C:D0
See the description for the Main buffer cache message above.
Controlling message logging
The Notify_Modulus database option adjusts the default frequency of
notification messages during loads, or omit these message. See the chapter
“Database Options” in the Adaptive Server IQ Reference Manual for details.
The NOTIFY option in the LOAD command overrides the Notify_Modulus
setting.
Item Description
Main: I: L# Number of logical file reads.
P# Number of physical file reads.
O: D# Number of times a buffer was destroyed.
P# Number of physical writes.
C: D# Buffer manager data compression ratio. This is the total number of
bytes eligible for compression minus number of bytes used after
compression divided by total number of bytes eligible for
compression times 100. In other words, it tells how much data was
compressed (what percentage it is of its uncompressed size). The
larger the number, the better. Only certain data blocks are eligible for
compression. Eligible blocks include indexes, (90-95% of a
database) and Sort sets. This reflects only data compression
techniques used by the buffer manager. Other data compression may
take place before data reaches the buffer manager, so the total data
compression may be higher.

Using the INSERT statement
190
Using the INSERT statement
The INSERT statement allows you to insert data without first putting it into a
flat file. Using this command, you can either:
• Insert a specified set of values row by row
• Insert directly from database tables
See the sections that follow for details of these two forms of the command.
Inserting specified values row by row
To add specified values to a table row by row, use the INSERT statement with
this syntax:
INSERT [ INTO ]
[
owner
.]
table_name
[ (
column_name
, ...) ]
... VALUES (
expression
...)
Adaptive Server IQ inserts the first value you specify into the first column you
specify, the second value you specify into the second column, and so on. If you
omit the list of column names, the values are inserted into the table columns in
the order in which the columns were created (the same order as SELECT *
would retrieve). Adaptive Server IQ inserts the row into the table wherever
room is available.
Values can be NULL, any positive or negative number, or a literal.
• Enclose values for CHAR, VARCHAR, DATE, TIME, and TIMESTAMP or
DATETIME columns in single or double quotation marks. To indicate a
value with a quotation in it use a different set of quotes for the outer quote,
such as “Smith' s”.

CHAPTER 5 Moving Data In and Out of Databases
191
• For DATE, TIME, and TIMESTAMP or DATETIME columns, you must use a
specific format. See “Converting data on insertion” for information on
data type conversions. See the Adaptive Server IQ Reference Manual for
a complete description of Adaptive Server IQ data types.
Note The TIMESTAMP and DATETIME data types are identical.
Allowing NULL values When you specify values for only some of the columns in a row, NULL is
inserted for columns with no value specified, if the column allows NULL. If
you specify a NULL value, the destination column must allow NULLs, or the
INSERT is rejected and an error message is produced in the message log.
Adaptive Server IQ columns allow NULLs by default, but you can alter this by
specifying NOT NULL on the column definition in the CREATE TABLE
statement or in other ways, such as using a primary key, for example.
Example The following example adds 1995-06-09 into the l_shipdate column and 123
into the l_orderkey column in the lineitem table.
INSERT INTO lineitem
(l_shipdate, l_orderkey)
VALUES(’1995-06-09’, 123)
If you are inserting more than a small number of data rows, it is more efficient
to insert selected rows directly from a database, as described in the next
section, or to load data from a flat file with the LOAD TABLE statement, than to
insert values row by row. Consider using a select statement with a few unions
instead of inserting values for a few rows, because this requires only a single
trip to the server.
Inserting selected rows from the database
To insert data from other tables in the current database, or from a database that
is defined as a Specialty Data Store to Adaptive Server IQ, use this syntax:
INSERT [ INTO ]
[
owner
.]
table_name
[ (
column-name
,...) ]
[
insert-load-options
]...
select-statement
insert-load-options:
LIMIT
number-of-rows
NOTIFY
number-of-rows

Inserting selected rows from the database
192
SKIP
number-of-rows
START ROW ID
number
This form of the INSERT statement lets you insert any number of rows of data,
based on the results of a general SELECT statement.
For maximum efficiency, insert as many rows as possible in one INSERT
statement. To insert additional sets of rows after the first insert, use additional
INSERT statements.
Like other SQL databases, Adaptive Server IQ inserts data by matching the
order in which columns are specified in the destination column list and the
select list; that is, data from the first column in the select list is inserted into the
first destination column, and so on. For both INSERT SELECT and INSERT
VALUES, if you omit destination column names, Adaptive Server IQ inserts
data into columns in the order in which they were created.
The tables you are inserting into must exist in the database you are currently
connected to. Adaptive Server IQ inserts the data into all indexes for the
destination columns. (
The columns in the table in the select-list and in the table must have the same
or compatible data types. In other words, the selection’s value must be, or must
be able to be converted to, the data type of the table’s column. See “Converting
data on insertion” for more information about data types and conversion
options.
With this form of the INSERT statement you can specify any of the following
insert-load-options:
The START ROW ID option lets you perform a partial-width insert. Read
“Partial-width insertions” before you specify this option.
For an explanation of all of these options, see “Specifying load options”.
Example This example shows an insert from one table, partsupp, to another, lineitem,
within the same database. The data from the source column l_quantity is
inserted into the destination column ps_availqty.
INSERT INTO partsupp(ps_availqty)
SELECT l_quantity FROM lineitem
Inserting from a different database
You can insert data from tables in any accessible database:

CHAPTER 5 Moving Data In and Out of Databases
193
• Tables in either the IQ Store or the Catalog Store of the database you are
currently connected to.
• Tables in an Adaptive Server Enterprise database.
•A proxy table in your current database, that corresponds to a table in a
database on a remote server. Adaptive Server IQ's remote data access
capabilities are currently supported on Windows NT only. For details, see
the Adaptive Server IQ Installation and Configuration Guide for Windows
NT.
Inserting directly from
an Adaptive Server
Enterprise database
You can insert data easily from an Adaptive Server Enterprise or SQL Server
database, using the LOCATION syntax of the INSERT statement. You can also
use this method to move selected columns from a pre-Version 12 Adaptive
Server IQ database into a Version 12 database.
In order to use this capability, all of the following must be true:
• The Sybase connectivity libraries must be installed on your system, and
the load library path environment variable for your platform must point to
them.
• The Adaptive Server Enterprise server to which you are connecting must
exist in the interfaces file on the local machine.
• You must have read permission on the source ASE or pre-Version 12 IQ
database, and INSERT permission on the target IQ 12 database
❖To insert data directly from Adaptive Server Enterprise
1 Connect to both the Adaptive Server Enterprise and the Adaptive Server
IQ 12 database using the same user ID and password.
2 On the Adaptive Server IQ 12 database, issue a statement using this
syntax:
INSERT INTO
asiq_table
LOCATION ’
ase_servername.ase_dbname
’
{ SELECT
col1
,
col2
,
col3
,...
FROM
owner
.
ase_table
}
3Issue a COMMIT to commit the insert.
Example The following command inserts data from the l_shipdate and l_orderkey
columns of the lineitem table from the Adaptive Server IQ 11.5 database
asiq11db.dba on the server detroit, into the corresponding columns of the
lineitem table in the current database.
INSERT INTO lineitem
(l_shipdate, l_orderkey)

Inserting selected rows from the database
194
LOCATION ’detroit.asiq11db’
{ SELECT l_shipdate, l_orderkey
FROM lineitem }
• The destination and source columns may have different names.
• The order in which you specify the columns is important, because data
from the first source column named is inserted into the first target column
named, and so on.
• You can use the predicates of the SELECT statement within the INSERT
command to insert data from only certain rows in the table.
Example This example inserts the same columns as the previous example, but only for
the rows where the value of l_orderkey is 1.
INSERT INTO lineitem
(l_shipdate, l_orderkey)
LOCATION ’detroit.asiqdb’
{ SELECT l_shipdate, l_orderkey
FROM lineitem
WHERE l_orderkey = 1 }
Note If you use START ROW ID and you select fewer columns than exist in
the destination table, the columns in remaining rows of the destination table
will be NULLs, if NULLs are legal values. See “Partial-width insertions” for
more information.
Importing data from
pre-Version 12
Adaptive Server IQ
To import data from an Adaptive Server IQ database version earlier than 12.0,
you must use of the following methods:
•The
LOAD TABLE command with the UNLOAD FORMAT option.
•The
INSERT...LOCATION syntax
You cannot use other forms of the INSERT command.
For more information on loading from an older version, see the Adaptive
Server IQ Installation and Configuration Guide.

CHAPTER 5 Moving Data In and Out of Databases
195
Importing data interactively
If you are inserting small quantities of data, you may prefer to enter it
interactively through DBISQL, using the INSERT statement
For example, you can insert listed values a single row at a time with the
following command:
INSERT INTO T1
VALUES ( ... )
For more information about the INSERT command, see “Using the INSERT
statement”.
Inserting into tables of a join index
You load or insert data into the tables underlying a join index, just as you would
any other indexes. There are only two differences:
• The data in a join index must be synchronized before you can use the join
index to resolve queries.
• You cannot perform a partial-width insert for tables that participate in a
join index.
When you first create a join index, Adaptive Server IQ synchronizes the join
index for you automatically. It does not matter whether you create the join
index before or after loading. The order also does not affect performance of the
load or synchronization.
Once you have created a join index, however, if you insert or load data into any
of its underlying tables except the top table in the join hierarchy, you must
synchronize it explicitly. To do so, use the SYNCHRONIZE command. For the
syntax of this command, see “Synchronizing join indexes” or see the Adaptive
Server IQ Reference.
Once any user has updated any of the tables in a join index, no other user can
update any of the tables underlying that join index until the join index has been
synchronized.
Updating from
different connections
may cause errors
When more than one user inserts into or deletes from different tables that
participate in the same join index, the second user's update will fail unless the
synchronize commits before the second user’s transaction starts. This failure
occurs if either of the following conditions exist:

Inserting into primary and foreign key columns
196
• The second user's transaction begins before the first user's transaction
commits.
• The second user tries to update after the first user's transaction commits,
but before the join index is synchronized.
This problem occurs because Adaptive Server IQ makes a new version of the
join index when any of its underlying tables is updated. The new version is not
visible to other transactions that have already begun. The problem does not
occur when one user makes all of the changes, because the newer table version
is visible to the user who made the original changes.
For example, assume that tables A, B, and C are all members of the same join
index. User 2 begins a transaction, and writes to another table not involved in
the join. Now, User 1 inserts into table B. This action creates a new version of
table B, and a new version of the join index. User 2 then tries to write to table
C. Even though no other user has changed table C, because C is a member of
the join index it can't be updated until the join index is synchronized.
For more information on join indexes, see Chapter 4, “Adaptive Server IQ
Indexes” For more information on transaction processing, see Chapter 8,
“Transactions and Versioning”
Inserting into primary and foreign key columns
You load or insert data into primary key and foreign key columns just as you
would into any other column.
When you insert into a single-column primary key, Adaptive Server IQ checks
that each value is unique. If it is not, an error occurs.
When you insert into multi-column primary keys, you are responsible for
making sure that the values in the primary key columns uniquely identify each
row. Adaptive Server IQ does not enforce multi-column primary key
uniqueness.
When you insert into foreign key columns, you are responsible for making sure
that the values match those in the column they reference. Adaptive Server IQ
does not enforce foreign keys. For example, in the sample database, the cust_id
column in the sales_order table is a foreign key that references the id column
in the customer table. You must insert values directly into both of these
columns, and ensure that they match.

CHAPTER 5 Moving Data In and Out of Databases
197
An easy way to enforce the integrity is to create and run stored procedures that
roll back any transaction that violates a constraint. You can use an EXISTS
clause to specify violations.
Partial-width insertions
By default, new rows are inserted wherever there is space in the indexes, and
each LOAD TABLE or INSERT statement starts a new row. This approach works
as long as the data you are inserting is a new row. Adaptive Server IQ also lets
you insert individual columns into an existing row, if you specify its rowid.
A partial-width insertion, also called a vertical insertion, is an insertion into a
subset of columns in a table. You can use two or more partial-width insertions
to insert data into all of the columns of the table.
Partial-width insertions let you:
• Insert data into just a few columns at a time. This approach can be helpful
if you have memory limitations.
For example, you can insert data into a few columns at a time, using
separate LOAD TABLE or INSERT statements for each group of indexes and
using the START ROW ID option to keep the ROW IDs consistent and the
memory requirement lower. You may want to do this if you are inserting
into a very wide table and do not have enough free memory to populate all
the indexes at one time.
• Use different data sources, such as multiple flat files, to insert into
different groups of columns in a table.
• Add a new column and corresponding index to a table after you have
already inserted data into the columns for that table. For more information,
see the ALTER INDEX command.
Warning! This is an advanced operation. If you do not perform all the steps
correctly in a partial-width insert, you may insert data incorrectly. Never use
this type of insert unless you are an experienced Adaptive Server IQ user and
are very familiar with your data. Full-width inserts, which insert into all the
column indexes on a table at the same time, ensure row-level integrity and are
less error-prone.
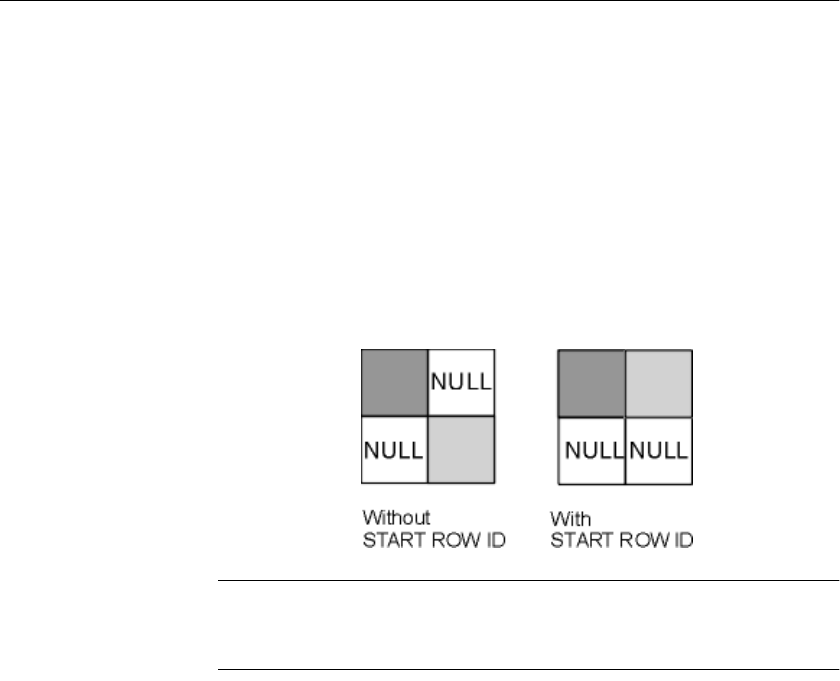
Partial-width insertions
198
Use START ROW ID to specify at which row you want to start the insert. This
allows you to insert into some of the columns in a row with one partial-width
INSERT or LOAD TABLE statement, and insert into the other columns in the
same row with additional INSERT or LOAD TABLE statements.
If you try to insert into a column that already contains data, you get an error.
You must be sure to control the row at which each insertion starts. If you do not
use START ROW ID, your insertion begins with the next row, and NULLs are
inserted in the remaining columns of the current row, as shown in Figure 5-1.
(The two shading patterns represent data inserted into columns in two separate
insert operations.)
Figure 5-1: Using START ROW ID with partial-width insertions
Note Do not try to perform a partial-width insertion using the INSERT VALUES
command format. Because you cannot specify START ROW ID using this
format, the problem shown in the figure results.
Partial-width insertion rules
Column indexes that are not included in the initial partial-width insert, and
therefore do not already contain data, must allow NULLs. Adaptive Server IQ
inserts NULLs into these column indexes. If they do not allow NULLs, the
insert fails.
When doing partial-width inserts, follow these steps:
1 For the first partial-width insert for each set of rows, do not specify START
ROW ID. Adaptive Server IQ automatically knows what the next available
row is for this insert.

CHAPTER 5 Moving Data In and Out of Databases
199
2 For the second and any subsequent partial-width inserts for the same set of
rows, use the START ROW ID option to specify the row where the insert
started. This number is the record number at the beginning of the insert
message log, as in this example:
In table ’department’, the full width insert of 3
columns
will begin at record 1.
You can also use the ROWID function to display the row ID, as in the following
query:
SELECT *, ROWID(
table_name
) FROM
table_name
Example 1 The UNIX example below shows an incorrect insertion of four columns from
the file tt.t into the indexes on the lineitem table. It inserts the first two columns
with one LOAD TABLE statement and the second two columns with another
LOAD TABLE statement, but does not use the START ROW ID option to align the
additional columns.
LOAD TABLE lineitem
(l_partkey ASCII(4),
l_suppkey ASCII(4),
FILLER(13))
FROM ’/d1/MILL1/tt.t’
PREVIEW ON
NOTIFY 1000
LOAD TABLE lineitem
(FILLER(8),
l_quantity ASCII(6),
l_orderkey ASCII(6),
FILLER(1))
FROM ’/d1/MILL1/tt.t’
PREVIEW ON
NOTIFY 1000
The result of the SELECT statement below shows that 10 rows are stored
instead of the correct number of 5.
SELECT *, rowid(lineitem) FROM lineitem
l_orderkey l_partkey l_suppkey l_quantity rowid(lineitem)
---------- --------- --------- ------------ ---------------
NULL 1 12 NULL 1
NULL 2 37 NULL 2

Partial-width insertions
200
NULL 3 28 NULL 3
NULL 4 13 NULL 4
NULL 5 9 NULL 5
190 NULL NULL 19 6
215 NULL NULL 2127 7
29 NULL NULL 1376 8
200 NULL NULL 119 9
59 NULL NULL 4 10
(10 rows affected)
Example 2 The following example shows the correct way to do this operation. Note the
START ROW ID option in the second LOAD TABLE statement.
LOAD TABLE lineitem
(l_partkey ASCII(4),
l_suppkey ASCII(4),
FILLER(13))
FROM ’/d1/MILL1/tt.t’
PREVIEW ON
NOTIFY 1000
SELECT *, rowid(lineitem) FROM lineitem
l_orderkey l_partkey l_suppkey l_quantity rowid(lineitem)
---------- --------- --------- ---------- ---------------
NULL 1 12 NULL 1
NULL 2 37 NULL 2
NULL 3 28 NULL 3
NULL 4 13 NULL 4
NULL 5 9 NULL 5
(5 rows affected)
LOAD TABLE lineitem
(FILLER(8),
l_quantity ASCII(6),
l_orderkey ASCII(6),
FILLER(1))
FROM ’/d1/MILL1/tt.t’
PREVIEW ON
NOTIFY 1000
START ROW ID 1
SELECT *, rowid(lineitem) FROM lineitem
l_orderkey l_partkey l_suppkey l_quantity rowid(lineitem)
---------- ---------- ---------- ----------- ---------------
190 1 12 19 1
215 2 37 2127 2

CHAPTER 5 Moving Data In and Out of Databases
201
29 3 28 1376 3
200 4 13 119 4
59 5 9 4 5
(5 rows affected)
To ensure that the data from the second two columns is inserted into the same
rows as the first two columns, you must specify the row number in the START
ROW ID option on the INSERT command for the next two columns.
Using the FILLER
Option The FILLER option tells Adaptive Server IQ which columns in the input file
to skip. This LOAD TABLE statement inserts NULLs into the second two
columns, because those columns are skipped. Note that these columns must
allow NULLs in order for this statement to work.
Example 3 For this next Windows NT example, assume the partsupp table has two
columns, ps_partkey and ps_availqty, and that partsupp is not part of any join
index.
The data for ps_value is calculated from ps_availqty so the ps_availqty column
must already contain data. Therefore, to insert data into the partsupp table, do
two inserts: one for ps_availqty and ps_partkey and then one for ps_value.
First, insert the data for partsupp directly from an ASCII file named tt.t.
LOAD TABLE partsupp
(ps_partkey ASCII(6),
ps_availqty ASCII(6),
FILLER(2))
FROM ’C:\\iq\\archive\\mill1.txt’
SELECT *, rowid(partsupp) FROM partsupp
ps_partkey ps_suppkey ps_availqty ps_value rowid(partsupp)
---------- ---------- ----------- -------- ---------------
213 NULL 190 NULL 1
24 NULL 215 NULL 2
(2 rows affected)
Next select the ps_availqty and do an 80% calculation. In this case you must use
an INSERT command to insert the results of a SELECT statement.
INSERT INTO partsupp(ps_value)
START ROW ID 1
SELECT ps_availqty * 0.80 FROM partsupp
SELECT *, rowid(partsupp) FROM partsupp
ps_partkey ps_suppkey ps_availqty ps_value rowid(partsupp)
---------- ---------- ----------- -------- ---------------

Converting data on insertion
202
213 NULL 190 152.00 1
24 NULL 215 172.00 2
(2 rows affected)
If you later load data from another file into ps_partkey and ps_availqty,
insertions begin correctly at the next row, as shown below.
LOAD TABLE partsupp
(ps_partkey ASCII(6),
ps_availqty ASCII(6),
FILLER(2))
FROM ’C:\\iq\\archive\\mill2.txt’
SELECT *, rowid(partsupp) FROM partsupp
ps_partkey ps_suppkey ps_availqty ps_value rowid(partsupp)
---------- ---------- ----------- -------- ---------------
213 NULL 190 152.00 1
24 NULL 215 172.00 2
28 NULL 490 NULL 3
211 NULL 15 NULL 4
(4 rows affected)
To calculate and insert the values for ps_value, you need to repeat the INSERT
statement shown earlier in this example, changing the START ROW ID value to
the new row number, 3.
Previewing partial-
width inserts Given the possibility of errors if you do a partial-width insert incorrectly, it is
a good idea to preview these inserts. The PREVIEW load option lets you see
the layout of input in the destination table. This option is available in LOAD
TABLE, but not in the INSERT command.
Converting data on insertion
The data you enter into your Adaptive Server IQ database will likely come
from diverse sources. Not all of your data will match the Adaptive Server IQ
data types exactly. Some of it will need to be converted. Data is converted in
two ways: explicitly and implicitly. For example, to insert CHAR data into an
INT column you must convert it explicitly.
Implicit conversions can occur:
• When you insert data selected from another column in the same database

CHAPTER 5 Moving Data In and Out of Databases
203
• When you insert data selected from another database
• When you load data from a flat file
When an explicit conversion is needed, the way that you specify the conversion
depends on whether you are loading from a flat file or inserting selected rows:
•In the LOAD TABLE statement, you convert data explicitly by specifying a
format in the column-spec.
•In the INSERT statement, you convert data explicitly using the data
conversion functions CAST, CONVERT, and DATEPART in the SELECT
statement.
For information on implicit and explicit conversions between Adaptive Server
IQ data types, see Table 5–6.
For information on conversions that occur if you are inserting from proxy
tables, see the Adaptive Server IQ Installation and Configuration Guide for
Windows NT.
While most Adaptive Server IQ data types are fully compatible with Adaptive
Server Anywhere and Adaptive Server Enterprise data types of the same name,
there are some differences. For details on compatibility, see “Matching
Adaptive Server Anywhere data types” and ““Matching Adaptive Server
Enterprise data types.”
For compatibility among versions, a few data types have been defined as
synonyms of other data types:
•DECIMAL is a synonym for NUMERIC.
•INTEGER is a synonym for INT.
•DATETIME is a synonym for TIMESTAMP.
•FLOAT (precision) is a synonym for REAL or DOUBLE, depending on the
value of precision. For Adaptive Server Enterprise, REAL is used for
precision less than or equal to 15, and DOUBLE for precision greater than
15. For Adaptive Server IQ and Adaptive Server Anywhere, the cutoff is
platform-dependent, but on all platforms the cutoff value is greater than
22.
•MONEY is an Adaptive Server Enterprise-compatible synonym for
NUMERIC(19,4), allowing NULL.
•SMALLMONEY is an Adaptive Server Enterprise-compatible synonym for
NUMERIC(10,4), allowing NULL.

Converting data on insertion
204
You can use a synonym interchangeably with its standard data type. Data is
stored internally as the standard data type, where synonyms exist. In error
messages, the standard name appears in place of the synonym.
Note By default, Adaptive Server IQ assumes that input data is binary
(numeric data) and tries to insert it that way. However, this presumes that the
input column length in bytes must match the destination column length in
bytes. If not, the insert will fail or lead to unexpected results. For example, if
you attempt to insert an input column with integer data of 4 bytes into a
SMALLINT destination column, Adaptive Sever IQ loads only the first 2 bytes
of that input column.
Inserting data from pre-Version 12 Adaptive Server IQ
If you are moving data into Adaptive Server IQ Version 12 from an earlier
version, you must convert certain data types before inserting or loading them.
For details, see “Migrating Data from Previous Versions” in the Adaptive
Server IQ Installation and Configuration Guide.
Load conversion options
The following table lists the conversion options for the LOAD TABLE statement
in alphabetical order and gives a brief description of what each option does. For
a detailed description of each option, see the sections that follow. To use these
options in the LOAD TABLE statement, see “Specifying load options”.
Table 5-5: Conversion options for loading from flat files
Option Adaptive Server IQ
Datatypes Action
ASCII TINYINT, SMALLINT, INT (or
INTEGER), UNSIGNED INT,
BIGINT, UNSIGNED BIGINT,
NUMERIC (or DECIMAL),
REAL, DOUBLE, BIT, DATE,
TIME, TIMESTAMP (or
DATETIME)
By default, Adaptive Server IQ assumes input data is binary of
appropriate width for the datatype. Using ASCII allows you to tell
Adaptive Server IQ that data is in character format and lets you
specify how wide it is. This option allows E notation for REAL
data, but it can hinder your performance.

CHAPTER 5 Moving Data In and Out of Databases
205
Note When loading from a flat file, use binary data if you have a choice of
using binary or character data. Using binary input can improve performance by
eliminating conversion costs.
Data conversions in IQ
When you use the INSERT statement to insert data directly from a database
rather than from a flat file, you cannot use the load conversion options. If the
data requires explicit conversion, you must use one of the conversion
functions, CAST or CONVERT, in the SELECT statement where you specify the
data to be inserted. If the data is converted implicitly, Adaptive Server IQ
handles the conversion automatically.
An implicit or explicit conversion is required whenever data types in a SELECT
statement need to match, but do not. This occurs when you do an INSERT
SELECT from one data type to another, but it also occurs whenever you
compare or compute values for differing data types.
The following tables show:
• Which conversions Adaptive Server IQ does implicitly (I)
• Which conversions you must do explicitly (E)
• Which conversions are unsupported (U)
These conversions apply to data within an Adaptive Server IQ database, or
coming from an Adaptive Server Anywhere database, or any other database
connected as a Specialty Data Store.
ASCII CHAR, VARCHAR By default, Adaptive Server IQ assumes same column width
between source and destination columns, which may cause it to
read input file incorrectly. This option lets you specify a different
width for the input column.
DATE DATE Converts ASCII date input of a fixed format to binary.
DATETIME TIMESTAMP (or DATETIME)
or TIME
Converts ASCII time or date/time input of a fixed format to
binary. The input specification is based on either a 12-hour or 24-
hour clock.
TIME TIME Converts ASCII time input of a fixed format to binary.
NULL all Lets you specify which input data values to convert to NULL on
insert.
Option Adaptive Server IQ
Datatypes Action
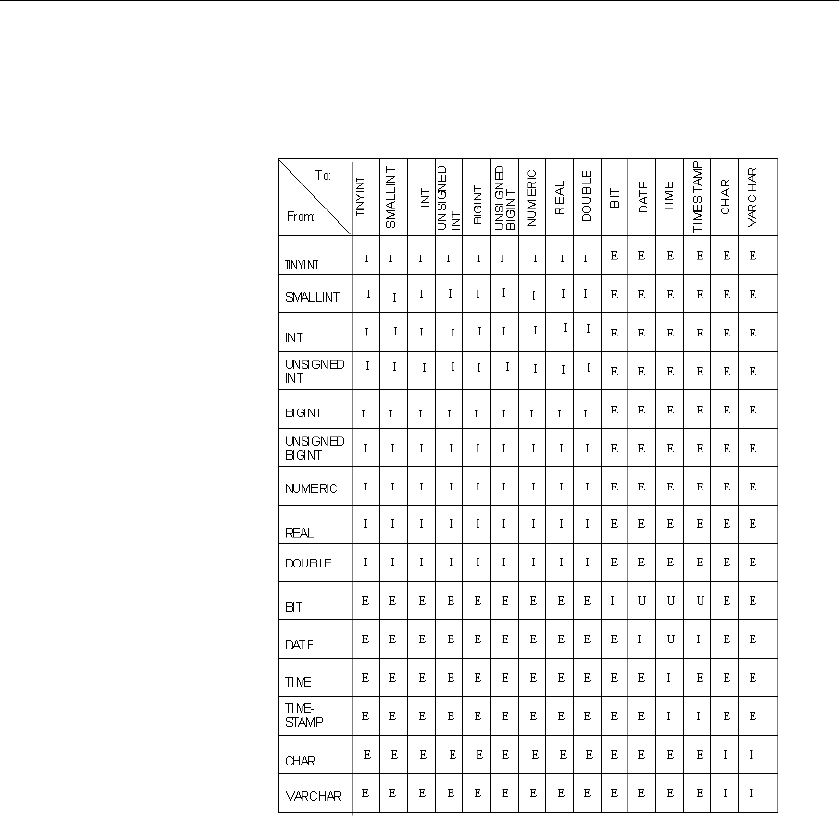
Converting data on insertion
206
The first table shows implicit (I), explicit (E), and unsupported (U) conversions
when there is no WHERE clause in the SELECT statement, or when the WHERE
clause is based on a comparison operation (=, > or <).
Figure 5-2: IQ conversions for comparison operations

CHAPTER 5 Moving Data In and Out of Databases
207
The second table shows implicit (I), explicit (E), and unsupported (U)
conversions when the WHERE clause in a SELECT statement is based on an
arithmetic operation (+, –, etc.).
Figure 5-3: IQ conversions for arithmetic operations
Note In arithmetic operations, bit data is implicitly converted to tinyint.

Converting data on insertion
208
Column width issues
Adaptive Server IQ assumes the width of the input data is the same as the
destination column width and reads the input file accordingly. If they are not
the same width, Adaptive Server IQ may read too few or too many bytes of the
input file for that column. The result is that the read for that column may be
incorrect, and the reads for subsequent columns in the input file will be
incorrect, because they will not start at the correct position in the input file.
For example, if input_column1 is 15 bytes wide and destination_column1 is 10
bytes wide, and you do not specify the ASCII conversion option, Adaptive
Server IQ assumes the input column is only 10 bytes wide. This is fine for
destination_column1, because the input data is truncated to 10 bytes in any case.
But it also means that Adaptive Server IQ assumes that the next column in the
input file starts at byte 11, which is still in the middle of the first column,
instead of at byte 16, which is the correct starting position of the next column.
Conversely, if input_column1 is 10 bytes wide and destination_column1 is 15
bytes wide, and you do not specify the ASCII conversion option, Adaptive
Server IQ assumes the input column is 15 bytes wide. This means that
Adaptive Server IQ reads all of input_column1 plus 5 bytes into the next column
in the input file and inserts this value into destination_column1. So, the value
inserts into destination_column1 and all subsequent columns are incorrect.
To prevent such problems, use the ASCII conversion option. With this option,
Adaptive Server IQ provides several ways to specify the fixed or variable
width of an input column. Your input data can contain fixed width input
columns with a specific size in bytes, variable width input columns with
column delimiters, and variable width input columns defined by binary prefix
bytes.
Using the ASCII conversion option
Use the ASCII conversion option to either:
• Convert ASCII input data to binary and specify the width of the input
column so data can be read in correctly for that column, or
• Insert ASCII data into an ASCII data type column when the width of the
input column is different from the width of the destination column. This
option lets you specify how much of the input data it should read for each
column.
You can use this option with any of the Adaptive Server IQ data types, with 1,
2, or 4 prefix bytes, and with a column delimiter.

CHAPTER 5 Moving Data In and Out of Databases
209
Truncation of data for
VARCHAR and CHAR
columns
If the width of the input column is greater than the width of the destination
column, Adaptive Server IQ truncates the data upon insertion. If the width of
the input data is less than the width of the destination column, for CHAR or
VARCHAR data types Adaptive Server IQ pads the data with spaces in the table
upon insertion.
Variable width inserts to a VARCHAR column will not have trailing blanks
trimmed, while fixed width inserts to a VARCHAR column will be trimmed. For
example, assume that you are inserting into column varcolumn in a table called
vartable. The following would constitute a fixed-width insert, where the value
would not be trimmed because you explicitly say to include the two blanks
(indicated by __ here):
INSERT INTO vartable VALUES (’box__’)
If instead you inserted the same value from a flat file using delimited input, it
would be a variable-width insert, and the trailing blanks would be trimmed.
The following table illustrates how the ASCII conversion option works with the
Adaptive Server IQ data types. The example inserts the data from the flat
ASCII file shipinfo.t into the Adaptive Server IQ table lineitem and summarizes
the content and format of the input data and the table.
Table 5-6: Input file conversion example
For the l_shipmode column, you insert ASCII data into an ASCII column (that
has a VARCHAR data type). Notice the width of the two columns is different.
In order for the insert on this column and the subsequent l_quantity column to
be correct, you specify the width of the l_shipmode column so the correct
amount of input data is read at the correct position.
For the l_quantity column, you are inserting ASCII data into a binary column
(INT data type). In order for the insert on this column to be correct, you must
convert the input data into binary and indicate the width of the input column.
The command for this is shown in the following UNIX example.
LOAD TABLE lineitem(
l_shipmode ASCII(15),
l_quantity ASCII(8),
FILLER(1))
FROM ’/d1/MILL1/shipinfo.t’
PREVIEW ON
shipinfo.t lineitem
column format width column datatype width
l_shipmode CHAR 15 l_shipmode VARCHAR 30
l_quantity ASCII 8 l_quantity INT 4

Converting data on insertion
210
Substitution of NULL or blank characters
Adaptive Server IQ supports zero-length CHAR and VARCHAR data. If the
length of a CHAR or VARCHAR cell is zero and the cell is not NULL, you get a
zero-length cell.
For all other data types, if the length of the cell is zero, Adaptive Server IQ
inserts a NULL.
This treatment of zero-length character data is ANSI behavior. If you require
non-ANSI behavior, see the Non_Ansi_Null_Varchar option in the Adaptive
Server IQ Reference Manual.
The DATE Option
Use the DATE conversion option to insert ASCII data that is stored in a fixed
format into a DATE column. This option converts the ASCII data input to
binary and specifies the format of the input data. (The DATE format is used
internally to interpret the input; it does not affect the storage or output format
of the data.) See the ASCII conversion format for more information.
Example In this Windows NT example, data for the l_shipdate column is converted from
the specified format into binary. The 1–byte FILLER skips over carriage returns
in the input file.
LOAD TABLE lineitem(
l_orderkey NULLS(ZEROS) ASCII(4),
l_partkey ASCII(3),
l_shipdate DATE(’MM/DD/YY’),
l_suppkey ASCII(5),
FILLER(1))
FROM ’C:\\MILL1\\shipinfo.t’
PREVIEW ON
Specifying the DATE Format
Specify the format of the input data using y or Y for years, m or M for months,
d or D for days, and j or J for Julian days. The length of the format string is the
width of the input column. Table 5-7 describes the formatting options.
Table 5-7: Formatting dates
Option Meaning
yyyy or YYYY
yy or YY
Represents number of year. Default is 1900.

CHAPTER 5 Moving Data In and Out of Databases
211
On input, the case the format code is ignored.
On output, the case of the format code has the following effect:
• Mixed case (for example, “Dd”) means do not pad with zeroes.
• Same case (for example, “DD” or “dd” means do pad with zeroes.
For example, a time as 17:23:03.774 using the default time format, but as
17:23:3.774 using 'HH:NN:Ss.SSS'.
The next table shows examples of how date input data looks and how to specify
the format with the DATE conversion option. Following the table are general
rules for specifying dates.
Table 5-8: Sample DATE format options
•The DATE specification must be in parentheses and enclosed in single or
double quotes.
• Adaptive Server IQ stores only the numbers of the year, month, and day;
it does not store any other characters that might appear in the input data.
However, if the input data contains other characters, for example, slashes
(/), dashes (-), or blanks to separate the month, day, and year, the DATE
format must show where those characters appear so they can be ignored.
mm or MM Represents number of month. Always use leading zeros for
number of the month where appropriate, for example ’05’ for
May. If you omit the month from a DATE value, the day is
treated as a Julian date. If you enter only the month, for
example, ’03’, Adaptive Server IQ applies the default year and
day and converts it to ’1900-03-01’.
dd or DD
jjj or JJJ
Represents number of day. Default day is 01. Always use
leading zeros for number of day where appropriate, for example
’01’ for first day. J or j indicates a Julian day (1 to 365) of the
year.
Option Meaning
Input Data Format Specification
12/31/98 DATE (’MM/DD/YY’)
12-31-98 DATE (’MM-DD-YY’)
19981231 DATE (’YYYYMMDD’)
12/98 DATE (’MM/YY’)
1998/123 DATE (’YYYY/JJJ’)

Converting data on insertion
212
• Use any character other than Y, M, J, or D to indicate the separator
character you want Adaptive Server IQ to skip over. You can even use
blanks.
•If a DATE format includes only a year and a day number within the year,
Adaptive Server IQ treats the date as a Julian date. For example, 1998-33
is the 33rd day in the year 1998, or February 2, 1998.
• If a year is specified with only two digits, for example "5/27/32", then
Adaptive Server IQ converts it to 19yy or 20yy, depending on the year and
on the setting of the NEAREST_CENTURY option.
For more information, see “Database Options” in the Adaptive Server IQ
Reference Manual.
The DATETIME conversion option
Use the DATETIME conversion option to insert ASCII data that is stored in a
fixed format into a TIME or TIMESTAMP or DATETIME column. This option
converts the ASCII data input to binary and specifies the format of the input
data. (The DATETIME format is used internally to interpret the input; it does not
affect the storage or output format of the data.) See the ASCII conversion format
for more information.
Note For compatibility with previous releases, you can specify that a column
contains DATETIME data. However, such data is stored internally as the
equivalent format, TIMESTAMP.
Here is the syntax:
DATETIME (’
input_date/time_format
’)
In this UNIX example, slashes are separators in the date portion of the input
data, and colons are separators in the time portion:
LOAD TABLE lineitem(
NEAREST_CENTURY
setting Year specified as Years assumed
Default (50) 00-49
50-99
2000-2049
1950-1999
0 any 1900s
100 any 2000s

CHAPTER 5 Moving Data In and Out of Databases
213
l_quantity ASCII(4),
l_shipdate DATETIME(’MM/DD/YY hh:mm:ss’),
FILLER(1))
FROM ’/d1/MILL1/tt.t’
BLOCK FACTOR 1000
PREVIEW ON
In this UNIX example, the FILLER(1) clause prevents Adaptive Server IQ
from inserting a NULL in the next column (VWAP) after the DATETIME
column:
LOAD TABLE snapquote_stats_base
SYMBOL ‘\x09’,
snaptime DATETIME('MM/DD/YY hh:mm:ss'),
FILLER(1))
VWAP ‘\x09’,
RS_DAY ‘\x09’,
FROM '/d1/MILL1/tt.t'
BLOCK FACTOR 1000
PREVIEW ON
In this UNIX example, the destination columns contain TIME data, but the input
data is DATETIME. You use the TIME conversion option, and use FILLER to skip
over the date portion.
LOAD TABLE customer(
open_time TIME('hh:mmaa'),
close_time TIME('hh:mmaa'),
FILLER(9))
FROM '/d1/MILL1/tt.t'
BLOCK FACTOR 1000
PREVIEW ON
Specifying the format for DATETIME conversions
Specify the format of the DATETIME input data using:
• Y or y for years
• M or m for months
• D or d for days
• H or h to indicate hours
• N or n to indicate minutes (mm is also accepted when colons are used as
separators
• S or s to indicate seconds and fraction of a second

Converting data on insertion
214
The length of the format string is the width of the input column. Table 5-7
describes the date formatting options. The following table describes the time
formatting options.
Table 5-9: Formatting times
The following table shows examples of how time input data may look and how
to specify the format for the DATETIME option. Following this table are the
general rules for specifying times.
Table 5-10: DATETIME format options
• Specification letters for time components must be in enclosed in
parentheses and single or double quotation marks.
Option Meaning
hh
HH
Represents hour. Hour is based on 24-hour clock. Always use
leading zeros for hour where appropriate, for example ’01’ for 1
am. ’00’ is also valid value for hour of 12 am.
nn Represents minute. Always use leading zeros for minute where
appropriate, for example ’08’ for 8 minutes.
ss[.ssssss] Represents seconds and fraction of a second.
aa Represents the a.m. or p.m designation.
pp Represents the p.m designation only if needed. (This is
incompatible with Adaptive Server IQ releases prior to 12.0;
previously, pp was synonymous with aa.)
hh Adaptive Server IQ assumes zero for minutes and seconds. For
example, if the DATETIME value you enter is ’03’, Adaptive
Server IQ converts it to ’03:00:00.0000’.
hh:nn or hh:mm Adaptive Server IQ assumes zero for seconds. For example, if the
time value you enter is ’03:25’, Adaptive Server IQ converts it to
’03:25:00.0000’.
Input Data Format Specification
12/31/98 14:01:50 DATETIME (’MM/DD/YY hh:nn:ss’)
123198140150 DATETIME (’MMDDYYhhnnss’)
14:01:50 12-31-98 DATETIME (’hh:mm:ss MM-DD-YY’)
12/31/98 14:01:12.456 DATETIME (’MM/DD/YY hh:nn:sssssss’)
12/31/98 14:01:.123456 DATETIME (’MM/DD/YY hh:mm:sssssss’)
12/31/98 02:01:50AM DATETIME (’MM/DD/YY hh:mm:ssaa’)
12/31/98 02:01:50pm DATETIME (’MM/DD/YY hh:mm:sspp’)

CHAPTER 5 Moving Data In and Out of Databases
215
• The input data can include up to nine positions for seconds, including a
floating decimal point, to allow for fractional seconds. On input and query,
the decimal point floats, so you can specify up to six decimal positions.
However, Adaptive Server IQ always stores only six decimal positions
with two positions for whole seconds (ss.ssssss). Any more decimal
positions are not permitted.
• Separators are used between the time elements. You can use any character
as a separator, including blanks. The example uses ':' (colons).
• Adaptive Server IQ stores only the numbers of hours, minutes, and
seconds; it does not store any other characters which might appear in the
input data. However, if the data contains other characters, for example
colons (:) or blanks to separate hours, minutes, and seconds, the time
portion of the format specification must show where those characters
appear so that Adaptive Server IQ knows to skip over them.
• To indicate whether a particular value is a.m. or p.m., the input data must
contain an upper- or lowercase 'a' or 'p' in a consistent place. To indicate
where Adaptive Server IQ should look for the a.m. or p.m. designation, put
a lowercase only 'aa' or 'pp' in the appropriate place in the format
specification. `aa' specifies a.m./p.m. is always indicated, while `pp'
specifies that pm is indicated only if needed.
• The format specification must have a character to match every character
in the input; you cannot have an 'm' in the format specification to match
the 'm' in the input, because 'm' is already used to indicate minutes.
• In the time section, when hours or minutes or seconds are not specified,
Adaptive Server IQ assumes 0 for each.
Working With NULLS
Use the NULL conversion option to convert specific values in the input data to
NULLS when inserting into Adaptive Server IQ column indexes. This option
can be used with any columns, but the column must allow NULLS. You can
specify this conversion option with any Adaptive Server IQ data type.
Here is the syntax.
NULLS ({BLANKS | ZEROS | literal’ [’literal’]...})
where:
•BLANKS indicates that blanks convert to NULLS.

Other factors affecting the display of data
216
•ZEROS indicates that binary zeros convert to NULLS.
•literal indicates that all occurrences of the specified literal convert to
NULLS. The specified literal must match exactly, including leading
and/or trailing blanks, with the value in the input file, for Adaptive Server
IQ to recognize it as a match. You can list up to 20 literal values.
You may need to use additional conversion options on the same column. For
example, to insert ASCII data into an INT column, which is stored in binary
format, and convert blanks in the input data to NULLS when inserted, use the
ASCII conversion option to convert the input to binary and the NULL conversion
option to convert blanks to NULLS.
Here is a Windows NT example:
LOAD TABLE lineitem(
l_orderkey NULLS(ZEROS) ASCII(4),
l_partkey ASCII(3),
l_shipdate date(’MM/DD/YY’),
l_suppkey ascii(5),
FILLER(1))
FROM ’C:\\MILL1\\tt.t’
PREVIEW ON
Other factors affecting the display of data
Whenever Adaptive Server IQ requires an explicit or implicit conversion from
one data type to another during a query or insert, it always truncates the results.
The following describes such situations:
• When you explicitly convert data from a higher scale to a lower scale,
Adaptive Server IQ truncates the values in the results. For example, if you
CAST a column value in a query to a scale 2 when it is stored with a scale
4, values such as 2.4561 become 2.45. See Chapter 8, “SQL Functions” in
the Adaptive Server IQ Reference Manual for more information.
• When Adaptive Server IQ implicitly converts from a higher scale to a
lower scale during an insertion, it truncates the values before inserting the
data into the table. For example, if you insert from one table with a data
type ofNUMERIC(7,3) to another table with a data type of DECIMAL(12,2),
values such as 2.456 will become 2.45.

CHAPTER 5 Moving Data In and Out of Databases
217
• When an arithmetic operation results in a higher scale than the
predetermined scale, Adaptive Server IQ truncates the results to fit the
scale after it has been determined using the rules defined in the Adaptive
Server IQ Reference Manual.
If your results require rounding of the values instead of truncation, you should
use the ROUND function in your command. However, for inserts, the ROUND
function can only be part of its query expression.
The maximum precision for numeric data is 126.
Matching Adaptive Server Enterprise data types
The tables below show which Adaptive Server IQ data types are compatible
with Adaptive Server Enterprise data types.
Here are some general rules:
• Adaptive Server IQ character string types accept any Adaptive Server
Enterprise character string type.
• Adaptive Server IQ exact numeric types accept any Adaptive Server
Enterprise number types. However, if the Adaptive Server IQ data type
holds a smaller amount of data than the Adaptive Server Enterprise type,
the value converts to a NULL (for example, when inserting data from the
underlying database into tables).
• Adaptive Server IQ date/time types accept any Adaptive Server Enterprise
date/time types.
Unsupported Adaptive Server Enterprise data types
These Adaptive Server Enterprise data types are not supported by Adaptive
Server IQ in this version:
•nchar
•nvarchar
•text
•varbinary
•image

Matching Adaptive Server Enterprise data types
218
Adaptive Server Enterprise data type equivalents
The table below indicates the Adaptive Server Enterprise exact numeric types
and the Adaptive Server IQ equivalents.
Table 5-11: Integer data types
The following table indicates the Adaptive Server Enterprise approximate data
types and the Adaptive Server IQ equivalents.
Table 5-12: Approximate numeric data types
Adaptive
Server
Enterprise
Datatype Adaptive Server IQ
Datatype Notes
int INT,BIGINT,UNSIGNED
INT, UNSIGNED BIGINT,
or NUMERIC
Adaptive Server IQ does not allow scaled integers, such as
INT(7,3). Data in the form INT(precision,scale) is converted to
NUMERIC(precision,scale). This differs from Adaptive Server
IQ versions prior to 12.0, and from Adaptive Server Enterprise,
in which int datatypes can be values between -2,147,483,648
and 2,147,483,647, inclusive.
To handle larger integer values, you can use a BIGINT, an
unsigned integer (UNSIGNED INT), or an UNSIGNED BIGINT
datatype. With UNSIGNED INT, the last bit is used as part of the
value. There is no positive or negative indication; all numbers
are assumed to be positive, so the value can go up to
4,294,967,295.
numeric DECIMAL or NUMERIC
with appropriate precision
If the precision of the Adaptive Server IQdatatype you define
is too small to store the Adaptive Server Enterprise value, the
value converts to NULL.
decimal DECIMAL or NUMERIC
with appropriate precision
See above.
smallint SMALLINT or NUMERIC Adaptive Server IQ SMALLINTdoes not allow precision and
scale. Adaptive Server Enterprise smallint(precision,scale) is
converted to NUMERIC(precision,scale)See INT above.
tinyint TINYINT Adaptive Server IQ TINYINT columns do not allow precision
and scale. Adaptive Server Enterprise tinyint(precision,scale) is
converted to NUMERIC(precision,scale). See INT above.
bit BIT
Adaptive Server
Enterprise Datatype Adaptive Server IQ
Datatype Notes
float (precision) FLOAT (precision) IQ supports greater precision for FLOAT
HNG indexes do not allow FLOAT, REAL, or DOUBLE data.

CHAPTER 5 Moving Data In and Out of Databases
219
The following table indicates the Adaptive Server Enterprise character data
types and the Adaptive Server IQ equivalents.
Table 5-13: Character data types
The following table indicates the Adaptive Server Enterprise money data types
and the Adaptive Server IQ equivalents.
Table 5-14: Money data types
The following table indicates the Adaptive Server Enterprise DATE/TIME data
types and the Adaptive Server IQ equivalents.
double precision DOUBLE
real REAL
Adaptive Server
Enterprise Datatype Adaptive Server IQ
Datatype Notes
Adaptive Server
Enterprise Datatype Adaptive Server
IQ Datatype Notes
char CHAR Adaptive Server IQ and Adaptive Server Enterprise character
(char or CHAR) datatypes are the same except that Adaptive Server
IQ can handle NULLs. If you want an Adaptive Server IQ CHAR
column to exactly match an Adaptive Server Enterprise char
column, specify Adaptive Server IQ column as NOT NULL.
Adaptive Server IQ default allows NULLs. Adaptive Server
Enterprise char columns that allow NULLs are internally
converted to varchar.
varchar VARCHAR See above.
nchar Not supported
nvarchar Not supported See nchar notes above.
text Not supported See nchar notes above.
Adaptive Server
Enterprise Datatype Adaptive Server IQ
Datatype Notes
money NUMERIC(19,4) money data is converted implicitly to NUMERIC(19,4).
smallmoney NUMERIC(10,4)

Matching Adaptive Server Enterprise data types
220
Table 5-15: DATE/TIME data types
Since the following Adaptive Server Enterprise data types are not supported,
you must omit columns with these data types:
•varbinary
•image
•nchar
This also applies to any custom Adaptive Server Enterprise data type.
Handling conversion errors on data import
When you are loading data from external sources, there may be errors in the
data. For example, there may be dates that are not valid dates and numbers that
are not valid numbers. The CONVERSION_ERROR database option allows you
to ignore conversion errors by converting them to NULL values.
Adaptive Server
Enterprise Datatype Adaptive Server
IQ Datatype Notes
datetime TIMESTAMP or
DATE or TIME
Adaptive Server Enterprise datetime columns maintain date and
time of day values in 4 bytes for number of days before or after
base date of virtual date 0/0/0000 and 8 bytes for time of day,
accurate to within one 1,000,000th of a second. Adaptive Server
IQ TIMESTAMP (or DATETIME) columns maintain date and time
of day values in two 4-byte integers: 4 bytes for number of days
since 1/1/0 and 4 bytes for time of day, based on 24-hour clock,
accurate to within one 10,000th of a second. Adaptive Server IQ
automatically handles the conversion.
Adaptive Server IQ also has a separate DATE datatype, a single 4-
byte integer. If you want to extract just a date from a SQL Server
or Adaptive Server Enterprise datetime column, you can do this
with Adaptive Server IQ DATE datatype. To do this, define an
Adaptive Server IQ DATE column with same name as the Adaptive
Server Enterprise datetime column. Adaptive Server IQ
automatically picks up appropriate portion of datetime value.
smalldatetime TIMESTAMPor
DATETIME or
DATE or TIME
Define Adaptive Server Enterprise smalldatetime columns as
TIMESTAMP (or DATETIME) datatype in Adaptive Server IQ.
Adaptive Server IQ properly handles the conversion. As with
regular datetime, if you want to extract just a date from an
Adaptive Server Enterprise smalldatetime column, do it with the
Adaptive Server IQ DATE datatype.

CHAPTER 5 Moving Data In and Out of Databases
221
For information on setting DBISQL database options, see “SET OPTION
statement” in the Adaptive Server IQ Reference Manual.
Tuning bulk loading of data
Loading large volumes of data into a database can take a long time and use a
lot of disk space. There are a few things you can do to save time.
Improving load performance during database definition
The way you define your database, tables, and indexes can have a dramatic
impact on load performance.
Optimizing for the number of distinct values
Adaptive Server IQ optimizes loading of data for a large or small set of distinct
values, based on parameters you specify when you create your database and
tables. Parameters that affect load optimization include:
•The
UNIQUE and IQ UNIQUE options, and the data type and width of the
column, all specified in the CREATE TABLE or ALTER TABLE command.
•The
IQ PAGE SIZE, specified in the CREATE DATABASE command.
For details of how these parameters affect loading, and information on how to
specify them, see “Creating tables” and “Choosing an IQ page size”.
Creating indexes
To make the best use of system resources, create all of the indexes you need
before loading data. While you can always add new indexes later, it is much
faster to load all indexes at once.

Tuning bulk loading of data
222
Adding dbspaces
If you run out of space while loading data, Adaptive Server IQ prompts you to
create another dbspace, and then continues the operation after you add the
dbspace. To avoid this delay, make sure that you have enough room for all of
the data you are loading before you start the load operation. Use the
sp_estspace or sp_iqestdbspaces stored procedure to help you estimate the
space you need for the database and its dbspaces.
To that ensure are you able to add a new dbspace if you do run out of space, see
the “RESERVED_TEMP_DBSPACE_MB” and
“RESERVED_MAIN_DBSPACE_MB” options in the Adaptive Server IQ
Administration and Performance Guide.
Setting server startup options
On some platforms you can set command-line options to adjust the amount of
memory available. Increasing memory can improve load performance. See
Chapter 2, “Running Adaptive Server IQ” for command-line options that
affect performance.
Adjusting your environment at load time
When you load data, you can adjust several factors to improve load
performance:
•Use the LOAD TABLE command whenever you have access to raw data in
ASCII or binary format. especially for all loads of over a hundred rows.
The LOAD TABLE command is the fastest insertion method.
• When loading from a flat file, use binary data if you have a choice of using
binary or character data. This can improve performance by eliminating
conversion costs and reducing I/O.
•Set
LOAD TABLE command options appropriately, as described in “Bulk
loading data using the LOAD TABLE statement”. In particular, if you
have sufficient memory to do so, or if no other users are active during the
load, increase the BLOCK FACTOR.
• Place data files on a separate physical disk drive from the database file, to
avoid excessive disk head movement during the load.

CHAPTER 5 Moving Data In and Out of Databases
223
• Increase the size of the database cache. Providing enough memory for the
load is a key performance factor. Use the SET OPTION command to adjust
MAIN_CACHE_MEMORY_MB and TEMP_CACHE_MEMORY_MB. For
these options to take effect, you must ensure that no users are using the
database where you set the option, and then disconnect from the database.
You can then reconnect and allow other users to connect.
• Adjust the amount of heap memory used by load operations by using the
SET OPTION command to change the LOAD_MEMORY_MB option. When
LOAD_MEMORY_MB is set to the default (0), Adaptive Server IQ uses the
amount of heap memory that gives the best performance. If your system
runs out of virtual memory, specify a value less than 500 and decrease the
value until the load works. For insertions into wide tables, you may need
to set LOAD_MEMORY_MB to a low value (100-200 MB). If you set the
value too low, it may be physically impossible to load the data.
• Ensure that only one user at a time updates the database. While users can
insert data into different tables at the same time, concurrent updates can
slow performance.
• Schedule major updates for low usage times. Although many users can
query a table while it is being updated, query users require CPU cycles,
disk space, and memory. You will want these resources available to make
your inserts go faster.
• If you are using the INSERT statement, run DBISQL or the client
application on the same machine as the server if possible. Loading data
over the network adds extra communication overhead. This might mean
loading new data during off hours.
Reducing Main IQ Store space use in incremental loads
An incremental load may modify a large number of pages within the table
being loaded. As a result, the pages are temporarily versioned within the main
dbspace, until the transaction commits and a checkpoint can release the old
versions. This versioning can be particularly prevalent if the incremental load
follows a delete from the same table. The reason for this is that, by default,
Adaptive Server IQ (by default) reuses row IDs from deleted records.
Setting this option to OFF reuses ROWIDs from deleted rows. To help reduce
space usage from versioned pages, set the APPEND_LOAD option ON so that
IQ appends new data to the end of the table. APPEND_LOAD is OFF by default.

Changing data using UPDATE
224
The Append_Load option applies to LOAD, INSERT...SELECT, and
INSERT...VALUES statements.
For more information on versioning see Chapter 8, “Transactions and
Versioning”.
Changing data using UPDATE
You can use the UPDATE statement, followed by the name of the table or view,
to change single rows, groups of rows, or all rows in a table. As in all data
modification statements, you can change the data in only one table or view at
a time.
The UPDATE statement specifies the row or rows you want changed and the
new data. The new data can be a constant or an expression that you specify or
data pulled from other tables.
If an UPDATE statement violates an integrity constraint, the update does not
take place and an error message appears. For example, if one of the values
being added is the wrong data type, or if it violates a constraint defined for one
of the columns or data types involved, the update does not take place.
UPDATE syntax See the Adaptive Server IQ Reference Manual for complete UPDATE syntax. A
simplified version of the syntax is:
UPDATE
table-name
SET
column_name
=
expression
WHERE
search-condition
If the company Newton Ent. (in the customer table of the sample database) is
taken over by Einstein, Inc., you can update the name of the company using a
statement such as the following:
UPDATE customer
SET company_name = ’Einstein, Inc.’
WHERE company_name = ’Newton Ent.’
You can use any condition in the WHERE clause. If you are not sure how the
company name was entered, you could try updating any company called
Newton, with a statement such as the following:
UPDATE customer
SET company_name = ’Einstein, Inc.’
WHERE company_name LIKE ’Newton%’

CHAPTER 5 Moving Data In and Out of Databases
225
The search condition need not refer to the column being updated. The company
ID for Newton Entertainments is 109. As the ID value is the primary key for
the table, you could be sure of updating the correct row using the following
statement:
UPDATE customer
SET company_name = ’Einstein, Inc.’
WHERE id = 109
The SET clause The SET clause specifies the columns to be updated, and their new values. The
WHERE clause determines the row or rows to be updated. If you do not have a
WHERE clause, the specified columns of all rows are updated with the values
given in the SET clause.
You can provide any expression of the correct data type in the SET clause.
The WHERE clause The WHERE clause specifies the rows to be updated. For example, the
following statement replaces the One Size Fits All Tee Shirt with an Extra
Large Tee Shirt
UPDATE product
SET size = ’Extra Large’
WHERE name = ’Tee Shirt’
AND size = ’One Size Fits All’
The FROM clause You can use a FROM clause to pull data from one or more tables into the table
you are updating.
Deleting data
To remove data from a database, you can do any of the following:
•Use the DELETE statement to remove from a table all rows that meet the
criteria you specify.
•Use the DROP TABLE statement to remove an entire table, including all
data rows.
•Use the TRUNCATE TABLE statement to delete all rows from a table,
without deleting the table definition.
For syntax of these statements, see the Adaptive Server IQ Reference Manual.
TRUNCATE TABLE is faster than a DELETE statement with no conditions.

Importing data by replication
226
Space for deletions When you use the DELETE statement, you may need to add space to your
database, due to the way Adaptive Server IQ stores versions of data pages. For
details, see “Overlapping versions and deletions”.
When you use DROP TABLE or TRUNCATE TABLE, you do not need to add
space, as no extra version pages are needed.
Importing data by replication
If you need to update your IQ data frequently from an Adaptive Server
Enterprise database, you may want to consider setting up a replication
environment. In this environment, you can use the Sybase Distribution
Director to automate the process of replicating data from an Adaptive Server
Enterprise database into an Adaptive Server IQ database.
Distribution Director establishes a two-phase process in which transactions
that occur on the source database—the Adaptive Server Enterprise database—
are repeated on the Adaptive Server IQ database. To make this process work,
you need:
• An operating Replication Server system, which includes a special database
called the Replication Server System Database (RSSD). This database
contains replication definitions that describe the transactions in the source
database, and how they should be replicated to the replicate databases.
• A specially prepared replicate database on an Adaptive Server Enterprise
database. This replicate database serves as a staging area for the migration
into your IQ database.
• Your IQ database set up with the appropriate tables for the data to be
replicated.
Here is a summary of how it works:
1 In Phase 1, the Replication Server replicates transactions from the source
database to the RSSD on a continuous basis.
2 In Phase 2, the Adaptive Server IQ staging migration is executed, to
transfer the replicated transactions from the RSSD into the IQ database.
This two-phase approach overcomes differences between the way Adaptive
Server Enterprise and Adaptive Server IQ store and update data. It also allows
you to schedule insertions into your database for lower usage periods, and
avoids conflicts with other insertions or loads to the same tables.

CHAPTER 5 Moving Data In and Out of Databases
227
For information on using Distribution Director and on setting up an appropriate
Replication Server environment, see the Distribution Director User’s Guide.

Importing data by replication
228
229
CHAPTER 6 Using Procedures and Batches
About this chapter This chapter explains how you create procedures and batches for use with
Adaptive Server IQ.
Procedures store procedural SQL statements in the database for use by all
applications. They enhance the security, efficiency, and standardization of
databases. User-defined functions are one kind of procedure that return a
value to the calling environment for use in queries and other SQL
statements. Batches are sets of SQL statements submitted to the database
server as a group. Many features available in procedures, such as control
statements, are also available in batches.
For many purposes, server-side JDBC provides a more flexible way to
build logic into the database than SQL stored procedures. For information
on JDBC, see Data Access Using JDBC in the Adaptive Server Anywhere
User’s Guide.
Overview of procedures
Procedures store procedural SQL statements in a database for use by all
applications.
Procedures can include control statements that allow repetition (LOOP
statement) and conditional execution (IF statement and CASE statement)
of SQL statements.
Procedures are invoked with a CALL statement, and use parameters to
accept values and return values to the calling environment. Procedures can
also return result sets to the caller. Procedures can call other procedures.
User-defined functions are one kind of stored procedure that returns a
single value to the calling environment. User-defined functions do not
modify parameters passed to them. They broaden the scope of functions
available to queries and other SQL statements.

Benefits of procedures
230
Benefits of procedures
Procedures are defined in the database, separate from any one database
application. This separation provides a number of advantages.
Standardization Procedures allow standardization of any actions that are performed by more
than one application program. The action is coded once and stored in the
database. The applications need only call the procedure to achieve the desired
result. If the implementation of the action evolves over time, any changes are
made in only one place, and all applications that use the action automatically
acquire the new functionality.
Efficiency When used in a database implemented on a network server, procedures are
executed on the database server machine. They can access the data in the
database without requiring network communication. This means that they
execute faster and with less impact on network performance than if they had
been implemented in an application on one of the client machines.
When a procedure is created, it is checked for correct syntax and then stored in
the system tables. The first time it is required by any application, it is retrieved
from the system tables and compiled into the virtual memory of the server, and
executed from there. Subsequent executions of the same procedure will result
in immediate execution, since the compiled copy is retained. A procedure can
be used concurrently by several applications and recursively by one
application. Only one copy is compiled and kept in virtual memory.
Security Procedures, including user-defined functions, execute with the permissions of
the procedure owner but can be called by any user that has been granted
permission to do so.
This means that a procedure can (and usually does) have different permissions
than the user ID that invoked it. Procedures provide security by allowing users
limited access to data in tables that they cannot directly examine or modify.
Introduction to procedures
In order to use procedures, you need to understand how to do the following:
• Call procedures from a database application
• Create procedures
• Drop, or remove, procedures

CHAPTER 6 Using Procedures and Batches
231
• Control who has permission to use procedures
This section discusses each of these aspects of using procedures, and also
describes some of the different uses of procedures.
Creating procedures
Procedures are created using the CREATE PROCEDURE statement. You must
have RESOURCE authority in order to create a procedure.
Where you enter the statement depends on the tool you are using:
• You can create the example procedure new_dept by connecting to the
sample database from DBISQL as user ID DBA, using password SQL, and
typing the statement in the command window.
• You can create the example procedure by connecting to the sample
database from Sybase Central, opening the Procedures folder, and clicking
Add Procedure/Function Wizard. The Wizard walks you through the
process. Alternatively, click Add Procedure/Function Template, which
places you immediately in the last window of the Wizard, the Procedure
window, in which you enter the code for the procedure.
• If you are using a tool other than DBISQL or Sybase Central, follow the
instructions for your tool. You may need to change the command delimiter
away from the semicolon before entering the CREATE PROCEDURE
statement.
The following simple example creates a procedure that carries out an INSERT
into the department table of the sample database, creating a new department.
CREATE PROCEDURE new_dept ( IN id INT,
IN name CHAR(35),
IN head_id INT )
BEGIN
INSERT
INTO DBA.department ( dept_id,
dept_name,
dept_head_id )
VALUES ( id, name, head_id );
END
For a complete description of the CREATE PROCEDURE syntax, see Adaptive
Server IQ Reference Manual.

Introduction to procedures
232
The body of a procedure is a compound statement. The compound statement
starts with a BEGIN statement and concludes with an END statement. In the case
of new_dept, the compound statement is a single INSERT bracketed by BEGIN
and END statements.
For more information, see “Using compound statements” on page 240
Parameters to procedures are marked as one of IN, OUT, or INOUT. All
parameters to the new_dept procedure are IN parameters, as they are not
changed by the procedure.
Calling procedures
A procedure is invoked with a CALL statement. Procedures can be called by
an application program, or they can be called by other procedures.
For more information, see Adaptive Server IQ Reference Manual.
The following statement calls the new_dept procedure to insert an Eastern
Sales department:
CALL new_dept( 210, ’Eastern Sales’, 902 );
After this call, you may wish to check the department table to see that the new
department has been added.
The new_dept procedure can be called by all users who have been granted
EXECUTE permission for the procedure, even if they have no permissions on
the department table.
Dropping procedures
Once a procedure is created, it remains in the database until it is explicitly
removed. Only the owner of the procedure or a user with DBA authority can
drop the procedure from the database.
The following statement removes the procedure new_dept from the database:
DROP PROCEDURE new_dept

CHAPTER 6 Using Procedures and Batches
233
Permissions to execute procedures
A procedure is owned by the user who created it, and that user can execute it
without permission. Permission to execute it can be granted to other users using
the GRANT EXECUTE command.
For example, the owner of the procedure new_dept could allow another_user to
execute new_dept with the statement:
GRANT EXECUTE ON new_dept TO another_user
The following statement revokes permission to execute the procedure:
REVOKE EXECUTE ON new_dept FROM another_user
For more information on managing user permissions on procedures, see
“Granting permissions on procedures” on page 361.
Returning procedure results in parameters
Procedures can return results to the calling environment in one of the following
ways:
• Individual values are returned as OUT or INOUT parameters.
• Result sets can be returned.
• A single result can be returned using a RETURN statement.
This section describes how to return results from procedures as parameters.
The following procedure on the sample database returns the average salary of
employees as an OUT parameter.
CREATE PROCEDURE AverageSalary( OUT avgsal
NUMERIC (20,3) )
BEGIN
SELECT AVG( salary )
INTO avgsal
FROM employee;
END
To run this procedure and display its output from DBISQL, carry out the
following steps:
1 Connect to the sample database from DBISQL as user ID DBA using
password SQL.
2 Create the procedure.

Introduction to procedures
234
3 Create a variable to hold the procedure output. In this case, the output
variable is numeric, with three decimal places, so create a variable as
follows:
CREATE VARIABLE Average NUMERIC(20,3)
4 Call the procedure, using the created variable to hold the result:
CALL AverageSalary(Average)
The DBISQL statistics window displays the message "Procedure completed"
if the procedure was created and run properly.
Look at the value of the output variable Average. The DBISQL Data window
displays the value 49988.623 for this variable, the average employee salary.
Returning procedure results in result sets
In addition to returning results to the calling environment in individual
parameters, procedures can return information in result sets. A result set is
typically the result of a query. The following procedure returns a result set
containing the salary for each employee in a given department:
CREATE PROCEDURE SalaryList (IN department_id INT)
RESULT ( "Employee ID" INT, "Salary" NUMERIC(20,3) )
BEGIN
SELECT emp_id, salary
FROM employee
WHERE employee.dept_id = department_id;
END
If this procedure is called from DBISQL, the names in the RESULT clause are
matched to the results of the query and used as column headings in the
displayed results.
To test this procedure from DBISQL, you can CALL it, specifying one of the
departments of the company. The results are displayed in the DBISQL Data
window. For example, to list the salaries of employees in the R & D department
(department ID 100), type the following:
CALL SalaryList (100)
Employee ID Salary
102 45700.000
105 62000.000
160 57490.000

CHAPTER 6 Using Procedures and Batches
235
To execute a CALL of a procedure that returns a result set, DBISQL opens a
cursor.
The cursor is left open after the CALL in case a second result set is returned.
The DBISQL statistics window displays the plan of the SELECT query in the
procedure and then displays the line:
Procedure is executing. Use RESUME to continue.
You need to execute the RESUME statement or the DBISQL CLEAR command
from the DBISQL Command window before you can alter or drop the
procedure.
For more information about using cursors in procedures, see “Using cursors
in procedures” on page 251
Introduction to user-defined functions
User-defined functions are a class of procedures that return a single value to the
calling environment. This section introduces creating, using, and dropping
user-defined functions.
Creating user-defined functions
User-defined functions are created using the CREATE FUNCTION statement.
You must have RESOURCE authority in order to create a user-defined
function.
The following simple example creates a function that concatenates two strings,
together with a space, to form a full name from a first name and a last name.
You can create the example function fullname by connecting to the sample
database from DBISQL as user ID DBA, using password SQL, and typing the
statement in the command window.
243 72995.000
247 48023.690
Employee ID Salary

Introduction to user-defined functions
236
If you are using a tool other than DBISQL or Sybase Central, you may need to
change the command delimiter away from the semicolon before entering the
CREATE FUNCTION statement.
CREATE FUNCTION fullname (firstname CHAR(30),
lastname CHAR(30))
RETURNS CHAR(61)
BEGIN
DECLARE name CHAR(61);
SET name = firstname || ’ ’ || lastname;
RETURN ( name );
END
For a complete description of the CREATE FUNCTION syntax, see Adaptive
Server IQ Reference Manual.
The CREATE FUNCTION syntax differs slightly from that of the CREATE
PROCEDURE statement. The following are distinctive differences:
•No
IN, OUT, or INOUT keywords are required, as all parameters are IN
parameters.
•The
RETURNS clause is required to specify the data type being returned.
•The
RETURN statement is required to specify the value being returned.
Calling user-defined functions
A user-defined function can be used, subject to permissions, in any place that
a built-in non-aggregate function is used.
The following statement in DBISQL returns a full name from two columns
containing a first and last name:
SELECT fullname (emp_fname, emp_lname)
FROM employee;
The following statement in DBISQL returns a full name from a supplied first
and last name:
fullname (emp_fname, emp_lname)
Fran Whitney
Matthew Cobb
Philip Chin
...

CHAPTER 6 Using Procedures and Batches
237
SELECT fullname (’Jane’, ’Smith’);
The fullname function can be used by any user who has been granted
EXECUTE permission for the function.
Dropping user-defined functions
Once a user-defined function is created, it remains in the database until it is
explicitly removed. Only the owner of the function or a user with DBA
authority can drop a function from the database.
The following statement removes the function fullname from the database:
DROP FUNCTION fullname
Permissions to execute user-defined functions
A user-defined function is owned by the user who created it, and that user can
execute it without permission. Permission to execute it can be granted to other
users using the GRANT EXECUTE command.
For example, the creator of the function fullname could allow another_user to
use fullname with the statement:
GRANT EXECUTE ON fullname TO another_user
The following statement revokes permission to use the function:
REVOKE EXECUTE ON fullname FROM another_user
For more information on managing user permissions on functions, see
“Granting permissions on procedures” on page 361
fullname (’Jane’,’Smith’)
Jane Smith

Introduction to batches
238
Introduction to batches
A simple batch consists of a set of SQL statements, separated by semicolons.
For example, the following set of statements form a batch that adds a new sales
representative to the Eastern Sales department, and adds two sales orders for
that sales rep.
INSERT INTO
employee (emp_id, emp_fname, emp_lname, dept_id,
start_date)
VALUES (2054, Edward, Baer, 220, 1998-08-15);
INSERT INTO
sales_order (id, cust_id, order_date, fin_code_id,
region, sales_rep)
VALUES (41880, 717, 1998-08-24, BU, PA, 2054) ;
INSERT INTO
sales_order (id, cust_id, order_date, fin_code_id,
region, sales_rep)
VALUES (418898, 021, 1998-08-25, BU, PA, 2054) ;
COMMIT ;
INSERT
INTO department ( dept_id, dept_name )
VALUES ( 220, ’Eastern Sales’ )
go
UPDATE employee
SET dept_id = 220
WHERE dept_id = 200
AND state = ’MA’
go
COMMIT
go
You can include this set of statements in an application and execute them
together.

CHAPTER 6 Using Procedures and Batches
239
DBISQL and batches
A list of semicolon-separated statements, such as the above, is parsed by
DBISQL before it is sent to the server. In this case, DBISQL sends each
statement individually to the server, not as a batch. Unless you have such
parsing code in your application, the statements would be sent and treated as a
batch. Putting a BEGIN and END around a set of statements causes DBISQL to
treat them as a batch.
Many statements used in procedures can also be used in batches. You can use
control statements (CASE, IF, LOOP, and so on), including compound
statements (BEGIN and END), in batches. Compound statements can include
declarations of variables, exceptions, temporary tables, or cursors inside the
compound statement.
The following batch creates a table only if a table of that name does not already
exist:
BEGIN
IF NOT EXISTS (
SELECT * FROM SYSTABLE
WHERE table_name = ’t1’ ) THEN
CREATE TABLE t1 (
firstcol INT PRIMARY KEY,
secondcol CHAR( 30 )
) ;
ELSE
MESSAGE ’Table t1 already exists’ ;
END IF
END
If you run this batch twice from DBISQL, it creates the table the first time you
run it. The next time you run it, it prints the message in the server log file on
Unix or on the server message window on Windows NT.
Control statements
There are a number of control statements for logical flow and decision making
in the body of the procedure or in a batch. The following is a list of control
statements available.

Control statements
240
For complete descriptions of each, see the entries in “SQL Statements” in
Adaptive Server IQ Reference Manual.
Using compound statements
A compound statement starts with the keyword BEGIN and ends with the
keyword END. The body of a procedure is a compound statement. Compound
statements can also be used in batches. Compound statements can be nested,
and combined with other control statements to define execution flow in
procedures or in batches.
A compound statement allows a set of SQL statements to be grouped together
and treated as a unit. SQL statements within a compound statement should be
separated with semicolons.
Control statement Syntax
Compound statements BEGIN [ ATOMIC ]
statement-list
END
Conditional execution: IF IF condition THEN
statement-list
ELSEIF condition THEN
statement-list
ELSE
statement-list
END IF
Conditional execution: CASE CASE expression
WHEN value THEN
statement-list
WHEN value THEN
statement-list
ELSE
statement-list
END CASE
Repetition: WHILE, LOOP WHILE condition LOOP
statement-list
END LOOP
Repetition: FOR cursor loop FOR
statement-list
END FOR
Break: LEAVE LEAVE label
CALL CALL procname( arg, ... )

CHAPTER 6 Using Procedures and Batches
241
A command delimiter is required after every statement in a statement list
except for the last, where it is optional.
Declarations in compound statements
Local declarations in a compound statement immediately follow the BEGIN
keyword. These local declarations exist only within the compound statement.
The following may be declared within a compound statement:
• Variables
•Cursors
• Temporary tables
• Exceptions (error identifiers)
Local declarations can be referenced by any statement in that compound
statement, or in any compound statement nested within it. Local declarations
are not visible to other procedures called from the compound statement.
The following user-defined function illustrates local declarations of variables.
The customer table includes some Canadian customers sprinkled among those
from the USA, but there is no country column. The user-defined function
nationality uses the fact that the US zip code is numeric while the Canadian
postal code begins with a letter to distinguish Canadian and US customers.
CREATE FUNCTION nationality( cust_id INT )
RETURNS CHAR( 20 )
BEGIN
DECLARE natl CHAR(20);
IF cust_id IN ( SELECT id FROM customer
WHERE LEFT(zip,1) > ’9’) THEN
SET natl = ’CDN’;
ELSE
SET natl = ’USA’;
END IF;
RETURN ( natl );
END
This example declares a variable natl to hold the nationality string, uses a SET
statement to set a value for the variable, and returns the value of the natl string
to the calling environment.
The following query lists all Canadian customers in the customer table:
SELECT *

Control statements
242
FROM customer
WHERE nationality(id) = ’CDN’
Declarations of cursors and exceptions are discussed in later sections.
Atomic compound statements
An atomic statement is a statement that is executed completely or not at all.
For example, a LOAD statement that inserts thousands of rows might encounter
an error after many rows. If the statement does not complete, and the default
ON FILE ERROR ROLLBACK option is in effect, all changes are undone. This
LOAD statement is atomic.
All noncompound SQL statements are atomic. A compound statement can be
made atomic by adding the keyword ATOMIC after the BEGIN keyword.
BEGIN ATOMIC
INSERT INTO
sales_order (id, order_date, sales_rep)
VALUES (41880, 1998-08-24, 2054) ;
INSERT INTO
sales_order_items (line_id, prod_id, quantity,
ship_date)
VALUES (01, 43629, 15, ’bad_data’) ;
END;
In this example, the two INSERT statements are part of an atomic compound
statement. They must either succeed or fail as one. The first INSERT statement
would succeed. The second one causes a data conversion error since the value
being assigned to the ship_date column cannot be converted to a date.
The atomic compound statement fails and the effect of both INSERT statements
is undone. Even if the currently executing transaction is eventually committed,
neither statement in the atomic compound statement takes effect.
COMMIT and ROLLBACK and some ROLLBACK TO SAVEPOINT statements are
not permitted within an atomic compound statement. See “Transactions and
savepoints in procedures” on page 265.
There is a case where some, but not all, of the statements within an atomic
compound statement are executed. This is when an error occurs, and is handled
by an exception handler within the compound statement.
For more information, see “Using exception handlers in procedures” on page
261.

CHAPTER 6 Using Procedures and Batches
243
The structure of procedures
The body of a procedure consists of a compound statement as discussed in
“Using compound statements” on page 240. A compound statement consists
of a BEGIN and an END, enclosing a set of SQL statements. The statements
must be separated by semicolons.
The SQL statements that can occur in procedures are described in “SQL
statements allowed in procedures” on page 243.
Procedures can contain control statements, which are described in “Control
statements” on page 239.
SQL statements allowed in procedures
Almost all SQL statements are allowed within procedures, including the
following:
• SELECT, UPDATE, DELETE, INSERT and SET VARIABLE.
• The CALL statement to execute other procedures.
• Control statements (see “SQL statements allowed in procedures” on page
243).
• Cursor statements (see “Using cursors in procedures” on page 251).
• Exception handling statements (see “Using exception handlers in
procedures” on page 261).
• The EXECUTE IMMEDIATE statement.
Some SQL statements are not allowed within procedures. These include the
following:
• CONNECT statement
• DISCONNECT statement.
COMMIT, ROLLBACK and SAVEPOINT statements are allowed within
procedures with certain restrictions (see “Transactions and savepoints in
procedures”).
For details, see the Usage for each SQL statement in the chapter “SQL
Statements” in Adaptive Server IQ Reference Manual.

The structure of procedures
244
Declaring parameters for procedures
Procedure parameters, or arguments, are specified as a list in the CREATE
PROCEDURE statement. Parameter names must conform to the rules for other
database identifiers such as column names. They must be a valid data types
(see “SQL Data Types” in Adaptive Server IQ Reference Manual), and must be
prefixed with one of the keywords IN, OUT or INOUT. These keywords have
the following meanings:
•IN The argument is an expression that provides a value to the
procedure.
•OUT The argument is a variable that could be given a value by the
procedure.
•INOUT The argument is a variable that provides a value to the
procedure, and could be given a new value by the procedure.
Default values can be assigned to procedure parameters in the CREATE
PROCEDURE statement. The default value must be a constant, which may be
NULL. For example, the following procedure uses the NULL default for an IN
parameter to avoid executing a query that would have no meaning:
CREATE PROCEDURE
CustomerProducts( IN customer_id
INTEGER DEFAULT NULL )
RESULT ( product_id INTEGER,
quantity_ordered INTEGER )
BEGIN
IF customer_id IS NULL THEN
RETURN;
ELSE
SELECT product.id,
sum( sales_order_items.quantity )
FROMproduct,
sales_order_items,
sales_order
WHERE sales_order.cust_id = customer_id
AND sales_order.id = sales_order_items.id
AND sales_order_items.prod_id=product.id
GROUP BY product.id;
END IF;
END
The following statement causes the DEFAULT NULL to be assigned, and the
procedure returns instead of executing the query.
CALL CustomerProducts();

CHAPTER 6 Using Procedures and Batches
245
Passing parameters to procedures
You can take advantage of default values of stored procedure parameters with
either of two forms of the CALL statement.
If the optional parameters are at the end of the argument list in the CREATE
PROCEDURE statement, they may be omitted from the CALL statement. As
an example, consider a procedure with three INOUT parameters:
CREATE PROCEDURE SampleProc( INOUT var1 INT
DEFAULT 1,
INOUT var2 int DEFAULT 2,
INOUT var3 int DEFAULT 3 )
...
We assume that the calling environment has set up three variables to hold the
values passed to the procedure:
CREATE VARIABLE V1 INT;
CREATE VARIABLE V2 INT;
CREATE VARIABLE V3 INT;
The procedure SampleProc may be called supplying only the first parameter as
follows:
CALL SampleProc( V1 )
in which case the default values are used for var2 and var3.
A more flexible method of calling procedures with optional arguments is to
pass the parameters by name. The SampleProc procedure may be called as
follows:
CALL SampleProc( var1 = V1, var3 = V3 )
or as follows:
CALL SampleProc( var3 = V3, var1 = V1 )
Passing parameters to functions
User-defined functions are not invoked with the CALL statement, but are used
in the same manner that built-in functions are. For example, the following
statement uses the fullname function defined in “Creating user-defined
functions” to retrieve the names of all employees:
SELECT fullname(emp_fname, emp_lname) AS Name
FROM employee

Returning results from procedures
246
Notes • Default parameters can be used in calling functions. However, parameters
cannot be passed to functions by name.
• Parameters are passed by value, not by reference. Even if the function
changes the value of the parameter, this change is not returned to the
calling environment.
• Output parameters cannot be used in user-defined functions.
• User-defined functions cannot return result sets.
Returning results from procedures
Procedures can return results that are a single row of data, or multiple rows. In
the former case, results can be passed back as arguments to the procedure. In
the latter case, results are passed back as result sets. Procedures can also return
a single value given in the RETURN statement.
For simple examples of how to return results from procedures, see
“Introduction to procedures”. For more detailed information, see the following
sections.
Returning a value using the RETURN statement
A single value can be returned to the calling environment using the RETURN
statement, which causes an immediate exit from the procedure. The RETURN
statement takes the form:
RETURN expression
The value of the supplied expression is returned to the calling environment. To
save the return value in a variable, an extension of the CALL statement is used:
Name
Fran Whitney
Matthew Cobb
Philip Chin
Julie Jordan
Robert Breault
...

CHAPTER 6 Using Procedures and Batches
247
CREATE VARIABLE returnval INTEGER ;
returnval = CALL myproc() ;
Returning results as procedure parameters
Procedures can return results to the calling environment in the parameters to
the procedure.
Within a procedure, parameters and variables can be assigned values in one of
the following ways:
• The parameter can be assigned a value using the SET statement.
• The parameter can be assigned a value using a SELECT statement with an
INTO clause.
Using the SET
statement The following somewhat artificial procedure returns a value in an OUT
parameter that is assigned using a SET statement:
CREATE PROCEDURE greater (IN a INT,
IN b INT,
OUT c INT)
BEGIN
IF a > b THEN
SET c = a;
ELSE
SET c = b;
END IF ;
END
Note The preceding example is artificial: generally a function is easier to use
than a procedure when only one result is required.
Using single-row
SELECT statements Single-row queries retrieve at most one row from the database. This type of
query is achieved by a SELECT statement with an INTO clause. The INTO
clause follows the select list and precedes the FROM clause. It contains a list of
variables to receive the value for each select list item. There must be the same
number of variables as there are select list items.

Returning results from procedures
248
When a SELECT statement is executed, the server retrieves the results of the
SELECT statement and places the results in the variables. If the query results
contain more than one row, the server returns an error. For queries returning
more than one row, cursors must be used. For information about returning
more than one row from a procedure, see “Returning result sets from
procedures”.
If the query results in no rows being selected, a
row not found
warning is returned.
The following procedure returns the results of a single-row SELECT statement
in the procedure parameters.
To return the number of orders placed by a given customer, type the following:
CREATE PROCEDURE OrderCount (IN customer_ID INT,
OUT Orders INT)
BEGIN
SELECT COUNT(DBA.sales_order.id)
INTO Orders
FROM DBA.customer
KEY LEFT OUTER JOIN DBA.sales_order
WHERE DBA.customer.id = customer_ID;
END
You can test this procedure in DBISQL using the following statements, which
show the number of orders placed by the customer with ID 102:
CREATE VARIABLE orders INT;
CALL OrderCount ( 102, orders );
SELECT orders;
Notes •The customer_ID parameter is declared as an IN parameter. This
parameter holds the customer ID that is passed in to the procedure.
•The Orders parameter is declared as an OUT parameter. It holds the value
of the orders variable that is returned to the calling environment.
• No DECLARE statement is required for the Orders variable, as it is
declared in the procedure argument list.
• The SELECT statement returns a single row and places it into the variable
Orders.

CHAPTER 6 Using Procedures and Batches
249
Returning result sets from procedures
If a procedure returns more than one row of results to the calling environment,
it does so using result sets.
The following procedure returns a list of customers who have placed orders,
together with the total value of the orders placed. The procedure does not list
customers who have not placed orders.
CREATE PROCEDURE ListCustomerValue ()
RESULT ("Company" CHAR(36), "Value" NUMERIC(14,2))
BEGIN
SELECT company_name,
CAST( sum(sales_order_items.quantity *
product.unit_price)
AS NUMERIC(14,2)) AS value
FROM customer
INNER JOIN sales_order
INNER JOIN sales_order_items
INNER JOIN product
GROUP BY company_name
ORDER BY value DESC;
END
• Type the following:
CALL ListCustomerValue ()
Notes • The number of variables in the RESULT list must match the number of the
SELECT list items. Automatic data type conversion is carried out where
possible if data types do not match.
• The RESULT clause is part of the CREATE PROCEDURE statement, and
is not followed by a command delimiter.
• The names of the SELECT list items do not need to match those of the
RESULT list.
Company Value
Chadwicks 8076
Overland Army Navy 8064
Martins Landing 6888
Sterling & Co. 6804
Carmel Industries 6780
... ...

Returning results from procedures
250
• When testing this procedure, DBISQL opens a cursor to handle the results.
The cursor is left open following the SELECT statement, in case the
procedure returns more than one result set. You should type RESUME to
complete the procedure and close the cursor.
Returning multiple result sets from procedures
A procedure can return more than one result set to the calling environment. If
a RESULT clause is employed, the result sets must be compatible: they must
have the same number of items in the SELECT lists, and the data types must
all be of types that can be automatically converted to the data types listed in the
RESULT list.
The following procedure lists the names of all employees, customers, and
contacts listed in the database:
CREATE PROCEDURE ListPeople()
RESULT ( lname CHAR(36), fname CHAR(36) )
BEGIN
SELECT emp_lname, emp_fname
FROM employee;
SELECT lname, fname
FROM customer;
SELECT last_name, first_name
FROM contact;
END
Notes To test this procedure in DBISQL, enter the following statement:
CALL ListPeople ()
You must enter a RESUME statement after each of the three result sets is
displayed in the DBISQL Data window to continue, and then complete, the
procedure.
Returning variable result sets from procedures
The RESULT clause is optional in procedures. Omitting the result clause
allows you to write procedures that return different result sets, with different
numbers or types of columns, depending on how they are executed.

CHAPTER 6 Using Procedures and Batches
251
If you are not using this feature of variable result sets, it is recommended that
you employ a RESULT clause, for performance reasons and to allow front-end
tools to discern the columns and data types the procedure will produce without
executing it.
For example, the following procedure returns two columns if the input variable
is Y, but only one column otherwise:
CREATE PROCEDURE names( IN formal char(1))
BEGIN
IF formal = ’y’ THEN
SELECT emp_lname, emp_fname
FROM employee
ELSE
SELECT emp_fname
FROM employee
END IF
END
The use of variable result sets in procedures is subject to some limitations,
depending on the interface used by the client application.
• Embedded SQL You must DESCRIBE the procedure call after the
cursor for the result set is opened, but before any rows are returned, in
order to get the proper shape of result set.
For information about the DESCRIBE statement, see “DESCRIBE statement”
in Adaptive Server IQ Reference Manual.
•ODBC Variable result set procedures can be used by ODBC
applications. The proper description of the variable result sets is carried
out by the Adaptive Server IQ ODBC driver.
• Open Client applications Variable result set procedures can be used
by Open Client applications. The proper description of the variable result
sets is carried out by Adaptive Server IQ.
• DBISQL DBISQL does not support variable result set procedures, and
so cannot be used for testing this feature.
Using cursors in procedures
Cursors are used to retrieve rows one at a time from a query or stored procedure
that has multiple rows in its result set. A cursor is a handle or an identifier for
the query or procedure, and for a current position within the result set.

Using cursors in procedures
252
Cursor management overview
Managing a cursor is similar to managing a file in a programming language.
The following steps are used to manage cursors:
1 Declare a cursor for a particular SELECT statement or procedure using the
DECLARE statement.
2 Open the cursor using the OPEN statement.
3 Use the FETCH statement to retrieve results one row at a time from the
cursor.
4 Records are usually fetched until the warning >Row Not Found> is
returned, signaling the end of the result set.
5 Close the cursor using the CLOSE statement.
By default, cursors are automatically closed at the end of a transaction (on
explicit or implied COMMIT or ROLLBACK statements). Cursors that are
opened using the WITH HOLD clause will be kept open for subsequent
transactions until they are explicitly closed.
Cursor positioning
A cursor can be positioned at one of three places:
•On a row
• Before the first row
• After the last row
When a cursor is opened, it is positioned before the first row. The cursor
position can be moved using the FETCH command (see “FETCH statement”
in Adaptive Server IQ Reference Manual). It can be positioned to an absolute
position from the start or the end of the query results (using FETCH
ABSOLUTE, FETCH FIRST, or FETCH LAST). It can also be moved relative
to the current cursor position (using FETCH RELATIVE, FETCH PRIOR, or
FETCH NEXT). The NEXT keyword is the default qualifier for the FETCH
statement.
Note Adaptive Server IQ treats the FIRST, LAST, and ABSOLUTE options
as starting from the beginning of the result set. It treats RELATIVE with a
negative row count as starting from the current position.

CHAPTER 6 Using Procedures and Batches
253
Using cursors on SELECT statements in procedures
The following procedure uses a cursor on a SELECT statement. It illustrates
several features of the stored procedure language. It is based on the same query
used in the ListCustomerValue procedure described in “Returning result sets
from procedures”.
CREATE PROCEDURE TopCustomerValue
( OUT TopCompany CHAR(36),
OUT TopValue INT )
BEGIN
-- 1. Declare the "error not found" exception
DECLARE err_notfound
EXCEPTION FOR SQLSTATE ’02000’;
-- 2.Declare variables to hold
-- each company name and its value
DECLARE ThisName CHAR(36);
DECLARE ThisValue INT;
-- 3.Declare the cursor ThisCompany
-- for the query
DECLARE ThisCompany CURSOR FOR
SELECT company_name,
CAST( sum( sales_order_items.quantity *
product.unit_price ) AS INTEGER )
AS value
FROM customer
INNER JOIN sales_order
INNER JOIN sales_order_items
INNER JOIN product
GROUP BY company_name;
-- 4. Initialize the values of TopValue
SET TopValue = 0;
-- 5. Open the cursor
OPEN ThisCompany;
-- 6. Loop over the rows of the query
CompanyLoop:
LOOP
FETCH NEXT ThisCompany
INTO ThisName, ThisValue;
IF SQLSTATE = err_notfound THEN
LEAVE CompanyLoop;
END IF;
IF ThisValue > TopValue THEN
SET TopCompany = ThisName;
SET TopValue = ThisValue;
END IF;
END LOOP CompanyLoop;

Using cursors in procedures
254
-- 7. Close the cursor
CLOSE ThisCompany;
END
Notes The TopCustomerValue procedure has the following notable features:
• The "error not found" exception is declared. This exception is used later in
the procedure to signal when a loop over the results of a query has
completed.
For more information about exceptions, see “Errors and warnings in
procedures”.
• Two local variables ThisName and ThisValue are declared to hold the
results from each row of the query.
• The cursor ThisCompany is declared. The SELECT statement produces a
list of company names and the total value of the orders placed by that
company.
• The value of TopValue is set to an initial value of 0, for later use in the loop.
•The
ThisCompany cursor is opened.
• The LOOP statement loops over each row of the query, placing each
company name in turn into the variables ThisName and ThisValue. If
ThisValue is greater than the current top value, TopCompany and TopValue
are reset to ThisName and ThisValue.
• The cursor is closed at the end of the procedure.
The LOOP construct in the TopCompanyValue procedure is a standard form,
exiting after the last row is processed. You can rewrite this procedure in a more
compact form using a FOR loop. The FOR statement combines several aspects
of the above procedure into a single statement.
CREATE PROCEDURE TopCustomerValue2(
OUT TopCompany CHAR(36),
OUT TopValue INT )
BEGIN
-- Initialize the TopValue variable
SET TopValue = 0;
-- Do the For Loop
CompanyLoop:
FOR CompanyFor AS ThisCompany
CURSOR FOR
SELECT company_name AS ThisName ,
CAST( sum( sales_order_items.quantity *
product.unit_price ) AS INTEGER )

CHAPTER 6 Using Procedures and Batches
255
AS ThisValue
FROM customer
INNER JOIN sales_order
INNER JOIN sales_order_items
INNER JOIN product
GROUP BY ThisName
DO
IF ThisValue > TopValue THEN
SET TopCompany = ThisName;
SET TopValue = ThisValue;
END IF;
END FOR CompanyLoop;
END
Errors and warnings in procedures
After an application program executes a SQL statement, it can examine a
return code. This return code indicates whether the statement executed
successfully or failed and gives the reason for the failure. The same mechanism
can be used to indicate the success or failure of a CALL statement to a
procedure.
Error reporting uses either the SQLCODE or SQLSTATE status descriptions.
Whenever a SQL statement is executed, a value is placed in special procedure
variables called SQLSTATE and SQLCODE. That value indicates whether or
not there were any unusual conditions encountered while the statement was
being performed. You can check the value of SQLSTATE or SQLCODE in an
IF statement following a SQL statement, and take actions depending on
whether the statement succeeded or failed.
For example, the SQLSTATE variable can be used to indicate if a row is
successfully fetched. The TopCustomerValue procedure presented in section
“Using cursors on SELECT statements in procedures” used the SQLSTATE
test to detect that all rows of a SELECT statement had been processed.
For full descriptions of SQLCODE and SQLSTATE error and warning values
and their meanings, see “Database Error Messages” in Adaptive Server IQ
Reference Manual.

Errors and warnings in procedures
256
Default error handling in procedures
This section describes how Adaptive Server IQ handles errors that occur during
a procedure execution, if you have no error handling built in to the procedure.
If you want to have different behavior from that described in this section, you
can use exception handlers, described in “Using exception handlers in
procedures” on page 261. Warnings are handled in a slightly different manner
from errors: for a description, see “Default handling of warnings in
procedures” on page 260
There are two ways of handling errors without using explicit error handling:
• Default error handling The procedure fails and returns an error code
to the calling environment.
• ON EXCEPTION RESUME If the ON EXCEPTION RESUME clause
is included in the CREATE PROCEDURE statement, the procedure
carries on executing after an error, resuming at the statement following the
one causing the error.
Default error handling Generally, if a SQL statement in a procedure fails, the procedure terminates
execution and control is returned to the application program with an
appropriate setting for the SQLSTATE and SQLCODE values. This is true
even if the error occurred in a procedure invoked directly or indirectly from the
first one.
The following demonstration procedures show what happens when an
application calls the procedure OuterProc, and OuterProc in turn calls the
procedure InnerProc, which then encounters an error.
CREATE PROCEDURE OuterProc()
BEGIN
MESSAGE ’Hello from OuterProc.’;
CALL InnerProc();
MESSAGE ’SQLSTATE set to ’,
SQLSTATE,’ in OuterProc.’
END
CREATE PROCEDURE InnerProc()
BEGIN
DECLARE column_not_found
EXCEPTION FOR SQLSTATE ’52003’;
MESSAGE ’Hello from InnerProc.’;
SIGNAL column_not_found;
MESSAGE ’SQLSTATE set to ’,
SQLSTATE, ’ in InnerProc.’;
END

CHAPTER 6 Using Procedures and Batches
257
Notes • The DECLARE statement in InnerProc declares a symbolic name for one
of the predefined SQLSTATE values associated with error conditions
already known to the server. The DECLARE statement does not take any
other action.
• The MESSAGE statement sends a message to the server window and the
dbconsol message window.
• The SIGNAL statement generates an error condition from within the
InnerProc procedure.
The following statement executes the OuterProc procedure:
CALL OuterProc();
The message window of the server then displays the following:
Hello from OuterProc.
Hello from InnerProc.
No statements following the SIGNAL statement in InnerProc are executed:
InnerProc immediately passes control back to the calling environment, which
in this case is the procedure OuterProc. No statements following the CALL
statement in OuterProc are executed. The error condition is returned to the
calling environment to be handled there. For example, DBISQL handles the
error by displaying a message window describing the error.
The TRACEBACK function provides a list of the statements that were
executing when the error occurred. You can use the TRACEBACK function
from DBISQL by typing the following statement:
SELECT TRACEBACK(*)

Errors and warnings in procedures
258
Error handling with ON EXCEPTION RESUME
If the ON EXCEPTION RESUME clause is included in the CREATE
PROCEDURE statement, the procedure checks the following statement when
an error occurs. If the statement handles the error, then the procedure does not
return control to the calling environment when an error occurs. Instead, it
continues executing, resuming at the statement after the one causing the error.
Note When a statement has several parts or clauses, such as IF, ELSE IF, END
IF, or FOR and END FOR, the “following statement” refers to the next new
statement, not a statement part.
The following statements are considered error-handling statements:
•IF
• SELECT @variable =
•CASE
• LOOP
•LEAVE
• CONTINUE
•CALL
•EXECUTE
• SIGNAL
• RESIGNAL
• DECLARE
The following example illustrates how this works.
Drop the procedures Remember to drop both the InnerProc and OuterProc procedures before
continuing with the tutorial. You can do this by entering the following
commands in the command window:
DROP PROCEDURE OUTERPROC;
DROP PROCEDURE INNERPROC
The following demonstration procedures show what happens when an
application calls the procedure OuterProc; and OuterProc in turn calls the
procedure InnerProc, which then encounters an error. These demonstration
procedures are based on those used earlier in this section:

CHAPTER 6 Using Procedures and Batches
259
CREATE PROCEDURE OuterProc()
ON EXCEPTION RESUME
BEGIN
DECLARE res CHAR(5);
MESSAGE ’Hello from OuterProc.’;
CALL InnerProc();
SELECT @res=SQLSTATE;
IF @res=’52003’ THEN
MESSAGE ’SQLSTATE set to ’,
res, ’ in OuterProc.’;
END IF
END;
CREATE PROCEDURE InnerProc()
ON EXCEPTION RESUME
BEGIN
DECLARE column_not_found
EXCEPTION FOR SQLSTATE ’52003’;
MESSAGE ’Hello from InnerProc.’;
SIGNAL column_not_found;
MESSAGE ’SQLSTATE set to ’,
SQLSTATE, ’ in InnerProc.’;
END
The following statement executes the OuterProc procedure:
CALL OuterProc();
The message window of the server then displays the following:
Hello from OuterProc.
Hello from InnerProc.
SQLSTATE set to 52003 in OuterProc.
The execution path is as follows:
1 OuterProc executes and calls InnerProc.
2 In InnerProc, the SIGNAL statement signals an error.
3 The MESSAGE statement is not an error-handling statement, so control is
passed back to OuterProc and the message is not displayed.
4 In OuterProc, the statement following the error assigns the SQLSTATE
value to the variable named res. This is an error-handling statement, and
so execution continues and the OuterProc message is displayed.

Errors and warnings in procedures
260
Default handling of warnings in procedures
Warnings are handled differently from errors. While the default action for
errors is to set a value for the SQLSTATE and SQLCODE variables, and return
control to the calling environment, the default action for warnings is to set the
SQLSTATE and SQLCODE values and continue execution of the procedure.
Drop the procedures Remember to drop both the InnerProc and OuterProc procedures before
continuing with the tutorial. You can do this by entering the following
commands in the command window:
DROP PROCEDURE OUTERPROC;
DROP PROCEDURE INNERPROC
The following demonstration procedures illustrate default handling of
warnings. These demonstration procedures are based on those used in “Default
error handling in procedures” on page 256. In this case, the SIGNAL statement
generates a row not found condition, which is a warning rather than an error.
CREATE PROCEDURE OuterProc()
BEGIN
MESSAGE ’Hello from OuterProc.’;
CALL InnerProc();
MESSAGE ’SQLSTATE set to ’,
SQLSTATE,’ in OuterProc.’;
END
CREATE PROCEDURE InnerProc()
BEGIN
DECLARE row_not_found
EXCEPTION FOR SQLSTATE ’02000’;
MESSAGE ’Hello from InnerProc.’;
SIGNAL row_not_found;
MESSAGE ’SQLSTATE set to ’,
SQLSTATE, ’ in InnerProc.’;
END
The following statement executes the OuterProc procedure:
CALL OuterProc();
The message window of the server then displays the following:
Hello from OuterProc.
Hello from InnerProc.
SQLSTATE set to 02000 in InnerProc.
SQLSTATE set to 02000 in OuterProc.

CHAPTER 6 Using Procedures and Batches
261
The procedures both continued executing after the warning was generated,
with SQLSTATE set by the warning (02000).
Using exception handlers in procedures
It is often desirable to intercept certain types of errors and handle them within
a procedure, rather than pass the error back to the calling environment. This is
done through the use of an exception handler.
An exception handler is defined with the EXCEPTION part of a compound
statement (see “Using compound statements” on page 240). The exception
handler is executed whenever an error occurs in the compound statement.
Unlike errors, warnings do not cause exception handling code to be executed.
Exception handling code is also executed if an error is encountered in a nested
compound statement or in a procedure that has been invoked anywhere within
the compound statement.
Drop the procedures Remember to drop both the InnerProc and OuterProc procedures before
continuing with the tutorial. You can do this by entering the following
commands in the command window:
DROP PROCEDURE OUTERPROC;
DROP PROCEDURE INNERPROC
The demonstration procedures used to illustrate exception handling are based
on those used in “Default error handling in procedures” on page 256 In this
case, additional code is added to handle the column not found error in the
InnerProc procedure.
CREATE PROCEDURE OuterProc()
BEGIN
MESSAGE ’Hello from OuterProc.’;
CALL InnerProc();
MESSAGE ’SQLSTATE set to ’,
SQLSTATE,’ in OuterProc.’
END
CREATE PROCEDURE InnerProc()
BEGIN
DECLARE column_not_found
EXCEPTION FOR SQLSTATE ’52003’;
MESSAGE ’Hello from InnerProc.’;
SIGNAL column_not_found;
MESSAGE ’Line following SIGNAL.’;
EXCEPTION
WHEN column_not_found THEN

Errors and warnings in procedures
262
MESSAGE ’Column not found handling.’;
WHEN OTHERS THEN
RESIGNAL ;
END
The EXCEPTION statement declares the exception handler itself. The lines
following the EXCEPTION statement are not executed unless an error occurs.
Each WHEN clause specifies an exception name (declared with a DECLARE
statement) and the statement or statements to be executed in the event of that
exception. The WHEN OTHERS THEN clause specifies the statement(s) to be
executed when the exception that occurred is not in the preceding WHEN
clauses.
In this example, the statement RESIGNAL passes the exception on to a higher-
level exception handler. RESIGNAL is the default action if WHEN OTHERS
THEN is not specified in an exception handler.
The following statement executes the OuterProc procedure:
CALL OuterProc();
The message window of the server then displays the following:
Hello from OuterProc.
Hello from InnerProc.
Column not found handling.
SQLSTATE set to 00000 in OuterProc.
Notes • The lines following the SIGNAL statement in InnerProc are not executed;
instead, the EXCEPTION statements are executed.
• As the error encountered was a column not found error, the MESSAGE
statement included to handle the error is executed, and SQLSTATE is reset
to zero (indicating no errors).
• After the exception handling code is executed, control is passed back to
OuterProc, which proceeds as if no error was encountered.
• You should not use ON EXCEPTION RESUME together with explicit
exception handlers. The exception handler code is not executed if ON
EXCEPTION RESUME is included.
• You should use explicit exception handling code after each statement that
may potentially generate an exception whenever you use ON
EXCEPTION RESUME. You gain flexibility in handling errors, but the
cost is more code and a higher risk of bugs in your code.

CHAPTER 6 Using Procedures and Batches
263
• If the error handling code for the column not found exception is simply
a RESIGNAL statement, control is passed back to the OuterProc procedure
with SQLSTATE still set at the value 52003. This is just as if there were
no error handling code in InnerProc. As there is no error handling code in
OuterProc, the procedure fails.
Exception handling
and atomic compound
statements
When an exception is handled inside a compound statement, the compound
statement completes without an active exception and the changes before the
exception are not undone. This is true even for atomic compound statements.
If an error occurs within an atomic compound statement and is explicitly
handled, some but not all of the statements in the atomic compound statement
are executed.
Nested compound statements and exception handlers
The code following a statement that causes an error is not executed unless an
ON EXCEPTION RESUME clause is included in a procedure definition.
You can use nested compound statements to give you more control over which
statements are and are not executed following an error.
Drop the procedures Remember to drop both the InnerProc and OuterProc procedures before
continuing with the tutorial. You can do this by entering the following
commands in the command window:
DROP PROCEDURE OUTERPROC;
DROP PROCEDURE INNERPROC
The following demonstration procedure illustrates how nested compound
statements can be used to control flow. The procedure is based on that used as
an example in “Default error handling in procedures” on page 256
CREATE PROCEDURE InnerProc()
BEGIN
DECLARE column_not_found
EXCEPTION FOR SQLSTATE VALUE ’52003’;
MESSAGE ’Hello from InnerProc’;
BEGIN
SIGNAL column_not_found;
MESSAGE ’Line following SIGNAL’
EXCEPTION
WHEN column_not_found THEN
MESSAGE ’Column not found handling’;
WHEN OTHERS THEN
RESIGNAL;

Using the EXECUTE IMMEDIATE statement in procedures
264
END
MESSAGE ’Outer compound statement’;
END
The following statement executes the InnerProc procedure:
CALL InnerProc();
The message window of the server then displays the following:
Hello from InnerProc
Column not found handling
Outer compound statement
When the SIGNAL statement that causes the error is encountered, control
passes to the exception handler for the compound statement, and the Column
not found handling message is printed. Control then passes back to the
outer compound statement and the Outer compound statement message
is printed.
If an error other than column not found is encountered in the inner
compound statement, the exception handler executes the RESIGNAL
statement. The RESIGNAL statement passes control directly back to the
calling environment, and the remainder of the outer compound statement is not
executed.
Using the EXECUTE IMMEDIATE statement in
procedures
The EXECUTE IMMEDIATE statement allows statements to be built up
inside procedures using a combination of literal strings (in quotes) and
variables.
For example, the following procedure includes an EXECUTE IMMEDIATE
statement that creates a table.
CREATE PROCEDURE CreateTableProc(
IN tablename char(30) )
BEGIN
EXECUTE IMMEDIATE ’CREATE TABLE ’ || tablename ||’
(column1 INT PRIMARY KEY)’
END

CHAPTER 6 Using Procedures and Batches
265
In ATOMIC compound statements, you cannot use an EXECUTE
IMMEDIATE statement that causes a COMMIT, as COMMITs are not allowed
in that context.
Transactions and savepoints in procedures
SQL statements in a procedure are part of the current transaction (see Chapter
8, “Transactions and Versioning”). You can call several procedures within one
transaction or have several transactions in one procedure.
COMMIT and ROLLBACK are not allowed within any atomic statement (see
“Atomic compound statements” on page 242).
Savepoints (see “Savepoints within transactions” on page 305) can be used
within a procedure, but a ROLLBACK TO SAVEPOINT statement can never
refer to a savepoint before the atomic operation started. Also, all savepoints
within an atomic operation are released when the atomic operation completes.
Some tips for writing procedures
This section provides some pointers for developing procedures.
Check if you need to change the command delimiter
You do not need to change the command delimiter in DBISQL or Sybase
Central when you are writing procedures. However, if you are creating and
testing procedures from some other browsing tool, you may need to change the
command delimiter from the semicolon to another character.
Each statement within the procedure ends with a semicolon. For some
browsing applications to parse the CREATE PROCEDURE statement itself, you
need the command delimiter to be something other than a semicolon.
If you are using an application that requires changing the command delimiter,
a good choice is to use two semicolons as the command delimiter (;;) or a
question mark (?) if the system does not permit a multicharacter delimiter.

Some tips for writing procedures
266
Remember to delimit statements within your procedure
You should terminate each statement within the procedure with a semicolon.
Although you can leave off semicolons for the last statement in a statement list,
it is good practice to use semicolons after each statement.
The CREATE PROCEDURE statement itself contains both the RESULT
specification and the compound statement that forms its body. No semicolon is
needed after the BEGIN or END keywords, or after the RESULT clause.
Use fully-qualified names for tables in procedures
If a procedure has references to tables in it, you should always preface the table
name with the name of the owner (creator) of the table.
When a procedure refers to a table, it uses the group memberships of the
procedure creator to locate tables with no explicit owner name specified. For
example, if a procedure created by user_1 references Table_B and does not
specify the owner of Table_B, then either Table_B must have been created by
user_1 or user_1 must be a member of a group (directly or indirectly) that is the
owner of Table_B. If neither condition is met, a table not found message results
when the procedure is called.
You can minimize the inconvenience of long fully qualified names by using a
correlation name to provide a convenient name to use for the table within a
statement. Correlation names are described in “FROM clause” in Adaptive
Server IQ Reference Manual.
Specifying dates and times in procedures
When dates and times are sent to the database from procedures, they are sent
as strings. The date part of the string is interpreted according to the current
setting of the DATE_ORDER database option. As different connections may
set this option to different values, some strings may be converted incorrectly to
dates, or the database may not be able to convert the string to a date.
You should use the unambiguous date format yyyy-mm-dd or yyyy/mm/dd when
sending dates to the database from procedures. These strings are interpreted
unambiguously as dates by the database, regardless of the DATE_ORDER
database option setting.
For more information on dates and times, see “Date and time data types” in
Adaptive Server IQ Reference Manual.

CHAPTER 6 Using Procedures and Batches
267
Verifying procedure input arguments
You can verify that input arguments to a procedure are passed correctly in
several ways.
You can display the value of the parameter on the message window of the
server using the MESSAGE statement. For example, the following procedure
simply displays the value of the input parameter var:
CREATE PROCEDURE message_test (IN var char(40))
BEGIN
MESSAGE var;
END
You can do the following from Interactive SQL:
Create the procedure.
Call the procedure:
CALL MESSAGE_TEST (’Test Message’);
After calling the procedure on a Windows NT system, double click the
server icon in the system tray to ensure that the message was passed
properly to the server.
SELECT GLOBALVAR
Statements allowed in batches
The following statements are not allowed in batches:
• CONNECT or DISCONNECT statement
• ALTER PROCEDURE or ALTER FUNCTION statement
• DBISQL commands such as OUTPUT
Otherwise, any SQL statement is allowed, including data definition statements
such as CREATE TABLE, ALTER TABLE, and so on.
The CREATE PROCEDURE statement is allowed, but must be the final
statement of the batch. Therefore a batch can contain only a single CREATE
PROCEDURE statement.

Calling external libraries from procedures
268
Using SELECT statements in batches
You can include one or more SELECT statements in a batch. Multiple SELECT
statements are allowed by Interactive SQL only if they return the same number
of columns and each column has the same data type.
The following is a valid batch:
IF EXISTS(SELECT *
FROM systable
WHERE table_name=’employee’ )
THEN
SELECTemp_lname AS LastName,
emp_fname AS FirstName
FROM employee;
SELECT lname, fname
FROM customer;
SELECT last_name, first_name
FROM contact;
END IF
The alias for the result set is required only in the first SELECT statement, as
the server uses the first SELECT statement in the batch to describe the result
set.
A RESUME statement is required following each query to retrieve the next
result set.
The following is not a valid batch, as the two queries return different result sets:
IF EXISTS( SELECT * FROM systable
WHERE table_name=’employee’ )
THEN
SELECTemp_lname AS LastName,
emp_fname AS FirstName
FROM employee;
SELECT id, lname, fname
FROM customer;
END IF
Calling external libraries from procedures
You can call a function in an external Dynamic Link Library (DLL) from a
stored procedure or user-defined functions under an operating system that
supports DLLs. You cannot use external functions on UNIX.

CHAPTER 6 Using Procedures and Batches
269
This section describes how to use the external library calls in procedures.
Warning! External libraries can corrupt your database.
External libraries called from procedures share the memory of the server. If you
call a DLL from a procedure and the DLL contains memory-handling errors,
you can crash the server or corrupt your database. Ensure that your libraries are
thoroughly tested before deploying them on production databases.
Creating procedures and functions with external calls
This section presents some examples of procedures and functions with external
calls.
For a full description of the CREATE PROCEDURE statement syntax, see
“CREATE PROCEDURE statement” in Adaptive Server IQ Reference
Manual.
For a full description of the CREATE FUNCTION statement syntax for
external calls, see “CREATE FUNCTION statement” in Adaptive Server IQ
Reference Manual.
Note You must have DBA permissions in order to create external procedures
or functions. This requirement is more strict than the RESOURCE permissions
required for creating other procedures or functions.
Syntax A procedure that calls a function function_name in DLL library.dll can be
created as follows:
CREATE PROCEDURE dll_proc ( parameter-list )
EXTERNAL NAME ’function_name@library.dll’
Such a procedure is called an external stored procedure. If you call an
external DLL from a procedure, the procedure cannot carry out any other tasks;
it just forms a wrapper around the DLL.
An analogous CREATE FUNCTION statement is as follows:
CREATE FUNCTION dll_func ( parameter-list )
RETURNS data-type
EXTERNAL NAME ’function_name@library.dll’

Calling external libraries from procedures
270
In these statements, function_name is the name of a function in the dynamic
link library, and library.dll is the name of the library. The arguments in the
procedure argument list must correspond in type and order to the arguments for
the library function; they are passed to the external DLL function in the order
in which they are listed. Any value returned by the external function is in turn
returned by the procedure to the calling environment.
No other statements
permitted A procedure that calls an external function can include no other statements: its
sole purposes are to take arguments for a function, call the function, and return
any value and returned arguments from the function to the calling environment.
You can use IN, INOUT, or OUT parameters in the procedure call in the same
way as for other procedures: the input values get passed to the external
function, and any parameters modified by the function are returned to the
calling environment in OUT or INOUT parameters.
External function declarations
When an external function is called, a stack is fabricated with the arguments
(or argument references in the case of INOUT or OUT parameters) and the
DLL is called. Only the following data types can be passed to an external
library:
• CHARACTER data types, but INOUT and OUT parameters must be no
more than 256 bytes in length
• SMALLINT and INT data types
• REAL and DOUBLE data types
This section describes the format of the function declaration.
For information about passing parameters to external functions, see “How
parameters are passed to the external function” on page 271
In the external library, function declarations should follow these guidelines:
• Windows NT The function declaration should be of the following form
for the Watcom C/C++ compiler:
return-type * __export __stdcall function-name(
argument-list )
and the following form for Microsoft Visual C++:
return-type * __declspec(dllexport) __stdcall
function-name( argument-list )

CHAPTER 6 Using Procedures and Batches
271
How parameters are passed to the external function
SQL data types are mapped to their C equivalents as follows:
These are the only SQL data types you can use: using others produces an error.
Procedure parameters that are INOUT or OUT parameters are passed to the
external function by reference. For example, the procedure
CREATE PROCEDURE dll_proc( INOUT xvar REAL )
EXTERNAL NAME ’function_name@library.dll’
has an associated C function parameter declaration of
function_name( float * xvar )
Procedure parameters that are IN parameters are passed to the external function
by value. For example, the procedure
CREATE PROCEDURE dll_proc( IN xvar REAL )
EXTERNAL NAME ’function_name@library.dll’
has an associated external function parameter declaration of
function_name( float xvar )
Character data types are an exception to IN parameters being passed. They are
always passed by reference, whether they are IN, OUT, or INOUT parameters.
For example, the procedure
CREATE PROCEDURE dll_proc ( IN invar CHAR( 128 ) )
EXTERNAL NAME ’function_name@library.dll’
has the following external function parameter declaration
function_name( char * invar )
SQL data type C data type
INTEGER long (32 bits)
SMALLINT short
REAL float
CHAR( n ) char *

Calling external libraries from procedures
272
Special considerations when passing character types
For the character data type (CHAR), Adaptive Server IQ allocates a 255-byte
buffer (including one for the null terminator) for each parameter. If the
parameter is an INOUT parameter, the existing value is copied into the buffer
and null terminated, and a pointer to this buffer is passed to the external
function. The external function should therefore not allocate a buffer of its own
for OUT or INOUT character parameters: the server has already allocated the
space. If the external function writes beyond the 256 bytes (including the
ending null character), it is writing over data structures in the server.
When the entry point returns, the parameter buffers are translated back into
their server data structure string equivalents based on the strlen() value of the
buffer.
The external function should be sure to null-terminate any output string
parameters. OUT parameters follow the same procedure except that as there is
no initial data, no initial value of the output buffer parameter is guaranteed.
Always be sure to put a null byte into an OUT char parameter, as the lack of
one could cause problems if the out buffer happens to be allocated adjacent to
an area that is not in the allocate address space of the server.
273
CHAPTER 7 Ensuring Data Integrity
About this chapter This chapter describes facilities for ensuring that the data in your database
is valid and reliable. These facilities include constraints on tables and
columns, and choosing appropriate data types.
The SQL statements in this chapter use the CREATE TABLE statement
and ALTER TABLE statement, basic forms of which were introduced in
Chapter 3, “Working with Database Objects”
Data integrity overview
For data to have integrity means that the data is valid—that is, correct and
accurate—and that the relational structure of the database is intact. The
relational structure of the database is described through referential
integrity constraints, business rules that maintain the consistency of data
between tables.
Adaptive Server IQ supports stored procedures and JDBC, which allow
you detailed control over how data gets entered into the database.
Procedures are discussed in Chapter 6, “Using Procedures and Batches”
See the Adaptive Server Anywhere User’s Guide for information on JDBC.
How data can become invalid
Here are a few examples of how the data in a database may become invalid
if proper checks are not made. Each of these examples can be prevented
by facilities described in this chapter.
Incorrectly formatted
information • An operator enters text where numeric data is required.
• An operator enters numeric data that is too wide for the column.
Duplicated data • A new department has been created, with dept_id 200, and needs to
be added to the department table of the organization's database—but
two people enter this information into the table.

Data integrity overview
274
Integrity constraints belong in the database
To help ensure that the data in a database are valid, you need to formulate
checks that define valid and invalid data and design rules to which data must
adhere. The rules to which data must conform are often called business rules.
The collective name for checks and rules is constraints.
Build integrity
constraints into
database whenever
possible
Constraints built into the database itself are inherently more reliable than those
built into client applications, or spelled out as instructions to database users.
Constraints built into the database are part of the definition of the database
itself and can be enforced consistently across all applications.
Setting a constraint once, in the database, imposes it for all subsequent
interactions with the database, no matter from what source. By contrast,
constraints built into client applications are vulnerable every time the software
is altered, and may need to be imposed in several applications, or several places
in a single client application.
Adaptive Server IQ enforces some constraints but not others. Because IQ data
typically is entered by only a few users, and often loaded directly from other
databases, IQ databases tend to be less vulnerable than OLTP databases to the
kinds of errors that can cause invalid data.
You should declare any constraints that apply, whether Adaptive Server IQ
enforces them or not. By declaring constraints, you ensure that you understand
your data requirements, and are designing a database that matches the business
rules of your organization.
Constraints aid IQ
optimization Adaptive Server IQ performs several types of optimization based on the
constraints you specify. This optimization does not depend on enforcement of
constraints. For the best performance of queries and load operations, put all
constraints in the database.
Here is a list of some of the types of optimization that rely on the constraints
and other features you build into the database:
• Join indexes optimize queries that join data from different columns. In
many cases, the join relationship for a join index relies on the foreign key
constraints you specify for the tables being joined.
• Query optimization relies heavily on the CHECK conditions in the table
definition.
•PRIMARY KEY and UNIQUE column constraints and the IQ UNIQUE
parameter can improve performance for your loads and queries and
facilitate automatic index creation.

CHAPTER 7 Ensuring Data Integrity
275
See “Creating tables” for more information on how constraints affect
optimization. For more on join indexes and foreign keys, see “Using join
indexes”.
Constraints and Load
Operations Adaptive Server IQ checks during load operations that certain constraints are
obeyed:
• Adaptive Server IQ ensures that data being loaded is the appropriate data
type and length.
• If you have a join index that relies on a foreign key-primary key
relationship, when synchronizing the join index Adaptive Server IQ
checks that data in the underlying tables maintains the expected one-to-
many relationship between the joined columns.
How database contents get changed
Information in database tables is changed by submitting SQL statements from
client applications. Only a few SQL statements actually modify the
information in a database.
• An existing row of a table may be deleted, using the DELETE statement.
• A new row may be inserted into a table, using the INSERT statement.
Data integrity tools
To assist in maintaining data integrity, you can use data constraints, and
constraints that specify the referential structure of the database.
Constraints You can use several types of constraints on the data in individual columns or
tables. For example:
• A NOT NULL constraint prevents a column from containing a null entry.
Adaptive Server IQ enforces this constraint.
• Columns can have unenforced CHECK conditions assigned to them, to
specify that a particular condition should be met by every item in the
column. You could specify, for example, that salary column entries should
be within a specified range.
• Unenforced CHECK conditions can be made on the relative values in
different columns, to specify, for example, in a library database that a
date_returned entry is later than a date_borrowed entry.

Data integrity overview
276
These and other table and column constraints are discussed in “Using table and
column constraints”. Column constraints can be inherited from user-defined
data types.
Entity and referential
integrity The information in relational database tables is tied together by the relations
between tables. These relations are defined by the primary keys and foreign
keys built into the database design. The following integrity rules define the
structure of the database:
• Entity integrity Keeps track of the primary keys. It guarantees that
every row of a given table can be uniquely identified by a primary key that
guarantees no nulls. Adaptive Server IQ enforces single-column primary
keys only; it does not enforce multi-column primary keys.
• Referential integrity Keeps track of the foreign keys that define the
relationships between tables. All foreign key values either should match a
value in the corresponding primary key or contain the NULL value if they
are defined to allow NULL. Adaptive Server IQ does not enforce foreign
keys, however.
For more information about referential integrity, see “Declaring entity and
referential integrity”.
SQL statements for implementing integrity constraints
The following SQL statements are used to implement integrity constraints:
• CREATE TABLE statement This statement is used to implement
integrity constraints as the database is being created.
• ALTER TABLE statement This statement is used to add integrity
constraints, or to delete constraints, from an existing database.
For full descriptions of the syntax of these statements, see “SQL Statements”
in Adaptive Server IQ Reference Manual.

CHAPTER 7 Ensuring Data Integrity
277
Using table and column constraints
The CREATE TABLE statement and ALTER TABLE statement can specify
many different attributes for a table. Along with the basic table structure
(number, name and data type of columns, name and location of the table), you
can specify other features that allow control over data integrity.
Warning! Altering tables can interfere with other users of the database.
Although the ALTER TABLE statement can be executed while other
connections are active, it is prevented if any other connection is using the table
to be altered. For large tables, ALTER TABLE can be a time-consuming
operation, and no other requests referencing the table being altered are allowed
while the statement is being processed.
This section describes how to use constraints to help ensure that the data
entered in the table is correct, and to provide information to Adaptive Server
IQ that boosts performance.
Using UNIQUE constraints on columns or tables
The UNIQUE constraint specifies that one or more columns uniquely identify
each row in the table. If you apply the UNIQUE constraint to a single column,
Adaptive Server IQ enforces this condition. If multiple columns are required to
uniquely identify a row, you must specify UNIQUE as an unenforced table
constraint.
UNIQUE is essentially the same as a PRIMARY KEY constraint, except that you
can specify more than one UNIQUE constraint in a table. With both UNIQUE
and PRIMARY KEY, a column must not contain any NULL values.
Example 1 The following example adds the column ss_number to the employee table, and
ensures that each value in it is unique throughout the table.
ALTER TABLE employee
ADD ss_number char(11) UNIQUE
Example 2 In this example, three columns are needed to make a unique entry. Therefore,
the UNIQUE constraint is unenforced.
ALTER TABLE product
ADD UNIQUE (name, size, color) UNENFORCED

Using table and column constraints
278
Using IQ UNIQUE constraint on columns
The IQ UNIQUE constraint specifies an estimate of the number of distinct
values in a column. You can apply the IQ UNIQUE constraint to any column in
a table. This constraint helps optimize loading of indexes.
For example, in the state column of the employee table, you would specify IQ
UNIQUE(50) to indicate that there are only 50 possible values (assuming U.S.
states only). Each of the possible values can occur many times.
Using CHECK conditions on columns
You can use a CHECK condition to specify that the values in a column must
satisfy some definite criterion.
You can apply an unenforced CHECK condition to values in a single column,
to specify the rules they should follow. These rules may be rules that data must
satisfy in order to be reasonable, or they may be more rigid rules that reflect
organization policies and procedures.
CHECK conditions on individual column values are useful when only a
restricted range of values are valid for that column. Here are some examples:
Example 1 You can specify a particular formatting requirement. If a table has a column for
phone numbers you can specify that they all be entered in the same manner. For
North American phone numbers, you could use a constraint such as the
following:
ALTER TABLE customer
MODIFY phone
CHECK ( phone LIKE ’(___) ___-____’ ) UNENFORCED
Note The keyword UNENFORCED must appear after every CHECK condition.
Example 2 You can specify that the entry should match one of a limited number of values.
For example, to specify that a city column only contains one of a certain number
of allowed cities (say, those cities where the organization has offices), you
could use a constraint like the following:
ALTER TABLE office
MODIFY city
CHECK ( city IN ( ’city_1’, ’city_2’, ’city_3’ ) )
UNENFORCED

CHAPTER 7 Ensuring Data Integrity
279
By default, string comparisons are case insensitive unless the database is
explicitly created as a case-sensitive database, using the CASE RESPECT
option.
Example 3 You can specify that a date or number falls in a particular range. For example,
you may want to require that the start_date column of an employee table must
be between the date the organization was formed and the current date, as in the
following:
ALTER TABLE employee
MODIFY start_date
CHECK ( start_date BETWEEN ’1983/06/27’
AND CURRENT DATE ) UNENFORCED
You can use several date formats: the YYYY/MM/DD format used in this
example has the virtue of always being recognized regardless of the current
option settings.
Column CHECK conditions from user-defined data types
You can attach unenforced CHECK conditions to user-defined data types.
Columns defined on those data types inherit the CHECK conditions. A
CHECK condition explicitly specified for the column overrides that from the
user-defined data type.
When defining a CHECK condition on a user-defined data type, any variable
prefixed with the @ sign is replaced by the name of the column when the
CHECK condition is evaluated. For example, the following user-defined data
type accepts only positive integers:
CREATE DATATYPE posint INT
CHECK ( @col > 0 ) UNENFORCED
Any variable name prefixed with @ could be used instead of @col. Any
column defined using the posint data type accepts only positive integers unless
it has a CHECK condition explicitly specified.
An ALTER TABLE statement with the DELETE CHECK clause deletes all
CHECK conditions from the table definition, including those inherited from
user-defined data types.
For information on user-defined data types, see “User-defined data types” in
the Adaptive Server IQ Reference.

Using table and column constraints
280
Working with column constraints in Sybase Central
All adding, altering, and deleting of column constraints in Sybase Central is
carried out in the Constraints tab of the column properties sheet.
❖To display the property sheet for a column:
1 Connect to the database.
2 Click the Tables folder for that database, and click the table holding the
column you wish to change.
3 Double-click the Columns folder to open it, and double-click the column
to display its property sheet.
For more information, see the Sybase Central online Help.
Using CHECK conditions on tables
A CHECK condition can be applied as a constraint on the table, instead of on
a single column. Such CHECK conditions typically specify that two values in
a row being entered or modified have a proper relation to each other. Column
CHECK conditions are held individually in the system tables, and can be
replaced or deleted individually. This is more flexible behavior, and CHECK
conditions on individual columns are recommended where possible.
For example, in a library database, the date_returned column for a particular
entry must be later than (or the same as) the date_borrowed entry:
ALTER TABLE loan
ADD CHECK(date_returned >= date_borrowed) UNENFORCED
Modifying and deleting CHECK conditions
There are several ways to alter the existing set of CHECK conditions on a table.
• You can add a new CHECK condition to the table or to an individual
column, as described above.
• You can delete a CHECK condition on a column by setting it to NULL.
The following statement removes the CHECK condition on the phone
column in the customer table:
ALTER TABLE customer MODIFY phone
CHECK NULL

CHAPTER 7 Ensuring Data Integrity
281
• You can replace a CHECK condition on a column in the same way as you
would add a CHECK condition. The following statement adds or replaces
an unenforced CHECK condition on the phone column of the customer
table:
ALTER TABLE customer
MODIFY phone
CHECK ( phone LIKE ’___-___-____’ )
UNENFORCED
There are two ways of modifying a CHECK condition defined on the table, as
opposed to a CHECK condition defined on a column.
• You can add a new CHECK condition using ALTER TABLE with an ADD
table-constraint clause.
• You can delete all existing CHECK conditions, including column CHECK
conditions, using ALTER TABLE DELETE CHECK, and then add in new
CHECK conditions.
All CHECK conditions on a table, including CHECK conditions on all its
columns and CHECK conditions inherited from user-defined data types, are
removed using the ALTER TABLE statement with the DELETE CHECK
clause, as follows:
ALTER TABLE table_name
DELETE CHECK
Deleting a column from a table does not delete CHECK conditions associated
with the column that are held in the table constraint. If the constraints are not
removed, any attempt to query data in the table will produce a column not
found error message.
Declaring entity and referential integrity
The relational structure of the database enables the database server to identify
information within the database. Adaptive Server IQ also ensures that primary
key-foreign key relationships between tables are properly upheld by all the
rows in any join index relying on these relationships.

Declaring entity and referential integrity
282
Enforcing entity integrity
When a new row in a table is created, or when a row is updated, the database
server ensures that the primary key for the table is still valid: that each row in
the table is uniquely identified by the primary key.
Note Adaptive Server IQ enforces single-column primary keys only. No action
is taken for invalid multi-column primary keys. If you have any multi-column
primary keys, you may want to define a procedure to use when you load or
insert data, that validates each set of values you insert in the primary key
columns.
You cannot create a join index that relies on a foreign key-primary key
relationship where the primary key is multi-column.
Example 1 The employee table in the sample database uses an employee ID as the primary
key. When a new employee is added to the table, IQ checks that the new
employee ID value is unique, and is not NULL.
Example 2 The sales_order_items table in the sample database uses two columns to define
a primary key.
This table holds information about items ordered. One column contains an id
specifying an order, but there may be several items on each order, so this
column by itself cannot be a primary key. An additional line_id columns
identifies which line corresponding to the item. The two columns id and line_id,
taken together, specify an item uniquely, and form the primary key.
Because it relies on multiple columns, this primary key is unenforced in the
current version of Adaptive Server IQ. However, you could create a stored
procedure to check insertions in both columns.
If a client application breaches entity integrity
Entity integrity requires that each value of a primary key be unique within the
table, and that there are no NULL values. If a client application attempts to
insert or update a single-column primary key value, and provides values that
are not unique, entity integrity would be breached.
If an attempt to breach entity integrity is detected, Adaptive Server IQ does not
add the new information to the database, and instead reports an error to the
client application.

CHAPTER 7 Ensuring Data Integrity
283
It is up to the application programmer to decide how to present this information
to the user and enable the user to take appropriate action. The appropriate
action in this case is usually just to provide a unique value for the primary key.
Primary keys enforce entity integrity
Once the primary key for each table is specified, no further action is needed by
client application developers or by the database administrator to maintain
entity integrity, if it is a single-column primary key.
For a multi-column primary key, you can create a stored procedure to check
insertions into all primary key columns, so that the combined columns would
always produce a unique value.
The primary key for a table is defined by the table owner when the table is
created. If the structure of a table is modified at a later date, the primary key
may also be redefined using the ALTER TABLE statement clauses DELETE
PRIMARY KEY or ADD PRIMARY KEY. For details, see the ALTER
TABLE statement in Adaptive Server IQ Reference Manual.
Some application development systems and database design tools allow you to
create and alter database tables. If you are using such a system, you may not
have to enter the CREATE TABLE or ALTER TABLE command explicitly:
the application generates the statement itself from the information you provide.
For information on creating primary keys, see “Creating primary and foreign
keys”. For the detailed syntax of the CREATE TABLE statement, see
“CREATE TABLE statement;” for information about changing table structure,
see the “ALTER TABLE statement,” both in the Adaptive Server IQ
Reference.
Declaring referential integrity
A foreign key relates the information in one table (the foreign table) to
information in another (referenced or primary) table. A particular column, or
combination of columns, in a foreign table is designated as a foreign key to the
primary table.
For the foreign key relationship to be valid, the entries in the foreign key must
correspond to the primary key values of a row in the referenced table.
Occasionally, some other unique column combination may be referenced,
instead of a primary key.

Declaring entity and referential integrity
284
Example 1 The sample database contains an employee table and a department table. The
primary key for the employee table is the employee ID, and the primary key for
the department table is the department ID.
One of the items of information about each employee is the department ID of
the department to which they belong. In the employee table, the department ID
is called a foreign key for the department table; each department ID in the
employee table corresponds exactly to a department ID in the department table.
The foreign key relationship is a many-to-one relationship. Several entries in
the employee table have the same department ID entry, but the department ID
is the primary key for the department table, and so is unique. If a foreign key
were able to reference a column in the department table containing duplicate
entries, there would be no way of knowing which of the rows in the department
table is the appropriate reference.
Example 2 Suppose the database also contained an office table, listing office locations.
The employee table might have a foreign key for the office table that indicates
where the employee’s office is located. The database designer may wish to
allow for an office location not being assigned at the time the employee is
hired. In this case, the foreign key should allow the NULL value for when the
office location is unknown or when the employee does not work out of an
office.
How you define foreign keys
Like primary keys, foreign keys are created using the CREATE TABLE
statement or ALTER TABLE statement.
For information on creating foreign keys, see “Creating primary and foreign
keys”.
Referential integrity is unenforced
Adaptive Server IQ does not enforce foreign key relationships. For this reason,
you must specify the keyword UNENFORCED when you declare a foreign key.
IQ lets you delete a primary key that is referred to by a foreign key; it does not
produce an error or carry out any other special action you might specify.
You may wish to create a procedure that is called each time you insert or delete
data, to enforce referential integrity independently of IQ.

CHAPTER 7 Ensuring Data Integrity
285
Integrity rules in the system tables
All the information about integrity checks and rules in a database is held in the
following system tables and views:
For a description of the contents of each system table, see “System Tables” in
the Adaptive Server IQ Reference Manual. You can use Sybase Central or
DBISQL to browse these tables and views.
System table Description
SYS.SYSTABLE CHECK constraints are held in the view_def
column of SYS.SYSTABLE. For views, the
view_def holds the CREATE VIEW command
that created the view. You can check whether a
particular table is a base table or a view by
looking at the table_type column, which is
BASE or VIEW.
SYS.SYSFOREIGNKEYS This view presents the foreign key information
from the two tables SYS.SYSFOREIGNKEY
and SYS.SYSFKCOL in a more readable
format.
SYS.SYSCOLUMNS This view presents the information from the
SYS.SYSCOLUMN table in a more readable
format. It includes default settings and primary
key information for columns.

Integrity rules in the system tables
286
287
CHAPTER 8 Transactions and Versioning
About this chapter This chapter describes Adaptive Server IQ’s approach to transaction
processing, called snapshot versioning, and its implications for
performance and other aspects of database administration.
Overview of transactions and versioning
Adaptive Server IQ uses transaction processing to allow many users to
read from the database while it is being updated. Transaction processing
ensures that logically related commands are executed as a unit.
Transactions are fundamental to maintaining the accuracy of your data,
and to data recovery in the event of system failure.
A crucial aspect of transaction processing is its ability to isolate users from
the effect of other users’ transactions. Adaptive Server IQ’s approach to
transaction processing, called snapshot versioning, supports the highest
level of isolation recognized by ISO.
Introduction to transactions
Transactions are simply groups of SQL statements. Each transaction
performs a task that changes your database from one consistent state to
another. These units play an important role in protecting your database
from media and system failures, and in maintaining the consistency of
your data.
Transactions are logical units of work
A transaction is a logical unit of work. Each transaction is a sequence of
logically related commands that accomplish one task and transform the
database from one consistent state into another.

Overview of transactions and versioning
288
Transactions are atomic. In other words, Adaptive Server IQ executes all the
statements within a transaction as a unit. At the end of each transaction,
changes can be committed to make them permanent. If for any reason all the
commands in the transaction do not process properly, then some or all of the
intermediate changes can be undone, or rolled back. The user application
controls the conditions under which changes are committed or rolled back. In
DBISQL the AUTO_COMMIT option can be used to control commits and
rollbacks automatically.
Transactions break the work of each user into small blocks. The completion of
each block marks a point at which the information is self-consistent.
Transaction processing is fundamental to ensuring that a database contains
correct information.
Note Adaptive Server IQ processes transactions quite differently from the way
Adaptive Server Anywhere does when it operates without IQ. This chapter
describes how Adaptive Server IQ handles transactions. If you are working in
an Anywhere-only database, see the Adaptive Server Anywhere User’s Guide
for information on transactions and locking.
Using transactions
Adaptive Server IQ allows commands to be grouped into transactions. In most
cases, IQ transactions begin and end automatically, based on the commands
being issued, and the options set. You can also issue explicit commands to
begin or end a transaction.
Starting transactions
Transactions start automatically with one of the following events:
• The first statement following a connection to a database.
• The first statement following the end of a previous transaction.
Completing transactions
Transactions complete with one of the following events:
•A
COMMIT statement makes the changes to the database permanent.

CHAPTER 8 Transactions and Versioning
289
•A
ROLLBACK statement undoes all the changes made by the transaction.
• A disconnection from a database causes an implicit rollback (the default)
or commit, depending on whether the DBISQL option COMMIT_ON_EXIT
is set.
• A statement with a side effect of an automatic commit is executed.
Database definition commands, such as ALTER, CREATE, and DROP all have
the side effect of an automatic commit. You can also use two DBISQL options
to cause a commit to occur automatically.
Options in DBISQL
DBISQL provides two options that let you control when and how transactions
end:
• If you set the option AUTO_COMMIT to ON, DBISQL automatically
commits your results following every successful statement, and
automatically performs a ROLLBACK after each failed statement.
• The setting of the option COMMIT_ON_EXIT controls what happens to
uncommitted changes when you exit DBISQL. If this option is set to ON
(the default), DBISQL does a COMMIT; otherwise it undoes your
uncommitted changes with a ROLLBACK statement.
Adaptive Server IQ also supports Transact-SQL commands, such as begin
transaction, for compatibility with Adaptive Server Enterprise. For further
information, see “Transact-SQL Compatibility” in the Adaptive Server
Anywhere User's Guide.
Committing a transaction writes data to disk
When you execute a write operation, Adaptive Server IQ does not immediately
write the data to disk. Instead, it writes it into a data cache, an area in memory
where it stores pages from the database while they are in use. Reading from and
writing to the cache reduces the number of number of times Adaptive Server
IQ must access the disk. It is an essential part of IQ’s high performance.
Eventually, IQ must write dirty pages—that is, pages that have been updated—
to the disk. Adaptive Server IQ writes dirty pages to disk each time a
transaction commits. This approach is a major benefit to IQ users, because it
means that IQ does not need to log data insertions in the transaction log. By not
logging the very large insertions that are typical with IQ, users gain tremendous
savings in disk and performance cost.

Overview of transactions and versioning
290
Subdividing transactions
You can identify important states within a transaction and return to them
selectively or cause other actions to occur by using savepoints. Savepoints are
discussed further in “Savepoints within transactions”.
Introduction to concurrency
Adaptive Server IQ can execute more than one transaction at the same time.
The term concurrency refers to this ability. Special mechanisms within the
database server allow IQ transactions to execute concurrently without
interfering with each other.
How concurrency works in IQ
While executing the SQL statements that comprise one transaction, the
database server can execute some or all of the statements in other transactions.
Transactions processed at the same time are said to be concurrent.
Adaptive Server IQ's approach to concurrency is designed especially for the
data warehouse. Typically, in a data warehouse environment, many users need
to read from the database, but only the DBA needs to update it. However, there
is often a need to be able to make those updates while other users continue to
request and receive query results.
Adaptive Server IQ allows many simultaneous connections by many users to
one database. It can also process transactions from more than one connected
user or application concurrently.
Adaptive Server IQ ensures that all database operations occur within a
transaction, and that these operations do not interfere with each other. It does
so by setting access restrictions at the table level, and by using a technique
called snapshot versioning, described in “Introduction to versioning”. On a
given table, IQ allows concurrent processing of multiple read transactions, but
only one write transaction. This approach maintains the internal consistency of
the database.

CHAPTER 8 Transactions and Versioning
291
Concurrency and IQ Multiplex
IQ Multiplex extends Adaptive Server IQ to allow concurrent processing of
read transactions on multiple Adaptive Server IQ servers. IQ Multiplex extends
snapshot versioning to maintain the consistency of the database across multiple
servers. For more information about using IQ Multiplex, see Adaptive Server
IQ Multiplex User’s Guide.
Concurrency for backups
Adaptive Server IQ also uses transaction processing and snapshot versioning
to allow you to back up your database concurrently with read and write
operations. Restore operations, however, require exclusive access, because
they write to the database. See Chapter 11, “Backup and Data Recovery” for
more information on concurrency issues for backup and restore operations.
Why concurrency benefits you
A data warehouse is a common repository of information shared by a large
number of people. These people may need frequent access to the information.
To avoid impeding their work, the database server must be able to process
many transactions at the same time.
Moreover, many sites also require frequent updates to the database. In high
availability sites, the DBA cannot postpone insertions and deletions to a time
when exclusive access is possible. Similarly, it is important to be able to back
up the database on a regular basis, without disrupting the activities of other
users.
Adaptive Server IQ's approach to concurrency gives query users immediate
access to information, and allows you to ensure the safety and accuracy of the
information they receive.
Introduction to versioning
Adaptive Server IQ uses snapshot versioning to allow transactions to operate
concurrently.
You can think of snapshot versioning as you would a snapshot you take with a
camera. When you photograph a snapshot of an object or scene, you get an
image of it as it appears at a given moment in time. Likewise, when IQ takes a
snapshot of an object in your database, it retains an image of that object at a
given instant in time.

Overview of transactions and versioning
292
Unlike a camera, though, IQ does not need to make a copy of the entire object
each time the image changes. Instead, it copies only the parts of the image—
the database pages—that have changed. Database pages that have not changed
are shared among all active versions in the database.
IQ takes its snapshot when a transaction begins. Throughout the transaction, a
user who reads from the object sees the unchanged image, or snapshot version.
Table-level versioning
In Adaptive Server IQ, at the user-visible level, the unit of versioning is the
table. Table-level versioning makes sense for Adaptive Server IQ for these
reasons:
• IQ data structures aggregate data for columns at the table level.
• Most IQ insertions and deletions write data table-wide.
With table-level versioning, Adaptive Server IQ can control access to the data
at the level where write operations occur, and where query results are focused.
Internally, however, data is versioned at the page level. This approach helps
conserve system resources.
A given IQ table may consist of millions of pages of data. When you update
that table, you may be writing to only a small percentage of those pages. It
would require a vast amount of disk space to maintain a complete copy of each
version of an entire table. Adaptive Server IQ saves on disk space by allowing
table versions to share pages that are not being updated.
One writer and multiple readers at the table level
On a given table, IQ permits only one user to have write access for doing
insertions and deletions, and multiple readers to issue queries concurrently.
Imagine a situation such as the one shown in Figure 8-1. First, User 1 begins a
transaction and starts to insert data into the customer table. As long as User 1's
transaction remains open, no other user can write to the customer table. Any
transaction that attempts to write to the customer table receives an error until
User 1's transaction commits.
In Figure 8-1, User 2 gets an error for attempting to write before User 1's
transaction commits. User 2's application determines whether to roll back the
transaction, or to try writing to a different table. However, User 2 cannot write
to the customer table again in the same transaction.
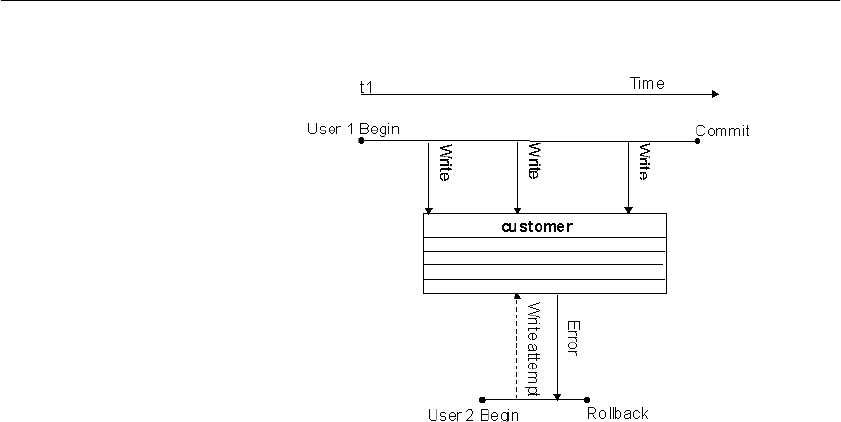
CHAPTER 8 Transactions and Versioning
293
Figure 8-1: Only one writer at a time
Meanwhile, other users can read from the customer table at any time. In this
way queries can proceed while the database administrator inserts and deletes
table data. In Figure 8-2, User 3 and User 4 are able to query the customer table
while User 1’s write transaction remains open.
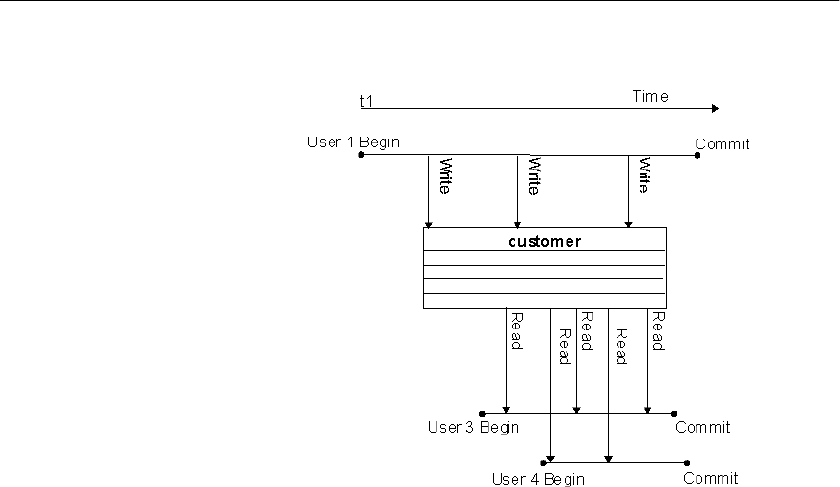
Overview of transactions and versioning
294
Figure 8-2: One writer, multiple readers
Multiple writers and readers in a database
Within an IQ database that is not multiplex, multiple read-only and read/write
users can operate concurrently, as long as the writers are inserting data into (or
deleting it from) different tables. So, for example, while User 1’s transaction is
inserting and deleting in the customer table, User 2 can begin a transaction that
loads data into the employee table, as shown in Figure 8-3. At the same time
other users can execute transactions that issue queries to both of these tables,
or to any other tables in the database.
In an IQ Multiplex database, read/write users must all connect to the write
server, whereas read-only users can connect to any query server or the write
server. For more information, see Adaptive Server IQ Multiplex User’s Guide.
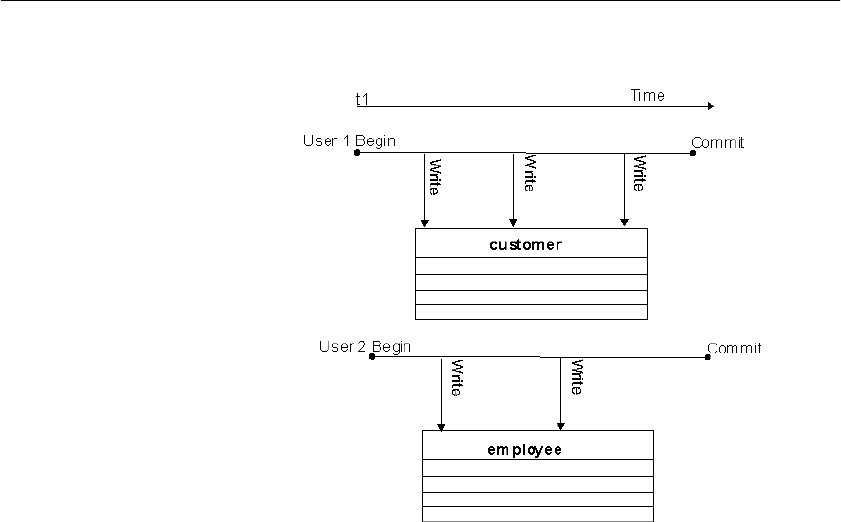
CHAPTER 8 Transactions and Versioning
295
Figure 8-3: Concurrent insertions to different tables
Data definition operations on a single table lock out all other readers and
writers from that table. See “Locks for DDL operations” for details.
Transactions use committed data
Committed data results when a write transaction commits. Every transaction
uses the latest committed version of the database as of the time the transaction
begins. It uses that version until the transaction commits.
The time a transaction begins is called its Start Timestamp. The start timestamp
can be any time before the transaction's first read. Any insertions and deletions
the transaction makes are reflected in the snapshot. Thus, for the user executing
a transaction, the image in the snapshot changes whenever that transaction
writes data to the table, and then reads it again. For all other users, the image
remains static until their transaction commits.
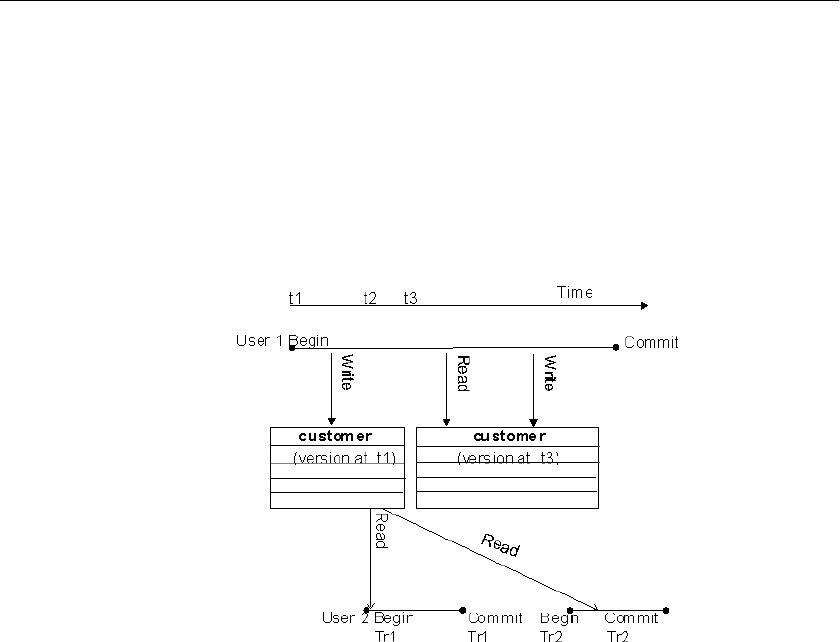
Overview of transactions and versioning
296
In other words, every transaction begins with a snapshot of the data in a reliable
state. The snapshot of the data that you see when you issue a query does not
change, even if another user is updating the table you are reading. For example,
in Figure 8-4, when User 1’s write transaction begins, it uses the customer table
version that was committed most recently. User 2’s transaction begins after
User 1 has begun writing, but before User 1 commits. Therefore, User 2’s first
transaction (Tr1) does not see any of User 1’s updates. User 2’s second
transaction begins after User 1 commits, so it sees all of User 1’s changes.
Figure 8-4: Transactions use committed data
The data that a writer sees changes only according to the changes he or she
makes; no other transaction can change what a writer sees until the writer’s
transaction commits. For example, in Figure 8-4, User 1 inserts some data,
then does a query, and then deletes some data. Those query results reflect the
insertions that User 1 has just made.
Other transactions that begin after User 1’s transaction begins but before it
commits see the version of the data from the time User 1’s transaction begins.
They can’t see the latest changes, because those changes were not yet
committed. As soon as User 1’s transaction commits, new transactions see User
1’s changes.
Timing of commits on read transactions affects versions
While a read transaction cannot affect what an existing write transaction sees,
committing a read transaction does have implications for other transactions.
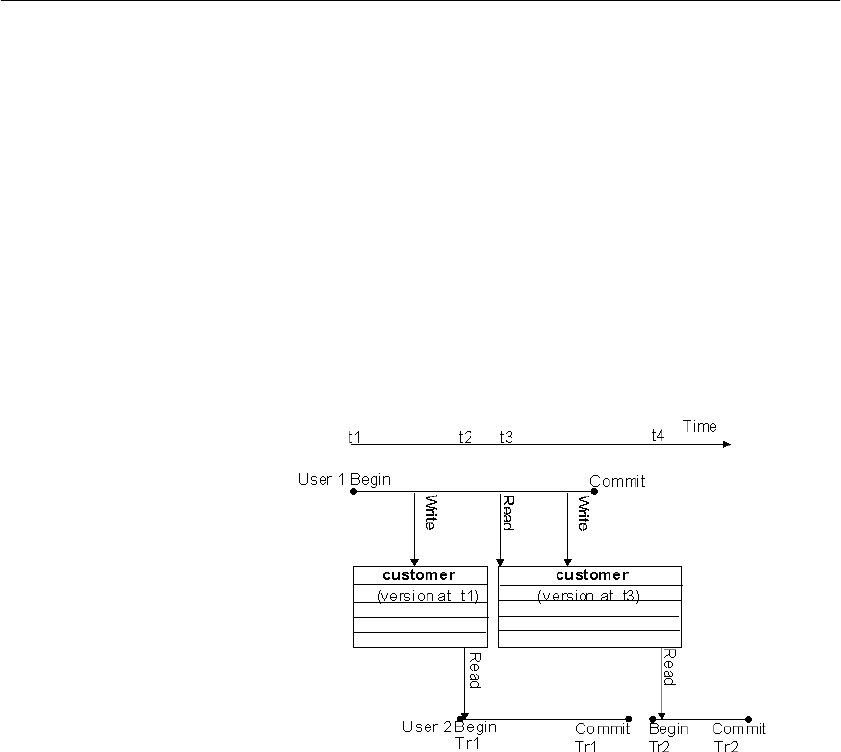
CHAPTER 8 Transactions and Versioning
297
• If a user's read transaction commits before a concurrent write transaction
does, and that user begins a new read transaction, the version remains the
same.
• If a read transaction commits after a concurrent write transaction does, any
new transaction, whether read-only or read/write, uses a new version.
Figure 8-4 on page 296 is an example of the first instance. Both of User 2's
transactions use the same version as User 1's transaction began with, because
that is the latest committed version of the data.
Figure 8-5 shows what happens in the second instance. This time, User 2's first
read transaction (Tr1) commits after User 1's write transaction. When User 2's
second transaction (Tr2) begins, it uses a new version that reflects the
committed data from User 1.
Figure 8-5: Effect of read transaction committing
Hold cursors span transactions
The only exception to the rule that transactions always use the latest committed
version is in transactions that use hold cursors. Hold cursors are treated
differently because they can span transactions. See “Cursors in transactions”
for details.

Overview of transactions and versioning
298
How Adaptive Server IQ keeps track of versions
Adaptive Server IQ assigns a version identifier to each database object that
exists in the metadata, and that has a life span beyond a single command. IQ
uses these version identifiers to ensure that writes to any database object are
always based on the latest version of the object. It keeps each active version of
a database object on disk.
When an older version is no longer needed by active transactions, Adaptive
Server IQ drops it from the database. A version is needed until the transactions
using it do one of the following:
•Commit
• Roll back
•Issue a RELEASE SAVEPOINT command releasing that version
For information on defining, releasing, and rolling back to savepoints, see
“Savepoints within transactions”.
Versioning of temporary tables
A temporary table that is created in the database is called a global temporary
table. A global temporary table is accessible to all users with the appropriate
permissions. Each user has his or her own instance of the table, however; only
one user ever sees a given set of rows. By default, a global temporary table is
deleted at the next COMMIT. You can override this default, by specifying ON
COMMIT PRESERVE ROWS when you create the temporary table.
A local temporary table is declared rather than created in the database. Only
one user sees any of the rows in a local temporary table. The table is dropped
when that user disconnects. When you declare a local temporary table,
Adaptive Server IQ issues a savepoint instead of committing the transaction
automatically, as it would for a data definition operation on any other type of
table.
For purposes of versioning, Adaptive Server IQ makes no distinction between
base tables (main database tables) and global temporary tables. Because the
data in any temporary table is accessible to only one user, there will never be
more than one write transaction open for a temporary table.

CHAPTER 8 Transactions and Versioning
299
Versioning prevents inconsistencies
Without versioning, concurrent read and write operations could cause
inconsistencies in the database. The table-level versioning provided by
Adaptive Server IQ prevents inconsistencies both by serializing transactions,
and by making the table the version level.
Adaptive Server IQ allows multiple writers to modify a table serially—that is,
one after the other, never more than one at a time—while multiple readers
continue to work on an original copy of the table. With this method, IQ takes
on full responsibility for preventing inconsistencies.
While any transaction processing system is designed to ensure that the database
remains consistent, the Adaptive Server IQ approach means that users don't
need to worry about placing their queries and updates in appropriate
transactions. IQ begins and ends transactions automatically, and ensures that
read and write operations do not interfere with each other.
How locking works
All Adaptive Server IQ locks occur automatically, based on the type of
operation a user requests. You do not need to request a lock explicitly. The
transaction that has access to the table is said to hold the lock.
When a table is locked in Adaptive Server IQ, no other transaction can have
write access to it, but any transaction can have read access to it. Data definition
operations form an exception to this universal read access; see the discussion
below for details. Any other write transaction that attempts to access a table
with a write lock on it receives an error.
The locks maintain the reliability of information in the database by preventing
concurrent access by other transactions. The database server retains all the
locks acquired by a transaction until the transaction completes, due to either a
commit or a rollback.
Locks for DML operations
Data Manipulation Language (DML) operations include insertions, deletions,
and queries. For all such operations, Adaptive Server IQ permits one writer and
multiple readers on any given table. This rule has the following implications:

How locking works
300
• Read transactions do not block write transactions.
• Write transactions do not block read transactions.
• A single update user and multiple read-only users can concurrently access
a table.
• Only a single user can update the data in a given table at one time.
The first transaction to open a table in write mode gains access to the table. A
second transaction that tries to open the table in write mode receives an error.
Any additional attempts to write to the table in the current transaction will fail.
The transaction can continue, but only with read operations or with writes to
other tables.
Locks for DDL operations
Data Definition Language (DDL) operations include CREATE, DROP, and
ALTER. DDL operations on a given table or index lock out all other readers and
writers from any table being modified. This approach is crucial to the accuracy
of query results. It ensures, for example, that a table column does not disappear
from the database while you are selecting data from that column.
CREATE, DROP, and ALTER commands have the following special properties:
• They cannot start while any other transaction is using the table or index
they are modifying.
• They cannot start while any other DDL command is operating in the
database. However, this restriction is in force for only a few seconds
during the operation.
• They include an automatic COMMIT on completion.
• Existing transactions that try to use the database object being modified
receive an error. In other words, if you are accessing an object, and a DDL
command changes that object, your command fails.
• At any given time, only one of the commands CREATE DBSPACE, DROP
DBSPACE, and CHECKPOINT can be executing in a database.
• They cannot execute while an IQ Multiplex is in multiplex mode. The
query servers must be stopped and the write server placed in simplex mode
to execute DDL commands.
If more than one DDL command is attempted at the same time, users may get
this error message:

CHAPTER 8 Transactions and Versioning
301
Cannot perform DDL command now as a DDL command is already in progress.
If a CREATE DBSPACE or DROP DBSPACE command is in progress, and a user
explicitly issues a CHECKPOINT command, the checkpoint fails with the
message:
Run time SQL Error
If a CHECKPOINT command is in progress, a user who issues a CREATE
DBSPACE or DROP DBSPACE command gets the following message:
Cannot perform requested command as there is a
CHECKPOINT command in progress.
A user who issues CREATE DBSPACE during a drop gets the message
Cannot perform requested command as there is a
DROP DBSPACE command in progress.
A user who issues DROP DBSPACE during a create gets the message:
Cannot perform requested command as there is a
CREATE DBSPACE command in progress.
See “Versioning of temporary tables” for special rules regarding temporary
tables.
When one transaction issues a DDL command on a given table or index, any
other transaction that began before the DDL transaction commits, and that tries
to access that table, receives an error.
When this error occurs, any additional attempts to read or write to the table in
the current transaction will fail.
If a transaction modifies the definition of a table that is part of a join index, it
locks every table with any columns that are joined in that index. This result
occurs whether or not the particular columns in the original write transaction
are being joined.
Concurrency rules for
index creation
commands
There is an exception to these rules for index creation commands. CREATE
INDEX and CREATE JOIN INDEX can occur concurrently with a SELECT on the
table(s) affected by the index creation. Adaptive Server IQ prevents use of the
new index or join index until the transaction creating the index commits.

Isolation levels
302
GRANT, REVOKE,
and SET OPTION are
not restricted
While the commands GRANT, REVOKE, and SET OPTION are also considered
DDL operations, they cause no concurrency conflicts, and so are not restricted.
GRANT and REVOKE always cause an automatic commit; SET OPTION causes
an automatic commit except when it is specified as TEMPORARY. GRANT and
REVOKE are not allowed for any user currently connected to the database. SET
OPTION affects all subsequent SQL statements sent to the database server,
except for certain options that do not take effect until after you restart the
database server. See the Adaptive Server IQ Reference Manual for details of
setting options.
Primary keys and locking
Because only one user can update a table, primary key generation does not
cause concurrency conflicts.
Isolation levels
An important aspect of transaction processing is the database server’s ability to
isolate an operation. ANSI standards define four levels of isolation. Each
higher level provides transactions a greater degree of isolation from other
transactions, and thus a greater assurance that the database remains internally
consistent.
The isolation level controls the degree to which operations and data in one
transaction are visible to operations in other, concurrent transactions. IQ
snapshot versioning supports the highest level of isolation. At this level, all
schedules may be serialized.
Snapshot versioning maintains this high level of isolation between concurrent
transactions by following these rules:
• Transaction management maintains a snapshot of committed data at the
time each transaction begins.
• A transaction can always read, as long as the snapshot version it uses is
maintained.
• A transaction's writes are reflected in the snapshot it sees.
• Once a transaction begins, updates made by other transactions are
invisible to it.

CHAPTER 8 Transactions and Versioning
303
The level of isolation that Adaptive Server IQ provides prevents several types
of inconsistencies. The ones most commonly encountered are listed here:
•Dirty Reads Transaction A modifies an object, but does not commit or
roll back the change. Transaction B reads the modified object. Then
Transaction A further changes the object before performing a COMMIT. In
this situation, Transaction B has seen the object in a state that was never
committed.
•Non-Repeatable Reads Transaction A reads an object. Transaction B
then modifies or deletes the object and performs a COMMIT. If Transaction
A attempts to read the same object again, it will have been changed or
deleted.
•Phantom Data Elements Transaction A reads a set of data that satisfies
some condition. Transaction B then executes an INSERT and then a
COMMIT. The newly committed data now satisfies the condition, when it
did not previously. Transaction A then repeats the initial read and obtains
a different set of data.
•Lost Update In an application that uses cursors, Transaction A writes a
change for a set of data. Transaction B then saves an update that is based
on earlier data. Transaction A's changes are completely lost.
Adaptive Server IQ protects you from all of these inconsistencies by ensuring
that only one user can modify a table at any given time, by keeping the changes
invisible to other users until the changes are complete, and by maintaining
time-stamped snapshots of data objects in use at any time.
While IQ allows you to set the isolation level to 0, 1, 2, or 3 (comparable to
ANSI levels 1, 2, 3, or 4) using SET OPTION ISOLATION_LEVEL, there is no
reason to do so. All users execute at isolation level 4, even if you set a different
level. There is no performance advantage to setting a lower isolation level.
Checkpoints, savepoints, and transaction rollback
Besides permitting concurrency, transaction processing plays an important role
in data recovery. Database recovery always recovers every committed
transaction. Transactions that have not committed at the time of a database
crash are not recovered.

Checkpoints, savepoints, and transaction rollback
304
Adaptive Server IQ relies on three transaction-related commands that help you
recover a stable set of data in the event of system or media failure. These
commands set checkpoints, set and release savepoints, and roll back
transactions.
Checkpoints
A checkpoint marks a significant point in a transaction, when Adaptive Server
IQ writes to disk certain information it tracks internally. It uses this information
in the event you need to recover your database.
Adaptive Server IQ uses checkpoints differently than OLTP databases such as
Adaptive Server Anywhere. OLTP databases tend to have short transactions,
that affect only a small number of rows. It would be very expensive for them
to write entire pages to disk. Instead, OLTP databases generally write to disk at
checkpoints, and write only the changed data rows.
As discussed in Chapter 1, “Overview of Adaptive Server IQ System
Administration”, Adaptive Server IQ is an OLAP database. A single OLAP
transaction can change thousands or millions of rows of data. For this reason,
Adaptive Server IQ does not wait for a checkpoint to occur to perform physical
writes. It writes updated data pages to disk after each transaction commits. For
an OLAP database, it is much more effective to write full pages of data to disk
than to write small amounts of data at arbitrary checkpoints.
Checkpoints aid in recovery
In order to recover from a system or media failure, Adaptive Server IQ must be
able to restore the database to a point where it is internally consistent. IQ uses
checkpoints to generate reference points and other information that it needs to
recover databases. The information that IQ writes to disk at each checkpoint is
essential to the recovery process.
When checkpoints occur
Most Adaptive Server IQ checkpoints occur automatically. You can also set
explicit checkpoints, although you do not need to do so.
A checkpoint occurs at the following times:
• When a transaction issues a CHECKPOINT command.
• When the CHECKPOINT_TIME is exceeded.

CHAPTER 8 Transactions and Versioning
305
• At the start and end of the backup process.
• When the database server is shut down.
The CHECKPOINT_TIME is the maximum time that can pass between
checkpoints. It is set by default at 60 minutes. You can adjust the checkpoint
interval with the SET OPTION command; see the Adaptive Server IQ Reference
Manual for details. You probably do not need to adjust the checkpoint time or
issue explicit checkpoints, however. Controlling checkpoints is less important
in Adaptive Server IQ than in OLTP database products, because IQ writes the
actual data pages after each transaction commits.
For more information on checkpoints in recovery, see “How transaction
information aids recovery”.
Savepoints within transactions
Adaptive Server IQ supports savepoints within a transaction.
A SAVEPOINT statement defines an intermediate point during a transaction.
Because a single IQ transaction may write millions of rows of data, you may
want to limit the amount of data that is committed—and thus written to disk—
to less than a full transaction's worth. Setting savepoints allows you to
subdivide transactions.
You can undo all changes after a savepoint using a ROLLBACK TO SAVEPOINT
statement. For more information on savepoints and rollback, see “Naming and
nesting savepoints”.
Releasing savepoints
Once a RELEASE SAVEPOINT statement has been executed or the transaction
has ended, you can no longer use the savepoint. Releasing a savepoint frees up
the version pages that have been used, up to that savepoint. Remember that data
is versioned at the page level internally. Adaptive Server IQ maintains a
separate copy of just the updated pages; the remaining pages are shared with
the previous version. By releasing savepoints, you free up the pages associated
with them, and thus make better use of your disk space.
Releasing savepoint n both releases all resources after that savepoint, and gives
up your ability to roll back to any intermediate savepoints.
No locks are released by the RELEASE SAVEPOINT command.

Checkpoints, savepoints, and transaction rollback
306
Rolling back to a savepoint
You can undo all changes after a savepoint by issuing a ROLLBACK TO
SAVEPOINT. This command rolls back to the savepoint you specify, or to the
most recent SAVEPOINT if you do not specify a named savepoint. Rolling back
to savepoint n undoes all actions for all savepoints greater than or equal to n.
Normally, locks are released only at the end of a transaction. However,
ROLLBACK TO SAVEPOINT does release locks under certain conditions, as in
the following scenario.
Example Assume that you have a series of savepoints in a transaction, and then perform
a write operation. You then roll back the transaction to an earlier savepoint. The
rollback undoes all actions after that savepoint, including the write operation
and any locks it acquires after the savepoint you are rolling back to.
Automatic and user-defined savepoints
IQ sets an implicit savepoint before and after every DML command. The data
page versions associated with these savepoints are released when the command
completes. If you want to retain data page versions beyond the end of a single
DML command, you need to set your own, named savepoints.
Naming and nesting savepoints
Savepoints can be named and they can be nested. By using named, nested
savepoints, you can have many active savepoints within a transaction. Changes
between a SAVEPOINT and a RELEASE SAVEPOINT can still be canceled by
rolling back to a previous savepoint or rolling back the transaction itself.
Changes within a transaction are not a permanent part of the database until the
transaction is committed. All savepoints are released when a transaction ends.
Savepoints cause Adaptive Server IQ to update information it maintains about
the location of available disk space. This information is used during transaction
rollback.
There is no additional overhead in using savepoints, although unreleased
savepoints may consume extra disk space by keeping older intermediate
versions active.

CHAPTER 8 Transactions and Versioning
307
Rolling back transactions
When you roll back a transaction, you undo all of the operations in that
transaction. We say that you are rolling back the database, since you are
returning the database to an earlier state.
What causes a rollback
Rollbacks can occur either due to an explicit user request, or automatically.
You use a ROLLBACK statement to undo any changes to the database since the
last COMMIT or ROLLBACK.
You use a ROLLBACK TO SAVEPOINTstatement to undo any changes to the
database since the SAVEPOINT you name, or else to the last SAVEPOINT.
Adaptive Server IQ rolls back the database automatically if a user is in a
transaction and then logs out or disconnects without committing. The rollback
is to the most recent commit or rollback.
Effect of rollback
Rollback returns both the main and temporary stores to their former state. It
also releases locks:
• Transaction rollback releases all locks held by the transaction.
• Rollback to a savepoint releases all locks acquired after that savepoint.
Rollback of open cursors deletes all cursor information and closes both hold
and non-hold cursors:
• Transaction rollback closes all cursors. It does not matter whether the
cursor was opened in the transaction being rolled back, or in an earlier
transaction.
• Rollback to a savepoint closes all cursors opened after that savepoint.
For more information on cursors, see “Cursors in transactions”. For more
information on rollback to a savepoint, see “Rolling back to a savepoint”.
System recovery
In the event of a system failure or power outage, or when you restart the
database server after it has been stopped, Adaptive Server IQ attempts to
recover automatically.

Checkpoints, savepoints, and transaction rollback
308
During Adaptive Server IQ database recovery, any uncommitted transactions
are rolled back, and any disk space used for old versions is returned to the pool
of available space. At this point, the database contains only the most recently
committed version of each permanent table.
During recovery from a system failure, Adaptive Server IQ reopens all
connections that were active at the time of the failure. If the -gm parameter,
which sets the number of user connections, was in effect at the time of the
failure, you need to restart the IQ server with at least as many connections as
were actually in use when the failure occurred. Temporary table contents are
not recoverable.
If a failure occurs, try to restart the database server and database. If you have
trouble starting a server or database, or if users are unable to connect to it, see
Adaptive Server IQ Troubleshooting and Error Messages Guide for
information on how to proceed. You will need information from your server log
and IQ message log to recover.
Sybase recommends that you run the stored procedure sp_iqcheckdb after a
system failure, preferably before allowing users to connect. This procedure
checks every block in your database, and produces statistics that allow you to
check the consistency and integrity of your database. For details, see Adaptive
Server IQ Troubleshooting and Error Messages Guide.
How transaction information aids recovery
Adaptive Server IQ’s recovery mechanism is designed for the data warehouse.
Typically in this environment, few transactions occur, but each transaction can
be quite time consuming.
To best suit this model, Adaptive Server IQ performs database updates by
making them on a copy of the actual database page, and then writes the data to
disk whenever a write transaction commits. It also records the following
information:
• The location and quantity of changed data for each transaction. It stores
this information in a transaction log.
• The location of any version pages and free space on disk. It uses this
information to free up space when versions are no longer needed. All
versions created throughout the duration of a write transaction become
obsolete when the write transaction commits or rolls back. Individual
versions can be released at a savepoint.

CHAPTER 8 Transactions and Versioning
309
• Additional information about checkpoints that occurred during a
transaction.
When you need to recover your database, instead of repeating all of the lengthy
transactions that have occurred, Adaptive Server IQ restores quickly from the
information in the transaction log and the checkpoint information. It uses the
information about versions and free space to roll back transactions, and to
release the disk space occupied by obsolete versions.
The transaction log requires very little space, only about 128 bytes for each
committed transaction. The information about checkpoints and disk space
availability are also very small.
The transaction log is deleted:
• Always after a full backup.
• Optionally after incremental backup.
• Always after backup files are restored following media failure, and a new
log is started.
The checkpoint information is deleted at the next checkpoint. Information
related to particular savepoints is deleted when the savepoint is released or
rolled back.
For other concurrency issues relating to backing up and restoring databases,
see “Concurrency and backups”.
Performance implications
Snapshot versioning should have a minimal impact on performance. The
flexibility you gain by being able to update the database while other users read
from it far outweigh any negative effects. There are certain resource issues you
should be aware of, however:
• Buffer consumption may increase slightly, if multiple users are using
different versions of the same database page simultaneously.
• Version management requires some overhead, but the effect on
performance is minimal. See also the bullet on disk space.
• The thread control, which determines how many processing resources a
user gets, and the sweeper controls, which use a small number of threads
to sweep dirty data pages out to disk, have a minor impact on performance.

Performance implications
310
• Disk space can sometimes become an issue. Storing overlapping versions
has the potential to use a lot of disk space, depending on the number and
size of versions in use simultaneously. Metadata and database page
versions are retained until they are dropped, either at a RELEASE
SAVEPOINT or when the last transaction that can see a given version
commits or rolls back. The space is then reclaimed.
Delays due to locking are minimal. Individual commits, rollbacks, and
checkpoints can block other read or write transactions only very briefly.
Remember that all of these performance and disk use factors only affect your
system in the degree to which you take advantage of IQ's concurrent read and
write capabilities. Disk space requirements in particular can vary widely,
depending on how long write transactions take before they commit, how many
read transactions take place during write transactions, the number of rows these
transactions affect, and whether you allow the release of data pages at interim
savepoints.
For an explanation of how Adaptive Server IQ uses the resources discussed in
this section, see Chapter 12, “Managing System Resources”
Overlapping versions and deletions
In order to delete data, you may actually need to increase disk space by adding
a dbspace to your IQ Store. The amount of space you need for a deletion
depends on the distribution of the data on data pages, more than on the size or
number of rows being deleted. IQ needs to retain a version of each page that
contains any of the data you are deleting, from the time the deletion begins until
the transaction commits. If the rows being deleted happen to be distributed
across many data pages, then you need space in your IQ Store to retain all of
those extra data pages.
For example, assume that you need to delete ten rows from a database where
each page holds 100 rows. If each of those ten rows is on a separate data page,
then your IQ Store needs to have space for ten version pages, each big enough
to hold 100 rows. While this distribution is unlikely, it is possible.
The space needed to delete data varies by index type. It is proportional to—and
in the worst case, equal to—the size of the index from which you are deleting.
For information on sizes of index types, see “Indexing criteria: disk space
usage”.
If you run out of space while deleting data, Adaptive Server IQ halts the
deletion and displays this message in the notification log:

CHAPTER 8 Transactions and Versioning
311
Out of disk space
After you add space, the deletion resumes. When the delete transaction
commits, the space becomes available for other deletions or insertions. If you
do not need normally that much space in your database, you can drop the
dbspace to regain the extra disk space for other purposes. Be sure you do so
before inserting any data, so that you do not lose any data that Adaptive Server
IQ might put in the new dbspace.
Running out of space during a deletion should not affect other query users.
If you run out of space, but do not have enough disk space to add another
dbspace, you must shut down the database engine and then restart it, allowing
the database to roll back. You can then delete the rows in smaller, separate
transactions.
Note DROP TABLE and DROP DATABASE delete the table or database and all
data in it without creating any version pages, so you do not need to add space
to use these commands.
Cursors in transactions
A cursor allows you to return the results of a SELECT in the form of a data type
called a cursor. A cursor is similar to a table, but has the additional property
that one row is identified as the present, or current row. Various commands
allow you to navigate through the rows of a cursor. For example, the FETCH
command retrieves a row from the cursor and identifies it as the current row.
You can step through all the rows in a cursor by calling this command
repeatedly.
Cursors are of most use when you program procedures, or when you write
applications that access a database using embedded SQL. They are also used
by many front-end query tools. They are not available when using DBISQL
interactively.
All Adaptive Server IQ cursors are read-only. You can write data, but the cursor
does not see the write operation.

Cursors in transactions
312
The rows in a cursor, like those in a table, have no order associated with them.
The FETCH command steps through the rows, but the order may appear
random and can even be inconsistent. For this reason, you will want to impose
an order by appending an ORDER BY phrase to your SELECT statement.
Cursors and versioning
When you use cursors, Adaptive Server IQ needs to be able to manage multiple
versions within a single transaction. For example, assume that you open a
cursor called cust_cursor at time x that uses the customer table. You then update
that table later on at time y. Adaptive Server IQ needs to retain the version of
the customer table from time x until you are done using cust_cursor.
See “Effect of rollback” for what happens to cursors during a rollback of the
database.
Adaptive Server IQ's support for cursors is oriented toward their likely use in
DSS applications. The following sections discuss specific cursor
characteristics with implications for transaction processing.
Cursor sensitivity
A cursor is said to be sensitive if its membership—the data rows it returns—
can vary from the time it is opened until the time it is closed. An insensitive
cursor has its membership fixed when it is opened. Adaptive Server IQ
supports only insensitive cursors.
Cursor scrolling
Adaptive Server IQ cursors can be either scrolling or non-scrolling. Non-
scrolling cursors allow only the command forms FETCH NEXT and FETCH
RELATIVE 0 to find and retrieve data. They do not keep track of which rows
have been fetched. A cursor declared as DYNAMIC SCROLL is the same as a
cursor declared as SCROLL.
You can force all cursors to be non-scrolling by setting the option
FORCE_NO_SCROLL_CURSORS to ON. You may want to use this option to
save on temporary storage requirements if you are retrieving very large
numbers (millions) of rows.

CHAPTER 8 Transactions and Versioning
313
Hold cursors
Specifying the HOLD option when you open a cursor keeps the cursor open past
the end of the transaction, if the transaction ends in a COMMIT. A hold cursor
does not remain open across a ROLLBACK in which a cursor is opened.
Although the HOLD option is not commonly used in a DSS environment, with
long transactions and no positioned updates, it may prove useful in some
situations. For example, many existing applications expect to use hold cursors,
and some ODBC drivers use hold cursors by default.
Adaptive Server IQ provides the version management needed for hold cursors.
Hold cursors do impact performance. All resources used by the cursor,
including memory, disk space, and process threads, are held until the cursor is
closed.
Positioned operations
In a positioned operation, the current location of the cursor determines where
a read or write operation begins. Adaptive Server IQ supports positioned
fetches, which can be helpful in long query transactions. It does not support
positioned updates, which are intended for shorter insertions and deletions. For
the most part, updates to IQ databases are likely to involve large amounts of
data; repositioning is a very minor part of such write operations.
Cursor command syntax and examples
For more information on using cursors in procedures, including examples of
cursor use, see Chapter 6, “Using Procedures and Batches”. For syntax of
cursor-related commands, see the Adaptive Server IQ Reference Manual.
Controlling message logging for cursors
By default, cursor operations are not logged in the IQ message file. If you need
to track cursor operations in order to determine the cause of a problem, turn on
the Log_Cursor_Operations option to produce a message each time a cursor is
opened or closed. See the Adaptive Server IQ Reference Manual for details.

Cursors in transactions
314
315
CHAPTER 9 International Languages and
Character Sets
About this chapter This chapter describes how to configure your Adaptive Server IQ
installation to handle international language issues.
Introduction to international languages and character
sets
This section provides an introduction to the issues you may face when
working in an environment that uses more than one character set, or when
using languages other than English.
When you create a database, you specify a collating sequence or collation
to be used by the database. A collation is a combination of a character set
and a sort order for characters in the database.
Adaptive Server IQ international features
Adaptive Server IQ provides two sets of features that are of particular
interest when setting up databases for languages.
• Collations You can choose from a wide selection of supplied
collations when you create a database. By creating your database with
the proper collation, you ensure proper sorting of data.
Whenever the database compares strings, sorts strings, or carries out
other string operations such as case conversion, it does so using the
collation sequence. The database carries out sorting and string
comparison when statements such as the following are executed:
• Queries with an ORDER BY clause.
• Expressions that use string functions, such as LOCATE,
SIMILAR, SOUNDEX.

Introduction to international languages and character sets
316
• Conditions using the LIKE keyword.
IQ indexes that hold character data are created based on the database
collation. The database also uses collations to identify valid or unique
identifiers (column names and so on).
• Character set translation You can set up Adaptive Server IQ to
convert data between the character set encoding on your server and client
systems, thus maintaining the integrity of your data even in mixed
character set environments.
Character set translation is provided between client and server, and also by
the ODBC driver. The Adaptive Server IQ ODBC driver provides OEM to
ANSI character set translation and Unicode support.
Using the default collation
If you use the default actions when creating an IQ database, your database has
the collation ISO_BINENG. This collation provides optimal performance for
IQ databases, but not necessarily the most natural sort order. For more
information, see “Performance issues” on page 352.
Note that this differs from Adaptive Server Anywhere, which infers the default
collation for new databases from the character set in use by the operating
system on which the database is created.
If it is not possible to set up your system in this default manner, you need to
decide which collation to use in your database, and whether to use character set
translation to ensure that data is exchanged consistently between the pieces of
your database system. This chapter provides the information you need to make
and implement these decisions.
Character set questions and answers
The following table identifies where you can find answers to questions.
To answer the question... Consider reading...
How do I set up my computing
environment to treat character sets
properly?
“Configuring your character set
environment” on page 344
How do I decide which collation to use
for my database?
“Understanding collations” on page
328

CHAPTER 9 International Languages and Character Sets
317
Understanding character sets in software
This section provides general information about software issues related to
international languages and character sets.
Pieces in the character set puzzle
There are several distinct aspects to character storage and display by computer
software:
• Each piece of software works with a character set. A character set is a set
of symbols, including letters, digits, spaces and other symbols.
• To handle these characters, each piece of software employs a character set
encoding, in which each character is mapped onto one or more bytes of
information, typically represented as hexadecimal numbers. This
encoding is also called a code page.
How are characters represented in
software, and Adaptive Server IQ in
particular?
“Understanding character sets in
software” on page 317
What collations does Adaptive Server
IQ provide?
“Supplied collations” on page 329
How do I ensure that error and
informational messages sent from the
database server to client applications
are sent in the proper language and
character set for my application?
“Character translation for database
messages” on page 336
I have a different character set on client
machines from that in use in the
database. How can I get characters to be
exchanged properly between client and
server?
“Starting a database server using
character set translation” on page
348
What character sets can I use for
connection strings?
“Connection strings and character
sets” on page 338
How do I create a collation that is
different from the supplied ones?
“Creating a database with a custom
collation” on page 351
To answer the question... Consider reading...

Understanding character sets in software
318
• Database servers, which sort characters (for example, list names
alphabetically), use a collation. A collation is a combination of a character
encoding (a map between characters and hexadecimal numbers) and a sort
order for the characters. There may be more than one sort order for each
character set; for example, a case-sensitive order and a case-insensitive
order, or two languages may sort characters in a different order.
• Characters are printed or displayed on a screen using a font, which is a
mapping between characters in the character set and their appearance.
Fonts are handled by the operating system.
• Operating systems also use a keyboard mapping to map keys or key
combinations on the keyboard to characters in the character set.
Language issues in client/server computing
Database users working at client applications may see or access strings from
the following sources:
• Data in the database Strings and other text data are stored in the
database. The database server processes these strings when responding to
requests.
For example, the database server may be asked to supply all the last names
beginning with a letter ordered less than N in a table. This request requires
string comparisons to be carried out, and assumes a character set ordering.
The database server receives strings from client applications as streams of
bytes. It associates these bytes with characters according to the database
character set. Data in some IQ indexes is stored based on the sort order of
the collation.
• Database server software messages Applications can cause
database errors to be generated. For example, an application may submit a
query that references a column that does not exist. In this case, the
database server returns a warning or error message. This message is held
in a language resource library, which is a DLL or shared library called
by Adaptive Server IQ.
• Client application The client application interface displays text, and
internally the client application may process text.
• Client software messages The client library uses the same language
library as the database server to provide messages to the client application.

CHAPTER 9 International Languages and Character Sets
319
• Operating system The client operating system has text displayed on
its interface, and may also process text.
For a satisfactory working environment, all these sources of text must work
together. Loosely speaking, they must all be working in the user’s language
and/or character set.
Code pages in Windows and Windows NT
Many languages have few enough characters to be represented in a single-byte
character set. In such a character set, each character is represented by a single
byte: a two-digit hexadecimal number.
At most, 256 characters can be represented in a single byte. No single-byte
character set can hold all of the characters used internationally, including
accented characters. This problem was addressed by the development of a set
of code pages, each of which describes a set of characters appropriate for one
or more national languages. For example, code page 869 contains the Greek
character set, and code page 850 contains an international character set suitable
for representing many characters in a variety of languages.
Upper and lower
pages With few exceptions, characters 0 to 127 are the same for all the single-byte
code pages. The mapping for this range of characters is called the ASCII
character set. It includes the English language alphabet in upper and lower
case, as well as common punctuation symbols and the digits. This range is
often called the seven-bit range (because only seven bits are needed to
represent the numbers up to 127) or the lower page. The characters from 128
to 256 are called extended characters, or upper code-page characters, and
vary from code page to code page.
Problems with code page compatibility are rare if the only characters used are
from the English alphabet, as these are represented in the ASCII portion of
each code page (0 to 127). However, if other characters are used, as is generally
the case in any non-English environment, there can be problems if the database
and the application use different code pages.
Example Suppose a database holding French language strings uses code page 850, and
the client operating system uses code page 437. The character À (upper case A
grave) is held in the database as character \xB7 (decimal value 183). In code
page 437, character \xB7 is a graphical character. The client application
receives this byte and the operating system displays it on the screen, the user
sees a graphical character instead of an A grave.

Understanding character sets in software
320
Remember that the code page used by the client system determines both the
values that are sent to server for each character you enter, and the characters
that are displayed when particular values are sent to the client from the server.
The code page used by the server system determines how the server interprets
values the client sends.
ANSI and OEM code pages in Windows and Windows NT
For Microsoft Windows and Windows NT users, the issue is complicated
because there are at least two code pages in use on most PCs. This issue affects
both Windows and NT clients and NT servers.
MS-DOS, as well as character-mode applications (those using the console or
"DOS box") in Windows 95/98 and Windows NT, use code pages taken from
the IBM set. These are called OEM code pages (Original Equipment
Manufacturer) for historical reasons.
Windows operating systems do not require the line drawing characters that
were held in the extended characters of the OEM code pages, so they use a
different set of code pages. These pages are based on the ANSI standard and
are therefore commonly called ANSI code pages.
Adaptive Server IQ supports collations based on both OEM and ANSI code
pages.
Example Consider the following situation:
• A PC is running the Windows 98 operating system with ANSI code page
1252.
• The code page for character-mode applications is OEM code page 437.
• Text is held in a database created using the collation corresponding to
OEM code page 850.
An uppercase A grave in the database is stored as character 183. This value is
displayed as a graphical character in a character-mode application. The same
character is displayed as a dot in a Windows application.
For information about choosing a single-byte collation for your database, see
“Understanding collations” on page 328.

CHAPTER 9 International Languages and Character Sets
321
Multibyte character sets
Some languages, such as Japanese and Chinese, have many more than 256
characters. These characters cannot all be represented using a single byte, but
can be represented in multibyte character sets. In addition, some character sets
use the much larger number of characters available in a multibyte
representation to represent characters from many languages in a single, more
comprehensive, character set.
Multibyte character sets are of two types. Some are variable width, in which
some characters are single-byte characters, others are double-byte, and so on.
Other sets are fixed width, in which all characters in the set have the same
number of bytes. Adaptive Server IQ supports only variable-width character
sets.
Example As an example, characters in the Shift-JIS character set are of either one or two
bytes in length. If the value of the first byte is in the range of hexadecimal
values from \x81 to \x9F or from \xE0 to \xEF (decimal values 129-159 or 224-
239) the character is a two-byte character and the subsequent byte (called a
follow byte) completes the character. If the first byte is outside this range, the
character is a single-byte character and the next byte is the first byte of the
following character.
• The properties of any Shift-JIS character can be read from its first byte
also. Characters with a first byte in the range \x09 to \x0D, or \x20, are
space characters.
• Characters in the ranges \x41 to \x5A, \x61 to \x7A, \x81 to \x9F or \xA1
to \xEF are considered to be alphabetic (letters).
• Characters in the range \x30 to \x39 are digits.
In building custom collations, you can specify which ranges of values for the
first byte signify single- and double-byte (or more) characters, and which
specify space, alpha, and digit characters. However, all first bytes of value less
than 64 (hex 40) must be single-byte characters, and no follow bytes may have
values less than 64. This restriction is satisfied by all known current encodings.
For information on the multibyte character sets, see “Using multibyte
collations” on page 336.

Understanding character sets in software
322
Sorting characters using collations
The database collation sequence includes the notion of alphabetic ordering of
letters, and extends it to include all characters in the character set, including
digits and space characters.
Associating more than
one character with
each sort position
More than one character can be associated with each sort position. This is
useful if you wish, for example, to treat an accented character the same as the
character without an accent.
Two characters with the same sort position are considered identical in all ways
by the database. Therefore, if a collation assigned the characters a and e to the
same sort position, then a query with the following search condition:
WHERE col1 = ’want’
is satisfied by a row for which col1 contains the entry went.
At each sort position, lower- and uppercase forms of a character can be
indicated. For case-sensitive databases (the default for IQ databases created as
of version 12.4.2), the lower- and uppercase characters are not treated as
equivalent. For case-insensitive databases, the lower- and uppercase versions
of the character are considered equivalent.
First-byte collation orderings for multibyte character sets
A sorting order for characters in a multibyte character set can be specified only
for the first byte. Characters that have the same first byte are sorted according
to the hexadecimal value of the following bytes.
International aspects of case sensitivity
Adaptive Server IQ is case preserving and case insensitive for identifiers,
such as table names and column names. This means that the names are stored
in the case in which they are created, but any access to the identifiers is done
in a case-insensitive manner.
For example, the names of the system tables are held in upper case
(SYSDOMAIN, SYSTABLE, and so on), but access is case insensitive, so that
the two following statements are equivalent:
SELECT *
FROM systable
SELECT *
FROM SYSTABLE

CHAPTER 9 International Languages and Character Sets
323
The equivalence of upper and lower case characters is enforced in the collation.
There are some collations where particular care may be needed when assuming
case insensitivity of identifiers.
Example In the Turkish 857TRK collation, the lower case i does not have the character I
as its upper case equivalent. Therefore, despite the case insensitivity of
identifiers, the following two statements are not equivalent in this collation:
SELECT *
FROM sysdomain
SELECT *
FROM SYSDOMAIN
Understanding locales
Both the database server and the client library recognize their language and
character set environment using a locale definition.
Introduction to locales
The application locale, or client locale, is used by the client library when
making requests to the database server, to determine the character set in which
results should be returned. If character-set translation is enabled, the database
server compares its own locale with the application locale to determine
whether character set translation is needed. Different databases on a server may
have different locale definitions.
For information on enabling character-set translation, see “Starting a database
server using character set translation” on page 348.
The locale consists of the following components:
• Language The language is a two-character string using the ISO-639
standard values: DE for German, FR for French, and so on. Both the
database server and the client have language values for their locale.
The database server uses the locale language to determine which language
library to load.
The client library uses the locale language to determine:
• Which language library to load.

Understanding locales
324
• Which language to request from the database.
For more information, see “Understanding the locale language” on page
324.
• Character set The character set is the code page in use. The client and
server both have character set values, and they may differ. If they differ,
character set translation may be required to enable interoperability.
For machines that use both OEM and ANSI code pages, the ANSI code
page is the value used here.
For more information, see “Understanding the locale character set” on
page 325.
• Collation label The collation label is the Adaptive Server IQ
collation. The client side does not use a collation label. Different databases
on a database server may have different collation labels.
For more information, see “Understanding the locale collation label” on
page 328.
Understanding the locale language
The locale language is an indicator of the language being used by the user of
the client application, or expected to be used by users of the database server.
For a list of supported locale languages, see “Language label values” on page
325.
For how to find locale settings, see “Determining locale information” on page
345.
The client library or database server determines the language component of the
locale as follows:
1 It checks the SQLLOCALE environment variable, if it exists.
For more information, see “Setting the SQLLOCALE environment
variable” on page 328.
2 On Windows and Windows NT, it checks the Adaptive Server IQ language
registry entry.
3 On other operating systems, or if the registry setting is not present, it
checks the operating system language setting.

CHAPTER 9 International Languages and Character Sets
325
Language label values The following table shows the valid language label values, together with the
equivalent ISO 639 labels:
Understanding the locale character set
Both application and server locale definitions have a character set. The
application uses its character set when requesting character strings from the
server. If character set translation is enabled, the database server compares its
character set with that of the application to determine whether character set
translation is needed.
For a list of available character set labels, see “Character set labels” on page
326.
For how to find locale settings, see “Determining locale information” on page
345.
The client library or database server determines the character set as follows:
1 If the connection string specifies a character set, it is used.
For more information, see the CharSet connection parameter in the
Adaptive Server IQ Reference Manual.
2 ODBC and Embedded SQL applications check the SQLLOCALE
environment variable, if it exists.
Language label Alternative
label ISO_639 language code
us_english english EN
french N/A FR
german N/A DE
spanish N/A ES
japanese N/A JA
korean N/A KO
portuguese portugue PT
chinese simpchin ZH
italian N/A IT
tchinese tradchin TW
polish N/A PL
norwegian norweg NO
swedish N/A SV
danish N/A DA

Understanding locales
326
For more information, see “Setting the SQLLOCALE environment
variable” on page 328.
Open Client applications check the locales.dat file in the Sybase locales
directory is used.
3 Character set information from the operating system is used to determine
the locale:
• On Windows operating systems, use the GetACP system call. This
returns the ANSI character set, not the OEM character set.
• On UNIX, default to ISO8859-1.
• On other platforms, use code page 850.
Character set labels The following table shows the valid character set label values, together with the
equivalent IANA labels and a description:
Character set
label IANA label Description
iso_1 iso_8859-1:1987 ISO 8859-1 Latin-1
cp850 <N/A> IBM CP850 - European code set
cp437 <N/A> IBM CP437 - U.S. code set
roman8 hp-rpman8 HP Roman-8
mac macintosh Standard Mac coding
sjis shift_jis Shift JIS (no extensions)
eucjis euc-jp Sun EUC JIS encoding
deckanji <N/A> DEC Unix JIS encoding
euccns <N/A> EUC CNS encoding: Traditional
Chinese with extensions
eucgb <N/A> EUC GB encoding = Simplified
Chinese
cp932 windows-31j Microsoft CP932 = Win31J-DBCS
iso88592 iso_8859-2:1987 ISO 8859-2 Latin-2 Eastern Europe
iso88595 iso_8859-5:1988 ISO 8859-5 Latin/Cyrillic
iso88596 iso_8859-6:1987 ISO 8859-6 Latin/Arabic
iso88597 iso_8859-7:1987 ISO 8859-7 Latin/Greek
iso88598 iso_8859-8:1988 ISO 8859-8 Latin/Hebrew
iso88599 iso_8859-9:1989 ISO 8859-9 Latin-5 Turkish
iso15 <N/A> ISO 8859-15 Latin1 with Euro, etc.
mac_cyr <N/A> Macintosh Cyrillic
mac_ee <N/A> Macintosh Eastern European

CHAPTER 9 International Languages and Character Sets
327
macgrk2 <N/A> Macintosh Greek
macturk <N/A> Macintosh Turkish
greek8 <N/A> HP Greek-8
turkish8 <N/A> HP Turkish-8
koi8 <N/A> KOI-8 Cyrillic
tis620 <N/A> TIS-620 Thai standard
big5 <N/A> Traditional Chinese (cf. CP950)
eucksc <N/A> EUC KSC Korean encoding (cf.
CP949)
cp852 <N/A> PC Eastern Europe
cp855 <N/A> IBM PC Cyrillic
cp856 <N/A> Alternate Hebrew
cp857 <N/A> IBM PC Turkish
cp860 <N/A> PC Portuguese
cp861 <N/A> PC Icelandic
cp862 <N/A> PC Hebrew
cp863 <N/A> IBM PC Canadian French code
page
cp864 <N/A> PC Arabic
cp865 <N/A> PC Nordic
cp866 <N/A> PC Russian
cp869 <N/A> IBM PC Greek
cp874 <N/A> Microsoft Thai SB code page
cp936 </N/A> Simplified Chinese
cp949 <N/A> Korean
cp950 <N/A> PC (MS) Traditional Chinese
cp1250 <N/A> MS Windows 3.1 Eastern European
cp1251 <N/A> MS Windows 3.1 Cyrillic
cp1252 <N/A> MS Windows 3.1 US (ANSI)
cp1253 <N/A> MS Windows 3.1 Greek
cp1254 <N/A> MS Windows 3.1 Turkish
cp1255 <N/A> MS Windows Hebrew
cp1256 <N/A> MS Windows Arabic
cp1257 <N/A> MS Windows Baltic
cp1258 <N/A> MS Windows Vietnamese
utf8 utf-8 UTF-8 treated as a character set
Character set
label IANA label Description

Understanding collations
328
Understanding the locale collation label
Each database has its own collation.
The database server determines the collation label as follows:
1 It checks the SQLLOCALE environment variable, if it exists.
For more information, see “Setting the SQLLOCALE environment
variable” on page 328.
2 It uses an internal table to find a collation label corresponding to the
language and character set.
Collation label values The collation label is a label for one of the supplied Adaptive Server IQ
collations, as listed in “Understanding collations” on page 328.
Setting the SQLLOCALE environment variable
The SQLLOCALE environment variable is a single string that consists of three
semicolon-separated assignments. It has the following form:
Charset=cslabel;Language=langlabel;CollationLabel=colabel
where cslabel, langlabel, and colabel are labels as defined in the previous
sections.
For information on how to set environment variables, see the Adaptive Server
IQ Reference Manual.
Understanding collations
This section describes the supplied collations, and provides suggestions as to
which collations to use under certain circumstances.
For information on how to create a database with a specific collation, see
“Creating a database with a named collation” on page 346.
Displaying collations
Each time the database server opens an IQ database, it displays the following
collation information:

CHAPTER 9 International Languages and Character Sets
329
• The collation (ASA_Label)
• Case sensitivity (Case)
• Blank padding (Blank Padding) if it was specified when the database was
created.
You can also see the collation of your current database by using the dbcollat
utility to write the collation into a file:
dbcollat -c "
connection-string
"
filename
For example, you might extract the collation from the asiqdemo database as
follows:
dbcollat -c "uid=DBA;pwd=SQL;eng=myhost_asiqdemo"
demo_col
You can display the contents of filename from the File menu in dbisql.
To see details of any collation that exists on your system, use the -z option of
dbcollat. For example, to extract collation 850, you could enter:
dbcollat -c "uid=DBA;pwd=SQL;eng=myhost_asiqdemo" -z
850 demo_col
Supplied collations
The following collations are supplied with Adaptive Server IQ.
Collation
label Type Description
437LATIN1 OEM Code Page 437, Latin 1, Western
437ESP OEM Code Page 437, Spanish
437SVE OEM Code Page 437, Swedish/Finnish
819CYR ANSI Code Page 819, Cyrillic
819DAN ANSI Code Page 819, Danish
819ELL ANSI Code Page 819, Greek
819ESP ANSI Code Page 819, Spanish
819ISL ANSI Code Page 819, Icelandic
819LATIN1 ANSI Code Page 819, Latin 1, Western
819LATIN2 ANSI Code Page 819, Latin 2, Central/Eastern
European
819NOR ANSI Code Page 819, Norwegian
819RUS ANSI Code Page 819, Russian

Understanding collations
330
819SVE ANSI Code Page 819, Swedish/Finnish
819TRK ANSI Code Page 819, Turkish
850CYR OEM Code Page 850, Cyrillic, Western
850DAN OEM Code Page 850, Danish
850ELL OEM Code Page 850, Greek
850ESP OEM Code Page 850, Spanish
850ISL OEM Code Page 850, Icelandic
850LATIN1 OEM Code Page 850, Latin 1
850LATIN2 OEM Code Page 850, Latin 2, Central/Eastern
European
850NOR OEM Code Page 850, Norwegian
850RUS OEM Code Page 850, Russian
850SVE OEM Code Page 850, Swedish/Finnish
850TRK OEM Code Page 850, Turkish
852LATIN2 OEM Code Page 852, Latin 2, Central/Eastern
European
852CYR OEM Code Page 852, Cyrillic
852POL OEM Code Page 852, Polish
855CYR OEM Code Page 855, Cyrillic
856HEB OEM Code Page 856, Hebrew
857TRK OEM Code Page 857, Turkish
860LATIN1 OEM Code Page 860, Latin 1, Western
861ISL OEM Code Page 861, Icelandic
862HEB OEM Code Page 862, Hebrew
863LATIN1 OEM Code Page 863, Latin 1, Western
865NOR OEM Code Page 865, Norwegian
866RUS OEM Code Page 866, Russian
869ELL OEM Code Page 869, Greek
920TRK ANSI Code Page 920, Turkish, ISO-8859-9
932JPN Multibyte Code Page 932, Japanese Shift-JIS
encoding
936ZHO Multibyte Code Page 936, Simplified Chinese, GB
2312-80 8-bit encoding
949KOR Multibyte Code Page 949, Korean KS C 5601-1987
encoding, Wansung
950TWN Multibyte Code Page 950, Traditional Chinese, Big 5
Encoding
Collation
label Type Description

CHAPTER 9 International Languages and Character Sets
331
ANSI or OEM?
Adaptive Server IQ collations are based on code pages that are designated as
either ANSI or OEM. In most cases, use of an ANSI code page is
recommended.
If you choose to use an ANSI code page, you must not use the ODBC
translation driver in the ODBC data source configuration window.
If you choose to use an OEM code page, you must do the following:
• Choose a code page that matches the OEM code pages on your users' client
machines.
1250LATIN2 ANSI Code Page 1250, Windows Latin 2,
Central/Eastern European
1250POL ANSI Code Page 1250, Windows Latin 2, Polish
1252LATIN1 ANSI Code Page 1252, Windows Latin 1, Western
SJIS Multibyte Japanese Shift-JIS Encoding
SJIS2 Multibyte Japanese Shift-JIS Encoding, Sybase
Adaptive Server Enterprise-compatible
EUC_JAPAN Multibyte Japanese EUC JIS X 0208-1990 and JIS X
0212-1990 Encoding
EUC_CHINA Multibyte Simplified Chinese GB 2312-80 Encoding
EUC_TAIWAN Multibyte Taiwanese Big 5 Encoding
EUC_KOREA Multibyte Korean KS C 5601-1992 Encoding, Johad,
Code Page 1361
ISO_1 ANSI ISO8859-1, Latin 1, Western
ISO_BINENG ANSI Binary ordering, English ISO/ASCII 7-bit
letter case mappings (IQ default)
ISO1LATIN1 ANSI ISO8859-1, ISO Latin 1, Western, Latin 1
Ordering
ISO9LATIN1 ANSI ISO8859-15, ISO Latin 9, Western, Latin 1
Ordering
WIN_LATIN1 ANSI Code Page 1252 Windows Latin 1, Western,
ISO8859-1 with extensions
WIN_LATIN5 ANSI Code Page 1254 Windows Latin 5, Turkish,
ISO8859-9 with extensions
UTF8 Multibyte UCS-4 Transformation Format
Collation
label Type Description

Understanding collations
332
• When setting up data sources for Windows-based ODBC applications, do
choose the Adaptive Server Anywhere or Adaptive Server IQ translation
driver in the ODBC data source configuration.
The translation driver converts between the OEM code page on your
machine and the ANSI code page used by Windows. If the database
collation is a different OEM code page than the one on your machine, an
incorrect translation will be applied.
Both DBISQL and Sybase Central detect whether the database collation is
ANSI or OEM by checking the first few characters, and either enable or disable
translation as needed.
For more information about code page translation in DBISQL, see the
CHAR_OEM_TRANSLATION option in the Adaptive Server IQ Reference
Manual.
Notes on ANSI collations
The ISO_1 collation ISO_1 is provided for compatibility with the Adaptive Server Enterprise
default ISO_1 collation. The differences are as follows:
• The lower case letter sharp s (\xDF) sorts with the lower case s in Adaptive
Server IQ and Adaptive Server Anywhere, but after ss in Adaptive Server
Enterprise.
• The ligatures corresponding to AE and ae (\xC6 and \xE6) sort after A and
a respectively in Adaptive Server IQ and Adaptive Server Anywhere, but
after AE and ae in Adaptive Server Enterprise.
The 1252LATIN1
collation This collation is the same as WIN_LATIN1 (see below), but includes the euro
currency symbol and several other characters (Z-with-caron and z-with-caron).
If you do not wish to use the default collation ISO_BINENG, the recommended
collation in most cases is 1252LATIN1 on Windows NT, and ISO1LATIN1 on
UNIX.
Windows NT service patch 4 changes the default character set in many locales
to a new 1252 character set on which 1252 LATIN1 is based. If you have this
service patch, you should use this collation instead of WIN_LATIN1.
The euro symbol sorts with the other currency symbols.
The WIN_LATIN1
collation WIN_LATIN1 is similar to ISO_1, except that Windows has defined characters
in places where ISO_1 says "undefined", specifically the range \x80-\xBF. The
differences from Adaptive Server Enterprise's ISO_1 are as follows:

CHAPTER 9 International Languages and Character Sets
333
• The upper case and lower case Icelandic Eth (\xD0 and \xF0) is sorted with
D in Adaptive Server IQ and Adaptive Server Anywhere, but after all
other letters in Adaptive Server Enterprise.
• The upper case and lower case Icelandic Thorn (\xD0 and \xF0) is sorted
with T in Adaptive Server IQ and Adaptive Server Anywhere, but after all
other letters in Adaptive Server Enterprise.
• The upper-case Y-diaresis (\x9F) is sorted with Y in Adaptive Server IQ
and Adaptive Server Anywhere, and case converts with lower-case Y-
diaresis (\xFF). In Adaptive Server Enterprise it is undefined and sorts
after \x9E.
• The lower case letter sharp s (\xDF) sorts with the lower case s in Adaptive
Server IQ and Adaptive Server Anywhere, but after ss in Adaptive Server
Enterprise.
• Ligatures are two characters combined into a single character. The
ligatures corresponding to AE and ae (\xC6 and \xE6) sort after A and a
respectively in Adaptive Server IQ and Adaptive Server Anywhere, but
after AE and ae in Adaptive Server Enterprise.
• The ligatures corresponding to OE and oe (\x8C and \x9C) sort with O in
Adaptive Server IQ and Adaptive Server Anywhere, but after OE and oe
in Adaptive Server Enterprise.
• The upper case and lower case letter S with caron (\x8A and \x9A) sorts
with S in Adaptive Server IQ and Adaptive Server Anywhere, but is
undefined in Adaptive Server Enterprise, sorting after \x89 and \x99.
The ISO1LATIN1
collation This collation is the same as ISO_1, but with sorting for values in the range A0-
BF. For compatibility with Adaptive Server Enterprise, the ISO_1 collation has
no characters for 0xA0-0xBF. However the ISO Latin 1 character set on which
it is based does have characters in these positions. The ISO1LATIN1 collation
reflects the characters in these positions.
If you are not concerned with Adaptive Server Enterprise compatibility,
ISO1LATIN1 is generally recommended instead of ISO_1.
The ISO9LATIN1
collation This collation is the same as ISO1LATIN1, but includes the euro currency
symbol and the other new characters included in the 1252 LATIN1 collation.
If your machine uses the ISO Latin 9 character set, and you are willing to
sacrifice some of the optimal performance of ISO_BINENG, then you should
use this collation.

Understanding collations
334
Notes on OEM collations
The following table shows the built-in collations that correspond to OEM code
pages. The table and the corresponding collations were derived from several
manuals from IBM concerning National Language Support, subject to the
restrictions mentioned above. (This table represents the best information
available at the time of writing. Due to continuing rapid geopolitical changes,
the table may contain names for countries that no longer exist.)
Country Language
Primary
Code
Page Primary
Collation
Second-
ary Code
Page Secondary
Collation
Argentina Spanish 850 850ESP 437 437ESP
Australia English 437 437LATIN1 850 850LATIN1
Austria German 850 850LATIN1 437 437LATIN1
Belgium Belgian
Dutch
850 850LATIN1 437 437LATIN1
Belgium Belgian
French
850 850LATIN1 437 437LATIN1
Belarus Belarussian 855 855CYR
Brazil Portuguese 850 850LATIN1 437 437LATIN1
Bulgaria Bulgarian 855 855CYR 850 850CYR
Canada Cdn French 850 850LATIN1 863 863LATIN1
Canada English 437 437LATIN1 850 850LATIN1
Croatia Croatian 852 852LATIN2 850 850LATIN2
Czech
Republic
Czech 852 852LATIN2 850 850LATIN2
Denmark Danish 850 850DAN
Finland Finnish 850 850SVE 437 437SVE
France French 850 850LATIN1 437 437LATIN1
Germany German 850 850LATIN1 437 437LATIN1
Greece Greek 869 869ELL 850 850ELL
Hungary Hungarian 852 852LATIN2 850 850LATIN2
Iceland Icelandic 850 850ISL 861 861ISL
Ireland English 850 850LATIN1 437 437LATIN1
Israel Hebrew 862 862HEB 856 856HEB
Italy Italian 850 850LATIN1 437 437LATIN1
Mexico Spanish 850 850ESP 437 437ESP
Nether-
lands
Dutch 850 850LATIN1 437 437LATIN1

CHAPTER 9 International Languages and Character Sets
335
New
Zealand
English 437 437LATIN1 850 850LATIN1
Norway Norwegian 865 865NOR 850 850NOR
Peru Spanish 850 850ESP 437 437ESP
Poland Polish 852 852LATIN2 850 850LATIN2
Portugal Portuguese 850 850LATIN1 860 860LATIN1
Romania Romanian 852 852LATIN2 850 850LATIN2
Russia Russian 866 866RUS 850 850RUS
S. Africa Afrikaans 437 437LATIN1 850 850LATIN1
S. Africa English 437 437LATIN1 850 850LATIN1
Slovak
Republic
Slovakian 852 852LATIN2 850 850LATIN2
Slovenia Slovenian 852 852LATIN2 850 850LATIN2
Spain Spanish 850 850ESP 437 437ESP
Sweden Swedish 850 850SVE 437 437SVE
Switzer-
land
French 850 850LATIN1 437 437LATIN1
Switzer-
land
German 850 850LATIN1 437 437LATIN1
Switzer-
land
Italian 850 850LATIN1 437 437LATIN1
Turkey Turkish 857 857TRK 850 850TRK
UK English 850 850LATIN1 437 437LATIN1
USA English 437 437LATIN1 850 850LATIN1
Venezuela Spanish 850 850ESP 437 437ESP
Yugoslavia Maced-
onian
852 852LATIN2 850 850LATIN2
Yugoslavia Serbian
Cyrillic
855 855CYR 852 852CYR
Yugoslavia Serbian
Latin
852 852LATIN2 850 850LATIN2
Country Language
Primary
Code
Page Primary
Collation
Second-
ary Code
Page Secondary
Collation

Understanding character set translation
336
Using multibyte collations
This section describes how multibyte character sets are handled. The
description applies to the supported collations and to any multibyte custom
collations you may create.
Adaptive Server IQ provides collations using several multibyte character sets.
For a complete listing, see “Understanding collations” on page 328
Understanding collations.
Adaptive Server IQ supports variable-width character sets. In these sets, some
characters are represented by one byte, and some by more than one, to a
maximum of four bytes. The value of the first byte in any character indicates
the number of bytes used for that character, and also indicates whether the
character is a space character, a digit, or an alphabetic (alpha) character.
Adaptive Server IQ does not support fixed-length multibyte character sets such
as 2-byte Unicode (UCS-2) or 4-byte Unicode (UCS-4).
Understanding character set translation
Adaptive Server IQ can carry out character set translation among character sets
that represent the same characters, but at different positions in the character set
or code page. There needs to be a degree of compatibility between the character
sets for this to be possible. For example, character set translation is possible
between EUC-JIS and Shift-JIS character sets, but not between EUC-JIS and
OEM code page 850.
This section describes how Adaptive Server IQ carries out character set
translation. This information is provided for advanced users, such as those who
may be deploying applications or databases in a multi-character-set
environment.
Character translation for database messages
Error and other messages from the database software are held in a language
resource library. Localized versions of this library are provided with localized
versions of Adaptive Server IQ.
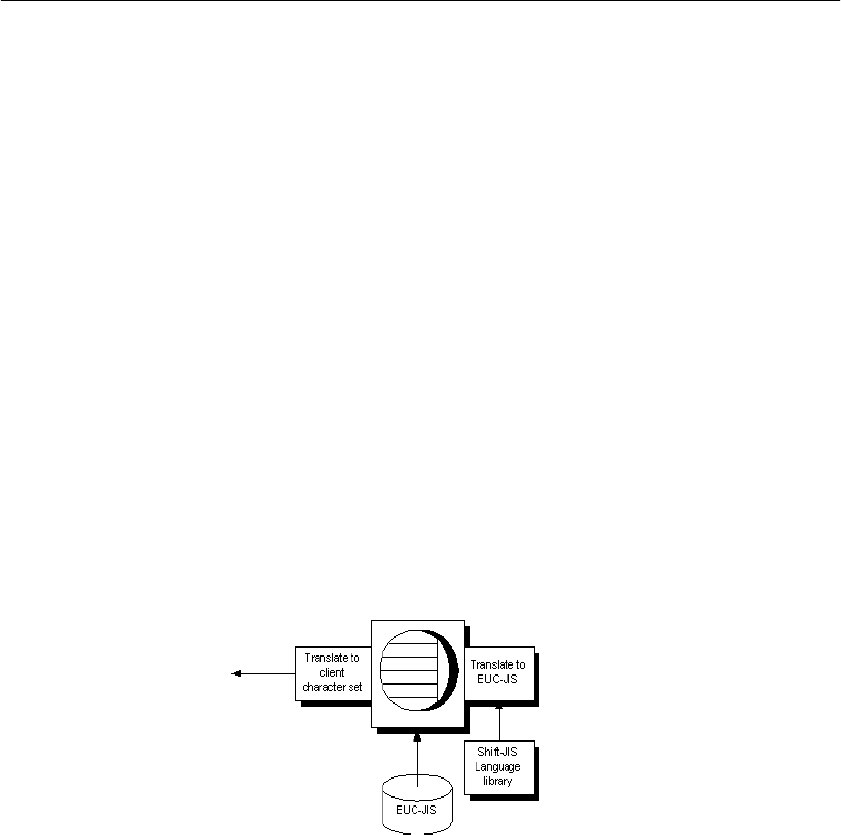
CHAPTER 9 International Languages and Character Sets
337
Client application users may see messages from the database as well as data
from the database. Some database messages, which are strings from the
language library, may include placeholders that are filled by characters from
the database. For example, if you execute a query with a column that does not
exist, the returned error messages is:
Column column-name not found
where column-name is filled in from the database.
To present these kinds of information to the client application in a consistent
manner, even if the database is in a different character set from the language
library, the database server automatically translates the characters of the
messages so that they match the character set used in the database collation.
❖To use character translation for database messages:
• Ensure that the collation for your database is compatible with the character
set used on your computer, and with the character set used in the Adaptive
Server IQ language resource library. The language resource library differs
among different localized versions of Adaptive Server IQ.
You must check that the characters of interest to you exist in each character
set.
Messages are always translated into the database collation character set,
regardless of whether the -ct command-line option is used.
A further character set translation is carried out if the database server -ct
command-line option is used, and if the client character set is different from
that used in the database collation.

Understanding character set translation
338
Connection strings and character sets
Connection strings present a special case for character set translation. The
connection string is parsed by the client library, in order to locate or start a
database server. This parsing is done with no knowledge of the server character
set or language.
The interface library parses the connection string as follows:
1 It is broken down into its keyword = value components. This can be done
independently of character set, as long as you do not use the curly braces
{} around CommLinks parameters. Instead, use the recommended
parentheses (). Curly braces are valid follow bytes in some multi-byte
character sets.
2 The server is located. The server name is interpreted according to the
character set of the client machine. In the case of Windows operating
systems, the ANSI character set is used. Extended chars can be used unless
they cause character set conversion issues between client and server
machine.
For maximum compatibility among different machines, you should use
server names built from ASCII characters 1 to 128 , using no punctuation
characters. Server names are truncated at 40 characters.
3 The DatabaseName or DatabaseFile parameter is interpreted in the
database server character set.
4 Once the database is located, the remaining connection parameters are
interpreted according to its character set.
Avoiding character-set translation
There is a performance cost associated with character set translation. If you can
set up an environment such that no character set translation is required, then
you do not have to pay this cost, and your setup is simpler to maintain.
If you work with a single-byte character set and are concerned only with seven-
bit ASCII characters (values 1 through 127), then you do not need character set
translation. Even if the code pages are different in the database and on the client
operating system, they are compatible over this range of characters. Many
English-language installations will meet these requirements.
If you do require use of extended characters, there are other steps you may be
able to take:

CHAPTER 9 International Languages and Character Sets
339
• If the code page on your client machine operating system matches that
used in the database, no character set translation is needed for data in the
database.
For example, in many environments it is appropriate to use the
1252LATIN1 collation in your database, which corresponds to the
Windows NT code page in many single-byte environments.
• If you are able to use a version of Adaptive Server IQ built for your
language, and if you use the code page on your operating system, no
character set translation is needed for database messages. The character set
used in the Adaptive Server IQ message strings is as follows:
Also, recall that client/server character set translation takes place only if the
database server is started using the -ct command-line switch.
Collation internals
This section describes internal technical details of collations, including the file
format of collation files.
This section is of particular use if you want to create a database using a custom
collation. For information on the steps involved, see “Creating a custom
collation” on page 349 and “Creating a database with a custom collation” on
page 351.
You can create a database using a collation different from the supplied
collations. This section describes how to build databases using such a custom
collation.
In building multibyte custom collations, you can specify which ranges of
values for the first byte signify single- and double-byte (or more) characters,
and which specify space, alpha, and digit characters. However, all first bytes of
value less than \x40 must be single-byte characters, and no follow bytes may
have values less than \x40. This restriction is satisfied by all supported
encodings.
Language Character set
English 1252LATIN1
French 1252LATIN1
German 1252LATIN1
Japanese SJIS2

Collation internals
340
Collation files may include the following elements:
• Comment lines, which are ignored by the database.
• A title line.
• A collation sequence section.
• An Encodings section.
• A Properties section.
Comment lines
In the collation file, spaces are generally ignored. Comment lines start with
either the percent sign (%) or two dashes (--).
The title line
The first non-comment line must be of the form:
Collation
label
(
name
)
In this statement:
For example, the Shift-JIS collation file contains the following collation line,
with label SJIS and name (Japanese Shift-JIS Encoding):
Collation SJIS (Japanese Shift-JIS Encoding)
Item Description
Collation A required keyword.
label
The collation label, which appears in the system tables as
SYS.SYSCOLLATION.collation_label and
SYS.SYSINFO.default_collation. The label must contain no
more than 10 characters, and must not be the same as one of the
built-in collations. (In particular, do not leave the collation label
unchanged.)
name
A descriptive term, used for documentation purposes. The name
should contain no more than 128 characters.

CHAPTER 9 International Languages and Character Sets
341
The collation sequence section
After the title line, each non-comment line describes one position in the
collation. The ordering of the lines determines the sort ordering used by the
database, and determines the result of comparisons. Characters on lines
appearing higher in the file (closer to the beginning) sort before characters that
appear later.
The form of each line in the sequence is:
[
sort-position
] :
character
[ [,
character
] ...]
or
[
sort-position
] :
character
[
lowercase
uppercase
]
Descriptions of
arguments
Multiple characters may appear on one line, separated by commas (,). In this
case, these characters are sorted and compared as if they were the same
character.
Specifying character
and sort-position Each character and sort position is specified in one of the following ways:
The following are some sample lines for a collation:
% Sort some special characters at the beginning:
Argument Description
sort-position Optional. Specifies the position at which the characters on
that line will sort. Smaller numbers represent a lesser value,
so will sort closer to the beginning of the sorted set.
Typically, the sort-position is omitted, and the characters sort
immediately following the characters from the previous sort
position.
character The character whose sort-position is being specified.
lowercase Optional. Specifies the lowercase equivalent of the character.
If not specified, the character has no lowercase equivalent.
uppercase Optional. Specifies the uppercase equivalent of the character.
If not specified, the character has no uppercase equivalent.
Specification Description
\dnnn Decimal number, using digits 0-9 (such as \d001)
\xhh Hexadecimal number, using digits 0-9 and letters a-f or A-
F (such as \xB4)
’c’ Any character in place of c (such as ’,’)
cAny character other than quote (’), backslash (\), colon (:)
or comma (,). These characters must use one of the
previous forms.

Collation internals
342
: ’ ’
: _
: \xF2
: \xEE
: \xF0
: -
: ’,’
: ;
: ’:’
: !
% Sort some letters in alphabetical order
: A a A
: a a A
: B b B
: b b B
% Sort some E’s from code page 850,
% including some accented extended characters:
: e e E, \x82 \x82 \x90, \x8A \x8A \xD4
: E e E, \x90 \x82 \x90, \xD4 \x8A \xD4
Other syntax notes For databases using case-insensitive sorting and comparison (that is, CASE
IGNORE was specified when the database was created), the lowercase and
uppercase mappings are used to find the lowercase and uppercase characters
that will be sorted together.
For multibyte character sets, the first byte of a character is listed in the collation
sequence, and all characters with the same first byte are sorted together, and
ordered according to the value of the following bytes. For example, the
following is part of the Shift-JIS collation file:
: \xfb
: \xfc
: \xfd
In this collation, all characters with first byte \xfc come after all characters with
first byte \xfb and before all characters with first byte \xfd. The two-byte
character \xfc \x01 would be ordered before the two-byte character \xfc \x02.
Any characters omitted from the collation are added to the end of the collation.
The tool that processes the collation file issues a warning.
The Encodings section
The Encodings section is optional, and follows the collation sequence. It is not
useful for single-byte character sets.

CHAPTER 9 International Languages and Character Sets
343
The Encodings section lists which characters are lead-bytes, for multi-byte
character sets, and what are valid follow-bytes.
For example, the Shift-JIS Encodings section is as follows:
Encodings:
[\x00-\x80,\xa0-\xdf,\xf0-\xff]
[\x81-\x9f,\xe0-\xef][\x40-\x7e,\x80-\xfc]
The first line following the section title lists valid single-byte characters. The
square brackets enclose a comma-separated list of ranges. Each range is listed
as a hyphen-separated pair of values. In the Shift-JIS collation, values \x00 to
\x80 are valid single-byte characters, but \x81 is not a valid single-byte
character.
The second line following the section title lists valid multibyte characters. Any
combination of one byte from the second line followed by one byte from the
first is a valid character. Therefore \x81\x40 is a valid double-byte character,
but \x81 \x00 is not.
The Properties section
The Properties section is optional, and follows the Encodings section.
If a Properties section is supplied, an Encodings section must be supplied also.
The Properties section lists values for the first-byte of each character that
represent alphabetic characters, digits, or spaces.
The Shift-JIS Properties section is as follows:
Properties:
space: [\x09-\x0d,\x20]
digit: [\x30-\x39]
alpha: [\x41-\x5a,\x61-\x7a,\x81-\x9f,\xe0-\xef]
This indicates that characters with first bytes \x09 to \x0d, as well as \x20, are
to be treated as space characters, digits are found in the range \x30 to \x39
inclusive, and alphabetic characters in the four ranges \x41-\x5a, \x61-\x7a,
\x81-\x9f, and \xe0-\xef.

International language and character set tasks
344
International language and character set tasks
This section groups together the tasks associated with international language
and character set issues.
Finding the default collation
If you do not explicitly specify a collation when creating a database, a default
collation is used. For IQ databases, the default collation is always
ISO_BINENG.
Configuring your character set environment
This section describes how to set up your computing environment so that
character set issues are handled properly. If you set your locale environments
properly, then you do not need to turn on character set translation between
client and server.
❖To configure your character set environment:
1 Determine the default locale of each computing platform in your
environment. The default locale is the character set and language of each
computer. On Windows operating systems, the character set is the ANSI
code page.
For how to find locale information, see “Determining locale information”
on page 345.
2 Decide whether the locale settings are appropriate for your environment.
For more information, see “Understanding collations” on page 328.
3 If the default settings are inappropriate, decide on a character set,
language, and database collation that matches your data and avoids
character set translation.
For more information, see “Avoiding character-set translation” on page
338.
4 Set locales on each of the machines in the environment to these values.
For more information, see “Setting locales” on page 346.
5 Create your database using the default collation. If the default collation
does not match your needs, create a database using a named collation.

CHAPTER 9 International Languages and Character Sets
345
For more information, see “Creating a database with a named collation”
on page 346.
When choosing the collation for your database,
• Choose a collation that uses a character set and sort order appropriate for
the data in the database. It is often the case that there are several alternative
collations that meet this requirement, including some that are OEM
collations and some that are ANSI collations.
• There is a performance cost, as well as extra complexity in system
configuration, when you use character set translation. Choose a collation
that avoids the need for character set translation.
You can avoid character set translation by using a collation sequence in the
database that matches the character set in use on your client machine
operating system. In the case of Windows operating systems on the client
machine, choose the ANSI character set.
For information, see “Avoiding character-set translation” on page 338.
Determining locale information
You can determine locale information using system functions.
For a complete list, see the Adaptive Server IQ Reference Manual.
❖To determine the locale of a database server:
1 Start DBISQL, and connect to a database server.
2 Execute the following statement to determine the database server
character set:
SELECT PROPERTY( ’CharSet’ )
The query returns one of the supported character sets listed in “Character
set labels” on page 326.
3 Execute the following statement to determine the database server
language:
SELECT PROPERTY( ’Language’ )
The query returns one of the supported languages listed in “Language
label values” on page 325.
4 Execute the following statement if you need to determine a good
alternative to the default collation, ISO_BINENG:

International language and character set tasks
346
SELECT PROPERTY( ’DefaultCollation’ )
The query returns one of the collations listed in “Supplied collations” on
page 329.
Notes To obtain client locale information, connect to a database server running on
your current machine.
To obtain the character set for an individual database, execute the following
statement:
SELECT DB_PROPERTY ( ’CharSet’ )
Setting locales
You can use the default locale on your operating system, or explicitly set a
locale for use by the Adaptive Server IQ components on your machine.
❖To set the Adaptive Server IQ locale on a computer:
1 If the default locale is appropriate for your needs, you do not need to take
any action.
To find out the default locale of your operating system, see “Determining
locale information” on page 345.
2 If you need to change the locale, create a SQLLOCALE environment
variable with the following value:
Charset=cslabel;Language=langlabel;CollationLabel=colabel
where cslabel is a character set label from the list in “Character set labels”
on page 326, langlabel is a language label from the list in “Language label
values” on page 325, and colabel is from the list in “Understanding
collations” on page 328 Understanding collations, or is a custom collation
label.
For information on how to set environment variables on different
operating systems, see the Adaptive Server IQ Reference Manual.
Creating a database with a named collation
The default collation for an IQ database is always ISO_BINENG. You can
specify a different collation for each database when you create it.
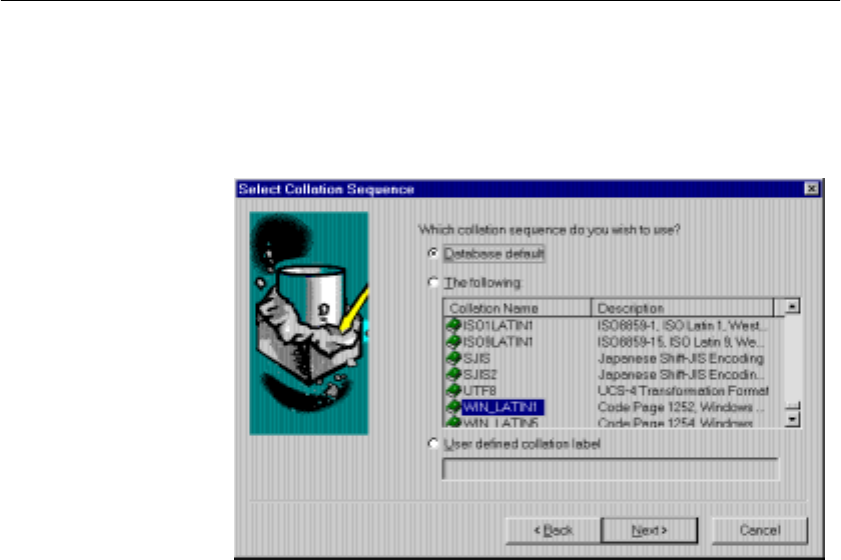
CHAPTER 9 International Languages and Character Sets
347
❖To specify a database collation when creating a database (Sybase
Central):
• You can use the Create Database wizard in Sybase Central to create a
database. The wizard has a Collation Sequence page where you choose a
collation from a list.
You can also see the name of your current collation in Sybase Central. Right-
click on the database whose collation you need. In the dropdown menu select
Properties, and then click the Extended Information tab.
❖To specify a database collation when creating a database (SQL)
1 List the supplied collation sequences:
SELECT * FROM SYS.SYSCOLLATIONMAPPINGS
The first column of the list is the collation label, which you supply when
creating the database.
437LATIN1 Code Page 437, Latin 1, Western
437ESP Code Page 437, Spanish
437SVE Code Page 437, Swedish/Finnish
819CYR Code Page 819, Cyrillic
819DAN Code Page 819, Danish
819ELL Code Page 819, Greek
...
2 Use the CREATE DATABASE statement to create a database. The
following statement creates a database with a Greek collation:

International language and character set tasks
348
CREATE DATABASE ’mydb.db’
COLLATION ’819ELL’
IQ SIZE 100
IQ PATH ’myiq.iq’
Starting a database server using character set translation
Character set translation takes place if the client and server locales are
different, but only if you specifically turn on character set conversion on the
database server command line.
❖To enable character-set translation on a database server:
• Start the database server using the -ct command-line option. For
example:
asiqsrv12 -ct asiqdemo.db
or on UNIX:
start_asiq -ct asiqdemo.db
Using ODBC code page translation
Adaptive Server IQ provides an ODBC translation driver. This driver
converts characters between OEM and ANSI code pages. It allows Windows
applications using ANSI code pages to be compatible with databases that use
OEM code pages in their collations.
Note If you use an ANSI character set in your database, and are using ANSI
character set applications, you do not need to use this translation driver.
The translation driver carries out a mapping between the OEM code page in use
in the "DOS box" and the ANSI code page used in the Windows operating
system. If your database uses the same code page as the OEM code page, the
characters are translated properly. If your database does not use the same code
page as your machine's OEM code page, you will still have compatibility
problems.
Embedded SQL does not provide any such code page translation mechanism.

CHAPTER 9 International Languages and Character Sets
349
❖To use the ODBC translation driver:
1 In the ODBC Administrator, choose Add to create a new Adaptive Server
IQ data source or Configure to edit an existing Adaptive Server IQ data
source.
2 On the ODBC tab of the ODBC Configuration for Adaptive Server IQ
window, click Select and choose Adaptive Server Anywhere 6.0
Translator from the list of translation drivers.
Character set translation for Sybase Central and DBISQL
DBISQL and Sybase Central both employ internal OEM to ANSI code page
translation if the database uses an OEM character set. As with the ODBC
translation driver, there is an assumption that the OEM code page on the local
machine matches the data in the database.
❖To turn off character set translation in DBISQL:
• Set the DBISQL option CHAR_OEM_Translation to a value of OFF.
SET OPTION CHAR_OEM_TRANSLATION = ’OFF’
For more information on OEM to ANSI character set translation in Interactive
SQL, see CHAR_OEM_TRANSLATION option in the Adaptive Server IQ
Reference Manual.
Creating a custom collation
If none of the supplied collations meet your needs, you can modify a supplied
collation to create a custom collation. You can then use this custom collation
when creating a database.
For a list of supplied collations, see “Supplied collations” on page 329.
❖To create a custom collation:
1 Decide on a starting collation.
You should choose a collation as close as possible to the one you want to
create as a starting point for your custom collation.
For a listing of supplied collations, see “Understanding collations” on
page 328.
2 Create a custom collation file.

International language and character set tasks
350
You do this using the Collation utility. The output is a collation file.
For example, the following statement extracts the 1252LATIN1 collation
into a file named mycol.col:
dbcollat -z 1252LATIN1 mycol.col
3 Edit the custom collation file.
Open the collation file (in this case mycol.col) in a text editor.
4 Change the name of the collation.
The name of the collation is specified on a line near the top of the file,
starting with Collation. You should edit this line to provide a new name,
The name you need to change is the second word on the line: in this case
1252LATIN1.
The other entries on this line are descriptive only, and do not need to be
changed.
5 Change the collation definition.
Make the changes you wish in the custom collation file to define your new
collation.
For information on the collation file contents and format, see “Collation
internals” on page 339.
6 Convert the file to SQL scripts.
You do this using the dbcollat command-line utility using the -d switch.
For example, the following command line creates the mycustmap.sql file
and mycustom.sql files from the mycol.col collation file:
dbcollat -d mycol.col mycustmap.sql mycustom.sql
7 Add the SQL scripts to the scripts in your installation.
The scripts used when creating databases are held in the scripts
subdirectory of your Adaptive Server IQ installation directory. Append the
contents of mycustmap.sql to custmap.sql, and the contents of
mycustom.sql to end of custom.sql.
The new collation is now in place, and can be used when creating
databases.
8 Restart the database.

CHAPTER 9 International Languages and Character Sets
351
Stop and restart the database server in order for it to recognize the new
collations and insert them into system tables SYSCOLLATION and
SYSCOLLATIONMAPPINGS.
Creating a database with a custom collation
If none of the supplied collations meet your needs, you can create a database
using a custom collation. The custom collation is used in indexes and any string
comparisons.
❖To create a database with a custom collation:
1 Create a custom collation.
You must have a custom collation in place to use when creating a database.
For instructions on how to create custom collations, see “Creating a
custom collation” on page 349.
2 Create the new database.
Use the CREATE DATABASE statement or Sybase Central, specifying the
name of your custom collation.
For example, the following statement creates a database named newcol.db
using the custom collation sequence newcol.
CREATE DATABASE ’newcol.db’
COLLATION ’newcol’
IQ PATH ’newcol.iq’
Compatibility issues
Prior to version 12.0, Adaptive Server IQ always used the ASCII sort order,
which sorts uppercase characters before lowercase. As of version 12.4.2, by
default IQ databases sort data in the same way as pre-version 12 Adaptive
Server IQ. The default applies these CREATE DATABASE options:
CREATE DATABASE
dbname
COLLATION ’ISO_BINENG’
BLANK PADDING ON
CASE RESPECT

Performance issues
352
With these options, uppercase characters precede all lowercase characters in
the collation sequence. For example, ’XYZ’ sorts before ’abc’ with these
options, just as it did in older versions of Adaptive Server IQ.
Performance issues
Performance for character data is better with a binary character set and
collation sequence than with a non-binary one.
To maximize performance, create a database with these default option settings:
CREATE DATABASE
dbname
COLLATION ’ISO_BINENG’
CASE RESPECT
These options result in a binary character set and collation sequence. All other
settings for these two options form a non-binary character set and collation
sequence.
The disadvantage of these settings is that uppercase characters are always
sorted before lowercase ones. For example, BANANA sorts before apple. If
you prefer a more natural sort order, but still need a case sensitive database, and
you are willing to sacrifice some degree of performance, use the collation
ISO_1 instead of the default, ISO_BINENG.
Note When your database uses the CASE RESPECT option, your user ID and
password become case sensitive. This means that you must enter them as they
have been defined, and the DBA’s user ID and default password must be
entered in uppercase. For example, you could enter the CONNECT statement as
follows:
connect database dbasiq user DBA identified by SQL
You would not be able to connect if you entered this statement as:
connect database dbasiq user dba identified by sql
353
CHAPTER 10 Managing User IDs and
Permissions
About this chapter Each user of a database must be assigned a unique user ID: the name they
type when connecting to the database. This chapter describes how to
manage user IDs.
An overview of database permissions
Proper management of user IDs and permissions is essential in a data
warehouse. It allows users to carry out their jobs effectively, while
maintaining the security and privacy of appropriate information within the
database.
You use SQL statements for assigning user IDs to new users of a database,
granting and revoking permissions for database users, and finding out the
current permissions of users.
Database permissions are assigned to user IDs. Throughout this chapter,
the term user is used as a synonym for user ID. You should remember,
however, that permissions are granted and revoked for each user ID.
Setting up individual user
IDs Even if there are no security concerns regarding a multiuser database,
there are good reasons for setting up an individual user ID for each user.
The administrative overhead for individual user IDs is very low if a group
with the appropriate permissions is set up. Groups of users are discussed
later in this chapter.
Among the reasons for using individual user IDs are the following:
• The network server screen and the listing of connections in Sybase
Central are both much more useful with individual user IDs, as you
can tell which connections are which users.
• The backup log identifies the user ID that created the backup.

An overview of database permissions
354
DBA authority overview
When a database is created, a single usable user ID is created. This first user
ID is DBA and the password is initially set to SQL. The DBA user ID is
automatically given DBA permissions, also called DBA authority, within the
database. This level of permission enables the DBA user ID to carry out any
activity in the database: create tables, change table structures, create new user
IDs, revoke permissions from users, and so on.
Note To ensure database security, the DBA needs to change the password from
the default of SQL to a new value.
Users with DBA
authority A user with DBA authority is referred to as the database administrator or
database owner. In this chapter, frequent reference is made to the database
administrator, or the DBA. This is shorthand for any user or users with DBA
authority.
Although DBA authority may be granted or transferred to other user IDs, in
this chapter it is assumed that the DBA user ID is the database administrator,
and the abbreviation DBA is used interchangeably to mean both the DBA user
ID and any user ID with DBA authority.
Adding new users The DBA has the authority to add new users to the database. As users are
added, they are also granted permissions to carry out tasks on the database.
Some users may need to simply look at the database information using SQL
queries, others may need to add information to the database, and others may
need to modify the structure of the database itself. Although some of the
responsibilities of the DBA may be handed over to other user IDs, the DBA is
responsible for the overall management of the database by virtue of the DBA
authority.
The DBA has authority to create database objects and assign ownership of
these objects to other user IDs
See the syntax of the commands for creating database objects, in “SQL
Language Elements” in Adaptive Server IQ Reference Manual.
DBA user ID in case
sensitive databases User IDs and passwords are actually objects in the database. For this reason, if
your database was created with the CASE RESPECT parameter, you must enter
the user ID DBA and its default password SQL in uppercase. For case
insensitive databases (the default), you can enter this user ID and password in
either uppercase or lowercase.

CHAPTER 10 Managing User IDs and Permissions
355
RESOURCE authority overview
RESOURCE authority is the permission to create database objects, such as
tables, views, and stored procedures. Resource authority may be granted only
by the DBA to other users.
Ownership permissions overview
The creator of a database object becomes the owner of that object. Ownership
of a database object carries with it permissions to carry out actions on that
object. These are not assigned to users in the same way that other permissions
in this chapter are assigned.
Owners A user who creates a new object within the database is called the owner of that
object, and automatically has permission to carry out any operation on that
object. The owner of a table may modify the structure of that table, for instance,
or may grant permissions to other database users to update the information
within the table.
The DBA has permission to modify any component within the database, and so
could delete a table created by another user, for instance. The DBA has all the
permissions regarding database objects that the owner of each object has.
The DBA is also able to create database objects for other users, and in this case
the owner of an object is not the user ID that executed the CREATE statement.
A use for this ability is discussed in “Groups without passwords”. Despite this
possibility, this chapter refers interchangeably to the owner and creator of
database objects.
Table and views permissions overview
There are several distinct permissions that may be granted to user IDs
concerning tables and views:
Permission Description
ALTER Permission to alter the structure of a table
DELETE Permission to delete rows from a table or view
INSERT Permission to insert rows into a table or view
REFERENCES Permission to create indexes on a table, and to create
unenforced foreign keys that reference a table
SELECT Permission to look at information in a table or view

Managing individual user IDs and permissions
356
Group permissions overview
Setting permissions individually for each user of a database can be a time-
consuming and error-prone process. For most databases, permission
management based on groups, rather than on individual user IDs, is a much
more efficient approach.
You can assign permissions to a group in exactly the same way as to an
individual user. You can then assign membership in appropriate groups to each
new user of the database, and they gain a set of permissions by virtue of their
group membership.
Example For example, you may create groups for different departments in a company
database (sales, marketing, and so on) and assign these groups permissions.
Each salesperson is made a member of the sales group, and automatically gains
access to the appropriate areas of the database.
Any user ID can be a member of several groups, and inherits all permissions
from each of the groups.
Managing individual user IDs and permissions
This section describes how to create new users and grant permissions to them.
For most databases, the bulk of permission management should be carried out
using groups, rather than by assigning permissions to individual users one at a
time. However, as groups are simply a user ID with special properties attached,
you should read and understand this section before moving on to the discussion
of managing groups.
Using ASE stored
procedures to manage
users
The procedures in this chapter let you manage users and groups using DBISQL
and Sybase Central. You can perform many of the same tasks using Adaptive
Server Enterprise-compatible stored procedures. If you have previously used
Adaptive Server Enterprise or pre-Version 12.0 Adaptive Server IQ, you may
prefer to use these stored procedures. For details, see “Adaptive Server
Enterprise system and catalog procedures”.
UPDATE Permission to update rows in a table or view. This may
be granted on a set of columns in a table only
ALL All the above permissions
Permission Description

CHAPTER 10 Managing User IDs and Permissions
357
Creating new users
A new user is added to a database by the DBA using the GRANT CONNECT
statement. For example:
❖To add a new user to a database, with user ID M_Haneef and password
welcome:
1 From DBISQL, connect to the database as a user with DBA authority.
2 Issue the SQL statement:
GRANT CONNECT TO M_Haneef
IDENTIFIED BY welcome
Only the DBA has the authority to add new users to a database.
Initial permissions for
new users By default, new users are not assigned any permissions beyond connecting to
the database and viewing the system tables. In order to access tables in the
database they need to be assigned permissions.
The DBA can set the permissions granted automatically to new users by
assigning permissions to the special PUBLIC user group, as discussed in
“Special groups”.
Using a DBISQL
command file to set
up new users
You may want to put commands for setting up new users into a DBISQL
command file. Command files help you standardize the way you perform
processes you repeat over time. For details on using command files, see the
chapter “Getting Started with DBISQL” in the Introduction to Adaptive Server
IQ.
Creating users in
Sybase Central
❖To create a user in Sybase Central:
1 Connect to the database.
2 Click the Users and Groups folder for that database.
3 Double-click Add User. A Wizard is displayed, which leads you through
the process.
For more information, see the Sybase Central online Help.
Changing a password
Changing a user’s
password If you have DBA authority, you can change the password of any existing user
with the following command:

Managing individual user IDs and permissions
358
GRANT CONNECT TO
userid
IDENTIFIED BY
password
The same command can also be used to add a new user. For this reason, if you
inadvertently enter the user ID of an existing user when you mean to add a new
user, you are actually changing the password of the existing user. You do not
receive a warning because this behavior is considered normal. This behavior
differs from pre-Version 12 Adaptive Server IQ.
To avoid this situation, use the system procedures sp_addlogin and sp_adduser
to add users. These procedures give you an error if you try to add an existing
user ID, as in Adaptive Server Enterprise and pre-Version 12 Adaptive Server
IQ.
Changing the DBA
password The default password for the DBA user ID for all databases is SQL. You should
change this password to prevent unauthorized access to your database. The
following command changes the password for user ID DBA to new_password:
GRANT CONNECT TO DBA
IDENTIFIED BY new_password
If you are using DBISQL, it is a good idea to put your permission grants into a
command file for reference and so that it can be modified and run again if it is
necessary to recreate the permissions.
Granting DBA and resource authority
DBA and RESOURCE authority are granted in exactly the same manner as
each other.
❖To grant resource permissions to a user ID:
1 Connect to the database as a user with DBA authority.
2 Type and execute the SQL statement:
GRANT RESOURCE TO
userid
For DBA authority, the appropriate SQL statement is:
GRANT DBA TO
userid
Notes • Only the DBA can grant DBA or RESOURCE authority to database users.
• DBA authority is very powerful, granting the ability to carry out any
action on the database and access to all the information in the database. It
is generally inadvisable to grant DBA authority to more than a very few
people.

CHAPTER 10 Managing User IDs and Permissions
359
• You should give users with DBA authority two user IDs, one with DBA
authority and one without, so that they connect as DBA only when
necessary.
• RESOURCE authority allows the user to create new database objects,
such as tables, views, indexes, or procedures.
Granting permissions on tables and views
You can assign a set of permissions on individual tables and views. Users can
be granted combinations of these permissions to define their access to a table
or view.
Combinations of
permissions • The ALTER (permission to alter the structure of a table) and
REFERENCES (permission to create indexes and to create unenforced
foreign keys) permissions grant the authority to modify the database
schema, and so will not be assigned to most users. These permissions do
not apply to views.
• The DELETE, INSERT, and UPDATE permissions grant the authority to
modify the data in a table or view. The DELETE, INSERT, and UPDATE
permissions grant the authority to modify the data in a table or view. Of
these, the UPDATE permission may be restricted to a set of columns in the
table or view.
• The SELECT permission grants authority to look at data in a table or view,
but does not give permission to alter it.
• ALL permission grants all the above permissions.
Example All table and view permissions are granted in a very similar fashion. You can
grant permission to M_Haneef to delete rows from the table named
sample_table as follows:
1 Connect to the database as a user with DBA authority, or as the owner of
sample_table.
2 Type and execute the SQL statement:
GRANT DELETE
ON sample_table
TO M_Haneef
You can grant permission to M_Haneef to update the column_1 and column_2
columns only in the table named sample_table as follows:

Managing individual user IDs and permissions
360
1 Connect to the database as a user with DBA authority, or as the owner of
sample_table.
2 Type and execute the SQL statement:
GRANT UPDATE (column_1, column_2)
ON sample_table
TO M_Haneef
Table and view permissions are limited in that they apply to all the data in a
table or view (except for the UPDATE permission which may be restricted).
Finer tuning of user permissions can be accomplished by creating procedures
that carry out actions on tables, and then granting users the permission to
execute the procedure.
Granting user
permissions on tables
in Sybase Central
One way to grant a user permissions on a table in Sybase Central is as follows:
❖To grant user permission on tables in Sybase Central
1 Connect to the database.
2 Double-click the Tables folder for that database, to display the tables in the
left panel.
3 Click the Users and Groups folder, and locate the user you want to grant
permissions to.
4 Drag the user to the table for which you want to grant permissions.
For more information, see the Sybase Central online Help.
Granting users the right to grant permissions
Each of the table and view permissions described in “Granting permissions on
tables and views” can be assigned WITH GRANT OPTION. This option gives
the right to pass on the permission to other users. This feature is discussed in
the context of groups in “Permissions of groups”.
Example You can grant permission to M_Haneef to delete rows from the table named
sample_table, and the right to pass on this permission to other users, as follows:
1 Connect to the database as a user with DBA authority, or as the owner of
sample_table:
2 Type and execute the SQL statement:
GRANT DELETE ON sample_table

CHAPTER 10 Managing User IDs and Permissions
361
TO M_Haneef
WITH GRANT OPTION
Granting permissions on procedures
There is only one permission that may be granted on a procedure, and that is
the EXECUTE permission to execute (or CALL) the procedure.
Permission to execute stored procedures may be granted by the DBA or by the
owner of the procedure (the user ID that created the procedure).
The method for granting permissions to execute a procedure is similar to that
for granting permissions on tables and views, discussed in “Granting
permissions on tables and views”.
Example You can grant M_Haneef permission to execute a procedure named
my_procedure, as follows:
1 Connect to the database as a user with DBA authority or as owner of
my_procedure procedure.
2 Execute the SQL statement:
GRANT EXECUTE
ON my_procedure
TO M_Haneef
Execution permissions
of procedures Procedures execute with the permissions of their owner. Any procedure that
updates information on a table will execute successfully only if the owner of
the procedure has UPDATE permissions on the table.
As long as the procedure owner does have the proper permissions, the
procedure will execute successfully when called by any user assigned
permission to execute it, whether or not they have permissions on the
underlying table. You can use procedures to allow users to carry out well-
defined activities on a table, without having any general permissions on the
table.
Granting user
permissions on
procedures in Sybase
Central
One way to grant a user permissions on a table in Sybase Central is as follows:
❖To grant user permissions on procedures in Sybase Central:
1 Connect to the database.

Managing individual user IDs and permissions
362
2 Click the Users and Groups folder, and locate the user you want to grant
permissions to.
3 Right-click the user, and select Copy from the popup menu.
4 Locate the procedure you want to allow the user to execute, in the Stored
Procedures folder.
5 Click the procedure, and choose Edit→Paste from the main menu to grant
permissions.
For more information, see the Sybase Central online Help.
Revoking user permissions
Any user’s permissions are a combination of those that have been granted and
those that have been revoked. By revoking and granting permissions, you can
manage the pattern of user permissions on a database.
The REVOKE statement is the exact converse of the GRANT statement. To
disallow M_Haneef from executing my_procedure, the command is:
REVOKE EXECUTE ON my_procedure FROM M_Haneef
This command must be issued by the DBA or by the owner of the procedure.
Permission to delete rows from sample_table can be revoked by issuing the
command:
REVOKE DELETE ON sample_table FROM M_Haneef
Warning! If you revoke a user’s connect privileges, any database objects
owned by that user are deleted without warning. Likewise, if you use the stored
procedure sp_dropuser to drop a user, database objects owned by that user are
dropped without warning. To avoid this problem, remove objects owned by a
user or assign them to another user before issuing REVOKE CONNECT or
sp_dropuser.
Note Procedures like sp_dropuser provide minimal compatibility with
Adaptive Server Enterprise stored procedures. If you are accustomed to
Adaptive Server Enterprise (or Adaptive Server IQ 11.x) stored procedures,
you should compare their text with Adaptive Server IQ 12 procedures before
using the procedure in dbisql. To compare, use the command

CHAPTER 10 Managing User IDs and Permissions
363
sp_helptext
sp_name_in_question
Managing groups
Once you understand how to manage permissions for individual users (as
described in the previous section) working with groups is straightforward. A
group is identified by a user ID, just like a single user, but this user ID is
granted the permission to have members.
DBA, RESOURCE,
and GROUP
permissions
When permissions on tables, views, and procedures are granted to or revoked
from a group, all members of the group inherit those changes. The DBA,
RESOURCE, and GROUP permissions are not inherited: they must be
assigned individually to each individual user ID requiring them.
A group is simply a user ID with special permissions. Granting permissions to
a group and revoking permissions from a group are done in exactly the same
manner as any other user, using the commands described in “Managing
individual user IDs and permissions”.
A group can also be a member of a group. A hierarchy of groups can be
constructed, each inheriting permissions from its parent group.
A user ID may be granted membership in more than one group, so the user-to-
group relationship is many-to-many.
The ability to create a group without a password enables you to prevent
anybody from signing on using the group user ID. This security feature is
discussed in “Groups without passwords”.
Creating groups
❖To create a group with a name and password:
1 Connect to the database as a user with DBA authority.
2 Create the group's user ID just as you would any other user ID, using the
following SQL statement:
GRANT CONNECT
TO personnel
IDENTIFIED BY group_password

Managing groups
364
3 Give the personnel user ID the permission to have members, with the
following SQL statement:
GRANT GROUP TO personnel
The GROUP permission, which gives the user ID the ability to have members,
is not inherited by members of a group. If this were not the case, then every
user ID would automatically be a group as a consequence of membership in the
special PUBLIC group.
Creating groups in
Sybase Central
❖To create a group in Sybase Central:
1 Connect to the database.
2 Click the Users and Groups folder for that database.
3 Double-click Add Group. A Wizard leads you through the process.
For more information, see the Sybase Central online Help.
Granting group membership to users
Making a user a member of a group is done with the GRANT statement.
Membership in a group can be granted either by the DBA or by the group user
ID. You can grant user M_Haneef membership in a group personnel as follows:
1 Connect to the database as a user with DBA authority, or as the group user
ID personnel.
2 Grant membership in the group to M_Haneef with the following SQL
statement:
GRANT MEMBERSHIP
IN GROUP personnel
TO M_Haneef
When users are assigned membership in a group, they inherit all the
permissions on tables, views, and procedures associated with that group.
Adding users to
groups in Sybase
Central
❖To add a user to a group in Sybase Central:
1 Connect to the database.

CHAPTER 10 Managing User IDs and Permissions
365
2 Double-click the Users and Groups folder for that database, to open it.
Groups are displayed in the left panel, and both users and groups are
displayed in the right panel.
3 In the right panel, select the users you want to add to a group, and drag
them to the group.
For more information, see the Sybase Central online Help.
Permissions of groups
Permissions may be granted to groups in exactly the same way as to any other
user ID. Permissions on tables, views, and procedures are inherited by
members of the group, including other groups and their members. There are
some complexities to group permissions that database administrators need to
keep in mind.
Notes The DBA, RESOURCE, and GROUP permissions are not inherited by the
members of a group. Even if the personnel user ID is granted RESOURCE
permissions, the members of personnel do not have RESOURCE permissions.
Ownership of database objects is associated with a single user ID and is not
inherited by group members. If the user ID personnel creates a table, then the
personnel user ID is the owner of that table and has the authority to make any
changes to the table, as well as to grant privileges concerning the table to other
users. Other user IDs who are members of personnel are not the owners of this
table, and do not have these rights. If, however, SELECT authority is explicitly
granted to the personnel user ID by the DBA or by the personnel user ID itself,
all group members do have select access to the table. In other words, only
granted permissions are inherited.
Referring to tables owned by groups
Groups are used for finding tables and procedures in the database. For
example, the query
SELECT * FROM SYSGROUPS
will always find the table SYSGROUPS, because all users belong to the
PUBLIC group and PUBLIC belongs to the SYS group which owns the
SYSGROUPS table. (The SYSGROUPS table contains a list of group_name,
member_name pairs representing the group memberships in your database.)

Managing groups
366
If a table employees is owned by the personnel user ID, and if M_Haneef is a
member of the personnel group, then M_Haneef can refer to the employees table
simply as employees in SQL statements. Users who are not members of the
personnel group need to use the qualified name personnel.employees.
Creating a group to
own the tables It is advisable that you create a group whose only purpose is to own the tables.
Do not grant any permissions to this group, but make all users members of the
group. This allows everyone to access the tables without qualifying names.
You can then create permission groups and grant users membership in these
permission groups as warranted. For an example of this, see the section
“Database object names and prefixes”.
Groups without passwords
Users connected to a group's user ID have certain permissions. This user ID can
grant and revoke membership in the group. Also, this user would have
ownership permissions over any tables in the database created in the name of
the group's user ID.
It is possible to set up a database so that all handling of groups and their
database objects is done by the DBA, rather than permitting other user IDs to
make changes to group membership.
This is done by disallowing connection as the group's user ID when creating
the group. To do this, the GRANT CONNECT statement is typed without a
password. Thus:
GRANT CONNECT
TO personnel
creates a user ID personnel. This user ID can be granted group permissions, and
other user IDs can be granted membership in the group, inheriting any
permissions that have been given to personnel, but nobody can connect to the
database using the personnel user ID, because it has no valid password.
The user ID personnel can be an owner of database objects, even though no
user can connect to the database using this user ID. The CREATE TABLE
statement, CREATE PROCEDURE statement, and CREATE VIEW statement
all allow the owner of the object to be specified as a user other than that
executing the statement. This assignment of ownership can be carried out only
by the DBA.

CHAPTER 10 Managing User IDs and Permissions
367
Special groups
When a database is created, two groups are also automatically created. These
are SYS and PUBLIC. Neither of these groups has passwords, so it is not
possible to connect to the database as either SYS or as PUBLIC. The two
groups serve important functions in the database.
The SYS group The SYS group is owner of the system tables and views for the database, which
contain the full description of database structure, including all database objects
and all user IDs.
For a description of the system tables and views, together with a description
of access to the tables, see Chapter 15, “System Tables” and Chapter 16,
“System Views” in Adaptive Server IQ Reference Manual.
The PUBLIC group When a database is created, the PUBLIC group is automatically created, with
CONNECT permissions to the database and SELECT permission on the
system tables.
The PUBLIC group is a member of the SYS group, and has read access for
some of the system tables and views, so that any user of the database can find
out information about the database schema. If you wish to restrict this access,
you can REVOKE PUBLIC's membership in the SYS group.
Any new user ID is automatically a member of the PUBLIC group and inherits
any permissions specifically granted to that group by the DBA. You can also
REVOKE membership in PUBLIC for users if you wish.
Database object names and prefixes
The name of every database object is an identifier. The rules for valid
identifiers are described in Chapter 6, “SQL Language Elements” in Adaptive
Server IQ Reference Manual.
In queries and sample SQL statements throughout this guide, database objects
from the sample database are generally referred to using their simple name. For
example:
SELECT *
FROM employee
Tables, procedures, and views all have an owner. The owner of the tables in the
sample database is the user ID DBA. In some circumstances, you must prefix
the object name with the owner user ID, as in the following statement.

Database object names and prefixes
368
SELECT *
FROM "DBA".employee
The employee table reference is said to be qualified. (In this case the owner
name is enclosed in double quotes, as DBA is a SQL keyword.) In other
circumstances it is sufficient to give the object name. This section describes
when you need to use the owner prefix to identify tables, view and procedures,
and when you do not.
When referring to a database object, a prefix is required unless:
• You are the owner of the database object.
• The database object is owned by a group ID of which you are a member.
Example Consider the following example of a corporate database. All the tables are
created by the user ID company. This user ID is used by the database
administrator and is therefore given DBA authority.
GRANT CONNECT TO company
IDENTIFIED BY secret;
GRANT DBA TO company;
The tables in the database are created by the company user ID.
CONNECT USER company IDENTIFIED BY secret;
CREATE TABLE company.Customers ( ... );
CREATE TABLE company.Products ( ... );
CREATE TABLE company.Orders ( ... );
CREATE TABLE company.Invoices ( ... );
CREATE TABLE company.Employees ( ... );
CREATE TABLE company.Salaries ( ... );
Not everybody in the company should have access to all information. Consider
two user IDs in the sales department, Joe and Sally, who should have access to
the Customers, Products and Orders tables. To do this, you create a Sales group.
GRANT CONNECT TO Sally IDENTIFIED BY xxxxx;
GRANT CONNECT TO Joe IDENTIFIED BY xxxxx;
GRANT CONNECT TO Sales IDENTIFIED BY xxxxx;
GRANT GROUP TO Sales;
GRANT ALL ON Customers TO Sales;
GRANT ALL ON Orders TO Sales;
GRANT SELECT ON Products TO Sales;
GRANT MEMBERSHIP IN GROUP Sales TO Sally;
GRANT MEMBERSHIP IN GROUP Sales TO Joe;
Now Joe and Sally have permission to use these tables, but they still have to
qualify their table references because the table owner is company, and Sally and
Joe are not members of the company group:

CHAPTER 10 Managing User IDs and Permissions
369
SELECT *
FROM company.customers
To rectify the situation, make the Sales group a member of the company group.
GRANT GROUP TO company;
GRANT MEMBERSHIP IN GROUP company TO Sales;
Now Joe and Sally, being members of the Sales group, are indirectly members
of the company group, and can reference their tables without qualifiers. The
following command will now work:
SELECT *
FROM Customers
Note Joe and Sally do not have any extra permissions because of their membership
in the company group. The company group has not been explicitly granted any
table permissions. (The company user ID has implicit permission to look at
tables like Salaries because it created the tables and has DBA authority.) Thus,
Joe and Sally still get an error executing either of these commands:
SELECT *
FROM Salaries;
SELECT *
FROM company.Salaries
In either case, Joe and Sally do not have permission to look at the Salaries table.
Using views and procedures for extra security
For databases that require a high level of security, defining permissions directly
on tables has limitations. Any permission granted to a user on a table applies to
the whole table. There are many cases when users’ permissions need to be
shaped more precisely than on a table-by-table basis. For example:
• It is not desirable to give access to personal or sensitive information stored
in an employee table to users who need access to other parts of the table.
• You may wish to give sales representatives update permissions on a table
containing descriptions of their sales calls, but limit such permissions to
their own calls.
In these cases, you can use views and stored procedures to tailor permissions
to suit the needs of your organization. This section describes some of the uses
of views and procedures for permission management.

Using views and procedures for extra security
370
For information on how to create views, see “Working with views”.
Using views for tailored security
Views are computed tables that contain a selection of rows and columns from
base tables. Views are useful for security when it is appropriate to give a user
access to just one portion of a table. The portion can be defined in terms of rows
or in terms of columns. For example, you may wish to disallow a group of users
from seeing the salary column of an employee table, or you may wish to limit
a user to see only the rows of a table that they have created.
Example The Sales manager needs access to information in the database concerning
employees in the department. However, there is no reason for the manager to
have access to information about employees in other departments.
This example describes how to create a user ID for the sales manager, create
views that provide the information she needs, and grants the appropriate
permissions to the sales manager user ID.
1 Create the new user ID using the GRANT statement, from a user ID with
DBA authority. Enter the following:
CONNECT "DBA"
IDENTIFIED by SQL;
GRANT CONNECT
TO SalesManager
IDENTIFIED BY sales
(You must enclose DBA in quotation marks because it is a SQL keyword,
just like SELECT and FROM.)
2 Define a view which only looks at sales employees as follows:
CREATE VIEW emp_sales AS
SELECT emp_id, emp_fname, emp_lname
FROM "DBA".employee
WHERE dept_id = 200
The table should be identified as "DBA".employee, with the owner of the
table explicitly identified, for the SalesManager user ID to be able to use
the view. Otherwise, when SalesManager uses the view, the SELECT
statement refers to a table that user ID does not recognize.
3 Give SalesManager permission to look at the view:
GRANT SELECT
ON emp_sales

CHAPTER 10 Managing User IDs and Permissions
371
TO SalesManager
Exactly the same command is used to grant permission on a view as to
grant permission on a table.
Example 2 The next example creates a view which allows the Sales Manager to look at a
summary of sales orders. This view requires information from more than one
table for its definition:
1 Create the view.
CREATE VIEW order_summary AS
SELECT order_date, region, sales_rep, company_name
FROM "DBA".sales_order
KEY JOIN "DBA".customer
2 Grant permission for the Sales Manager to examine this view.
GRANT SELECT
ON order_summary
TO SalesManager
3 To check that the process has worked properly, connect to the
SalesManager user ID and look at the views you have created:
CONNECT SalesManager IDENTIFIED BY sales ;
SELECT * FROM "DBA".emp_sales ;
SELECT * FROM "DBA".order_summary ;
No permissions have been granted to the Sales Manager to look at the
underlying tables. The following commands produce permission errors.
SELECT * FROM "DBA".employee ;
SELECT * FROM "DBA".sales_order;
Other permissions on
views The previous example shows how to use views to tailor SELECT permissions.
INSERT, DELETE, and UPDATE permissions can be granted on views in the
same way.
For information on allowing data modification on views, see “Using views”
on page 129.
Using procedures for tailored security
While views restrict access on the basis of data, procedures restrict the actions
a user may take. As described in “Granting permissions on procedures” a user
may have EXECUTE permission on a procedure without having any
permissions on the table or tables on which the procedure acts.

How user permissions are assessed
372
Strict security For strict security, you can disallow all access to the underlying tables, and
grant permissions to users or groups of users to execute certain stored
procedures. With this approach, the manner in which data in the database can
be modified is strictly defined.
How user permissions are assessed
Groups do introduce complexities in the permissions of individual users.
Suppose user M_Haneef has been granted SELECT and UPDATE permissions
on a specific table individually, but is also a member of two groups, one of
which has no access to the table at all, and one of which has only SELECT
access. What are the permissions in effect for this user?
Adaptive Server IQ decides whether a user ID has permission to carry out a
specific action in the following manner:
1 If the user ID has DBA permissions, the user ID can carry out any action
in the database.
2 Otherwise, permission depends on the permissions assigned to the
individual user. If the user ID has been granted permission to carry out the
action, then the action is allowed to proceed.
3 If no individual settings have been made for that user, permission depends
on the permissions of each of the groups of which the user is a member. If
any of these groups has permission to carry out the action, the user ID has
permission by virtue of membership in that group, and the action is
allowed to proceed.
This approach minimizes problems associated with the order in which
permissions are set.
Managing the resources connections use
Building a set of users and groups allows you to manage permissions on a
database. Another aspect of database security and management is to limit the
resources an individual user can use.

CHAPTER 10 Managing User IDs and Permissions
373
For example, you may wish to prevent a single connection from taking too
much of the available memory or CPU resources, so that one connection does
not slow down other users of the database.
Adaptive Server IQ provides a set of database options that the DBA can use to
control resources. These options are called resource governors.
Setting options You can set database options using the SET OPTION statement, which has the
following syntax:
SET [ TEMPORARY ] OPTION
... [
userid
. | PUBLIC. ]
option-name
= [
option-value
]
For reference information about options, see “Database Options” in Adaptive
Server IQ Reference Manual. For information on the SET OPTION statement,
see Adaptive Server IQ Reference Manual.
Resources that can be
managed The following options can be used to manage resources. See Chapter 12,
“Managing System Resources” or see the Adaptive Server IQ Reference
Manual for more information on these options.
• AGGREGATION_CUTOFF Sets the precision level at which Adaptive
Server IQ uses a more efficient internal storage type to do calculations on
SUM or AVG numeric expressions.
• CURSOR_WINDOW_ROWS Defines the number of cursor rows to
buffer.
• LOAD_MEMORY_MB Sets an upper bound for the amount of heap
memory that subsequent load operations can use.
• MAIN_CACHE_MEMORY_MB Sets the size of the cache for the main
IQ Store.
• MAX_CARTESIAN_RESULT Limits the number of result rows from a
query containing a cartesian join.
• MAX_IQ_THREADS_PER_CONNECTION Sets the number of
processing threads available to a connection for use in IQ operations.
• TEMP_CACHE_MEMORY_MB Sets the size of the cache for the IQ
Temporary Store.
• JOIN_OPTIMIZATION Enables optimization of join order. When this
option is on (default), Adaptive Server IQ optimizes the join order to
reduce the size of intermediate results and sorts, and to balance the system
load.
The following options affect the database engine, but have limited impact on
Adaptive Server IQ:

Users and permissions in the system tables
374
• JAVA_HEAP_SIZE Sets the maximum size (in bytes) of that part of
the memory that is allocated to Java applications on a per connection basis.
• MAX_CURSOR_COUNT Limits the number of cursors for a
connection.
• MAX_STATEMENT_COUNT Limits the number of prepared
statements for a connection.
• BACKGROUND_PRIORITY Limits the impact requests on the current
connection have on the performance of other connections
Database option settings are not inherited through the group structure.
Users and permissions in the system tables
Information about the current users of a database and about their permissions
is stored in the database system tables and system views.
For a description of each of these tables, see “System Tables” in Adaptive
Server IQ Reference Manual.
The system tables are owned by the special user ID SYS. It is not possible to
connect to the SYS user ID.
The DBA has SELECT access to all system tables, just as to any other tables
in the database. The access of other users to some of the tables is limited. For
example, only the DBA has access to the SYS.SYSUSERPERM table, which
contains all information about the permissions of users of the database, as well
as the passwords of each user ID. However, SYS.SYSUSERPERMS is a view
containing all information in SYS.SYSUSERPERM except for the password,
and by default all users have SELECT access to this view. All permissions and
group memberships set up in a new database for SYS, PUBLIC, and DBA can
be fully modified.
The following table summarizes the system tables containing information
about user IDs, groups, and permissions. All tables and views are owned by
user ID SYS, and so their qualified names are SYS.SYSUSERPERM and so
on.
Appropriate SELECT queries on these tables generates all the user ID and
permission information stored in the database.

CHAPTER 10 Managing User IDs and Permissions
375
The following table summarizes the system views containing information
about user IDs, groups, and permissions.
In addition to these, there are tables and views containing information about
each object in the database.
Table Default Contents
SYSUSERPERM DBA only Database-level permissions and
password for each user ID
SYSGROUP PUBLIC One row for each member of each
group
SYSTABLEPERM PUBLIC All permissions on table given by
the GRANT commands
SYSCOLPERM PUBLIC All columns with UPDATE
permission given by the GRANT
command
SYSDUMMY PUBLIC Dummy table, can be used to find
the current user ID
SYSPROCPERM PUBLIC Each row holds one user granted
permission to use one procedure
Views Default Contents
SYSUSERAUTH DBA only All information in
SYSUSERPERM except for user
numbers
SYSUSERPERMS PUBLIC All information in
SYSUSERPERM except for
passwords
SYSUSERLIST PUBLIC All information in
SYSUSERAUTH except for
passwords
SYSGROUPS PUBLIC Information from SYSGROUP in a
more readable format
SYSTABAUTH PUBLIC Information from
SYSTABLEPERM in a more
readable format
SYSCOLAUTH PUBLIC Information from SYSCOLPERM
in a more readable format
SYSPROCAUTH PUBLIC Information from
SYSPROCPERM in a more
readable format

Users and permissions in the system tables
376
377
CHAPTER 11 Backup and Data Recovery
About this chapter This chapter explains how to back up your database, and how to recover
data when necessary. It tells you why it is important to perform backups
on regular basis, and gives recommendations for scheduling backups.
Backup protects your data
Adaptive Server IQ provides a full set of features that protect you from
two types of computer failure, and from database corruption.
•A system failure occurs when the computer or operating system goes
down while there are partially completed transactions. This could
occur when the computer is inappropriately turned off or rebooted,
when another application causes the operating system to crash, or
because of a power failure.
•A media failure occurs when the database file, the file system, or the
device storing the database file, becomes unusable.
After a system failure, Adaptive Server IQ can usually recover
automatically, so that you may not need to restore your database.
Recovery from system failures is discussed in Adaptive Server IQ
Troubleshooting and Error Messages Guide.
After media failure, or if for any reason the data in your database is
corrupted, you must restore your database. To protect your data in all of
these situations, make regular backups of your databases. In particular,
you should back up your database each time you finish inserting any large
quantities of new data into the database.
When failures occur, the recovery mechanism treats transactions properly,
as atomic units of work: any incomplete transaction is rolled back and any
committed transaction is preserved. This ensures that even in the event of
failure, the data in your database remains in a consistent state.

Backing up your database
378
Backing up your database
You use the BACKUP command to back up your IQ database. Backup includes
both the Adaptive Server IQ data (the IQ Store) and the underlying Adaptive
Server Anywhere database (the Catalog Store)
Backup runs concurrently with read and write operations in the database. By
contrast, during a restore no other operations are allowed on that database.
You must be connected to a database in order to back it up. The BACKUP
command has no way to specify another database.
For an IQ multiplex database, you must run backups on the write server, but
you may execute backups while the servers are all running in multiplex mode.
For more information about multiplex backups, see Adaptive Server IQ
Multiplex User’s Guide.
Types of backups
Adaptive Server IQ provides three types of backups:
•Full backup makes a complete copy of the database.
•Incremental backup copies all transactions since the last backup of any
type.
•Incremental-since-full backup copies all transactions since the last full
backup.
All three backup types fully back up the Catalog Store. In most cases, the
Catalog Store is much smaller than the IQ Store. If the Catalog Store is larger
than (or nearly as large as) the IQ store, however, incremental backups of IQ
will be bigger than you may want or expect.
Temporary Store data is not backed up. However, the meta data and any other
information needed to recreate the Temporary Store structure is backed up.
Data in backups
BACKUP backs up committed data only. Backups begin with an automatic
checkpoint. At this point, the backup program determines what data will be
backed up. It backs up the current snapshot version of your database as of the
time of this checkpoint. Any data that is not yet committed when this
checkpoint occurs is not included in the backup.

CHAPTER 11 Backup and Data Recovery
379
A second automatic checkpoint occurs at the end of backup. Any data that is
committed while the backup is in progress is included in any subsequent
backups. However, if a failure occurs between the first and second checkpoints,
any work that occurred after the first checkpoint cannot be restored.
Adaptive Server IQ backs up only those database blocks actually in use at the
time of backup. Free blocks are not backed up.
Adaptive Server IQ backs up the database files and the Catalog information
that pertains to the IQ database to which you are connected. It does not back up
the transaction log file. It does not use the transaction log to restore the
database.
If your database needs a rollback or is missing files, the backup fails.
The transaction log in backup, restore, and recovery
Adaptive Server IQ uses the transaction log file during recovery from a system
failure. It does not use the transaction log to restore an IQ database, to recover
committed IQ transactions, or to restore the Catalog Store for an Adaptive
Server IQ database. However, the restore program does check for the existence
of the transaction log:
• For a full restore, the transaction log must not exist. You must delete this
file before starting a full restore.
• For an incremental restore, the transaction log must exist. You must not
delete this file or you will not be able to do an incremental restore.
Note Adaptive Server Anywhere databases use the transaction log and other
logs differently. If you are recovering such a database, you need its transaction
log file, and BACKUP retains it for you. See the Adaptive Server Anywhere
User’s Guide for details. Also, if you have data (other than the system tables)
in your Catalog store, transactions for that data can only be recovered if they
were written to disk before a failure.

Backing up your database
380
Distribution of backup data
BACKUP always makes a full backup of the Catalog Store on the first archive
device, and then backs up the data from the IQ Store in parallel across all of the
devices you specify. Blocks are not distributed evenly across archive media.
You may have more on one device than others, depending on the processing
speed of individual threads.
Note The distribution of backup data is important because sets of files must be
restored in the order in which they were backed up. See “Restoring in the
correct order” on page 403 for more information.
Ensuring that your database is consistent
Although Backup does check that all necessary files are present before backing
up your database, it does not check internal consistency. For a more thorough
check, you can run the stored procedure sp_iqcheckdb before making a backup.
See “Validating your database” on page 393 for details.
Selecting archive devices
You can back up any IQ database onto either disk or magnetic tape. Adaptive
Server IQ supports backup and restore using multiple tape drives at near device
speeds, or to multiple disks if disk striping is in use. You specify the backup
device name in the archive_device parameter of the BACKUP command.
Disk backup requirements
Disk backups must go to a file system; raw disk is not supported as a backup
medium. All disks on a RAID device are treated as a single device.
Tape backup requirements
If you regularly back up large databases, you should use DLT drives, if they are
supported for your platform. In any case, Sybase recommends that you use
multiple tape drives.
Adaptive Server IQ BACKUP can support the following tape drives:
• Digital Linear Tape (DLT) on UNIX systems

CHAPTER 11 Backup and Data Recovery
381
• 4 mm DDS
•8 mm
Adaptive Server IQ also allows Stacker drives with multiple tapes.
Adaptive Server IQ BACKUP does not support jukeboxes or robotic loaders. If
you need them, use a third party media manager.
Adaptive Server IQ BACKUP does not support fixed-length tape devices on
UNIX systems, like Quarter Inch Cartridge (QIC) drives.
Note Tape devices on AIX systems can be configured for either fixed- or
variable-length block mode. See the Adaptive Server IQ Installation and
Configuration Guide for information on how to show and change the block
mode. Adaptive Server IQ BACKUP does not support fixed-length block mode.
Preparing for backup
In order to run BACKUP, you must first install and run Adaptive Server IQ. You
must also make sure that you meet the other requirements described in the
sections that follow.
Obtaining DBA privileges
You need DBA privileges on a database to run BACKUP or RESTORE. You
must either log on as the DBA user, or be granted DBA authority by the DBA
as described in “Granting DBA and resource authority”.
Rewinding tapes
Adaptive Server IQ does not rewind tapes before using them. You must ensure
the tapes used for backup or restore operations are at the correct starting point
before putting them in the tape device.
Tapes are rewound after the backup if you are using a rewinding device. If your
tape device automatically rewinds tapes, take care that you do not overwrite
any information on the tape.

Backing up your database
382
Retaining old disk backups
BACKUP overwrites existing disk files of the same name. If you need to retain
a backup, when you create a new backup either use different file or path names
for the archive devices, or move the old backup to another location before
starting the backup.
Two ways to run BACKUP
You can run BACKUP in two ways:
•Attended. In attended mode, BACKUP assumes that an operator is present,
and prompts you to mount the archive media when necessary. With this
method, you must run BACKUP interactively from the command line.
•Unattended. In unattended mode, BACKUP assumes that no operator is
present, and does not issue prompts. Instead, you must make appropriate
estimates of the space required, and set up your devices accordingly. Any
error is considered fatal.
In some cases, you can use third party software to create backups. Such
products can be particularly useful for unattended backups. See “Unattended
backup” for details if you want to run backups when no operator is present.
Note You can run BACKUP from a batch script or procedure, as well as from
Interactive SQL.
Estimating Media Capacity
Before you do a backup, be sure that your archive media has sufficient space.
When you estimate available space on disk or tape, keep in mind these rules:
• You need enough room for a full backup of the Catalog Store, as well as
the full or incremental backup of the IQ Store. If your Catalog Store holds
Adaptive Server Anywhere data in addition to the Adaptive Server IQ
system tables, you need room to back up this data as well.
• You do not need to include space for the transaction log, as this log is not
backed up.
• For tape backups, the first tape set you specify must be able to hold the full
backup of the Catalog Store, including any non-IQ data in the Catalog
Store. (A tape set consists of one or more backup tapes produced on a
given archive device.)

CHAPTER 11 Backup and Data Recovery
383
• For stacker devices that hold multiple tape drives, all tapes for a given
device must be the same size.
Sybase recommends that you always start a new tape for every backup.
Before starting a backup to disk, Adaptive Server IQ first tests whether there is
enough disk file space for the backup. For an operator-attended backup to disk,
if there is not enough space, BACKUP prompts you to move some files from the
disk before it writes any data. The backup does not start until you provide more
disk space.
Likewise, if you run out of space during an attended disk backup, BACKUP
closes all open backup files and waits until it detects that you have cleared
some space. Then it restarts with new backup files. You can also stop the
backup if you prefer.
By default, you must provide at least 8KB of free disk space before the backup
resumes.
Unattended backup cannot prompt you to provide more space. If enough space
is not available, unattended backup fails. BACKUP treats size estimates
differently for unattended backups. See “Unattended backup” for details.
For an operator-attended backup to tape, BACKUP simply begins the backup. If
it runs out of room, you must mount additional tapes.
Concurrency and backups
Backups can be run concurrently with all other database operations with one
exception: no metadata changes can occur while the Catalog Store is backed
up. Be aware, however, that transactions that have not committed when you
start a backup are not backed up. If a system or media failure occurs during
backup, you cannot restore uncommitted transactions.
Once a backup is started, you cannot execute a CHECKPOINT command.
The BACKUP statement
To back up an IQ database, use the following syntax:
BACKUP DATABASE
...[ CRC ON | OFF ]
...[ ATTENDED ON | OFF ]
...[ BLOCK FACTOR
integer
]
...[ { FULL | INCREMENTAL | INCREMENTAL SINCE FULL } ]

Backing up your database
384
...TO ’
archive_device
’ [ SIZE
#_of_KB
][STACKER
#_of_drives_in_stack
] ...
[ WITH COMMENT ’
string
’ ]
Note If you need to back up an Adaptive Server Anywhere database, see the
Adaptive Server IQ Reference Manual for additional options.
Specifying operator presence
ATTENDED ON or OFF controls whether or not human intervention is expected
when new tapes or disk files are needed. The default is ON.
For unattended backups to disk, BACKUP does not prompt you to add more
disk space. If you run out of space, an error occurs and BACKUP halts.
For unattended backups to tape, BACKUP does not prompt for a new tape to be
loaded. The SIZE and STACKER options determine what happens if you run out
of space. See the information on these options under “Specifying archive
devices”.
Specifying the type of backup
FULL | INCREMENTAL | INCREMENTAL SINCE FULL specifies the type of
backup. Choose one:
•FULL causes a full backup of both the Catalog Store and the IQ Store. FULL
is the default action.
•INCREMENTAL makes a full backup of the Catalog Store, and then backs
up all changes to the IQ Store since the last IQ backup of any type.
•INCREMENTAL SINCE FULL makes a full backup of the Catalog Store, and
then backs up all changes to the IQ store since the last full IQ backup.
For guidance in selecting a backup type, see “Scheduling routine backups”.
Specifying archive devices
The TO
archive_device
clause indicates the destination disk file(s) or system
tape drive(s) for the backup. You specify one TO
archive_device
clause for each
destination file or device. At least one is required. BACKUP distributes output
in parallel—that is, concurrently—across all of the devices you specify. For
faster backups you should specify more devices, up to the number your
hardware platform supports.

CHAPTER 11 Backup and Data Recovery
385
Backup file names for
backup to disk BACKUP always assigns file names to disk backup files by appending a suffix
to the archive_device name you specify. The suffix consists of “.” followed by
a number that increases by one for each new file. For example, if you specify
/iqback/mondayinc as the archive_device, the backup files are
/iqback/mondayinc.1, /iqback/mondayinc.2, and so on. This convention allows
you to store as large a backup as you need, while allowing you control over the
file size; see the SIZE option for details. Your file system must support long file
names to accommodate this convention.
You must make sure that the directory names you specify for the
archive_device exist. BACKUP does not create missing directories. If you try to
start a backup in a directory that does not exist, the backup fails.
You should avoid using relative pathnames to specify the location of disk files.
BACKUP interprets the pathname as relative to the location where the server
was started, which you may not be able to identify with certainty when you do
a backup. Also, if there is data in other directories along the path, you may not
have enough room for the backup.
Positioning tape
devices BACKUP does not position tapes for you. You must position the tape
appropriately before starting your backup, and be sure that you do not
overwrite any of the backup if you use a rewinding tape device. For these
reasons, Sybase recommends you use a non-rewinding tape device. See the
operating system documentation for your platform for appropriate naming
conventions.
Specifying tape
devices on UNIX Here are examples of how you specify non-rewinding tape devices on UNIX
platforms:
• On Sun Solaris platforms, insert the letter n for “no rewind” after the
device name, for example, '/dev/rmt/0n'.
• On IBM AIX platforms, use a decimal point followed by a number that
specifies the appropriate compression setting with rewind setting, for
example, '/dev/rmt0.1'.
• On HP-UX platforms, use '0m' to specify the default tape mechanism and
'n' for “no rewind,” for example, '/dev/rmt/0mn'.
• On DEC UNIX platforms, put an n in front of the device name, for
example, '/dev/nrmt0h'.
Warning! If you misspell a tape device name and write a name that is not a
valid tape device on your system, BACKUP assumes it is a disk file.

Backing up your database
386
Specifying tape
devices on Windows
NT
Windows NT systems do not specify rewind or no rewind devices and only
support fixed-length I/O operations to tape devices. Adaptive Server IQ
requires variable-length devices. It does additional processing to accommodate
NT’s fixed-length tape I/O.
While Windows NT supports tape partitioning, Adaptive Server IQ does not
use it, so do not use another application to format tapes for Adaptive Server IQ
backup or restore. Windows NT has a simpler naming strategy for its tape
devices, where the first tape device is ’\\.\tape0’, the second is ’\\.\tape1’, a nd s o
on.
Warning! For backup (and for most other situations) Adaptive Server IQ treats
the leading backslash in a string as an escape character, when the backslash
precedes an n, an x, or another backslash. For this reason, when you specify
backup tape devices you must double each backslash required by the NT
naming convention. For example, indicate the first NT tape device you are
backing up to as ’\\\\.\\tape0’, the second as ’\\\\.\\tape1’, and so on. If you omit
the extra backslashes, or otherwise misspell a tape device name, and write a
name that is not a valid tape device on your system, Adaptive Server IQ
interprets this name as a disk file name.
For more information about fixed-length I/O on NT, see “Tuning backup
operations” in the Adaptive Server IQ Installation and Configuration Guide.
Specifying the size of
tape backups The SIZE option of the TO clause identifies the maximum size of the backed up
data on that stripe, in KB.
If you use the Sybase–provided backup (as opposed to a third party backup
product), you should specify SIZE for unattended tape backups on platforms
that do not reliably detect the end-of-tape marker. No volume used on the
corresponding device can be shorter than this value. Although IQ does not
require you to specify SIZE for an attended tape backup, it is always best to
supply an accurate size estimate.
If tapes run out of space and you have not specified SIZE, you get an error. If
tapes run out of space before the specified size, you do not get an error
immediately; instead, here is what happens:
• For attended backups with SIZE and STACKER specified, Backup tries to
open the next tape.
• For attended backups with SIZE specified but not STACKER, Backup asks
you to put in a new tape.

CHAPTER 11 Backup and Data Recovery
387
• For unattended backups with SIZE and STACKER specified, Backup tries
to open the next tape. If there are no volumes available, or if you did not
specify STACKER, you get an error.
Any additional tapes do not contain the header information needed for a
restore, so you must be careful to mount tapes in order during the restore or
your database could become corrupt.
On Windows NT, there are special requirements for the SIZE option on tape
devices:
• The value of SIZE must be a multiple of 64.
• If you specify a SIZE that is not a multiple of 64, it is automatically
rounded down to a multiple of 64.
• If you do not specify SIZE explicitly, it is automatically set to 1.5GB.
If you specify SIZE explicitly on any platform, and on NT even if you do not
specify it explicitly, then if you run of space on a tape backup, you get an error
and the backup fails.
Specifying the size of
disk backups The SIZE option of the TO clause identifies the maximum size of the backed up
data on that stripe, in KB.
If you use the Sybase–provided backup, either attended or unattended, specify
SIZE if you need a maximum size other than the default of 2GB. When you
omit SIZE for a backup to disk, BACKUP assumes that each disk file you name
as an archive_device can be up to 2GB.
For example, if you specify one archive_device, a disk file called janfull, and
you specify SIZE 200000 for a maximum 200MB file, but your backup
requires 2GB, then BACKUP creates ten 200MB files: janfull.1,
janfull.2,...janfull.10.
Specifying stacker
devices The STACKER option of the TO clause indicates that you are backing up to an
automatically loaded multitape stacker device, and specifies the number of
tapes in that device. When ATTENDED is ON and STACKER is specified,
BACKUP waits indefinitely for the next tape to be loaded. All tapes in a given
stacker device must be the same size.
Specifying devices for
third party backups Note Do not specify SIZE or STACKER if you are using a third party backup
product, as size information is conveyed in the vendor_specific_information
string. To specify this string, see “Performing backups with non-Sybase
products”.

Backing up your database
388
Other backup options
Specifying the block
factor BLOCK FACTOR specifies the number of IQ blocks to write to the archive
device at one time. It must be greater than 0, or BACKUP returns an error
message. BLOCK FACTOR defaults to 25 on UNIX platforms. On Windows
NT, the default BLOCK FACTOR is based on the block size of your database.
For example, if the block size is 512 bytes, BLOCK FACTOR is 120 blocks. If
the block size is 32KB, BLOCK FACTOR is 1 block.
This parameter also controls the amount of memory used for buffers during the
backup, and has a direct impact on backup performance. The effects of the
block factor are a function of disk subsystem speed, tape speed, and processor
speed. Some systems have better backup performance with a smaller block
factor, while others may have better backup performance with a larger one.
Error checking CRC ON or OFF activates or deactivates 32-bit cyclical redundancy checking
on a per block basis. (BACKUP also uses whatever error detection is available
in the hardware.) With CRC ON, the numbers computed on backup are verified
during any subsequent RESTORE operation. The default is CRC ON.
Adding comments WITH COMMENT specifies a string up to 32KB long as part of the header
information for the backup archive. If you omit this option, BACKUP enters a
NULL. You can view the comment string by executing a RESTORE
DATABASE FROM CATALOG ONLY, or by displaying the backup
log,backup.syb, that Adaptive Server IQ provides.
If you need to back up an Adaptive Server Anywhere-only database, see the
Adaptive Server Anywhere Reference Guide for additional BACKUP options.
Waiting for Tape Devices
During backup and restore operations, if Adaptive Server IQ cannot open the
archive device (for example, when it needs the media loaded), it waits for ten
seconds and tries again. It continues these attempts indefinitely until either it is
successful or the operation is terminated with a CTRL-C.
Backup Examples
Example 1 — Full
backup This example makes a full, attended backup of the database asiquser to two
tape devices on UNIX. Before running this backup you must position the tapes
to the start of where the backup files will be written, and connect to asiquser.
Then issue the following command:
BACKUP DATABASE

CHAPTER 11 Backup and Data Recovery
389
TO ’/dev/rmt/0n’
TO ’/dev/rmt/1n’
WITH COMMENT ’Jan 18 full backup of asiquser’
The Catalog Store is backed up first, to /dev/rmt/0n. The IQ Store is backed up
next, to both tapes.
Example 2 —
Incremental backup To make an incremental backup of the same database, this time using only one
tape device, issue the command as follows:
BACKUP DATABASE
INCREMENTAL
TO ’/dev/rmt/0n’ SIZE 150
WITH COMMENT ’Jan 30 incremental backup of asiquser’
An example of how to restore this database from these two backups is provided
later in this chapter.
Recovery from errors during backup
There are two likely reasons for a failed backup: insufficient space, or
hardware failure. Problems with third party software could also cause a failure.
Checking for backup space
BACKUP uses the STACKER and SIZE parameters to determine whether there
is enough space for the backup.
• For disk backups, if it decides that you have not provided enough space, it
fails the backup before actually writing any of the data.
• If it decides that there is enough space to start the backup, but then runs
out before it finishes (for example, if your estimate is incorrect, or if a user
in another application fills up a lot of disk space while your backup is in
progress), an attended backup prompts you to load a new tape, or to free
up disk space. An unattended backup fails if it runs out of space.
• If neither STACKER nor SIZE is specified, backup proceeds until it
completes or until the tape or disk is full. If you run out of space, an
attended backup prompts you to load a new tape, or to free up disk space;
an unattended backup fails.
Recovery attempts
If a backup fails, the backup program attempts to recover as follows:

Backing up your database
390
• If backup fails during either the checkpoint at the start of backup or the
checkpoint when backup is complete, it performs normal checkpoint
recovery.
• If backup fails between checkpoints, it rolls back the backup.
• If the system fails at any time between the initial and final checkpoint and
you must restore the database, you must do so using an older set of backup
tapes or disk files.
• If the system fails during the final checkpoint after a FULL backup, you can
restore from the backup tapes or files you have just created.
After you complete a backup
In the event that you ever need to move a database or one of its dbspaces, you
need to know the name of every dbspace in the database when the backup was
made. See “Recording dbspace names” for details on how to record this
information after you complete a backup.
Performing backups with non-Sybase products
Adaptive Server IQ supports backup and restore using a number of third-party
products. The package you use must conform to the Adaptive Server Enterprise
Backup Interface. Check the documentation for your product to be sure that it
supports Sybase databases.
To perform such a backup or restore, you issue the BACKUP or RESTORE
statement as if you were using Adaptive Server IQ to perform the operation,
with the following exceptions:
• For each archive_device, instead of specifying the actual device name,
specify a string in the following format:
dll_name
::
vendor_specific_information
• Do not specify the STACKER or SIZE parameters.
The dll_name corresponds to a Dynamic Link Library loaded at run time. It can
be from 1 to 30 bytes long, and can contain only alphanumeric and underscore
characters. The dll_name must be the same for each archive_device.
The content of vendor_specific_information varies by product, and can differ
for each archive_device. The total string (including dll_name:: and vendor
information) can be up to 255 bytes long.

CHAPTER 11 Backup and Data Recovery
391
The backup program passes vendor information to the third-party program
automatically. When you request a third-party backup, it places this
information in the backup header file, and writes the header file on the first tape
or disk file actually created for each archive_device you specify.
Performing system-level backups
The BACKUP command is the most reliable method you can use to back up IQ
data. If you are careful to follow the procedures in this section, however, you
can use system-level backups for an IQ database.
Warning! Do not use system-level backups for backing up your IQ database
unless you follow these procedures. If you attempt to restore your IQ database
files from a system-level backup without these safeguards in place, you are
likely to cause data loss or corruption, either from activity in the database while
the system-level backup occurred, or from missing files.
Shutting down the database
Your IQ database must not be running during a system-level backup.
You must shut down your IQ database before starting the system-level backup.
You must also ensure that no one starts the IQ database until the system-level
backup is complete.
Ensuring that the
database is shut down The file protection of the .db file is read-only when the database is shut down
cleanly, and set to read/write when the database is in use. If you are writing a
script to perform backups, it is a good idea for the script to check the access
mode of the file, to be sure that the database is shut down.
To ensure that a database remains shut down, the script can check the size of
the .iqmsg file at the start and end of the script to make sure it has not changed.
If the database was started while the script was running, the .iqmsg file will be
bigger.

Performing system-level backups
392
Backing up the right files
Required files You must back up the following files:
• SYSTEM dbspace file, typically named dbname.db.
• The transaction log file, which is required for system recovery, typically
named dbname.log
• The IQ_SYSTEM_MAIN dbspace file, typically named dbname.iq
• The IQ_SYSTEM_TEMP dbspace file, typically named dbname.iqtmp
• Files for any additional dbspaces that have been added to
IQ_SYSTEM_MAIN or IQ_SYSTEM_TEMP
Optional files It is a good idea to back up the ASCII message files such as dbname.iqmsg and
the $ASLOGDIR/*.svrlog and $ASLOGDIR/*.stderr files. These files are not
required. However, if problems occur during a restore, the .iqmsg file will
prove that the database was shut down before the backup started.
These files may be useful in diagnosing the cause of the database failure you
are recovering from. Be sure to make a copy before restoring, for use in later
analysis.
Keeping your backup
list updated It is critically important to add to your system backup specification any
dbspaces that are added to the database, whether they are in SYSTEM,
IQ_SYSTEM_MAIN, or IQ_SYSTEM_TEMP. If a dbspace is added several
months down the road, or after some turnover in your organization, you may
miss this step.
To ensure that you are backing up all the files you need, use a script for system-
level backups. In the script, before starting the backup, compare a select from
SYSFILES (for the system dbspaces) and from IQSYSFILES (for the IQ
dbspaces) to a list of dbspaces known to be in the system backup specification.
Raw devices and
symbolic links If your database files are on raw devices, be sure your system backup is
backing up the raw device contents, not just the NAME of the device in /dev/*.
If symbolic links are used for raw device names, as recommended, be sure the
system backup utility follows the symbolic link and backs up the device.
Restoring from a system-level backup
If you must restore from a system-level backup, you must ensure that database
server is shut down, just as it was during the backup. See “Shutting down the
database” on page 391 for details.

CHAPTER 11 Backup and Data Recovery
393
Ensuring that all files
exist Before restoring, review the table of contents of the backup to ensure that all
files required for IQ are present. The list of files depends on your application.
See the discussion of required and optional files in “Backing up the right files”
on page 392.
Checking ownership
and permissions Ensure that ownership and permission levels do not change during the system-
level restore.
Validating your database
Backing up a database is useful only if the database is internally consistent.
Backup always makes sure that a database is in a usable state before it
proceeds. However, it's a good idea to validate any database before you back it
up, to ensure that any database you restore is stable. The restore program does
not check for corruption in the data it is restoring, since the database may not
even exist.
To validate your database, issue the following command:
sp_iqcheckdb
You should run sp_iqcheckdb periodically, and whenever you suspect a
problem with the database. The sections that follow provide basic information
on using sp_iqcheckdb. For full details see the Adaptive Server IQ
Troubleshooting and Error Messages Guide.
This stored procedure works in conjunction with the set option
DBCC_OPTION. This option should be set to its default value, 0, when you
run sp_iqcheckdb for a routine validation before backup.
sp_iqcheckdb reads every database page from disk into memory and does
various consistency checks. For this reason, running this procedure on a large
database can take a long time. Reading the data consumes most of the
execution time, so you can estimate how long it will take to run the procedure
by the size of your database:
For this size database It takes about this long
10GB 30 minutes
100GB 400 minutes (6 1/2 hours)

Validating your database
394
Interpreting results
The procedure produces a very long list of statistics about your database.
Statistics are listed first for the Main IQ Store, then for Temporary Store. For
each store, you see three types of statistics:
• Dynamic statistics. These are cumulative counts from the time the
database server was started, and vary each time you run the procedure.
Examples include buffer manager statistics. You can also obtain these
statistics by running the stored procedure sp_iqcommandstats.
• Size statistics. These report on space used by various database objects.
• Orphaned blocks. These are the key statistics to look for. They always
have an asterisk next to them so you can find them easily. Orphaned block
statistics are described in the table below. If you see a non-zero value for
any of these statistics, your database likely has a serious consistency
problem. (You also see a non-zero value if other users are active while
sp_iqcheckdb is run; see “Concurrency issues for sp_iqcheckdb” below.)
The following figure shows an excerpt from sp_iqcheckdb output for the
sample database. You can see the key statistics designated by asterisks.
Orphaned block statistic Meaning
NDBBlocksDupOwned More than one table claims ownership
of the same page
NDBBlocksUnOwned No table owns the pages, but the free
list says these pages are free
NDBBlocksOwnedButNE A table claims to own these pages, but
the free list says they are available
(you will never see a non-zero value
for this statistic)
NDB1stDupOwnedBlock First orphaned block of this type
NDB1stUnOwnedBlock First orphaned block of this type
NDB1stOwnedButNEBlock First orphaned block of this type
NDBBlockCountMismatch Sum of NDBBlocksDupOwned,
NDBBlocksUnOwned,
NDBBlocksOwnedButNE
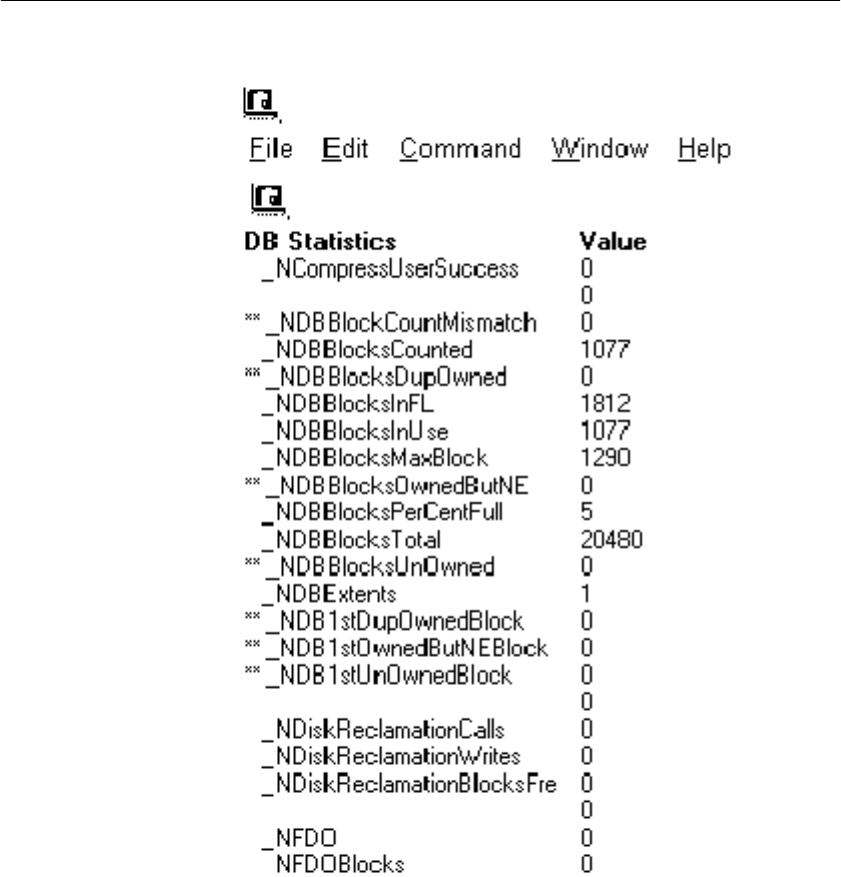
CHAPTER 11 Backup and Data Recovery
395
Figure 11-1: sp_iqcheckdb results
Concurrency issues for sp_iqcheckdb
When you run sp_iqcheckdb, it reads every database page in use. This
procedure consumes most of the database server’s time, so that the I/O is as
efficient as possible. Any other concurrent activities on the system will run

Restoring your databases
396
more slowly than usual.
If other users are active when you run sp_iqcheckdb, the results you see reflect
only what your transaction sees.
If another user is doing inserts and deletes, those blocks appear as unowned in
the Main IQ Store. To avoid confusion, you should not allow inserts and deletes
while sp_iqcheckdb executes.
If another user is running queries, Temporary Store blocks used for the queries
appear as unowned, and also affect CountMismatch. This is not really a
problem, as consistency in the temporary store is not important.
Restoring your databases
Once you have created a database and made a full backup of it, you can restore
it when necessary. Adaptive Server IQ restores the database to its state as of the
automatic CHECKPOINT at the start of the backup.
Before you restore
Before you can restore a database, make sure that the following conditions are
met:
• You must have DBA privileges.
• You must be connected to the utility_db database. For information on
utility_db and how to set privileges for using it, see the Adaptive Server IQ
Installation and Configuration Guide for your platform.
• No user can be connected to the database being restored. RESTORE exits
with an error if there are any active Read Only or Read/Write users of the
specified database.
• You must restore the database to the appropriate server, and that server
must have the archive devices you need. When you use the Sybase-
provided restore, you need the same number of archive devices (that is, the
disk files or tape drives) as when the backup was created.

CHAPTER 11 Backup and Data Recovery
397
• For a full restore, the Catalog Store (by default the .db file) and the
transaction log (by default the .log file) must not exist in the location you
are restoring to. If either of these files exists, you must delete it or move it
to a different directory before doing the full restore.
When a full restore begins, it destroys all old database files and then
recreates them. The requirement that you manually delete the Catalog
Store and transaction log files protects you from doing a full restore
accidentally.
• For any incremental restore, the Catalog Store (.db) and transaction log
(.log) files must exist. If they exist, but in a different location than the one
you are restoring to, you must follow the procedure described in “Moving
database files”. If either of these files does not exist, you can only do a full
restore.
• For any incremental restore, the database must not have changed since the
last restore.
Restore requires exclusive access to the database. The default database server
startup option -gd DBA guarantees that only the DBA can start a database. To
ensure exclusive access, start the database server with the -gd DBA option set,
but do not start the database you are restoring. RESTORE automatically starts
the database in such a way that no other users can connect to it.
You must restore an entire backup or set of backups. Restoring individual files
is not supported. However, you can move database files to a new location,
using the RENAME clause of the RESTORE command.
Restore accommodates dbspace changes
During a set of incremental restores, RESTORE creates and drops dbspaces as
needed to match what was done during the period of operation encompassed
by the restores. For example, assume that you make a full backup of a database,
then add a dbspace to that database, and then do an incremental backup after
adding the dbspace. When you restore from these backups, RESTORE creates
a file for the new dbspace, at the start of the incremental restore. Similarly, if
you drop a dbspace, it is dropped during the restore, although the actual file is
not removed.

Restoring your databases
398
Restoring disk backup files
If you back up to disk and then move those files to tape, you must move them
back to disk files with the same names as when you created the backup.
Adaptive Server IQ cannot restore disk files that are moved to tape directly
from tape.
When you restore using the Sybase-provided backup and restore, you must
specify the same number of archive devices (disk files) for the restore as were
used to create the backup.
Restoring tape backup files
When restoring from tape, you must position the tape to the start of the IQ data.
RESTORE does not reposition the tape for you.
When you restore using the Sybase-provided backup and restore, you must use
the same number of tape drives for the restore as were used to create the
backup(s) you are restoring.
Specifying files for an incremental restore
For an incremental restore, files you restore must match in number and size the
files they replace, for both the IQ and Catalog Stores.
Keeping the database unchanged between restores
If you are doing a set of incremental restores, and any user changes the
database before you finish restoring the complete set, the Restore program does
not let you restore the remaining incrementals. For example, if you have a set
consisting of a full restore and two incrementals, and a user’s write transaction
commits after the full restore but before you issue the second or third
RESTORE command, you cannot proceed with the incremental restores.
Instead, you must restore the full backup and apply the incrementals again.
If the database has changed since the last restore and you try to do an
incremental restore, the following error occurs:

CHAPTER 11 Backup and Data Recovery
399
Database has changed since the last restore
Note Adaptive Server IQ does not let you do an incremental restore if the
database has changed since the previous restore. However, it does not prevent
users from making changes. It is the responsibility of the DBA or system
operator to ensure that no changes are made to the database until all restores
are complete.
Restoring from a compatible backup
RESTORE lets you restore database files for Adaptive Server IQ 12.0 and up.
Due to changes in the format of the database, Adaptive Server IQ 12.0 does not
let you restore from a backup created on an older version. Likewise, you cannot
restore a pre-Version 12.0 IQ database from a Version 12.0 backup.
To move your data from an Adaptive Server IQ 11.5.1 database to Adaptive
Server IQ 12.0, you must follow the migration procedure described in the
Adaptive Server IQ Installation and Configuration Guide.
RESTORE does not let you restore an Adaptive Server IQ backup to an
Adaptive Server Anywhere database.
The RESTORE statement
To restore a database, use the following syntax:
RESTORE DATABASE ’
db_file
’
FROM ’
archive_device
’ [ FROM ’
archive_device
’ ]...
... [ RENAME
dbspace_name
TO ’
new_dbspace_path
’ ]...
... [ CATALOG ONLY ]
Remember that you must be connected to the utility_db database as DBA to
issue this statement.
You must specify the db_file and at least one archive_device.
For db_file you specify the location of the Catalog Store file for the database
(created with the suffix .db by default). You can specify the full pathname or a
pathname relative to the server where the database was created. If you specify
a new pathname, the Catalog Store and any files created relative to it will be
moved to that location, except for any files you include in a RENAME clause.

Restoring your databases
400
Just as for backup, each archive_device specifies the API (Sybase or third
party) and, for the Sybase API, the physical tape device or disk file name from
which you are restoring. For third-party APIs, the content of the
archive_device string depends on your vendor. The archive device must not be
a raw disk device. When you restore from disk files using the Sybase API, you
must supply the same number of archive devices as were specified when this
backup was created.
Warning! If you misspell a tape device name and give a name that is not a valid
tape device on your system, RESTORE assumes it is a disk file and tries to read
from it.
See “Specifying archive devices” for details on specifying devices.
Note If you are restoring from tape devices on Windows NT, note that you do
not need to redouble the backslashes when you specify tape devices for restore,
as you did for backup.
Example 1 —
Restoring to the same
location
This Windows NT example restores a database to asiquser.db. The database is
restored from two disk files. All database files will be restored to their original
locations.
RESTORE DATABASE ’asiquser.db’
FROM ’c:\\asiq\\backup1’
FROM ’c:\\asiq\\backup2’
Moving database files
If you need to move database files to a new location—for example, if one of
your disk drives fails—you use one of the following methods:
• To move the database file that holds the Catalog Store (by default, the .db
file), you simply specify the new name as db_file.
• To move or rename the transaction log file, you use the Transaction Log
utility (DBLOG). For syntax and details, see “The DBLOG command-line
utility” on page 405.

CHAPTER 11 Backup and Data Recovery
401
• To move any other database file, you use the RENAME option.
Note The DBTRAN utility is not supported by Adaptive Server IQ because it
regenerates only those parts of the transaction log that are specific to Adaptive
Server Anywhere.
Example 2 — Moving
the Catalog Store This example restores the same database as Example 1. In Example 2, however,
you move the Catalog Store file and any database files that were created
relative it. To do so, you replace the original file name with its new location,
c:\newdir, as follows:
RESTORE DATABASE ’c:\\newdir\\asiqnew.db’
FROM ’c:\\asiq\\backup1’
FROM ’c:\\asiq\\backup2’
Adaptive Server IQ moves database files other than the Catalog Store as
follows:
• If you specify a RENAME clause, the file is moved to that location.
• If you do not specify a RENAME clause, and the file was created using a
relative pathname, it is restored relative to the new location of that
database file. In other words, files originally created relative to the
SYSTEM dbspace, which holds the Catalog Store file, are restored relative
to the Catalog Store file. Files originally created relative to the
IQ_SYSTEM_MAIN dbspace, which holds the main IQ Store file, are
restored relative to the main IQ Store file.
• If you do not specify a RENAME clause, and the file was created using an
absolute pathname, the file is restored to its original location.
In other words, if you want to move an entire database, you should specify in
a RENAME clause the new location for every IQ dbspace in the database—
required, temporary, and user-defined. The SYSTEM dbspace is the only one
you do not include in a RENAME clause.
If you only want to move some of the files, and overwriting the original files is
not a problem, then you only need to rename the files you actually want to
move.
You specify each dbspace_name as it appears in the SYSFILE table. You
specify new_dbspace_path as the new raw partition, or the new full or relative
pathname, for that dbspace.
You cannot use the RENAME option to specify a partial restore.

Restoring your databases
402
Relative pathnames in the RENAME clause work as they do when you create a
database or dbspace: the main IQ Store dbspace, Temporary Store dbspaces,
and Message Log are restored relative to the location of db_file (the Catalog
Store); user-created IQ Store dbspaces are restored relative to the directory that
holds the main IQ dbspace.
If you are renaming files while restoring both full and incremental backups, be
sure you use the dbspace names and paths consistently throughout the set of
restores. It is the safest way to ensure that files are renamed correctly.
If a dbspace was added between the full backup and an incremental backup,
and you are renaming database files, you need one more RENAME clause for
the incremental restore than for the full restore. Similarly, if a dbspace was
deleted between backups, you need one fewer RENAME clause for the restores
from any backups that occurred after the dbspace was deleted.
See “Recording dbspace names” for information on how to obtain a list of the
dbspace names in your database, so that you will know the correct names to
include in RENAME clauses.
Example 3 — Moving
a user dbspace This example shows how you restore the full and incremental backups in
example shown earlier in this chapter. In this case, media failure has made a
UNIX raw partition unusable. The user-defined dbspace on that raw partition,
IQ_USER, must be moved to a new raw partition, /dev/rdsk/c1t5d2s1. No other
database files are affected.
First, you connect to the utility_db database. Then you restore the full backup
from two tape devices. In this case they are the same two tape devices used to
make the backup, but the devices could differ as long as you use the same
number of archive devices, the same media type (tape or disk), and the same
tape sets in the correct order, as described in “Restoring in the correct order”.
The first RESTORE command is:
RESTORE DATABASE ’asiquser’
FROM ’/dev/rmt/0n’
FROM ’/dev/rmt/1n’
RENAME IQ_SYSTEM_MAIN TO ’/dev/rdsk/c2t0d1s1’
RENAME IQ_SYSTEM_TEMP TO ’/dev/rdsk/c2t1d1s1’
RENAME IQ_SYSTEM_MSG TO ’asiquser.iqmsg’
RENAME IQ_USER TO ’/dev/rdsk/c1t5d2s1’
The second RESTORE command, to restore the incremental backup, is:
RESTORE DATABASE ’asiquser’
FROM ’/dev/rmt/0n’
RENAME IQ_SYSTEM_MAIN TO ’/dev/rdsk/c2t0d1s1’
RENAME IQ_SYSTEM_TEMP TO ’/dev/rdsk/c2t1d1s1’

CHAPTER 11 Backup and Data Recovery
403
RENAME IQ_SYSTEM_MSG TO ’asiquser.iqmsg’
RENAME IQ_USER TO ’/dev/rdsk/c1t5d2s1’
Note You could also issue these commands with only the last RENAME clause,
since only one dbspace is being restored to a new location. Listing all of the
files or raw partitions, as shown here, ensures that you know exactly where
each will be restored.
Displaying header information
The CATALOG ONLY option displays the header information for the database.
It does not restore any data, either from the Catalog Store or the IQ Store. See
“Displaying header information” for a list of the information displayed.
When you specify CATALOG ONLY you include the FROM
archive_device
clause, but omit the RENAME clause.
Adjusting data sources and configuration files
When you move a database, you may need to modify your data sources,
configuration files, and integrated logins to reflect the new location of the
database.
Restoring in the correct order
When you restore from a full backup, every block in use at the time the backup
was made is written to disk. When you restore from an incremental backup,
only the blocks that changed between the previous backup (or the previous full
backup) and this backup are written to disk.
You must restore full and incremental backups in the correct order, with a
separate RESTORE command for each backup you are restoring. RESTORE
ensures that backups are restored in order, and gives the following error if it
determines that the order is incorrect:
SQL Code: -1012009
SQL State: QUA09
This restore cannot immediately follow the previous
restore.

Restoring your databases
404
To determine the correct order, you need the information about backup files
that is stored in the backup log. See “Getting information about backups and
restores” for the content and location of this file.
Restore backups as follows:
• If your database is corrupt, or if you are moving any files to a new location,
you must restore a FULL backup.
• If your most recent backup is a FULL backup, or if you need to restore a
database to the state that existed before any existing incremental(s) were
made, restore the full backup only.
• If you have an INCREMENTAL_SINCE_FULL backup that precedes the
database failure, first restore from the last FULL backup, and then restore
the INCREMENTAL_SINCE_FULL backup.
• If you do not have an INCREMENTAL_SINCE_FULL backup, but you have
performed one or more INCREMENTAL backups since your last FULL
backup, first restore the FULL backup, and then restore the INCREMENTAL
backups in the order in which they were made.
Within a given backup, the order in which you restore tapes is also important.
In particular, you need to keep track of the order of tapes in each backup tape
set, that is, the set of tapes produced in a given backup on a given archive
device:
• You must restore the tape set that contains the backup of the Catalog Store
first, and it must be on the first archive device.
• Within each set, you must restore tapes in the order in which they were
created.
• You cannot interleave sets; each set must be restored before you can
restore another set.
• After the first set, the order in which sets are restored does not matter, as
long as it is correct within each set.
Use the same number of drives to restore as were used to produce the backup,
so that you do not accidentally interleave tapes from different sets.
Example Assume that you are restoring a full backup, in which you used three archive
devices, and thus produced three tape sets, A, B, and C. The contents of each
set, and the restore order, are as follows:
Set A Tapes A1, A2, and A3. Tapes A1 and A2 contain the Catalog Store. This
set must be restored first, and must be in the first device.

CHAPTER 11 Backup and Data Recovery
405
Set B Tapes B1 and B2. These must be restored as a set, after Set A, and either
before or after Set C. They can be in either the second or third device.
Set C Tapes C1, C2, and C3. These must be restored as a set, after Set A, and
either before or after Set B. They can be in either the second or third device.
The Restore program checks that tapes within each set are in the correct order
on a single device. If not, you get an error, and the restore does not proceed
until you supply the correct tape. Except for the set with the Catalog Store, it
does not matter which set you put on a given device.
Note You must ensure that the Catalog Store tape set is restored first. The
Restore program does not check this.
Although these rules also apply to disk files, you are not likely to back up to
multiple files on a given disk device.
Renaming the transaction log after you restore
When you rename or move all other files in the database, you should also do
the same for the log file. To move or rename the log file, use the Transaction
Log utility (DBLOG). You should run this utility:
• After using RESTORE with a new database name
• After using RESTORE with the RENAME option
Note The database server must not be running on that database when the
transaction log filename is changed. If you try to use this utility on a running
database, you get an error message.
You can access the Transaction Log utility from the system command line,
using the DBLOG command-line utility.
The DBLOG command-line utility
Syntax dblog
[switches] database-file
Switches Switch Description
-m mirror-name Set transaction log mirror name.
-t log-name Set the transaction log name

Restoring your databases
406
Description The DBLOG command line utility allows you to display or change the name
of the transaction log or transaction log mirror associated with a database. You
can also stop a database from maintaining a transaction log or mirror, or start
maintaining a transaction log or mirror.
Transaction log utility options
Set the name of the transaction log mirror file (-m) This option sets a
filename for a new transaction log mirror. If the database is not currently using
a transaction log mirror, it starts using one. If the database is already using a
transaction log mirror, it changes to using the new file as its transaction log
mirror. Most Adaptive Server IQ databases do not use a transaction log mirror,
so this switch is rarely used.
Set the name of the transaction log file (-t) This option sets a filename,
including an optional directory path, for a new transaction log. If the database
is not currently using a transaction log, it starts using one. If the database is
already using a transaction log, it changes to using the new file as its
transaction log.
Validating the database after you restore
To ensure that tapes have been restored in the correct order, you should run the
stored procedure sp_iqcheckdb after you finish restoring your database. If you
are restoring a set of incremental backups, it is safest to run sp_iqcheckdb after
restoring each backup. Because this procedure can take many hours, however,
you may prefer to run it after the full backup only, not after each incremental.
For more information, see “Validating your database”.
Restore requires exclusive write access
Once RESTORE starts, no other users are allowed to access the specified
database. If you restore from a full backup and then from one or more
incremental backups, you should ensure that no users are modifying the
database between the restores. The modifications are permitted, but you cannot
perform any more incremental restores. Instead, you must start the entire
restore again.

CHAPTER 11 Backup and Data Recovery
407
In an IQ Multiplex, you must restore on the write server in simplex mode, and
synchronize the query server following the completion of the restore. For more
information on multiplex restores, see Adaptive Server IQ Multiplex User’s
Guide.
This restriction extends to any incremental restores you may need if your
system crashes during recovery. If you need to recover from a system or media
failure that occurs during a restore, you must do one of the following:
• Continue the original sequence of full and incremental restore operations,
or
• Perform a full restore, followed by any incremental restores needed to
fully recover your database.
The default database server startup setting -gd DBA makes DBA privileges a
requirement for starting up a database. When the DBA runs RESTORE, the
command automatically starts the database, gets the information it needs for
the restore, and then stops the database. At the end of the restore, the command
starts the database, issues a checkpoint, and stops it again. This procedure
ensures that the DBA has exclusive write access throughout a restore.
When all incremental restores are complete, the DBA issues the START
DATABASE command again to allow other users access to the database.
Displaying header information
You can display the contents of the header file by using the RESTORE
statement with the CATALOG ONLY option and no FILE clauses. The header file
includes the following information:
• Database name
• Database type (Adaptive Server IQ or Adaptive Server Anywhere)
• Backup creation date
• Approximate number of tapes or disk files in the backup
• User who did the backup
• Backup type (full, incremental, or incremental-since-full)
• Medium (always Othr)
• Number, type, and size of dbspaces

Restoring your databases
408
For an example of the information you see in a header file, see any RESTORE
line in the sample backup log in “Content of the backup log”. A RESTORE
with CATALOG ONLY produces the information in the same format as the
backup log entry for an actual RESTORE.
Recovery from errors during restore
If an incremental restore fails early in the operation, the database is still usable
(assuming it existed and was not corrupt before the restore). If a full restore
fails, you will not have a usable database.
If a failure occurs after a certain point in the operation, the restore program
marks the database as corrupted. In this case recovery is only possible by
means of a FULL RESTORE. If you were performing a FULL RESTORE when
the failure occurred, you may need to go back to the previous FULL BACKUP.
Using Symbolic Links (UNIX Only)
If you use symbolic links, you may unknowingly cause dbspaces to be created
in a different directory from where you may want them to be. For example,
suppose you have created dbspaces in the following files:
-rw-r--r-- 1 dkusner sybase 122880000 Feb 26 18:27 asiqdemo.db
-rw-r--r-- 1 dkusner sybase 122880000 Feb 26 18:27 asiqdemo.iq1
-rw-r--r-- 1 dkusner sybase 122880000 Feb 26 18:27 asiqdemo.iq2
-rw-r--r-- 1 dkusner sybase 122880000 Feb 26 18:27 asiqdemo.iq3
-rw-r--r-- 1 dkusner sybase 122880000 Feb 26 18:27 asiqdemo.iqtmp
-rw-r--r-- 1 dkusner sybase 122880000 Feb 26 18:27 asiqdemo.iqmsg
If you create the following links beforehand, then the dbspaces, when they are
created, are actually created in the directories (or on the raw partitions) pointed
to by the links:
lrwxrwxrwx 1 dkusner sybase 14 Feb 26 17:48 asiqdemo.iq1 ->
LINKS/asiqdemo.iq1
lrwxrwxrwx 1 dkusner sybase 14 Feb 26 17:48 asiqdemo.iq2 ->
LINKS/asiqdemo.iq2
lrwxrwxrwx 1 dkusner sybase 18 Feb 26 17:48 asiqdemo.iq3 ->
/dev/rdsk/c2t6d0s0

CHAPTER 11 Backup and Data Recovery
409
When you back up the files and restore them with the CATALOG ONLY option,
you don’t see anything telling you that these files were links; in fact, this
information is not saved.
Adaptive Server IQ saves these files as though they were actually present in the
directory where the symbolic links reside. When you do the restore, the files
are recreated in the directories or on the raw partitions named by the database
name. Whether or not the links exist at restore time, they will never be used
again. The database is restored to its original location.
Unattended backup
With the ATTENDED OFF option, you can specify that no operator will be
present during a backup. Adaptive Server IQ currently supports two unattended
backup features:
• The operator does not need to respond to prompts during the backup.
• The archive devices can be stacker drives, which automatically load a set
of tapes into a single drive. You can use stacker drives for both attended
and unattended backups.
Unattended backup tries to detect all possible reasons for a backup failing
except tape media failure, and report any potential errors before attempting the
backup, such as available space on disk or tape, and consistent size and block
factor.
For unattended backup to disk, Adaptive Server IQ first tests whether there is
enough free disk space for the backup, However, it does not preallocate the
backup files to reserve the space. If another user writes to that disk and as a
result there is not enough room for the backup, the backup fails when disk
space runs out.
For backup to tape, you must estimate how much data each tape will hold, and
specify that number of kilobytes in the TO
archive_device
parameter of the
BACKUP command. The backup program checks information stored internally
to see how much room it needs to back up your database. If it determines that
there is enough room on the tape, the backup proceeds. However, if you
overestimate the amount of space available on the tape(s) and the backup runs
out of space, the backup fails at that point.
If you omit the SIZE parameter for an unattended backup, the entire backup
must fit on one tape.

Getting information about backups and restores
410
If you are using a third-party backup product, the vendor information string
needs to convey any information needed for the backup, such as the
specification of devices, size of files, and stacker drives. See your vendor’s
documentation for details.
Note Adaptive Server IQ does not permit unattended restore.
Getting information about backups and restores
Adaptive Server IQ provides a backup log, .backup.syb, to help you manage
your backup media. This log is not used to create the backup or to restore the
database; however, information describing the backup or restore is recorded in
this file during both Backup and Restore.
Note To display only the information about a particular backup, you can run
RESTORE with the CATALOG ONLY option. This option displays the header
file for a backup from the media rather than from the file, so that the DBA can
identify what is on the tape or file. See “Displaying header information”.
Locating the backup log
The.backup.syb file is in ASCII text format. Its location depends on the setting
of environment variables at the time the server is started:
• On UNIX, the server tries to place it in the following locations, in this
order:
• The directory specified by the ASLOGDIR environment variable.
• The directory specified by the HOME environment variable.
• The home directory as obtained from account information.
• The current directory (where the server was started).
If the file is placed in the "home" directory, it is prefixed with a "." in order
to make it a hidden file.

CHAPTER 11 Backup and Data Recovery
411
• On Windows NT, the server tries to place it in the following locations, in
this order:
• The directory specified by the ASLOGDIR environment variable.
• The directory that holds the server executable files.
Content of the backup log
For every backup or restore you perform, the backup log contains the following
fields, separated by commas:
• Operation (Backup or Restore)
•Version
• Database name
• Database type (Adaptive Server IQ or Adaptive Server Anywhere)
• Date and time of backup or restore
• Creator user ID
• Type of backup/restore: Full, Incremental, or Incremental_since_full, or
Database File Only (for Adaptive Server Anywhere databases only)
• Method: Archive or Image
• Location
• Comment (if entered on the BACKUP command), enclosed in single
quotes. If the comment includes quotes, they appear as two consecutive
single quotes.
Here is a sample backup log, with ellipses added to show continuation lines.
BACKUP, 1.0, all_types.db, ASIQ, ’1998-12-22 16:25:00.000’,.....
DBA, Full, Arch, TED_FULL00, ’’ BACKUP, 1.0, all_types.db, ASIQ, ’1998-12-22
16:53:00.000’,...
DBA, Incr, Arch, TED_X_bkup_inc, ’’ RESTORE, 1.0, all_types.db, ASIQ, ’1998-
12-22
16:25:00.000’,...
DBA, Full, Arch, TED_FULL00, ’’ RESTORE, 1.0, all_types.db, ASIQ, ’1998-12-22
16:53:00.000’,...
DBA, Incr, Arch, TED_X_bkup_inc, ’’ BACKUP, 1.0, all_types.db, ASIQ, ’1998-12-22
20:07:00.000’,...
DBA, InSF, Arch, A_partial2_yes_sf, ’’ BACKUP, 1.0, all_types.db, ASIQ, ’1998-
12-22

Getting information about backups and restores
412
20:07:00.000’, ...
DBA, InSF, Arch, A_partial2_yes_sf, ’’
Maintaining the backup log
It’s a good idea to clean up the backup log after you purge backup media. Use
a text editor to do so. Be careful with your edits: once BACKUP or RESTORE
records information in this file, it does not check its accuracy.
There is only one backup log on a server. The server must be able to read and
write this file. The system administrator may want to limit access to this file by
other users. If you are running more than one database server on a system, you
should set the ASLOGDIR environment variable differently for each server, to
produce separate backup logs.
Warning! Do not edit the backup log while a backup or restore is taking place.
If you are modifying the file while BACKUP or RESTORE is writing to it, you
may invalidate the information in the file.
Viewing the backup log in Sybase Central
The backup log contains information in raw, unsorted form. To see the
information in a form that is easier to understand, you can view it in Sybase
Central.
Note This feature is not yet supported.
Recording dbspace names
In the event that you ever need to use the RENAME option of RESTORE to
move a database or one of its dbspaces, you need to know the name of every
dbspace in the database. The dbspace names are in the SYSFILE table of every
database, but you will not have this table available when you are restoring. For
this reason, you should issue the following statement any time you back up
your database:
select * from SYSFILE

CHAPTER 11 Backup and Data Recovery
413
Keep the results of this query some place other than the disk where the database
resides, so that you will have a complete list of dbspace names if you need
them.
You can also run the following script in DBISQL. This script produces an
output file that contains the set of rename clauses you would use if you did not
actually change the location of any files. You can substitute any new file
locations, and use the resulting file in your RESTORE statement.
Note Because the database may not exist when you need to restore, you may
want to run this script after you back up your database.
-- This select statement will get names of IQ dbspaces
and file names
-- and add rename syntax including quotes
select ’rename’ , dbspace_name , ’to’ ,’’’’ + file_name
+ ’’’’
from SYSFILE where store_type =’IQ’;
-- output to file in proper format
-- no delimiters and no additional quotes
output to restore.tst delimited by ’ ’ quote ’’;
--this produces a file restore.tst looking like this:
--rename IQ_SYSTEM_MAIN to ’/dev/rdsk/c2t0d1s7’
--rename IQ_SYSTEM_TEMP to ’/dev/rdsk/c2t1d1s7’
--rename IQ_SYSTEM_MSG to ’all_types.iqmsg’
Determining your data backup and recovery strategy
To develop an effective strategy for backing up your system, you need to
determine the best combination of full, incremental, and incremental-since-full
backups for your site, and then set up a schedule for performing backups.
Consider the performance implications of various backup options, and how
they affect your ability to restore quickly in the event of a database failure.

Determining your data backup and recovery strategy
414
Scheduling routine backups
Make a full backup of each database just after you create it, to provide a base
point, and perform full and incremental backups on a fixed schedule thereafter.
It is especially important to back up your database after any large number of
changes.
Your backup plan depends on:
• The load on your system
• The size of your database
• The number of changes made to the data
• The relative importance of faster backups and faster recovery
Determining the type of backup
When you decide whether to do a full, incremental, or incremental_since_full
backup, you need to balance the time it takes to create the backup with the time
it would take to restore. You also should consider media requirements. A given
incremental backup is relatively quick and takes a relatively small amount of
space on tape or disk. Full backups are relatively slow and require a lot of
space.
Incremental_since_full is somewhere in between. It starts out as equivalent to
incremental, but as the database changes and the number of backups since a full
backup increases, incremental_since_full can become as time-consuming and
media-consuming as a full backup, or worse.
In general, the opposite is true for restore operations. For example, if you need
to restore from a very old full backup and a dozen or more incrementals, the
restore may take longer and the backup may use up more space than a new full
backup.
The obvious advantage of incremental backups is that it is much faster and
takes less space to back up only the data that has changed since the last backup,
or even since the last full backup, than to back up your entire database. The
disadvantage of relying too heavily on incremental backups is that any eventual
restore takes longer.

CHAPTER 11 Backup and Data Recovery
415
For example, once you have a full backup of your database, in theory you could
perform only incremental backups thereafter. You would not want to do this,
however, because any future recovery would be intolerably slow, and would
require more tape or disk space than doing a full backup periodically.
Remember that other users can have read and write access while you do
backups, but no one else can use the database while you are restoring it. You
might find yourself needing to restore dozens of incremental backups, with
your system unavailable to users throughout the process.
A much better approach is a mix of incremental and full backups.
The greater the volume of your database changes, the more important it is do a
backup, and the smaller the advantage of incremental backups. For example, if
you update your database nightly with changes that affect 10 percent or more
of the data, you may want to do an incremental_since_full backup each night,
and a full backup once a week. On the other hand, if your changes tend to be
few, a full backup once a month with incrementals in between might be fine.
Designating Backup and Restore Responsibilities
Many organizations have an operator whose job is to perform all backup and
recovery operations. Anyone who is responsible for backing up or restoring an
Adaptive Server IQ database must have DBA privileges for the database.
Improving performance for backup and restore
The overall time it takes to complete a backup or recover a database depends
largely on the strategy you choose for mixing full and incremental restores.
Several other factors also affect the speed of backup and restore operations: the
number of archive devices, data verification, the memory available for the
backup, and size of the IQ and Catalog Stores.
Increasing the number of archive devices
BACKUP and RESTORE write your IQ data in parallel to or from all of the
archive devices you specify. The Catalog Store is written serially to the first
device. Faster backups and restores result from greater parallelism. To achieve
greater performance when backing up or restoring a large database, specify
more archive devices.

Determining your data backup and recovery strategy
416
Eliminating data verification
You can also improve the speed of backup and restore operations by setting
CRC OFF in the BACKUP command. This setting deactivates cyclical
redundancy checking. With CRC ON, numbers computed on backup are
verified during any subsequent restore operation, affecting performance of
both commands. The default is CRC ON. If you turn off this checking,
remember that you are giving up a greater assurance of accurate data in
exchange for faster performance.
Spooling backup data
You may find that it is faster and more efficient to create backups on disk, and
then spool them onto tape for archival storage. If you choose this approach, you
need to unspool the data onto disk before restoring it.
Increasing memory used during backup
The amount of memory used for buffers during backup directly affects backup
speed, primarily for tape backups. The BLOCK FACTOR parameter of the
BACKUP command controls the amount of memory used. If your backups are
slow, you may want to increase the value of BLOCK FACTOR for faster
backups.
The effect of BLOCK FACTOR depends on your operating system, and on the
block size specified when the database was created. By default, the database
block size is 4096.
On UNIX, the default BLOCK FACTOR is 25. With this combination, BACKUP
is able to buffer data ideally for most UNIX tape drives, with enough data in
memory that drives are kept busy constantly throughout the backup.
On Windows NT, the default BLOCK FACTOR is computed based on the
database block size. This value usually achieves maximum throughput on NT.
Because of the way NT handles tape devices, you may not be able to achieve
faster backups by increasing the BLOCK FACTOR.
Balancing system load
Adaptive Server IQ allows you to perform backups concurrently with all other
read/write operations, except those that affect the structure of the database. It
is still a good idea to schedule backups during times of low system use,
however, to make the best possible use of system resources—disk, memory,
and CPU cycles.

CHAPTER 11 Backup and Data Recovery
417
Controlling the size of the Catalog Store
An IQ database consists of an IQ Store and an underlying Catalog Store.
BACKUP makes a full backup of the Catalog Store at the start of every backup,
both full and incremental. Ordinarily the Catalog Store is quite small,
containing only the system tables, metadata, and other information Adaptive
Server IQ needs to manage your database. However, it is possible to create non-
IQ tables in the Catalog Store. You can improve IQ backup performance by
keeping any non-IQ data in a separate Adaptive Server Anywhere-only
database, rather than in the Catalog Store.
Backup copies only the latest committed version of the database. Other version
pages used by open transactions are not backed up.

Determining your data backup and recovery strategy
418
419
CHAPTER 12 Managing System Resources
About this chapter This chapter describes the way Adaptive Server IQ uses memory, disk I/O,
and CPUs, and the relationships among these factors. It also explains how
the DBA can tune performance by adjusting resource usage.
The suggestions in this chapter are generic. You need to adjust them to suit
your hardware and software configuration.
Introduction to performance terms
Performance is the measure of efficiency of a computerized business
application, or of multiple applications running in the same environment.
It is usually measured in response time and throughput.
Response time is the time it takes for a single task to complete. It is
affected by:
• Reducing contention and wait times, particularly disk I/O wait times
• Using faster components
• Reducing the amount of time the resources are needed (this is the
same as increasing concurrency)
Throughput refers to the volume of work completed in a fixed time period.
Throughput is commonly measured in transactions per second (tps), but
can be measured per minute, per hour, per day, and so on.
Designing for performance
Most gains in performance derive from good database design, thorough
query analysis, and appropriate indexing. The largest performance gains
can be realized by establishing a good design and by choosing the correct
indexing strategy.

Overview of memory use
420
Other considerations, such as hardware and network analysis, can locate
bottlenecks in your installation.
Overview of memory use
Adaptive Server IQ uses memory for several purposes:
• Buffers for data read from disk to resolve queries
• Buffers for data read from disk when loading from flat files
• Overhead for managing connections, transactions, buffers, and database
objects
The sections that follow explain how the operating system supports IQ's use of
memory, how IQ allocates memory for various purposes, how you can adjust
the memory allocations for better performance, and what you may need to do
to configure the operating system so that enough memory is available for IQ.
Paging increases available memory
When there is not enough memory on your system, performance can degrade
severely. If this is the case, you need to find a way to make more memory
available. Like any RDBMS software, Adaptive Server IQ requires a lot of
memory. The more memory you can allocate to Adaptive Server IQ, the better.
However, there is always a fixed limit to the amount of memory in a system,
so sometimes operating systems can have only part of the data in memory and
the rest on disk. When the operating system must go out to disk and retrieve
any data before a memory request can be satisfied, it is called paging or
swapping. The primary objective of good memory management is to avoid or
minimize paging or swapping.
The most frequently used operating system files are swap files. When memory
is exhausted, the operating system swaps pages of memory to disk to make
room for new data. When the pages that were swapped are called again, other
pages are swapped, and the required memory pages are brought back. This is
very time-consuming for users with high disk usage rates. In general, try to
organize memory to avoid swapping and, thus, to minimize use of operating
system files.

CHAPTER 12 Managing System Resources
421
To make the maximum use of your physical memory, Adaptive Server IQ uses
buffer caches for all reads and writes to your databases.
Utilities to monitor swapping
You can use the UNIX vmstat command, the UNIX sar command, or the
Windows NT Task Manager, to get statistics on the number of running
processes and the number of page-outs and swaps. Use this information to find
out if the system is paging excessively. Then make any necessary adjustments.
You may want to put your swap files on special fast disks.
For examples of vmstat output, see “Monitoring paging on UNIX systems”.
Server memory
Adaptive Server IQ allocates memory for various purposes from a single
memory pool, called server memory. Server memory includes all of the
memory allocated for managing buffers, transactions, databases and servers.
This concept differs markedly from the way memory was used in versions prior
to 12, which relied heavily on the use of shared memory for buffer caches.
Buffer caches are still a crucial aspect of IQ memory management. However,
they now receive a memory allocation from the server memory pool.
At the operating system level, IQ server memory consists of both heap memory
and shared memory. For the most part, you do not need to be concerned with
whether memory used by Adaptive Server IQ is heap memory or shared
memory. All memory allocation is handled automatically. However, you may
need to make sure that your operating system kernel is correctly configured to
use shared memory before you run Adaptive Server IQ. See the Adaptive
Server IQ Installation and Configuration Guide for your platform for details.
Memory for loads,
synchronizations, and
deletions
To avoid overallocating the physical memory on the machine, you can set the
LOAD_MEMORY_MB database option for operations where loads occur. In
addition to LOAD operations, this option affects SYNCHRONIZE and DELETE
operations. The LOAD_MEMORY_MB option sets an upper bound (in MB) on
the amount of heap memory subsequent loads can use. For information on
loads and buffer cache use, see “Memory requirements for loads” on page 424.
For details of the LOAD_MEMORY_MB option, see the Adaptive Server IQ
Reference Manual.

Overview of memory use
422
Killing processes
affects shared
memory
Warning! Killing processes on UNIX systems may result in semaphores or
shared memory being left behind instead of being cleaned up automatically.
The correct way to shut down an IQ server on UNIX is the stop_asiq utility,
described in “Stopping the database server” on page 43. For information on
cleaning up after an abnormal exit, see the chapter “Troubleshooting Hints” in
Adaptive Server IQ Troubleshooting and Error Messages Guide.
Managing buffer caches
Adaptive Server IQ needs more memory for buffer caches than for any other
purpose. Adaptive Server IQ has two buffer caches, one for the IQ Store and
one for the Temporary Store. It uses these two buffer caches for all database I/O
operations—for paging, for insertions into the database, and for backup and
restore. Data is stored in one of the two caches whenever it is in memory. All
user connections share these buffer caches. Adaptive Server IQ keeps track of
which data is associated with each connection.
Read the sections that follow for in-depth information on managing buffer
caches:
• For information on how to calculate your memory requirements, see
“Determining the sizes of the buffer caches”
• For information on how to set buffer cache sizes once you know what they
should be, see “Setting buffer cache sizes”
Determining the sizes of the buffer caches
The buffer cache sizes you specify for the Main IQ Store and Temporary Store
will vary based on several factors. The default values (8MB and 4MB) are too
low for most large databases. The actual values required for your application
depend on the total amount of physical memory on your system and how much
of this memory Adaptive Server IQ, the operating system, and other
applications need to do their tasks.
The following diagram shows the relationship between the buffer caches and
other memory consumption.
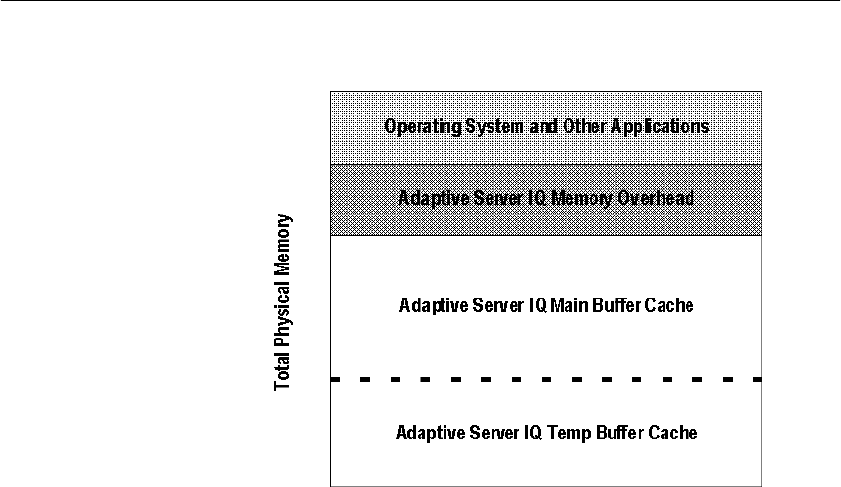
CHAPTER 12 Managing System Resources
423
Figure 12-1: Buffer caches in relation to physical memory
The following sections describe each part in more detail and provide guidelines
to help you determine how much memory each part requires.
Operating system and other applications
This amount will vary for different platforms and how the system is used. For
example, UNIX “cooked” file systems do more file buffering than UNIX raw
partitions, so the operating system has a higher memory requirement. As a
minimum, you can assume that UNIX systems use 60MB or more, while
Windows NT systems use 30MB or more.
In addition, other applications that run in conjunction with Adaptive Server IQ
(such as query tools) have their own memory needs. See your application and
operating system documentation for information on their memory
requirements.
Adaptive Server IQ memory overhead
After determining how much physical memory the operating system, and other
applications use, you can calculate how much of the remaining memory
Adaptive Server IQ requires to do its tasks. The factors that affect this overhead
are described in the following sections.

Overview of memory use
424
Raw partitions versus file systems
For UNIX systems, databases using “cooked” file systems rather than raw
partitions may require another 30% of the remaining memory to handle file
buffering by the operating system. Windows NT file systems do not have the
same overhead as UNIX file systems. However, Windows NT and some UNIX
systems may benefit from reserving a significant portion of memory for the file
system to better handle I/O operations. For more information, see the Adaptive
Server IQ Installation and Configuration Guide for your platform.
Multi-user database access
For multi-user queries of a database, Adaptive Server IQ needs about 10MB
per “active” user. An active user is defined as one that simultaneously accesses
or queries the database. For example, 30 users may be connected to Adaptive
Server IQ, but only 10 or so may be actively using a database at any one time.
Memory requirements for loads
Adaptive Server IQ also requires a portion of memory separate from the buffer
caches to perform loads operations, synchronization, and deletions. This
memory is used for buffering I/O for flat files. Adaptive Server IQ uses
memory to buffer a read from disk. The size of this read equals the BLOCK
FACTOR multiplied by the size of the input record. BLOCK FACTOR is an
option of the LOAD TABLE command. With the default value of 10,000, an
input row of data of 200 bytes results in 2MB total that Adaptive Server IQ uses
for buffering I/O. This memory is required only when loading from flat files,
not for inserts from a database.
Memory for thread stacks
Processing threads require a small amount of memory. The more IQ processing
threads you use, the more memory needed. The -iqmt server switch controls the
number of threads for IQ.
If you have a large number of users, the memory needed for Catalog Store
processing threads also increases, although it is still relatively small. The -gn
switch controls Catalog Store processing threads.

CHAPTER 12 Managing System Resources
425
Adaptive Server IQ main and temp buffer caches
After determining how much overhead memory Adaptive Server IQ needs, you
must decide how to split what’s left between your main IQ and temp buffer
caches. The dashed line dividing the two areas in Figure 12-1 indicates that this
split may change from one database to another based on several factors.
The general rule of thumb for IQ, unlike most other databases, is a split of
about 40% for the main buffer cache and 60% for temp buffer cache. However,
this rule of thumb is only a beginning. While some operations, such as queries
with large sort-merge joins or inserts involving HG indexes, may require a
larger temp buffer cache than main, other applications can have entirely
different needs. IQ supports memory allocation ratios from 30/70 to 70/30,
main to temp.
Note These guidelines assume you have one active database on your system
at a time (that is, any Adaptive Server IQ users are accessing only one
database). If you have more than one, you need to further split the remaining
memory among the databases you expect to use.
It is highly recommended that you start with the general guidelines presented
here and watch the performance of Adaptive Server IQ by using its monitor
tool (described in “Monitoring the buffer caches” on page 467) and any
specific tools described in the Adaptive Server IQ Installation and
Configuration Guide for your platform.
Buffer caches and physical memory
The total memory used for IQ main and temporary buffer caches, plus IQ
memory overhead, and memory used for the operating system and other
applications, must not exceed the physical memory on your system.
If you set buffer cache sizes higher than your system will accommodate,
Adaptive Server IQ cannot open the database. Specify the server startup
options -iqmc (main cache size) and -iqtc (temp cache size) to open the database
and reset the defaults. The default sizes are 8MB for the main cache and 4MB
for the temporary cache.
Note On some UNIX platforms, you may need to set other server switches to
make more memory available for buffer caches. See “Platform-specific
memory options” on page 434 for more information.

Overview of memory use
426
Other considerations
Adaptive Server IQ buffer cache sizes may differ from one database to the next
based on how you use it. For maximum performance, you need to change the
settings between inserting, querying the database, and mixed use. In a mixed-
use environment, however, it is not always feasible to require all users to exit
the database so that you can reset buffer cache options. In those cases, you may
need to favor either load or query performance. When possible, define the
cache sizes before doing any work in the database.
The buffer cache and memory overhead guidelines also may differ between
platforms. See your Adaptive Server IQ Installation and Configuration Guide
for any other issues.
Example of setting buffer cache sizes
The following table provides a list of the factors that may consume memory for
your system and how much remains for your main and temp buffer caches. It
assumes that the system has 1GB of physical memory, no other significant
applications on the hardware other than running Adaptive Server IQ, and only
one active database at a time. The table makes a distinction in the storage type
(raw versus “cooked”) and the way the database is accessed (queries or inserts).
Table 12-1: Memory available for buffer caches (Example)
Memory available
using raw partitions
Memory available
using "cooked" file
systems
Memory Use Amount
Used Queries Inserts Queries Inserts
Total amount of physical memory
available (approximate in MB)
1000 1000 1000 1000
Operating system use assuming a
minimum amount for a UNIX
system
60a940 940 940 940
Overhead from using "cooked" file
system: 30% of remaining memory
from step 3 above
278 647 647
Overhead for number of active
users: approximately 30 connected
users but only about 10 active at
10MB each
100 825 547
Overhead for inserts from flat files
assuming a 200-byte record size and
default settings
97 828 550

CHAPTER 12 Managing System Resources
427
aMinimum operating system use for Windows NT is 30MB
As shown in the table, you should have one set of values for your buffer caches
when primarily inserting into the database, another set when primarily
querying the database, each differing from a typical mixed load of inserting and
querying. To change the cache sizes, see “Setting buffer cache sizes”.
Remember that the cache size options do not take effect until you stop and
restart the database.
Setting buffer cache sizes
By default, Adaptive Server IQ sets the size of the main and temporary buffer
caches to 8MB and 4MB respectively. Most applications will require much
higher values (limited by the total amount of physical memory).
Several options and server switches can affect buffer cache sizes:
Table 12-2: Methods of adjusting buffer cache sizes
Memory remaining for the main and
temp buffer caches
675 828 397 550
Main_Cache_Memory_Mb setting:
60% of memory remaining for
buffer caches
405 497 238 330
Temp_Cache_Memory_Mb setting:
40% of memory remaining for
buffer caches
270 331 159 220
Memory available
using raw partitions
Memory available
using "cooked" file
systems
Memory Use Amount
Used Queries Inserts Queries Inserts
Method When to use it How long the setting is
effective For more
information, see
MAIN_CACHE_MEMORY_
MB and
TEMP_CACHE_MEMORY_
MB database options
Normal way to set buffer
cache sizes. Database
must be open to set these
values.
From the next time the
database is restarted, until
you reset these options, or
temporarily override them
with server switches
“Setting buffer cache
size database options”
on page 428

Overview of memory use
428
Setting buffer cache size database options
To set buffer cache sizes permanently (that is, until you explicitly reset them)
use the SET OPTION statement. Follow the procedure below.
❖To change the buffer cache sizes permanently:
1 If the database whose cache sizes you are changing is not already started,
start it now:
START DATABASE
dbfile
[AS
dbname
] [ON
engine_name
]
2 Set one or both cache sizes.
• To set the buffer cache size for the IQ Store (the main buffer cache)
use the following syntax:
SET OPTION "PUBLIC".MAIN_CACHE_MEMORY_MB =
#_of_MB
• To set the buffer cache size for the Temporary Store (the temp buffer
cache) use the following syntax:
SET OPTION "PUBLIC".TEMP_CACHE_MEMORY_MB =
#_of_MB
-iqmc and -iqtc server
switches
Reset cache sizes when
the database is not
running. Especially useful
if cache sizes are larger
than your system can
accommodate.
From the time the server is
started until it is stopped
“Setting buffer cache
size server switches” on
page 429
-iqsmem and -iqwmem
server switches
Use on some UNIX
platforms to provide
additional memory for use
as buffer caches.
From the time the server is
started until it is stopped
“Platform-specific
memory options” on
page 434
LOAD_MEMORY_MB
database option
Indirectly affects buffer
cache size, by controlling
the memory that can be
used for loads. On some
platforms, allowing
unlimited memory for
loads means less memory
is available for buffer
caches.
Immediately until you reset
the option
“Memory for loads,
synchronizations, and
deletions” on page 421
Method When to use it How long the setting is
effective For more
information, see

CHAPTER 12 Managing System Resources
429
3 Make sure all users are disconnected from the database, and stop the
database.
• If the -ga command-line switch is set, the database shuts down
automatically after the last user disconnects.
• If -ga is not set, stop the database, by using the stop_asiq utility on
UNIX, or by clicking Shutdown on the database server display on
Windows NT.
4 Restart the database. The new cache sizes are now in effect.
Note It is important to have an appropriate PUBLIC setting of the cache size
options. Otherwise, when the database server is restarted they will revert to the
default settings, which are far too low for most applications.
Setting buffer cache size server switches
Normally you change the buffer cache sizes by setting the
MAIN_CACHE_MEMORY_MB and TEMP_CACHE_MEMORY_MB database
options. However, if you set these parameters to a value that is higher than your
system will accommodate, you will not be able to open the database. If this
occurs, use the server startup options -iqmc and -iqtc to change the current
buffer cache sizes. These parameters only remain in effect while the server is
running, so you still need to set the buffer cache size database options.
Specifying page size
When you create a database, you set its page size. This parameter, in
conjunction with the size of the buffer cache, determines memory use and disk
I/O throughput for that database.
Setting the page size
Adaptive Server IQ swaps data in and out of memory in units of pages. When
you create a database, you specify a separate page size for the Catalog Store
and the IQ Store. The Temporary Store has the same page size as the IQ Store.
For IQ page size recommendations for the best performance, see “Choosing an
IQ page size” on page 111.

Overview of memory use
430
Because the Catalog Store accounts for only a tiny fraction of I/O, the page size
for the Catalog Store has no real impact on performance. The default value of
4096 bytes should be adequate.
The IQ page size determines two other performance factors, the default I/O
transfer block size, and the maximum data compression for your database.
These factors are discussed in the sections that follow.
Block size
All I/O occurs in units of blocks. The size of these blocks is set when you
create an IQ database; you cannot change it without recreating the database. By
default, the IQ page size determines the I/O transfer block size. For example,
the default IQ page size of 64KB results in a default block size of 4096 bytes.
In general, IQ uses this ratio of default block size to page size, but it considers
other factors also.
The default block size should result in an optimal balance of I/O transfer rate
and disk space usage for most systems. It does favor saving space over
performance, however. If the default block size does not work well for you, you
can set it to any power of two between 4096 and 32,768, subject to the
constraints that there can be no fewer than two and no more than 16 blocks in
a page. You may want to set the block size explicitly in certain cases:
• For a raw disk installation that uses a disk array, larger blocks may give
better performance at the expense of disk space.
• For a file system installation, to optimize performance over disk space, the
IQ block size should be greater than or equal to the operating system's
native block size, if there is one. You may get better I/O rates if your IQ
block size matches your file system’s block size.
Table 12-3 shows the default block size for each IQ page size.

CHAPTER 12 Managing System Resources
431
Table 12-3: Default block sizes
Data compression
Adaptive Server IQ compresses all data when storing it on disk. Data
compression both reduces disk space requirements and contributes to
performance. The amount of compression is determined automatically, based
on the IQ page size.
Saving memory
If your machine does not have enough memory, to save memory you can try
the following adjustments.
Decrease buffer cache settings
You may be able to save memory by decreasing buffer cache sizes. Keep in
mind that if you decrease the buffer caches too much, you could make your
data loads or queries inefficient or incomplete due to insufficient buffers.
Decrease memory used for loads
You can set the LOAD_MEMORY_MB option to limit the amount of heap
memory used for loads and other similar operations. See “Memory for loads,
synchronizations, and deletions” on page 421.
Adjust blocking factor for loads
Use BLOCK FACTOR to reduce I/O when loading from a flat file. The BLOCK
FACTOR option of the LOAD command specifies the blocking factor, or number
of records per block, that were used when the input file was created. The
default BLOCK FACTOR is 10,000.
The syntax for this load option is as follows:
BLOCK FACTOR =
integer
Page Size (KB) Block Size (bytes)
64 4096
128 8192
256 16384
512 32768

Overview of memory use
432
Use the following guideline to determine BLOCK FACTOR:
record size * BLOCK FACTOR = memory required
You need extra memory for this option, in addition to the memory for the
buffers. If you have a lot of memory available, or if no other users are active
concurrently, increasing the value of BLOCK FACTOR can improve load
performance.
Optimizing for large numbers of users
Adaptive Server IQ, running on Tru64-UNIX, Solaris/32, and Solaris/64,
handles up to 500 user connections. In order to support this greater number of
users you must adjust both operating system parameters and start_asiq server
parameters.
IQ command line option changes:
-gm #_connections_to_support
-iqgovern #_ ACTIVE_ queries_to_support
-gn #_Catalog_Store_front_end_threads
-c
-gm This is the total number of connections the server will support. Statistically,
some of these are expected to be connected and idle while others are connected
and actively using the database.
-iqgovern Although 500 users can be connected to IQ, for best throughput it is
recommended that far fewer users are allowed to query at once in order to allow
each of them sufficient resources to be productive. The -iqgovern value places
a ceiling on the maximum number of queries to execute at once. If more users
than the -iqgovern limit have submitted queries, new queries will be queued
until one of the active queries is finished.
The optimal value for -iqgovern depends on the nature of your queries, number
of CPUs, and size of the IQ buffer cache. The default value is 2*numcpus + 10.
-gn The correct value for -gn depends on the value of -gm. Setting -gn too low can
result in a hung server. Setting -gn above 480 is not recommended. For this
reason, for 500 users an -iqgovern value of 40 is required.

CHAPTER 12 Managing System Resources
433
-c The Catalog Store buffer cache is also the general memory pool for the Catalog
Store (the front end of Adaptive Server IQ). Sybase recommends a 64MB
minimum for 500 users.
Use of the -iqmt option is not required. If -iqmt is set too low for the number of
specified connections, the number of threads will be increased to handle the
number of requested connections. That is, -gm overrides -iqmt. However, if the
number of IQ threads is elevated by means of the -iqmt option then that factor
needs to be used in setting limits, as described in "Setting Operating System
Parameters" below.
IQ Temp space
You may need to increase your temp dbspace to accommodate more users.
Relative priorities of new and existing connections
If Adaptive Server IQ is very busy handling already connected users, it maybe
slow to respond to new connection requests. In extreme cases (such as test
scripts that fire off hundreds of connections in a loop while the server is busy
with inserts) new connections may have to wait up to a minute to before
becoming active or may even time out their connection request. In this
situation, the server may appear to be down when it is merely very busy. A user
getting this behavior should try to connect again. This issue will be addressed
in a future version.
Setting operating system parameters
To run Adaptive Server IQ with many connections you need to change certain
system parameters.
Solaris Although the Solaris thread limit is not a problem, developers and Sybase field
personnel should be aware that using the Solaris debugger on IQ requires a file
descriptor for each thread in addition to the file descriptors for each dbspace.
You need to adjust the number of file descriptors by means of the C shell limit
command and "set rlim_fd_max=4096" in /etc/system.
Tru64-UNIX / Digital
UNIX Adaptive Server IQ needs three threads to support each connection plus some
overhead threads the operating system needs to have its maximum number of
threads adjusted upwards. To accomplish this, you must raise the Digital UNIX
default number of threads, using the formula 60*NUMCPUS +10 +3*. You can
change this value either by editing Digital UNIX’s /etc/sysconfigtab directly or
updating it using a Compaq GUI (see Adaptive Server IQ Installation and
Configuration Guide or your Compaq documentation).

Overview of memory use
434
Within the "proc:" section of this file you must update max-threads-per-user.
For example:
proc:
:
.
max-threads-per-user = 9000
Since this count is on a per user basis (not a per process basis) this number must
be high enough to allow for all threads of all processes running under the
Sybase user ID.
Platform-specific memory options
On all platforms, Adaptive Server IQ uses memory for four primary purposes:
• Main buffer cache
• Temporary buffer cache
• Thread stacks
• Load buffers
See Figure 12-1: Buffer caches in relation to physical memory earlier in this
chapter for a diagram of IQ memory use.
The HP UNIX and AIX platforms limit the total amount of memory available
to IQ or any other single application. You must set IQ server options on these
platforms in order to gain the maximum usable memory.
The total amount of usable memory varies by platform. See the following table
for details.

CHAPTER 12 Managing System Resources
435
Table 12-4: Total available memory by platform
On 64-bit platforms (Tru64, SGI IRIX, and Solaris 64-bit), the only limit is the
physical size of memory on the system.
For Windows NT systems, see the Adaptive Server IQ Installation and
Configuration Guide for more performance tuning hints, including
recommendations for small memory configurations.
For UNIX systems only, Adaptive Server IQ provides two command-line
options that can provide more memory.
Wired memory pool On Digital UNIX, HP and Sun platforms, you can designate a specified amount
of memory as “wired” memory. This memory is locked down so that it cannot
be paged. Wired memory can improve performance. To create a pool of
“wired” memory on these UNIX platforms only, specify the -iqwmem
command-line switch, indicating the number of MB of wired memory. The
maximum value for -iqwmem varies by platform:
• 3800 on Sun
• 2000 on HP UNIX
• no real maximum for DEC
For example, to add 1GB of wired memory, you specify:
-iqwmem 1000
Warning! Use this switch only if you have enough memory to dedicate some
of it for this purpose. Otherwise, you can cause serious performance
degradation.
Platform Total memory available
CompaqTru64 (Digital UNIX) Effectively unlimited
HP UNIX 3GBa
IBM RS6000 AIX 2GBa
SGI IRIX Effectively unlimited
Sun Solaris 32-bit 3.3GB
Sun Solaris 64-bit Effectively unlimited
Windows NTb2.5GB
aYou must specify the -iqsmem option to get this much memory on HP UNIX and
AIX.
bYou need Windows NT Enterprise to get this much memory.

Overview of memory use
436
Unwired memory pool On AIX, Tru64 (Digital UNIX), and HP UNIX systems, you can create an
unwired (swappable) memory pool to increase total available memory.
Unwired memory can be paged. To create the unwired memory pool, use the -
iqsmem command-line switch. Specify this switch as the number of MB of
unwired memory. The maximum value for -iqsmem is platform-specific. For
example, to add 1GB of unwired memory you specify:
-iqsmem 1000
Note For this version, on some platforms there is no difference between wired
and unwired memory:
•On Sun Solaris, -iqwmem always provides wired memory. You cannot
specify -iqsmem on this platform.
• On HP, AIX, and Tru64, -iqsmem and -iqwmem provide wired memory if
you start the server as root. They provide unwired memory if you are not
root when you start the server. This behavior may change in a future
version.
Settings in start_asiq The start_asiq startup utility sets -iqsmem to a platform-specific value
automatically. On Tru64 (Digital UNIX) systems, start_asiq does not set
-iqsmem automatically, but the range of permissible values is up to 28,000MB.
See the Adaptive Server IQ Installation and Configuration Guide for your
platform for the range of permissible values.
Impact of other
applications and
databases
Remember, the memory used for buffer caches comes out of a pool of memory
used by all applications and databases. If you try to run multiple servers or
multiple databases on the same machine at the same time, or if you have other
applications running that use shared memory, you may need to make your
buffer caches smaller.
You may also be unable to get all of memory you request in -iqsmem. The
server log reports how much memory you actually get:
Created 1073741824 byte segement id 51205 Attached at
80000000
Created 184549376 byte segement id 6151 Attached at
C3576000
You can also issue the UNIX command ipcs -mb to see the actual number of
segments.

CHAPTER 12 Managing System Resources
437
Managing large buffer caches on HP
On HP UNIX, start_asiq sets -iqsmem to 500 by default. This setting allows a
total buffer cache size (i.e., main and temp caches combined) of 2GB.
If you need more than 2GB for buffer caches, and your system can
accommodate a larger value, you must add unwired memory, by specifying
-iqsmem. The value you specify on the command line overrides the start_asiq
setting.
For example, the following settings are needed to allow buffer caches of
1600MB main and 800MB temp on HP UNIX:
SET OPTION "PUBLIC".MAIN_CACHE_MEMORY_MB = 1600
SET OPTION "PUBLIC".TEMP_CACHE_MEMORY_MB = 800
You must then restart the server with the following command:
start_asiq my_iqserver -iqsmem 800 my_iqdb
Controlling file system buffering
On Solaris UFS file systems and Windows NT file systems only, you can
control whether file system buffering is turned on or off. Turning off file
system buffering saves a data copy from the file system buffer cache to the
main IQ buffer cache. Usually, doing so reduces paging, and therefore
improves performance. However, you need to be aware of certain exceptions:
• If the IQ page size for the database is less than the file system's block size
(typically only in the case in testing situations) turning off file system
buffering may decrease performance, especially during multiuser
operation.
• During loads, file system buffering may be helpful.
To get this much memory for
buffer caches Set -iqsmem to this value
Up to 2000MB provided by default by start_asiq
2200MB 600
2400MB 800
2600 1000
2800 1200
3000 1400

Overview of memory use
438
• On Solaris systems with more than 4GB of memory, the file system buffer
cache competes with IQ's buffer cache less, so you may decrease
performance by turning off file system buffering.
• On NT systems, under certain loads and configurations, disabling the file
system buffer cache can likely improve performance.
As of Version 12.4.2, file system buffering is turned off by default for newly
created IQ databases.
To disable file system buffering for existing databases, issue the following
statement:
SET OPTION "PUBLIC".OS_FILE_CACHE_BUFFERING = OFF
You can only set this option for the PUBLIC group. You must shut down the
database and restart it for the change to take effect.
Note Solaris does not have a kernel parameter to constrain the size of its file
system buffer cache. Over time, the file system buffer cache grows and
displaces the IQ buffer cache pages, leading to excess operating system paging
activity and reduced IQ performance.
NT can bias the paging algorithms to favor applications at the expense of the
file system. This bias is recommended for IQ performance. See Chapter 5,
“Performance and Tuning Tasks” in the Adaptive Server IQ Installation and
Configuration Guide for Windows NT for details.
Other ways to get more memory
In certain environments, you may be able to adjust other options to make more
memory available to Adaptive Server IQ.
Options for Java-enabled databases
The JAVA_HEAP_SIZE option of the SET OPTION command sets the maximum
size (in bytes) of that part of the memory that is allocated to Java applications
on a per connection basis. Per connection memory allocations typically consist
of the user's working set of allocated Java variables and Java application stack
space. While a Java application is executing on a connection, the per
connection allocations come out of the fixed cache of the database server, so it
is important that a run-away Java application is prevented from using up too
much memory.

CHAPTER 12 Managing System Resources
439
The JAVA_NAMESPACE_SIZE option of the SET OPTION command sets the
maximum size (in bytes) of that part of the memory that is allocated to Java
applications on a per database basis. Per database memory allocations include
Java class definitions. As class definitions are effectively read-only, they are
shared among connections. Consequently, their allocations come right out of
the fixed cache, and this option sets a limit on the size of these allocations.
The process threading model
Adaptive Server IQ uses operating system kernel threads to improve
performance. Threads can be found at the user level and at the kernel level.
Lightweight processes are underlying threads of control that are supported by
the kernel. The operating system decides which lightweight processes (LWPs)
should run on which processor and when. It has no knowledge about what the
user threads are or how many are active in each process.
The operating system kernel schedules LWPs onto CPU resources. It uses their
scheduling classes and priorities. Each LWP is independently dispatched by the
kernel, performs independent system calls, incurs independent page faults, and
runs in parallel on a multiprocessor system.
Adaptive Server IQ Version 12 uses a simpler process threading model than
previous versions. Instead of multiple processes for each CPU shuttling among
users, there is now a single, highly threaded process that serves all Adaptive
Server IQ users. Adaptive Server IQ assigns varying numbers of kernel threads
to each user connection, based on the type of processing being done by that
process, the total number of threads available, and the setting of various
options.
The following figure shows kernel threads for various users as they are
distributed across multiple CPUs.

The process threading model
440
Figure 12-2: Multithreaded architecture
Multiple threads improve performance. Even a single-CPU machine gets better
performance by using threads.
Insufficient threads error
When you do not have enough server threads to initiate the query you have
issued, you get the error:
Not enough server threads available for this query
This condition may well be temporary. When some other query finishes,
threads are made available and the query may succeed the next time you issue
it. If the condition persists, you may need to restart the server and specify more
IQ threads, as described in the next section.
IQ options for managing thread usage
Adaptive Server IQ offers the following options to help you manage thread
usage.
• To set the maximum number of threads available for Adaptive Server IQ
use, set the server startup option -iqmt. This option is set automatically by
the start_asiq startup utility on the IBM UNIX platform only. The default
value is calculated from the number of connections and the number of
CPUs and is usually adequate. See the Adaptive Server IQ Installation and
Configuration Guide for the default value of -iqmt on your platform.

CHAPTER 12 Managing System Resources
441
• To set the maximum number of threads a single user will use, issue the
command SET OPTION MAX_IQ_THREADS_PER_CONNECTION. This
can be used to control the amount of memory a particular operation
consumes. For example, the DBA can set this option before issuing an
INSERT or LOAD command.
Balancing I/O
This section explains the importance of balancing I/O on your system. It
explains how to use disk striping and how to locate files on separate disks to
gain better performance.
Raw I/O (on UNIX operating systems)
Most UNIX files systems divide disks into fixed size partitions. Partitions are
physical subsets of the disk that are accessed separately by the operating
system. Disk partitions are typically accessed in two modes: cooked mode
(through the UFS file system) or raw mode. Raw mode (sometimes called
character mode) does unbuffered I/O, generally making a data transfer to or
from the device with every read or write system call. The UFS (cooked) mode
is a UNIX file system and a buffered I/O system which collects data in a buffer
until it can transfer an entire buffer at a time.
When you create a database or a dbspace, you can place it on either a raw
device or a file system file. Adaptive Server IQ determines automatically from
the pathname you specify whether it is a raw partition or a file system file. Raw
partitions can be up to 128GB.
For more information, see “Working with databases”.

Balancing I/O
442
Using disk striping
Traditional file management systems allow you to locate individual files on
specific disks. Consequently, all file operations occur against a single disk
drive. Some operating systems allow you to create logical devices or volumes
that span multiple disk drives. Once a file fills the first disk drive, it is
automatically continued onto the next drive in the logical volume. This feature
increases the maximum file size and concentrates activity on a single disk until
it is full.
However, there is another way. Disk striping is a generic method of spreading
data from a single file across multiple disk drives. This method allows
successive disk blocks to be located on striped disk drives. Striping combines
one or more physical disks (or disk partitions) into a single logical disk. Striped
disks split I/O transfers across the component physical devices, performing
them in parallel. They achieve significant performance gains over single disks.
Disk striping lets you locate blocks on different disks. The first block is located
on the first drive. The second block is located on the second drive, and so on.
When all the drives have been used, the process cycles back and uses additional
blocks on the drives. The net effect of disk striping is the random distribution
of data across multiple disk drives. Random operations against files stored on
striped disks tend to keep all of the drives in the striped set equally busy,
thereby maximizing the total number of disk operations per second. This is a
very effective technique in a database environment.
You can use disk striping either as provided by your operating system and
hardware, or IQ’s internal disk striping.
Setting up disk striping on UNIX
UNIX systems offering striped disks provide utilities for configuring physical
disks into striped devices. See your UNIX system documentation for details.
Setting up disk striping on Windows NT
On Windows NT systems, use hardware disk striping via an appropriate
SCSI-2 disk controller. If your machine does not support hardware disk
striping, but you have multiple disks available for your databases, you can use
Windows NT striping to spread disk I/O across multiple disks. Set up Windows
NT striping using the NT Disk Administrator.

CHAPTER 12 Managing System Resources
443
Recommendations for disk striping
Here are some general rules on disk striping:
• For maximum performance, the individual disks in a striped file system
should be spread out across several disk controllers. But be careful not to
saturate a disk controller with too many disks. Typically, most SCSI
machines can handle 2–3 disks per controller. See your hardware
documentation for more information.
• Do not put disks on the same controller as slower devices, such as tape
drives or CD-ROMs. This slows down the disk controller.
• Allocate 4 disks per server CPU in the strip.
• The individual disks must be identical devices. This means they must be
the same size, have the same format, and often be the same brand. If the
layouts are different, then the size of the smallest one is often used and
other disk space is wasted. Also, the speed of the slowest disk is often
used.
• In general, disks used for file striping should not be used for any other
purpose. For example, do not use a file striped disk as a swap partition.
• Never use the disk containing the root file system as part of a striped
device.
In general, you should use disk striping whenever possible.
Note For the best results when loading data, dump the data to a flat file located
on a striped disk and then read the data into Adaptive Server IQ with the LOAD
TABLE command.
Internal striping
Adaptive Server IQ stores its information in a series of dbspaces—files or raw
partitions of a device—in blocks. Assuming that disk striping is in use,
Adaptive Server IQ spreads data across data across all dbspaces that have space
available. This approach lets you take advantage of multiple disk spindles at
once, and provides the speed of parallel disk writes.

Balancing I/O
444
Disk striping option
This section explains how you can use the option Adaptive Server IQ provides
to do disk striping, without using third party software. If you already have a
disk striping solution through third party software and hardware, you should
use it instead.
Turning disk striping
on or off The syntax you use to turn disk striping on or off is:
SET OPTION "PUBLIC".DISK_STRIPING = { ON | OFF }
The default is ON for UNIX systems, and OFF for Windows NT systems. When
disk striping is ON, incoming data is spread across all dbspaces with space
available. When disk striping is OFF, dbspaces (disk segments) are filled up
from the front on the logical file, filling one disk segment at a time.
As with all PUBLIC options, you must disconnect and then reconnect in order
for the change to take effect.
When disk striping is on, you cannot drop dbspaces with the DROP DBSPACE
command. Since dbspaces are dropped as they are empty from last to first, and
with this strategy dbspaces are filled partially in a more distributed manner, it
is unlikely the dbspaces will be empty. If you want to be able to drop dbspaces,
you should set DISK_STRIPING to OFF.
Disk striping hints
Here are several different ways to think about distributing space on a large disk
drive, for example 9GB:
1 Use different segments in different databases.
2 Mix them into the usage list with segments from different disk drives in
between.
3 For the best multiuser performance, set your operating system or disk
array to the maximum stripe size it supports.
Here is a good example:

CHAPTER 12 Managing System Resources
445
Figure 12-3: Internal disk striping
The example above shows disk drive A has two 2GB partitions (a and b) and
two 500MB (or .5GB) partitions (c and d). There are three other 1GB disk
drives (E, F, and G). You should create your database on partition a, then add
dbspaces for E, c, F, b, G and d.
Using multiple dbspaces
Using multiple dbspaces allows your IQ and temporary data to be broken down
into multiple operating system files or partitions. These files can then be spread
across multiple disks.
Like disk striping, randomness can be created by placing successive database
files across multiple drives. You can create additional segments for your IQ and
temporary data with the CREATE DBSPACE command.
When to create
dbspaces When possible, allocate all dbspaces when you create a database.
If you add dbspaces later, IQ stripes new data across both old and new
dbspaces. Striping may even out, or it may remain unbalanced, depending on
the type of updates you have. The number of pages that are “turned over” due
to versioning has a major impact on whether striping is rebalanced.
The transaction log file
The transaction log file contains information that allows Adaptive Server IQ to
recover from a system failure. Adaptive Server IQ does not use the transaction
log to restore an IQ database, to recover committed IQ transactions, or to
restore the Catalog Store for an IQ database. All databases require a transaction
log.

Balancing I/O
446
To move or rename the transaction log file, use the Transaction Log utility
(DBLOG). For syntax and details, see “The DBLOG command-line utility” on
page 405.
Warning! The Adaptive Server IQ transaction log file is different than most
relational database transaction log files. If for some reason you lose your
database files, then you lose your database (unless it's the log file that is lost).
However, if you have an appropriate backup, then you can reload the database.
The message log
A message log file exists for each database. The default name of this file is
dbname.iqmsg, although you can specify a different name when you create the
database. The message log file is actually created when the first user connects
to a database.
By default, Adaptive Server IQ logs all messages in the message log file,
including error, status, and insert notification messages. You can turn off
notification messages in the LOAD and INSERT statements.
Strategic file locations
Performance related to randomly accessed files can be improved by increasing
the number of disk drives devoted to those files, and therefore, the number of
operations per second performed against those files. Random files include
those for the IQ Store, the Temporary Store, the Catalog Store, programs
(including the IQ executables, user and stored procedures, and applications),
and operating system files.
Conversely, performance related to sequentially accessed files can be
improved by locating these files on dedicated disk drives, thereby eliminating
contention from other processes. Sequential files include the transaction log
and message log files.

CHAPTER 12 Managing System Resources
447
Figure 12-4: Avoid I/O contention
The figure above illustrates how you want to spread access across separate
disks to avoid I/O contention.
To avoid disk bottlenecks, follow these suggestions:
• Keep random disk I/O away from sequential disk I/O.
• Isolate IQ database I/O from I/O for proxy tables in other databases, such
as Adaptive Server Enterprise.
• Place the transaction log and message log on separate disks from the IQ
Store, Catalog Store, and Temporary Store, and from any proxy databases
such Adaptive Server Enterprise.
Working space for inserting, deleting, and synchronizing
When you insert or delete data, and when you synchronize join indexes,
Adaptive Server IQ needs some working space in the IQ Store. This space is
reclaimed for other purposes when the transaction that needs it commits.

Options for tuning resource use
448
Ordinarily, as long as you maintain a reasonable percentage of free space in
your IQ Store, you will have enough free space. However, for certain deletions,
depending on the size of the data and its distribution among database pages,
you may need a large amount of working space. In the case where you are
deleting a major portion of your database, and the data is distributed sparsely
across many pages, you could temporarily double the size of your database.
Note In other databases, including Adaptive Server IQ Version 11.x, this
working space is in a pre-image file. If you are migrating from Version 11.x,
you need working space in your IQ Store comparable to the space in your
Version 11.x transaction image (TI) file.
Options for tuning resource use
The number of concurrent users of an IQ database, the queries they run, and the
processing threads and memory available to them, can have a dramatic impact
on performance, memory use, and disk I/O. Adaptive Server IQ provides
several options for adjusting resource use to accommodate varying numbers of
users and types of queries. Most of these are SET OPTION command options
that affect only the current database. A few are command-line options that
affect an entire database server.
For more information on all of these options, including parameters, when the
options take effect, and whether you can set them for both a single connection
and the PUBLIC group, see the Adaptive Server IQ Reference Manual.
Restricting concurrent queries
The -iqgovern command-line option takes the opposite approach from the
OPTIMIZE_FOR_THIS_MANY_USERS option. Instead of letting the number of
users determine resource use, the -iqgovern switch lets you control the number
of concurrent queries on a server. This is not the same as the number of
connections, which is controlled by your license.
The -iqgovern switch optimizes paging of buffer data out to disk, so that
memory is used most effectively. The default value of -iqgovern is (2 x the
number of CPUs) +10.

CHAPTER 12 Managing System Resources
449
Limiting a query’s memory use
The QUERY_TEMP_SPACE_LIMIT option of the SET command lets you
restrict the amount of memory available to any one query. By default, a query
can use 1000MB of memory.
When you issue a query, Adaptive Server IQ estimates the temporary space
needed to resolve the query. If the total estimated temporary result space for
sorts, hashes, and row stores exceeds the current QUERY_TEMP_SPACE_LIMIT
setting, the query is rejected, and you receive a message such as:
Query rejected because it exceeds total space resource
limit
If this option is set to 0 there is no limit, and no queries are rejected based on
their temporary space requirements.
Limiting queries by rows returned
The QUERY_ROWS_RETURNED_LIMIT option of the SET command tells the
query optimizer to reject queries that might otherwise consume too many
resources. If the query optimizer estimates that the result set from a query will
exceed the value of this option, it rejects the query with the message:
Query rejected because it exceed resource:
Query_Rows_Returned_Limit
If you use this option, set it so that it only rejects queries that consume vast
resources.
Forcing cursors to be non-scrolling
When you use scrolling cursors with no host variable declared, Adaptive
Server IQ creates a temporary store node where query results are buffered. This
storage is separate from the Temporary Store buffer cache. If you are retrieving
very large numbers (millions) of rows, this store node can require a lot of
memory.
You can eliminate this temporary store node by forcing all cursors to be non-
scrolling. To do so, set the FORCE_NO_SCROLL_CURSORS option to ON.
You may want to use this option to save on temporary storage requirements if
you are retrieving very large numbers (millions) of rows. The option takes
effect immediately for all new queries submitted.

Options for tuning resource use
450
If scrolling cursors are never used in your application, you should make this a
permanent PUBLIC option. It will use less memory and make a big
improvement in query performance.
Limiting the number of cursors
The MAX_CURSOR_COUNT option specifies a resource governor to limit the
maximum number of cursors that a connection can use at once. The default is
50. Setting this option to 0 allows an unlimited number of cursors.
Limiting the number of statements
The MAX_STATEMENT_COUNT option specifies a resource governor to limit
the maximum number of prepared statements that a connection can use at once.
Lowering a connection’s priority
When you set the BACKGROUND_PRIORITY option to ON, requests on the
current connection have minimal impact on the performance of other
connections. This option allows tasks for which responsiveness is critical to
coexist with other tasks for which performance is not as important.
Prefetching cache pages
The SET option PREFETCH_BUFFER_LIMIT defines the number of cache
pages available to Adaptive Server IQ for use in prefetching (the read ahead of
database pages). This option has a default value of 20, which can degrade
multi-user performance. Sybase recommends that you set this option to 0 for
multi-user applications. For more information, see the Adaptive Server IQ
Reference Manual.

CHAPTER 12 Managing System Resources
451
Optimizing for typical usage
Adaptive Server IQ tracks the number of open cursors and allocates memory
accordingly. In certain circumstances, USER_RESOURCE_RESERVATION
option can be set to adjust the minimum number of current cursors that IQ
thinks is currently using the product and hence allocate memory from the
temporary cache more sparingly.
This option should only be set after careful analysis shows it is actually
required. Contact Sybase Technical Support with details if you need to set this
option.
Other ways to improve resource use
This section describes several ways to adjust your system for maximum
performance or better use of disk space.
Restricting database access
For better query performance, set the database to read-only, if possible, or
schedule significant updates for low usage hours. Adaptive Server IQ allows
multiple query users to read from a table while you are inserting or deleting
from that table. However, performance can degrade during concurrent updates.
Disk caching
Disk cache is memory used by the operating system to store copies of disk
blocks temporarily. All file-system based disk reads and writes usually pass
through a disk cache. From an application’s standpoint, all reads and writes
involving disk caches are equivalent to actual disk operations.

Indexing tips
452
Operating systems use two different methods to allocate memory to disk cache:
fixed and dynamic. A preset amount of memory is used in a fixed allocation;
usually a 10–15 percent memory allocation is set aside. The operating system
usually manages this workspace using a LRU (least recently used) algorithm.
For a dynamic allocation, the operating system determines the disk cache
allocation as it is running. The goal is to keep as much memory in active use as
possible, balancing the demand for real memory against the need for data from
disk.
Using RAM disk
When RAM disk is implemented, the operating system views a portion of
memory as a disk drive. Disk operations involving RAM disk are very fast.
When files are placed on RAM disk, the performance of processes using those
files can improve dramatically. Primary candidates for RAM disks are
programs and temporary files.
Warning! This is not recommended for database files or transaction log files.
Database integrity may be compromised if these files are placed on RAM disk.
Indexing tips
The following sections give some tips for selecting and managing indexes. See
Chapter 4, “Adaptive Server IQ Indexes” for more information on these topics.
Picking the right index type
It is important to pick the correct index type for your column data. Adaptive
Server IQ provides some indexes automatically—a default index on all
columns that optimizes projections, and an HG index for UNIQUE and single-
column PRIMARY KEY columns. While these indexes are useful for some
purposes, you need other indexes to process certain queries as quickly as
possible. Adaptive Server IQ chooses the best index type for you when there
are multiple index types for a column.

CHAPTER 12 Managing System Resources
453
You should create either an LF or HG index in addition to the default index on
each column referenced by the WHERE clause in a join query. Adaptive Server
IQ cannot guarantee that its query optimizer will produce the best execution
plan if some columns referenced in the WHERE clause lack either an LF or HG
index. Non-aggregated columns referenced in the HAVING clause must also
have the LF or HG index in addition to the default index. For example:
SELECT c.name, SUM(l.price * (1 - l.discount))
FROM customer c, orders o, lineitem l
WHERE c.custkey = o.custkey
AND o.orderkey = l.orderkey
AND o.orderdate >= "1994-01-01"
AND o.orderdate < "1995-01-01"
GROUP by c.name
HAVING c.name NOT LIKE "I%"
AND SUM(l.price * (1 - l.discount)) > 0.50
ORDER BY 2 desc
In addition to the default index, all columns in this example beside l.price and
l.discount should have an LF or HG index.
Using join indexes
Users frequently need to see the data from more than one table at once. This
data can be joined at query time, or in advance by creating a join index. You
can usually improve query performance by creating a join index for columns
that must be joined in a consistent way.
Because join indexes require substantial time and space to load, you should
create them only for joins needed on a regular basis. Adaptive Server IQ join
indexes support one-to-many and one-to-one join relationships.
Allowing enough disk space for deletions
When you delete data rows, Adaptive Server IQ creates a version page for each
database page that contains any of the data being deleted. The versions are
retained until the delete transaction commits. For this reason, you may need to
add disk space when you delete data. See “Overlapping versions and
deletions” for details.

Managing database size and structure
454
Managing database size and structure
This section offers ideas on improving your database design and managing
your data.
Managing the size of your database
The size of your database depends largely on the indexes you create, and the
quantity of data you maintain. You achieve faster query processing by creating
all of the indexes you need for the types of queries your users issue. However,
if you find that some tables or indexes are not needed, you can drop them. By
doing so, you free up disk space, increase the speed of backups, and reduce the
amount of archive storage you need for backups.
To control the quantity of data stored in a given table, consider how best to
eliminate data rows you no longer need. If your IQ database contains data that
originated in an Adaptive Server Anywhere database, you may be able to
eradicate unneeded data by simply replaying Anywhere deletions; command
syntax is compatible. You can do the same with data from an Adaptive Server
Enterprise database, because Adaptive Server IQ provides Transact-SQL
compatibility.
Denormalizing for performance
Once you have created your database in normalized form, you may perform
benchmarks and decide to intentionally back away from normalization to
improve performance. Denormalizing:
• Can be done with tables or columns
• Assumes prior normalization
• Requires a knowledge of how the data is being used
Good reasons to denormalize are:
• All queries require access to the “full” set of joined data
• Computational complexity of derived columns require storage for selects

CHAPTER 12 Managing System Resources
455
Denormalization has risks
Denormalization can be successfully performed only with thorough knowledge
of the application and should be performed only if performance issues indicate
that it is needed. One of the things to consider when you denormalize is the
amount of effort it will then take to keep your data up-to-date with changes.
This is a good example of the differences between decision support
applications, which frequently need summaries of large amounts of data, and
transaction processing needs, which perform discrete data modifications.
Denormalization usually favors some processing, at a cost to others.
Whatever form of denormalization you choose, it has the potential for data
integrity problems which must be carefully documented and addressed in
application design.
Disadvantages of denormalization
Denormalization has these disadvantages:
• Denormalization usually speeds retrieval but can slow updates. This is not
a real concern in a DSS environment.
• Denormalization is always application-specific and needs to be re-
evaluated if the application changes.
• Denormalization can increase the size of tables, which is not a problem in
Adaptive Server IQ.
• In some instances, denormalization simplifies coding; in others, it makes
it more complex.
Performance benefits of denormalization
Denormalization can improve performance by:
• Minimizing the need for joins
• Precomputing aggregate values, that is, computing them at data
modification time, rather than at select time
• Reducing the number of tables, in some cases

Improving your queries
456
Deciding to denormalize
When deciding whether to denormalize, you need to analyze the data access
requirements of the applications in your environment and their actual
performance characteristics. Some of the issues to examine when considering
denormalization include:
• What are the critical queries, and what is the expected response time?
• What tables or columns do they use? How many rows per access?
• What is the usual sort order?
• What are concurrency expectations?
• How big are the most frequently accessed tables?
• Do any processes compute summaries?
• Should you create join indexes to gain performance?
Improving your queries
This section discusses several ways to improve queries for better performance,
including:
• Tips on how to structure your queries to avoid operations that may be time
consuming
• Suggestions for using the query plans Adaptive Server IQ provides
• Options you can set to modify query processing
Tips for structuring queries
Here are some hints for better query structure:
• In some cases, command statements that include subqueries can also be
formulated as joins and may run faster.
• If you group on multiple columns in a GROUP BY clause, list the columns
by descending order by number of unique values. This will give you the
best query performance.

CHAPTER 12 Managing System Resources
457
• Join indexes typically cause join queries to execute faster than ad hoc
joins, at the expense of using more disk space. However, when a join query
does not reference the largest table in a multi-table join index, an ad hoc
join usually outperforms the join index.
• You can improve performance by using an additional column to store
frequently calculated results.
Planning queries
If you have created the right indexes, the Adaptive Server IQ query optimizer
can usually execute queries in the most efficient way—sometimes even if you
have not used the most effective syntax. Proper query design is still important,
however. When you plan your queries carefully, you can have a major impact
on the speed and appropriateness of results.
Before it executes any query, the Adaptive Server IQ query optimizer creates a
query plan. Adaptive Server IQ helps you evaluate queries by letting you
examine and influence the query plan, using the options described in the
sections that follow. For details of how to specify these options, see the
Adaptive Server IQ Reference Manual.
Query evaluation options
The following options can help you evaluate the query plan. All of these
options are OFF by default.
•IQ_QUERY_PLAN_ONLY When you set this option ON, the query
optimizer dumps the query plan into the log transaction file rather than
submitting it to the query engine.
•QUERY_INFORMATION When you set this option ON, Adaptive Server
IQ produces messages about queries. These include messages about using
join indexes, about the join order, and about join algorithms for the
queries.
•QUERY_DETAIL When you set this option ON, Adaptive Server IQ
displays additional information (as part of the QUERY_INFORMATION
option) about the query when producing its query plan. When
QUERY_INFORMATION is OFF (the default), this option is ignored.

Improving your queries
458
•QUERY_TIMING This option controls the collection of timing statistics
on subqueries and some other repetitive functions in the query engine.
Normally it should be OFF because for very short correlated subqueries
the cost of timing every subquery execution can be very expensive in
terms of performance.
Setting query optimization options
By adjusting the following options you can influence the speed at which
queries are processed.
•AGGREGATION_ALGORITHM_PREFERENCE Controls the choice of
algorithms for processing an aggregate (GROUP BY, DISTINCT, SET
functions). This option is designed primarily for internal use; do not use it
unless you are an experienced database administrator. See the Adaptive
Server IQ Reference Manual for details.
•AGGREGATION_CUTOFF Specifies at which precision level to use a
more efficient internal storage type for SUM or AVG calculations. The
default is 10. The internal storage type is slower, but avoids risking
overflows.
•INDEX_PREFERENCE Sets the index to use for query processing. The
Adaptive Server IQ optimizer normally chooses the best index available to
process local WHERE clause predicates and other operations which can be
done within an IQ index. This option is used to override the optimizer
choice for testing purposes; under most circumstances it should not be
changed.
•JOIN_ALGORITHM_PREFERENCE Controls the choice of algorithms
when processing joins. This option is designed primarily for internal use;
do not use it unless you are an experienced database administrator. See the
Adaptive Server IQ Reference Manual for details.
•JOIN_OPTIMIZATION When this option is ON (the default), Adaptive
Server IQ optimizes the join order to reduce the size of intermediate results
and sorts and to balance the system load. When it is OFF, the join order is
determined by the order of the tables in the FROM clause of the SELECT
statement. (The left-most table becomes the outer table of the topmost
join.) This option should be ON whenever queries are ad hoc and untried,
when you don't know optimum join order for a multi-table join query, or
when you cannot alter queries.

CHAPTER 12 Managing System Resources
459
•JOIN_MAX_HASH_ROWS Sets the maximum estimated number of
rows the query optimizer will consider for a hash algorithm. The default is
125,000 rows. For example, if there is a join between two tables, and the
estimated number of rows entering the join from both tables exceeds this
option value, the optimizer will not consider a hash join. On systems with
more than 50MB per user of TEMP_CACHE_MEMORY_MB, you may want
to consider a higher value for this option.
•MAX_CARTESIAN_RESULT Limits the number of result rows from a
query containing a cartesian join (usually the result of missing one or more
join conditions when creating the query). If Adaptive Server IQ cannot
find a query plan for the cartesian join with an estimated result under this
limit, it rejects the query and returns an error. The default is 100,000,000
rows.
•ROW_COUNTS Specifies whether the database will always count the
number of rows in a query when it is opened. Default is OFF. Turning on
this option guarantees an accurate count, but can slow the start of query
processing.
Network performance
The following sections offer suggestions for solving some network
performance issues.
Improving large data transfers
Large data transfers simultaneously decrease overall throughput and increase
the average response time. Here are some suggestions to improve performance
during these transfers:
• Perform large transfers during off-hour periods, if possible.
• Limit the number of concurrent queries during large transfers.
• Do not run queries and insertions concurrently during large transfers.
• Use stored procedures to reduce total traffic.
• Use row buffering to move large batches through the network.

Network performance
460
• If large transfers are common, consider installing better network hardware
that is suitable for such transfers. For example:
• Token ring–responds better during heavy utilization periods than
ethernet hardware.
• Fiber optic–provides very high bandwidth, but is usually too
expensive to use throughout the entire network.
• Separate network–can be used to handle network traffic between the
highest volume workstations and the server.
Isolate heavy network users
In case A, clients accessing two different database servers use one network
card. That means that clients accessing Servers A and B have to compete over
the network and past the network card. In the case B, clients accessing Server
A use a different network card than clients accessing Server B.
It would be even better to put your database servers on different machines. You
may also want to put heavy users of different databases on different machines.
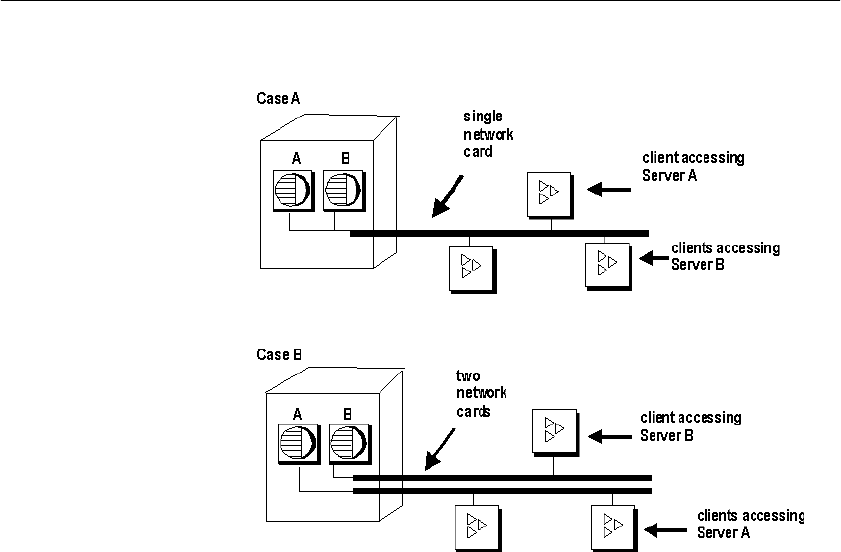
CHAPTER 12 Managing System Resources
461
Figure 12-5: Isolating heavy network users
Put small amounts of data in small packets
If you send small amounts of data over the network, keep the default network
packet size small (default is 512 bytes). The -p server startup option lets you
specify a maximum packet size. Your client application may also let you set the
packet size.
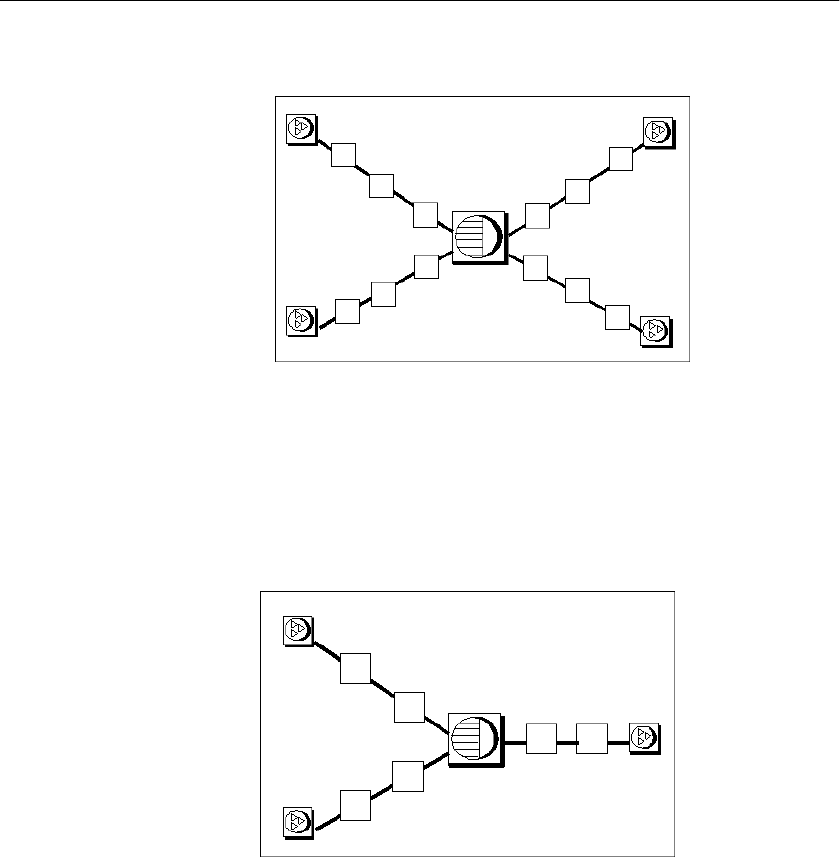
Network performance
462
Figure 12-6: Small data transfers and small packet sizes
Put large amounts of data in large packets
If most of your applications send and receive large amounts of data, increase
default network packet size. This will result in fewer (but larger) transfers.
Figure 12-7: Large data transfers and larger packet sizes
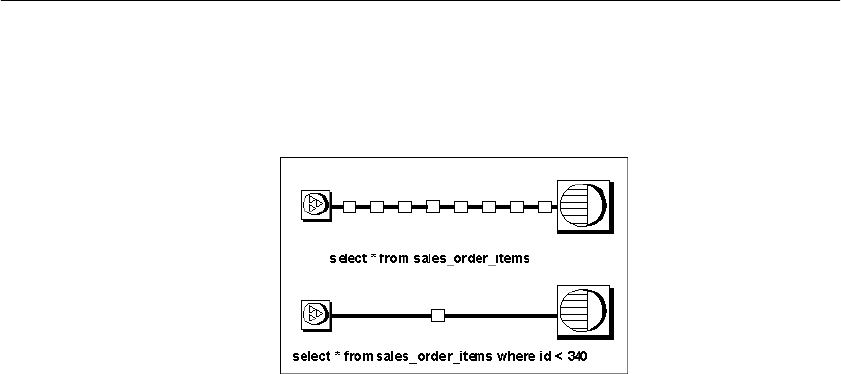
CHAPTER 12 Managing System Resources
463
Process at the server level
Filter as much data as possible at the server level.
Figure 12-8: Work at the server level

Network performance
464
465
CHAPTER 13 Monitoring and Tuning
Performance
About this chapter This chapter describes tools you use to monitor Adaptive Server IQ
performance. Use these tools to determine whether your system is making
optimal use of available resources. To understand how Adaptive Server IQ
uses memory, process threads, and disk, and to learn about options you can
set to control resource use, see Chapter 12, “Managing System
Resources” See also the sections on performance implications and tuning
in other chapters of this guide for more tuning hints.
Viewing the Adaptive Server IQ environment
The first step in tuning Adaptive Server IQ performance is to look at your
environment. You have various options:
• Use system monitoring tools (each system and site has different tools
in place).
• Use one of the stored procedures that displays information about
Adaptive Server IQ. See the next section for more information.
• Determine appropriateness of index types. See Chapter 4, “Adaptive
Server IQ Indexes” for more information about choosing index types.
• For on-screen information, look at your insert and delete notification
messages. “Interpreting notification messages” gives more
information about these messages.
• Look at the IQ message file, called dbname.iqmsg by default.
Getting information using stored procedures
Adaptive Server IQ offers several stored procedures that display
information about your database:

Viewing the Adaptive Server IQ environment
466
•sp_iqcheckdb checks the validity of your current database
•sp_iqdbstatistics reports results of the most recent sp_iqcheckdb
•sp_iqdbsize gives the size of the current database
•sp_iqstatus displays miscellaneous status information about the database.
See the example below.
•sp_iqtablesize gives the size of the table you specify.
•sp_iqgroupsize lists the members of the specified group.
See Adaptive Server IQ Reference Manual for details of all Adaptive Server IQ
stored procedures.
Example The output from sp_iqstatus looks like the following:
Name Value
=======================================================
===================
Adaptive Server IQ (TM) Copyright (c) 1992-2000 by Sybase, Inc. All rights
reserved.
Version: 12.4.2/(32bit mode)/Sun_svr4/OS
5.6/EBF 0000
Time Now: 2000-03-14 12:05:54.288
Build Time: Sat Mar 11, 2000 21:39:55 EST
File Format: 23 on 03/18/1999
Catalog Format: 2
Stored Procedure Revision: 1
Page Size: 131072/8192blksz/16bpp
Number of DB Spaces: 8
Number of Temp Spaces: 2
DB Blocks: 1-12132344 IQ_SYSTEM_MAIN
DB Blocks: 12545280-24677623 mydb_2
DB Blocks: 25090560-37222903 mydb_3
DB Blocks: 37635840-49768183 mydb_4
DB Blocks: 50181120-62313463 mydb_5
DB Blocks: 62726400-74858743 mydb_6
DB Blocks: 75271680-87404023 mydb_7
DB Blocks: 87816960-99949303 mydb_8
Temp Blocks: 1-8823288 IQ_SYSTEM_TEMP
Temp Blocks: 9408960-18232247 mydb_tmp2
Create Time: 1999-12-30 19:10:55.231
Update Time: 2000-03-14 09:52:13.609
Main IQ Buffers: 11174, 1400Mb
Temporary IQ Buffers: 15165, 1900Mb
Main IQ Blocks Used: 43515029 of 97058752, 44%=331Gb, Max

CHAPTER 13 Monitoring and Tuning Performance
467
Block#: 95065709
Temporary IQ Blocks Used: 610 of 17646576, 0%=4Mb, Max Block#: 0
Main Reserved Blocks Available: 1280 of 1280, 100%=10Mb
Temporary Reserved Blocks Available: 1280 of 1280, 100%=10Mb
Memory: Current: 3351mb, Max: 3384mb
Main IQ Buffers: Used: 11172, Locked: 0
Temporary IQ Buffers: Used: 38, Locked: 0
Main IQ I/O: I: L88043944/P495510 O:
C760342/D761393/P736587 D:24753 C:65.9
Temporary IQ I/O: I: L16515025/P1222153 O:
C2609951/D3838862/P1228941
D:2609913 C:46.3
Old Versions: 1 = 59Gb
Active Txn Versions: 0 = C:0Mb/D:0Mb
Monitoring the buffer caches
Adaptive Server IQ provides a tool to monitor the performance of the buffer
caches. This monitor collects statistics on the buffer cache, memory, and I/O
functions taking place within Adaptive Server IQ, and stores them in a log file.
Buffer cache performance is a key factor in overall performance of Adaptive
Server IQ. Using the information the monitor provides, you can fine tune the
amount of memory you allocate to the main and temp buffer caches. If one
cache is performing significantly more I/O than the other, reallocate some of
the memory appropriately. Reallocate in small amounts such as 10 to 50MB
and on an iterative basis. After reallocating, rerun the workload and monitor
the changes in performance.
Starting the buffer cache monitor
You run the Adaptive Server IQ buffer cache monitor from DBISQL. Each
time you start the monitor it runs as a separate kernel thread within DBISQL.
Use this syntax to start the monitor:
IQ UTILITIES { MAIN | PRIVATE }
INTO
dummy_table_name
START MONITOR ’
monitor_options
[ ... ]’
MAIN starts monitoring of the main buffer cache, for the IQ Store of the
database you are connected to.

Monitoring the buffer caches
468
PRIVATE starts monitoring of the temp buffer cache, for the Temporary Store
of the database you are connected to. You need to issue a separate command to
monitor each buffer cache.
dummy_table_name can be any IQ table. However, it’s a good idea to create a
table that you use only for monitoring. The table name is required for syntactic
compatibility with other IQ UTILITIES commands. No matter what table name
you specify, you are monitoring buffer caching for all tables in a database.
’monitor_options’ can include one or more of the following values:
•-summary displays summary information for both the main and temp
buffer caches. If you do not specify any monitor options, you receive a
summary report. The fields displayed are as described for the other
options, plus the following:
•Users: Number of users connected to the buffer cache
•IO: Combined physical reads and writes by the buffer cache
•-cache displays activity in detail for the main or temp buffer cache. The
fields displayed are:
•Finds: Find requests to the buffer cache
•Creats: Requests to create a page within the database
•Dests: Requests to destroy a page within the database
•Dirty: Number of times the buffer was dirtied (modified)
•HR%: Percentage of above satisfied by the buffer cache without
requesting any I/O
•BWaits: Find requests forced to wait for a busy page (page frame
contention)
•ReReads: Number of times the same portion of the store needed to be
reread into the cache within the same transaction
•FMiss: False misses, number of times the buffer cache needed
multiple lookups to find a page in memory. This number should be 0
or very small. If the value is high, it is likely that a rollback occurred,
and certain operations needed to be repeated
•Cloned: Number of buffers that Adaptive Server IQ needed to make a
new version for a writer, while it had to retain the previous version for
concurrent readers

CHAPTER 13 Monitoring and Tuning Performance
469
•Reads/Writes: Physical reads and writes performed by the buffer
cache
•PF/PFRead: Prefetch requests and reads done for prefetch
•GDirty: Number of times the LRU buffer was grabbed dirty and
Adaptive Server IQ had to write it out before using it
•Pin%: Percentage of pages in the buffer cache in use and locked
•Dirty%: Percentage of buffer blocks that were modified
•-cache_by_type produces the same results as -cache, but broken down by
IQ page type. (An exception is the Bwaits column, which shows a total
only.) This format is most useful when you need to supply information to
Sybase Technical Support.
•-file_suffix suffix creates a monitor output file named
<dbname>.<connid>-<main_or_temp>-<suffix>. If you do not
specify a suffix, it defaults to iqmon.
•-io displays main or temp (private) buffer cache I/O rates and compression
ratios. The fields displayed are:
•Reads: Physical reads performed by the buffer cache
•Lrd(KB): Logical kilobytes read in
•Prd(KB): Physical kilobytes read in
•Rratio: Compression ratio of logical to physical data read in
•Writes: Physical writes performed by the buffer cache
•Lwrt(KB): Logical kilobytes written
•Pwrt(KB): Physical kilobytes written
•Wratio: Compression ratio of logical to physical data written
•-bufalloc displays information on the main or temp buffer allocator, which
reserves space in the buffer cache for objects like sorts, hashes, and
bitmaps.
•OU: OptimizeForThisManyUsers option setting
•AU: Current number of active users
•MaxBuf: Number buffers under control of the buffer allocator
•Avail: Number of currently available buffers for pin quota allocation

Monitoring the buffer caches
470
•AvPF: Number of currently available buffers for prefetch quota
allocation
•Slots: Number of currently registered objects using buffer cache quota
•PinUser: Number of objects using pin quota
•PFUsr: Number of objects using prefetch quota
•Posted: Number of objects that are pre-planned users of quota
•UnPost: Number of objects that are ad hoc quota users
•Locks: Number of mutex locks taken on the buffer allocator
•Waits: Number of times a thread had to wait for the lock
•-contention displays many key buffer cache and memory manager locks
•AU: Current number of active users
•LRULks: Number times the LRU was locked (repeated for the temp
cache)
•woTO: Number times lock was granted without timeout (repeated for
the temp cache)
•Loops: Number times IQ retried before lock was granted (repeated for
the temp cache)
•TOs: Number of times IQ timed out and had to wait for the lock
(repeated for the temp cache)
•BWaits: Number of "Busy Waits" for a buffer in the cache (repeated
for the temp cache)
•IOLock: Number of times IQ locked the compressed I/O pool
(repeated for the temp cache)
•IOWait: Number of times IQ had to wait for the lock on the
compressed I/O pool (repeated for the temp cache)
•HTLock: Number of times IQ locked the blockmaps hash table
(repeated for the temp cache)
•HTWait: Number of times IQ had to wait for the blockmaps hash table
(repeated for the temp cache)
•FLLock: Number of times IQ had to lock the free list (repeated for the
temp cache)

CHAPTER 13 Monitoring and Tuning Performance
471
•FLWait: Number of times IQ had to wait for the lock on the free list
(repeated for the temp cache)
•MemLks: Number of times IQ took the memory manager (heap) lock
•MemWts: Number of times IQ had to wait for the memory manager
lock
•-threads displays information about processing threads
•cpus: Number of CPUs on system
•Limit: size of thread manager pool
•NTeams: Number of thread teams currently in use
•MaxTms: Largest number of teams that has ever been in use
•NThrds: Current number of existing threads
•Resrvd: Number of threads reserved for system (connection) use
•Free: Number of threads available for assignment
•Locks: Number of locks taken on the thread manager
•Waits: Number of times IQ had to wait for the lock on the thread
manager
•-interval specifies the reporting interval in seconds. The default is every 60
seconds. The minimum is every 2 seconds. You can usually get useful
results by running the monitor at the default interval during a query or time
of day with performance problems.
•-append | - truncate Append to existing output file or truncate existing
output file, respectively. Truncate is the default.

Monitoring the buffer caches
472
•-debug is used mainly to supply information to Sybase Technical Support.
It displays all the information available to the performance monitor,
whether or not there is a standard display mode that covers the same
information. The top of the page is an array of statistics broken down by
disk block type. This is followed by other buffer cache statistics, memory
manager statistics, thread manager statistics, free list statistics, CPU
utilization, and finally buffer allocator statistics. The buffer allocator
statistics are then broken down by client type (hash, sort, and so on) and a
histogram of the most recent buffer allocations is displayed.
Note The interval, with two exceptions, applies to each line of output, not to
each page. The exceptions are -cache_by_type and -debug, where a new page
begins for each display.
Stopping the buffer cache monitor
The command you use to stop a monitor run is similar to the one you use to
start it, except that you do not need to specify any options. Use this syntax to
stop the IQ buffer cache monitor:
IQ UTILITIES { MAIN | PRIVATE }
INTO
dummy_table_name
STOP MONITOR
Examining and saving monitor results
The monitor stores results in an ordinary text file. This file defaults to:
•dbname.connection#-main-iqmon for main buffer cache results
•dbname.connection#-temp-iqmon for temp buffer cache results
The prefix dbname.connection# represents your database name and
connection number. If you see more than one connection number and are
uncertain which is yours, you can run the Catalog stored procedure
sa_conn_info. This procedure displays the connection number, user ID, and
other information for each active connection to the database.
You can use the -file_suffix parameter on the IQ UTILITIES command to change
the suffix iqmon to a suffix of your choice.
To see the results of a monitor run, use a text editor or any other method you
would normally use to display or print a file.

CHAPTER 13 Monitoring and Tuning Performance
473
When you run the monitor again from the same database and connection
number, by default it overwrites the previous results. If you need to save the
results of a monitor run, copy the file to another location before starting the
monitor again from the same database or use the -append option.
Examples of monitor results
This section shows sample results using different monitor options.
Example of -summary
option The -summary option produces results like the following. Note that it shows
both main and temp buffer cache statistics, no matter which you request in the
IQ UTILITIES command:
Options string for private cache: "-summary -interval 5"
Summary
1998-08-18 14:07:51
Users Main Cache Temp Cache
C/A Finds HR% Reads/ GDirty Pin% Finds HR% Reads/ GDirty Pin%
Writes Writes
0/0 347 100.0 0/0 0 0.1 1219 100.0 0/0 0 8.8
0/0 163 98.8 2/0 0 0.1 357 100.0 0/0 0 0.0
0/0 4662 99.8 10/0 0 3.7 1740 100.0 0/0 0 7.8
0/0 1386 99.8 3/0 0 0.2 1716 100.0 0/0 0 0.3
0/0 1472 91.2 129/0 0 6.1 1327 100.0 0/0 0 3.2
0/0 1152 99.7 3/0 0 0.8 4137 100.0 0/0 0 2.8
0/0 262 97.7 6/0 0 1.7 1149 100.0 0/0 0 0.4
0/0 1358 98.0 27/0 0 0.1 853 100.0 0/0 0 5.4
0/0 321 80.1 64/0 0 1.9 458 100.0 0/0 0 4.3
0/0 102 82.4 18/0 0 1.9 14 100.0 0/0 0 5.8
0/0 104 82.7 18/0 0 1.9 64 100.0 0/0 0 4.7
0/0 85 81.2 16/0 0 1.3 14 100.0 0/0 0 6.2
0/0 1 100.0 0/0 0 0.1 1974 100.0 0/0 0 0.1
0/0 736 86.1 102/0 0 2.2 1070 100.0 0/0 0 6.8
0/0 79 100.0 0/0 0 0.1 4109 100.0 0/0 0 0.4
0/0 518 96.1 20/0 0 0.1 1576 100.0 0/0 0 0.0
0/0 1083 86.2 149/0 0 0.1 1578 100.0 0/0 0 0.2
0/0 704 99.3 5/0 0 0.1 1240 100.0 0/0 0 0.4
0/0 872 100.0 0/0 0 4.0 1764 100.0 0/0 0 0.8
0/0 346 87.0 45/2 2 0.1 597 100.0 0/0 0 7.8
Example of -cache
option The -cache option produces results like the following, which are for the temp
buffer cache.
Options string for Temp cache: "-cache -interval 10"
Temp Shared Buffer Cache
1999-01-17 17:43:55

Monitoring the buffer caches
474
Finds Creats Dests Dirty HR% BWaits ReReads FMiss Cloned Reads/ PF/
GDirty Pin% Dirty%
Writes PFRead
Tm: 640 82 57 84 99.4 0 4 0 0 4/0 0/0
0 0.0 2.8
Tm: 1139 109 83 109 100.0 0 0 0 0 0/0 0/0
0 0.0 5.5
Tm: 6794 754 749 754 100.0 0 0 0 0 0/0 0/0
0 0.0 6.1
Tm: 10759 1646 1646 1646 100.0 0 0 0 0 0/0 0/0
0 0.0 6.1
Example of -io option The -io option produces results like the following, which are for the main buffer
cache:
Options string for main cache: "-IO -interval 5"
Main Buffer Cache
1998-08-18 13:58:48
Input Output
Reads Lrd(KB) Prd(KB) Rratio Writes Lwrt(KB) Pwrt(KB) Wratio
Mn: 10 40 34 1.18 14 56 23 2.43
Mn: 0 0 0 0.00 21 84 34 2.43
Mn: 0 0 0 0.00 7 28 11 2.43
Mn: 0 0 0 0.00 22 88 35 2.48
Mn: 0 0 0 0.00 63 252 100 2.51
Mn: 0 0 0 0.00 54 216 93 2.32
Mn: 0 0 0 0.00 64 256 101 2.52
Mn: 0 0 0 0.00 62 248 94 2.62
Mn: 0 0 0 0.00 73 292 110 2.65
Mn: 0 0 0 0.00 105 420 121 3.47
Example of -bufalloc
option The -buffalloc option produces results like the following.
Options string for Main cache: "-bufalloc -file_suffix bufalloc-iqmon -
append -interval 10"
Buffer Allocation
2000-01-24 10:58:39
OU/AU MaxBuf Avail AvPF Slots PinUsr PFUsr Posted UnPost Quota Locks
Waits
1/0 1592 1592 20 0 0 0 0 0 0 1 0
1/1 1592 1592 20 0 0 0 0 0 0 1 0
1/1 1592 1592 20 0 0 0 0 0 0 1 0

CHAPTER 13 Monitoring and Tuning Performance
475
Example of
-contention option Note The actual -contention output shows Main Cache, Temp Cache, and
Memory Manager on the same line. Because this format is very wide, each of
these sets of columns is shown separately here.
The -contention results for the main cache are:
Options string for Main cache:
"-contention -file_suffix contention-iqmon -append -interval 10"
Contention
2000-01-24 10:57:03
AU| Main Cache |
|LRULks woTO Loops TOs BWaits IOLock IOWait HTLock HTWait FLLock FLWait
0 66 0 0 0 0 1 0 5 0 4 0
1 2958 0 0 0 0 160 0 1117 0 6 0
1 1513 0 0 0 1 378 0 2 0 8 0
1 370 0 0 0 0 94 0 2 0 10 0
1 156 0 0 0 0 46 0 2 0 12 0
1 885 0 0 0 0 248 0 2 0 14 0
1 1223 0 0 0 0 332 1 2 0 16 0
1 346 0 0 0 0 66 0 2 0 18 0
The -contention results for the temp cache are:
Temp Cache
|LRULks woTO Loops TOs BWaits IOLock IOWait HTLock HTWait FLLock FLWait
70 0 0 0 0 1 0 4 0 5 0
466 0 0 0 0 2 0 15 0 12 0
963 0 0 0 0 2 0 8 0 20 1
1186 0 0 0 0 2 0 2 0 23 1
357 0 0 0 0 2 0 2 0 25 1
444 0 0 0 0 2 0 3 0 29 0
884 0 0 0 0 2 0 2 0 31 1
1573 0 0 0 0 2 0 5 0 37 1
The results for the memory manager are:
| Memory Mgr
MemLks MemWts
55483 13
5705 0
2048 0
186 4

Avoiding buffer manager thrashing
476
2 0
137 0
22 0
203 3
Example of -threads
option The results of the -threads option look like the following:
Options string for Main cache: "-threads -file_suffix threads-iqmon -append
-interval 10"
Threads
2000-01-24 10:59:24
CPUs Limit NTeams MaxTms NThrds Resrvd Free Locks Waits
10 100 4 12 100 13 68 106 590
10 100 6 12 100 12 63 4 6
10 100 6 12 100 12 63 0 0
10 100 7 12 100 12 62 1 1
10 100 7 12 100 12 62 0 0
10 100 7 12 100 12 58 1 5
10 100 7 12 100 12 58 0 0
Avoiding buffer manager thrashing
Operating system paging affects queries that need buffers which exceed the
free memory available. Some of this paging is necessary, especially as you
allocate more and more physical memory to your buffer caches. However, if
you overallocate the physical memory to your buffer caches, the operating
system paging occurs much more frequently, and it can cause your entire
system to thrash. The reverse is true as well: IQ thrashes if you do not allocate
enough memory to your buffer caches.

CHAPTER 13 Monitoring and Tuning Performance
477
Buffer manager thrashing occurs when the operating system chooses less
optimum buffers to page out to disk, which forces the buffer manager to make
extra reads from disk to bring those buffers back to memory. Since Adaptive
Server IQ knows which buffers are the best candidates to flush out to disk, you
want to avoid this operating system interference by reducing the overall
number of page outs.
When you set buffer sizes, keep in mind the following trade-off:
• If the IQ buffer cache is too large, the operating system is forced to page
as Adaptive Server IQ tries to use all of that memory.
• If the IQ buffer cache is too small, then Adaptive Server IQ thrashes
because it cannot fit enough of the query data into the cache.
If you are experiencing dramatic performance problems, you should monitor
paging to determine if thrashing is a problem. If so, then reset your buffer sizes
as described in “Managing buffer caches”.
Monitoring paging on Windows NT systems
Windows NT provides the NT Performance Monitor to help you monitor
paging. To access it, select the object Logical Disk, the instance of the disk
containing the file PAGEFILE.SYS, and the counter Disk Transfers/Sec. This
should be on a separate disk from your database files. You can also monitor the
Object Memory and the counter Pages/Sec. However, this value is the sum of
all memory faults which includes both soft and hard faults.
Monitoring paging on UNIX systems
UNIX provides a system command, vmstat, to help you monitor system activity
such as paging. The abbreviated command syntax is:
vmstat
interval
count
The interval is the time between rows of output, and count is the number times
a row of output is displayed. For more information about vmstat (including its
options and field descriptions), see your operating system's documentation.
Here is an example:
> vmstat 2 3
procs memory page disk faults cpu
r b w swap free re mf pi po fr de sr s0 s1 sd in sy cs us sy id

Avoiding buffer manager thrashing
478
0 0 0 3312376 31840 0 8 0 0 0 0 0 0 0 0 297 201 472 82 4 14
0 0 0 3312376 31484 2 3 0 0 0 0 0 0 0 0 260 169 597 80 3 17
0 0 0 3312368 31116 0 8 0 0 0 0 0 0 0 0 205 1202 396 67 4 29
The above output shows a steady Adaptive Server IQ querying state where the
physical memory of the machine has not been overallocated. Little to no
system page faulting is occurring. These next set of examples show vmstat
output that indicates a problem. (The output shown omits some of the above
fields to fit better on the page.)
procs memory page faults cpu
r b w swap free re mf pi po fr de sr in sy cs us sy id
0 0 0 217348 272784 0 148 11 3 9 0 2 251 1835 601 6 3 91
0 0 0 3487124 205572 0 5 0 0 0 0 0 86 131 133 0 1 99
0 0 0 3487124 205572 0 5 0 0 0 0 0 71 162 121 0 0 100
0 0 0 3483912 204500 0 425 36 0 0 0 0 169 642 355 2 2 96
0 0 0 3482740 203372 0 17 6 0 0 0 0 158 370 210 1 3 97
0 0 0 3482676 203300 0 4 10 0 0 0 0 160 1344 225 1 2 97
0 0 0 3343272 199964 1 2123 36 0 0 0 0 213 131 399 7 8 85
0 0 0 3343264 185096 0 194 84 0 0 0 0 283 796 732 1 6 93
0 0 0 3342988 183972 0 17 58 0 0 0 0 276 1051 746 2 4 94
0 0 0 3342860 183632 0 119 314 0 0 0 0 203 1660 529 3 4 94
0 0 0 3342748 182316 2 109 184 0 0 0 0 187 620 488 4 2 95
0 0 0 3342312 181104 2 147 96 0 0 0 0 115 256 260 9 2 89
0 0 0 3340748 179180 0 899 26 0 0 0 0 163 836 531 4 4 92
0 0 0 3328704 167224 0 2993 6 0 0 0 0 82 2195 222 4 7 89
The first line of the above output provides a summary of the system activity
since the machine was started. The first three lines show that there is
approximately 200MB of free physical memory and that the machine is idle.
The fourth line corresponds to Adaptive Server IQ starting up for the first time.
Beginning at the eighth line, the amount of free memory starts to reduce
rapidly. This corresponds to the Adaptive Server IQ buffer caches being
allocated and database pages being read in from disk (note that CPU usage has
increased). At this time there is little user CPU time as no queries have begun.
procs memory page faults cpu
r b w swap free re mf pi po fr de sr in sy cs us sy id
7 0 0 3247636 58920 0 1880 1664 0 0 0 0 1131 442 1668 80 18 3
18 0 0 3246568 43732 0 709 1696 0 0 0 0 1084 223 1308 90 10 1
12 0 0 3246604 37004 0 358 656 0 0 0 0 600 236 722 95 5 0
15 0 0 3246628 32156 0 356 1606 0 0 0 0 1141 226 1317 91 9 0

CHAPTER 13 Monitoring and Tuning Performance
479
19 0 0 3246612 26748 0 273 1248 0 0 0 0 950 394 1180 92 7 0
The above output is from slightly later when the query is underway. This is
evident from the user mode CPU level (us field). The buffer cache is not yet
full as page-in faults (pi field or KB paged in) are still occurring and the amount
of free memory is still going down.
procs memory page faults cpu
r b w swap free re mf pi po fr de sr in sy cs us sy id
21 0 0 3246608 22100 0 201 1600 0 0 0 0 1208 1257 1413 88 12 0
18 0 0 3246608 17196 0 370 1520 0 464 0 139 988 209 1155 91 8 0
11 0 0 3251116 16664 0 483 2064 138 2408 0 760 1315 218 1488 88 12 0
30 0 0 3251112 15764 0 475 2480 310 4450 0 1432 1498 199 1717 87 13 0
The above output is from even later. On the third line of the output it shows that
the system has reached its threshold for the amount of free memory it can
maintain. At this point, page-outs (po field or KB paged out) occur and the
level of system mode CPU (sy field) increases accordingly. This situation
results because physical memory is overallocated: the Adaptive Server IQ
buffer caches are too big for the machine. To resolve this problem, reduce the
size of one or both of the buffer caches.
System utilities to monitor CPU use
Use these operating system utilities to monitor CPU usage while using
Adaptive Server IQ. On UNIX systems use:
•ps command
•vmstat command (see example in the previous section)
•sar command (UNIX SystemV)
On Windows NT systems use:
• Performance Monitor
• Task Manager

System utilities to monitor CPU use
480
481
CHAPTER 14 Adaptive Server IQ as a Data
Server
About this chapter Adaptive Server IQ supports client application connections through either
ODBC or JDBC. This chapter describes how to use Adaptive Server IQ as
a data server for client applications.
With certain limitations, Adaptive Server IQ may also appear to certain
client applications as an Open Server.This chapter also briefly describes
the restrictions for creating and running these applications.
For information on developing Open Client applications for use with
Adaptive Server IQ, see “The Open Client Interface” in Adaptive Server
Anywhere Programming Interfaces Guide.
You do not use the facilities described in this chapter to use the remote
data access capabilities available to IQ users on Windows NT systems.
For information on remote data access, see the Adaptive Server IQ
Installation and Configuration Guide for Windows NT.
Client/server interfaces to Adaptive Server IQ
This section describes the key concepts of the Adaptive Server IQ
client/server architecture, and provides the conceptual background for the
rest of the chapter.
If you simply wish to use a Sybase application or a third-party client
application with Adaptive Server IQ, you do not need to know any details
of connectivity interfaces or network protocols. However, an
understanding of how these pieces fit together may be helpful for
configuring your database and setting up applications. This section
explains how the pieces fit together, and avoids any discussion of the
internal features of the pieces. For more details about third party client
applications, see the Adaptive Server IQ Installation and Configuration
Guide.

Client/server interfaces to Adaptive Server IQ
482
Open Clients and
Open Servers Members of the Adaptive Server family act as Open Servers. Client
applications communicate with Open Servers using the Open Client libraries
available from Sybase. Open Client includes both the Client Library (CT-
Library) and the older DB-Library interfaces. Adaptive Server IQ can also act
as an Open Server, but in order to use the Open Client libraries, the client
application must use only the supported system tables, views and stored
procedures. See Appendix A, “Transact-SQL Compatibility,” in Adaptive
Server IQ Reference Manual for a list of compatible syntax.
The following figure shows how client applications communicate with an
Adaptive Server IQ. In Adaptive Server IQ 12, you do not need to install Open
Client libraries, and you can connect through either ODBC or JDBC. This
contrasts with Adaptive Server IQ 11.5 and earlier, which required separate
Open Client libraries, and did not support JDBC.
Programming
Interfaces and
application protocols
Adaptive Server IQ supports two application protocols:
• An application protocol specific to Adaptive Server IQ and Adaptive
Server Anywhere is used for ODBC, JDBC, and Embedded SQL
applications.
•TDS (tabular data stream) is used for JDBC connections, Open Client
applications and for other Sybase applications such as OmniConnect.
Tabular Data Stream Open Clients and Open Servers exchange information using the TDS
application protocol. All applications built using the Sybase Open Client
libraries are also TDS applications, because the Open Client libraries handle
the TDS interface. However, some applications (such as Sybase jConnect) are
TDS applications even though they do not use the Sybase Open Client libraries
(they communicate directly to the TDS layer).

CHAPTER 14 Adaptive Server IQ as a Data Server
483
At the other end of the client/server connection, while many Open Servers use
the Sybase Open Server libraries to handle the interface to TDS, some
applications have a direct interface to TDS of their own. Sybase Adaptive
Server Enterprise and Adaptive Server IQ both have internal TDS interfaces.
They appear to client applications as an Open Server, but do not use the Sybase
Open Server libraries.
TDS uses TCP/IP Application protocols such as TDS sit on top of lower level communications
protocols that handle network traffic. Adaptive Server IQ supports TDS only
over the TCP/IP network protocol. In contrast, the Adaptive Server IQ-specific
application protocol supports several network protocols as well as a shared
memory protocol designed for same-machine communication.
Configuring IQ Servers with DSEDIT
Adaptive Server IQ can communicate with other Adaptive Servers, Open
Server applications, and client software on the network. Clients can talk to one
or more servers, and servers can communicate with other servers via remote
procedure calls. In order for products to interact with one another, each needs
to know where the others reside on the network. This network service
information is stored in the interfaces file.
The interfaces file
The interfaces file is usually named sql.ini on PC operating systems, and
interfaces or interfac on UNIX operating systems.
The interfaces file is like an address book. It lists the name and address of every
database server known to Open Client applications on your machine. When
you use an Open Client program to connect to a database server, the program
looks up the server name in the interfaces file and then connects to the server
using the address.
The name, location, and contents of the interfaces file differ between operating
systems. Also, the format of the addresses in the interfaces file differs between
network protocols.
When you install Adaptive Server IQ, the setup program creates a simple
interfaces file that you can use for local connections to Adaptive Server IQ over
TCP/IP. It is the System Administrator’s responsibility to modify the interfaces
file and distribute it to users so that they can connect to Adaptive Server IQ
over the network.
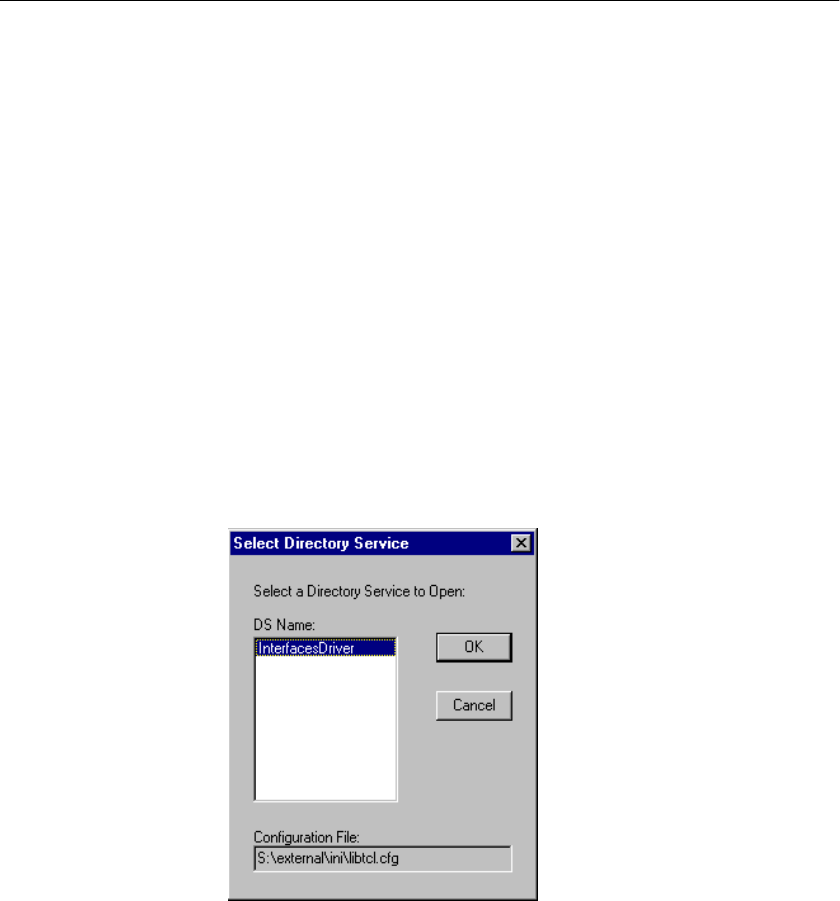
Client/server interfaces to Adaptive Server IQ
484
Using the DSEDIT utility
The DSEDIT utility is an Open Client utility that allows you to configure the
interfaces file (sql.ini or interfaces). The following sections explain how to use
the DSEDIT utility to configure the interfaces file. You must be the owner of
the Sybase home directory ($SYBASE on UNIX or %SYBASE% on Windows
NT) in order to run DSEDIT.
These sections describe how to use DSEDIT for those tasks required for
Adaptive Server IQ. It is not complete documentation for the DSEDIT utility.
For more information on DSEDIT, see the Utility Programs book for your
platform, included with other Sybase products.
Starting DSEDIT
The dsedit executable is held in the SYBASE\bin directory, which is added to
your path on installation. You can start DSEDIT either from the command line
or (Windows NT only) by double-clicking dsedit.exe from the Windows
Explorer
When you start DSEDIT, the Select Directory Service window appears.
Opening a Directory Services session
The Select Directory Service window allows you to open a session with a
directory service. You can open a session to edit one of the following:
• Any directory service that has a driver listed in the libtcl.cfg file

CHAPTER 14 Adaptive Server IQ as a Data Server
485
• The interfaces file (sql.ini).
❖To open a session:
• Select Interfaces Driver from the DS Name box and click OK.
Note The DSEDIT utility uses the SYBASE environment variable to locate
the libtcl.cfg file. If the SYBASE environment variable is not set correctly,
DSEDIT cannot locate the libtcl.cfg file.
You can add, modify, or delete entries for servers, including Adaptive Server
IQ servers, in this window.
Adding a server entry
❖To add a server entry:
1 Choose Add from the Server Object menu. The Input Server Name
window appears.
2 Type a server name in the Server Name box, and click OK to enter the
server name.
The server entry appears in the Server box. To specify the attributes of the
server, you must modify the entry.
Server entry name
need not match server
command-line name
The server name entered here does not need to match the name provided on the
Adaptive Server IQ command line. The server address, not the server name, is
used to identify and locate the server.
It server name field is purely an identifier for Open Client. For Adaptive Server
IQ, if the server has more than one database loaded, the DSEDIT server name
entry identifies which database to use.
Adding or changing the server address
Once you have entered a Server Name, you need to modify the Server Address
to complete the interfaces file entry.
❖To enter a Server Address:
1 Select a server entry in the Server box.
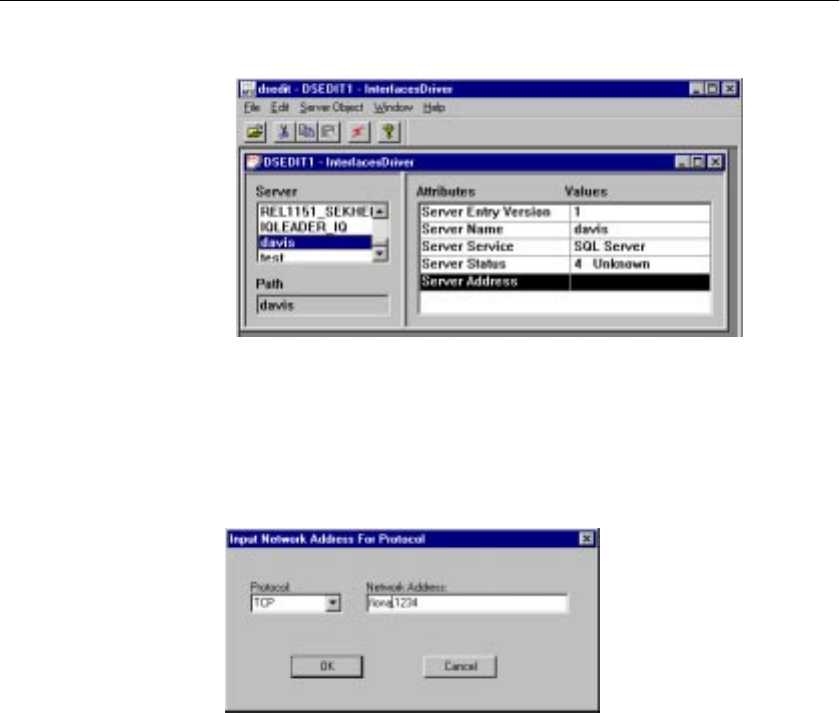
Client/server interfaces to Adaptive Server IQ
486
2 Select the Server Address in the Attributes box.
3 Double-click on the Server Address or right click and choose Modify
Attribute from the popup menu. The Network Address Attribute window
appears, showing the current value of the address. If you have no address
entered, the box will be empty.
4 Click Add. The Network Address for Protocol window appears. Select
TCP from the Protocol list box and enter a value in the Network Address
text box.
For TCP/IP, addresses take one of the following two forms:
• computer name,port number
• IP-address,portnumber
The address or computer name is separated from the port number by a
comma.
Machine name The machine on which the server is running is identified by a name or an IP
address. On Windows and Windows NT you can find the machine name in
Network Settings, in the Control Panel.
If your client and server are on the same machine, you must still enter the
machine name. In this case, you can use
localhost

CHAPTER 14 Adaptive Server IQ as a Data Server
487
to identify the current machine.
Port Number The port number you enter must match the port specified on the Adaptive
Server IQ database server command line, as described in “Starting the database
server as an Open Server”. The default port number for Adaptive Server IQ
servers is 2638.
The following are valid server address entries:
elora,2638
123.85.234.029,2638
Verifying the server address
You can verify your network connection by using the Ping command from the
Server Object menu.
Note Verifying a network connection confirms that a server is receiving
requests on the machine name and port number specified. It does not verify
anything about database connections.
❖To ping a server:
1 Ensure that the database server is running.
2 Click the server entry in the Server box of the dsedit session window.
3 Select Ping Server from the Server Object menu. The Ping window
appears.
4 Click the address that you want to ping. Click Ping.
A message box appears, to notify you if the connection is successful or not.
A message box for a successful connection states that both Open
Connection and Close Connection succeeded.
Renaming a server entry
You can rename server entries from the dsedit session window.
❖To rename a server entry:
1 Select a server entry in the Server box.
2 Choose Rename from the Server Object menu. The Input Server Name
window appears.

Client/server interfaces to Adaptive Server IQ
488
3 Type a new name for the server entry in the Server Name box. Click OK
to make the change.
Deleting server entries
You can delete server entries from the dsedit session window.
❖To delete a server entry:
1 Click a server entry in the Server box.
2 Choose Delete from the Server Object menu.
Sybase applications and Adaptive Server IQ
The ability of Adaptive Server IQ to act as an Open Server enables Sybase
applications such as OmniConnect to work with Adaptive Server IQ. Note that,
in order to use the Open Client libraries, the client application must use only
the supported system tables, views and stored procedures.
OmniConnect support Sybase OmniConnect provides a unified view of disparate data within an
organization, allowing users to access multiple data sources without having to
know what the data looks like or where it is located. In addition, OmniConnect
performs heterogeneous joins of data across the enterprise, enabling cross-
platform table joins of targets such as DB2, Sybase Adaptive Server Enterprise,
Adaptive Server Anywhere, Oracle, and VSAM.
Using the Open Server interface, Adaptive Server IQ can act as a data source
for OmniConnect.
Open Client applications and Adaptive Server IQ
You can build Open Client applications using the Open Client libraries directly
from a C or C++ programming environment such as Powersoft Power++, as
long as the applications use only catalog tables, views and system stored
procedures that are supported by both Adaptive Server Enterprise (Transact-
SQL syntax) and Adaptive Server IQ. Appendix A, “Transact-SQL
Compatibility,” in the Adaptive Server IQ Reference Manual describes how to
create compatible applications.

CHAPTER 14 Adaptive Server IQ as a Data Server
489
Setting up Adaptive Server IQ as an Open Server
This section describes how to set up an Adaptive Server IQ server to receive
connections from Open Client applications.
System requirements
There are separate requirements at the client and server for using Adaptive
Server IQ as an Open Server.
Server-side
requirements At the server side, in order to use Adaptive Server IQ as an Open Server, you
must have a TCP/IP protocol stack in order to use Adaptive Server IQ as an
Open Server, even if you are not connecting over a network.
Note When connecting to a remote Adaptive Server IQ from a local Adaptive
Server Enterprise server using OmniConnect, use these server classes:
• To connect to Adaptive Server IQ 12.x, use server classes asaodbc and
asajdbc.
• To connect to Adaptive Server IQ 11.x, use server class asiq.
Client-side
requirements In order to use Sybase client applications to connect to an Open Server,
including Adaptive Server IQ, you need the following:
•Open Client components—The Open Client libraries provide the network
libraries that your application needs to communicate via TDS.
•DSEDIT —The Directory Services Editor makes server names available
to your Open Client application.
Starting the database server as an Open Server
If you wish to use Adaptive Server IQ as an Open Server, you must ensure that
it is started using the TCP/IP protocol. By default, all available
communications protocols are started by the server, but you can limit the
protocols started by listing them explicitly on the command line. For example,
the following command lines are both valid:
asiqsrv12 -x tcpip,ipx
other_server_switches
asiqdemo.db
asiqsrv12 -x tcpip -n myserver
other_server_switches

Setting up Adaptive Server IQ as an Open Server
490
asiqdemo.db
On UNIX, you can use the start_asiq utility in place of asiqsrv12.
The first command line uses both TCP/IP and IPX protocols, of which TCP/IP
is available for use by Open Client applications. The second line uses only
TCP/IP.
The server can serve other applications through the TCP/IP protocol or other
protocols using the Adaptive Server IQ-specific application protocol at the
same time as serving Open Client applications over TDS.
Port numbers Every application using TCP/IP on a machine uses a distinct TCP/IP port, so
that network packets end up at the right application. The default port for
Adaptive Server IQ is port 2638, which is used for shared memory
communications. You can specify a different port number with the Port
network option:
asiqsrv12 -x tcpip(Port=2629) -n myserver asiqdemo.db
On UNIX you can include this parameter in the start_asiq command.
Open Client settings To connect to this server, the interfaces file at the client machine must contain
an entry specifying the machine name on which the database server is running,
and the TCP/IP port it uses.
For details on setting up the client machine, see “Configuring IQ Servers with
DSEDIT”.
Configuring your database for use with Open Client
Your database must be Adaptive Server IQ 12.0 or higher.
Ensure your database
is compatible If you are using Adaptive Server IQ together with Adaptive Server Enterprise,
you should ensure that your database is created for maximum compatibility
with Adaptive Server Enterprise.
When connecting to Adaptive Server IQ as an Open Server, applications
frequently assume services they expect under Adaptive Server Enterprise (or
SQL Server) are provided. These services are not always present.
For information on creating Adaptive Server Enterprise-compatible databases,
see the appendix “Transact-SQL Compatibility” in the Adaptive Server IQ
Reference Manual.

CHAPTER 14 Adaptive Server IQ as a Data Server
491
Characteristics of Open Client and jConnect
connections
When Adaptive Server IQ is serving applications over TDS, it automatically
sets relevant database options to values that are compatible with Adaptive
Server Enterprise default behavior. These options are set temporarily, for the
duration of the connection only. They can be overridden by the client
application at any time.
Default settings The database options that are set on connection using TDS are as follows:
How the startup
options are set The default database options are set for TDS connections using a system
procedure named sp_tsql_environment. This procedure sets the following
options:
SET TEMPORARY OPTION TSQL_VARIABLES=’ON’;
SET TEMPORARY OPTION ANSI_BLANKS=’ON’;
SET TEMPORARY OPTION TSQL_HEX_CONSTANT=’ON’;
SET TEMPORARY OPTION CHAINED=’OFF’;
SET TEMPORARY OPTION QUOTED_IDENTIFIER=’OFF’;
SET TEMPORARY OPTION ALLOW_NULLS_BY_DEFAULT=’OFF’;
SET TEMPORARY OPTION AUTOMATIC_TIMESTAMP=’ON’;
SET TEMPORARY OPTION ANSINULL=’OFF’;
SET TEMPORARY OPTION CONTINUE_AFTER_RAISERROR=’ON’;
SET TEMPORARY OPTION FLOAT_AS_DOUBLE=’ON’;
SET TEMPORARY OPTION ISOLATION_LEVEL=’1’;
Option Set to
ALLOW_NULLS_BY_DEFAULT OFF
ANSINULL OFF
AUTOMATIC_TIMESTAMP ON
CHAINED OFF
CONTINUE_AFTER_RAISERROR ON
DATE_FORMAT YYYY-MM-DD
DATE_ORDER MDY
ESCAPE_CHARACTER OFF
ISOLATION_LEVEL 1
FLOAT_AS_DOUBLE ON
QUOTED_IDENTIFIER OFF
TIME_FORMAT HH:NN:SS.SSS
TIMESTAMP_FORMAT YYYY-MM-DD HH:NN:SS.SSS
TSQL_HEX_CONSTANT ON
TSQL_VARIABLES ON

Characteristics of Open Client and jConnect connections
492
SET TEMPORARY OPTION DATE_FORMAT=’YYYY-MM-DD’;
SET TEMPORARY OPTION TIMESTAMP_FORMAT=’YYYY-MM-DD
HH:NN:SS.SSS’;
SET TEMPORARY OPTION TIME_FORMAT=’HH:NN:SS.SSS’;
SET TEMPORARY OPTION DATE_ORDER=’MDY’;
SET TEMPORARY OPTION ESCAPE_CHARACTER=’OFF’
Note Do not edit the sp_tsql_environment procedure yourself. It is for system
use only. Options that are not supported by Adaptive Server IQ are ignored.
The procedure only sets options for connections that use the TDS
communications protocol. This includes Open Client and JDBC connections
using jConnect. Other connections (ODBC and Embedded SQL) have the
default settings for the database.
You can change the options for TDS connections as follows:
❖To change the option settings for TDS connections:
1 Create a procedure that sets the database options you want. For example,
you could use a procedure such as the following:
CREATE PROCEDURE my_startup_procedure()
BEGIN
IF connection_property(’CommProtocol’)=’TDS’ THEN
SET TEMPORARY OPTION QUOTED_IDENTIFIER=’OFF’;
END IF
END
This procedure changes only the QUOTED_IDENTIFIER option from the
default settings.
2 Set the LOGIN_PROCEDURE option to the name of a new procedure:
SET OPTION LOGIN_PROCEDURE=
’dba.my_startup_procedure’
3 Future connections will use the procedure.
For more information about database options, see Chapter 5, “Database
Options” in the Adaptive Server IQ Reference.
Data type mappings If you are developing Open Client applications, you should be aware of
mappings between the data types supported by Adaptive Server IQ and those
expected by Open Client. For more information about these data type
mappings, see the chapter entitled “The Open Client Interface” in Adaptive
Server Anywhere Programming Interfaces Guide.

CHAPTER 14 Adaptive Server IQ as a Data Server
493
Servers with multiple databases
Using Open Client Library, you can now connect to a specific database on a
server with multiple databases.
• Set up entries in the interfaces file for each server.
•Use the -n parameter on the start_asiq command to set up a shortcut for the
database name.
• Specify the -S database_name parameter with the database name on the
isql command. This parameter is now required whenever you connect.
You can run the same program against multiple databases without changing the
program itself by putting the shortcut name into the program and merely
changing the shortcut definition.
For example, the following interfaces file excerpt defines two servers,
live_credit and test_credit:
live_credit
query tcp ether host8832 5555
master tcp ether host 8832 5555
test_credit
query tcp ether host8832 7777
master tcp ether host 8832 7777
Start the server(s) and set up an alias for a particular database. The following
command sets live_credit equivalent to creditcard.db:
start_asiq -n amxcredit_live <other parameters> \ -x
‘tcpip{port=5555}’ creditcard.db -n live_credit
To connect to the live_credit server, use this syntax:
isql -Udba -Psql -Slive_credit
A server name may only appear once in the interfaces file. Because the
connection to Adaptive Server IQ is now based on the database name, the
database name must be unique. If all your scripts are set up to work on
creditcard database, you will not have to modify them to work with live_credit
or test_credit.

Characteristics of Open Client and jConnect connections
494
495
Symbols
&
UNIX command line 28
A
Access
ODBC configuration for 67
ad hoc joins
performance 149
Adaptive Server Enterprise
inserting from 193
Adaptive Server IQ
buffer caches 427
matching data types with Adaptive Server
Enterprise 217
monitor syntax 467
aggregates 145
AGGREGATION_ALGORITHM_ PREFERENCE
option 458
AGGREGATION_CUTOFF option 458
ALL permissions 359
ALLOW_NULLS_BY_DEFAULT option
Open Client 491
alphabetic characters
defined 343
ALTER INDEX statement 197
ALTER permissions 359
ALTER statement
automatic commit 289
ALTER TABLE statement
CHECK conditions 278
foreign keys 284
ANSI code pages
about 320
choosing 331
ASCII
conversion on insert 208
conversion option 204
data format 172
ASCII character set
about 319
ASCII character sets
about 319
asiqdemo database 8
ASTMP environment variable
disk space 93
atomic compound statements 242
Autocommit
ODBC configuration 68
AUTOMATIC_TIMESTAMP option
Open Client 491
Autostop connection parameter
ODBC configuration 69
AVG function 145
B
BACKGROUND_PRIORITY option 450
backup log
about 410
location 410
BACKUP statement 383
backups
about 377
attended 382
concurrency 291
concurrency issues 383
data included in 378
devices 380, 384
displaying header file 407
full 414
increasing memory 416
incremental 414
multiplex 378
performance issues 415
privileges required 381
Index

Index
496
recovering from errors 389
responsibilities 415
scheduling 414
specifying tape devices on NT 386
third party 390
unattended 382, 409
wait time 388
base tables 120
batches
about 229, 238
control statements 239
data definition statements 239
SQL statements allowed 267
BIT data
converting 207
indexes allowed in 143
blanks
converting to NULLs 215
BLOCK FACTOR
BACKUP statement option 388
load option 181, 431
BLOCK SIZE
LOAD TABLE option 182
block size 113
relationship to IQ page size 430
buffer cache
monitoring 467
buffer cache monitor 467
examples 473
buffer caches 427
determining sizes 422
example 426
setting sizes 427
buffer manager
thrashing 476
buffer size
ODBC configuration 70
buffer space
ODBC configuration 70
buffers
disabling operating system buffering 437
build number 17
BYTE ORDER option
LOAD TABLE statement 182
C
-c switch 35
cache
See Also buffer cache 467
writing to 289
cache pages
prefetching 450
cache size
setting for Catalog Store 35
CALL statement
about 229
examples 232
parameters 245
syntax 239
case sensitivity
collations 342
command line 29
database and server names 32
international aspects 322
CASE statement
syntax 239
CATALOG ONLY
RESTORE option 407
Catalog Store
about 6
setting cache size 35
CBSize connection parameter
about 73
CBSpace connection parameter
about 73
CHAINED option
Open Client 491
CHAR data
zero-length cells 210
character data types
matching Adaptive Server Enterprise and Adaptive
Server IQ data 219
character set
application 325
determining 325
server 325
character set translation
about 348
error messages 336
character sets
about 315

Index
497
avoiding translation 338
choosing 344
definition 317
encoding 315, 317
fixed width 321
Interactive SQL 349
multibyte 321, 336
single-byte 319
Sybase Central 349
translation 348
Unicode 336
variable width 321
Windows 320
characters
alphabetic 343
digits 343
white space 343
CHECK conditions
columns 278
deleting 280
modifying 280
tables 280
user-defined data types 279
checkpoints
about 304
automatic and explicit 304
in recovery 304
in system recovery 308
CLOSE statement
procedures 252
code pages
ANSI 320
definition 317
Interactive SQL 349
OEM 320
overview 319
Sybase Central 349
Windows 320
collation file
editing 339
collations
about 315, 322
choosing 344
creating 349
custom 339, 349, 351
definition 317
file format 339
internals 339
ISO_1 332
multibyte 336
OEM 334
WIN_LATIN1 332
column delimiters
load format option 179
LOAD TABLE statement 177
column names
international aspects 322
column set to during load 213
column width
insertion issues 208
columns
adding 123
changing 123
deleting 123
retrieving row identifiers 11
command delimiter
setting 265
command files
creating database objects 101
DBISQL 101
command-line switches 28
displaying 29
required 30
set by start_asiq 24
CommBufferSize connection parameter
about 73
CommBufferSpace connection parameter
about 73
COMMIT statement
compound statements 242
procedures 265
committing transactions
effect of timing on read transactions 296
in DBISQL 289
CommLinks connection parameter
about 73
compatibility 19
compound statements
atomic 242
declarations 241
using 240
concurrency

Index
498
backups 291, 383
data definition 300
in Adaptive Server IQ 290
insertions, deletions, and queries 299
read and write 292
configuration files
using 29
configuring
ODBC data sources 67
CONN connection parameter
about 73
connect
permission 357
connecting
character sets 338
connection name
ODBC configuration 70
connection parameters
about 73
case sensitivity 75
conflicts 76
data sources 63
default 61
embedded databases 76
in connection strings 52
location of 79
priority 75
table of 73
connection strings
character sets 338
representing 52
ConnectionName connection parameter
about 73
connections
embedded database 57
establishing 52
examples 53
how the server establishes 77
Interactive SQL 54, 85
JDBC 51
limiting concurrent 34
limiting statements used by 450
local database 54
over a network 60
overview 50
to database on foreign host 55
troubleshooting 93
using data source 59
constraints
effect on performance 274
CONTINUE_AFTER_RAISERROR option
Open Client 491
control statements
list 239
conversion options
DATE 210
DATE format specification 210
DATETIME 212, 213
substitution for zero-length cells 210
CONVERSION_ERROR database option 220
conversions
between Adaptive Server Enterprise and Adaptive
Server IQ 217
errors on import 220
insert options 204
on insert 202
COUNT DISTINCT
impact on index choice 141
COUNT function 145
CPU usage
monitoring 477, 479
CREATE DATABASE statement 108
CREATE DBSPACE statement 114, 445
CREATE INDEX statement 138
CREATE JOIN INDEX statement 162
CREATE PROCEDURE statement
examples 231
parameters 244
CREATE statement
automatic commit 289
concurrency rules 300
CREATE TABLE statement
and command files 101
example 119
CT-library
about 481
cursors
and LOOP statement 253
connection limit 372
hold 297, 313
in procedures 253
in transactions 311

Index
499
limiting number of 450
ODBC configuration 68
on SELECT statements 253
procedures 251
custom collations
about 339
creating 339
creating databases 351
D
daemon
database server as 28
data
duplicated 273, 274
exporting 171, 174
importing 171
in transactions 295
input and output formats 172
invalid 273
loading 171
data definition
concurrency rules 300
data definition language
about 99
data integrity
constraints 276
overview 273
rules in the system tables 285
data modification
permissions 173
data source description
ODBC 67
data source name
ODBC 67
See Also DSN, FileDSN, data sources 64
data sources
about 63
configuring 67
connecting with 59
creating 64
Embedded SQL 63
ODBC 63
UNIX 72
data types
character 219
conversion during loading 204
converting 202
converting between Adaptive Server Enterprise and
Adaptive Server IQ 217
creating with sp_addtype 10
dropping user-defined 10
FLOAT 218
integer 218
matching Adaptive Server IQ and Adaptive Server
Enterprise 217
money 219
REAL 218
retrieving 11
specifying in table creation 120
SQL and C 271
database administrator
See Also DBA 354
See DBA
database administrator (DBA)
defined 354
database file
ODBC configuration 69
database name
ODBC configuration 69
database options
changing or displaying 10
Open Client 491
startup settings for TDS connections 491
database segments
locating for best performance 445
database server
about 5
as Windows NT service 28
command-line switches 28
connecting to 60
emergency stop 96
name caching 84
name switch 31
naming at startup 32
starting 21
starting from NT Start menu 26
starting on UNIX 23
starting on Windows NT 26
stopping 43, 45
DatabaseFile connection parameter

Index
500
about 73
DatabaseName connection parameter
about 73
databases
Adaptive Server Anywhere 6
Adaptive Server IQ data 6
benefits of denormalizing 455
block size 113
character set 336
checking consistency 393
choosing a location 110
connecting to 50, 77
creating 106
custom collations 351
default characteristics 108
denormalizing for performance 454
designing 99
displaying status information 9
displaying validation results 9
dropping 118
estimating space requirements 9
initializing 107
listing size 9
management tasks 2
managing 454
managing with Interactive SQL 101
moving 108
moving files 400
multiple on server 493
naming at startup 32
overview of setup 101
owner role 4
page size 111
permission to start 46
permissions 4, 36, 353
preallocating space 104
privileges needed to create 103
relative pathnames 109
security overview 3
size 111
stopping 47
temporary data 6
unloading 46
utility 18
validating 9
working with objects 99
DatabaseSwitches connection parameter
about 73
DataSourceName connection parameter
about 73
DATE
conversion option 204
load conversion option 210
DATE data type
specifying format for conversion 210
date data types
matching Adaptive Server Enterprise and Adaptive
Server IQ data 219
DATE format
converting two-digit dates 212
dates
procedures 266
DATETIME
conversion option 204
load conversion option 212
DATETIME data type 213
format for conversion 213
DBA (database administrator)
defined 354
responsibilities 2
role of 4
DBA authority
about 354
granting 358
not inheritable 363
DBASE format 172
DBCOLLAT utility 351
custom collations 349
DBF connection parameter
about 73
embedded databases 57
DBG connection parameter
about 73
DBISQL
command line parameters 55
committing transactions 289
inserting data interactively 195
introduction 101
logon window 56
See Also Interactive SQL 101
specifying output format 173
DB-Library

Index
501
about 481
DBLOG utility 405
DBN connection parameter
about 73
DBS connection parameter
about 73
dbspaces
creating 114
definition 104
dropping discouraged 116
estimating space requirements 9
locating for best performance 445
DDL
about 99
DDL (Data Definition Language) 16
Debug connection parameter
about 73
DECLARE statement
compound statements 241
procedures 252, 257
default index
about 145
defaults
connection parameters 61
DELETE permissions 359
DELIMITED BY option 179
Delphi
ODBC configuration for 68
denormalization
disadvantages 455
performance benefits 455
reasons for 454
device types
for databases 104
DIF format 172
digit characters
defined 343
DisableMultiRowFetch connection parameter
about 73
disk cache
definition 451
disk caching
performance impact 451
disk space
allocating 114
indexes 143
saving 312
disk striping
Adaptive Server IQ 442
definition 442
internal 443
rules 443
use in loads 443
DLLs
calling from procedures 268
DML (Data Manipulation Language) 16
DMRF connection parameter
about 73
Driver Not Capable error
ODBC configuration 68
DROP statement
automatic commit 289
concurrency rules 300
DROP TABLE statement
example 124
DROP VIEW statement
example 131
DSEDIT
entries 485
starting 484
using 484
DSN (data source name)
using 64
DSN connection parameter
about 63, 73
DSS (decision support system) 2
E
embedded databases
connectin 57
connection parameters 76
Java 58
starting 57
ENC connection parameter
about 73
encoding
character sets 317
definition 317
multibyte character sets 342
encrypted passwords

Index
502
ODBC configuration 69
EncryptedPassword connection parameter
about 73
encryption
network packets 70
Encryption connection parameter
about 73
ENG connection parameter
about 73
EngineName connection parameter
about 73
ENP connection parameter
about 73
entity integrity
about 276
enforcing 281
environment variables
SQLCONNECT 62
error handling
ON EXCEPTION RESUME 258
error messages
character set translation 336
PIPE_NOT_CONNECTED 179
redirecting to files 175
errors
data conversion 220
insertions and deletions 300
procedures 255
transaction processing 300
ESCAPE CHARACTER option
LOAD TABLE option 181
euro symbol
1252LATIN1 collation 332, 333
exception handlers
procedures 261
exceptions
declaring 257
EXECUTE IMMEDIATE statement
procedures 264
exporting data
about 174
overview 171
extended characters
about 319
external procedures
about 268
F
failures
media 377
system 377
FETCH statement
procedures 252
file data source name
See FileDSN
FileDataSourceName connection parameter
See FileDSN
FileDSN
connection parameter 63, 73
creating 71
distributing 64
See Also data sources 64
FileDSN (file data source name)
See FileDSN
files
locating for best performance 446
redirecting output to 174
FILLER option 201
FIXED format 172
fixed width character sets
about 321
flat files
load conversion options 204
loading from 175
FLOAT_AS_DOUBLE option
Open Client 491
follow bytes
about 321
FOR statement
syntax 239
foreign keys
creating 126
inserting data 196
optional 284
referential integrity 284
retrieving information 11
unenforced 126
FoxPro format 172
FROM clause
join indexes 152
UPDATE statement 225
functions
external 268

Index
503
types of 16
G
global temporary tables
about 120
gm switch 34
effect on recovery 308
GRANT statement
creating groups 363
DBA authority 358
group membership 364
new users 357
passwords 357
permissions 359
procedures 361
RESOURCE authority 358
WITH GRANT OPTION 360
without password 366
GROUP BY clause
impact on index choice 141
GROUP permissions
not inheritable 363
groups
adding with sp_addgroup 10
changing membership 10
creating 363
dropping 10
managing 363
membership 364
permissions 356, 365
PUBLIC 367
Sybase Central 364
SYS 367
without passwords 366
H
HG index
advantages 147
comparison to other indexes 147
disadvantages 147
recommended use 146
HG index
additional indexes 147
High_Group index
See HG index
High_Non_Group index
See HNG index
HNG index 148
additional indexes 149
advantages 148
comparison to other indexes 149
disadvantages 148
recommended use 148
hold cursors 297, 313
I
I/O
performance recommendations 441
identifiers
case insensitivity 322
international aspects 322
IF statement
syntax 239
importing
from pre-Version 12 IQ databases 193
importing data
conversion errors 220
from Adaptive Server Enterprise 192
LOAD TABLE statement 175
in LOAD TABLE 213
index types
about 135
choosing for performance 452
criteria for choosing 140
LF 145
recommendations 142
selecting 150
INDEX_PREFERENCE option 458
Indexes
parallel creation 139
indexes
about 135
adding after loading tables 151
adding and dropping 137
created automatically 121
creating 138

Index
504
creating in Sybase Central 139
disk space usage 143
displaying size 9
dropping 134
in system tables 133
introduction 132
listing 9
parallel creation 139
selecting an index type 150
insert conversion options 204
INSERT LOCATION statement 193
INSERT permissions 359
INSERT statement 151
about 190
and integrity 275
incremental 192
partial-width insert 198
performance 192
VALUES option 190
inserting
column width issues 208
from Adaptive Server Enterprise database 193
from older versions 204
from other databases 192
interactively 195
join index tables 195
overview 171
partial-width inserts 197
performance 221
primary and foreign key columns 196
See Also loading data 204
selected rows 191
INT connection parameter
about 73
integer data types
matching Adaptive Server Enterprise and Adaptive
Server IQ 218
Integrated connection parameter
about 73
integrated logins
default user 92
network aspects 92
ODBC configuration 69
operating systems 86
using 89
integrity
constraints 275, 276
overview 273
Interactive SQL
command delimiter 265
See Also DBISQL 101
window problems 96
interface libraries
connections 50
interfaces file
configuring 483
internal build number 17
INTO clause
using 247
IP address
about 485
IQ PAGE SIZE 111
IQ page size
determining 429
IQ PATH option
choosing a raw device 441
IQ Store
buffer cache size 427
content and structure 6
IQ UNIQUE constraint 278
IQ UNIQUE table option 122
IQ_QUERY_PLAN_ONLY option 457
iqgovern switch 34
restricting queries to improve performance 448
iqsmem switch 35, 436
iqwmem switch 34, 435
ISO_1 collation
about 332
Isolation level
ODBC configuration 67
isolation levels 302
ISOLATION_LEVEL option
Open Client 491
J
Java
connection parameters 76
memory requirements 35
use in Adaptive Server IQ 51, 113
jConnect

Index
505
TDS 482
JDBC
connections 51
join columns 159
join hierarchy 152
join indexes
about 151
altering columns 124
columns in tables 153
creating 157
creating in Sybase Central 164
estimating size 169
estimating space requirements 9
inserting into 195
join hierarchy 152
join relationships 159
listing size 9
modifying underlying tables 168
performance impact 453
synchronizing 158
join relationships
defining 159
specifying 161
JOIN_ALGORITHM_PREFERENCE option 458
JOIN_MAX_HASH_ROWS option 459
JOIN_OPTIMIZATION option 458
joins
multi-table 156
performance impact 149
updates using 225
K
key joins 159, 163
keyboard mapping
about 317
L
language
locale 324
language resource library
messages file 318
language support
about 315
collations 344
multibyte character sets 336
overview 315
LEAVE statement
syntax 239
leveness
ODBC configuration 70
LF index 145
additional indexes 146
advantages 146
comparison to other indexes 146
disadvantages 146
recommended use 145
libctl.cfg file
DSEDIT 484
lightweight processes 439
LIMIT option
LOAD TABLE statement 183
Links connection parameter
about 73
LivenessTimeout connection parameter
about 73
load conversions
See conversion options
load options 180
LOAD TABLE statement 151
about 175
FILLER option 201
partial-width insert 198
syntax 176
loading data
ASCII conversion option 208
concurrency rules 299
conversion errors 220
conversion options 204
file specification 178
format options 179
memory requirements 424
named pipes 179
notification messages 187
overview 171
performance 221, 431
privileges needed 173
See Also inserting 204
using striped disk 443

Index
506
local temporary tables
about 120
locale
character sets 336
language 324
locales
about 323
setting 346
localhost
machine name 485
locking
tables 299
LOG connection parameter
about 73
Logfile connection parameter
about 73
LOGIN_MODE database option
integrated logins 87
logins
integrated 86, 87
LOOP statement
in procedures 253
syntax 239
Lotus format 172
Low_Fast index
See LF index
lower code page
about 319
LTO connection parameter
about 73
M
main database
buffer cache size 427
MAIN_CACHE_MEMORY_MB option 427
MAX_CARTESIAN_RESULT option 459
MAX_CURSOR_COUNT option 450
MAX_STATEMENT_COUNT option 450
memory
connection limit 372
creating unwired memory pool 35
creating wired memory pool 34
for Catalog Store cache 35
overhead 423
paging 420
reducing requirements 431
requirements for loads 424
restricting use by queries 449
See Also buffer caches 427
unwired 436
wired 435
memory message
load notification messages 187
message log 17
Adaptive Server IQ 446
MESSAGE statement
procedures 257
messages
dropping 10
language resource library 318
memory notification 187
recorded in message log 17
redirecting to files 175
retrieving stored strings 10
metadata
in Catalog Store 6
Microsoft Access
ODBC configuration for 67
Microsoft Visual Basic
ODBC configuration for 67
migration 19
money data types 219
multibyte character sets
about 321
using 336
multibyte characters
encodings 342
properties 343
multiple databases
DSEDIT entries 485
multiple record fetching
ODBC configuration 70
multiplex databases
backups 378
multiprocessor machines
switch 33
multithreading
performance impact 439

Index
507
N
named pipes 179
national language support
about 315
collations 344
multibyte character sets 336
overview 315, 317
natural joins 163
NEAREST_CENTURY option 212
network communications
troubleshooting startup 94
network protocol
specifying 60
network protocols
ODBC configuration 70
networks
large transfers 459
performance suggestions 459
settings 459
NOT NULL constraint 275
notification messages 187
NOTIFY insert option 153
NOTIFY option
LOAD TABLE statement 183
NULL 213
conversion option 204, 215
converting to 215
inserting 190
result of partial-width insertions 194
NULL value
output 175
NULLS option
DBISQL 175
O
objects
qualified names 367
ODBC
data sources 63
driver location 78
initialization file for UNIX 72
translation driver 348
UNIX support 72
ODBC (Open Database Connectivity)
data sources 65
ODBC data sources
configuring 67
UNIX 72
ODBC translation driver
ODBC configuration 67
OEM code pages
about 320
choosing 331
OmniConnect
support 488
ON clause joins 163
ON EXCEPTION RESUME clause
about 258
not with exception handling 262
ON FILE ERROR option
LOAD TABLE statement 183
Open Client
configuring 483
interface 481
Open Server
address 485
architecture 481
starting 489
system requirements 489
Open Servers
adding 483
OPEN statement
procedures 252
operator
tasks of 415
options
Open Client 491
setting 373
startup settings for TDS connections 491
OS_FILE_CACHE_BUFFERING option 437
output format
DBISQL 173
output redirection 174
OUTPUT_FORMAT
DBISQL option 173
owner
role of 4
owners
about 355

Index
508
P
page size 111
Catalog 37
switch 37
paging
effect on performance 420
memory 420
monitoring on UNIX 477
monitoring on Windows NT 477
Parallel CREATE INDEX 139
partial-width insertions
about 197
rules 198
START ROW ID option 194
partial-width inserts
examples 199
partitions
definition 441
password
default 354
Password connection parameter
about 73
passwords
changing 11, 357
ODBC configuration 69
pathnames
for databases 109
performance
ad hoc joins 149
balancing I/O 441
benefits of denormalizing databases 455
choosing correct index type 452
definition 419
designing for 419
disk caching 451
effect of constraints 274
impact of versioning 309
indexes 132
inserts 192
loading data 221
loading from flat files 205
monitoring 467
multi-user 450
procedures 230
RAM disk use 452
restricting queries with iqgovern 448
performance monitor
examples 473
performance tuning
introduction 465
permissions
command-line switches 36
conflicts 372
connect 357
DBA authority 354
external procedures 269
granting passwords 357
group 363
group membership 364
groups 356, 365
in Sybase Central 360, 361
individual 356
inheriting 360, 363
INSERT and DELETE, on views 371
listing 374
managing 353
overview 353
passwords 357
procedures 233, 361
RESOURCE authority 355, 358
tables 355, 359
the right to grant 360
types of 4
user-defined functions 237
views 130, 359
WITH GRANT OPTION 360
ping
testing Open Client 487
PIPE_NOT_CONNECTED error 179
plug-ins
connecting 49
port number
default 55
specifying on NT 56
specifying on UNIX 55
port numbers
TCP/IP 490
Port option
introduction 490
PREFETCH_BUFFER_LIMIT option 450
Prefetched cache pages 450
PREVIEW option

Index
509
LOAD TABLE statement 184
primary keys
creating 125
entity integrity 283
inserting data 196
order of columns 126
retrieving information 11
unenforced multi-column 126
priority
lowering 450
privileges
defining database objects 103
for inserting and deleting 173
procedures
about 229
benefits of 230
calling 232
command delimiter 265
creating 231
cursors 251
cursors in 253
dates and times 266
default error handling 256
dropping 232
error handling 255
exception handlers 261
EXECUTE IMMEDIATE statement 264
execution permissions 233
external 268
multiple result sets from 250
owner 355
parameters 244, 245
performance 230
permissions 361
permissions for creating 355
result sets 234, 249
returning results 246, 247
returning results from 233
savepoints in 265
security 369
See Also stored 7
SQL statements allowed in 243
structure 243
system 7
table names 266
using 230
variable result sets from 250
verifying input 267
warnings 260
writing 265
process threading model 439
protocols
switch 38
ps command
monitoring CPUs on UNIX 479
PUBLIC group 367
PWD connection parameter
about 73
Q
qualified object names 367
queries
concurrency rules 299
indexing recommendations 452
limiting concurrent 34
optimizing 457, 458
restricting concurrent 448
restricting memory use 449
structuring 456
query plans 457
query types
index types for 141
QUERY_DETAIL option 457
QUERY_INFORMATION option 457
QUERY_TEMP_SPACE_LIMIT option 449
QUERY_TIMING option 458
questions
character sets 316
quotation marks
in SQL 368
QUOTED_IDENTIFIER option
Open Client 491
R
RAM disk memory 452
raw devices
effect on performance 441
raw partitions

Index
510
memory use 424
RAWDETECT
disk striping option 444
REAL data type
matching Adaptive Server Enterprise and Adaptive
Server IQ data 218
recovery
system 307
transaction log in 308
transactions in 307
redirecting
output to files 174
REFERENCES permissions 359
referential integrity
declaring 283
enforcing 281
permissions 173
RELEASE SAVEPOINT statement 305
renaming database files 400
Replication Server
support 488
RESIGNAL statement
about 262
RESOURCE authority
about 355
granting 358
not inheritable 363
response time 419
restore operations
about 396
displaying header file 407
ensuring correct order 403
excluding other users 406
performance issues 415
recovering from errors 408
RESTORE statement
about 399
restoring databases
renaming files 400
result sets
multiple 250
procedures 234, 249
variable 250
RETURN statement
about 246
REVOKE statement
about 362
ROLLBACK statement 305
compound statements 242
procedures 265
ROLLBACK TO SAVEPOINT statement 305
ROW DELIMITED BY option
LOAD TABLE statement 184
row id
displaying 199
in notification message log 199
ROW_COUNTS option 459
S
sample database 8
sar command
monitoring CPUs on UNIX 479
SAVEPOINT statement
and transactions 305
savepoints
procedures 265
within transactions 305
security
about 353
integrated logins 90, 91
procedures 230, 361, 369
views 369
See database utilities 62
segments
database, using multiple 445
SELECT DISTINCT projection 141
SELECT permissions 359
SELECT statement
in INSERT statement 194
INTO clause 247
join indexes 152
restrictions for view creation 129
semicolon
command delimiter 265
sequential disk I/O 447
server
See database server
server address
DSEDIT 485
server information

Index
511
asasrv.ini file 84
server name
ODBC configuration 69
ServerName connection parameter
about 73
servers
multiple databases on 493
SET clause
UPDATE statement 225
seven-bit characters
about 319
shutdown
database 47
troubleshooting 93
SIGNAL statement
procedures 257
single-byte character sets
about 319
snapshot versioning
See Also versioning 287
software release number 17
sort order
collations 315
sort orders
definition 317
sorting
collation file 341
sp_iqcheckdb
checking database consistency 393
sp_iqestdbspaces
estimating dbspace requirements 105
sp_iqestjoin
estimating join index space requirements 105
sp_iqestspace
estimating database space requirements 105
sql.ini file
configuring 483
SQLCODE variable
introduction 255
SQLCONNECT environment variable
connections 63
SQLLOCALE environment variable
about 328, 336
setting 346
SQLSTATE variable
introduction 255
Start connection parameter
about 73
start line
ODBC configuration 69
Start parameter
embedded databases 58
START ROW ID option 197
about 198, 201
INSERT statement 192
partial-width inserts 194, 198
start_asiq
starting asiqdemo database 47
starting server on UNIX 23
starting 48
StartLine connection parameter
about 73
startup
troubleshooting 93
startup command
UNIX 25
Windows NT 26
startup parameters 28
set by start_asiq 24
startup script 23
stored procedures
about 7
Adaptive Server Enterprise catalog 11
Adaptive Server Enterprise system 10
Adaptive Server IQ 8
performance monitoring 465
retrieving information 11
retrieving parameter information 11
system 9
subtransactions
and savepoints 305
procedures 265
SUM function 145
swap files
effect on performance 420
swapping
effect on performance 420
memory 420
Sybase Central 48
adding users to groups 364
altering tables 124
and permissions 360

Index
512
column constraints 280
creating dbspaces 115
creating groups 364
creating tables 118
creating users 357
creating views 129
dropping views 131
foreign keys 126
introduction 100
permissions 361
primary keys 125
stopping 50
system tables 127
SYBASE environment variable
DSEDIT 484
synchronizing
about 158
SYS group 367
SYSCOLAUTH view
permissions 375
SYSCOLLATION table
collation files 340
SYSCOLUMN table
integrity 285
SYSDUMMY table
permissions 374
SYSFOREIGNKEY table
integrity 285
SYSGROUP table
permissions 374
SYSGROUPS view
permissions 375
SYSINFO table
collation files 340
SYSPROCAUTH view
permissions 375
SYSPROCPERM table
permissions 374
SYSTABAUTH view
permissions 375
SYSTABLE table
integrity 285
view information 131
SYSTABLEPERM table
permissions 374
system tables 12
about 127
character sets 340
indexes in 133
national languages 340
permissions 374
SYSCOLLATION 340
SYSINFO 340
users and groups 374
views 131
system views
integrity 285
permissions 374
SYSUSERAUTH view
permissions 375
SYSUSERLIST view
permissions 375
SYSUSERPERM table
permissions 374
SYSUSERPERMS view
permissions 375
SYSVIEWS view
view information 131
T
table names
international aspects 322
procedures 266
table-level versioning
about 292
See Also versioning 292
tables
adding keys to 125
altering 123
collapsing 453
creating 118
displaying size 9
dropping 124
group owners 365
join relationships 159
joining 453
joining multiple 156
listing 11
listing with sp_iqtable 9
loading 175

Index
513
locking 299
owner 355
permissions 355
qualified names 365, 367
See Also information in system tables 12
tabular data stream (TDS)
about 481
tape devices
for backup 385
TCP/IP
addresses 485
Open Server 489
TDS
about 481
TEMP environment variable
disk space 93
TEMP_CACHE_MEMORY_MB option 427
temporary storage
option to save space 312
Temporary Store
about 6
buffer cache size 427
temporary tables
about 120
loading 120
versioning 298
terminators
LOAD TABLE statement 177
The 439, 450
threads
management options 440
throughput 419
time data types
matching Adaptive Server Enterprise and Adaptive
Server IQ data 219
times
procedures 266
TMP environment variable
disk space 93
top table
size and performance 156
TRACEBACK function 257
transaction log
about 445
in system recovery 308
renaming 405
transaction processing
about 287
transactions
about 287
cursors in 311
definition 287
ending 288
in recovery 307
procedures 265
rolling back 307
savepoints 305
starting 288
subtransactions and savepoints 305
Translation driver
ODBC configuration 67
translation drivers
ODBC 348
troubleshooting
database connections 77
server address 487
server startup 94
startup, shutdown, and connections 93
TSQL_HEX_CONSTANT option
Open Client 491
TSQL_VARIABLES option
Open Client 491
U
UID connection parameter
about 73
UNC connection parameter
about 73
Unconditional connection parameter
73
Unicode character sets
about 336
UNIQUE constraints 277
UNIX
ODBC support 72
unloading data
from pre-Version 12 Adaptive Server IQ 186
unwired memory 436
setting iqsmem switch 35
UPDATE statement

Index
514
using 224
using join operations 225
upper code page
about 319
user accounts
adding with sp_addlogin 10
user ID
ODBC configuration 69
user IDs
creating 357
default 354
deleting 362
listing 374
managing 353
user-defined data types
CHECK conditions 279
user-defined functions
calling 236
creating 235
dropping 237
execution permissions 237
external 268
parameters 245
using 235
Userid connection parameter
about 73
users
adding to groups 364
adding with sp_adduser 10
creating in Sybase Central 357
creating individual 356
dropping 10
dropping with sp_droplogin 10
Using 208
utilities
Transaction Log 405
utility database
about 18
V
VALUES option
INSERT statement 190
VARCHAR data
zero-length cells 210
variable width character sets
about 321
version string 17
versioning
about 287, 291
at table level 292
cursors and 312
in system recovery 308
isolation levels 302
performance impact 309
temporary tables 298
vertical insertions
about 197
views
creating 128
deleting 131
differences from permanent tables 128
inserting and deleting 130
modifying 130
owner 355
permissions 130, 355
security 369
SELECT statement restrictions 129
using 129
working with 127
Visual Basic
ODBC configuration for 67
vmstat command
monitoring buffer caches on UNIX 477
monitoring CPUs on UNIX 479
W
WarehouseArchitect
about 100
warnings
procedures 260
Watfile format 172
WHERE clause
impact on index choice 142
join indexes 152
UPDATE statement 225
WHILE statement
syntax 239
white space characters

Index
515
defined 343
WIN_LATIN1 collation
about 332
wired memory 435
setting iqwmem switch 34
WITH GRANT OPTION clause 360
Y
year 2000
conversion options 212
Z
-Z option
database server 94
zeros
converting to NULL 215

Index
516
