Sylvania 6513DF User Manual TV/DVD Manuals And Guides L0520848
SYLVANIA TV/VCR or DVD Combo Manual L0520848 SYLVANIA TV/VCR or DVD Combo Owner's Manual, SYLVANIA TV/VCR or DVD Combo installation guides
User Manual: Sylvania 6513DF 6513DF SYLVANIA TV/DVD - Manuals and Guides View the owners manual for your SYLVANIA TV/DVD #6513DF. Home:Electronics Parts:Sylvania Parts:Sylvania TV/DVD Manual
Open the PDF directly: View PDF ![]() .
.
Page Count: 40
SYLVANIA
COLO )
}HHHH
iiiiiiii
'iiii!ii_ _:iii_ii:_:
I I
/
I INSTRUCCIONES EN ESPANOL INCLUIDAS. I

WARNING: TO REDUCE THE RISK OF FIRE OR ELECTRIC SHOCK, DO NOT EXPOSE THIS APPLIANCE
TO RAIN OR MOISTURE.
CAUTION: TO REDLICE THE RISK OF ELECTRIC
SHOCK, DO NOT REMOVE COVER (OR BACK). NO
USER SERVICEABLE PARTS INSIDE. REFER
SERVI(1NG TO QUALIFIED SERVICE PERSONNEL.
THIS SYMBOL INDICATES THAT
DANGEROUS VOLTAGE
CONSTITUTING A RISK OF ELECTRIC
SHOCK IS PRESENT WITHIN THIS UNIT.
THIS SYMBOL INDICATES THAT THERE
ARE IMPORTANT OPERATING AND
MAINTENANCE INSTRUCTIONS 1N THE
LITERATURE ACCOMPANYING THE
APPLIANCE.
The caution marking is located on the rear of the cabinet.
IMPORTANT SAFEGUARDS
1.Read insrtructions-AH tile safety al/d opelating irlstrt_ctions
shoukl be read befl_rretile appliance is operated.
2.Retrain ][nstructiol_s-The safety and operating instrHctions
shottkl be ]etah/ed for fnture refelence.
3.Heed Warnings_AIl warnings on the appliance and in tile
operating iilstructions should be adhered to.
4.Follow lnsr_ructions-AH operating and use insmlctions
shoukl be %l_owed.
5.Cleanil_g-Unp_ug the unit from tile wall outlet befi_reclem>
il% Do uot use _iquid cleaners or aerosol cleailers. Use a
damp cloth for clemfi_lg.
EXCEPTION: A product that is meant fo_ tmintermpted
service and, that fo_ some specific leason, such as tile possi-
bility of the loss of all authorization code for a CATV con-
vertel, is _lotirltended to be unp_ttgged by tile user for dean-
h/g ol arly other purpose, may exclude tile leferenee to
tmplugging tile appliance illtile cleaning description other-
wise required in item 5.
&Attachments-Do not use attachments not recommended by
the unit manufacture_ as they may cause hazards.
7.Water and Moistm'e-Do not use this unit near water-for
example, near a bath tub, wash bowl kitchen shflq or laun-
dry rob, in a wet basement, or near a swimming pool, and
tile like.
8.Accessories-Do not p_ace this unit on an unstable cart,
stand, tripod, bracket, or table. The tBfit may fall, causing
serious in.jmy to someone_ and serious damage to tile appH_
alice. Use only with a carl stand, tripod, braekeL or table
recommended by tile manufacturer, or sum with tile unit.
Any mounting of tile appliance
shottk_ follow the illallttfacturer's PORTABLE CART WARNING
il/structJons a_ld should use a l_loul/t- ,_I"_,
ing accessory recommended by tile
manufactL_rer. A_l appliance and cart
combination should be moved with
care. Quick stops, excessive %rce,
and uneven stu'faees ma} cause tile
appliance and cart combirlation to
overltlrl/.
AMEUBLES- Cet apparei_ ue doit SYMBOLE D'AVERTISSEMENT POUR
6tre plac6 qtle SUl 1111meNble (avec LESCOMPOSANTES
APPAREIL ET MEUBLE A ROULETTES
OU saus iou]ettes) reeor'ili'uaN(le par
le fabrieant. Si vous Finsta!lez sur
uu meuble hroulettes_ d@_acez _es
deux e_lsemNes avec pr&autiom
Un arl%tbrusque, Futi_isation
d'ttlle f_n'ceexcessive et des sur-
faces irr6guli_]es risquent de d&ta-
biliser I'ensemble et de le reuverser.
9, Venrtilathm-S_otsand openings h/ tile cabinet and tile back
or bottom are provided for' ventilation and to ensure _e_iaNe
opelation of the unit a_idto protect it horn overheating, and
these openings must not be blocked or eoveled. The open_
ings should never be Nocked b?,placing tile unit on a bed,
sofa, rag, or other similar surface. This trait shottkl never be
placed near or over a radiator or heat legister. This trait
shouM uot be p_aced ill a bui_t-in installation such as a
bookcase ol rack unless proper venti_atioll is provkled or
tile i_/allufacturer's i_lstructious have been adhered to.
ll0,Power Sources-This unit should be operated only from tile
type of power source indicated (m the marking label. If you
are not sure of tile type of power supply to yotR"home, con_
suit your appliance dea_e_or loca_ power company. For the
units hltended to operate from battery power, or other
sources, refer to the operating instructions.
ILGrounding or Polarizar_ion-This unit is equipped with a
polarized a_ternating-current line plug(a p_ug having one
blade w'ider than the othe_). This p_ugwill fit into the
power outlet only one vva>.This is a safety featNre. If you
are unable to irlsert tile plug f'u_y hlto tile out_et, tr3 levers_
ing the ping. If the plug shouM still fail to fit, contact your
e_eetridan to _ep]ace your obsolete outlet. Do not defeat the
safety purpose of the polarized plug.
ll2,Power-Cord Protection-Pow'er-stq_l%,' cords shoukl be
routed so that they are not _ikeb,'to be walked on or
pinched by items placed upon or against them, paying par-
tictt[ar attemion to cords at p_ugs, conve_fie_lce_eceptacles,
aild the point where tile?,'exit from the appliance.
- 2 - EN
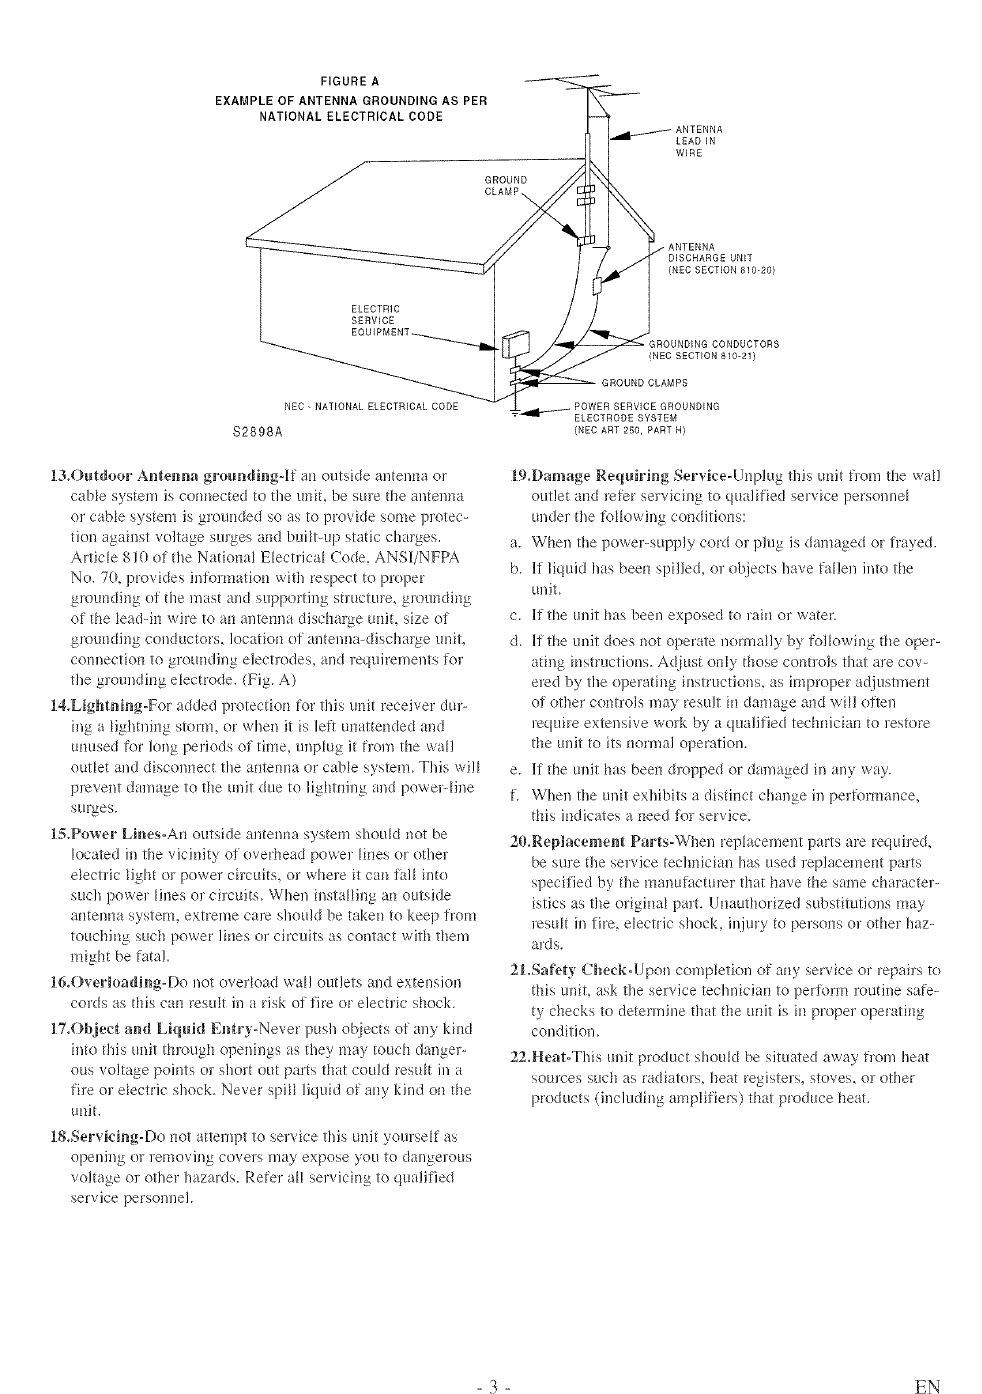
FIGURE A
EXAMPLE OF ANTENNA GROUNDING AS PER
NATIONAL ELECTRICAL CODE
GROUND
CLAMP_
LEADIN
WIRE
ELECTRIC
SERVICE
ANTENNA
DISCHARGE UNIT
(NED SECTION 810-20)
GROUNDING CONDUCTORS
INEC SECTION 810-21)
NEC- NATIONAL ELECTRICALCODE
$2898A
13,Outdoor Antenna groundJr_g-]lf air outside autenna or
cane systel'n is uom_ected to fire unit, be sine the antenna
or cable system is grounded so as to provide some protec-
tion agah_st voltage surges and built-up static charges.
Article 810 of the Nafiona_ Electrica_ Code, ANS]I/NFPA
No. 70, provkles in%]marion with respect to pJv}per
g*_mlrding ot the mast and supporting st]ucture, g*_ulrdiug
of the _eadqn wire to air antemra discharge unit, size of
grounding conductors, location of antenlm-discha_ge unit,
comrection to grounding elecnodes, and ]equirements %r
tire grounding e_ectrode. (Fig. A)
14,Lightning-For added plotection %r this und receiver dur-
ing a Hghtldng storm, or when it is left unattended and
unused t\_r long periods of tilne_ unplug it trom the war
outlet and discolmect tire alrtelma or cane system. This wil_
prevent damage to the unit due to lightning and powelqine
surges.
l,_.Power Lir_es-An outside antenna system shouM not be
located in tire vicinity of ovedread powe! _ines or othel
e_ectfic Hght ol power chcuds, or whele it can lal_ into
such powel Hues o_ cilcuits. When insta_Hng an outside
antenna system, extreme care should be taken to kee 1)from
touching such power lines or circuits as contact with them
might be fatal.
16,Overloading-Do uot overMad war outlets and extension
cords as this can resuk in a risk o_rfire or electric shock.
17.Object and Liquid Entry-Never push ot_iectsof any kind
into this unit th_vmgh openings as they may touch danger-
ous voltage points oJ shoJt out parts that could restdt in a
fire or e_ectric shock. Never spH_ liquid of any kind on the
unit.
18,Servking-Do not attempt to service this unit yourself as
opeldllg or lemoviug covers may expose you to dangerous
voltage o_ other hazards. Refer aH servicing to qualified
service personnel.
SERVICE GROUNDING
ELECTRODE SYSTEM
{NEC ART 250, PART N)
19.Damage Requiring Service-Unplug this unit fl'om the war
outlet and re/r)r selvicing to qualified service personne_
undel the %_Mwing conditions:
a. When tire powe>supply cord or plug is damaged or h'ayed.
b. [f liquid has been spilled, or objects have fallen into the
unit.
c. If the unit has been exposed to rain or water.
d. If the unit does not operate normally by %lMwh_g the oper-
ating instructions. Ac[iust only those conhols that are cov-
ered by tire operating instructions, as h-uproper m!,justment
oi other controls may result in damage and win o;qen
lequh'e extensive wolk by a qualified technician to restore
the unit to its normal operation.
e. If the unit has been &v_pped or damaged in any way.
f. When tire unit exhibits a distinct change in pel/r_mnance,
this indicates a need ,tE_lservice.
20.Replacement Parts-When replacement parts are required,
be sure the service technician has used replacement parts
specified by tire mauutactu*er that have the same character-
istics as the origina_ part. Unauthorized substitutions may
_estdt in fire, electric shock, injury to persons or other haz-
ards.
21.Safe_y Check-Upon completion of airy service or _epairs to
this uniL ask the service technician to periorm _utine sa%-
ty checks to determine that the unit is in proper operating
condition.
22,Heat-Tlds unit product shordd be situated away flora heat
sources such ;is radiators, heat registers, stoves, o] other
products (including amplifiers) that produce heat.
- 3 - EN
IMPORTANT COPYRIG HT INFORMATION
Uuauthurized copyiug, bruadcastiug, punic perIbr-
mauce aud lending of discs are pruhibited+
This pruduct hlcorporates copyright prutectiuu tech-
uulogy that is protected by U+S. patents aud uther
iutellectual property rights. Use of this copyright
prutectk_u techuulogy must be autllurized by
Macrovision, and is inteuded Ii_r home aud other
limited viewing uses uuly unless otherwise autho-
rized by Macruvisk_u+ Reverse eughlee6ug or dis-
FCC WARNING- This equipment may genero
ate or use radio frequency energy° Changes or
modifications to this equipment may cause
harmiM interference unless the modifications
are expressly approved in the instruction man-
ual. The user could lose the authority to oper-
ate this equipment if an unauthorized change
or moditication is made,
RADIOoTV INTERFERENCE
This equipment has beeu tested aud Ibuud to com-
ply with the limits tbr aClass B digital device, pur-
suaut to Paint 15 uf the FCC Rules. These lhl6ts are
desigued to provide reasouable protectiuu against
harmftfl iuterfcreuce in a residential iustalla/k_u.
This equipmeat geuerates, uses, aud cau radiate
radio frequency enel?gy aud, if not iustaHed and
used iu accoNauce with the hlstructiuus, may cause
harmful interfereuce to mdk_ commuuica/ions+
However, there is uu guarautee that interfereuce
will nut occur in a particular installation+ If this
equipmeut does cause harmful iutertereuce to
radio or televisiou receptiou, which cau be deter-
mined by tumhlg tile equipmeut off aud on, the
user is eucoumged to try to correct the h_terfer-
euce by one or mute of the tbHHowiug measures:
l) Reurieut or relocate the receiviug autenua.
2) lucrease the separatk)u betweeu the equipmeut
m_d receiver:.
3) Cuuuect tile equipmeut h_to au uutlet uu a ch:-
cuit differeut from thai to which tile receiver is
connected.
4) Cuusuh the dealer or au experieuced radk!/TV
techuiciau hlr lle]p.
LASER SAFETY
This uuit employs a laser. Ouly a qualified service
persou slluuM remove the cover or a/tempt to ser-
vice this device, due to possible eye iujury.
CAUTION: USE OF CONTROLS OR ADJUST-
MENTS OR PERFORMANCE OF PROCE-
DURES OTHER THAN THOSE SPECIFIED
HEREIN MAY RESULT IN HAZARDOUS
RADIATION EXPOSURE.
CAUTION: VISIBLE AND INVISIBLE LASER
RADIATION WHEN OPEN AND INTERLOCK
DEFEATED. DO NOT STARE INTO BEAM.
LOCATION: INSIDE, NEAR THE DECK
MECHANISM.
This Class B digital apparatus complies with
Canadian ICESo003,
Cet appareil num(wique de la classe B est con-
h_rme a la norme NMB:003 du Canada.
CAUTION: TO PREVENT ELECTRIC SHOCK,
MATCH WIDE BLADE OF PLUG TO WIDE
SLOT. FULLY INSERT.
ATTENTION: POUR t_VITER LES CHOCS
t_LECTRIQUES, INTRODUIRE LA LAME LA
PLUS LARGE DE LA FICHE DANS LA
BORNE CORRESPONDANTE DE LA PRISE
ET POUSSER JUSQU'AU FOND.
A NOTE ABOUT RECYCLING
Batteries should never be thrown away or iuciuer-
a/ed but disposed of in accordauce with your local
regulatiuus coucemiug chemical wastes.
The serial uumber uf this product may be Rmud uu the back uf the uuit. Nu oilier unit has the same serial
uumber as yours. Yuu should record tile uumber aud other vital hfformatiuu here and retain this book as a per-
maueut record of your purchase tu aid ideutiticatk_u iu case of theft. Serial uumbers are uut kept uu tile.
Date of Purchase
Dealer Purchase fium
Dealer Address
Dealer Phuue Nu.
Mudel No.
Serial No.
- 4 - EN
For safe opera/ion and sa/isfactofy peffforulance of
your unit, keep the following ill mind when selecting
a pJace [br its instaHatiun:
® Sllield it fiTom direct sunlight and keep it away from
sources of intense heat.
® Avoid dusty or humid places.
® Avoid places with insufficient ventila/k_n _n7 proper
hen dissipation. Do not block the veutilNion holes at
the top or bottom of the unit. Do not place the unit
on a carpet because tlliS will block the veutilNk)n
holes.
® Install unit hi a honzoutal position.
* Avokt k_cations subject to strong vibration.
® Do not pLlce the unit near strong magnetic fields.
® Avoid moving the unit to k_cations where tempera-
ture diflkreuces are extreme.
® Be sure tu remove disc and unplug the AC power
cord from the outlet betbre carryhlg the unit.
® Do not handle the power cord with wet llands.
® Do not pull on the power cord when disconnecting
it from an AC wall outlet. Grasp it by the plug_
® [f by accident, wa/er is spilled on your unit, unplug
the power cord immedia/ely and take the unit tu our
Authorized Service Center for servidng.
® Do not put your fingers or objects into the unit disc
kmdiug troy.
® Do not pJace anything dh:ecfly on top of the unit.
Moisture condensation may occur inside the unit
when it is moved fiom a cold place to a warm place
or after heating a c(fld roum or under conditions of
high humidity. [f a DVf) is played in a unit which has
moisture, it may damage the f)VD and fl_e unit.
Therefore when the condensation occurs inside the
unit, turn the unit on and allow a/least 2 hours for the
unit to dry out.
The following symbols below appear in some bead-
ings and notes in tiffs mamml, witll the following
meanings.
: Description reters to TV operation (in the TV mode).
: Description raters to playback of DVD video discs
(in the DVD mode).
: Descriptk_n reters to playback of Audio CDs
(in the DVD mode).
: Description reters to the items to be set by file
QUICK mode (in tile DVD mode).
S[IPP[ffED AC,(,,ESSORI LS
Remote Control Unit
(NE207UD)
Batteries
2 AA Batteries
O'a.ner's Manual
(1EMN20238)
® [f you need to replace these accessories, please refer to the PART NO. under the ilJustrations and call our
help line mentkmed on the front page_
* Depending on your antemla system, you may need different types of Combiners (Mixer) or Separators
(Splitter). Contact your local electronics store [br these items.
- 5 - EN
mIMPORTANT SAFEGUARDS ..... 2
mPRECAUTIONS ................ 4
LOCATION ................... 5
AVOID THE HAZARDS OF
ELECTRICAL SHOCK AND FIRE .5
WARNING .................... 5
SYMBOLS LISED IN THIS
MANUAL ..................... 5
mSUPPLIED AC(_7£'SSORfBS ....... 5
mTABLE" OF CONTENTS , ......... 6
mFEATURES .................... 7
mOPERATING CONTROLS AND
FUNCTIONS ................... 8
mPREPARATI()N FOR USE ....... 10
ANTENNA/CABLE
CONNECTION ................ I0
CONNECTING TO FRONT A/V
INPUT JACKS ................ I1
CONNECTING TO A STEREO
AMPLIFIER EQU [PPED WITH
DIGITAL INPUT JACKS (for DVD). I1
CONNECTING TO A DOLBY
DIGITAL DECODER (tbr DVD) .. 12
INSTALLING THE BATTERIES ..12
TV SECT/ON
mTV OPERATION AND SETTINGS .13
WATCHING A TV PROGRAM . .. 13
DEGALISSING ................ 13
PICTURE CONTROL ........... 13
SLEEP TIMER ................ 14
CLOSED CAPTION SYSTEM .... 14
CHANNEL SET UP ............ 15
V-CHIP SET UP ............... 16
TV RAFING SET UP ......... 16
MPAA RATING SET UP ...... 17
CHANGE ACCESS CODE ..... 17
MENU LANGUAGE ........... 17
DVD SECT/ON
mABOUT THE DISCS ............ 19
PLAYABLE DISCS ............ 19
UNPLAYABLE DISCS .......... 19
mPLAYING A DISC .............. 20
BASIC PLAYBACK ............ 20
GENERAL FEATURES ......... 20
DISC MENU ................. 20
TITLE MENU ................. 20
RESLIME .................... 21
PAUSE ...................... 21
STEP BY STEP PLAYBACK ..... 21
FAST FORWARD /
FAST REVERSE .............. 21
SLOW FORWARD /
SLOW REVERSE .............. 21
ZOOM ...................... 21
mSEARCH FUNCTION. .......... 22
TRACK SEARCH ............. 22
TITLE /CHAPTER SEARCH .... 22
TIME SEARCH ............... 22
MARKER SETUP SCREEN ...... 22
mSPECIAL PLAYBACK FUNCTII)N ., .23
REPEAT ..................... 23
PROGRAM ................... 23
RANDOM PLAYBACK ......... 23
m CHANGING THE SETTINGS .... 24
SUBTITLE LANGLIAGE ........ 24
AUDIO LANGLIAGE ........... 24
STEREO SOUND MODE ........ 24
CAMERA ANGLE ............. 24
BLACK LEVEL SETTING ....... 24
VIRTUAL SURROUND ......... 25
mTHE'ON.SCREEN INI_'ORMATION ,. ,25
m CHANGING THE DVD SET UP
ITEMS ....................... 26
CUSTOM MENU .............. 26
LANGUAGE SETTING ........ 26
DISPLAY SETTING .......... 27
AUDIO SETTINGS ........... 27
PARENTAL CONTROL ........ 28
OTHER SETTINGS ........... 28
INITIALIZE .................. 28
mTROUBLESHOOIYN(;. GUIDE ...29
mMA1NI_'NANCE ............... 32
DISC HANDLING ............. 32
mSPECIFICATIONS ............. 33
mESPA[V'OL .................... 34
mWARRANTY ........... Back Cover
mCABLE CHANNEL
DESIGNAI¥ONS . ............. 18
- 6 - EN
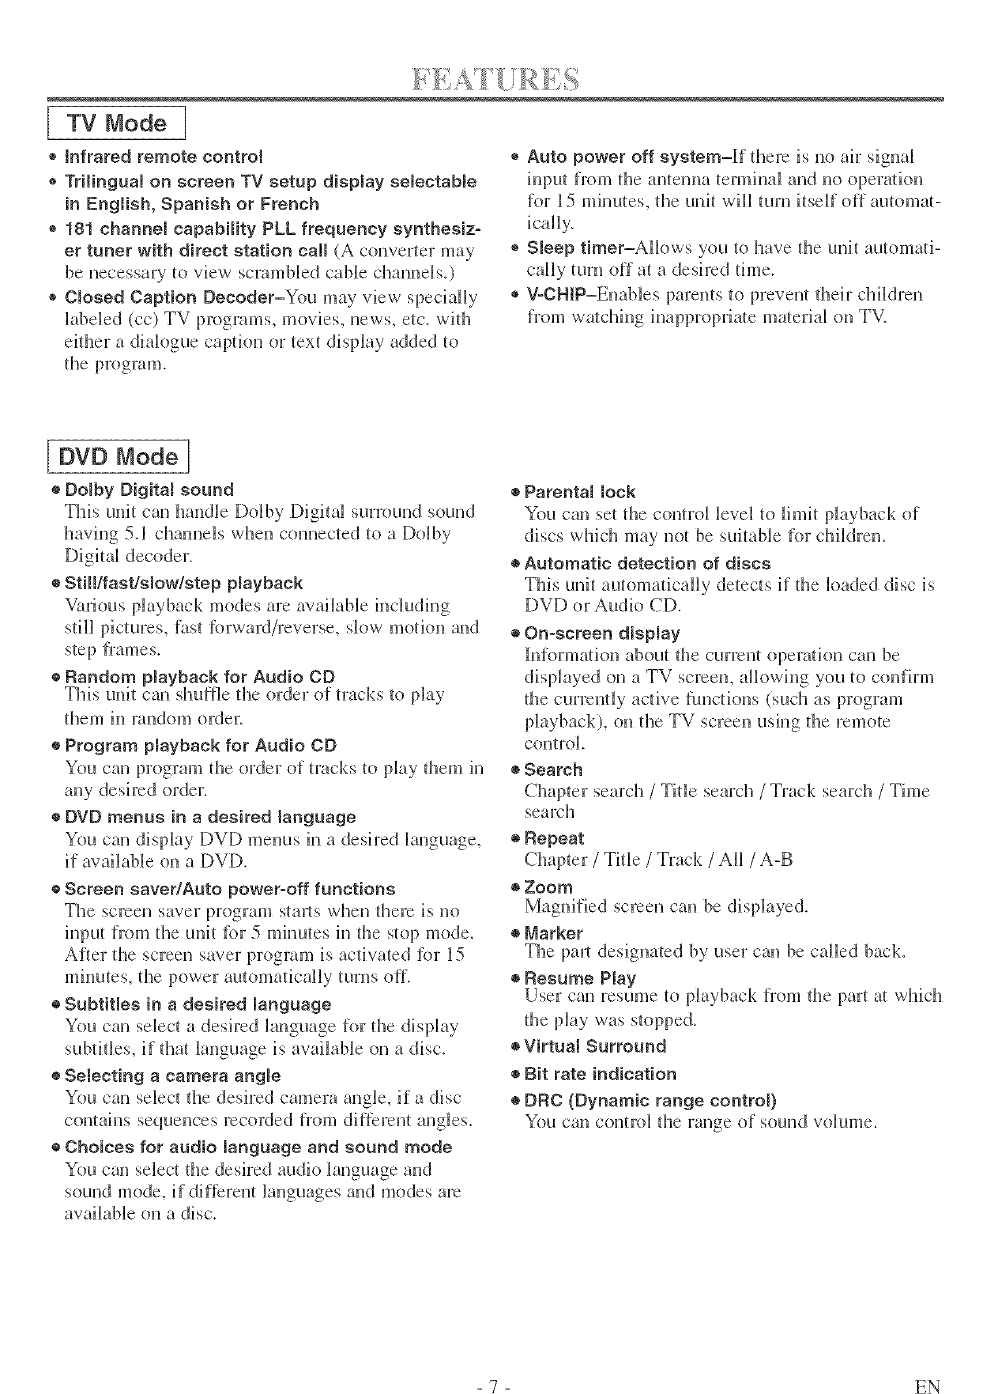
[ TV Mode I
® tnfrared remote control
® Trilingual on screen TV setup display selectable
in English, Spanish or French
® 181 channel capabiIRy PLL frequency synthesiz-
er tuner with direct station calm (A converter may
be necessary to view scrambled cable channels.)
Omosed Caption Decoder=You may view specially
h_beled (cc) TV programs, movies, news, etc_ with
either a diah_gue caption or text display added to
the program.
®Auto power off system=If fftere is no air signal
input from the antenna temfinal and no operation
for 15 minutes, the unit will turn itself off automat-
icaliy,
®Sleep timer=AHows you to have the unit automa/i-
caHy turn off at a desired time.
®V-CHiP=Enables parents to prevent fl_eir children
from we/thing inappropria/e material on TV.
[ DVD Mode]
®Domby Digital sound
This unit can handle Dolby Digital surround sound
having 5.1 channels when connected to a Dolby
Digitgd decoder.
®Still/fast&mow/step Nayback
Various playback modes are awdL_ble h_cluding
still pictures, fast lbrward/reverse, slow motkm and
step flames.
o Random Nayback for Audio CD
This unit can shuffle the order of tracks to play
them in random order_
®Program Nayback for Audio CD
You can program the order of tracks to play them in
any desired order.
®DVD menus in a desired language
You can display f)Vf) metals in a desh:ed hmguage,
if available on a DVD.
o Screen saver/Auto power-off functions
The screen saver program stmls when there is no
input from the unit fbr 5 mimutes in the stop mode.
After the screen saver program is actiw_ted fbr 15
minutes, the power automatically turns off.
®Subtitles in a desired language
You can select a desh:ed Hanguage for ttle display
subtitles, if that language is available on a disc.
o Selecting a camera angle
You can select ttle desired camera angle, if a disc
contains sequences recorded from different angles.
®Choices for audio manguage and sound mode
You can select the desired audio _anguage and
sound mode, if different Banguages and modes are
available on a disc.
®Parental lock
You can set the control level to limit playback of
discs whicll may not be suitable for children.
®Automatic detection of discs
This unit automatically detects if the loaded disc is
DVf) or Audio CD.
®On-screen dispmay
hfformation about tl_e current opera/ion can be
displayed on a TV screen, aHowh_g you to confirm
the currently active functions (such as program
playback), on the TV screen ush_g the remote
coRtrol,
®Search
Chapter search /Title search /Track search /Time
search
®}Repeat
Chapter /Title /Track /All /A-B
• Zoom
Magaified screen can be displayed.
®Marker
The paint designated by user can be called back.
®}Resume Play
User can resame to phyback from d_e part a/which
the phy was stopped.
®Virtual Surround
®Bit rate indication
®DRC (Dynamic range controt)
You can control the range of sound volume.
- 7 - EN
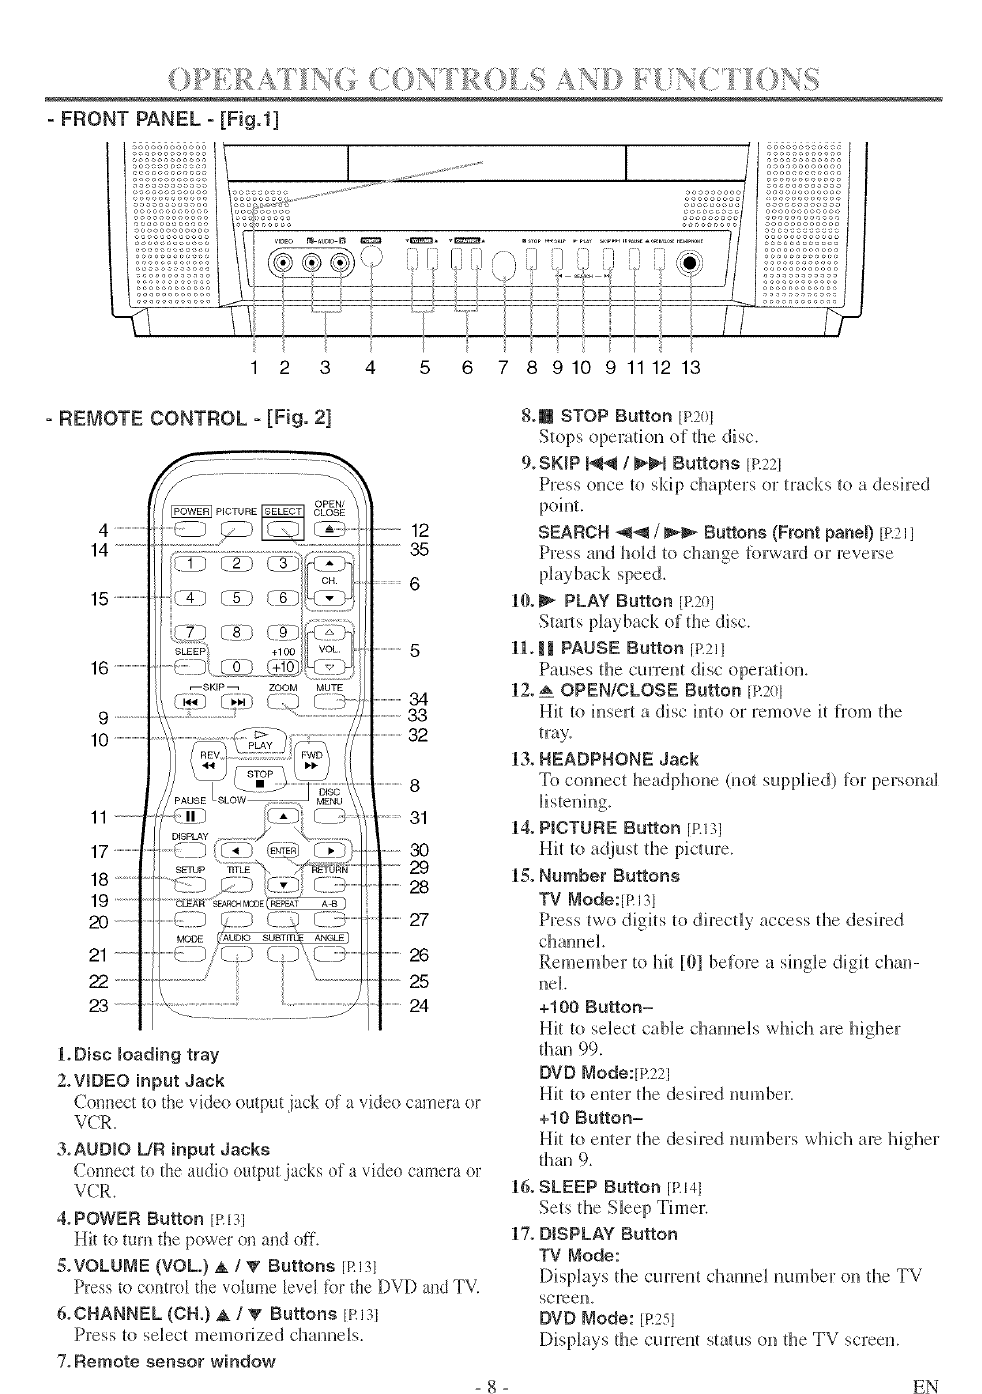
1 2 3 4
- REMOTE CONTROL - [Fig. 2]
5 6 7 8 9 10 9 11 12 13
4 ........................
14 ............
15 ........................
16 ........................
9 ............
10 ........................
11
17 ....................
18
19
20
21
22 ..........
23
12
35
5
34
33
32
8
31
30
29
28
27
26
25
24
LDisc moading tray
2.WDEO input Jack
Connect to the video output jack of a video camera or
VCR.
3°AUDIO [JR input Jacks
Conl_ect to the audio output jacks of a video camera or
VCR.
&POWER Button tRIP
Hit to turn the power on and off.
S.VOLUME (VOL) A/_' Buttons [RI3I
Press tu control the vohm_e level tot the DVD al_d TV.
&CHANNEL (ell.) _ /VButtons [RIR
Press [o select memorized channels.
7. Remote sensor window
8.1_ STOP Button jR201
Stops opem[ion of @e disc.
9.SKIP _ /_'_1 Buttons [R221
Press once to skip chapters or tracks to a desired
point.
SEARCH _1_ /_1_ Buttons (Front panel) in21l
Press and hoM _o change R_rward or reverse
10._ PLAY Button [R2@
Starts playback of [he disc.
1L _ PAUSE Button [R211
Pauses d_e current disc opera_iou.
12. _ OPEN/CLOSE Button [R201
Hit [o insert a disc into or remove it from the
tray.
13. HEADPHONE Jack
To connect headphone (not supplied) for personal
14. P_CTURE Button jR131
Hit {o adjus{ the picture.
IS. Number Buttons
TV Mode:[Rl31
Press _wo digits 1o directly access the desired
channel.
Remember to 1@ [01 before a single digit chan-
nel.
+100 Button=
Hit [o select cable channels wMcl_ are higher
@au 99.
DVD Mode:[p.221
Hit 1o enter the desh:ed number.
+10 Button=
Hit [o enler fl_e desired numbers which are Mgher
flmu 9.
16. SLEEP Button [RNi
Sets [l_e Sleep Thuer.
17. DISPLAY Button
TV _ode:
Displays the cun:eu[ elrunnel urnabet on d_e TV
SCFeen_
DVD Node: [R251
Displays fl_e cun:eul status on [he TV screen.
EN
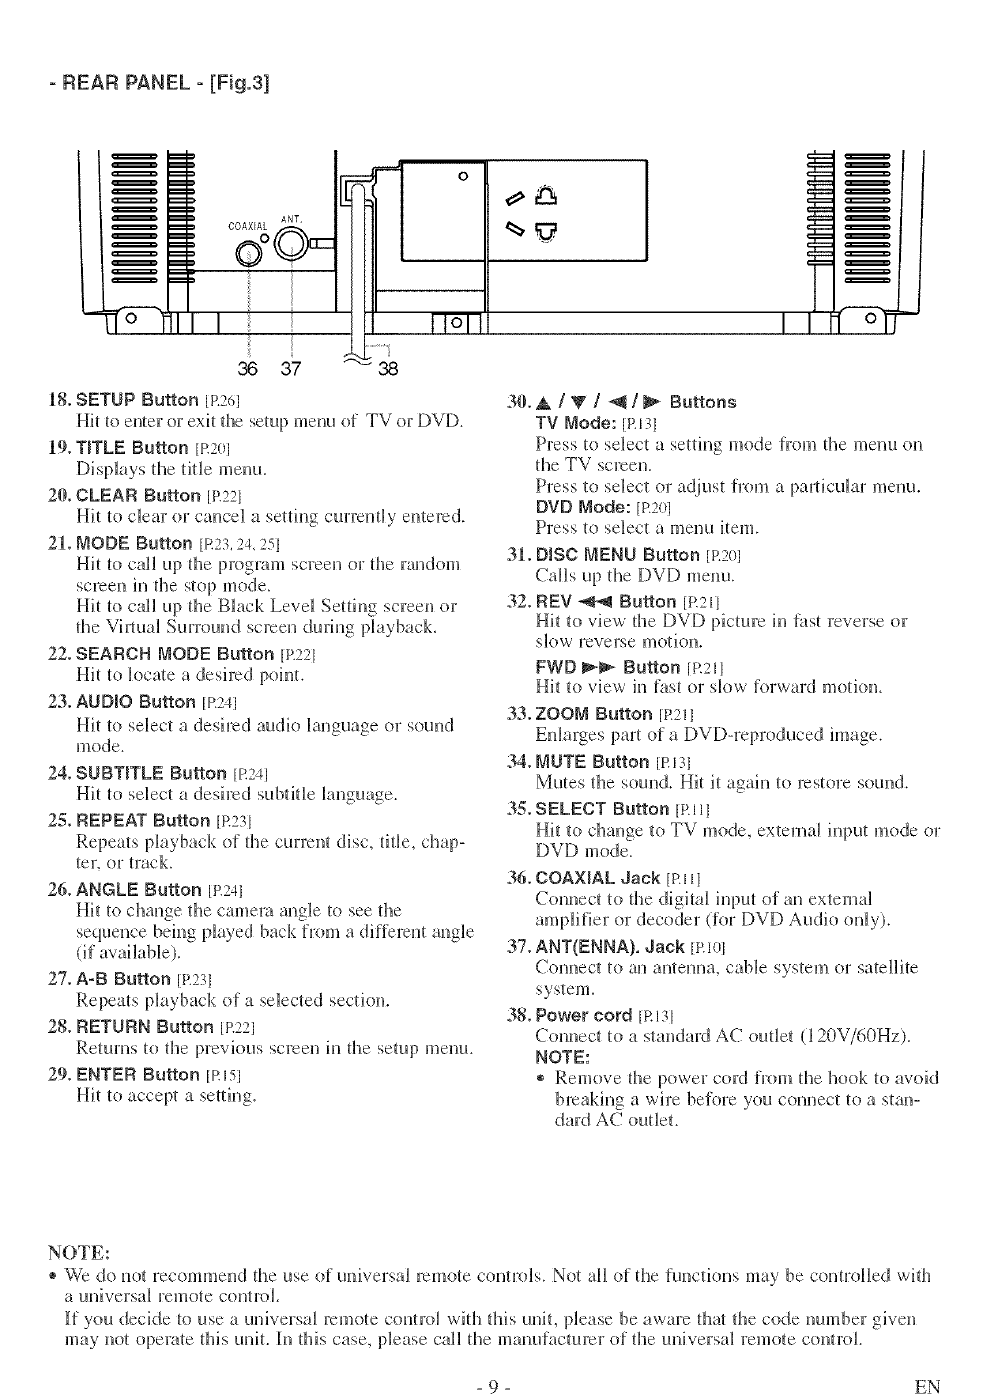
- REARPANEL- [Fig.3]
I
36 37
o
Ill
11ol
-38
18° SETUP Button [P.2ed
Hit to enter or exit the setup menu of TV or DVD.
19.TITLE Button [R20i
Displays the tide menu.
20. CLEAR Button [R22I
Hit to clear or cancel a setting curren {By entered.
211.NODE Button [R23,24, 25]
Hit to call up the program screen or the random
screen in tile stop mode.
Hit to call up the Black Level Setting screen or
the Vh_tuM Surround screen during phyback.
22. SEARCH MODE Button [R221
Hit to locate a desired point.
23. AUDIO Button [R241
Hit to select a desired audio Banguage or sound
mode.
24. SUBTITLE Button [R241
Hit to select a desired subtiHe language.
25. REPEAT Button [R231
Repeats playback of the current disc, titBe, chap-
ter. or track.
26. ANGLE Button [R241
Hit to change the camera angle to see fl_e
sequence being played back from a different angle
(if avaHaNe).
27. A-B Button [R231
Repeats playback of a selected section.
28. RETURN Button [R221
Returns to the previous screen h_ the setup menu.
29. ENTER Button [Risl
Hit to accept a setting.
30°A/V/_/_ Buttons
TV Mode: [PA31
Press to select a setting mode from the menu on
the TV screen.
Press to select or adjust fl'om a paJ_ticuJar menu.
DVD Mode: [R201
Press to select a menu item.
31. D_BC MENU Button [R201
Calls up the IDV[) menu.
32. REV _ Button [R21l
Hit to view' the DVD picture in _st reverse or
skew reverse motion.
FWD _ Button [R211
Hit to view in fast or slow forward motion.
33. ZOOM Button JR211
Enlarges part of a DVD-reproduced image.
34. MUTE Button [RI31
Mutes the sound. Hit it agah_ to restore sound.
3._. SELECT Button [>111
Hit to change to TV mode, external input mode or
DVf) mode.
36. COAXIAL Jack [P.llI
Connect to the digital input of an external
amplifier or decoder (for DVD Audio only).
37. ANT(ENNA). Jack [R101
Connect to an antenna, cable system or satellite
system.
38. Power cord [RI31
Com_ect to a standard AC outlet (] 20V/60Hz).
NOTE:
® Remove the power cord from the hook to avoid
breakh_g a wire before you connect to a stan-
dard AC outlet.
NOTE:
® We do not recommend the use of universal remote controls. Not all of the functions may be controlled with
a universM remote control,
[f you decide to use a universal remote contro_ with this unit, please be aware thai the code number given
may not operate this unit. In this case, please call the manufacturer of the universal remote control.
- 9 - EN
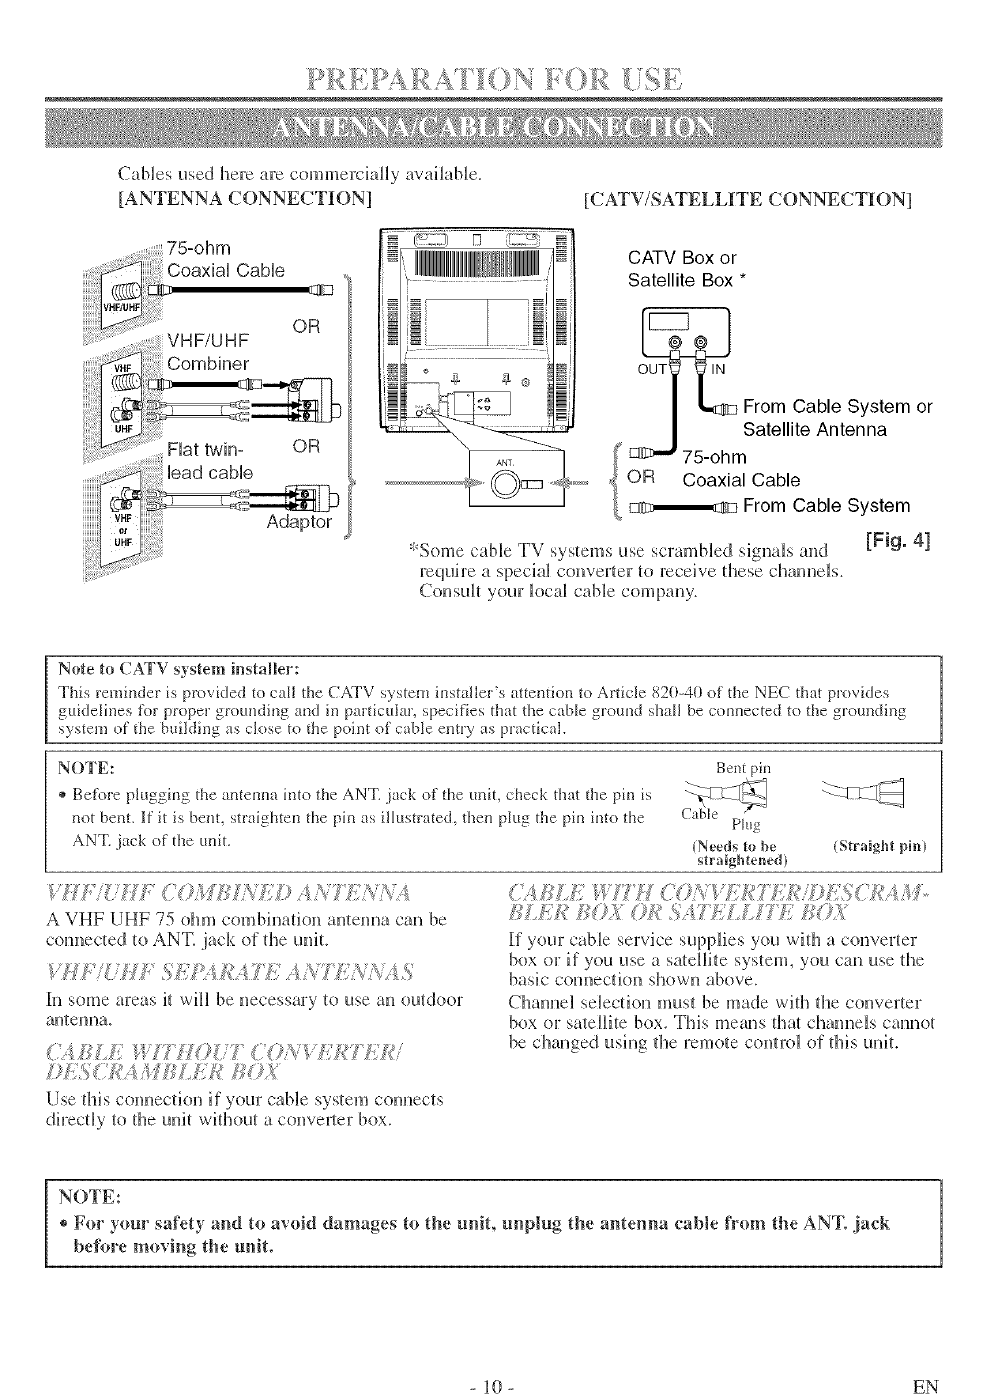
Cablesusedl_e_earecommerciallyavailable.
[ANTENNACONNECTION] [CATV/SATELLITE CONNECTION]
75-ohm
CoaxiaH CaMe
OR
INN!!!!MININIIIi,++1
i_ + ++i+
+++ii
+ ++ {
CATV Box or
Satellite Box *
From Cable System or
Satellite Antenna
OR Coaxial Cable
From Cable System
*Some cane TV systems use scramNed sigmtJs and [gig. 4]
require a special converter to receive these cha, mels.
Consult your locaH cable company.
Note to CATV system installer:
This remi_der is provided to call the CATV system installer's attemion to Article 820-40 of the NEC flint provides
guidelines l\_r proper grotmdii_g a+_din particular, specifies that the cable grom-ld shall be conl_ected to the grom_di_g
system of the building as close to the point of cable emry as practical.
NOTE: Bent pin
+ Be+\_re plugging the amemm into the ANT. }ack of the refit, check that the pin is
_ot bel_t. ]f it is be_t, straighten the ph_ as illustrated, the_ plug the pin into the Plug
ANT. jack of the refit. {Needs to be (Straight pin}
straightened)
'.i?[."{.U : 7©M/S_+'](© A_t7 ];+}+/_,.'_
A VHF UHF 75 ohm combi,mtion amenmt can be
co,mected to ANT. jack of the unit
in some areas _ will be necessary to use an outdoor
amenna.
(',_2_ ,/2_,!+70(77 {'+Oi;'V?;.<_7]..f,_'i
./J];,W7_A/iJ/¢L/:;k' /;©._
Use thiscom_eciionifyourcane sysiemcom_ects
directHy_o fl_eunit without a conver_er box.
]_£E]+!,h{OX0]+_SA/]:.L]. TZ ,_<_;+2
If your cable servbe supplies you with a converter
box or if vou use a satellite system, you can use the
basic con_ectkm shown above.
Chmmel seHection must be made with the converter
box or sateHHitebox. This means that cha,mels cmmot
be changed using the remote comrol of fiJs unit.
NOTE:
®For your sa_'ety and tn avoid damages to the unit, unplug the antenna cable from the ANT. jack
before moving the unit. 1
]0 - EN
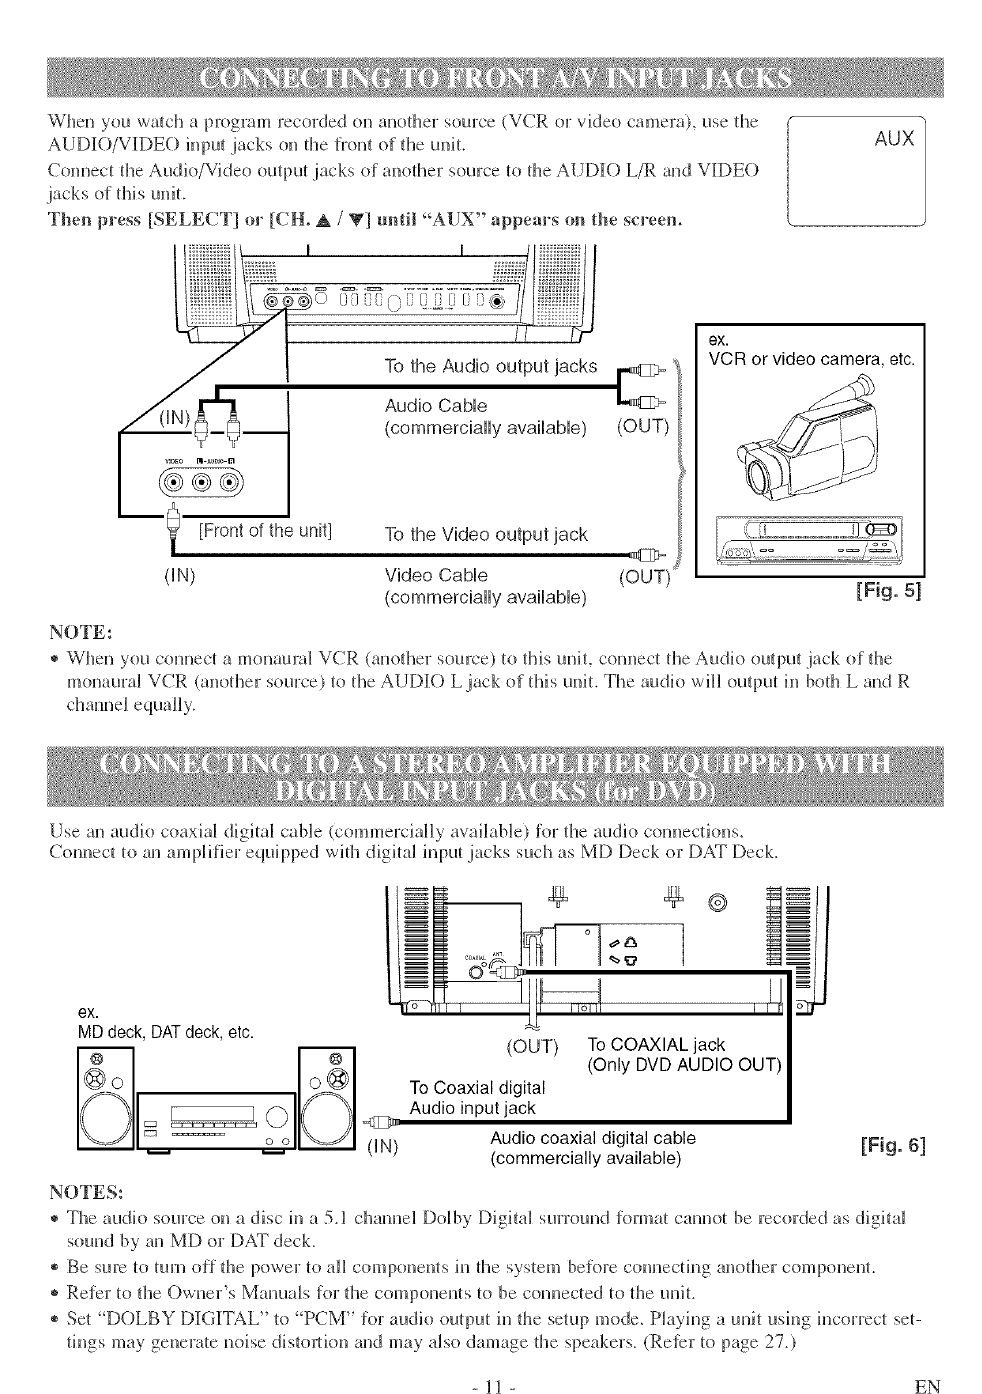
Wllenyouwa/chaprogramrecordedonanodler source (VCR or video camera), use die
AUDIO/VIDEO inpu_ jacks on tile lront of the unit.
Cunnect the Audk!/Video output jacks of anodler source tu file AUDIO L/R and VIDE()
jack s of thi s u@t.
Then press [SELECT] or [CH. A /V] until "AUX" appears on the sereem
vl_o BI _u_o In
[Front of the unit]
dN)
NOTE:
Audio Cable
(commercially available) (OUT)
To the Video output jack
Video Cable
(commercially available)
(OUT)
ex.
VCR or video camera etc.
[Fig. 51
® When you connect a monaural VCR (another source) to @is unit, comlect the Audk! ouq)ut jack of @e
monaural VCR (another source) tu tile AUDK) L jack ol this u@L The audk) will output hi bodl L and R
channel equally.
Use an audio coaxial digital cane (cummerciaHy available) for the audio counectkms.
Connect to an ampHIier equipped wifil digi_a_ hq)ut jacks such as MD Deck or DAT Deck.
ex.
MD deck, DATdeck, etc.
O(IN) Audio coaxial digital cable
(commercially available) [Fig. 6]
NOTES:
® The audio source on a disc in a 5.1 c]lamle] Dolby Digital surround R)rmat cannot be recorded as digital
sound by an Mr) or DAT deck.
® Be sure to turn off @e power tu aH compuneuls h_ @e system before connecting anofller componenl.
* Refer tu the Owner's Manuals for die components to be comlected to the u@L
® Set "D()LBY DIGITAL" to PCM" _or audio output hi @e setup mode. Playing a unit ush_g hlcorrect seF
tings may generate noise distortion and may also damage @e speakers. (Reter to page 27.)
- ll - EN
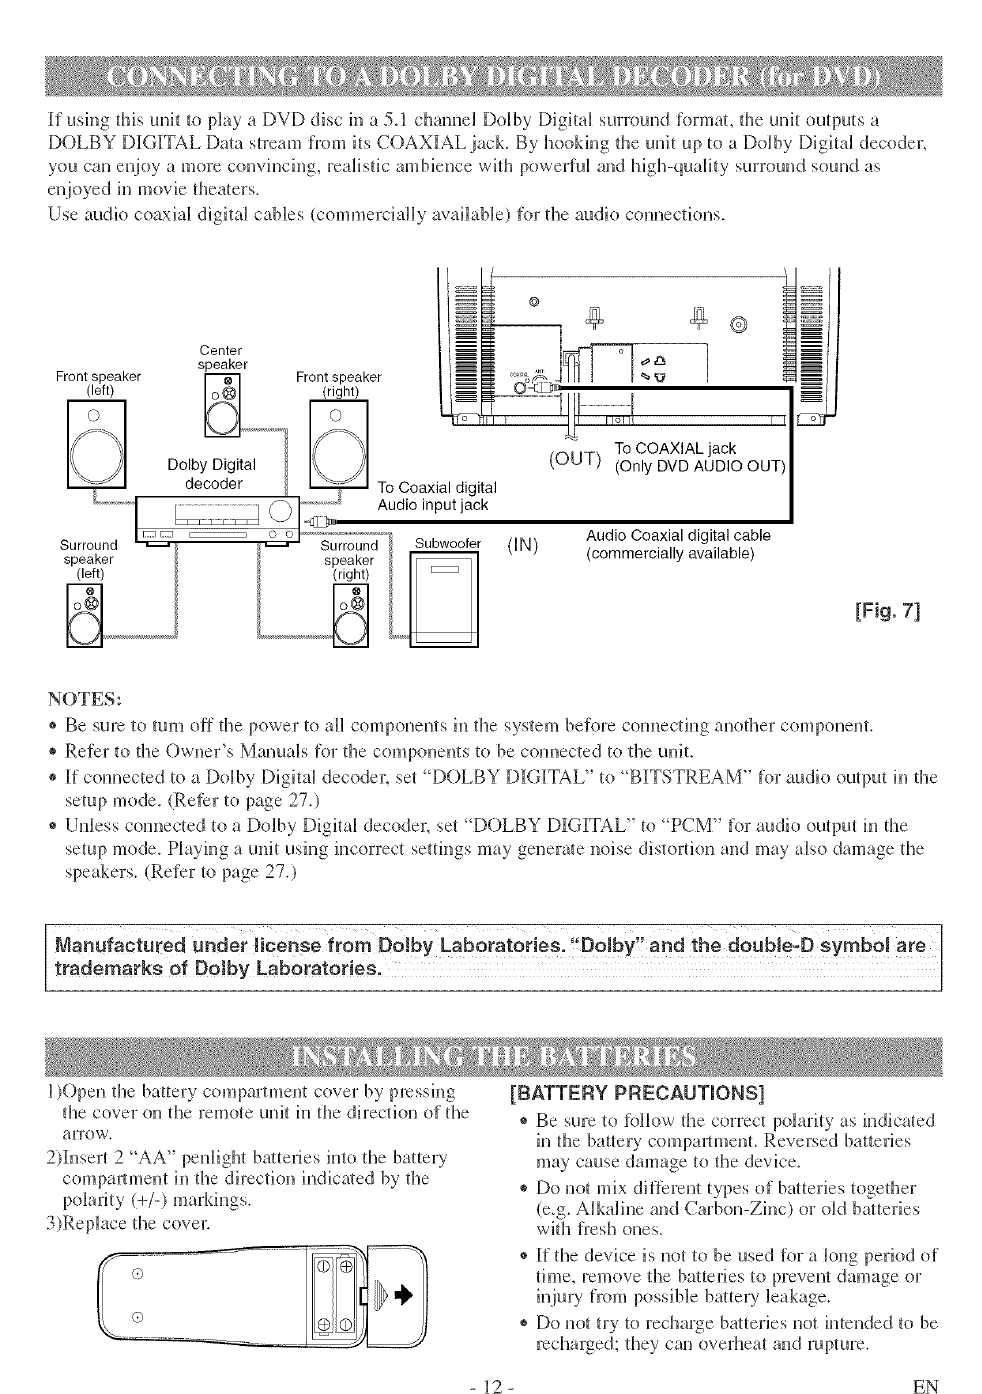
If usingthisunittoplayaDVDdiscill a5.1clmnudDolbyDigitalsurroundformat,theunitoutputsa
DOLBYDIGI[TALDatastreamfromitsCOAXIALjack.ByhookingtheunituptoaDolbyDigita_decoder.
youcanel_joyaluorecolwincing,realis[icambiencewithpowerfuland high-quality surruund sound as
enjoyed in movie theaters.
Use audio coaxial digital cables (commerdaHy available) for the audio connections.
Center
speaker
Front speaker _ Front speaker
(left) _1 (right)
Dolby Digital
decoder To Coaxial digital
............ Audio input jack
Surround Surround /, _r
speaker speaker
(left) (right)
(IN) Audio Coaxial digital cable
(commercially available)
[Fig. 71
NOTES:
® Be sure tu turu off the power to aH componenls in the system before com_ecting anofller component.
® Refer to the Owner's Manuals for the components to be connected to tile unit.
® If connected to a Dulby Digital decodm; set DOLBY DIGITAL" tu "BITSTREAM" for audio output in tile
setup mode. (Refer tu page 27,)
® Unless com_ected to a Dolby Digital decoder, set "D()LBY D]IGI[TAL" to "PCM" for audio output in the
setup mode. Playing a unit using incorrect settings may geuera/e noise distortion and may also damage tile
speakers. (Refer to page 27.)
Mo.,, oot,, ed..aor co,sof,o Do,byLoboratoi!e .!'Do!W"andt,edoUb!eiBsymb0!are
trademarks of Dolby Laboratories,
l)Open the battery cumpamuent cover by pressh_g
the cover on the remote unit hi the direction of the
arrow.
2)l[nsert 2 "AA" peuligllt baHeries into the battery
compmlmeut in the direction indica/ed by the
polarity (+/-) markings.
3)Replace the cove_:
[BATTERY PRECAUTIONS]
®Be sure tu Rfilow file correct polarity as indicated
in the battery compal_tment. Reversed batteries
may cause damage to tile device.
® Do not mix dif[erent types of ba/teries togefller
(e.g. Alkaline and Carbon-Zhlc) or (lid ba/teHes
with fresh oues.
®If tile device is not tu be used for a long period of
time, remove the batteJJes _oprevent damage or
injury from possH)lebattery leakage.
* Do not try to recharge batteries not intended to be
recharged; they can overheat and rupture.
- 12 - EN
q'V
screen, hit [POWER] without unNug-
grog the power cur&
Press [CH. _. /V] or the Number buttons to select
your desired chame_ numbe_:
Note for using the Number buttons:
•You must precede sMgle-digit cham_el numbers
with a zero (for example: 02, 03, 04 and so on).
•When selecting cable cham_els wMch are higher
thm_ 99, lilt [+1001 first, then press the last two
digits. (Example: to select cham_el 125, first hit
[+1001 then hit [21 and [51.)
Press[VOL A /V] to adjustthe
Vdume.
Hit [MUTE] tu h_standy mute the H_,,_ .....
sound.
Hit it again to restore the previous sound level
NOTE:
® If you press [CH. _. /V] in the DVD mode, you
cau change the TV cham_els. Even i[ you turn off
the unit in the DVD mode, when you turn it on
again, it will go into the TV mode.
":,w?' "'. _:¢ % ?h.L.L/?b.
®If the uuk is com_ected to a cable box or satellite
box, press [CH° ,_./ V] to select CH3 or CH4
according to the output chmmel setting of the
device and select desh'ed clmm_el on that device.
70/;i _?('H A._S?L/CA'A/, L'fPi! ?
®When au external equipment is comlected to the
fl'ont AUDI[O/VIDEO input jacks, press
[SELECT] or [CH. A /_l repeatedly until
"AUX" appears on fl_e screen.
TMs television has a degaussiug circuit that will clear
up color errors on the TV screen tha_ are caused by
any excess magnetism which happens to get too cluse
to the TV. This circuit is designed to operate once
when the set is first plugged in.If minor color
errors m°e seen in some locations on the screen,
please unplug the TV h_r approximately 30 min-
utes° When the TV is plugged back m, the degauss-
mg drcuit will operate once tu clear them up. Repeat
tMs procedure any time the TV screen is accidentally
magnetized or when the TV is moved or relocated.
The unit's picture controls -BRIGH% CON°
TRAS% COLOR, TINT and SHARPNESS - are
preset to ihctury specificatkms, A_though they are
usually the best, you may need to make some fu_lher
adjustments for amore natural looking hnage.
Make sure ...
® The unit must be turned on,
Hit [PICTURE].
Press [_ /_] IJntil desired control is displayed.
BRIGHT
CONTRAST
COLOR
TINT
SHARPNESS
9
,.* Ad !_st t_÷ se t_'g
Press [J/_1 to adjust to your desu:ed level withM 5
seconds.
BRIGHT to decrease to increase
CONTRAST tu decrease tu increase
contrast contrast
COLOR to pale to brilliant
TINT to purple to green
SHARPNESS to soft to clear
Even if there is apower failure of an 5,kind, the
unit will retain its memory for this feature.
- tg - FN
The Sleep Timer fuuctkm turns off the unit without
using [POWER] ater a desired period of time.
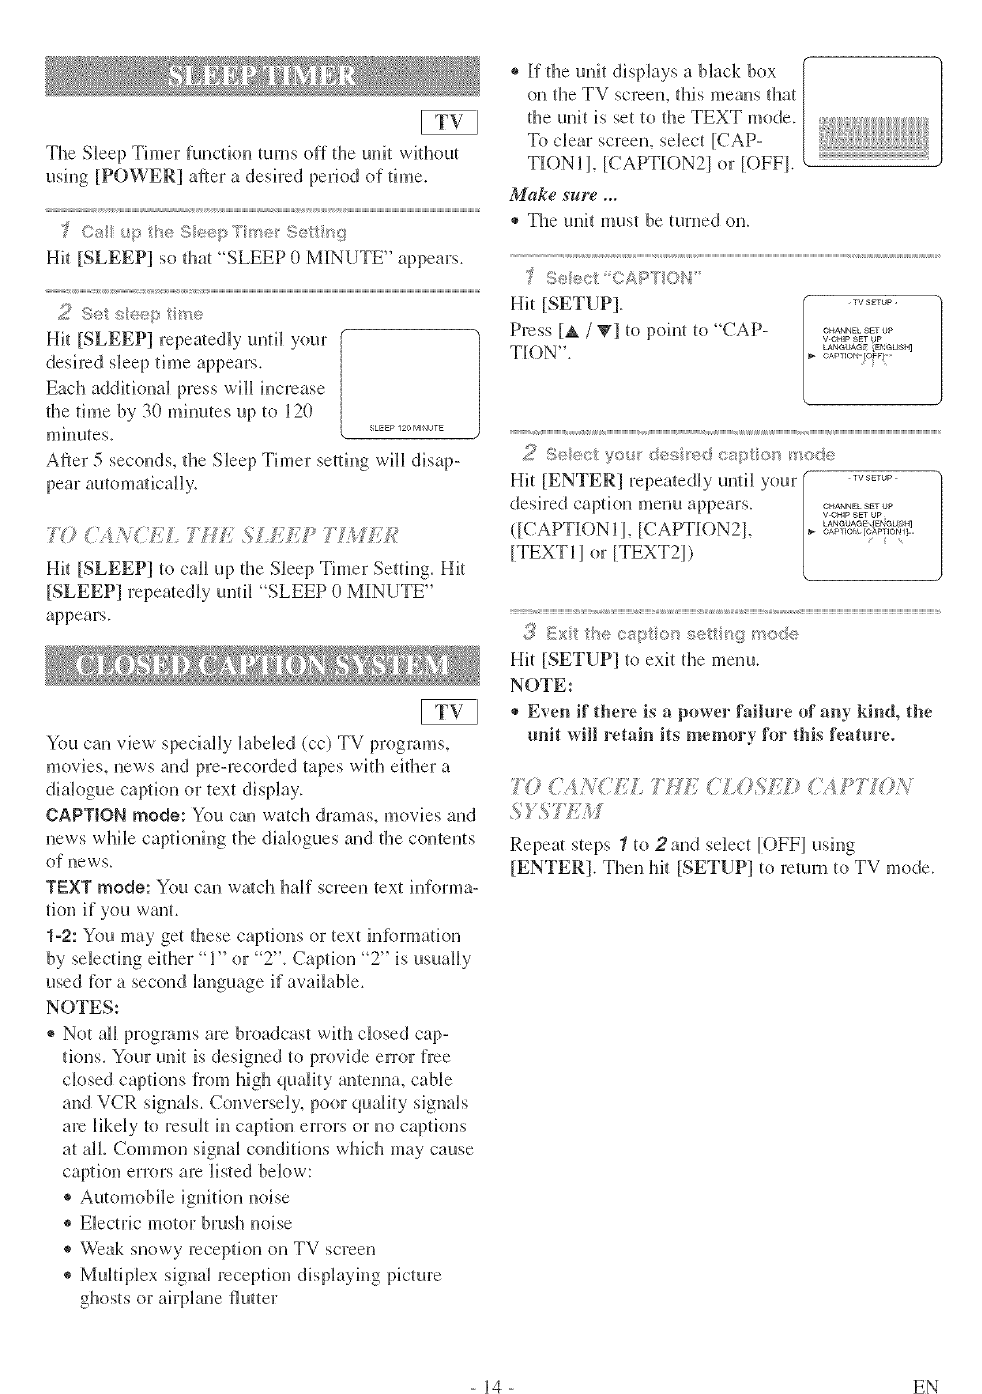
Hit [SLEEP] so that "SLEEP 0 MI[NUTE" appears.
2 Sut s<_{,@>e
Hit [SLEEP] repea/edly undl your
Each additkmal press will increase
the time by 30 minutes up to 120
miuutes, s_p _o M,_ur_
After 5 seconds, d_e Sleep Timer setdng will disap-
tI, '"+=;= )_',=> >,_ II)@,H
Hit [SLEEP] to call up the Sleep Timer Setting, Hit
[SLEEP] repeatedly until "SLEEP 0 MINUTE"
appears.
You can view' spedally labded (cc) TV programs,
movies, news aud pre-recorded tapes with either a
dialogue caption or text display.
CAPTION mode: You can watch dramas, movies and
news wMle captioning tl_e diak)gues and the contents
of news,
TEXT mode: You can wa/ch half screen text hfforma-
fion if you want.
1-2: You may get d_ese captions or text in[brmatkm
by selectiug either "1" or "2". Caption "2" is usually
used tbr a second language if available.
NOTES:
®Not all programs are broadcast wid_ closed cap-
tkms. Your unit is designed to provide error free
closed captious [rein high quality antemm, cable
and VCR signals. Conversely, poor quality signals
are likely to result in caption errors or l}ocaptions
at all Common sigual couditions which may cause
captkm errors are listed below:
® Automobile ignitkm noise
® Electric motor brush noise
® Weak snowy reception on TV screen
® Multiplex signal reception displaying picture
* If the unit displays a black box
on the TV screen, this means that
the unit is set to the TEXT mode.
To clear screem sdect [CAP-
TIONIJ, [CAPTI()N2J or [OFFJ.
Make sure ...
®The unit must be turned on.
< ,,,I <,_, ,,b
Hit [SETUP]. -........
Press [A /_] tupoint tu"CAP .............V.GH]p SET UP
CAPTIO_ ©U: ....
Hit [ENTER] repeatedly until your .........
desired caption menu appears. CHANNEL SET OP
V-CHIp 8_1 Up
([CAPTION lI, [CAPTR)N2I,
[TEXT11 or [TEXT2I)
_/!]'Exit the captie _set_i ig _ode
Hit [SETUP] tu exit the menu.
NOTE:
®Even if there is apower failure of any kind, the
unit will retain its memory for this feature°
{. (',:[ _,{' :/ ,TIE </,0_i [ )
Repeat steps 1to 2and sdect [OFFJ using
[ENTER]. Then hit [SETUP] to return to TV mode.
- 14 - EN

Make sure ...
* The uni_ mus_ be turned on.
AD,;} /'_ 7/9}ti/,1i7 L'_ _' (N,'s_A%LLS
The channeb you no kluger receive or se]doul v,aich
call be deleted from fire memory. (Of course, you call
add the deleted chmmd hlo the memory again.)
'{ g'74 ,:1, )Flay Y L_ l_>i;<_
<, ),f _, _, :,,_', ,F
As the initial sefiug, dlis t.mit has memorized all
cllaunels, iucludiug tile ones not available iu your
area. This [cature automatically puts only available
cllamlels into the memory.
f ); #<,I (I Al@ql{_S!;s;,TUP ........
Hit [SETUP] ............... V CHIp lit UP
LANGLJAGE [INGUIH]
Press [A /_1 to point to "CHAN ........ _o<
NEL SET UP", dlen hit [ENTER].
' -, (I,4 ;* I I IS QI2'T I [?
"TIIITUI- _i! 1i ,i +i = xi H,*I ......... 2 1_;>_/_<,_0I l_[ l,.}l[}_;:,l.I I I GI't
Hit [SETUP]. <:........... Press [A /V] to point to
Press [A /T] to point to _22&2gg,%_u_ ADD/DELETE CH", dlen hit
CAPTION [OFt]
"CHANNEL SET UP', dlen hit [ENTER].
[ENTER].
CHANNEL SET UP
ADD ; OECETE CH (CAW)
AUTO CH PROG_AM_ING
2Be@n c_ r_el sea_' ig
Press [_. /W] to point to "AUTO ..............
CH PROGRAMMING", tleu Mt ..................
[ENTER]. _....................
The tuner scans and memorizes aH
the active channels in your area.
£'!_Aftel sea ining
The tuner stops on the klwest memorized channel.
NOTES:
®When "AUTO CH PROGRAM-
MING" is activated where dlere
is uo TV signal input, "NO TV ...........
SIGNALS" will appear on tile
display after the completion of
®The uuit may recoguize CATV chamlels to be TV
dlaunels if reception condition is poo_: In this case,
check die antenna comlecdon and try "AUTO CH
PROGRAMMING" again when reception condi-
tions are better.
®Channel memory programming is NOT neces-
sary when c(mnected to a cable box or satellite
box. Just select the channel [_r cable box or
satellite input (ex. CH3) on the unit, then select
your desired channel on the cable box or satel-
lite box.
3" tt'e "
Press [CH. _ /V] or the Number
buttons until your desh:edcllamlel
mm_ber appears. (You can also 08
press [A /W] tO enter it.) ADD ;_LEr_
®You must precede singb-digit
dlamle] mmlbers with a zero (Example: CHS)
(Example: 02 _. 09).
®When sdecdng cane chamlels whM1 are higher
thau 99, hit [+10O] first, then press the last two
digits. (Example: to select channel 125, fh:sthit
[MOO] then hit [21 m_d [51.)
dDelete (o add} it om (o5"i to} me>oW
Hit [ENTER]. The chaune] number changes to liglt
red. The chauuel is deleted from memory.
®To delete anodler channel repeat steps 3to 4.
* If you hit [ENTER] agahl, the cllamlel is memo-
rized again.
Added channel : Light blue
Deleted channel: Light red
,(_ Exi tte eha/'_ne/sel_p mode
Hit [SETUP] to exit the menu.
NOTE:
* To confirm that channel(s) has been deleted or
added, press [CH° A / 'g].
15 EN
Thisfeatureenablesparentstopreventtheirchildren
fromwatchinginappropriatematerialonTV.When
you{rytoaccessaprogramwhichisblocked,
"PROTECTEDPROGRAMby_/'messageappears
ontheTVscreen.
js
MM_e sure...
®The unit must be turned on.
£,@ c.l'V..C_4p S_:::TJ'.>' •.......
Hit [SETUP1. CHANNEL SET UP
V ©HIp SET Up
Press [A /T] to sdect 'V-CHIP .......... r.......
CAPTION [OFF-]
SET UP", dien hit [ENTER].
2E_e_ Access co@5 ...........
Press the Number buttons to
enter tlie access code_
®For the first time set-up or in die
event die unit has lost power.
eWterthe default code of 0000.
<<
3Seec t}!edes ed
Press [A /T] to select 'TV RATING", "MPAA
RATING" or "CHANGE CODE", dlen hit [ENTER].
Reter to the pages below to set up each item.
16 [] Step 4
17 [] Step 4
17 [] Step 4
Follow steps 1 to 3M die "V-CHIP SET UP" sec-
tion above.
_'?Beck ig TV p o%'s_'_s
Press [A /V] to select a rating dlat
you wish to block.
Hit [ENTER] repeatedly to set it to
[BLOCK} or |VIEW}.
Selection
TV-Y
TV-Y7
TV-G
TV-PG
TV-14
TV-MA
TV Y [VIEW]
TV Y7 ( ) [VIEW]
TVJ_ [VIEW]
TV PG ( _ [WEW]
TV 14 ] _ [VIEW]
TV MA{ _ [VIEW]
Rating Category Explanations
Appropriate tbr all chiktren
Appropriate lbr children seven and older
Genend Audience
Parental Guidance suggested.
Unsuitable lbr ddldren under 14
Mature audience only
NOTE:
* When you select a rating and set
it to [BLOCK}, the higher ratings
will be bk)cked automatically.
The lower raqngs will beavail-
able _i)r viewing.
®When you set the kiwest rating to
TV v [v_w] |
TV Y7 { } [VI_W]
TV G [BLOGK]
TV PG (DLSV _ [BLOCK]
TV 14 (OLSV) [BLOCN
TV MA{ LBV_ [BLOCK]
[VIEW}, aft other ratings will automatically be
awtHaNe for viewing.
.5i5 0..,at_l{d':>
When you select die radngs of TV- _ _ r_,_w_
TV ¥7 ( _ [VIEW]
i-v cs NIEw]
TV PG( _ [VIEW]
TV 14 ( ) [V_EW]
TV MA { ) [VIEW]
Y7, TV-PG, TV-14 or TV-MA you
will have the option of setdng sub
rating categories.
Press [_ /_] to select a rating with
sub-ratings you wish to block, then
Mt [ENTER] twice.
Press [_ /'_] to select a sub-rating,
then hit [ENTER] to set it to
[BLOCKI or [VIEWI.
TV ¥7 [BLOCK] |
FV [BLOCK]
TV PG [BLOCK] 1
LD [BLOCK]
[_OCK]
S [BLOCK]
V [BLOCK]
Selection Rating Category Explanations
TV-Y7
FV Fantasy Violence
TV-PG, TV-14, TV-MA
D Suggestive Diabg (TV-PG TV-14only)
LCoarse Language
S Sexual Situation
V Violence
NOTE:
®The bbcked sub-ratings will
appear next to the rating category
in die "TV RATING" menu.
TV ¥
TV Y7 ( )
TV G
TV PG (DLSV)
TV 14 {DLSV}
TV MA(LSV)
c.x,h,_;,V-Osp selt;;t/__od<_
Hit [SETUP] to exit the menu.
NOTE:
®To change die rating, the TV must(
be Rmled to an unprotected pro- { ........#°/F.....
gram. If' PROTECTED PRO- ]
GRAM b} _/' appears on the {
screen, phase change the channel /
to a station that is not protected, v.
- 16 - EN
_ __,_'.__.._:__k_O SET _:.
Follow steps 1 to 3in the "V-CHI[P SET UP" sec-
tk)n on page 16.
4 >e,_c et < :>_ed e>
Press [A /T] _opohl to ,vour _r_,_w_r_'_w_
pc 18 [VIEW]
desired i_em. @en hit [ENTER] to _ r_oo_,]
NC17 [BEOGK]
select [BLOCK] or [VlfEW]. × r=_oo_,]
Selection Rating Category Explanations
G Genera[ Audience
PG Parental Guidance suggeste&
PG-13 Unsuitable [br children under 13
R Restricted: under 17 requires accompa-
m'Mg parent or adt@ guardian
NC-17 No one under 17 admifed
X Ma/ure audience only
* When you select a ra@_g and set it to [BLOCKI,
@e higher rath]gs vail be blocked automatically.
The lower ra@_gs will be awAhtble R>rviewing.
* When you set dle lowest ra@_g to [VIEW], all
other ra@_gs will au_omatically be awdlable Dr
,(_ Exi heV_O ip sei _,',_mode
Hi_ [SETUP] _oexit d_e menu.
1< ;U_,'r' < '_;QC "0£)£7
Follow steps _ _o 3M the V-CHIP SET UP" sec-
tion on page 16.
..... NEW COrsE
Press the Number buttons to enter
yolr desired access code in _he
"NEW CODE" space, then enter
_he same code in the "CONFIRM
CODE" space. When completed, the menu will
17elwTl}tO"V-CHIP SET UP".
®Make sure you enter exactly t]te same new code in
@e "CONFIRM CODE" space as one in the
NEW CODE" space. If @ey are dif}emnt, d_e
NEW CODE" space is cleared }Drredoing.
,(!ii Exi he W,Ohip sei k?_; mode
Hit [SETUP] _oexit tl_e menu.
NOTE:
®Your personal access code will be erased and will
return lo the default (0000) when a power f?_Alure
occurs or when you mm off the power usMg a
wall switch. If yol have forgotten ll_e code, unplug
dle power cord for 10 seconds _ofes{ore dle access
code to 0000.
7; Select: LAHQUAGE ' •.......
Hit [SETUP] .............
V ©HIP S_T U_,
Press [_ /'_] to point _o "LAN ........... _....... _......
GAPTION [OF] ....
GUAGE".
Hit [ENTER] rcpea/edly _o select "ENGLISH",
ESPAI'qOL"= Spanish or "FRAN(iAIS"= French.
{_? Exit heLs_guage_ ode
Hit [SETUP] to exit tl_e menu.
NOTES:
* This function effects only the language on the
screen menu and not [tie audio source,
* If fDr some reason tl_e menu is in Spamsh or
French, hit [SETUP], press [_ /_] to poim _o
"IDIOMA [ESPANOL]" or "LANGAGE
[FRAN(]AIS]", then ]tit [ENTER] repeatedly _o
sNect desired kmguage, then hit [SETUP].
- 17 - EN
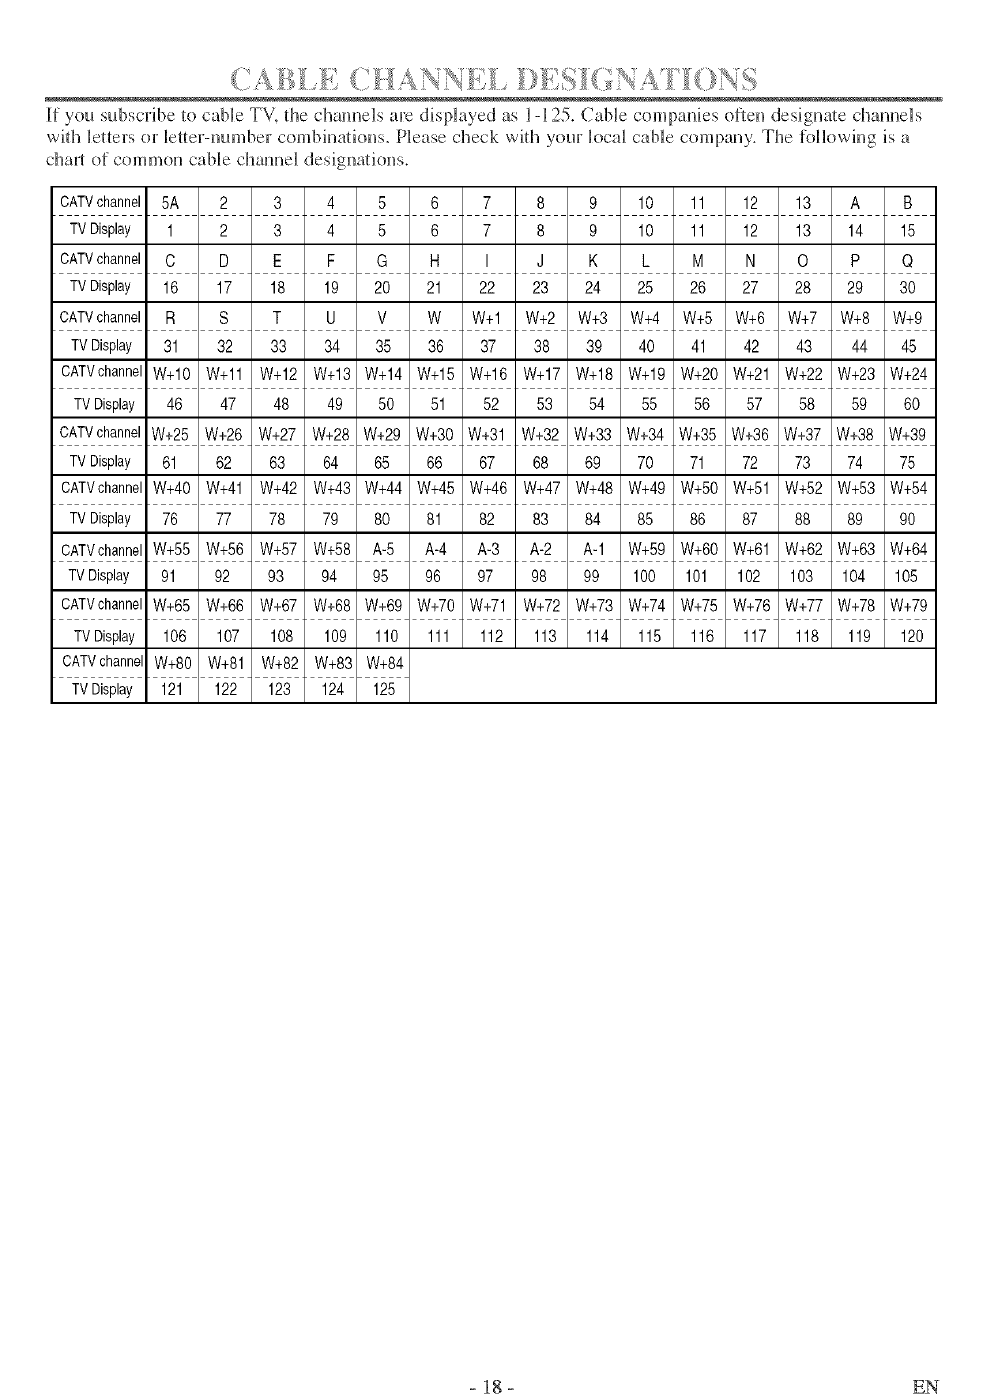
If you subscribe to cane TV. the channels are displayed as 1-125. CaNe companies often designate channels
with letters or letter-number combinations. P_ease check with your local cable company. The [ol]owing is a
char_ of common cable channel designations.
CATVchannel 5A 2 3 4 5 6 7 8 9 10 11 12 13 A B
TVDisplay 1 2 3 4 5 6 7 8 9 10 11 12 13 14 15
CATVchannel C D E F G H I J K L M N O P Q
TVDisplay 16 17 18 19 20 21 22 23 24 25 26 27 28 29 30
CATVchannel R S T U V W W+I W+2 W+3 W+4 W+5 W+6 W+7 W+8 W+9
TVDisplay 31 32 33 34 35 36 37 38 39 40 41 42 43 44 45
CATVchannelW+10 W+11 W+12 W+13 W+14 W+15 W+16 W+17 W+18 W+19 W+20 W+21 W+22 W+23 W+24
TVDisplay 46 47 48 49 50 51 52 53 54 55 56 57 58 59 60
CATVchannelW+25 W+26 W+27 W+28 W+29 W+30 W+31 W+32 W+33 W+34 W+35 W+36 W+37 W+38 W+39
TVDisplay 61 62 63 64 65 66 67 68 69 70 71 72 73 74 75
CATVchannelW+40 W+41 W+42 W+43 W+44 W+45 W+46 W+47 W+48 W+49 W+50 W+51 W+52 W+53 W+54
TVDisplay 76 77 78 79 80 81 82 83 84 85 86 87 88 89 90
CATVchannelW+55 W+56 W+57 W+58 A-5 A-4 A-3 A-2 A-1 W+59 W+60 W+61 W+62 W+63 W+64
TVDisplay 91 92 93 94 95 96 97 98 99 100 101 102 103 104 105
CATVchannelW+65 W+66 W+67 W+68 W+69 W+70 W+71 W+72 W+73 W+74 W+75 W+76 W+77 W+78 W+79
TVDisplay 106 107 108 109 110 111 112 113 114 115 116 117 118 119 120
CATVchannelW+80 W+81 W+82 W+83 W+84
TVDisplay 121 122 123 124 125
- 18 - EN

Playable Mark 0ogo)
discs
3VD-Video
* 1,2,3,1o
DVD-RW
DVD-R
1,3,4,5,6
8,9
DVD+RW
DVD+R
1,3,4,5,7,8,9
Audio CD
* 3,5
VIDEO
ORw
DVD_R.W.,_U. DVD,R
DmlT_L_UOle
CD-RW ............. o,_.._...,o
CD-R _
Region code Recorded
signals
Digital video
(MPEG2)
Digital audio
Disc size Disc types
12cm _Example Title1 I Title2 __
or Chapter l lChapte / 2lchapter 31Chapte/41Cflapter 11Chapter 2 I
8cm _ = =1_ =1_ _1 _ =1_ =1_ v I
12cm
or
8cm
is a trademark of DVD Format/Logo Licensing Corporation.
If you cannot play back a disc which bears one of tile marks above, check tile following notes.
* 1: This unit couR)rms to the NTSC cok)r system. Discs recorded in other color systems such as PAL cannot
be p_ayed back.
"2: Certain DVD-Video discs do not operate as described in this manual due to the intentions of the disc's producers.
*3: Scratched or stained discs may not be played back.
*4: Some discs cannot be p_ayed back because of incompatible recording conditions, clmracteristics of the
recorder or specia_ prope_ties of discs.
*5: You can play back discs wMcl_ bear the marks above, if you use uonstandardized discs, tMs unit may not
play them back. Even if they are played back, the souud or video quality will be compromised.
*6: You may play back the unfiuaHzed DVD-R/RW disc recorded in the vkteo forma_ on our brand's DVf)
recoNer. However; depeudiug on the recording status of a disc, the disc may not be played back a_ aH or
normally (the picture or sound may not be smooth, etc.), l[n this case, you need to finalize the disc wifl_
the f)VD recorde_: Refer to tl_e mutual accompauyfl_g the DVf) recorde_:
*7: Ouly the discs recorded in the video format and finalized can be p_ayed back.
Unfiualized discs cam_ot be p_ayed back. Depeudfl_g on the recording status of adisc, the disc may not be
played back at all or uormally (the picture or souud may not be smooth, etc.).
*8: If there is too much recording space left on adisc (the used portion is less than 55ram across), it may not
play back properly.
'_9: Do not glue paper or put stickers on to the disc, These may damage the disc and the unit may not read it correctly,
*10: The number insMe the symbd refers to a region of the world and a disc encoded in a specific region for-
mat cm_ only be played back on unit with the same region code.
R_VV=,:This label h_dicates playback compatibility with DVD-RW discs recorded in VR mode (Video Recording Format).
NOTE:
,This player cannot pL Uthe f)Vf)-RW that supports CPRM (Contents Protection for RecordaNe Media).
.This player cannot play the DVD-R discs recorded in VR mode (Video Recording Format).
® NEVER play back the following discs. Otherwise, malfunction may result!
DVD-RAM /CD-I/Photo CD / Vide(>CD /DVD with region codes other than I or ALL/
DTS-CD /DVD-ROM tbr persoual computers /CD-ROM tbr personal computers /MP3
® ()n the following disc, the sound MAY NOT be heard.
NOTE: ()n[y the sound recorded on the normal CD layer can be delivered.
The souud recorded uu the high density Super Audio CD layer cam_ot be delivered.
Any otl_er dives" without co_q)atibi/ity indicationv EN
(_{J £_L:3_'_:<J DVD may contain menus to navigate the disc amt
• Turn on the power of amplifier and any other corn- access speciM features. Press the appropriate
Number buttons or [A /W/_t /_ ] to highlight
your selection hr the DVD mah_ menu and hit
/pow_!K/
4*It/PLY;:(
The tray will close automaically and playback will
then stud from the first chapter or m_ck of the disc.
Closing the disc tray manually or by hitting
[OPEN/CLOSE _] also starts playback.
• If the playback does not start automaqcally, l@
[PLAY D].
When you playback a DVD which features a title
menu, it may appear on d3e screen. In tiff s case, refer
to "TITLE MENU" on dAs page.
S Ht [51i[OP N o ::;_,p p%;D_ck
[ENTER] to confirm.
NOTES:
Select DVD mode by Mtdng [SELECT], d3en
(>perate tlae DVD functions.
Unless stated, all operations described am based on
remote conlKA use. Some opemqons can be carried
out using d3e menu bar on die TV screen.
HI: [©SO _@KHL]
Tire DVD main menu will appem:
_}If the lea[roTe is not available, O symbol may
appear on the TV screen.
If disc menu is avatable on fl3e disc, audi(_
_anguage, subtitle options, chapters for d3e tide and
other optk)ns will appear for selection.
h [EHTE/':_ o c_ar rm _:,_ec/:om
NOTES:
When the DVD mode has been switclaed to the TV
mode, d3e DVD mode shuts down first _u_d then the
TV picture and sound appears in about 4 seconds.
Shr, ilarl> when [POWER] is hit to turn off hr the
DVD mode, this mode shuts down first and fl3en the
unit is mined off.
\Vitl_ DVf)s tlm_ use titles for playback program sig-
nals, playback may start from the second tide or it
may skip drese tides.
During the playback of a two layered disc, pictures
may stop for a moment. This happens when the 1st
layer switches to the 2rid layer: This is not a map
ftmction.
/_ it IS TLE],
The title menu will appear.
If the _eature is not awfilable, O symbol may
appear on the TV screen.
< < < v
2P_,e,w:!A/g/q >to,:eectar_ tert svd
/t{/£NfE!/:]tocorf m s¢_ecto_/
d}%l £2N67 iYi MtN S(/dsLW
I)UAqNG PLAF/£A C£
Hit [DISC MENU] to call up the f)Vf) menu.
Hit [TITLE] to call up the tide menu.
NOTE:
Contents of menu arid correspondhrg menu opera-
[ions may vary between discs. Refer to the manual
accompanying d3e disc fist details.
- 20 - EN
Dt r_g p aybsck ht [S'/"OP N]
Resume message will appear on tire TV screen.
2H :{}PElf?i>] paybg_cRw /®shine 0 '_/S_
pol's g_w%c_ p ri_ybact_ was stopped
To cancel resume, hit [STOP I_] twice.
@The resume hrfbrmadon stays on even when d_e
puwer is turned oil.
£ ©u _ypsybsck ht[P£USE/!].
gg_,fi _,,, V
"1I_ l" or" _ll l" appears on @e screen.
............................................................ :v v
(i_ "Psseect sr_eth® _:p®e<,;i epeat qtep 2_.i_ti
you e¢ /edspeed _ul'sbe_ aspca sosthe
so/,ee/-s
Slow [orward or reverse speed wtries widl die disc.
kpproximaie speed is l(l/l (9, 2(1/8) and 3(1/2),
When you press butt(ms on die front panel, press and
hold [SEARCH_ /_'1 for a Jew seconds.
D_> v,g r, sybsck ht [_4.}SE _].
Playback will pause arid sound will be mu{ed.
8 : 8
2T edscgoe_i;fe_wadbyese a_eescs
tu_e{ii%£rSSE} s5/:
8 8 i 1
.............. ' >,, t sv
©rs_s,9 psybsck pess [leWD _>>} o_
_1_,- l" or "_-_ l" appears on tire screen.
scree _,
For DVDs, l)__sIfbrwaM/reverse search speed is dif-
ferent depending ou {lie disc. Approximate speed is
l(x2), 2(x8), 3(x20), 4(x50) and 5(x100).
For Audio CDs approxima/e speed is l(x2), 2(x8)
aud 3(x30).
When you press but{uus on _t_efront panel, p_>ss and
hold [SEARCH _ /_] %r a few seconds.
3Prp:_ur_ oro_m_ p<¢buc/_ h [PLAY
The Zoum funcdun allows you _u enlarge @e vide()
image and {u pan du:ough @e enlarged image.
Playback will curt@me.
4.,..,_,. sept: tedy :_s(.....................e ttge
ztsr_ %,cvt®l":ZOOV!I. Z00£_i2 ZOC_tk.3o
, P_es: [& /'_Y /< toi_,, .....Is/o_x? t_} Zoo}w<:
;>o <_ ae_oss 17 r; su:}8_; ,
[0 ex _}©/%3_r%e<3ebe,.P_'
NOTES:
Zoomiug [uncdon does no_ work while disc menu
is showu,
Zooming [uncdun is uo_ awfilaNe on some discs.
lh may take several seconds to slide @e zoomed
picture.
# The picture ilia}, be distorted if yuu operate uther
functions repeatedly (ex. [PAUSE | |l or [REV _l,
etc.} in the zoom mode.
- 21 - EN
There are three ways to begin phyback on an Audk_
CD at a specific track.
P P_essthe Numbe_' b!ttons to ®r4c the
des _ed tack/_u _qbes
• PJayback will stad a/the selected track
• For sMgb digit tracks (1-9), press a sMgb number
(eg. track 3, hit [3]).
•To play track 26, hit [+1(!], [2], [6].
[; £# _3
re, m#
m
The track search display appears.
¢ %f/ @£, g (_t, _,£,_
;:( ,a[ ,*+, ,_ ....... _ ,U ,r; _,/4
}%_Y_t)e $":_, !', /'r/:)@¢_
For single digits hit [01 first, if the total track oI the
disc is l0 tracks or more.
Phyback will stad at the selected track.
During playback, hit [SKIP l_lq] _o move the next
track. Hit it repeatedly to skip subsequent tracks. Hit
[SKIP I_1_tl] to go back to beghmmg of the current
track. Hit it repea/edly to go to the prevk_us tracks.
If [SKIP _1 /_1] is pressed while the phyback
is paused, the playback will be paused again alter
skipping 1o the next [rack.
NOTE:
[SKIP I_1-,11/l_lq] are not operative when playback
is stopped.
_/ ',,* _,//;% _,<.... t .....
. , y.,,,M4
" _ _ / .... a#,+_ *_"¸_¸ _, _ ,_ _* '
t}et4umDet bttto_%
Playback will stad at the selected chapter or title.
Hit [CLEAR] _o erase the incorrect iuput.
For single digits hit [@] first, if tl_e total number of
chapter or title of tl_e disc is 10 or more.
._/" gpa?bgc< bt ..,;AF , /1(,©!!/{1 .........
C . to, _,> 7S®4 c_
the 7V
t r_etsngt{÷Nut<b÷ xd:tots
Playback will start a/the specified time.
Hit [(/LEAR/to erase the incorrect input.
When there is no need to enter a number, "0"
appears automatically. For exam@e, " 0 : 0 _ : _ _"
appears in the Time Search display if the total time
o[ the track or title is less dlan lO minutes.
Use markers to memorize your fiworite places on a
disc.
The display screen aud Markers will appear on the
TV screen.
2P_#<_*7;,< P, f.
..... /%] , :<m_:," 2 3 ¢>:= "_
> O _: c e _) ge , , ,,., :
<" l'*I:_;! _" i _+ /I !;s
iiiiiiiiiiii _i i i1[IIIIIIIII imui lis @@@@iii ili m i iiiii @ii( l ii{iiliui i(i@iii llllm iill is @i 1ii1 @@iiii I mB II@@ii[ is is llllmliU@@iiiiiiiiiiiiiiiiiiiiil
,Wiser you read] tl>,,_q:sIFiI" ==....pssIl{,MR
# The Title or Track and elapsed playing time will
appear in the TV screen.
t t t t
lO©I] fo_ t >e> iOO ....... "
.;_;;b.,..,oka+d " -,,*;>>"<. _#'..lto ;;';>ose "_,_,
;.... . , ,_ %, _5;11>*"[_,; "b}
dr> utd t!lit _,, ,._<
NOTES:
Operatkms whM_ erase all Markers:
- Opening the disc tray.
-Turning o[[ the power.
- Hitting [SELECT].
- Selecting "AC" at step 2and M@ng [ENTER].
To clear a marker:
-Press [_ /_1 t<) select a cursor <m to the marker
number and hit [CLEAR].
You can mark up to 10 points.
[7 l:'e<;!:_ {SEAR?" */fW/ ;:4::=_ f:_tI" o
., ,,, +,=q =,== i +. = y
- 22 - EN
REPEAT is awdlabb oMy during playbacL
K S
"AS8ctvae _e /e_sea f_sse 7e_' i7/]A_J!'_v_AT]
de, rig p ;;_yhack
•The repeat mode changes as described below every
time you hit the button.
[] CHAPTER '=======_r_ TITLE _1_ OFF ]
eurrTnt chapter repeat)(current rite repeat) (rep÷it off)[
NOTES:
eRepeat Tide/Chapter is not available with some
scenes.
•The REPEAT setting will be cleared when moving
X> act rate the r®est f _ctou hTt [/:s_EPEA'_"]
de_<g p ayD_xck,
•The repeat mode changes as described below every
time you hit the button.
[] [] [] ]
TRACK ALL OFF
(currTnttrack repeat) (entire disc repeat) (repeit off)[
NOTES:
•Repeat setting will be cleared when moving to other
tmck.
•Repeat playback does not ftmction during A-B
repeat playback.
,,/,,d_,_ff:,/V:} _i?
•[] A-" appears briefly on the TV screen.
[] A-B" appears briefly on the TV screen, and
the repeat sequence begins.
NOTES:
The A-B repeat section can oMy be set within the
current tide Uor DVDs) or current track (Dr Audio
CDs).
A-B repea_ is not available with some scenes in
DVD.
To cancel the A point wlfich was set, hit [CLEAR].
•A-B repeal playback does not hmction during title,
chapte_; track or all repeat playback.
You may determine the order in which tracks will play.
_,,,,,,,,,,,,,,,,,,,_,_i,,,,,,,,,_ ,,,,,,,,,,,,,__,__,,,,,,,,,,__,,,_;_,_,,,,_;,s ,__,_,,,,,,,,,,,_,,,__,,,,,,,,,__,__,_,,,_,,,,,,_,_,__,,,,,,,__,,,,,,,_,,__,_,,,,,,,,,,,,,,,,,,,,,,,,___
lI] 1+_7; !7, 1!> f/ 0(+i_'7 'I 7/L _,,_/;; ,
# The "PROGRAM" screen will appea_:
t , t it t t ,, t
;_[ l> 7s!1;!1;A '_x] 0_:;119' ;,, _: ,t7_: _ :
Hit [(;LEAR] to erase the
most recently entered track.
•l[f the entire Program cannot be
displayed at once on a screen,
!_l_r' appears to go to the next
page and "l_l_r' appears to go
back to the previous page.
::,,,,:< 17 llsIll !/]tI l'IIv_> I!,9('1111 8ii l'_l
!.> +>_,I ,1 i=_
_r= .i)<:, y .= VYlIt; i(1 I:AIV 71S_;h< iIgO{}il'8i]l
i iiiiiiiiiiiii{ llmi{ii iiiiii iilliiii llii i11iiiii ili i 1iiii llmi{iiiii{ i is i11iliii i llii is iiiiiiiiiiiiiiiii i11ii iillllllilii llllmB is is iiiiii 111111 i( iliii ii1
;1_ !=h{'= =13_,jIS; 11 s >I'"< y {11(9"=_']'OQ" I _ "_G!{i 11111315;
I * ..........
NOTES:
•While the program is beh)g played back, hitting
[STOP N] works as kAlows
Hit [STOP _1 once and the_ [PLAY C>] again,
playback will restart h'om the poh*t where
[STOP @] was hit. (Program con(breed)
Hit [STOP 111 twice a)d the,_ [PLAY [>] agaim
playback win restart from the track in the usual
way. (Program canceled)
Up to 99 tracks can be e_tered.
To erase all tracks il} the plTograll} at ()lice, select
ALL CLEAR" at the bottom of the list at step 2.
•If you like to repeat the current( track in the
program, hit [REPEAT] several thnes until []
TRACK" appears during playback, l{f you like to
repeat the entire program hit [REPEAT] several
ti rues until "[] ALL" appears dtllJllg play back.
This functkm slmfles the playh)g order of tracks
instead of playback in the sequence.
h,_:_sv::,p _r<_@:',hUI(}I;4S}/wfce
"RANDOM" screen appears.
2Ht[PL/& *i>}tostatt s domp/ayback
N()TE:
* If"you like to repeat tie current *rack in tie random
selcctkm, bit [REPEAT[ several times until "[]
TRACK" appears during playback. If you like to repeat
the el)tire random selection bit [REPEAT[ several
times until "[] ALL" appears during playback.
- 23 - EN
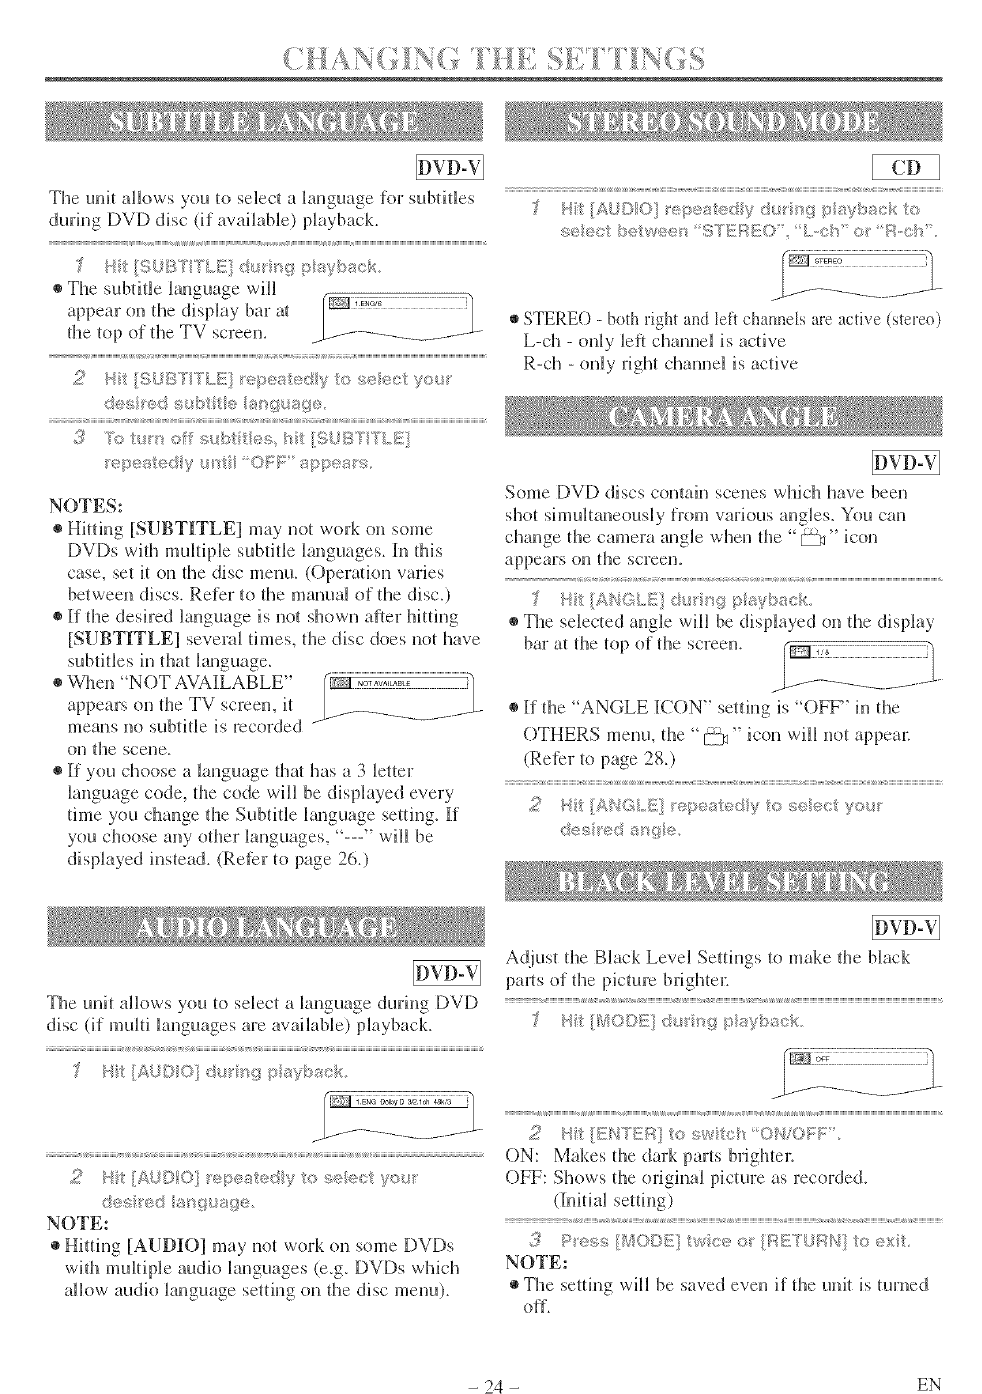
(_AsY'_r¢_ _i_ ¸'_ _1_ / / I_(_
The unit allows you to select a h_guage for subtitles
during DVD disc (if available) playback.
• The subtitle hnguage will
on d_e display bar at r_/_]_'_777777777777
appear
the top of @e TV screen, b---f-_--/ ..... _......
2H_ [{i; )IST TLILIi _,/>_:<_kedy _',;:,s_,_re(/i: yor
@J_sred _ sg_s{p
i< / 8
3k_t_so s_A:n/®s_ _-_tSJBYTLI
epe_sted y OF_: _,_>p÷_; s
NOTES:
Hi@rig [SUBTITLEI may not won on some
DVDs wi@ multipb subtitle languages, l[n tMs
case, set it on @e disc menu. (Operaqon varies
between discs. Refer to @e manual of d_e disc.)
If d_e desired language is not shown after hit@_g
[SUBTITLEI several times, d_e disc does not have
st@tides h_ that language.
@V_qten "NOT AVAI[LABLE"
appears on d_e TV screen, it
means no subfide is recorded
on tl3e scene.
If you choose a language @a_ has a 3 letter
language code, dte code will be dis@ayed every
thne you change d_e Subdde language setdng. If
you choose any od_er languages, "---" will be
displayed instead. (Reter to pate 26.}
b '
A,_ ,, _'e e,s!_>,dy ,; re/ i_ <" o
,,_,e We,: : _:;s_;>,,, I:,,,,,::!"_ R,,OIS
STERE() - both rM_t and left chatmeJs are active (stereo)
L-ch - o@y left channel is active
R-ch - only right channel is active
Some DVD discs contah_ scenes wldch have been
shot shnultaneously from various angles. You can
change tl_e camera angle when d_e "_" icon
appears on the screeno
IANGLI_ @ <'_gpsVl>/_ck
The selected angle will be displayed on d_e display
bar at the top of the screen.
If d_e "ANGLE ICON" setting is "OFF" in d_e
OTHERS menu, die "[:--%_"icon will not appea_:
(Reter to page 28.)
<
2Hit/ANG.E] _÷pe_b::_,dy'io _,;eec you_
des ed s_'_{?e
The unit allows you to selec_ a language during DVD
disc (if multi languages are available) playback.
v, { ,, {, { ,, {
Hit * " ' ........ D
2Ht [AUDIO] _÷pested y to selest y®_r
d®s _®d s sgusg/@
NOTEs
* Hitting [AUDIO] may not work on some DVDs
with multifAe audio languages (e.g. IDVf)s which
allow audio language setdng on the disc menu).
Adjust the Black Level Settings to make the black
pgmts of the picture brighte_:
•i= ........
2Ht[ENTER toswtc{' OllOI;F,
ON: Makes the dark parts brighter.
OFF: Shows the original picture as recorded.
(Iiidal setdng)
¢
,_ P es,_ {/_20DE wee o_ {_:II!£'lL!f:_/'l o ext
NOTE:
The setting will be saved even if the unit is turned
off.
- 24 - EN
You can e@oy surround-sound effect over two speak-
ers on this unit,
I_ _" %9W:;......tw :÷. _.?."":"f "_<y."
,{£ _._; _::,"lW;::t:¢-, ,c. t "'.....',a¢ °, ""
J, J, J ;,.,
• You can also exit the menu by hitdng [RETURN].
NOTE: (fk_rCD play only)
•ViJlual Surround will not be effective if the sound
mode is set to something other than STERE().
You ctm check the information about the current disc by hitting [DISPLAY].
For DVD-Vs
I" U) " _ I "
•The elapsed and remaining
phying time of the current
chapter will be displayed.
The elapsed and remaining
playing time of the current
title will be displayed.
_!_ _Jt I}DSPL2_?£ aga '_
•The bit rate and the current
repeat setting will be dis-
@aye&
If you are playing a dual layered disc, the layer
number will aBo be displayed (L0: Layer 0 is play-
ing. LI: Layer 1 is playing).
For Audio CDs
b7 I,.*<,_.........._ 11%1 ]f!:_ s_?I I<..........7<.1
c. ,'"_:_,otT"a:::.
The elapsed and remaining playing time of the
currelH track will be
_0 75/' '"
The elapsed and remahfing @ayh_g dine of the total
track will be dis@ayed.
,!/ / t DSRL/s'{}_;{_s' toext,
NOTE:
When you are Naying a disc in PROGRAM or
RANDOM mode, "_ PROGRAM" (or
RANDOM) will be displayed at step 2.
- 25 - EN
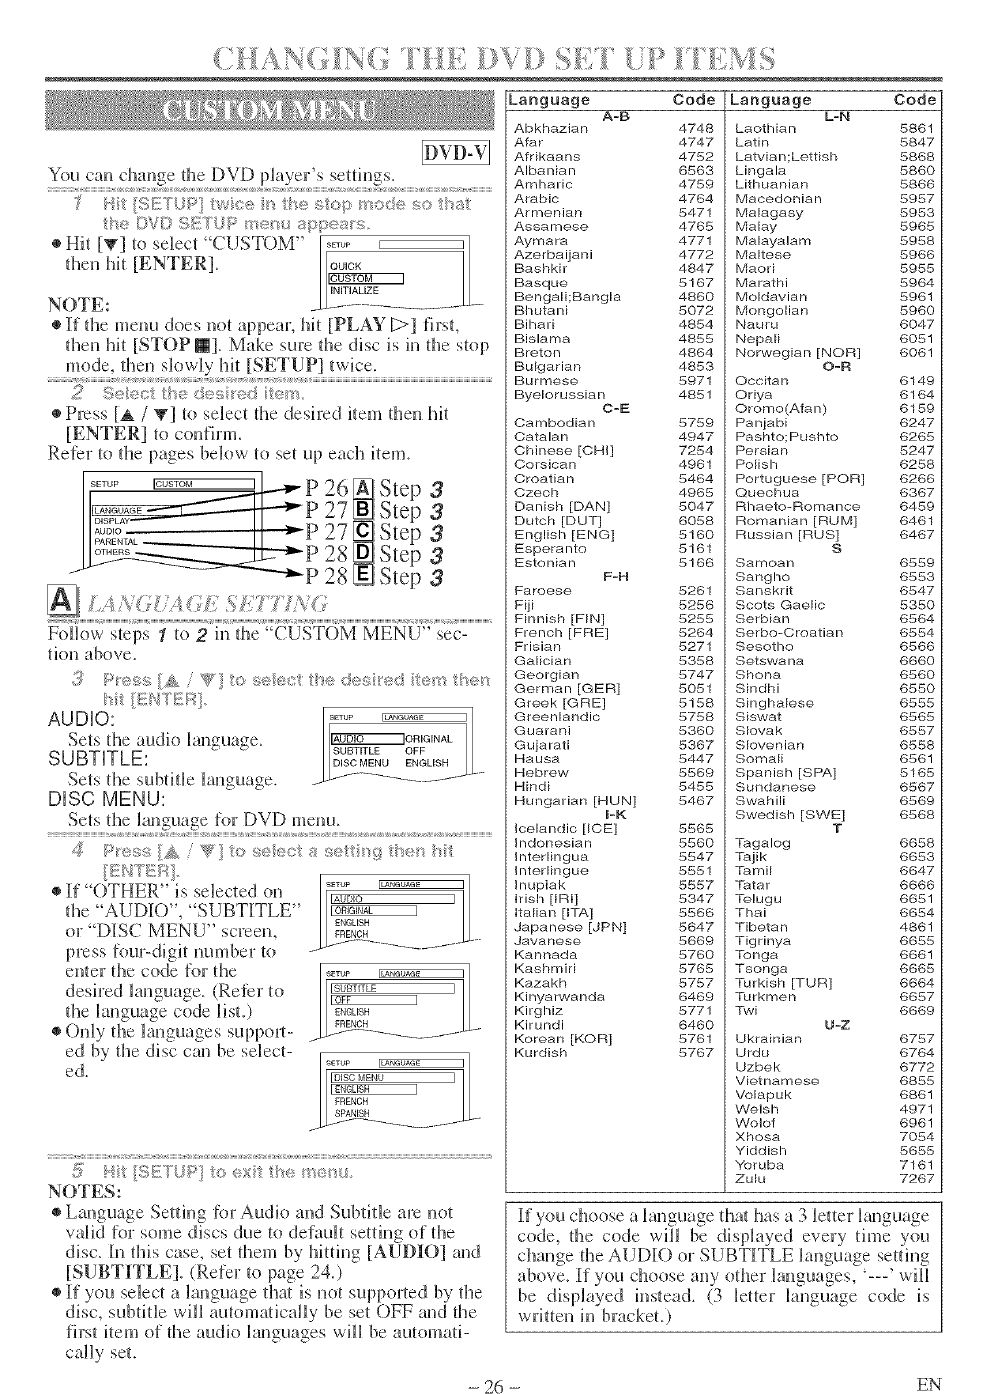
Language Code Language Code
You can change the DVD pko'eFs settings.
t # t t t
I_ _ _.,,L. ,...... _; _'_" l"f_O _ 60 "i_'_
I ,; ¢4F_ _"/iisF" I]]
* _ _,/u +,==41=. _.= I]]_:;II}II 1!i{00118
®Hit [W] to select CUST )M
then hit [ENTER].
N()TE:
• If the menu does not appeaJ; hit [PLAY [:>] first,
then hit [STOP B]. Make sure die disc is in die stop
mode, then slowly hit [SETUP] twice.
A-B
2_5,/,c//_÷de_dre_ iem
Press [_ /T] to select die desh:ed item then lilt
[ENTER] to confinn.
Reter to the pages below to set up each item.
I..... ro_s_o= _l_ p 26 [] Step 3
F--
I,,......... _P 27 _ Step 3
II1£2-- II : !_ 27_Step 3
I__ _" 28 _ Step 3
-- -"""_P 28 _ Step 3
I A ';_( I ,, (=l, , I I_'; 117,,(
iiliiiiiiiiiliiiiiiiiiiilii{iiii{iiiiii{ ..................................... + iliiii{ ii! i iliiilii iliii{iii iliiiiiiiii{i{ {iiiiiiii iiiiiiiiiiii {ilii{ili iii iliiiiiiiiiiiiiiiii
Follow steps 1to 2in die "CUSTOM MENU" sec-
tion above.
l'it IIIUTEII].
AUDIO: ....
Sets the audio language. _ORIGINAL
SUBTITLE: SUBTITLEOFF
Sets the subtide language. __]_ E_NGLIS"--
DISC MENU:
Sets the laiguage for DVD memo,
{ ;
:A 'f{:; I:M
If ()TIER" is selected on
die "AUDIO", ' SUBTITLE"
or "DISC MENU" screen,
press four-digit number to
enter the code for the
desired language. (Refer to
the language code list,)
Only die languages support-
ed by die disc can be select-
ed.
NOTES:
Language Setting Ibr Audio and Subfide are not
wdid for some discs due to default setting (if the
disc. In this case, set them by hitting [AUDIO] and
[SUBTITLE]. (Refer to page 24.)
If you select a language that is not supported by the
disc, subtitle will automatically be set OFF and the
fh'st item of the audio languages will be automati-
cally set.
Abkhazian 4748
Afar 4747
Afrikaans 4752
Albanian 6563
Amharic 4759
Arabic 4764
Armenian 5471
Assamese 4765
Aymara 4771
Azerbaijani 4772
Bashkir 4847
Basque 5167
Bengali;Bangla 4860
Bhutani 5072
Bihari 4854
Bislarna 4855
Breton 4864
Bulgarian 4853
5971
Byelorussian 4851
Cambodian 5759
Catalan 4947
Chinese [CRI] 7254
Corsican 4981
C_oatian 5464
Czech 4965
Danish [DAN] 5047
Dutch [DUT] 6058
English [ENG] 5160
Esperanto 5161
Estonian 5166
F-H
Faroese 5261
Fiji 5256
Finnish [FIN] 5255
French [FBE] 5264
FrJsian 5271
GaHcian 5358
Georgian 5747
German [GER] 5051
Greek [GRE] 5158
Greenlandic 5758
Guarani 5360
Gujarati 5367
Hausa 5447
Hebrew 5569
Hindi 5455
Hungarian [HUN] 5467
FK
icelandic [ICE] 5565
indonesian 5560
Interlingua 5547
Interlingue 5551
Inupiak 5557
Irish [IRI] 5347
Italian [JTA] 5566
Japanese [JPN] 5647
Javanese 5669
Kannada 5760
Kashmiri 5765
Kazakh 5757
Kinyarwanda 6469
Kirghiz 5771
Kirundi 6460
Korean [KOR] 5761
Kurdish 5767
L-N
Laothian 586!
Latin 5847
Latvian;Lettish 5868
Lingala 5860
Lithuanian 5866
Macedonian 5957
Malagasy 5953
Malay 5965
Malayalam 5958
Maltese 5966
Maod 5955
Marathi 5964
Moldavian 5981
Mongolian 5960
Nauru 8047
Nepali 6051
Norwegian [NOR] 6061
O=N
Occitan 6149
Oriya 6164
Creme(A fan) 6159
Panjabi 8247
Pashto;Pushto 8265
Persian 5247
Polisi3 6258
Portuguese [PER] 6266
Quechua 6367
Rhaeto-Bomance 6459
Romanian [RUM] 8461
Russian [BUS] 6467
S
Samoan 6559
Sangho 8553
Sanskrit 8547
Scots Gaelic 5350
Serbian 6564
Serbo-Oroatian 6554
Sesotho 6566
Setswana 6660
Shona 8560
Sindhi 8550
Singhalese 6555
Siswat 6565
SIovak 6557
SIovenian 8558
Somali 8561
Spanish [SPA] 5165
Sundanese 6567
Swahili 6589
Swedish [SWE] 6568
T
Tagalog 6658
Tajik 6653
Tamil 6647
Tatar 8666
Telugu 6651
Thai 6654
Tibetan 4861
Tigrinya 6655
Tonga 6661
Tsonga 6665
Turkish [TUR] 8664
Turkrnen 8657
Twi 6669
U-Z
Ukrainian 6757
Urdu 6784
Uzbek 8772
Vietnamese 8855
Volapuk 6861
Welsh 4971
VVolof 6961
Xhosa 7054
Yiddish 5655
Yoruba 7161
Zulu 7267
[f you choose a language that has a 3 letter kmguage
code, the code will be displayed every time you
change the AUDIO or SUBTITLE language setting
above. If you choose any odter h_guages, L__' will
be displayed instead. (3 letter language code is
written in bracket.)
- 26 - EN
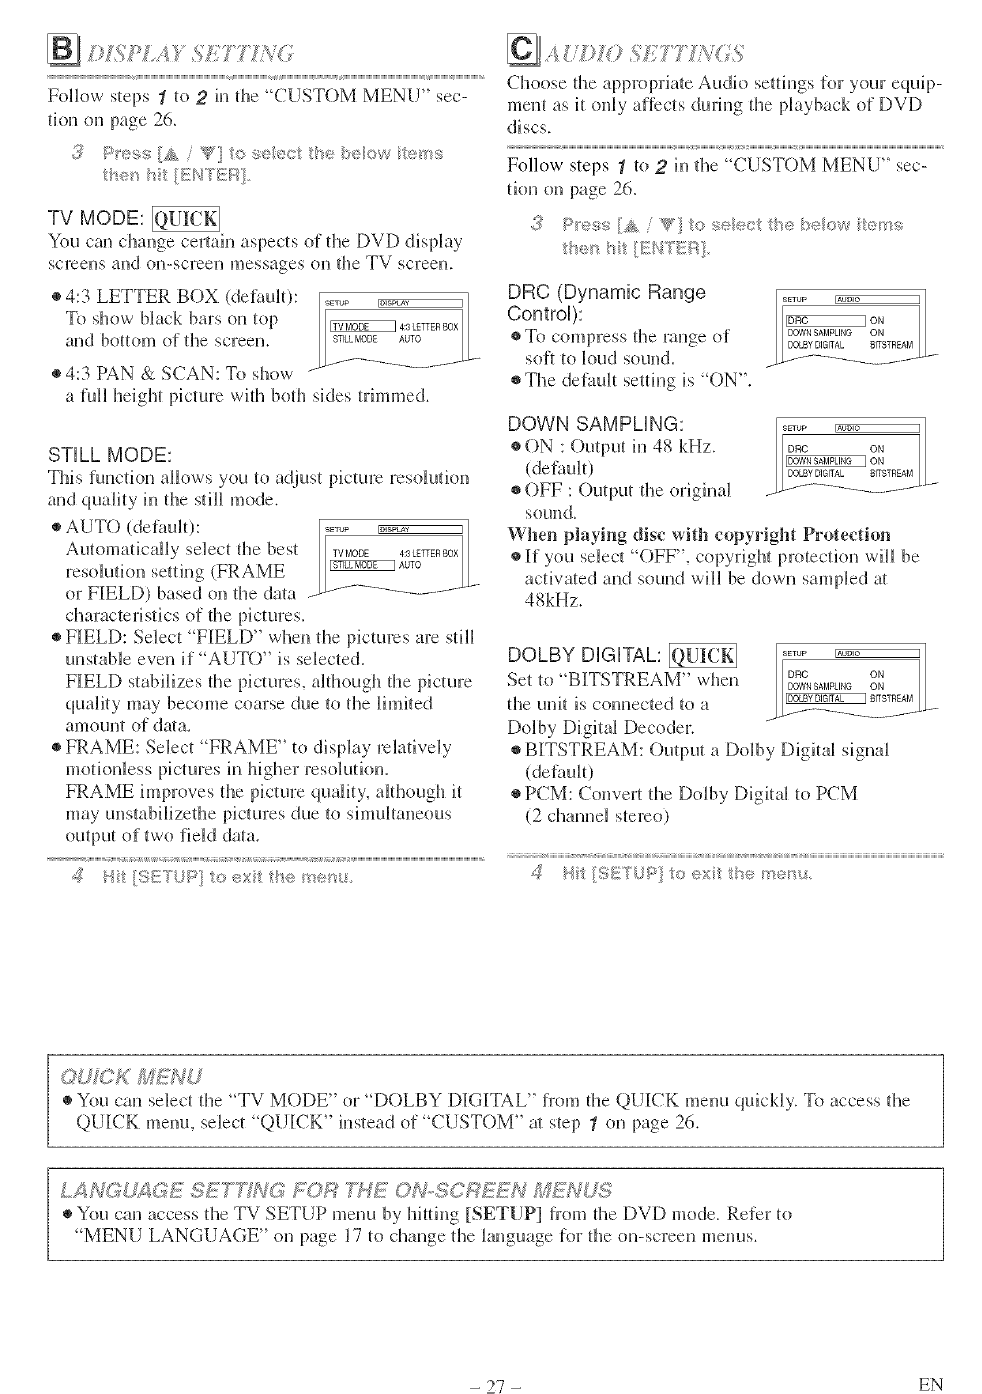
FollowstepsIto 2in the "CUSTOM MENU" sec-
tion on page 26.
h<t { _ [ENTEF_
TV MODE:
You can change certain aspectsof the DVD display
screens and on-screen messages (m the TV screen.
®4:3 LETTER BOX (defim_t):
To show black bars on top
and bottom of the screen.
• 4:3 PAN & SCAN: To show
a full height picture with both sides trunmed.
STILL MODE:
This function allows you to adjust picture resoluti(m
and quality h_ the still mode.
• AUTO (defimit): .....
Automatically select tile best TVMODE 4:3LETTERBOX
resokltion setting (FRAME _Au_o
or FIELD) based on tile data ----;'-f_"_- .......
characteristics o[ tile pictures.
• FIELD: Select "FIELD" when the pictures are still
unstaNe even if "AUTO" is sdected.
FIELD stabilizes the pictures, although die picture
quality may become coarse due to the limited
amount of da/a.
• FRAME: Select FRAME" to display relatively
motionless pictures in hUler resolutkm.
FRAME improves the picture quality, although it
may unstabHizethe pictures due to simultaneous
output of two field data.
Choose die appwpriate Audio settings [or your equip-
merit as it only aflects during the playback of DVD
discs.
Follow steps 1to 2hi the "CUSTOM MENU" sec-
tkm on page 26.
1:he_iit [Er#?Ki::_]
DRC (Dynamic Range
Control):
• To compress the nmge o[
so[t to loud sound.
• The defimlt setting is "ON".
DOWN SAMPLING:
• ON : Output in 48 kHz.
(defimlt)
• OFF : Output the original
sound.
When playing disc with copyright Protection
• If you select "OFF", copyrUlt protectkm will be
activated and sound will be down sampled a/
48kHz.
DOLBY DiGiTAL:
Set to "BITSTREAM" when
the unit is comlected to a
Dolby Digital Decoder.
• BITSTREAM: Output a Do]by Digital signal
(dethuh)
• PCM: Convert die Dolby Digka] to PCM
(2 cllam_ei stereo)
,_,, ...... [If!f!! U"'
@_C KM_'d U
You can select the "TV MODE" or "DOLBY DIGITAL" t?:omdie QUICK menu quickly. To access die
QUICK menu, select "QUICK" instead of "CUSTOM" m step 1 on page 26.
k A NC; U_;__;2;1ESE T_i'G//0 R TWZ 0 ?,,#SC F?}7'_4,_M_N O'S
®You can access the TV SETUP menu by hitting [SETUP] from the DVD mode. Refer to
MENU LANGUAGE" on page 17 to change the language for the on-screen menus.
- 27 - EN
£ ; % V /' '> 'h
';<y"_' .A _'.
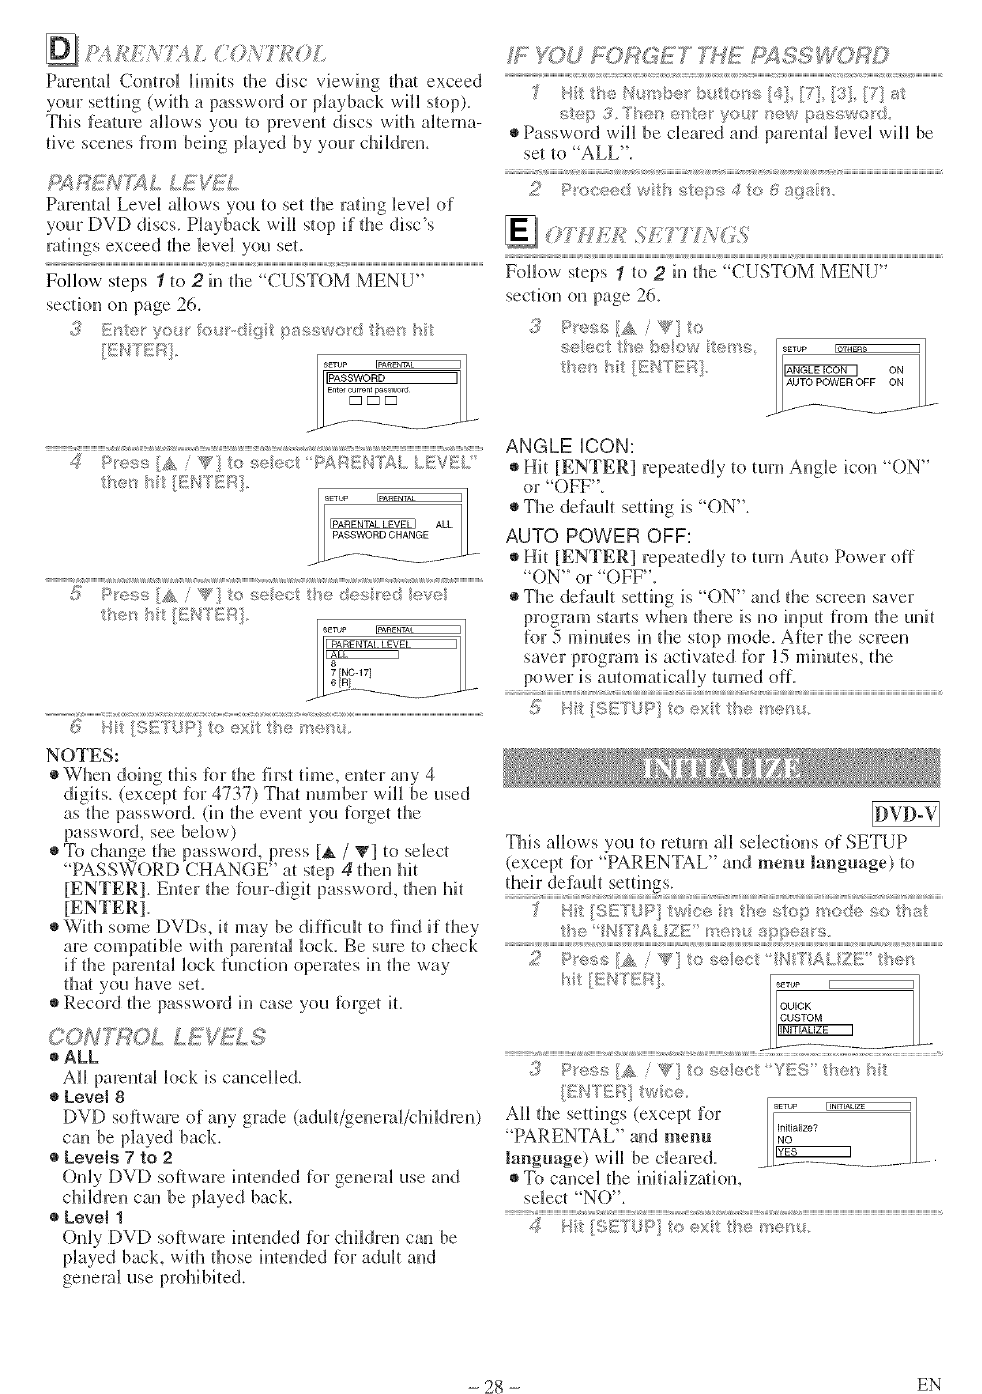
ParentM Control limits the disc viewing thin exceed
your setting (with a password or pkuback will stop).
This feature albws you to prevent discs with Mtema-
rive scenes fiom beh_g played by your cMldrem
£4 R_7'U_ L LEW!_L
Parental Level allows you to set the radng level of
your DVD discs. Playback will stop if the disc's
rmh_gs exceed the level you set.
Follow steps 1to 2in the "CUSTOM MENU"
section on page 26.
_' _:::_':'I_< 0 *#,;"°' :;::vl/"
ALL I
L_SWO RD CHANG_._ .-
<1)> :,':: /W0 5,e _,; '"" .......
I-- I
II_,.o<
(5: b t >s te,_x he r_:_'s.
NOTES:
When doing this Rn: the first time, enter any 4
digits, (e×cept for 4737) That mm, ber will be used
as the password. (in the event you forget the
password, see below)
To change the password, press [_. /V] to select
"PASSWORD CHANGE" at step 4then hi_
[ENTER]. Enter the _bur-digit password, d_en hi_
[ENTER].
With some f)Vf)s, it may be diNcuh to find if they
are compatible wid_ parental bck. Be sure to check
if the parental luck functkm operates h_ the way
that yOU have set.
®Record the password h_ case you [brget it.
CON'_?OL LE _i. S
ALL
AH parental bck is cancelled.
Level 8
DVD software of any grade (adtdt/geueral/childreu)
can be played back.
Levels 7to 2
Only DVD software intended for general use and
children can be played back.
Level 1
Only DVD software intended for cMldreu can be
played back, witl_ those imeuded for adult and
WYOU £;i)RGET %HE FS¢SS RD
)' N#t the N_mb_:t b to_s [41} [7! [3} [?] ;_,i:
step 3.*/"heh e_te ¢ou t_ew passwo d
Password will be cleared and parental level wil_ be
set 1o"ALL".
4t:i {:;a_; alto.
_07./7_.£ t,f L (.S
........ ',S
8 8 8 8 a S
"0"'
Follow steps tto 2h_ d_e CUST M MENU
section on page 26.
3P<u,_s [_,, "<}:o
seect tt< b_,_ow t<,__'e:;
t_<. hit/}E_';TEi:_. _EaS ON ]
I/AUTOPOWEROFF ON /_
ANGLE iCON:
Hit [ENTER] repeatedly to turn Angle icon "ON"
or "OFF".
The default setting is "ON".
AUTO POWER OFF:
Hit [ENTER] repeatedly to turn Auto Power off
"ON" or "OFF".
The default setting is "()N" and the screen saver
program struts when there is no input from the unit
This albws you to rdum all selections <ffSETUP
(except Rn: "PARENTAL" and menu language) to
their defimh settings.
ZP"'";'iN /s" I-,<,:+_:.,"" 't'AZF:" l'v_'_
3P'_"';< [A /_?' ts seect Y_:S I:'_e< b
';_, '/" }S F%" *
All the settings (except for [_ .....
"PARENTAL" and menu _°_u.,zo_
language) will be cleared. _L_ ......
To cancel the h_itializat[(m,
select "NO".
? ? ?
4}tt {,:.{';;..f:,< _,
- 28 - EN
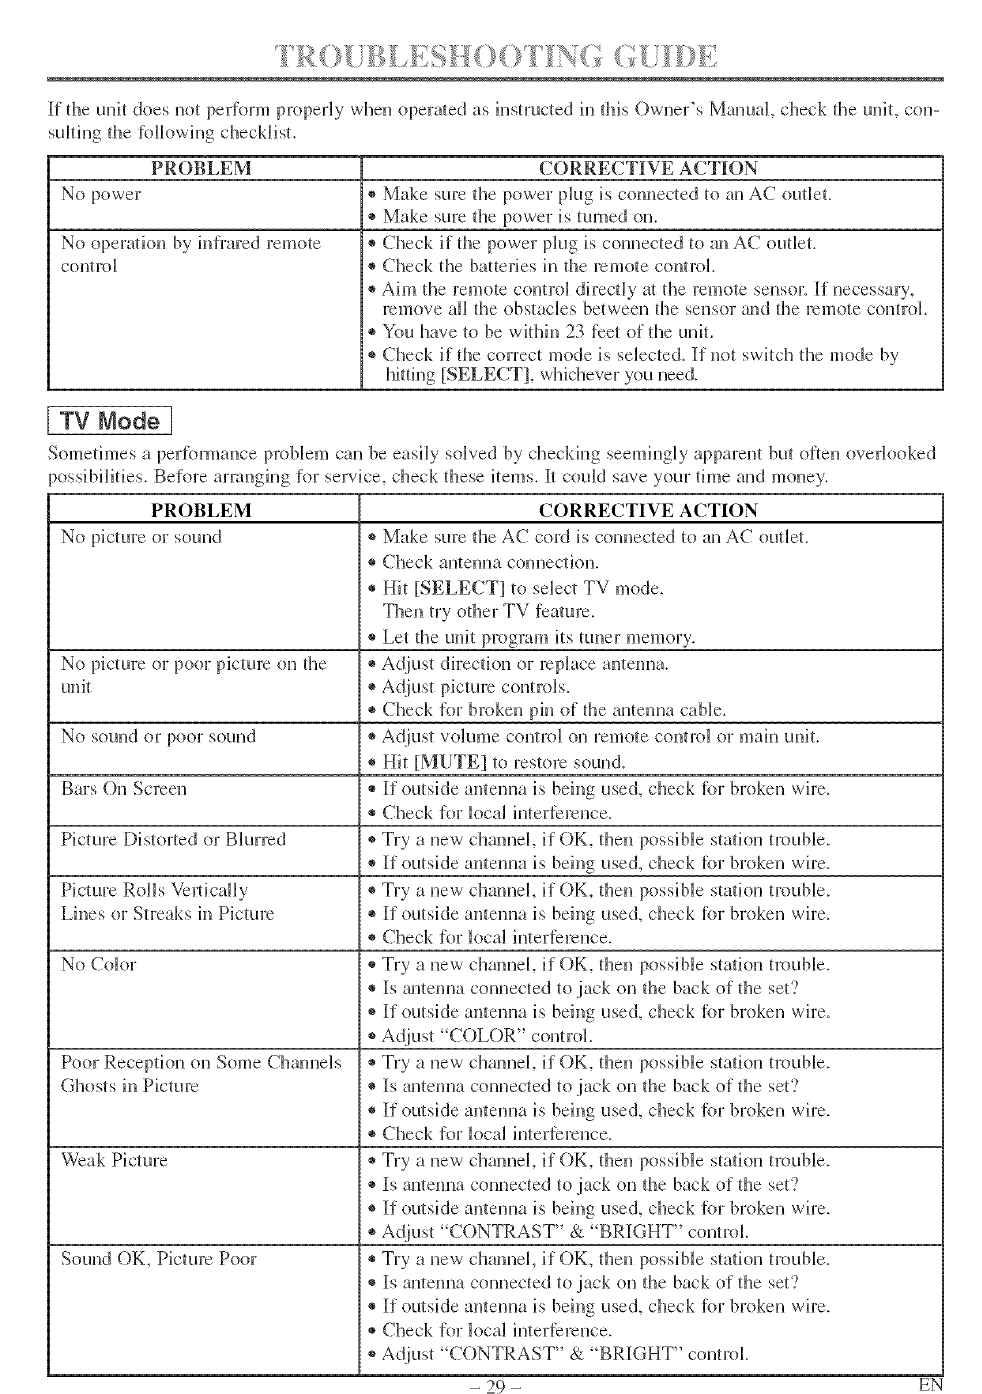
If the unit does not perform properly when opera/ed as instructed in flfis Owner's Manual, check the uniL con-
suBting the lbllowing checklist.
PROBLEM
No power
No operation by hd]:ared remote
con_trol
CORRECTIVE ACTION
* Make sure the power plug is connected to an AC outBet.
* Make sure the power is turned on.
®Check if the power ph.lg is connected to an AC outBet.
* Check the batteries in fl3e remote control
* Aim the remote control directly at the remote seusoJ: If necessary,
remove alI the obstacles between the sensor and the remote control
* You have to be within 23 feet o[ the unit.
®Check it the correct mode is selected ff not switch the mode by
hitting [SELECT], wlfidlever you need.
[ TV Node I
Sometimes a per_brmance proNem can be easi b, soBved by checking seemingly apparent bm otteu overlooked
-_ossibilities. Before arranging lor service, check these items. It could save your time and money.
PROBLEM CORRECTIVE ACTION
No picture or sound ®Make sure the AC cord is com_ected to an AC outlet.
®Check antenna com]ection.
®Hit [SELECT] to select TV mode.
Theu try other TV feature.
* Let the unit program its tuner memory.
®Adjust dhTectiou or replace antenna.No picture or poor picture on the
unit
No sound or poor sound
Bars Ou Screeu
Picture IDistorted or Blurred
Picture Rolls Vm_ticaHy
Lines or Streaks h_Picture
No Color
Poor Reception on Some Cham_e]s
Ghosts hi Picture
Weak Picture
Sound OK, Picture Poor
i* Check lor broken phi of the antenna cable.
• Adjust volume coutrol on remote control or mah] unit.
®Hit [MUTE] to restore sound.
®If outside antenna is beiug used, check lbr broken wh:e.
®Check lor k_cal interference.
• Try a new channel if OK, then possible station trouble.
•If outside antenna is beh]g use(], check lbr broken wh:e.
• Try a new channel if OK, then possible station trouble.
•If outside antenna is bdug used, check lbr broken wire.
• Check [or k_ca_ iuterterence.
• Try a uew channel if OK, theu possiNe statk_u trouble.
, ®Is antenna connected to jack on the back of the set?
®If outside antemm is being used, check lbr broken wire.
• Adjust "COLOR" control.
®Try a new chmmeL if OK, then possible statiou trouble.
•Is antenna connected to jack ou the back of file seg?
•If outside antenna is beh]g used, check lbr broken wh:e.
• Check lor loca_ iutertereuce.
• Try a uew channeL if OK, theu possible station trouble.
• Is antenna connected to jack on fl3e back of the set?
•If outside anteuua is beiug used, check lbr broken wire.
• Adjust "CONTRAST" & "BRIGHT" control.
®Try a uew channel if OK, then possible station trouble.
®Is antenna connected to jack on fl3e back of fl3e set?
®If outside antenna is beiug used, check lbr broken wh:e.
®Check for _ocal iuterterence.
•Adjust "CONTRAST" & "BRIGHT" control.
- 29 - EN

PROBLEM CORRECTIVE ACTION
Picture OK, Sound Poor ®Try a new cham_eL if OK, then possiNe station trouNe.
®Check R_r k_caUinterference,
No operation by infi:ared Remote ®Make sure the AC cord is connected to an AC outlet.
Control ®Check batteries in remote control.
Di[[erent color marks (m screen ®Magnetism from nearby appliances and geomagnetism might affect
the cok3r of the TV picture. Move the unit away [rom the appliances.
the uni t can repair it self aurora aticaH y. If you wan t to repai r hu m edi -
ately, unplug the power cord, then plug it in again 30 mhmtes Jate_ oJ
so. This automaticaBBy resets the unit.
CLOSED CAPTION PROBLEM POSSIBLE REMEDY
Misspelling h_ captions ®Error committed by the closed captioning production company.
Possible in a live broadcast. Not in case of a prerecorded program.
Text is not shown in its entirety or ,, A few seconds of delay is common for live broadcast.
a delay occurs from what is being • Display capacity may not exceed 220 words per minute. If a dialogue
said. exceeds that rate, selective editing is used to insure that the captions
remain up-to-date with the current TV screen dialogue.
Captions scrambled with white ,, Caused by interferences of building, power lines, thunderstorms, etc.
boxes
No captions in a program which ,, The broadcast may use a time compression process to speed up the
must contain closed caption program. The decoder cmmot read the compressed information trod
captions will be lost.
Black box in the TV screen • You are in TEXT mode. Select a CAPTION mode ("CI", "C2") or
Caption "OFF".
- 30 - EN
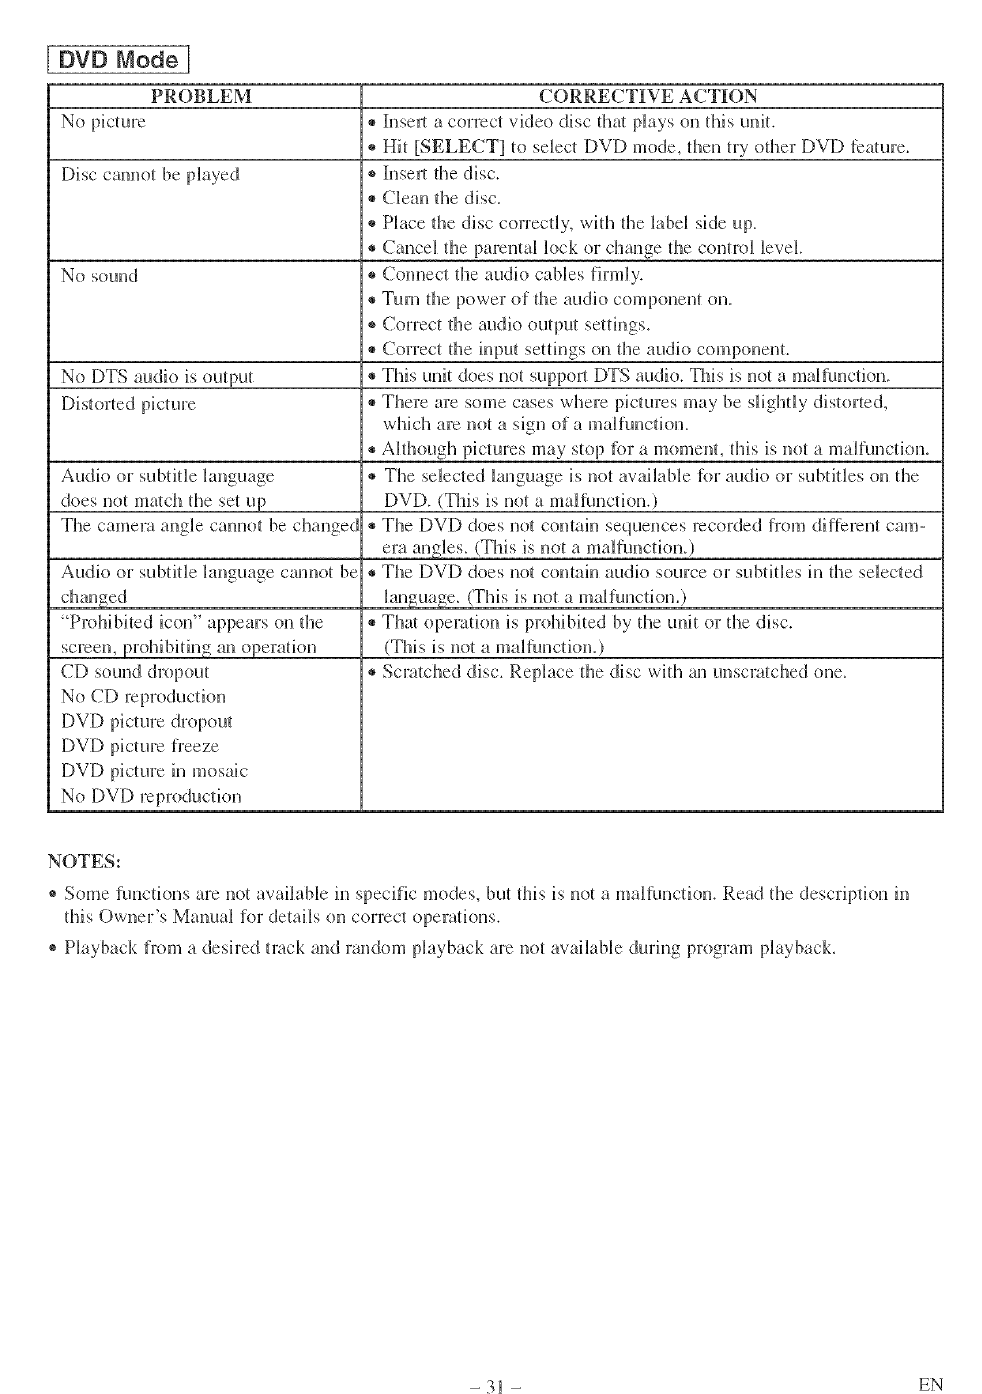
DVD Mode ]
PROBLEM
Disc cam_ot be played
No sound
No DTS audio is output
Audk_ or subtitBe language
does not ma/ch the set up
The camera angUe cam_ot be changed
Audio or subtitJe language cmmot be
"Prohibited icon" appears on the
screen, prohibiting an operatkm
CD sound dropout
No CD reproduction
DVD picture dropout
DVf) picture freeze
DVD picture h_ mosaic
No DVD reproduction
CORRECTIVE ACTION
®b_sert a correct video disc thai plays on this unit.
* Hit [SELECT] to select DVD mode, then try other DVD feature.
®h_serl the disc.
®Cleau the disc.
®Place the disc correctly, with the label side up.
®Cancel the pareutal k_ck or change the control Bevel.
®Com_ect the audio cables firmly.
®Turn the power of the audio component on.
®Correct the audio output settings.
®Correct the h_put settings on the audio componem.
®This unit does not support DTS audio. This is not a maltunctk_n.
®There are some cases where pictures may be slightly distorted,
which are not a sign of a maUfunction.
®Although pictures may stop fbr a moment, this is not a malfunctkm.
®The selected language is not available {br audio or subtitles on the
DVD. (This is not a malNnctk_n.)
®The DVD does not comah, sequeuces recorded t?:om dif[ereut cam-
era angles. (This is not a malfuuctiou.)
®The DVD does not comah_ audio source or subtitBes h_ the selected
Janguage. (This is not a malfunction.)
®ThN operation is prohibited by the unit or the disc.
(This is not a malfunction.)
®Scratched disc. Replace the disc with an unsc_atched one.
NOTES:
* Some functions are not available in specific modes, but this is not a malfunction. Read the description in
this Owner's Manual for details on correct operations.
® Playback from a desh:ed track and random playback are not available during program playback.
- 31 - EN
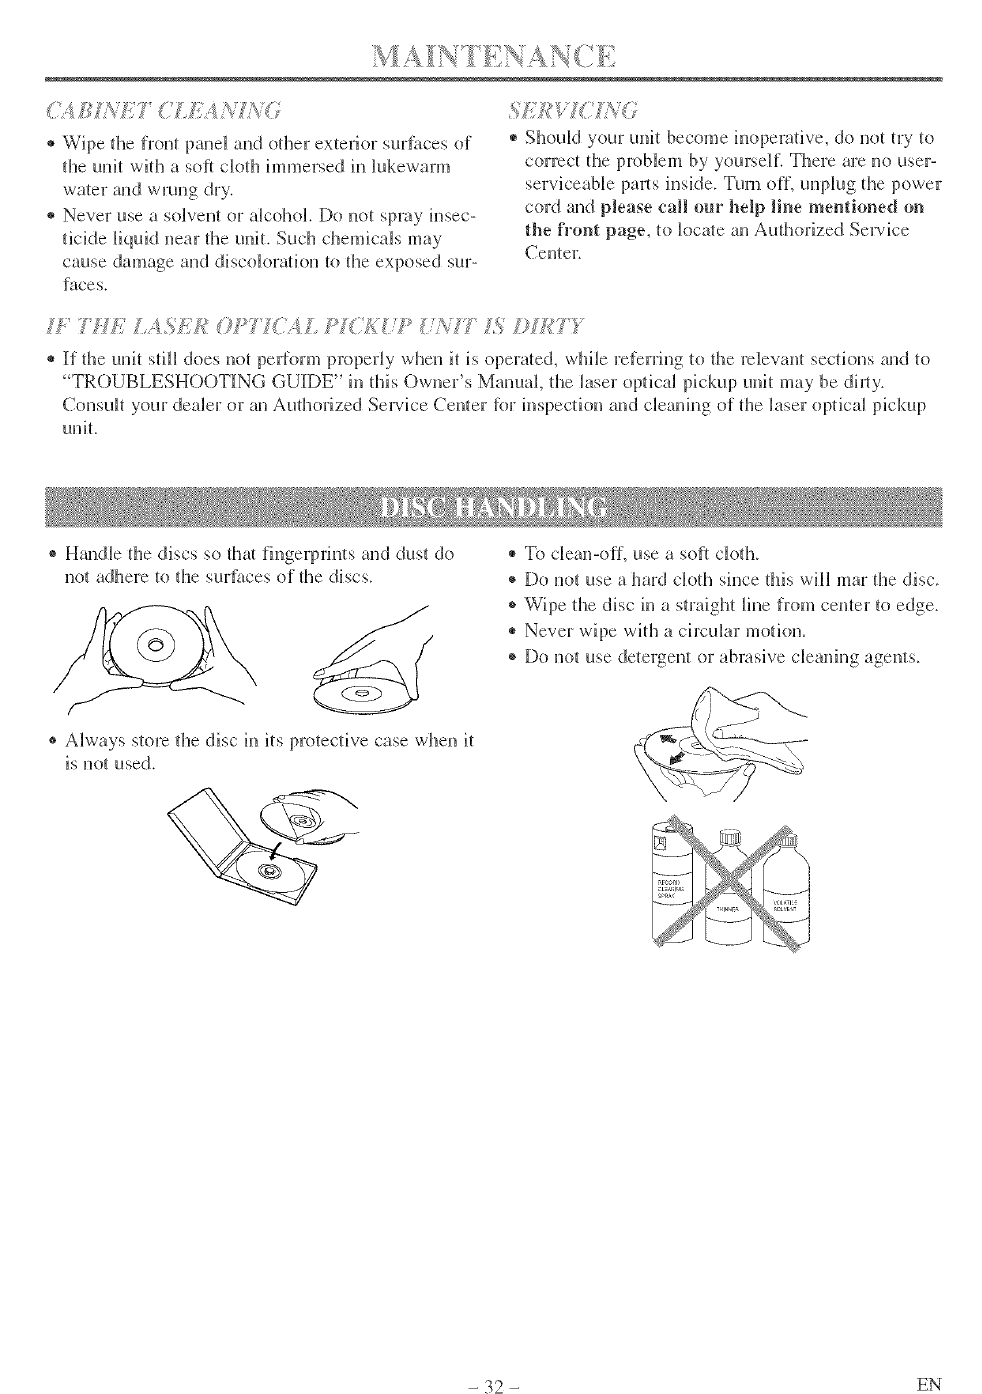
® Wipe tl_e fl:ont panel and other exterior sur_ilces of
tile unit with a soft cloth immersed ill Bukewarm
water and wrung dry.
® Never use a solvent or alcohol. Do uot spray insec-
ticide liquid near the unit. Such chemicals may
cause damage and discoloration to tl_e exposed sur-
faces.
® Should your unit become inoperative, do not try to
correct tl_e problem by yourself. There are no user-
inside. Turn o{L unpMg the power
cord aud please call our help line mentioned on
the fi°ont page, to k_cNe an Audn_rized Service
Centel:
7/£/AS/:,k _©P? I( ',,'IL PI;A/P ?/A? IS *H_??"
® If the unit stilB does not peliorm properly when it is operated, while referring tu fl_e rdevanl sections and to
TROUBLESHOOTING GUIDE" in fifis Owner's Manual tl_e Jaser opdcaJ pickup unit may be dimy.
ConsuBt your dealer or an Aufln_rized Service Cenler R_rinspection and cleaning of tile laser optical pickup
unit.
®Hmldle the discs so tlta fhlgerpfints and dust do
not adhere to tl_e surt).tces o[ tile discs.
® Always store the disc in its protective case when it
is not used.
®To clean-o{L use a soft cloth.
+ Do not use a hard cloth since fffis will mar fl3e disc.
® Wipe tl_e disc in a straight line from cemer to edge.
® Never wipe with a circuBar motion,
® Do nut use detergent or abrasive cleaning agents.
- 32 - EN
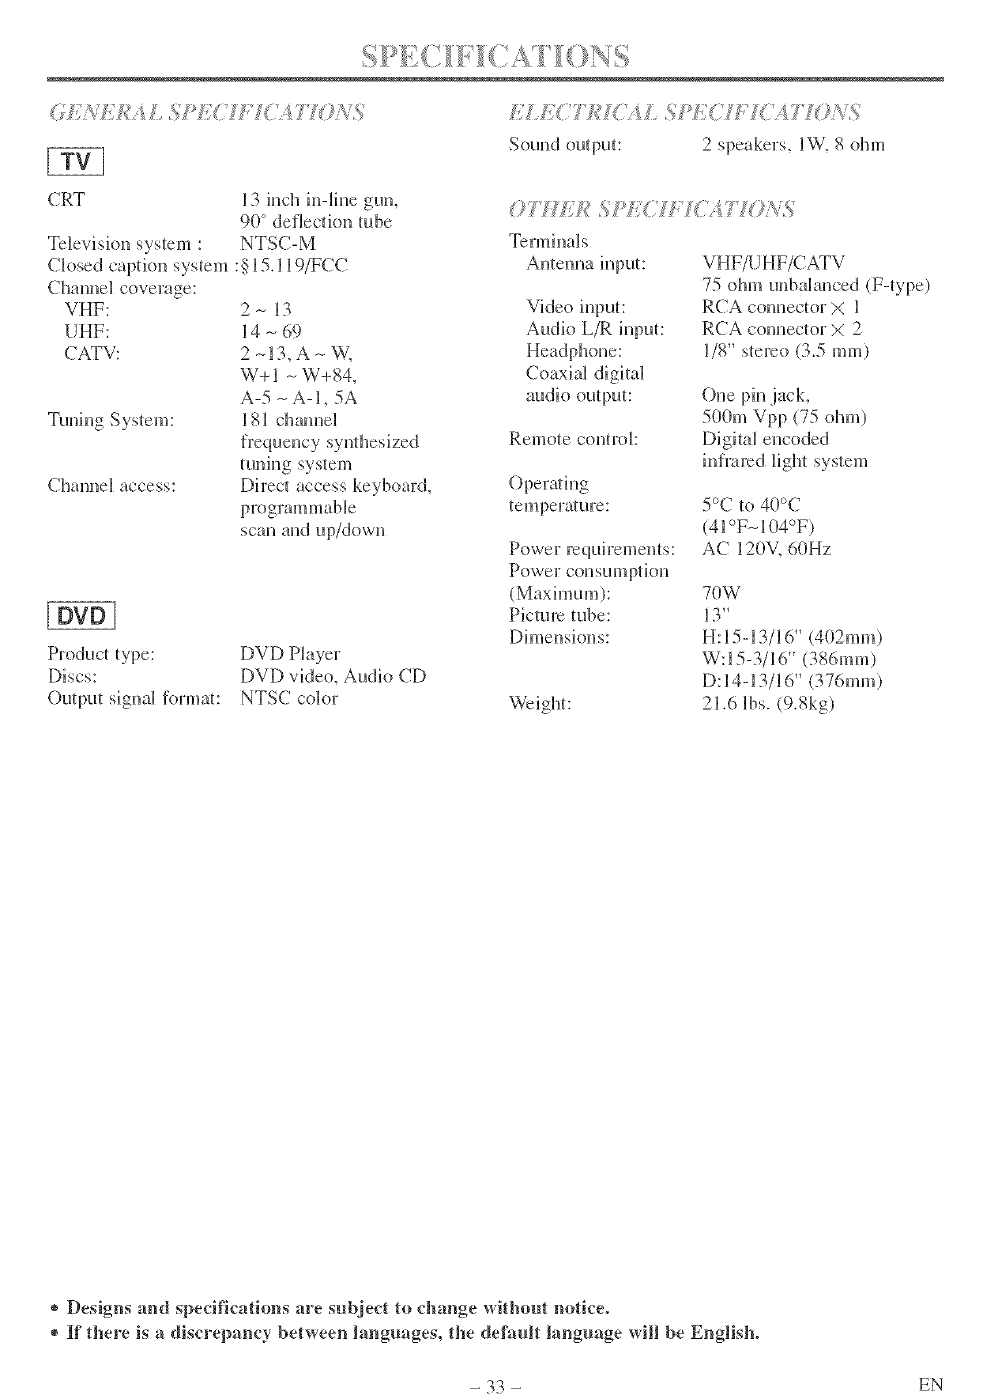
( f{ _*?_2/_:A/ SJ_J{(' f'?(',177 /s_,s
CRT
Te]evisiou system :
Ck_sed capdou system
Channel coverage:
VHF:
UHF:
CATV:
13 inch in-line gun,
90° deflection tube
NTSC-M
:§15.119/FCC
2-13
14 - 69
2-13, A- W.
W+I - W+84,
A-5 -A-I, 5A
181 channel
C]lanne] access:
tuniug system
Direct aCCESSkeyboard,
scan and up/down
2 speakers, IW. 8 ohm
Termhmls
Anlemm input: VHF/UHF/CATV
Audk> L/R input:
RCA counector X l
RCA conuector X 2
1/8" s_ereo (3.5 ram)
audio output:
Remote control:
Operating
temperature:
One pin jack,
500m Vpp (75 ohm)
DigitM encoded
infrared Bightsystem
5°C to 40°C
(41°F_104°F)
AC 120V. 60Hz
Discs:
Output signal R_rmat:
(Maximum): 70W
Picture tube: 13"
Dimensions: H:15-13/16" (402ram)
DVD P_ayer W 1.53-./16 (386mm)
DVD vide(), Audio CD D 14-1.'_/16 (376mm)
NTSC color Weight: 21.6 lbs. (9.Skg)
* Designs and specifications are subject to change without notice.
®If there is adiscrepancy between languages, the default language will be English°
- 33 - EN
mINDICE ..................................... 34
mCONTROLES DE OPERACION Y FUNCIONES ..... 34
mPREPARACI()N PARA LA UTILIZACION .......... 35
CONEX1ONES DE ANTENA/CABLE .............. 35
CONEX10N A TOMAS DE ENTRADA DELANTERAS 36
CONEXl(>N A {IN AMPLIFICADOR ESTF_REO
EQUIPADO CON TOMAS DE ENTRADA DIGITAL
(para DVD) .................................. 36
CONEXl(>N A UN DE(ODW_CADOR DOLBY D_GITAL
(pala DVD) ................................... 36
PARA _NSERTAR LAS P_LAS .................... 36
SECC[ON DE TV
PARA IvHRAR (IN PROGRAMA DE TV ............ 37
DK)MA [)EL MENLI ........................... 37
SECC]ON DE DVD
REPRODUcCION BASICA ...................... 38
MEN0 DE D_SCO ............................. 38
REAN UDAC_()N .............................. 38
•Consulte la figura 1 de la pfigina 8para el panel frontal de la unidad
• Consulte la figura 2 de la pfigina 8 para el mando a distancia
•Consulte la figura 3 de la pagina 9 para la vista posterior
1. Bandeia de carga demdisco
2. Toma de entrada VIDEO
Conecte aquf la toma de salida de vkLeo de uua
videocfimara o de una videograbadora.
3, Tomas de entrada AUDIO LIFt
Conecte aquf las tomas de salkLa de audk_ de m-la
videoc_imara o de una videograbadora.
4, Botdn POWER
Presioue para enceuder y apagar [a m_idad.
5, Botones VOLUME {VOL.) A /T
Presk)ue para coutrolar e[ mve[ de vohtmeu de[ DVD y
eI televisor.
6, Botones CHANNEL (CH,) at /V'
Utilice para selecciouar cauales memorizados.
7, VentaniHa del sensor de mando adistancia
8, Botdn [] STOP
Detieue la operacidu del disco.
9, Botones SKIP N!_ /_
Presioue uua vez para omitir capfmlos opistas y
desplazarse a m_ pm-_to especffico.
Betones SEARCH _ /_(Panem frontam)
Mauteuga el botdn presiouado para cambiar [a
velocidad de rcproduccidn en avauce orctroceso,
10. Botdn _ PLAY
lnicia [a reproduccidu de[ conteuido del disco.
11, Botdn mmPAUSE
Hate una patlsa eu la reproduccidu del disco.
12, Bet6n _ OPEN/CLOSE
Presio_e para insertar m-i disco eu la baudcja o retirarIo
de ella.
13, Tema HEADPHONE
Para conectar auricularcs (no suministrados) ),rescllc_t_"
eu privado.
14, Botdn PICTUBE
Presione para a_iustar la imageu.
15, Botones Numericos
Mode TV:
Presioue dos cffras para acceder directameute al canM
deseado.
No olvide presiouar [0] antes de elegir un canal de mm
sola cifra.
- 34 -
Botdn +100
Presione para seleccionar cauales de televisidn per
cable cuyo u(Imero sea superior a 99.
Mode DVD:
Presione para introduch" el ufimero deseado.
Botdn +10
Presione para h-ltroduch"n(m_eros superiors a 9.
16. Botdn SLEEP
Utilise para ajustar el temporizador de dormh'.
17. Botdn DISPLAY
Mode TV:
ludica eI ndmero deI caual en Ia pantalla deI televiso_:
Mode DVD:
hMica el estado actual en la pantalla del televiso_:
18. Boton SETUP
Presione para emtar o salir del meufi de configuraci(m
de televisor oDVD.
19, Botdn TITLE
Pm'a visualizar el meufi de tftulos.
20, Botdn CLEAR
Para canceIa_ o borra_ m__tinste entrado actuaImeute.
21. Botdn MODE
P_esione para [lalua_ la pautaIIa de [a leproduccidn
programada o ]a de reprodnccidu aJeatoria eu el mode
de parada.
Presione para [Iamar ]a pamalla de _tiuste de[ hive[ de[
negro o la pamalla de souido ambiental durante la
reproduccidn.
22. Botdn SEARCH MODE
Presione para k_calizar uu punto deseado.
23. Botdn AUDIO
Presione pm'a seIeccionar m-imode de souklo o idioma
de audio deseado.
24, Botdn SUBTITLE
Presione para seleccionar el idioma de subtftulos
deseado.
28. Botdn REPEAT
Repite ]a reproduccidu de] disco, tftulo, capftulo o pista
actual.
26. Botdn ANGLE
Presione para cambiar el fiugulo de la c(mmra y vet la
secueucia que se est_i reproduciendo desde un £_gulo
difere,_te (si existe).
ES
27+Bot6nA-B
Repke ]a reproduccidn de mm seccidn seleccionada.
28+ Bot6n RETURN
Permite vo]ver a la pantaNa anterior en el men(_ de
configuracidn.
29. Botdn ENTER
Presione para estabbcer/m %}uste.
30. Botones A I V /_/
Modo TV:
Presione para seleccionar un modo de ajuste ell el
men5 que apareceell la panmlht del televisor.
Presidnelos tambidn pm'a seIeccionar opckmes o
estabIecer _justes entm mend en particula'.
Modo DVD:
Preskme para seleccionar un ftem de mend.
31+ Botdn DISC MENU
Muestra mend del DVD.
32+ Botdn REV -,_-,q
Presione para mover la imagen de DVD en ret_oceso
rapido en o ell c_mara [enta ell rctroceso.
Botdn FWD
Pmsione para mover ell avarice _pido o en c_mam
]enta,
33+ Botdn ZOOM
Amplfa parte de ]a imagen reproducida de un DVD.
34+ Botdn MUTE
Supdme la salida de sonido. Prcsi6nelo de nuevo pm'a
restablecer el sonido.
35+ Botdn SELECT
Preskme para cambiar al modo TV, modo de entrada
externa o modo de DVD.
36. Toma COAXIAL
Conecte solamente a la entrada digital de un
mnplificador extemo o decodificador (pm'a audio de
DVD solmlleme).
37+ Toma ANT.
Conecte a tma antena, sistema de tebvisidn pot cable o
sistema de satdlite.
38+ Cable electrico
ConScte a m_toma de CA estAndar (120 V,/60 Hz),
NOTA:
® Antes de conectar el cable el_ctrico a una toma de
CA, reth'elo del gaucho para evitar dafiarlo.
la f]gura de la pagina ]
C(msulte 4 10
ANTE?',_ ( <L)M¢'A.!/4_ IE 'il/TifLM,
La ameua combiuada de VHF/UHF de 75 ohmios
pnede couecmrse a latoma ANT.
A >¢7'F>_A.%.%k,M.UCAJ_I.'_II;
El} a[gunas zonas ser_ necesario u[i[izar una antena
exterioc
77.;/7 ! If[)>, ?OH ('4 D_/, SIV ('<14 I)]:.
<'OA kk!777 )01¢
Ulilice esm conexidn si sn sistema de televisi/n pot
cable se conecta dhectameute a la unidad, sin una
POB I/;liLE 4'0>{CLI%
DE (OA- U:Aql])<?Hi]}E<70©II<41)OI¢
0<;,IL.i./.,'_ESA71_ I k
Si sa cumpaiSfade _elevisidnpot cablelesuminism_
nua c@_ de converfidoro siadlizaun sistemade
satdlite, podrd tlilizar la conexidn bdsica clue se
muestra eu la ilustmddm
La seleccidn de los canales deberd hacerse con la caja
de converfidor o con la c_ja de sa/dlite. Esto significa
clue no es posible cambiar de canal udlizando el
mando a dismncia de la unidad.
Nota para el instalador de sistemas CATV
Esta nora dene la fhmlidad de llamar la meucidu
del insmlador de sistemas CATV para que _enga
en cueum el Ardculo 820-40 de la NEC, que
proporcioua recomeudackmes para hacer una
conexidn a derra aprupiada y, en particular.
especifica clue la derra del cable debe conectarse
al sistema de puesm a derra del edificio, mu cerca
del panto de emrada del cable como sea pusible.
NOTA:
Antes de euchufar la anteua a la {oma ANT. de la
nnidad, compmebe que la clavija uo estd doblada.
Siesm doblada, pdngala derecha como se muestra
en la ilust:acidn, y luegu condctela en la loma
ANT. de la unidad.
Chlvi.ia doblada
Cable Clavija
(Necesita enderezarse) (Clavija derecha)
NOTA:
®Para su seguridad y para evitar que se dafie
la unidad, desencbufe el cable de anlena de la
toma ANT. antes de mover la unidad.
- 35 - ES
Cuando vea un progralF_a grabado en otra faen_e
(videograbadora o videoc&_mra), utilice las tomas de
entrada AUDIO/VIDEO de la parte delantem de la
unidad.
Conecte las tomas de saHda de audio/vfdeo de otra
fuente a Bas tomas AUDIO L/R y VIDEO de esta
unklad.
Despfies, presione [SELECT] o [CH. A /T] basra
que aparezca "AUX" en la pantalla.
IConsulte la figura 5 de la pagina 11 ]
NOTA:
® Cuando conecte una videograbadora monofdnica
(om_ fuente) a esta unidad, conecte la toma de
salida de audio de la videograbadom monof6nica
(otto fuente) a la toma AUDIO L de esta unidad. E1
audio saldr_ iguah_]ente pot k_s canales izquierdo y
derecho.
Uti[ice un cable digital coaxial de audio (disponible
en el comercio) para hacer Bas conexiones de audio.
Conexidn a un ampHficador equipado con tomas de
emrada digital, plahm MD o plahm DAT.
[C(msulte la figm°a 6de la pfigina 11 ]
NOTAS:
® La Nente de audio de un disco gmbado en forma/o
de sonkto envolvente Dolby Digita_ de 5,1 canales
no se puede grabar como sonido digital mediante
una p_aina MD o f)AT.
® Asegdrese de apagar todos los componentes del
sistema antes de conectar otfo componente.
® Consulte _os manua_es de insmlcckmes de los
componentes que va a conectar a la unidad.
® Ajuste la funcidn "DOLBY DIGITAL" a PCM"
para sMida de audio en el modo de configuracidn.
La rcproduccidn eu una unidad utilizando ajustes
incorrectos puede generar ruido y distorsidn, y
tambidn puede provocar dafios a k_s altavoces.
Si utiliza esta unidad para reproducir un disco DVD
en un _brmato de sonido envolvente Do[by Digital de
5,1 canales, [a unidad (lard salida a an flujo de datos
DOLBY DIGITAL desde su toma COAXIAL. Si
conecta [a unidad a un decodfficador f)o[by Digital
podr_ disflTutar de una tonalidad m_s convincente y
real con un sonido euvogven_e poten_e y de alta
calidad sh_]ilar ag de los cines.
UtiHce cables digitMes coaxiales de audio
(disponi bles en el comerck_) para hacer ]as
conexkmes de audio.
la figura de la p_gina
Consulte 7 12
NOTAS:
®Aseg6rcse de apagar todos los componeates de]
sistema antes de conectar otro componente_
®Consulte _os manaa_es de instrucciones de los
componentes que va a conectar a ]a uuidad.
* Si conecta un decodificador Ddby Digital, gtiuste
Bafund6n "D()LBY DIGITAL" a "BITSTREAM"
para salida de audio en el modo de con[]gurad6n.
®A meJ]os que se haga ]a conexidn a un
decodificador Dolby Digital ajus_e [a funci6n
"DOLBY DIGITAL" a "PCM" para saHda de
attdio eJ] el modo de congguraci6n. La
rcprodaccidn en una unidad utilizando _tiustes
incorrectos puede generar mido y distorsidn, y
tambidn puede provocar daiSosa k_s almvoces.
Fabricado ba]_ licencia de Dolby [
Laboratories. DNby y el simboio de la [
doble D son marcas comerciales de Dolby
Laboratories.
1) Abra la cubierta dd compartimiento de las pflas
empujando la cubim_ta de[ mando a __
distaucia en e_ sentido de Ja flec]m.
2) [nse]_te 2 picas "AA" en el
compaJ_timiento de Jas pflas, en e_
sentido indicado pot _as marcas de polaridad (+/-).
3) Vuelva a poner _a cuNerta.
- 36 - ES
Euchuic d cable d@trico de ia uuidad eu uu
_omacorrieute de CA dd hoga:
NOTA:
®Si apareceu uOmeros en _aesquiua de la pau{aHa,
preskme [POWER] siu deseudmfar el cable
d@trico_
v < <
Presioue [POWER] pare eucender la uuidad.
<
Pmsioue [CH. A /T] o los hotones m_ma'kos para
sdecciouar su uOmero de canal &sea&.
Nota para d uso de los botones uum@ieos:
• Debe cobcar uu cero autes de los uOmeros de
cauai de uua sola cifra (por ejemplo: 02, 03, 0Z
etc.).
• Cmmdo sdeccioue cauabs de cable de m£ de 99,
presioue primero [+190] y &spuds las dos fiNimas
cifras. (Ejempb: para sdeccionar el canal 125,
primero presioue [+100] y &spuds presioue [21 y
[5].)
z z
Presioue [VOL° A/V] pare ajustar d volumen.
Presioue [MUTE] pare sileuciar iustau{4ueameu{e el
souido_
Presioue nuevameme para recupqTar el uivel de
souido auierioJ:
NO'IA:
®Si presioue [CE A /T] eu d modo DVD, puede
cambiar los cauabs de TV. h_cluso si descouecta Ba
unidad eu el modo DVD, cuando vudva a
couectar, vo[ver_ a[ modo TV.
#_'_,f,_",4?//£ (}'t ?;A,LfTS L: ££ 0
9÷ ®co ou÷ LA/_TGUAGE
Presioue [SETUP].
Presioue [_. /V] para apumar a "LANGUAGE".
Pmskme [ENTER] rcpetidameme pare sdecdonar
"ENGLI[SH" = iuglds, "ESPA1NOL" o "FRAN(_TAI[S"
= frm_ds.
,3 Sa/ya <÷ too@, de doms
Presioue [SETUP] pare saHr del meuO.
NOTAS:
®Esta _uncidn afccta sdio el idioma eu el meud de la
pautaHa y uo la fuente de audio.
®Si por alguua razdu, el men0 est_ eu frands,
presioue [SETUP], presione [_ /_'] para apuuta7
al "LANGAGE [FRAN(TAISI" y preskme
[ENTER] repetidamente para seleccioua7 el
idbma deseado y presioue [SETUP].
®Si _a unidad est4 conectada a uua caja de cable o
caja de sa_ai{e, preskme [CH. _, /V] para
sdecciouar CH3 o CH4 de acuerdo cou el _(ius{e
de caual de saHda dd dispositivo y seleccioue el
cauai deseado eu el dispositivo.
P;4£A g/3 if£'_ LA 77(!A/_ _ L_,?k£h /
® Cuando se couec[a uu equip() ex[erno eu ]as {omas
de eutrada AUDIO/VI[DEO fromabs, prcskme
[SELECT] o [CH. A /_] repetidameute hasm que
aparezca "AUX" eu la pautaHa.
- 37 - ES
Conectelaalimentacidndelamplificadoryotros
componentes,siesnecesario.
•La alimentacidn se conedar£
>_mde a de ca 9_:_de d '_K;o.
?,
ro,,, r :, ,:_, _,', I,, SS/'_deS ¢0
La bandeja se cerrar_i autom_ificamente y la
reproduccidn coMe_lzar_ desde N priH_er cap[[@o o
pism dN disco.
La reproduccidn tambVen empieza eerrando
manualmente la bandeia del disco o presionando
[OPEN/CLOSE _1.
•Si kt reproducddn no comienza autom_iticamente,
preskme [PLAY [>].
•Cuando reproduzca un DVD que tenga grabado un
mend de @@os, e_ mend po&i aparecer en _a
Aparecer_i el mend principal de DVD.
Si no existe la [unci6n, puede aparecer el sfmbolo
1_ en _apantaHa de TV.
•Si e] mend de disco existe en el disco, aparecer_in
e] idkmm de audk_, opciones de subtft@o, capft@os
para el tft@o y otras opciones pare su selecNdn.
_,t , a pes s_e
<',r# % ,_ S
Aparecer4 e_ mensaje de con@maddn en bt
<s , e[_t_,AY [t!_ e_}(<i,io¢6 _
c_'_ }_,atS de_:_ _; 6 ultots'_dese 'a6 8
Pare cancNar _a con@macidn, presione dos veces
[STOP 1_].
La hfformacidn de confinuacidn permanece
acfivada incluso cuando apaga el inlermptor
- 38 - ES

- 30 - ES
GENERAL, iNDiRECT OR CONSEQUENTIAL DAMAGES ARiSiNG OUT OF OR OCCASIONED BY THE
USE OF OR THE iNABiLiTY TO USE THiS PRODUCT. THiS WARRANTY iS MADE iN LiEU OF ALL
OTHER WARRANTIES, EXPRESS OR iMPLiED, AN[) OF ALL OTHER LiABiLiTiES ON THE PART (iF
FUNA1, ALL OTHER WARRANTIES iNCLUDiNG THE WARRANTY OF MERCHANTABiLiTY AND
FITNESS FOR A PARTICULAR PURPOSE, ARE HEREBY DiSCLAiMED BY FUNAI AND iTS
REPRESENTATIVES iN THE UNITED STATES.
ALL WARRANTY iNSPECTiONS AN[) REPAIRS MUST BE PERFORMED BY A FUNA1 AUTHORIZED
SERVICE CENTER. THiS WARRANTY iS ONLY VALID WHEN THE UNiT iS CARRIED-iN TO A FUNA1
AUTHORIZED SERVICE FACiLiTY.
IMPORTANT:
THiS LiMiTED WARRANTY GIVES YOU SPECiFiC LEGAL RIGHTS. YOU MAY HAVE OTHER RIGHTS
THAT 'gARY FROM STATE TO STATE. IK AT ANY TiME DURING THE WARRANTY PERIOD, YOU ARE
UNABLE TO OBTAIN SATiSFACTiON WiTH THE REPAIR OF THiS PRODUCT, PLEASE CONTACT FUNA1
CORR
ATTENTION:
FUNAI CORR RESERVES THE RIGHT TO MOr)IFY ANY r)ESI[GN OF THIS PRODUCT
WITHOUT PRIOR NOTI[CE.
To locate your nearest SYLVANIA Authorized Service Center or for general service inquiries,
please call or write to the h_llowing:
FUNAI (ORPORATION, INC.
SERVICE CENTER
J9900 Van Ness Ave_e, "_Ummce, CA 90501
Tel :1o800-968o3429
http://www'SylvaniaC°nsumerElectr°nics'c°m
Head OtYice: I0(t North Street. Tetelboro. NJ 07608
PLEASE riO NOT SHIP YOUR UNIT TO THE TETERBORO ADr)RESS,
Prh_ied in Malaysia IEMN20238
