Sylvania LD200SL8 User Manual LCD TELEVISION Manuals And Guides L0705199
SYLVANIA TV/VCR or DVD Combo Manual L0705199 SYLVANIA TV/VCR or DVD Combo Owner's Manual, SYLVANIA TV/VCR or DVD Combo installation guides
User Manual: Sylvania LD200SL8 LD200SL8 SYLVANIA LCD TELEVISION - Manuals and Guides View the owners manual for your SYLVANIA LCD TELEVISION #LD200SL8. Home:Electronics Parts:Sylvania Parts:Sylvania LCD TELEVISION Manual
Open the PDF directly: View PDF ![]() .
.
Page Count: 48
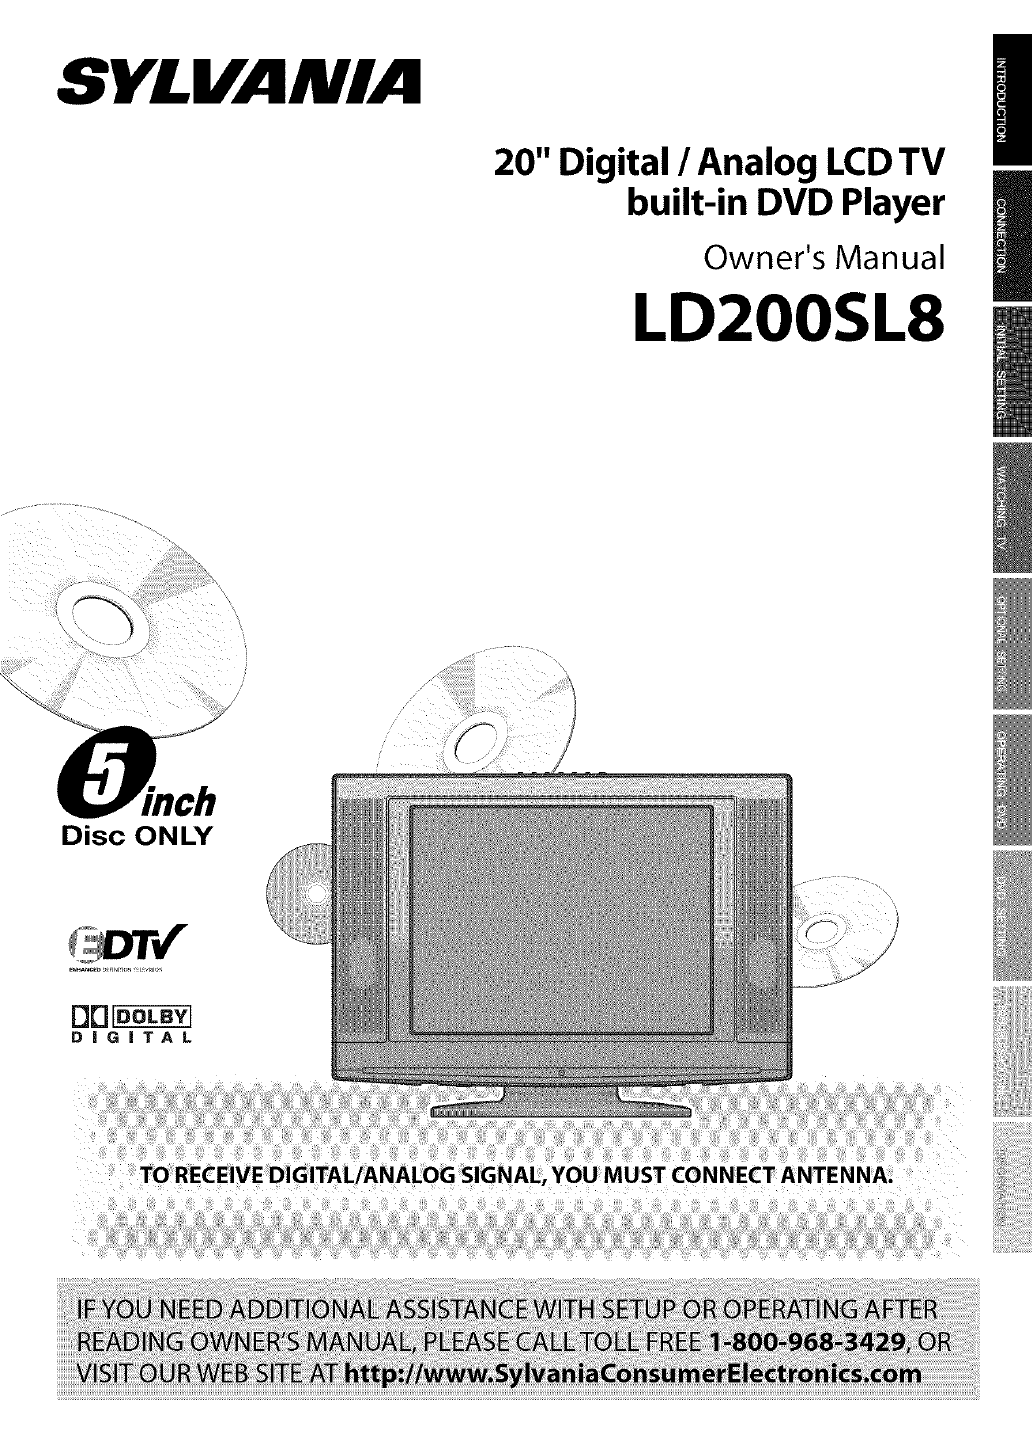
SYLVANIA
20" Digital /Analog LCDTV
built-in DVD Player
Owner's Manual
LD200SL8
Disc ONLY
!i!!i!ii!i!i!ii!iiiiiiliiiiiiii!i!!!!!i!!i!!i!!i!!_!_i_!_!_i_ii!
WARNING:TO REDUCE THE RISK OF FIRE OR ELECTRIC SHOCK, DO NOT EXPOSE THIS
APPLIANCE TO RAIN OR MOISTURE.
CAUT,ON/ A
CAUTION: TO REDUCE THE RISK OF ELECTRIC SHOCK,
DO NOT REMOVE COVER (OR BACK). NO USER SERVICEABLE
PARTS INSIDE. REFER SERVICING TO QUALIFIED SERVICE
PERSONNEL.
The important note is located on the rear 0fthe cabinet.
Important Safeguards
1o READ INSTRUCTIONS - All the safety and operating instructions
should be read before the appliance is operated.
2o RETAIN INSTRUCTIONS - The safety and operating instructions
should be retained for future reference.
3o HEED WARNINGS - All warnings on the appliance and in the
operating instructions should be adhered to.
4o FOLLOW INSTRUCTIONS -All operating and use instructions
should be followed.
5o CLEANING - Unplug TV from the wall outlet before cleaning. Do
not use liquid cleaners or aerosol cleaners. Use a damp cloth for
cleaning.
EXCEPTION: A product that is meant for uninterrupted service and,
that for some specific reason, such as the possibility of the loss
of an authorization code for a CATV converter, is not intended to
be unplugged by the user for cleaning or any other purpose, may
exclude the reference to unplugging the appliance in the cleaning
description otherwise required in item 5.
6o ATTACHMENTS - Do not use attachments not recommended by
theTV manufacturer as they may cause hazards.
7o WATER AND MOISTURE - Do not use this TV near water, for
example, near a bath tub, wash bowl, kitchen sink, or laundry tub,
in a wet basement, or near a swimming pool, and the like.
_o ACCESSORIES - Do not place this TV on
an unstable cart, stand, tripod, bracket,
or table. The TV may fall, causing serious
injury to someone, and serious damage to
the appliance. Use only with a cart, stand,
tripod, bracket, or table recommended by the
manufacturer, or sold with the TV.
Any mounting of the appliance should follow
the manufacturer's instructions and should
use a mounting accessory recommended by the manufacturer.
An appliance and cart combination should be moved with care.
Quick stops, excessive force, and uneven surfaces may cause the
appliance and cart combination to overturn.
AMEUBLES - Cet appareil ne dolt _tre plac_
que sur un meuble (avec ou sans roulettes)
recommand_ par le fabricant. Sivous I'
installez sur un meuble 5 roulettes, d_placez
les deux ensembles avec precaution. Un arr6t
brusque, I'utilisation d'une force excessive
et des surfaces irr_guli_res risquent de
d_stabiliser I'ensemble et de le renverser.
9o VENTILATION - Slots and openings in the cabinet and the back
or bottom are provided for ventilation and to ensure reliable
operation of the TV and to protect it from overheating, these
openings must not be blocked or covered. The openings should
never be blocked by placing theTV on a bed, sofa, rug, or other
similar surface. This TV should never be placed near or over a
radiator or heat register. This TV should not be placed in a built-in
installation such as a bookcase or rack unless proper ventilation is
provided or the manufacturer's instructions have been adhered to.
0o POWER SOURCES - This TV should be operated only from the type
of power source indicated on the marking label. If you are not sure
of the type of power supply to your home, consult your appliance
dealer or local power company. For TVs intended to operate from
battery power, or other sources, refer to the operating instructions.
THIS SYMBOL INDICATES THAT DANGEROUS
VOLTAGE CONSTITUTING A RISK OF ELECTRIC
SHOCK IS PRESENTWlTHIN THIS UNIT.
THIS SYMBOL INDICATES THATTHERE ARE
IMPORTANT OPERATING AND MAINTENANCE
INSTRUCTIONS IN THE LITERATURE
ACCOMPANYINGTHE APPLIANCE.
Io GROUNDING OR POLARIZATION - This TV is equipped with a
polarized alternating-current line plug (a plug having one blade
wider than the other). This plug will fit into the power outlet only
one way. This is a safety feature. If you are unable to insert the plug
fully into the outlet, try reversing the plug. If the plug should still
fail to fit, contact your electrician to replace your obsolete outlet.
Do not defeat the safety purpose of the polarized plug.
2oPOWER-CORD PROTECTION - Power-supply cords should be
routed so that they are not likely to be walked on or pinched by
items placed upon or against them, paying particular attention to
cords at plugs, convenience receptacles, and the point where they
exit from the appliance.
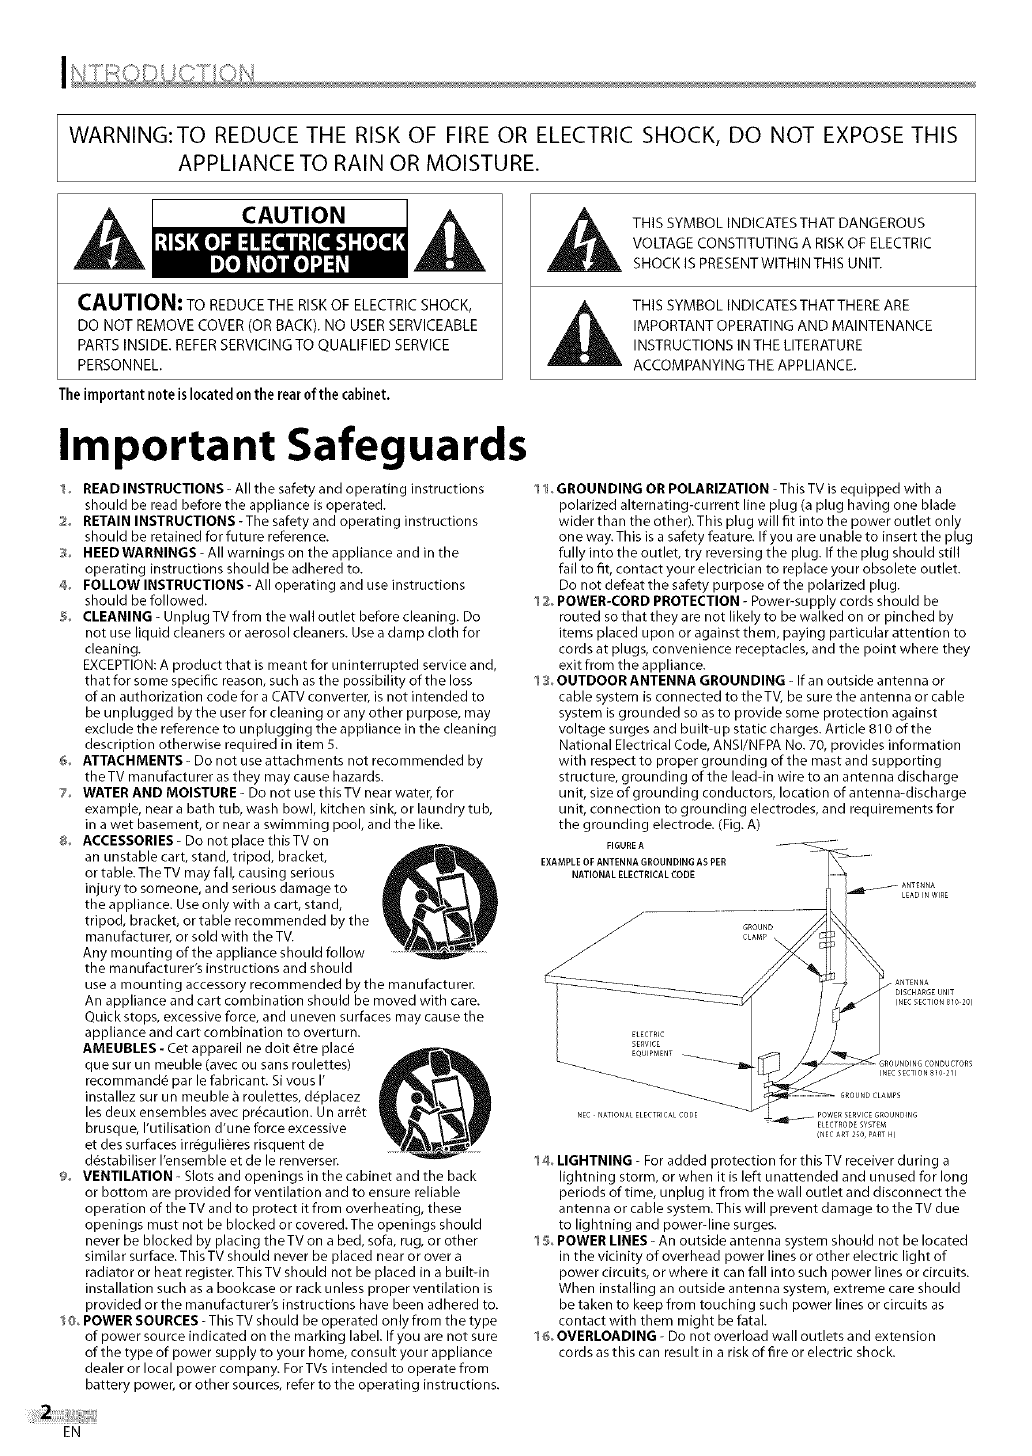
3oOUTDOOR ANTENNA GROUNDING -If an outside antenna or
cable system is connected to theTV, be sure the antenna or cable
system is grounded so as to provide some protection against
voltage surges and built-up static charges. Article 810 of the
National Electrical Code, ANSI/NFPA No. 70, provides information
with respect to proper grounding of the mast and supporting
structure, grounding of the lead-in wire to an antenna discharge
unit, size of grounding conductors, location of antenna-discharge
unit, connection to grounding electrodes, and requirements for
the grounding electrode. (Fig. A)
FIGURE A
EXAMPLE OF ANTENNA GROUNDING AS PER
NATIONAL ELECTRICAL CODE
4o LIGHTNING - For added protection for this TV receiver during a
lightning storm, or when it is left unattended and unused for long
periods of time, unplug it from the wall outlet and disconnect the
antenna or cable system. This will prevent damage to the TV due
to lightning and powerdine surges.
5oPOWER LINES - An outside antenna system should not be located
in the vicinity of overhead power lines or other electric light of
power circuits, or where it can fall into such power lines or circuits.
When installing an outside antenna system, extreme care should
be taken to keep from touching such power lines or circuits as
contact with them might be fatal.
6o OVERLOADING - Do not overload wall outlets and extension
cords as this can result in a risk of fire or electric shock.
EN
17OBJECTAND LIQUID ENTRY- Never push objects of any kind into
this TV through openings asthey may touch dangerous voltage
points or short out parts that could result in afire or electric shock.
Never spill liquid of any kind on the TV.
18oSERVICING- Do not attempt to servicethis TVyourself asopening
or removing covers may exposeyou to dangerous voltage or other
hazards. Referall servicing to qualified service personnel.
19oDAMAGE REQUIRINGSERVICE_ Unplug this TV from the wall
outlet and refer servicing to qualified service personnel under the
following conditions:
a. When the power supply cord or plug is damaged orfrayed.
b. If liquid has been spilled,or objects havefallen into the TV.
c. IftheTV has been exposed to rain or water.
d. If the TV does not operate normally byfollowing the operating
instructions. Adjust only those controls that arecovered by the
operating instructions, asimproper adjustment of other controls
may result in damage and will often require extensive work by a
qualified technician to restore the TV to its normal operation.
[] Precautions
e. If the TV has been dropped or damaged in any way.
f. When theTV exhibits a distinct change in performance, this
indicates a need for service.
2@° REPLACEMENT PARTS -When replacement parts are required, be
sure the service technician uses replacement parts specified by
the manufacturer that have the same characteristics as the original
part. Unauthorized substitutions may result in fire, electric shock,
injury to persons or other hazards.
21 oSAFETY CHECK- Upon completion of any service or repairs to this
TV, ask the service technician to perform routine safety checks to
determine that the TV is in proper operating condition.
22 HEAT- This TV product should be situated away from heat sources
such as radiators, heat registers, stoves, or other products (including
amplifiers) that produce heat.
2:3° WALL OR CEILING MOUNTING - This TV product should be
mounted to awall or ceiling only as recommended by the
manufacturer.
[(_) LAMP IN LCD CONTAINS MERCURY, DISPOSE ACCORDING TO LOCAL, STATE OR FEDERAL LAW. j
1
CAUTION: TO PREVENT ELECTRIC SHOCK, MATCH WIDE BLADE OF PLUG TO WIDE SLOT, FULLY INSERT. 1
1
ATTENTION: POUR EVITER LES CHOCS ELECTRIQUES, INTRODUIRE LA LAME LA PLUS LARGE DE LA FICHE DANS LA
BORNE CORRESPONDANTE DE LA PRISE ET POUSSER JUSQU'AU FOND.
equipment may generate or use radio frequency energy. Changes or modifications to this equipment 1
FCC WARNING This
may cause harmful interference unless the modifications are expressly approved in the manual. The user
cou dose the authority to operate this equipment if an unauthorized change or modification is made.
RADIO-TV INTERFERENCE
This equipment has been tested and found to comply with the limits for a Class B digital device, pursuant to Part 15 of the
FCCRules. These limits are designed to provide reasonable protection against harmful interference in a residential installation.
This equipment generates, uses, and can radiate radio frequency energy and, if not installed and used in accordance with the
instructions, may cause harmful interference to radio communications. However, there is no guarantee that interference will not
occur in a particular installation. If this equipment does cause harmful interference to radio or television reception, which can be
determined by turning the equipment off and on, the user is encouraged to try to correct the interference by one or more of the
following measures:
1) Reorient or relocate the receiving antenna.
2) Increase the separation between the equipment and receiver.
3) Connect the equipment into an outlet on a circuit different from that to which the receiver is connected.
4) Consult the dealer or an experienced radio/TV technician for help.
This Class B digital apparatus complies with Canadian ICES-O03.
Cet appareil num_rique de la classe B est conforme _ la norme NMB-O03 du Canada.
Note to CATV system installer:
This reminder is provided to call the CATV system installer's attention to Article 820-40 of the NEC that provides guidelines
for proper grounding and, in particular, specifies that the cable ground should be connected to the grounding system of the
building as close to the point of cable entry as practical
LASER SAFETY
This unit employs a laser, Only a qualified service person should remove the cover or attempt to service this device, due to
possible eye injury,
CAUTION: USE OF CONTROLS OR ADJUSTMENTS OR PERFORMANCE OF PROCEDURES OTHER THAN THOSE SPECIFIED
HEREIN MAY RESULT IN HAZARDOUS RADIATION EXPOSURE,
CAUTION: VISIBLE AND INVISIBLE LASER RADIATION WHEN OPEN AND INTERLOCK DEFEATED, DO NOT STARE INTO BEAM,
LOCATION: INSIDE, NEARTHE DECK MECHANISM.
IMPORTANT COPYRIGHT INFORMATION
Unauthorized copying, broadcasting, public performance and lending of discs are prohibited. This product incorporates
copyright protection technology that is protected by U.S. patents and other intellectual property rights. Use of this copy-
right protection technology must be authorized by Macrovision, and is intended for home and other limited viewing uses
only unless otherwise authorized by Macrovision. Reverse engineering or disassembly is prohibited.
i_ii!i!
ii!iii
ii(il
iiiiii!
i!!ill
i l;iiiiill
i i:i:!iiii
i iiiii',
EN
LOCATION
Forsafeoperationandsatisfactoryperformanceoftheunit,keepthefollowinginmindwhenselectingaplaceforitsinstallation:
•Shielditfromdirectsunlightandkeepitawayfromsourcesofintenseheat.
•Avoiddustyorhumidplaces.
•Avoidplaceswithinsufficientventilationforproperheatdissipation.Donotblocktheventilationholesatthetopandbottomofthe
unit.Donotplacetheunitonacarpetbecausethiswillblocktheventilationholes.
•Installtheunitinahorizontalposition.
•Avoidlocationssubjecttostrongvibration.
•Donotplacetheunitnearstrongmagneticfields.
•Avoidmovingtheunittolocationswheretemperaturedifferencesareextreme.
• Be sure to unplug the AC power cord from the outlet before carrying the unit.
TO AVOID THE HAZARDS OF ELECTRICAL SHOCK AND FIRE
• Do not handle the power cord with wet hands.
• Do not pull on the power cord when disconnecting it from an AC outlet. Grasp it by the plug.
• If, by accident, water is spilled on the unit, unplug the power cord immediately and take the unit to our authorized service center for
servicing.
• Do not place anything directly on top of the unit.
MOISTURE WARNING
• Moisture condensation may occur inside the unit when it is moved from a cold place to a warm place, or after heating a cold
room or under conditions of high humidity.
When the condensation occurs inside the unit, turn the unit on and leave it at least 2 hours to dry out.
The serial number of this product may be found on the back of the unit. No others have the same serial number as yours. You
should record the number and other vital information here and retain this book as a permanent record of your purchase to aid
identification in case of theft.
dealer phone No. serial N01
Ldealerpurchasefrom model No, dealer address
Note about recycling: ]
This product's packaging materials are recyclable and can be reused, Please dispose of any materials in accordance with your I
local recycling regulations, i
Batteries should never be thrown away or incinerated but disposed of in accordance with your local regulations concerning[
chemical wastes, i
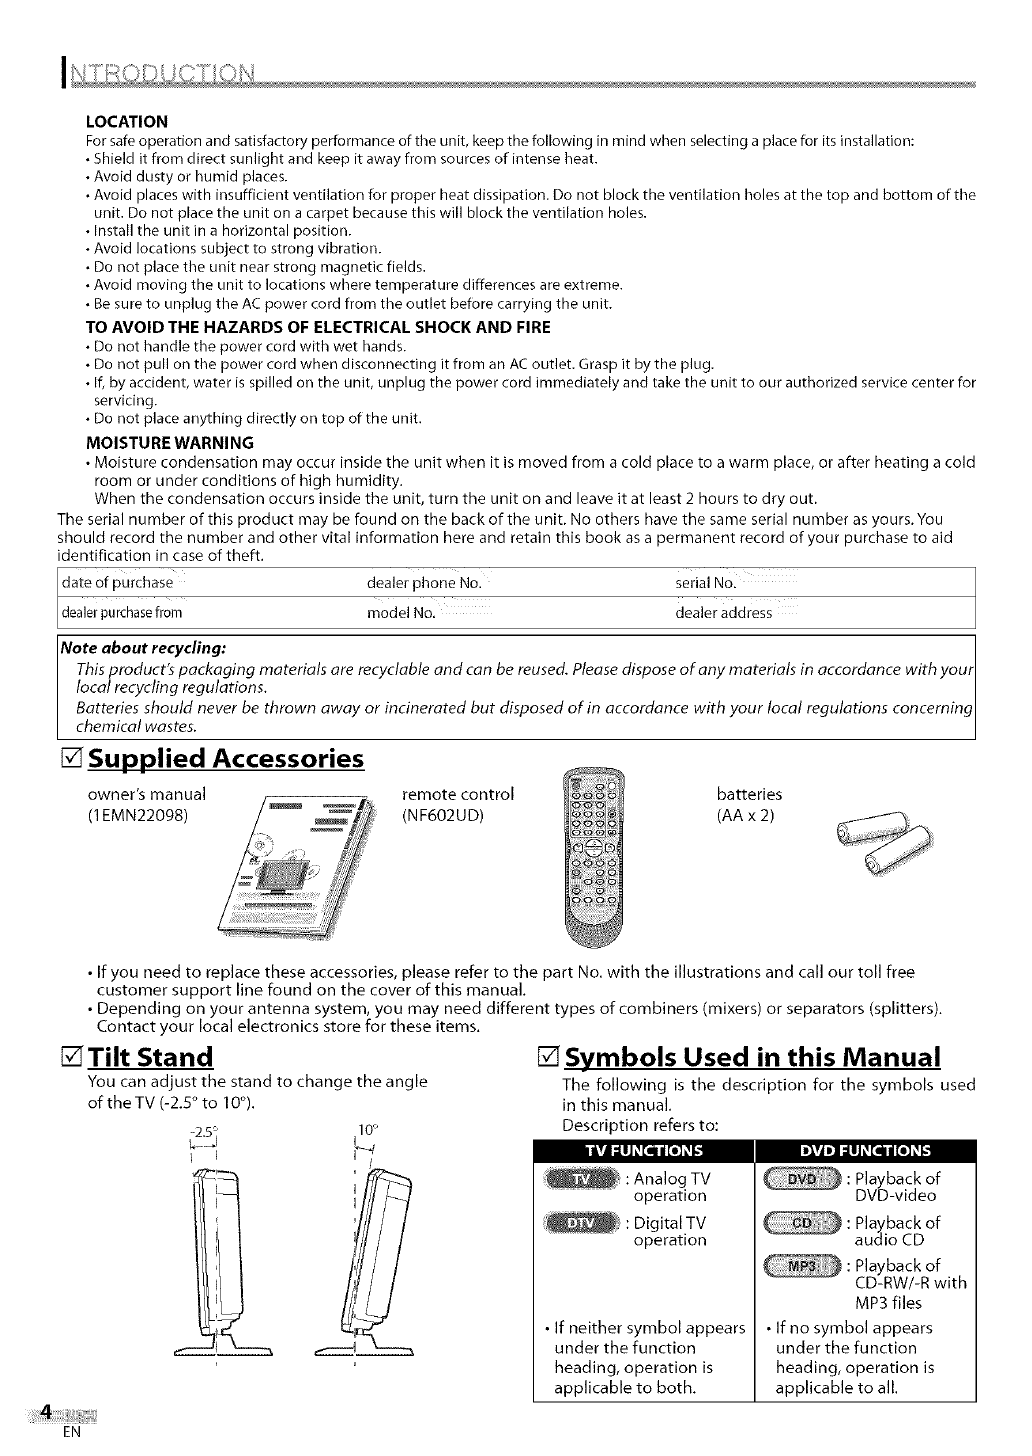
[] Supplied Accessories
owner's manual remote control
(1EMN22098) (NF602UD)
batteries
(AA x 2)
•If you need to replace these accessories, please refer to the part No, with the illustrations and call our toll free
customer support line found on the cover of this manual,
• Depending on your antenna system, you may need different types of combiners (mixers) or separators (splitters),
Contact your local electronics store for these items,
[]Tilt Stand
You can adjust the stand to change the angle
of theTV (-2,5° to 10°).
[] Symbols Used in this Manual
The following is the description for the symbols used
in this manual,
Description refers to:
operation
: Digital TV
operation
• If neither symbol appears
under the function
heading, operation is
applicable to both,
CD-RW/-R with
MP3 files
• If no symbol appears
under the function
heading, operation is
applicable to all.
EN
[] Contents
/N I_RODUCT/ON DVD Functions
ImportantSafeguards............................................. 2
Precautions...................................................... 3
SuppliedAccessories.............................................. 4
TiltStand........................................................ 4
SymbolsUsedinthisManual....................................... 4
Features......................................................... 6
RemoteControlFunction.......................................... 7
Installingthe Batteries............................................ 7
ControlPanel..................................................... B
RearPanel....................................................... 8
AttachingaWallMount Bracket(soldseparately).................... 9
CONNECT ON
BasicConnection................................................. 10
ExternalDeviceConnection....................................... 11
/N T/AL SE1 YNG
Initial Setup..................................................... 13
MainMenu...................................................... 14
AutoChannelScan............................................... 14
LanguageSelection.............................................. 15
WATC NG TV
ChannelSelection................................................ 16
VolumeAdjustment.............................................. 16
SwitchingEachMode............................................. 17
MTSSystem..................................................... 17
ScreenInformation .............................................. 18
TVScreenDisplayMode........................................... 19
SleepTimer..................................................... 19
OPERA YNG DVD
PlayableMedia.................................................. 27
UnplayableMedia............................................... 27
Playback........................................................28
DVDMenu ......................................................28
ResumePlayback................................................ 28
Pause.......................................................... 28
Step-by-stepPlayback............................................ 29
FastForward/FastReverse....................................... 29
SlowForward/SlowReverse...................................... 29
Zoom........................................................... 29
MP3Playback................................................... 30
SearchFunctions................................................. 31
RepeatPlayback................................................. 32
RepeatA-BPlayback............................................. 32
ProgrammedPlayback........................................... 33
RandomPlayback................................................ 33
0n-screenDisplay................................................ 34
SpecialSettings.................................................. 35
i
i:x;
OPT ONAL SETT NG
ChannelAdd/Delete.............................................. 20
PictureAdjustment.............................................. 20
ClosedCaption................................................... 21
DTVClosedCaption............................................... 22
DTVCCStyle ..................................................... 23
BackLightSetting ............................................... 23
ColorTemperature............................................... 24
V<hip .......................................................... 24
ili!{
iii
i!!i!!}
i111
DVD SETT NG
DVDLanguageSetting ........................................... 38
DisplaySetting .................................................. 39
DVDAudioSetting ............................................... 40
ParentalSetting................................................. 41
Others.......................................................... 42
Resettothe DefaultSetting....................................... 43
LanguageCodeList.............................................. 43
TROUBLESHOOT NG
TroubleshootingGuide........................................... 44
i_iiii!I
3
INFORMATION
Glossary........................................................ 46
Maintenance.................................................... 46
CableChannelDesignations....................................... 47
GeneralSpecifications............................................ 47
ElectricalSpecification............................................ 47
OtherSpecifications.............................................. 47
Limited Warranty ........................................ Backcover
i iiiiiii_i
i iiii
EN
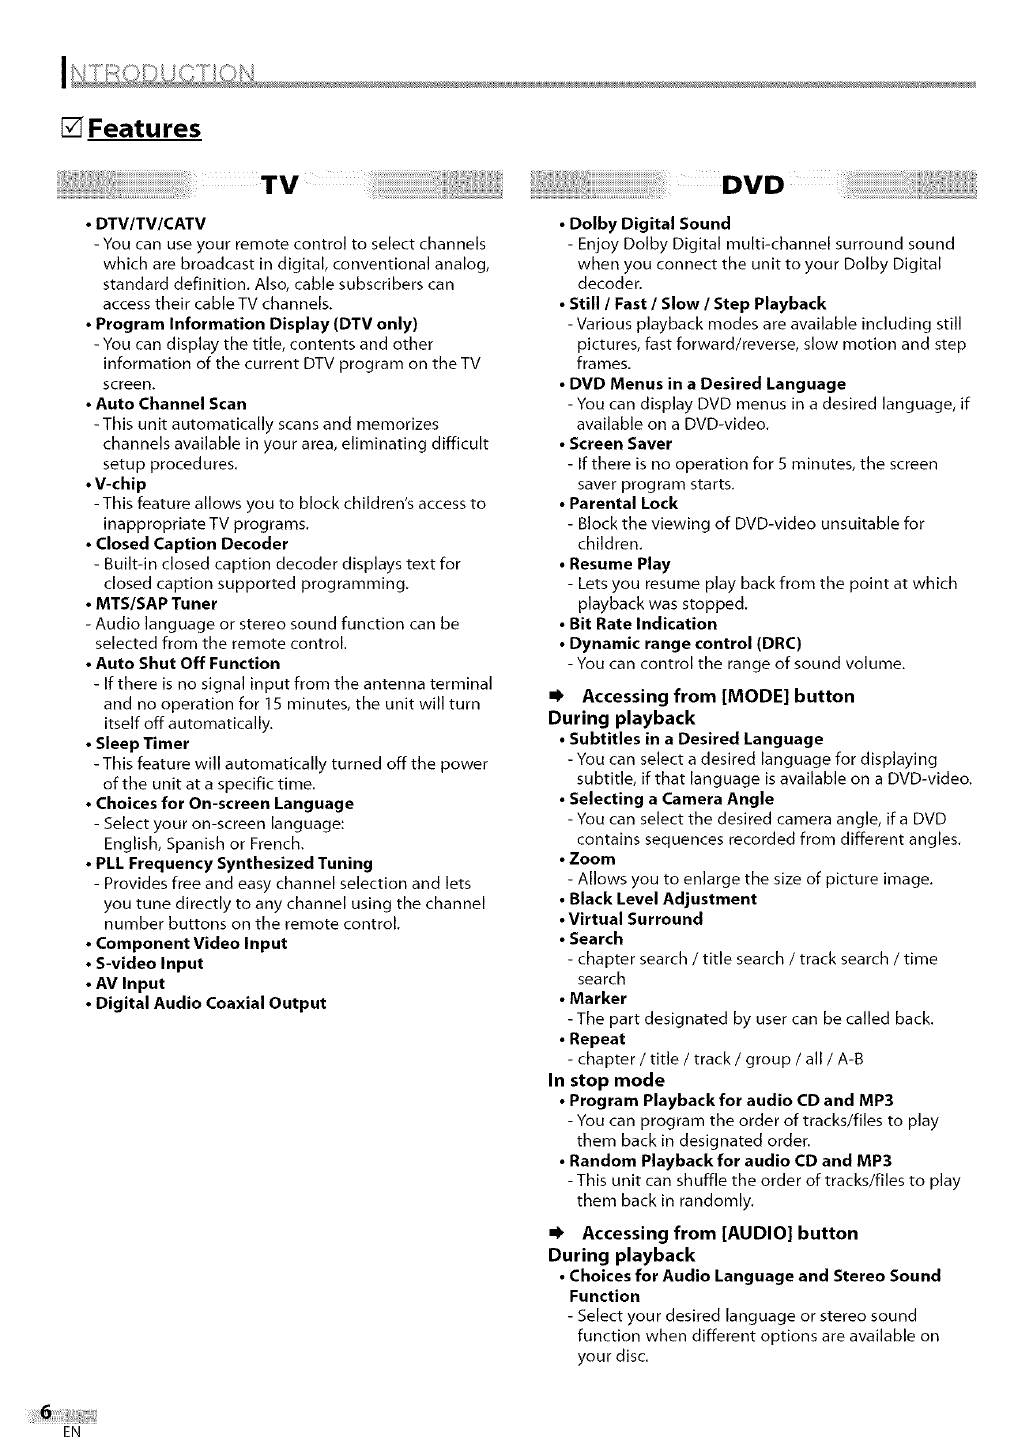
_Features
TV
• DTV/TV/CATV
- You can use your remote control to select channels
which are broadcast in digital, conventional analog,
standard definition. Also, cable subscribers can
access their cable TV channels.
•Program Information Display (DTV only)
- You can display the title, contents and other
information of the current DTV program on the TV
screen.
•Auto Channel Scan
-This unit automatically scans and memorizes
channels available in your area, eliminating difficult
setup procedures.
•V-chip
-This feature allows you to block children's access to
inappropriate TV programs.
•Closed Caption Decoder
- Buih-in closed caption decoder displays text for
closed caption supported programming.
•MTS/SAP Tuner
- Audio language or stereo sound function can be
selected from the remote control.
•Auto Shut Off Function
- If there is no signal input from tile antenna terminal
and no operation for I 5 minutes, the unit will turn
itself off automatically.
•Sleep Timer
-This feature will autornatically turned off the power
of the unit at a specific time.
•Choices for On-screen Language
- Select your on-screen language:
English, Spanish or French.
•PLL Frequency Synthesized Tuning
- Provides free and easy channel selection and lets
you tune directly to any channel using the channel
number buttons on the remote control.
•Component Video Input
•S-video Input
•AV Input
•Digital Audio Coaxial Output
DVD
•Dolby Digital Sound
- Enjoy Dolby Digital multi-channel surround sound
when you connect the unit to your Dolby Digital
decoder.
• Still IFast ISlow I Step Playback
-Various playback modes are available including still
pictures, fast forward/reverse, slow motion and step
frames.
•DVD Menus in a Desired Language
-You can display DVD rnenus in a desired language, if
available on a DVD-video.
•Screen Saver
- If there is no operation for S minutes, the screen
saver program starts.
•Parental Lock
- Block the viewing of DVD-video unsuitable for
children,
•Resume Play
- Lets you resume play back frorn the point at which
playback was stopped.
•Bit Rate Indication
•Dynamic range control (DRC)
-You can control the range of sound volume.
=_ Accessing from [MODE] button
During playback
•Subtitles in a Desired Language
- You can select a desired language for displaying
subtitle, if that language is available on a DVD-video.
•Selecting a Camera Angle
- You can select the desired camera angle, if a DVD
contains sequences recorded from different angles.
•Zoom
- Allows you to enlarge the size of picture image.
•Black Level Adjustment
•Virtual Surround
•Search
- chapter search /title search /track search /time
search
•Marker
-The part designated by user can be called back.
•Repeat
- chapter /title /track /group /all /A-B
In stop mode
•Program Playback for audio CD and MP3
- You can program tile order of tracks/files to play
them back in designated order.
•Random Playback for audio CD and MP3
-This unit can shuffle the order of tracks/files to play
them back in randomly.
=_ Accessing from [AUDIO] button
During playback
•Choices for Audio Language and Stereo Sound
Function
- Select your desired language or stereo sound
function when different options are available on
your disc.
EN
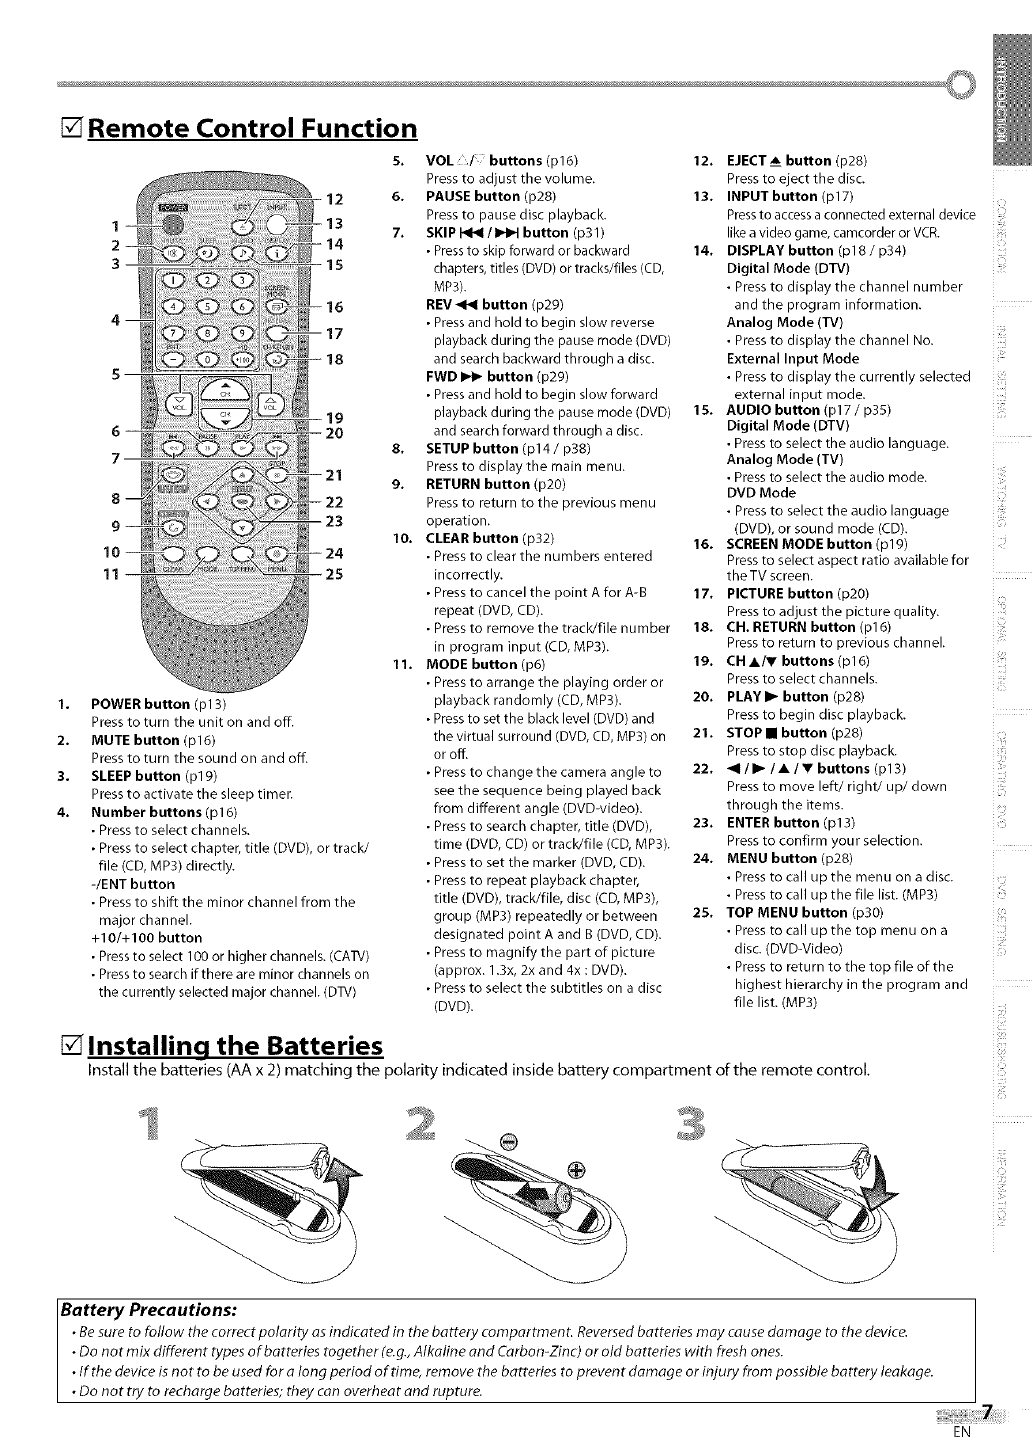
[] Remote Control Function
S.
1
2
3
6
7
8
9
lO
11 25
1.
2.
3.
4.
POWER button (pl 3)
Press to turn the unit on and off.
MUTE button (pl 6)
Press to turn the sound on and off.
SLEEP button (pl 9)
Press to activate the sleep timer.
Number buttons (pl 6)
• Press to select channels.
• Press to select chapter, title (DVD), or track/
file (CD, MP3) directly.
-lENT button
• Press to shift the minor channel from the
major channel.
+10/+100 button
• Press to select 100 or higher channels. (CAW)
• Press to search if there are minor channels on
the currently selected major channel. (D]X/)
VOL buttons (p16)
Press to adjust the volume.
6• PAUSE button (p28)
Press to pause disc playback.
7. SKIP 141HII/b41_lbutton (p31)
• Pressto skip forward or backward
chapters, titles (DVD) or tracks/files (CD,
MP3).
REV _ button (p29)
• Pressand hold to begin slow reverse
playback during the pause mode (DVD)
and search backward through a disc.
FWD _button (p29)
• Pressand hold to begin slow forward
playback during the pause mode (DVD)
and search forward through a disc.
8. SETUP button (p14 /p38)
Press to display the main menu.
9. RETURN button (p20)
Press to return to the previous menu
operation.
10• CLEAR button (p32)
• Press to clear the numbers entered
incorrectly.
• Press to cancel the point A for A-B
repeat (DVD, CD).
• Press to remove the track/file number
in program input (CD, MP3).
11. MODE button (p6)
• Press to arrange the playing order or
playback randomly (CD, MP3).
•Press to set the black level (DVD) and
the virtual surround (DVD, CD, MP3) on
or off.
• Press to change the camera angle to
see the sequence being played back
from different angle (DVDwideo).
• Press to search chapter, title (DVD),
time (DVD, CD) or track/file (CD, MP3).
• Press to set the marker (DVD, CD).
• Press to repeat playback chapter,
title (DVD), tracWfile, disc (CD, MP3),
group (MP3) repeatedly or between
designated point A and B (DVD, CD).
• Press to magnify the part of picture
(approx. 1.3x, 2x and 4x : DVD).
• Press to select the subtitles on a disc
(DVD).
12. EJECTA button (p28)
Press to eject the disc.
13• INPUT button (p17)
Pressto accessa connected external device
like a video game, camcorder or VCR.
14. DISPLAY button (p18 /p34)
Digital Mode (DTV)
• Press to display the channel number
and the program information.
Analog Mode (TV)
• Press to display the channel No.
External Input Mode
• Press to display the currently selected
external input mode.
15. AUDIO button (p17 /p35)
Digital Mode (DTV)
• Press to select the audio language.
Analog Mode (TV)
• Press to select the audio mode.
DVD Mode
• Press to select the audio language
(DVD), or sound mode (CD).
16• SCREEN MODE button (p19)
Press to select aspect ratio available for
the TV screen.
17. PICTURE button (p20)
Press to adjust the picture quality.
18. CH• RETURN button (p16)
Press to return to previous channel.
19. CH •/V buttons (p16)
Press to select channels.
20, PLAYI_ button (p28)
Press to begin disc playback.
21• STOPII button (p28)
Press to stop disc playback.
22. _1 /I_ /•/•buttons (pl 3)
Press to move left/right/up/down
through the items.
23• ENTER button (p13)
Press to confirm your selection.
24. MENU button (p28)
• Press to call up the menu on a disc.
• Press to call up the file list. (MP3)
25• TOP MENU button (p30)
• Press to call up the top menu on a
disc. (DVD-Video)
• Press to return to the top file of the
highest hierarchy in the program and
file list. (MP3)
[] Installing the Batteries
Install the batteries (AA x 2) rnatching the polarity indicated inside battery cornpartrnent of the remote control.
ii ii}i!
i!!i!!}
Battery Precautions:
•Be sure to follow the correct polarity as indicated in the battery compartment. Reversed batteries may cause damage to the device.
•Do not mix different types of batteries together (e.g., Alkaline and Carbon-Zinc) or old batteries with fresh ones.
•Iftbe device is not to be used for along period oftirne, remove the batteries to prevent damage or injury from possible battery leakage.
•Do not try to recharge batteries; they can overheat and rupture.
iiiiiii:ii:
EN
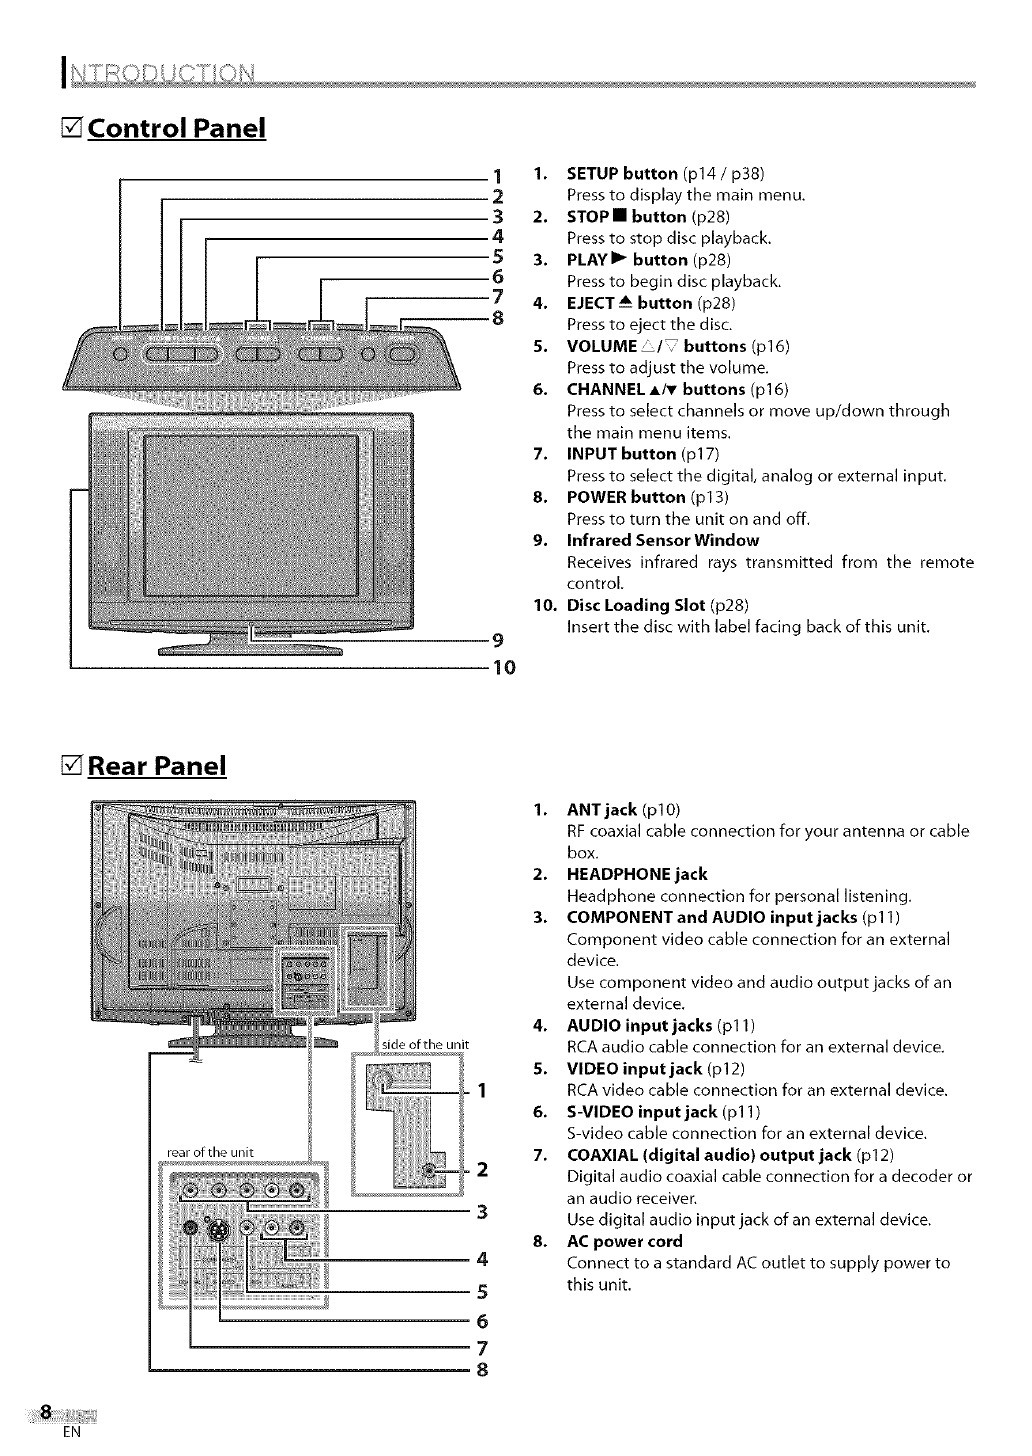
[] Control Panel
1
2
3
4
5
6
7
8
9
10
1. SETUP button (p14 /p38)
Press to display the main menu,
2. STOP• button (p28)
Press to stop disc playback.
3. PLAYII_ button (p28)
Press to begin disc playback.
4. EJECT_i button (p28)
Press to eject the disc.
5. VOLUME /_buttons(p16)
Press to adjust the volume.
6. CHANNELA/T buttons (p16)
Press to select channels or move up/down through
the main menu items.
7. INPUT button (p17)
Press to select the digital, analog or external input.
8. POWER button (p13)
Press to turn tile unit on and off.
9. Infrared Sensor Window
Receives infrared rays transmitted from the remote
control.
10. Disc Loading Slot (p28)
Insertthe discwith labelfacingback ofthisunit.
[] Rear Panel
side of the unit
2
3
4
5
6
7
8
1. ANT jack (pl0)
RF coaxial cable connection for your antenna or cable
box.
2. HEADPHONE jack
Headphone connection for personal listening.
3. COMPONENT and AUDIO input jacks (p11)
Component video cable connection for an external
device.
Use component video and audio output jacks of an
external device.
4. AUDIO input jacks (p11)
RCA audio cable connection for an external device.
5. VIDEO input jack (p12)
RCA video cable connection for an external device.
6. S-VIDEO input jack (pl 1)
S-video cable connection for an external device,
7. COAXIAL (digital audio) output jack (p12)
Digital audio coaxial cable connection for a decoder or
an audio receiver.
Use digital audio input jack of an external device.
8. AC power cord
Connect to a standard AC outlet to supply power to
this unit.
EN
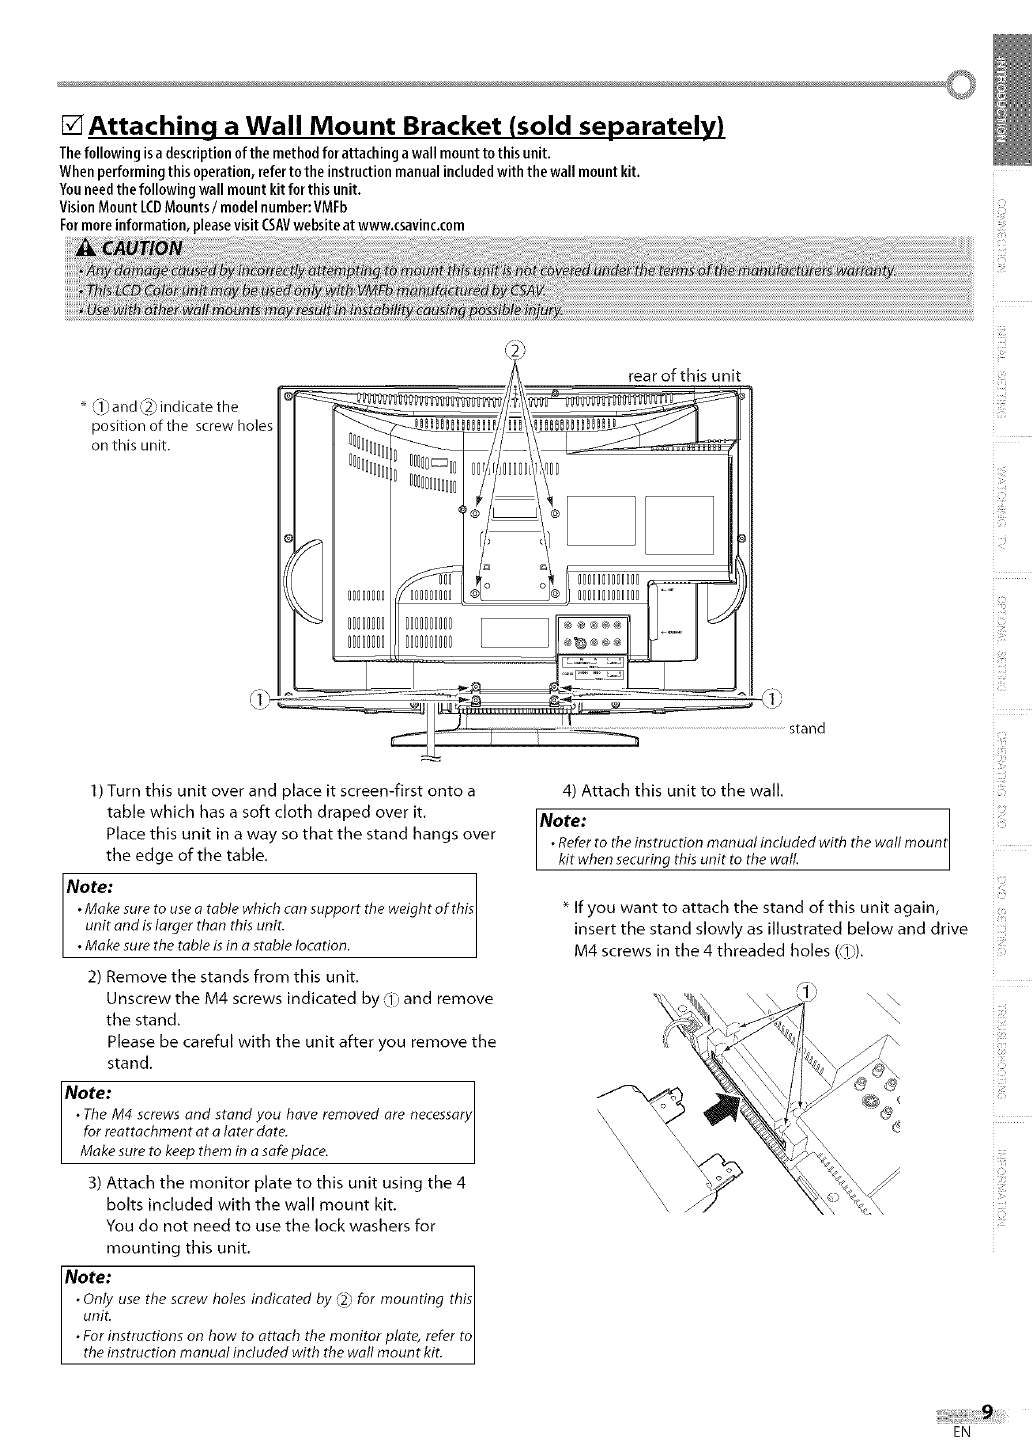
[]Attaching a Wall Mount Bracket (sold separately)
Thefollowingisa descriptionofthe methodforattachinga wall mounttothisunit.
Whenperformingthisoperation,referto theinstructionmanualincludedwith thewall mountkit.
Youneedthefollowingwallmountkitforthisunit.
VisionMount LCDMounts/model number:VMFb
Formoreinformation,pleasevisitCSAVwebsiteatwww.csavinc.com
_ _r!_,and ,_2_indicate the
position of the screw holes
on this unit.
\.)
1) Turn this unit over and place it screen-first onto a
table which has a soft cloth draped over it.
Place this unit in a way so that the stand hangs over
the edge of the table.
Note:
•Make sure to use a table which can support the weight of this
unit and islarger than this unit.
• Make sure the table is in a stable location.
2) Remove the stands from this unit,
Unscrew the M4 screws indicated by _1_and remove
the stand.
Please be careful with the unit after you remove the
stand,
Note: necessary
• TheM4 screws and stand you have removed are
for reattachment at alater date.
Make sure to keep them in a safe place.
3) Attach the monitor plate to this unit using the 4
bolts included with the wall mount kit,
You do not need to use the lock washers for
mounting this unit,
IN°te: I
•Only use the screw holes indicated by @, for mounting this
unit. I
•For instructions on how to attach the monitor plate, refer to
the instruction manual included with the wall mount kit.
rear of this unit
stand
4) Attach this unit to the wall.
Note:
• Referto the instruction manual included with the wall mounI
kit when securing this unit to the wall.
i_iiiii!
i _iiii!I
7%1
171!!
* If you want to attach the stand of this unit again,
insert the stand slowly as illustrated below and drive
s_
M4 screws in the 4 threaded holes (_lj). .......
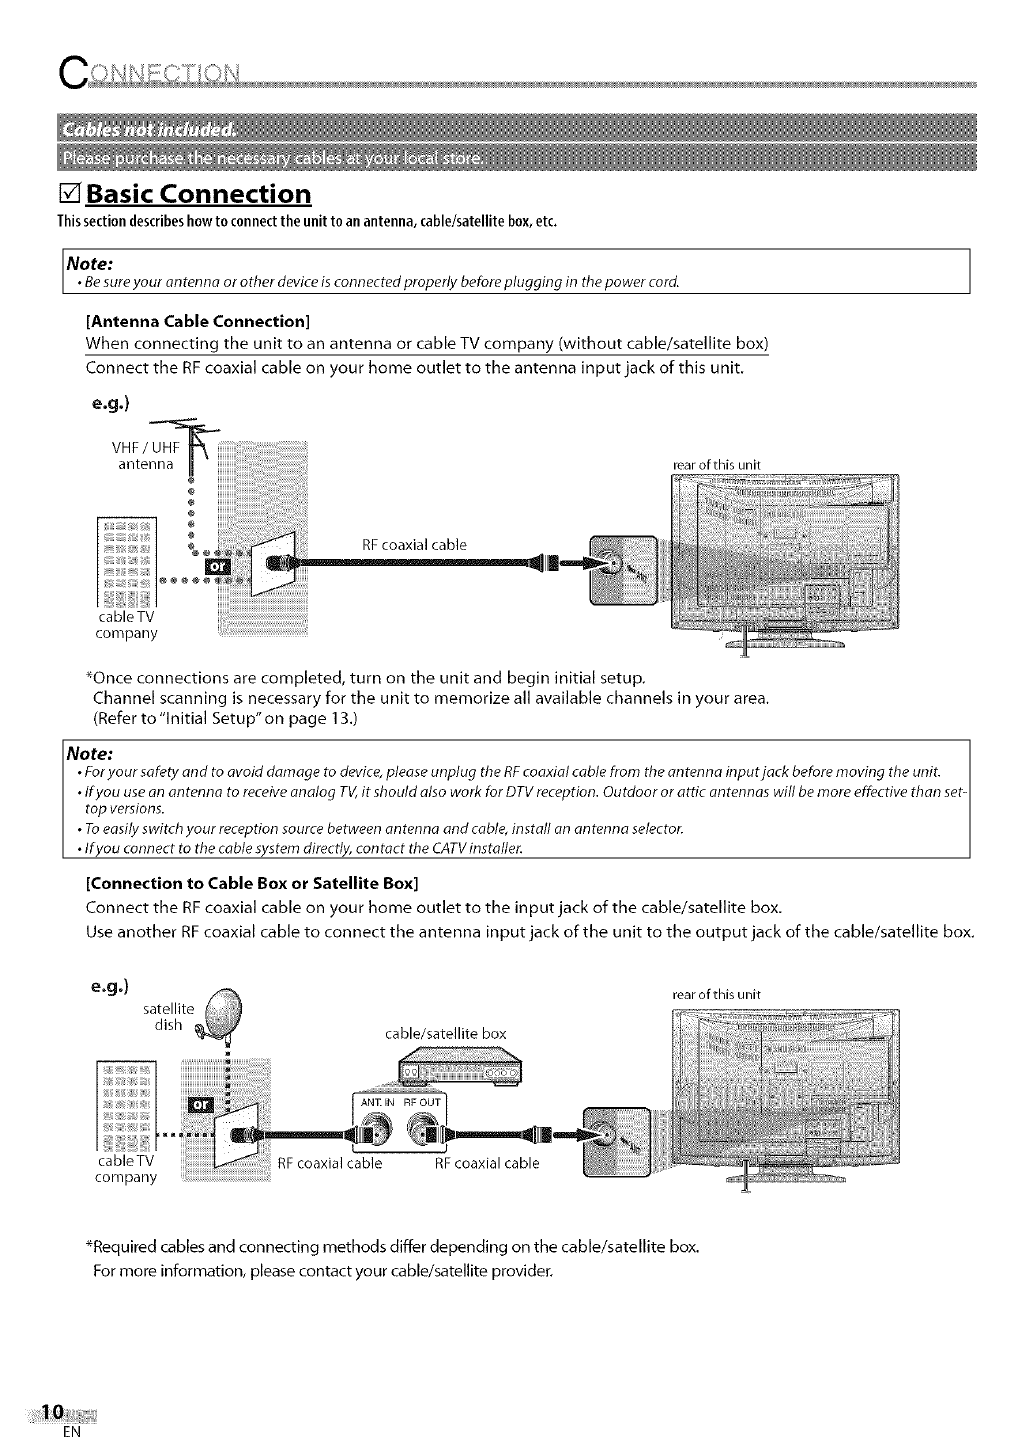
[] Basic Connection
Thissectiondescribeshowto c0nnectthe unit toanantenna,cable/satellitebox,etc.
Note:
•Besure your an tenna or other device is connected properly before plugging in the power cord.
[Antenna Cable Connection]
When connecting the unit to an antenna or cable TV company (without cable/satellite box)
Connect the RF coaxial cable on your home outlet to the antenna input jack of this unit.
e.g.)
VHF/UHF-_ =_'"
antenna II rear of this unit
RF coaxial cable
cableTV
company
_Once connections are completed, turn on the unit and begin initial setup.
Channel scanning is necessary for the unit to memorize all available channels in your area.
(Refer to"Initial Setup'on page 13.)
Note:
• Foryour safety and to avoid damage to device,please unplug the RFcoaxial cable from the an tenna input jack before moving the unit.
• If you use on antenna to receive analog TV,it should also work for DTV reception. Outdoor or attic antennas will be more effective than set-
top versions.
• To easily switch your reception source between antenna and cable, install an antenna selector.
• fyou connect to the cable system directly, contact the CATVinstaller.
[Connection to Cable Box or Satellite Box]
Connect the RF coaxial cable on your home outlet to the input jack of the cable/satellite box.
Use another RFcoaxial cable to connect the antenna input jack of the unit to the output jack of the cable/satellite box.
e.g.) satellite
dish cable/satellite box
rear of this unit
RF coaxial cable RF coaxial cable
_Required cables and connecting methods differ depending on the cable/satellite box.
For more information, please contact your cable/satellite provider.
EN
o !ili!
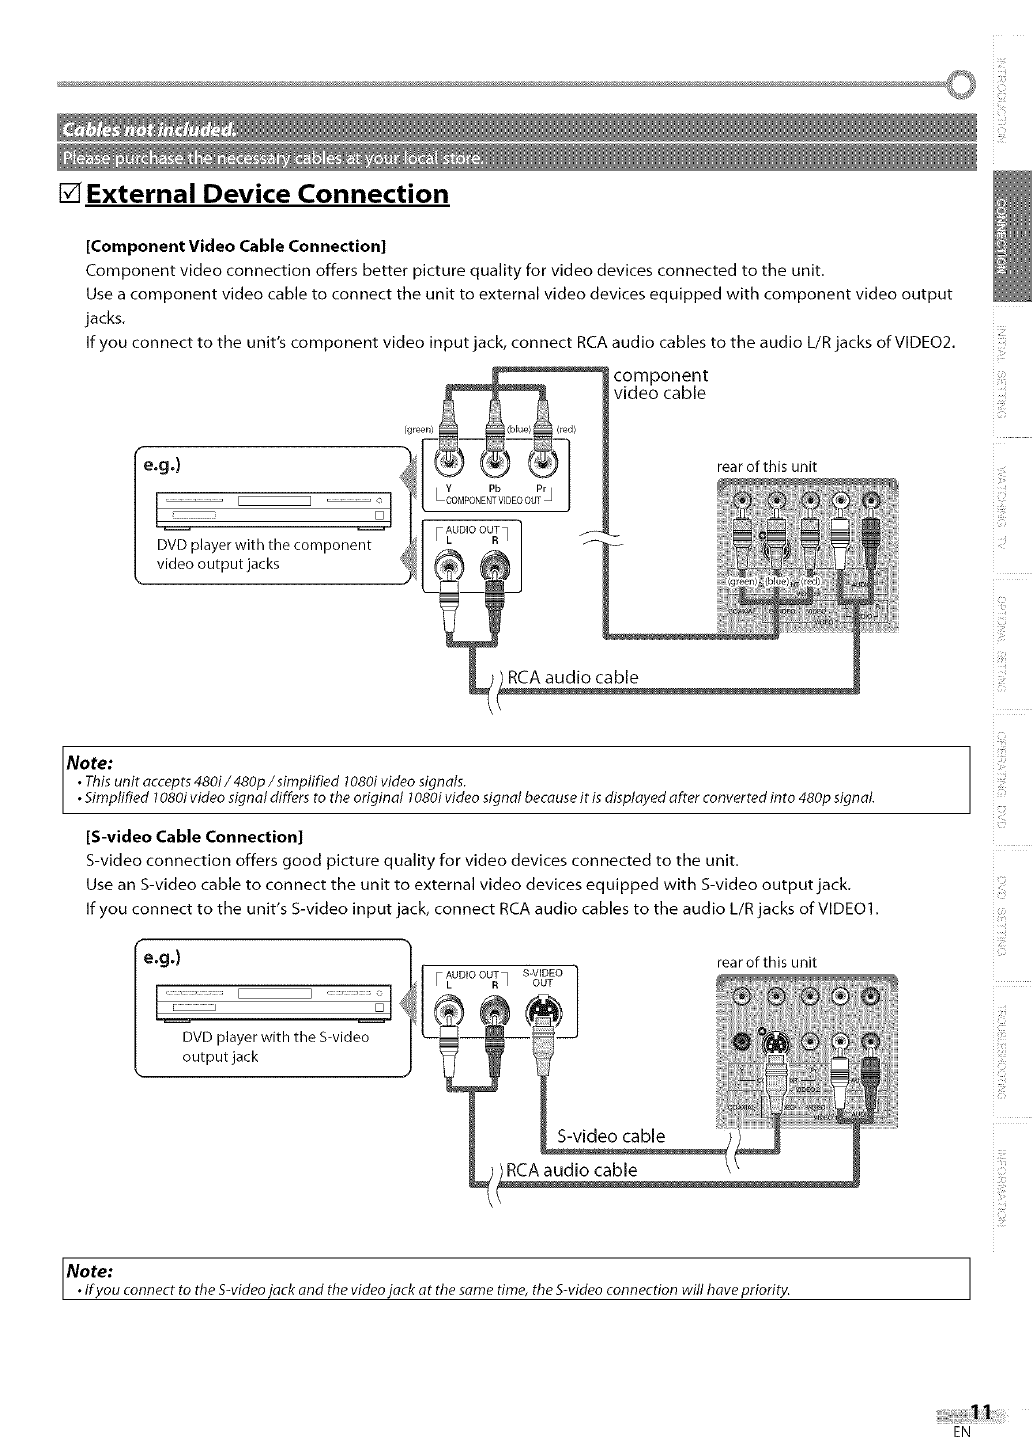
[] External Device Connection
[Component Video Cable Connection]
Component video connection offers better picture quality for video devices connected to the unit.
Use a component video cable to connect the unit to external video devices equipped with component video output
jacks.
If you connect to the unit's component video input jack, connect RCA audio cables to the audio L/R jacks of VIDEO2.
component
video cable
rear of this unit
DVD player with the component
video output jacks
AUDIO OUT
FL Rq
RCAaudio cable
ill?
Note:
•This unit accepts 480i/480p/simplified 1080ivideo signals.
• Simplified 1080i video signal differs to the original 1080ivideo signal becauseit is displayed after converted into 480p signal.
[S-video Cable Connection]
S-video connection offers good picture quality for video devices connected to the unit,
Use an S-video cable to connect the unit to external video devices equipped with S-video output jack.
If you connect to the unit's S-video input jack, connect RCA audio cables to the audio L/R jacks of VIDEO1,
e.g.)
L .......................
DVD player with the S-video
output jack
AUDIO OUT S-VIDEO
F L R ] OUT
rear of this unit
RCAaudio cable
Note:
• fyou connect to the S-videojack and the video jack at the same time, the S-video connection will have priority.
EN
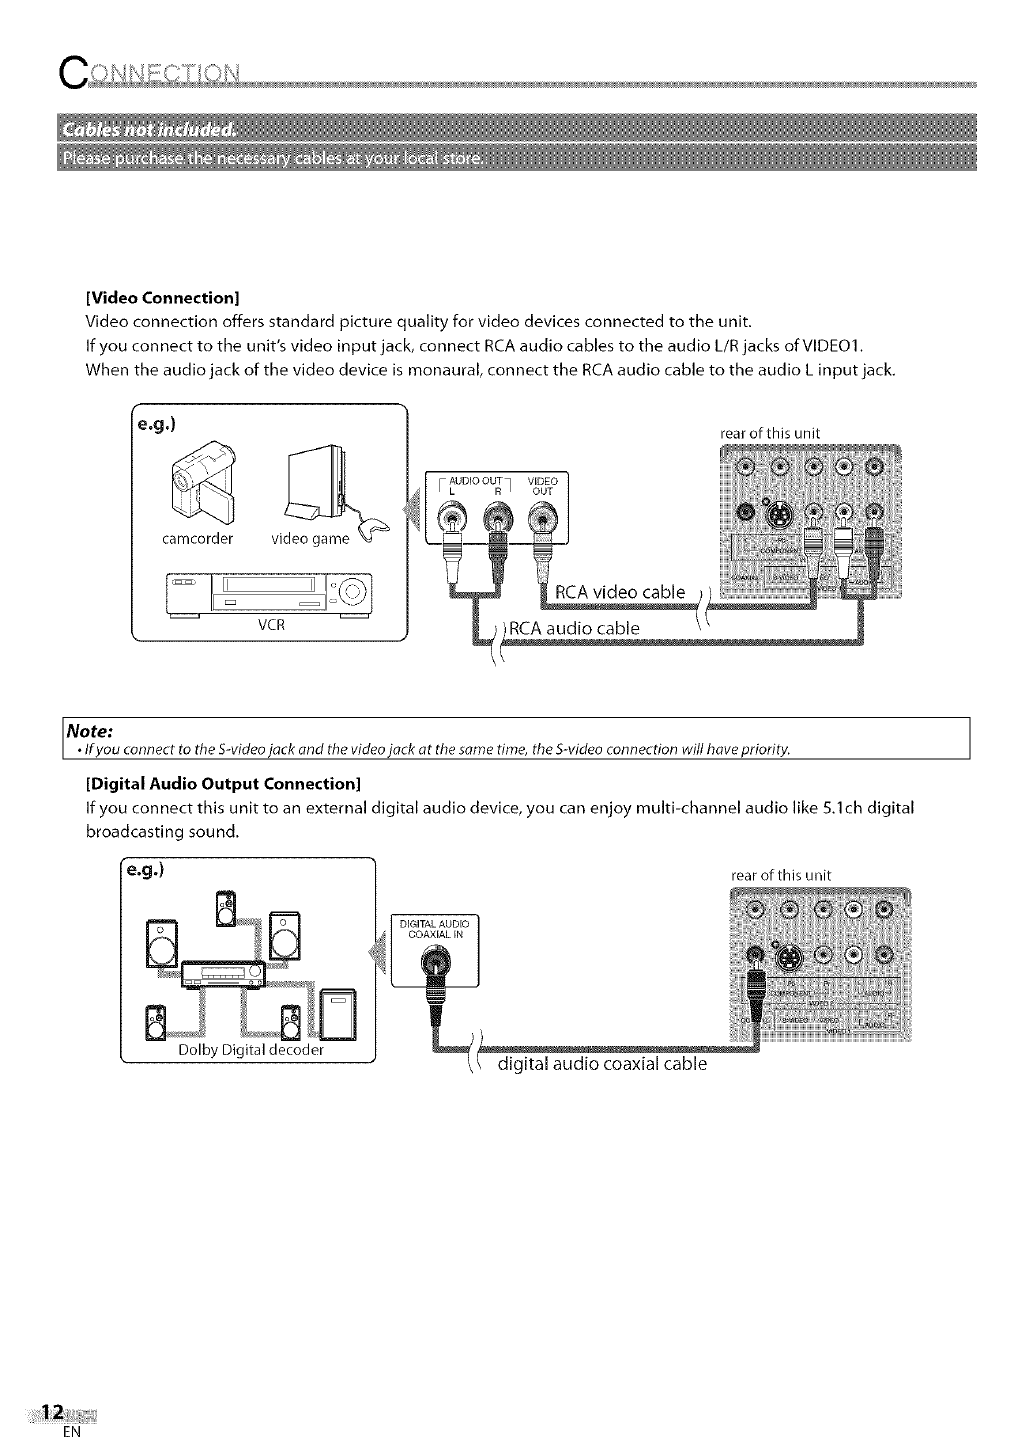
[Video Connection]
Video connection offers standard picture quality for video devices connected to the unit.
If you connect to the unit's video input jack, connect RCA audio cables to the audio L/R jacks of VIDE01.
When the audio jack of the video device is monaural, connect the RCA audio cable to the audio L input jack.
e.g.)
camcorder
VCR
AUDIO OUT VIDEO
FL Rq OUT
RCA audio cable
rear of this unit
Note:
•fyou connect to the S-videojack and the video jack at the same time, the S-video connection will have priority.
[Digital Audio Output Connection]
If you connect this unit to an external digital audio device, you can enjoy multi-channel audio like 5.1ch digital
broadcasting sound.
e.g.)
Dolby Digital decoder
DIGITAL AUDIO
COAXIAL IN
rear of this unit
digital audio coaxial cable
EN
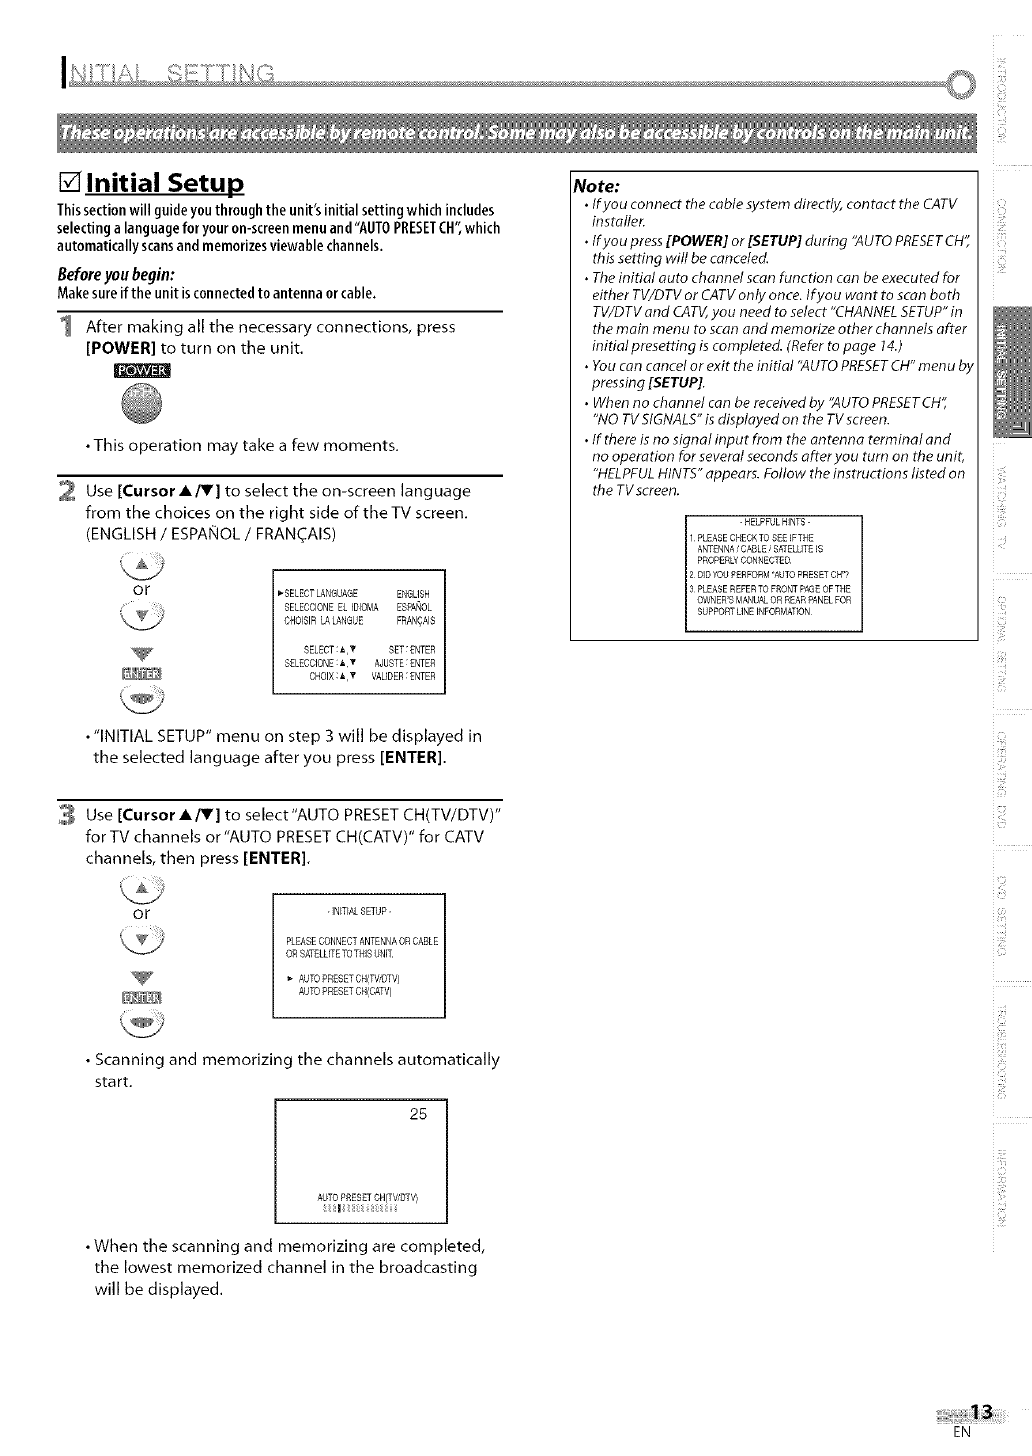
[] Initial Setup
Thissectionwill guideyouthroughthe unit'sinitialsettingwhichincludes
selectingalanguageforyouron-screenmenuand"AUTOPRESETCH",which
automaticallyscansand memorizesviewable channels,
Before youbegin:
Makesureif the unit isconnectedto antenna orcable.
1 After making all the necessary connections, press
[POWER] to turn on the unit.
•This operation may take a few moments.
2 Use [Cursor A/V] to select the on-screen language
from the choices on the right side of theTV screen.
(ENGLISH /ESPANOL /FRAN(_AIS)
or I_SELECT LANGUAGE ENGUSH
SELECCIONE EL IDIOMA ESPAIqOL
CHOISIR LALANGUE FRAN_AIS
SELECT:I,_ SET:ENTER
SELECQONE:_V AJUSTE:ENTER
CHOIX:_,V VAUDER:ENTER
• "INITIAL SETUP" menu on step 3 will be displayed in
the selected language after you press [ENTER].
3 Use [Cursor A/V] to select"AUTO PRESETCH(TV/DTV)"
for TV channels or "AUTO PRESET CH(CATV)" for CATV
channels, then press [ENTER].
or -INITIAL SETUP-
PLEASECONNECTANTENNA OR CABLE
OR SATELLITETOTHIS UNIT
AUTOPRESET CH/TM_DTV)
AUTOPRESET CH/CAW)
• Scanning and memorizing the channels automatically
start.
25
AUTO PRESETGH(TV/DT_
I :
• When the scanning and memorizing are completed,
the lowest memorized channel in the broadcasting
will be displayed.
No to:
•Ifyou connect the cable system directly, contact the CATV
installer.
•Ifyou press[POWER] or [SETUP] during "AUTOPRESETCH",
this setting will be canceled.
•Theinitial auto channel scan function can be executed for
either TV/DTV or CATVonly once.If you wan t to scan both
TV/DTVand CATV,you need toselect "CHANNELSETUP"in
the main menu to scan and memorize other channels after
initial presetting iscompleted. (Referto page 14.)
•Youcon cancel or exit the initial "AUTOPRESETCH"men u b,
pressing [SETUP].
•When no channel can be received by "AUTOPRESETCH",
"NO TVSIGNALS"is displayed on the TVscreen.
•If there is no signal input from the antenna terminal and
no operation for several seconds ofter you turn on the unit,
"HELPFULHINTS"appears. Follow the instructions listed on
the TVscreen.
- HELPFULHINTS -
1 PLEASECHECK TO SEE IFTHE
ANTENNA/CABLE _SATELLITEIS
PROPERLYCONNECTED
2 DIDYOU PERFORM'AUTO PRESET CH"?
3 PLEASEREFER TO FRONTPAGEOF THE
OWNER'SMANUALOR REAR PANEL FOR
SUPPORT LINE INFORMATION
i ii:{;i
i!tii!]i
i iii'_:'
C3
i::ii:i
IMI:
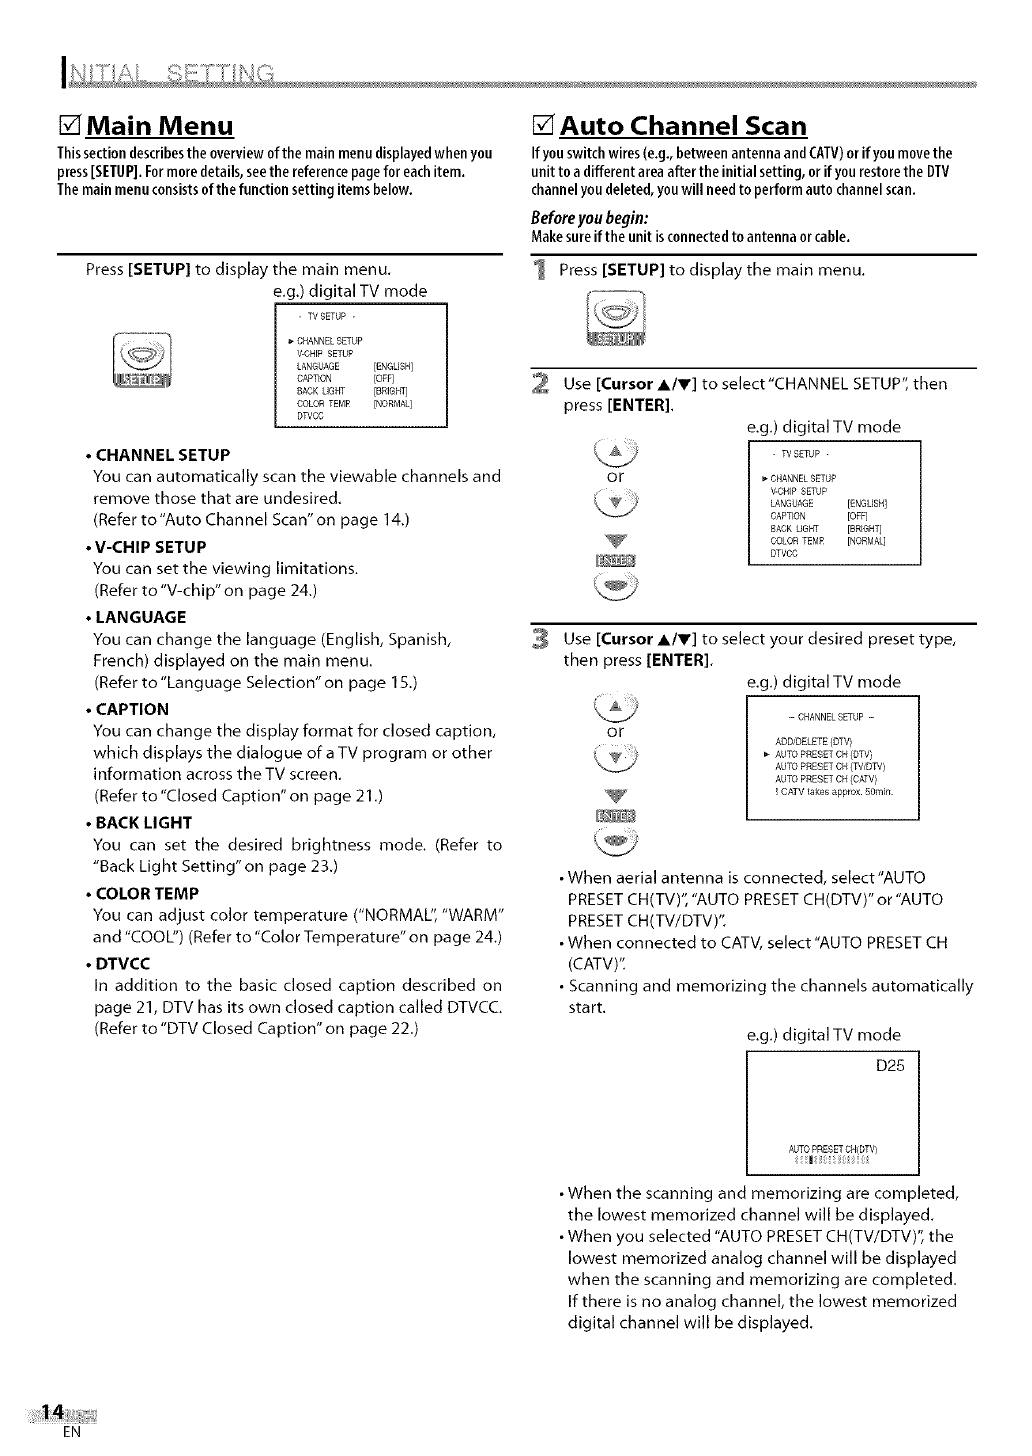
[] Main Menu
Thissectiondescribesthe overviewofthe mainmenudisplayedwhen you
press[SETUP].Formoredetails,seethe referencepagefor eachitem.
Themainmenuconsistsofthe functionsettingitemsbelow.
Press [SETUP] to display the main menu,
e,g.) digital TV mode
- TV SETUP -
CHANNEL SETUP
V-CHFPSETUP
LANGUAGE [ENGLISH]
CAPTEON [OFF]
BACK UGHT [BRIGHTj
COLOR TEMP [NORMAL]
DWCC
• CHANNEL SETUP
You can automatically scan the viewable channels and
remove those that are undesired,
(Refer to"Auto Channel Scan'on page 14,)
•V-CHIP SETUP
You can set the viewing limitations,
(Refer to "V-chip" on page 24,)
•LANGUAGE
You can change the language (English, Spanish,
French) displayed on the main menu.
(Refer to "Language Selection" on page ] 5.)
•CAPTION
You can change the display format for closed caption,
which displays the dialogue of a TV program or other
information across the TV screen,
(Refer to "Closed Caption" on page 21 ,)
•BACK LIGHT
You can set the desired brightness mode, (Refer to
"Back Light Setting" on page 23,)
•COLOR TEMP
You can adjust color temperature ("NORMAL", "WARM"
and "COOL") (Refer to "Color Temperature" on page 24,)
•DTVCC
In addition to the basic closed caption described on
page 21, DTV has its own closed caption called DTVCC,
(Refer to "DTV Closed Caption" on page 22,)
[] Auto Channel Scan
If youswitchwires(e,g,,betweenantennaandCAW)orif youmovethe
unitto adifferentareaaftertheinitialsetting,orif yourestorethe DTV
channelyoudeleted,youwill needto performautochannelscan,
Beforeyou begin:
Makesureif the unitisconnectedto antennaorcable.
1 Press [SETUP] to display the main menu.
2Use [Cursor A/V] to select"CHANNEL SETUP", then
press [ENTER].
e.g.) digital TV mode
- WSETUP -
Oi _ _ CHANNELSETUP
V-CHIP SETUP
LANGUAGE [ENGLISH]
CAPTEON [OFF]
RACK LIGHT [BREGHTj
COLOR TEM£ [NORMAL]
DTVCC
3Use [Cursor A/V] to select your desired preset type,
then press [ENTER].
e.g.) digital TV mode
or
-- CHANNEL SETUP -
ADDIDELETE (DTV)
AUTO PRESET CH (DTV)
AUTO PRESET CH (TV/DW)
AUTO PRESET CH (CAW)
! CATV _akes approx. SOmin.
•When aerial antenna is connected, select"AUTO
PRESETCH(TV)', "AUTO PRESETCH(DTV)" or "AUTO
PRESETCH(TV/DTV)".
• When connected to CATV, select "AUTO PRESETCH
(CATV)':
• Scanning and memorizing the channels automatically
start.
e.g.) digital TV mode
D25
AUTO PRESET CH{DTV)
I :
• When the scanning and memorizing are completed,
the lowest memorized channel will be displayed.
• When you selected "AUTO PRESET CH(TV/DTV)", the
lowest memorized analog channel will be displayed
when the scanning and memorizing are completed.
If there is no analog channel, the lowest memorized
digital channel will be displayed.
EN
o
Note:
•If you connect the cable system directly, contact the CATV
installer.
• Ifyou press [POWER] or [SETUP] during auto channel scan,
the setting will be canceled.
• When no channel can be received by auto channel scan,
"NO TV SIGNALS" will be displayed on tbe TV screen.
•Channel settings will be saved even if the power fails.
• If you have Spanish or French menus and need English,
press [SETUP[. Use [Cursor A/Y] to select "IDIOMA"
or "LANGAGE'f Press [ENTER[ to select "ENGLISH" Press
[SETUP] to remove the main menu.
• With regard only to the digital channel, even after the
scanning is complete if you unplug the AC power cord
before turning off the unit by pressing [POWER], the
channel setting may be lost.
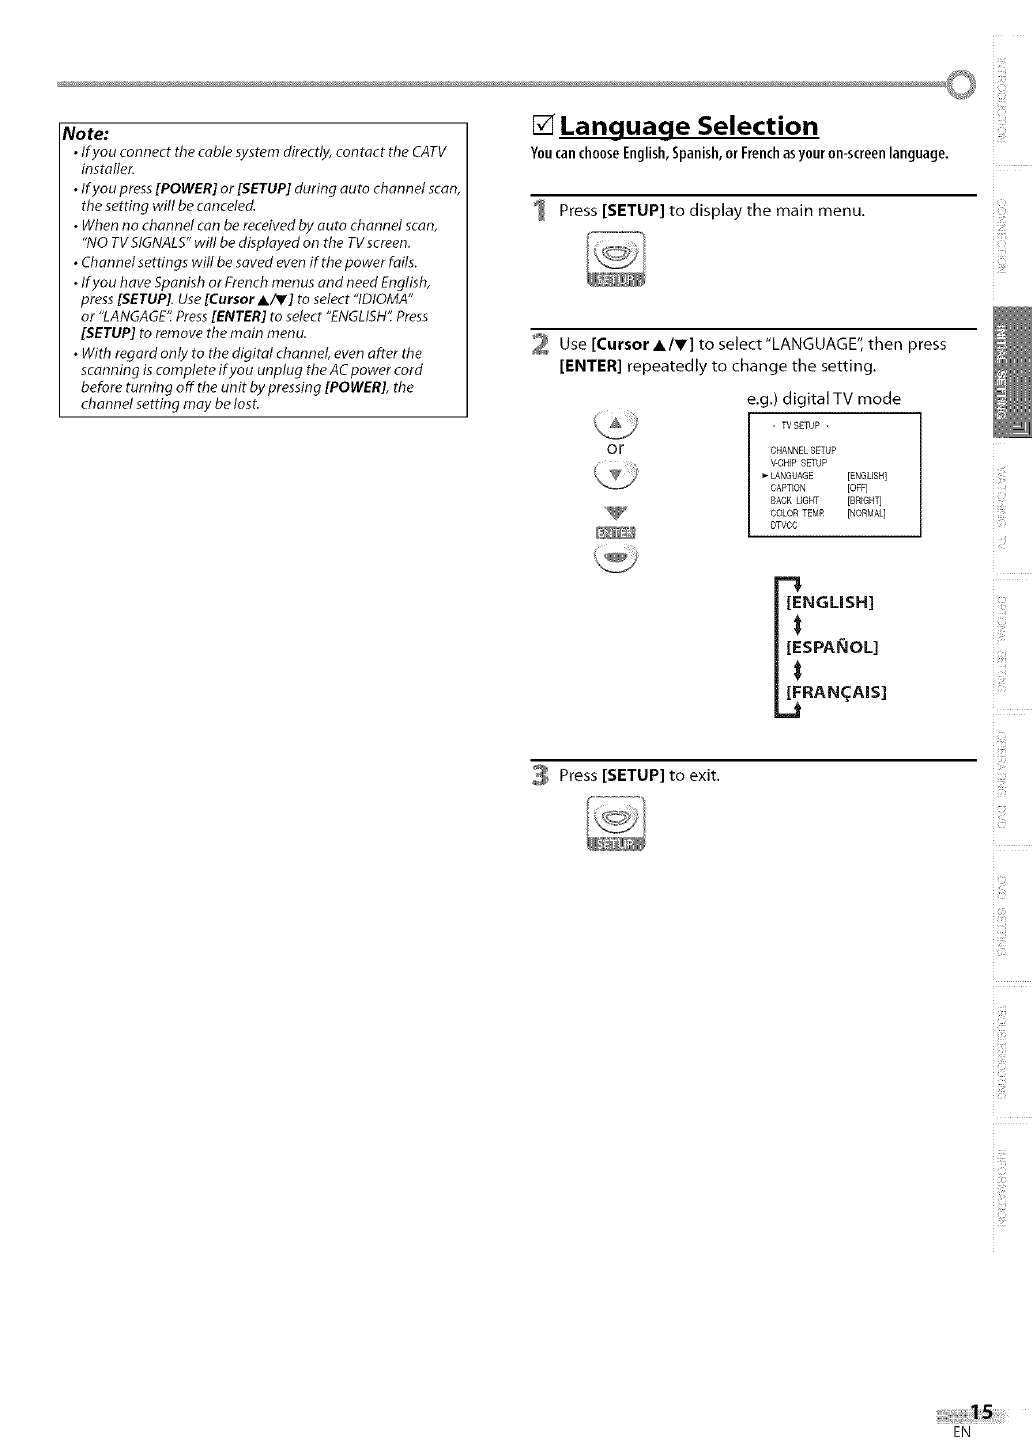
[] Language Selection
You can choose English, Spanish, or French asyour on-screen language.
Press [SETUP] to display the main menu.
2 Use [Cursor A/V] to select"LANGUAGE", then press
[ENTER] repeatedly to change the setting.
e.g.) digital TV mode
OF
- WSETUP -
CHANNELSETUP
V-CHIP SETUP
LANGUAGE [ENGLISH]
CAPTION [OFF]
BACK LIGHT [BRIGHT]
COLOR TEMR [NORMAL]
DTVCO
NGLISH]
SPAI_IOL]
RAN_AIS]
3 Press [SETUP] to exit.
ill?
i!iiii!iil
i iii'_:'
¸i¸¸¸¸
EN
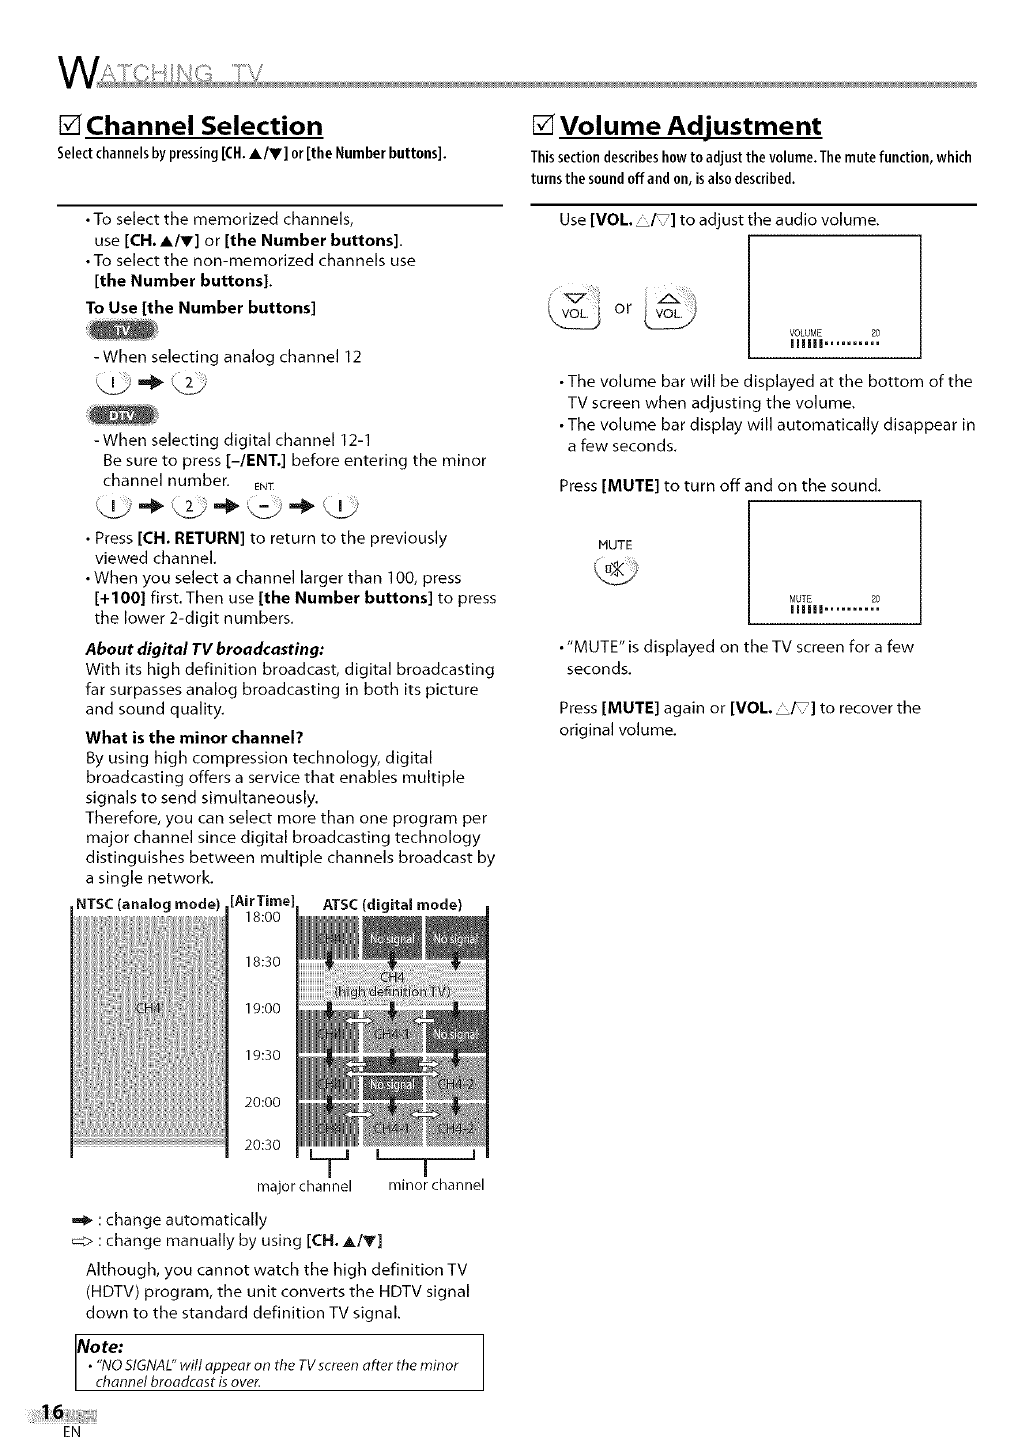
[] Channel Selection
Selectchannelsbypressing[CH.A/V] or [the Numberbuttons].
•To select the memorized channels,
use [CH.A/V] or [the Number buttons].
• To select the non-memorized channels use
[the Number buttons].
To Use [the Number buttons]
-When selecting analog channel 12
,,JL,j.4_ _2_Zi........
-When selecting digital channel 12-1
Be sure to press [-/ENT.] before entering the minor
channel number. EN_
• Press [CH. RETURN] to return to the previously
viewed channel.
• When you select a channel larger than 100, press
[+100] first.Then use [the Number buttons] to press
the lower 2-digit numbers.
About digital TV broadcasting:
With its high definition broadcast, digital broadcasting
far surpasses analog broadcasting in both its picture
and sound quality.
What is the minor channel?
By using high compression technology, digital
broadcasting offers a service that enables multiple
signals to send simultaneously.
Therefore, you can select more than one program per
major channel since digital broadcasting technology
distinguishes between multiple channels broadcast by
a single network.
NTSC(analog mode) [girTime] ATSC(digital mode)
18:00
18:30
19:00
19:30
20:00
20:30 __ [ j '
major channel minor channel
:change automatically
_;> : change manually by using [CH. A/V]
Although, you cannot watch the high definition TV
(HDTV) program, the unit converts the HDTV signal
down to the standard definition TV signal.
Note:
• "NOSIGNAL"will appear on the TVscreen after the minor
channel broadcast isover.
[] Volume Adjustment
Thissectiondescribeshowto adjust the volume.Themutefunction,which
turnsthe soundoffandon,isalsodescribed.
Use [VOL. _/ ]to adjust the audio volume.
or
VOLUME 20
IIIIII ..........
• The volume bar will be displayed at the bottom of the
TV screen when adjusting the volume.
• The volume bar display will automatically disappear in
a few seconds.
Press [MUTE] to turn offand on the sound.
MUTE
MUTE 20
Illlll ..........
• "MUTE" is displayed on the TV screen for a few
seconds,
Press [MUTE] again or [VOL _] to recover the
original volume.
EN
o
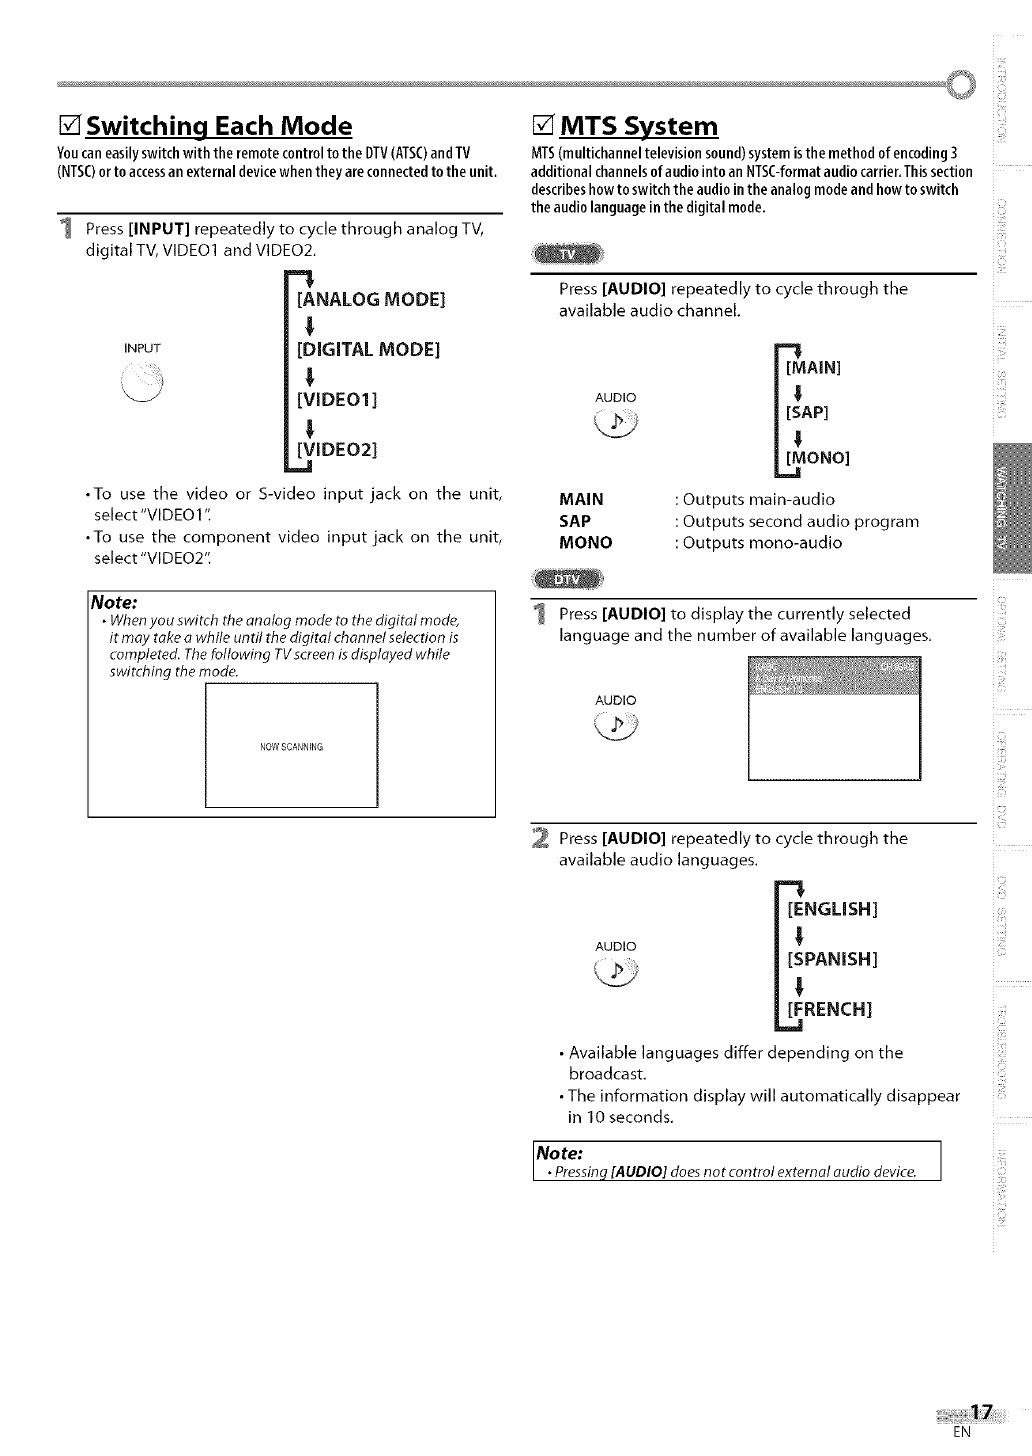
[] Switching Each Mode
Youcaneasilyswitchwiththe remotecontroltothe DTV(ATSC)andTV
(NTSC)orto accessanexternal devicewhentheyareconnectedtothe unit,
1 Press [INPUT] repeatedly to cycle through analog TV,
digital TV, VIDEO1 and VIDEO2.
-!
[ANALOG MODE]
!
INPUT [DIGITAL MODE]
[VIDEO1 ]
!
[VIDEO2]
_J
•To use the video or S-video input jack on the unit,
select"VlDEO11
•To use the component video input jack on the unit,
select "VIDEO2".
[] MTS System
MTS(multichanneltelevisionsound)systemisthe methodof encoding3
additionalchannelsofaudiointo an NTSC-formataudiocarrier,Thissection
describeshowtoswitchthe audiointhe analogmodeandhowto switch
theaudiolanguageinthe digitalmode,
Press [AUDIO] repeatedly to cycle through the
available audio channel.
AUDIO _AIN]
jE API
_ONO]
MAIN : Outputs main-audio
SAP : Outputs second audio program
MONO : Outputs mono-audio
[Vote:
•When you switch the analog mode to the digital mode,
it may take awhile until the digital channel selection is
completed. The following TV screen is displayed while
switching the mode.
NOWSCANNING
1 Press [AUDIO] to display the currently selected
language and the number of available languages.
AUDIO
2 Press [AUDIO] repeatedly to cycle through the
available audio languages.
-I
[ENGLISH]
AUDIO
[SPANISH]
!
[FRENCH]
•Available languages differ depending on the
broadcast.
• The information display will automatically disappear
in 10 seconds.
No re:
•Pressinq[AUDIO] doesnot control external audio device.
i i!,!i!;
u_2
i ii:iiill
i!iiii!iil
i iii'_f
¸i¸¸¸¸
EN
[] Screen Information
Youcandisplaythe currently selectedchannelor otherinformationsuchas
the audiomodeonthe TVscreen.
Inthe analogmode,the current channelnumberis displayed.
Press [DISPLAY],
DISPLAY
CHIO
•The current channel number is displayed at the top-
right corner of the TV screen.
• To clear the display, press [DISPLAY] again.
In the digital mode,the detailed broadcastinginformation for the current
channelsuchas programtitle, programguidesare displayed.
Press [DISPLAY] repeatedly to cycle through the
available display modes.
[OFF]
DISPLAY
[BROADCASTING INFORMATION]
!
[PROGRAM GUIDE]
[Broadcasting Information]
• The following information is displayed,
1 channel number
2 broadcast station
3 program title
4 audio language
("OTHER" is displayed when the audio language cannot
be acquired, or the acquired languages are other than
English, Spanish or French,)
[Program Guide]
• The program guide added to broadcasting
information is displayed.
guide
No re:
•When the program guide consistsof more than 6 lines, use
[CursorA/T] to scroll
• "No description provided"is displayed when the program
guide is not provided.
•While the program guide isdisplayed, the closed caption
function is interrupted.
•In external input mode, the following screenis displayed;
e.g.)When an external device is connected to VIDEO1input
jack.
VIDEO I
•Available languages differ depending on the broadcast.
•Theinformation display will automatically disappear in 1
minute.
•Pressing[AUDIO] doesnot control external audio device.
EN
o!!i
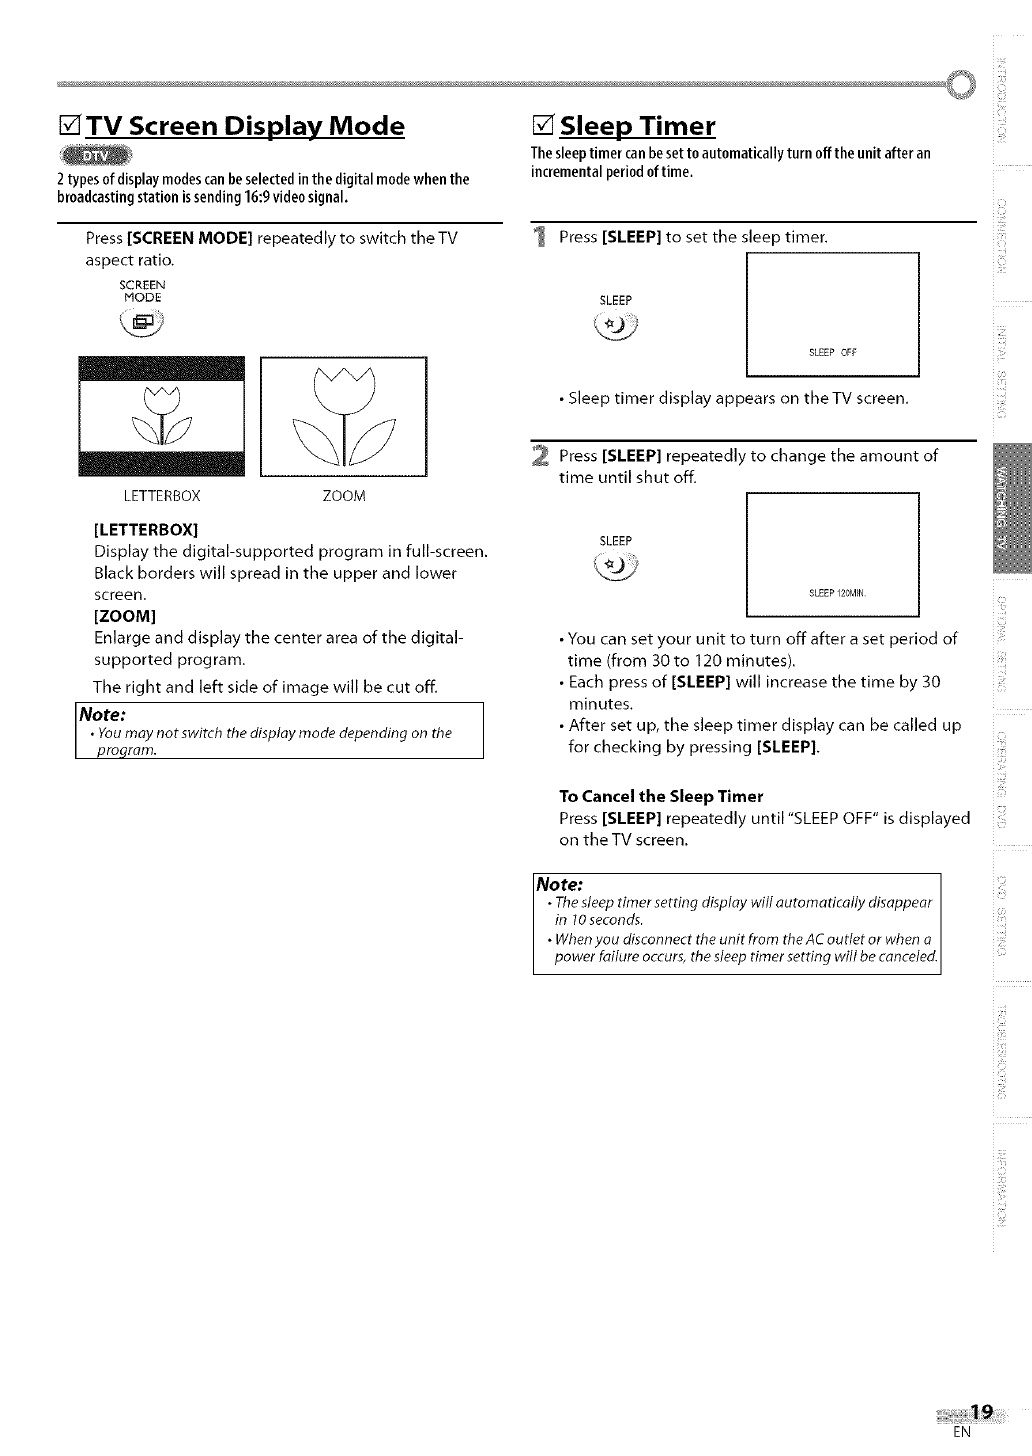
[]TV Screen Display Mode [] Sleep Timer
2 types ofdisplay modescanbeselectedin the digital modewhen the
broadcastingstation is sending16:9video signal.
Press [SCREEN MODE] repeatedly to switch the TV
aspect ratio,
SCREEN
MODE
LETTERBOX ZOOM
[LETTERBOX]
Display the digital-supported program in full-screen.
Black borders will spread in the upper and lower
screen.
[ZOOM]
Enlarge and display the center area of the digital-
supported program.
The right and left side of image will be cut off,
Note:
•Youmay not switch the display mode depending on the
proqram.
Thesleeptimer canbeset to automatically turn offthe unit after an
incrementalperiod of time.
1 Press [SLEEP] to set the sleep timer.
SLEEP
SLEEP OFF
•Sleep timer display appears on theTV screen,
2 Press [SLEEP] repeatedly to change the amount of
time until shut off,
SLEEP
SLEEP 120MIN
• You can set your unit to turn off after a set period of
time (from 30 to 120 minutes).
• Each press of [SLEEP] will increase the time by 30
minutes.
• After set up, the sleep timer display can be called up
for checking by pressing [SLEEP].
To Cancel the Sleep Timer
Press [SLEEP] repeatedly until "SLEEP OFF" is displayed
on the TV screen,
Note:
•The sleep timer setting display will automatically disappear
in lO seconds.
•When you disconnect the unit from the AC outlet or when a
power failure occurs, the sleep timer setting will be canceled,
ill'fill
i!iiii!iil
EN
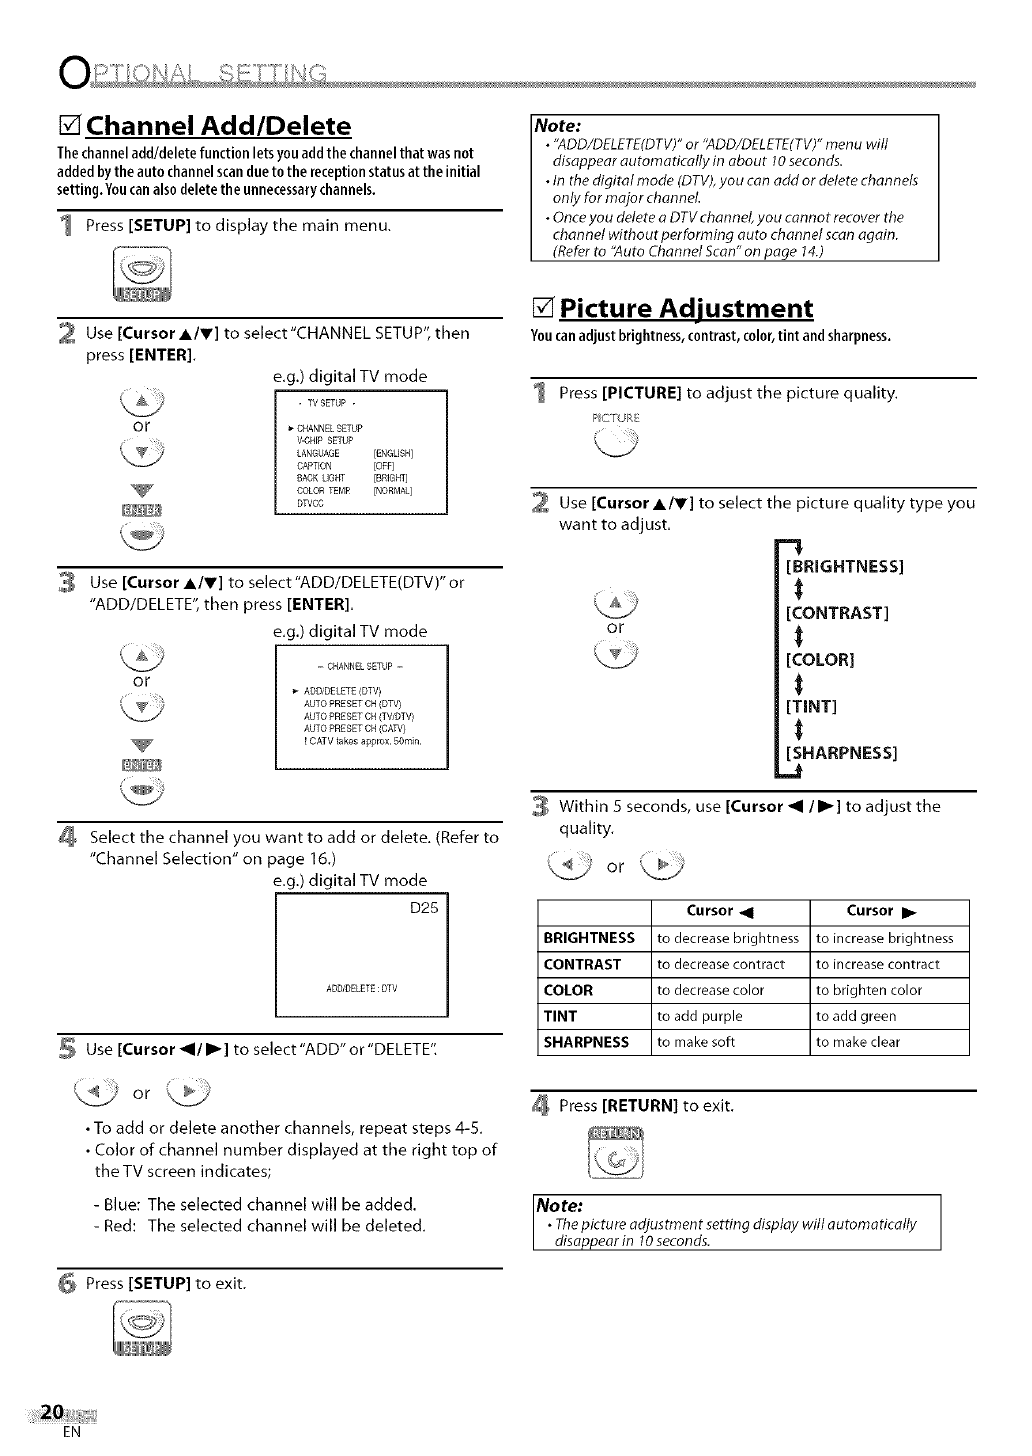
[] Channel Add/Delete
Thechanneladd/deletefunctionletsyouaddthechannelthat wasnot
addedbytheauto channelscandueto the receptionstatusat theinitial
setting. Youcanalso deletethe unnecessarychannels.
1 Press [SETUP] to display the main menu.
Note:
• "ADD/DELETE(DTV)"or '`ADD/DELETE(TV)"menu will
disappear automatically in about 10seconds.
• In the digital mode (DTV),you can add or delete channels
only for major channel
• Once you deleteaDTV channel you cannot recover the
channel without performing auto channel scan again.
(Referto "Auto Channel Scan" on page 14.)
2 Use [Cursor A/V] to select"CHANNEL SETUP", then
press [ENTER].
e,g.) digital TV mode
- W SETUP -
OF CHANNEL SETUP
V-CHFPSETUP
LANGUAGE [ENGLISH]
CAPTEON [OFF]
BACK UGHT [BRIGFTj
COLOR TEMP [NORMAL]
DWCC
3 Use [Cursor A/r] to select"ADD/DELETE(DTV)" or
"ADD/DELETE", then press [ENTER].
e.g.) digital TV mode
OF
- CNANNELSETUP -
ADDJDELETE (DTV)
AUTO PRESET CH (DTV_
AUTO PRESET CH (TWDTV)
AUTO PRESET CH (CAW)
! CATV takes approx. 50rn]n.
Select the channel you want to add or delete. (Refer to
"Channel Selection" on page 16.)
e.g.) digital TV mode
D25
AUD/DELETE:DTV
Use [Cursor _1/I_] to select "ADD" or "DELETE".
•To add or deleteanother channels,repeatsteps4-5.
•Color of channel number displayedatthe righttop of
the TV screen indicates;
- Blue: The selected channel will be added.
- Red: The selected channel will be deleted.
6 Press [SETUP] to exit.
[] Picture Adjustment
Youcanadjust brightness,contrast, color,tint andsharpness.
1 Press [PICTURE] to adjust the picture quality.
PCT/ P,
Use [Cursor A/r] to select the picture quality type you
want to adjust.
[BRIGHTNESS]
[CONTRAST]
or _
[COLOR]
[TINT]
[SHARPNESS]
_J
Within 5 seconds, use [Cursor _1 /I_] to adjust the
quality.
Cursor _1 Cursor I_
BRIGHTNESS to decrease brightness to increase brightness
CONTRAST to decrease contract to increasecontract
COLOR to decrease color to brighten color
TINT to add purple to add green
SHARPNESS to makesoft to make clear
Press [RETURN] to exit.
Note:
•Thepicture adjustment setting display will automatically
disappear in 10seconds.
EN
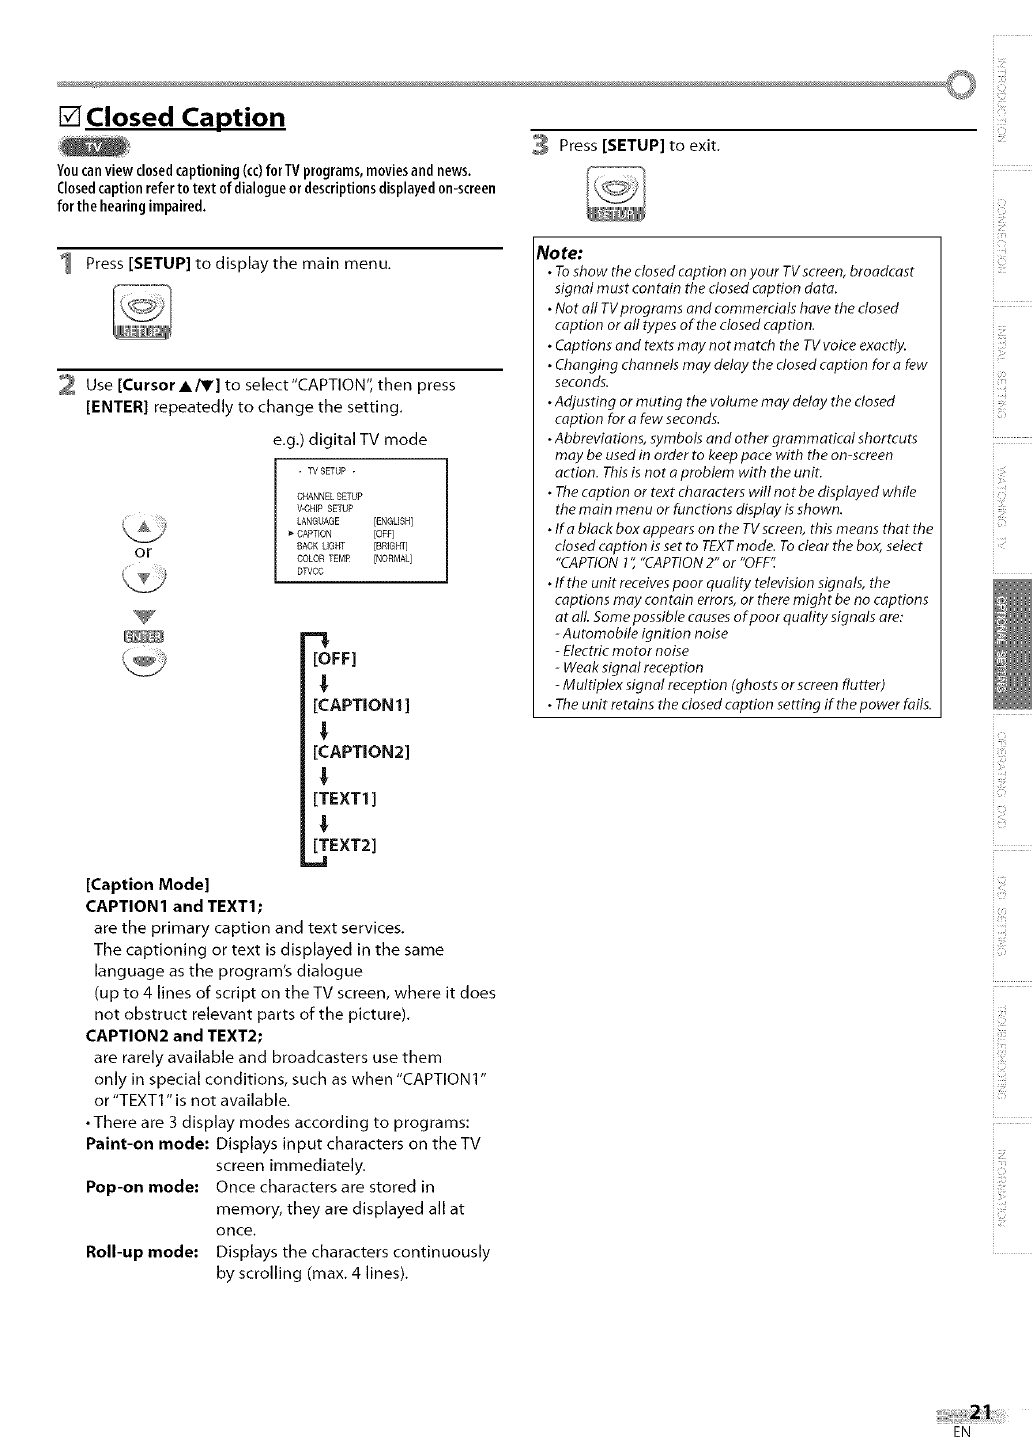
[] Closed Caption
3 Press [SETUP] to exit.
Youcanview closedcaptioning (co)for TVprograms,moviesand news.
Closedcaption referto text of dialogueor descriptionsdisplayed0n-screen
f0r the hearingimpaired.
1 Press [SETUP] to display the main menu.
2 Use [Cursor AiV] to select"CAPTION", then press
[ENTER] repeatedly to change the setting.
e.g.) digital TV mode
or
- TV SETUP -
CHANNEL SETUP
V-CHFPSETUP
LANGUAGE [ENGLISH]
_"CAPTEON [OFF]
SACK UGHT [BRIGHT]
COLOR TEMR [NORMAL]
DWO¢
[OFF]
!
[CAPTION1 ]
!,
[CAPTION2]
!,
[TEXT1 ]
!
[TEXT2]
[Caption Mode]
CAPTION1 and TEXT1;
are the primary caption and text services.
The captioning or text is displayed in the same
language as the program's dialogue
(up to 4 lines of script on the TV screen, where it does
not obstruct relevant parts of the picture).
CAPTION2 and TEXT2;
are rarely available and broadcasters use them
only in special conditions, such as when "CAPTION 1"
or "TEXT1" is not available.
•There are 3 display modes according to programs:
Paint-on mode: Displays input characters on theTV
screen immediately.
Pop-on mode: Once characters are stored in
memory, they are displayed all at
once.
Roll-up mode: Displays the characters continuously
by scrolling (max. 4 lines).
No re:
•Toshow the closedcaption on your TVscreen, broadcast
signal must contain the dosed caption data.
•Not all TVprograms and commercials have the dosed
caption or all types of the closed caption.
•Captions and texts may not match the TV voice exactly.
• Changing channels may delay the dosed caption for afew
seconds.
•Adjusting or muting the volume may delay the dosed
caption for afew seconds.
•Abbreviations, symbols and other grammatical shortcuts
may be used in order to keep pace with the on-screen
action. Thisis not aproblem with the unit.
•Thecaption or text characters will not be displayed while
the main menu or functions display is shown.
•Ifa black boxappears on the TVscreen, this means that the
closed caption isset to TEXTmode. To dear the box, select
"CAPTION1","CAPTION2" or "OFF".
•If the unit receivespoor quality television signals, the
captions may contain errors, or there might be no captions
at all. Somepossible causesof poor quality signals are:
-Automobile ignition noise
-Electricmotor noise
-Weak signal reception
-Multiplex signal reception (ghosts or screenflutter)
•Theunit retains the dosed caption setting if the power fails.
i i!:¸
i_iiiiill
i iiiiill
EN
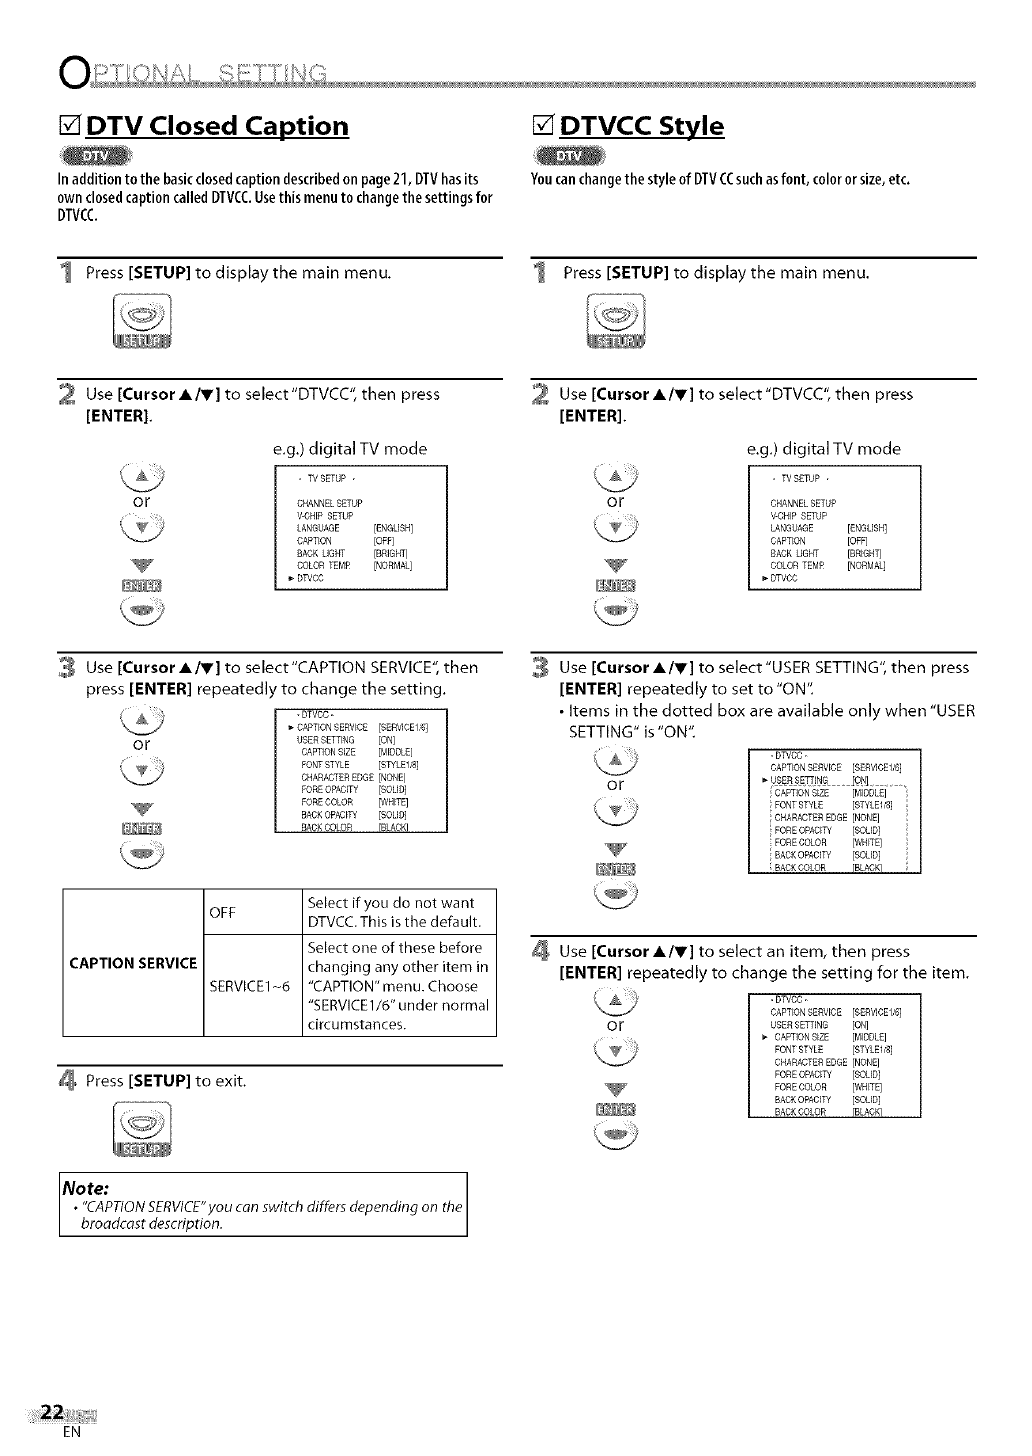
[] DTV Closed Caption
Inaddition tothe basicclosedcaption describedon page21, DTVhasits
ownclosedcaptioncalledDTVCCUsethismenuto changethesettings for
DTVCC
[] DTVCC Style
Youcanchangethe style of DTVCCsuchasfont,colororsize,etc.
1 Press [SETUP] to display the main menu. Press [SETUP] to display the main menu.
2 Use [Cursor A/V] to select"DTVCC", then press
[ENTER].
e.g.) digital TV mode
or
- TV SETUP -
CHANNEL SETUP
V-CHIP SETUP
LANGUAGE [ENGLISH]
CAPTION [OFF]
SACK UGHT [BRIGHT]
COLOR TEMR [NORMAL]
DWCC
Use [Cursor A/Y] to select"DTVCC", then press
[ENTER].
e.g.) digital TV mode
or
- WSETUP -
CHANNELSETUP
V-CRIB SETUP
LANGUAGE [ENGLISH]
CAPTION [OFF]
SAOK LIGHT [BRIGHT]
GOLONTEMR [NORMAL]
DTVCG
3 Use [Cursor A/V] to select'CAPTION SERVICE",then
press [ENTER] repeatedl to change the setting.
or
- DTVDC -
CAPTION SERVICE [SERVICEI_]
USER SETTING [ON]
CAPTION SIZE [MIONLE]
FONT STYLE [STYLED8]
CHARACTEREDGE [NONE]
PORE OPAGITY [SOLID]
PORE DOLOR [WHITE]
BACK OPACITY [SOLID]
BACK GOLOR FBLAONI
CAPTION SERVICE
OFF
SERVICE1-6
Select if you do not want
DTVCC. This is the default.
Select one of these before
changing any other item in
"CAPTION" menu. Choose
"SERVICE1/6" under normal
circumstances.
Press [SETUP] to exit.
Note: the
•"CAPTIONSERVICE"youcan switch differs depending on
broadcast description.
Use [Cursor A/V] to select'USER SETTING", then press
[ENTER] repeatedly to set to "ON".
• Items in the dotted box are available only when "USER
SETTING" is "ON".
or
- DTVCC -
CAPTIONSERWCE [SERVICEI/6]
_-USERSE_'JNG•[ONj..........,
CAPTIONSIZE [MIDDLE]
FONT STYLE [STYLEDS]
CHARACTEREDGE [NONE]
FORE OPACITY [SOLID]
FORE COLOR [WRITE]
'BACKOPACITY [SOLID] ',
; BACKCOLOR BLACK
Use [Cursor A/V] to select an item, then press
[ENTER] repeatedly to change the setting for the item.
or
- DTVCC -
CAPTIONSERVICE [SERVICEII6]
USER SETTING [ON]
_" CAPTIONSIZE [MIDDLE]
FONT STYLE [STYLED8]
ONARADTEREDGE [NONE]
FORE OPACITY [SOLID]
FORE GOLOR [WHITE]
BACKOPACITY [SOLED]
BACKONLOR rBLAGK]
EN
i i!:¸
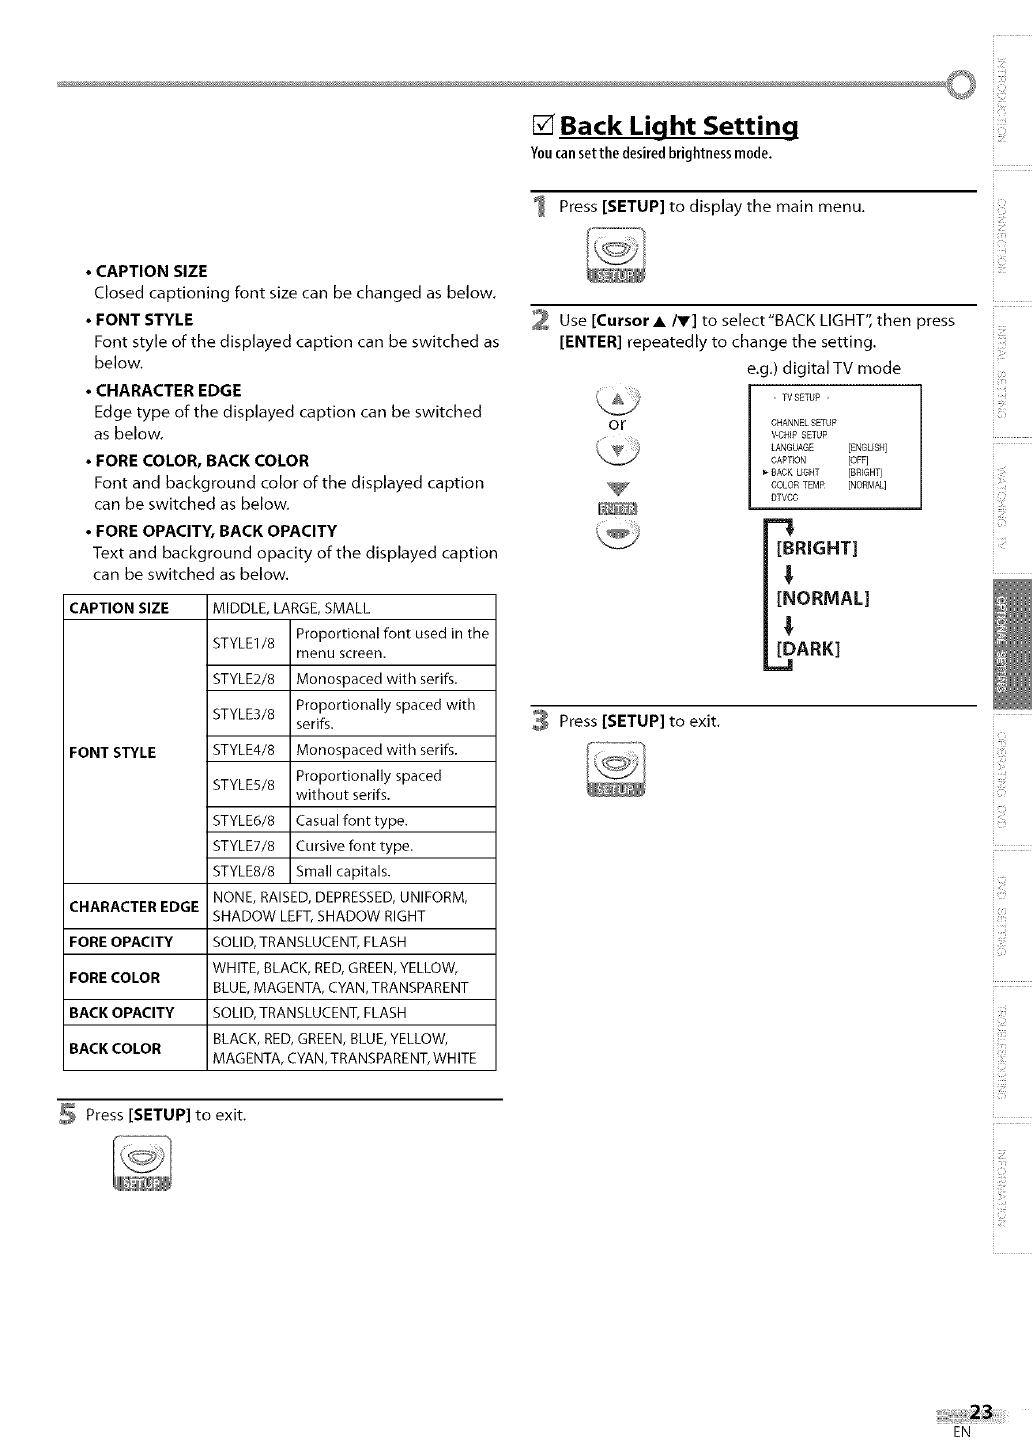
[] Back Light Setting
Youcansetthe desiredbrightnessmode,
Press [SETUP] to displaythe main menu.
• CAPTION SIZE
Closed captioning font size can be changed as below.
•FONT STYLE
Font style of the displayed caption can be switched as
below.
•CHARACTER EDGE
Edge type of the displayed caption can be switched
as below.
•FORE COLOR, BACK COLOR
Font and background color of the displayed caption
can be switched as below.
•FORE OPACITY, BACK OPACITY
Text and background opacity of the displayed caption
can be switched as below.
CAPTION SIZE
FONT STYLE
CHARACTER EDGE
FORE OPACITY
FORE COLOR
BACK OPACITY
BACK COLOR
Press [SETUP] to exit.
MIDDLE, LARGE, SMALL
STYLE1/8 Proportional font used in the
menu screen.
STYLE2/8 Monospaced with serifs.
STYLE3/8 Proportionally spaced with
serifs.
STYLE4/8 Monospaced with serifs.
STYLES/8 Proportionally spaced
without serifs.
STYLE6/8 Casual font type.
STYLE7/8 Cursive font type.
STYLE8/8 Small capitals.
NONE, RAISED, DEPRESSED, UNIFORM,
SHADOW LEFT, SHADOW RIGHT
SOLID, TRANSLUCENT, FLASH
WHITE, BLACK, RED, GREEN, YELLOW,
BLUE, MAGENTA, CYAN, TRANSPARENT
SOLID, TRANSLUCENT, FLASH
BLACK, RED, GREEN, BLUE, YELLOW,
MAGENTA, CYAN, TRANSPARENT, WHITE
2 Use [Cursor A/V] to select'BACK LIGHT", then press
[ENTER] repeatedly to change the setting.
e.g.) digital TV mode
- TVSETUP -
OF CHANNEL SETUP
V-CHIP SETUP
LANGUAGE [ENGLISH]
CAPTEON [OFF]
BACK LIGHT [BREGHT]
COLOR TEMP [NORMAL]
DTVCC
[BRIGHT]
!
[NORMAL]
!
[DARK]
_J
3 Press [SETUP] to exit.
i_iiill
i iilLi
_M
i li!!il!_
.........
EN
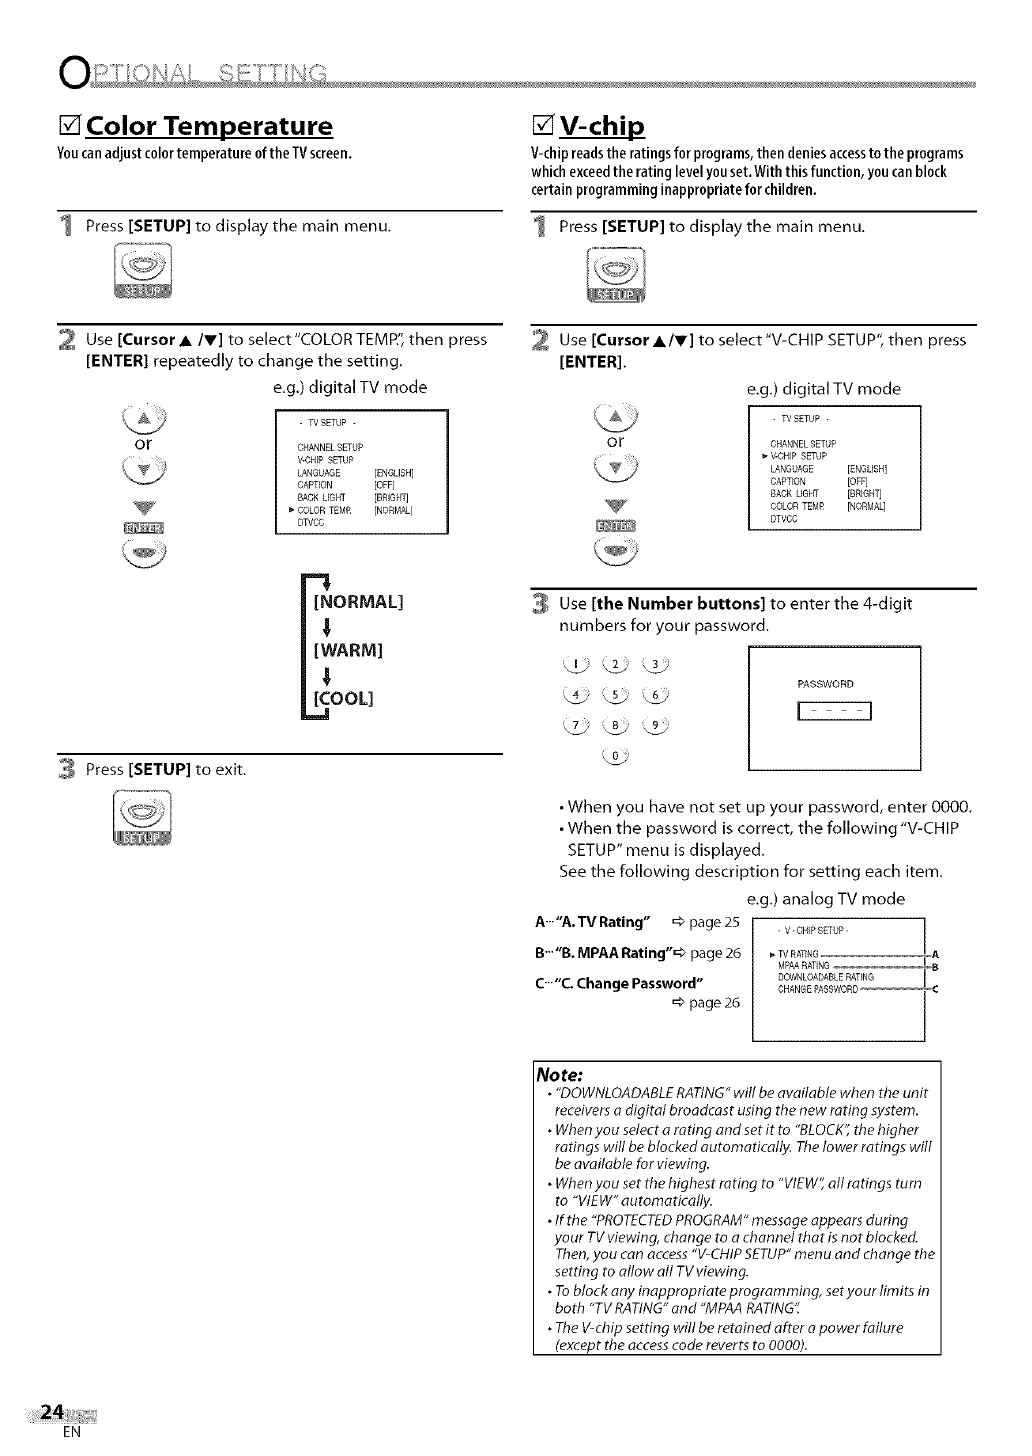
[] Color Temperature
Youcanadjust colortemperatureofthe TVscreen.
1 Press [SETUP] to display the main menu.
[]V-chil
V-chipreadsthe ratingsforprograms,thendeniesaccessto the programs
whichexceedtheratinglevelyouset.With thisfunction,youcanblock
certainprogramminginappropriateforchildren.
Press [SETUP] to display the main menu.
2 Use [Cursor •IV] to select"COLOR TEMP", then press
[ENTER] repeatedly to change the setting.
e.g.) digital TV mode
OF
- W SETUP -
CHANNEL SETUP
V-CHIP SETUP
LANGUAGE [ENGUSH]
CAPTION [OFF]
BACK UGHT [BRIGHT]
COLOR TEMR [NORMAL]
DWCC
Use [Cursor•IV] to select"V-CHIP SETUP", then press
[ENTER].
e.g.) digital TV mode
OF
- W SETUP -
CHANNELSETUP
V-CHIP SETUP
LANGUAGE [ENGLISH]
CAPTION [OFF]
BACK LIGHT [BREGH_
COLOR TEMR [NORMAq
DTVCC
[NORMAL]
[WARM]
[COOL]
_.1
3 Press [SETUP] to exit.
Use [the Number buttons] to enter the 4-digit
numbers for your password.
_0_
PASSWORD
•When you have not set up your password, enter 0000.
•When the password is correct, the following "V-CHIP
SETUP" menu is displayed.
See the following description for setting each item.
e.g.) analog TV mode
A'""A.TV Rating" =>page 25 . V-CHIPSETUP- I
I
B'""B.MPAA Rating"=> page 26 _TVRATING A
MPAARATING I8,
DOWNLOADABLERATING i
C'"'C Change Password" CHANGE PASSWORD-- C
=>page 26
No re:
• "DOWNLOADABLERATING"will be available when the unit
receiversa digital broadcast using the new rating system.
•When you selecta rating and set it to "BLOCK",the higher
ratings will be blocked automatically. Thelower ratings will
be available for viewing.
•When you set the highest rating to "VIEW",all ratings tum
to "VIEW" automatically.
•If the "PROTECTEDPROGRAM"message appears during
your TV viewing, change to a channel that is not blocked.
Then,you can access"V-CHIPSETUP"menu and change the
setting to allow all TVviewing.
•Toblock any inappropriate programming, setyour limits in
both "TV RATING"and "MPAARATING".
•TheV-chip setting will be retained after apower failure
(except the accesscode reverts to 0000).
EN

Lx_
i!!:!!!
4 Use [Cursor A/V] to select'TV RATING", then press
[ENTER].
e.g.) digital TV mode
- V-CHIP SETUP -
or _- TV RATING
MPAARATING
DOWNLOADABLE RATING
CHANGE PASSWORD
Use [Cursor A/V] to select the desired rating, then
press [ENTER] repeatedly to switch between "VIEW"
and "BLOCK".
OF w-Y [WEW]
W-Y7 ( ) [VIEW]
TV-G [VIEW]
TV-PG( ) [VIEW]
TV-14 { ) [VIEW]
TV-MA( ) [VIEW]
Press [SETUP] to exit.
[To Set the Sub Ratings]
As for TV-Y7, TV-PG, TV-14 or TV-MA, you can further
set the sub ratings to block specific elements of
programming. To set the sub ratings, follow the steps
below.
1. Use [Cursor A/V] to select the desired main rating,
then press [ENTER] twice to show its sub ratings,
OF TV-Y [VIEW]
TV-Y7 ( ) [VIEW]
W-G [VIEW]
TV-PG(DLSV) [BLOCK]
W-14 (DLSV) [BLOCK]
TV-MA(LSV) [BLOCK]
2. Use [Cursor A/V], then press [ENTER] repeatedly to
change the setting.
oF
e.g.) TV-PG
W-PG [BLOCK]
_- O[BLOCK]
L [BLOCK]
S [BLOCK]
V [BLOCK]
Rating Category
TV-Y Appropriate for allchildren lower
TV-Y7 Appropriate for allchildren 7 and J
older
TV-G General audience
TM-PG Parental guidance suggested
TV-14 Unsuitable for children under 14 _
TV-MA Mature audience only higher
Sub Rating
FV
V
S
L
D
Category
FantasyViolence
Violence
Sexual Situation
Coarse Language
Suggestive Dialogue
Rating
TV-Y7
TV=PG
TV-14
TV-MA
TV=PG, TV-14
Note:
•Blocked sub ratings will appear beside the main rating
category in "TV RATING" menu.
• You cannot black a sub rating (D, L, S or V) if the main rating
is set to "VIEW':
•Changing the category to "BLOCK" or "VIEW" automatically
changes all its sub ratings to the same ("BLOCK" or "VIEW").
i_!!:;
i iii_:1
i:iii!_
i iiii!_i
i iiii_!i
i;;:ill
i i(!iiii_i!
EN
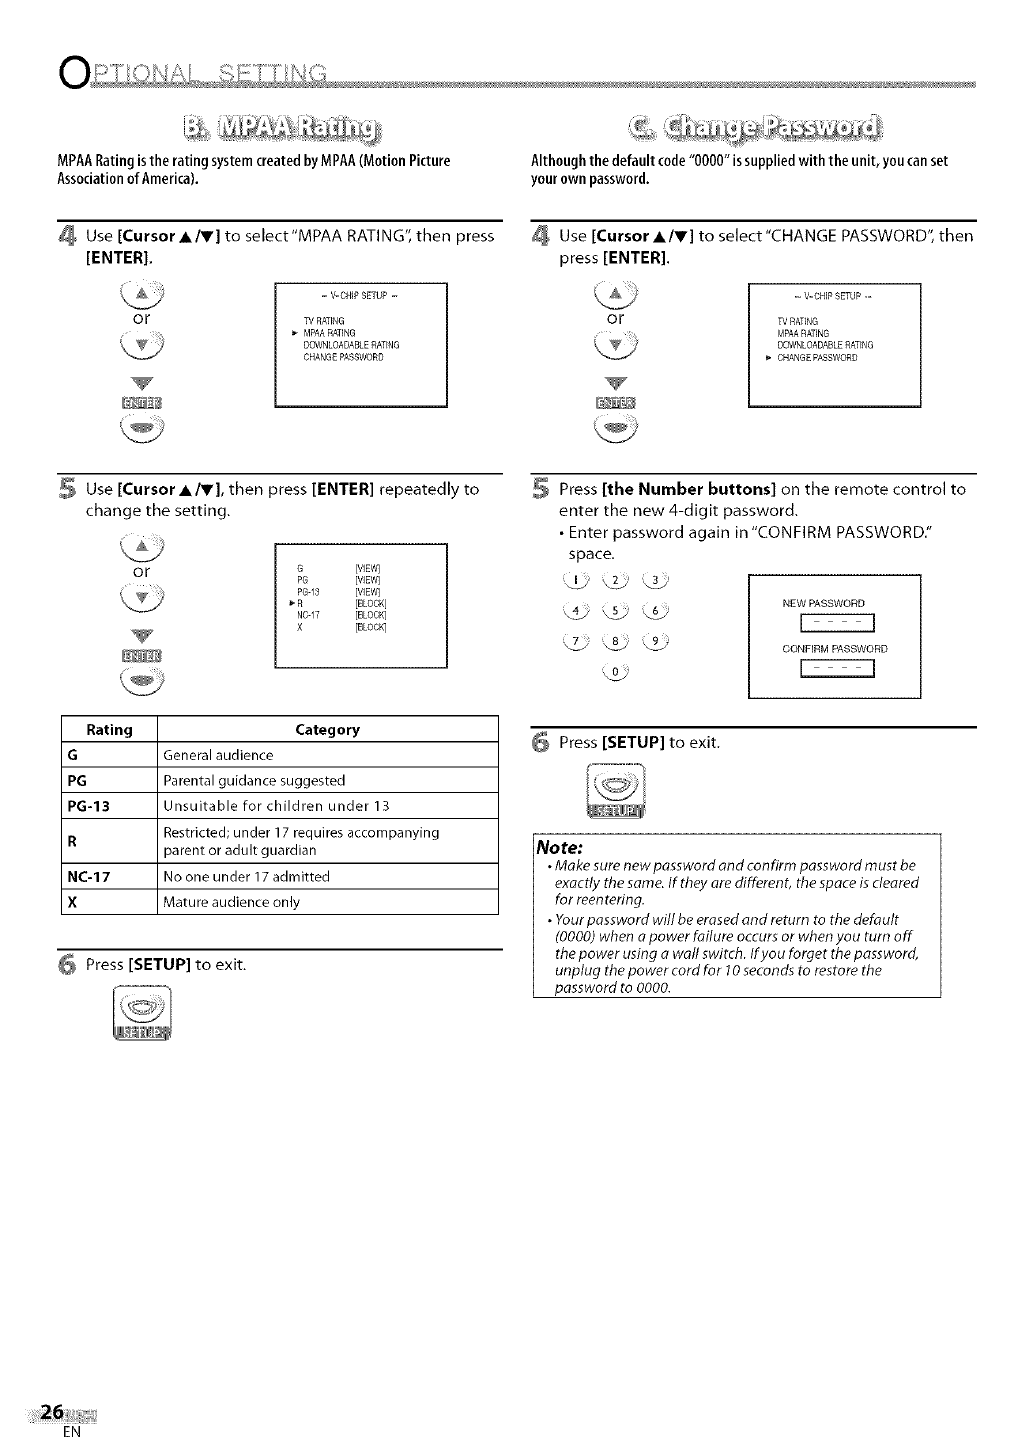
MPAARatingisthe ratingsystemcreatedbyMPAA(Motion Picture
Associationof America). Althoughthe default code"0000" issuppliedwith the unit,you canset
your own password.
Use [Cursor A_F] to select'MPAA RATING",then press
[ENTER].
OF
- V-CHIP SETUP -
W RATING
MPAARATING
DOWNLOADABLERATING
CHANGEPASBWORD
Use [Cursor A/Y] to select"CHANGE PASSWORD", then
press [ENTER].
OF
- V-CHIP SETUP -
W RATING
MPAA RATING
DOWNLOABABLEBATING
_" CHANGE PASSWORD
Use [Cursor A/V], then press [ENTER] repeatedly to
change the setting.
OF G [VIEW]
PG [VIEW]
PG-13 [VIEW]
R [BLOCK]
Nca7 [BLOCK]
X [BLOCK]
Press [the Number buttons] on the remote control to
enter the new 4-digit password.
• Enter password again in "CONFIRM PASSWORD."
space.
NEW PASSWORD
_7 _8 L_ CONFIRMPASSWORD
Rating Category
GGeneral audience
PG Parental guidance suggested
PG-13 Unsuitable for children under 13
R Restricted; under 17 requires accompanying
_arent or adult guardian
NC-17 No one under 17 admitted
X Mature audience only
Press [SETUP] to exit.
Press [SETUP] to exit.
Note:
•Make sure new password and confirm password must be
exactly the same. If they are different, the space is cleared
for reentefing.
•Your password will be erased and return to the default
(0000) when apower failure occurs or when you turn off
the power using a wall switch. If you forget the password,
unplug the power cord for l Oseconds to restore the
password to 0000.
EN
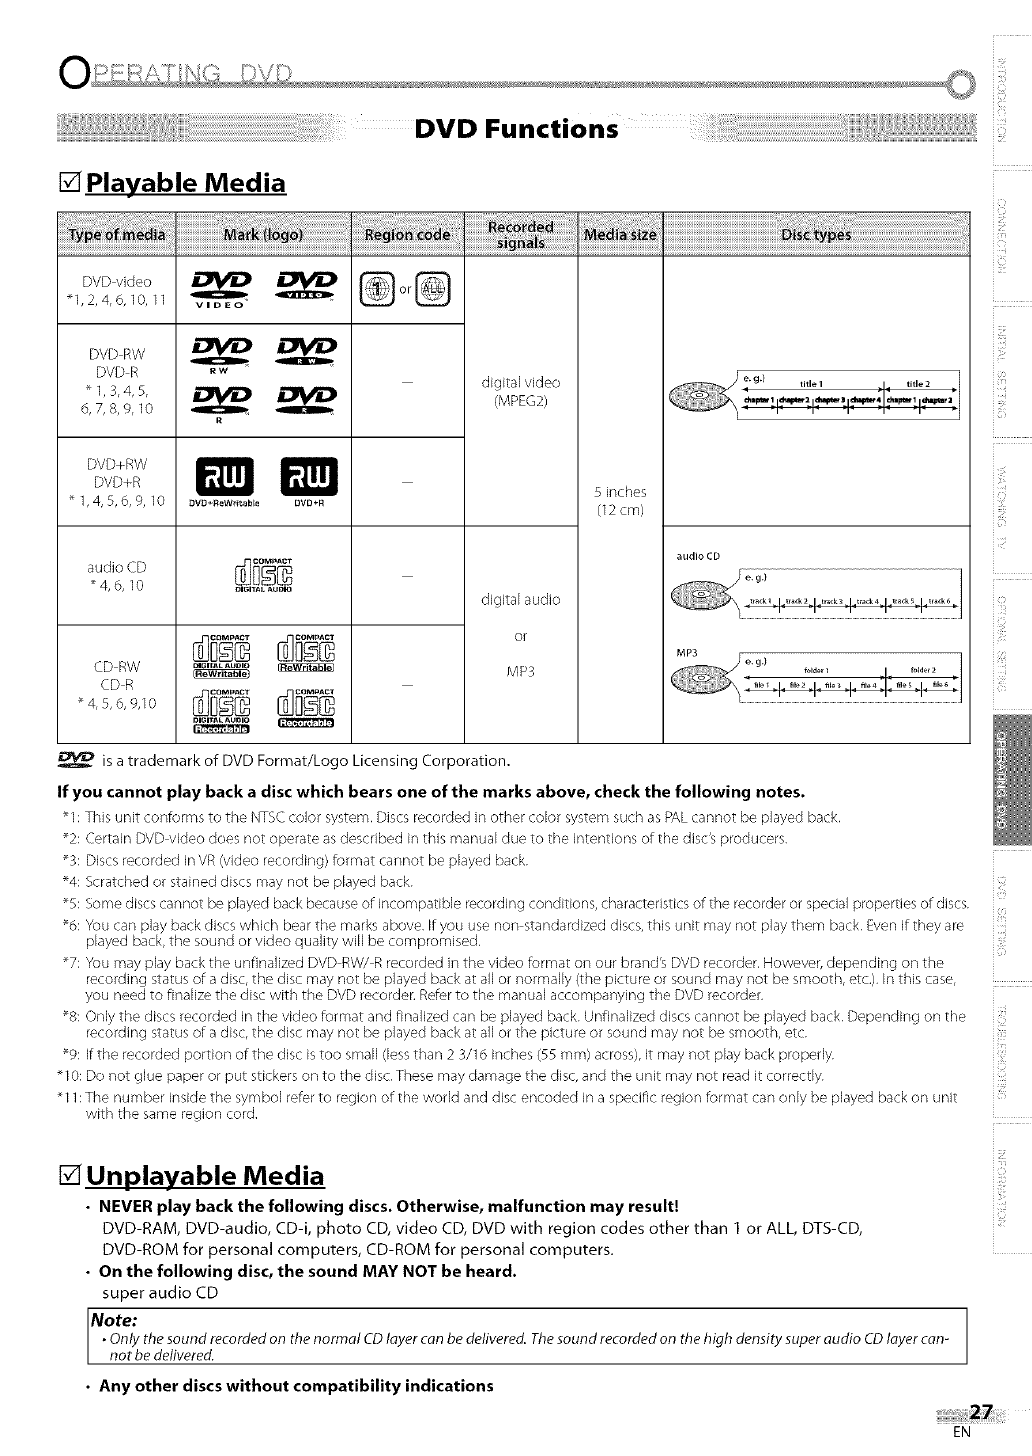
[] Playable Media
_1,2,4,6,10,11
DVDRW
DVDR
"1,3,4,5,
6,7,8,%10
DVD+RW
DVD+R
* 1,4,5,6,9, 10
audio CD
"4,6,10
CD RW
CD R
_ 4, 5, 6, 9,10
RW Q
R
_V_+ReW_taMe DVD+R
DIGITAL AU_
NGITAL AUDIO _
DIGITAL AUDIO _
digital video
(MPEG2)
digital audio
or
MP3
5 inches
(12cm)
eg} title 1 _4 title 2
audio CD
MP3
is a trademark of DVD Format/Logo Licensing Corporation.
If you cannot play back a disc which bears one of the marks above, check the following notes.
_1: This unit conforms to the NTSCcolor system. Discsrecorded in other color system such as PALcannot be played back.
%: Certain DVD video does not operate asdescribed in this manual due to the intentions of the disc's producers.
%: Discs recorded in VR (video recording) format cannot be played back.
_4: Scratched or stained discs may not be played back.
%: Some discs cannot be played back becauseof incompatible recording conditions, characteristics of the recorder or special properties of discs.
%: You can play back discs which bear the marks above. If you use non standardized discs, this unit may not play them back. Even if they are
played back, the sound or video quality will be compromised.
_7: You may play back the unfinalized DVD RW/R recorded in the video format on our brand's DVD recorder. However, depending on the
recording status of a disc,the disc may not be played back at all or normally (the picture or sound may not be smooth, etc.). In this case,
you need to finalize the disc with the DVD recorder.Referto the manual accompanying the DVD recorder.
%: Only the discs recorded in the video format and finalized can be played back. Unfinalized discs cannot be played back. Depending on the
recording status of a disc,the disc may not be played back at all or the picture or sound may not be smooth, etc.
_9: If the recorded portion of the disc istoo small (lessthan 2 3/16 inches (55 mm) across),it may not play back properly. i
_10: Do not glue paper or put stickers on to the disc.These may damage the disc,and the unit may not readit correctly.
_11:The number inside the symbol referto region of the world and disc encoded in a specific region format can only be played back on unit
with the same region cord.
[] Unplayable Media
• NEVER play back the following discs. Otherwise, malfunction may result!
DVD-RAM, DVD-audio, CD-i, photo CD, video CD, DVD with region codes other than 1 or ALL, DTS-CD,
DVD-ROM for personal computers, CD-ROM for personal computers.
•On the following disc, the sound MAY NOT be heard.
super audio CD
Note:
•Only the sound recorded on the normal CDlayer can be delivered. Thesound recorded on the high density super audio CDlayer can-
not be delivered.
•Any other discs without compatibility indications
EN
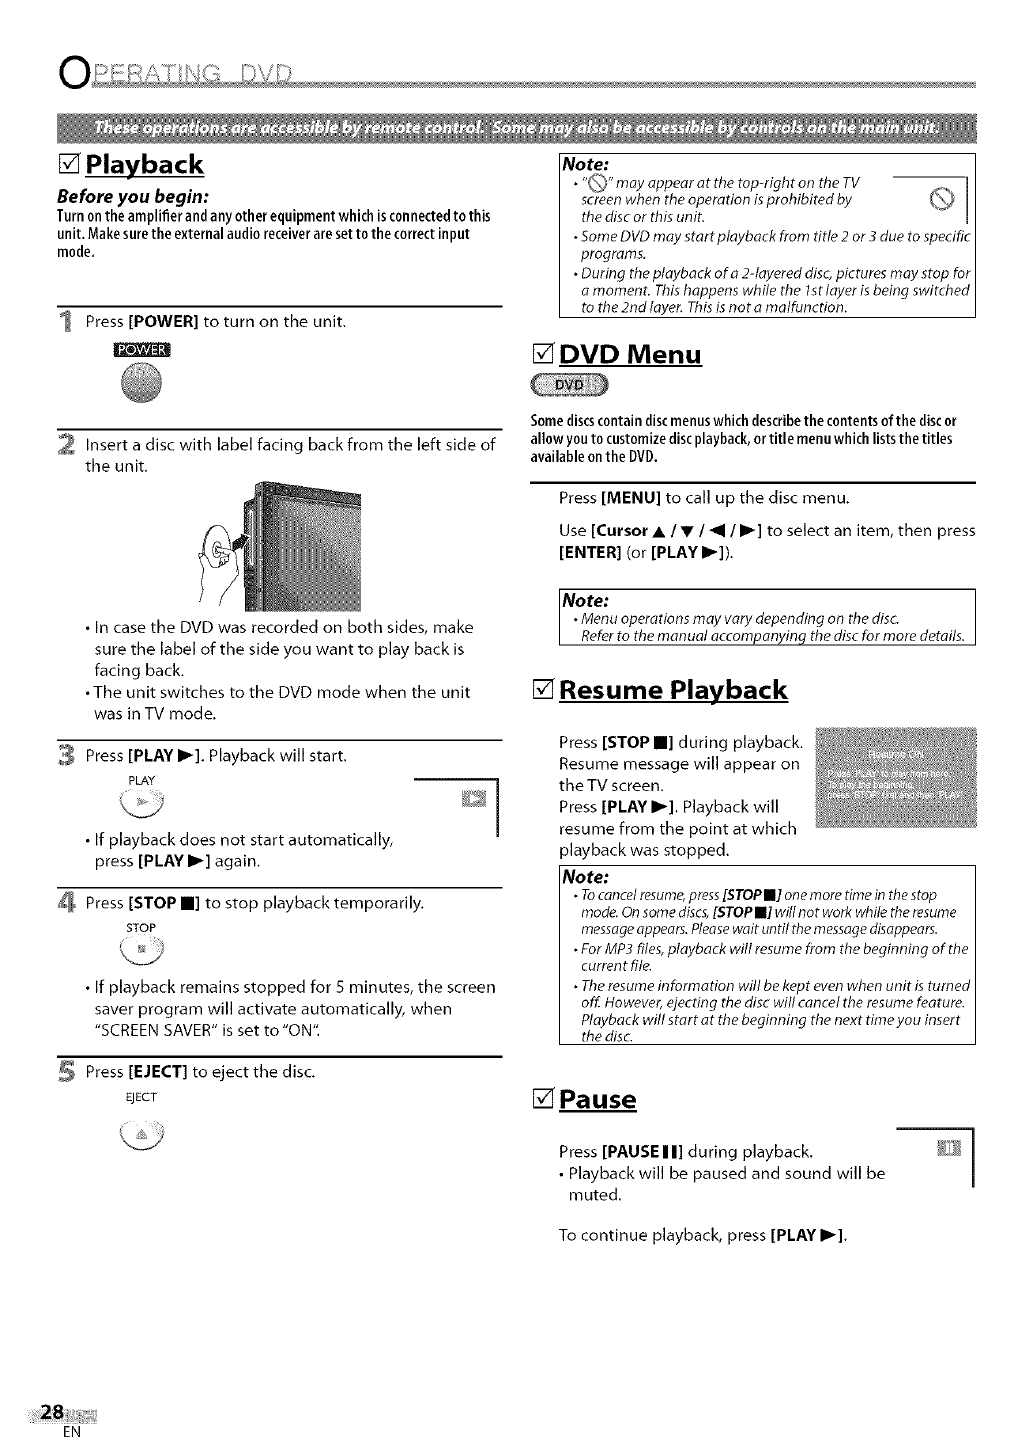
[] Playback
Before you begin:
Turnontheamplifierandanyotherequipment whichisconnectedto this
unit, Makesurethe external audioreceiveraresetto thecorrectinput
mode,
1 Press [POWER] to turn on the unit.
No te:
•"Q" may appear at the top-right or) the TV _. ]
screenwhen the operation isprohibited by \j Ithe disc or this unit.
• SomeDVD may start playback from title 2or 3 due to specific
programs.
• During the playback of a 2-layered disc,pictures may stop for
a moment. Thishappens while the ls t layer is being switEhed
to the 2nd layer. Thisis not a malfunction.
[] DVD Menu
2 Insert a disc with label facing back from the left side of
the unit.
• In case the DVD was recorded on both sides, make
sure the label of the side you want to play back is
facing back.
• The unit switches to the DVD mode when the unit
was in TV mode.
3 Press [PLAY I1_]. Playback will start.
PLAY
• If playback does not start automatically,
press [PLAY I1_] again.
Press [STOP m] to stop playback temporarily.
STOP
• If playback remains stopped for 5 minutes, the screen
saver program will activate automatically, when
"SCREEN SAVER" is set to "ON".
Press [EJECT] to eject the disc.
EJECT
k_
Somediscscontain discmenuswhich describethe contentsof the discor
allow you to customizediscplayback,or title menuwhich liststhe titles
availableon the DVD.
Press [MENU] to call up the disc menu.
Use [Cursor A/V/_1/11_] to select an item, then press
[ENTER] (or [PLAY I_]).
No te: l
•Menu operations may vary depending on the disc.
Refer to the manual accompanying the disc for more details.
[] Resume Playback
Press [STOP l] during playback.
Resume message will appear on
the TV screen.
Press [PLAY I_]. Playback will
resume from the point at which
playback was stopped.
Note:
•Tocancelresume,press[STOPN] one more timein the stop
mode.On somediscs,[STOPm] will not work while the resume
messageappears.Pleasewait until the messagedisappears.
•For MP3 files,playback will resume from the beginning of the
current file.
•Theresume information will be kept even when unit isturned
off. However, ejecting the disc will cancel the resumefeature.
Playback will start at the beginning the next time you insert
thedisc
[]Pause
1
Press [PAUSEII] during playback. _Y
• Playback will be paused and sound will be /
muted.
To continue playback, press [PLAY I_].
EN
i i!:¸
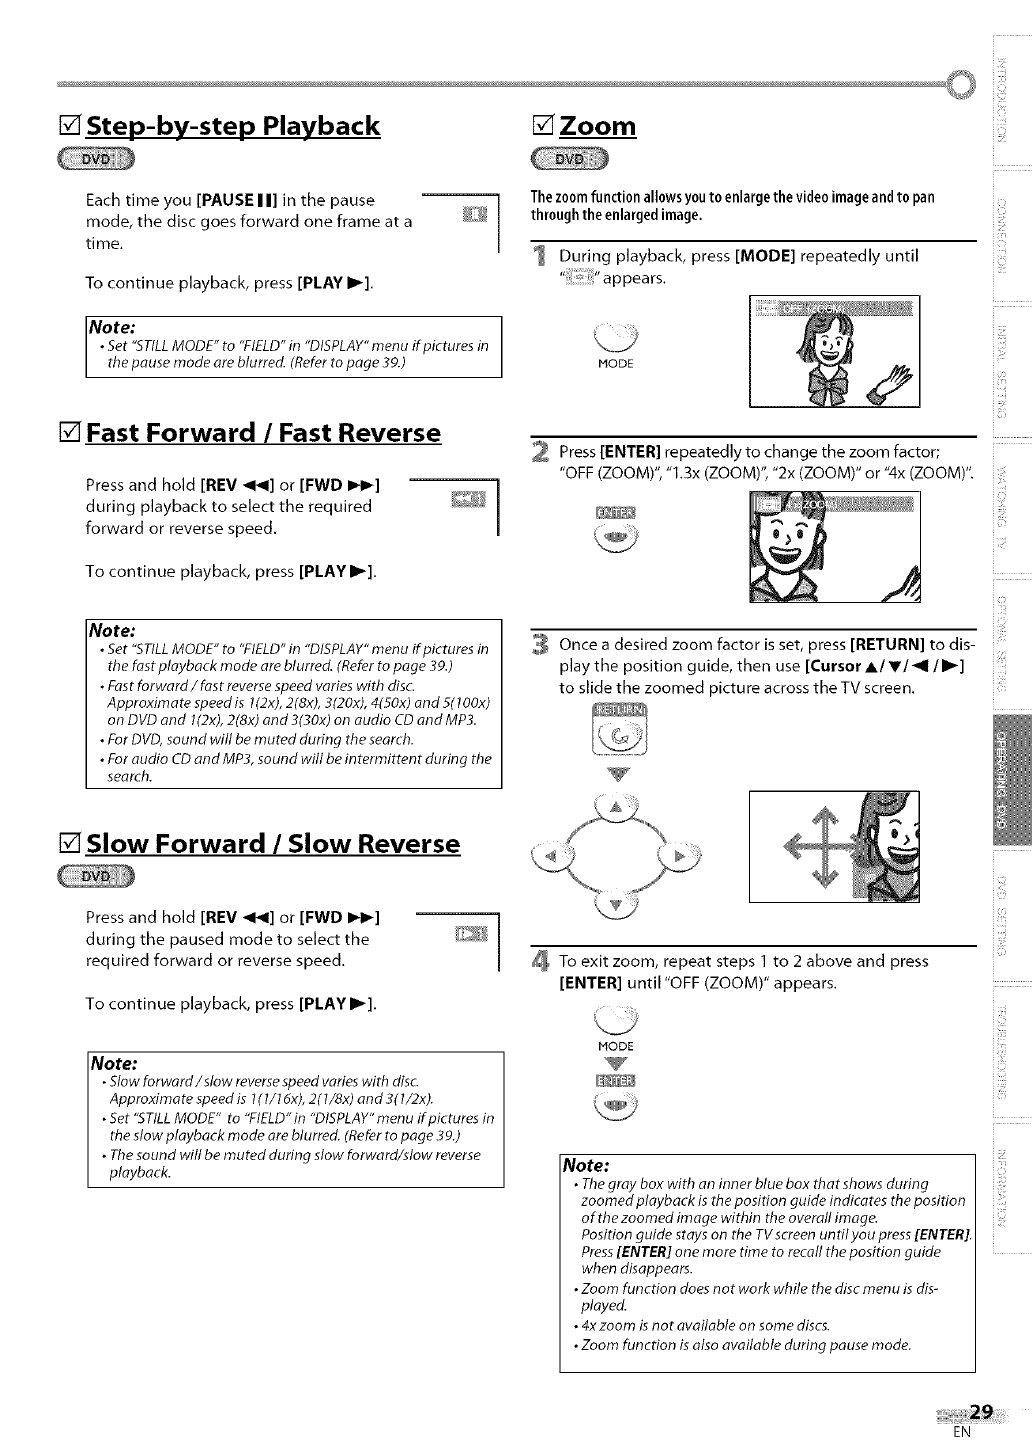
[] Step-by-step Playback [] Zoom
Each time you [PAUSE I I] in the pause 1
mode, the disc goes forward one frame at a _] /
time.
To continue playback, press [PLAY I_].
Note:
•Set "STILLMODE" to "FIELD"in "DISPLAY"menu if pictures in
the pause mode are blurred. (Referto page 39.)
[] Fast Forward /Fast Reverse
Press and hold [REV _1_1]or [FWD I_1_] _
during playback to select the required _s_/_ /
forward or reverse speed.
To continue playback, press [PLAY I1_].
Note:
•Set "STILL MODE" to "FIELD" in "DISPLAY" menu if pictures in
the fast playback mode are blurred. (Refer to page 39.)
•Fast forward/fast reverse speed varies with disc.
Approximate speed is 1(2x), 2(8x), 3(20x), 4(50x) and 5(100x)
on DVD and 1(2x), 2(8x) ond 3(30x) on audio CD and MP3.
•For DVD, sound will be muted during the search.
•For audio CD and MP3, sound will be in termittent during the
search.
Thezoomfunction allows youto enlargethe video image and to pan
through the enlargedimage.
During playback, press [MODE] repeatedly until
MODE
2 Press [ENTER] repeatedly to change the zoom factor;
"OFF (ZOOM)", "1.3x (ZOOM)", "2x (ZOOM)" or "4x (ZOOM)".
3 Once a desired zoom factor is set, press [RETURN] to dis-
play the position guide, then use [Cursor AI vl _I II_]
to slide the zoomed picture across the TV screen.
in
[] Slow Forward /Slow Reverse
Press and hold [REV _1_1]or [FWD I_1_] 1
during the paused mode to select the _ I
required forward or reverse speed.
To continue playback, press [PLAY I_].
Note:
•Slow forward/slow reverse speed varies with disc.
Approximote speed is I(1/16x), 2(1/8x) and 3(l/2x).
• Set "STILL MODE" to "FIELD"in "DISPLAY"menu if pictures in
the slow playback mode ore blurred. (Refer to page 39.)
• The sound will be muted during slow forward/slow reverse
playback.
To exit zoom, repeat steps 1 to 2 above and press
[ENTER] until "OFF (ZOOM)" appears.
MODE
Note:
• Thegray box with an inner blue box that shows during
zoomed ployback is the position guide indicates the position
of the zoomed image within the overall image.
Position guide stays on the TV screen until you press[ENTER].
Press[ENTER] one more time to recall the position guide
when disappears.
• Zoom function does not work while the disc menu isdis-
played.
• 4x zoom isnot available on some discs.
• Zoom function is also available during pause mode.
izi
EN
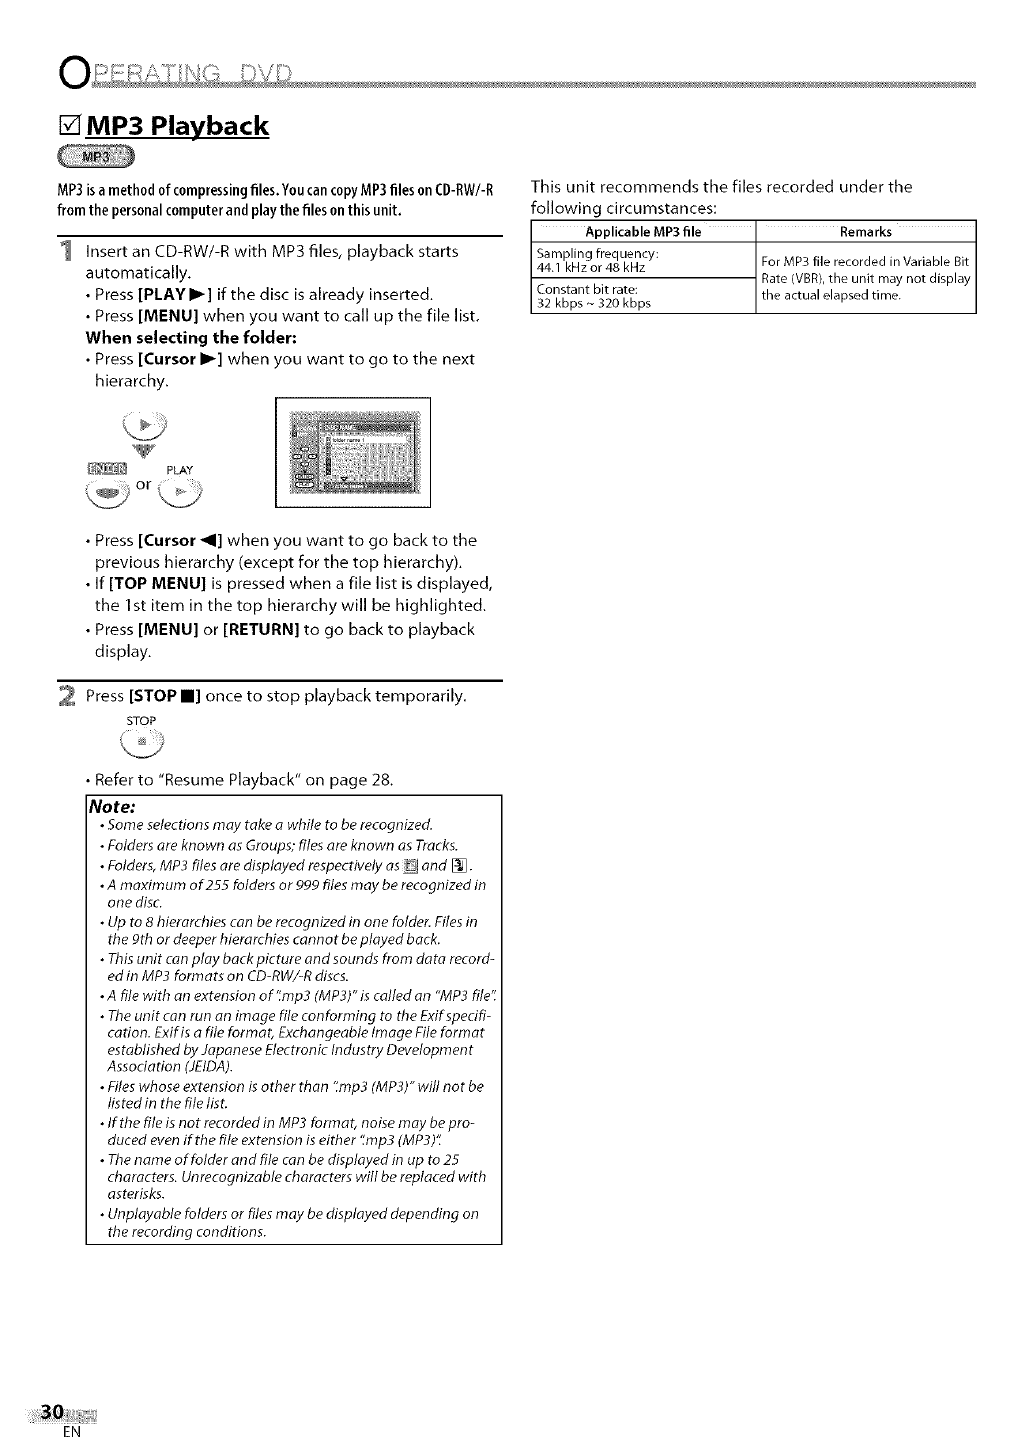
[] MP3 Playback
MP3isamethodofcompressingfiles, YoucancopyMP3files onCDRW/R
fromthe personalcomputerandplaythefiles onthisunit,
I Insert an CD-RW/-R with MP3 files, playback starts
automatically.
• Press [PLAY II_] if the disc is already inserted.
• Press [MENU] when you want to call up the file list.
When selecting the folder:
• Press [Cursor I_] when you want to go to the next
hierarchy.
This unit recommends the files recorded under the
following circumstances:
Applicable MP3 file ' Remarks
Sampling frequency:
44.1 kHz or 48 kHz For MP3 file recorded in Variable Bit
Rate (VBR),the unit may not display
Constant bit rate: the actual elapsed time.
32 kbps ~ 320 kbps
L_ PLAY
• Press [Cursor _I] when you want to go back to the
previous hierarchy (except for the top hierarchy).
• If [TOP MENU] is pressed when a file list is displayed,
the Ist item in the top hierarchy will be highlighted.
• Press [MENU] or [RETURN] to go back to playback
display.
2 Press [STOP II] once to stop playback temporarily.
STOP
• Refer to "Resume Playback" on page 28.
Note:
•Some selections may take awhile to be recognized.
•Folders are known asGroups; files are known asTracks.
•Folders,MP3 files aredisplayed respectively as and [_.
•A maximum of 255 folders or 999 files may be recognized in
one disc.
•Up to 8 hierarchies can be recognized in one folder. Filesin
the 9th or deeper hierarchies cannot be played back.
•Thisunit can play backpicture andsounds from data record-
ed in MP3 formats on CD-RW/-Rdiscs.
•A file with an extension of'_mp3 (MP3)"is calledan "MP3 file".
•Theunit can run an image file conforming to the Exifspecifi-
cation. Exif isafile format, Exchangeable Image File format
established by Japanese Electronic Industry Development
Assodation (JEIDA).
•Files whose extension is other than '_mp3(MP3)" will not be
listed in the file list.
•If the file is not recorded in MP3 format, noise may be pro-
duced evenif the file extension is either ':mp3 (MP3)'_
•Thename of folder and file can be displayed in up to 25
characters. Unrecognizable characters will be replaced with
asterisks.
•Unplayable folders or files may be displayed depending on
the recording conditions.
EN
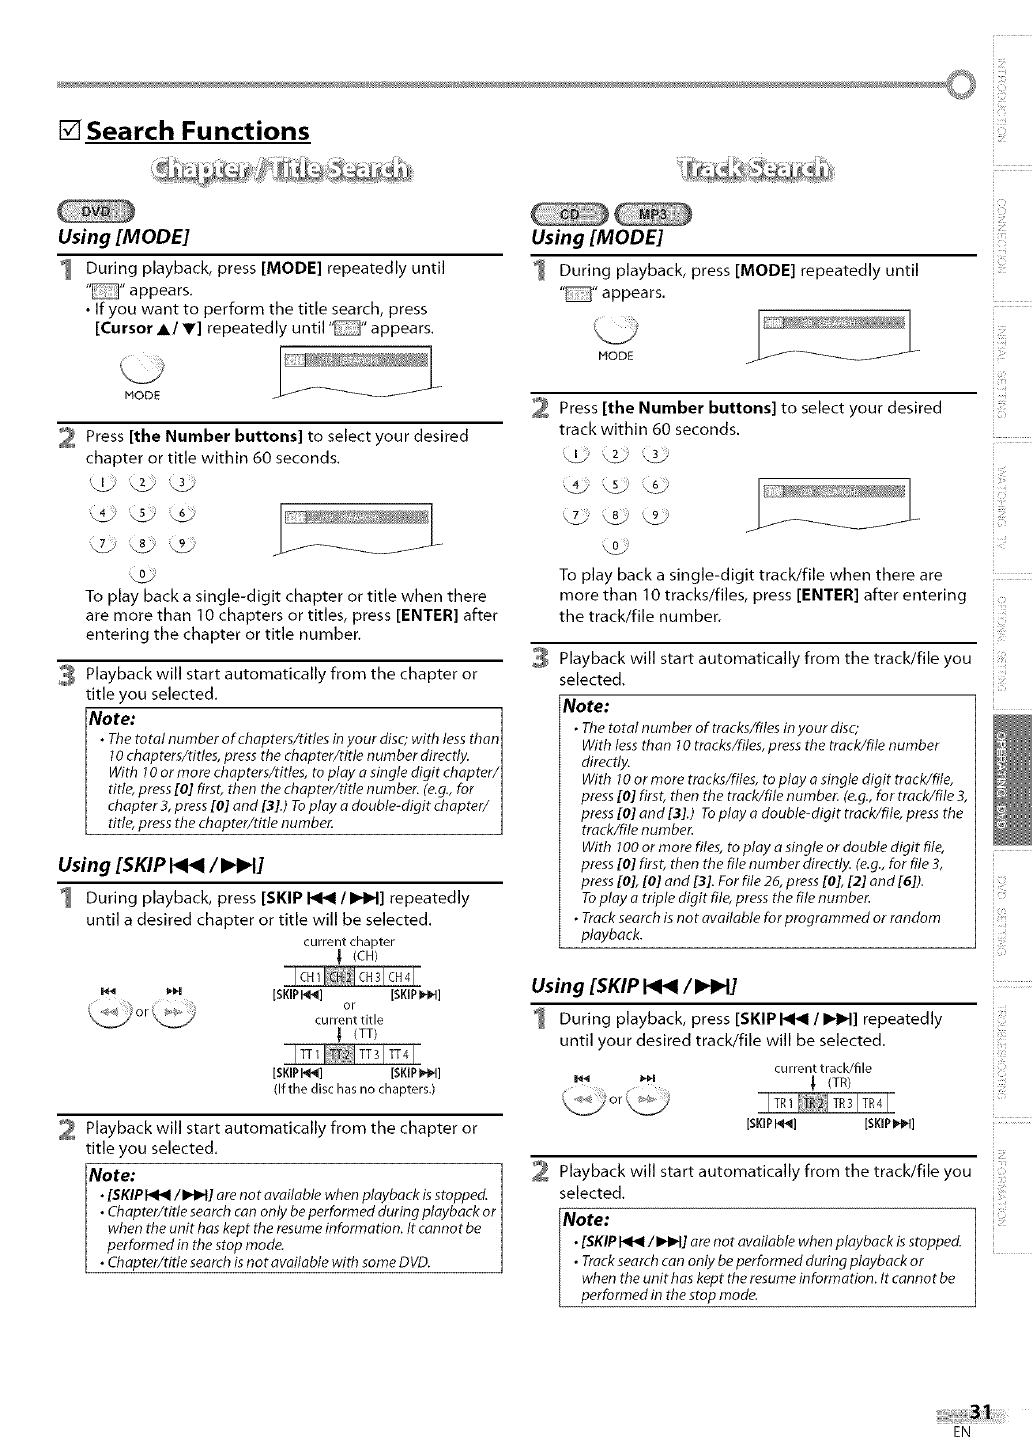
[] Search Functions
Using [MODE]
During playback, press [MODE] repeatedly until
" "appears.
• If you want to perform the title search, press
[Cursor A/V] repeatedly until" "appears.
MODE
2 Press [the Number buttons] to select your desired
chapter or title within 60 seconds.
To play back a single-digit chapter or title when there
are more than 10 chapters or titles, press [ENTER] after
entering the chapter or title number.
3 Playback will start automatically from the chapter or
title you selected.
Note: 1
•The total number of chapters/rifles in your disc; with less than]
10 chapters/titles, press the chapter/title number directly. I
With 10 or more chapters/titles, to play o single digit chopter/]
title, press [0] first, then the chapter/title number. (e.g., for I
chapter 3, press [0] and [3].) To play adouble-digit chapter/ I
title, press the chapter/title number. 1
Using [SKIP _/I_H]
During playback, press [SKIP _/IdlH] repeatedly
until a desired chapter or title will be selected.
current chapter
! (CH)
_,H [SKIPI_] [SKIPI_]
or
current title
(TT)
[SKIPI_] [SKIPPIN]
(If the disc has no chapters.)
Playback will start automatically from the chapter or
title you selected.
Note:
•[SKIPI<t</I_H] orenot available when playback isstopped.
• Chapter/title searchcan only beperformed during playback or
when the unit has kept the resumeinformation. It cannot be
performed in the stop mode.
• Chapter/title searchis not available with some DVD.
Using [MODE]
During playback, press [MODE] repeatedly until
"_" appears.
2Press [the Number buttons] to select your desired
track within 60 seconds.
To play back a single-digit track/file when there are
more than I0 tracks/files, press [ENTER] after entering
the track/file number.
Playback will start automatically from the track/file you
selected.
Note:
•The total number of tracks/files in your disc;
With lessthan 10 tracks/files, press the track/file number
directly.
With 10or more tracks/files, to play o single digit track/file,
press[0] first, then the track/file number. (e.g.,for track/file 3,
press[0] and [3].) Toplay a double-digit track/file, press the
track/file number.
With 100or more files, to play a single or double digit file,
press[0] first, then the file number directly. (e.g.,for file 3,
press[0], [0] and [3]. For file 26, press[0], [2] and [6]).
Toplay a triple digit file, press the file number.
•Track searchis not available for programmed or random
playback.
Using [SKIP _/I_H]
During playback, press [SKIP _IIHH] repeatedly
until your desired track/file will be selected.
current track/file
_ _H _ (TR)
[SKIPI'_] [SKIPI_]
Playback will start automatically from the track/file you
selected.
Note:
•[SKIP_/I_H] arenot available when playback isstopped.
•Tracksearch can only be performed during playback or
when the unit has kept the resume information. Itcannot be
performed in the stop mode.
c ¸
i_ii!ill
i i_i[ii
EN
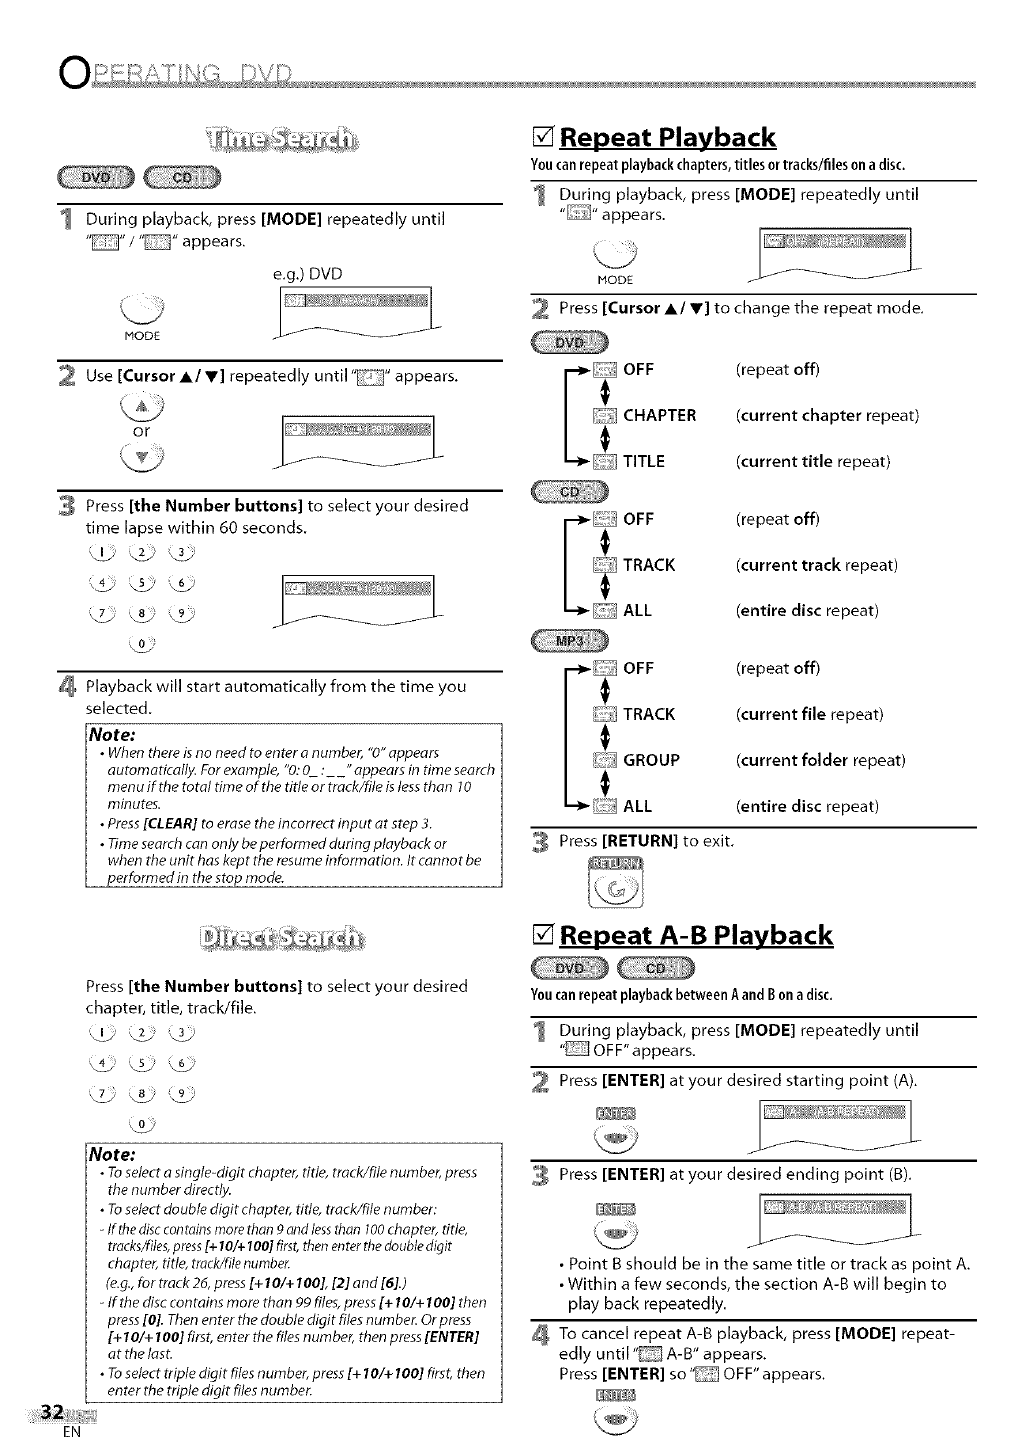
I Duringplayback,press[MODE] repeatedly until
"_" /"[Z_" appears.
e.g.) DVD
MODE
2 Use [Cursor A/V] repeatedly until" "appears,
or
J
3Press [the Number buttons] to select your desired
time lapse within 60 seconds.
_ _k_ _ _ '
Playback will start automatically from the time you
selected.
Note:
•When there is no need to enter anumber, "0" appears
automatically. For example, "0:0 :_" appears in time search
menu if the total time of the title or track/file is less than 10
minutes.
•Press [CLEAR] to erase the incorrect input at step 3.
• Time search can only be performed during playback or
when the unit has kept the resume information. It cannot be
performed in the stop mode.
[] Repeat Playback
Youcanrepeatplaybackchapters,titlesor tracks/filesona disc.
I During playback, press [MODE] repeatedly until
"" appears.
MODE
Press [Cursor A/T] to change the repeat mode.
r_ OFF (repeat off)
CHAPTER (current chapter repeat)
t__ TITLE (current title repeat)
_! OFF (repeat off)
TRACK (current track repeat)
........ALL (entire disc repeat)
3
Ii OFF (repeat off)
_TRACK (current file repeat)
GROUP (current folder repeat)
t__ ALL (entire disc repeat)
Press [RETURN] to exit.
Press[the Number buttons] to select your desired
chapter, title, track/file.
Note:
• To select asingle-digit chapter, title, track/file number, press
the number directly.
• To select double digit chapter, title, track/file number:
-If the disc con rains more than 9 and less than 100 chapter, title,
tracks/files, press [+ 10/+ 100] first, then enter the double digit
chapter, title, track/file numbe_
(e.g., for track 26, press [+ I0/+ 100], [2] and [6].)
-If the disc contains more than 99 files, press [+ 10/+ 100] then
press [0]. Then enter the double digit files number. Or press
[+ I 0/+ 100] first, enter the files number, then press [ENTER]
at the last.
• To select triple digit files number, press [+ I 0/+ 100] first, then
enter the triple digit files number.
[] Repeat A-B Playback
Youcanrepeatplaybackbetween Aand Bon adisc.
I During playback, press [MODE] repeatedly until
"E_ OFF" appears.
Press [ENTER] at your desired starting point (A).
Press [ENTER] at your desired ending point (B).
•Point B should be in the same title or track as point A.
• Within a few seconds, the section A-B will begin to
play back repeatedly.
To cancel repeat A-B playback, press [MODE] repeat-
edly until "_ A-B" appears.
Press [ENTER] so" OFF" appears.
EN
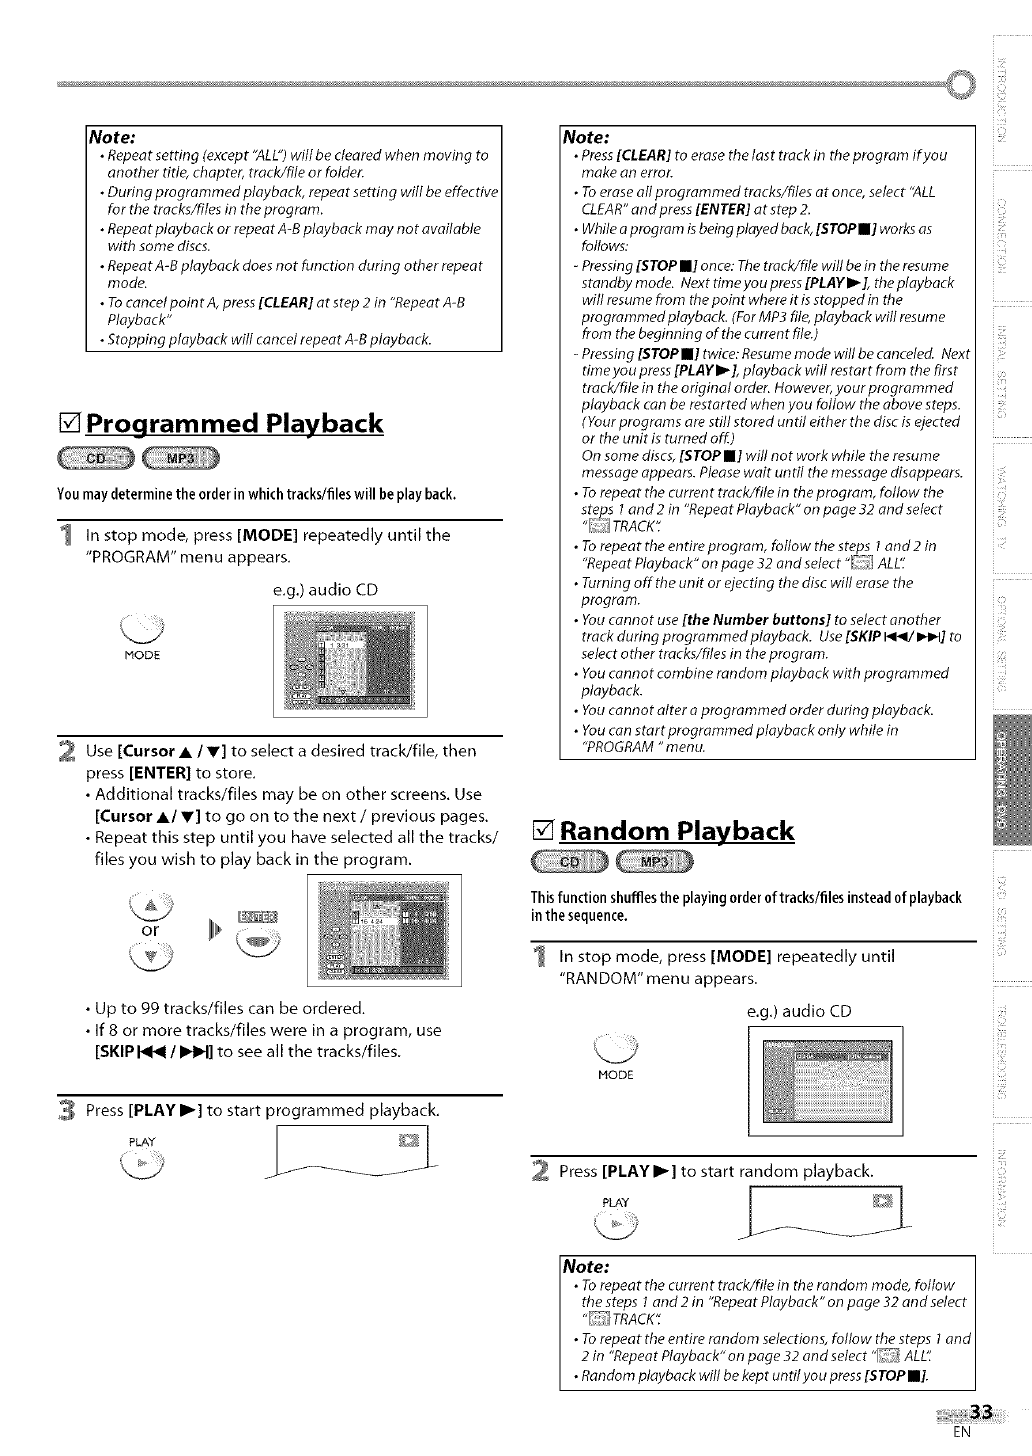
©
Note:
•Repeat setdng (except "ALL")will be cleared when moving to
another dtle, chapter, track/file or folder.
•During programmed playback, repeat setting will be effective
for the tracks/files in the program.
•Repeat playback or repeat A-B playback may not available
with some discs.
•RepeatA-B playback doesnot function during other repeat
mode.
• Tocancelpoin t A, press[CLEAR] at step 2 in "Repeat A-B
Playback"
•Stopping playback will cancel repeat A-Bplayback.
[] Programmed Playback
Youmaydeterminethe orderinwhich tracks/fileswill be playback.
1 In stop mode, press [MODE] repeatedly until the
"PROGRAM" menu appears.
e.g.) audio CD
MODE
2 Use [Cursor • /V] to select a desired track/file, then
press [ENTER] to store.
• Additional tracks/files may be on other screens. Use
[Cursor •/V] to go on to the next /previous pages.
• Repeat this step until you have selected all the tracks/
files you wish to play back in the program.
Note:
• Press[CLEAR] to erase the last track in the program if you
make an error.
• Toerase all programmed tracks/files at once, select "ALL
CLEAR"and press[ENTER] at step 2.
• Whilea program is beingplayed back,[STOPII] worksas
follows:
-Pressing[STOPII] once:Thetrack/file will be in the resume
standby mode. Next time you press [PLAY I_], the playback
will resumefrom the point where it is stopped in the
programmed playback. (For MP3file, playback will resume
from the beginning of the current file.)
-Pressing[STOPII] twice: Resumemode will be canceled. Next
timeyou press[PLAYI_], playback will restart from the first
track/file in the original order. However,your programmed
playback can be restarted when you follow the above steps.
(Your programs arestill stored until either the disc is ejected
or the unit is turned off.)
On some discs, [STOPII] will not work while the resume
message appears. Pleasewait until the messagedisappears.
• To repeat the current track/file in the program, follow the
steps I and 2 in "Repeat Playback" on page 32 and select
"[_i__JTRACK".
• To repeat the entireprogram, follow the steps I and2 in
"RepeatPlayback" on page 32 and select "r!__[ALL':
• Turning offthe unit or ejecting the disc will erase the
program.
• Youcannot use [the Number buttons] to select another
track during programmed playback. Use(SKIPI<</1_1_t] to
select other tracks/files in the program.
• Youcannot combine random playback with programmed
playback.
• Youcannot alter a programmed order during playback.
• Youcan startprogmmmed playback only while in
"PROGRAM"menu.
[] Random Playback
Thisfunction shuffles the playingorder 0f tracks/files insteadof playback
in the sequence.
1 In stop mode, press [MODE] repeatedly until
"RAN DOM" men u appears.
i i!:¸
• Up to 99 tracks/files can be ordered,
• If 8 or more tracks/files were in a program, use
[SKIP _ I IHH] to see all the tracks/files.
Press [PLAY II_] to start programmed playback,
PLAY _
/
e.g.) audio CD
MODE
Press [PLAY I1_] to start random playback.
PLAY _[_.
Note: ]
•Torepeatthecurrenttrack/fileintherandomrnode, follow I
the steps 1 and 2in "Repeat Playback" on page 32 and select I
"TRACK': I
• To repeat the entire random selections,follow the steps 1 and I
2 in "Repeat Playback" on page 32 and select" ALE: l
• Random playback will be kept untilyou press[STOPII]. J
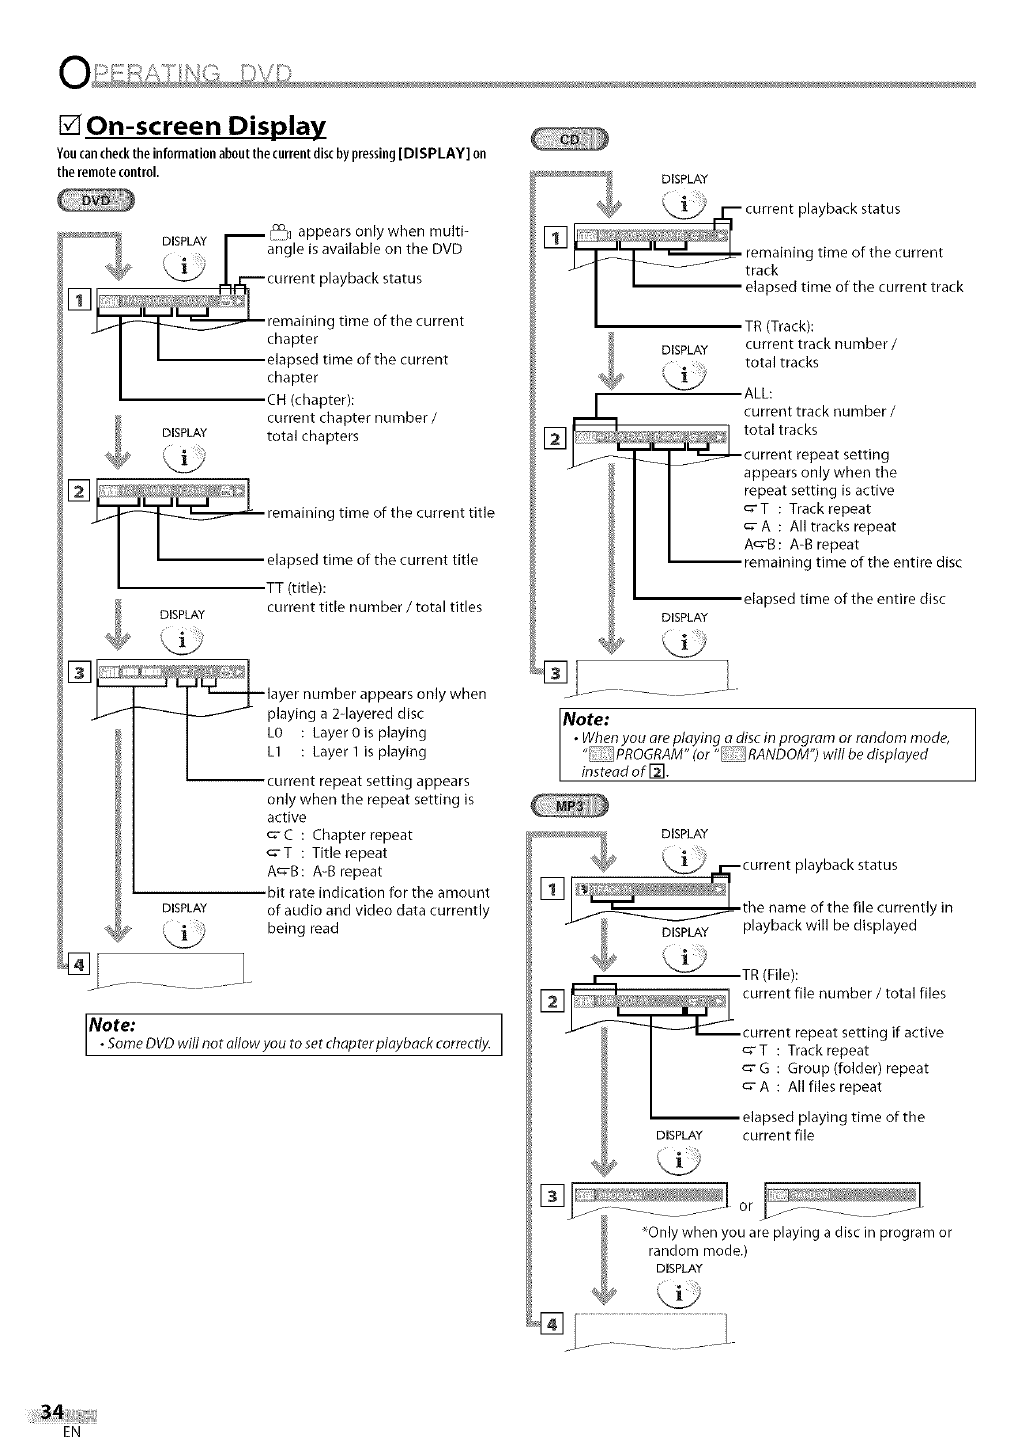
[] On-screen Display
Youcan checkthe informationaboutthe currentdisc by pressing [DISPLAY] on
the remote control.
_'_ DISPLAY _ appears only when multi-
Fangle is available on the DVD
_ _1_.2 1.[i,i._ current playback status
remaining time of the current
I I chapter
I I elapsed tiPne of the current
::pter): current chapter number/
DISPLAY total chapters
[]
_ emaining time of the current title
I ' :,T::::):ime of tbe current title
current title number /total titles
DISPLAY
DISPLAY
@ .......
layer number appears only wnen
-_-t-_--t_'- playing a 2-layered disc
L0 : Layer0is playing
L1 : Layer 1 is playing
current repeat setting appears
only when the repeat setting is
active
_- C : Chapter repeat
c'T : Title repeat
A_'B: A-B repeat
bit rate indication for the amount
of audio and video data currently
being read
INote:
•SomeDVD will not allowyou to set chapterplayback correctly. 1
TR (Track):
current track number /
DISPLAY total tracks
_;!_'J ALL:
current track number /
total tracks
current repeat setting
appears only when the
repeat setting is active
_'T : Track repeat
_- A : All tracks repeat
A_-B : A-B repeat
remaining time of the entire disc
elapsed time of the entire disc
DISPLAY
Note:
•When you are playing a disc in program or random mode,
"PROGRAM" (or "RANDOM") will be displayed
instead of [_.
DISPLAY
[_ .......................... I current file number /total files
_ _--<r-_current repeat setting if active
I c;'T : Track repeat
I _ G : Group (folder) repeat
/ I _ A : All files repeat
I elapsed playing time of the
DISPLAY current file
_::_Z __ ....... or ........... "
---- ................
_Only when you are playing a disc in program or
random mode.)
DISPLAY
®LL: i
EN
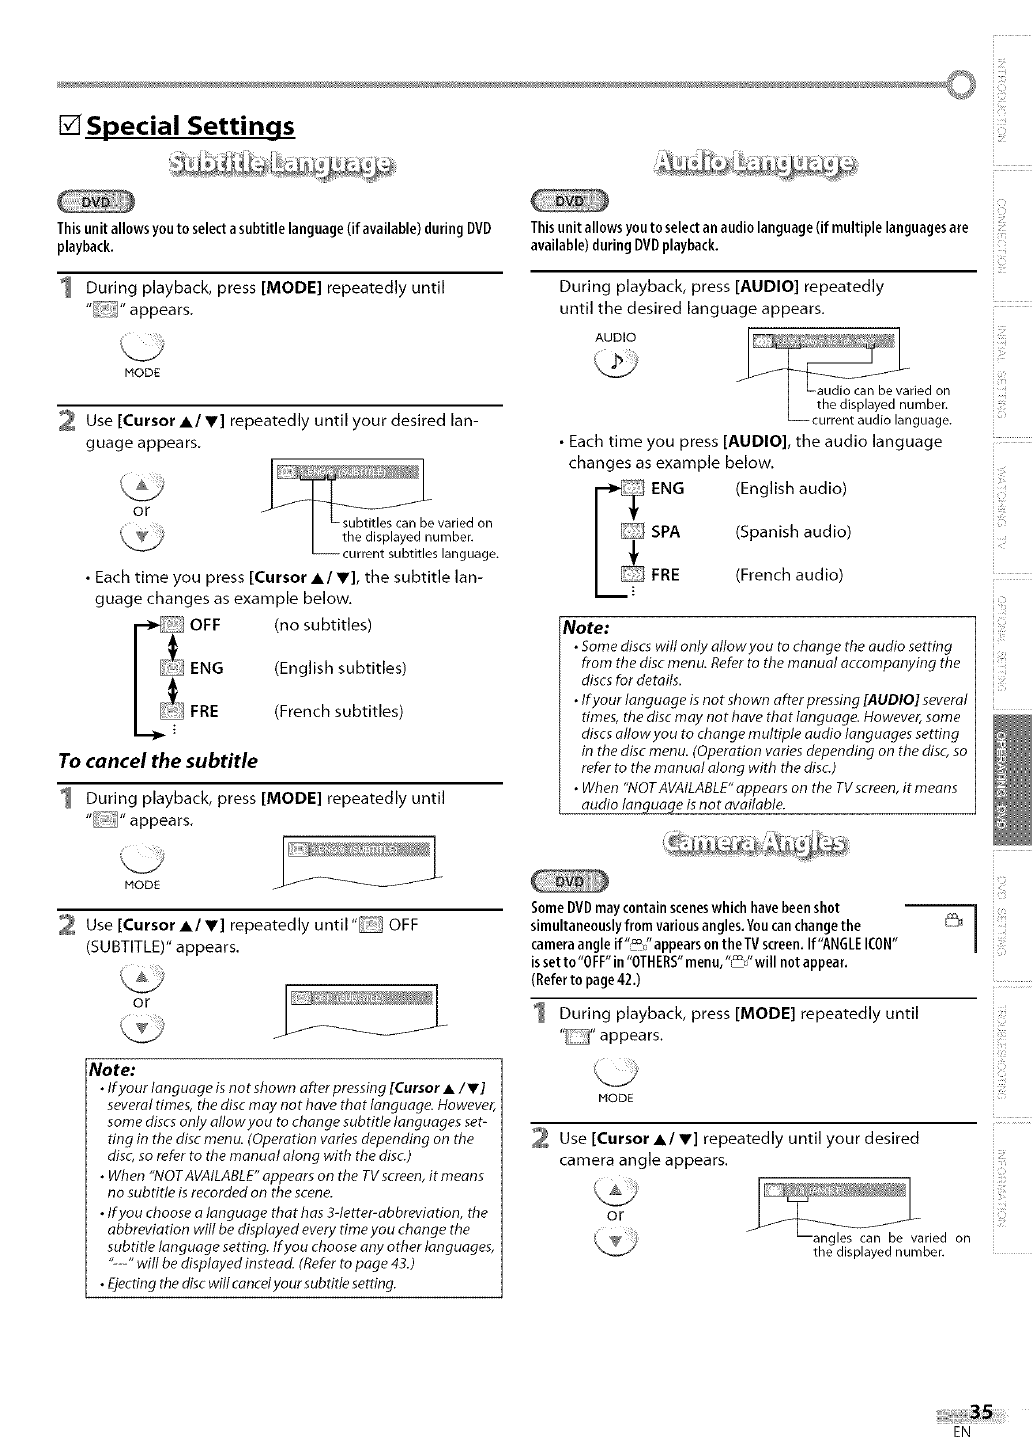
[] Special Settings
Thisunitallows youto selecta subtitle language(if available)duringDVD
playback.
1 During playback, press [MODE] repeatedly until
MODE
2 Use [Cursor A/Y] repeatedly until your desired lan-
guage appears.
or
•Each time you press [Cursor A/V], the subtitle lan-
guage changes as example below.
OFF (no subtitles)
ENG (English subtitles)
FRE (French subtitles)
To cancel the subtitle
1 During playback, press [MODE] repeatedly until
MODE f
Use [Cursor A/V] repeatedly until" OFF
(SUBTITLE)" appears.
or
Note:
•If your language is not shown after pressing [Cursor •/V]
several times, the disc may not have that language. However,
some discs only allow you to change subtitle languages set-
ting in the disc menu. (Operation varies depending on the
disc, so refer to the manual along with the disc.)
•When "NOTAVAILABLE" appears on the TVscreen, it means
no subtitle is recorded on the scene.
•If you choose alanguage that has 3getter-abbreviation, the
abbreviation will be displayed every time you change the
subtitle language setting. If you choose any other languages,
,c_, will be displayed instead. (Refer to page 43.)
•Ejecting the disc will cancetyour subtitle setting.
c ¸
Thisunit allowsyouto selectan audio language(if multiple languagesare
available)during DVDplayback.
During playback, press [AUDIO] repeatedly
until the desired language appears.
AUDIO .......
I Laudio carl be varied on
]the displa_{ed, number.
L_current audio language.
• Each time you press [AUDIO], the audio language
changes as example below.
ENG (English audio)
SPA {Spon shaud o
FRE (French audio)
Note:
•Some discswill only allowyou to change the audio setting
from the disc menu. Referto the manual accompanying the
discsfor details.
•If your language is not shown after pressing [AUDIO] several
times, the discmay not have that language. However, some
discsallow you to change multiple audio languages setting
in the disc menu. (Operation varies depending on the disc-,so
refer to the manual along with the disc-.)
•When "NOTAVAILABLE"appears on the TVscreen, it means
audio language is not available.
SomeDVDmaycontainsceneswhichhavebeenshot
simultaneouslyfromvariousangles.Youcanchangethe
cameraangle if"_/'appears on theTV screen.If'ANGLEICON"
issetto"O FF"in "OTHERS"menu,"_/'will not appear.
(Referto page42.)
1 During playback, press [MODE] repeatedly until
"" appears.
MODE
Use [Cursor A/V] repeatedly until your desired
camera angle appears.
or
_angles can be varied on
the displayed number.
i!,_iill
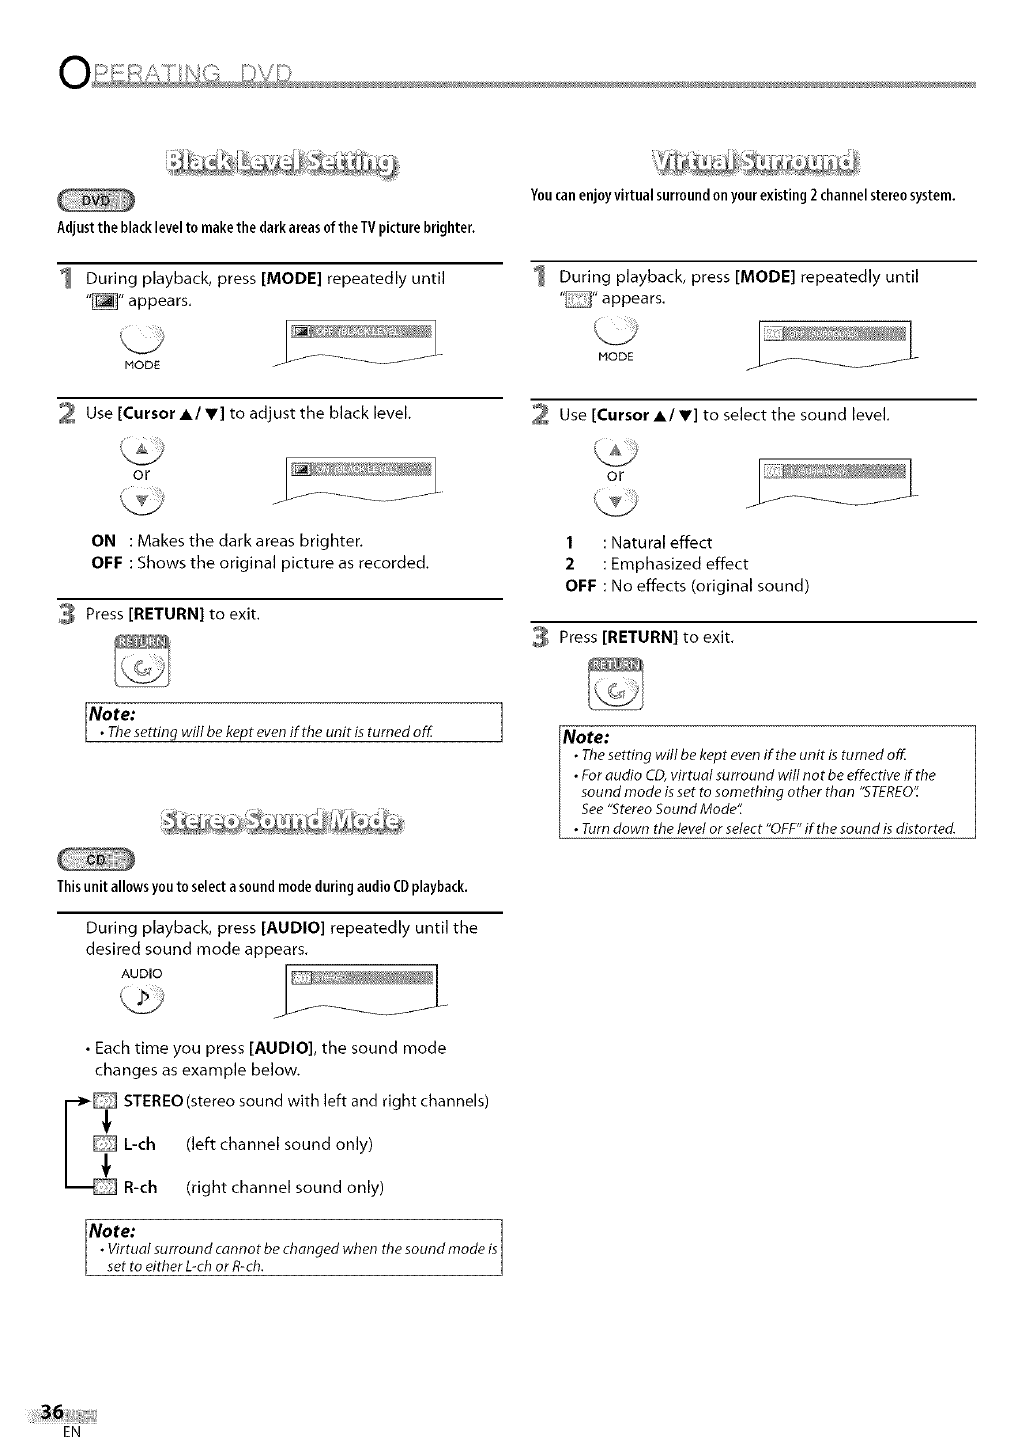
Adjustthe blacklevelto makethedarkareasof theTVpicturebrighter.
1 During playback, press [MODE] repeatedly until
"_" appears.
Youcanenjoyvirtual surroundon yourexisting 2 channelstereosystem.
I During playback, press [MODE] repeatedly until
"" appears.
MODE
2 Use [Cursor AI Y] to adjust the black level.
or
ON : Makes the dark areas brighter.
OFF : Shows the original picture as recorded.
3 Press [RETURN] to exit.
Note: 7
•Thesetting will be kept evenif the unit isturned off.
MODE
Use [Cursor A/V] to select the sound level,
or
/
1 : Natural effect
2: Emphasized effect
OFF : No effects (original sound)
Press [RETURN] to exit.
Note:
• The setting will be kept evenif the unit is turned off.
• For audio CD,virtual surround will not be effective if the
sound mode is set to something other than "STEREO'_
See"Stereo Sound Mode';
• Turn down the level or select "OFF"if the sound isdistorted.
Thisunit allowsyou to selecta soundmodeduring audioCDplayback.
During playback, press [AUDIO] repeatedly until the
desired sound mode appears.
AUDIO
• Each time you press [AUDIO], the sound mode
changes as example below.
_ STEREO (stereo sound with left and right channels)
Note: 1
• Virtual surround cannot be changed when the sound mode isI
set to either L-ohor R-oh.
EN
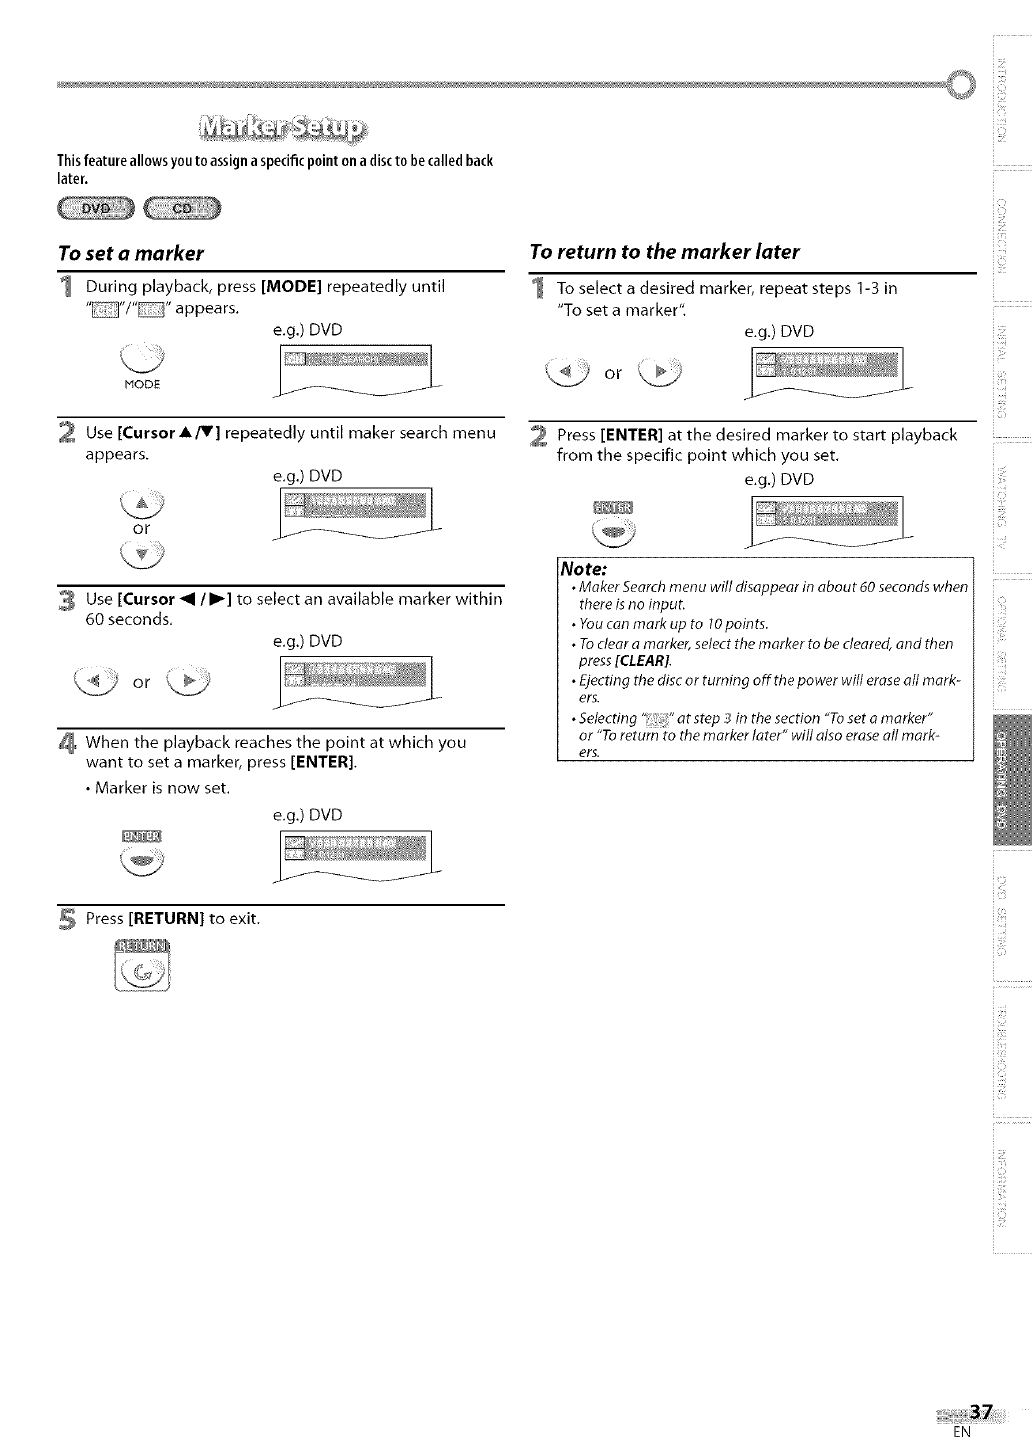
Thisfeature allows youto assigna specificpoint on a discto becalledback
later.
To set a marker
1 During playback, press [MODE] repeatedly until
""/"" appears.
e.g.) DVD
MODE
2 Use [Cursor A/V] repeatedly until maker search menu
appears.
e.g.) DVD
OF
3 Use [Cursor _1 /I_] to select an available marker within
60 seconds.
e.g.) DVD
When the playback reaches the point at which you
want to set a marker, press [ENTER].
• Marker is now set.
e.g.) DVD
To return to the marker later
1 To select a desired marker, repeat steps 1-3 in
"To set a marker".
e.g.) DVD
Press [ENTER] at the desired marker to start playback
from the specific point which you set.
e.g.) DVD
Note:
•Maker Searchmenu will disappear in about 60 seconds when
there isno input.
•Youcan mark up to 10points.
•Toclear amarker, select the marker to be cleared, and then
press[CLEAR].
•Ejecting the disc or turning off the power will eraseall mark-
ers.
•Selecting '_ :_"at step _in the section "Toset amarker"
or "Toreturn to the marker later" will also erase all mark-
ers.
Press [RETURN] to exit.
i!!:!!!
_zc
iili_i
iz
i li_ii!i
i;;iill
i i_i!iiii_i!
!fyoumakes_ttingfor"TVMODE'!or!'DOLBYDIGITAL",you
canalsoenterfromthe'!QUICK"menu.Use[Cursor• ly] to
select"QUlCKNand press [ENTER]at step 3.
ill i_i iii
[] DVD Language Setting
Youcanchangethedesiredlanguagewhenplayingbackthedisc,
1 In stop mode, press [SETUP] to display"TV SETUP".
-- TV SETUP -
LANGUAGE [ENGLISH]
BACK LIGHT [BRIGHT]
COLORTEMR [NORMAL]
BVB SETUP
2 Use [Cursor A/Y] to select"DVD SETUP",then press [ENTER].
or -- TV SETUP -
LANGUAGE [ENGLISH]
BACK LIGHT [BRIGHT]
COLORTEMR [NORMAL]
b- BVB SETUP
6 Use [Cursor A/V] to select the desired item, then press
[ENTER].
[AUDIO] "1, *2 (Default: ORIGINAL)
Select the desired audio language.
or
[SUBTITLE] *% "2 (Default: OFF)
Select the desired subtitle language.
or
[DISC MENU] "1 (Default: ENGLISH)
Select the desired language in DVD menu.
or
Use [Cursor A/_v] to select"CUSTOM", then press [ENTER].
or
Use [Cursor A/V] to select"LANGUAGE", then press [ENTER].
or
Use [Cursor A/V] to select the desired item, then press
[ENTER].
No re:
•Tochange the on-screen language, call up "TVSETUP"menu
by pressing [SETUP] onceand set the desired language.
(Referto "Language Selection" on page 15.)
• Language options are not available with some discs.
• If "OTHER"is selectedin "AUDIO""SUBTITLE"or "DISCMENU"
menu, press4-digit number to enter the codefor the desired
language. (Referto "Language Code List" on page 43.)
• Only the languages supported by the disc can be selected.
*2
• Use]MODE] to selectsubtitles available on the DVD.
• Use]AUDIO] to select audio available on the DVD.
• If the DVD'sdefault settings for audio and subtitle arethe
samelanguage, the subtitles may not show unlessyou turn
them on.
Press [SETUP] to exit.
or
EN
©
[] Display Setting
YoucanchangetheTVaspectratio and still modeclarity in"DISPLAY" _ Use [Cursor •IV] to select the desired item, then press
menu. [ENTER].
1 In stop mode, press [SETUP] to display"TV SETUP".
-- TV SETUP -
_" LANGUAGE [ENGLISH]
BACK LIGHT [BRIGHT]
COLORTEMR [NORMAL]
DVD SETUP
[TV MODE] (Default: 4:3 LETTER BOX)
Select the desired TV aspect ratio.
or
2 Use [Cursor A/V] to select'DVD SETUP", then press
[ENTER].
or -- TV SETUP -
LANGUAGE [ENGLISH]
BACK LIGHT [SRIGNT]
COLORTEMR [NORMAL]
DVD SETUP
3 Use [Cursor A/V] to select"CUSTOM", then press
[ENTER].
or
Use [Cursor A/V] to select"DISPLAY", then press
[ENTER].
[STILL MODE] (Default: AUTO)
Select the desired still mode.
or
No te:
TV MODE:
•Select "4:3LETTERBOX",so that black bars may appear on
the top and bottom of the TVscreen.
• Select "4:3 PAN& SCAN" for afull height picture with both
sidesadjusted.
STILL MODE:
• Select "AUTO"usually.
• Ifyou select "FIELD",the picture in the still mode will be
stabilized.
• Ifyou select "FRAME",the picture in the still mode will be
highly defined.
i i!:¸
iZ!
or
Use [Cursor A/V] to select the desired item, then press
[ENTER].
7 Press [SETUP] to exit.
iiiilii]_ii
or
EN
[] DVD Audio Setting
Choosethe appropriateaudiosettingsforyourequipment, It onlyaffects
duringthe playbackof DVD.
1 In stop mode, press [SETUP] to display"TV SETUP".
-- TV SETUP -
_" LANGUAGE [ENGLISH]
BACK LIGHT [BRIGHT]
COLORTEMR [NORMAL]
DVD SETUP
2 Use [Cursor A/V] to select'DVD SETUP", then press
[ENTER].
or -- TV SETUP -
LANGUAGE [ENGLISH]
BACK LIGHT [SRIGNT]
COLORTEMR [NORMAL]
DVD SETUP
3 Use [Cursor A/V] to select"CUSTOM", then press
[ENTER].
Use [Cursor A/V] to select the desired item, then press
[ENTER].
[DRC] (Default: ON)
Sets the dynamic range control.
This function is available only on the discs which are
recorded in the Dolby Digital format.
or
ON : Compress the range between soft and loud
sounds,
OFF : No effects (original sound).
[DOWN SAMPLING] (Default: ON)
This function is available only on digital outputting of a
disc recorded in 96kHz.
or
or
Use [Cursor A/V] to select"AUDlO", then press
[ENTER].
or
Use [Cursor A/V] to select the desired item, then press
[ENTER].
or
ON :When outputting in 48kHz.
OFF :When outputting the original sound.
Note:
•Whenplaying back o 96 kHz disc with the copyright protec-
tion or when virtual surround is set to 1or 2, the sound will
be down sampled at 48 kHz even if "DOWN SAMPLING"is
OFF
[DOLBY DIGITAL] (Default: BITSTREAM)
Sets "BITSTREAM" when this unit is connected to a
Dolby Digital decoder. Available on DVD only.
or
BITSTREAM : Outputs Dolby Digital signals.
PCM : Converts the Dolby Digital into PCM.
(2 channel)
7 Press [SETUP] to exit.
EN
[] Parental Setting
Parentalsetting preventsyourchildrenfrom viewinginappropriatematerials. 7 Use [Cursor •IV] to select the desired item, then press
(passwordprotected.)Playbackwill stopif the ratingsexceedthe levelsyouset. [ENTER].
1 In stop mode, press [SETUP] to display"TV SETUP".
-- TV SETUP -
LANGUAGE [ENGLISH]
BACK LIGHT [BRIGHT]
COLORTEMR [NORMAL]
SVD SETUP
or
2 Use [Cursor AfV] to select"DVD SETUP",then press [ENTER].
or -- TV SETUP -
LANGUAGE [ENGLISH]
BACK LIGHT [BRIGHT]
COLORTEMR [NORMAL]
I* DVD SETUP
3 Use [CursorA/V] to select"CUSTOM", then press [ENTER].
PARENTAL LEVEL
ALL : all parental locks are canceled.
8 [ADULT] : all ratings (adult/general/children) can
be played back.
7[NC-17]-2 [G] : only DVD intended for general use and
children can be played back.
1 [KID SAFE] : only DVD intended for children can be
played back.
8 Press [SETUP] to exit.
or
Use [Cursor A/V] to select"PARENTAL'; then press
[ENTER].
or
To change the password
Follow steps 1 to 4. Use [Cursor A/V] to select
"PASSWORD CHANGE", then press [ENTER].
or
in
i]i_!ii!i_
i _iiiiill
i iiiiiii
i _#!!
Use [the Number buttons] to enter the 4-digit
number for your password, then press [ENTER].
•If you have set password already, use [the Number
buttons] to enter the current 4-digit password.
• You cannot use the default password (4737) to play a DVD.
Use [Cursor A/V] to select"PARENTAL LEVEL",then
press [ENTER].
or
Use [the Number buttons] to enter the new 4-digit
password, then press [ENTER].
_00_
No re:
•DVD-video may not respond to parental lock settings. Make
sure this function works with your DVD-video.
•Record the password in caseyou forget it.
• #you forget the password, press[4], [7], [3], [7], then enter
your new password. Password will be cleared and parental
levels will be set to "ALL"
•A power failure will not eraseyourpassword.
Press [SETUP] to exit.
i!iiiii!
i,i]]
iii!!]_ii
EN

[] Others
Youcanchangetheother functions.
1 In stop mode, press [SETUP] to display"TV SETUP".
-- TV SETUP -
LANGUAGE [ENGLISH]
BACK LIGHT [SRIGNT]
COLORTEMR [NORMAL]
DVD SETUP
Use [Cursor AIr] to select the desired item, then press
[ENTER].
[ANGLE ICON] (Default: ON)
Set to "ON" to show the angle icon when multiple cam-
era angles are available during DVD playback.
or
2 Use [Cursor A/V] to select'DVD SETUP", then press
[ENTER].
or -- TV SETUP -
LANGUAGE [ENGLISH]
BACK LIGHT [SRIGNT]
COLORTEMR [NORMAL]
I_ DVD SETUP
[SCREEN SAVER] (Default: OFF)
If you select "ON", the screen saver program starts when
there is no input from the unit for S minutes in stop
mode,
Use [Cursor A/V] to select"CUSTOM", then press
[ENTER].
or
or
7 Press [SETUP] to exit.
Use [Cursor A/V] to select"OTHERS'; then press
[ENTER].
or
Use [Cursor A/V] to select the desired item, then press
[ENTER].
or
EN
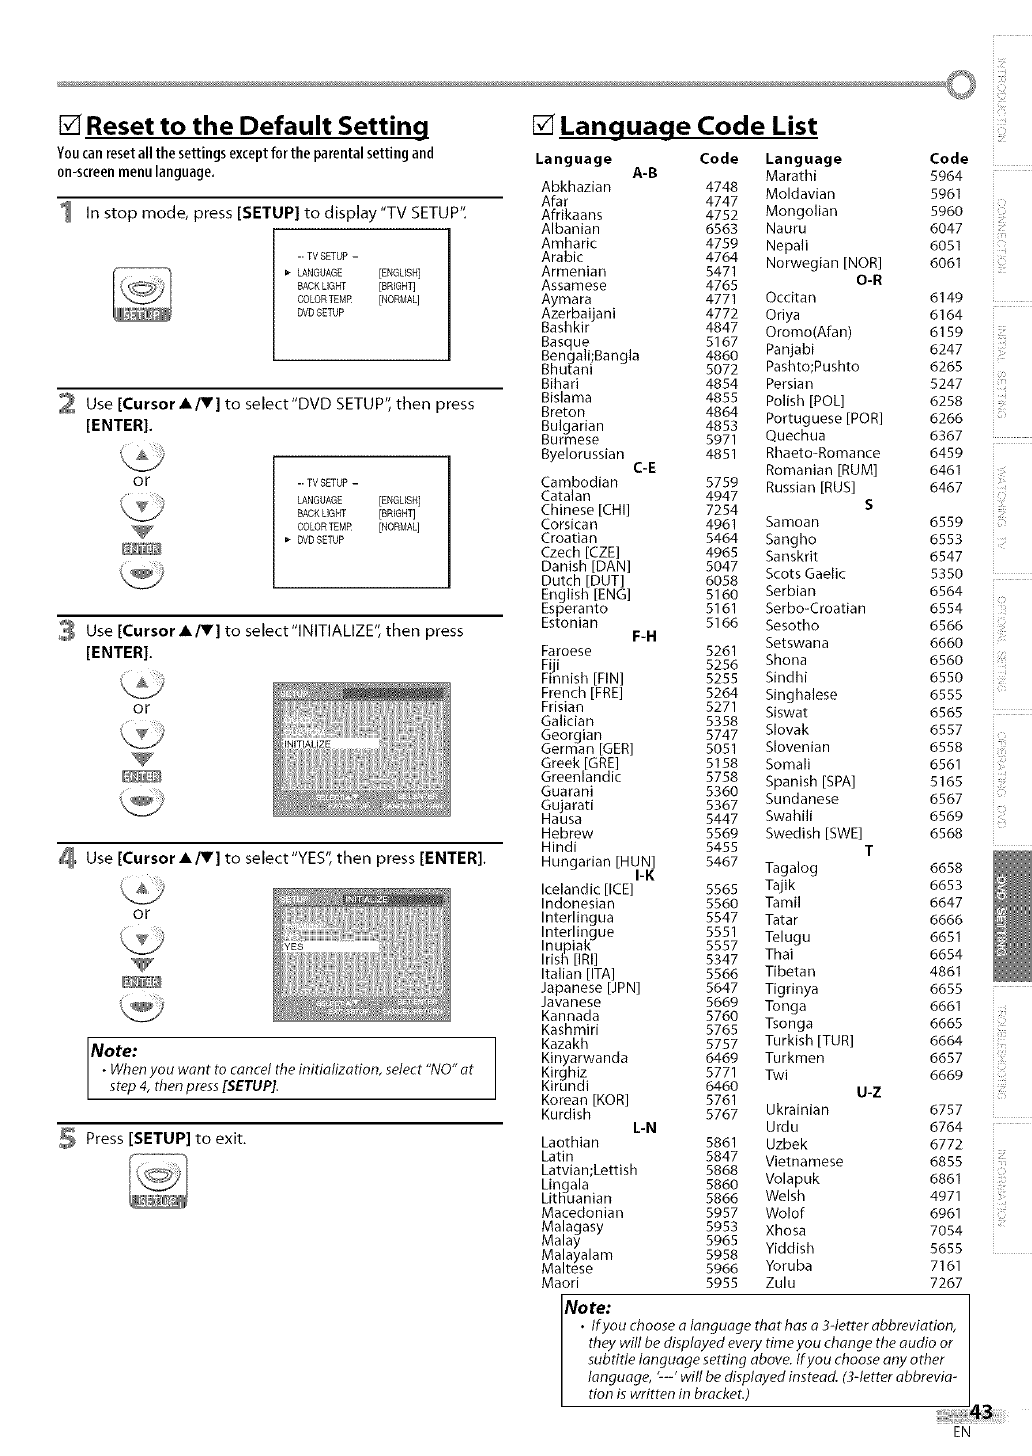
i i!:¸
[] Reset to the Default Setting
You can reset all the settings except for the parental setting and
0n-screen menu language,
1 In stop mode, press [SETUP] to display"TV SETUP",
-- TV SETUP -
LANGUAGE [ENGLISH]
BACK LIGHT [BRIGHT]
COLORTEMR [NORMAL]
DVD SETUP
2 Use [Cursor./V] to select'DVD SETUP", then press
[ENTER].
or -- TV SETUP -
LANGUAGE [ENGLISH]
SACK LIGHT [BRIGHT]
COLORTEMR [NORMAL]
DVD SETUP
3 Use [Cursor./V] to select"lNITIALIZE", then press
[ENTER].
or
Use [Cursor./V] to select"YES", then press [ENTER].
or
Note:
•Whenyou wont to cancel the initialization, select "NO" at
step 4, then press[SETUP].
Press [SETUP] to exit.
[] Language Code List
Language Code Language Code
A-B Marathi 5964
Abkhazian 4748 Moldavian 5961
Afar 4747
Afrikaans 4752 Mongolian 5960
Albanian 6563 Nauru 6047
Amharic 4759 Nepali 6051
Arabic 4764 Norwegian [NOR] 6061
Armenian 5471
Assamese 4765 O-R
Aymara 4771 Occitan 6149
Azerbaijani 4772 Oriya 6164
Bashkir 4847 Oromo(Afan) 6159
Basque 5167 Panjabi 6247
Bengali;Bangla 4860
Bhutani 5072 Pashto;Pushto 6265
Bihari 4854 Persian 5247
Bislama 4855 Polish [POL] 6258
Breton 4864 Portuguese [POR] 6266
Bulgarian 4853
Burmese 5971 Quechua 6367
Byelorussian 4851 Rhaeto-Romance 6459
C-E Romanian [RUM] 6461
Cambodian 5759 Russian [RUS] 6467
Catalan 4947
Chinese [CHI] 7254 S
Corsican 4961 Samoan 6559
Croatian 5464 Sangho 6553
Czech [CZE] 4965 Sanskrit 6547
Danish [DAN] 5047 Scots Gaelic 5350
Dutch [DUT] 6058
English [ENG] 5160 Serbian 6564
Esperanto 5161 Serbo-Croatian 6554
Estonian 5166 Sesotho 6566
F-H Setswana 6660
Faroese 5261
Fiji 5256 Shona 6560
Finnish [FIN] 5255 Sindhi 6550
French [FRE] 5264 Singhalese 6555
Frisian 5271 Siswat 6565
Galician 5358
Georgian 5747 Slovak 6557
German [GER] 5051 Slovenian 6558
Greek [GRE] 5158 Somali 6561
Greenlandic 5758 Spanish [SPA] 5165
Guarani 5360 Sundanese 6567
Gujarati 5367
Hausa 5447 Swahili 6569
Hebrew 5569 Swedish [SWE] 6568
Hindi 5455 T
Hungarian [HUN] 5467
I-K Tagalog 6658
Icelandic lICE] 5565 Tajik 6653
Indonesian 5560 Tami] 6647
Interlingua 5547 Tatar 6666
Interlingue 5551 Telugu 6651
Inupiak 5557
Irish [IRI] 5347 Thai 6654
Italian [ITA] 5566 Tibetan 4861
Japanese [JPN] 5647 Tigdnya 6655
Javanese 5669 Tonga 6661
Kannada 5760
Kashmiri 5765 Tsonga 6665
Kazakh 5757 Turkish [TUR] 6664
Kinyarwanda 6469 Turkmen 6657
Kirghiz 5771 Twi 6669
Kirundi 6460 U-Z
Korean [KOR] 5761
Kurdish 5767 Ukrainian 6757
L-N Urdu 6764
Laothian 5861 Uzbek 6772
Latin 5847 Vietnamese 6855
Latvian;Lettish 5868
Lingala 5860 Volapuk 6861
Lit[iuanian 5866 Welsh 4971
Macedonian 5957 Wolof 6961
Malagasy 5953 Xhosa 7054
Malay 5965
Malayalam 5958 Yiddish 5655
Maltese 5966 Yoruba 7161
Maori 5955 Zulu 7267
iZi
ii_iiii!
!z zz
izzzzzzz
i i_iiiiiii_
iiiilii]_ii
Note:
• lfyou choose alanguage that has o 3-letter abbreviation,
they will be displayed every time you change the audio or
subtitle language setting above. Ifyou choose any other
language, '--' will be displayed instead. (3-letter abbrevia-
tion is written in bracket.)
iiii_ii:ii:
EN
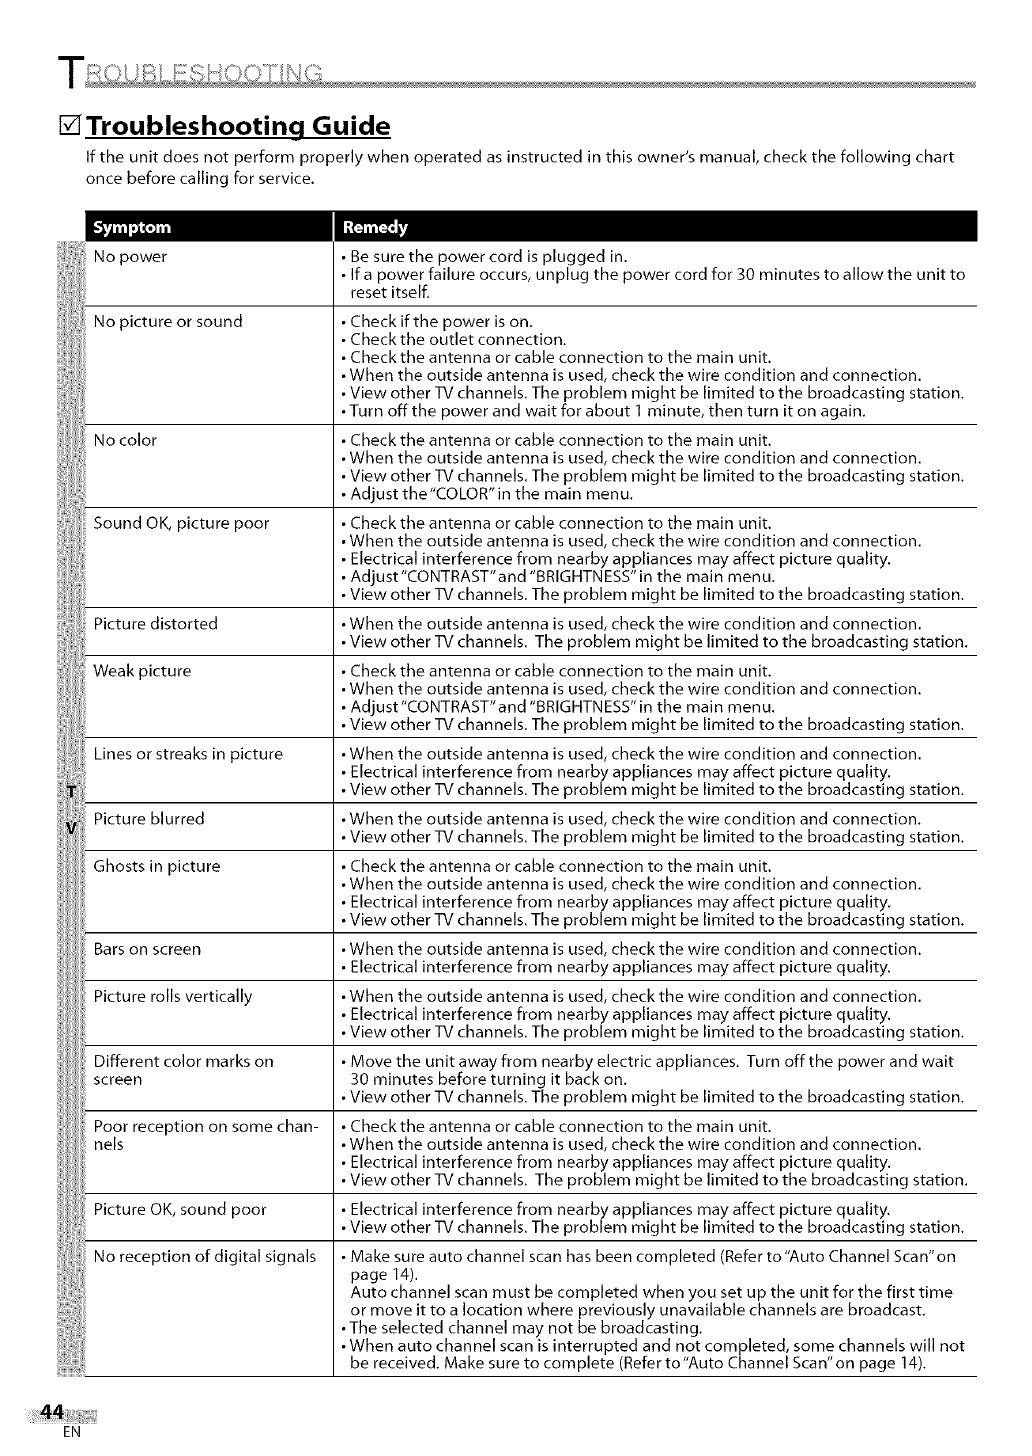
[]Troubleshooting Guide
If the unit does not perform properly when operated as instructed in this owner's manual, check the following chart
once before calling for service.
No power
No picture or sound
No color
Sound OK, picture poor
Picture distorted
Weak picture
Lines or streaks in picture
Picture blurred
Ghosts in picture
Bars on screen
Picture rolls vertically
Different color marks on
screen
Poor reception on some chan-
nels
Picture OK, sound poor
No reception of digital signals
Be sure the power cord is plugged in.
If a power failure occurs, unplug the power cord for 30 minutes to allow the unit to
reset itself.
Check if the power is on.
Check the outlet connection.
Check the antenna or cable connection to the main unit.
• When the outside antenna is used, check the wire condition and connection.
• View other TV channels. The problem might be limited to the broadcasting station.
• Turn off the power and wait for about 1 minute, then turn it on again.
Check the antenna or cable connection to the main unit.
• When the outside antenna is used, check the wire condition and connection.
• View other TV channels. The problem might be limited to the broadcasting station.
Adjust the"COLOR"in the main menu.
Check the antenna or cable connection to the main unit.
• When the outside antenna is used, check the wire condition and connection.
Electrical interference from nearby appliances may affect picture quality.
Adjust"CONTRAST"and "BRIGHTNESS" in the main menu.
• View other TV channels. The problem might be limited to the broadcasting station.
• When the outside antenna is used, check the wire condition and connection.
• View other TV channels. The problem might be limited to the broadcasting station.
Check the antenna or cable connection to the main unit.
• When the outside antenna is used, check the wire condition and connection.
Adjust"CONTRAST"and "BRIGHTNESS" in the main menu.
• View other TV channels. The problem might be limited to the broadcasting station.
• When the outside antenna is used, check the wire condition and connection.
Electrical interference from nearby appliances may affect picture quality.
• View other TV channels. The problem might be limited to the broadcasting station.
• When the outside antenna is used, check the wire condition and connection.
• View other TV channels. The problem might be limited to the broadcasting station.
Check the antenna or cable connection to the main unit.
• When the outside antenna is used, check the wire condition and connection.
Electrical interference from nearby appliances may affect picture quality.
• View other TV channels. The problem might be limited to the broadcasting station.
• When the outside antenna is used, check the wire condition and connection.
Electrical interference from nearby appliances may affect picture quality.
• When the outside antenna is used, check the wire condition and connection.
Electrical interference from nearby appliances may affect picture quality.
• View other TV channels. The problem might be limited to the broadcasting station.
Move the unit away from nearby electric appliances. Turn off the power and wait
30 minutes before turning it back on.
• View other TV channels. The problem might be limited to the broadcasting station.
Check the antenna or cable connection to the main unit.
• When the outside antenna is used, check the wire condition and connection.
Electrical interference from nearby appliances may affect picture quality.
• View other TV channels. The problem might be limited to the broadcasting station.
Electrical interference from nearby appliances may affect picture quality.
• View other TV channels. The problem might be limited to the broadcasting station.
Make sure auto channel scan has been completed (Refer to "Auto Channel Scan"on
page 14).
Auto channel scan must be completed when you set up the unit for the first time
or move it to a location where previously unavailable channels are broadcast.
• The selected channel may not be broadcasting.
• When auto channel scan is interrupted and not completed, some channels will not
be received. Make sure to complete (Refer to"Auto Channel Scan"on page 14).
EN
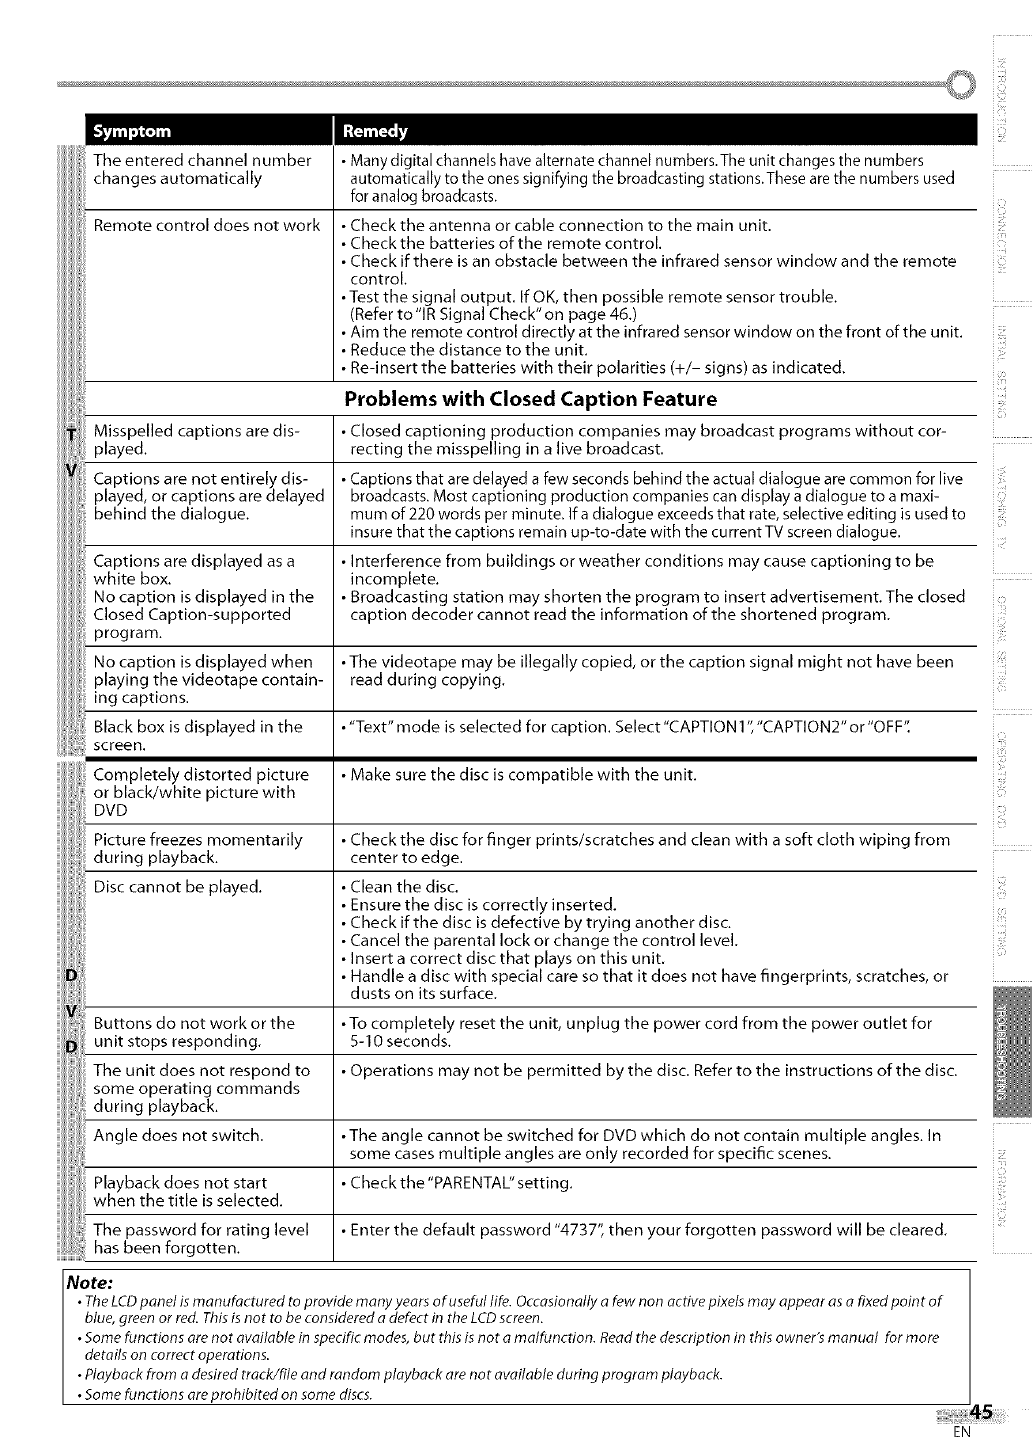
Theenteredchannelnumber
changesautomatically
Remotecontroldoesnotwork
Manydigitalchannelshavealternatechannelnumbers.Theunitchangesthenumbers
automaticallytotheonessignifyingthebroadcastingstations.Thesearethenumbersused
foranalogbroadcasts.
Checktheantennaorcableconnectiontothemainunit,
Checkthebatteriesoftheremotecontrol.
Checkifthereisanobstaclebetweentheinfraredsensorwindowandtheremote
control,
•Test the signal output, If OK, then possible remote sensor trouble,
(Refer to'lR Signal Check"on page 46,)
Aim the remote control directly at the infrared sensor window on the front of the unit.
Reduce the distance to the unit,
Re-insert the batteries with their polarities (+/- signs) as indicated,
Problems with Closed Caption Feature
Misspelled captions are dis- Closed captioning production companies may broadcast programs without cor-
played, recting the misspelling in a live broadcast,
Captions are not entirely dis- Captions that are delayed a few seconds behind the actual dialogue are common for live
played, or captions are delayed broadcasts. Most captioning production companies can display a dialogue to a maxi-
behind the dialogue, mum of 220 words per minute. If a dialogue exceeds that rate, selective editing is used to
insure that the captions remain up-to-date with the cu trent TV screen dialogue,
Captions are displayed as a Interference from buildings or weather conditions may cause captioning to be
white box. incomplete,
No caption is displayed in the Broadcasting station may shorten the program to insert advertisement, The closed
Closed Caption-supported caption decoder cannot read the information of the shortened program,
program,
No caption is displayed when •The videotape may be illegally copied, or the caption signal might not have been
playing the videotape contain- read during copying,
ing captions.
Black box is displayed in the •"Text" mode is selected for caption. Select "CAPTION 1","CAPTION2" or "OFF".
screen.
Completely distorted picture Make sure the disc is compatible with the unit,
or black/white picture with
DVD
Picture freezes momentarily
during playback,
Disc cannot be played,
in
iiii_!ii!i_
Check the disc for finger prints/scratches and clean with a soft cloth wiping from
center to edge.
Clean the disc,
Ensure the disc is correctly inserted,
Check if the disc is defective by trying another disc,
Cancel the parental lock or change the control level,
Insert a correct disc that plays on this unit,
Handle a disc with special care so that it does not have fingerprints, scratches, or
dusts on its surface,
Buttons do not work or the •To completely reset the unit, unplug the power cord from the power outlet for
unit stops responding, 5-10 seconds,
The unit does not respond to Operations may not be permitted by the disc, Refer to the instructions of the disc.
some operating commands
during playback,
Angle does not switch, •The angle cannot be switched for DVD which do not contain multiple angles, In
some cases multiple angles are only recorded for specific scenes.
Playback does not start Check the "PARENTAL" setting,
when the title is selected,
The password for rating level Enter the default password "4737", then your forgotten password will be cleared,
has been forgotten,
Note:
•The LCD panel is manufactured to provide many years of useful life. Occasionally a few non active pixels may appear as a fixed point of
blue, green or red. This is not to be considered a defect in the LCD screen.
•Some functions are not available in specific modes, but this is not a malfunction. Read the description in this owner's man ual for more
details on correct operations.
•Playback from a desired track/file and random playback are not available during program playback.
•Some functions are prohibited on some discs.
iiiz_ii:ii
EN
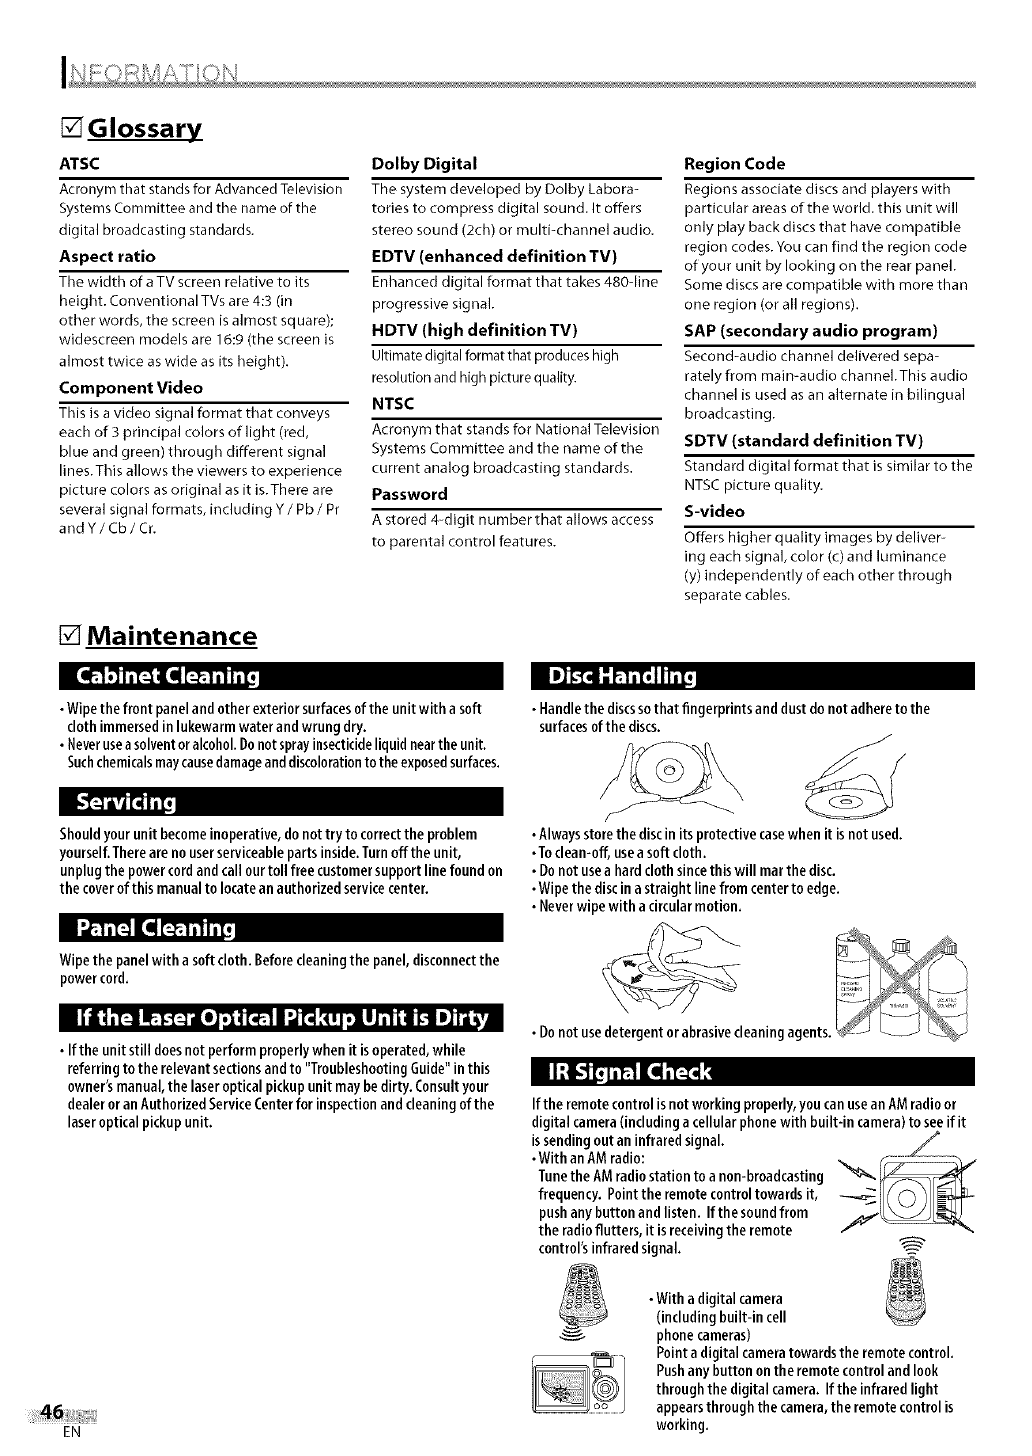
[]Glossary
ATSC
Acronym that stands for AdvancedTelevision
Systems Committee and the name of the
digital broadcasting standards.
Aspect ratio
Tbe width of a TV screen relative to its
height. Conventional TVs are 4:3 (in
other words, the screen is almost square);
widescreen models are 16:9 (the screen is
almost twice as wide as its height).
Component Video
This is a video signal format that conveys
each of 3 principal colors of light (red,
blue and green) through different signal
lines.This allows the viewers to experience
picture colors as original as it is.There are
several signal formats, including Y /Pb /Pr
andY/Cb/Cr.
[] Maintenance
Dolby Digital
The system developed by Dolby Labora-
tories to compress digital sound. It offers
stereo sound (2ch) or multi-channel audio.
EDTV (enhanced definition TV)
Enhanced digital format that takes 480-line
progressive signal.
HDTV (high definition TV)
Ultimate digital format that produces high
resolution and high picture quality.
NTSC
Acronym that stands for National Television
Systems Committee and the name of the
current analog broadcasting standards.
Password
A stored 4-digit number that allows access
to parental control features.
Region Code
Regions associate discs and players with
particular areas of the world, this unit will
only play back discs that have compatible
region codes.You can find the region code
of your unit by looking on the rear panel.
Some discs are compatible with more than
one region (or all regions).
SAP (secondary audio program)
Second-audio channel delivered sepa-
rately from main-audio channel.This audio
channel is used asan alternate in bilingual
broadcasting.
SDTV (standard definition TV)
Standard digital format tbat is similar to the
NTSCpicture quality.
S-video
Offers higher quality images by deliver-
ing each signal, color (c) and luminance
(y) independently of each other through
separate cables.
•Wipethe front paneland otherexterior surfacesof the unit with a soft
cloth immersedin lukewarmwaterand wrung dry.
• Neverusea solventor alcohol.Donotsprayinsecticideliquid nearthe unit.
Suchchemicalsmaycausedamageanddiscolorationto the exposedsurfaces.
Shouldyour unit becomeinoperative, do nottry to correctthe problem
yourself.Thereare no userserviceableparts inside.Turnoff the unit,
unplugthe powercordandcall ourtoll free customersupport line found on
the coverof this manual to locatean authorizedservicecenter.
•Handlethe discssothat fingerprints and dustdo not adhereto the
surfacesof the discs.
•Alwaysstorethe discin its protectivecasewhenit is not used.
•To clean-off, usea soft cloth.
• Do not usea hard clothsincethis will mar the disc.
•Wipe the discin astraight line from centerto edge.
• Neverwipewith a circularmotion.
Wipethe panelwith a softcloth. Beforecleaningthe panel,disconnectthe
powercord.
llilql_.TIt'.E'II[_'.I,qlI._,_
• If the unit still doesnot performproperlywhen it is operated,while
referring to the relevant sectionsandto "TroubleshootingGuide"in this
owner's manual,the laseroptical pickupunit maybe dirty. Consultyour
dealer or an AuthorizedServiceCenterfor inspectionand cleaningof the
laseroptical pickupunit.
EN
Ifthe remotecontrol isnot workingproperly,youcanusean AMradioor
digital camera(including a cellularphonewith built-in camera)to seeif it
issendingout an infrared signal. ._
•With an AMradio: .......
Tunethe AMradio station to a non-broadcasting
frequency. Point the remote controltowards it,
pushanybutton and listen. If the soundfrom
the radioflutters, it is receivingthe remote
control'sinfrared signal.
•With a digital camera
(includingbuilt-in cell
phonecameras)
Point a digital cameratowards the remotecontrol.
Pushany button on the remote control and look
through the digital camera. If the infrared light
appearsthrough the camera,the remote control is
working.
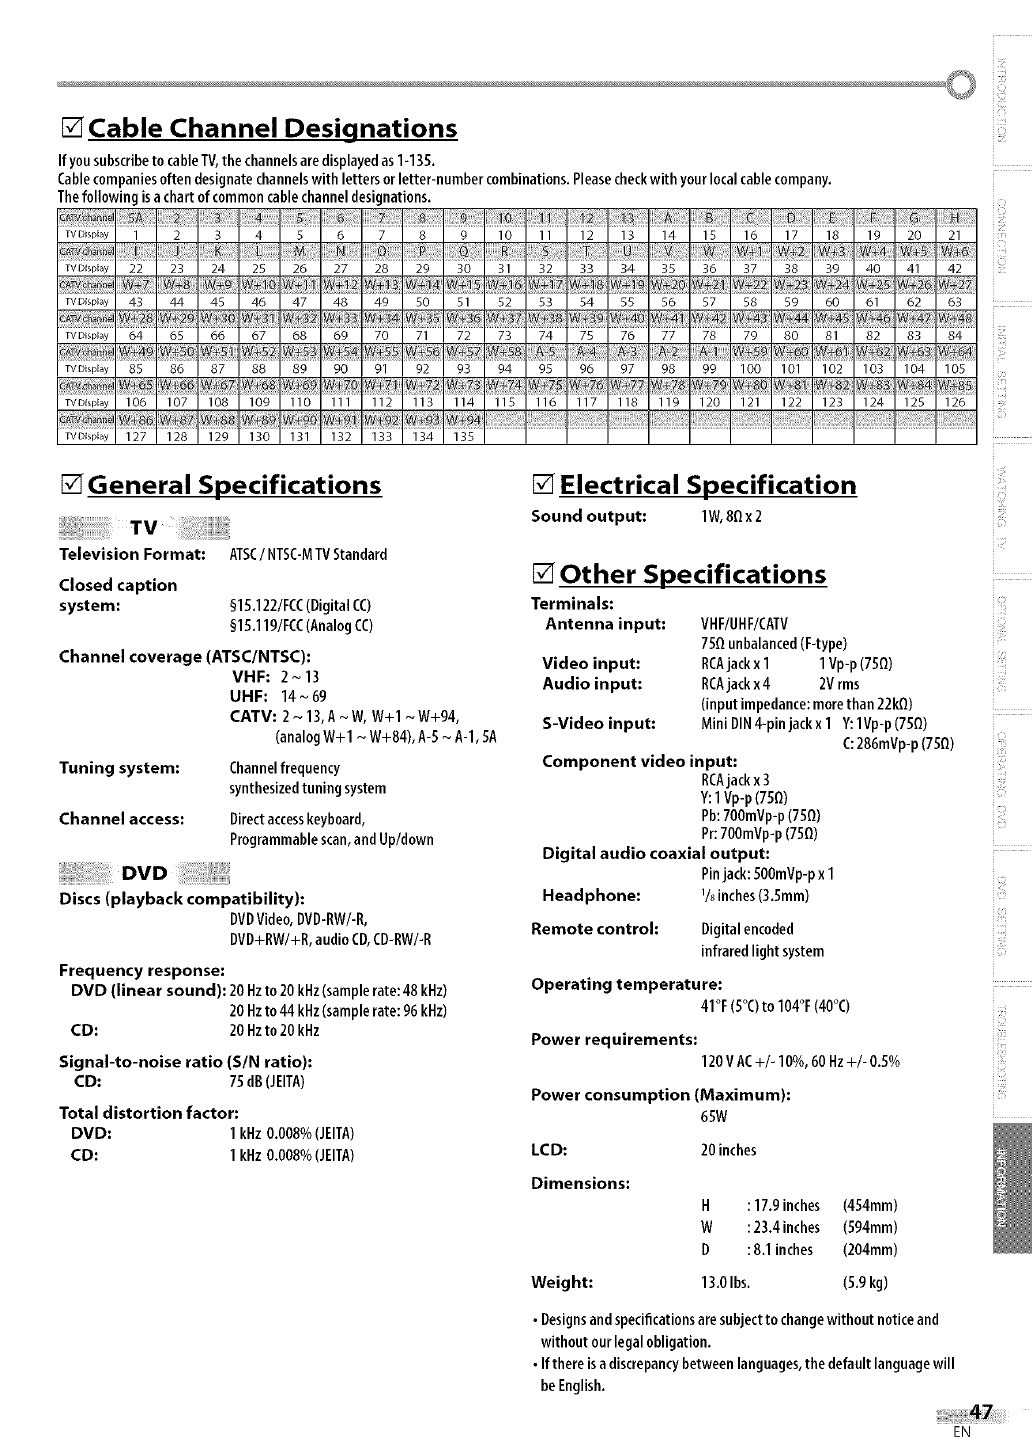
[] Cable Channel Designations
Ifyousubscribeto cableTV,the channelsaredisplayedas1-135.
Cablecompaniesoftendesignatechannelswith lettersorletter-numbercombinations.Pleasecheckwithyourlocalcablecompany.
Thefollowingisachartof commoncablechanneldesignations.
TVDispEay 1 2 3 4 5 6 7 8 9 10 11 12 13 14 15 16 17 18 19 20 21
w+sw++
TVDEspEay 22 23 24 25 26 27 28 29 30 31 32 33 34 35 36 37 38 39 40 41 42
TVDEspEay 43 44 45 46 47 48 49 50 51 52 53 54 55 56 57 58 59 60 61 62 63
W÷41,
TVDispEay 64 65 66 67 68 69 70 71 72 73 74 75 76 77 78 79 80 81 82 83 84
] W++O_V++I
IV DispEay 85 86 87 88 89 90 91 92 93 94 95 96 97 98 99 100 101 102 103 104 105
W+66 W+73
TVDEspEay 106 107 108 109 110 111 112 113 114 115 116 117 118 119 120 121 122 123 124 125 126
+
TVD(spEay 127 128 129 130 131 132 133 134 135
[] General Specifications
Television Format: ATSC/NTSC-MTVStandard
Closed caption
system: §15.122/FCC(DigitalCC)
§15.119/FCC(AnalogCC)
Channel coverage (ATSC/NTSC):
VHF: 2 ~ 13
UHF: 14~69
CATV: 2 ~ 13,A~ W, W+I ~W+94,
(analogW+I ~ W+84), A-5~A-l, 5A
Tuning system: Channelfrequency
synthesizedtuningsystem
Channel access: Directaccesskeyboard,
Programmablescan,andUp/down
Discs (playback compatibility):
DVDVideo,DVD-RW/-R,
DVD+RW/+R,audioCD,CD-RW/-R
Frequency response:
DVD (linear sound): 20 Hzto20 kHz(samplerate:48 kHz)
20 Hzto44 kHz(samplerate:96 kHz)
CD: 20 Hzto20 kHz
Signal-to-noise ratio (SIN ratio):
CD: 75 dB(JEITA)
Total distortion factor:
DVD: 1 kHz0.008%(JEITA)
CD: 1kHz0.008%(JEITA)
[] Electrical Specification
Sou nd output: lW, 8Qx2
[] Other Specifications
Terminals:
Antenna input: VHF/UHF/CATV
7SQunbalanced(F-type)
Video input: RCAjack x1 1 Vp-p(75Q)
Audio input: RCAjackx4 2Vrms
(inputimpedance:morethan 22kQ)
S-Video input: Mini DIN4-pinjackx 1 Y:1Vp-p(75_) i!ill
i#
Component video input:
RCAjackx3
Y:1Vp-p(75Q)
Ph:700mVp-p(75Q)
Pr:700mVp-p(75Q)
Digital audio coaxial output:
Pinjack:500mVp-px1
Headphone: 1/8inches(3.Smm)
C:286mVp-p(750)
Digitalencoded
infraredlight system
Remote control:
Operating temperature:
41°F(5°()to 104°F(40°()
Power requirements:
0 0
120VAC+/-IOYo,60Hz+/-0.5_
Power consumption (Maximum):
65W
i,i]]
LCD: 20 inches
Dimensions:
H:17.9 inches (454mm)
W:23.4 inches (594mm)
D: 8.1 inches (204mm)
Weight: 13.0Ibs. (5,9 kg)
•Designsand specificationsaresubjectto changewithout notice and
without our legal obligation.
•Ifthere isadiscrepancybetween languages,the defaultlanguagewill
be English.
EN
SYLVANIA
LIMITED WARRANTY
FUNAI CORP.will repair this product, free of charge in the USA in the event of defect in materials or workman-
FUNAI CORP.will provide parts to replace defective parts without charge for one (1) year
from the date of original retail purchase. Certain parts and LCD image burn-in are excluded
from this warranty.
LABOR: FUNAI CORP.will provide the labor without charge for a period of ninety (90) days from the
date of original retail purchase.
LIMITS AND EXCLUSIONS:
THIS WARRANTY IS EXTENDED ONLYTOTHE ORIGINAL RETAIL PURCHASER. A PURCHASE RECEIPT OR
OTHER PROOF OF ORIGINAL RETAIL PURCHASE WILL BE REQUIRED TOGETHER WITH THE PRODUCTTO
OBTAIN SERVICE UNDER THIS WARRANTY.
This warranty shall not be extended to any other person or transferee.
This warranty is void and of no effect if any serial numbers on the product are altered, replaced, defaced,
missing or if service was attempted by an unauthorized service center.This limited warranty does not
apply to any product not purchased and used in the United States.
This warranty only covers failures due to defects in material or workmanship which occur during normal
use. It does not cover damage which occurs in shipment, or failures which are caused by repairs, altera-
tions or products not supplied by FUNAI CORP., or damage, which results from accident, misuse, abuse,
mishandling, misapplication, alteration, faulty installation, improper maintenance, commercial use such
as hotel, rental or office use of this product, or damage which results from fire, flood, lightning or other
acts of God.
THIS WARRANTY DOES NOT COVER PACKING MATERIALS, ANY ACCESSORIES (EXCEPT REMOTE CONTROL),
ANY COSMETIC PARTS,COMPLETE ASSEMBLY PARTS, DEMO OR FLOOR MODELS.
FUNAI CORR AND ITS REPRESENTATIVESOR AGENTS SHALL IN NO EVENT BE LIABLE FOR ANY GENERAL,
INDIRECT OR CONSEQUENTIAL DAMAGES ARISING OUT OF OR OCCASIONED BYTHE USE OF OR THE
INABILITY TO USE THIS PRODUCT. THIS WARRANTY IS MADE IN LIEU OF ALL OTHER WARRANTIES, EXPRESS
OR IMPLIED, AND OF ALL OTHER LIABILITIES ON THE PART OF FUNAI, ALL OTHER WARRANTIES INCLUDING
THE WARRANTY OF MERCHANTABILITY AND FITNESS FOR A PARTICULAR PURPOSE, ARE HEREBY
DISCLAIMED BY FUNAI AND ITS REPRESENTATIVESIN THE UNITED STATES.
ALL WARRANTY INSPECTIONS AND REPAIRSMUST BE PERFORMED BY AN AUTHORIZED SERVICECENTER.
THIS WARRANTY IS ONLY VALID WHEN THE UNIT IS CARRIED-IN TO AN AUTHORIZED SERVICECENTER.
THE PRODUCT MUST BE ACCOMPANIED BY A COPY OF THE ORIGINAL RETAIL PURCHASE RECEIPT. IF NO
PROOF OF PURCHASE IS ATTACHED, THE WARRANTY WILL NOT BE HONORED AND REPAIRCOSTS WILL BE
CHARGED.
IMPORTANT:
THIS LIMITED WARRANTY GIVES YOU SPECIFIC LEGAL RIGHTS. YOU MAY HAVE OTHER RIGHTS THAT VARY
FROM STATETO STATE.IF,AT ANYTIME DURING THE WARRANTY PERIOD, YOU ARE UNABLE TO OBTAIN
SATISFACTION WITH THE REPAIROF THIS PRODUCT, PLEASECONTACT FUNAI CORP.
ATTENTION:
FUNAI CORR RESERVESTHE RIGHT TO MODIFY ANY DESIGN OF THIS PRODUCT
WITHOUT PRIOR NOTICE.
WARRANTY STATEMENT REGARDING NON AUTHORIZED REPAIRS:
To obtain warranty service, you must take the product, or deliver the product freight prepaid, in either its
original packaging or packaging affording an equal degree of protection, to any AUTHORIZED SERVICE
CENTER. FUNAI CORP.will not reimburse you for any service done by unauthorized service providers with-
out prior written approval.
To locate your nearest AUTHORIZED SERVICE CENTER or for general service inquiries,
please contact us at: FUNAI CORPORATION
Customer Service
Tel • 1-800-968-3429
http'//www.SylvaniaConsumerElectro nics.com
19900 Van Ness Avenue, Torrance, CA 90501
Printed in China A7440UH
1EMN22098 _
ship as follows:
DURATION:
PARTS:
