Symbol Technologies SPT1733 SPT 1700 Series Terminal User Manual manual
Symbol Technologies Inc SPT 1700 Series Terminal manual
manual
SPT 1700 Series

SPT 1700 Series
1999 SYMBOL TECHNOLOGIES, INC. All rights reserved.
Symbol reserves the right to make changes to any product to improve reliability,
function, or design.
Symbol does not assume any product liability arising out of, or in connection with, the
application or use of any product, circuit, or application described herein.
No license is granted, either expressly or by implication, estoppel, or otherwise under
any patent right or patent, covering or relating to any combination, system, apparatus,
machine, material, method, or process in which Symbol products might be used. An
implied license only exists for equipment, circuits, and subsystems contained in Symbol
products.
Symbol and Spectrum24 are registered trademarks of Symbol Technologies, Inc. Other
product names mentioned in this manual may be trademarks or registered trademarks
of their respective companies and are hereby acknowledged.
Symbol Technologies, Inc.
One Symbol Plaza
Holtsville, N.Y. 11742-1300
http://www.symbol.com
Patents
This product is covered by one or more of the following U.S. and foreign Patents:
U.S. Patent No.4,360,798; 4,369,361; 4,387,297; 4,460,120; 4,496,831; 4,593,186; 4,603,262; 4,607,156; 4,652,750;
4,673,805; 4,736,095; 4,758,717; 4,816,660; 4,845,350; 4,896,026; 4,897,532; 4,923,281; 4,933,538; 4,992,717;
5,015,833; 5,017,765; 5,021,641; 5,029,183; 5,047,617; 5,103,461; 5,113,445; 5,130,520 5,140,144; 5,142,550;
5,149,950; 5,157,687; 5,168,148; 5,168,149; 5,180,904; 5,229,591; 5,230,088; 5,235,167; 5,243,655; 5,247,162;
5,250,791; 5,250,792; 5,262,627; 5,262,628; 5,266,787; 5,278,398; 5,280,162; 5,280,163; 5,280,164; 5,280,498;
5,304,786; 5,304,788; 5,306,900; 5,321,246; 5,324,924; 5,337,361; 5,367,151; 5,373,148; 5,378,882; 5,396,053;
5,396,055; 5,399,846; 5,408,081; 5,410,139; 5,410,140; 5,412,198; 5,418,812; 5,420,411; 5,436,440; 5,444,231;
5,449,891; 5,449,893; 5,468,949; 5,471,042; 5,478,998; 5,479,000; 5,479,002; 5,479,441; 5,504,322; 5,519,577;
5,528,621; 5,532,469; 5,543,610; 5,545,889; 5,552,592; 5,578,810; 5,581,070; 5,589,679; 5,589,680; 5,608,202;
5,612,531; 5,619,028; 5,664,229; 5,668,803; 5,675,139; 5,693,929; 5,698,835; 5,705,800; 5,714,746; 5,723,851;
5,734,152; 5,734,153; 5,745,794; 5,754,587; 5,762,516; 5,763,863; 5,767,500; 5,789,728; 5,808,287; 5,811,785;
5,811,787; 5,815,811; 5,821,519; 5,821,520; 5,823,812; 5,828,050; 5,580,078; D305,885; D341,584; D344,501;
D359,483; D362,453; D363,700; D363,918; D370,478; D383,124; D391,250.
Invention No. 55,358; 62,539; 69,060; 69,187 (Taiwan); No. 1,601,796; 1,907,875; 1,955,269 (Japan).
European Patent 367,299; 414,281; 367,300; 367,298; UK 2,072,832; France 81/03938; Italy 1,138,713.
rev. 1/99
Licensed under one or more of the following Palm Computing, Inc. (a subsidiary of 3Com Corporation) patents: U.S. Pat.
Nos. 5,125,039, 5,550,715, 5,727,202 and other Patents Pending.
1
Quick Reference
Introduction
Congratulations on your purchase of Symbol Technologies’ SPT
1700 Series Terminal! The unique combination of pocket size,
Personal Information Management software, RF communication
via Symbol’s Spectrum24® wireless network, printing support and
scanning capability make this product superior for use in a wide
range of applications.
About This Guide
This guide covers the procedures for the basic set up and use of the
terminal. Specific topics covered include:
•Parts of the SPT 1700 on page 2
•Getting Started with the SPT 1700 on page 4
•Charging the Battery on page 4
•Installing the Battery on page 7
•Starting the SPT 1700 on page 8
•Using the SPT 1700 on page 9
•Using the Contrast Control on page 10
•Writing with the Stylus on page 10
•Icon Descriptions on page 11
•Scanning with the SPT 1700 on page 12
•Initiate the Spectrum24 Network Connection on page 13
•Resetting Your SPT 1700 Terminal on page 13
•Attaching the Handstrap on page 15
•Maintaining the SPT 1700 on page 16
•Troubleshooting on page 17
•Service Information on page 20.
The SPT 1700 Product Reference Guide (part number 70-37544-
xx) provides more detail about the applications available on the SPT
1700. See your Reseller or call Symbol Technologies to receive this
document.

2
SPT 1700 Series
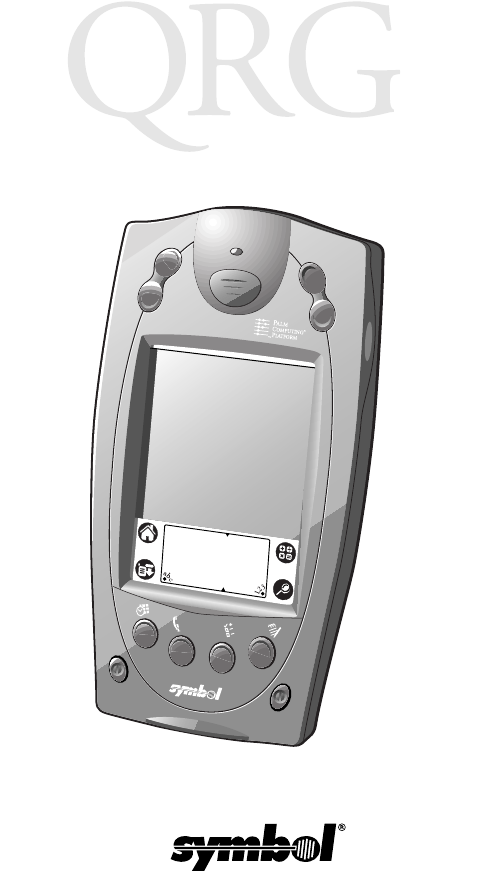
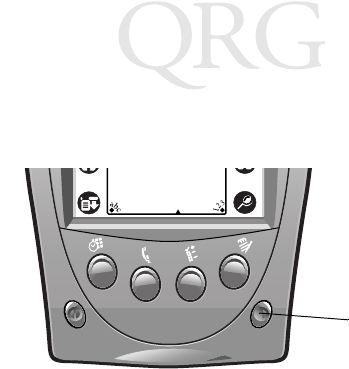
Parts of the SPT 1700
The following illustration indicates each part of the SPT 1700
Terminal.
Scroll Button
(Up and Down)
Laser Decode LED Center Scan Button
Scroll Button
(Up and Down)
Right Scan Trigger
LCD (Screen)
Calculator Icon
Find Icon
Applications
Icon
Menu Icon
Contrast Button
Power
Button
Application Buttons
Left Scan
Trigger
Front View
Left View
Graffiti Input Area
3
Quick Reference
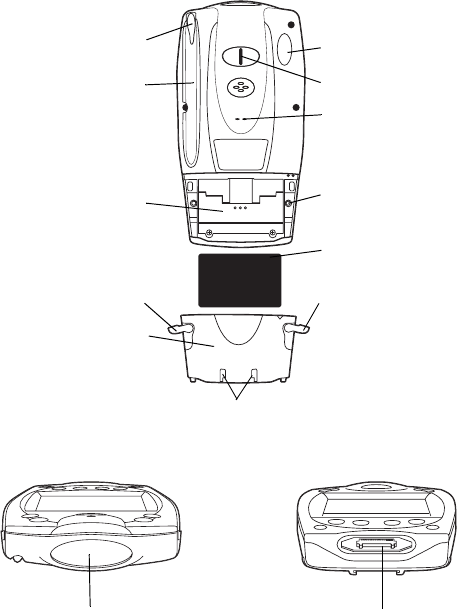
Parts of the SPT 1700 (continued)
Infrared Port
Handstrap Connector
Lithium-Ion Battery
Battery Latch
Handstrap Connector
Stylus
Stylus Silo
Battery Latch
Battery Compartment
Battery Cover
Serial PortScanner Exit Window
Speaker
Bottom View
To p Vi ew
Back View
Reset Button

4
SPT 1700 Series
Getting Started with the SPT 1700
Before you can use your SPT 1700, perform the basic set up
procedures covered on the following pages. Specifically:
• Charge and Install the Battery
• Start the SPT 1700
• Initiate the Spectrum24 network connection (SPT 1740 only).
Charging the Battery
Before using your SPT 1700 for the first time, charge and install the
lithium-ion battery. The terminal’s battery can be charged using the
Cradle, the Synchronization/Charging Cable, or the Universal
Battery Charger (UBC). For instructions on using the UBC to charge
your batteries, see the Quick Reference Guide which came with
your UBC. Follow these same procedures to recharge the battery
when the terminal’s battery level is low.
Note: The battery included in the package (p/n 20-36098-01/
model number 1UF103450) must be used exclusively as
the power source for the SPT 1700 series, and should
not be used for any other purpose.
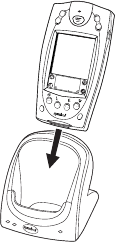
Using the Cradle to Charge the Battery
To charge the terminal’s battery using the CRD 1700 cradle:
1. Make sure the battery is installed in the terminal. See Install-
ing the Battery on page 7 for instructions.
2. Make sure the cradle is plugged into a wall outlet.
5
Quick Reference
3. Insert the SPT 1700 terminal in the cradle as shown:
The terminal’s battery is fully charged after approximately two
hours. You can also charge a terminal’s spare battery by inserting it
in the spare battery charging slot on the back of the cradle. Once
inserted, the spare battery will be fully charged after approximately
two hours. See the SPT 1700 Cradle Quick Reference Guide (p/n
70-37840-xx) for more information.
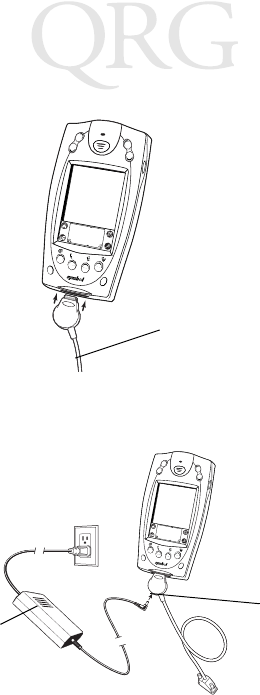
Using the Synchronization/Charging Cable to Charge the Battery
To charge the terminal’s battery using the Synchronization/
Charging Cable:
1. Make sure the battery is installed in the terminal. See Install-
ing the Battery on page 7 for instructions.
6
SPT 1700 Series
2. Insert the cable into the bottom of the terminal.
3. Plug the power cable into a wall outlet and plug the other end
into the battery charging receptacle on the side of the Synchro-
nization/Charging Cable.
The battery is fully charged after approximately two hours.
Synchronization/
Charging Cable
Battery
Charging
Receptacle
Power
Supply
Serial Cable

7
Quick Reference
Installing the Battery
To install the battery in your SPT 1700:
1. Open the latches on the battery cover and lift it away from the
SPT 1700.
2. Insert the lithium-ion battery in the battery compartment,
making sure it snaps into place.
3. Replace the battery cover and re-secure the latches.
Note: Be careful to position the battery latches completely
open while securing the battery cover on the terminal.
Latch
Latch

8
SPT 1700 Series
Starting the SPT 1700
After charging and installing the battery, start the terminal by
pressing the red power button. If the terminal does not power on,
perform a hard reset by following the instructions on page 14.
Calibrating the Screen
The first time you start your SPT 1700, the calibration screen
appears. Follow the steps in this section to align the internal
circuitry of your SPT 1700 with its touch-sensitive screen.
Note: If your SPT 1700 unit came pre-loaded with a custom
software application, you may not need to calibrate
your screen, in which case you will not see the calibra-
tion screen.
To calibrate your SPT 1700:
1. Press the power button on the front panel of your SPT 1700
to display the calibration screen. (This screen also displays fol-
lowing a hard reset).
Note: If necessary, adjust the contrast control on the SPT 1700
so the screen is clear and readable. See Using the Con-
trast Control on page 10 for instructions.
2. Remove the stylus from its storage silo on the back of the SPT
1700.
Power
Button

9
Quick Reference
3. Tap the exact center of each target that appears on the screen
with the tip of the stylus.
If, at any time, you need to recalibrate the digitizer, open the
Preferences application, tap on the top right corner of the screen,
and select the digitizer option from the pull down menu.
Using the SPT 1700
Using the Power Button/Backlight Control
The power button turns the SPT 1700 on and off. This button also
serves as your backlight control for low-light conditions. With the
unit on, press and hold the power button for approximately 2
seconds to turn the backlight on and off. When the backlight is on,
the screen text displays in reverse video.
10
SPT 1700 Series
Using the Contrast Control
The contrast control button is located on the lower right-hand side
of the terminal.
To adjust the contrast:
1. Press the contrast control button, which displays the contrast
adjusting bar on the terminal’s screen.
2. Using your stylus, adjust the contrast by scrolling the contrast
bar until the contrast is set to the desired level, or use either of
the scroll buttons on the top of the terminal to adjust the con-
trast level.
3. Press the contrast control button or tap Done on the terminal
screen to turn off the contrast control.
Writing with the Stylus
Your SPT 1700 includes Graffiti handwriting software as the
primary system for entering text and numbers. Graffiti is a system
where simple strokes you write with the stylus are instantly
recognized as letters or numbers. See the SPT 1700 Product
Reference Guide, part number 70-37544-xx for more detailed
information.
Contrast
Control
11
Quick Reference
Using the Onscreen Keyboard
You can activate the on-screen keyboard any time you need to enter
text or numbers on your SPT 1700. Note that you cannot enter
Graffiti characters while using the on-screen keyboard.
To use the on-screen keyboard:
1. Open any SPT 1700 application.
2. Tap any record name, or tap the New button with the tip of
the stylus.
3. Tap the left target to open the Alpha keyboard, or tap the right
target to open the Numeric keyboard.
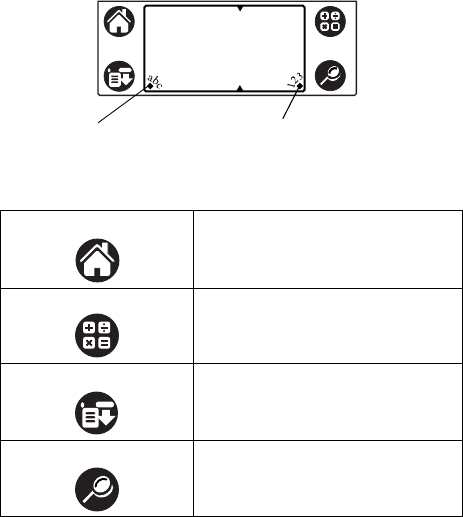
Icon Descriptions
Applications Icon Tap to exit the current application
and to display a list of available ap-
plications for selection.
Calculator Icon Tap to display the calculator applica-
tion.
Menu Icon Tap from within an application to
display the appropriate menu of op-
tions for the selected application.
Find Icon Tap from within an application to
enter search criteria to find an entry.
Tap here for letters
keyboard Tap here for numbers
keyboard
12
SPT 1700 Series
Scanning with the SPT 1700
The SPT 1700 has an integrated laser bar code scanner which, if
your unit has been configured to use scanning input, allows you to
collect data by scanning bar codes.
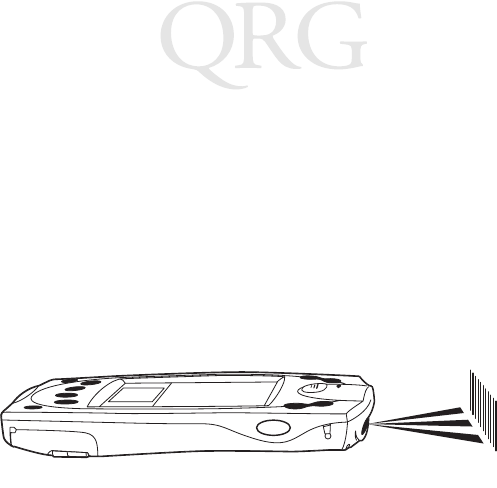
To scan bar codes with the SPT 1700:
1. Start your scanning application.
1. Aim the scanner at the bar code.
2. Press either the right, left or center scan trigger. Make sure the
red scan beam covers the entire bar code. The green scan LED
lights and a beep sounds to indicate a successful decode.
13
Quick Reference
Initiate the Spectrum24 Network Connection
Before the SPT 1740 can be used, the Spectrum24 network must be
properly set up. For information about configuring the SPT 1740
terminal for use in a Spectrum24 environment, please refer to the
SPT 1700 Series Product Reference Guide, part number 70-37544-
xx.
Resetting Your SPT 1700 Terminal
Under normal circumstances, you will never have to use the reset
button. However, on rare occasions your SPT 1700 terminal may
“hang” (no longer respond to buttons or the screen). In this case,
you need to perform a reset to get your SPT 1700 terminal running
again.
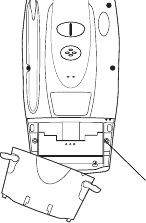
Performing a Soft Reset
A soft reset tells your SPT 1700 terminal to stop what it’s doing and
start over again. All records and entries stored in your SPT 1700
terminal are retained with a soft reset. After a soft reset, the Palm
Computing Platform Logo screen appears followed by the General
Preferences screen.
To perform a soft reset, remove the battery cover and gently press
the reset button, which is located under the battery cover.
Reset button

14
SPT 1700 Series
Performing a Hard Reset
A hard reset tells your SPT 1700 terminal to start over again and
erase all records and entries stored in your SPT 1700 terminal.
Therefore, never perform a hard reset unless a soft reset does not
solve your problem.
Note: You can restore any data previously synchronized with
your computer during the next HotSync operation.
To perform a hard reset:
1. Remove the battery cover.
2. Hold down the power button on the front of the SPT 1700 ter-
minal.
3. While holding down the power button, gently press the reset
button on the back of the terminal.
4. Release the reset button and then the power button.
5. When a message appears on the SPT 1700 terminal screen
warning that you are about to erase all the data stored on your
SPT 1700 terminal, do one of the following:
a. Press the upper half of either of the scroll buttons on the
front panel of the SPT 1700 terminal to complete the hard
reset and display the Digitizer screen.
b. Press any other button to perform a soft reset.
Note: With a hard reset, the current date and time are retained.
Formats Preferences and other settings are restored to
their factory default settings.
15
Quick Reference
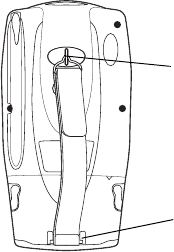
Attaching the Handstrap
The SPT 1700 has an optional handstrap which increases comfort
when holding the terminal for extended periods of time. To attach
the handstrap to the back of the terminal:
1. Thread the round metal piece through the metal handstrap
connection on the back of the terminal.
2. Slide the flat metal piece into the handstrap connection on the
bottom of the terminal.
3. Adjust the velcro® strap to fit your hand.
Thread round metal
piece through this
connector
Slide flat metal piece up
and into this connector

16
SPT 1700 Series
Maintaining the SPT 1700
Your SPT 1700 is designed to be reliable and to provide years of
trouble-free service. However, you should observe the following
general tips when using your SPT 1700:
• Take care not to scratch the screen of your SPT 1700. When
working with your SPT 1700, use the supplied stylus or plas-
tic-tipped pens intended for use with a touch-sensitive screen.
Never use an actual pen or pencil or other sharp object on the
surface of the SPT 1700 screen.
• Although your SPT 1700 is water and dust resistant, it should
not be exposed to rain or moisture for an extended period of
time. In general, treat your SPT 1700 as you would a pocket
calculator or other small electronic instrument.
• The touch-sensitive screen of your SPT 1700 contains a glass
element. Take care not to drop your SPT 1700 or subject it to
any strong impact.
• Protect your SPT 1700 from temperature extremes. Do not
leave your SPT 1700 on the dashboard of a car on a hot day,
and keep it away from heaters and other heat sources.
• Do not store or use your SPT 1700 in any location that is ex-
tremely dusty, damp or wet.
• Use a soft lens cloth to clean your SPT 1700. If the surface of
the SPT 1700 screen becomes soiled, clean it with a soft cloth
moistened with a diluted window-cleaning solution.
17
Quick Reference
Troubleshooting
SPT 1700 terminal does not turn on:
• Adjust the contrast control.
• Make sure the battery is fully charged and installed properly.
• Replace the battery. If your SPT 1700 terminal still does not
operate, try a soft reset; see Resetting Your SPT 1700.
Low battery warning after replacing the battery:
• The battery warning message may appear immediately after
replacing the battery. In addition, if you check the battery
gauge in the Applications Launcher immediately after replac-
ing the battery, the gauge may start at “empty” and slowly rise
to “full.” This is normal. It takes a minute for the battery
gauge to accurately show the condition of the battery.
No sound:
• Check the Sound options in the General Preferences screen. If
the option is set to off, there will be no sound. See the SPT
1700 Product Reference Guide for more information.
SPT 1700 terminal turns itself off:
• Your SPT 1700 terminal is designed to turn itself off after a pe-
riod of inactivity. This period can be set at one minute, two
minutes or three minutes. Check the “Auto-off after” setting
in the General Preferences screen, and change the setting if you
need a longer delay before the automatic shutoff feature acti-
vates. See the SPT 1700 Product Reference Guide for more in-
formation. The terminal also turns itself off when the battery
power is extremely low.
SPT 1700 terminal doesn’t recognize my handwriting:
• For your SPT 1700 to recognize handwriting input with the
stylus, you need to use the Graffiti® character strokes. See the
SPT 1700 Product Reference Guide for information about
how to write Graffiti character strokes.

18
SPT 1700 Series
• Make the Graffiti character strokes in the Graffiti writing area
— not on the display part of the screen.
• Make sure you are writing the strokes for letters in the left-
hand side, and the strokes for numbers in the right-hand side
of the Graffiti writing area.
• Make sure that Graffiti is not shifted into extended or punc-
tuation modes. See the SPT 1700 Product Reference Guide for
information about shifting into and out of punctuation
modes.
Tapping the screen buttons or icons does not activate the
corresponding feature:
• Recalibrate the digitizer. Choose Digitizer from the Preferenc-
es application pick list and follow the directions on the screen.
When I tap the icon, nothing happens:
• Not all applications or screens have menus. Try changing to a
different application.
Beamed data does not transmit:
• Confirm that the SPT 1700 terminals are 5” apart, the receiver
has its IRDA capability enabled, and that the path between the
two devices is clear of obstacles.
When receiving beamed data an out of memory message appears:
• Your SPT 1700 terminal requires at least twice the amount of
memory available as the data you are receiving. For example,
if you are receiving a 30K application, you must have at least
60K free.
Your SPT 1700 unit does not accept scan input:
• Verify that the unit is loaded with a scanning application. See
your System Administrator.
• Check to be sure the bar code symbol is not defaced.
• Be sure you are within proper scanning range.
19
Quick Reference
• Be sure the unit is programmed to accept the type of bar code
you are scanning.
• If you are expecting a beep on a good decode and don’t hear
one, check that the application is set to generate a beep on
good decode.
• If the scanner stops emitting a laser beam when you press the
trigger, check your battery level. When the battery is low, the
scanner shuts off before the terminal notifies you of the low
battery condition.
Note: If, after performing these checks, the scanner is still not
reading symbols, contact your distributor or Symbol
Technologies.

20
SPT 1700 Series
Service Information
Before you use the unit, it must be configured to operate in your facility’s network and
run your applications.
If you have a problem running your unit or using your equipment, contact your
facility’s Technical or Systems Support. If there is a problem with the equipment, they
will contact the Symbol Support Center:
Warranty
Symbol Technologies, Inc. (“Symbol”) manufactures its hardware products in
accordance with industry-standard practices. Symbol warrants that for a period of
twelve (12) months from date of shipment, products will be free from defects in
materials and workmanship.
This warranty is provided to the original owner only and is not transferable to any third
party. It shall not apply to any product (i) which has been repaired or altered unless
done or approved by Symbol, (ii) which has not been maintained in accordance with
any operating or handling instructions supplied by Symbol, (iii) which has been
subjected to unusual physical or electrical stress, misuse, abuse, power shortage,
negligence or accident or (iv) which has been used other than in accordance with the
product operating and handling instructions. Preventive maintenance is the
responsibility of customer and is not covered under this warranty.
Wear items and accessories having a Symbol serial number, will carry a 90-day limited
warranty. Non-serialized items will carry a 30-day limited warranty.
United States 1-800-659-2240 Canada 905-629-7226
United Kingdom 0800 328 2424 Asia/Pacific 337-6588
Australia 1-800-672-906 Austria 1-505-5794
Denmark 7020-1718 Finland 9 5407 580
France 01-40-96-52-21 Germany 6074-49020
Italy 2-484441 Mexico 5-520-1835
Netherlands 315-271700 Norway 66810600
South Africa 11-4405668 Spain 9-1-320-39-09
Sweden 84452900
Latin America Sales Support 1-800-347-0178 Inside US
+1-561-483-1275 Outside US
Europe/Mid-East Distributor Operations Contact local distributor or call
+44 118 945 7360
21
Quick Reference
Warranty Coverage and Procedure
During the warranty period, Symbol will repair or replace defective products returned
to Symbol’s manufacturing plant in the US. For warranty service in North America, call
the Symbol Support Center at 1-800-659-2240. International customers should contact
the local Symbol office or support center. If warranty service is required, Symbol will
issue a Return Material Authorization Number. Products must be shipped in the
original or comparable packaging, shipping and insurance charges prepaid. Symbol
will ship the repaired or replacement product freight and insurance prepaid in North
America. Shipments from the US or other locations will be made F.O.B. Symbol’s
manufacturing plant.
Symbol will use new or refurbished parts at its discretion and will own all parts
removed from repaired products. Customer will pay for the replacement product in
case it does not return the replaced product to Symbol within 3 days of receipt of the
replacement product. The process for return and customer’s charges will be in
accordance with Symbol’s Exchange Policy in effect at the time of the exchange.
Customer accepts full responsibility for its software and data including the appropriate
backup thereof.
Repair or replacement of a product during warranty will not extend the original
warranty term.
Symbol’s Customer Service organization offers an array of service plans, such as on-site,
depot, or phone support, that can be implemented to meet customer’s special
operational requirements and are available at a substantial discount during warranty
period.
General
Except for the warranties stated above, Symbol disclaims all warranties, express or
implied, on products furnished hereunder, including without limitation implied
warranties of merchantability and fitness for a particular purpose. The stated express
warranties are in lieu of all obligations or liabilities on part of Symbol for damages,
including without limitation, special, indirect, or consequential damages arising out of
or in connection with the use or performance of the product.
Seller’s liability for damages to buyer or others resulting from the use of any product,
shall in no way exceed the purchase price of said product, except in instances of injury
to persons or property.
Some states (or jurisdictions) do not allow the exclusion or limitation of incidental or
consequential damages, so the proceeding exclusion or limitation may not apply to you.
Ergonomic Recommendations
Caution: In order to avoid or minimize the potential risk of ergonomic injury follow
the recommendations below. Consult with your local Health & Safety Manager to
ensure that you are meeting with your company’s safety programs to prevent employee
injury.
• Reduce or eliminate repetitive motion
• Maintain a natural position
• Reduce or eliminate excessive force

22
SPT 1700 Series
• Keep objects that are used frequently within easy reach
• Perform tasks at correct heights
• Reduce or eliminate vibration
• Reduce or eliminate direct pressure
• Provide adjustable workstations
• Provide adequate clearance
• Provide a suitable working environment
• Improve work procedures.
Regulatory Information
Radio Frequency Interference Requirements
This device has been tested and found to comply with the limits for a Class B digital
device pursuant to Part 15 of the Federal Communications Commissions Rules and
Regulation. These limits are designed to provide reasonable protection against harmful
interference when the equipment is operated in a commercial environment. This
equipment generates, uses, and can radiate radio frequency energy and, if not installed
and used in accordance with the instruction manual, may cause harmful interference to
radio communications. Operation of this equipment in a residential area is likely to
cause harmful interference in which case the user will be required to correct the
interference at his own expense.
However, there is no guarantee that interference will not occur in a particular
installation. If the equipment does cause harmful interference to radio or television
reception, which can be determined by turning the equipment off and on, the user is
encouraged to try to correct the interference by one or more of the following measures:
• Re-orient or relocate the receiving antenna.
• Increase the separation between the equipment and receiver.
• Connect the equipment into an outlet on a circuit different from that which the
receiver is connected.
• Consult the dealer or an experienced radio/TV technician for help.
Radio Frequency Interference Requirements - Canada
This Class B digital apparatus meets the requirements of the Canadian Interference-
Causing Equipment Regulations.
Cet appareil numérique de la Classe B respecte toutes les exigences du Reglement sur le
Materiél Brouilleur du Canada.
CE Marking and European Union Compliance
Products intended for sale within the European Union are marked with the
CE Mark which indicates compliance to applicable Directives and
European Normes (EN), as follows. Amendments to these Directives or
ENs are included:
Applicable Directives
• Electromagnetic Compatibility Directive 89/336/EEC
23
Quick Reference
• Low Voltage Directive 73/23/EEC
Applicable Standards
• EN 55 022 - Limits and Methods of Measurement of Radio Interference Charac-
teristics of Information technology Equipment
• EN 50 082-1:1997 - Electromagnetic Compatibility - Generic Immunity Stan-
dard, Part 1: Residential, commercial, Light Industry
• IEC 1000-4-2(1995-01) - Electromagnetic compatibility (EMC) - Part 4:Testing
and measurement techniques - Section 2: Electrostatic discharge immunity test.
• IEC 1000-4-3(1995-03) - Electromagnetic compatibility (EMC) - Part 4:Testing
and measurement techniques - Section 3: Radiated, radio-frequency, electromag-
netic field immunity test.
• EN 60 950 + Amd 1 + Amd 2 - Safety of Information Technology Equipment
Including Electrical Business Equipment
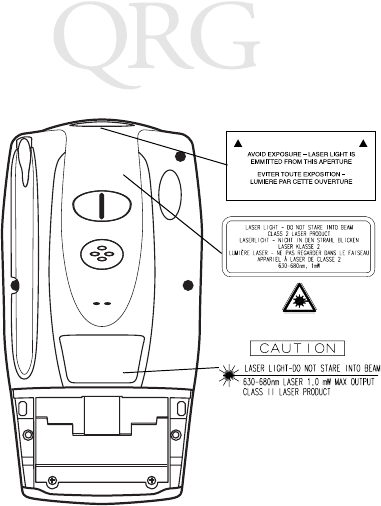
• EN 60 825-1 (EN 60 825) - Safety of Devices Containing Lasers
Laser Devices
Symbol products using lasers comply with US 21CFR1040.10, Subchapter J and
IEC825/EN 60 825 (or IEC825-1/EN 60 825-1, depending on the date of
manufacture). The laser classification is marked on one of the labels on the product.
Class 1 Laser devices are not considered to be hazardous when used for their intended
purpose. The following statement is required to comply with US and international
regulations:
Caution: Use of controls, adjustments or performance of procedures other than those
specified herein may result in hazardous laser light exposure.
Class 2 laser scanners use a low power, visible light diode. As with any very bright light
source, such as the sun, the user should avoid staring directly into the light beam.
Momentary exposure to a Class 2 laser is not known to be harmful.
24
SPT 1700 Series
Scanner Labeling
25
Quick Reference
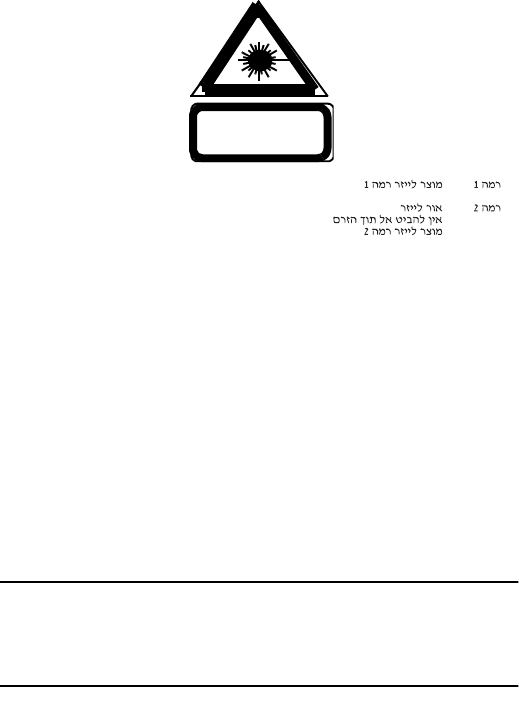
In accordance with Clause 5, IEC 0825 and EN60825, the following information is
provided to the user:
ENGLISH HEBREW
CLASS 1 CLASS 1 LASER PRODUCT
CLASS 2 LASER LIGHT
DO NOT STARE INTO BEAM
CLASS 2 LASER PRODUCT
DANISH
KLASSE 1 KLASSE 1 LASERPRODUKT ITALIAN
KLASSE 2 LASERLYF CLASSE 1 PRODOTTO AL LASER DI CLASSE 1
SE IKKE IND I STRÅLEN CLASSE 2 LUCE LASER
KLASSE 2 LASERPRODUKT NON FISSARE IL RAGGIOPRODOTTO
AL LASER DI CLASSE 2
DUTCH
KLASSE 1 KLASSE-1 LASERPRODUKT NORWEGIAN
KLASSE 2 LASERLICHT KLASSE 1 LASERPRODUKT, KLASSE 1
NIET IN STRAAL STAREN KLASSE 2 LASERLYS IKKE STIRR INN I LYSSTRÅLEN
KLASSE-2 LASERPRODUKT LASERPRODUKT, KLASSE 2
FINNISH PORTUGUESE
LUOKKA 1 LUOKKA 1 LASERTUOTE CLASSE 1 PRODUTO LASER DA CLASSE 1
LUOKKA 2 LASERVALO
ÄLÄ TUIJOTA SÄDETTÄ CLASSE 2 LUZ DE LASER NÃO FIXAR O RAIO LUMINOSO
LUOKKA 2 LASERTUOTE PRODUTO LASER DA CLASSE 2
FRENCH SPANISH
CLASSE 1 PRODUIT LASER DE CLASSE 1 CLASE 1 PRODUCTO LASER DE LA CLASE 1
CLASSE 2 LUMIERE LASER CLASE 2 LUZ LASER
NE PAS REGARDER LE RAYON FIXEMENT NO MIRE FIJAMENTE EL HAZ
PRODUIT LASER DE CLASSE 2 PRODUCTO LASER DE LA CLASE 2
GERMAN SWEDISH
KLASSE 1 LASERPRODUKT DER KLASSE 1 KLASS 1 LASERPRODUKT KLASS 1
KLASSE 2 LASERSTRAHLEN KLASS 2 LASERLJUS STIRRA INTE MOT STRÅLEN
NICHT DIREKT IN DEN LASERSTRAHL SCHAUEN LASERPRODUKT KLASS 2
LASERPRODUKT DER KLASSE 2
Battery Caution
Caution: Danger of explosion if battery is incorrectly replaced.
Replace only with the same or equivalent type recom-
mended by the manufacturer. Dispose of used batteries
according to the manufacturer's instructions.

70-37543-01
Revision B—June 1999
Symbol Technologies, Inc. One Symbol Plaza Holtsville, NY 11742-1300
For Frequently Asked Questions and tips on SPT 1700 operation,
please visit the Symbol Palm website at
http://www.symbol.com/palm.