Sysgration FTR-CBX1021 FM Modulator User Manual LTD 1021 manual 03
Sysgration Ltd. FM Modulator LTD 1021 manual 03
User Manual

FM Modulator (FTR-CBX1021) Included
LTD-1021 User's Manual Notices
I

Notices LTD-1021 User's Manual
II
Safety Instructions
l. Please read these safety instructions carefully.
2. Please keep this User's Manual for later reference.
3. All precautions and warnings on the equipment should be carefully noted.
4. Please disconnect the LTD-1021 from the AC outlet before cleaning.
Do not use sprays, liquids or cleaning detergents for cleaning the LTD-
1021.
5. Never pour liquids into any openings or directly on the LTD-1021. This
could result in fire or electrical shock.
6. Ensure the voltage range of the power outlet is between 100V and 240V
before connecting the LTD-1021. Exceeding the maximum rated voltage may
cause damage to the AC adapter or to the LTD-1021. This could result in fire
or electrical shock.
7. When the AC adapter is plugged into an electrical outlet, place the power
cord so it will not be stepped or walked on. Do not place objects over or on
the power cord.
8. If the LTD-1021 is not used for a long time, disconnect the AC power
supply to avoid damage by transient over voltage.
9. Use the supplied bag and Stand when using the LTD-1021 to avoid
damage or breakage caused by dropping the unit.
10. Use the LTD-1021 in a clean, dry, temperature controlled environment.
Do not use the LTD-1021 in areas of high humidity, around water or outdoors
while it is raining.
11. Never open or disassemble the LTD-1021. For safety reasons, this
equipment should be repaired only by qualified servicing personnel.
12. Seek qualified service personnel if any of the following issues should
arise:
• The AC adapter, power cord or plug is damaged
• Liquid has been spilled into the LTD-1021
LTD-1021 User's Manual Notices
III
• The LTD-1021 has been exposed to excessive moisture
• The LTD-1021 exhibits errors and or does not function according to
specification
• The LTD-1021 has been dropped or otherwise mechanically damaged
DO NOT LEAVE THIS EQUIPMENT IN A NON-TEMPERATURE CONTROLLED
ENVIRONMENT. STORAGE TEMPERATURES BELOW -4ºC (20ºF) OR ABOVE
60ºC (140ºF) MAY DAMAGE THE UNIT.
Safety Notices
To comply with Canadian and U.S. laws, the following
safety information is provided in English and French.
Caution: To reduce the risk of an electric shock, which could cause
personal injury, follow all safety notices. The symbols
shown are used in your documentation and on your
equipment to indicate safety hazards.
Attention: Afin de prévenir les risques d'électrocution, respectez
toutes les consignes de sécurité. Les symboles figurant
dans la documentation et sur l'appareil indiquent les
points dangereux.
IT System Connectors: This equipment has not been designed for connection
to all IT power systems; if a modification is required contact your dealer or
local electrical authority.
Connecteurs système IT Cet appareil n'a pas été conçu pour être connecté à
tous les systèmes d'alimentation IT et si vous avez besoin d'y apporter une
modification, adressez-vous à votre revendeur ou à un électricien.

Notices LTD-1021 User's Manual
IV
Safety Notices for the power cord
This equipment has a 2 or 3-wire power cord. Replace the power cord if it
becomes damaged. Contact your dealer for an exact replacement.
In the U.S.A. and Canada, the power cord must be a UL-listed detachable
power cord (in Canada, CSA-certified). For 2-wire it is SPT-2 18AWG, for 3-
wire cord it is SVT or SJT, 18 AWG, 3-conductor, provided with a molded-on
NEMA type (1-15 2-wire) (5-15 3-wire) P plug cap at one end and a molded-
on cord connector body at the other end. The cord length must not exceed 3
meters.
Outside the U.S.A. and Canada, the plug must be rated for 250 VAC, 2.5 Amp
minimum, and must display an international agency approval marking. The
cord must be suitable for use in the end-user country. Consult your dealer or
the local electrical authorities if you are unsure of the type of power cord to
use in your country. Changes of Voltage occur automatically in the power
supply.
Consignes de sécurité
Cet équipement possède un cordon d'alimentation à deux/trois fils. Si le
cordon d'alimentation venait à être abîmé, avant de le remplacer, consultez
votre revendeur.
Aux Etats-Unis et au Canada, le cordon d'alimentation doit être détachable,
homologué UL (Certifié CSA pour le Canada), de type SPT-2, 18 AWG, à 2 fils
(trois fils avec SVT, SJT, 18 AWG) fourni avec prise surmoulée NEMA de type
1-15P (5-15P trois fils) à une extrémité et un cordon de raccordement
surmoulé à la masse à l'autre extrémité. La longueur du cordon ne doit pas
dépasser 3 mètres.
Hors des Etats-Unis et du Canada, la prise doit être conforme pour 250 V, 2.5
A minimum; la marque d'homologation d'un organisme international doit
également figurer sur la prise. Le cordon d'alimentation doit être conforme
aux normes du pays de l'utilisateur final. Si vous ne savez pas quel type de
cordon utiliser, adressez-vous à votre revendeur ou à un électricien. Le
changement de voltage survient automatiquement dans l'alimentation.

LTD-1021 User's Manual Notices
V
Warning: Under no circumstances should the user attempt to
disassemble the power supply. The power supply has no
user-replaceable parts. Inside the power supply are
hazardous voltages that can cause serious personal
injury. A defective power supply must be returned to your
dealer.
Attention: Ne tentez jamais de démonter le bloc d'alimentation.
Vous n'êtes pas qualifié pour en remplacer les éléments,
et vous risqueriez de vous électrocuter en touchant l'une
de ses zones à haute tension. S'il est défectueux, vous
devrez le rapporter chez votre revendeur.

Notices LTD-1021 User's Manual
VI
Safety Notices for Users outside the U.S.A. and Canada
PELV (Protected Extra-Low Voltage) Integrity – For ensuring the extra-low
voltage integrity of the equipment, connect only equipment with mains-
protected electrically compatible circuits to the external ports.
Remote Earths - To prevent electrical shock, connect all local (individual office)
computers and computer support equipment to the same electrical circuit of
the building wiring. If you are unsure, check the building wiring to avoid
remote earth conditions.
Earth Bonding - For safe operation, only connect the equipment to a building
supply that is in accordance with current wiring regulations in your country. In
the U.K., those regulations are the IEE.

LTD-1021 User's Manual Notices
VII
Laser Compliance Statement for DVD drives
The DVD drive for this unit contains a laser. The classification label of the
drive is located on the bottom of the drive. Below is a sample of the
classification label:
CLASS 1 LASER PRODUCT
LASER KLASSE 1
LUOKAN 1 LASERLAITE
APPAREIL A LASER DE CLASSE 1
KLASS 1 LASER APPARAT
The drive is certified in the USA to comply with the requirements of the
Department of Health and Human Services 21 Code of Federal Regulations
(DHHS 21 CFR) Subchapter J. for Class 1 laser products.
In other countries the drive is certified to comply with the requirements of
EN60825.
Caution: Do not open the drive. There are no user-serviceable
parts or components inside. Use of controls, adjustments
and operation of procedures other than those specified,
may result in hazardous exposure to radiation. Class I (1)
laser products are not considered hazardous. The drive
has an internal Class I (1), 0.5-milliwatt, aluminum
gallium-arsenide laser that operates at a wavelength of
760 to 810 nanometers. The design of the laser system
and the drive ensures that there is no exposure to laser
radiation above a Class I (1) level during normal
operation, user maintenance or servicing conditions.

Notices LTD-1021 User's Manual
VIII
NOTICE OF EMC COMPLIANCE
This equipment has been tested and found to comply with the limits for a
class B digital device, pursuant to part 15 of the FCC Rules. These limitations
are designed to provide reasonable protection against harmful interference in
a residential installation. This equipment generates, uses and can radiate
radio frequency energy and, if not installed and used in accordance with the
instructions, may cause harmful interference to radio communications.
However, there is no guarantee that interference will not occur in a particular
installation. If this equipment does cause harmful interference to radio or
television reception, which can be determined by turning the equipment off
and on, the user is encouraged to try to correct the interference by one or
more of the following measures:
• Reorient or relocate the receiving antenna.
• Increase the separation between the equipment and receiver.
• Connect the equipment into an outlet on a circuit different from that
to which the receiver is connected.
• Consult your dealer or a Radio/TV technician for help.
Use only shielded I/O cables to connect I/O devices to this equipment.
You are cautioned that changes or modifications not expressly approved by
the party responsible for compliance could void your authority to use the
equipment.
Canadian EMI Compliance Statement
This Class B digital apparatus meets all requirements of the Canadian
Interference-Causing Equipment Regulations.
Avis de conformité aux normes du EMI du Canada
Cet appareil numérique de la classe B respecte toutes les exigences du
Règlement sur le matériel brouilleur du Canada.

LTD-1021 User's Manual Contents
IX
Contents
Chapter 1 Introduction 1-1
1.1 Unpacking................................................................................... 1-1
1.2 Overview ..................................................................................... 1-1
1.3 Setting up................................................................................... 1-1
1.4 AC-adapter.................................................................................. 1-1
1.5 Remote Control ........................................................................... 1-1
1.6 Operating environment.................................................................. 1-1
Chapter 2 Before you begin 2-1
2.1 Video Source.............................................................................. 2-1
2.2 Menus ........................................................................................ 2-1
2.3 Default Conditions........................................................................ 2-2
2.4 Picture adjustment....................................................................... 2-2
2.5 FM transmitter............................................................................. 2-3
2.6 Wireless Audio............................................................................. 2-3
2.7 Carry bag installation.................................................................... 2-3
Chapter 3 TV mode 3-1
3.1 Antenna setup............................................................................. 3-1
3.2 Fine tuning of certain TV stations .................................................. 3-1
3.3 TV Navigation.............................................................................. 3-2
3.4 Parental control ........................................................................... 3-2
Chapter 4 DVD mode 4-1
4.1 DVD control locations .................................................................. 4-1
4.2 Basic operation ........................................................................... 4-1
4.3 Audio.......................................................................................... 4-2
4.4 Subtitles ..................................................................................... 4-2
4.5 Changing camera angle................................................................ 4-3
Chapter 5 Music mode 5-1
5.1 MP3 selecting songs ................................................................... 5-1
5.2 Random songs ............................................................................ 5-1
5.3 Other functions............................................................................ 5-2
Chapter 6 Photo viewing mode 6-1
6.1 Basic Navigation.......................................................................... 6-1

Contents LTD-1021 User's Manual
X
6.2 Special Navigation ....................................................................... 6-1
6.3 Slide show effects........................................................................ 6-2
6.4 Zoom pictures ............................................................................. 6-2
Appendix A to E A-1
A Specifications..............................................................................A-1
B Wall mounting.............................................................................B-1
C Trouble shooting..........................................................................C-1
D Maintenance...............................................................................D-1
E Returning your LTD-1021..............................................................E-1
LTD-1021 User's Manual Introduction
LTD-1021 User Manual Page 1-5
Chapter 1 Introduction
Thank you for purchasing the LTD-1021. We are confident it will provide you
with functionality and ease of use at home or on the road.
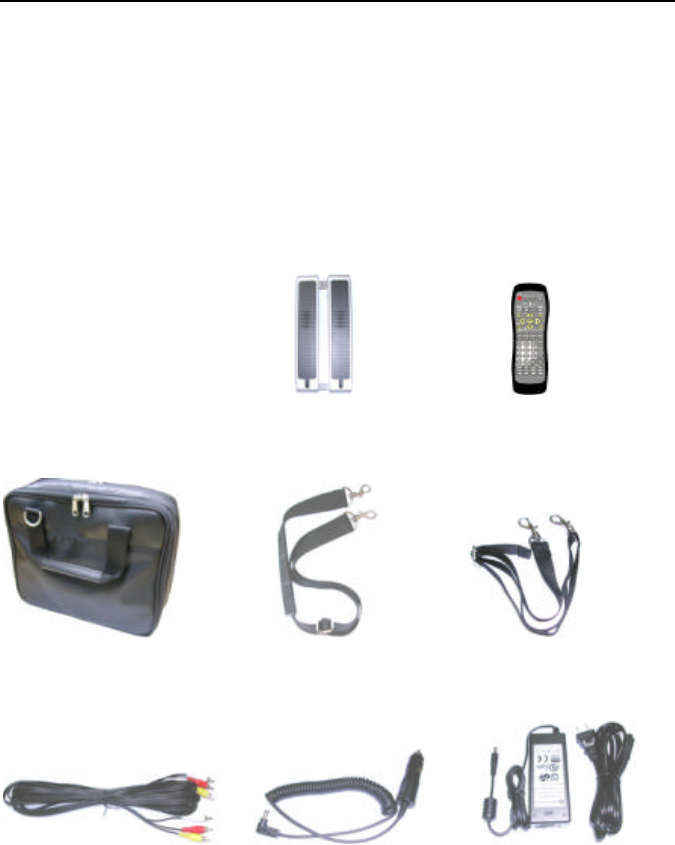
1.1 Unpacking
(2) (3)
(4)
(5) (6) (7)

Introduction LTD-1021 User's Manual
Page 1-4 LTD-1021 User Manual
(1) IR-Wireless Audio Headset *2
(2) Speaker (Right/Left) *2
(3) Remote Controller
(4) Carry Bag
(5) AV Cord
(6) Car Cord (Plug Adaptor)
(7) AC-DC Adaptor+ Power Cord
(8) Packing Box
(9) User Manual
Please make sure that you have all the above items; if not, contact the dealer
where you bought your LTD-1021.
If you need to send your LTD-1021 for service or upgrade it is strongly
recommended to use the original packing box and materials.
LTD-1021 User's Manual Introduction
LTD-1021 User Manual Page 1-5
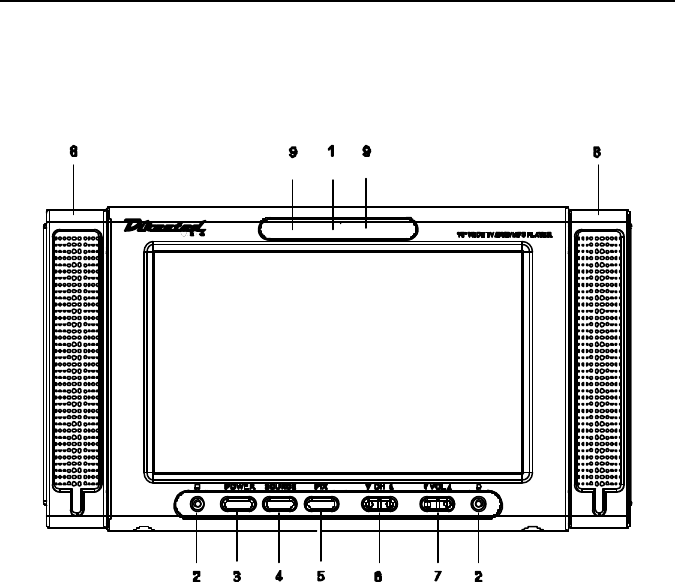
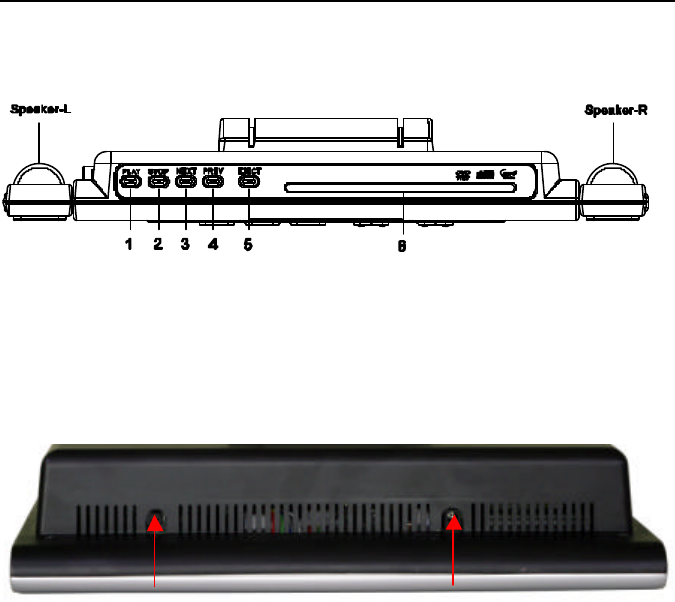
1.2 Overview
1.2.1 Front View
• IR Receiver Infrared receiver for remote controller
‚ Headset Plug external headset here
ƒ POWER Power on and off the unit
„ SOURCE Toggle TV/DVD/CATV/AV1/AV2…
… PIX See Chapter 2.xxx for more information
† CH Change TV channel
‡ VOL Increase or Decrease the volume level
ˆ Speaker Right/Left Channel Speaker
‰ IR transmitter Two Channels for Wireless Audio (2.3MHz, 2.8MHz)

Introduction LTD-1021 User's Manual
Page 1-4 LTD-1021 User Manual
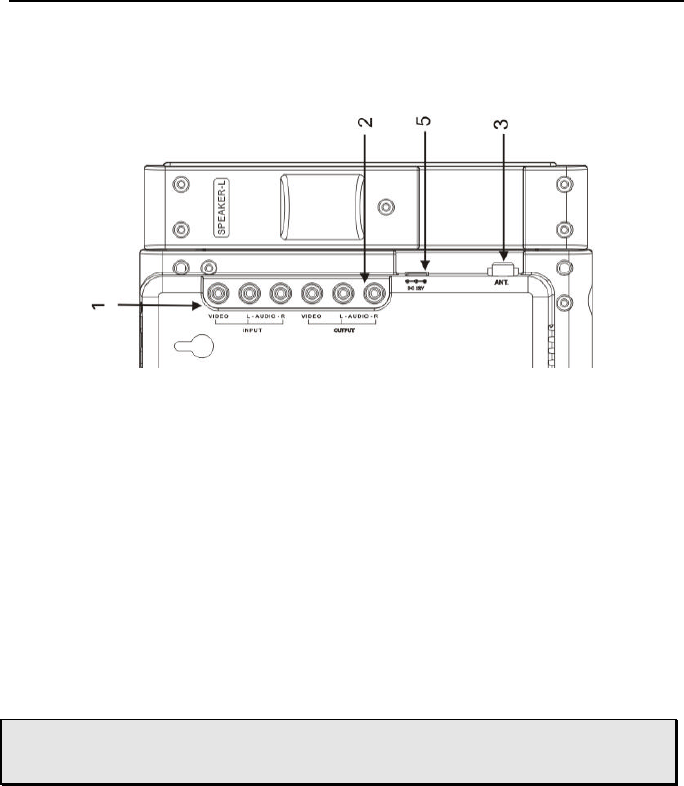
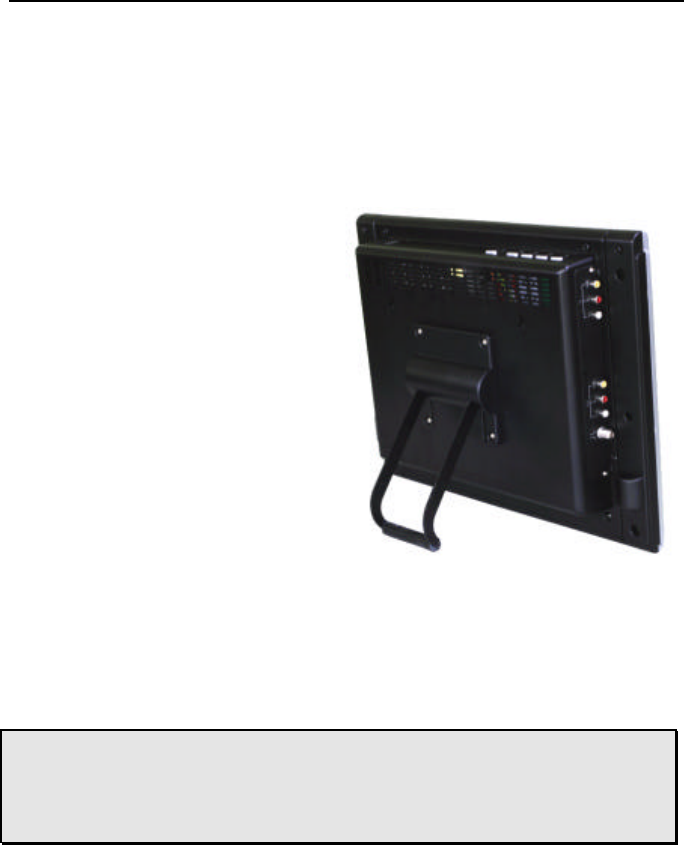
1.2.1 Read View
• AV INPUT Connect external devices here, like: VCR, PS2,
Xbox, Game-Cube, Video Camera, Blue-Ray, LD
etc…
‚ AV OUTPUT Connect to external recording or visual devices
here, like: DVD-recorder, VCR, TV, or Projector.
ƒ ANT Attach your antenna or cable here
„ Stand The mobile stand can tilt in various angles, or be
removed for mounting the unit on the wall.
See Appendix B for more Information.
… Power Jack 12VDC-power jack where the DC-power plug from
the AC adaptor connects.
LTD-1021 User's Manual Introduction
LTD-1021 User Manual Page 1-5
1.2.3 Top View
• FM antenna (see chapter 2.5)
• Play/Pause ‚ Stop playing ƒ Next chapter
„ Previous chapter … Eject disc † DVD/CD disc slot
• ‚
LTD-1021 User's Manual Introduction
LTD-1021 User Manual Page 1-5
1.3 Setting up
To set up the LTD-1021 together with a VCR (for recording TV programs)
connect these cables:
1. Connect TV cable to the Antenna jack at ƒ
2. Connect the 3pcs AV cables from the VCR AV-IN to LTD-1021 AV-
OUT‚.
3. Connect the 3pcs AV cables from the VCR AV-OUT to LTD-1021
AV-IN at • or to an external TV, projector or other display device.
4. To record, set the VCR source to AV mode (see VCR manual), and
then you will be able to record TV programs from the LTD-1021.
If your VCR doesn’t have AV-in or out but a round S-Video connector, you
need to buy an S-Video to AV adaptor and connect it accordingly.
Notes: DVD movies are Macrovision-protected and will not be
able to be recorded onto VCR tapes or to DVD recorders.

LTD-1021 User's Manual Introduction
LTD-1021 User Manual Page 1-5
1.4 AC-adapter
The supplied AC adapter is a universal adapter and can accept input voltages
from 100V to 240V. The universal AC adapter will allow you to charge and/or
operate your LTD-1021 anywhere in the world. However, the supplied power
cord is region specific. You may need to purchase plug adapter in order to
plug in the power cord in other countries.
Notes: Use only the supplied AC adapter with your LTD-1021.
The AC adapter will accept line voltages from 100V -
240V. You may purchase additional power cords for other
countries from your dealer; electrical outlet adapters may
be purchased from electronics stores.
Caution: This unit is to be used with LEI model NU40-2120330-I3
Attention: Pour utiliser avec LEI modèle NU40-2120330-I3
LTD-1021 User's Manual Introduction
LTD-1021 User Manual Page 1-5
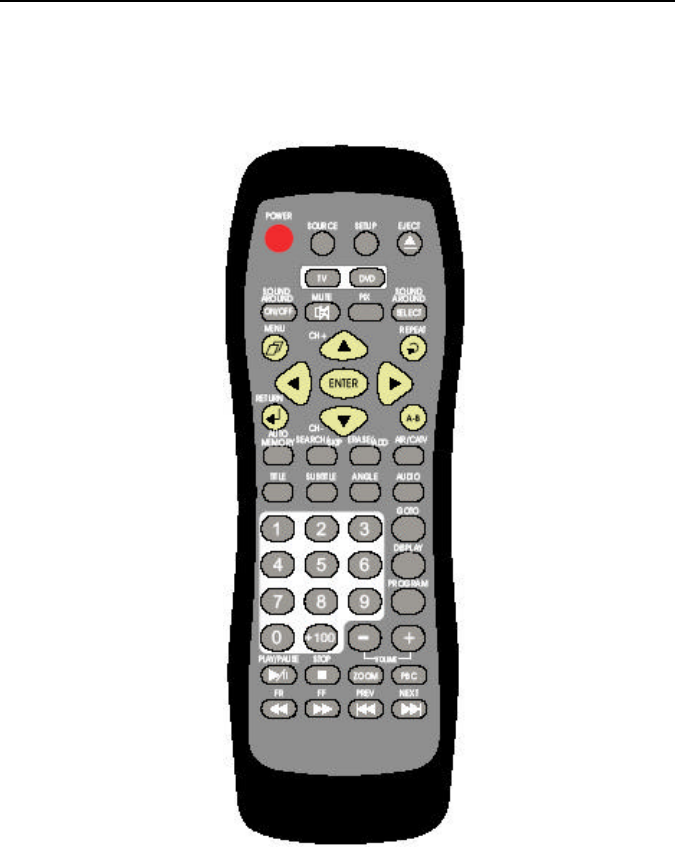
1.5 Remote Control

Introduction LTD-1021 User's Manual
Page 1-4 LTD-1021 User Manual
Most functions are self-explanatory or will be described in related chapters in
this manual.

LTD-1021 User's Manual Introduction
LTD-1021 User Manual Page 1-5
To change between TV/DVD modes, first power on the unit by pressing the
big red power button at the upper-left corner of remote controller, then click
on one of two mode keys (TV, DVD). Some keys will not function in certain
modes, like changing TV channel will not work in DVD mode and DVD play
button will not work in TV mode. If you are in DVD mode and the Play button
doesn’t work, click the DVD button one more time.
Notes: First install two AAA batteries in the battery compartment.

LTD-1021 User's Manual Introduction
LTD-1021 User Manual Page 1-5
1.6 Operating environment
Care should be taken while traveling with or using the LTD-1021 system.
When selecting a suitable location, select the location on these points:
• Good ventilation
• Temperature controlled, best is room temperature
• Avoid extreme heat or cold
• Avoid dust and dirt
• Avoid fluids
• Avoid electromagnetic and RF interferences
• Good and stabile power to avoid power surges
• Overheating (don’t cover ventilation holes)
• Position cables correctly to avoid audio interference
• Place the unit far from edges, bookshelves, etc where the unit might
easily fall down
• Avoid direct sunlight, which might damage the LCD screen
Warning: Do not expose the LTD-1021 to extreme temperatures. Do
not leave the LTD-1021 in a car. Do not drop, or spill
fluids on the LTD-1021, and do not open the case. Failure
to observe these warnings may void your warranty.
The LTD-1021’s Liquid Crystal Display (LCD) may be
damaged by exposure to intense sunlight, which builds up
excessive heat inside the display enclosure. Only exposure
to indirect or subdued sunlight is recommended.

LTD-1021 User's Manual Before you begin
LTD-1021 User Manual Page 2-5
Chapter 2 Before you begin
Plug in the power cable to the AC-adapter and the AC-cord into the LTD-1021.
Then you may turn on the power either on the unit itself or via the remote
control. See chapter 1 for locations of buttons and location of connectors if in
doubt.
2.1 Video Source
There are THREE buttons on the remote control to select the Source, these
are: TV / DVD / AV1 (AV2 is not used on the LTD-1021).
Select one of these modes either via the Remote control or by clicking the
Source button on the unit, if you click on the unit you may need to click up to
two times to go to the correct source.
If you want to watch a VHS movie or connect to your Video Camera, select
the AV1. Connect your respective device to the Video-In ports.
2.2 Menus
There are two different menu systems in the LTD-1021, one for TV and one
for DVD.
The TV menu can be selected by clicking the Menu button on the remote
control while in TV mode. Under DVD mode the Menu button will call up the
DVD menu.
To select a submenu click the ‘Enter’ button, to return to previous menu,
click the ‘Return’ button. To leave the Menu program, click ‘Return’ button on
the top menu.
Notice: First time you use the LTD-1021 it is preferable to go to
the TV menu, select ‘Initial’ and select your preferred
‘Language’.

Before you begin LTD-1021 User's Manual
Page 2-4 LTD-1021 User Manual
2.3 Default Conditions
The default settings should be suitable for most people, but if you would like
to adjust Brightness, Contrast, Color, Sharpness, Color temperature or fine
tune TV channels it’s possible to do so:
1. Turn on the LTD-1021
2. Click the TV button on the remote control
3. Click the Menu (2) button on the remote control
4. Click the Down (6) arrow to select ‘PICTURE’ and press
‘ENTER’
5. You may now select one of the several picture enhancing modes
by moving up and down, click the ‘ENTER’ button to select.
6. Once you select an option and finish adjusting it, click the
‘RETURN’ (8) button to return to previous menu, click once
again to leave the Menu or wait a few seconds.
To restore default settings go to the ‘Picture’ submenu (once you are in TV
mode and click the Menu button), select the ‘Reset’ option to set the LTD-
1021 to factory default settings.
2.4 Picture adjustment
The default settings in Chapter2.3 can easily be changed to fit your individual
need. Below these modes are described:
Brightness Make the picture brighter or dimmer, default is 100.
Contrast A higher contrast makes the distinctions between different
colors even greater (will result in picture degrading), a lower
contrast makes all color become quite similar and also
degrade the picture. The default is 50.
Color A lower number reduced the amount of color (almost black
and white), while a higher number makes the colors very
bright, default value is 50.
Tint Low number makes the picture reddish; High number makes
the picture greenish, default is 50.
Sharpness Adjust the sharpness, default is 50.

LTD-1021 User's Manual Before you begin
LTD-1021 User Manual Page 2-5
Color temp. You may select three kinds of color temperatures, Cool,
Normal and Warm. Choose the one that pleases you, default
in Normal.
Fine Tuning If the default TV channel is not perfect, you may fine tune the
setting here. Note that it will only fine tune the channel you
are currently watching.
Reset Resets all the above settings to default values (including
volume). However V-chip password and it’s setting are not
reset. See Chapter 2.5 for information about V chip.
2.5 FM transmitter
LTD-1021 has got a built-in FM transmitter, so the LTD-1021 can broadcast
your current audio signal to a stereo radio-equipment nearby. The LTD-1021
can be used in the car and want everyone in the car to listen to the movie or
music track you are playing. Under TV mode, click the Menu button and
select ‘FM transmitter’, and choose one of the five different frequencies. Once
you select a frequency the internal and external audio sources are cut off,
audio can now only be listened over a radio. FM transmitter emission
frequency: 88.1 MHz; 88.3 MHz; 88.5 MHz; 88.7 MHz; 88.9 MHz
Note: All audio sources will be transmitted, TV, DVD, CD, MP3
or external video sources. To disable this you may press
the remote control or enter the menu as shown above
and select ‘Disable’.
2.6 Wireless Audio
Wireless Audio is always enabled on the LTD-1021. It can use any standard
IR wireless headset that receives Audio on the 2.3MHz and 2.8MHz channels.
Distance is about 6m.
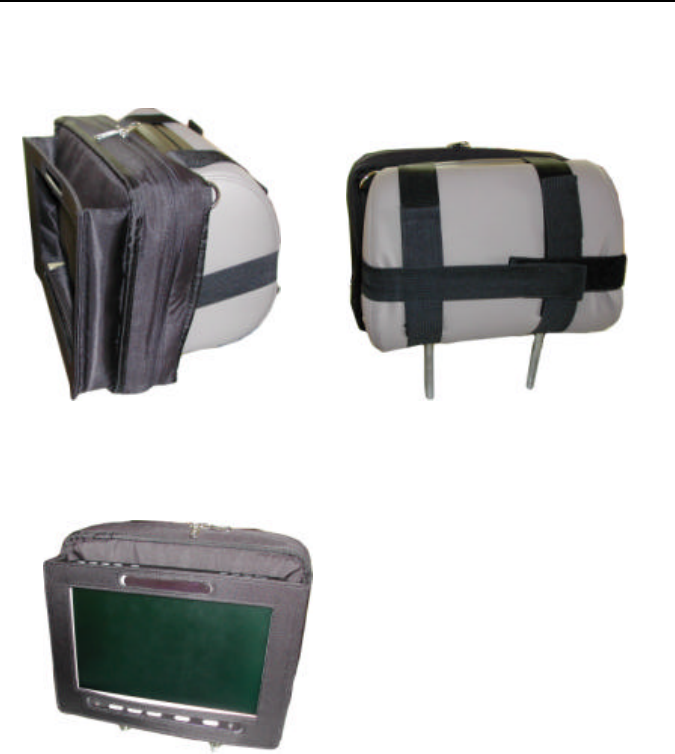
2.7 Carry bag installation
The LTD-1021 comes with a special carry bag that allows the unit to be fixed
on the headrest pillow and used very conveniently in a car.

Before you begin LTD-1021 User's Manual
Page 2-4 LTD-1021 User Manual
Please see the installation pictures below on how to install it easily:
2.7.1 Spider-Hanging Installation
LTD-1021 User's Manual Before you begin
LTD-1021 User Manual Page 2-5
2.7.1 Head-Rest Pillow Installation:

LTD-1501 User's Manual TV Mode
LTD-1021 User Manual Page 3-5
Chapter 3 TV mode
Once you have completed the setup procedures stated in Chapter 2 you are
now ready to start to watch TV on the LTD-1021 for the first time.
3.1 Antenna setup
There are two ways to receive TV on the LTD-1021, once is via a TV-antenna,
the other is via a TV-cable. You need to select your preference first before
you can watch TV. Here is how to do that:
1. Turn on the LTD-1021
2. Click the TV button on the remote control
3. Click the Menu (2) button on the remote control
4. Click the Down arrow to select ‘INITIAL’ and press ‘ENTER’
5. Select ‘Auto Program’, press ‘ENTER’
6. Select ‘Channel Mode’, press ‘ENTER’
7. Now you may choose ‘CATV’ or ‘AIR’. By pressing the ‘UP’ or
‘DOWN’ (56) buttons, select your choice by pressing the
‘RETURN’ key (8)
8. You will now be back to the ‘Auto Program’ menu, now select
the ‘Auto Scan’ and press ‘ENTER’
9. The LTD-1021 will scan through all your CATV or Air channels
and program them automatically.
Notice: Note that if you move the LTD-1021 from one location to
another, you may need to re-scan the TV channels since
TV and cable providers offer different signals in different
areas.
3.2 Fine tuning of certain TV stations
Some times you may want to fine tune a channel to adjust it’s setting, you
may do this by reading and following the instructions in Chapter 2.4.

TV Mode LTD-1021 User's Manual
Page 3-2 LTD-1021 User Manual
3.3 TV Navigation
You may navigate the various TV stations in your area by pressing the
Channel Up/Down buttons, or enter the number by pressing the numeric keys.
If you don’t have the remote control, you may also click the buttons on top of
the LTD-1021 to select the channel accordingly.
3.4 Parental control
It is possible to child lock the LTD-1021 to avoid young children to watch
violent or sexual TV programs.
Under TV mode, click the ‘Menu’ button on your remote control and select
‘Initial’, then select ‘V chip’. It will ask you for a password (default password
is ‘1234’, we recommend you to change this. Once you keyed in the
password and clicked ‘Enter’ you can select the ‘V chip’ settings for either
‘TV ratings’ or ‘Movie ratings’.
Notice: Parental control is only working in USA, if in doubt check
with your local TV provider.
It will not stop children from watching DVD or VCD movies
with sexual content, only TV stations that support the
feature.

LTD-1501 User's Manual DVD Mode
LTD-1021 User Manual Page 4-5
Chapter 4 DVD mode
The DVD player in LTD-1021 can’t only play DVD movies, but it can play
VCD movies also. Playing either kind of movie you can easily skip chapter,
freeze frames, and play at faster or slower speed. Below some of the
standard and some special features are highlighted. Note that depending on
the movie you are watching some features that might not be available.
Note: Several DVD movies are locked for certain regions, and
they are region coded. There are six regions worldwide
and you can only watch DVD movies that are region free
or from the same region as your LTD-1021 (see label on
rear).
4.1 DVD control locations
The LTD-1021 has got two locations for DVD controls. One is on top of the
unit, and the other is the remote control. The functions on top of the unit are
very simple, which provide basic operation only, while the remote control has
complete control. If you loose the remote control you’ll still be able to watch
movies.
4.2 Basic operation
To play a DVD movie for the first time, simply put it into the slot (label facing
forward), the DVD will automatically load. Note that you need to select the
source to DVD mode (either by clicking the source button on the unit or
clicking the DVD button on the remote control).
Depending on the movie it will either start playing immediately or it will give
you a DVD menu, where you may select subtitles, language versions,
special features or deleted scenes. To navigate this menu use the navigation
keys (5346), to select a menu click the ‘ENTER’ button, which is located
in the center of the navigation area. You may go back to this menu at any
time by clicking the ‘MENU’ (2) button.

Batteries LTD-1501 User's Manual
Page 4-2 LTD-1021 User Manual
Once you are watching a movie you may choose to Pause (;) it (you will
see a frozen picture, while Stop (<) will show you our DVD screen. You may
play the movie faster forward (8) or rewind (7) it in 2x/4x/8x/16x and 32x
speeds, do this by clicking the forward or rewind buttons.
To move even faster than fast forward/rewind you may skip entire chapters,
you can do this by clicking the Next (:)/ Previous (9) Chapter buttons.
Another nice feature is the ability to repeat a certain sequence, do this by
pressing the ‘A -B’ button once for the start of the sequence and once for the
end of the sequence, it will repeat this sequence until you press ‘A -B’ button
again.
The ‘REPEAT’ button is very different from the ‘A -B’ button, by selecting the
‘REPEAT’ button once you can select to repeat the chapter, another click
will select to repeat the title and a third click will repeat all, a fourth click will
deselect the repeat function.
To eject a DVD disc you may either press the ‘EJECT’ (5) button on the
remote control or on top of the LTD-1021.
4.3 Audio
The ‘AUDIO’ button allows you to listen to the various soundtracks that are
recorded on the DVD. This feature depends on the DVD, but some DVD
movies might have various languages, 2 channels or 5.1 channels or even
director commentaries. A great way to learn new languages, or to understand
how the movie was done! Pressing the ‘AUDIO’ buttons toggles the different
audio modes.
4.4 Subtitles
Most DVD movies feature various languages as subtitles, you may click the
‘SUBTITLE’ button several times to see the various choices or even to remove
the subtitles altogether.

LTD-1501 User's Manual DVD Mode
LTD-1021 User Manual Page 4-5
4.5 Changing camera angle
Very few movies provide several angles; Movies of scenery or sexual content
might do this though. While watching such a movie, press the ‘ANGLE’
button to select different camera angles.

LTD-1021 User's Manual Music mode
LTD-1021 User Manual Page 5-5
Chapter 5 Music mode
Your LTD-1021 is an excellent music center, and you may either listen to
Audio CDs or MP3 CDs that you have complied yourself. If you make your
own CD we recommend you to put the songs in directories, it’s easier to
navigate.
You need to be under DVD mode to play music, press the DVD button on the
remote control or the source button until “DVD” is displayed.
5.1 MP3 selecting songs
Simply insert an audio CD or a CD-R/RW or DVD-R/RW disc with MP3
music on it. You will now see a blue menu with either songs or directories on
the left side. Navigate up and down with the Down (6) or Up (5) buttons,
once you find the song or directory you want to go to press the ‘Enter’ button,
if it was a directory you will now see a sub directory, select the song and
press ‘Enter’.
Once you are playing a song you may play the song fast forward (8) or
rewind (7), up to 32x speed to quickly find the portion of the song you like
(this is most useful for language CDs where each lesson may be very long).
Once the song you play is finished it will automatically play the next song,
unless you have pressed the ‘Repeat’ button and selected either ‘Single’
(plays the song only once then stops), ‘Folder’ (plays until the last song in
the folder, then stops). ‘Repeat Folder’ repeats the same folder over and over
again, ‘Repeat One’ repeats the same song over and over again.
5.2 Random songs
You may also want to play random songs in a folder, press the ‘Random’
button and select ‘Shuffle’, to disable the shuffle mode press ‘Random’ to
display ‘Folder’ and the next song will be played.
It’s also possible to play random songs over the entire disc, even though you
have several directories. Press the ‘Program’ button, now all the directories

Music mode LTD-1021 User's Manual
Page 5-2 LTD-1021 User Manual
will disappear and you will get a list of all the songs on the disc. Pressing the
‘Random’ button will play any song randomly selected from the entire
collection.
5.3 Other functions
You may also want to repeat a small portion over and over again from a song.
You may do this by pressing the (A-B) button, press once for the start of the
segment and once for the end of the segment. This segment will play
endlessly until you press the (A-B) button again.
Pressing the ‘Audio’ button allows you to change the sound effect, from
Concert, Living Room, Hall, Bathroom, Cave, Arena, Church and off.

LTD-1021 User's Manual Photo mode
LTD-1021 User Manual Page 6-5
Chapter 6 Photo viewing mode
Another great feature of the LTD-1021 is it’s ability to browse digital images
of CD or DVD discs. You may create these discs by yourself at home on
your computer and later watch them on the LTD-1021.
You need to be under DVD mode to display photos, press the DVD button on
the remote control or the source button until DVD displays.
6.1 Basic Navigation
The easiest way to browse a disc with JPG images on them is to insert a
disc with JPG images on it. A menu will appear with a thumbnail (smaller
picture) to the right and a list of six images to the left.
You may press the Down (6) or Up (5) buttons to see a thumbnail of the
next/previous picture. Once you find the picture you want to look at, press
the ‘Enter’ button and it will be displayed in full size. To return to the
thumbnail mode, press the (2) button.
To see a slide show, press the Play (4) button, you may also see next /
previous picture by pressing the Next (:)/ Previous (9) buttons.
Once a picture is displayed, you may rotate it by pressing the navigation
buttons (5346).
You may press the Stop (<) button to see an overview of 12 thumbnails, you
may move freely between these pictures with the navigation keys, or press
the ‘Slide show’, ‘Menu’ or ‘Prev’ / ‘Next’.
6.2 Special Navigation
The ‘Random’ button allows you to select either to shuffle all pictures on the
CD or shuffle only pictures within the current folder.
The ‘Repeat’ buttons allows you to show only a single picture, repeat one/all
the pictures.

Photo mode LTD-1021 User's Manual
Page F-2 LTD-1021 User Manual
6.3 Slide show effects
To start a slideshow, press the Play (4) button
It’s possible to display some nice transition effects in the slide show, press
the ‘Display’ button and you may choose from 15 different transitions!
6.4 Zoom pictures
It’s also possible to zoom into the pictures to see details more clearly. Press
the ‘Zoom’ button, and the default zoom is displayed, which is 100%. Now
press the forward (8) or rewind (7) buttons, and the zoom will change to
125%, 150% and 200% or 75% and 50% respectively.

LTD-1021 User's Manual Appendix
LTD-1021 User Manual Page 1-5
Appendix A to E
LTD-1021 User's Manual Appendix
LTD-1021 User Manual Page A-1
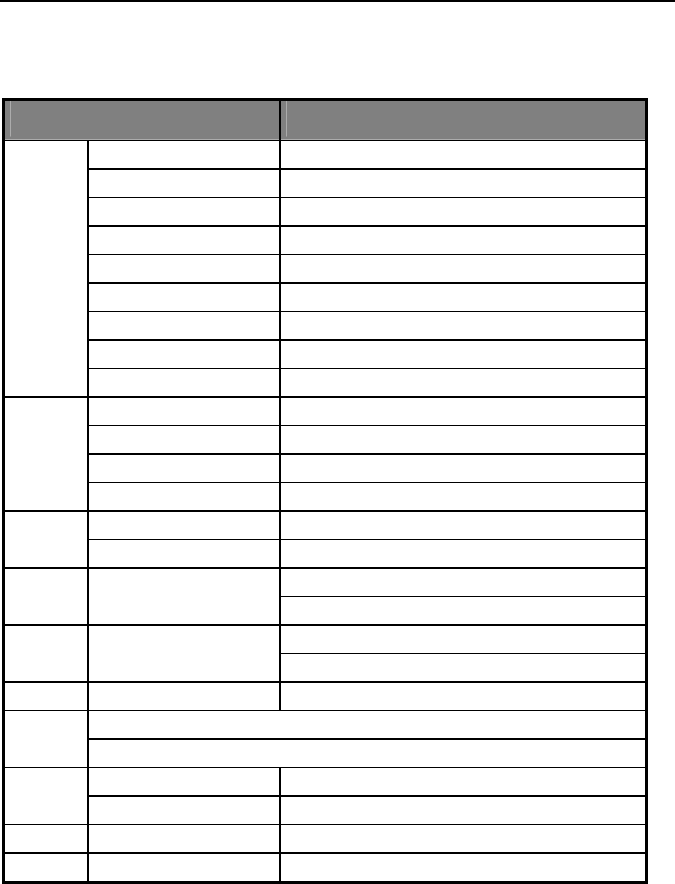
A Specifications
ITEMS SPECIFICATION
Scr
een Size
1
0.2
” TFT
-
LCD Panel
Resolution
1024 x 768 (XGA)
Display Area (opening) H x
304.128 mm x 228.096mm
Pixel Pitch
0.297 mm x 0.297mm
Display colors
16.2M colors
(6 bit
+
FRC)
Contrast Ratio
400 : 1 (typ.)
Brightness
250 cd / m2 (typ.
)
Viewing Angle
Typical:
130º (H) / 100o (Ver)
Display
Response Time
Tr:
5ms
+
Tf:
11ms
TV standard
NTSC
/PAL
TV Tuning System
PLL 181 CH
Sound
Mono
TV Function
CATV
125 CH
Composite Signal
CVBS
Video Input
Y/C
Signal
S
-
Video
Audio 1 for CVBS
Audio Input
Audio I / P: L / R x 2
Audio 2 for S
-
Video
Speaker: (Build
-
in) : 3 W + 3 W
(rms)
Audio
Output
Audio O / P : L / R x 2
RCA(R,
L)
Video
Video O /P x 1
RCA (CVBS)
TV function (7
-
Key): POWER,
PIX
, ISOU
RCE, VOL+/
-
,
CH+/
-
User keys
DVD function (5
-
Key): Play/Pause, Eject, Stop, FF, REW
Power Supply
AC 100V ~ 240V , 50 / 60Hz (AC adapter)
Power
Power Consumption
< 40 W
Dimensions
W x H x D
466mm x 292mm x 186mm.
Weight(net)
Kg ( w/o accessories )
T.B.D.
LTD-1021 User's Manual Appendix
LTD-1021 User Manual Page B-1
B Wall mounting
It is possible to wall mount the LTD-1021, since it supports standard VESA
mounting. The mounting holes are 100mm apart from each other in a square.
To mount the LTD-1021 you need to first remove the stand:
1. Remove the four screws
for the stand
2. The rear of the LTD-1021
is now plain
3. Follow the instruction
manual for the VESA
mounting bracket you
bought separately on how
to install it
4. If you don’t have a VESA
mounting bracket it’s also
possible (but not
recommended) to use the
two holes on the rear of
the LTD-1021
5. If you use the two holes on the rear of the LTD-1021, make sure that
the nails or screws you use on the wall are strong enough and
supported well. The LTD-1021 is quite heavy and might fall off if the
mounting is done badly.
Notice: Warranty will be void if you wall mount the unit and it falls
down. This would be considered bad craftsmanship on
the mounting, so make sure that the wall and screws are
all strong enough to support the LTD-1021.

LTD-1021 User's Manual Appendix
LTD-1021 User Manual Page C-1
C Trouble shooting
If you have some problems with the LTD-1021, please check these quick
guides, hopefully they will resolve your problem.
TV mode:
• Make sure that the TV antenna or cable is inserted
• Select the correct antenna mode, see Chapter 3.1
• If you press a TV related button but don’t get any response, press
the TV button on the remote control again, it might have accidentally
been pressed to a different mode
• If you are unable to watch TV stations with adult content, the unit
might be locked, see Chapter 3.4 to unlock it
DVD mode:
• Make sure the disc is not scratched, dirty or damaged
• Insert the disc with label towards you (assuming you stand in front of
the screen)
• Only DVDs with the right region can be displayed, check the DVD
region matches the logo on the rear of the LTD-1021
• Not all DVDs have Angle, Subtitle and Audio tracks, some might not
have DVD menu
• If you press a DVD related button but don’t get any response, press
the DVD button on the remote control again, it might have
accidentally been pressed to a different mode
Music mode:
• Only CDs or DVDs with MP3 and CD Audio can be listened to
• Make sure you are in the DVD mode when you listen to music
Photo mode:
• Only JPG pictures can be viewed
• Depending on the resolution of the picture it takes longer or shorter
time to display it
• Make sure you are in the DVD mode when browsing pictures

Appendices LTD-1501 User's Manual
Page C-2 LTD-1021 User Manual
Other troubles:
• Check the power cable is inserted both to the wall outlet, to AC-
adapter, and to the LTD-1021.
• Make sure there are fresh batteries in the remote control and the
battery polarity is correct.
• To listen to wireless Audio, make sure there are fresh batteries in the
headset, only headset with frequency of 2.3 and 2.8MHz can be
used.
• It’s not possible to mute the audio on the LTD-1021 and listen to
wireless Audio same time. Both are muted.
• When you select FM Wireless mode (see Chapter 2.5) all audio
ports will be disabled in the LTD-1021.
• Picture quality can be set up in Chapter 2.4.

LTD-1021 User's Manual Appendix
LTD-1021 User Manual Page D-1
D Maintenance
To clean the LTD-1021, wipe it with a soft dry cloth.
If the surfaces are extremely dirty, use a soft cloth dipped in soap-and-water
solution or a weak detergent solution.
• Use eyeglass cleaner to remove stubborn dirt from the LCD screen
• Never use alcohol, paint thinner or benzene to clean this unit
• Before using chemically treated cloth, read the instructions that came
with the cloth carefully
Caution: If water or similar substances get inside the LTD-1021
warranty will be void and damage might appear.
Whenever you clean the unit, remove the power cord!

LTD-1021 User's Manual Appendix
LTD-1021 User Manual Page E-1
E Returning your LTD-1021
After you have enjoyed your LTD-1021 for many years, and feel it’s time for it
to retire, please return it and any accessories to your dealer or the
manufacturer. Your dealer or manufacturer will accept these and will
responsibly recycle the components.
Notice : The changes or modifications not expressly approved by the party
responsible for compliance could void the user’s authority to operate
the equipment.