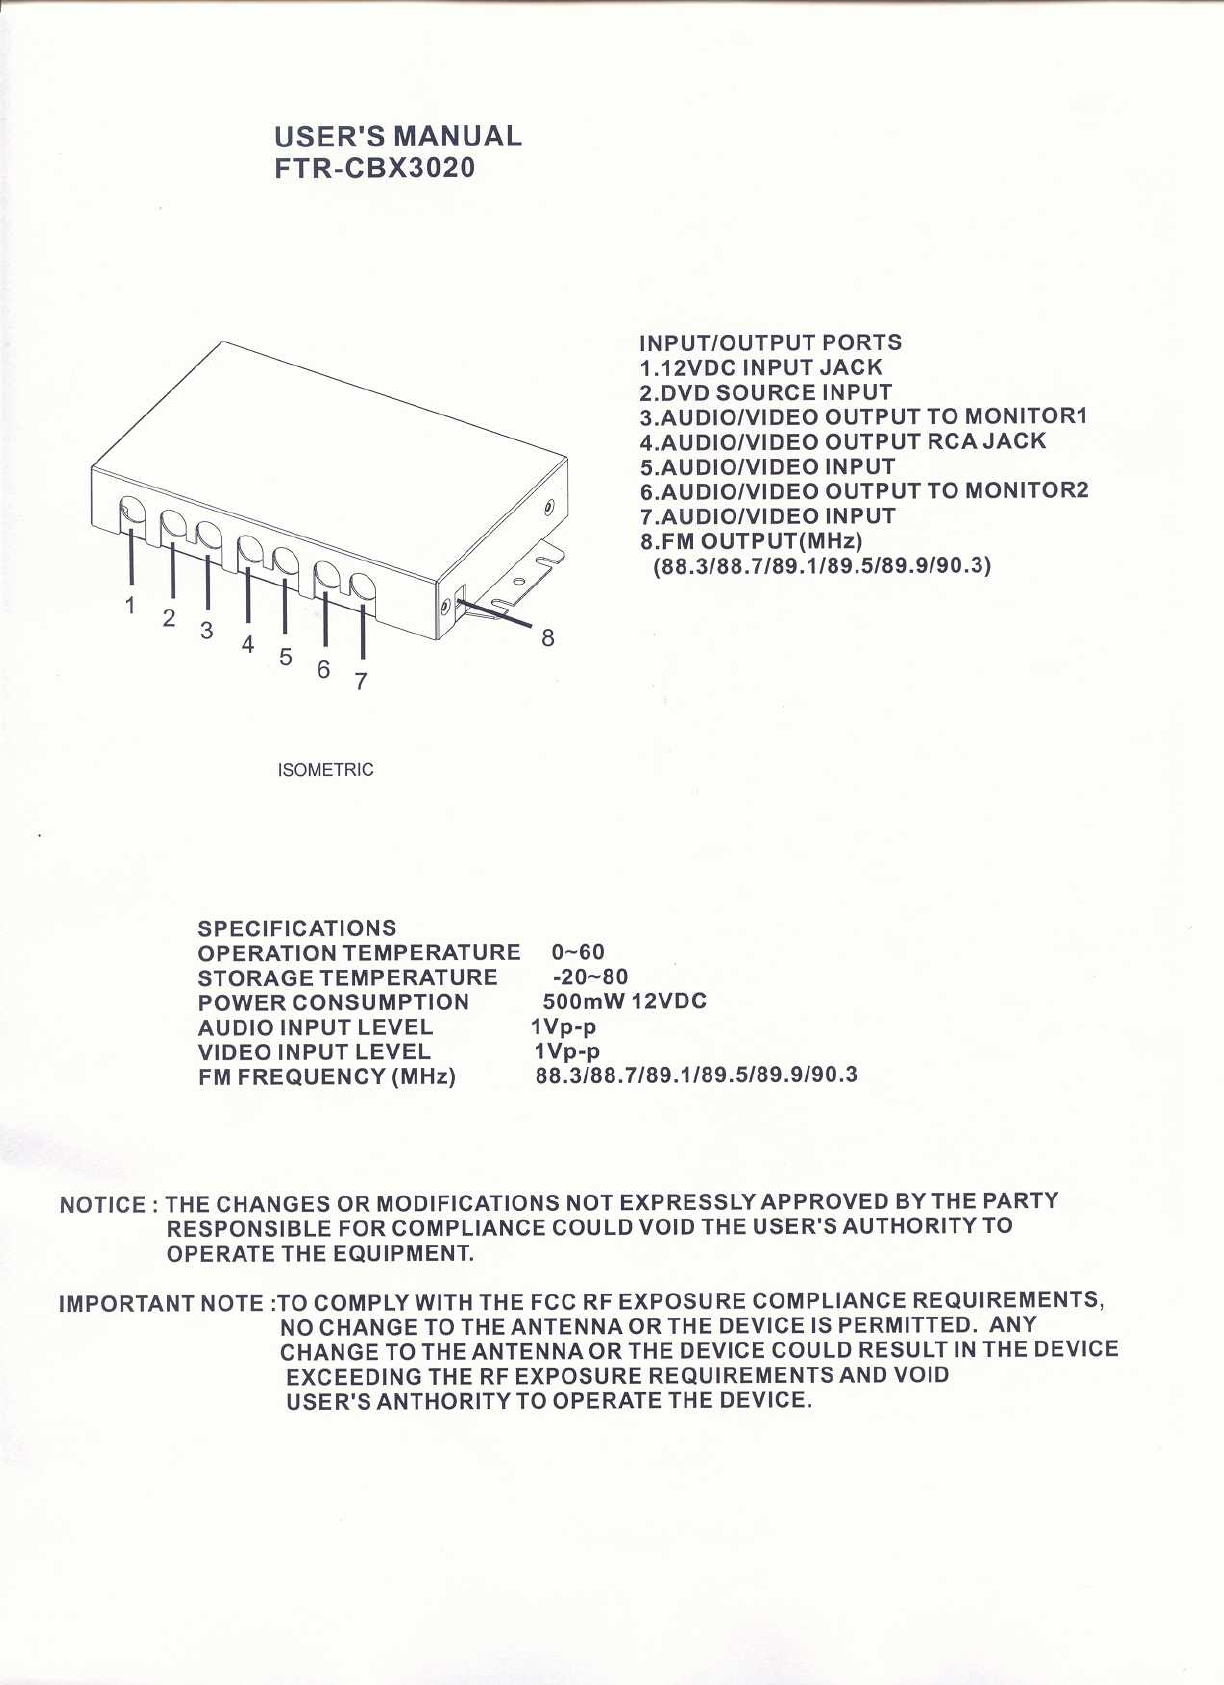
Sysgration FTR-CBX3000 FM Modulator User Manual
Sysgration Ltd. FM Modulator Users Manual
Users Manual

Owner's Manual
HMD-0702
Headrest Video Monitor with Built-in DVD

It is unlawful in most jurisdictions for a person to drive
a motor vehicle which is equipped with a television
viewer or screen that is located in the motor vehicle at
any point forward of the back of the driver's seat, or
that is visible, directly or indirectly, to the driver while
operating the vehicle. In the interest of safety, the unit
should never be installed where it will be visible,
directly or indirectly, by the operator of the motor
vehicle.
This device complies with FCC Rules Part 15.
Operation is subject to the following two conditions: (1)
This device may not cause harmful interference and (2)
this device must accept any interference that may be
received, including interference that may cause
undesired operation.
For safety reasons, when changing video disc it is
recommended that the vehicle be not in motion, and that
you do not allow children to unfasten seat belts to
change disc or make any adjustments to the system.
System adjustments can be accomplished using the
remote control unit, while seatbelts remain fastened.
Enjoy your entertainment system but remember safety
of all passengers remains the number one priority.
-1-
Important Notice Safety Precaution
Product Features
-2-
w7-Inch Color TFT-LCD Panel with 16:9 aspect
wBuilt-in Top-loading Slot-in DVD loader.
wInfrared Transmitters for wireless Headphone
wAux Input Source * 1 (3 RCA jacks)
wMonitor Input Source * 2 (Din jacks)
wAux Monitor Output Source * 2 (Slave 3 RCA jacks)
wMonitor Output Source * 3 (Din jacks)
wForward Remote Sensor on the Front Panel
wThe unit with a Control Box
w5 Control Buttons on the Front Panel---MENU, UP,
DOWN, POWER and SOURCE
wOSD(On Screen Display) Control
w12V DC Power Input
-3-
Table of Contents
Wiring and Installation-----------------------------------------------------------------4
Control Buttons on Front Panel------------------------------------------------------6
Remote Control Operations-----------------------------------------------------------9
General Operating Instructions--------------------------------------------------------------------13
Accessories------------------------------------------------------------------------------15
DVD Basics------------------------------------------------------------------------------16
Playing Audio CD----------------------------------------------------------------------22
Playing MP3 CD----------------------------------------------------------------------23
Warnings/TroubleShooting-----------------------------------------------------------25
Specifications--------------------------------------------------------------------26
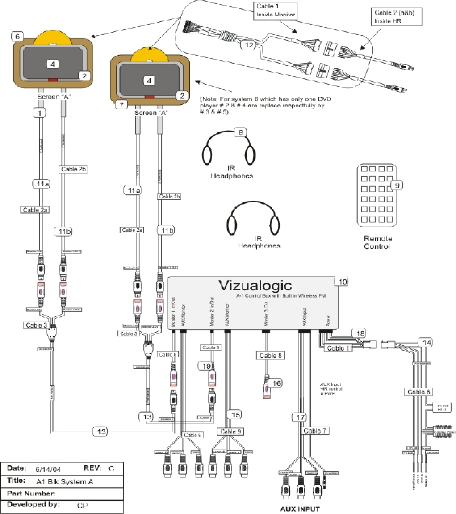
Wiring and Installation
-4-
Control Buttons on Front Panel
-5-
MENU
Enter and navigate the OSD menus (Main Menu and Hidden Menu).
UP
Increase the value or navigate the options upwards.
DOWN
Decrease the value or navigate the options downwards.
SOURCE
Select the AV source among AV1/AV2/AV3
POWER
Soft-power on/off.
Function Descriptions
IR Sensor
Allow the remote controller to navigate the OSD(On Screen
Display) on this unit and to control other accessories.
Infrared Transmitters
Be used to transmit audio to the wireless headphone.
-6-
Level Lock and Release Latch
Allow the user to adjust the viewing angle of LCD panel or
lock the panel into the secure position.
-7-

Remote Control Operations
BATTERY INSTALLATION
Before attempting to operate your remote control, inst-
all the batteries as described below.
(1)Turn the remote control face down.
Press down on the ridged area of the battery cov-
er and slide it off.
(2)Install two "AAA" batteries as shown.
Make sure that proper polarity(+ or -) is observed.
(3)Slide the cover back until it clicks.
The remote control will operate the unit. It is not a univ-
ersal remote control and will not control other equipme-
nts.
-8-
MONITOR FUNCTION
MONITOR POWER
Press this button to turn the monitor ON. The current video
source will be displayed on screen, and the picture will
appear in a few seconds. Press the button again to turn the
monitor OFF.
SOURCE
Any video equipment connected to the AV inputs can be used
with the monitor by pressing this button. Each time thebutton
is pressed, the AV source will change in the following seque-
nce DVD Input Source.
DOWN
(1) Shift left or down OSD menu.
(2) Decrease the value of TINT, COLOR, BRIGHTNESS, or
CONTRAST bar.
UP
(1)Shift right or up OSD menu.
(2) Increase the value of TINT, COLOR, BRIGHTNESS, or
CONTRAST bar.
-9-
Function Descriptions
ZOOM
Select the screen-mode among wide/normal/cinema/zoom.
PICTURE
Press this button to enter OSD menu(Hidden menu) can be
change the value of TINT, COLOR, BRIGHTNESS, or
CONTRAST.
FM ON/OFF
Press this button to turn on Frequency Modulator. Press this
button Again to turn off Frequency Modulator.
FM SELECT
Press this button to select Frequency Modulator channel.
DVD FUNCTION
DVD POWER
Press this button to turn the DVD ON. The current video
source will be displayed on screen, and the picture will
appear in
a few seconds. Press the button again to turn the DVD OFF.
EJECT
Eject disc from disc compartment or pull disc into the compa-
Rtment.
UP
Shift up DVD SETUP menu.
DOWN
Shift down DVD SETUP menu.
RIGHT
Shift right DVD SETUP menu.
LEFT
Shift left DVD SETUP menu.
ENTER
Make a selection.
RETURN
Return to previous menu screen or playing point.
SETUP
Navigate SETUP MENU. There are 4 pages to configure sys-
tem:
(1)Geneal Setup Page.
(2)Audio Setup Page.
(3)Preference Page.
(4)Password Setup Page.
TITLE
Navigate the Title Menu included in the disc.
MENU
Go to Root Menu included in the disc.
AUDIO DOWN
Press this button to decrease DVD volume.
AUDIO UP
Press this button to increase DVD volume.
SUBTITLE
AUDIO
Change the audio language to another available language
(Only if the disc contains multiple audio languages).
REPEAT(Except VCD with PBC on)
Repeats part or all of a chapter, title, track, or an entire disc.
A-B(Except Mp3)
Repeat from point A to point B.
GOTO
Navigate the Goto Menu and go to the desired title, chapter,
track or song inside the disc.
Change the subtitle language to another available language
or set off (only if the disc contains multiplesubtitle languages).
-10-
DISPLAY
Show information on the left-up corner on the screen inclu-
ding Title, chapter/track, time elapsed, and time remained,
or turn off the display.
PLAYMODE
For mp3 use.
MUTE
Press this button to shut off the sound at the headphone stat-
ion. The screen will display that the sound has been turned
off. Pressing the button again restores sound to the revious-
ly set Level.
ZOOM
(1) Enlarge the picture in the movie by 2x, 3x and 4x.
(2) Shrink the picture in the movie by 1/2x,1/3x, and 1/4x.
PLAY
Press this button to play a movie while disc is
loaded into the disc compartment. For more information ,
consult the DVD Basics section.
STOP
Stop playing the movie or songs.
STOP -> PLAY: Resume playing,
STOP -> STOP -> PLAY: Resume from the point being
stopped.
PAUSE
Press this button to pause a movie while disc is
loaded into the disc compartment. For more information ,
consult the DVD Basics section.
SLOW
Press this button movie will be play slow motion.
There are 3 speed options to choose:1/2 , 1/4 , 1/8.
FR(Fast Rewind)
Press button to search disc backward continuously. There
are 5 speed options to choose like FF ( Fast Forward) is.
FF(Fast Forward)
Press button to search disc forward continuously. There are
5 speed options to choose: 2X, 4X,8X,16X, and 32X.
PREV
Play the previous chapter or track.
NEXT
Play the next chapter or track.
PBC ( Video CD only)
Turn the PBC ( Play Back Control) on or off.
NUMBERS
Decimal number: 0 to 9
-11-
OSD FUNCTION CONTROL
OSD MAIN MENU
Press MENU key to enter OSD main menu, then select
Item in the menu by continuously hitting MENU key.
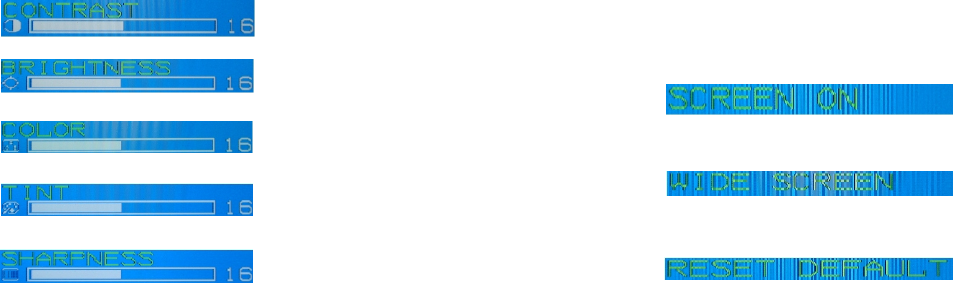
CONTRAST
Adjust CONTRAST value from 0 -32 (default:16)
BRIGHTNESS
Adjust BRIGHTNESS value from 0-32 (default:16)
COLOR
Adjust COLOR value from 0-32 (default:16)
TINT
Adjust TINT value from 0-32 (default:16)
SHARPNESS
Adjust SHARPNESS value from 0-32 (default:16)
SCREEN AUTO(AUTO/ON/OFF)
Set the unit condition when power connected the system
AUTO: When power connected the machine, the machine
will soft-power on or off, It based on the machine
was soft-power on or off last time.
ON: When power connected the machine, the machine
will soft-power on.
OFF: When power connected the machine, the machine
will not soft-power on.
WIDE SCREEN
Select the screen-mode among wide/normal/cinema/zoom.
RESET DEFAULT
Reset all OSD adjust value to default.(except screen-mode)
Turning the unit ON or OFF
-12-

OSD HIDDEN MENU
Press MENU key for 5 seconds to enter or leave OSD hidden
menu then select item in the menu by continuously hitting
MENU key.
IR PHONE(OFF/A/B)
Select Infrared Transmitters channel.
FM CHANNEL(OFF/CH1/CH2/CH3/CH4/CH5/CH6)
Select Frequency Modulator channel.
MIRROR(OFF/ON)
Set display screen mirror.
-13-
The unit incorporates an infrared sensor which relays
signals from the remote control to be controlled simply
by pointing its remote control at the remote sensor eye.
This provides control of auxiliary equipment such as an
Video Cassette Player. The infrared sensor can relay
signals from any manufacturer 's remote control to its
respective component connected to the AUX input, such
as a DVD player. In this case you must use the remote
control supplied with the DVD player.
-14-
Remote Sensor
Accessories
This unit includes a built-in dual channel infrared trans-
mitter for use with a wireless headphone. The volume
can then be adjusted with the controls on each headset .
The wireless headphone must be used within a line of
sight from the transmitter, as infrared transmission, like
visible light travels only in a straight line.
Wireless Headphone
-15-
DVD Basics
To get the optimum use out of DVD, make sure you read
this section completely.
Both the DVD player and disc are coded by region. The-
se regional codes must match in order for the disc to
play. If the codes don't match, the disc won't play. This
unit's code is region 1. Other regional codes can't be
played in this unit.
Types of Discs your DVD Will Play
DVD-Video: DVD contains video.
CD-DA: CD contains musical or sound content only.
CD-Video: CD contains movie only.
CD-R/RW: A disc that contains audio files (for example,
a CD-R with downloaded Mp3 Files), MPEG,
or JPEG files.
Loading and Playing Discs
Before you load a disc, make sure that it is compatible
with the player. Note that the following discs CANNOT
be used with this player:
Loading and Playing a Disc
Optical disc
•CD-1, CD-ROM, DVD-ROM
Mini disc
•CDG(audio only, not graphics).
When you press the POWER button the unit is on and in
DVD mode. Put the disc printed-side up into the disc com-
partment about halfway into the slot .The disc will load au-
tomatically and begin to play momentarily.
Regional Coding
-16-
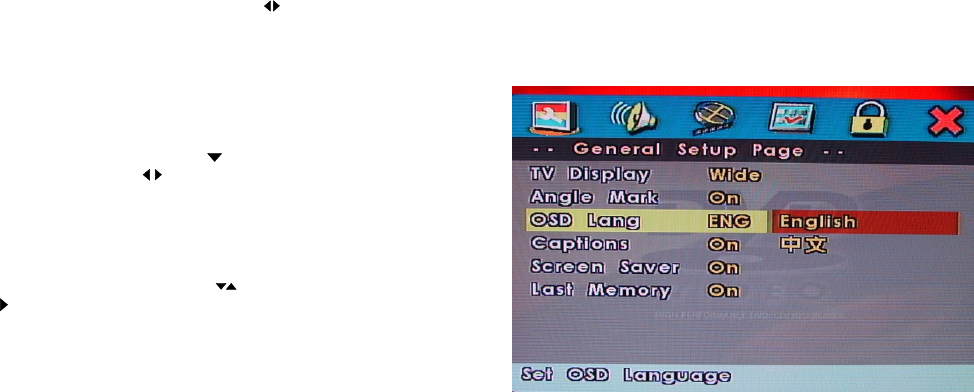
Using the setup display , you can do the initial setup ,adjust the picture quality , and set the various output. You can also set a language
for the on-screen display and the setup display, and limit playback by children.
The OSD Lang sub-menu allows the user to select the
language for the on-screen display. Press and then
use the buttons to select the desired language. The
user can select either English,French or Spanish for the
OSD language.
Settings and Adjustments
Using the Setup Menu
This chapter describes how to set and adjust using the on-screen setup pages included in the SETUP MENU.
To Cancel Using The Setup Display
Press the SETUP button on the remote.
Setting the Language for On-Screen Display
(1) Press the SETUP button to display the icons and pages on the display screen.
(2) Select the desired page you want by using buttons to move the cursor.
Press the SETUP button, use the buttons navigating to
General Setup Page, then use the button to select OSD
Lang.
OSD(On Screen Display) Language Menu
-17-
Then press ENTER to confirm the screen.
Settings for Display
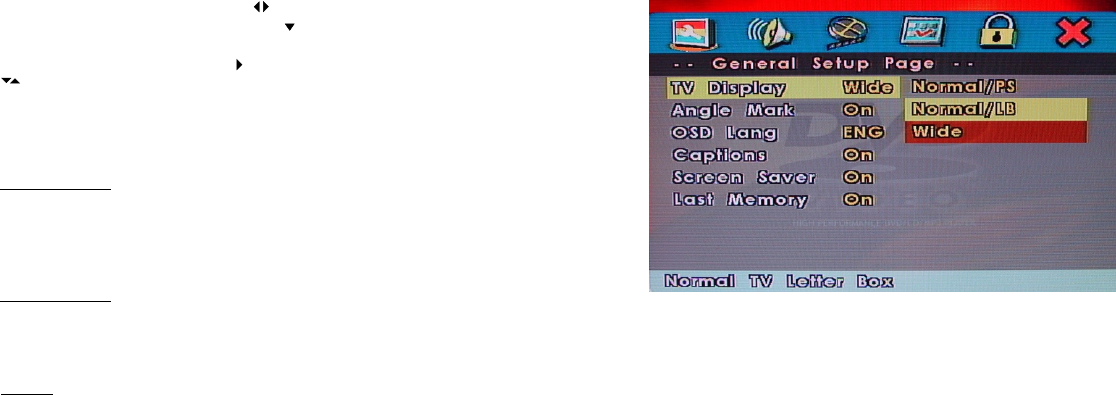
Press the SETUP button, use buttons navigating to
General Setup Page, and then the button to select TV
Display sub-menu.The setup allows you to adjust screen
setting(aspect ratio). Press and then use the buttons
to select the appropriate setting. The options are as
follows:
Normal/PS(Pan and Scan)
This displays the wide picture on the screen with a portion
of the left & right sides removed.
Normal/LB(Letter-Box)
This display the wide picture with black bands on the
upper and lower portions of the screen.
This option is choose if the LCD panel is of wide screen.
Wide(16:9)
-18-
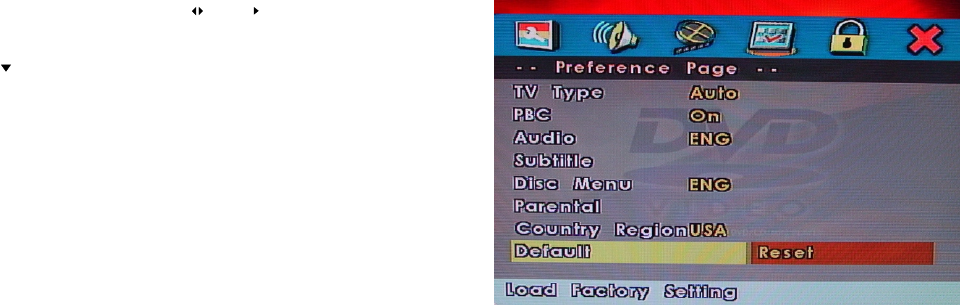
Press the SETUP button, and use buttons and go-
ing to the Default sub-menu under preference Page.
The default setup allow you to reset all options to facto-
ry defaults. Press and then press ENTER to carryout
the reset.
Note : This function will not effect the parental setting.
Default Settings
-19-
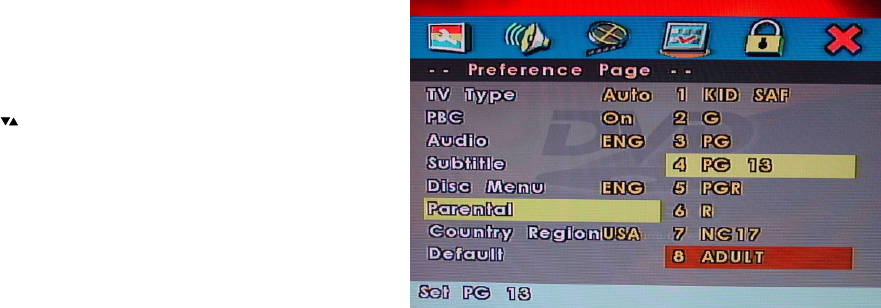
2. Press the ENTER button to confirm the selection.
Settings for Parental (Parental Control)
This section of the SETUP MENU allows users to control
the content of movie playback from G to ADULT. The
parental control function allows you to limit viewing to
your preference.
1. After navigating to the Parental sub-menu under
Preference Page, use the buttons to select from:
KID SAF (Children)
G
PG
PG 13
PGR
R
NC-17
ADULT
Note : The lower the value , the more strict the
limitation.
3. Input a password in 4 digits using the numeric buttons
then press the ENTER button.
Note: The default password is 136900.
-20-
Then navigate to the OK button and press ENTER to
implement it.
-21-
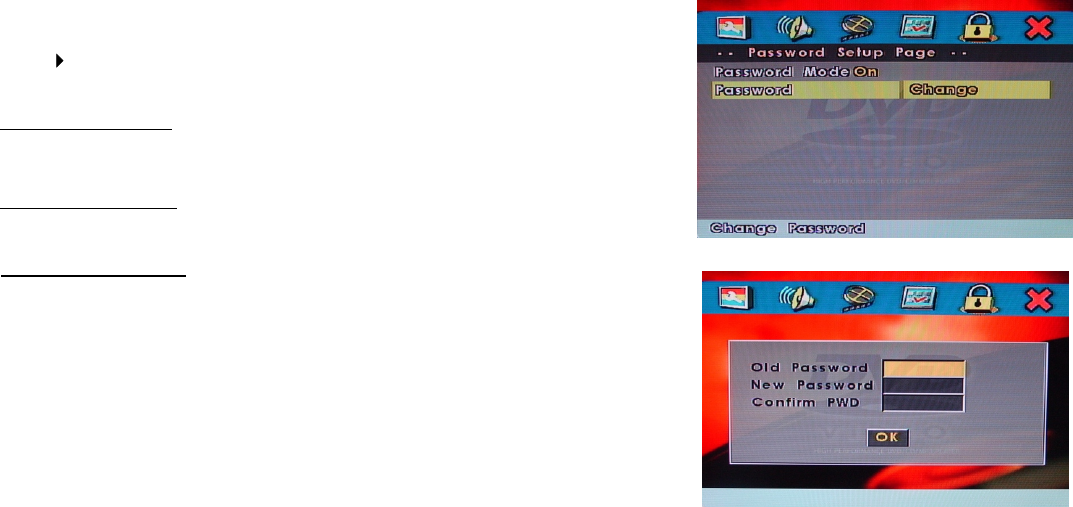
Settings for Password(Parental Control Password)
Press the SETUP button and navigate to Password sub-
memu under Password Setup Page. The menu appears
and allows you to change the parental control password.
Press and then press ENTER.
OLD PASSWORD
Input the old password or the default password ( 4digits).
NEW PASSWORD
Input a new password (4 digits) using numeric buttons.
CONFIRM PWD
Confirm the new password by entering the same new
password again.
Playing Audio CD
When playing an audio CD, the DISPLAY banner appe-
ars automatically. It displays the current track and the
amount of the time for that track playing, the total amo-
unt of time on the disc and the current time running on
the disc. Press the DISPLAY button on the remote to
display the DISPLAY banner. The options below show
you what happens when you press the DISPLAY button.
The default mode for the REPEAT feature is OFF. Pres-
sing REPEAT button consecutively changes the REPEAT
options as follows:
•Track - repeat the track that is playing.
•All - repeat the disc that is playing.
-22-
" Single Elapsed " appears along with the current track
playing and the time of that track .
Press DISPLAY(1x)
" Total Remain " appears along with the current track
playing and the amount of time left on CD.
Press DISPLAY(2x)
" Single Remain " appears along with the current track
playing and the amount of time left.
Press DISPLAY(3x)
" Total Elapsed " appears along with the current track
playing and the total time playing on CD.
Press DISPLAY(4x)
Using the REPEAT Feature
As you toggle through the options, the REPEAT option
changes that time. The track repeats once that track has
ended. The selected repeat option loops repeatedly until
you turn it off.
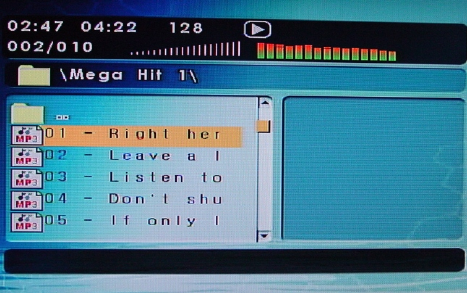
Playing MP3 CD
When an MP3 disc is inserted in the player, the naviga-
tion screen appears automatically. You can change fol-
ders and songs through navigating the file system. The
DVD player plays the songs in order they were burned
to the disc.
1. If a disc is playing, press STOP. Press the UP or
DOWN arrow button to go through the folder list on
the left side of the navigation screen.
2. Once the folder you want is highlighted, press ENTER.
MP3 is the format for storing digital audio. An audio CD
-quality song can be compressed into the MP3 format
with very little loss of quality, while taking up much less
space. CD-R/RW discs that have been encoded in MP3
format can be played on your DVD player.
Selecting Folders and Songs
3. Press the UP or DOWN arrow button going through
the song list and highlight the song you want. Press
ENTER to begin the playback of the highlighted song.
-23-

Use NEXT( ) button on the remote control to move to
the next song. Use the PREV ( ) button to move to
The beginning of the currently playing song. Press the
button 2 times to move to the previous song.
The default mode for the repeat feature is OFF. Pressing
REPEAT consecutively changes the repeat option:
•Repeat One - repeat the songs that is playing.
•Repeat Folder - repeat the folder that is playing.
Skipping Songs
Selecting a Play Mode
The play mode options are as follows:
•Single:Play a selected song.
•Folder:Play the folder in the order the songs were re-
corded.
•Random:Play the songs in the random order.
•Shuffle:Play the songs in random order (from within
the selected folder).
You can choose what order the songs will play on a disc
temporarily. The FOLDER play mode is the default. To
access the play mode options, press REPEAT button.
Using the REPEAT Feature
-24-
(Q1) IR Sensor Inoperative
(1) Verify that the batteries in the remote are fresh.
(2) Verify that the remote sensor eye is not obstru-
cted.
(3) Verify that the infrared transmitter is affixed ov-
er the sensor eye of the component to be contr-
olled.
(Q2) No Picture
(1) Verify that the correct video input mode is used
on the TV.
(2) Verify that the video cable is plugged into jack
securely.
(Q3)No Sound
(1) Verify that the correct audio input mode is used
on the TV.
(2) Verify that the audio cable is plugged into jack
Securely.
Warnings Trouble Shooting
vDo not use any solvents or cleaning materials when
cleaning the video system.
vDo not use any abrasive cleaners, they may
scratch the screen. Use only a lightly dampened lint
free cloth to wipe the screen if it is dirty.
vLock the LCD screen in the fully closed position
when not in use.
vBefore putting on headphones always adjust the
volu- me setting to the lowest position.
vRemember to leave the dome light switch in the off
or auto positions when the vehicle is unattended, as
the dome lights, if left on, can drain the vehicle
battery.
vDo not put pressure on the screen.
vCaution children to avoid touching or scratching the
screen, as it may become dirty or damaged.
-25-
LCD Backlighting
Resolution Pixels
Operation Temperature
Storage Temperature
Expected Backlight life
Sensitivity
Video Display System
Audio Output
Operating Voltage
Specifications
CCFL
1440(W)X234(H)
o
0-60 C
o
-20-80 C
10,000hours
35db
NTSC
0.5W@16S
11 to 16 VDC
-26-