Systems and Technology STAVL1520 Personal Tracker User Manual PT IT P1 00 1310UEN indd
Systems & Technology Corp. Personal Tracker PT IT P1 00 1310UEN indd
User Manual

CAREU
P2
Personal Tracker
User Guide
Version: 1.00
Reference No.: PT-CU-P2-00-17100UEN
Date: January 24, 2017
SYSTEMS & TECHNOLOGY CORP.
BV Certificate Use
2017/02/06 17:09
General Information
If any breakdown occurs due to the operation of the described product or users’ improper handling
in accordance with the instructions of the document, SYSTECH shall be liable for the General
Conditions based on the delivery of the described product and the content of the document. This
product is not designed for the use of life support appliances, devices or systems and thence a
malfunction of the product might reasonably be expected to make personal injury. SYSTECH
customers using or selling this product for such applications will take the risk on their own;
therefore, it must be agreed SYSTECH will be fully indemnified from any damages due to illegal
use or resale. All information in this document is subject to change without notice at any time.
Disclaimer
The information, specification, images and photos in this user guide are subject to change without
notice and without obligation to notify any person of such revision change.
Copyright
This user guide, including all photographs, illustrations and software, is protected under
international copyright laws, with all rights reserved. This document contains confidential, restricted
and proprietary information that it has been exclusively prepared for the internal use of certain
designated SYSTECH employees, and may not be duplicated or distributed, in whole or in part,
without the prior written consent of SYSTECH’s authorized delegates.
Any illegal copying and disclosure of the document are absolutely prohibited, and violators are
liable to the damages caused.
© Systems & Technology Corp. All Rights Reserved
BV Certificate Use
2017/02/06 17:09
Table of Content
Chapter 1. Introduction .................................................................................................... 1
1.1. About this Document ...................................................................................................... 1
Chapter 2. The Device ....................................................................................................... 2
2.1. Specification ..................................................................................................................... 2
2.2. Device Outlook ................................................................................................................ 2
2.3. Setting up the Device...................................................................................................... 3
Chapter 3. Getting Started with CAREU P2 ..................................................................... 6
3.1 Device Configuration ...................................................................................................... 6
3.2 Communication Settings ..............................................................................................10
3.3 GPS Tracking Configurations ......................................................................................11
Chapter 4. Using the CAREU P2 ..................................................................................... 12
4.1. Self Geo-fencing ............................................................................................................12
4.2. Positioning ......................................................................................................................15
4.3. Unusual Collision Alarm ...............................................................................................17
4.4. SOS Alert ........................................................................................................................19
4.5. Bluetooth (BLE) .............................................................................................................20
4.6. P2 Station Specification ...............................................................................................21
Chapter 5. About Systems & Technology Corp. .......................................................... 23
Chapter 6. Declaration ................................................................................................... 24
Chapter 7. Regulations .................................................................................................. 25
BV Certificate Use
2017/02/06 17:09

CAREU P2 Personal Tracker User Guide
1
Chapter 1. Introduction
The CAREU P2 Personal Tracker integrates GSM and GPS tracking services to provide
monitoring care for the elderly and children by mobile applications. CAREU P2 can be activated
through mobile phones to track down the latest position of the device user, while the manually
activated Geo-fencing Protection featured by CAREU P2 makes it possible to detect if the device is
either inside or outside of the predefined safety zone range.
In case of emergencies, the CAREU P2 device user (elderly or children) is able to ask for
help by simply pressing the SOS button on the device. Upon button trigger, the CAREU P2 will
automatically send alert messages to notify the device user’s emergency contact and transact
services of homecare and protection.
1.1. About this Document
This user guide will walk you through all the features of your CAREU P2 Personal Tracker and
all the necessary settings for CAREU P2 functions.
BV Certificate Use
2017/02/06 17:09
CAREU P2 Personal Tracker User Guide
2
Chapter 2. The Device
2.1. Specification
• Weight: 76g
• GPS Receiver: 72 Channels or Above
• Datum: WGS-84
• Power Source: 5V DC
• Operating Temperature:
• Communications: GSM 850/900/1800/1900 ,WCDMA 800/850/900/1900/2100
, Voice, SMS, GPRS TCP/UDP
• Back-Up Battery: 770mA Lithium-Ion Battery
• IP65 Water Proof
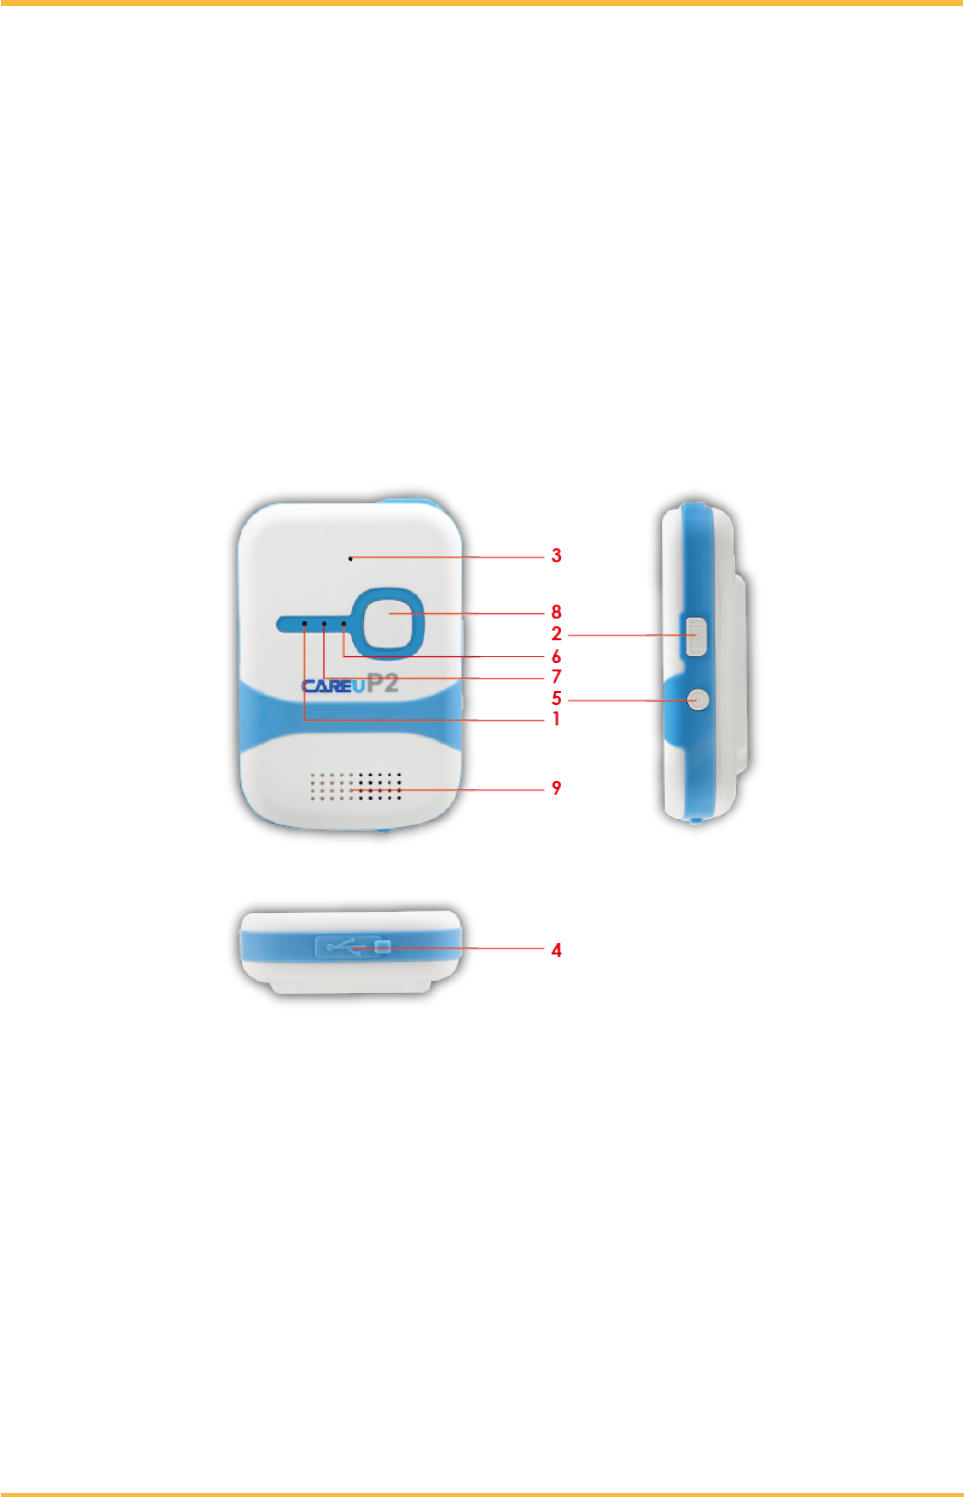
2.2. Device Outlook
1. Power Button
2. Geo-fencing Button
3. Microphone
4. Micro USB Port
5. Charging & BT Indicator
6. GPS Indicator
7. GSM Indicator
8. SOS Button
9. Speaker
Charge: 0℃ ~ +40℃; Discharge: 0℃ ~ +60℃
CAUTION
RISK OF EXPLOSION IF BATTERY IS REPLACED BY AN INCORRECT TYPE.
DISPOSE OF USED BATTERIES ACCORDING TO THE INSTRUCTIONS
CAREU P2 Personal Tracker User Guide
3
• Notification LED
1. Power LED: Red lights
• Red: Charging
• OFF: Fully charged / Discharging
2. GSM LED: Blue light
• Flashing (once every 3 seconds): Searching signals
• Flashing (once every 10 seconds): Receiving signals normally.
3. GPS LED: Yellow light
• Flashing (once every 3 seconds): Searching signals in normal mode
• Flashing (once every 10 seconds): Searching signals in A-GPS mode
4. GSM+GPS LED:
• Flashing (three times every 5 seconds): SOS Event.
• Flashing (once every 3 seconds): Self-Geo fence mode
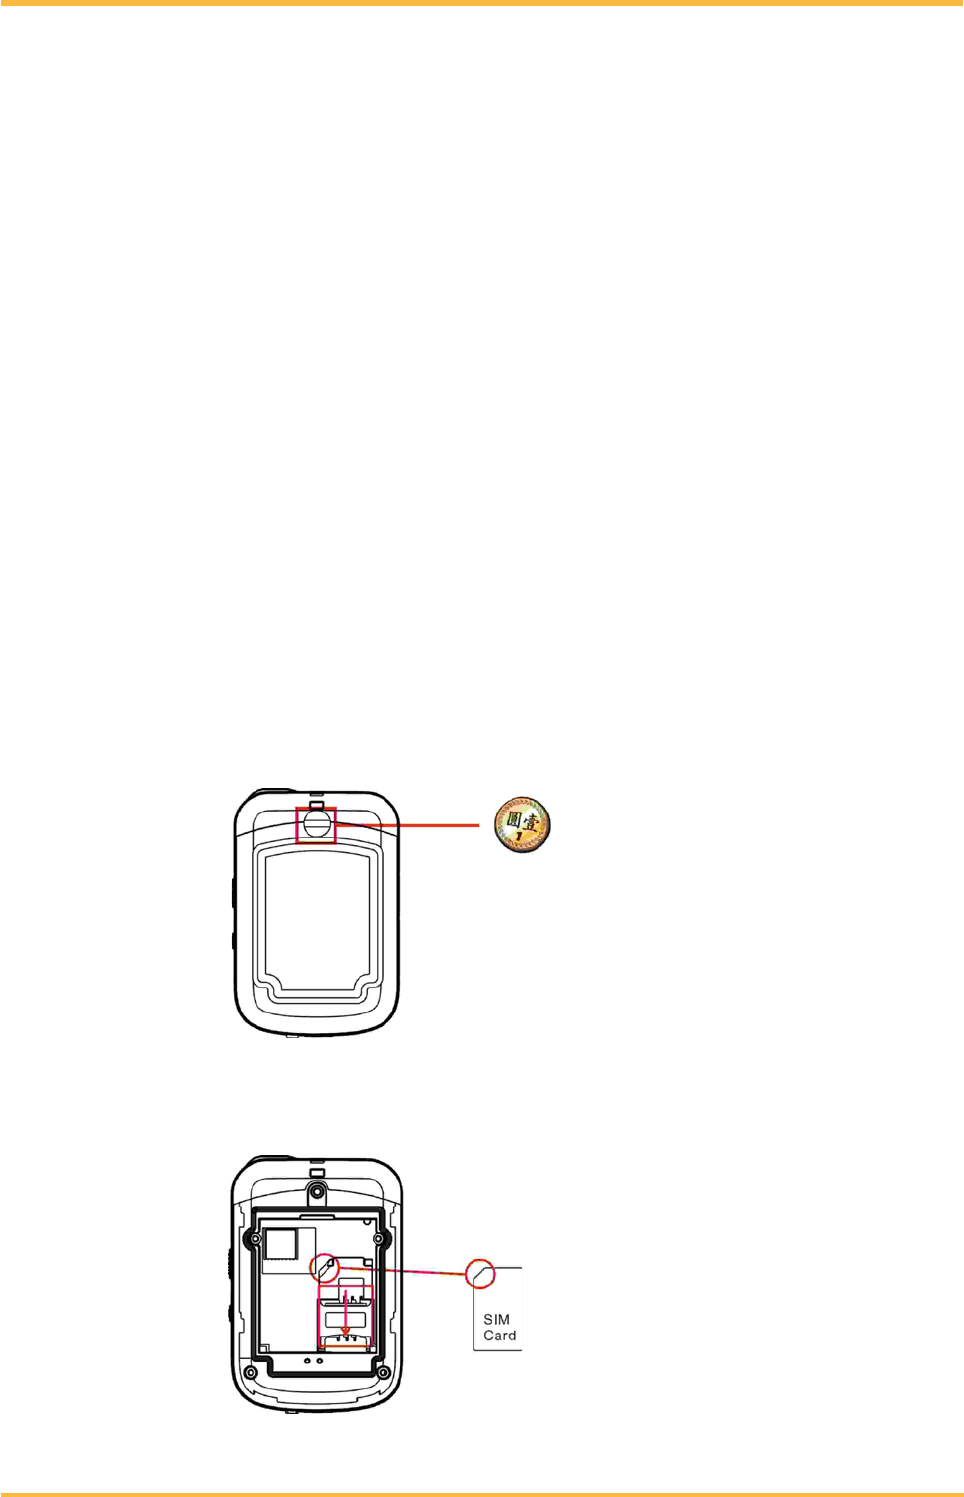
2.3. Setting up the Device
1. Install SIM Card and Battery
• Open the back cover by removing the mini screw.
Note: For CAREU P2 to function, install a SIM card first.
• Fit the SIM card into SIM card socket with the metal contact facing down.
BV Certificate Use
2017/02/06 17:09
CAREU P2 Personal Tracker User Guide
4
Note: Before installing the SIM card, be sure to remove SIM protection (PIN
code) with a mobile phone.
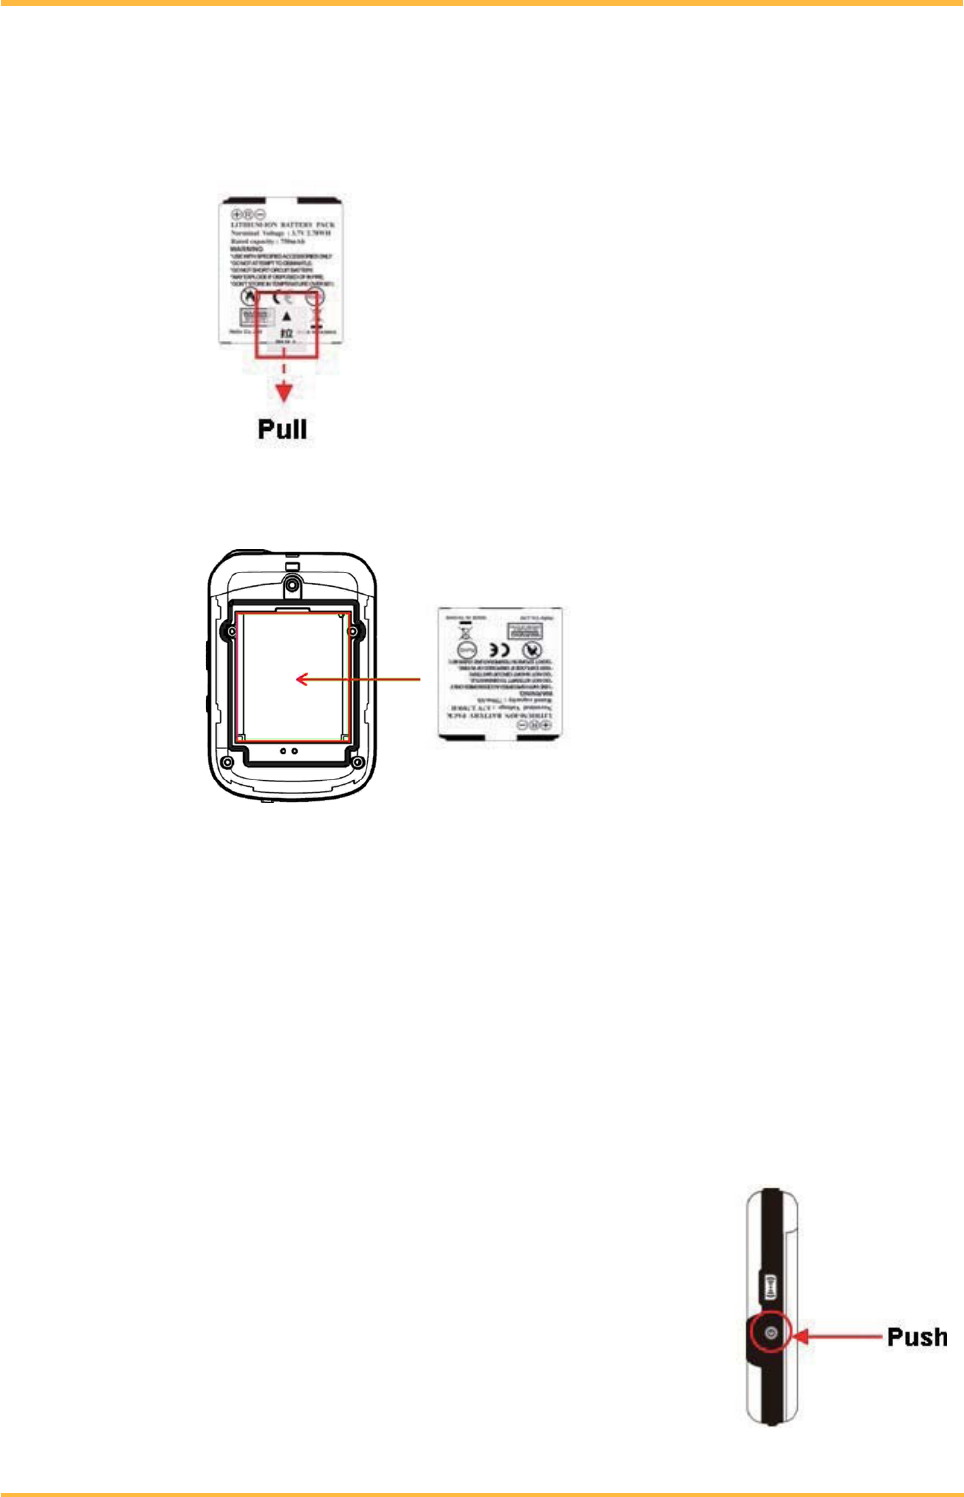
• Remove the plastic strip from the battery.
• Place the battery into the battery compartment.
• Restore the back cover to its original position.
Note: Before restoring the back cover, make sure the SIM card and battery are
installed properly in place.
• Optional: Place the CAREU P2 into the jelly case cover.
Note: The jelly case may protect your CAREU P2 from dust and scratches while
allowing you full access to the three buttons and mini USB port.
2. Power on the Device
Power on/off your CAREU P2 with the Power Button.
• Power On
To power on CAREU P2, press and hold the Power
Button for 2 seconds. Then CAREU P2 will make a long
beep to indicate power-on status.
BV Certificate Use
2017/02/06 17:09

CAREU P2 Personal Tracker User Guide
5
• Power Off
To power off CAREU P2, press and hold the Power Button for 2 seconds. The
CAREU P2 will make a long beep and power off.
3. Charge the device
• You may charge CAREU P2 through the Micro USB port at the bottom of the device.
Or
• Charge CAREU P2 through the optional CAREU P2 Station.
• Charger output specification 5V@1A required.
BV Certificate Use
2017/02/06 17:09
CAREU P2 Personal Tracker User Guide
6
Chapter 3. Getting Started with CAREU P2
3.1 Device Configuration
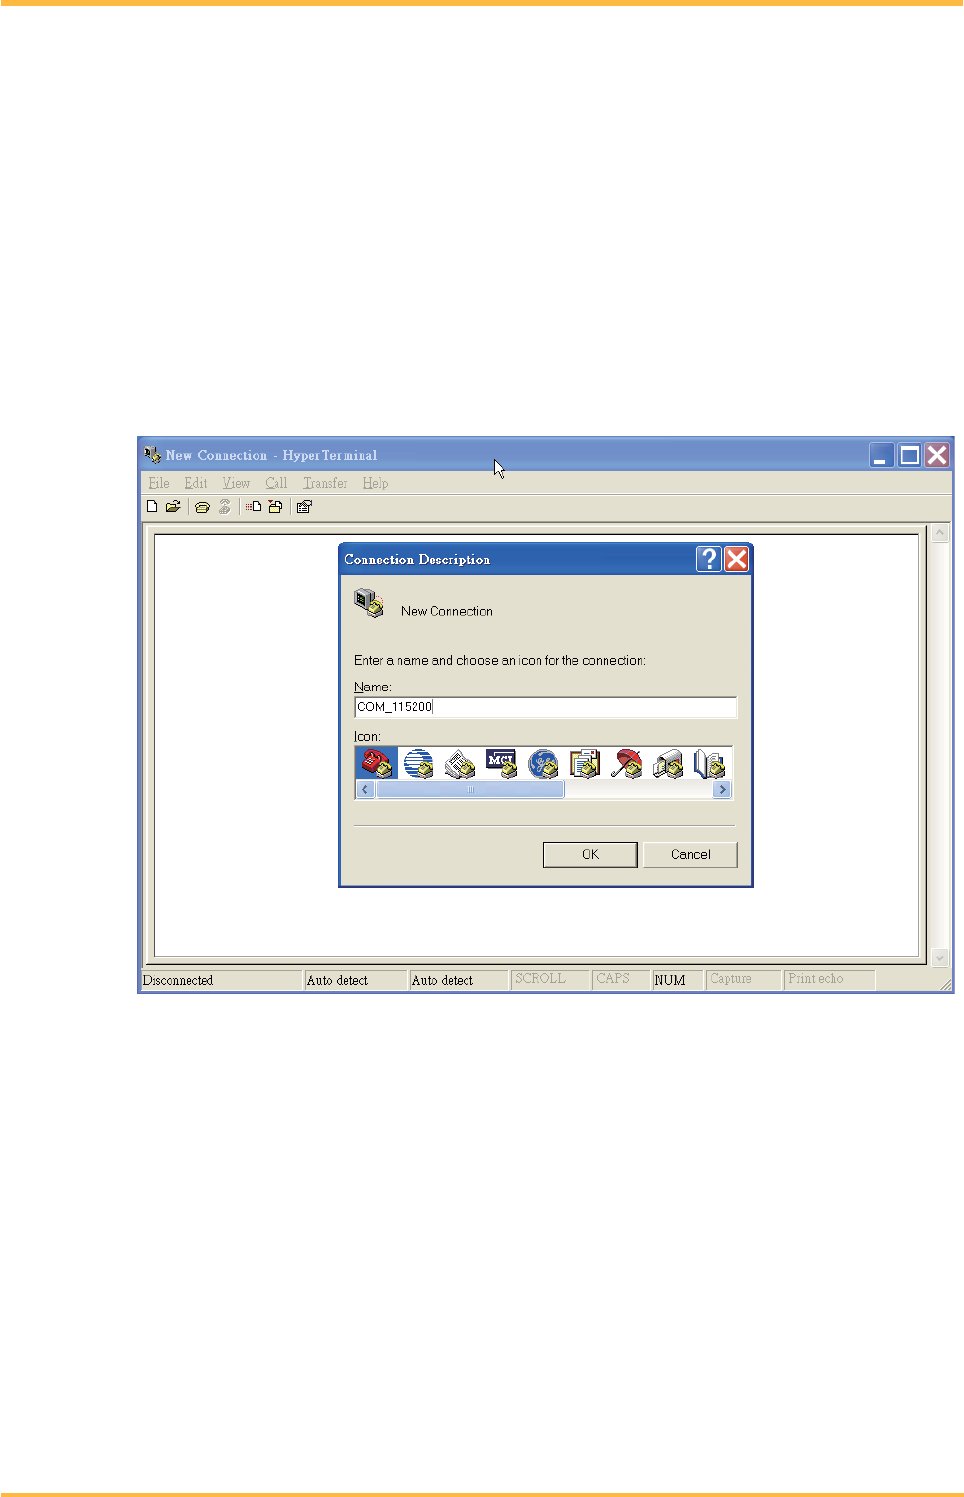
1. In Windows OS, open HyperTerminal, or similar terminal console program.
2. If you are prompted to input the information of your location, complete them to proceed.
3. On the File menu of HyperTerminal, click New Connection.
4. In the Name box, type a name that describes the connection. In the Icon box, click
an appropriate icon. Press the OK button to proceed.
5. For Com port properties, configure as follows:
Baud Rate --> 115200 bps
Data Bits --> 8
Parity --> None
Stop Bits --> 1
Flow Control --> None
BV Certificate Use
2017/02/06 17:09
CAREU P2 Personal Tracker User Guide
7
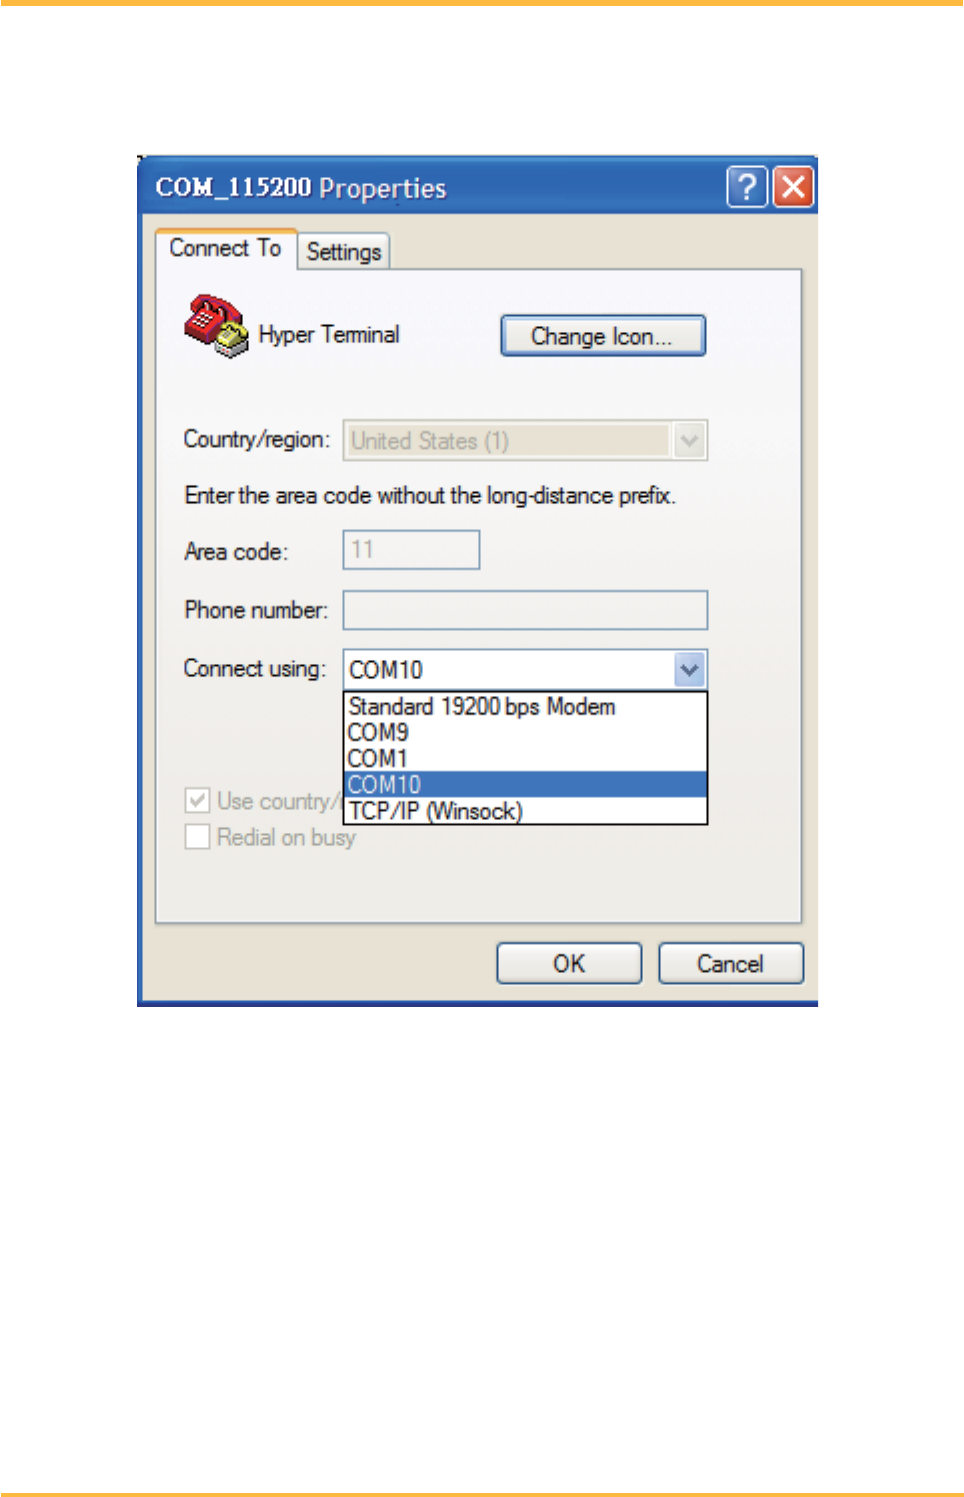
6. In the connection that you have just set up, click File | Properties. Select the
[Connect To] tab. From the [Connect using] drop down list, select the correct
com port by checking Window’s [DeviceManager].
BV Certificate Use
2017/02/06 17:09
CAREU P2 Personal Tracker User Guide
8
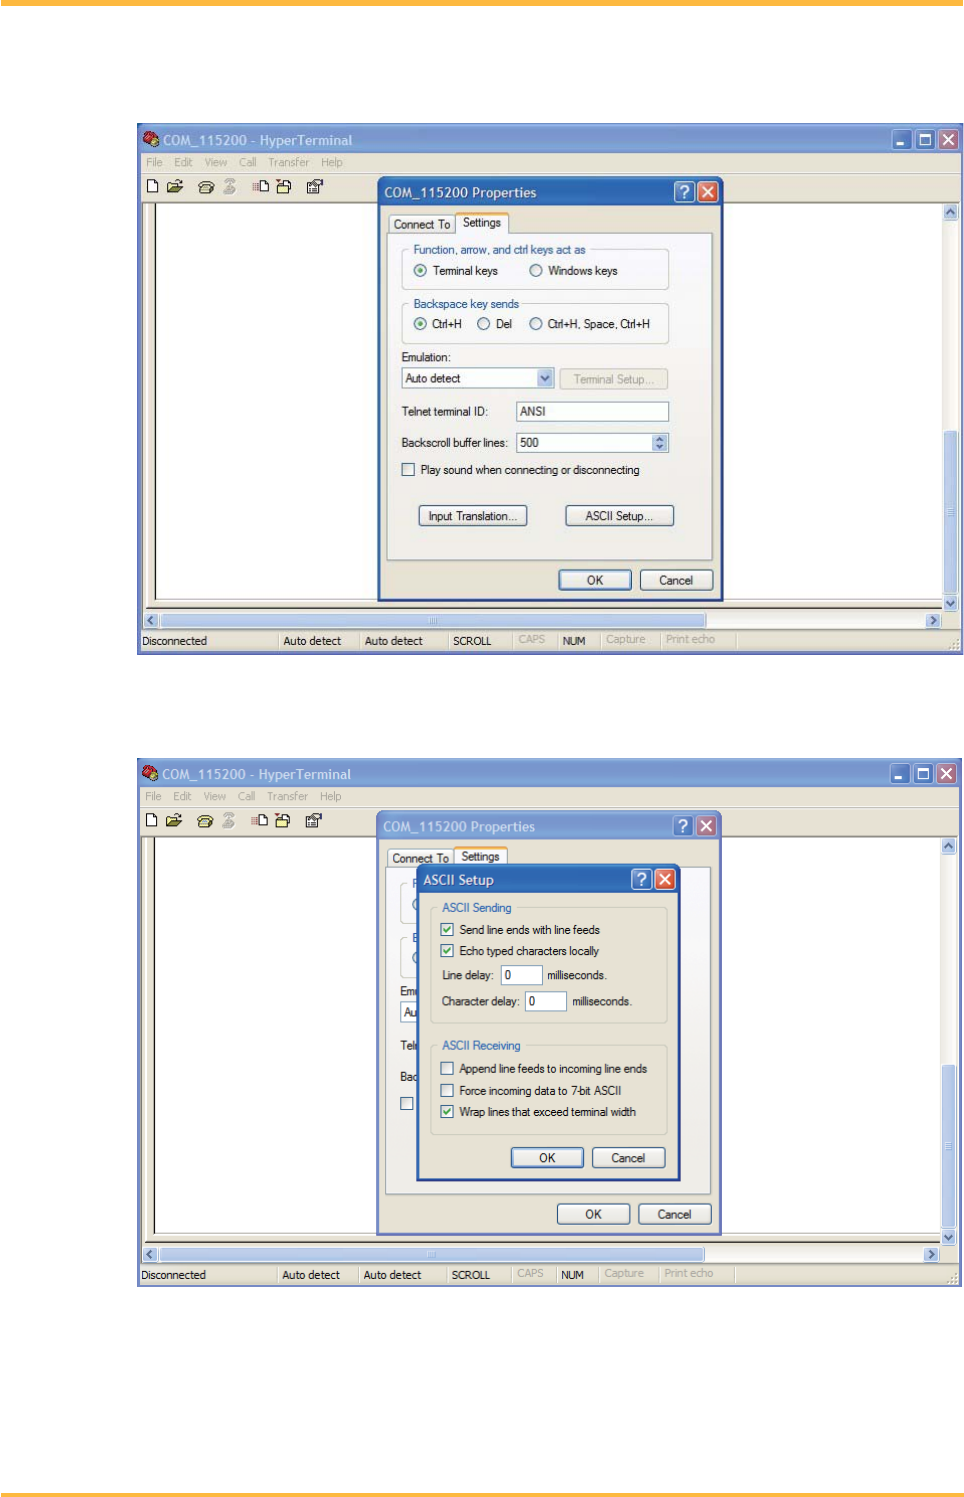
7. In the File menu, click Properties. Click the [Settings] tab. Press the ASCII Setup
button.
8. In the [ASCII Sending] group box. Select both Send line ends with line feeds and
Echo typed characters locally. Press the OK button.
BV Certificate Use
2017/02/06 17:09
CAREU P2 Personal Tracker User Guide
9
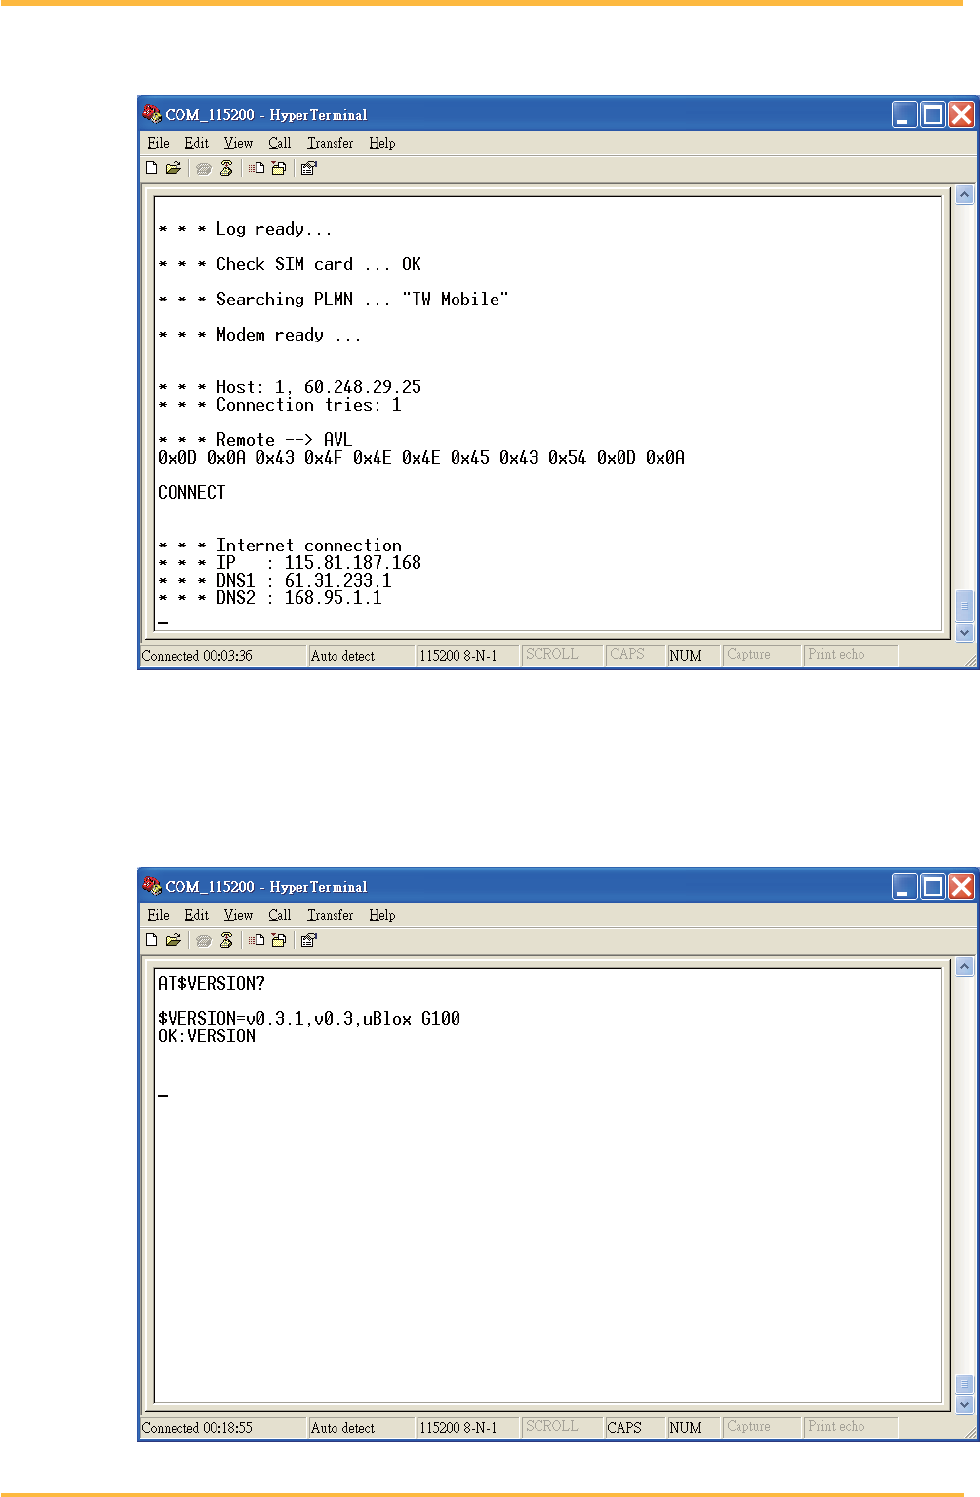
9. Connect CAREU P2 and Power ON.
10. In the [HyperTerminal] window, type in the command "AT$VERSION?" and press
the Enter key. The hardware and firmware version will show. As long as your
[HyperTerminal] window appears as the screenshot below, a connection between the
device and your system has already been built up and working. It is time to send all
configuration commands.
BV Certificate Use
2017/02/06 17:09

CAREU P2 Personal Tracker User Guide
10
3.2 Communication Settings
The CAREU P2 communicates with your control center by either SMS or GPRS
(TCP/UDP).
1. SMS Configuration
Use AT$SMSDST command to set a SMS control center phone number or short code.
For example, if the SMS control center phone number is +886123456789, the
AT$SMSDST command to be issued into HyperTerminal should be:
AT$SMSDST=+886123456789
Then you can try to use cellular phone or SMS gateway to send a SMS message to
the CAREU P2. Send a SMS message --> "AT$MODID?"
Device will response:
$MODID=101000001
OK
This shows a successful SMS communication between mobile phone and CAREU P2 .
2. GPRS Configuration
Set GPRS servers by using the following commands:
AT$APN=internet,username,password (APN=internet, Username=username,
Password=password)
AT$HOSTS=1,0,60.148.19.10,6000
(Server IP address = 60.148.19.10 and Port number =6000)
OK
AT$RETRY=5,10 (Message retry settings)
AT$IPTYPE=1 (Using TCP/IP mode)
AT$GPRSEN=1 (GPRS enable)
AT$HB=60,1 (Heartbeat setting)
Please refer to the CAREU P2 Protocol Document for more command details.
BV Certificate Use
2017/02/06 17:09
CAREU P2 Personal Tracker User Guide
11
3.3 GPS Tracking Configurations
After the device communication settings are done, the GPS tracking function is then ready to
operate. The setting of GPS tracking can be done by using AT$PDSR command.
For example,
AT$PDSR=1,300,25,0,2,0,0,1,1(Tracking through GPRS by time interval 300 seconds)
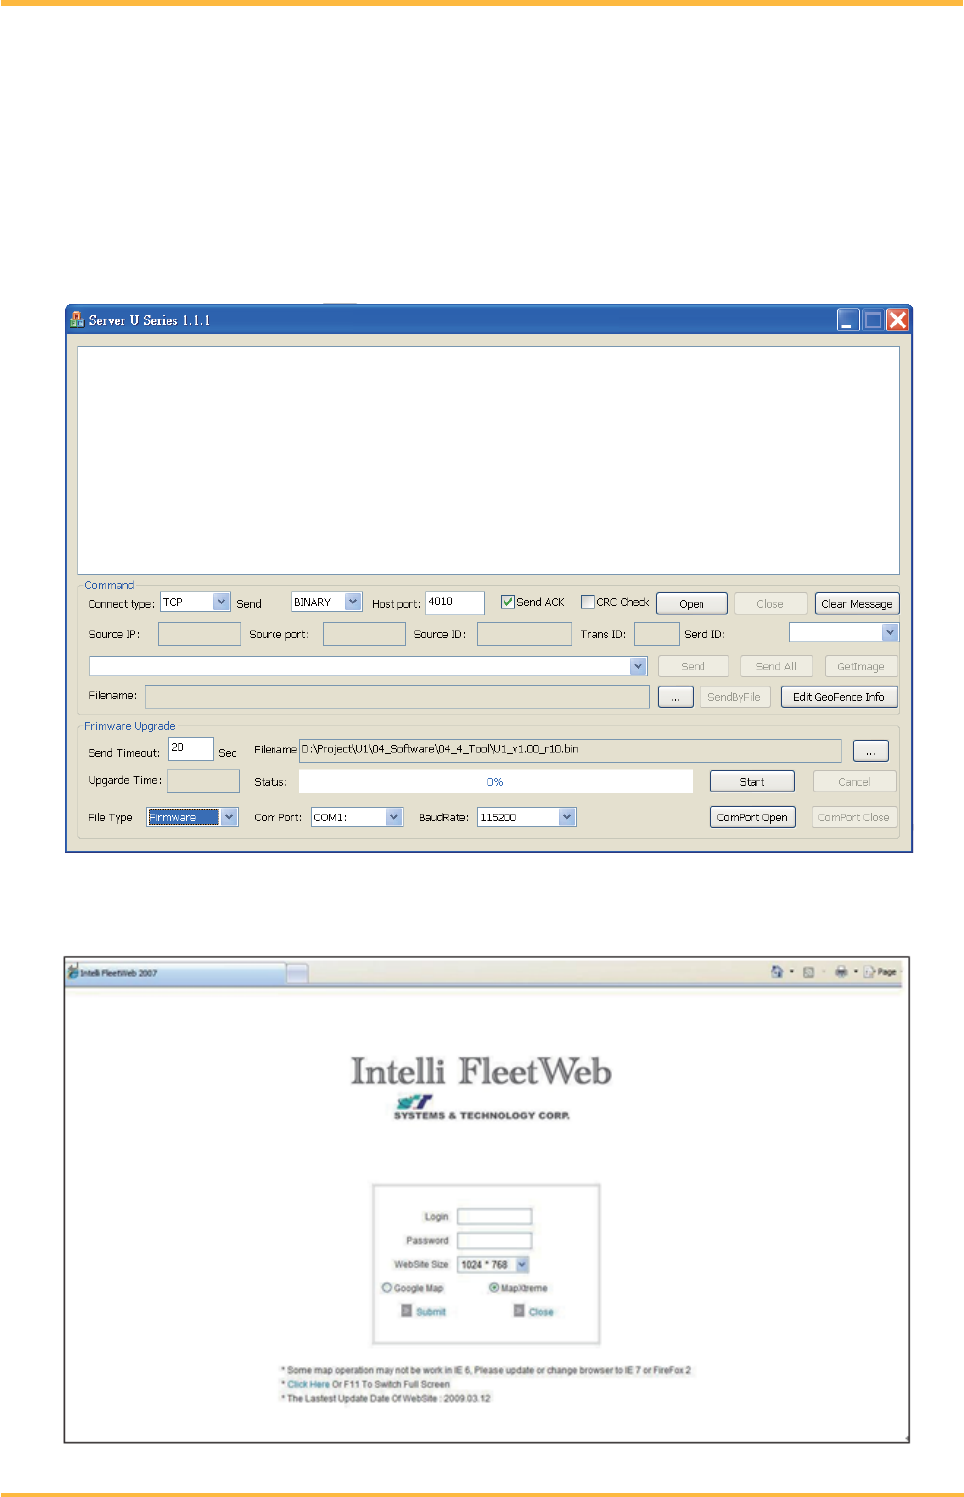
For simple testing of GPRS, run the TCP Server U-Series software which is provided by
SYSTECH.
You may also apply for a testing account from SYSTECH's FleetWeb solution. Please contact
your sales representative for more information.
BV Certificate Use
2017/02/06 17:09
CAREU P2 Personal Tracker User Guide
12
Chapter 4. Using the CAREU P2
This chapter will guide you to major functions of CAREU P2 and necessary settings to operate the
device.
4.1. Self Geo-fencing
The device user may define the Geo Fence radius through protocol command (AT$SGF,
default 100m), after triggering the Geo-fencing button, CAREU P2 will use its last known
fixed GPS location as the center to create a circular fence. Alert reports will be generated
when the device either exits or re-enters this self defined Geo-fence.
• To enable/disable self define geo-fencing for your CAREU P2:
Create the Self Geo-fence:
Press and hold Geo-fencing Button for 2 seconds. CAREU P2 will make a short
beep twice first, and then makes a short beep 3 times when valid GPS fix location is
acquired. The GSM / GPS LED will both flash simultaneously every 3 seconds.
Note: If valid GPS fix location is not acquired (Geo-fence cannot be created),
the device will indicate such status by vibrating 3 times.
Cancel the Self Geo-fence:
Press and hold Geo-fencing Button for two seconds.CAREU P2 will make one long
beep and cancel the Geo-fence creating process.
.
Self Geo-fence Related Protocol Commands :
AT$SGF Self Geo-fence alert settings
Description
This command is used to set/query the Self Geo-Fence zone settings.
Syntax
Write Command:
AT$SGF=<Radius>,< Entry Time>,<Exit Time>
Read Command:
AT$SGF?
Read Status:
AT$SGF
Parameters
< Radius >
Radius in meters of circle used to detect exit
from Self Geo-Fence.
(50 ~ 65535)
<
Entry Time > Qualifying delay in seconds. (10~255)
< Exit Time >
Qualifying delay in seconds. Duration of time
that must elapsed after transitioning out of zone
before accepting an out of zone state change
and causing an alert.
(10~255)
BV Certificate Use
2017/02/06 17:09

CAREU P2 Personal Tracker User Guide
13
Return Value
Write Command:
OK:SGF
Read Command:
OK:SGF
$SGF=<Radius>,< Entry Time >,< Exit Time >
Error Response:
ERROR:SGF
Example
AT$SGF=100,20,20
OK:SGF
AT$SGF?
OK:SGF
$SGF=100,20,20
Note
AT$SGFEN Self Geo-fence alert enable
Description
This command is used to set/query the Self Geo-Fence enable settings.
Syntax
Write Command:
AT$SGFEN=< Option >,< Action >,< Force Connection >
Read Command:
AT$ SGFEN?
Read Status:
AT$
SGFEN
Parameters
<Option>
0 – Disable
1 – Entry and Exit
2 – Entry Only
3 – Exit Only
<Action>
1 – Logging
When the alert condition is true, log the most
recent GPS position to non-volatile flash memory
for future retrieval.
2 – Polling
When the alert condition is true, send the latest
GPS position to the remote base station.
3 – Logging + polling
When the alert condition is true, log the most
recent GPS position to non-volatile flash memory
and send the latest GPS position to the remote
base station.
<Force Connection>
0 – Disable
Bit 0 – Deliver HB before report (Only ASCII
mode)
Bit 1 – Send SMS Report
(Default is 0)
BV Certificate Use
2017/02/06 17:09

CAREU P2 Personal Tracker User Guide
14
Return Value
Write Command:
OK:SGFEN
Read Command:
OK:SGFEN
$SGF=< Option >,< Action >,< Force Connection >
Error Response:
ERROR:SGFEN
Example
AT$SGFEN=1,3,1
OK:SGFEN
AT$SGFEN?
OK:SGFEN
$SGFEN=1,3,1
Note
BV Certificate Use
2017/02/06 17:09
CAREU P2 Personal Tracker User Guide
15
4.2. Positioning
Setting regular timed interval or distance travelled interval reports.
AT$PDSR Position and device status reporting settings
Description Position and data shall be reported when the device is moving. Reporting
shall be based upon satisfying a minimum time requirement and minimum
distance requirement
Syntax
Write Command:
AT$PDSR=<Mode>,<Min. Time>,<Min. Distance>,< Reserve >,
[<Destination>,< Reserve >,<Reserve>,<Time Multiplier>,<IgnoreGPS>]
Read Command:
AT$PDSR?
Parameters
<Mode>
0 – Disable
Bit 0(2^0 = 1) – Time Mode
Bit 1(2^1 = 2) – Distance Mode
Bit 2(2^2 = 4) – Reserved
Bit 3(2^3 = 8) –Reserved
Bit 4(2^4 = 16) – Time or Distance Mode
You can set two or more conditions like 3(1+2) for
ignition on and time conditions.
Bit 4 can’t be set with Bit 0 or Bit1 simultaneously.
<Min. Time> Minimum Time in seconds that must elapse before
reporting next position. (1 – 65535)
<Min. Distance> Minimum Distance in meters that must be traveled
before reporting next position. (25 – 50000)
<Reserve> 0
<Destination>
Bit 0 – Log to Data Queue
Bit 1 – Transmit GPRS
Bit 2 – Reserved
Bit 3 – Transmit SMS
< Reserve > 0
<Reserve> 0
<Time Multiplier>
1 – The PDSR Log and GPRS messages will be
sent according to the <Min. Time> setting.
n – The PDSR Log messages will be performed
according to the <Min. Time> setting, the PDSR
GPRS messages will be sent according to <Min.
Time> times n. (2 – 65535)
<IgnoreGPS>
0 – Continuously tracking regardless of GPS
signal.
1 – Ignore no GPS signal tracking report.
BV Certificate Use
2017/02/06 17:09

CAREU P2 Personal Tracker User Guide
16
Return Value
Write Command:
OK:PDSR
Read Command:
OK:PDSR
$PDSR=<Mode>,<Min. Time>,<Min. Distance>,< Reserve >, <Destination>,<
Reserve >,<Reserve>,<Time Multiplier>,<IgnoreGPS>
Error Response:
ERROR:PDSR
Example
Tracking every 30 seconds through GPRS
AT$PDSR=1,30,1000,30,2,0,0,1,0
OK:PDSR
Tracking every 60 seconds through GPRS and Logging every 15 seconds
AT$PDSR=1,15,1000,30,3,0,0,4,0
OK:PDSR
Note If <Mode> is 3 and both <Min. Time> and <Min. Distance> parameters are
set, the position and data are only reported if both the minimum amount of
time has elapsed and the minimum distance has been traveled.
BV Certificate Use
2017/02/06 17:09
CAREU P2 Personal Tracker User Guide
17
4.3. Unusual Collision Alarm
The CAREU P2 is integrated with a 3-axis G sensor to detect any unusual collision.
To enable and disable the alarm for unusual collision:
• Enable / Disable Unusual Collision Alarm:
AT$DOWN Man Down Detection settings
Description
This command is used to set/query man down threshold settings. Man
down
is described as an abrupt change in velocity as might be
experienced during a wreck.
Syntax
Write Command:
AT$DOWN=<Detect Threshold >,<Detect Duration>
Read Command:
AT$DOWN?
Parameters
< Detect Threshold >
The g-force threshold setting that must be
exceeded in order to be considered an impact.
(1 ~ 128) where force is equal to N * 15.625mG.
< Detect Duration >
Duration at which impact must be sustained to
indicate impact has been detected.
(1 ~ 255) where time is N * 2.5ms.
Return Value
Write Command:
OK: DOWN
Read Command:
OK: DOWN
$ DOWN =<Detect Threshold >,<Detect Duration>
Error Response:
ERROR:DOWN
Example
AT$DOWN=15,1
OK:DOWN
AT$DOWN?
OK:DOWN
$DOWN=15,1
Note
AT$DOWNEN Man Down alert enable
Description This command is used to set or query man down alert enable.
Syntax
Write Command:
AT$DOWNEN=<Option>,<Action>,<Force Connection>
Read Command:
AT$DOWNEN?
Parameters <Option>
0 – Disable
1 –Man down detect under power ON mode
2 –Man down detect under power OFF mode
3 –Man down detect under power ON/OFF mode
BV Certificate Use
2017/02/06 17:09
CAREU P2 Personal Tracker User Guide
18
<Action>
1 – Logging
When the alert condition is true, log the most
recent GPS position to non-volatile flash memory
for future retrieval.
2 – Polling
When the alert condition is true, send the latest
GPS position to the remote base station.
3 – Logging + polling
When the alert condition is true, log the most
recent GPS position to non-volatile flash memory
and send the latest GPS position to the remote
base station.
<Force Connection>
0 – Disable
Bit 0 – Deliver HB before report (Only ASCII
mode)
Bit 1 – Send SMS Report
(Default is 0)
Return Value
Write Command:
OK:DOWNEN
Read Command:
OK:DOWNEN
$ DOWNEN =<Option>,<Action><Force Connection>
Error Response:
ERROR:DOWNEN
Example AT$ DOWNEN =3,3,1
OK:DOWNEN
Note
BV Certificate Use
2017/02/06 17:09
CAREU P2 Personal Tracker User Guide
19
4.4. SOS Alert
• Press and hold the SOS Button for 2 seconds, the CAREU P2 will beep 4
times. Within 10 seconds time, if the user presses and holds the Geo-fencing
button for 2 seconds, CAREU P2 will make a long beep once and cancels the
SOS alert event. If no cancellation action takes place within 10 seconds time,
the SOS event then becomes valid and proceeds to alert actions.
• As soon as the SOS Button is pressed, the CAREU P2 will automatically
power on and executes the “SOS” process even if the CAREU P2 is prevously
powered off.
• Geo-fencing is disabled when “SOS” event is active.
Note: When SOS alert event is active, Power Button is disabled immediately. The
user must cancel the SOS event by pressing the Geo-fencing button first
before CAREU P2 is able to power off normally.
SOS alert event related Protocol Commands.
AT$SOS SOS Tracking Report Configuration
Description This command is used to set SOS Tracking report characteristics.
Syntax
Write Command:
AT$SOS=< Enable >,<Tricking Time>,<Force Connection>
Read Command:
AT$SOS?
Parameters
<Enable>
0 – Disable
1 – Enable
< Tricking Time >
Minimum Time in 180 seconds that must elapse
before reporting next position. (180 –7200)
<Force Connection>
0 – Disable
Bit 0 – Deliver HB before report (Only ASCII
mode)
Bit 1 – Send SMS Report for SOS event triggered
(Default is 0)
Return Value
Write Command:
OK:SOS
Read Command:
OK:SOS?
$ SOS =< Enable >,<Tricking Time>,<Force Connection>
Error Response:
ERROR:SOS
Example
AT$ SOS =1,180,0
OK:SOS
AT$SOS?
OK:SOS
$SOS =1,180,0
Note
BV Certificate Use
2017/02/06 17:09
CAREU P2 Personal Tracker User Guide
20
4.5. Bluetooth (BLE)
When BLE function is enabled, an alert report is generated if CAREU P2 is out of the P2
Station proximity range. A separate alert report is also generated when CAREU P2 is once
again within the P2 Station proximity range.
BLE function related Protocol Commands
AT$BLEEN BLE alert enable
Description
This command is used to set/query the BLE enable settings.
Syntax
Write Command:
AT$ BLEEN =< Option >,< Action >,< Force Connection >
Read Command:
AT$ BLEEN?
Read Status:
AT$ BLEEN
Parameters
<Option>
0 – Disable
1 – Entry and Exit
2 – Entry Only
3 – Exit Only
<Action>
1 – Logging
When the alert condition is true, log the most
recent GPS position to non-volatile flash memory
for future retrieval.
2 – Polling
When the alert condition is true, send the latest
GPS position to the remote base station.
3 – Logging + polling
When the alert condition is true, log the most
recent GPS position to non-volatile flash memory
and send the latest GPS position to the remote
base station.
<Force Connection>
0 – Disable
Bit 0 – Deliver HB before report (Only ASCII
mode)
Bit 1 – Send SMS Report
(Default is 0)
Return Value
Write Command:
OK:BLEEN
Read Command:
OK:BLEEN
$ BLEEN =< Option >,< Action >,< Force Connection >
Error Response:
ERROR:BLEEN
Example
AT$ BLEEN =1,3,2
OK: BLEEN
AT$ BLEEN?
OK: BLEEN
$ BLEEN =1,3,2
Note
BV Certificate Use
2017/02/06 17:09
CAREU P2 Personal Tracker User Guide
21
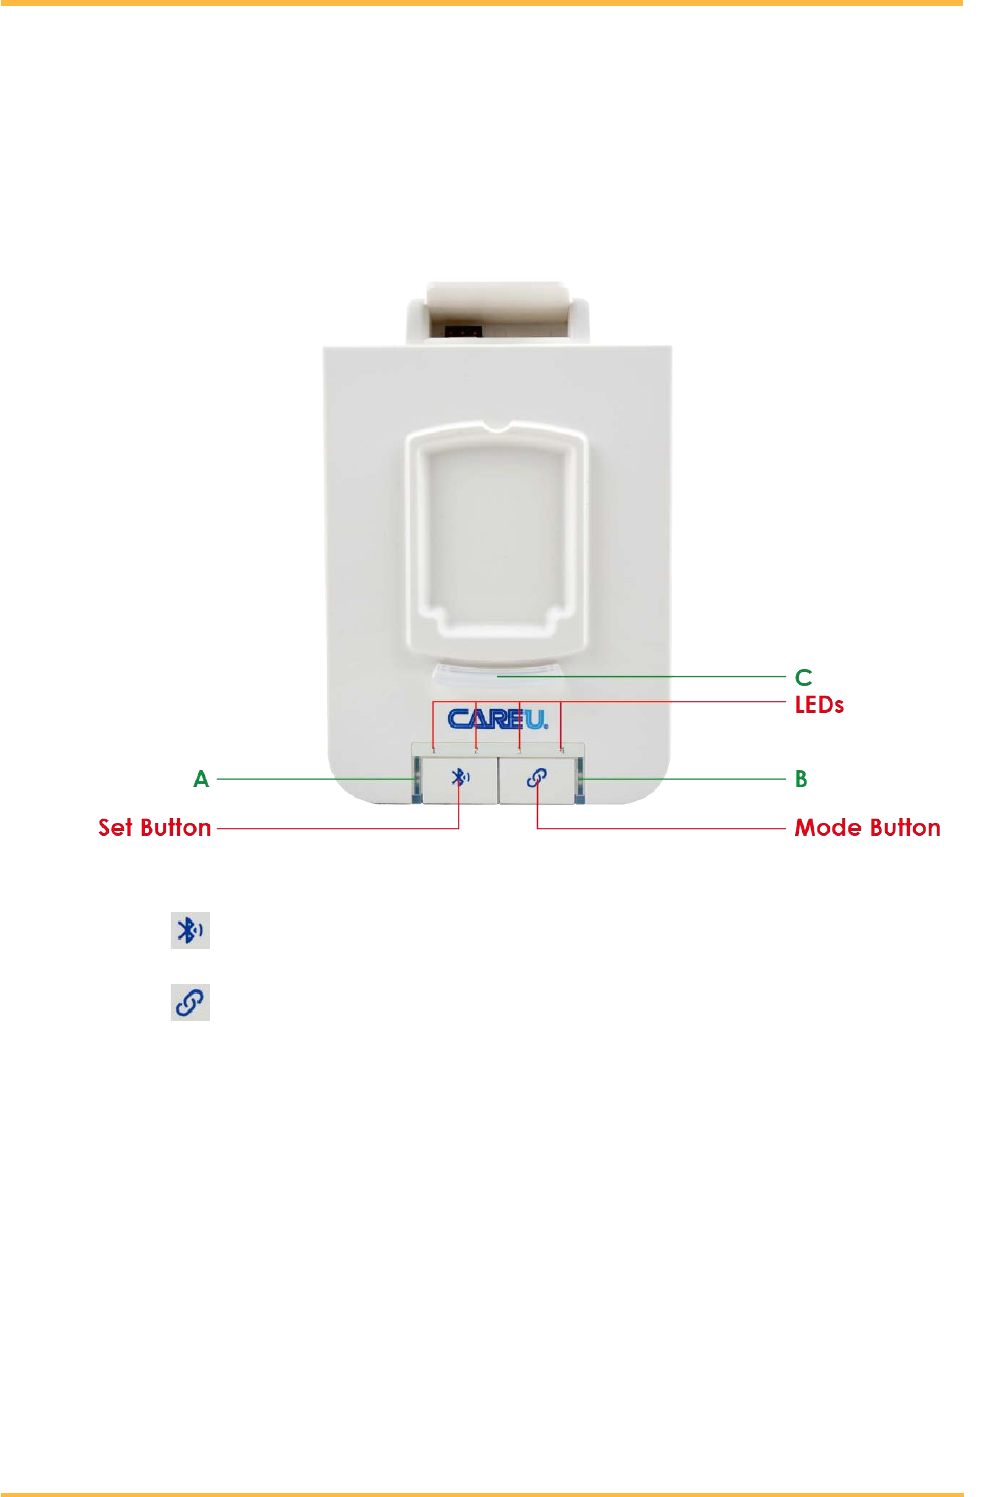
4.6. P2 Station Specification
• Weight: 80g
• Power Source: 5V DC (via Micro USB)
• Operating Temperature: -20℃ ~+60℃
4.6.1 P2 Station Outlook
1. Set Bluetooth Button
2. Mode Button
3. LEDS status Indicator
A. Backup battery slot charged LED (solid light when fully charged)
B. Backup battery slot charging status LED (solid light when battery is charging)
C. Qi wireless charger status LED (solid light when CAREU P2 is paired and
wirelessly charging, LED light flashes if there is an error in pairing, LED off if
CAREU P2 is not paired or taken off the P2 Station)
BV Certificate Use
2017/02/06 17:09
CAREU P2 Personal Tracker User Guide
22
4.6.2 P2 Station Pairing
Upon powering up the P2 Station, the station automatically enters Scanning Mode to scan
within its proximity for all previously paired CAREU P2 units. When a CAREU P2 unit is
already paired, the number LED on the P2 Station lights up. The different numbering of
LED lights also indicate which CAREU P2 unit is currently connected to the P2 Station.
One P2 Station may pair up to maximum 4 units of CAREU P2.
P2 Station Pairing Mode: Storing CAREU P2 address into P2 Station memory.
Step 1. Powering up P2 Station, while in Scanning Mode, press and hold the "Link
Button" for 3 seconds to enter Pairing Mode.
When in Pairing Mode, if there are no previously stored pairing of CAREU P2
units, all LEDs (LED1/LED2/LED3/LED4) beings to flash (On:1 sec ,Off:1 sec).
Note: If the P2 Station is already stored with maximum 4 pairings of CAREU
P2 units, the number LEDs will flash in sequence LED1-> LED2->
LED3-> LED4 and then returns to Scanning Mode. User must delete
the previously paired CAREU P2 units before the P2 Station can pair
more units.
Step 2. If a CAREU P2 unit is found while in Pairing Mode, the P2 station
automatically stores the unit address into the number slot memory. The
numbering LED on the P2 Station will flash in sequence to indicate CAREU
P2 is newly paired (LED 1 flashes for 3s when first unit is paired, LED 2
flashes for 3 seconds if another unit is paired). If no CAREU P2 is found
within the proximity after 30 seconds the P2 Station automatically returns to
Scanning Mode.
Note: If there already existed previously paired CAREU P2 units, the
numbering LED will become solid light indicating the number slot is
already paired.
Delete Pairing Mode: Delete the paired CAREU P2 units stored in P2 Station
memory
Step 1. While P2 station is in Scanning Mode, press and hold both the Bluetooth
Button and Link Button together to enter Delete Mode, the numbering
LED will quickly flash in this order LED4-> LED3-> LED2-> LED1.
Step 2. Within 10 seconds time, press the “Bluetooth Button" again to confirm
delete and clear all previously stored CAREU P2 unit pairings. The numbering
LEDs will fast flash for 5 seconds (On:0.1 sec ,Off:0.1 sec) indicating all paired
units are successfully deleted before P2 Station returns to Scanning Mode.
BV Certificate Use
2017/02/06 17:09

CAREU P2 Personal Tracker User Guide
23
Chapter 5. About Systems & Technology Corp.
The CAREU P2 Personal Tracker is produced by Systems & Technology Corporation. The
company is a key developer and supplier of advanced systems in tracking solutions, geographical
information systems and navigation systems.
If you need the information about other products, please contact us by phone or by fax as listed
below, or visit our websites.
Contact Information for Systems & Technology Corp.
SYSTECH Web Site http://www.systech.com.tw
Technical Support Hotline +886-2-2698-1599
Technical Support E-mail avl@systech.com.tw
Main Phone
+886-2-2698-1599
Main Fax +886-2-2698-1211
BV Certificate Use
2017/02/06 17:09

CAREU P2 Personal Tracker User Guide
24
Chapter 6. Declaration
As the CAREU P2 Personal Tracker works based on GPS (Global Positioning System) and GSM
(Global System for Mobile Communication), it has to work with normal GSM and GPS conditions.
Performance of the CAREU P2 is liable to the following:
• Weak GPS satellite signals: The positioning quality will be affected.
• Weak GSM signals: The report quality of CAREU P2 will be affected.
Notification of GPS
GPS (Global Positioning System) is based on the 24 satellites launched by the Defense
Department of the United States to measure and compute vehicle positions. Systems and Tech-
nology Corporation, the developer and producer of CAREU P2, therefore does not guarantee
CAREU P2will work normally under the poor surroundings due to the following causes:
• Locations with weak GPS signals
• The Defense Department of the United States temporarily closes or disturbs the GPS.
• Some tinted window films can hinder CAREU P2 from receiving GPS signal. Please consult
your tinted window film vendors for details.
Notification of GSM
GSM (Global System for Mobile Communication) is the key factor if the system can immediately
notify the message receiver through short messages. Systems & Technology Corp. therefore
does not guarantee CAREU P2 will work normally under the poor surroundings due to the
following causes:
• Place with weak GSM signals
• Message losing or detention caused by telecommunication service providers.
• Malfunction of telecommunication systems
• Invalid SIM cards
BV Certificate Use
2017/02/06 17:09
CAREU P2 Personal Tracker User Guide
25
Chapter 7. Regulations
• This device complies with part 15 of FCC Rules. Operation is subject to the following two
conditions: (1) This device may not cause harmful interference, and (2) this device must accept
any interference received, including interference that may cause undesired operation.
• This device has been tested and found to comply with the limits for a Class B digital device,
pursuant to Part 15 of FCC Rules. These limits are designed to provide reasonable protection
against harmful interference in a residential installation. This equipment generates, uses and
can radiated radio frequency energy and, if not installed and used in accordance with the
instructions, may cause harmful interference to radio communications. However, there is no
guarantee that interference will not occur in a particular installation If this equipment does
cause harmful interference to radio or television reception, which can be determined by turning
the equipment off and on, the user is encouraged to try to correct the interference by one or
more of the following measures:
- Reorient or relocate the receiving antenna.
- Increase the separation between the equipment and receiver.
- Connect the equipment into an outlet on a circuit different from that to which the receiver is
connected.
- Consult the dealer or an experienced radio/TV technician for help.
Changes or modifications not expressly approved by the party responsible for compliance could
void the user‘s authority to operate the equipment.
The antenna(s) used for this transmitter must not be co-located or operating in conjunction with any
other antenna or transmitter.