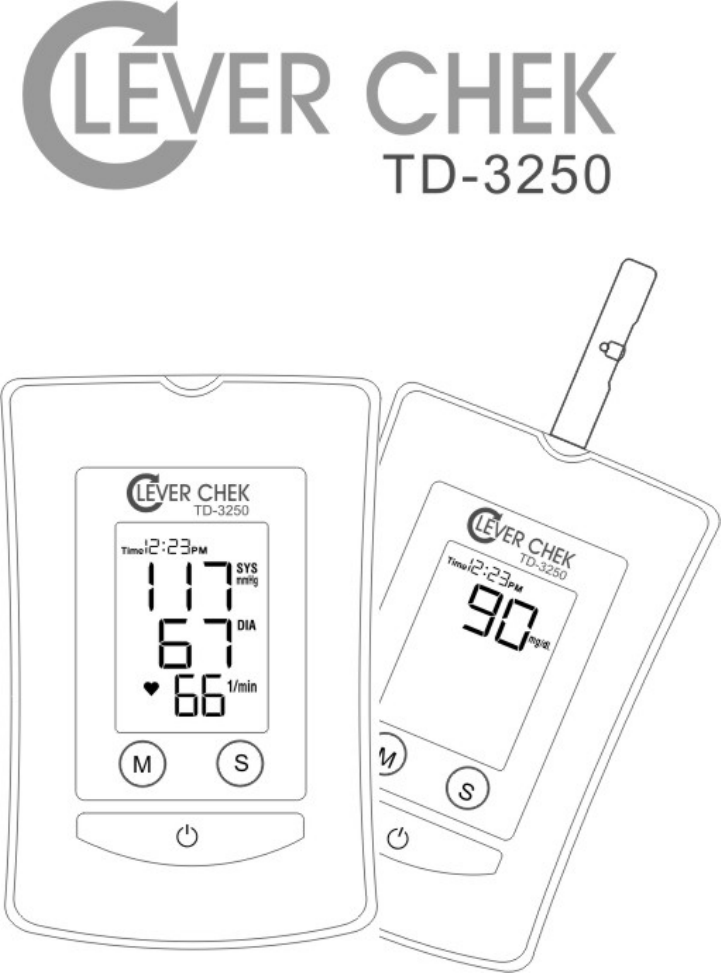
TAIDOC TECHNOLOGY 3250CBEM2 Blood Glucose plus Blood Pressure Minitor User Manual Manual
TAIDOC TECHNOLOGY CORP. Blood Glucose plus Blood Pressure Minitor Manual
Manual
Version 2 2006/07/04
Table of Contents
BEFORE YOU START 04
Warnings and Precautions 04
Intended Use 05
Health Information 06
ABOUT THIS SYSTEM 08
Content of the System 08
Device Overview 09
Button Function & Pressure Cuff 11
LCD Display Description 13
Test Strip Description 14
PREPARATIONS BEFORE USE 16
Battery Installation and Replacement 16
Setting the Monitor 18
HOW TO MEASURE BLOOD GLUCOSE 20
Important Information and Possible Interferences 21
Coding the Monitor 22
Checking the Code 23
Testing With Control Solution 24
Getting a Drop of Blood 27
Taking a Reading 29
Comparing With Laboratory Results 31
HOW TO MEASURE BLOOD PRESSURE 32
Suggestions before Measuring 33
Applying the Pressure Cuff 34
Proper Measurement Position 35
Taking a Reading 36
HOW TO USE THE MEMORY FEATURES 37
Viewing Memory in the Monitor 37
Viewing Results on a Personal Computer 38
2

Deleting memory 39
HOW TO TAKE CARE OF YOUR MONITOR 40
Cleaning 40
Storage 40
ERROR MESSAGE 41
TROUBLESHOOTING 42
SPECIFICATIONS 44
SYMBOLS INFORMATION 45
3
* Before testing, please read all instructions and practice the test.
* Be sure to keep this manual for future reference.
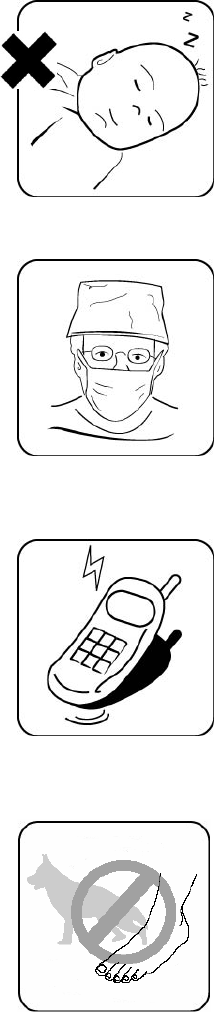
Warnings and Precautions
The CLEVER CHEK TD-3250 System is designed for
use on individuals age 16 and above. It shall NOT be
used:
1. to diagnose newborns with diabetes.
2. on infants or persons who cannot communicate.
This device does not serve as a cure of any symptoms
or disease. The data measured are only for reference.
Always consult your physician to have the results
interpreted.
This device is not able to measure in the presence of
common arrhythmia, such as arterial or ventricular
premature beats or arterial fibrillation. It may produce
reading error.
Use of the device near a mobile phone or microwave
oven may cause inaccurate results.
Do not use the device for purposes other than
measuring blood glucose and blood pressure for
humanbeings.
Do not wrap the pressure cuff on anything besides your
arm.
4
BEFORE YOU START

Intended Use
What it is:
The CLEVER CHEK TD-3250 system is a 2 in 1 system designed to measure
blood glucose outside of human body and to measure blood pressure
non-invasively. The system performs only one function at a time to avoid any
interference problems. The system consists of the CLEVER CHEK TD-3250
monitor, test strips, and check & code strip. The system also comes with
control solutions for quality control.
How it works:
Blood glucose is tested using an Amperometric Biosensor. Capillary action at
the absorbent hole of the test strip draws a small amount of blood into the
reaction chamber, and then the reading is displayed after 10 seconds.
Blood pressure is measured non-invasively at the upper arm based on the
oscillometric method.
This user’s manual contains important information that you must know about
your system. Please read it carefully.
For other questions regarding this system, please contact:
U.S.A. representative
Chunming Shih
4331 Stevens Battle Lane,
Fairfax, VA 22033
Customer Care Line: (703) 591-4934
Hours of Operation: 9 am- 4 p.m. EST (14:00 - 21:00 GMT)
At all other times, you should contact your health care
professional for assistance.
A warranty registration card is included with your system.
Please complete it and mail it to us; if you prefer to fill it
out online, please visit http://www.taidoc.com
5
BEFORE YOU START

Health Information
Blood Glucose
Blood glucose monitoring plays an important role in diabetes control. A
long-term study shows that keeping blood glucose levels close to normal can
reduce the risk of diabetes complications by up to 60 %.*
The results you get with the CLEVER CHEK TD-3250 can help you and your
healthcare professional monitor and adjust your treatment plan to gain better
control of your diabetes. The American Diabetes Association (ADA)
recommends that you keep your blood sugar levels at:
Time of day ADA recommendation
Before
meals
80-120 mg/dL / 4.5-6.7
mmol/L
1-2 hours
after meals
Less than 180 mg/dL /
10 mmol/L
Bedtime 100-140 mg/dL /
5.6-7.8 mmol/L
Source: American Diabetes Association (2005). Standards of medical care in diabetes.
Clinical Practice Recommendations 2005. Diabetes Care, 28(Suppl): S4–S36.
*Reference: American Diabetes Association: Position Statement on the
Diabetes Control and Complications Trial (1993).
6
BEFORE YOU START
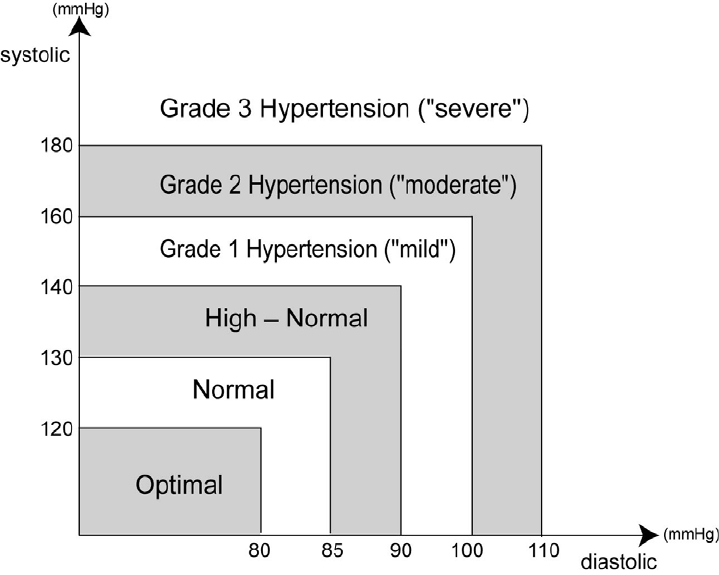
Blood Pressure
Clinical studies show that the adult diabetes is often accompanied by elevated
blood pressure. People with diabetes can reduce their heart risk by managing
their blood pressure along with diabetes treatment*.
Knowing your routine blood pressure trend tells whether your body is in good
condition or not. Human blood pressure naturally increases after reaching
middle age. This symptom is a result of continuous aging of the blood vessel.
Further causes include obesity, lack of exercise, and cholesterol (LDL)
adhering to the blood vessels. Rising of blood pressure accelerates hardening
of the arteries, and the body becomes more susceptible to apoplexy and
coronary infarction. The WHO (world health organization) published the
guideline of blood pressure range:
Source: 1999 WHO/ISH guidelines for the management of hypertension
*Reference: American Diabetes Association: The Diabetes-Heart Disease Link
Surveying Attitudes, Knowledge and Risk (2002)
7
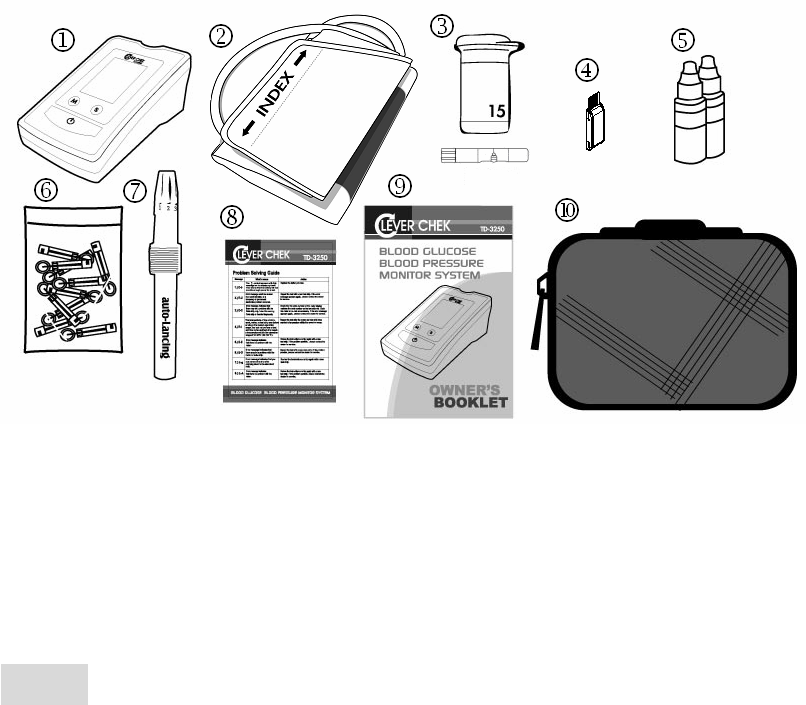
Content of the System
1 Blood glucose and blood pressure monitor
x1 6
Sterile lancets X25
2 Pressure cuff x1 7
Lancing device x1
3 Test strip X25 8
Quick guide x1
4 Check & code strip X1 9
User’s manual x1
5 Taidoc control solutions X2
Sporty bag x1
These products have been designed, tested, and proven to work together as a
system to produce accurate blood glucose test results. Use only CLEVER
CHEK TD-3250 test strips and control solution with your CLEVER CHEK
TD-3250 Monitor.
Caution!
Check your system to be sure that it is unopened prior to use and that it
contains all parts listed above. If either of these conditions occurred, please
return your system to the place of purchase.
ABOUT THIS SYSTEM
8
Device Overview
Three subtype of TD-3250 were developed and the difference of function
among them is simply in data transmission.
Subtype of TD-3250 Data transmission function
TD-3250A
No
, you can only view results on the monitor itself.
TD-3250B
Yes
, you can view results on the PC through
cable connection.
TD-3250C
Yes
, you can view results on the PC through
wireless connection using Bluetooth technology.
Five features are included in TD-3250:
Feature 1. Blood glucose test:
Test Slot is the ONLY place you need to use when testing
blood glucose. For detailed procedures, please see page 20.
Note: If you try to measure blood pressure and press
button during blood glucose test, the monitor will turn off
automatically with beeping sound.
ABOUT THIS SYSTEM
9
Feature 2. Blood pressure test:
Button is the ONLY button you need when measuring
blood pressure. For detailed procedures, please see page 32.
This is also the main power button of this monitor. When the
monitor is on, no matter what function it is in, pressing
Button will turn it off instantly.
Note: If you insert test strip during blood pressure test, there
will be no action.
Feature 3. Memory recall
M Button helps you when you want to see previous data. For
detailed procedures, please see page 37.
Feature 4. Monitor setting
S Button helps you set up year, month, date, time, and units.
For detailed procedures, please see page 18.
Feature 5. Cable connection
Data port is the unique part for model TD-3250B which is used
to connect the monitor to the personal computer through
RS232 cable for data transmission. For detailed procedures,
please see page 38.
Feature 6. Wireless connection
BT Button and Bluetooth indicator, only in model TD-3250C,
assist you to transmit data wirelessly. For detailed procedures,
please see page 38.
10
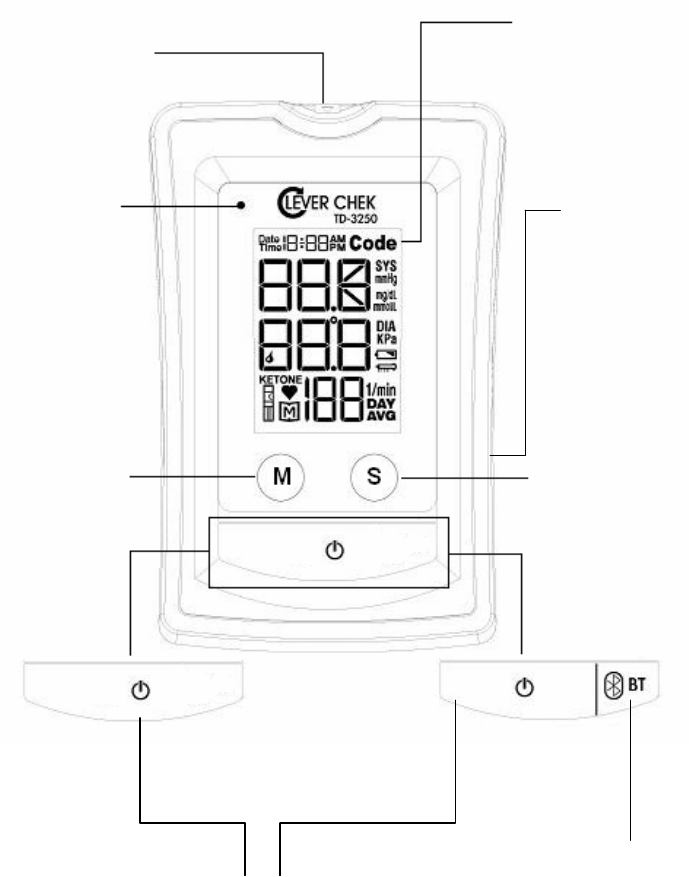
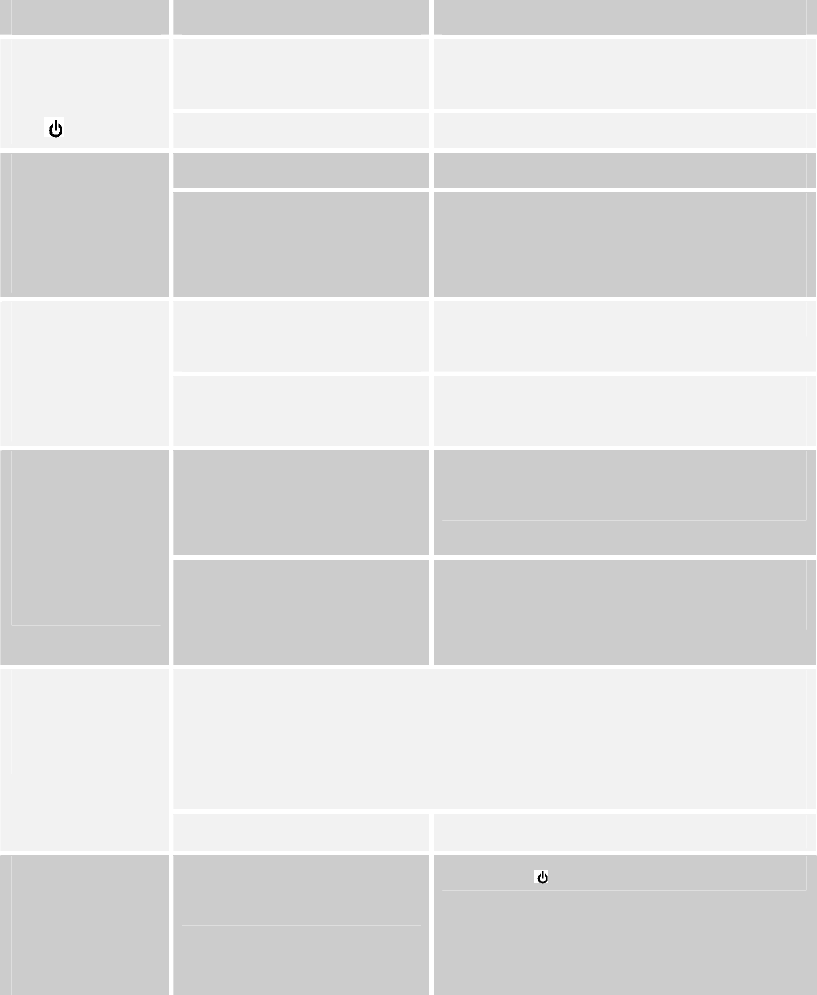
11
Button Function & Pressure Cuff
LCD Display
Test results are
displayed with
symbols and
simple messages.
Test Slot
For Feature1 Blood
glucose test
Bluetooth
Indicator
(ONLY for model TD-3250C)
For Feature6
Wireless
Connection
Set Button
For Feature4
Monitor setting
Memory Button
For Feature3
Memory Recall
Power Button
For Feature2
Blood pressure test
For both model TD-3250A
and TD-3250B ONLY for model TD-3250C
BlueTooth Button
For Feature6
Wireless connection
Data Port
(ONLY for model TD-3250B)
For Feature5
Cable connection
ABOUT THIS SYSTEM
12
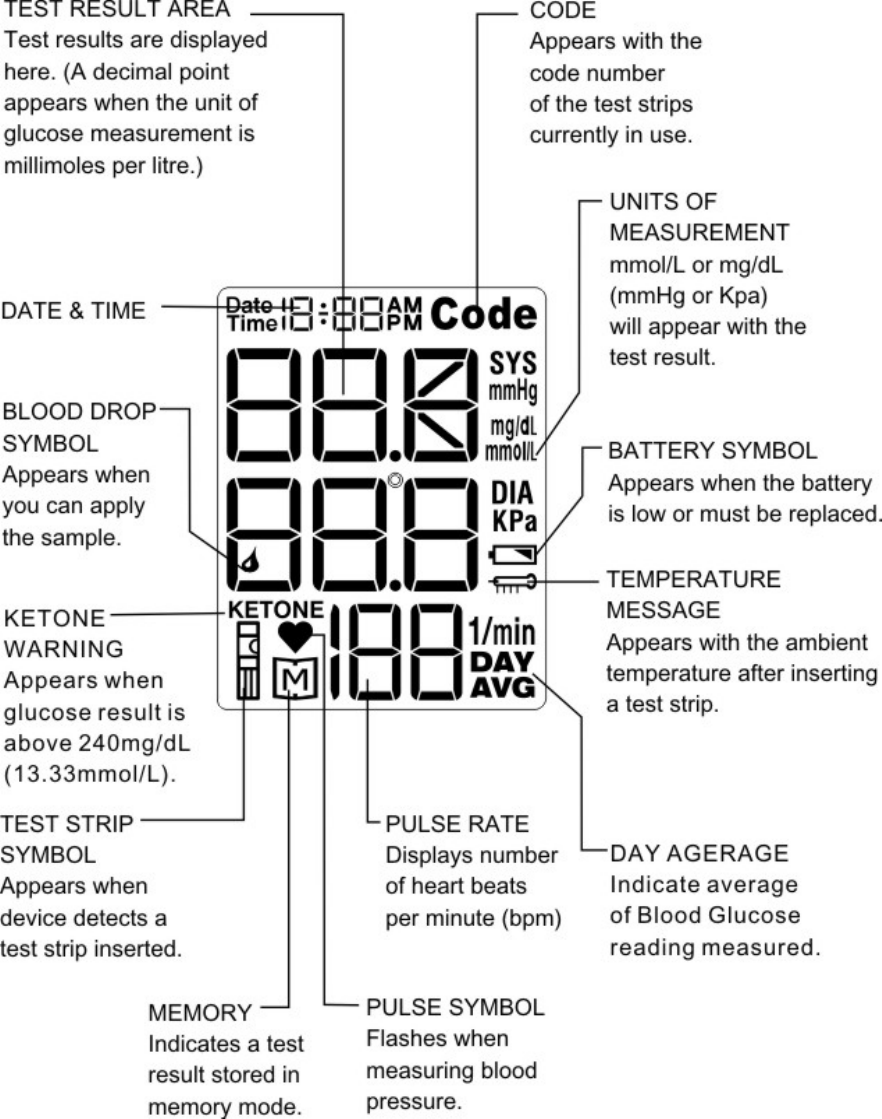
LCD Display Description
13
ABOUT THIS SYSTEM
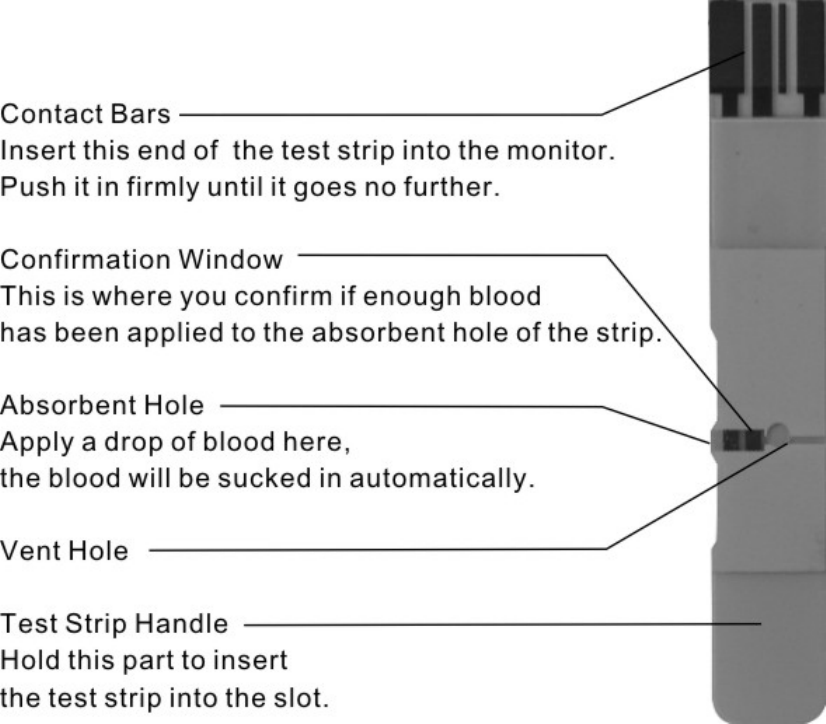
Test Strip Description
Your system measures the amount of sugar (glucose) in whole blood. Blood is
applied to the absorbent hole of the test strip and is automatically drawn into
the reaction chamber where the reaction takes place.
The test strip consists of the following parts:
14
ABOUT THIS SYSTEM

Important usage information
When you get a new vial of test strips:
Check the expiry date on the vial. Do not use test strips beyond the expiry
date since they may cause inaccurate results.
Write the discard date on the vial when you first open it.
When you use a test strip:
Touch the test strip with clean and dry hands.
Tightly close the vial cap immediately after removing a test strip.
Use each test strip immediately after removing it from the vial.
Do not bend, cut or alter a test strip in any way.
Apply only blood sample to the absorbent hole. Applying other substances to
the absorbent hole will cause inaccurate results.
When you store your test strips:
Store your test strips in their original vial only; do not transfer them to a new
bottle or any other container.
Store test strip packages in a cool and dry place between 4 oC (39oF) and
40oC (104oF). Keep away from direct sunlight and heat.
Discard remaining test strips and the vial three months after first opening
date.
Warning!
Keep the test strip vial away from children. The cap is a choking hazard. The
vial contains a pouch filled with drying agents that may be harmful if inhaled or
swallowed and may cause skin or eye irritation.
15
(Fig. 1)
(Fig. 2)
Battery Installation and Replacement
Your monitor comes with batteries already installed.
When replacing, use ONLY 1.5V AA size alkaline batteries for best
performance and longest life.
Low Power Signal
The monitor will remind you when the power is getting low by displaying two
different messages:
1. Battery Symbol appears while you perform tests. (Fig. 1)
This means it is about time to change the batteries although still
30 more measurements can be made.
2. Battery Symbol flashes by itself and the monitor cannot
perform any measurement.
(Fig. 2) This means you must change the batteries before
making any measurements.
16
PREPARATIONS BEFORE USE
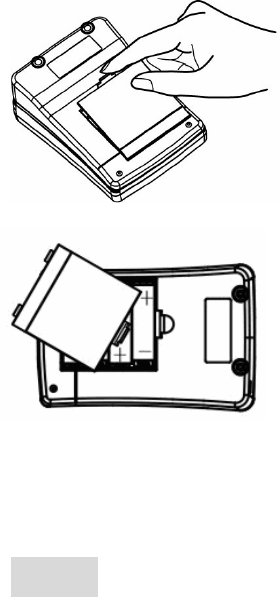
Battery Replacement
To replace the batteries, make sure the monitor is turned off.
Step1- Press the edge of the battery cover
and pull up. (Fig. 3) Lift the battery cover and
remove the batteries inside.
Step2- Insert four 1.5V AA size alkaline
batteries. Make sure the + (positive) and
–(negative) marks match as indicated
in the battery compartment. (Fig. 4) If
inserted correctly, you will hear a "beep".
Caution!
Do not use different type, date or brand name batteries together. Use only
new batteries of the required size and type.
Replacing the batteries does not affect previous test results stored in the
monitor. But you may need to update the settings.
Batteries might leak chemicals if not used for a long time. Remove the
batteries if you are not going to use the device for an extended period (i.e., 3
months or more).
17
(Fig. 3)
(Fig. 4)
(Fig. 6)
Setting the Monitor
Your monitor comes with the time, date, and units preset. These options may
be changed any time to fit your needs. They also need to be set again when
you change the batteries.
How to set the monitor?
Step 1- Start with the meter turned off.
Press the "S" button to enter the Setting Mode.
Step 2- Select and make changes.
Press the "S" button to select what you would like to change. The selected one
will be flashing. Press the "M" button to make the change.
Step 3- Save the Changes.
Press the "S" Button to save the changes you made and move on to next step.
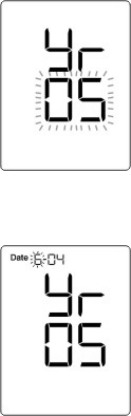
Let’s see the year setting for example:
1. Press “S” button and the year will appear first, with the
number flashing. (Fig. 5)
2. Press and release the M button to advance one year.
To move the number faster, hold the M button down.
3. Press the Set button and the year will be set. At the same
time, the date will appear on the display with the month segment
flashing. (Fig. 6)
Set the month, day, hour, minute, and units in the same way.
18
(Fig. 5)
PREPARATIONS BEFORE USE
(Fig. 7)
While setting is completed
After choosing the units of glucose measurement, press “S”
Button to save the settings and turn off the monitor. (Fig. 7)
You may also press the button any time to turn off the monitor and exit the
Setting Mode.
19
Is your monitor all set?
Refer to page 16 to replace the
batteries and set the monitor.
Refer to page 22 to code the
monitor.
Measure blood glucose.
Refer to page 27 to get a drop of
blood.
Refer to page 29 to take a reading.
Store your monitor carefully.
Refer to page 39 for how to take
care of your monitor.
Turn the monitor off by removing
the test strip.
And then you can:
Check the memory (refer to page
37).
Perform blood pressure test (refer to
page 32).
20
HOW TO MEASURE BLOOD GLUCOSE

Important Information and Possible Interferences
Important Information:
Test results below 3.3mmol/L (60mg/dL) indicate hypoglycemia, which
means abnormally low glucose level. If higher than 13.3mmol/L (240 mg/dL),
symptoms of hyperglycemia might occur. Consult your physician when a
result above occurs.
If you have symptoms that are not consistent with your blood glucose or
pressure level AND you have followed all instructions described in the user’s
manual, contact your healthcare professional.
Possible interferences:
Severe dehydration and excessive water loss may cause false low results.
A red blood cell percentage (hematocrit) that is extremely high (above 60%)
or low (less than 20%) may cause false results.
Elevated blood triglyceride, reducing substances such as uric acid and
ascorbic acid at normal blood concentration, or acetaminophen, dopa,
methyldopa, L-dopa, and tolbutamide at normal blood concentrations do not
significantly affect the test results.
21
HOW TO MEASURE BLOOD GLUCOSE
Coding the Monitor
You must code the monitor every time you begin to use a new vial of test strips.
Test results may be inaccurate if the code number displayed on the monitor
does not match the number printed on the strip vial.
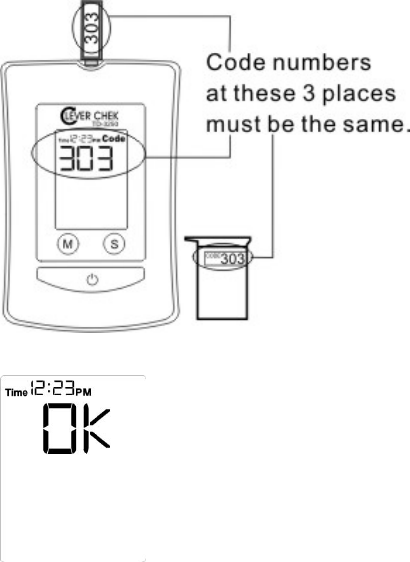
Step 1- Insert the check & code strip
when the monitor is off. Wait until the
code number appears on the LCD
display. (Fig 8)
Make sure the code number on LCD
display, on check & code strip, and
on strip vial are the same.
Step 2- Remove the check & code strip, the LCD display will
show “OK”. This tells you that the monitor has finished coding
and is ready for blood glucose testing.
22
(Fig. 8)
HOW TO MEASURE BLOOD GLUCOSE
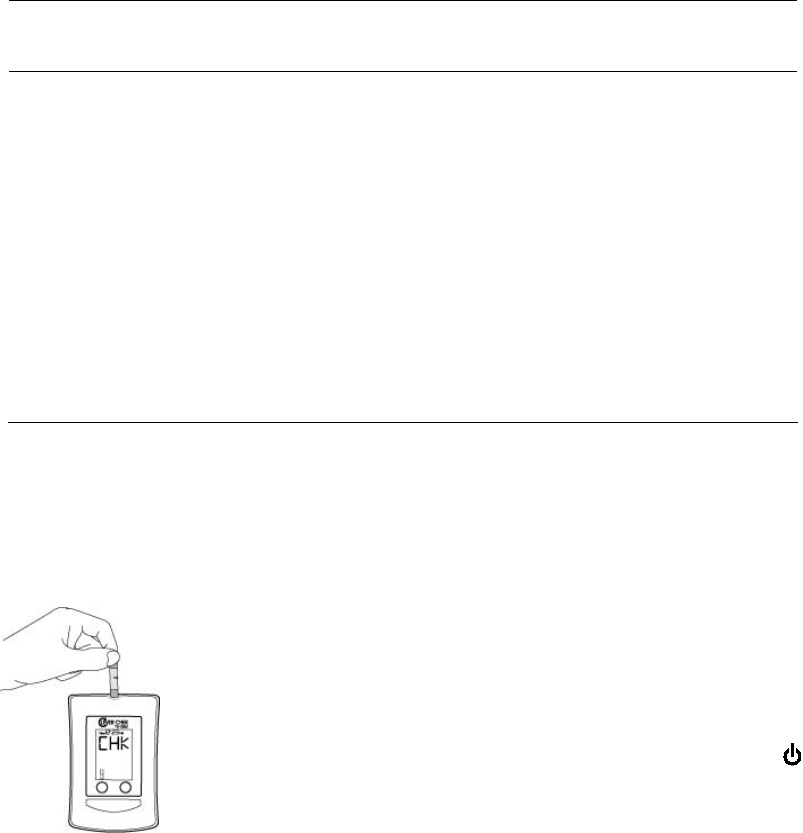
Checking the Code
When you start measuring blood glucose, check the code number first.
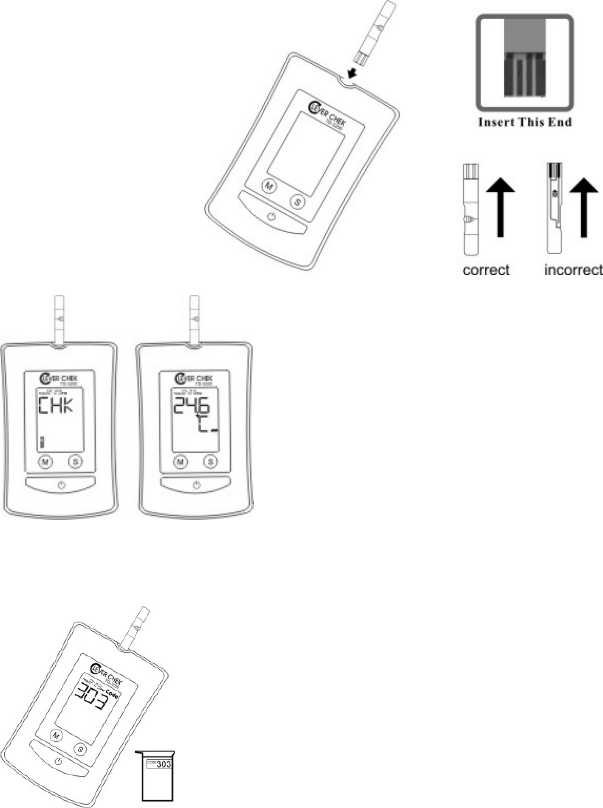
Step1- With the monitor off, insert a test strip into the Test Slot. Make sure you
insert the end with the contact bars first and facing up. Contact bars must be
inserted all the way into the monitor for an accurate result. (Fig. 9)
Step2- The monitor will display “CHK” and the strip
symbol. (Fig. 10) In about 1 second, the ambient
temperature will be shown (Fig. 11).
Step3- Then the code number and flashing blood drop
appears. Check if the number shown on the monitor
matches the number on the test strip vial. (Fig. 12) If it
matches, you can proceed with your test.
If it does not match, please code the monitor as described in previous page.
23
(Fig. 10) (Fig. 11)
(Fig.12)
(Fig. 9)
HOW TO MEASURE BLOOD GLUCOSE
Testing with Control Solution
What is a control solution test?
The control solution contains a known amount of glucose that reacts with test
strips. Compare your control solution test results with the expected range
printed on the test strip vial label. This enables you to check if the monitor and
the test strips are working together properly, and that you are performing the
test correctly.
Therefore, before testing your blood glucose for the first time, practice the
procedure using control solution. When you can do three tests in a row that are
within the expected range, you are ready to test your blood sugar.
Please note that the control solution range printed on the test strip vial is for
TaiDoc Control Solution only. It is used to test the monitor and test strip
performance. It is not a recommended range for your blood glucose level.
When should I do a control solution test?
When you begin using a new vial of test strips.
If you drop the monitor.
When your blood glucose test results are not consistent with how you feel, or
when you think your results are not accurate.
Important usage information
Use only TaiDoc Control Solution to check system performance.
Tightly close the control solution and store below 30oC (86oF).
Control solution, monitor, and test strips should be at room temperature
(20-25 oC /68-77 oF) before testing.
Use a period of 30 days from the date that you first open it.
Also check the expiration date on the control solution vial.
Do not use if expired.
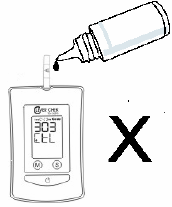
Do not directly apply solution to the test strip. Place a drop
of control solution on a clean surface or on your fingertip
instead to avoid contamination.
24
HOW TO MEASURE BLOOD GLUCOSE
How to do a control solution test?
Step 1- Insert a test strip and check if the code number shown on LCD display
is the same as the code on the strip bottle.
Step 2- Press the M Button. The symbol "CtL" will appear on the display.
When you do this, control solution readings will not be stored in the memory.
Step 3- Get a drop of control solution:
1. Shake the control solution vial well.
2. Remove the cap. Squeeze the vial and
discard the first drop with a clean tissue to
ensure an accurate result.
3. Squeeze the vial again to get a hanging
drop and place the drop on your fingertip.
(Fig.13)
Step 4- Apply the drop to the absorbent hole of the test strip
until the drop is drawn into the test strip, and the confirmation
window is filled. (Fig. 14)
Step 5- The monitor will begin countdown. After 10 seconds, the control
solution test result will appear. The result should fall within the range printed
on the test strip vial.
25
(Fig. 13)
(Fig. 14)
What to do if out-of-range results appear?
If test results fall outside the range printed on the test strip vial, repeat the test.
Out-of-range results may be caused by one or more of the following:
Error in performing the test.
Not shaking the control solution vial vigorously.
Control solution too warm or too cold.
Expired or contaminated control solution.
Improper coding of the monitor.
Test strip deterioration.
Monitor malfunction.
If you continue to get out-of-range results, the system may not be working
properly. Do not use the monitor to test your blood glucose in this condition.
Please contact your local customer service for help.
26
Getting a Drop of Blood
Be sure to read this section and the test strip package insert found in the test
strip box carefully before testing. Make sure you have all items needed to test:
monitor, test strips, lancing device, and sterile lancet.
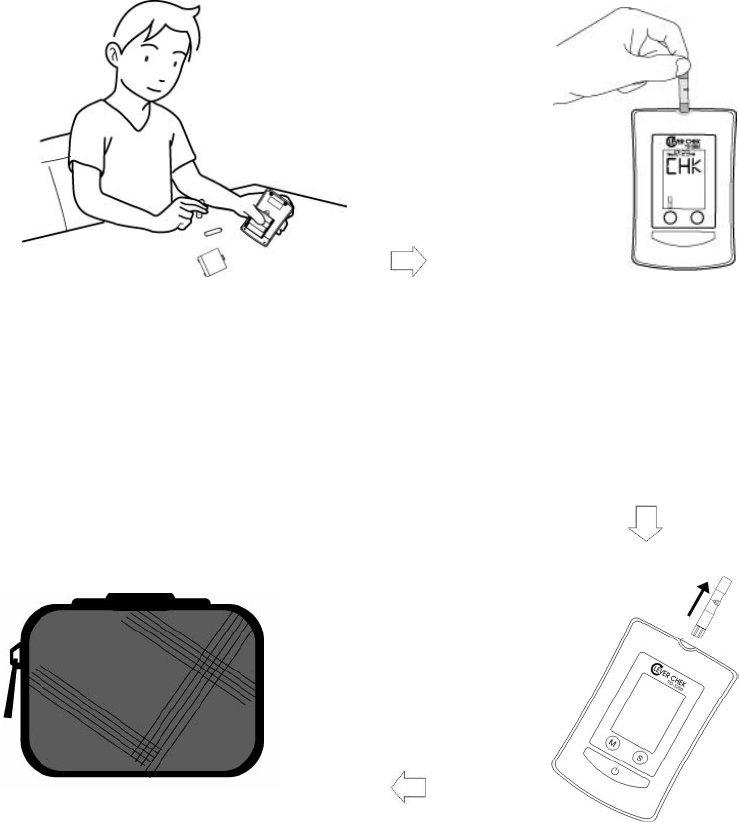
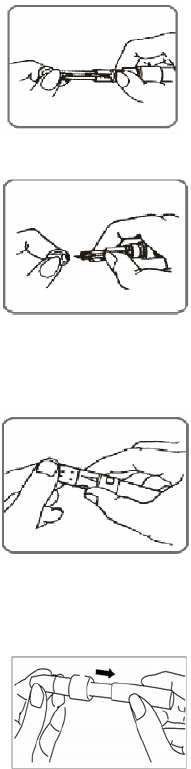
Step 1- Insert a lancet in the adjustable lancing device.
(Fig. 15)
Twist and remove the cap of lancing device.
Insert a lancet into the lancet holder and push down firmly
until it is fully seated. (Fig. 15)
(Fig. 16)
Twist the protective disk until it separates from the lancet.
(Fig. 16)
Replace the lancing device cap until it is snug but not too
tight.
Step 2- Select the depth of puncture.
(Fig. 17)
Twist the adjustable tip in either direction to select the
depth of puncture. (Fig. 17)
Five levels of depth were offered:
1-2 for soft or thin skin, 3 for average skin, and 4-5 for thick
or calloused skin. Please select the most suitable depth for
you to avoid unnecessary pain.
Step 3- Set the ejection control.
Slide the ejection/cocking control back until it clicks. (Fig.
18)
If it does not click, the lancing device may have been cocked
when the lancet was inserted.
(Fig. 18)
27
HOW TO MEASURE BLOOD GLUCOSE
(Fig. 20)
Step 4- Wash your hands.
Use warm and soapy water to wash your hands. Rinse and dry thoroughly.
Clean the puncture site with 70% alcohol cotton and leave it dry completely.
Step 5- Select a puncture site on fingertip.
Hold the lancing device firmly against the side of your
finger. (Fig. 19) Press the release button. You will hear a
click, indicating that puncture is complete.
Step 6- Obtain the required blood sample (1.8 microlitre in volume).
Gently massage the chosen area to get enough blood. Do not
smear the blood sample. (Fig. 20) Proceed with your Blood
glucose test.
Step 7- Discard the lancet.
Always use caution when removing the lancet.
Remove the cap of lancing device.
Place the protective disk on a hard surface and push the
exposed tip into the protective disk.
Take it out carefully and place it into a container for sharp
objects.
WARNING!
1. To reduce the chance of infection:
Never share a lancet with anyone.
Always use a new, sterile lancet. Lancets are for single use only.
Avoid getting lotion, oil, dirt, or debris in or on the lancets and the sampler.
2. Choose a different spot each time you test. Repeated puncture in the same
spot may cause soreness and calluses.
28
(Fig. 19)
(Fig. 21)
(Fig. 22)
(Fig. 23)
Taking a Reading
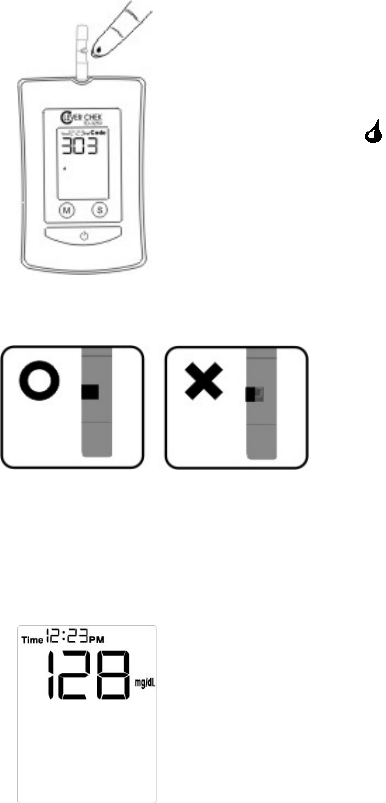
Step 1- Insert a test strip and check if the code number shown on LCD display
is the same as the code on the strip vial. If not, please refer to “Coding the
monitor”.
Step 2- Obtain a drop of blood as described in “Getting a Drop
of Blood”.
Step 3- When the “ “ symbol is flashing on the LCD display,
apply the drop of blood to the absorbent hole of the test strip.
(Fig. 21) Do not push your finger against the test strip or try to
apply a smeared sample.
Step 4- Make sure the blood sample completely
cover the confirmation window before moving
your finger away from the strip. (Fig 22) If the
confirmation window is not filled completely, do
not add more blood to the test strip. Discard the
test strip and retest.
Step 5- Read result after 10 seconds. (Fig 23) The test result
will be automatically stored in the monitor memory. Turn the
monitor off by removing the test strip.
29
HOW TO MEASURE BLOOD GLUCOSE

Ketone Warning:
When your test reading is ≧240 mg/dL(13.3 mmol/dL), “KETONE" will appear
on the LCD display.
Ketone is a byproduct produced as the body burns fat for energy when there
isn't enough insulin present for the metabolism of glucose. Ketone
accumulation in the blood may lead to a dangerous condition known as
diabetic ketoacidosis (DKA).
High blood glucose is a symptom of insufficient insulin for people with type 1
diabetes. If you are type 1 diabetes, please beware of high ketone when your
blood glucose is too high.
When "KETONE" appears, please test again. If continually appears, please
consult your physician.
CAUTION!
1. If you do not apply blood sample within 3 minutes, or if you accidentally turn
off the monitor by pressing the button, the monitor will alert you with flashing
test strip symbol and continuous beeping. You will need to turn the monitor off
by removing the test strip.
2. To start a blood pressure test after performing a blood glucose test, make
sure that the test strip is removed from the monitor. Then turn the monitor off
and refer to "MEASURE BLOOD PRESSURE".
30
Comparing With Laboratory Results
Results obtained from your monitor may differ somewhat from your laboratory
result due to normal variation. Monitor results can be affected by factors and
conditions that do not affect laboratory results in the same way.
Blood glucose levels can change significantly over short periods, especially if
you have recently exercised, eaten, taken medication, or experienced stress.
The glucose level of blood from fingertip would be higher than blood from a
vein (venous sample) used in lab tests if you have eaten recently. The
difference can be as high as 3.9 mmol/L (70 mg/dL). Therefore, it is best to
fast for eight hours before doing comparison tests.
Before you go to the lab:
Perform a control solution test to make sure that the monitor is working
properly.
It is best to fast for eight hours before comparison test. Take your monitor
with you to the lab.
While at the lab:
Make sure that the samples for both tests (the monitor test and the lab test)
are taken and tested within 15 minutes of each other.
Wash your hands before obtaining a blood sample.
For the monitor test, use fresh blood from the fingertip only.
Never use your monitor with blood that has been collected in a gray-cap test
tube.
Factors such as irregular amount of red blood cells in the blood (a high or low
hematocrit) or loss of body fluid (severe dehydration) may also cause
differences between the monitor result and the laboratory result.
References
1. Surwit, R.S., and Feinglos, M.N.: Diabetes Forecast (1988), April, 49-51
2. Sacks, DB: "Carbohydrates." Burtis, CA, and Ashwood, ER (ed.), Tietz
Textbook of Clinical Chemistry. Philadelphia: WB Saunders Company (1994)
31
HOW TO MEASURE BLOOD GLUCOSE
Is your monitor all set?
Refer to page 16 to replace the
batteries and set the monitor.
Measure blood pressure.
Refer to page 34 for applying the
pressure cuff.
Refer to page 35 for proper
measurement position.
Refer to page 36 for taking a reading
Store your monitor carefully.
Refer to page 39 for how to take
care of your monitor.
Turn the monitor off by pressing the
button.
And then you can:
Check the memory (refer to page 37)
Perform blood glucose test (refer to
page 20)
32
HOW TO MEASURE BLOOD PRESSURE
Suggestions before Measuring
Avoid caffeine, tea, alcohol, and cigarette at least 30 minutes before
measurement.
Wait 30 minutes after exercising or bathing before measurement.
Sit or lie down for at least 10 minutes before measuring.
Do not measure when feeling anxious or tense.
Take a 5-10 minute break between measurements. This break can be
longer if necessary, depending on your physical conditions
Keep the records for your physician as reference.
Blood pressure varies from two hands naturally. Always measure your
blood pressure on the same arm.
33
HOW TO MEASURE BLOOD PRESSURE
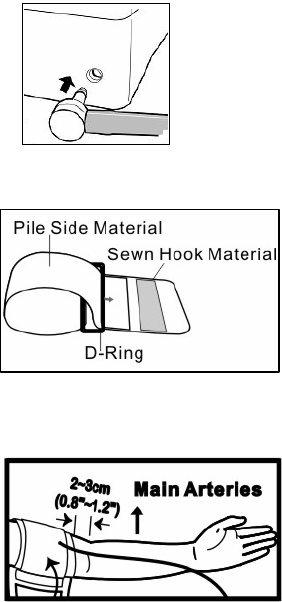
Applying the Pressure Cuff
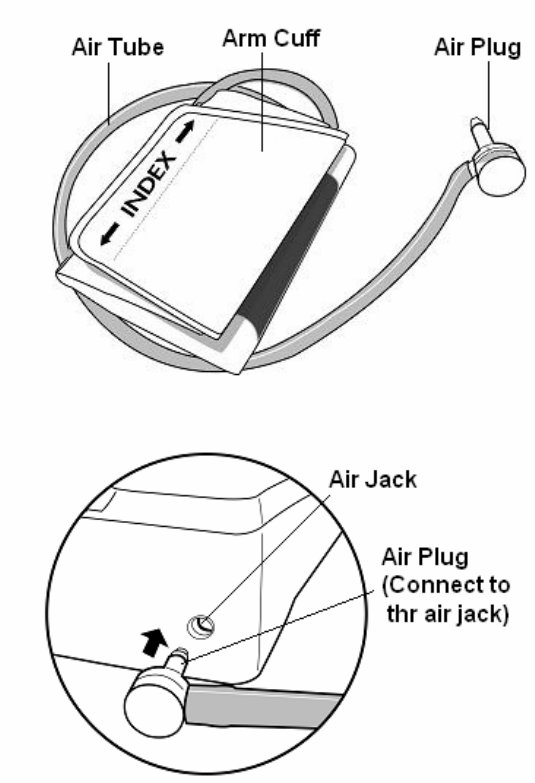
Step 1- Connect the air plug of the tubing to the air jack at the
side of the monitor. (Fig.24)
Step 2- Assemble the cuff as Figure 25. The
smooth cloth is on the inside of the cuff loop and
the metal D-ring will not touch your skin.
Step 3- Hold your left arm in front of you with your
palm facing up. Slide the cuff onto your left arm,
above your elbow. The red line on the edge of the
cuff should be approximately 0.8 to 1.2 inch (2 cm
to 3 cm) above your elbow. Align the tubing over
the main arteries at the inside of your arm. (Fig. 26)
Step 4- When the cuff is positioned correctly, pull the end of the cuff to tighten
the cuff snugly around your upper arm. You should be able to fit your index
finger between the cuff and your arm.
Step 5- Press the hook material firmly against the pile material. The top and
bottom edges of the cuff should be tightened evenly around your upper arm.
34
(Fig. 24)
(Fig. 25)
(Fig. 26)
HOW TO MEASURE BLOOD PRESSURE
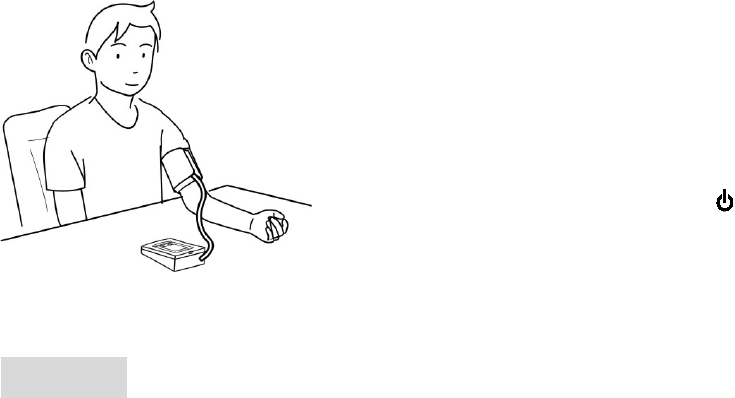
Proper Measurement Position
Please sit and take a rest at least 10 minutes before measuring.
Step1- Place your elbow on a table or other
object. Relax your hand with the palm facing
up. (Fig 27)
Step2- Relax and make sure the cuff is at the
same height as your heart. Press the
button. Remain still and do not talk or move
during the measurement.
(Fig. 27)
WARINING!
It is extremely important that the cuff is at the same level of the heart. If the cuff
is relatively lower (higher) than the heart, the blood pressure measured will be
higher (lower) than the actual value. A 15cm difference in height may result
in an error of 10 mmHg
35
HOW TO MEASURE BLOOD PRESSURE
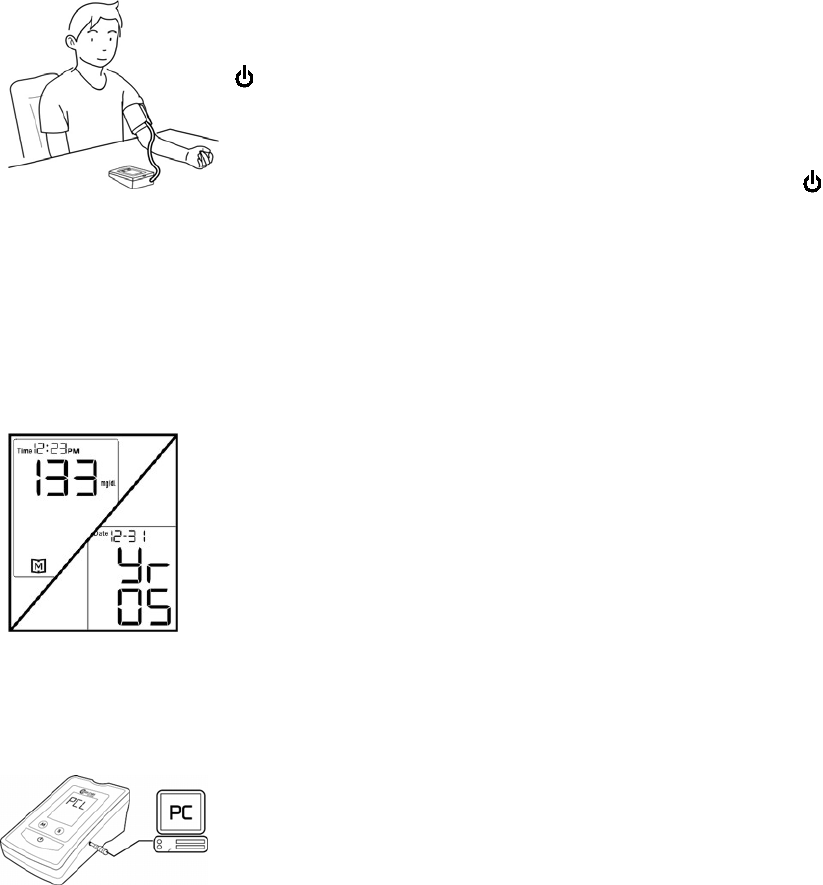
Taking a Reading
Read "Suggestions before Measuring" and "Applying the Pressure Cuff"
before taking a reading. Always apply the pressure cuff before turning on the
device.
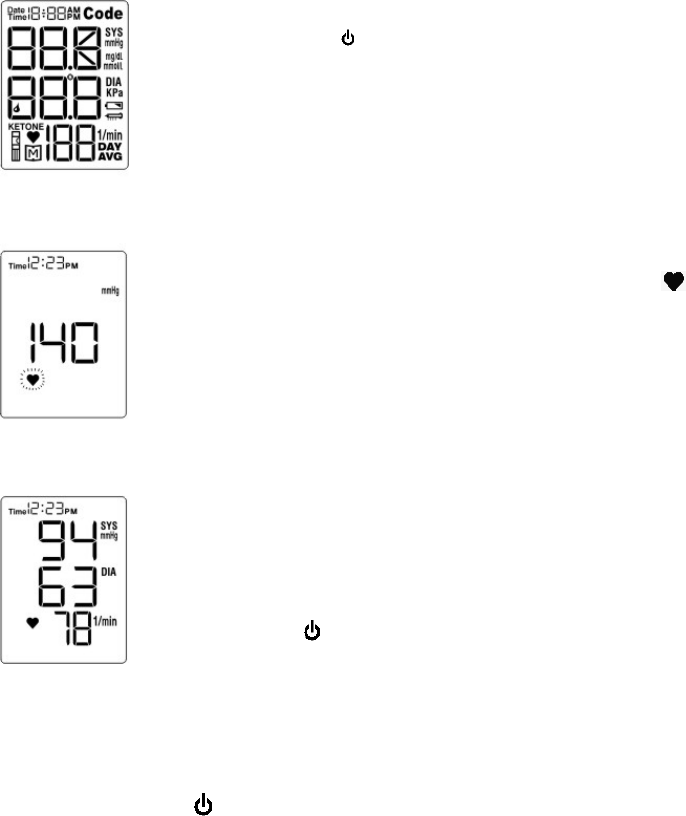
Step 1- Press the button. All the LCD display symbols will
appear with a long “beep” sound (Fig. 28). Then cuff begins to
inflate automatically.
Step 2- After the cuff pressure is reached, the cuff begins to
deflate. When detecting pulse, the Pulse Symbol “ ” will flash,
along with a beeping sound during measurement. (Fig. 29)
Note: If a higher pressure value is needed, the monitor will stop
deflation and inflate again.
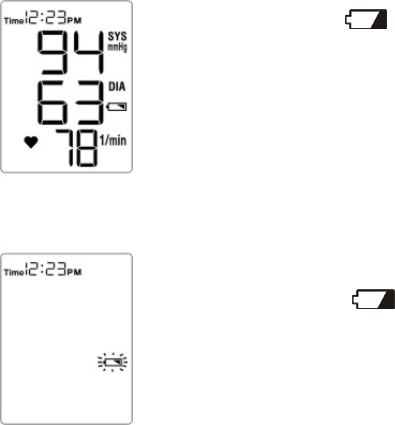
Step 3- After the measurement, the monitor displays the systolic
pressure, diastolic pressure, and heart rate. (Fig. 30)
Step 4- Press button to switch off. Or it will switch off
automatically after three minutes.
Note:
If you press the button during the measurement, the monitor will turn off.
36
(Fig. 28)
(Fig. 29)
(Fig. 30)
HOW TO MEASURE BLOOD PRESSURE
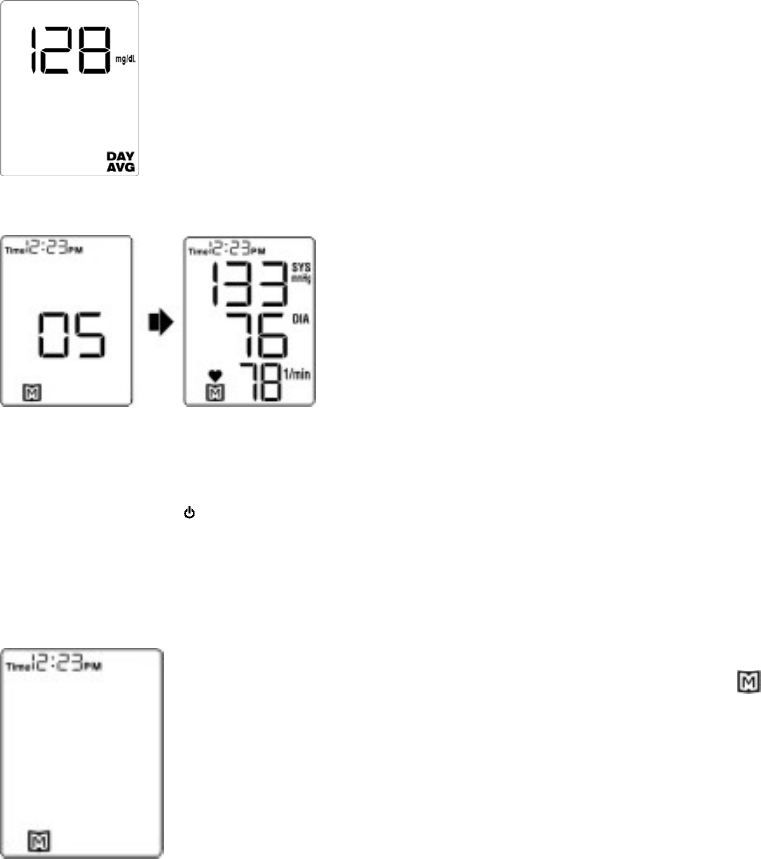
Viewing Memory in the Monitor
Your monitor stores the most 352 recent results of blood glucose and pressure
with date and time in its memory. You can review the test results in memory
with these easy steps.
Step 1- When the monitor is off, press the M Button once. You
will see the average of the blood glucose results. (Fig. 31)
(Fig. 31)
Step 2- Press M Button again to recall the
readings measured previously. The other
results will be displayed in the order of time
and date taken. You will see the number of
the result stored, followed by the result. (Fig.
32) When the memory is full, the oldest
results are deleted as new ones are added.
Step 3- Press the button to turn off the monitor and exit the memory mode,.
Using the monitor for the first time
When using the monitor for the first time, or when there are
no test results in memory, you will only see flashing “ ”.
This means that there are no test results in memory. (Fig.
33)
37
(Fig. 33)
(Fig. 32)
HOW TO USE THE MEMORY FEATURES
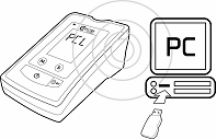
Viewing Results on a Personal Computer
Results in memory can be transmitted to the personal computer either by
cable or by wireless connection for model TD-3250B or TD-3250C,
respectively. Accessories needed to activate this function are:
Health Management Software: is able to download from Taidoc website.
Interface Cable: an optional accessory for model TD-3250B.
Bluetooth Adapter: an optional accessory for model TD-3250C.
Please contact your local customer service for above accessories.
Transmitting data via cable (TD-3250B)
Step1- Install Health Management Software on your computer by
following the instructions provided on Taidoc's website:
http://www.taidoc.com.
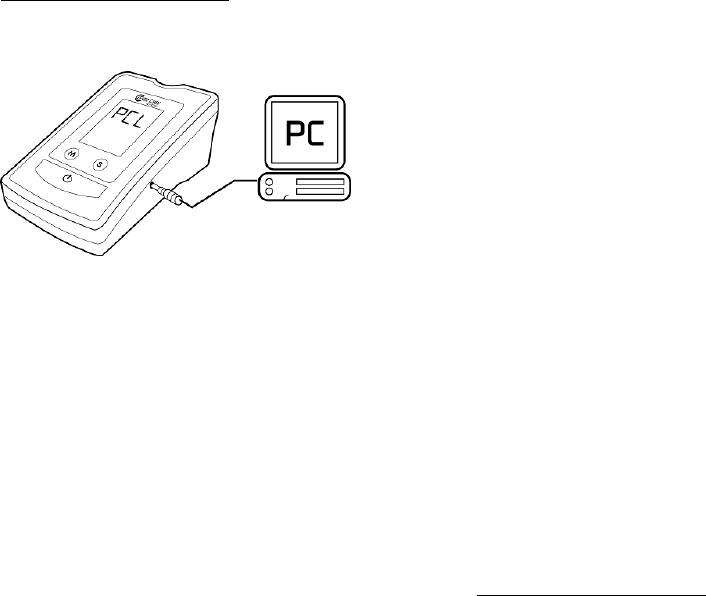
Step 2- Connect to Personal Computer with interface cable
When the monitor is off, connect the serial
Port of PC with the Data Port of monitor by
interface cable. Then "PCL" will appear in
the monitor, indicating it is ready to
transmit data. Follow the instructions
provided in the Health Management
Software to download the data. Results transmitted will include date and time,
and you can view and analyze the data easily.
Transmitting data via Bluetooth adapter (TD-3250C)
Step 1- Install Bluetooth Adapter Software
Step 2- Reset TD-3250C monitor
Step 3- Register TD-3250C
Step 4- Install Health Management Software on your computer by following
the instructions provided on Taidoc's website: http://www.taidoc.com.
Step 5- Connect TD-3250C with PC and view your data.
Please refer to the additional package insert ”How to Start Wireless
Communication of TD-3250C Blood Glucose plus Blood Pressure (BGBP)
Monitor” for detail information.
38
HOW TO USE THE MEMORY FEATURES
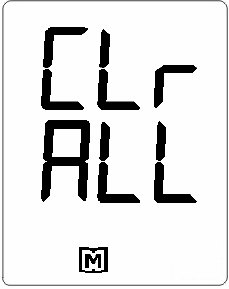
Deleting Memory
To clear the memory, with the monitor turned off, press
and hold the M Button for 3 seconds. “CLr/ALL” then
appears and indicate that ALL the memories stored in
the monitor will be cleared.
39
HOW TO USE THE MEMORY FEATURES
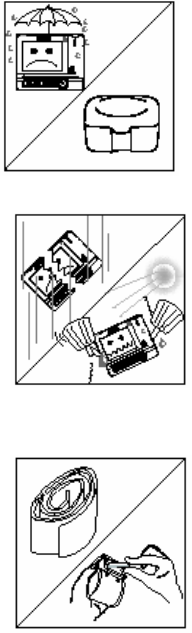
Cleaning
To clean the monitor exterior, wipe with a cloth moistened with tap water or a
mild cleaning agent, then dry the device with a soft and dry cloth. Do not
flush with water.
Do not use organic solvents to clean the monitor and cuff.
The cuff can be cleaned by wiping with a moistened cloth and soap. Do not
immerse in water.
Storage
Storage conditions: -20oC-60oC, 10%-95% relative
humidity.
Always use the storage box provided with the
monitor to transport or store it.
Avoid dropping and strong impact.
Avoid direct sunlight and humidity.
Do not disassemble, modify or try to repair the
monitor or wrist cuff by yourself.
Do not over-wring the cuff and turn the cuff inside
out.
If you are not going to use the monitor for an
extended period, please remove the batteries.
40
HOW TO TAKE CARE OF YOUR MONITOR

ERROR MESSAGE
Please check the chart below for problems you can fix at home without tools. If
you follow “What to Do” but the problem still exists, please contact Customer
Care Line: (703) 591-4934 for help.
Message Cause What to Do
Err.00 Weak pulse.
Err.02 Monitor can not figure out
systolic pressure.
Err.04 Monitor can not figure out
diastolic pressure or it is out
of range.
Refit cuff tightly, relax, and repeat
measurement as shown in "Applying
the Pressure Cuff".
Err.22 Invalid coding. Try a new check & code strip and insert
again.
Err.24 Used strip insertion. Use a new strip.
Err.25 Ambient temperature is
below operating
temperature.
Err.26 Ambient temperature is over
operating temperature.
Please operate this monitor between
10℃ -40℃
Lo Blood glucose value lower
than 20 mg/dL
Hi Blood glucose value higher
than 600 mg/dL
Follow directions in “Measure Blood
Glucose” and test again. Please seek
immediate medical assistance.
Err.05
Err.06
Err.09
Err.10
Err.11
Err.15
Err.20
Err.28
Those messages indicate internal problems with the monitor. You
cannot fix by yourself.
Please contact Customer Care Line: (703) 591-4934 for help.
41
TROUBLESHOOTING
Please check the chart below for problems you may encounter during
measurement and what to do. If you follow “What to Do” but the problem still
exists, please contact Customer Care Line: (703) 591-4934 for help.
Blood Glucose Function
If no message appears after inserting a test strip:
POSSIBLE CAUSE WHAT TO DO
Batteries exhausted. Replace the batteries.
Batteries incorrectly installed or
absent.
Check that the batteries are correctly
installed.
Test strip inserted upside down or not
completely inserted.
Insert the test strip correctly
With the contact bars end first and
facing up.
Defective monitor. Please contact your local customer
service for help.
If the test does not start after applying the sample:
POSSIBLE CAUSE WHAT TO DO
Insufficient blood sample. Repeat the test with a new test strip
and a larger sample.
Defective test strip. Repeat the test with a new test strip.
Defective monitor. Please contact your local customer
service for help.
If you accidentally touch the button during glucose measurement, or if you
do not apply a drop of blood in 3 minutes, the monitor will turn off with a
beeping sound. Please remove the strip from the slot.
If you remove the strip form the slot before the monitor finishes count down,
the result will not be accurate. Please use a new strip to test again.
42
Blood Pressure Function
Condition Cause What to do
Batteries incorrectly
installed or absent.
Insert the batteries in the correct
position.
No display
after pushing
the button. Batteries exhausted. Replace the batteries.
Batteries exhausted. Replace the batteries. Battery
symbol
appears on
LCD.
Batteries might
perform poorly at low
temperatures.
Warm up the batteries, or place
at a warm place for a while, then
test again
Moving during
measurement.
Repeat measurement. Heart rate
higher/lower
than user’s
average.
Measuring right after
exercise.
Rest at least 30 minutes before
measurement.
May be not in correct
position during
measuring.
Adjust to a correct position to
measure.
Result higher
or lower than
user’s
average
measurement.
Blood pressure
naturally varies from
time to time.
Keep in mind for next
measurement.
Normal action, if user’s blood pressure is higher than the
initial pressure value, the device would automatically pump
to a higher pressure by 20 mmHg each time of inflation until
it reaches a suitable pressure.
Cuff inflates
again during
measuring.
Cuff is not fastened. Fasten the cuff again.
Power goes
off when not
used for a
while.
This feature is built into
the system.
Push the button again.
43
SPECIFICATIONS
System performance
Power source: Four 1.5V alkaline AA batteries
Size of monitor w/o cuff: 137mm (L) x 90 mm (W) x 54 mm (H)
Memory: 352 measurement results with date& time
Power saving: Automatic power off if idle for 3 minutes
System operating condition: 10℃-40℃ (50-104℉), below 85% RH
System storage condition: 4℃ to 40℃ (39-104℉), below 85% RH
Bluetooth Carrier Frequency 2400MHz to 2483.5MHz
Bluetooth Modulation Method GFSK,1Mbps,0.5BT Gaussian
Maximum Data Rate Asynchronous:723.2kbps/57.6kbps
Synchronous:433.9kbps/433.9kbps
Transmission Power +3dBm to –20dBm; Power control 4 stage
Receiving Signal Range -88dBm to -20 dBm
Receiver IF Frequency 1.5MHz center frequency
Blood glucose measurement performance
Measurement unit: mg/dL or mmol/L
Linear range: 20-600 mg/dL (1.1 -33.3 mmol/L)
Precision: ±5 % (CV)
Accuracy: ±15mg/dL when glucose <75mg/dL
±20% when glucose ≧75mg/dL
Ketone warning: glucose value is over 240 mg/dL
Blood pressure measurement performance
Pressure range: 0-300 mmHg
Heart rate range: 40-199 beat per minute
Measurement unit: mmHg or KPa
Accuracy of pressure: ±3mmHg or ±2% of reading
Accuracy of heart rate: ±4% of reading
Maximum inflation pressure: 300 mmHg
44
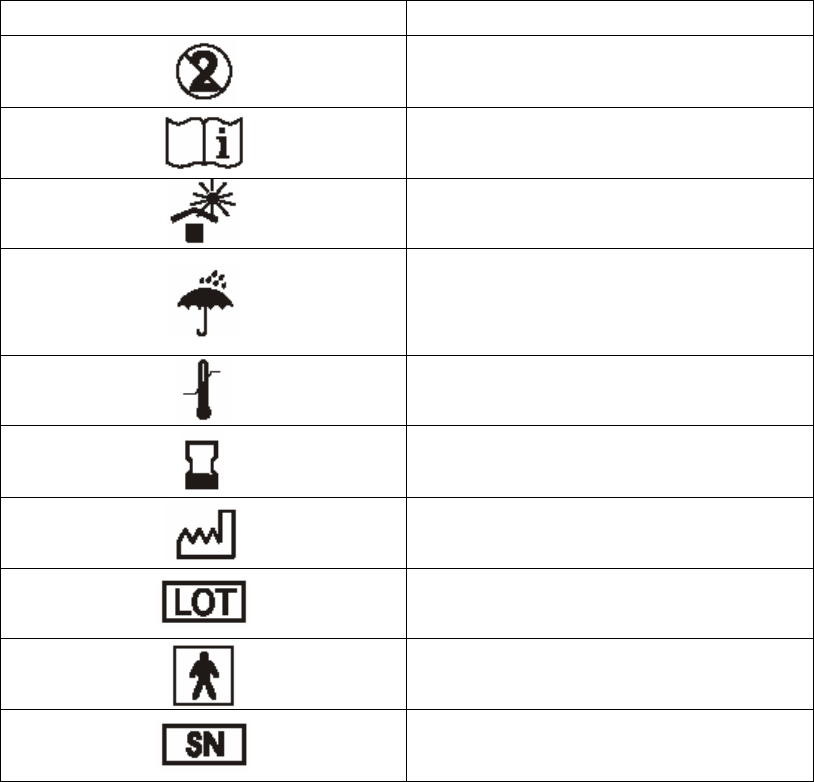
SYMBOLS INFORMATION
Symbol Referent
Do not re-use
Consult operating instruction
Keep away from sunlight
Keep dry
Temperature limitation
Use by
Date of manufacture
Batch code
Type BF Equipment
Serial number
45
Federal Communications Commission (FCC) Statement
15.21
You are cautioned that changes or modifications not expressly approved by
the part responsible for compliance could void the user’s authority to operate
the equipment.
15.105(b)
This equipment has been tested and found to comply with the limits for a Class
B digital device, pursuant to part 15 of the FCC rules. These limits are
designed to provide reasonable protection against harmful interference in a
residential installation. This equipment generates, uses and can radiate radio
frequency energy and, if not installed and used in accordance with the
instructions, may cause harmful interference to radio communications.
However, there is no guarantee that interference will not occur in a particular
installation. If this equipment does cause harmful interference to radio or
television reception, which can be determined by turning the equipment off and
on, the user is encouraged to try to correct the interference by one or more of
the following measures:
-Reorient or relocate the receiving antenna.
-Increase the separation between the equipment and receiver.
-Connect the equipment into an outlet on a circuit different from that to
which the receiver is connected.
-Consult the dealer or an experienced radio/TV technician for help.
Operation is subject to the following two conditions:
1) this device may not cause interference and
2) this device must accept any interference, including interference that may
cause undesired operation of the device.
46
FCC RF Radiation Exposure Statement:
This equipment complies with FCC radiation exposure limits set forth for an
uncontrolled environment. End users must follow the specific operating
instructions for satisfying RF exposure compliance. This transmitter must not
be co-located or operating in conjunction with any other antenna or
transmitter.
Note
The changes or modifications not expressly approved by the party responsible
for compliance could void the user’s authority to operate the equipment.
Manufacturer:
TaiDoc Technology Corporation
4F, No.88, Sec1, Kwang-Fu Rd.
San-Chung, Taipei County, Taiwan
TEL: 886-2-66358080
FAX: 886-2-66355959
At all other times, you should contact your health care professional for
assistance.
47
U.S.A Representative
Chunming Shih
4331 Stevens Battle Lane
Fairfax, VA 22033
Custom Care Line:
(703) 591-4934
Hours of Operation: 9 am- 4 p.m. EST
(14:00 - 21:00 GMT)