TASER T00300ATC TASER AXON TACTICAL COMPUTER User Manual AXONOperatingManual 0 0
TASER International TASER AXON TACTICAL COMPUTER AXONOperatingManual 0 0
TASER >
Users Manual

AXON™ 4 Jan 2010
TASER International Private & Confidential 1
TASER AXON™ System
Operating Manual
(DRAFT 1.3, 1/4/10)

AXON™ 4 Jan 2010
TASER International Private & Confidential 2
INTRODUCTION ........................................................................................................................................ 3
WARNING ................................................................................................................................................... 3
WHAT IS THE AXON SYSTEM? .................................................................................................................. 5
HARDWARE ................................................................................................................................................ 6
AXON TACTICAL COMPUTER (ATC) ......................................................................................................... 6
HEADCAM .................................................................................................................................................. 7
COMHUB .................................................................................................................................................... 8
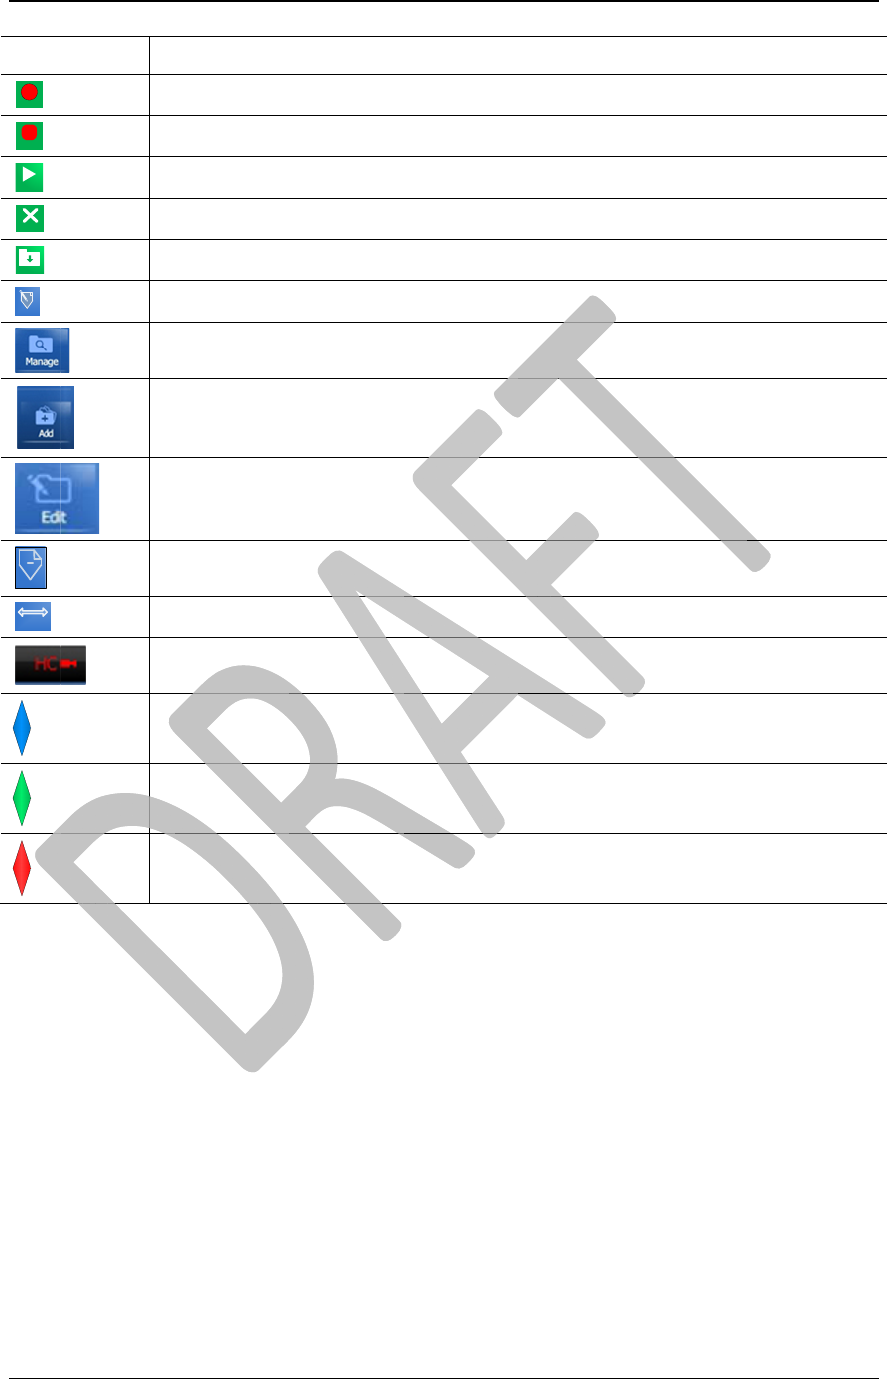
TOUCH SCREEN ICONS ................................................................................................................................ 9
AUDIO PROMPTS....................................................................................................................................... 11
SETUP ......................................................................................................................................................... 12
EVIDENCE.COM REGISTRATION ........................................................................................................... 12
CONFIGURING THE ATC ........................................................................................................................... 13
CHARGING THE ATC ................................................................................................................................ 14
ASSEMBLY ................................................................................................................................................ 15
ASSEMBLING THE HEADCAM ................................................................................................................... 15
ASSEMBLING THE EARPIECE ..................................................................................................................... 15
ASSEMBLING THE AXON ......................................................................................................................... 16
GETTING STARTED ................................................................................................................................ 18
LOGGING IN .............................................................................................................................................. 18
NAVIGATING AROUND THE ATC .............................................................................................................. 21
BASIC OPERATIONS .............................................................................................................................. 25
AXON MODES ......................................................................................................................................... 25
STANDARD AXON OPERATION ................................................................................................................ 28
PLAYING BACK EVENT VIDEO .................................................................................................................. 30
ADDING MARKERS ................................................................................................................................... 31
SHOWING MARKS ..................................................................................................................................... 35
RETURNING TO THE ETM DOCK ............................................................................................................... 36
ADDITIONAL FEATURES ...................................................................................................................... 39
EDITING MARKS ....................................................................................................................................... 39
MANAGING EVENTS ................................................................................................................................. 41
TROUBLESHOOTING ............................................................................................................................. 43
SCREENS ................................................................................................................................................... 43

AXON™ 4 Jan 2010
TASER International Private & Confidential 3
Introduction
Warning
Changes or modifications not expressly approved by the manufacturer could void the
user’s authority to operate the equipment.
Note: This equipment has been tested and found to comply with the limits for a Class B
digital device, pursuant to part 15 of the FCC Rules. These limits are designed to provide
reasonable protection against harmful interference in a residential installation. This
equipment generates, uses and can radiate radio frequency energy and, if not installed and
used in accordance with the instructions, may cause harmful interference to radio
communications. However, there is no guarantee that interference will not occur in a
particular installation. If this equipment does cause harmful interference to radio or
television reception, which can be determined by turning the equipment off and on, the
user is encouraged to try to correct the interference by one or more of the following
measures:
• Reorient or relocate the receiving antenna.
• Increase the separation between the equipment and receiver.
• Connect the equipment into an outlet on a circuit different from that to which the
receiver is connected.
• Consult the dealer or an experienced radio/TV technician for help.
FCC/IC NOTICE:
This device meets the body worn human exposure limits found in OET Bulletin 65, 2001,
and ANSI/IEEE C95.1, 1992. Proper operation of this radio according to the instructions
found in this guide will result in exposure substantially below the FCC’s recommended
limits. To comply with the FCC and ANSI C95.1 RF exposure limits, this device has
been tested for compliance with FCC RF Exposure (SAR) limits in the typical
configuration. It is recommended that the antenna must not be co‐located or operating in
conjunction with any other antenna or radio transmitter.
NOTE: The radiated output power of this wireless device is far below the FCC radio
frequency exposure limits. Nevertheless, this device should be used in such a manner that
the potential for human contact (i.e., touching the wireless unit) during normal operation
is minimized.
NOTE: Unauthorized modifications could void the user’s authority to operate the
equipment.
RSS 210 Warning Statement: The installer of this radio equipment must ensure that the
antenna is located or pointed such that it does not emit RF field in excess of Health
Canada limits for the general population; consult Safety Code 6, obtainable from Heath
Canada’s website www.hc‐sc.gc.ca/rpb.
THIS MODEL DEVICE MEETS THE GOVERNMENT’S REQUIREMENTS FOR
EXPOSURE TO RADIO WAVES:

AXON™ 4 Jan 2010
TASER International Private & Confidential 4
Your wireless device is a radio transmitter and receiver. It is designed and manufactured
not to exceed the emission limits for exposure to radiofrequency (RF) energy set by the
Federal Communications Commission of the U.S. Government. These limits are part of
comprehensive guidelines and establish permitted levels of RF energy for the general
population. The guidelines are based on standards that were developed by independent
scientific organizations through periodic and thorough evaluation of scientific studies.
The standards include a substantial safety margin designed to assure the safety of all
persons, regardless of age and health. The exposure standard for wireless devices
employs a unit of measurement known as the Specific Absorption Rate, or SAR. The
SAR limit set by the FCC is 1.6W/kg. Tests for SAR are conducted using standard
operating positions specified by the FCC with the device transmitting at its highest
certified power level in all tested frequency bands. Although the SAR is determined at
the highest certified power level, the actual SAR level of the device while operating can
be well below the maximum value. Before a device model is available for sale to the
public, it must be tested and certified to the FCC that it does not exceed the limit
established by the government‐adopted requirement for safe exposure. The tests are
performed in positions and locations (e.g., next to the body) as required by the FCC for
each model. The FCC has granted an Equipment Authorization for this model device with
all reported SAR levels evaluated as in compliance with the FCC RF emission guidelines.
SAR information on this model device is on file with the FCC and can be found under the
Display Grant section http://www.fcc.gov/oet/fccid after searching on FCC ID.
AXON™ 4 Jan 2010
TASER International Private & Confidential 5
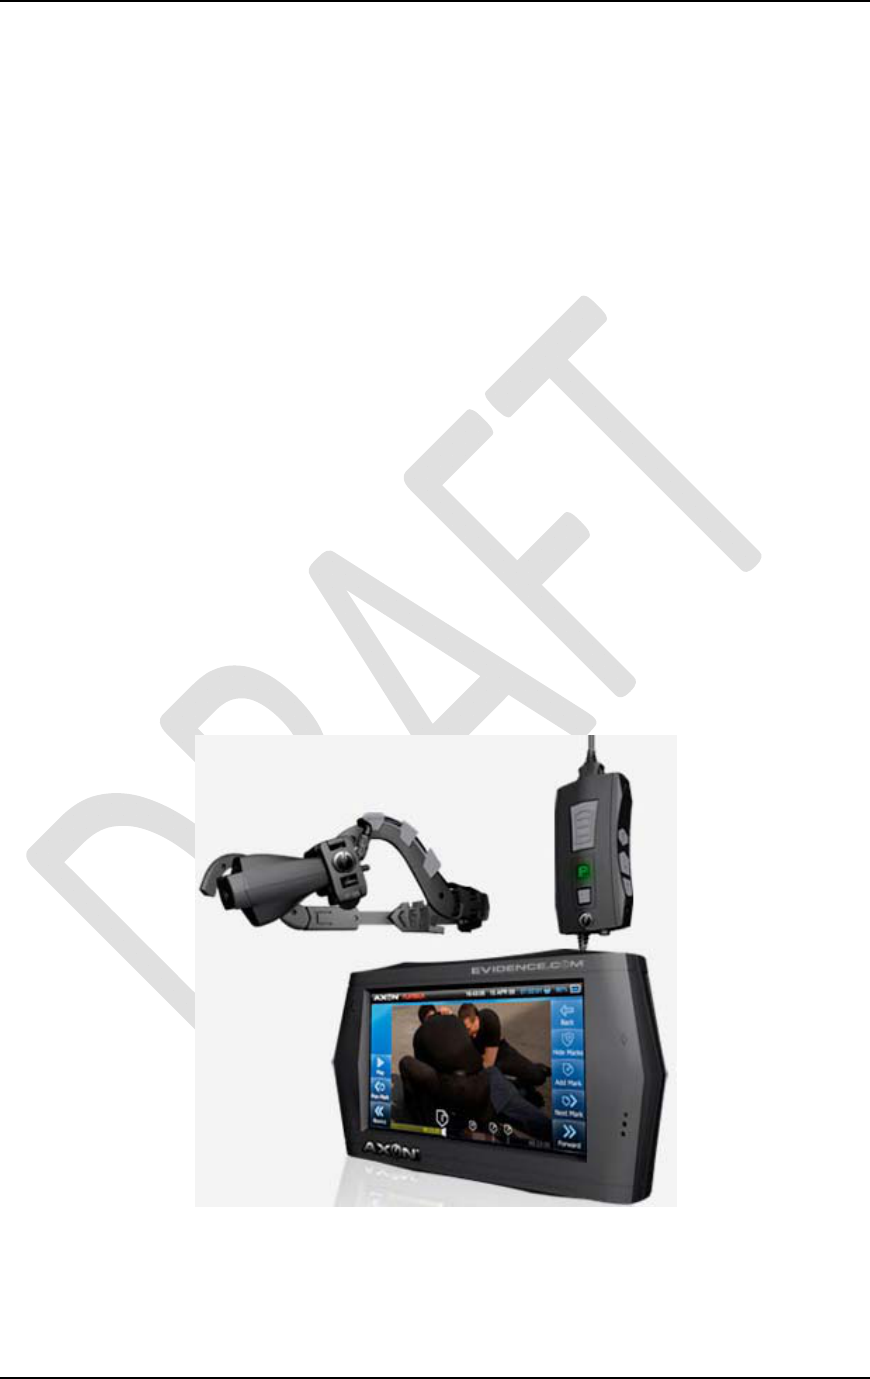
What is the AXON System?
The TASER AXON™ system is a tactical computer combined with an audio/visual
recording device and a control box to be worn by a peace officer on duty. The AXON
system is designed to document a shift’s events for later storage and analysis. The AXON
system also allows you to replay recorded events and make audio comments. At the end
of a shift, you can transfer the files containing the day’s events to the
EVIDENCE.COM™ services site via the SYNAPSE™ Evidence Transfer Manager
(ETM).
The AXON system has several operating modes designed to accommodate the needs of
law enforcement. The standard mode is a continuous loop, which eliminates the need to
go through hours of irrelevant footage. The other modes are designed to record important
events and recognize the need for operator privacy. There also is a PLAYBACK mode
for reviewing event footage. The system also has annotation features so you can make
text and voice comments about recorded events.
This manual begins with the Hardware chapter, describing the physical components.
Setup shows how create an EVIDENCE.COM account. The Assembly chapter covers
connecting the components. Getting Started covers the ATC. The Basic Operations
chapter provides detailed instructions on using an AXON system to gather information.
The Standard AXON Operation subsection summarizes these operations as they might be
used during your shift.
There is more to the AXON product than recording videos and uploading them. You can
and add notes—in text or voice form—to provide additional documentation. See the
Additional Features chapter for more information.
AX
O
TAS
E
Ha
r
The
p
Com
H
AX
O
The
A
272
r
uplo
a
O
N™
E
R Internatio
n
r
dware
p
rimary co
m
H
ub.
O
N Tactic
a
A
TC is a Li
n
r
esolution.
T
a
d of files to
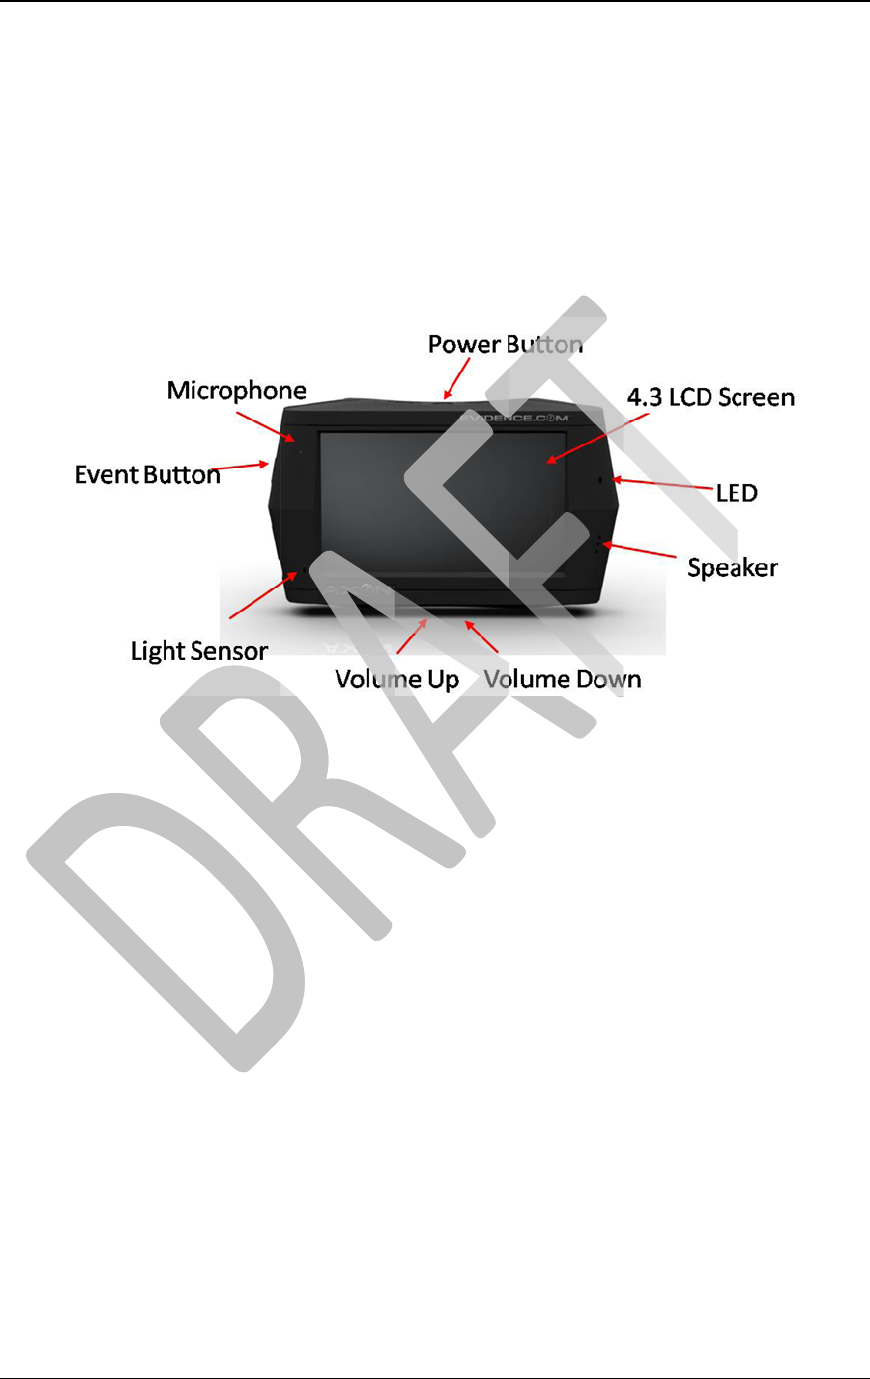
Power B
u
and to wa
k
A momen
t
five secon
d
accidently
seconds.
Microph
o
LCD Scr
e
ATC EV
E
mode and
out of the
E
During re
c
does not a
l
viewing.
LED – Di
s
Light Sen
Volume
U
files.
Speaker
–
n
al
m
ponents are
a
l Comp
u
n
ux-
b
ased t
a
T
his portion
o
the EVIDE
N
u
tton – Turns
k
e it up. A th
r
t
ary press tur
n
d
s to turn the
turning the
A
o
ne – Record
s
e
en – Used to
E
NT Button
–
begins recor
d
E
VENT mo
d
c
ording, if th
e
l
ter or affect
t
s
plays the m
o
sor – Adjust
s
U
p/Volume
D
–
For playing
Privat
e
the AXON
u
ter (ATC
)
a
ctical comp
u
o
f the AXO
N
N
CE.COM
the ATC on
a
r
ee- to five-s
e
n
s the sleep
m
ATC off. T
h
A
TC off. To
r
s
the audio p
o
view video
a
–
A moment
a
d
ing video an
d
e.
e
event butto
n
t
he video in
a
o
de that the
A
s
the LCD sc
r
D
own – Adju
s
back audio/v
e
& Confiden
t
Tactical Co
m
)
u
ter with a
4
N
system al
l
services sit
e
a
nd off; also
u
e
cond press a
c
m
ode on and
o
h
e 5-second r
e
r
eset the AT
C
o
rtion of eve
n
a
nd other dat
a
a
ry press take
d audio. A fi
v
n
is pressed, t
h
a
ny way. It o
n
A
TC is in (bu
f
r
een display i
n
s
ts the ATC v
ideo files.
t
ial
m
puter (AT
C
4
.3″ liquid c
r
l
ows audio/
v
e
.
u
sed to put t
h
c
tivates the
A
o
ff. Press an
d
e
quirement r
e
C
, press and h
o
n
ts, as well as
a
, and enter i
n
s the AXON
v
e-second pr
e
h
is creates a
“
n
ly serves as
f
fering, priva
c
n
tensity base
olume when
p
C
), HeadCa
m
r
ystal displa
y
v
ideo playb
a
h
e ATC in th
e
A
TC.
d
hold the po
w
e
duces the po
s
o
ld the butto
n
your voice a
n
n
formation.
system into t
h
e
ss takes the
A
“
mark” on th
e
a bookmark
f
c
y, or recordi
d on ambient
p
laying back
4 Jan 201
m
, and
y
of 480 x
a
ck and
e
sleep mode
w
er button fo
r
s
sibility of
n
for eight
n
notations.
h
e EVENT
A
XON syste
m
e
video. Thi
s
f
or later
ng).
light.
audio/video
0
6
r
m
s

AX
O
TAS
E
Hea
The
H
O
N™
E
R Internatio
n
dCam
H
eadCam a
s
Cable M
a
HeadCa
m
Imager C
l
Headban
d
Lens – T
h
Neck Pad
s
n
al
s
sembly inc
o
a
nagement –
m
– A module
l
amp – Hold
s
d
– Enables t
h
h
e camera len
s
s
– Rubberiz
e
Privat
e
o
rporates a
m
Metal clips t
h
containing t
h
s
the HeadC
a
h
e user to we
a
s
.
e
d pads desig
n
e
& Confiden
t
m
icrophone,
h
at hold wire
s
h
e camera, m
i
a
m to the hea
d
a
r the HeadC
n
ed to impro
v
t
ial
headlamp,
a
s
to the head
b
i
crophone, a
n
d
band.
am on the he
a
v
e headband
a
nd radio ea
r
b
and.
n
d infrared la
m
a
d.
fit and comf
o
4 Jan 201
r
piece.
m
p.
o
rt.
0
7
AX
O
TAS
E
Co
m
The
C
O
N™
E
R Internatio
n
m
Hub
C
omHub pr
o
ComHub
the EVEN
PTT – Th
e
radios.
TACOM
™
will provi
d
Privacy I
n
activated.
PRIVAC
Y
Volume
U
system.
3.5 mm J
a
n
al
o
vides quic
k
EVENT Bu
t
T mode.
e
Push to Tal
k
™
Button –
F
d
e fo
r
comm
u
n
dicator Wi
n
Y
Button –
T
U
p/Volume
D
a
ck – Conne
c
Privat
e
k
operation
o
t
ton – Takes
t
k
button is u
s
F
or a capabili
t
u
nication wit
h
n
dow – This
L
T
urns the PRI
V
D
own – Allo
w
c
ts the ComH
u
e
& Confiden
t
o
f the syste
m
t
he AXON s
y
s
ed when the
t
y currently
u
h
tactical co
m
L
ED is illum
i
V
ACY mode
w
s you to adj
u
u
b to certain
t
ial
m
in the field
y
stem out of
t
ComHub is
c
u
nder develo
p
m
munication-
e
i
nated when
t
on and off.
u
st the sound
v
police radios
.
t
he buffering
c
onnected to
s
p
ment, the T
A
e
nabled TAS
E
t
he PRIVAC
Y
v
olume for y
o
.
4 Jan 201
mode and in
t
s
elect police
A
COM butto
n
E
R equipme
n
Y
mode is
o
ur AXON
0
8
t
o
n
n
t.
AX
O
TAS
E
Tou
c
This
touc
h
I
Forward
Rewind
Skip
O
N™
E
R Internatio
n
c
h Screen
section des
c
h
screen.
con
S
e
I
n
I
n
P
r
P
l
S
u
B
a
E
v
S
h
H
Ad
F
o
R
e
S
k
S
k
S
c
E
v
N
a
T
e
n
al
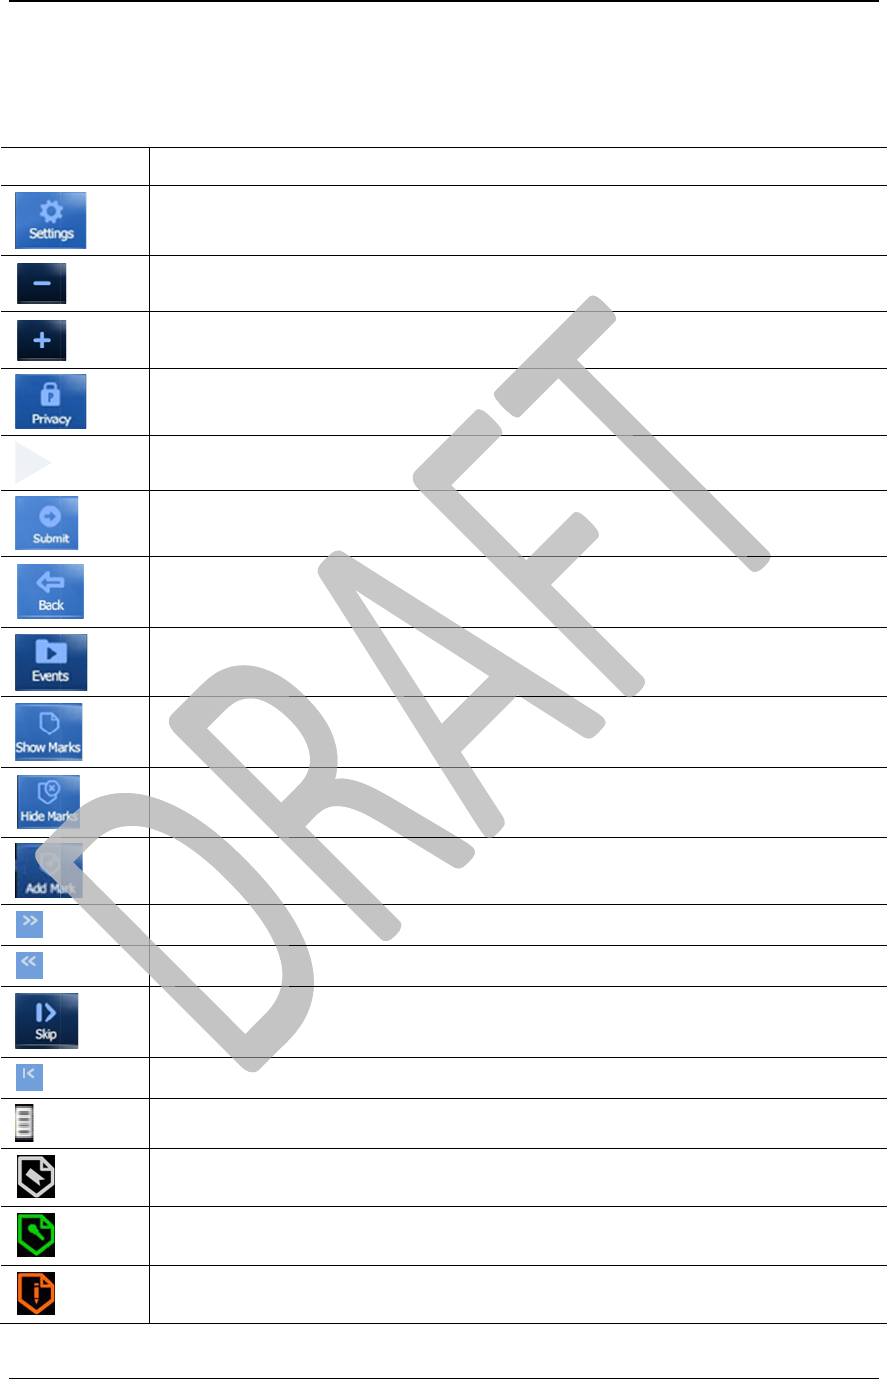
Icons
c
ribes the va
r
e
ttin
g
s
(
over
a
tensit
y
contr
o
tensit
y
contr
o
r
ivac
y
mode
l
a
y
video
u
bmit inform
a
a
ck to previo
u
v
ents
(
acces
s
h
ow Marks
(
t
e
ide Marks
(
te
x
d
d Mark
(
text
o
rward throu
g
e
wind a vide
o
k
ip forward t
o
k
ip backward
c
rubber
(
mov
v
ent mark
a
rration mar
k
e
xt annotatio
n
Privat
e
r
ious button
a
ll
)
o
l
o
l
a
tion or instru
c
u
s
s
recorded ev
e
e
xt and narra
t
x
t and narrati
o
or narration
)
g
h a video
o
o
a mark
to a mark
e marks to di
f
k
n
mark
e
& Confiden
t
s and indica
Desc
r
c
tions
e
nts
)
t
ion
)
o
n
)
f
ferent stop p
o
t
ial
tors availab
l
r
iption
o
ints
)
l
e through t
h
4 Jan 201
h
e ATC’s
0
9
AX
O
TAS
E
I
Start
Stop
Play
Back
Save
Edit Mark
Delete
Move
O
N™
E
R Internatio
n
con
S
t
S
t
P
l
C
a
S
a
E
d
M
Ad
E
d
R
e
M
T
h
B
U
P
R
E
V
n
al
t
art recordin
g
t
op recordin
g
l
a
y
back a na
a
ncel a narra
t
a
ve a narrati
o
d
it Mark – ed
i
ana
g
e event
d
d an event
c
d
it an event
c
e
move a mar
ove a mark
h
e HeadCam
U
FFERING
m
R
IVACY mod
V
ENT mode
a
Privat
e
a narration
a narration
rration for re
v
t
ion
o
n
i
t a text anno
t
cate
g
ories
c
ate
g
or
y
c
ate
g
or
y
k
is not conne
c
m
ode active
(b
e active
(g
re
e
a
ctive
(
red L
E
e
& Confiden
t
Desc
r
v
iew before s
a
t
ation or audi
o
c
ted to the A
T
b
lue LED
)
e
n LED
)
E
D
)
t
ial
r
iption
a
vin
g
it
o
narration
T
C
4 Jan 201
1
0
1
0

AXON™ 4 Jan 2010
TASER International Private & Confidential 11
Audio Prompts
The AXON system features voice messages called audio prompts that inform you of the
operating mode in use and the system’s status. You normally will hear these audio
prompts through the HeadCam, though they will issue through the ATC’s speaker if the
HeadCam or ComHub is disconnected.
Audio Prompt Explanation
BUFFERING mode active The ATC has transitioned from one operating mode to the
BUFFERING mode.
EVENT mode active The ATC has transitioned from one operating mode to the EVENT
mode. This message will repeat every 15 minutes.
PRIVACY mode active The ATC has transitioned from one operating mode to the
PRIVACY mode. This message will repeat itself 15 minutes.
Battery low The battery has 10 percent or less remaining capacity. This
message will repeat every 15 minutes.
Battery depleted The battery is depleted.
Memory low The memory is 90 percent or more full. This message will repeat
every 15 minutes.
Memory full The memory is full, and no more information can be stored in the
ATC. This message will repeat every 30 seconds.
Video signal lost The HeadCam or ComHub is not connected.
AXON™ 4 Jan 2010
TASER International Private & Confidential 12
Setup
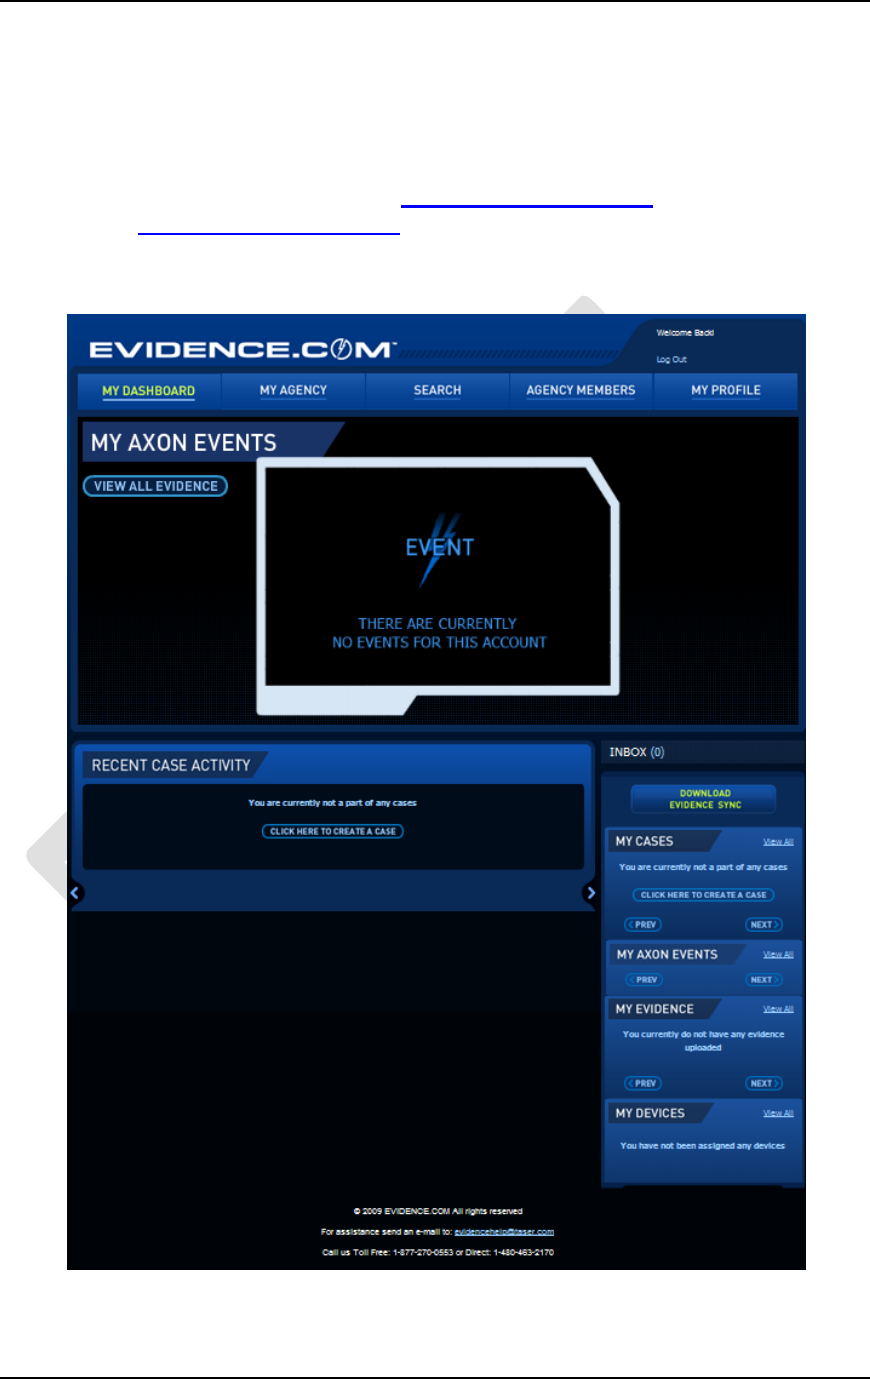
EVIDENCE.COM Registration
Before you can use the AXON, you will need to make sure you are registered and have
an account on EVIDENCE.COM. Go to https://pro.evidence.com or if you are a pilot
agency, go to https://pilot.evidence.com
Once you have set up your account, you will be active in the system and can log in to the
ATC.
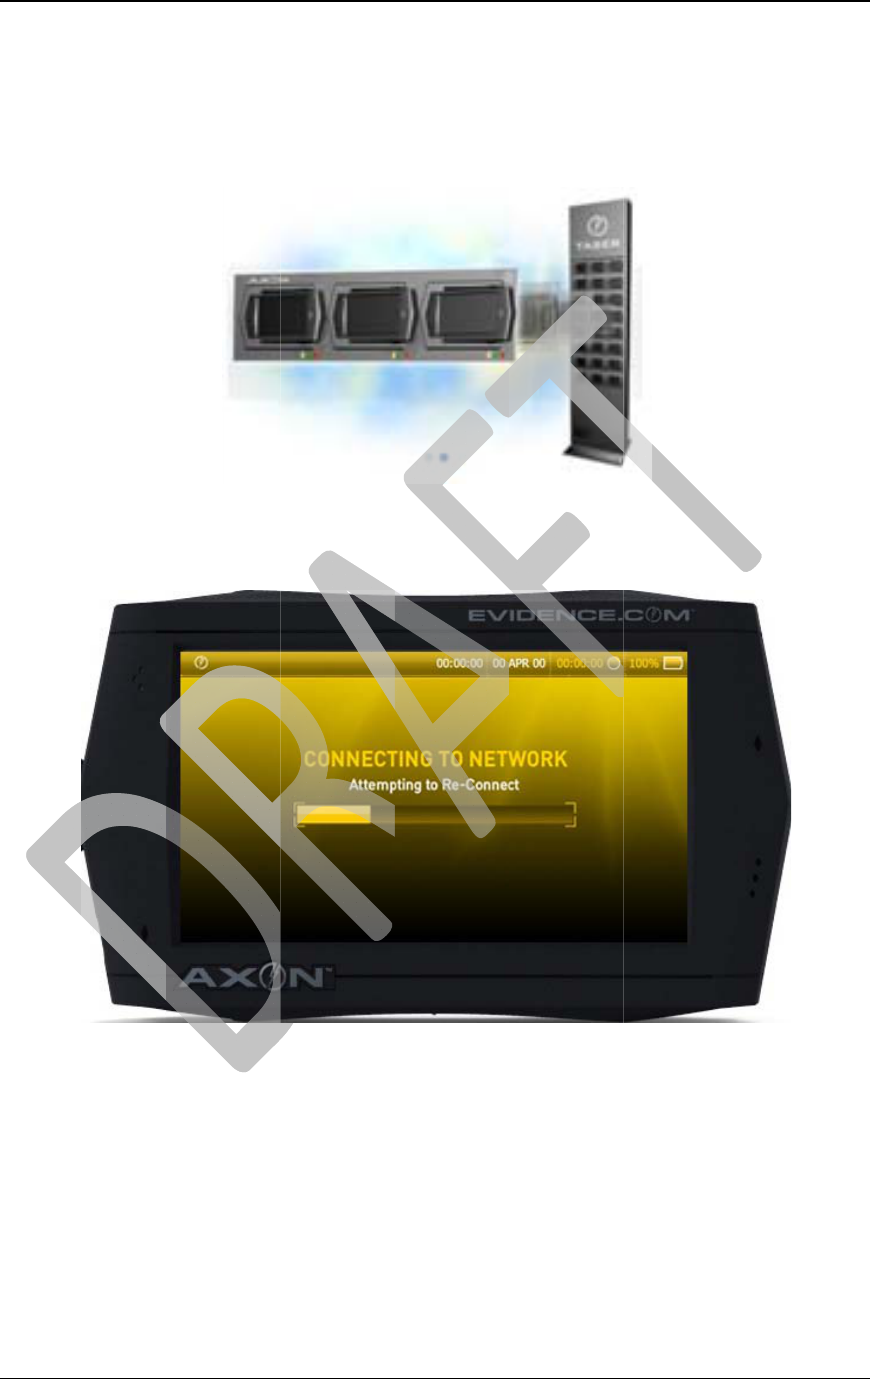
AX
O
TAS
E
Co
n
1.
2.
3.
4.
5.
6.
O
N™
E
R Internatio
n
n
fi
g
urin
g
t
Out of the
b
included, a
n
Dock the A
T
The ATC
w
such as ne
w
is automati
c
Upon initia
l
prompt you
the device
h
• You ma
while o
u
lost.
Once the A
T
See the Lo
g
n
al
he ATC
b
ox, the AT
C
n
d the powe
r
T
C to the E
T
w
ill commun
i
w
software u
p
c
and no “IT
l
docking, t
h
to “Tap scr
e
h
as been act
i
y also see t
h
u
t on the fie
l
T
C has com
m
gg
ing In sect
i
Privat
e
C
will alrea
d
r
will be off.
T
M.
i
cate with t
h
p
grades for
t
” effort is n
e
h
e ATC scre
e
e
en to long
o
i
vated and d
o
h
is screen a
g
l
d, or if you
r
m
unicated
w
i
on to learn
h
e
& Confiden
t
d
y have the
b
h
e ETM to g
a
t
he operatin
g
e
eded.
e
n will disp
l
o
n to EVID
E
o
cked after
m
g
ain if you e
n
r
agency’s n
e
w
ith EVIDE
N
h
ow to acti
v
t
ial
b
attery and
d
a
ther any ne
g
system. C
l
ay a yellow
E
NCE.CO
M
m
anufacturi
n
n
counter a p
e
twork con
n
N
CE.COM,
v
ate the AT
C
d
ata storage
c
cessary inf
o
onfiguratio
n
alert screen
M
,” as this is
t
n
g.
ower loss o
n
n
ection to th
e
the unit is r
e
C
for field u
s
4 Jan 201
1
c
ard
o
rmation,
n
of the AT
C
that will
t
he first tim
e
n
the ATC
e
ETM gets
e
ady to use.
s
e.
0
1
3
C
e

AXON™ 4 Jan 2010
TASER International Private & Confidential 14
Charging the ATC
You have three options for charging the battery in your ATC; via a wall charger, car
charger, or by connecting the ATC to the SYNAPSE ETM.
To use the wall charger:
1. The ATC can be turned off, or left on.
2. Plug the charger into the ATC and then plug the charger into the wall.
To use the car charger:
1. The ATC can be turned off, or left on.
2. Plug the charger into the ATC and then plug the charger into the inverter, then plug
that into 12-volt car receptacle.
To charge via ETM:
1. Slide the ATC into an ETM “bank” or “dock.”
2. The ATC will automatically begin charging, whether the device is turned on or off.
AXON™ 4 Jan 2010
TASER International Private & Confidential 15
Assembly
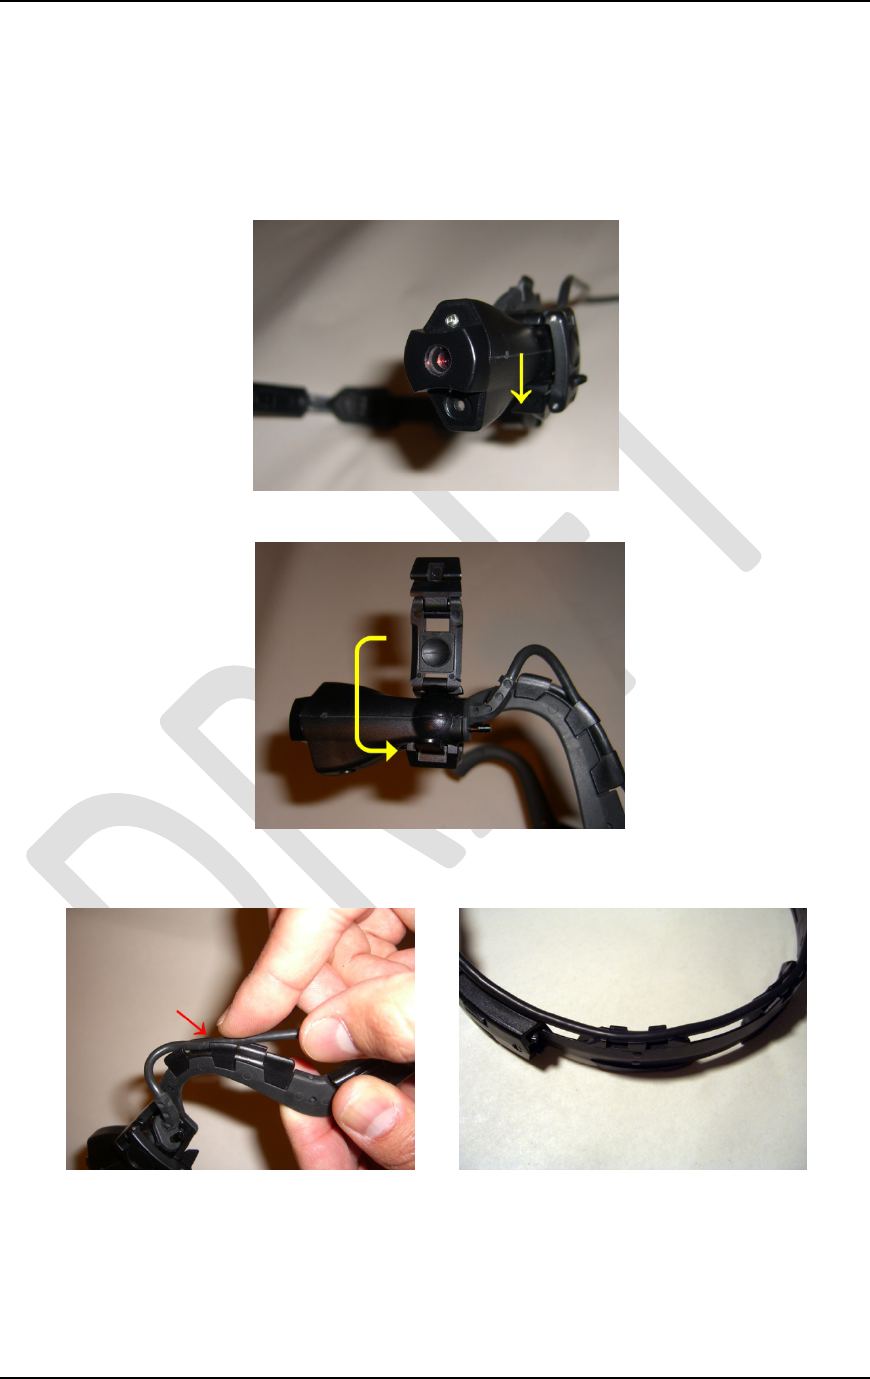
Assembling the HeadCam
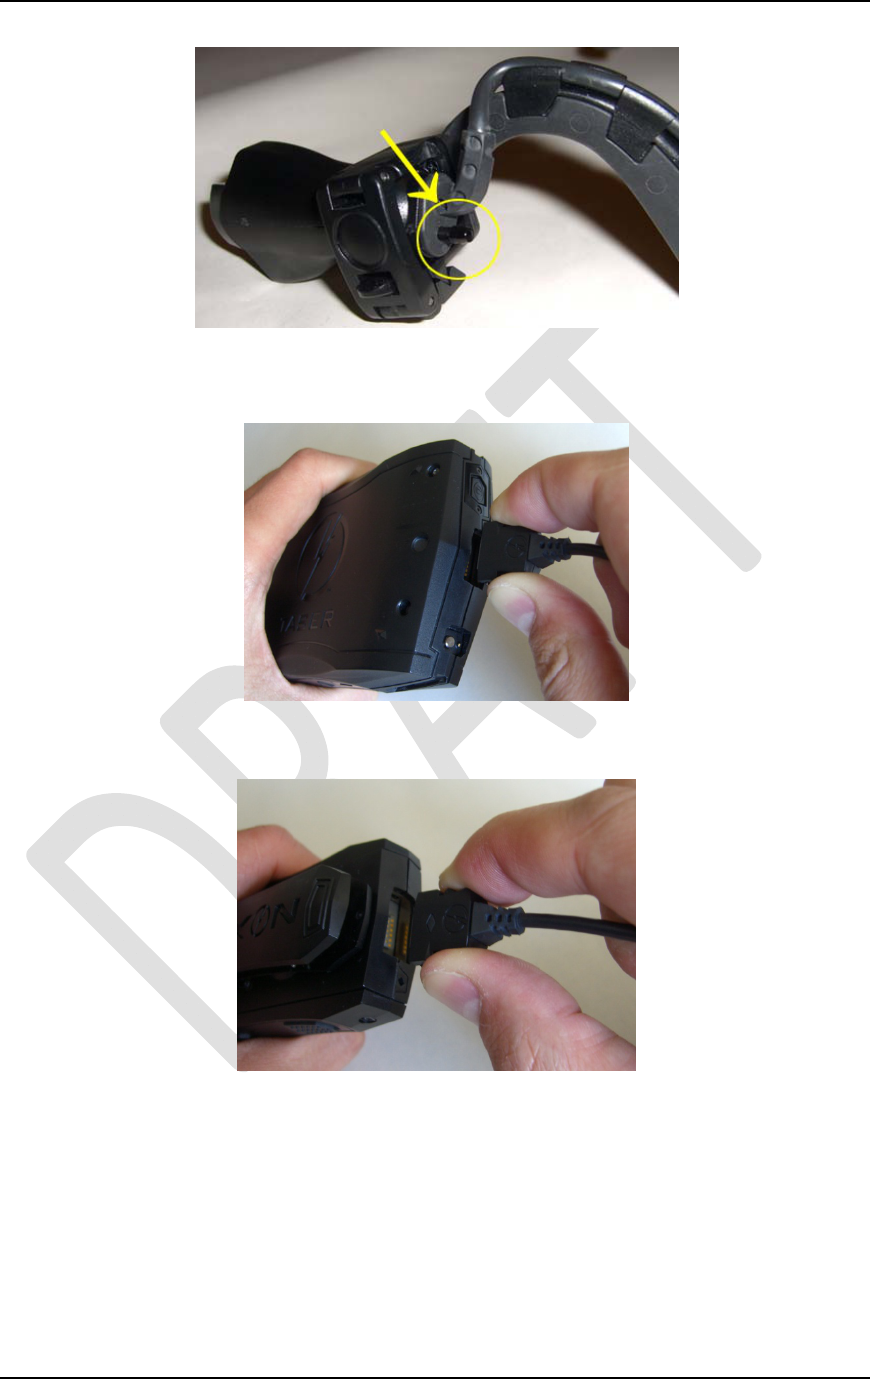
1. Clip the HeadCam to the headband. Make sure the serial number faces down
towards the ground when you are wearing the headband.
2. Close the imager clamp on the HeadCam. You should hear a snap when it shuts.
3. Thread the wire from the HeadCam through the cable management clips in the
headband.
Assembling the Earpiece
1. Slip the earpiece tube onto the fixture on the back of the HeadCam.
AXON™ 4 Jan 2010
TASER International Private & Confidential 16
Assembling the AXON
1. Ideally, you should connect the ComHub cable to the ATC when it is turned off.
2. Connect the HeadCam cable to the ComHub. Make sure that the “diamond” on the
connector is facing the back of the ComHub device.

AXON™ 4 Jan 2010
TASER International Private & Confidential 17
NOTE: It is important to make sure that the cable plugs have a good connection and
that they are seated properly in their slots. Sometimes, it might look like they are
secure when they actually are not, so make sure that the cable plug is seated all the
way in.
AX
O
TAS
E
Ge
t
Lo
gg
Afte
r
the
A
1.
2.
O
N™
E
R Internatio
n
t
ting Sta
r
g
in
g
In
r
you have c
o
A
XON.
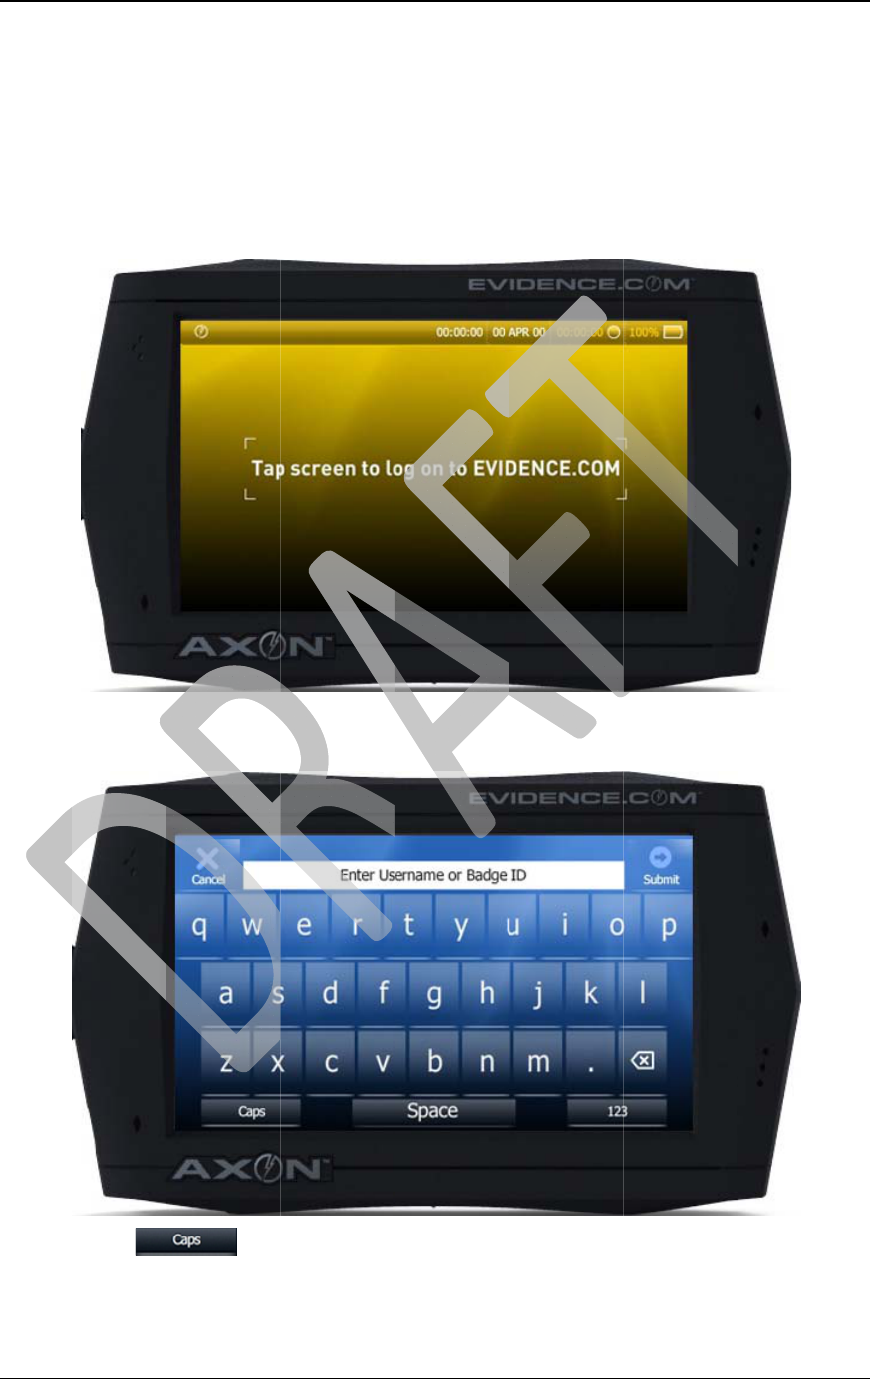
Tap the scr
e
Use the tou
c
username a
n
• The
to all ca
p
n
al
r
ted
o
nfigured t
h
e
en and the
l
c
h pad scre
e
n
d badge ID
b
ut
t
p
italized let
t
Privat
e
h
e ATC with
l
og in keybo
e
n to enter y
o
you registe
r
t
on at the bo
t
t
ers.
e
& Confiden
t
the ETM a
s
ard will dis
p
o
ur userna
m
r
ed on EVI
D
t
tom left of
t
t
ial
s
described
a
p
lay.
m
e or badge I
D
ENCE.CO
M
t
he screen
w
a
bove, you
c
D (this is th
e
M
).
w
ill toggle t
h
4 Jan 201
1
c
an start usi
n
e
same
h
e keyboard
0
1
8
n
g
AX
O
TAS
E
3.
4.
5.
6.
O
N™
E
R Internatio
n
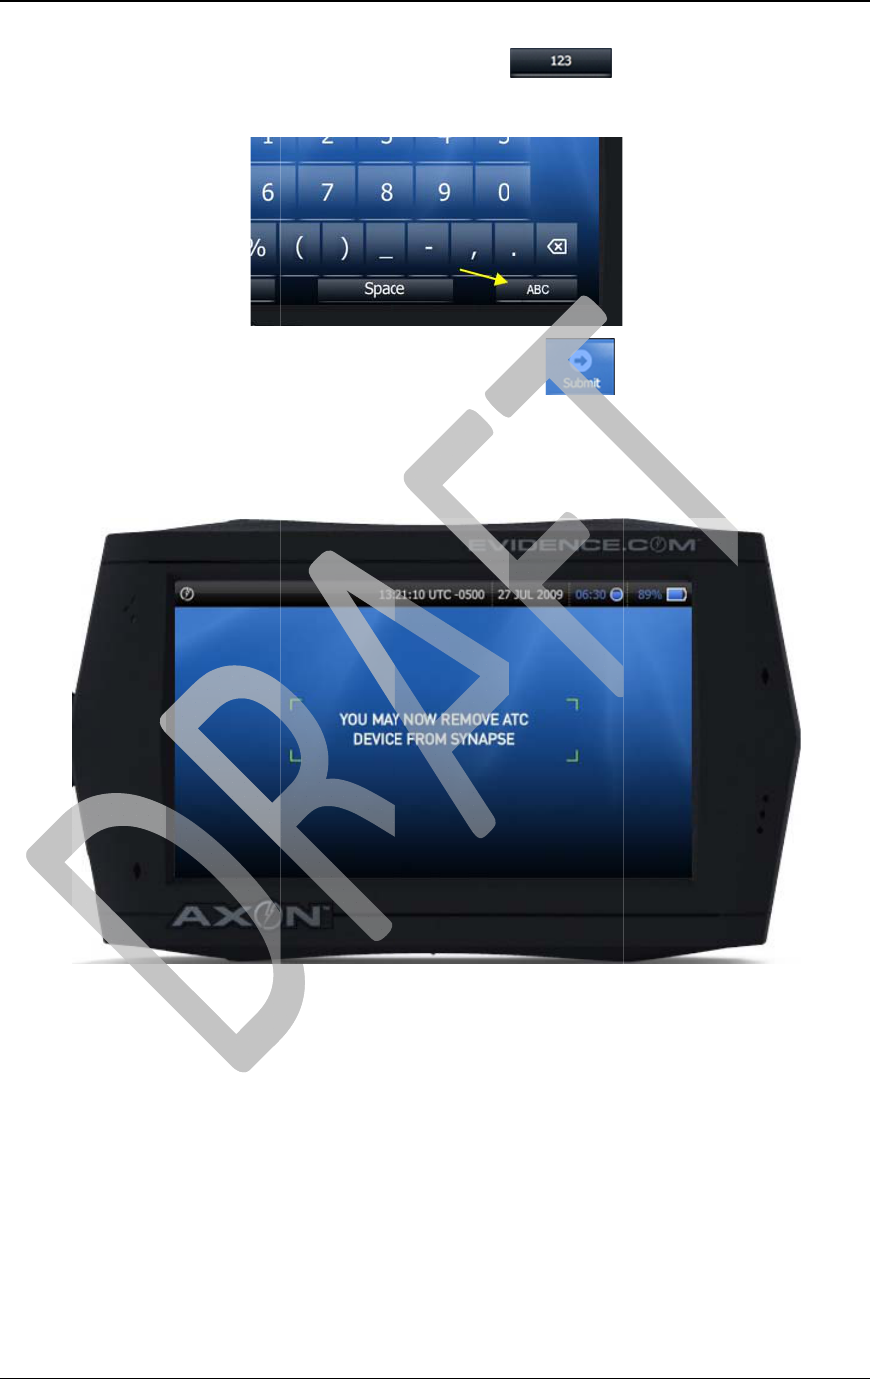
• If you n
right. I
t
which y
After typin
g
The ATC
w
Once the s
y
the ATC fr
o
To remove
t
hear the so
u
ATC withi
n
n
al
eed to type
n
t
will activa
t
ou can pres
s
g
your usern
a
w
ill automati
c
y
stem recog
n
o
m the ET
M
t
he ATC, p
u
u
nd of the E
T
n
10 seconds
Privat
e
n
umbers, fir
t
e the numb
e
s
to return t
o
a
me or bad
g
c
ally synch
r
n
izes your lo
M
dock.
u
sh it into th
e
T
M latches
r
, the latches
e
& Confiden
t
st press the
e
r screen. T
h
o
the alpha k
g
e ID, press
t
r
onize with t
h
gin, it send
s
e
dock sligh
t
r
eleasing th
e
will close
a
t
ial
b
h
e 123 butt
o
eys.
t
he
b
h
e EVIDE
N
s
an approva
l
t
ly before y
o
e
ATC. If y
o
a
nd relock t
h
b
utton at the
o
n will toggl
e
b
utton at the
N
CE.COM s
e
l
to the ET
M
o
u slide it o
u
o
u do not re
m
h
e ATC into
4 Jan 201
1
bottom
e
to ABC,
top right.
e
rvices site.
M
to unlock
u
t. You will
m
ove the
the dock.
0
1
9
AXON™ 4 Jan 2010
TASER International Private & Confidential 20
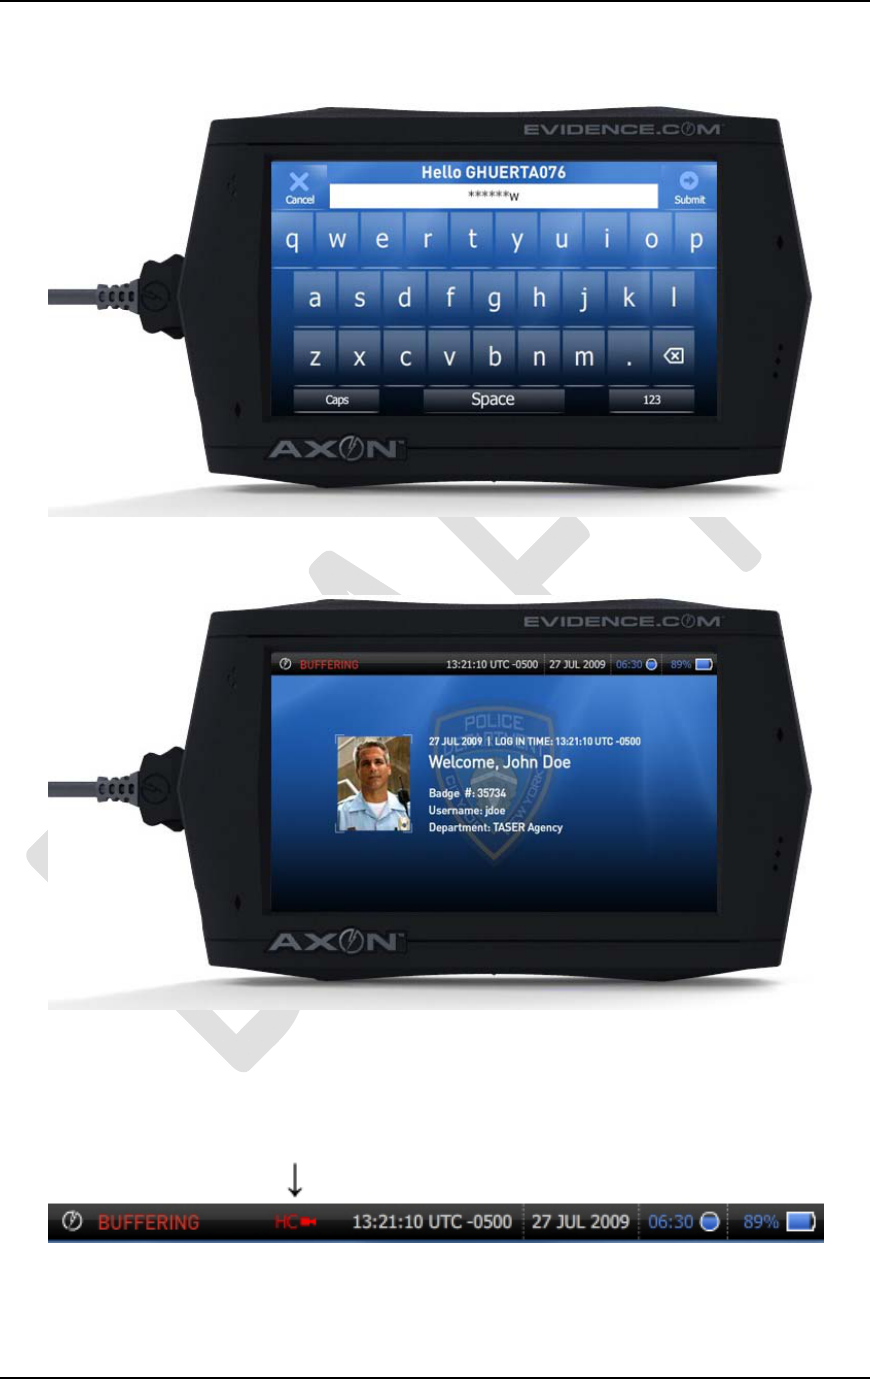
7. Once you remove the ATC from the ETM dock, continue the log in process and
enter your password (the same password you use on EVIDENCE.COM).
8. You will receive your welcome screen, with your name, username, agency name,
and log in time and date.
9. Tap the middle of the welcome screen to go to your main screen (or wait 15 seconds
and the welcome screen will fade out).
10. If you have not connected your HeadCam or ComHub to the ATC, you will notice
that there is a red “HC” blinking icon on the top bar.
AX
O
TAS
E
Nav
The
A
imm
e
audi
o
ATC
See t
h
The
A
of its
1.
2.
3.
O
N™
E
R Internatio
n
i
g
atin
g
A
r
A
TC’s defa
u
e
diately afte
r
o
prompt thr
o
if the Head
C
h
e AXON
M
A
TC touch
s
status.
You can ad
j
Press the
As of the D
e
b
uttons ava
i
n
al
r
ound the
u
lt operatin
g
r
log in and
o
ugh the H
e
C
am is not
c
M
odes sectio
n
s
creen will
h
j
ust the AT
C
b
utto
n
e
cember 20
0
i
lable.
Privat
e
ATC
g
mode is th
e
the welcom
e
e
adCam ear
p
c
onnected).
n
for more d
e
h
ave a persis
t
C
to your pe
r
n
from the
m
0
9 Version
1
e
& Confiden
t
e
BUFFERI
N
e
screen has
p
iece, “Buff
e
e
tails on the
t
ent top bar
r
sonal likin
g
m
ain screen.
1
.0 software
t
ial
N
G mode.
T
closed. Th
e
e
ring Mode
A
Buffering
m
that will gi
v
g
and comfo
r
release, the
r
T
his mode i
e
AXON wi
l
A
ctive” (or
t
m
ode.
v
e you a gen
e
r
t level.
r
e are curre
n
4 Jan 201
2
s activated
l
l issue an
t
hrough the
e
ral overvie
w
n
tly four
0
2
1
w
AXON™ 4 Jan 2010
TASER International Private & Confidential 22
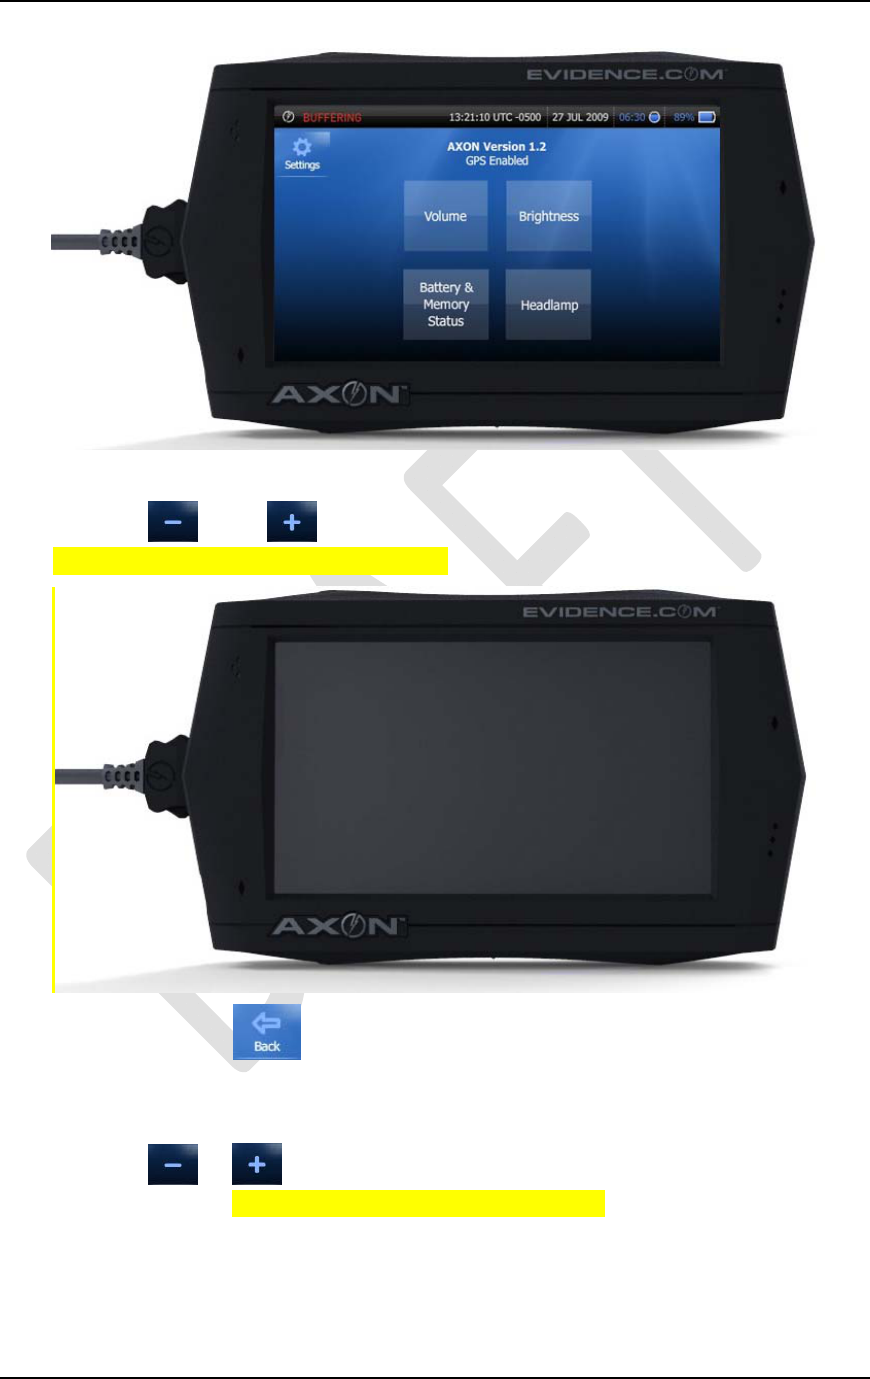
4. Press the BRIGHTNESS button to configure the brightness of the touch screen.
5. Press the or the buttons to adjust the screen brightness accordingly.
(NEED BRIGHTNESS SCREENSHOT)
6. You can press the button at any time to return to Settings. If you adjusted
the brightness, your new brightness setting will be saved.
7. Press the VOLUME button to configure the volume.
8. Press the or buttons to adjust the volume of the ATC and HeadCam to
your comfort level. (NEED VOLUME SCREENSHOT)
AXON™ 4 Jan 2010
TASER International Private & Confidential 23
9. Press the button to return to Settings. If you adjusted the volume, your new
setting will be saved.
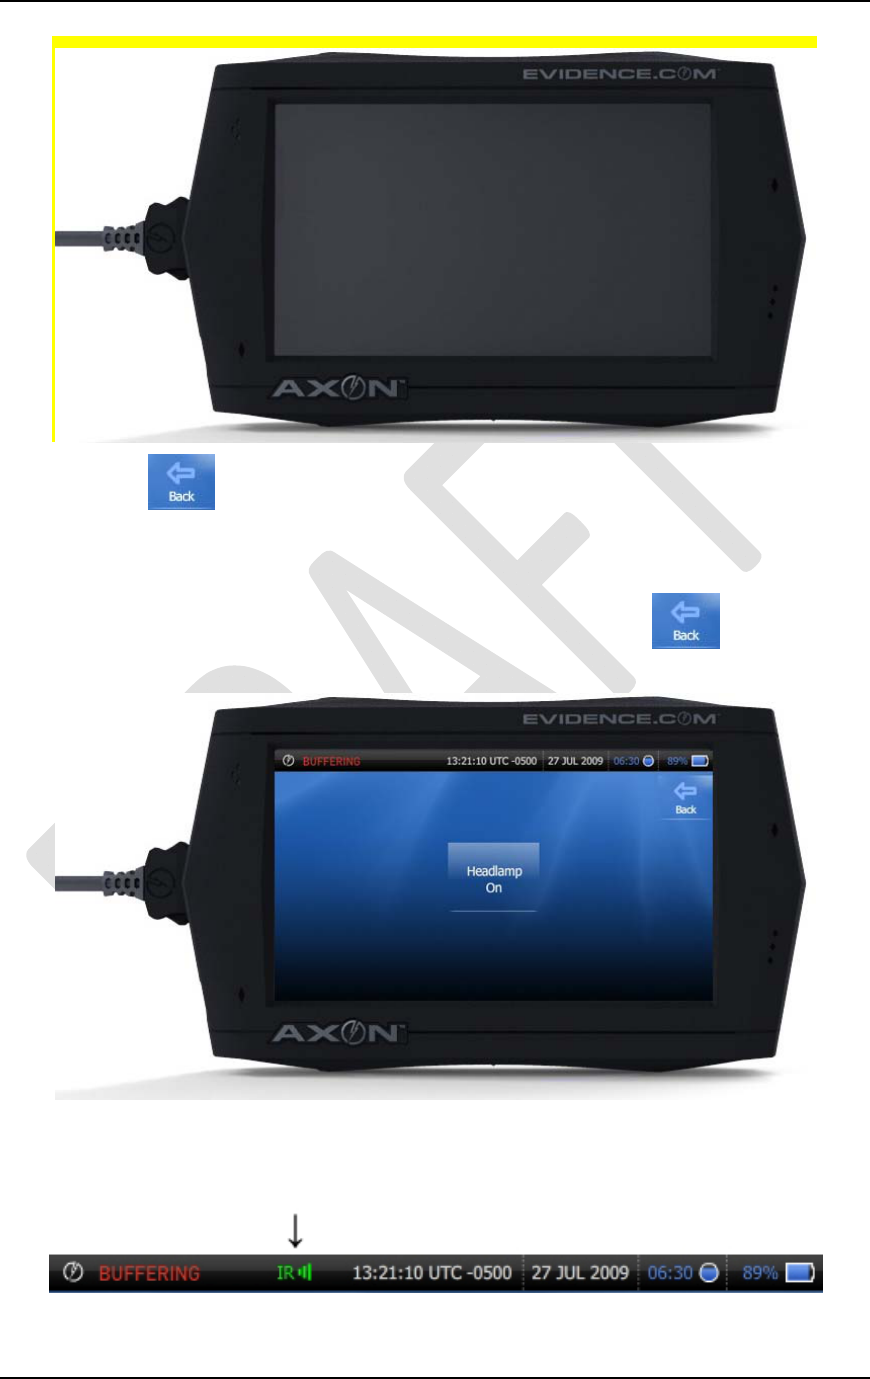
10. Press the HEADLAMP button.
11. You can turn the headlamp off or on, as needed. Pressing the button will
return you to the Settings menu. If made any changes, it will be saved.
12. When the Infrared capability on the HeadCam is active, a green “IR” icon will
appear in the top bar of the ATC. (The IR on the HeadCam is an automatic function
that is triggered in low light situations).

AXON™ 4 Jan 2010
TASER International Private & Confidential 24
13. Press the BATTERY & MEMORY STATUS button. This will display the
remaining battery and file storage on the ATC.
(NEED BATTERY/STORAGE SCREENSHOT)
AXON™ 4 Jan 2010
TASER International Private & Confidential 25
Basic Operations
AXON Modes
The AXON system has three operating modes:
1. BUFFERING
2. EVENT
3. PRIVACY
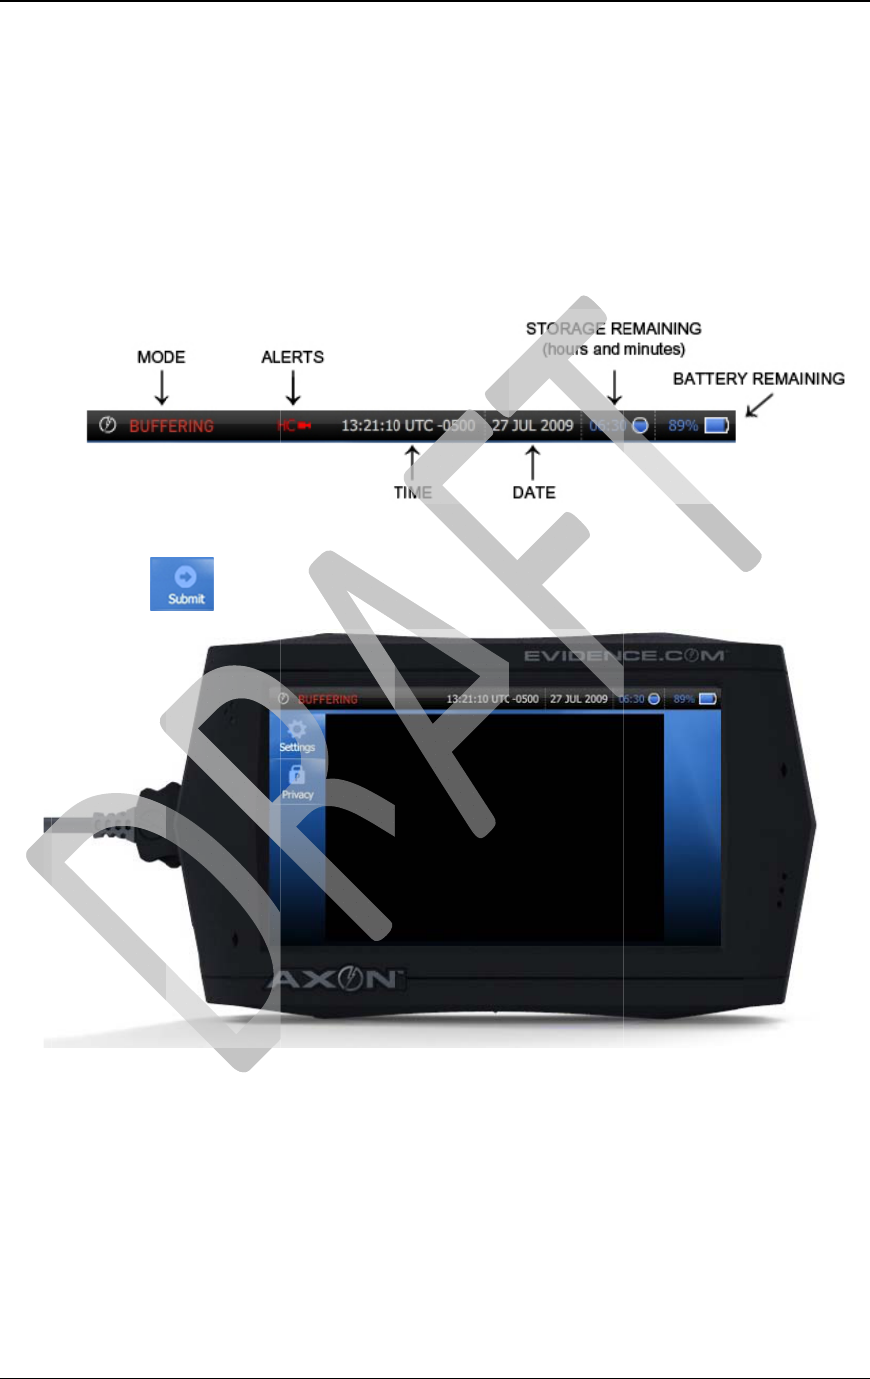
The mode is displayed on the top left corner of the touch screen.
The BUFFERING mode is the default mode of operation, and is activated immediately
after power-up and log in. During the Buffering mode, the touch screen operates similar
to a viewfinder on a digital camera or video recorder. It provides real-time display of
images based on the orientation of the HeadCam.
You will hear an audio prompt, “Buffering Mode Active” through the HeadCam
earpiece. (If the HeadCam is not connected, the ATC speaker will project this
audio prompt.)
The LEDs on the top of the ComHub and on the front of the ATC will illuminate
blue to provide a visual indicator that you are in the Buffering mode.
The HeadCam will be receiving video and audio, but will not record to permanent
memory at this time.
The AXON will “buffer” 00:30 seconds of video, and will refresh continually
refresh buffering until you enter another mode (Privacy or Event).
Buffered video duration is currently set to thirty seconds (00:30). Software
updates for EVIDENCE.COM will eventually allow your agency
administrator to configure and determine buffering time (between 10 to 60
seconds).
If you begin an event recording, you go into EVENT mode – it is only at this time
that the buffered video directly prior to the event will be saved and attached to the
event in permanent memory. This feature is intended to capture the video of an
incident that led to your decision to activate the Event mode.
The 00:30 seconds of buffered video will not contain audio, only video.
AX
O
TAS
E
EVE
or A
T
any
m
The
t
O
N™
E
R Internatio
n
NT mode –
T
C to put y
o
m
ode (
b
uffe
r
t
op bar on t
h
Once yo
u
event wil
l
video wil
l
The mo
m
from the
H
until you
During a
n
create an
point in t
h
video/au
d
When yo
u
EVENT
b
requirem
e
Ending a
n
mode.
n
al
To record a
n
o
ur system i
n
r
ing, privac
y
h
e touch scr
e
u
begin reco
r
l
be saved a
n
l
not contai
n
m
ent you pre
s
H
eadCam,
a
end it.
n
event reco
r
event mark
e
h
e video for
d
io recordin
g
u
want to en
b
utton on th
e
e
nt reduces
t
n
event reco
r
Privat
e
n
event or i
n
n
the Event
m
y
, or playba
c
e
en will cha
n
r
ding an eve
n
n
d attached
t
n
audio).
s
s the EVE
N
a
nd will con
t
r
ding, you c
a
e
r. Event M
later revie
w
g
.
d or comple
e
ATC or th
e
t
he possibili
t
r
ding will t
a
e
& Confiden
t
n
cident, pre
s
m
ode. You
c
c
k).
n
ge to displ
a
n
t, the buffe
t
o the event
N
T button, b
o
t
inue throug
h
a
n moment
a
arkers will
s
w
. It will no
t
te an event
(
e
ComHub
f
t
y of accide
n
a
ke you im
m
t
ial
s
s the Event
c
an begin a
n
a
y “RECOR
D
red video d
i
recording.
(
o
th video a
n
h
out the dur
a
a
rily tap the
E
s
imply “boo
k
t
alter or aff
e
(
exit the Ev
e
f
or five seco
n
n
tally exitin
g
m
ediately ba
c
b
utton on t
h
n
event reco
r
D
ING.”
i
rectly prece
d
(
Reminder,
t
n
d audio wil
l
a
tion of the
r
E
VENT but
t
k
mark” that
e
ct the origi
n
e
nt mode), p
r
n
ds. The 5-
s
g
the EVEN
c
k into the B
4 Jan 201
2
h
e ComHub
r
ding from
d
ing the
t
he buffered
l
be recorde
d
r
ecording
t
on, and
specific ti
m
n
al
r
ess the
s
econd
T mode.
uffering
0
2
6
d
m
e
AX
O
TAS
E
The
P
priv
a
This
conv
e
To a
c
You
c
mod
e
Sele
c
O
N™
E
R Internatio
n
P
RIVACY
m
a
cy without
b
could inclu
d
e
rsations, et
c
c
tivate the P
R
c
an also pre
e
ON.
Privacy b
u
c
t ON to go
t
When th
e
the scree
n
The LED
ATC will
n
al
m
ode is for
t
b
uffering vi
d
d
e private ti
m
c
.
R
IVACY
m
ss the PRIV
A
u
tton on tou
c
t
o the PRIV
A
e
AXON sys
t
n
displays t
h
on the Co
m
turn green
a
Privat
e
t
hose mome
d
eo that cou
l
m
e during r
e
m
ode, press t
h
A
CY butto
n
c
h screen:
A
CY mode:
t
em is in th
e
h
e message
“
m
Hub will di
s
a
s well.
e
& Confiden
t
nts when a
n
l
d be “captu
r
e
stroom bre
a
h
e PRIVAC
Y
n
on the tou
c
e
PRIVACY
“
PRIVACY
M
s
play a gree
n
t
ial
n
officer is e
n
r
ed” if the
E
a
ks, meal br
e
Y
button on
c
h screen, a
n
mode, buff
e
M
ODE AC
T
n
“P,” and t
h
n
titled to co
m
E
vent mode
i
e
aks, private
the ComH
u
n
d then turn
t
e
ring is ter
m
T
IVE.”
h
e LED in f
r
4 Jan 201
2
m
plete
i
s activated.
u
b.
t
he Privacy
m
inated and
r
ont of the
0
2
7
AXON™ 4 Jan 2010
TASER International Private & Confidential 28
You will hear the audio prompt “Privacy Mode Active” through the HeadCam.
The audio prompt will repeat in 15 minute intervals as a reminder that you are in
still in Privacy mode.
The ATC touch screen will display with a red background so that you can easily
detect that your system is not buffering, or recording.
You can still activate the EVENT mode from the Privacy mode, however, because
no content is being buffered while in the Privacy mode, the 30-second buffer will
not exist when the event starts recording. Again, both audio and video will record
simultaneously the moment you press the EVENT button.
You cannot enter the Privacy mode directly from the Event Mode. The Privacy
mode can only be activated from Buffering mode.
To exit the PRIVACY mode, press the PRIVACY button on the ComHub.
You can also use the touch screen and press the PRIVACY button and turn
Privacy OFF.
The PLAYBACK mode is a subsequent mode within the PRIVACY mode. You can
review, manage and edit your recorded events in Playback mode. Just as in the
PRIVACY mode, there will be no buffering available in this mode.
The PLAYBACK mode is discussed in detail in the Playing back Event Video section.
Standard AXON Operation
For the most part, you will most likely check out an ATC from an ETM at the beginning
of your shift, be in Event mode at different times during your shift, and then return the
ATC to the ETM at the end of your shift.
Typical Shift Scenario:
1. At the beginning of your shift, log in to the ATC and undock from the ETM.
The ATC will either have the yellow “Tap screen to log on to EVIDENCE.COM”
screen, or a green “READY” screen.
AXON™ 4 Jan 2010
TASER International Private & Confidential 29
2. Enter your username or badge ID, wait for ETM to unlock the ATC, and remove it
from the dock.
3. Connect the ComHub and HeadCam to the ATC.
4. Continue the log in by entering your password.
Once you have logged on, you will see your welcome screen, and the system will go
directly to Buffering mode.
You can now outfit yourself with the AXON equipment, and adjust the HeadCam
on your person accordingly.
5. From here, you can go about your normal day.
• You can enter EVENT mode at any time by pressing the Event mode button on
the ComHub or on the ATC.
• If you need to make a personal call or otherwise, and would like to make sure
nothing is recorded or buffered, you can press the Privacy button on the
ComHub or navigate to the Privacy mode on the ATC touch screen.
• You can play back, review, and add notes to any events that you had recorded
during your shift
• You can charge the ATC periodically throughout the day using the car or wall
charger.
AXON™ 4 Jan 2010
TASER International Private & Confidential 30
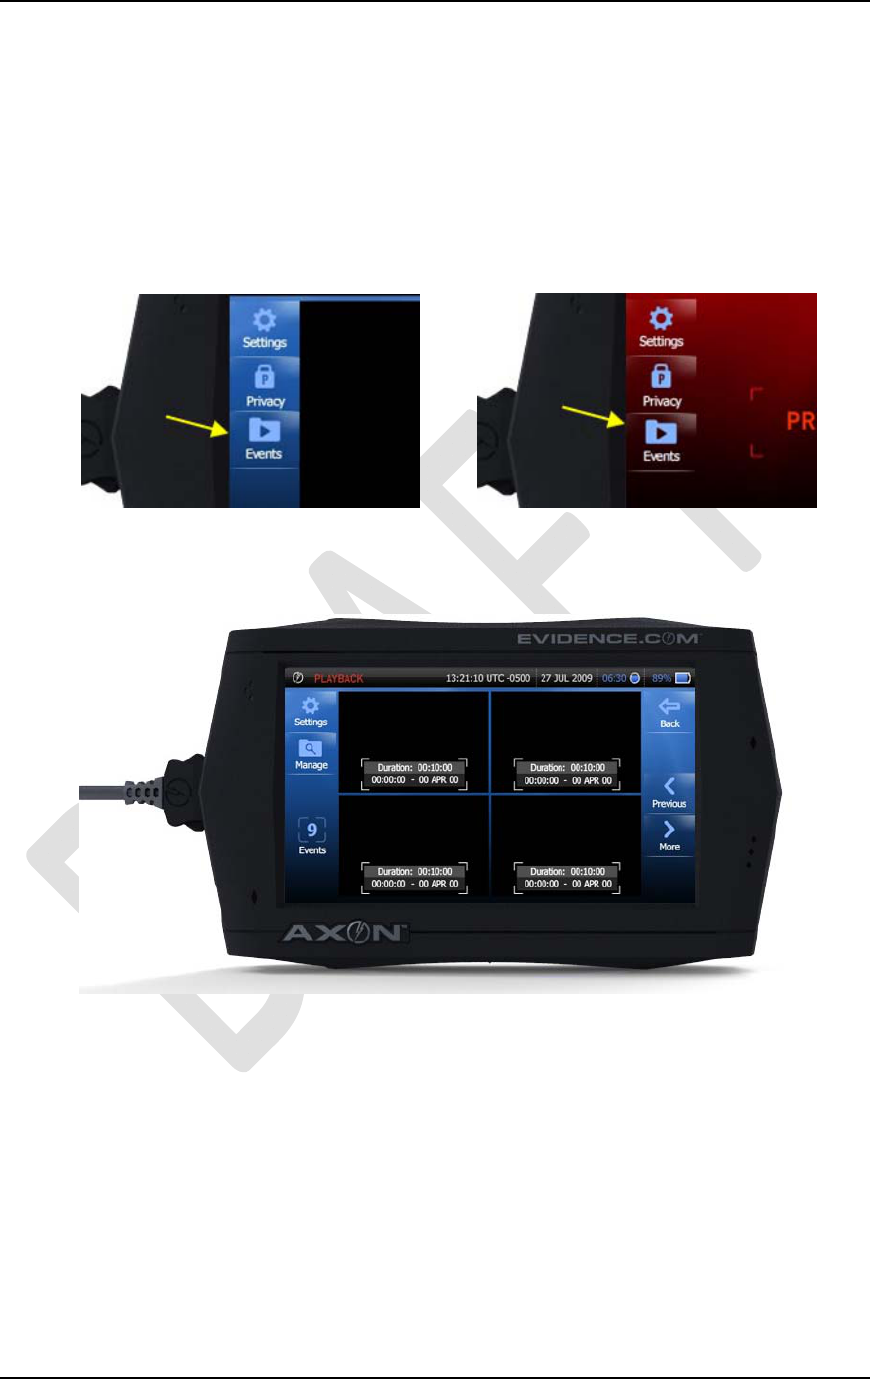
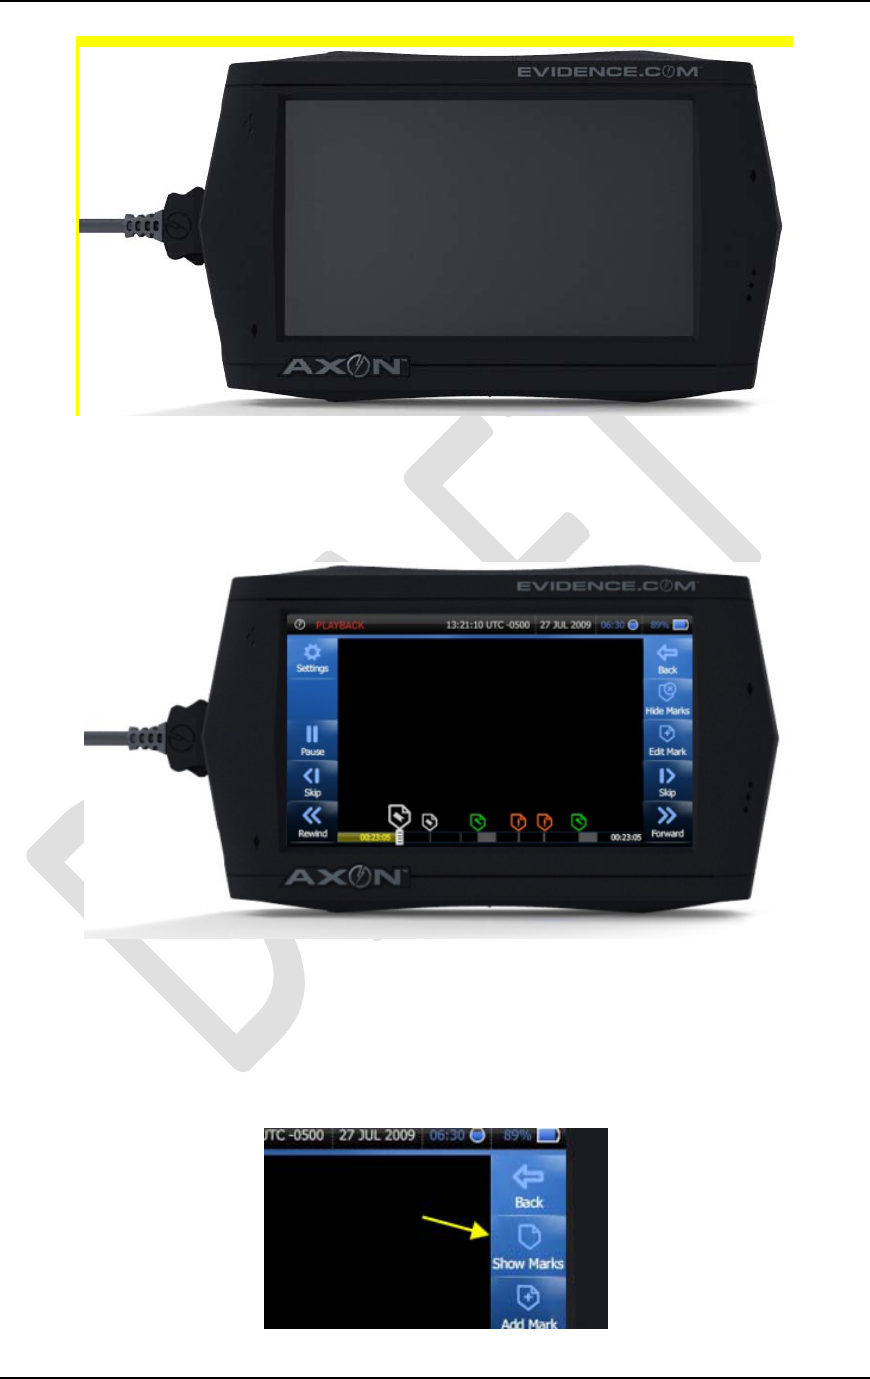
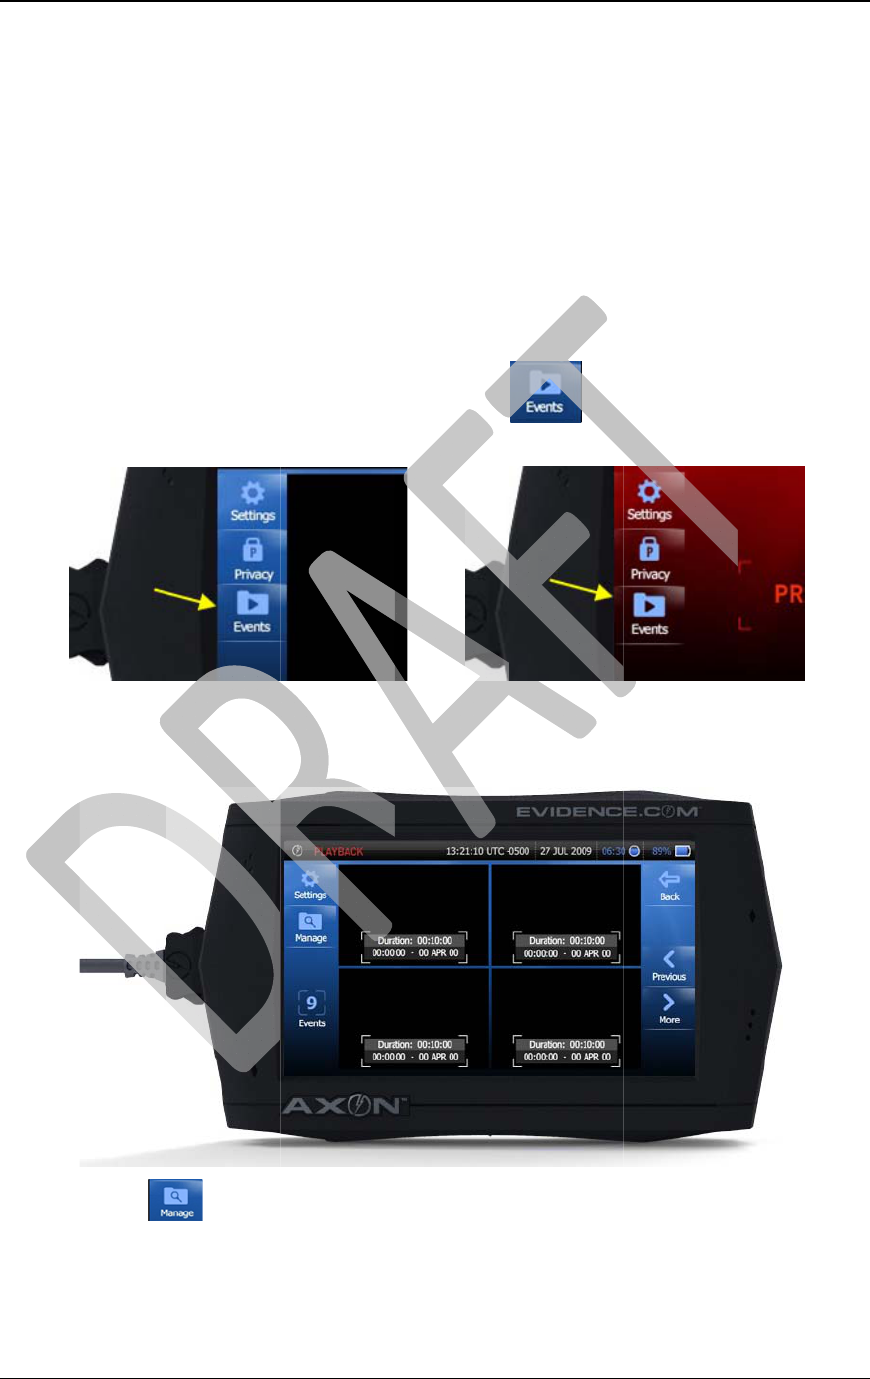
Playing back Event Video
When you have finished recording an event, you can review it as often as you wish.
The only time you cannot playback an event video is during an event recording. You can
playback from Buffering or Privacy mode at any time.
To play back an Event video:
1. From Buffering or Privacy mode, select the EVENTS file button on the left side of
the screen.
2. The first screen that is displayed is the event menu screen. Once you enter this
screen, you are in the PRIVACY mode. There will be no buffering of video at this
time.
3. You can select any video by selecting and pressing on one the thumbnail of the
video you wish to review.
4. The next screen to display will be the video player.

AXON™ 4 Jan 2010
TASER International Private & Confidential 31
• The event video will play in the center of the screen.
• Video will play back with the audio captured from the HeadCam microphone.
• You will have “video controls” available
o Pause
o Skip Back/Skip Forward
o Forward
o Rewind
o Timeline with “scrubber”
o Show Marks
o Add Marks
• You will also have Settings option available
5. To exit the player, simply hit the button.
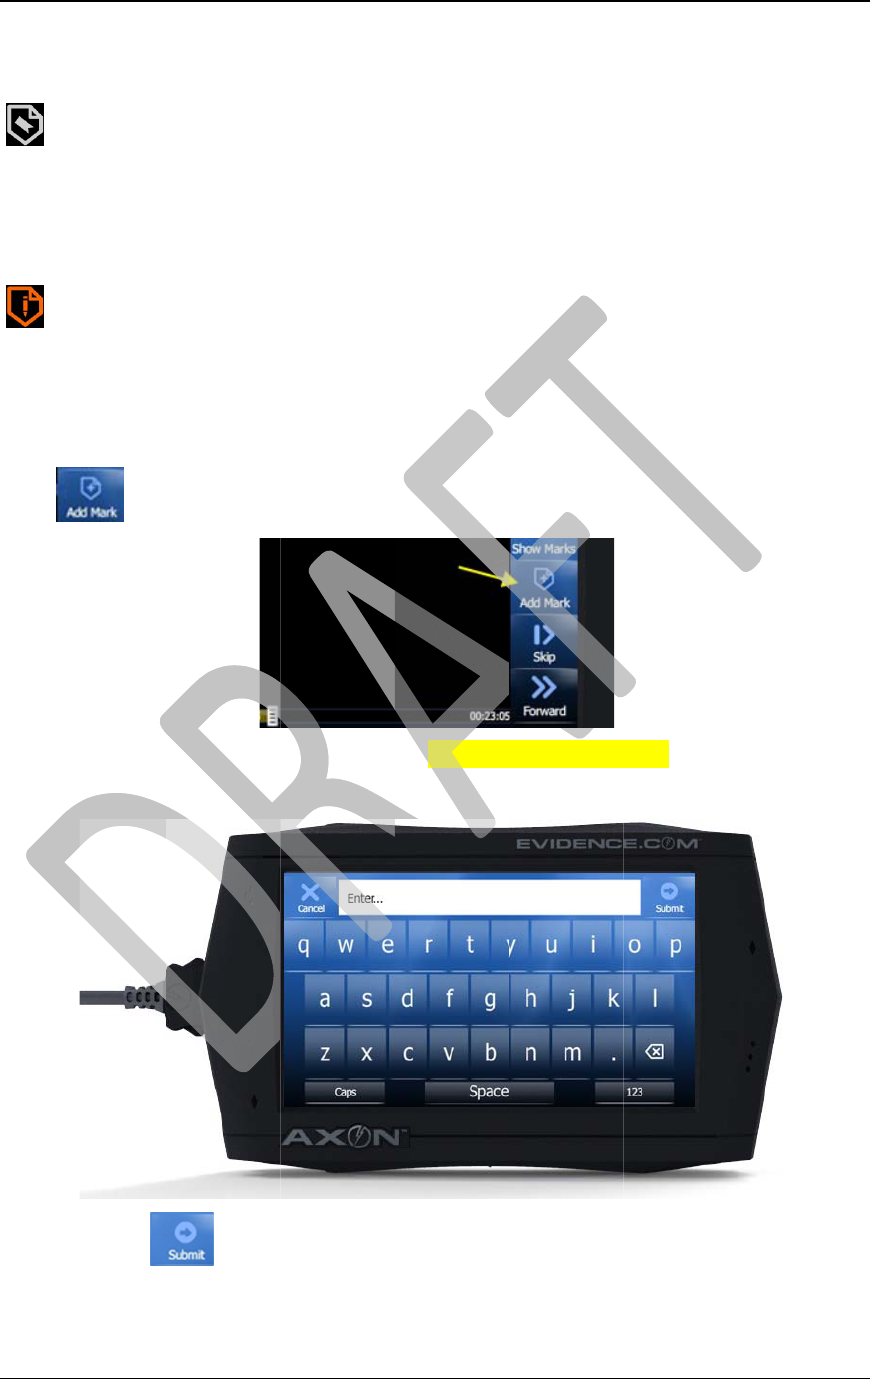
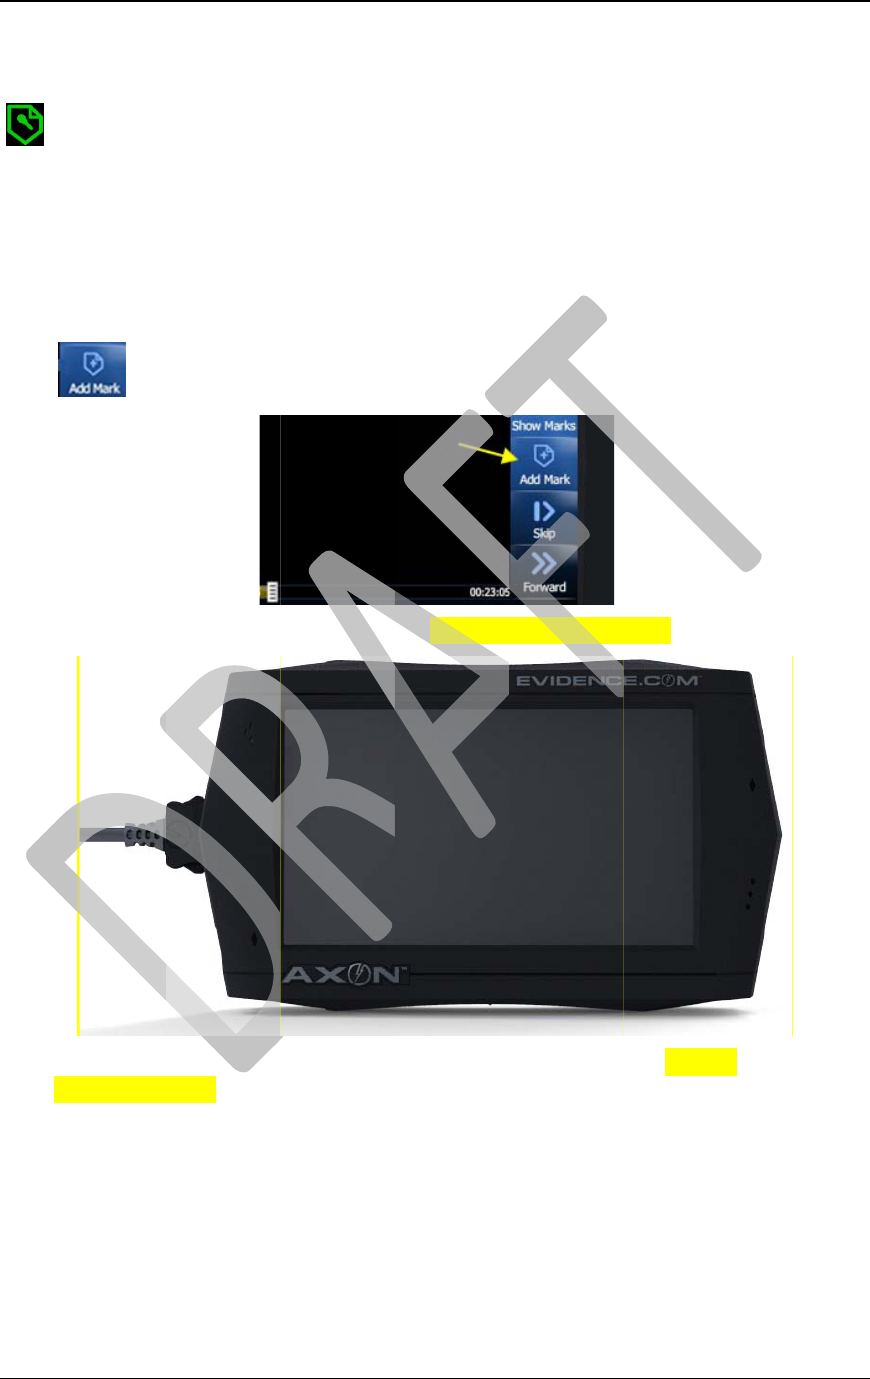
Adding Markers
If you wish to add any text notations or audio narratives to your event, you can do so in
the event player.
There are three kinds of markers on the AXON:
1. Event
2. Text Notations
3. Audio Narrative
Marks are points in the event video that you can indicate as a “bookmark” of
sorts, and points out what you think is significant.
Marks do not affect or alter the event video/audio that was recorded.
AX
O
TAS
E
mo
m
that
p
Duri
n
that
y
that
y
num
b
To a
d
1.
2.
3.
4.
O
N™
E
R Internatio
n
Any mar
k
files over
Event m
a
m
entarily pre
s
p
oint.
n
g event pla
y
y
ou can easi
l
Text not
a
y
ou add, suc
h
b
er).
d
d a text ma
r
While you
a
b
ut
t
Press the A
D
You will h
a
Press the
n
al
k
s you add
o
to EVIDE
N
a
rks are cre
a
s
s the EVE
N
y
back in th
e
l
y jump to.
a
tions are si
m
h
as “weap
o
r
ke
r
:
a
re in the ev
e
t
on.
D
D TEXT
M
a
ve the keyb
o
b
utto
n
Privat
e
o
n the ATC
t
N
CE.COM
a
ted via the
C
N
T button o
n
e
player, the
s
m
ilar to a “
s
o
n thrown o
u
e
nt player a
n
M
ARK butt
o
o
ard displa
y
n
when you
a
e
& Confiden
t
t
hat is not d
e
C
omHub.
W
n
the ComH
u
s
e marks wi
l
s
ubtitle” tha
t
u
t window”
o
n
d are watc
h
o
n. (NEED
S
y
to enter in
a
a
re done. Y
o
t
ial
e
leted will b
e
W
hile recor
d
u
b and it wi
l
l
l be “chapt
e
t
plays in a
m
o
r “7JIL089
7
h
ing your se
l
S
CREENS
H
a
ny text you
o
ur text mar
e
uploaded
w
d
ing an even
t
l
l create a b
o
e
r points” o
n
m
ovie. It is
a
7
” (license
p
l
ected video
,
H
OT)
wish to ent
e
k has been
s
4 Jan 201
3
w
ith all you
r
t
, you
o
okmark at
n
the video
a
text line
p
late
,
press the
e
r.
s
aved.
0
3
2
r
AX
O
TAS
E
5.
certa
i
spec
i
b
e a
ff
from
To a
d
1.
2.
3.
O
N™
E
R Internatio
n
You can re
s
repeating st
e
Audio N
a
i
n point of t
h
i
fic time of t
h
ff
ected or alt
e
the event b
e
d
d an Audio
While you
a
b
ut
t
Press the A
D
You will se
e
SCREENS
H
n
al
s
ume playba
c
e
ps 2–4 abo
v
a
rration is
b
h
e video. It
h
e video.
A
e
red by this
e
fore re-doc
k
Narrative:
a
re in the ev
e
t
on.
D
D NARR
A
e
the pause
d
H
OT)
Privat
e
c
k by pressi
n
v
e.
b
asically a d
is a verbal
n
A
gain, the or
i
digital reco
r
k
ing your A
T
e
nt player a
n
A
TION butt
o
d
screen of t
h
e
& Confiden
t
n
g the PLA
Y
igital recor
d
n
ote that yo
u
i
ginal video
r
ding. You
c
T
C to the E
T
n
d watching
o
n. (NEED
h
e video, an
d
t
ial
Y
button, or
d
ing that yo
u
u
make to a
d
and audio t
h
c
an choose
t
T
M.
your select
e
SCREENS
H
d
new contr
o
add more t
e
u
attach to t
h
d
d furthe
r
de
t
h
at you reco
r
t
o delete thi
s
e
d video, pr
e
H
OT)
o
ls. (NEED
4 Jan 201
3
e
xt marks b
y
h
e video at a
t
ails to that
r
ded will no
t
s
narration
e
ss the
0
3
3
y
t
AXON™ 4 Jan 2010
TASER International Private & Confidential 34
4. Press the START button and begin talking.
5. Once you have completed your narration, press the STOP button. (NEED
SCREENSHOT)
6. Immediately after recording your narrative,
• You can choose to listen to your narration by pressing PLAY.
• You can record over your narration by pressing the START button.
• You can cancel by pressing the BACK button.
• You can exit and resume playback by pressing the SAVE button.
(NEED SCREENSHOT)
AXON™ 4 Jan 2010
TASER International Private & Confidential 35
7. You can resume playback by pressing the PLAY button, or add more text marks by
repeating steps 1–5 above.
All the markers you create will show up as icons on the timeline and will allow you to
easily jump or “skip” through to those sections of the video.
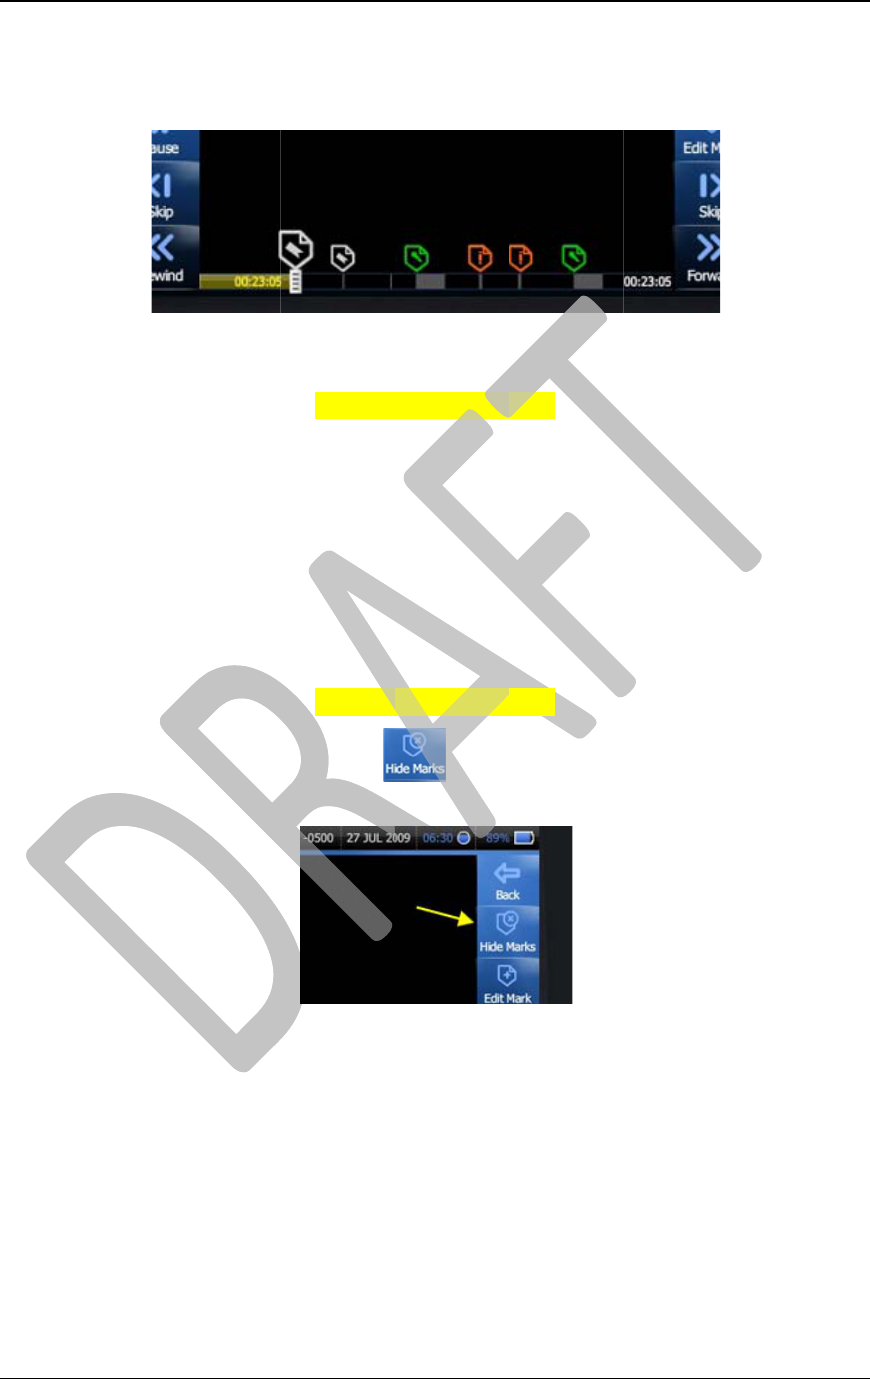
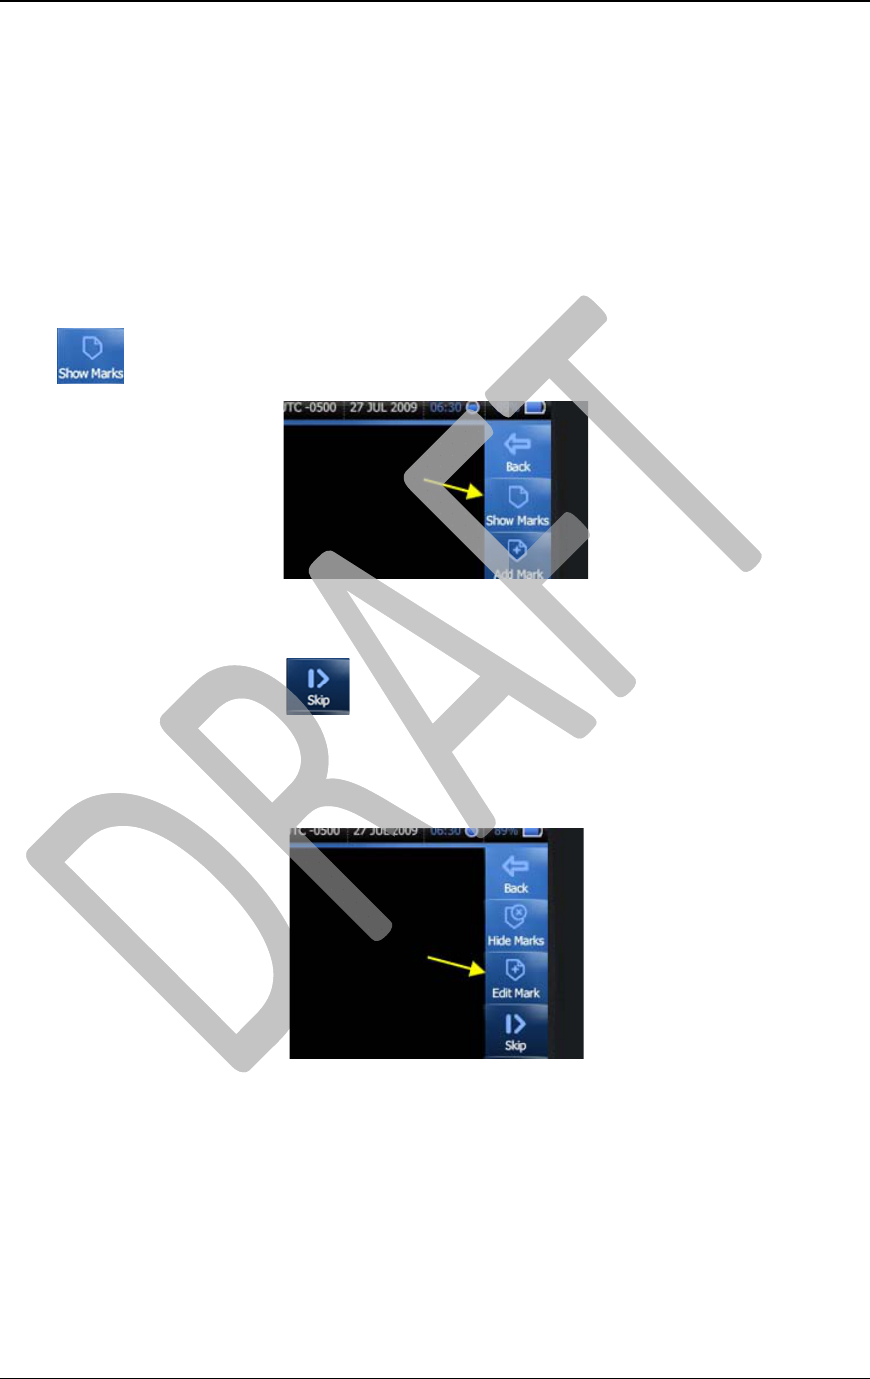
Showing Marks
You can choose to display all your markers on an event video during playback. After
you select a video by pressing the thumbnail, you will be in the video player.
1. In the video player, if you have any markers available, the SHOW MARKS button
will be available on the right side.
AX
O
TAS
E
2.
3.
4.
5.
6.
7.
Ret
u
Re-d
o
from
1.
2.
3.
O
N™
E
R Internatio
n
Pressing S
H
simply disp
l
or event m
a
As the vide
o
display ove
r
You can pr
e
• If there
• If there
If you take
n
resume pla
y
As the vide
o
displayed
w
To turn off
t
toggle betw
u
rnin
g
to
t
o
cking the
A
the ATC b
e
Disconnect
HeadCam t
o
You will h
e
(This is bec
Dock the A
T
n
al
H
OW MAR
K
l
ay all the p
o
a
rk).
o
reaches a
T
r
the video.
e
ss the PLA
Y
i
s another
m
are not mar
k
n
o action w
h
y
back after
1
o
reaches a
n
w
ith the choi
c
t
he markers
,
een Show a
n
t
he ETM
D
A
TC is simp
l
e
fore dockin
g
the ComHu
b
o
the ATC,
d
ar the audio
ause the He
a
T
C into an
E
Privat
e
K
S will not i
o
ints in the
e
T
ext Mark,
(NEED
S
Y
button to
r
m
ark availab
l
k
s available,
h
ile the text
1
0 seconds.
n
audio narr
a
c
e to Play t
h
(NEED
S
,
press the
n
d Hide acc
o
D
ock
l
e. You wil
l
g
the ATC i
n
b
cable plu
g
d
isconnect t
h
prompt, “
V
a
dCam and
C
E
TM bank.
e
& Confiden
t
nterrupt the
e
vent video
t
the video
w
S
CREENS
H
r
esume you
r
l
e, the video
the SKIP b
u
mark is dis
p
a
tion, the vi
d
h
e narration,
S
CREENS
H
b
utto
n
o
rdingly).
l
have to dis
n
to the ET
M
g
from the A
T
h
e HeadCa
m
V
ideo Signal
C
omHub ha
v
t
ial
video play
b
t
hat contain
w
ill pause an
d
H
OT)
r
video, or y
o
will SKIP t
o
u
tton will n
o
p
layed, your
d
eo will pau
s
or Continu
e
H
OT)
n
on the left
connect the
M
.
T
C. (If you
m
cable fro
m
Lost” throu
g
v
e been dis
c
b
ack. The ti
m
a marker (t
e
d
the text n
o
o
u can press
o
that next
m
o
t do anythi
n
video will
a
s
e and you
w
e
video play
b
side (this b
u
ComHub a
n
only conne
c
m
the ATC.)
g
h the ATC
c
onnected).
4 Jan 201
3
m
eline will
e
xt, narrativ
e
o
te will
SKIP.
m
ark.
n
g.
a
utomaticall
y
w
ill be
b
ack.
u
tton will
n
d HeadCa
m
c
ted your
speaker.
0
3
6
e
,
y
m
AX
O
TAS
E
4.
5.
6.
O
N™
E
R Internatio
n
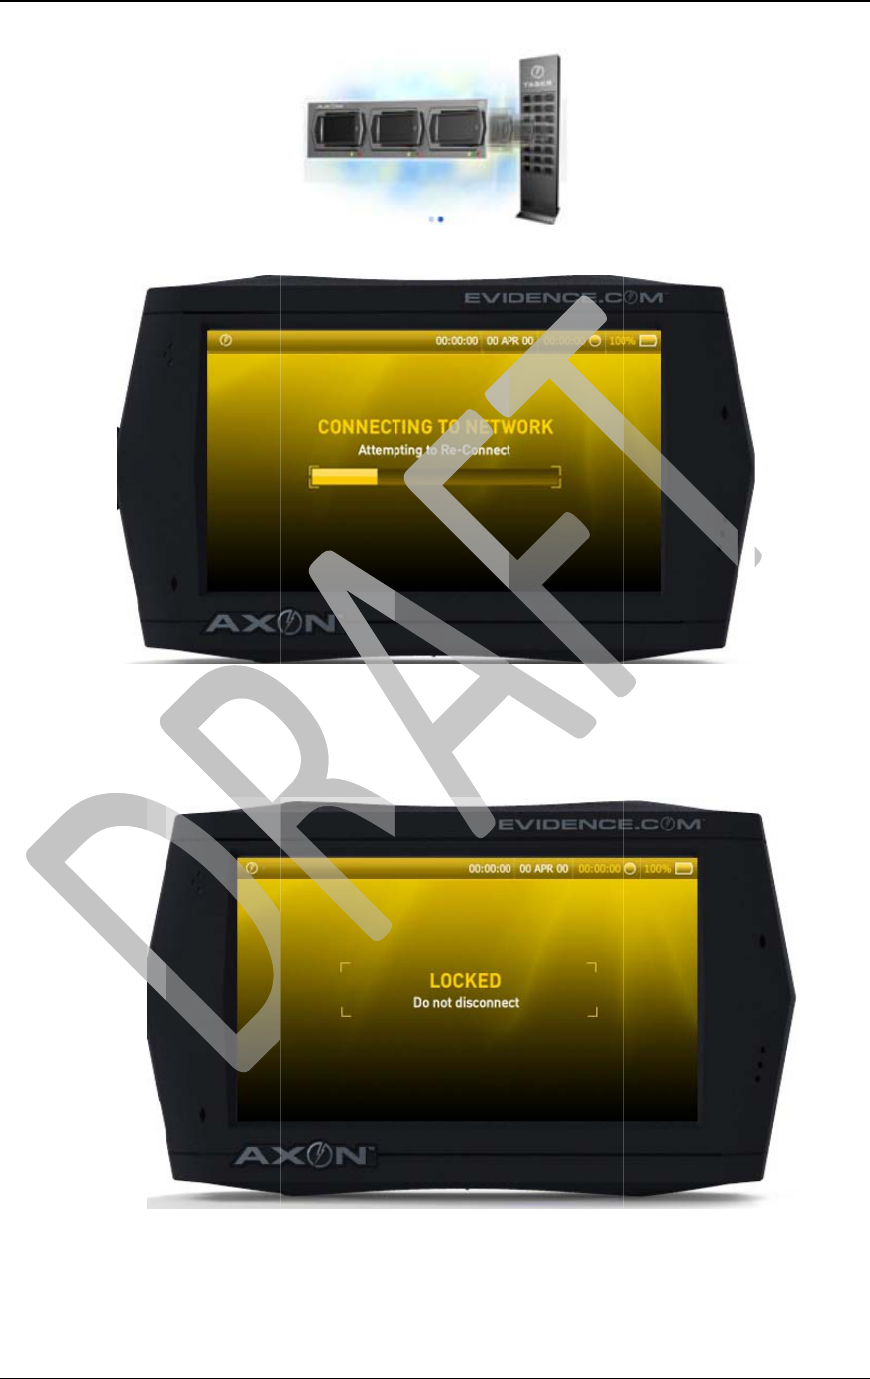
The ATC t
o
Once it has
from the A
T
their associ
a
your accou
n
If the uploa
d
you will se
e
n
al
o
uch screen
w
established
T
C securely
a
ted notes,
m
n
t.
d
to EVIDE
N
e
this screen
:
Privat
e
w
ill automa
t
a connectio
n
over to EVI
m
arkers, aud
N
CE.COM
i
:
e
& Confiden
t
t
ically estab
l
n
, the ETM
w
DENCE.C
O
io narration
s
i
s complete
d
t
ial
l
ish a conne
c
w
ill begin u
p
O
M and you
r
s
, and other
d
before the
c
tion with t
h
p
loading all
r
event files,
data will be
batte
r
y is f
u
4 Jan 201
3
h
e network.
the files
including a
l
uploaded t
o
u
lly charged,
0
3
7
l
l
o

AXON™ 4 Jan 2010
TASER International Private & Confidential 38
• You will still be able to log in and deploy the ATC, however, just keep in mind
that your battery will only be partially charged.
AX
O
TAS
E
Ad
d
Edi
t
To E
d
1.
2.
3.
4.
5.
NO
T
inco
r
for
T
that
h
O
N™
E
R Internatio
n
d
itional
F
t
in
g
Mar
k
d
it a Text
M
While you
a
b
ut
t
As the vide
o
over the vi
d
that you wa
n
You will n
o
EDIT butto
n
Press the E
D
You will th
e
• ADD
M
• REMO
V
• MOVE
• BACK
–
T
E: For the
r
rectl
y
buil
t
T
ext Marks
h
ave multi
p
n
al
F
eatures
k
s
M
arke
r
:
a
re in the ev
e
t
on.
o
reaches a
t
d
eo. (You ca
n
n
t to edit).
o
tice that the
n
.
D
IT button.
e
n be able t
o
M
ORE text n
o
V
E the exist
i
the text not
e
–
to return t
o
December
2
t
and does
n
with onl
y
o
p
le notes.
Privat
e
e
nt player a
n
t
ext mark, t
h
n
also press
ADD butto
n
o
:
o
tes to the c
u
i
ng note(s)
b
e
to a differ
e
o
the video
p
(NEED
S
2
009 Versi
o
n
ot follow s
p
ne text not
e
e
& Confiden
t
n
d are watc
h
h
e video wil
l
the
b
n
on the rig
h
u
rrent note.
b
y selecting
t
e
nt time in t
h
p
laye
r
S
CREENS
H
o
n 1.0 softw
a
p
ecification
s
e
, and will
n
t
ial
h
ing your se
l
l
pause and
t
b
utton to go
h
t side of th
e
t
he “X” nex
t
h
e video
H
OT)
a
re release,
s
. Current
l
n
ot do an
y
t
h
l
ected video
,
t
he text note
directly to t
h
e
screen wil
l
t
to the text
n
DELETE
b
ly
, it will on
h
in
g
for tex
t
4 Jan 201
3
,
press the
will displa
y
h
e text mar
k
l
toggle to a
n
n
ote
b
utton is
l
y
function
t
markers
0
3
9
y
k
n
AX
O
TAS
E
To
M
1.
2.
3.
4.
To E
d
1.
2.
3.
4.
5.
6.
7.
O
N™
E
R Internatio
n
M
ove a Text
M
Press the
M
On the time
wish to mo
v
Press the S
E
Your text
m
d
it an Audi
o
While you
a
b
ut
t
As the vide
o
displayed
w
(You can al
want to edi
t
You will n
o
Edit Mark
b
Press EDIT
You will th
e
• MOVE
• DELET
E
• BACK
–
To MOVE
a
n
al
M
ark:
M
OVE
b
utto
n
bar, move t
h
v
e the text
m
E
T button.
m
ark is now
s
o
Narrative:
a
re in the ev
e
t
on.
o
reaches a
n
w
ith the choi
c
so press the
t
).
o
tice that the
b
utton.
.
e
n be able t
o
the text not
e
E
the narrat
i
–
to return t
o
a
narrative,
s
Privat
e
n
.
h
e scrubber
a
m
ark.
s
et to the ne
w
e
nt player a
n
n
Audio Nar
r
c
e to play th
b
utt
o
ADD butto
n
o
:
e
to a differ
e
i
ve complet
e
o
the video
p
s
imply pres
s
e
& Confiden
t
a
cross to th
e
w
timecode.
n
d are watc
h
r
ation, the v
i
e narration,
o
n to go dir
e
n
on the rig
h
e
nt time in t
h
e
ly
p
layer
s
MOVE.
t
ial
e
point of th
e
h
ing your se
l
i
deo will pa
u
or continue
e
ctly to the
a
h
t side of th
e
h
e video
e
video to w
h
l
ected video
,
u
se and you
video playb
a
udio narrat
i
e
screen wil
l
4 Jan 201
4
h
ich you
,
press the
will be
ack.
i
on that you
l
toggle to a
n
0
4
0
n
AX
O
TAS
E
8.
9.
Ma
n
As o
f
even
t
creat
e
To a
d
1.
2.
3.
4.
O
N™
E
R Internatio
n
On the time
the narrativ
e
Press SET.
Your narrat
i
n
a
g
in
g
Ev
e
f
the Decem
b
t
videos in
y
e
s on EVID
E
d
d a Catego
r
From the B
u
the screen.
The first sc
r
screen, you
time.
Press the
The screen
w
recording.
n
al
bar, move t
h
e
to.
i
ve is now s
e
e
nts
b
er 2009 V
e
y
our event
m
E
NCE.CO
M
r
y
u
ffering or
P
r
een that is
d
are in the P
R
button.
w
ill now ve
r
Privat
e
h
e scrubber
a
e
t to the ne
w
e
rsion 1.0 so
m
anager. Th
e
M
available i
n
P
rivacy mod
d
isplayed is
t
R
IVACY m
o
r
tically list
a
e
& Confiden
t
a
cross to th
e
w
timecode.
ftware relea
e
ATC will
h
n
the Mana
g
e, press the
t
he event m
e
o
de. There
w
a
ll of your e
v
t
ial
e
point of th
e
se, you can
a
h
ave the cat
e
g
e menu on
t
file
e
nu screen.
w
ill be no b
u
v
ents in ord
e
e
video you
w
a
dd categor
i
e
gories that
y
t
he ATC.
button on t
h
Once you e
n
u
ffering of
v
e
r of most re
4 Jan 201
4
w
ish to mo
v
i
es to your
y
our agenc
y
h
e left side
o
n
ter this
v
ideo at this
cent
0
4
1
v
e
y
o
f
AX
O
TAS
E
5.
6.
7.
8.
9.
10.
11.
O
N™
E
R Internatio
n
Press the
The Catego
r
Select one
o
It automati
c
By pressin
g
category sa
v
You will al
s
Press the
category, o
r
n
al
ADD b
r
ies that we
r
o
f the categ
o
c
ally adds y
o
g
the
v
ed.
s
o be able t
o
b
utt
o
r
CANCEL
t
Privat
e
utton.
r
e created o
n
o
ries by pres
s
o
ur selectio
n
b
utton, you
o
EDIT the c
o
n and you
c
t
o return to
t
(NEED
S
e
& Confiden
t
n
EVIDEN
C
s
ing the key
n
as a catego
r
return to th
e
ategory you
c
an opt to a
d
t
he previous
S
CREENS
H
t
ial
C
E.COM wil
l
. (NEED S
C
r
y your eve
n
e
Manage
m
adde
d
.
dd
another c
a
screen.
H
OT)
l
be display
e
C
REENSH
O
n
t chosen.
m
enu list, wit
h
a
tegory, RE
M
4 Jan 201
4
e
d.
O
T)
h
your
M
OVE the
0
4
2
AXON™ 4 Jan 2010
TASER International Private & Confidential 43
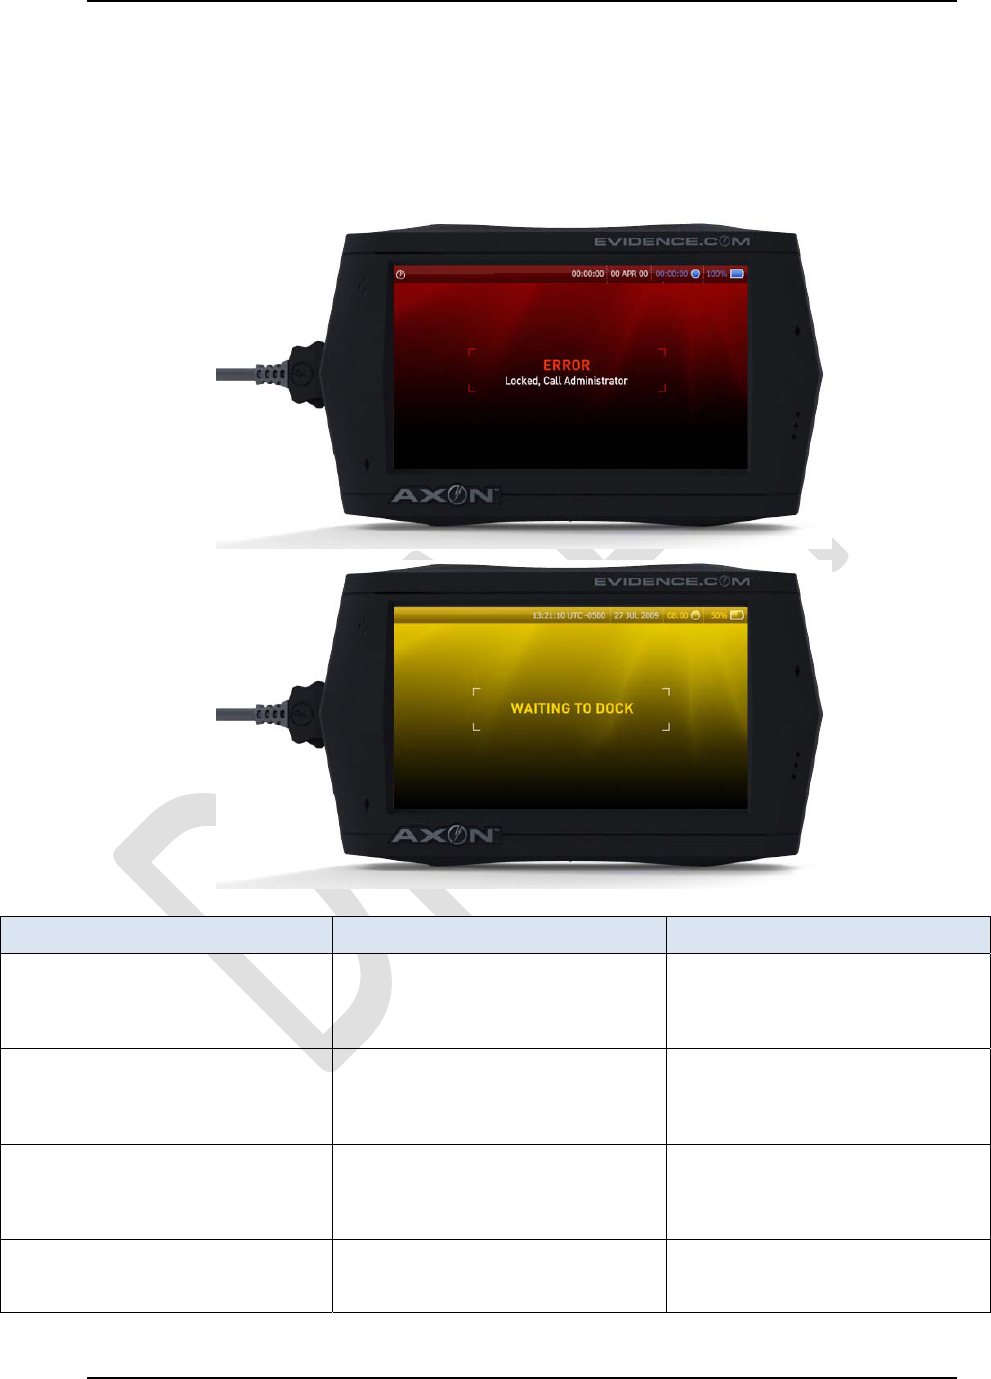
Troubleshooting
Screens
As of December 2009 Version 1.0 hardware and software release, here are the possible
error screens you may encounter:
SYMPTOM LIKELY CAUSE SOLUTION
HeadCam Disconnected displays
on the ATC touch screen The HeadCam or ComHub is not
connected Check the fit of the connectors.
The cable plugs may not be
securely seated.
"Video Signal Lost" is heard from
the ATC The HeadCam or ComHub is not
connected Check the fit of the connectors.
The cable plugs may not be
securely seated.
Cannot find markers on playback Markers are hidden Press the SHOW MARKS button
in the video player to display the
markers.
Cannot add Categories Agency did not create Categories Contact your Agency
Administrator to create categories

AXON™ 4 Jan 2010
TASER International Private & Confidential 44
on EVIDENCE.COM
ATC screen goes blanks ATC screen is asleep Press the POWER button
momentarily to "wake" the ATC.
ATC Locks Up Internal Hardware or Software error Press and hold the POWER
button for 8 seconds to reboot the
ATC.
Error - Locked, Call Administrator Internal Hardware or Software error Return ATC to SYNAPSE ETM
and re-dock.
Waiting to Dock Bug Return ATC to SYNAPSE ETM
and re-dock.
AXON, EVIDENCE.COM, SYNAPSE, TASER, ‘Protect Life’ and © are trademarks of
TASER International, Inc. All rights reserved. © 2009 TASER International, Inc.