TCL Air conditioner TWAC-TYWFS Windows Type Air-condition User Manual
TCL Air conditioner (Zhong Shan) Co.,Ltd. Windows Type Air-condition
User manual
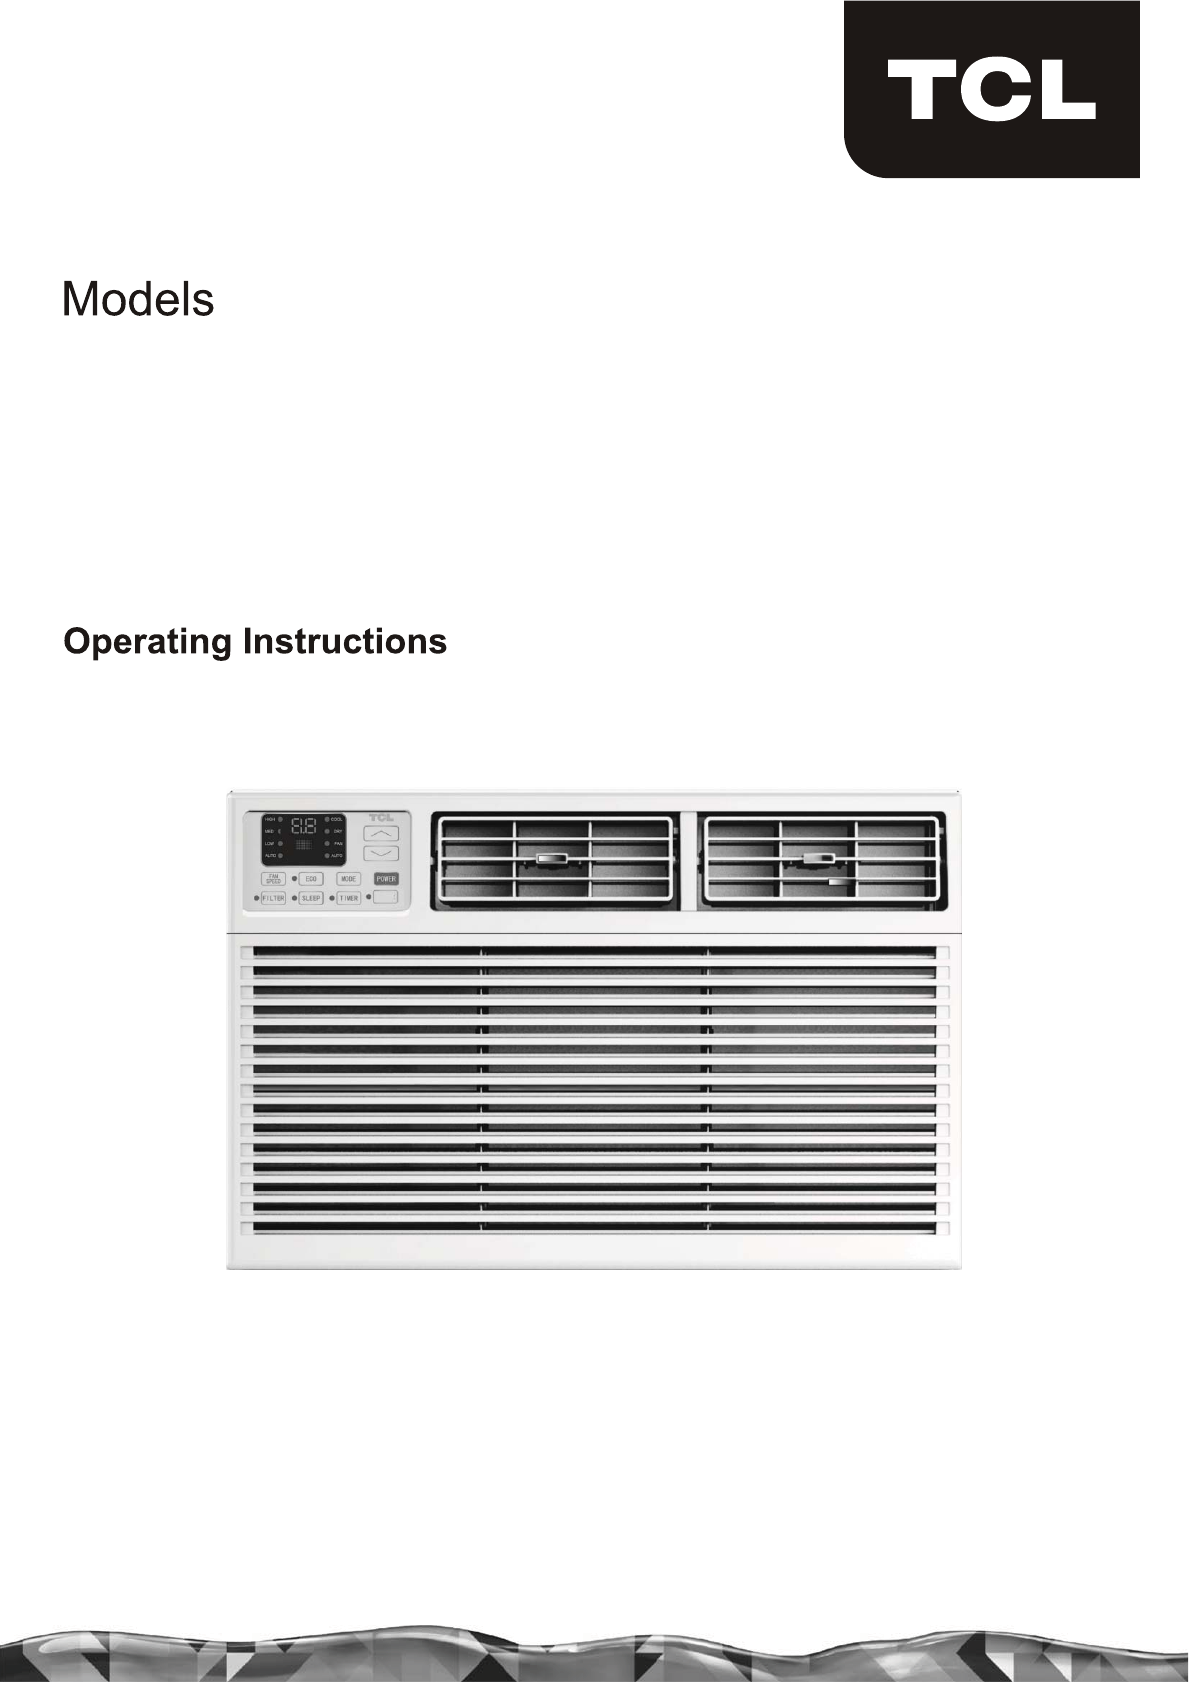
TWAC-15CRA1/K8U(ES)
TWAC-24CRA2/J3U(ES)
Windows Type Air-condition
HEALTH

INTRODUCTION
IMPORTANT SAFETY INSTRUCTION ...........................................................................
...................................................................................
PACKING LIST ............................................................................................................
INSTALLATION&ASSEMBLY INSTRUCTIONS ..............................................................
USING YOUR AIR CONDITIONER ................................................................................
........................................................................
CARE AND CLEANING ................................................................................................
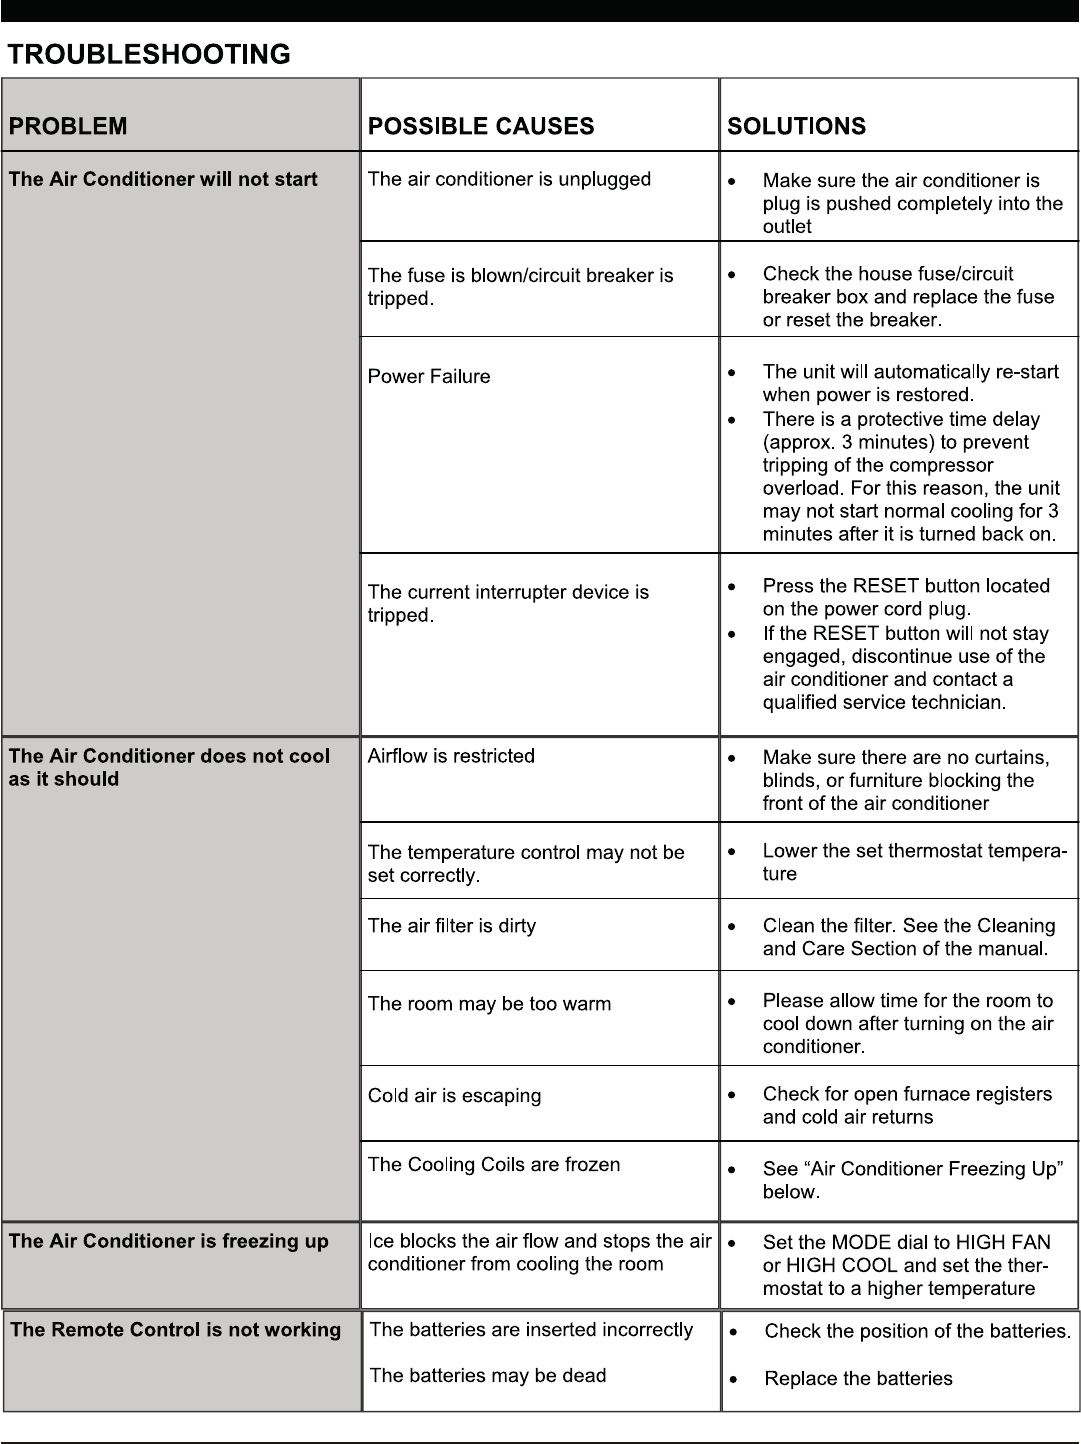
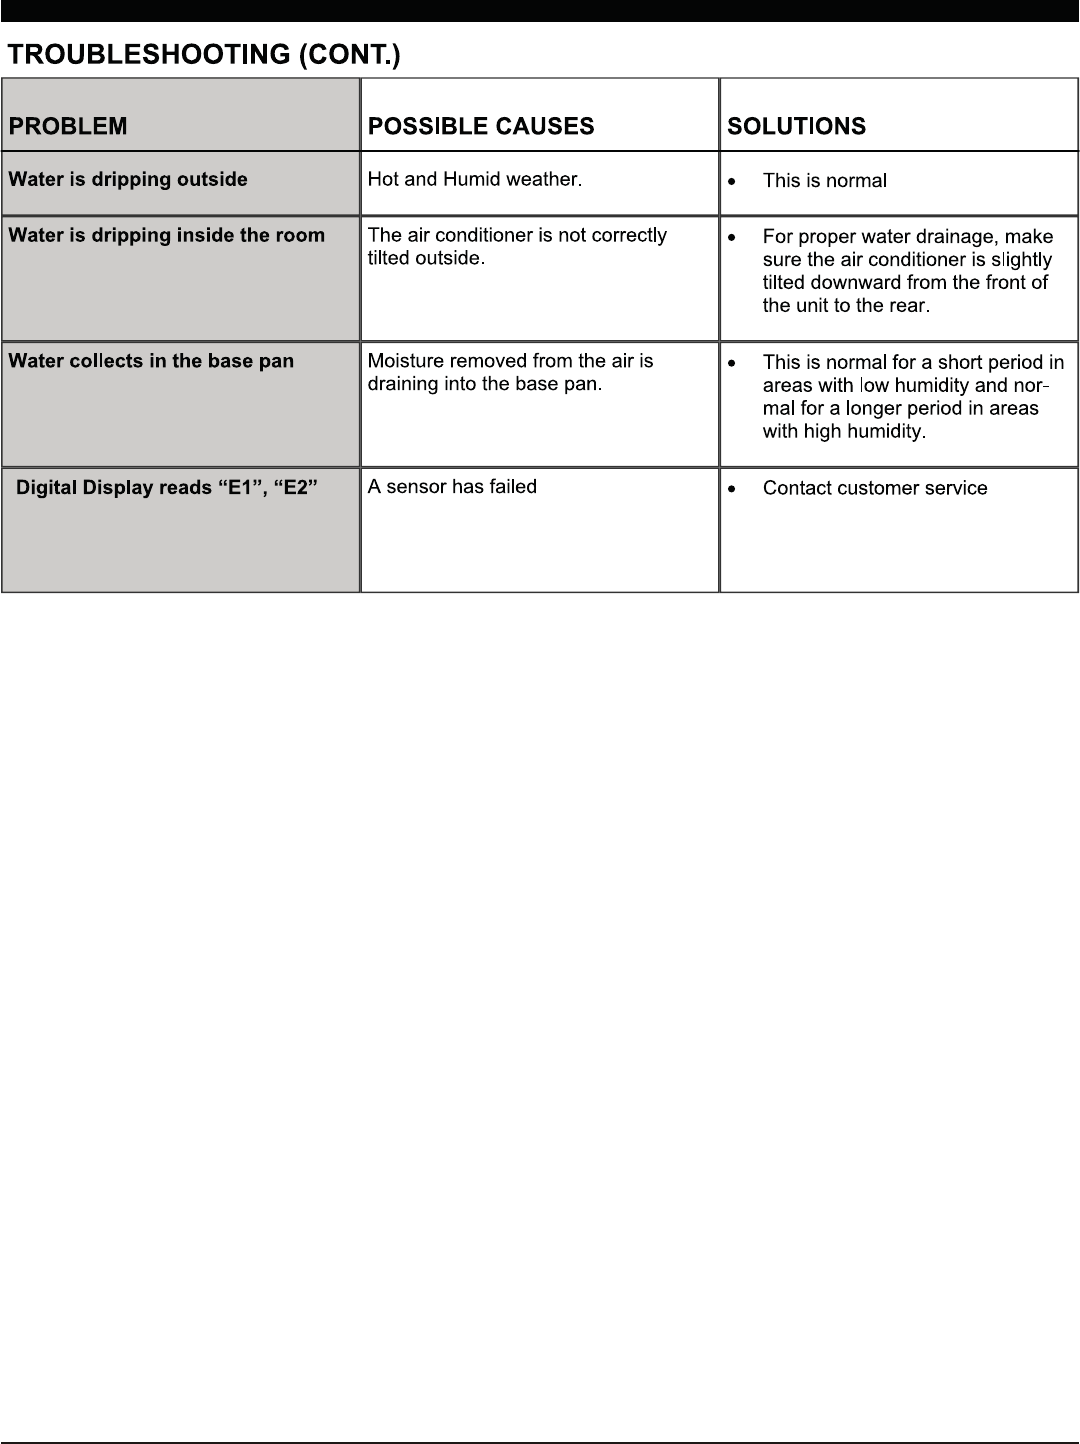
TROUBLESHOOTING .................................................................................................
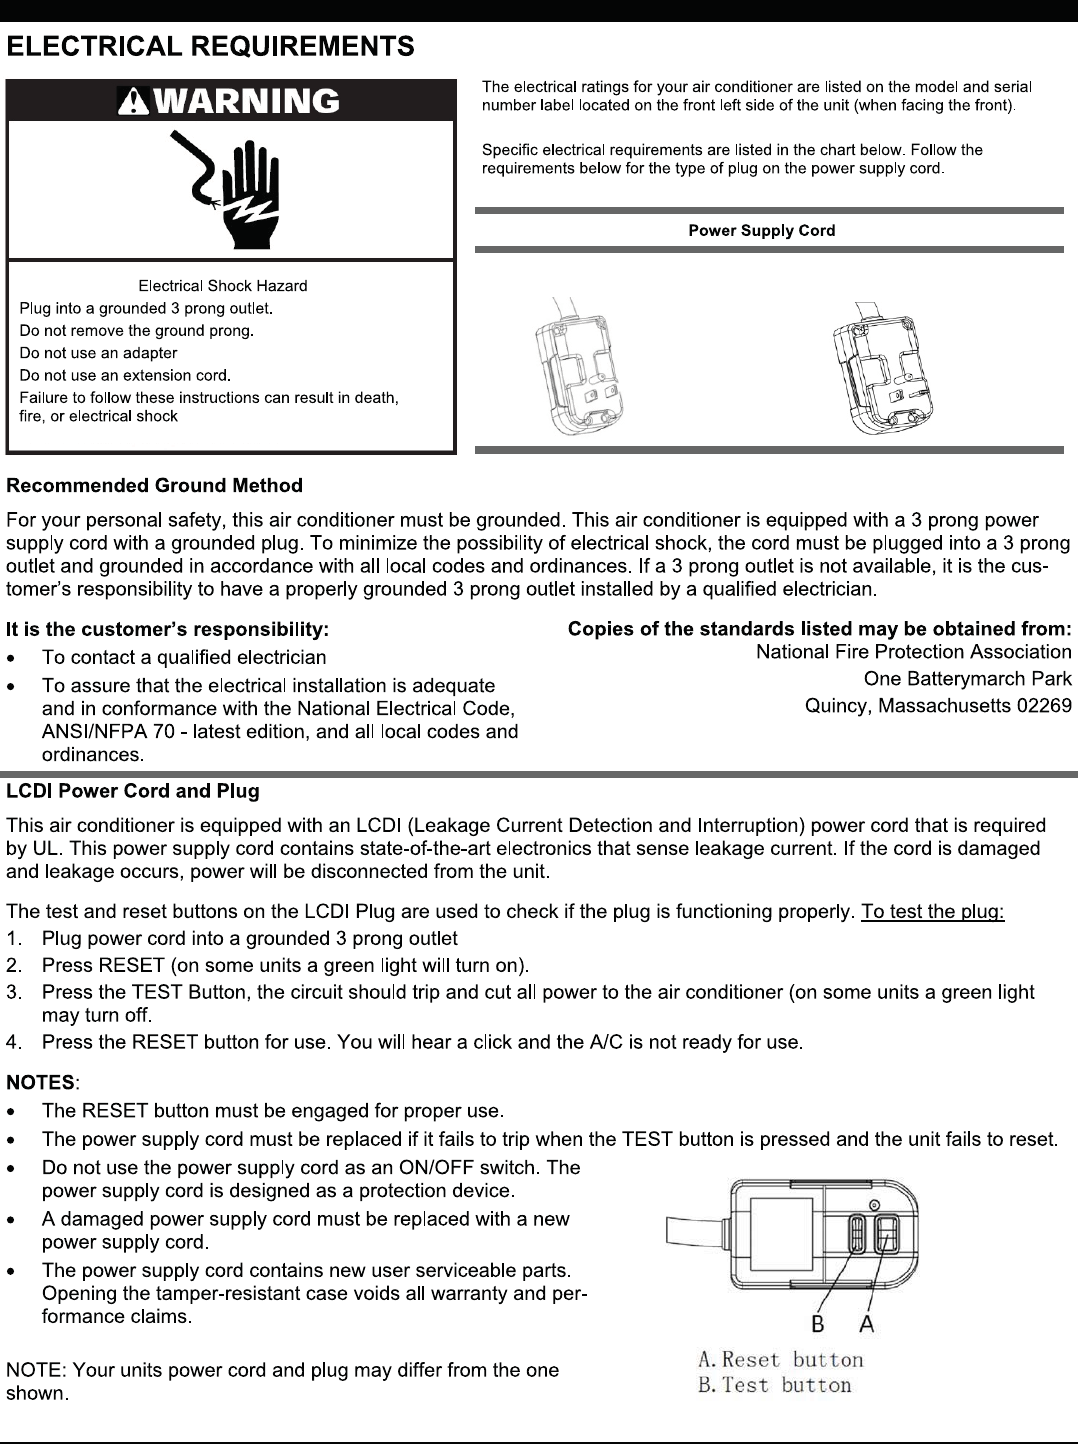
ELECTRICAL REQUIREMENTS
OPERATING YOUR AIR CONDITIONER
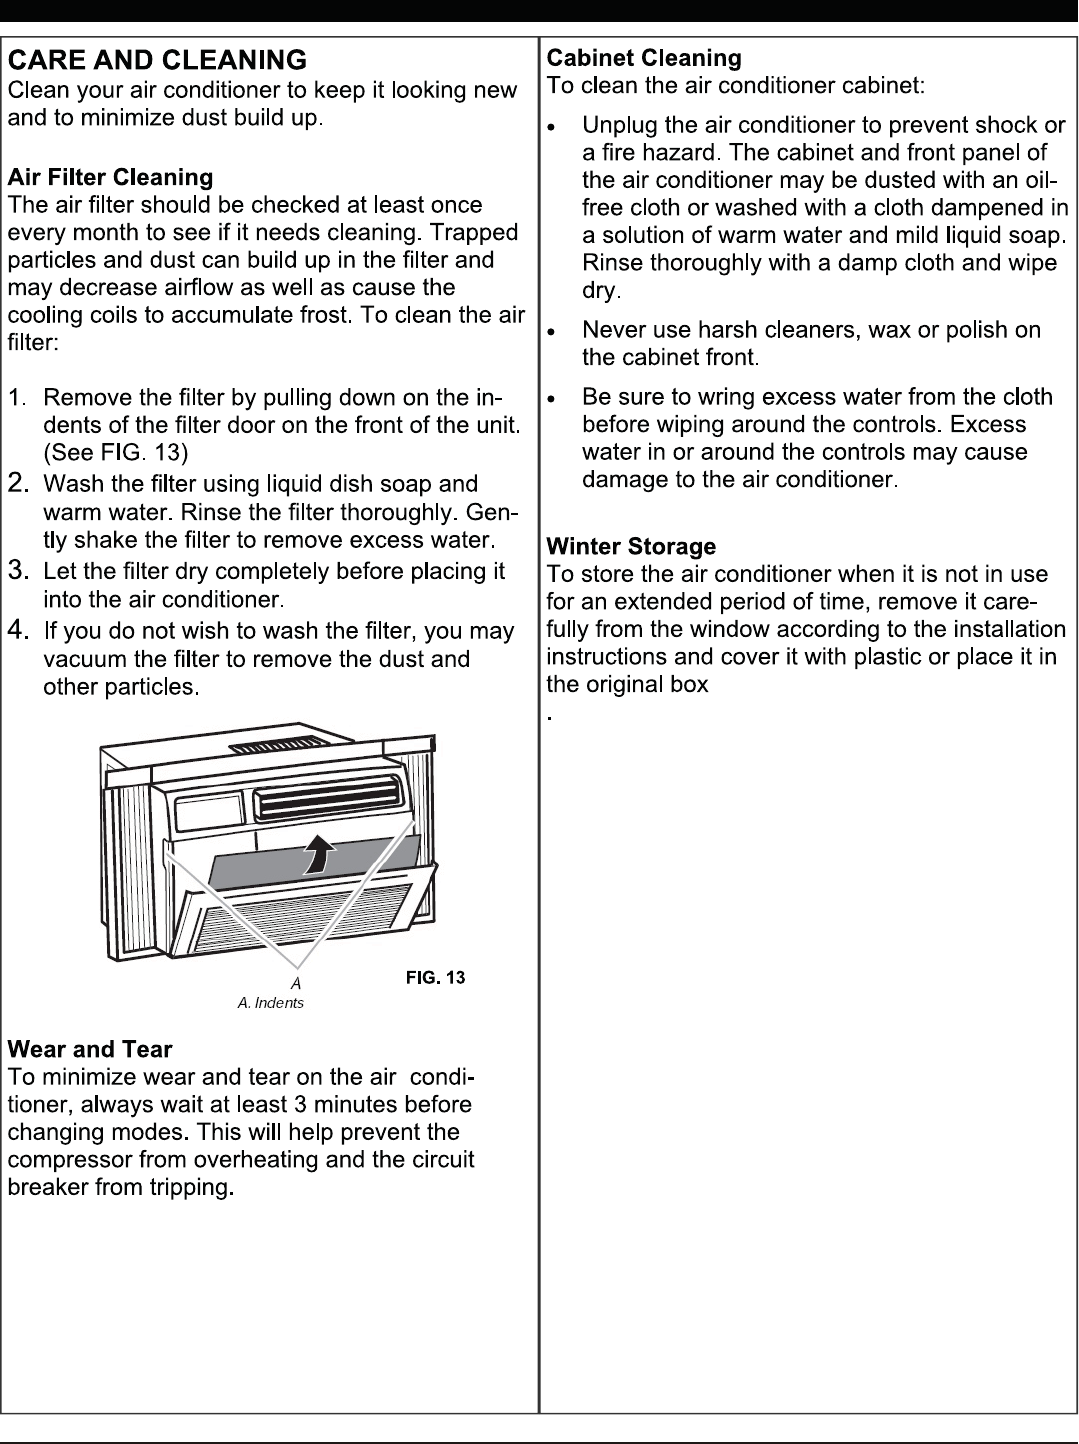
1
2
3
4
13
15
16
17
1
2
15K 18K/22K/24K
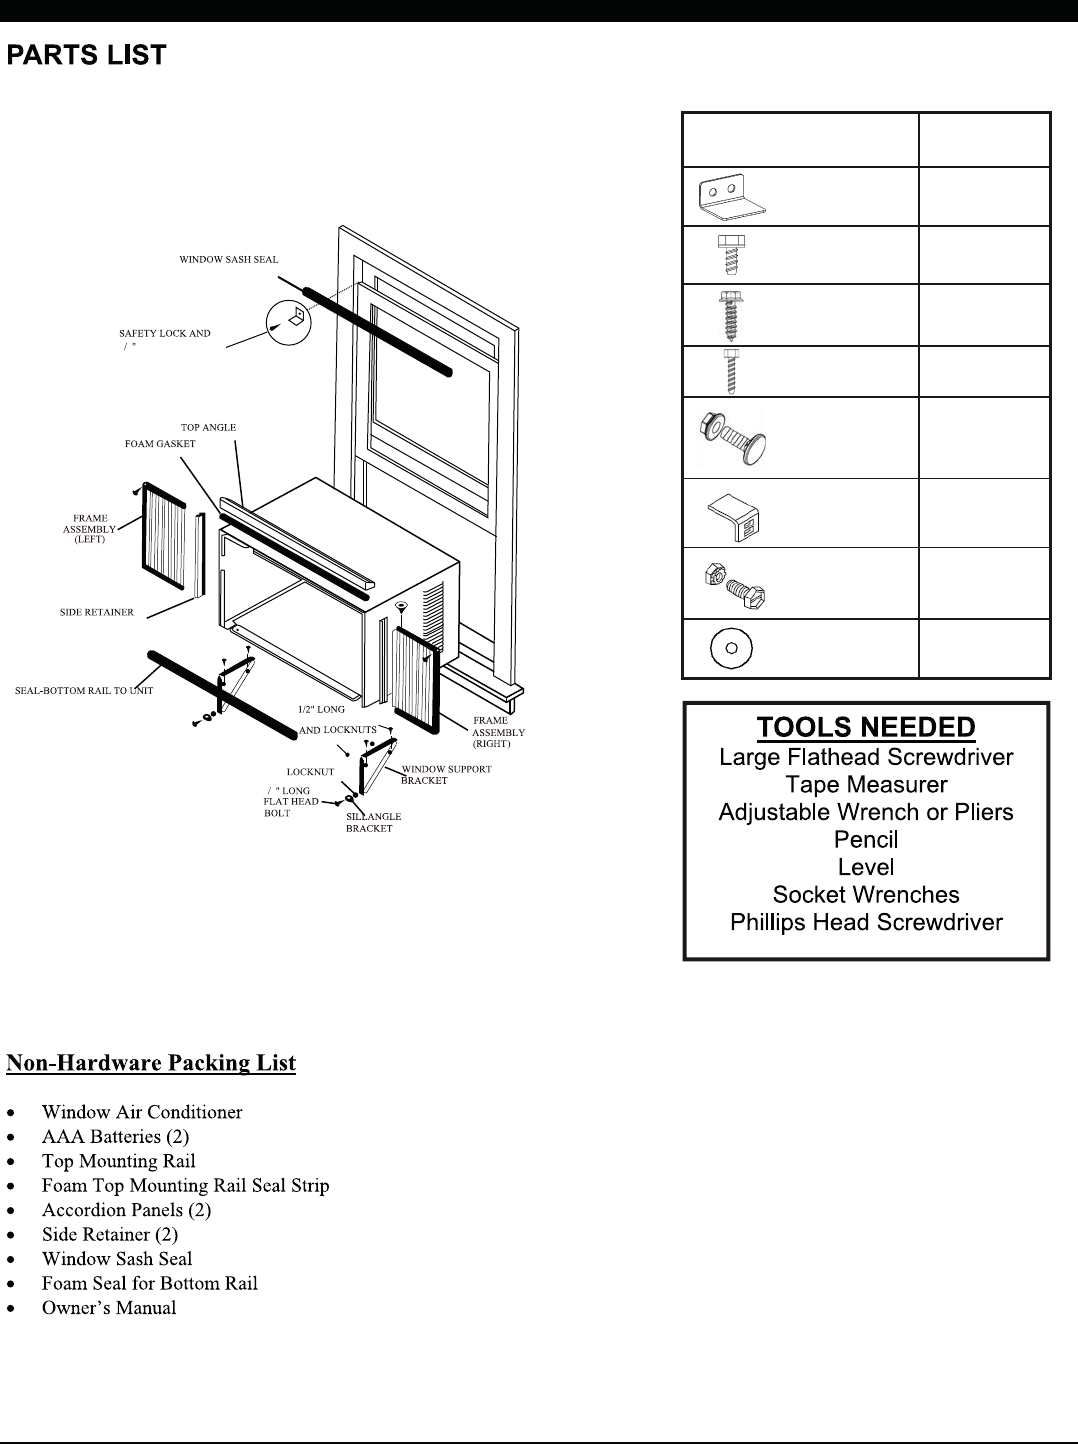
3
58
SCREW
HEX-HEAD
FLAT-HEAD BOLT
58
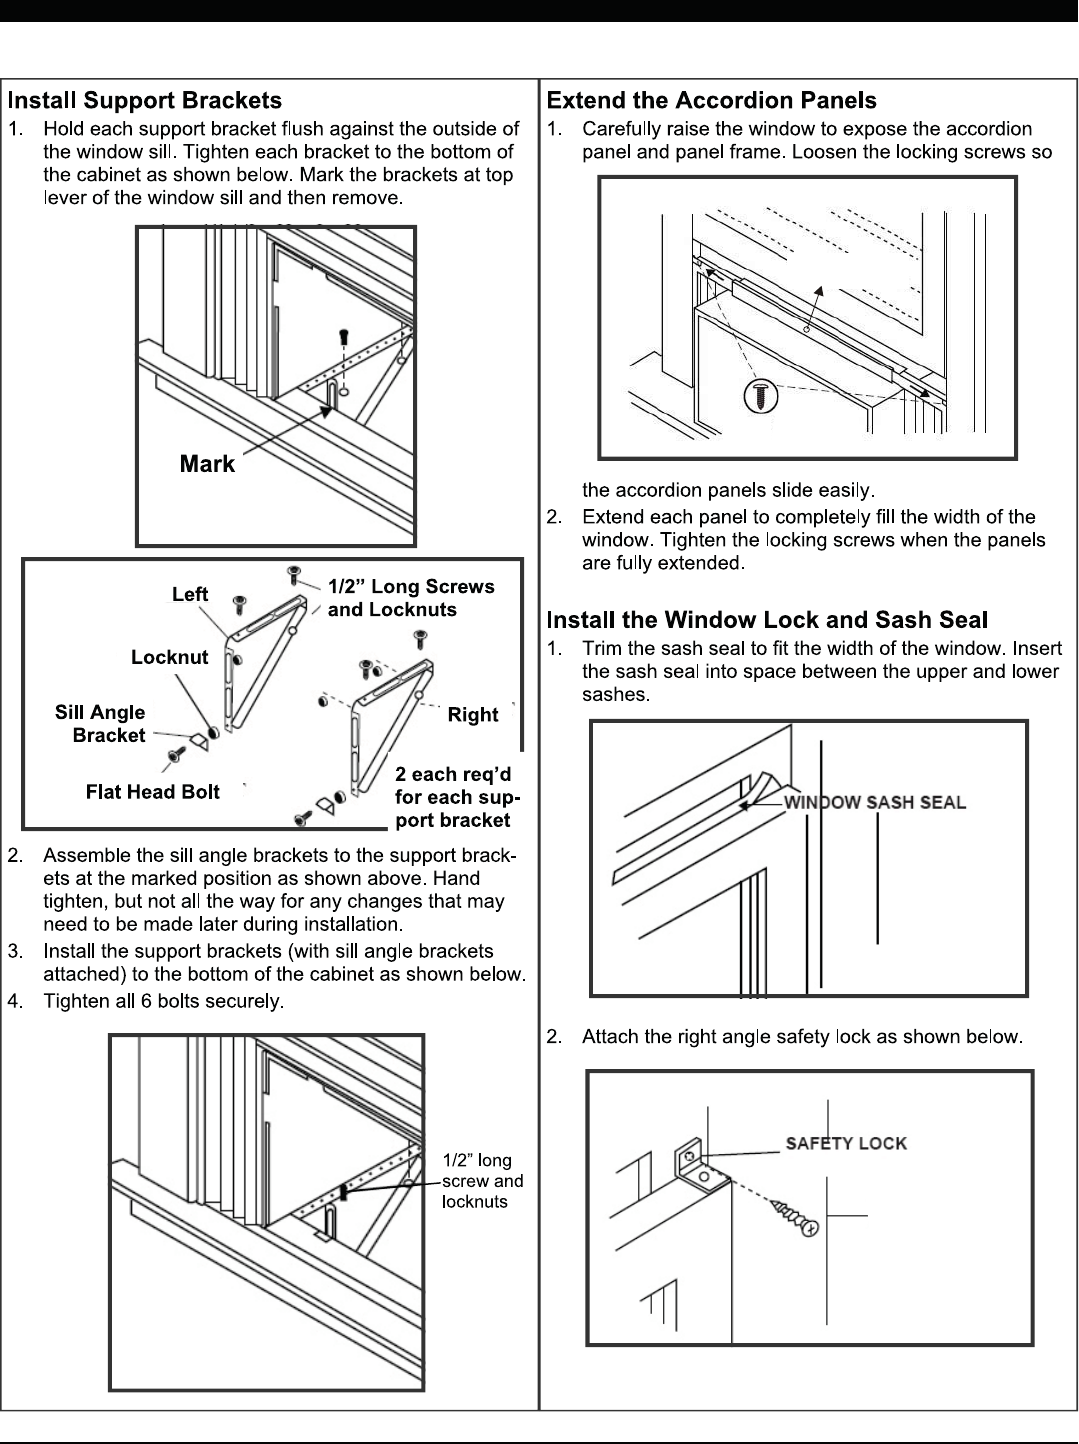
Hardware
(in plastic bag) Qty.
Safety Lock
5/16" Long
Hex-head Screw
5/8" Long
Hex-head Screw
1/2" Long
Hex-head Screw
5/8" Long Flat
Head Bolt and
Locknut
Sill Angel Bracket
1/2" Long Flat
Head Bolt and
Locknut
Gasket
1
10
4
2
2ea
2
4ea
2
4
15K/18K
17.91 18.625
23.625 26.50
19.00 19.50
28.00 30.00
41.00 41.00
22K/24K
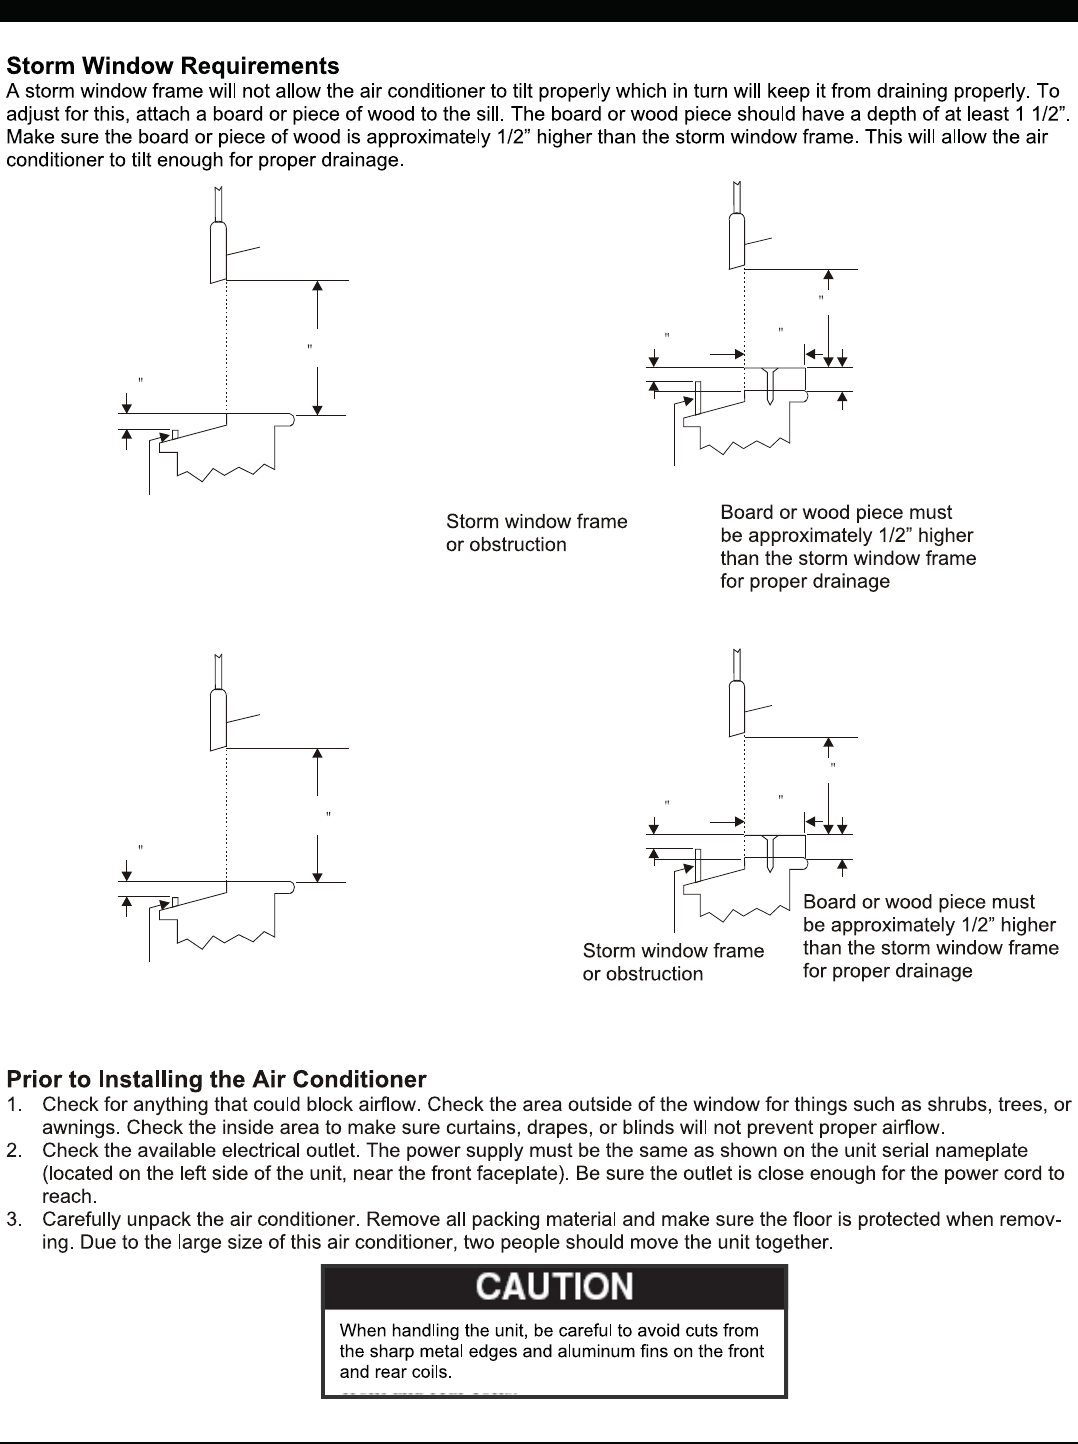
SASH
SASH
1/2 MIN
1/2 MIN
19 MIN
19 1/2 MIN
FIG.1
FIG.3
STORM WINDOW FRAME OR
OTHER OBSTRUCTION
STORM WINDOW FRAME OR
OBSTRUCTION
FIG.2
FIG.4
SASH
SASH
1/2 MIN
1/2 MIN
19 MIN
19 1/2 MIN
1/2 MIN
1/2 MIN
Storm window frame
or obstruction
5
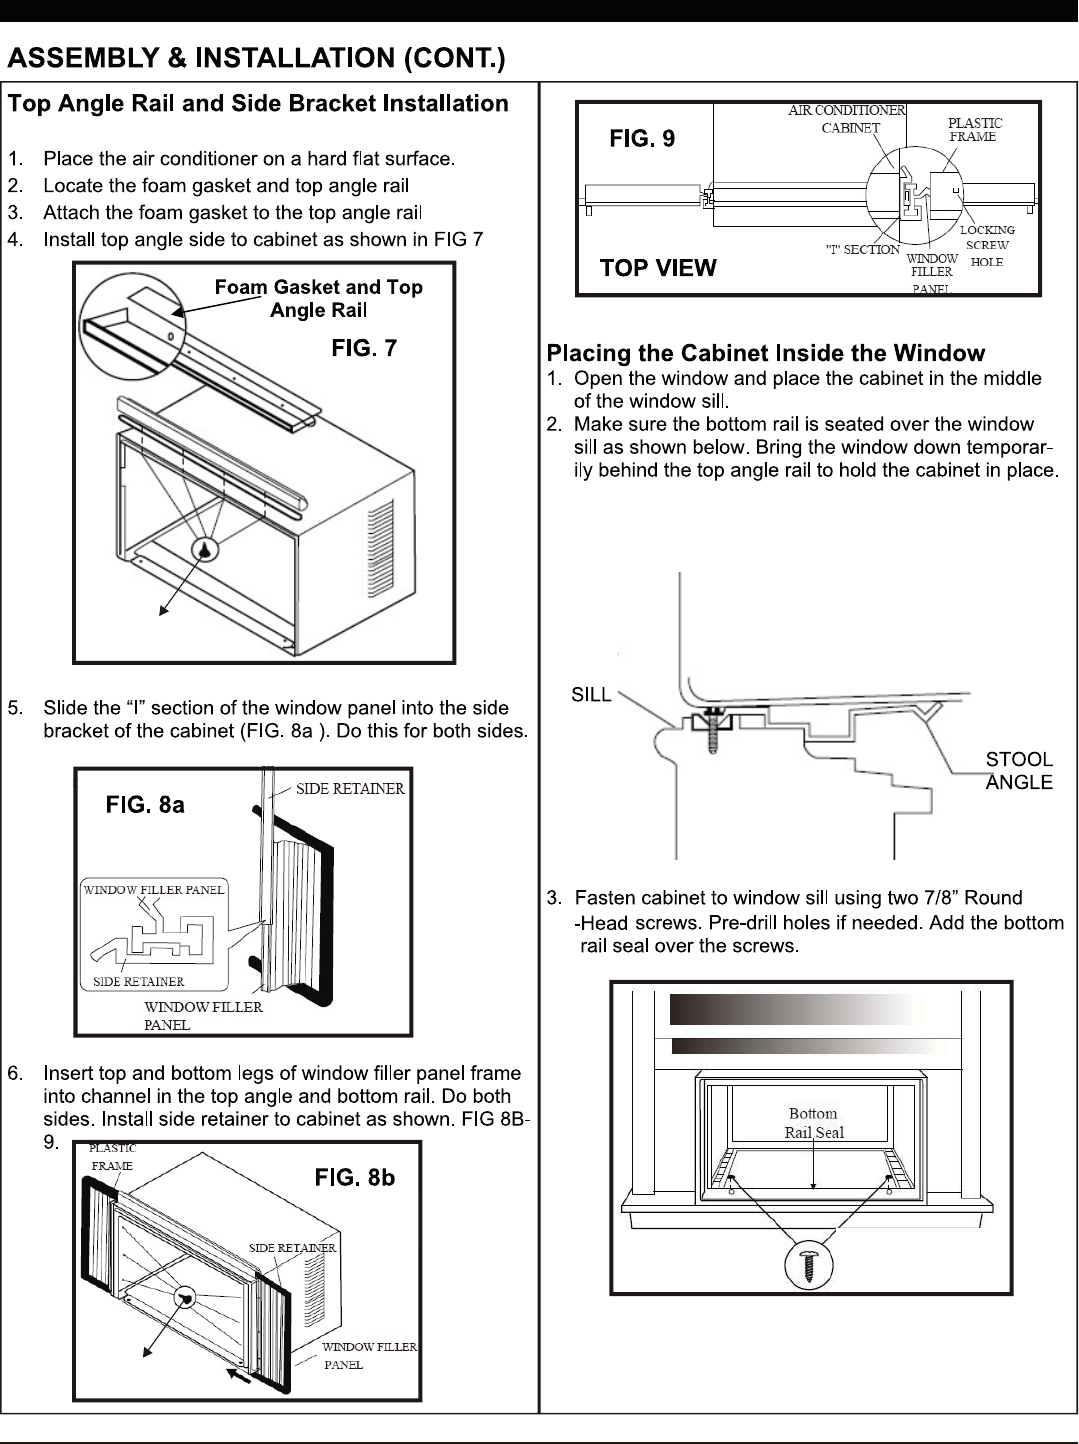
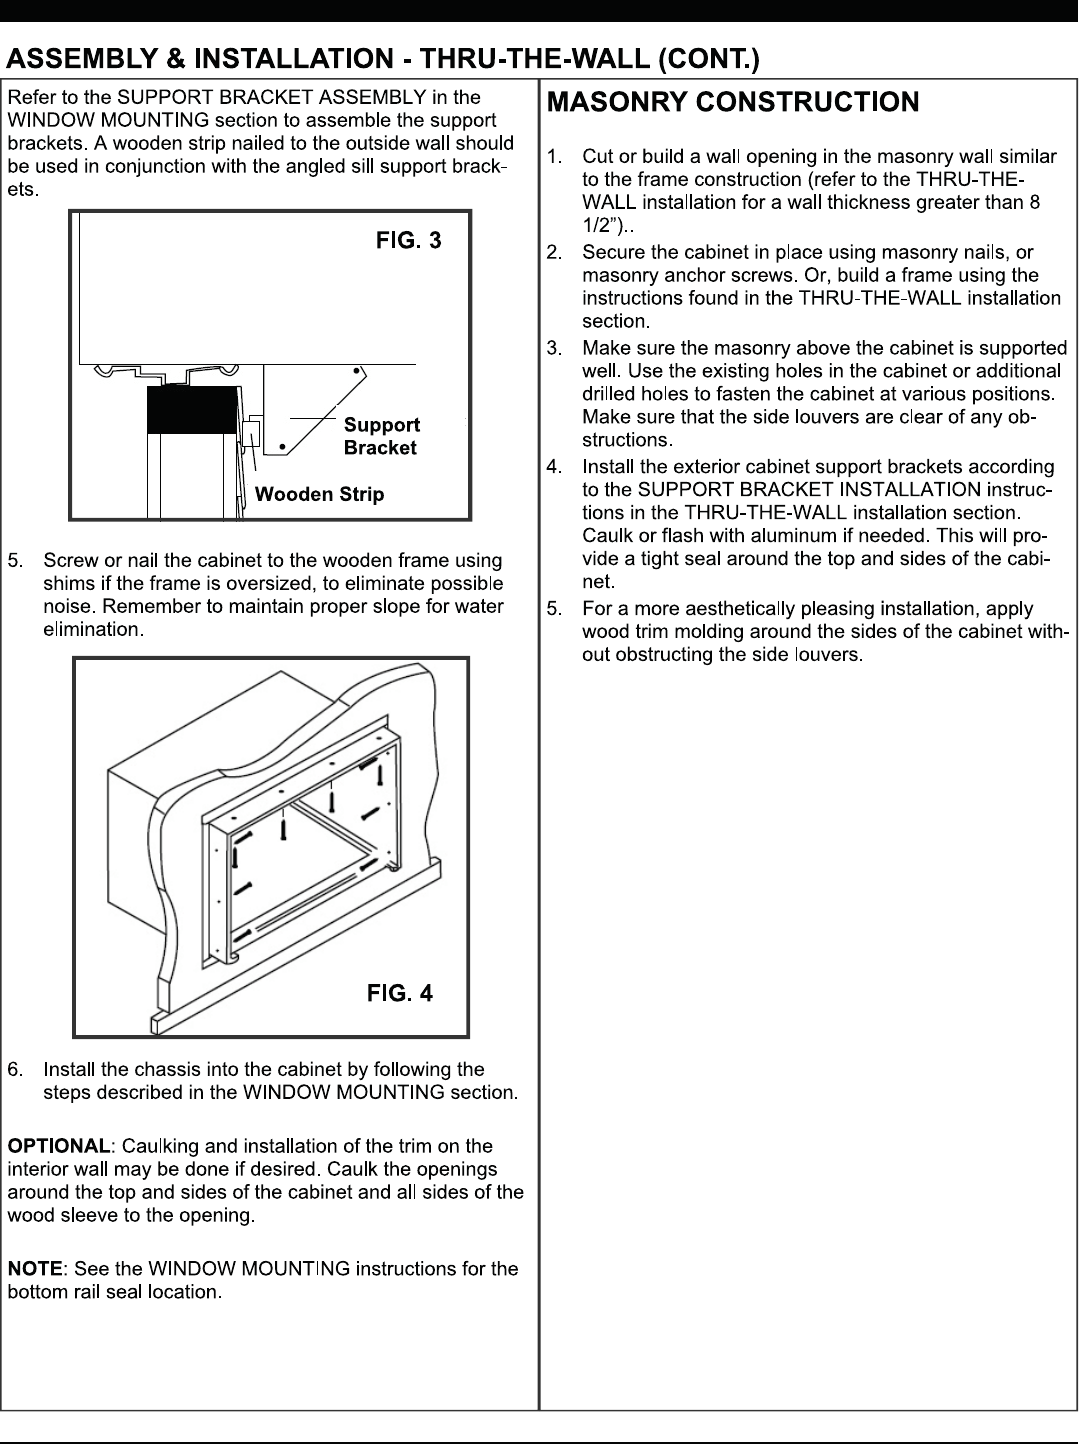
(15K/18K See FIG.1/FIG.2 ; 22K/24K See FIG.3/FIG.4).
6
7
8
5/16" Long
Hex-head Screw
5/16" Long
Hex-head Screw
5/8" Long
Hex-head Screw
(Suggest to keep a downward oblique angle within
3 degree, to let accumulated rain water to drain out,
from back side of the unit bottom.)
9
5/8" Long
Hex-head Screw
1/2" Long
Hex-head Screw
5/8" Long
Hex-head Screw

10
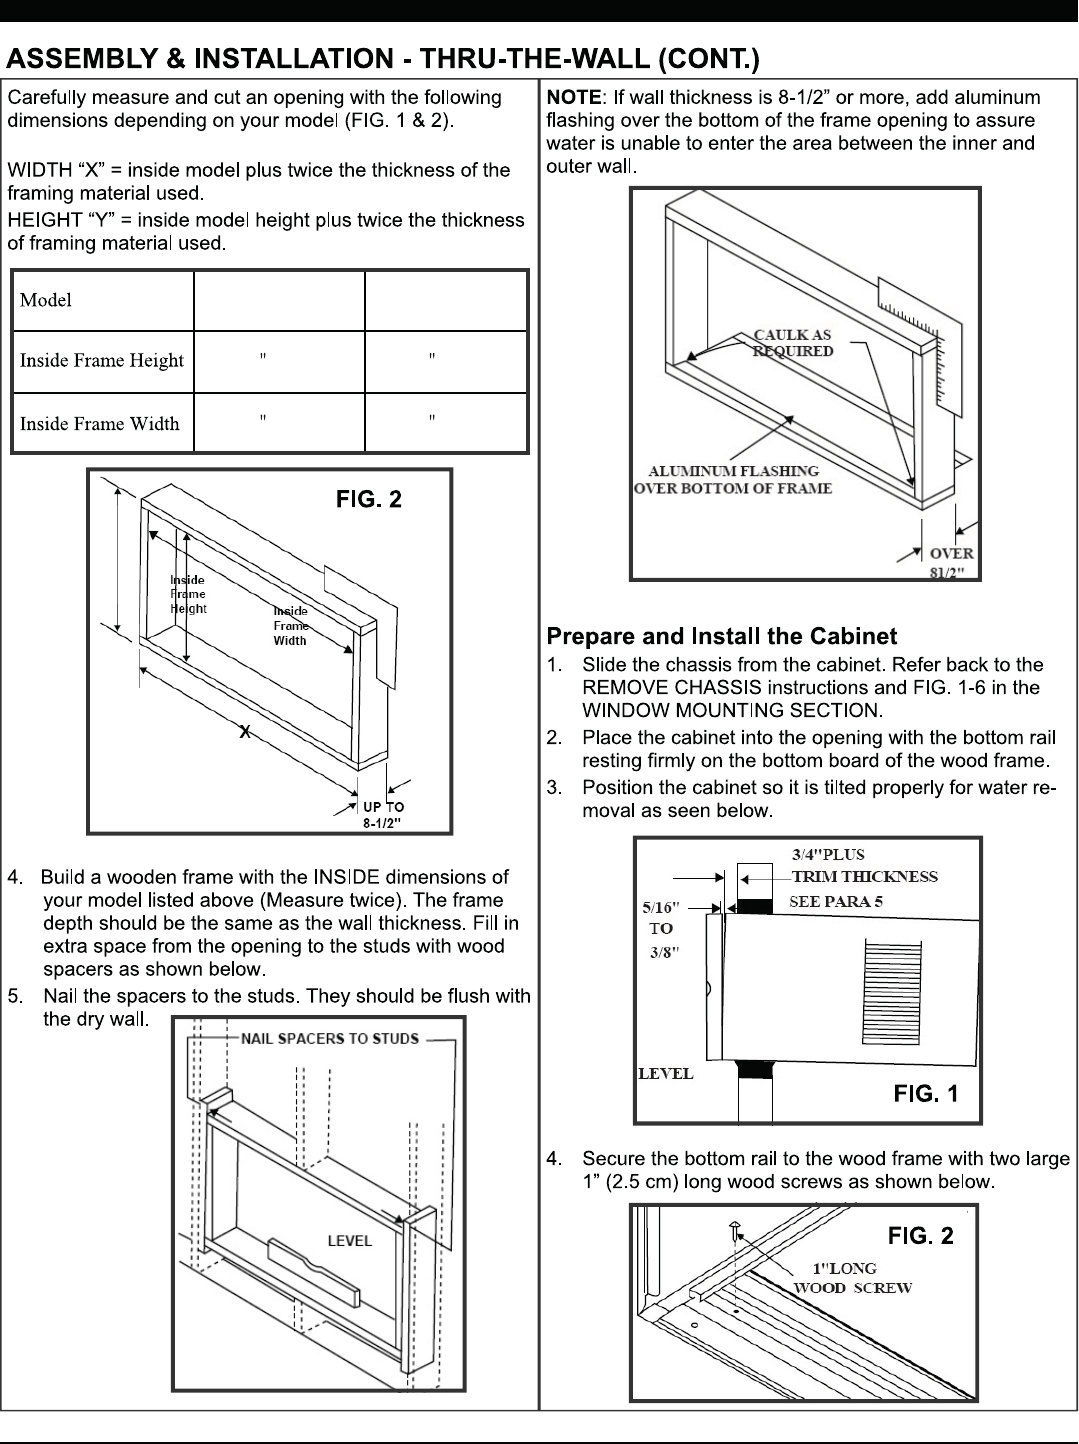
11
15K/18K
18 1/4 (46.4 cm)
23 7/8 (60.6 cm)
22K/24K
18 7/8 (47.9 cm)
26 3/4 (67.9 cm)
Y
12
13
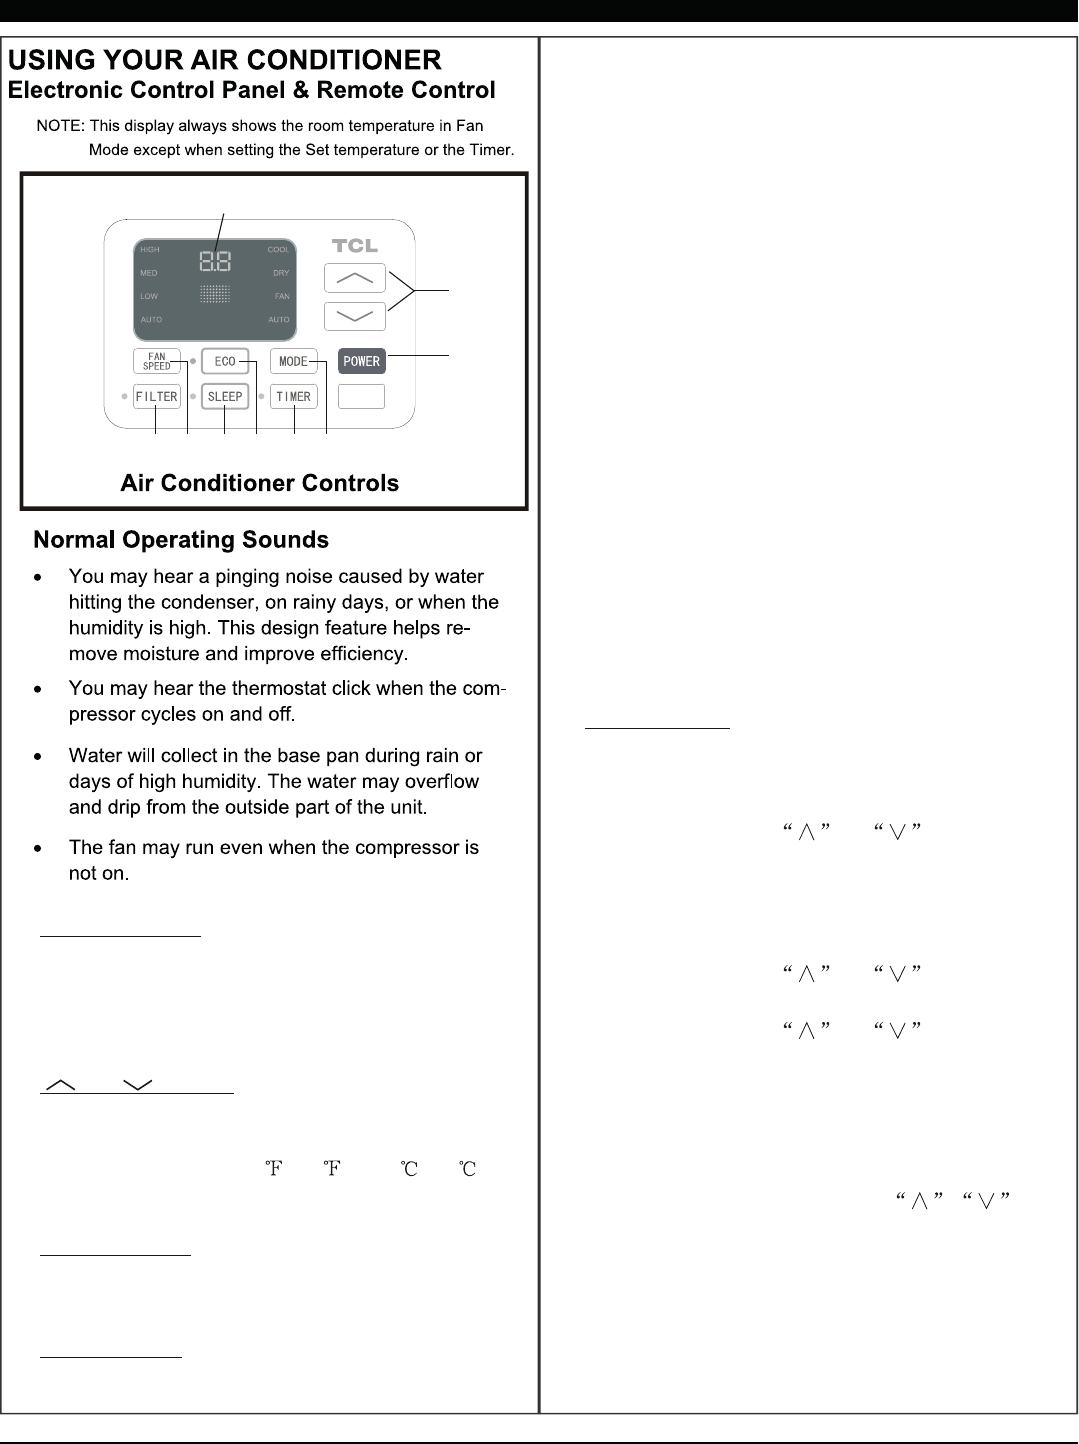
1
2
3
456789
1. Without timer setting,the
operation mode is Cooling,Dry, Fan and Auto,and
the set temperature will be displayed.
Time will be displayed under timer setting.
Digital Display:
and Button:2. Use these buttons on the
control panel and remote to increase or decrease
the Set Temperature or Timer.
Temperature range: 61 ~88 or 16 ~31 .
3. Turn the air conditioner on and
off.
Power Button:
Press the mode button to cycle
through the various modes: Cool, Dry, Fan and
Auto.
4. Mode Button:
Use these buttons on the control
panel and remote to set the Timer.
Timer Off: The timed stop is programmed by
pressing TIMER button. Set the rest time by
pressing the button or until the rest
time displayed is to your demand then press
TIMER button again.
Timer On: When the unit is off, press TIMER
button at the first time, set the temperature with
pressing the button or . Press TIMER
button at the second time, set the rest time with
pressing the button or . Press TIMER
button at the third time, confirm the setting, then
the rest time to next automatical switching-on
could be read on the display of the machine.
Note: It can be set to automatically turn off or on in
0.5-24 hours. Each press of the
buttons will increase or decrease the timer. The
Timer can be set in 0.5 hours increment below 10
hours and 1 hour increment for 10 hours or above.
The SET light will turn on while setting.
To cancel the setted function, press the TIMER
button again.
5. Timer Button:
Cool Mode: The cooling function allows the air
conditioner to cool the room and at the same time
reduces Air humidify. Press the MODE button to
activate the cooling function. To optimize the
function of the air conditioner, adjust the
temperature and the speed by pressing the button
indicated.
Dry Mode: This function reduces the humidity of
the air to make the room more comfortable. Press
MODE button to set the DRY mode. An automatic
function of alternating cooling cycles and air fan
is activated.
Fan Mode: The conditioner works in only
ventilation. Press MODE button to set the FAN
mode. With pressing FAN SPEED button the
speed changes in the following sequence: Hi, Med
and Lo in FAN mode. The remote control also
stories the speed that was set in the previous
mode of operation. In AUTO mode the unit
automatically chooses the fan speed and the
mode of operation(COOL,DRY or FAN).
HEALTH
14
When the unit is in ECO mode, the
light will turn on. In ECO mode, the unit will
turn-off once the room is cooled to the user set
temperature. The fan will also be off at this point.
The unit will turn back on when the room
temperature rises above the user set temperature.
6. Eco Button:
Press the SLEEP button, the Sleep
Light will be on after 10s, and all the left lights will
be off. In SLEEP mode, the air-conditioner will
automatically adjust the temperature and fan
speed to make the room more comfortable during
the night. The set temperature will automatically
raise by 1 every 30-60 minutes and at most
change six times until the set temperature is 28 .
And every running time depends on the set
temperature.
7. Sleep Button:
Press the FAN SPEED button
to choose the fan speed options. You can choose
Hi, Med, Lo or auto speed in COOL mode and
choose Hi, Med, Lo in FAN mode.
8. Fan Speed Button:
9.
10.
When the Filter Check light is off,
it is useless to press the Filter Check button. When
the Filter Check light is on, it can turn off the light
by pressing the Filter Check button. After the
compressor works for 500 total hours, the Filter
Check light will turn on to remind the user to clean
the filter.
To direct the airflow,
horizontal wheel to control the horizontal direction,
air deflector to control the vertical direction.
Filter Button:
Directional Louvers:
horizontal wheelair deflector air deflector
11.WIFI remote function please read the
APP user manual.
15
1
4
5
6
3
3
7
8
10
9
2
When the unit is in ECO mode, the light
will turn on. In ECO mode, the unit will turn-off
once the room is cooled to the user set
temperature. The fan will also be off at this
point. The unit will turn back on when the room
temperature rises above the user set
temperature.
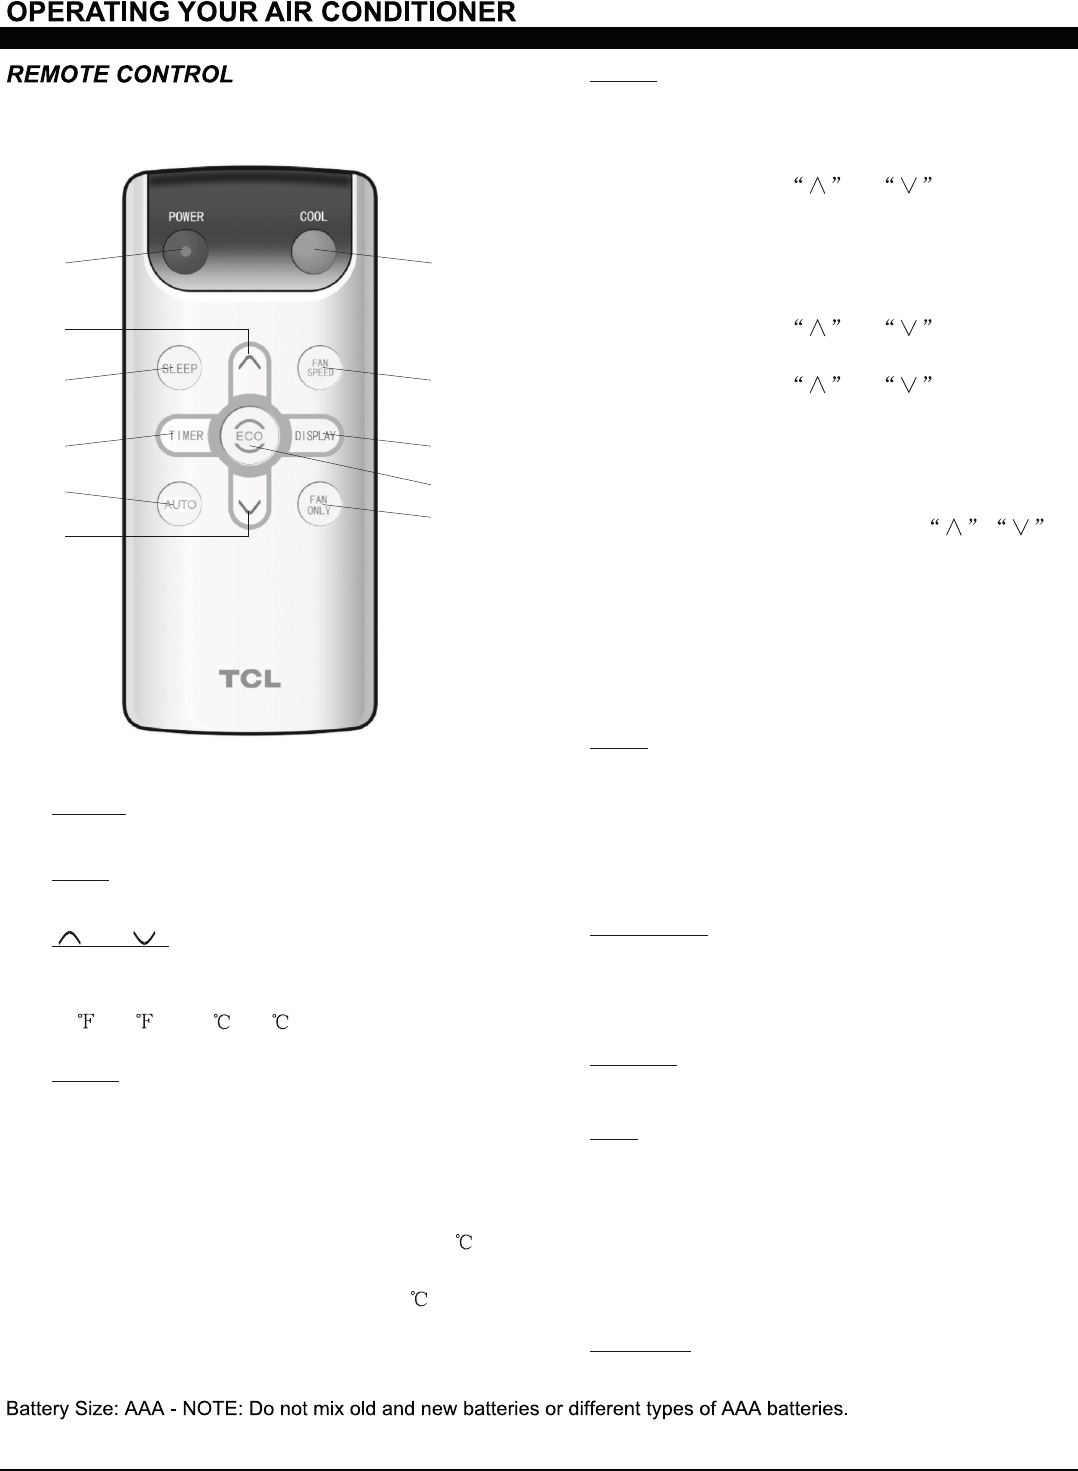
Press the Fan Only button to FAN
ONLY mode.
9.
10.
Eco:
Fan Only:
Press the FAN SPEED button to
choose the fan speed options. You can choose
Hi, Med, Lo or auto speed in COOL mode and
choose Hi, Med, Lo in FAN mode.
7. Fan Speed:
To press the DISPLAY button, it can
switch off/on all lights or LED display.
8. Display:
Use these buttons on the control panel
and remote to set the Timer.
Timer Off: The timed stop is programmed by
pressing TIMER button. Set the rest time by
pressing the button or until the rest
time displayed is to your demand then press
TIMER button again.
Timer On: When the unit is off, press TIMER
button at the first time, set the temperature with
pressing the button or . Press TIMER
button at the second time, set the rest time with
pressing the button or . Press TIMER
button at the third time, confirm the setting, then
the rest time to next automatical switching-on
could be read on the display of the machine.
Note: It can be set to automatically turn off or on
in 0.5-24 hours. Each press of the
buttons will increase or decrease the timer. The
Timer can be set in 0.5 hours increment below
10 hours and 1 hour increment for 10 hours or
above. The SET light will turn on while setting.
To cancel the setted function, press the TIMER
button again.
5. Timer:
Press AUTO button enter into AUTO
mode directly. In this mode the fan speed and
the temperature are set automatically
according to the room temperature (tested by
the temperature sensor which is incorporated
in the indoor unit.).
6. Auto:
Press the SLEEP button, the Sleep
Light will be on after 10s, and all the left
lights will be off. In SLEEP mode, the
air-conditioner will automatically adjust the
temperature and fan speed to make the room
more comfortable during the night. The set
temperature will automatically raise by 1
every 30-60 minutes and at most change six
times until the set temperature is 28 . And
every running time depends on the set
temperature.
4. Sleep:
1. Turn the air conditioner on and off.Power:
2. Press the COOL button to COOL mode.Cool:
and :3. Use these buttons on the control
panel and remote to increase or decrease the
Set Temperature or Timer. Temperature range:
61 ~88 or 16 ~31 .
16
17
18
FCC Caution.
This device complies with part 15 of the FCC Rules. Operation is subject to the following two
conditions: (1) This device may not cause harmful interference, and (2) this device must accept
any interference received, including interference that may cause undesired operation.
Any Changes or modifications not expressly approved by the party responsible for compliance
could void the user's authority to operate the equipment.
Note: This equipment has been tested and found to comply with the limits for a Class B digital
device, pursuant to part 15 of the FCC Rules. These limits are designed to provide reasonable
protection against harmful interference in a residential installation. This equipment generates
uses and can radiate radio frequency energy and, if not installed and used in accordance with the
instructions, may cause harmful interference to radio communications. However, there is no
guarantee that interference will not occur in a particular installation. If this equipment does
cause harmful interference to radio or television reception, which can be determined by turning
the equipment off and on, the user is encouraged to try to correct the interference by one or
more of the following measures:
-Reorient or relocate the receiving antenna.
-Increase the separation between the equipment and receiver.
-Connect the equipment into an outlet on a circuit different from that to which the receiver is
connected.
-Consult the dealer or an experienced radio/TV technician for help.
This equipment complies with FCC radiation exposure limits set forth for an uncontrolled
environment. This equipment should be installed and operated with minimum distance 20cm between
the radiator & your body.


Please scan the QR code to download the latest App software.
Or download “Smart Life-smart home
The latest App software includes air conditioner, deh-
umidifier and Portable air conditioner.
” from APP Store or Goo-
gle Play.
Service condition
Thank you for choosing our air conditioner.
This manual apply to the air conditioners which has WiFi function.
Please read the manual carefully before using the product and keep it
properly for further review.
Please do not unplug the WIFI module by yourself.
For technical update, there may be deviation of the actual items from
the manual. We express our apologies. Please refer to the actual product.
Mention
FCC ID: 2AJCLTWAC-TYWFS
This device complies with Part 15 of the FCC Rules.
Operation is subject to the following two conditions:
(1) this device may not cause harmful interference, and
(2) this device must accept any interference received, including inter-
ference that may cause undesired operation.
1
For Android For IOS
APP User Manual
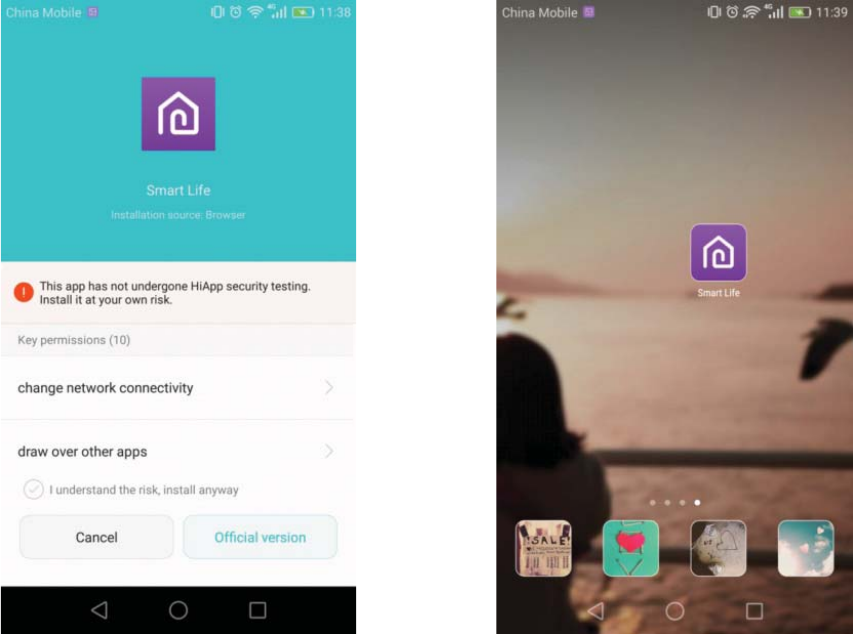
Install the APP
When download the APP software, you can install it in your smart phone.
After installation, you can find the “Smart Life icon on your phone desk.”
2
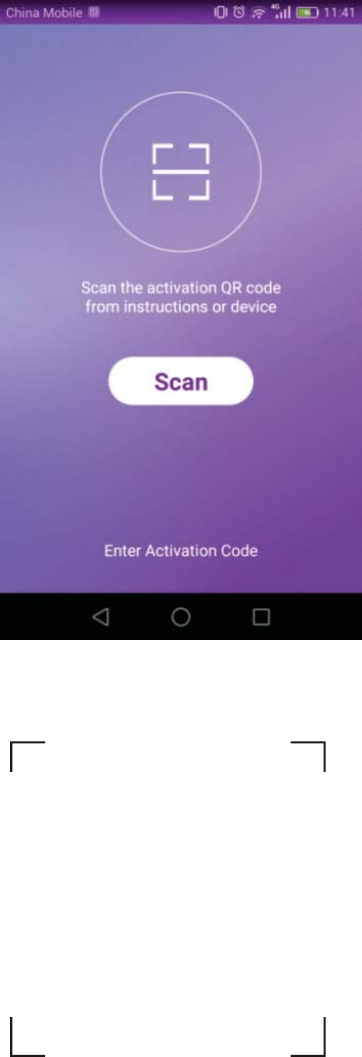
Activate QR code
1. When you first time enter the App, it will display activation interface,
you can select scan activation QR code (click “Scan” button and scan the
activation QR code in below page) or input words (in be-
low page), click “activate” button to active it.
“activation code”
2. Air conditioner activation QR code
3. Air conditioner activation code WORDS:_____________
3
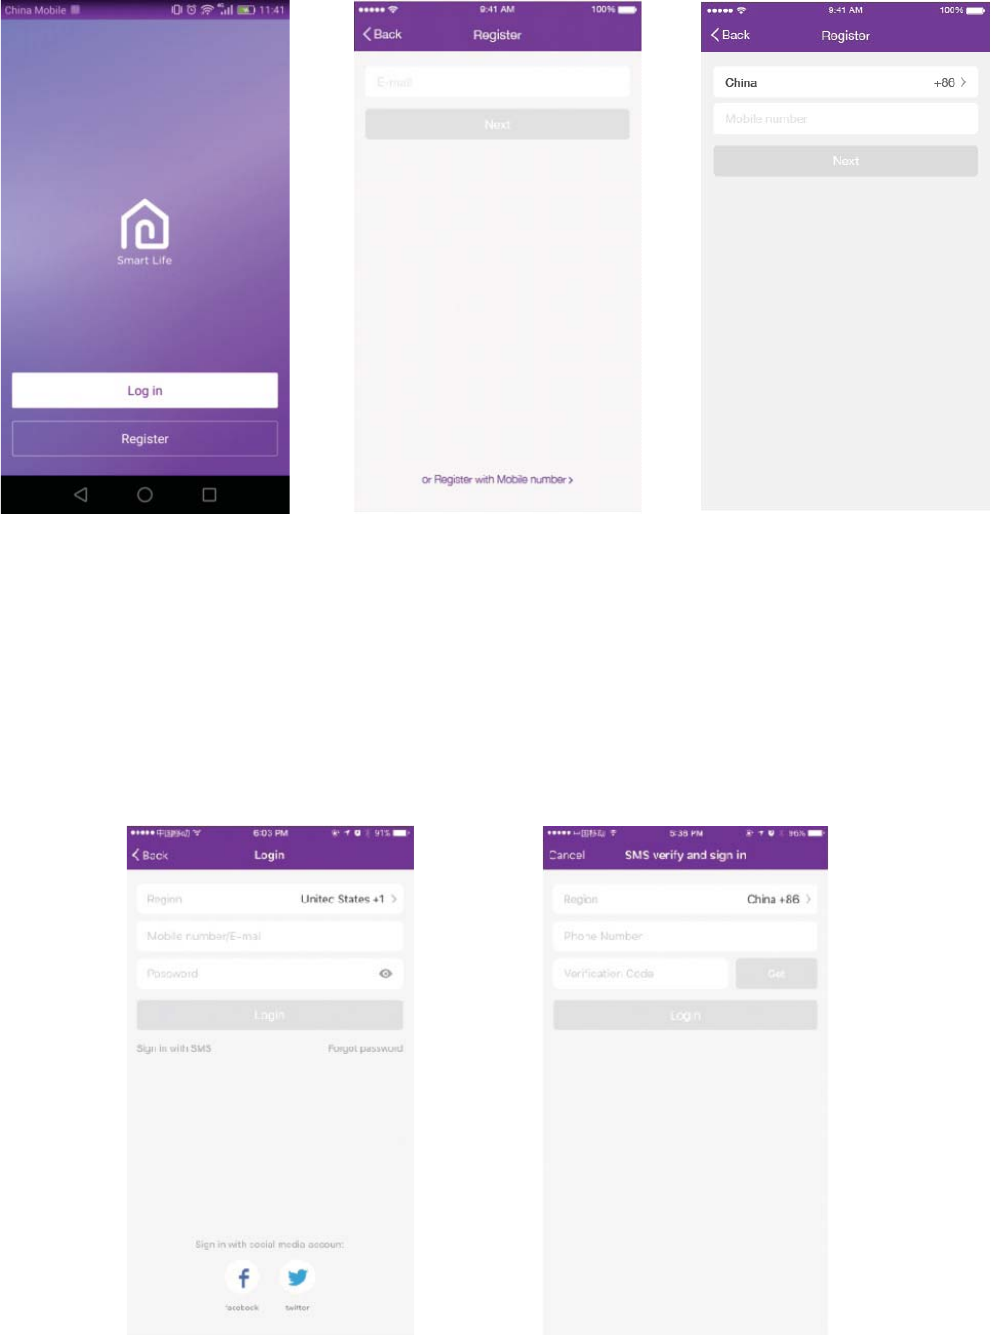
Register user account
When you first time use the App, you need to register an account.
Click “Register” button to enter to the register interface. You can register
with email or “Register with Mobile number”.
1. Register account login, fulfill the registered email or phone number account
and password, press “Login” button.
2. Phone number login, press “Sign in with SMS” button to enter the next page,
fulfill the phone number and press “get” button to receive the confirm code,
and fill in, then press “Login” button.
3. You also can use the Facebook or Twitter account to login by the below part.
Login user account
4
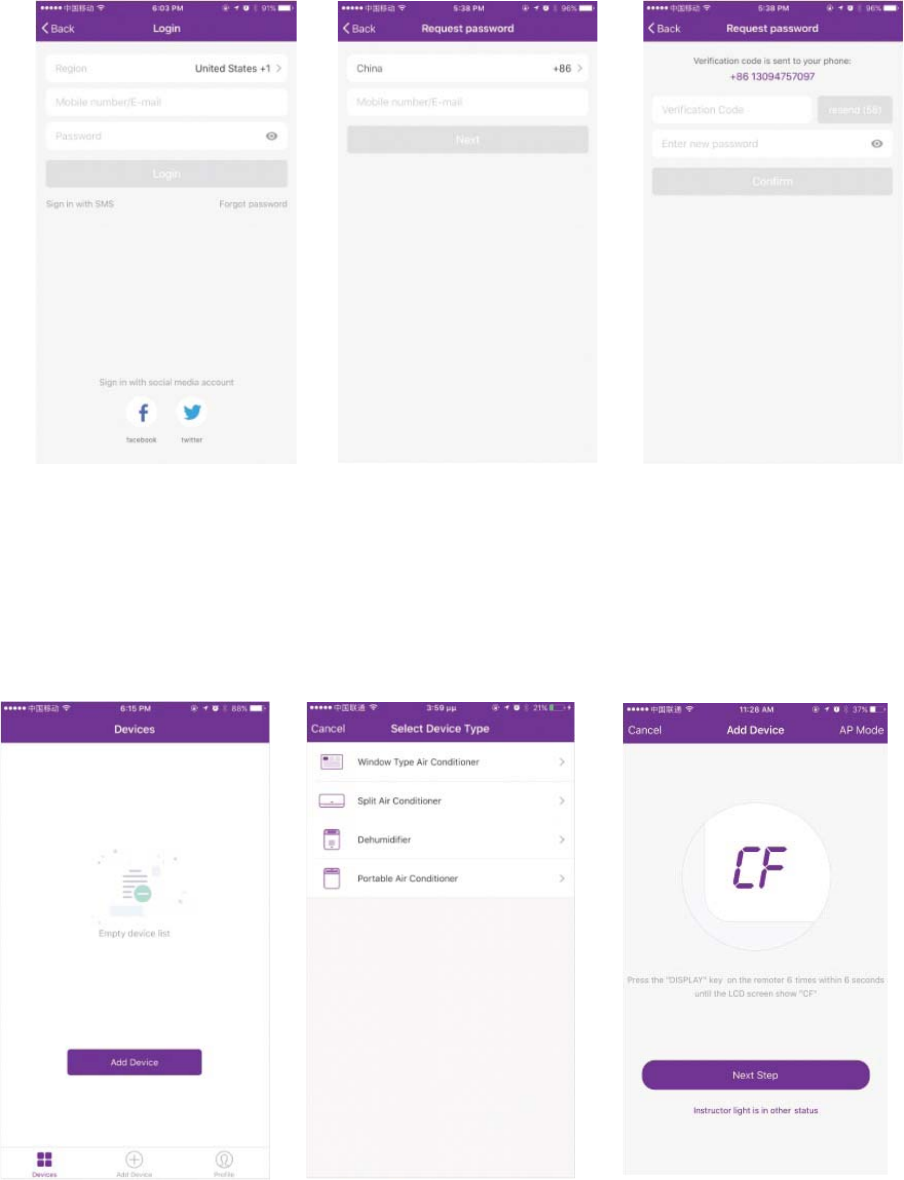
Forget password
If you forget the password, you can retrieve it by below process.
1. Press the “Forgot password” button to enter the next page.
2. Fulfill the registered phone number or email account, press“Next”
button to enter the next page.
3. You will receive the verification code, fulfill it, and set the new pas-
sword, press “confirm” button to finish.
Add the device
1. Press “Add Device” button to next page, select the product type.
2. There are two methods to do the device match, “CF” or “AP mode”.
You can choose by the different button..
5
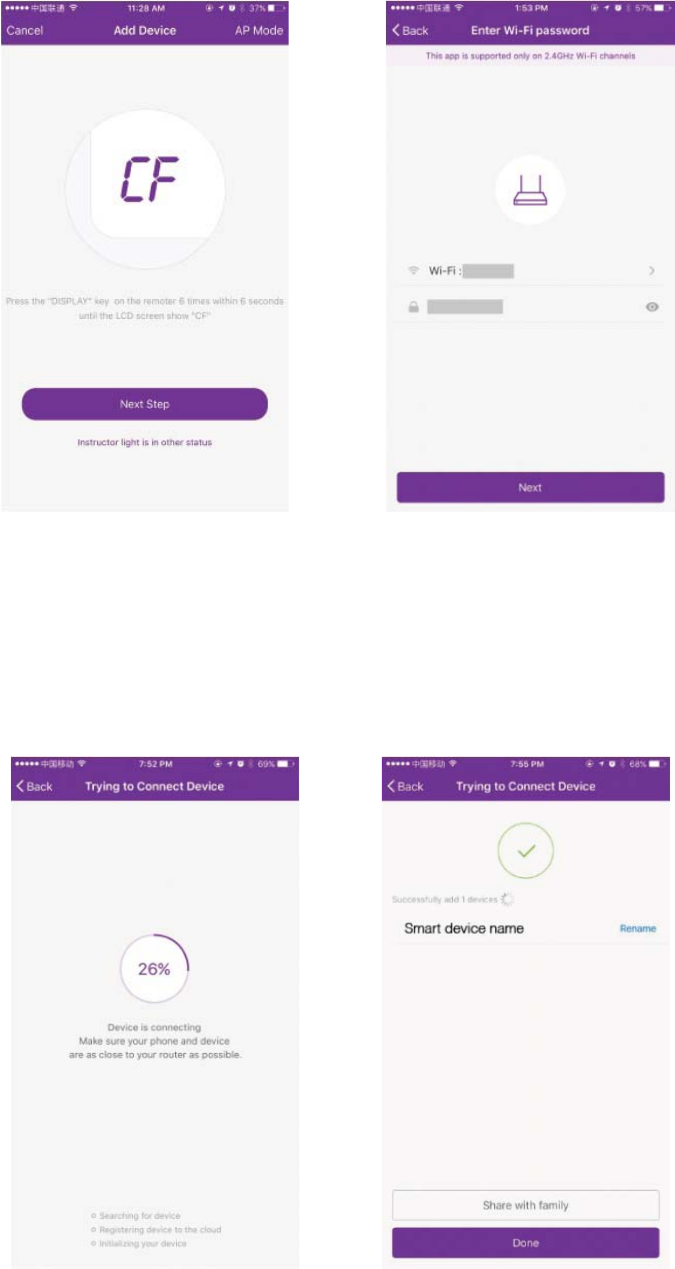
Add the device (CF mode)
For CF Mode
1. The system defaults to CF mode at first, Press “Next Step” to continue.
2. Select the home router, and fulfill the password of router, press “Next”
to continue.
3. The APP software will automatically to do the device match.
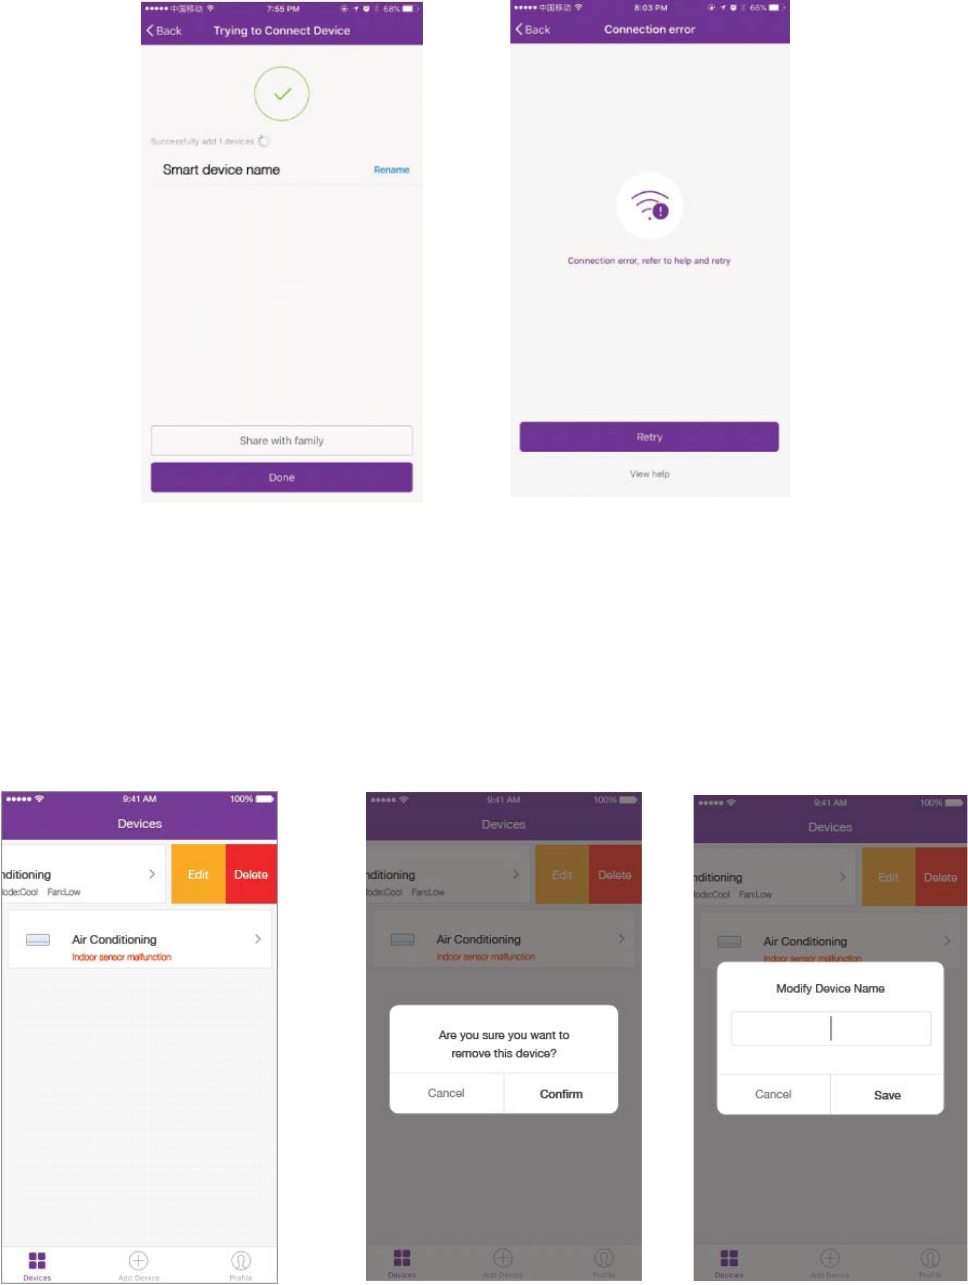
4. After match successfully, the page will display the prompt as below.
5. You can “Rename” the device name as you like, or share with family,
or press “Done” to start to control the device.
6
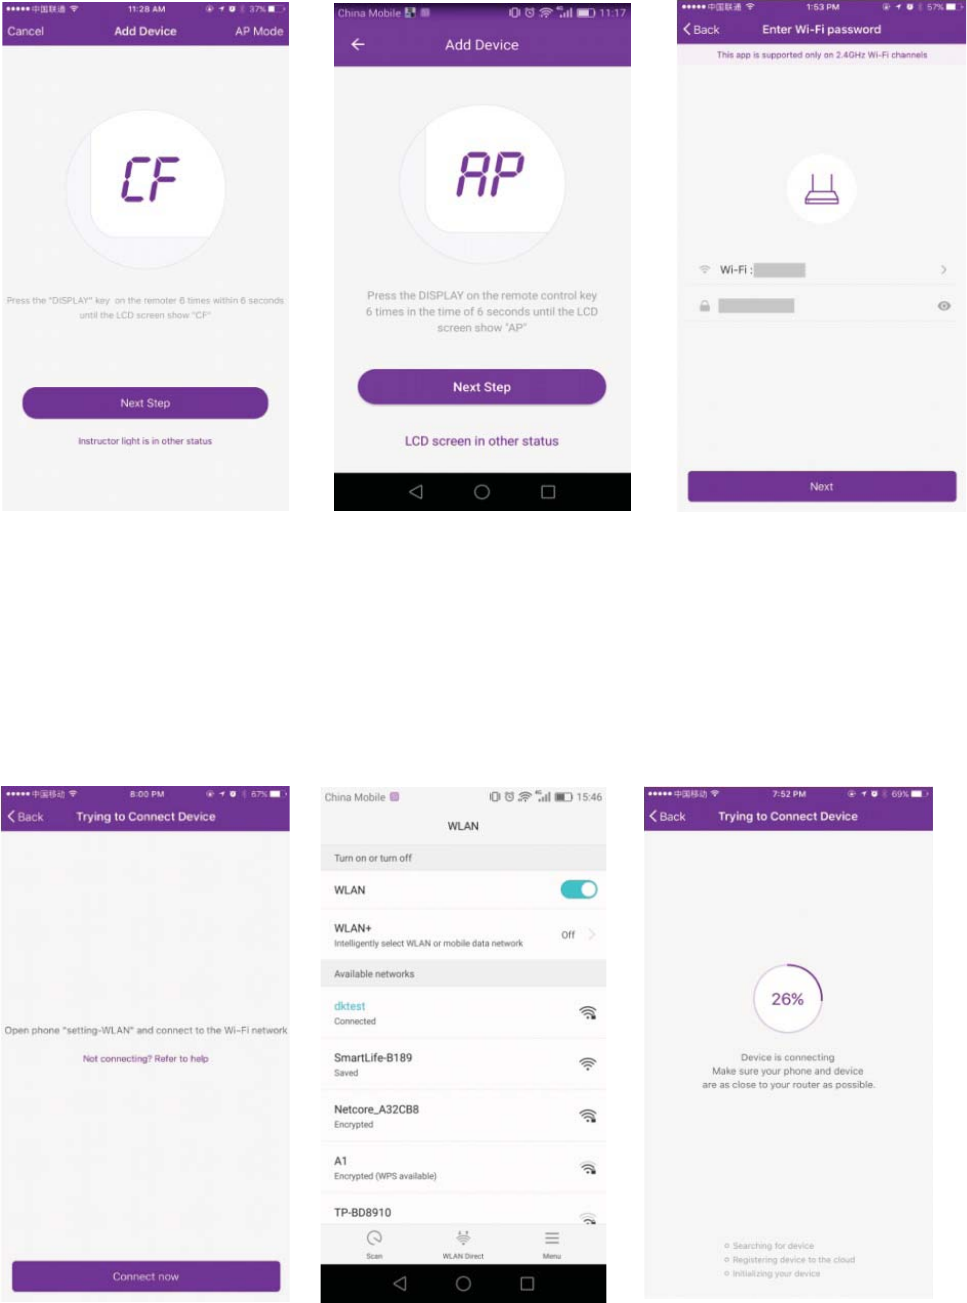
Add the device (AP mode)
For AP mode
1. Click the “AP Mode” to the “AP” page. Press “Next Step” to continue.
2. Select the home router, fulfill the password, press “Next” to continue.
3. Select the AC Device as name “SmartLife-XXX” at the WLAN setting,
then back to the APP interface. The APP will automatically do match.
7
Add the device (AP mode)
4. After match successfully, the page will display the prompt as below.
5. If match failed, the APP will mention it, and press “Retry” to try again.
Go back to “Device list” page at first.
Slide the device name toward the left side, you can choose to delete it,
or modify the device name as you like.
Delete the device or Modify device name
Air conditioner
8
Air conditioner control
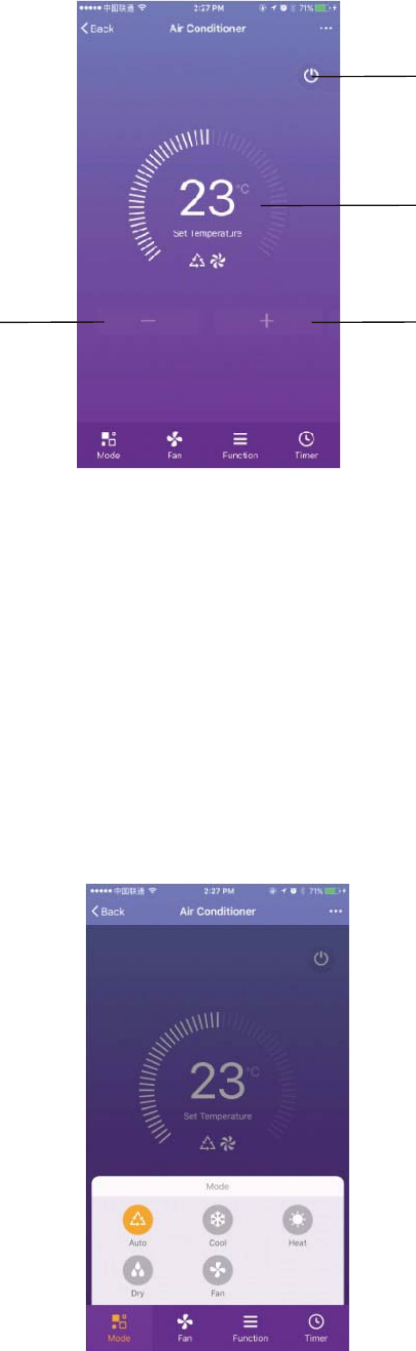
1. Click the air conditioner name to enter the control interface. Turn ON/OFF.
Adjust the setting temperature.
Decrease setting
temperature. Increase setting
temperature.
*For App update, there maybe deviation of the actual items from what is
on the manual without prior notice. We express our apologies.
Turn ON/OFF.
2. Adjust the different operating mode, Cool, Heat, Dry, Fan, Auto mode.
Click the “Mode” button, and choose different running mode as you like.
For the cooling only unit, the heat mode is no useful.
For Dry mode, at the first 3 minutes, the APP temperature display may
be little different from the unit display, caused by the unit temperature
fast changing.
Display the setting
temperature.
9
Air conditioner control
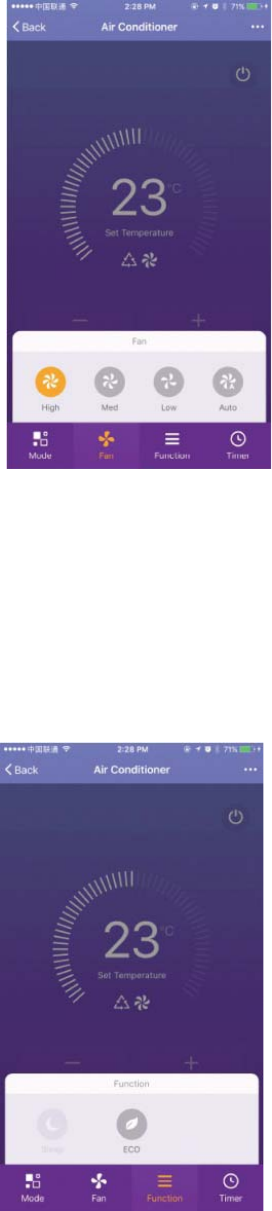
3. Click the “Fan” button, choose different fan speed, Low, Med,
High, Auto.
4. Other function control can by selected by “Function” button, Sleep, ECO.
When Sleep mode, the fan speed will be fixed to low speed.
Air conditioner
Air conditioner
10
Air conditioner control
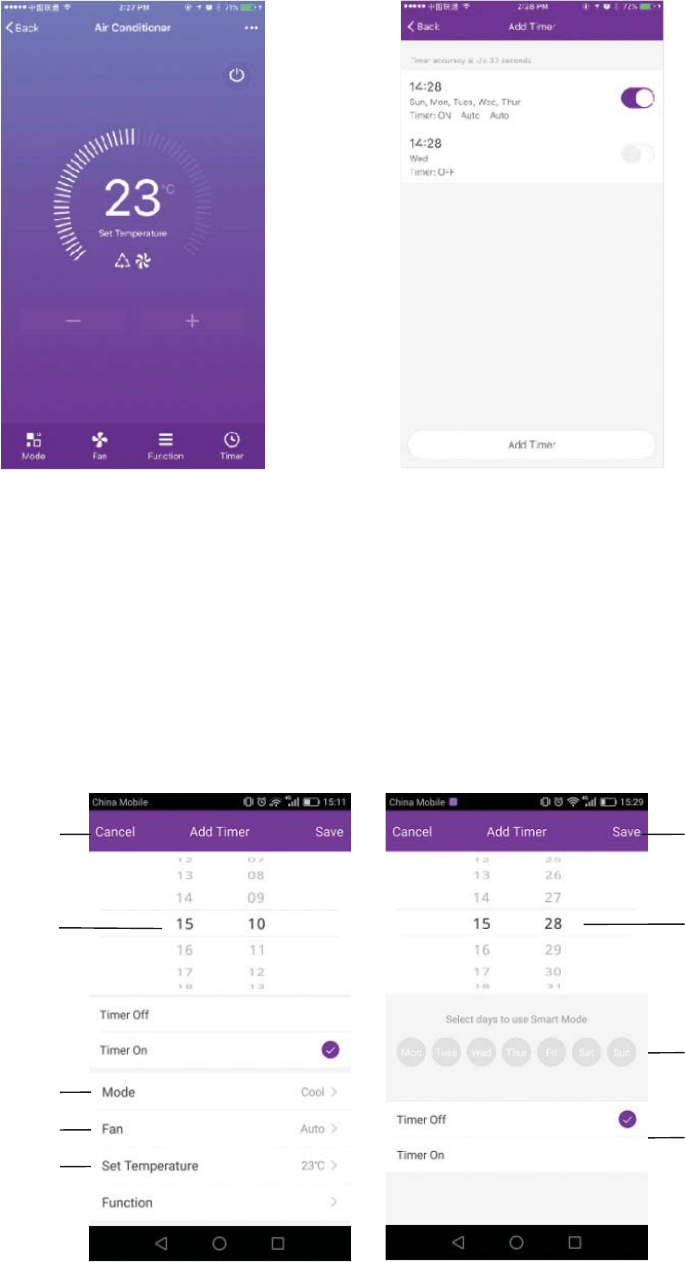
5. Setting Timer function. Click the “Timer” button, the APP will enter to timer
setting interface. It will display the task scheduler set before. You can long-
term press to edit or build a new scheduler by “Add Timer” button.
6. Click “ON” or “OFF” button to set Timer ON or Timer OFF.
You can set Hour, Minute, operate Mode, operate Fan Speed, operate
Temperature, also can set the weekly Timer.
After finish the setting, click the button to cancel or confirm.
Hour setting Minute setting
Mode setting
Fan Speed setting
Weekly setting
Timer cancel Timer submit
Temperature
setting
Air conditioner
Timer ON/OFF
setting

Air conditioner control
7. More setting. From the right-up corner, you can do more function setting,
as Modify Device Name, Device Sharing, Device information, Feedback,
Check for firmware update, Remove Device, Restore Manufacture setting.
8. Profile. You can manage your personal information. It includes:
a, Account information.
b, Scan QR code: Developers could preview the control interface.
c, Share Device: Display user s device sharing information.
d, Message Centre: Displays all messages that system sent to users.
e, Feedback: Where users could submit feedback online.
f, About: Displays the current App version information.
‘
11
Air conditioner
Air conditioner control
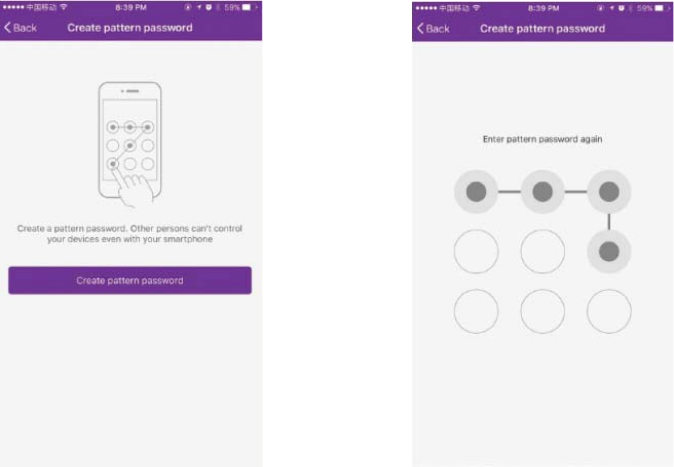
9. Pattern unlock. Tap “Pattern unlock” to set up your App unlock pattern.
After it is enabled, you need to draw the pattern to unlock the App.
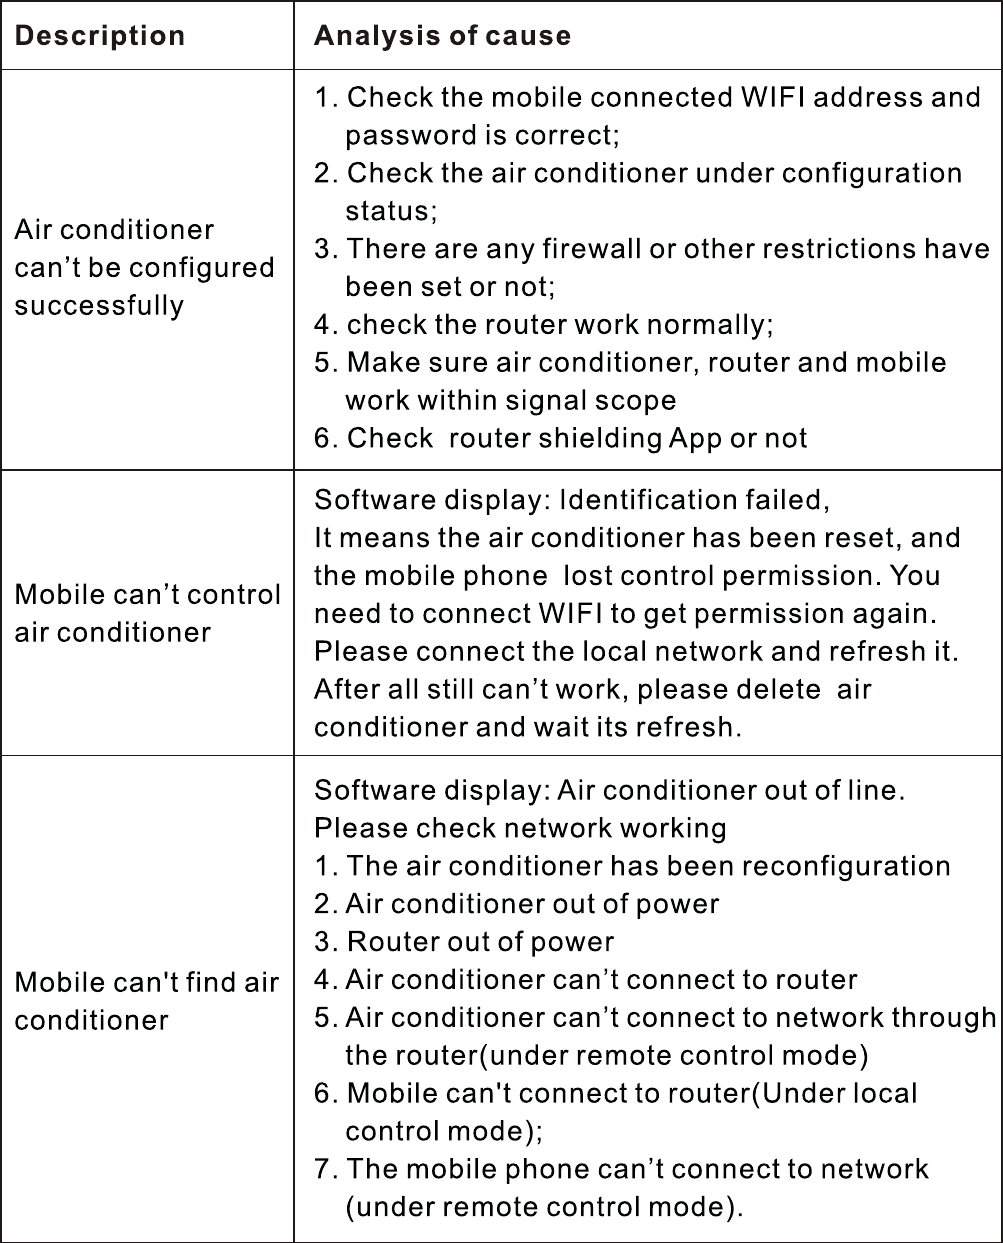
Trouble shooting
12