TCL Communication B001 CDMA 1X/EVDO tri-band mobile phone User Manual Soul 4 EVDO Boost UG English 20141015 Certificationx
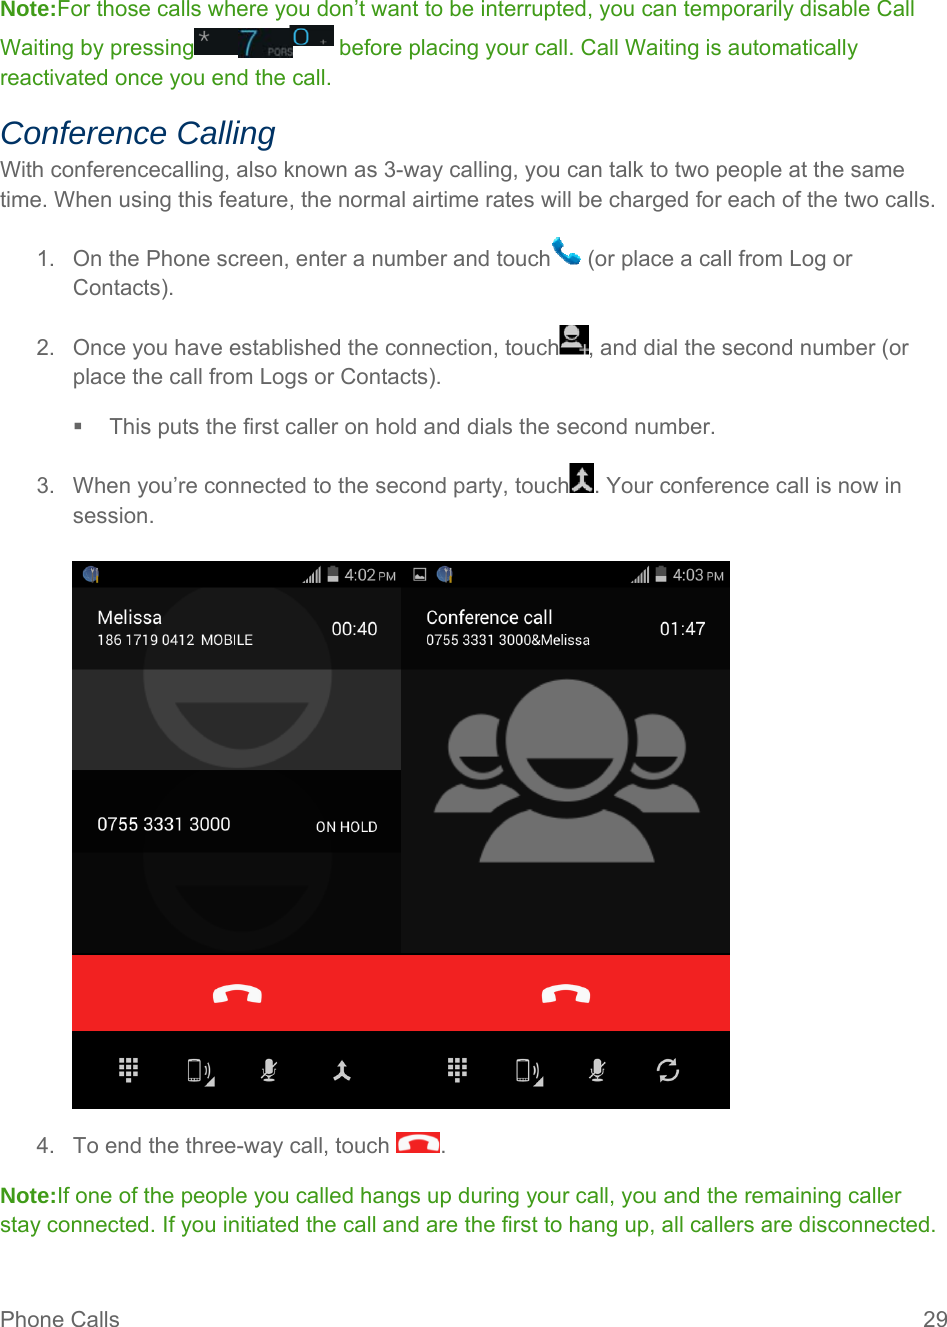
TCL Communication Ltd. CDMA 1X/EVDO tri-band mobile phone Soul 4 EVDO Boost UG English 20141015 Certificationx
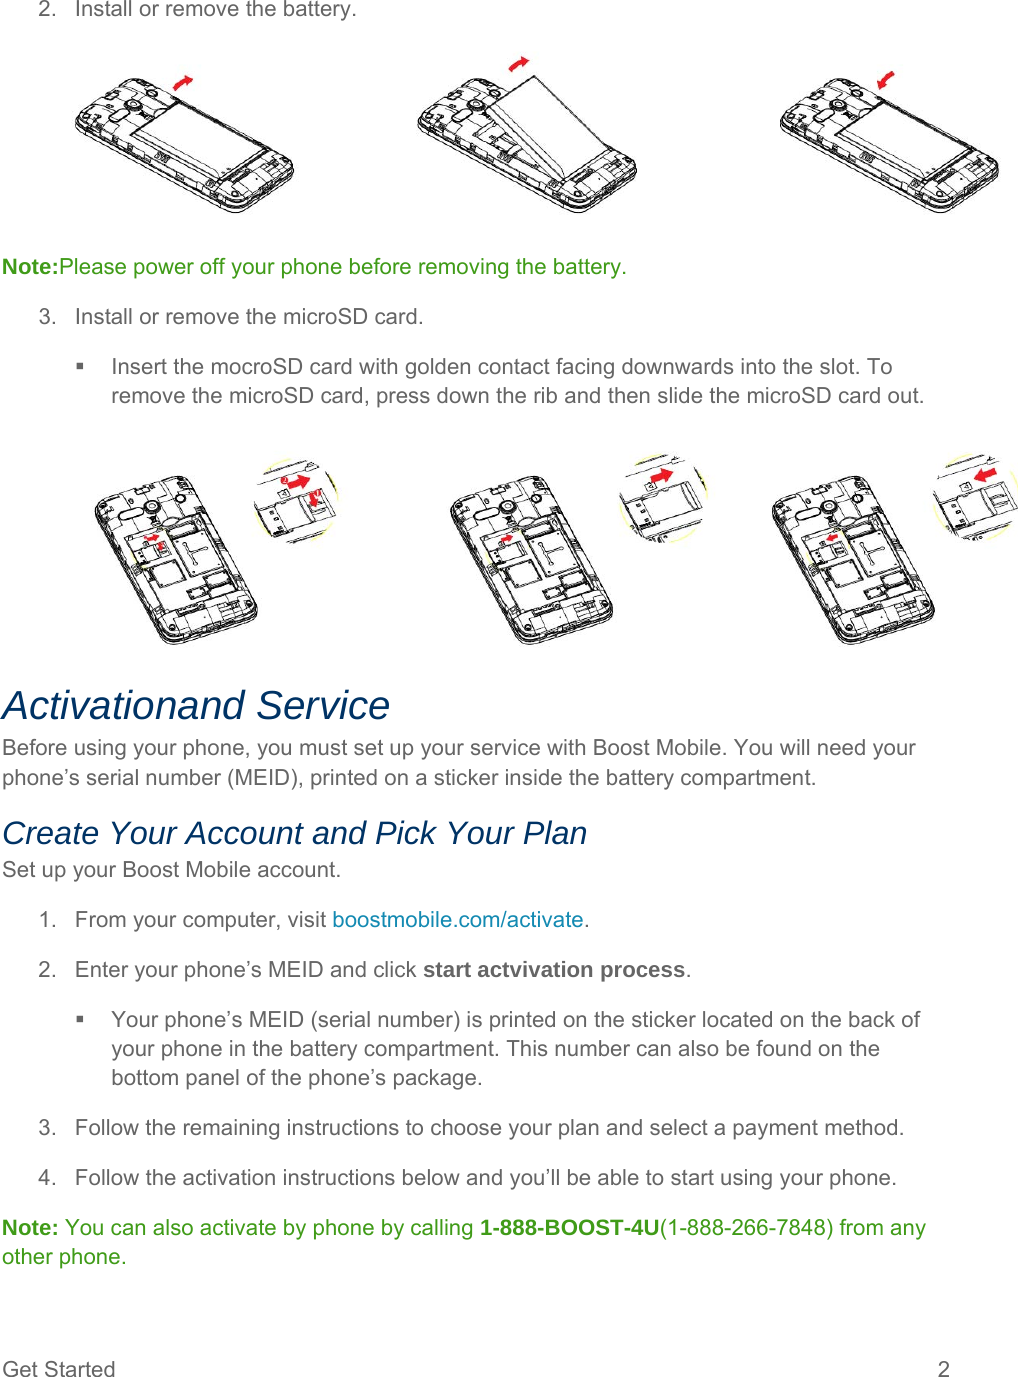
Contents
- 1. Soul-4 EVDO Boost UG English 20141015-Certification.pdf
- 2. Soul-4 EVDO Boost UG English 20141015-Certification
Soul-4 EVDO Boost UG English 20141015-Certification.pdf
![User Guide [Boost_Alcatel_Soul4 EVDO_UG_EN_20140911_Draft1] [UG template version 13b]](https://usermanual.wiki/TCL-Communication/B001.Soul-4-EVDO-Boost-UG-English-20141015-Certification-pdf/User-Guide-2419744-Page-1.png)


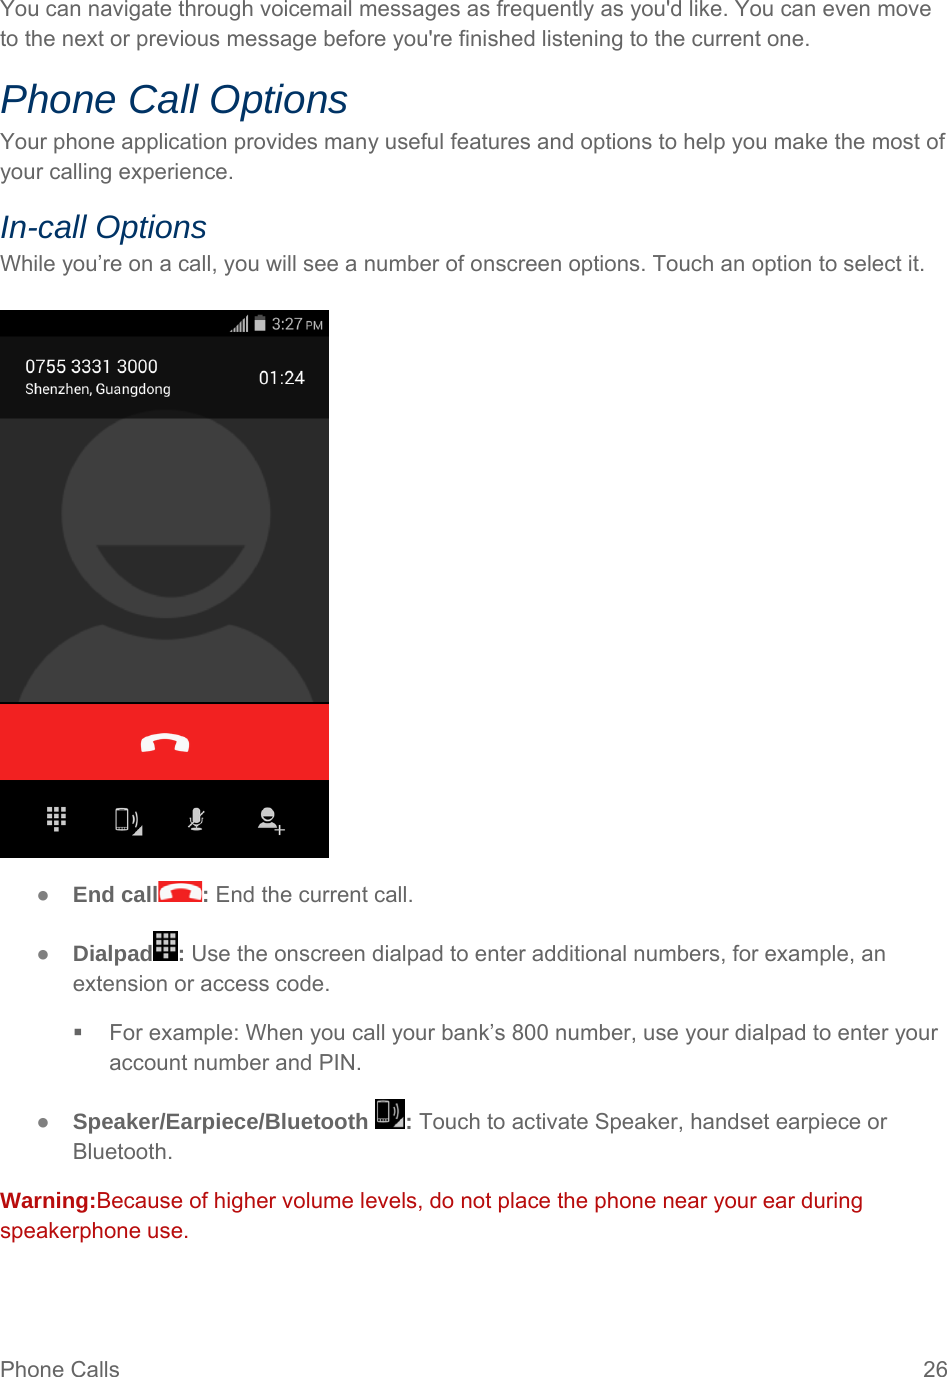
![Phone Calls 31 3. Touch >Clear call log. 4. Touch OK to clear the call records. Call Settings Your phone’s Call Settings menu lets you configure your voicemail options and a number of other settings for the phone application. Voicemail Settings If you need to adjust your voicemail provider or access settings, use the Voicemail settings menu. 1. From the home screen, touch to display the phone app. 2. Touch >Settings>Voicemail. 3. Configure your options. [list of options and descriptions] TTY Mode A TTY (teletypewriter, also known as a TDD or Text Telephone) is a telecommunications device that allows people who are deaf, hard of hearing, or who have speech or language disabilities, to communicate by telephone. Your phone is compatible with select TTY devices. Please check with the manufacturer of your TTY device to ensure that it supports digital wireless transmission. Your phone and TTY device will connect using a special cable that plugs into your phone’s headset jack. If this cable was not provided with your TTY device, contact your TTY device manufacturer to purchase the connector cable. To turn TTY Mode on or off: 1. Touch >Settings>Call>TTY mode. 2. Touch TTY Full, TTY HCO, or TTY VCO to turn TTY mode on. – or – Touch TTY Off to turn TTY mode off. Note:When enabled, TTY mode may impair the audio quality of non-TTY devices connected to the headset jack. Warning:911 Emergency Calling It is recommended that TTY users make emergency calls by other means, including](https://usermanual.wiki/TCL-Communication/B001.Soul-4-EVDO-Boost-UG-English-20141015-Certification-pdf/User-Guide-2419744-Page-40.png)
![Contacts 35 Contacts to display:Touch to display contacts from SIM, the phone or display all contacts, etc. Import/export:Import or export contacts between phone, SIMcard, and microSD card, or share contacts. Accounts:Manage the synchronization settings for differentaccounts Settings:Access contact display settings Add a Contact You can add contacts from your phone’s Phone application. Enter details such as name, phone numbers, email addresses, mailing addresses, and more. 1. Touch > . 2. Touch to add a contact. 3. If you have multiple account types associated with your phone, select a contact type. Select Google if you want to save contacts to your Google Account; these will be synced automatically with your Google Account online. Select Phone as the sync account if you want your contacts on your phone only; they will not be synced with your Google Account. 4. Use the keyboard to enter as much information as you want. [picture]: Touch the picture icon to assign a picture to the contact. See Assign a Stored Picture to a Contact or Assign a New Picture to a Contact. Name Phone Email Address Groups Ringtone Add another field: Touch Add another field to include additional information such as IM address, Notes, Nickname, Website, etc. Note:To select a type (label) for a phone number, email address, or postal address (such as Mobile, Home, Work, etc.), touch the type to the right of the field and select the appropriate type.](https://usermanual.wiki/TCL-Communication/B001.Soul-4-EVDO-Boost-UG-English-20141015-Certification-pdf/User-Guide-2419744-Page-44.png)
![Accounts and Messaging 47 2. TouchDelete . Exchange ActiveSync Email Features Set options for your corporate Exchange ActiveSync email messages, including synchronization options, flagging messages, out-of-office messages, meeting requests, and message priority. [If applicable, include information about further configuring/customizing Exchange ActiveSync accounts.] Synchronize Exchange ActiveSync Email You can set Exchange ActiveSync to automatically check for new Exchange ActiveSync email messages. Flag Email Messages For an Exchange ActiveSync account, you can flag email messages to help you keep track of them. Set Out of Office Status You can set your Out of Office status and auto-reply message right from your phone. Send a Meeting Request [details] Set Email Message Priority [details] Email Account Settings You can edit settings for your individual email accounts, such as email address and password, name display and signature, frequency of retrieval, and more. 1. Touch > >Email . 2. Switch to the email account you want to edit. 3. Touch >Settings, and choose from these options: [account name]: Change the email account settings such as the name, email address, password, and description. General preferences: Set the font size when reading email messages, enable, disable or set the signature, set the account as the default email account, and set where to save email attachments. 无法显示链接的图像。该文件可能已被移动、重命名或删除。请验证该链接是否指向正确的文件和位置。](https://usermanual.wiki/TCL-Communication/B001.Soul-4-EVDO-Boost-UG-English-20141015-Certification-pdf/User-Guide-2419744-Page-56.png)
![Accounts and Messaging 50 Enter phone numbers directly in the Enter recipient field. If you’re sending the message to several phone numbers, separate the phone numbers with a comma. As you enter information, any matching phone numbers from your contacts list are displayed. Touch a match to enter that number or address directly. Touch the icon, and then select the contacts to whom you want to send the message. You can also select contact groups as recipients. When you have selected all the message recipients, touch Done. Note: You can add a subject line by touching >Add subject. 4. Touch the “Enter message” box, and then start composing your message. 5. Touch . 6. In the Attach window, select from the following file attachments: [Please match the attachment list and descriptions to your phone. They change frequently.] Picture. Select Camera to take a picture and attach it, or Gallery to attach a stored picture. Video. Select Camcorder to capture a video and attach it, or Videos to attach a stored video. Audio. Select Voice Recorder to make a voice recording and attach it, or Music & sounds to attach a stored music file or voice recording. Location. Add your current location (requires GPS to be turned on), or a location you pick on a map to your message. See Google Maps. Contacts. Select a contact from your phone, and then select which contact information you want to attach. Calendar. Select the calendar event you want to attach. 7. To make changes to your attachment, touchthe item. You can also touch , and then touchRemove to start over. 8. TouchSend to send the MMS message. Create a Slideshow In a multimedia message, you can add slides, each containing a picture, video, or audio. 1. In the multimedia message you’re composing, touch >Add slide to add space for a new slide. 2. Touch the space for the slide. 无法显示链接的图像。该文件可能已被移动、重命名或删除。请验证该链接是否指向正确的文件和位置。无法显示链接的图像。该文件可能已被移动、重命名或删除。请验证该链接是否指向正确的文件和位置。](https://usermanual.wiki/TCL-Communication/B001.Soul-4-EVDO-Boost-UG-English-20141015-Certification-pdf/User-Guide-2419744-Page-59.png)
![Accounts and Messaging 53 4. To save the attachment to the storage card, touch and hold the sender’s name or number, and then touchSave [attachment type] on the options menu. Note: When Auto-retrieve in MMS settings is disabled, only the message header is downloaded. To download the entire message, touch the Download button at the right side of the message. For details, see Text and MMS Options. Note: If you are concerned about the size of your data downloads, check the multimedia message size before you download it. Reply to a Message 1. Touch > >Messaging . 2. On the Messaging screen, touch a text or multimedia message thread to open it. 3. Touch the text box at the bottom of the screen, enter your reply message, and then touchSend . Note: To reply to a text message with a multimedia message, open the text message, touchand then touchMore>Add subject, or Attach. The text message is automatically converted into a multimedia message. Protect (Lock) a Message You can lock a message so that it will not be deleted even if you delete the other messages in the conversation. 1. Touch > >Messaging . 2. On the Messaging screen, touch a message thread. 3. Touch and hold the message that you want to lock. 4. TouchLock message on the options menu. A lock icon is displayed at the right hand side of the message. Delete a Message Thread 1. Touch > >Messaging . 2. On the Messaging screen, touch the message thread that you want to delete. 3. Touch >Delete messages. 4. When prompted to confirm, touchOK. Any locked messages in the thread will not be deleted unless you select the Delete locked messages check box.](https://usermanual.wiki/TCL-Communication/B001.Soul-4-EVDO-Boost-UG-English-20141015-Certification-pdf/User-Guide-2419744-Page-62.png)
![Accounts and Messaging 54 Delete Multiple Message Threads 1. Touch > >Messaging . 2. On the Messaging screen, touch >Delete threads. 3. Select the message threads you want to delete. 4. TouchDelete and then touch OK to confirm. Any locked messages will not be deleted. Delete a Single Message 1. While viewing a message thread, touch and hold the message that you want to delete. 2. If the message is locked, touchUnlock message on the options menuand hold the message to display the options menu again. 3. TouchDelete message on the options menu. 4. When prompted to confirm, touchOK. View Contact Information from a Message When you have received a message from someone in your stored contacts, you can touch the contact’s picture or icon in the message thread to open a menu of options. Depending on the stored contact information, you can view the contact details, phone or send an email message to the contact, and more. Text and MMS Options The messages settings menu lets you control options for your text and MMS messages including message limits, size settings, and notifications. 1. Touch > >Messaging . 2. On the Messaging screen, touch and then touchSettings. You can set the following: Display Settings ● [list all settings in categories; these change frequently, so check with each phone] Storage Settings ● Delete old messages: Automatically delete older messages, except for locked messages, when the set limits are reached. ● Text message limit: Choose the maximum number of text messages to store in each conversation thread. (This does not include locked messages.)](https://usermanual.wiki/TCL-Communication/B001.Soul-4-EVDO-Boost-UG-English-20141015-Certification-pdf/User-Guide-2419744-Page-63.png)

![Apps and Entertainment 60 2. Touch the Search icon and search for "scout". 3. TouchScout by Telenav from the results list. 4. TouchInstall, and then touchAccept & download. 5. When the download has completed, touchOpen. To open the app from the home screen, touch >Scout . Enable Location Services on Your Phone Before using any location-based services, you must enable your phone’s GPS location feature. For more information about location services, see Location Settings. 1. Touch > >Systemsettings >Location services. 2. Select the check boxes for your location options. Use wireless networks uses Wi-Fi and mobile networks to determine location. Use GPS satellites uses GPS to provide location accurate to street level. Location and Google search allows Google to use your location data for improved search results and other services. Use Scout as Your Personal Navigator 1. Touch > >Scout . 2. [additional usage text] Google Maps Use the Google Maps app to determine your location, find directions, browse local businesses and attractions, rate and review places, and more. [additional intro text as desired] Enable Location Services on Your Phone Before using any location-based services, you must enable your phone’s GPS location feature. For more information about location services, see Location Settings. 1. Touch >Settings >Location. 2. Select the check boxes for your location options. Use wireless networks uses Wi-Fi and mobile networks to determine location. Use GPS satellites uses GPS to provide location accurate to street level. 无法显示链接的图像。该文件可能已被移动、重命名或删除。请验证该链接是否指向正确的文件和位置。无法显示链接的图像。该文件可能已被移动、重命名或删除。请验证该链接是否指向正确的文件和位置。](https://usermanual.wiki/TCL-Communication/B001.Soul-4-EVDO-Boost-UG-English-20141015-Certification-pdf/User-Guide-2419744-Page-69.png)


![Settings 113 3. Enter your account information and touch Next. Depending on the account type, you may need to enter an email address or user address, password, domain name, or other information. For Corporate Sync accounts, contact your server administrator to determine what information you will need. 4. Touch Done when you are finished. Manage Existing Accounts 1. Touch > >System settings>[account type]. Touch a field to edit its settings. Touch Remove account to delete the account from your phone. 2. Touch Done when you are finished. Date & Time Settings Use the Date & Time settings menu either to automatically use the network-provided date and time or manually set these values, as well as select time and date format options. 1. Touch > >System settings>Date & time. 2. Touch the menu to set date and time. Accessibility Settings The Accessibility menu lets you enable and manage accessibility-related applications. TalkBack Talkback peovides spoken feedback for blind and low-vision users. 1. Touch > >System settings> Accessibility > TalkBack. 2. Touch to turn on TalkBack. 3. Follow the steps to finish settings. System The system includes captions, large text, etc. Captions Touch to turn on captions and find standard option seeting such as languages, text size and caption style.](https://usermanual.wiki/TCL-Communication/B001.Soul-4-EVDO-Boost-UG-English-20141015-Certification-pdf/User-Guide-2419744-Page-122.png)