TCL Communication B065 GSM Quad-band / UMTS Quad-band / LTE 6-band mobile phone User Manual User Guide
TCL Communication Ltd. GSM Quad-band / UMTS Quad-band / LTE 6-band mobile phone User Guide
Contents
- 1. Safety and Warranty Information
- 2. User Guide
User Guide
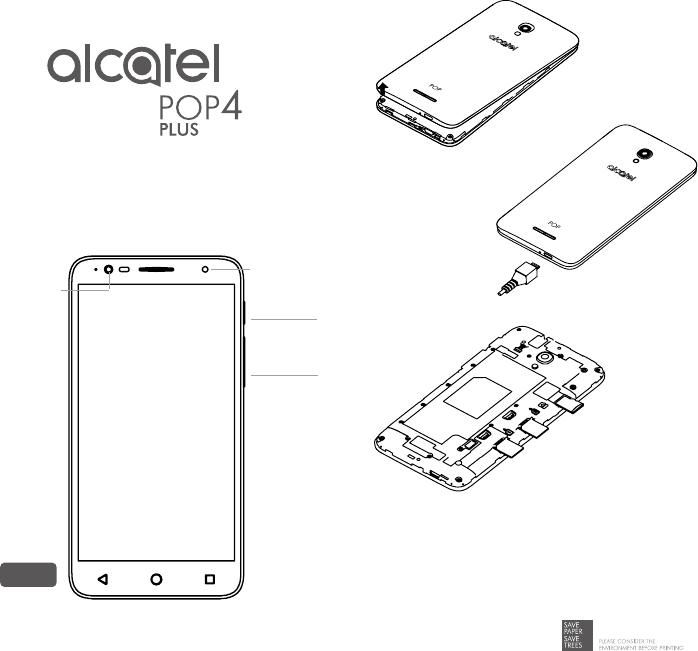
QUICK START GUIDE
Power key
Volume up/
down
5056E
5.5"
Front
camera
Front ash
Removing or installing
the back cover.
Charging the battery.
1. Installing or removing the SIM card1.
2. Installing or removing the SIM card2.
3. Inserting or removing the microSD card.
User guide and FAQ are available online
www.alcatelonetouch.com
US_English - CJB1F56ALAAA

1 2
1 Home screen
You can move frequently used items (applications, shortcuts, folders
and widgets) to your Home screen for quick access. Touch the Home
key to switch to the Home screen.
Touch to display application list.
Status bar
• Status/Notification indicators
• Touch and drag down to open the
notification panel.
Touch an icon to open an application,
folder, etc.
Favorites tray applications
• Touch to enter the application.
• Long press to move or change applications.
Search bar
• Touch Google search bar to enter
text search screen.
• Touch microphone icon to enter
voice search screen.
The Home screen is provided in an extended format to allow more
space for adding application icons, shortcuts etc. Slide the Home
screen horizontally left and right to get additional view.
1.1 Status bar
In the status bar, you can see the phone notifications on the left side
and the phone connection service status on the right side.
Touch and drag the Status bar downward to access the Notification
panel or the Quick Settings panel. To close the panel, touch and
drag upward.
Touch to clear all event-
based notifications. On-going
notifications will remain on
the panel.
Touch this icon to display the
Quick settings panel.
Notification panel
When there are notifications, you can touch them to view more
information.
Quick settings panel
In the upper right of the Notification panel, you can touch to open
the Quick settings panel. Then enable or disable functions or change
modes by touching the icons.
Touch to edit your profile.
Touch to access phone
settings, where you can
make changes to more
functions.
3 4
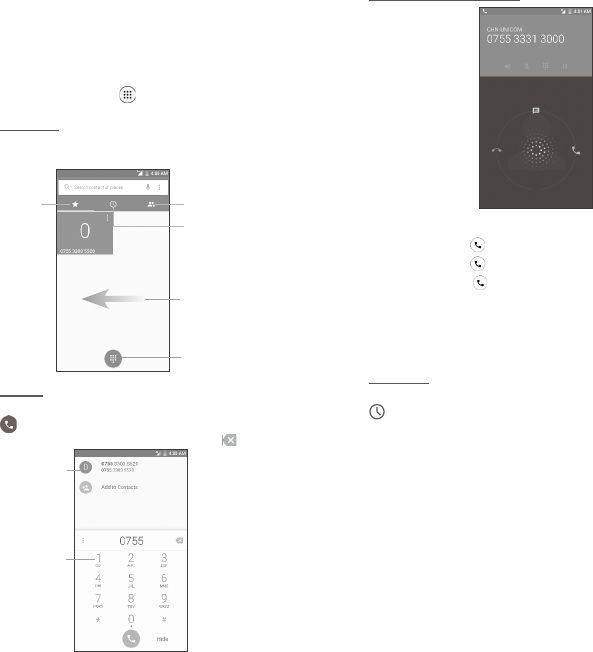
2 Phone call
2.1 Placing a call
You can easily place a call using the Call application. Touch
Applications menu icon from the Home screen and select Call,
or touch the Call icon on your Favorites Tray.
Call screen
Select a contact by sliding or touching tabs, then choose your target
SIM card to make the call.
Slide to access
RECENT and
CONTACTS.
Touch to display
dial pad.
CONTACTS
SPEED
DIAL RECENT
Dial pad
Enter the desired number from the dial pad and touch the Call icon
to place the call. If you make a mistake, you can delete the
incorrect digits by touching the Delete button .
Display the
suggested
numbers.
Long press
to access
voicemail.
Answering or rejecting a call
When you receive a call:
• Slide the Call icon to the right to answer;
• Slide the Call icon to the left to reject;
• Slide the Call icon icon upward to reject the call by sending a
preset message.
To mute the ringtone volume of an incoming call, press the Volume
Up/Down key or turn the phone over (Enable this feature by going to
Settings > Gestures > Turn over to mute).
Call history
You can access your call history by touching the RECENT tab
from the Call screen to view missed calls, outgoing calls, and
incoming calls.
56
3 Contacts
Contacts are stored in your phone with the Contacts app. It allows
you to add, delete, or edit your contacts. You can also import or
export your contacts from different locations such as a SIM card, an
external storage, your Gmail or other email account.
3.1 Adding a contact
Open the Contacts app from applications list, then touch the Plus
button on the bottom right of the screen to add a new contact.
3.2 Import or synchronize Contacts
Open the Contacts app from the applications list. When there is no
contacts on the phone, tap on the IMPORT CONTACTS button to
import vCard file from the phone storage. When your SIM card is
first inserted, you can also tap on IMPORT to copy your contacts to
the phone. Tap on the "SIGN IN TO AN ACCOUNT" to synchronize
your phone with your list of contacts on your Google Account or other
email account via Exchange.
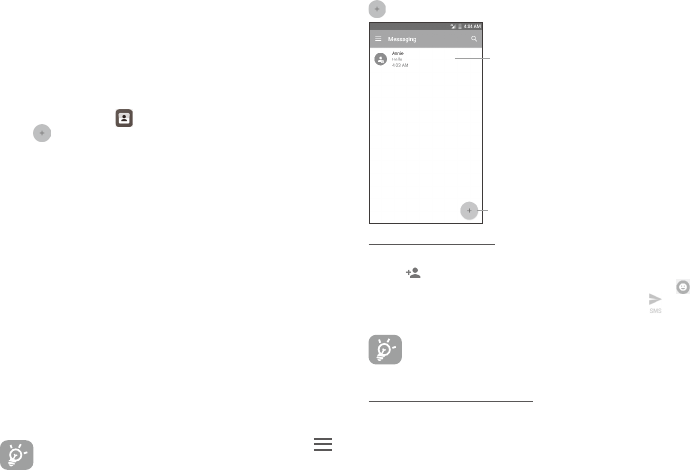
4 Messaging
This phone comes with a pre-installed Messaging app that allows
you to send and receive SMS (Short Message Service) or MMS
(Multimedia Messaging Service) with your wireless service provider.
To open your Messaging app, go to the Home screen and touch
the Messaging icon in the Favorites tray or from the application list.
To check messages stored in your SIM card, touch the
button from the Messaging screen, then touch Settings >
ADVANCED > Manage SIM messages.
4.1 Write message
On the Messaging app screen, touch the new message Plus button
in the bottom right of the screen to begin.
Touch to create a new message.
• Touch to see the whole
message thread.
• Touch and hold to
activate delete mode.
Sending a text message
Enter the mobile phone number of the recipient in the "To" bar or
touch to add recipient(s) and touch the Send message bar to
enter the text of the message. Touch the Smiley Face button to
insert emoticons. When finished, touch the Send button to send
the text message.
An SMS of more than 160 characters will be charged as
several SMS. Specific character like accent will also
increase the size of the SMS. This may cause multiple SMS
to be sent to your recipient.
Sending a multimedia message
MMS enables you to send video clips, images, photos, animations,
slides, and sounds to other compatible phones and email addresses.
An SMS will be converted to MMS automatically when media files
(image, video, audio, slides, etc.) are attached.

7 8
5 Gmail
Gmail is a Google web-based email service. When you first set up
your phone, it is automatically synchronized with your Gmail account.
With this app, you can receive and send email, manage your email,
and archive your email, etc.
To open Gmail
From the Home screen, touch the Gmail icon in the Favorites tray.
Gmail displays messages and conversations from one single Gmail
account at a time. If you own more than one account, you can add
an account by touching the Menu button and then the down
arrow after your account name from the Inbox screen, then touch
Add account. When finished, you can switch to another account by
touching the name of the account you want to view.
To create and send emails
1 Touch the Edit button from the Inbox screen.
2 Enter the recipient(s)’s email address in "To" field.
3 To add Copy or Blind copy, touch the down arrow button and
enter the email address in the Cc or Bcc line.
4 Enter the subject and the content of the message.
5 Touch the Attach button icon and select Attach file to add
an attachment.
6 Finally, touch the Send button to send.
7 If you do not want to send the email out right away, you can touch
the Menu overflow button and then touch Save draft. To view
the draft later, touch the Menu button and select the Drafts folder.
Touch the draft email and then the Edit button to open it.
6 Getting connected
To connect to the Internet with this phone, you will need to have an
internet connection via Cellular Data provider or via Wi-Fi.
6.1 Connecting to the Internet
6.1.1 Cellular Data
The first time you turn on your phone with your SIM card inserted, it
will automatically configure your network service: 2G, 3G, 4G.
To check the network connection you are using, touch Settings >
More > Cellular networks, and touch Access Point Names or
Network carriers. Your network service connection is also displayed
on the Status bar.
6.1.2 Wi-Fi
The phone can also be connected to a Wi-Fi internet service. This
can be used without a SIM card or Cellular Data service.
To turn Wi-Fi on and connect to a Wi-Fi network
• Go to Settings > Wi-Fi.
• Touch the OFF switch to turn on Wi-Fi.
• Touch a Wi-Fi network to connect. If the network you selected is
a secured network, you will need to enter a password or other
credentials. When finished, touch CONNECT.
• For hidden network, touch the Overflow Menu button in the upper
right and select Add network. Enter the SSID of the network,
password and its secured credentials. Then, touch CONNECT.