TCL Communication H052 HSUPA/HSDPA/UMTS 5 bands /GSM quad band mobile phone User Manual A 8 5010S 01
TCL Communication Ltd. HSUPA/HSDPA/UMTS 5 bands /GSM quad band mobile phone A 8 5010S 01
Contents
- 1. A.8_5010S_User Manual_01
- 2. A.8_5010S_User Manual_02 v2
A.8_5010S_User Manual_01
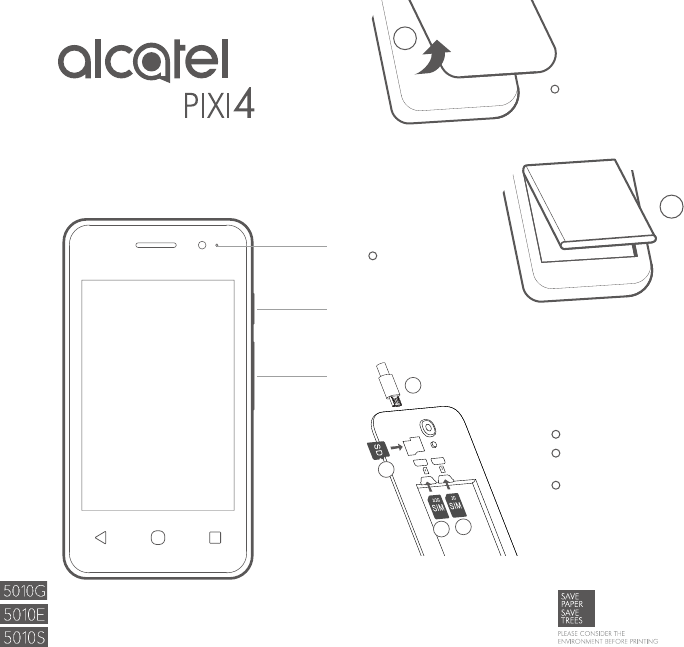
1 Removing or
installing the back
cover.
www.alcatel-mobile.com
User guide and FAQ are available online
English - CJB28S1ALAAA
1
Power key
Volume
up/down
LED
indicator
5.0”
* 5010E only
QUICK START GUIDE
2 Installing or removing
the battery.
3 Charging the battery.
4 Inserting or removing
the SIM card.
5 Installing or removing
the microSD card.
2
44
5
3
*
1 2
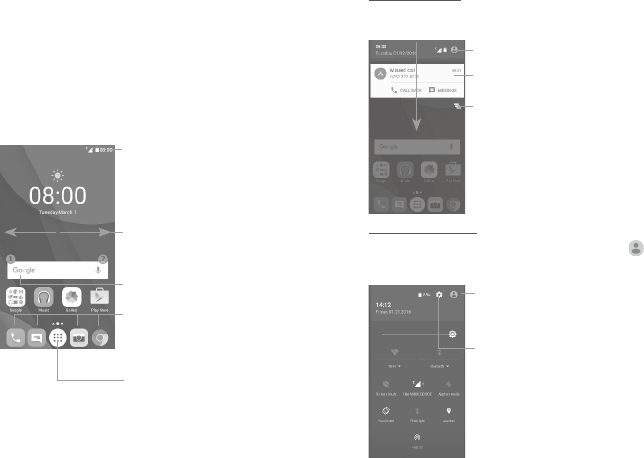
1 Home screen ....................
Touching the Home key always takes you to your main Home screen,
and you can personalise all your Home screens by adding your
favorite apps, shortcuts and widgets to them. On the Home screen
the bottom set of icons is always visible, whichever of your Home
pages you are on. This also includes the Application tab, which will
show all your available apps.
Application tab
• Touch to open all apps
Status bar
• Status/Notification indicators
• Touch and drag down to open the
notification panel.
Favorite tray applications
• Touch to enter the application.
• Long press to move or remove
applications.
Google search bar
• Touch to enter text search screen.
• Touch to enter voice search screen.
Slide left or right to see other panels
on the Home screen
The Home screen extends to allow more space for adding
applications, shortcuts, etc. Slide the Home screen horizontally left
and right to get a complete view of the Home screen. The white
spot in the lower part of the screen indicates which screen you are
viewing.
1.1 Status bar
From the status bar, you can see both phone status (to the right side)
and notification information (to the left side).
Drag down the status bar to view notifications and drag down again
to open the Quick settings panel. Touch and drag up to close it. When
there are notifications, you can touch them to access notifications
directly.
Notification panel
When there are notifications, touch and drag down the Status bar to
open the Notification panel to read more detailed information.
Touch to clear all event–based
notifications (other ongoing notifications
will remain).
Touch to switch to the Quick settings
panel.
Touch a notification and slide it
sideways to delete it.
Quick settings panel
Touch and drag down the Notification panel or touch to open the
Quick settings panel. You can enable or disable functions or change
modes by touching the icons.
Touch to enter the user screen.
Touch to open Settings, where you
can set more items.
3 4
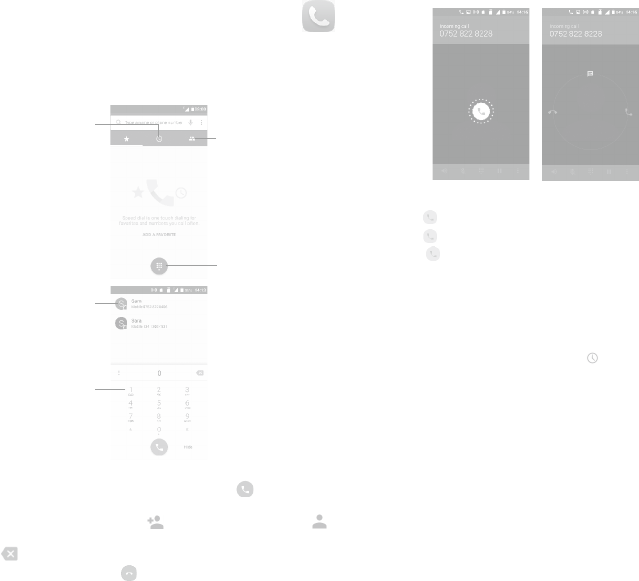
2 Phone call ....................
2.1 Placing a call
To make a call when the phone is on, go to the Home screen and
touch the Phone icon in the Favorites tray.
Show the dial
pad
Long press
to access
voicemail.
Display the
suggested
number(s).
Call log
Contacts
Enter the number you want from the dial pad or select a contact from
Call log or Contacts by touching tabs, then touch to place the call.
The number you entered can be saved to Contacts by touching
the Create new contact icon or the Add to a contact icon .
If you make a mistake, you can delete the incorrect digits by touching
.
To hang up a call, touch .
2.2 Answering or rejecting a call
When you receive a call:
• Slide the icon right to answer;
• Slide the icon left to reject;
• Slide the icon upwards to reject the call by sending a preset
message.
To mute incoming calls, press the Volume up/down key, or turn
the phone over when Turn over to mute option is activated under
Settings > Gestures.
2.3 Consulting your call log
You can open your call history by touching tab from the Phone
screen to see Missed calls, Outgoing calls and Incoming calls.
5 6
3 Contacts ......................
You can see and create contacts on your phone and synchronise
these with your Gmail contacts or other applications on the web or
on your phone.
3.1 Adding a contact
Touch from the applications list, then touch the icon in the
contacts list to create a new contact.
3.2 Synchronising contacts in multiple
accounts
Contacts, data or other information can be synchronised from
multiple accounts, depending on the applications installed on your
phone.
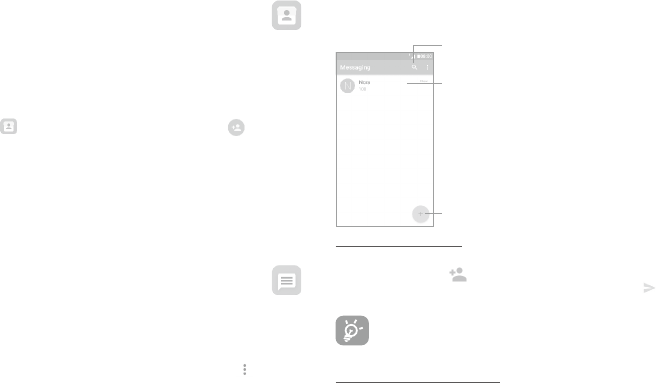
4 Messaging ...................
You can create, edit and receive SMS and MMS with this phone.
To open your Messaging, go to the Home screen and touch the
Messaging icon in the Favorites tray.
To check messages stored in your SIM card, touch the icon from
the Messaging screen, then touch Settings > Text message (SMS) >
Manage SIM card messages.
4.1 Write a new message
On the message list screen, touch the new message icon to write
text/multimedia messages.
Touch to create a new message
• Touch to see the whole message
thread.
• Long press message threads to
open other options available with this
contact
Search in all messages
Sending a text message
Enter the name or mobile phone number of the recipient on the
recipients bar or touch to add recipients, then touch the content
bar to enter the text of the message. When finished, touch to
send the text message.
An SMS of more than 160 characters will be charged as
several SMS. Specific letters (accent) will also increase the
size of the SMS. This may cause multiple SMS to be sent to
your recipient.
Sending a multimedia message
MMS enables you to send video clips, images, photos, contacts,
slides, and sounds to other compatible phones and email addresses.
An SMS will be converted to MMS automatically when media files
(image, video, audio, slides, etc.) are attached or Subject or email
addresses added.

7 8
5 Email ............................
To open Email, touch the Application tab from the Home screen,
then select Email.
An email setup wizard will guide you through the steps to set up an
email account.
• Enter the email address of the account you want to set up.
• Touch NEXT. If the account you entered is not provided by your
service provider in the phone, you will be prompted to go to
the email account settings screen to enter settings manually.
Alternatively, you can touch MANUAL SETUP to directly enter
the incoming and outgoing settings for the email account you are
setting up.
• Enter your password.
• Finish account settings of email synchronizing frequency,
notification, etc.
• Edit your account name if necessary.
To add another email account, you can touch the icon and then
Settings. Touch Add account to create.
To create and send emails
• Touch the icon from the inbox screen.
• Enter recipient(s) email address (es) in the To field.
• If necessary, touch the Add Cc/Bcc menu icon to add a copy
or a blind copy to the message.
• Enter the subject and the content of the message.
• Touch to add an attachment.
• Finally, touch to send.
• If you do not want to send the mail out right away, you can touch
the icon and select Save draft or touch the Back key to save
a copy. To view the draft, touch to display all labels, then
select Drafts.
• If you do not want to send or save the mail, you can touch the
icon and then touch Discard.
To add a signature to emails, touch the icon from the inbox
screen and then touch Settings, choose an account, then touch
Signature.
6 Getting connected ...........
Your phone can connect to the Internet using either GPRS/EDGE/3G
or Wi-Fi.
6.1 Connecting to the Internet
6.1.1 GPRS/EDGE/3G
The first time you turn on your phone with your SIM card inserted,
it will automatically configure your network service: GPRS, EDGE,
3G. If the network is not connected, you can turn on mobile data in
Settings > Data usage.
To check the network connection you are using, touch the Application
tab on the Home screen, then go to Settings > More > Mobile
networks > Access point names or Network operators.
6.1.2 Wi-Fi
You can connect to the Internet when your phone is within the range
of a wireless network. Wi-Fi can be used on your phone even without
a SIM card inserted.
To turn Wi-Fi on and connect to a wireless network
• Go to Settings > Wi-Fi.
• Touch the switch to turn on/off Wi-Fi.
• Turn on Wi-Fi: detailed information of all detected Wi-Fi networks is
displayed in the Wi-Fi networks section.
• Touch a Wi-Fi network to connect. If the network you selected is
secured, you will need to enter a password or other credentials
(contact network operator for details). When finished, touch
CONNECT.