TCM Mobile YP1 Wireless Internet Phone User Manual Manual
TCM Mobile LLC Wireless Internet Phone Manual
User Manual

1
YPHONE ™ ™
User Guide
What information is needed? Numbers Where is the number?
The YPHONE ™ is a pocket-sized, wireless phone that works just like a regular
cellular phone.
How it Works
The YPHONE ™ works by accessing wireless Internet connections such as a
wireless router in your home or office, or WiFi hotspots. This innovative wireless
Internet phone provides portable, high-quality services.
Great Features
With the YPHONE ™, you can call anybody, around the world at a low fixed rate.
Copyright TCM – TCM Mobile LTD.
2
YPHONE ™
For your safety
Read these simple guidelines. Not following them may be dangerous or illegal.
SWITCH ON SAFELY
Do not switch the phone on when wireless phone use is prohibited
or when it may cause interference or danger.
ROAD SAFETY
Obey all local laws. Always keep your hands free to operate the
vehicle while driving. Your first consideration while driving should
be road safety.
INTERFERENCE
All wireless phones may be susceptible to interference, which
could affect performance.
SWITCH OFF IN HOSPITALS
Follow any restrictions. Switch the phone off near medical
equipment.
SWITCH OFF IN AIRCRAFT
Follow any restrictions. Wireless devices can cause interference in
aircraft.
SWITCH OFF WHEN REFUELLING
Do not use the phone at a refueling point. Do not use near fuel or
chemicals.
SWITCH OFF NEAR BLASTING
Follow any restrictions. Do not use the phone where blasting is in
3
progress.
USE SENSIBLY
Use only in the normal position as explained in the product
documentation. Do not touch the antenna unnecessarily.
QUALIFIED SERVICE
Only qualified personnel may install or repair this product.
ENHANCEMENTS AND BATTERIES
Use only approved enhancements and batteries. Do not connect
incompatible products.
WATER-RESISTANCE
Your phone is not water-resistant. Keep it dry.
BACK-UP COPIES
Remember to make back-up copies or keep a written record of all
important information stored in your phone.
CONNECTING TO OTHER DEVICES
When connecting to any other device, read its user guide for
detailed safety instructions. Do not connect incompatible
products.
EMERGENCY CALLS
Ensure the phone is switched on and in service. Press the end key
as many times as needed to clear the display and return to the
start screen. Enter the emergency number, then press the call key.
Give your location. Do not end the call until given permission to
do so.
ADDITIONAL SAFETY INFORMATION
4
CERTIFICATION INFORMATION (SAR)
THIS MOBILE DEVICE MEETS GUIDELINES FOR EXPOSURE TO RADIO
WAVES.
Your mobile device is a radio transmitter and receiver. It is designed not to
exceed the limits for exposure to radio waves
recommended by international guidelines. These guidelines were developed by
the independent scientific organization ICNIRP
and include safety margins designed to assure the protection of all persons,
regardless of age and health.
The exposure guidelines for mobile devices employ a unit of measurement
known as the Specific Absorption Rate or SAR. The
SAR limit stated in the ICNIRP guidelines is 2.0 watts/kilogram (W/kg) averaged
over 10 grams of tissue. Tests for SAR are
conducted using standard operating positions with the device transmitting at its
highest certified power level in all tested
frequency bands. The actual SAR level of an operating device can be below the
maximum value because the device is designed
to use only the power required to reach the network. That amount changes
depending on a number of factors such as how
close you are to a network base station. The 10-gram SAR level determined from
the actual SAR assessment of the device was 0.0 W/kg and the 1-gram SAR
level was also 0.0 W/kg.
Use of device accessories and enhancements may result in different SAR
values. SAR values may vary depending on national
reporting and testing requirements and the network band.
Operating environment
This device meets RF exposure guidelines when used either in the normal use
position against the ear or when positioned at
5
least 2,2 centimeters (7/8 inches) away from the body. When a carry case, belt
clip, or holder is used for body-worn operation,
it should not contain metal and should position the device the above-stated
distance from your body.
To transmit data files or messages, this device requires a quality connection to
the network. In some cases, transmission of data
files or messages may be delayed until such a connection is available. Ensure
the above separation distance instructions are
followed until the transmission is completed.
Parts of the device are magnetic. Metallic materials may be attracted to the
device. Do not place credit cards or other magnetic
storage media near the device, because information stored on them may be
erased.
Medical devices
Operation of any radio transmitting equipment, including wireless phones, may
interfere with the functionality of inadequately
protected medical devices. Consult a physician or the manufacturer of the
medical device to determine if they are adequately
shielded from external RF energy or if you have any questions. Switch off your
device in health care facilities when any regulations
posted in these areas instruct you to do so. Hospitals or health care facilities may
be using equipment that could be sensitive
to external RF energy.
Implanted medical devices
Manufacturers of medical devices recommend that a minimum separation of 15.3
centimeters (6 inches) should be maintained
between a wireless device and an implanted medical device, such as a
pacemaker or implanted cardioverter defibrillator, to
6
avoid potential interference with the medical device. Persons who have such
devices should:
• Always keep the wireless device more than 15.3 centimeters (6 inches)
from the medical device when the wireless device is
turned on.
• Not carry the wireless device in a breast pocket.
• Hold the wireless device to the ear opposite the medical device to
minimize the potential for interference.
• Turn the wireless device off immediately if there is any reason to suspect
that interference is taking place.
• Read and follow the directions from the manufacturer of their implanted
medical device.
If you have any questions about using your wireless device with an implanted
medical device, consult your health care provider.
Hearing aids
Some digital wireless devices may interfere with some hearing aids. If
interference occurs, consult your service provider.
Vehicles
RF signals may affect improperly installed or inadequately shielded electronic
systems in motor vehicles such as electronic fuel
injection systems, electronic antiskid (antilock) braking systems, electronic speed
control systems, and air bag systems. For more
information, check with the manufacturer, or its representative, of your vehicle or
any equipment that has been added.
Only qualified personnel should service the device or install the device in a
vehicle. Faulty installation or service may be dangerous
and may invalidate any warranty that may apply to the device. Check regularly
that all wireless device equipment in your vehicle
is mounted and operating properly. Do not store or carry flammable liquids,
gases, or explosive materials in the same
7
compartment as the device, its parts, or enhancements. For vehicles equipped
with an air bag, remember that air bags inflate
with great force. Do not place objects, including installed or portable wireless
equipment in the area over the air bag or in the
air bag deployment area. If in-vehicle wireless equipment is improperly installed
and the air bag inflates, serious injury could
result.
Using your device while flying in aircraft is prohibited. Switch off your device
before boarding an aircraft. The use of wireless
teledevices in an aircraft may be dangerous to the operation of the aircraft,
disrupt the wireless telephone network, and may
be illegal.
Potentially explosive environments
Switch off your device when in any area with a potentially explosive atmosphere,
and obey all signs and instructions. Potentially
explosive atmospheres include areas where you would normally be advised to
turn off your vehicle engine. Sparks in such areas
could cause an explosion or fire resulting in bodily injury or even death. Switch
off the device at refueling points such as near
gas pumps at service stations. Observe restrictions on the use of radio
equipment in fuel depots, storage, and distribution areas;
chemical plants; or where blasting operations are in progress. Areas with a
potentially explosive atmosphere are often, but not
always, clearly marked. They include below deck on boats, chemical transfer or
storage facilities, vehicles using liquefied
petroleum gas (such as propane or butane), and areas where the air contains
chemicals or particles such as grain, dust, or metal
powders.
8
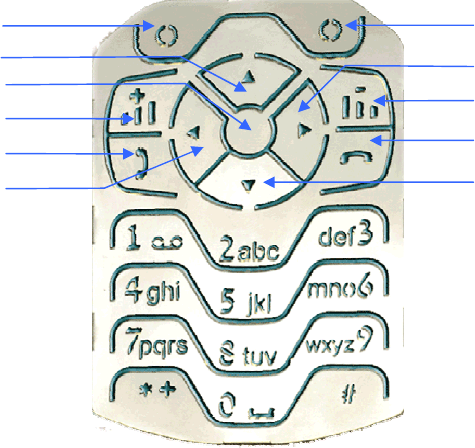
11
9
7
5
1
2
4
6
8
10
3
GETTING STARTED
General Information
The YPHONE ™ provides various functions that are easy to use, such as
Text-Messages, E-mail, Internet, Clock, Calculator, and Calendar.
1.0 YOUR Y PHONE - KEYS AND PARTS
1. Left selection key.
2. Right selection key.
3. Up scroll key.
4. Right scroll key.
5. Middle selection key.
6. Volume down key.
7. Volume up key.
8. End/Power(on/off) key.
9. Send key.
10. Down scroll key.
11. Left scroll key.
1.1 Installing and charging the battery -
Always switch the device off and disconnect the charger before removing the
battery.
1.1.1 Installing and removing the battery:
Remove the back cover of the phone by pushing the back
cover release slide (1), lift the cover (2).

9
Remove/insert the battery as shown (3). Place the back
cover into its place (4). Make sure it clicks into place, so
that the back cover release slide resumes its normal position (5).
1.1.2 – Charging The battery:
1. Connect the power cord to the charger.
You will hear it click into place.
2. Connect the charger to an AC wall outlet.
3. Connect the power cord from the charger to the base of the phone
The battery indicator bar will start scrolling.
Note: the phone can be used while charging.
4. When the battery is fully charged, the bar stops scrolling. Disconnect the
charger from the AC outlet and then from the phone.
1.2 - Switching the phone on (or off) -
Press and hold the end key for a few seconds.
The indicators described below are shown when the phone is ready for use, with
no characters keyed in. In this state, the phone is in ‘standby mode’.
10
Your telephone number, the date and time and the network name is shown on
screen.
1.3 Antenna
Your device has an internal antenna.
Note: As with any other radio transmitting device, do not touch the antenna
unnecessarily when the device is switched on. Contact with the antenna affects
call quality and may cause the device to operate at a higher power level than
otherwise needed. Avoiding contact with the antenna area when operating the
device optimizes the antenna performance and the battery life.
1.4 – Display
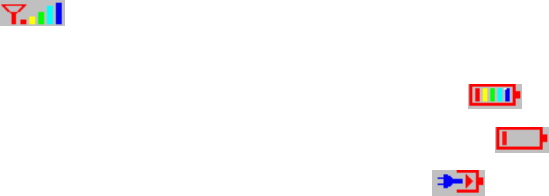
1.4.1 – Standby Display
When the phone is in standby mode the screen can include the following
indicators and symbols:
1. Network mode indicator.
2. Network signal strength -
3. Battery charge status:
a. The following icon indicates that you have a fully charged battery -
b. The following Icon indicates that the battery needs to be recharged -
c. The following Icon indicates that the battery is being charged -
4. Clock.
5. Network name.
6. Date.

11
1.4.2 – Active Mode–
When the phone is in active mode the following symbols might be displayed:
-Indicates that you have received a new message in your inbox.
-Indicates that you have received a new e-mail.
-Indicates that you have received new voice messages.
- Indicates that you have activated the alarm.
- Indicates an unsecured network (found in scan).
- Indicates a secured network.
- Indicates the phone is on ringer mode.
- Indicates phone is in “silent” mode (ringer is turned off).
- Indicates both ringer and vibrator are turned on.
- Indicates vibrator is tuned on while ringer is silenced.
The main display will include:
1. Network mode indicator.
2. Network signal strength.
3. Battery charge status.
4. Indicators.
5. Network name.
6. Clock.
7. Main display.
8. The left selection key.
9. The right selection key – Menu key.
12
1.5 – Menu Shortcuts
Your Y-phone allows you to access applications without using the phone menu.
The following applications are accessible through shortcuts:
• To access the calendar press the right button on the five way scroller
button.
• To access the Message editor press the left button on the five way scroller
button.
• To see the most recent incoming calls press the “down” button on the five
way scroller.
• To access the ringer profile options press the “up” button on the five way
scroller.
• To access and edit the network profiles press the center button on the five
way scroller.
13
2.0 Y-PHONE CALL FUNCTIONS
2.1.0 – Making a Call
1. Enter the phone number, including the area code. For international calls, enter
the country code, the area code without the leading 0, if necessary, and the
phone number.
2. To call the number, press the call key. To increase the volume in a call, press
the volume up key and to decrease press the volume down key.
3. To end the call or to cancel the call attempt, press the end key, or
close the phone.
2.1.1 - Making a call using the phone book directory
1. To open the Contacts list directory, press right menu key and go to contacts.
2. Scroll down through names until requested name is highlighted.
3. Press left select key to call or press Send to call.
2.2 Speed dialing
Speed dialing is a quick way to call frequently used numbers. You can assign
speed dialing keys to 200 phone numbers. Assign a phone number to one of the
speed-dialing keys, 3 to 9. To call the contact by Speed dialing, press the
selected number’s speed dial digits and the desired telephone number will be
shown on screen.
14
2.3.0 Answering and ending a Call
2.3.1 Answering a call
In order to answer an incoming call you may follow either of the following steps:
1. Press the Send key.
2. Flip open the phone.
2.3.2 - Ending a call
In order to end a call you may follow either of the following steps:
1. Press the End key.
2. Close the phone flip.
2.3.3 – Ignoring an incoming call
To reject an incoming call, press the end key or close the phone.
2.4. Call waiting
To answer the waiting call during an active call, press the send/call key.
The first call is put on hold. To end the active call, press the send key.
To activate the Call waiting function, see section 2.4.2.6.
2.5 – Putting a call on Hold
To put a call on hold press the “send” button, in order to resume the call press
15
the send button once more.
2.6 – Forwarding a call
Incoming calls can be forwarded to another number under the following
conditions:
• No answer – calls are forwarded if they are answered for 18 seconds.
• Busy – calls are forwarded if phone is not idle.
• “Do Not Disturb” – Calls are automatically forwarded. No indication of an
incoming call is given.
2.7 – Transferring a call
• To transfer a call, press the “Send” key, then dial the new number and
press the “Send” key again.
• To transfer immediately, press the “Cancel” key.
• To transfer after receiving reply, wait for the call to be answered, consult
and then press “Cancel” key.
• To abort the transfer (if there is no reply), press the “Send” key to return to
the original call.
• When transferring calls with consultation, you can switch back and forth
between calls by pressing the “Send” key.
2.8 – Voicemail
When you are unable to answer a call, callers are forwarded to a voicemail
service where they can leave you a message. To access your messages, call the
number supplied by your service provider.
When you receive a new voice message, a message will pop up on screen –

16
“You have received a new voice message” To call the service press the left
selection key, or press “cancel” (right selection key) to cancel.
3. 0 – Y-PHONE MENU NAVIGATION
The main menu can be accessed by pressing the Menu key (right selection key).
The menu will display all the Y-phone applications.
Menu options include:
3.1 - Profiles.
3.2 - Phone book.
3.3 - Messaging.
3.4 - Settings.
3.5 - Status.
3.6 - Call log.
3.7 - Accessories.
3.8 - Administration.
Operation Instructions:
To choose an application, scroll to view (use the up, down. left and right
keys on the five way scroller key to navigate). Each application is
indicated by a different image, as the image is highlighted the name of the
application will be displayed. Select the application by pressing the left
selection key.
To return to the first screen press the Cancel (right selection) key.

17
3.1 - Profiles
This is an application for finding and creating a connection with an available
network. When a connection is made, the network name appears on the next
screen.
Profile menu options:
1. Select Profile.
2. Edit Profile.
3. Add Profile.
4. Delete Profile.
Note: to activate, change and delete the profile use the Menu Operation
Instructions.
3.2.0 – Phone book
In the phone memory you can save different types of phone numbers and short
text items for a contact. The first number you save is automatically set as the
default number.
Options in the Phone Book Menu:
3.2.1. Find.
3.2.2. Options.
3.2.3. Add Contact.
3.2.4. Delete All.
3.2.1 - Find

18
In the dialog window the name and internet address of the contact's name can be
included. To find a contact's name, use the up and down keys on the five way
scroller key to navigate. A status bar highlights the name, select the name, or
press the central key on the five way scroller, the options menu will appear on
screen.
To return to the first screen, press the end key.
To cancel, press the right selection key.
3.2.2 - Options
The contact's name will appear as the title of this sub-menu.
This sub-menu includes the following options:
3.2.2.1. Call.
3.2.2.2. Show Details.
3.2.2.3. Edit.
3.2.2.4. Delete.
3.2.2.1 - Call
Choosing the call option enables the caller to call any of the contact’s inputted
numbers directly.
If the contact information includes only one telephone number then pressing the
call button will immediately connect the user with the contact. If the contact
information includes more than one telephone number then the call menu will
open in to a sub menu that will list all of the selected contact’s available numbers.
Use the up and down keys on the four way scroll button to see all the available
telephone numbers. Use the select key or the enter key to make the call.
3.2.2.2 – Edit
19
After choosing the requested contact’s name the edit section allows the user to
edit the information saved.
Choosing the edit option for a contact will open a screen showing all the available
information for the selected contact – Name, Home Number (default), Cellular
Number, Email and Fax. Use the up and down buttons on the five way scroller
buttons to select the detail you wish to edit. The area becomes highlighted when
chosen. After editing the selected data, the information can be saved or deleted
by pressing the left or right selection keys.
3.2.2.3 – Delete
Choosing this option will allow the user to delete a contact and/or any data
connected with the chosen contact. Delete clears a contact's name from the
phone book. You will be asked if you wish to delete the selected contact from the
phone book – press left selection key to confirm or right selection key to cancel
and keep the contact information.
3.2.2.4 - Add Contact
In the Contacts section, you can store and manage contact information, such as
names, phone numbers and email addresses.
To add a contact's name, fill in the available fields and press the central key on
the five way scroller to save. The contact information is saved in the phone
memory, after which it is accessible in the Phone Book.
To clear the field press the left selection key (“Clear”).
3.2.2.5 – Delete All
Selecting the delete all option will allow you to delete the entire phonebook
contact list.
Warning: choosing the delete option will delete the entire phonebook and contact
list information.
20
3.2.2.6 – Save to Server
This option allows you to make a back up file of your entire contact list. Selecting
this option will cause the phone to send a copy of your entire contact list to the
server for future use.
WARNING: Selecting this option when you have an empty contact list could
cause your contact list to be deleted if you later choose to load contact list from
server.
3.2.2.7 – Load from Server
Selecting this option causes the server to send you any contact list previously
sent to the server. Thus ensuring that if you accidentally delete your contact list a
back up is available.
WARNING: Selecting this option when you recently sent the server an empty
contact list could cause your contact list to be deleted.

21
3.2.3 - Messages
The Messages menu includes all the messaging options – Text messages, Voice
messages and Emails. Here you can manage your emails, access voice and text
messages and create new messages.
3.2.3.1 – Text Messages
Here you can read incoming messages, create and delete messages and
manage your inbox. All messages are organized into folders.
These options are available:
3.2.3.1.1 - New Message.
3.2.3.1.2 – Inbox.
3.2.3.1.3 – Drafts.
3.2.3.1.4 – Sent Messages.
3.2.3.1.5 – Outbox.
Each of the above options opens a sub-menu.
3.2.3.1.1 - New Message
This section allows you to create a text message multimedia message or email
and to save it in a folder or send it.
3.2.3.1.1.1 - Message Editor
In the Message Editor the user will be able to create messages using the phone
keypad. An indicator on the top right of the display shows when you are writing
text using traditional text input.
Writing a message:
22
• Press a number key (-), repeatedly until the desired character appears.
• Punctuation marks and symbols – press the *, # , 1 and 0 keys in order to
access punctuation marks and symbols.
• To switch between upper and lower cases continue pressing the number
key until the correct case appears.
• To insert a number in letter mode, press and hold the number key.
• To switch between letter and number mode, press and hold.
• If the next letter is located on the same key as the present one, wait until
the cursor and enter the chosen letter.
• To erase a character press “clear”. Press and hold to clear more than one
character.
After completing the message, you may press the right button to cancel and
return to previous screen, the left button in order to clear the field and the center
key on the five way scroller button to send.
If you choose to send the message, you are asked if you wish to save your
message in drafts, if so, press the yes button, or press no to continue to sending
options.
3.2.3.1.1.1.1 – Sending Options
This screen includes empty fields which can be filled by the user – the user can
send the message to up to seven numbers. This can be done in two ways, using
the up and down keys on the five way scroller, highlight one of the empty fields
manually fill each field with the selected phone number, or, select the “find” key
which will open the phonebook and allow you to select a contact from the list.
After selecting all the message destination numbers select the “send” key
(central key on the five way scroller button) to send the message.
23
3.2.3.1.2 – Inbox
The inbox folder keeps all messages sent to the phone. A status bar highlights
the title of the selected message. Navigate using the up and down keys on the
five way scroller and press “select”(left button) to view chosen message.
To return to inbox press the right key.
When you receive a message, you will receive notification on the main screen –
“Received New Message” the new message will appear as the first message in
your inbox.
3.2.3.1.3 – Drafts
This folder contains message templates. Select the preferred message template
from the available list by using the up and down keys on the five way scroller.
Press the “select” (left) key to use template or the right key to cancel.
3.2.3.1.4 – Sent Messages
This folder contains all the messages recently sent from the phone. Use the up
and down keys on the five way scroller button to navigate and select the
preferred message.
Press the “select” (left) key to use template or the right key to cancel.
3.2.3.1.5 – Outbox
The outbox folder is a temporary storage folder for messages that have not yet
been sent by the user, once the messages are sent they are automatically
removed from the outbox in to the “Sent” folder. Use the up and down keys on
the five way scroller button to navigate and select the preferred message. Press
the “select” (left) key to use template or the right key to cancel.
24
3.2.3.2 – Email Services
If you select this option and have not set up your e-mail account, please contact
your “Y-phone” service provider in order to receive your email settings.
If you have set up your email account you will be able to access the following
services:
3.2.3.2.1 – Open Mailbox
When you open the mailbox, the device asks if you want to
connect to the mailbox (Connect to mailbox?).
To connect to your mailbox and retrieve new e-mail
headings or messages, select the left “Yes” key or “No” to cancel.
Here you can view new and old email messages, you can also forward emails to
an additional address.
3.2.3.2.2 – Create New Email
Here you can use the message editor to create new e-mail messages. Fill in the
necessary fields – which address you wish to send to, how many addresses to
include etc… use the up and down keys on the five way scroller button to move
between the message fields. When you have completed your message, use the
central button on the five way scroller to send or use the left selection key to
clear fields. To cancel press the right (“cancel”) selection key.
WARNING: E-mail messages may contain malicious software or otherwise be
harmful to your device or PC.

25
3.2.3.3 – Voicemail
When you receive a voice message, it will be forwarded to your voicemail inbox;
here you can see the time of call and caller information.
To access messages use the up and down keys on the five way scroller button.
To select the message press the left selection key or press the right “cancel key”
to cancel. In the message window the message details will be listed, use the left
selection key to go access the message options or use the right selection key to
cancel and return to the previous window.
In the options window you can –
1. Call voice mail.
2. Delete message.
Use the up and down keys on the five way scroller button to scroll between
options, and use the left selection key to make your selection. To cancel use the
right (“cancel”) selection key.
For more information on voicemail services see chapter 2.8.
3.2.4 - Settings
This menu includes all the necessary options for your phone’s settings:
3.2.4.1 – Set Time
3.2.4.2 – Ring/Vibrator
3.2.4.3 – Ringer Type
3.2.4.4 – Wallpapers
3.2.4.5 – Brightness
3.2.4.6 – Call Waiting

26
3.2.4.7 – Block My Caller ID
3.2.4.8 – Refuse No Caller ID
3.2.4.9 – Speaker Volume
3.2.4.10 – Ring tone Volume
3.2.4.1 – Set Time
Using the number key pad enter the correct time and date.
• To save the settings, Press the select key. (Left button)
• To cancel the settings, press the right key.
3.2.4.2 – Ring/Vibrator
This menu allows the user to select the phone ring and vibrator settings the
options are:
3.2.4.2.1 – Ring.
3.2.4.2.2 - Ring and Vibrate.
3.2.4.2.3 – Vibrate Only.
3.2.4.2.4 - Silent.
Use the up and down keys on the five way scroller button to navigate between
the options. When preferred option is highlighted press the “Select” (left) key to
save or press the right key to cancel.
3.2.4.3 – Ring tones
Select the ring tone of your choice for voice calls messages and alarms.
3.2.4.3.1 – Voice call Ring tones
27
Using the up and down keys on the five way scroller button navigate between the
ringer type options, choose by pressing the “Select”(left) button or press right key
to cancel.
3.2.4.3.2 – Message Tones
Using the up and down keys on the five way scroller button navigate between the
ringer type options, choose by pressing the “Select”(left) button or press right key
to cancel.
3.2.4.3.3 – Alarm Tones
Using the up and down keys on the five way scroller button navigate between the
ringer type options, choose by pressing the “Select”(left) button or press right key
to cancel.
3.2.4.4 – Wallpapers
Select a wallpaper for your phone screen by choosing form among the available
wallpaper images and themes (may vary between models). Use the up and down
keys on the five way scroller button to navigate between the available options,
press “select” (left) key or right key to cancel, or choose preview option to
preview selected wallpaper.
3.2.4.4.1 – Preview wallpaper
Selecting the preview option will open a new screen containing the chosen
wallpaper, to go ahead with wallpaper choice press the “select” (left) key, or
press the right key to cancel and return to wallpaper options.
3.2.4.5 – Brightness
28
Adjust the screen brightness by using the up and down keys on the five way
scroller button. Press the “select” button to keep adjusted brightness level and
return to previous menu, or press the right key to cancel adjustment and return to
previous menu
3.2.4.6 – Call Waiting
If you have an incoming call while a call is already in progress, the network will
notify you of a new call “waiting”. Press Yes to answer the call waiting, or No to
deny the call. To return to previous call press the “send” key.
3.2.4.7 – Block My Caller ID
This network service allows you to block your phone number from the person you
are calling. So that they will not be able to identify you. To select block my caller
ID and return to previous screen press the “select” key or press the right key to
cancel and return to previous menu.
3.2.4.8 – Refuse No Caller ID
This network service allows you to block incoming calls from unidentified
numbers. To select Refuse No Caller ID and return to previous screen press the
“select” key or press the right key to cancel and return to previous menu.
3.2.4.9 – Volume Control (Speaker Volume)
Adjust the volume by using the up and down keys on the five way scroller button.
Press the “select” button to keep adjusted volume level and return to previous
menu, or press the right key to cancel adjustment and return to previous menu.

29
3.2.4.10 – Ring tone Volume
Adjust the volume by using the up and down keys on the five way scroller button.
Press the “select” button to keep adjusted volume level and return to previous
menu, or press the right key to cancel adjustment and return to previous menu.
3.2.5 – Status
The status section deals with connection options and diagnostics.
A few menu selection options are available:
3.2.5.1 Current Status
This screen shows the current status of the phone connections. Current Status
shows an access point -The point where your phone connects to the Internet.
To return to previous screen press right key.
3.2.5.2 Diagnostic Status
This screen shows the status of all phone connection configurations. Press the
left “select” key to refresh the right set to zero or press the right key to return to
the previous screen.
3.2.6 – Call Log
The phone registers missed, received, and dialed calls. In the Call Log, for each
communication event, you can see the sender or recipient name, phone number
30
and access point.
The Call Log menu includes the following options:
3.2.6.1 - Missed Calls
3.2.6.2 - Received Calls
3.2.6.3 - Dialed calls
3.2.6.1 - Missed calls
Shows a list of recent incoming phone numbers or contact names from calls
which were not answered.
You may choose one of the following options:
3.2.6.1.1 – Show Details
Show missed call details – shows phone number, contact name (if available) and
time of call. To return to options press right selection key.
3.2.6.1.2 – Save
This option allows you to save a missed call number or detail in your contact’s
list. Fill in the fields and press the “select” (left) key. The contact card is saved in
the phone memory after which it is available for viewing in the Phone Book. (See
section 3.2.2.4)
3.2.6.1.3 – Delete
Selecting the delete option will erase the call number and/or contact name from
the missed calls log.
Press the Left selection key to delete the information and return to previous
menu, or the right selection button to cancel and return to previous menu.
3.2.6.2 - Received Calls
31
Shows a list of the phone numbers or contact names from which you have most
recently received calls.
3.2.6.2.1 – Show Details
Show received call details – shows phone number, contact name (if available)
and time of call. To return to options press right selection key.
3.2.6.2.2 – Save
This option allows you to save a received call number or detail in your contact’s
list. Fill in the fields and press the “select” (left) key. The contact card is saved in
the phone memory after which it is available for viewing in the Phone Book. (See
section 3.2.2.4)
3.2.6.2.3 – Delete
Selecting the delete option will erase the call number and/or contact name from
the received calls log.
Press the Left selection key to delete the information and return to previous
menu, or the right selection button to cancel and return to previous menu.
3.2.6.3 - Dialed Calls
Shows a list of phone numbers that you have most recently called or attempted
to call.
3.2.6.3.1 – Show Details
Show dialed call details – shows phone number, contact name (if available) and
time of call. To return to options press right selection key.
3.2.6.3.2 – Save
This option allows you to save a dialed number or detail in your contact’s list. Fill

32
in the fields and press the “select” (left) key. The contact card is saved in the
phone memory after which it is available for viewing in the Phone Book. (See
section 3.2.2.4)
3.2.6.3.3 – Delete
Selecting the delete option will erase the call number and/or contact name from
the dialed calls log.
Press the Left selection key to delete the information and return to previous
menu, or the right selection button to cancel and return to previous menu
3.2.7 - Accessories
In this menu you can manage phone accessories including games and organizer
utilities. This menu includes:
3.2.7.1 – Alarm Clock
3.2.7.2 – Calendar
3.2.7.3 – Calculator
3.2.7.4 – Games
3.2.7.1 – Alarm Clock
Three options are available to the user – alarm on, daily alarm, and alarm off.
3.2.7.1.1 – Alarm On
This option allows user to set a one time alarm – the alarm goes on and off at
selected time and goes off. Use the up and down keys on the five way scroller
button to adjust the alarm times. To turn off alarm press right selection key.
3.2.7.1.2 – Daily Alarm
This option allows user to set the alarm to go on and off at a selected time and
repeat itself daily without further need for setting. Use the up and down keys on
33
the five way scroller button to adjust the alarm times. To turn off alarm press right
selection key.
3.2.7.1.3 – Alarm Off
This option turns off and cancels all previous alarm settings – to set alarm to “off”
press the left select key or press the right select key to cancel and return to
previous menu.
3.2.7. 2 - Calendar
The calendar section allows you to keep track of appointments meetings and
their time and date. You can also set a calendar alarm to remind you of
upcoming events. The calendar is set according to the time and date settings
entered in to the phone (see section 3.2.4.1).
• To select a different month or year use the up and down keys on the five
way scroller button.
• To change the selected day, use the left and right keys on the five way
scroller.
• To make an entry on the selected date press the left selection key, or
press the right selection key to cancel and return to previous screen.
3.2.7.2.1 – Editor/Reminder
Through this option you can add a reminder to the selected date, simply write the
requested reminder/appointment. If the selected date already has an entry then
you will be able to edit or delete the entry. To return to the previous screen press
the right selection key or press the left selection key to save and continue to “Set
Time” sub menu.
3.2.7.2.1.1 – Set Time
This option allows you to set a time for the calendar entry/reminder, if chosen a
34
reminder will pop on the main screen on the selected date.
To set time use the five way scroller button, when time is set press the left
selection key to save and return to main calendar menu or press the right
selection key to cancel and return to previous menu.
3.2.7.3 - Calculator
Opens mathematical calculator. Use number keypad to enter numbers, use the
five way scroller for the following computations:
Up: +
Down: -
Left: *
Right: /
Press left selection key to see result and right selection key to cancel and return
to previous screen.
3.2.7.4 - Games
This menu allows you to navigate between the games available on this phone
(games may vary). To select a game use the up and down keys on the five way
scroller and press the left selection key. Press the right selection key to cancel
and exit games menu.

35
3.2.8 – Administration
This menu handles the phone’s administration and LCD settings.
It includes:
3.2.8.1 – Misc. Menu
This menu focuses on tCPUcpu settings and profiles and includes the following
sub-menus:
3.2.8.1.2 – Profiles
3.2.8.1.3 – Software Version
Shows the software version details, press right selection button to return to
previous menu.
3.2.8.2 – LCD Settings
This section deals with LCD settings. Note: After changing the LCD settings the
phone will have to be restarted in order for the changes to take effect.
3.2.8.2.1 – Power Save
Press the left selection key to begin the power save mode, press the right
selection key to cancel and return to previous menu.
3.2.8.2.2 – LCD Off
This sub menu enables the user to select the time period after which the LCD will
be turned off. There are five options – one minute, two minutes, three minutes,
four minutes and five minutes. Use the up and down keys on the five way scroller
to navigate between the options and press the left selection key to make the
selection. Press the right selection key to cancel and return to previous screen.
36
3.2.8.2.3 – Backlighting
This sub menu allows the user to select the backlighting options – keep the
backlighting on at all times or for selected time periods. To navigate between
options use the up and down keys on the five way scroller button and press the
left selection key to save the selection. To cancel and return to the previous
screen press the right selection key.
3.2.8.3 – Language Settings
This option allows the user to change the phone’s display language.
The language options are: English, French and Spanish.
To select/change the language use the up and down keys on the five way
scroller in order to navigate between the options. Press the left selection key to
select and change settings or press the right selection key to cancel and keep
previous settings.
4.0 - TECHNICAL INFORMATION
Feature Specification

37
Frequency Range Lowband
2412-2462 MHz (TX)
2412-2462 MHz (RX)
Battery Voltage
3.7 Volt
Copyright TCM – TCM Mobile LTD.
This device TCM-YPHONE ™-01 (FCC ID No. VN9YP1) complies with Part 15 of the FCC Rules.
Operation is subject to the following two conditions: (1) this device may not cause harmful
interference, and (2) this device must accept any interference received, including interference that
may cause undesired operation.
Note: This equipment has been tested and found to comply with the
limits for a Class B digital device, pursuant to part 15 of the FCC
Rules. These limits are designed to provide reasonable protection
against harmful interference in a residential installation. This
equipment generates, uses and can radiate radio frequency energy and, if
not installed and used in accordance with the instructions, may cause
harmful interference to radio communications. However, there is no
guarantee that interference will not occur in a particular installation.
If this equipment does cause harmful interference to radio or television
reception, which can be determined by turning the equipment off and on,
the user is encouraged to try to correct the interference by one or more
of the following measures:
--Reorient or relocate the receiving antenna.
--Increase the separation between the equipment and receiver.
--Connect the equipment into an outlet on a circuit different from that
to which the receiver is connected.
--Consult the dealer or an experienced radio/TV technician for help.
CAUTION: changes or modifications to the equipment could void the user's authority to
operate the equipment.