TCT Mobile 436 HSUPA/HSDPA/UMTS dual band /GSM quad-bans mobile phone User Manual IP4886 4015T UM Eng USA 01 140214 indd
TCT Mobile Limited HSUPA/HSDPA/UMTS dual band /GSM quad-bans mobile phone IP4886 4015T UM Eng USA 01 140214 indd
4015T_User Manual_Eng_USA_01_140214
Some of the contents in this manual may differ from your phone depending on the
software of the phone. Actual color may vary.
Your phone is designed to make it easy for you to access a wide variety of content. For
your protection, we want you to be aware that some applications that you enable may
involve the location of your phone being shared. For applications available through AT&T,
we offer privacy controls that let you decide how an application may use the location of
your phone and other phones on your account. However, the AT&T privacy tools do not
apply to applications available outside of AT&T. Please review the terms and conditions
and the associated privacy policy for each location-based service to learn how location
information will be used and protected. In addition, your AT&T phone may be used to
access the internet and to download, and/or purchase goods, applications, and services
from AT&T or elsewhere from third parties. AT&T provides tools for you to control access
to the Internet and certain Internet content. These controls may not be available for
certain devices which bypass AT&T controls.
Service provided by AT&T Mobility. Portions © 2013 AT&T Intellectual Property. All rights
reserved. AT&T, the AT&T logo and all other AT&T marks contained herein are trademarks
of AT&T Intellectual Property and/or AT&T affiliated companies. All other marks contained
herein are the property of their respective owners.
ALCATEL is a trademark of Alcatel-Lucent used under license by TCT Mobile Limited.
©2014 All rights reserved. • OM871AGR1 • CJA27G4ALAAA
1
Table of contents
1. Basics .................................. 3
Box Contents .........................................3
Activating Your Phone ............................3
Powering On or Off .................................5
Charging Your Phone ..............................5
Phone Overview ..................................... 6
Setting Up Voicemail ...............................7
2. Getting Started ....................... 8
Status Bar Icons ....................................8
Menu Navigation .....................................9
Changing Your Shortcuts Menu ............ 10
3. Phone Calls ..........................11
Making a Call ........................................11
Answering a Call ................................... 12
Ending a Call .........................................13
Adjusting Call Volume ........................... 13
Recent Calls .......................................... 13
In-Call Options .....................................13
4. Address Book .......................14
Using the Contact List ...........................14
Adding New Contacts ............................14
Editing/Deleting Contacts ...................... 15
Making a Call from Your Contact List ...15
Speed Dial List ......................................15
Address Book Settings ..........................16
5. Entering Text .........................17
Keypad Inputting ...................................17
Text Input Mode ...................................18
Changing Text Mode ............................. 18
6. Messaging ...........................18
Types of Messages ............................... 18
Creating and Sending New Text Messages
..20
Creating and Sending New Multimedia
Messages ..............................................20
Reading New Messages ........................20
Using Message Options ........................20
Deleting Messages ................................21
Message Settings ..................................21
7. Email .................................22
Accessing Email .................................... 22
Email Account Set-up ...........................22
Using Email Options .............................23
8. AppCenter ...........................24
Accessing AppCenter ............................ 24
Ringtones .............................................24
Ringback Tones .................................... 24
Wallpapers ............................................ 24
Accessing My Accounts & Credits ........24
9. Mobile Web .........................25
Launching Browser ............................... 25
Accessing a WAP Site ........................... 25
Navigating with the Browser .................25
Settings .................................................25
10. Music .................................26
Music Player .........................................26

2
Shopping Music .................................... 26
AT&T Radio ..........................................26
11. Settings ..............................27
Accessing the Setting Menu ..................27
Phone Settings ......................................27
Call Settings .......................................... 28
Flight Mode ........................................... 30
Security .................................................30
Connectivity ..........................................31
Widget Settings ....................................31
12. Profiles ...............................32
General .................................................32
Meeting .................................................32
Outdoor .................................................32
Indoor ................................................... 32
Silence ..................................................32
13. Tools .................................33
Alarm Clock ..........................................33
Calendar ................................................33
Calculator ..............................................34
World Clock .......................................... 34
Voice Recorder .....................................34
Unit Converter .......................................35
Notes ....................................................35
Currency Converter ............................... 35
Stop Watch ...........................................35
Flashlight ..............................................35
14. My Stuff ..............................36
Applications ..........................................36
Marketplace ..........................................36
File Manager .........................................36
15. Camera ...............................37
Access ..................................................37
Camera .................................................37
Video .....................................................37
16. Image Viewer .......................38
17. Video Player ........................39
18. FM Radio ............................39
19. Twitter ................................40
20. Facebook ............................40
21. News .................................41
22. Weather ..............................41
Add New City ........................................41
Set As default ........................................41
23. Bluetooth™ ..........................42
Turning On/Off Bluetooth ...................... 42
Visibility ................................................42
Device List ............................................ 42
Pairing and Registering Your Bluetooth
Device ................................................... 42
Available Functions ...............................43
24. Safety and Use ......................43
25. General Information ................50
26. Warranty ..............................51
3
Basics1.
Box Contents
You should find the following items inside
the box:
Battery•
USB cable •
Charger•
User guide•
Phone and feature guide•
Quick start guide•
Activating Your Phone
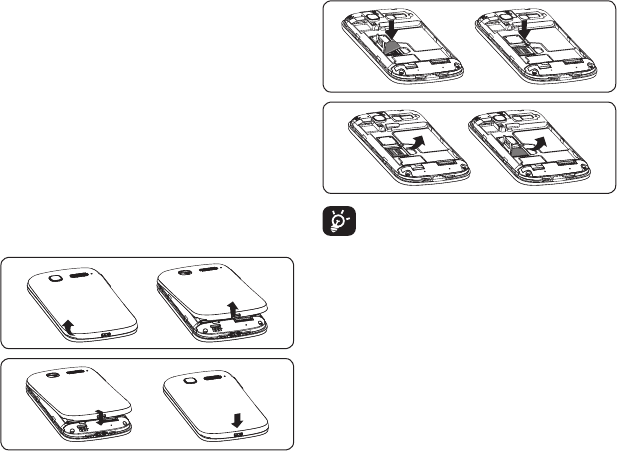
Removing or Installing the Back Cover
Inserting or Removing the SIM Card
You must insert your SIM card before making
and receiving calls.
Your phone only support mini-SIM
card. Do not attempt to insert other
SIM type like micro and nano card,
otherwise may cause phone damage.
1. Power off your phone and remove the
battery before inserting or removing the
SIM card.
2. Release the SIM card holder and slide it in
the direction of the arrow and lift it.
3. Insert the SIM card with the golden contact
window downward.
4. Turn down the SIM card holder and slide it
in the opposite direction to lock it.
4
Installing or Removing the Battery
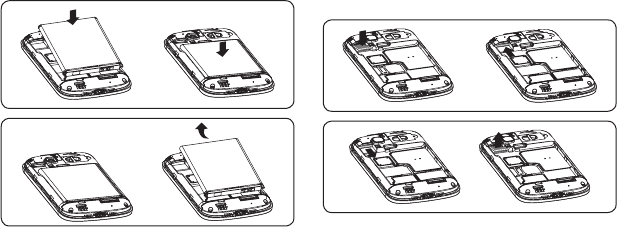
1. Place the battery on the back of the phone
so the metal contacts match up on the
battery and in the battery cavity.
2. Slide the battery down into the battery
cavity until it locks into place.
3. To remove, lift the battery out of the cavity
from the upper left corner.
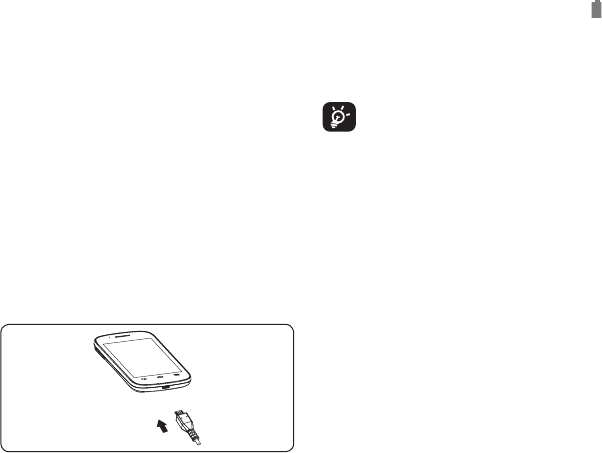
Installing or Removing the MicroSD
Card
1. Insert the external microSD card into the
slot with the gold contact facing down.
2. To remove the external microSD card,
gently press and slide it out.
5
Powering On or Off
Power On Your Phone
Hold down the Power key until the phone
powers on. It will take a few seconds before
the screen lights up.
Set up your phone for the first time
Once you have powered on your phone for
the first time, you should set the following
options: language, input method, date & time,
Google account, etc.
If you power on your phone with no SIM card
inserted, you can connect to a Wi-Fi network
to sign into your Google account and to use
some features.
Power Off Your Phone
Hold down the Power key from the Home
screen until the Phone options appear, select
Power Off.
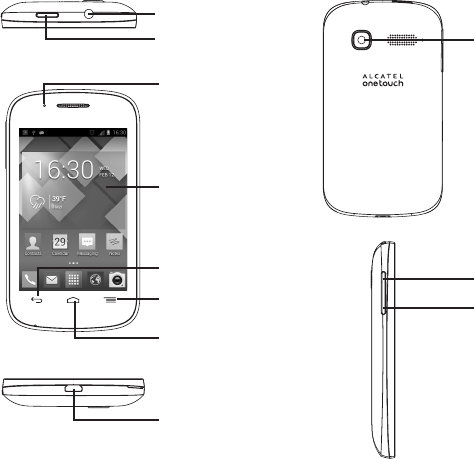
Charging Your Phone
Connect the battery charger to your phone and
mains socket respectively.
Make sure the battery is correctly inserted •
before connecting the charger.
When using your telephone for the •
first time, charge the battery fully
(approximately 5 hours).
You are advised to fully charge the battery ( ) .
The charge status is indicated by an on-screen
percentage reading while the phone is powered
off. The percentage increases as the phone is
charged.
If the battery is very low, there will
be no indication that power is being
received until the charge is sufficient
to show the charging status bar.
To reduce power consumption and
energy waste, once the battery is fully
charged, disconnect your charger
from the plug; switch off Wi-Fi, GPS,
Bluetooth or background-running ap-
plications when not in use; reduce the
backlight time, etc.
6
Phone Overview
Power key
Headset connector
micro-USB
connector
Back key
Home key
Menu key
Touch screen
LED light
Volume up
Volume down
Camera

7
Menu key
Option menu.• Touch to access
Wallpaper, Manage Applications
and Settings.
Recent apps. • Touch and hold to
open a list of thumbnail images of
apps you've worked with recently.
Touch it to open an app. Swipe it
upwards or downwards to remove a
thumbnail from the list.
Home key
While on any application or screen, •
touch to return to the Home screen.
Back key
Touch to go back to the previous •
screen, or to close a dialog box,
options menu, the notification panel,
etc.
Power key
Press: Lock the screen/Light up the •
screen
Press and hold: Show the pop-up •
menu to select from Power Off/
Restart/Airplane Mode/Quick Start
Press and hold: Power on
Press to mute the ringtone when •
there’s an incoming call.
Press and hold for more than 7 •
seconds to restart the phone if the
system has frozen.
Press and hold the • Power and
Volume Down keys to capture a
screenshot.
Press and hold the • Power and
Volume Up keys in power off mode
to restore factory settings.
8
Volume keys
In call mode, adjusts the earpiece or •
headset volume.
In Music/Video/Streaming mode, •
adjusts the media volume.
In general mode, adjusts the ring •
tone volume.
Mutes the ringtone of an incoming •
call.
In Camera mode, when used as the •
capture key, allows you to take a
photo.
Getting Started 2.
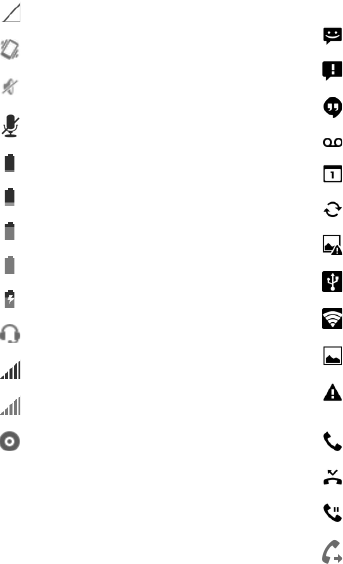
Status Icons
GPRS connected
GPRS in use
EDGE connected
EDGE in use
3G connected
3G in use
HSPA (3G+) connected
HSPA (3G+) in use
Connected to a Wi-Fi network
Bluetooth is on
Connected to a Bluetooth device
Airplane mode
Alarm is set
GPS is on
Roaming
9
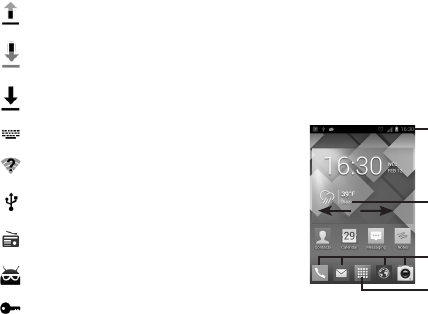
No SIM card inserted
Vibrate mode
Ringer is silenced
Phone microphone is mute
Battery is very low
Battery is low
Battery is partially drained
Battery is full
Battery is charging
Headset connected
No signal (gray)
Signal strength (blue)
Song is playing
Notification Icons
New text or multimedia message
Problem with SMS or MMS delivery
New Hangouts message
New voicemail
Upcoming event
Data is synchronizing
Screenshot error
USB tethering is on
Portable Wi-Fi hotspot is on
Screenshot captured
Carrier data use threshold approach-
ing or exceeded
Call in progress
Missed call
Call on hold
Call forwarding is on
10
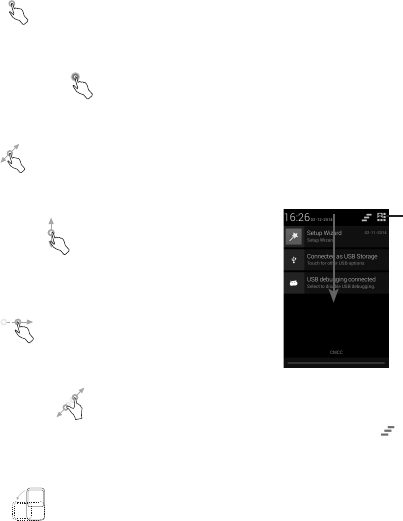
Uploading data
Downloading data
Download finished
Select input method
An open Wi-Fi network is available
Phone is connected via USB cable
Radio is on
System update available
Connected to VPN
Home Screen
You can bring all the items (applications,
shortcuts, folders and widgets) you use most
frequently to your Home screen for quick ac-
cess. Touch the Home key to switch to Home
screen.
Status Bar
Status/Notification indicators •
Touch and drag down to open the •
notification panel
Application Tab
Touch to open main menu•
Favorite Applications Tray
Touch to enter the application•
Touch and hold to move or •
change applications
Add a location to display local
weather
Home screen is provided in an extended
format to allow more space for adding appli-
cations, shortcuts etc. Slide the Home screen
horizontally left and right to get a complete
view of the Home screen. The white short line
at the lower part of the screen indicates which
screen you are viewing.
11
Using the Touchscreen
Touch
To access an application, touch it with your
finger.
Touch and Hold
Touch and hold the home screen to access the
available options for setting the wallpaper.
Drag
Place your finger on any item to drag it to
another location.
Slide/Swipe
Slide the screen to scroll up and down the
applications, images, web pages… at your
convenience.
Flick
Similar to swiping, but flicking makes it move
quicker.
Pinch/Spread
Place your fingers of one hand on the screen
surface and draw them apart or together to
scale an element on the screen.
Rotate
Automatically change the screen orientation
from portrait to landscape by turning the
phone sideways to have a better view.
Status Bar
From status bar, you can view both phone
status (to the right side) and notification
information (to the left side).
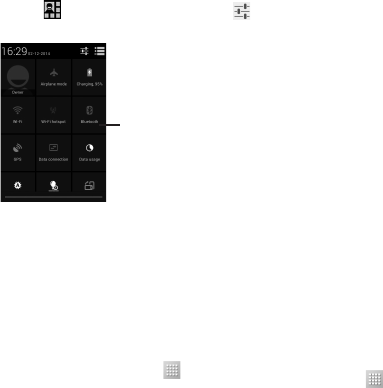
Notification Panel
Touch and drag down the Status bar to open
the notification panel. Touch and drag up to
close it. From the Notification panel, you can
open items and other reminders indicated
by notification icons or view wireless service
information.
Touch to access Quick Setting Bar
Touch one notification and slide it sideways
to delete it.
Touch the icon to clear all event–based
notifications (other ongoing notifications will
remain).
12
Touch and then the Settings icon to
access Settings.
Quick Setting Bar
Touch icons to enable/disable •
functions or to change modes
Lock/Unlock Your Screen
To protect your phone and privacy, you can
lock the phone screen by creating a variety of
patterns, PIN or password etc.
Personalize Your Home Screen
Add
Touch the application tab , touch and hold
an application or a widget to activate Move
mode, and drag the item to any Home screen
as you prefer.
Reposition
Touch and hold the item to be repositioned
to activate Move mode, drag the item to the
desired position and then release. You can
move items both on the Home screen and the
Favorite tray. Hold the icon on the left or right
edge of the screen to drag the item to another
Home screen.
Remove
Touch and hold the item to be removed to
activate Move mode, drag the item up to the
top of Remove icon, and release after the item
turns red.
Create Folders
To improve the organization of items (short-
cuts or applications) on the Home screen and
the Favorite tray, you can add them to a folder
by stacking one item on top of another. To
rename a folder, open it, touch the folder’s
title bar to input the new name.
Wallpaper Customization
Touch and hold an empty area on the Home
screen or touch Settings > Display > Wallpa-
per to customize wallpaper.
Application Tab
Touch from the Home screen to enter
applications list.
To return to the Home screen, touch the
Home key.
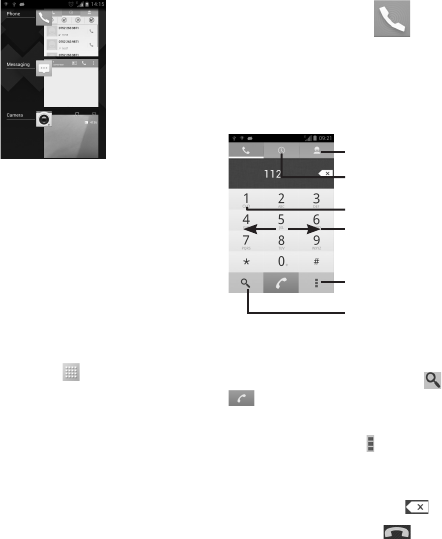
Consult Recently-used Applications
To consult recently-used applications, you
can touch and hold the Menu key. Touch a
thumbnail in the window to open the related
application.Touch one thumbnail and slide it
upwards or downwards to delete it.
13
Volume Adjustment
You can set ringer, media and phone •
ringtone volume to your preference by
pressing Volume Up/Down key or touching
Settings > Sound.
Applications and Widgets List
The list contains all pre-embedded and newly
installed applications and widgets.
To access the list, touch from the Home
screen. To return to the Home screen, touch
the Home key or the Back key.
Phone Call 3.
Placing a Call
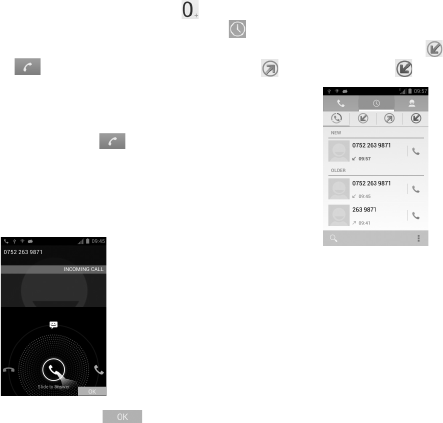
You can easily launch a call using Phone.
Touch Application tab from the Home screen
and select Phone.
Touch and hold to access voicemail
Slide to access Call log and Contacts
Touch to access Settings
Contacts
Call log
Touch to find contacts
Enter the desired number from the keyboard
directly or select a contact from Contacts or
Call log by sliding or touching , then touch
to place the call.
The number you entered can be saved to
Contacts by touching and selecting Add to
Contacts.
If you make a mistake, you can delete the
incorrect digits by touching .
To hang up a call, touch .
14
International Call
To dial an international call, touch and hold
to enter "+", then enter the international coun-
try prefix followed by the full phone number
and finally touch .
Emergency Call
If your phone has network coverage, dial
emergency number and touch to make
an emergency call. This works even without a
SIM card and without typing the PIN code.
Answering or Rejecting a Call
When you receive a call, touch .
Slide rightward to answer;•
Slide leftward to reject;•
Slide upward to reject the call by sending a •
preset message.
To mute incoming calls, press the Volume Up/
Down key or turn the phone face down.
Consulting Your Call Memory
You can access your call memory by touching
from the Dial screen to view call history
in categories of Incoming calls , Outgoing
calls , and Missed calls .

15
Contacts 4.
You can view and create contacts on your
phone and synchronize these with your Gmail
contacts or other applications on the web or
on your phone.
Adding a Contact
Touch Application tab on the Home screen,
select Contacts app, then touch the icon in
the contact list to create a new contact.
Contact group list
Touch to display contacts list
option menu
Touch to add contact
Favorites
Contact list
Touch to find contacts in contact list
Importing, Exporting and
Sharing Contacts
From Contacts screen, touch to open the
options menu, touch Import/Export, then
choose to import/export contacts from/to SIM
card, Phone storage, SD card, etc.
To import/export a single contact from/to SIM
card, select the contact you want to import/
export, and touch to confirm.
To import/export all contacts from/to SIM
card, touch Select All and touch to
confirm.
You can share a single contact or contacts
with others by sending the contact's vCard to
them via Bluetooth, Gmail, etc.
Touch a contact you want to share, touch
and Share from the contact details screen,
then select the application to perform this
action.
Synchronizing Contacts in
Multiple Accounts
Contacts, data or other information can
be synchronized from multiple accounts,
depending on the applications installed on
your phone.
16
Text Input5.
Using the Onscreen Keyboard
Onscreen Keyboard Settings
Touch the application tab from the home
screen, select Settings > Language & Input,
touch the Settings icon on the right of
Android Keyboard or Swype. Settings are
available for your selection from the displayed
series.
Adjust the Onscreen Keyboard Orientation
Turn the phone sideways or upright to adjust
the Onscreen Keyboard orientation. You can
also adjust it by changing the settings (Touch
Settings > Display > Auto-rotate Screen).
Android keyboard
Touch to switch between symbol and numeric keyboard
Touch & hold, then select to enter
symbols/emoticons
Touch to enter text or numbers
Touch & hold to show input options; when Wi-Fi or data
connection is on, touch to enter voice input
Touch to switch between "abc/
Abc" mode; Touch & hold to switch
between "abc/ABC" mode
Swype Keyboard
Swype lets you enter a word with one continu-
ous motion: just drag your finger over the
letters in the word.
Place your finger on the key with the first •
letter of the word and drag your finger to
each subsequent letter without lifting your
finger off the screen.
Continue until you have finished the word. •
Lift your finger after the last letter.
If Swype cannot clearly determine your •
word, the word choice window opens.
Select an alternative word from the list.
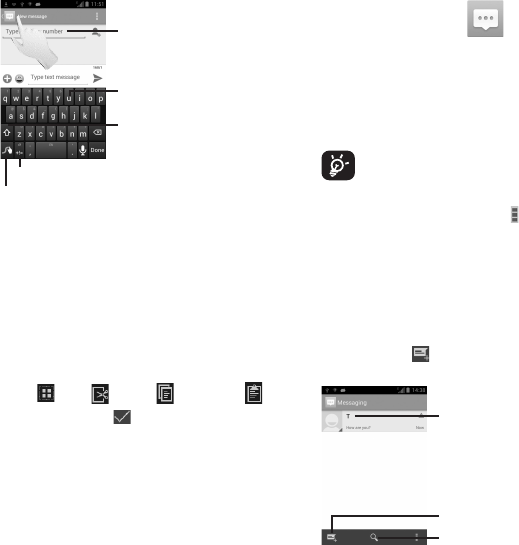
17
Touch and hold to enter multiple
choices mode
Touch to enter text or numbers
Touch to switch "abc/Abc/ABC"
input mode
Touch and hold for Swype settings and additional information
Touch to enter numbers, symbols, etc
Text Editing
You can edit the text you have entered.
Touch and hold or double-tap within the •
text you would like to edit.
Drag the tap to change the highlighted •
selection.
The following options will appear: • Select
all , Cut , Copy and Paste .
Touch the icon • to confirm.
Messaging 6.
You can create, edit and receive SMS and
MMS with this mobile phone.
To access this feature, touch the Application
tab from the Home screen, then select Mes-
saging.
All messages you receive or send
out can only be saved in the phone's
memory. To consult messages stored
in the SIM card, touch from the Mes-
saging screen, then touch Settings >
Text Messages (SMS) > Manage SIM
Messages.
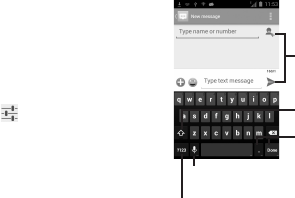
Writing a Message
On the message list screen, touch the new
message icon to write text/multimedia
messages.
Touch to create a new message
Touch to search in all messages
Touch to view the whole message •
thread
Touch & hold message threads •
to delete messages or to add
shortcut

18
Sending a Text Message
Enter the mobile phone number of the recipi-
ent on the Type Person's Name or Number
bar or touch to add recipients, touch the
Type Text Message bar to enter the text of the
message. When finished, touch to send the
text message.
An SMS of more than 160 charac-
ters will be charged as several SMS.
Specific (accented) letters will increase
the size of the SMS, which may cause
multiple SMS to be sent to your recipi-
ent.
Sending a Multimedia Message
MMS enables you to send video clips, images,
photos, animations, slides and audio to other
compatible phones and e-mail addresses.
An SMS will be converted to MMS
automatically when media files (image, video,
audio, slides, etc.) are attached or Subject or
email addresses are added.
Email 7.
Besides your Gmail account, you can also
set-up external POP3 or IMAP email accounts
in your phone.
To access this function, touch Application tab
from the Home screen, then select Email.
An email wizard will guide you through the
steps to set-up an email account.
Enter the email address and password of •
the account you want to set-up.
Touch • Next. If the account you entered is
not provided by your service provider in
the phone, you will be prompted to go to
the email account settings screen to enter
settings manually. Alternatively, you can
touch Manual Setup to directly enter the
incoming and outgoing settings for the
email account you are setting up.
Enter the account name and display name •
in outgoing emails.
To add another email account, you •
can touch and Settings. Touch ADD
ACCOUNT on the right of the title to create
the account.

19
To Create and Send Emails
Touch the icon • from Inbox screen.
Enter recipient(s) email address(es) in • To
field.
If necessary, touch • and touch Add Cc/Bcc
to add a copy or a blind carbon copy to the
message.
Enter the subject and the content of the •
message.
Touch • , touch Attach File to add an
attachment.
Finally, touch • to send.
If you do not want to send the mail right •
away, you can touch and Save Draft or
touch Back key to save a copy.
Hangouts 8.
Google's instant messaging service,
Hangouts, lets you communicate with your
friends whenever they are connected to this
service.
To access this feature and sign in, touch the
Application tab from the Home screen, then
touch Hangouts. All friends added by using
Hangouts from the web or phone will be
displayed in your friends list.
To sign out, touch from the Friends list
screen to display options, then touch Settings
> Sign Out.

20
Getting Connected 9.
To connect to the Internet with this phone,
you can use GPRS/EDGE/3G networks or Wi-
Fi, whichever is most convenient.
Connecting to the Internet
GPRS/EDGE/3G
The first time you turn on your phone with a
SIM card inserted, it will automatically config-
ure network service: GPRS, EDGE or 3G. If the
network is not connected, you can touch
on Quick setting bar.
To check the network connection you are
using, touch Application tab on the Home
screen, then touch Settings > More... >
Mobile Networks > Access Point Names or
Network Operators.
Wi-Fi
Using Wi-Fi, you can connect to the Internet
when your phone is within range of a wireless
network. Wi-Fi can be used on the phone even
without a SIM card inserted.
To Turn Wi-Fi On and Connect to a Wireless
Network
Touch • on Quick setting bar to get to
Settings.
Touch the switch • beside Wi-Fi to
turn on/off Wi-Fi.
Touch • Wi-Fi, detailed information of all
detected Wi-Fi networks is displayed in the
Wi-Fi networks section.
Touch a Wi-Fi network to connect to it. If •
the network you selected is secured, you
are required to enter a password or other
credentials (contact network operator for
details). When finished, touch Connect.
Browser
Using Browser, you can enjoy surfing the
Web.
To access this function, touch Application tab
from Home screen, then touch Browser.
To Go to a Web Page
On Browser screen, touch the URL box at the
top, enter the address of the web page, then
touch to confirm.

21
Connecting to a Computer
With the USB cable, you can transfer media
files and other files between micro SD card/
internal storage and a computer.
Before using MTP or PTP, first mark USB
Debugging.
To access this function, touch • Settings >
About Phone, then touch Build Number 7
times. Now touch Settings > Development
> USB Debugging.
To Connect/Disconnect Your Phone to/From
the Computer:
Use the USB cable that came with your •
phone to connect the phone to a USB
port on your computer. You will receive a
notification that the USB is connected.
If you use mass storage, open the •
Notification panel and touch USB
Connected, then touch Mount in the dialog
that opens to confirm that you want to
transfer files.
If you use MTP or PTP, your phone will be •
automatically connected.
To disconnect (from mass storage):
Unmount the microSD card on your •
computer.
Open the Notification panel and touch • Turn
Off.
For Windows XP or lower operating
systems, you should download and
install Windows Media Player 11 on
your computer from the following link:
http://windows.microsoft.com/en-us/
windows/download-windows-media-
player.
To Locate the Data You Have Transferred or
Downloaded in the Internal Storage:
Touch Application tab from the Home •
screen to open the applications list.
Touch • File Manager.
All data you have downloaded is stored in
File Manager, where you can view media files
(videos, photos, music and others), rename
files, install applications on your phone, etc.
22
Sharing Your Phone's Mobile
Data Connection
You can share your phone's mobile data
connection with a single computer via a USB
cable (USB tethering) or with up to eight
devices at once by turning your phone into a
portable Wi-Fi hotspot.
To Turn on USB Internet Portable Wi-Fi
Hotspot
Touch • on Quick setting bar to get to
Settings.
Touch • More... > Portable Hotspot.
Mark the checkbox of • USB Internet or turn
on Wi-Fi Hotspot to activate this function.
These functions may incur additional
network charges from your network op-
erator. Extra fees may also be charged
in roaming areas. You can check data
usage by touching Settings > Data Us-
age.
Find My Location Using 10.
GPS Satellites
To activate your phone’s global positioning
system (GPS) satellite receiver:
Touch • on Quick setting bar to get to
Settings.
Touch • Location Services.
Mark the checkbox of • Access to My
Location, then the Switch besides
GPS Satellites will be automatically on.
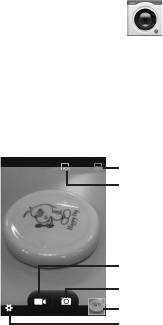
Find your location by opening Maps:
Your location
23
Use your phone’s GPS satellite receiver to
pinpoint your location within an accuracy as
close as several meters ("street level"). The
process of accessing the GPS satellite and
setting your phone's precise location for
the first time will require up to 5 minutes.
You will need to stand in a place with a clear
view of the sky and avoid moving. After this,
GPS will only need 20-40 seconds to identify
your precise location. Then you can start the
navigation to find the target location.
Camera 11.
Your mobile phone is fitted with a Camera for
taking photos and shooting videos.
Before using the Camera, please be sure to
open the protective lens cover to avoid it af-
fecting your picture quality.
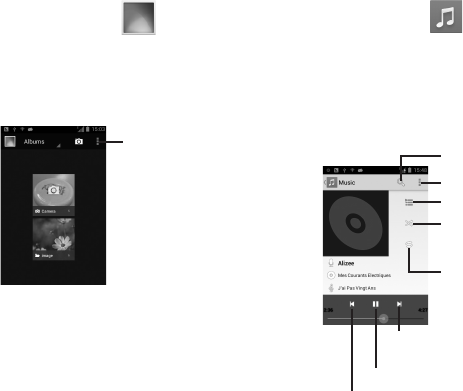
Switch to HDR mode
Switch to normal mode
View pictures/videos you have taken
Touch to take a photo
Touch to shoot a video
Touch to settings
24
Gallery 12.
The Gallery acts as a media player for you to
view photos and playback videos. In addition,
a set of further operations to pictures and
videos are available for your choice.
Further operations
You can work with pictures by editing them,
sharing them with friends, setting them as a
contact photo or wallpaper, etc.
Music 13.
Using this menu, you can play music files
stored on your phone or microSD card.
You will find four categories in which all songs
are classified: Artists, Albums, Songs and
Playlists. Slide left and right to view all.
Search music
Further operations
Touch to show the displayed song
Touch to play the current playlist in
shuffle mode (tracks are played in
random order)
Touch to select repeat mode: Re-
peating all songs, Repeating current
song, or Repeat is off
Touch to skip to the next track in the album,
playlist, or shuffle
Touch to pause/resume playback
Touch to skip to the previous track in the album, playlist,
or shuffle

25
YouTube 14.
YouTube is an online video-sharing service
where the user can download, share and view
videos. It supports a streaming function that
allows you to start watching videos almost
as soon as they begin downloading from the
Internet.
As an online video service, your phone
must have a network connection to
access YouTube.
All videos in YouTube are grouped into
several categories, like Most Popular, Most
Discussed, Featured Videos, etc.
By touching from the YouTube screen,
you can set General settings and Search
settings for YouTube. For details about these
features, please visit the YouTube website:
www.YouTube.com
Calendar 15.
Use the Calendar to keep track of important
meetings, appointments, etc.
You can display the Calendar in daily, weekly,
monthly, or agenda view.
To Create New Events
You can add new events from any Calendar
view.
Touch the • icon to New Event.
Fill in all required information for this new •
event. If it is a whole-day event, you can
select All Day.
When finished, touch • DONE from the top of
the screen.
26
Time 16.
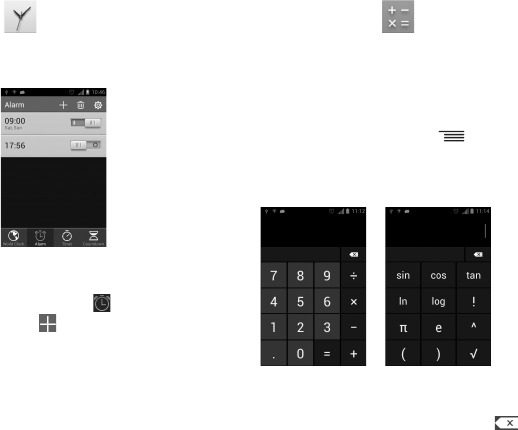
World Clock, Alarm, Timer, Countdown are
available within this menu.
To Set an Alarm
From the Time screen, touch to enter the
Alarm screen, touch to add a new alarm.
When finished, touch OK to confirm.
Calculator 17.
With the Calculator, you can solve many
mathematical problems.
There are two panels available: Basic panel
and Advanced panel.
To switch between panels, touch from the
basic panel to open the option menu and
touch Advanced Panel; or under auto rotation
mode, rotate screen automatically to switch.
Enter a number and the arithmetic operation
to be performed, enter the, second number,
then touch "=" to display the result. Touch
to delete digits one by one, touch and hold to
delete all at one time.

27
File Manager 18.
File Manager displays all data stored on both
microSD card and phone storage, including
applications, media files such as videos, pic-
tures or audios you have captured; other data
transferred via Bluetooth, USB cable, etc.
When you download an application from a
PC to your microSD card, you can locate the
application on File Manager, then touch it to
install it in your phone.
File Manager allows you to perform and be
really efficient with the following common
operations: create a (sub) folder, open a
folder/file, view, rename, move, copy, delete,
play, share, etc.
Setup Wizard 19.
To access this function, touch the Application
tab from the Home screen, then touch Setup
Wizard.
Setup Wizard helps set up your phone in
multiple ways: language, input method,
mobile data connection, account setup and
synchronization, system update, etc. This will
also be performed the first time you power on
your phone.

28
FM Radio 20.
Your phone is equipped with a radio
(1) . You
can use the application as a traditional radio
with saved channels or with parallel visual
information related to the radio program on
the display if you tune to stations that offer
Visual Radio service. You can listen to it while
running other applications.
To use it, you must plug in your
headset, which works as an antenna
connected with your phone.
(1) The quality of the radio depends on the cov-
erage of the radio station in that particular
area.
Data Backup 21.
This phone enables you to back up your
phone’s settings and other application data to
Google Servers, with your Google Account.
If you replace your phone, the settings and
data you’ve backed up are restored onto the
new phone the first time you sign in with your
Google Account.
To activate this function:
Touch • on Quick setting bar to get to
Settings.
Touch • Backup and Reset > Back Up My
Data to mark the checkbox.
Once activated, a wide variety of settings and
data are backed up, including your Wi-Fi pass-
words, bookmarks, a list of the applications
you’ve installed, the words you’ve added to
the dictionary used by the onscreen keyboard,
and most of the settings configured within
the Settings application. If you deactivated this
option, settings are no longer backed up, and
any existing backups are deleted from Google
Servers.

29
Factory Data Reset22.
To activate factory data reset:
Touch • on Quick setting bar to get to
Settings.
Touch • Backup and Reset > Factory Data
Reset.
Touch • Reset Phone > Erase Everything.
Phone reset will erase all of your personal
data from internal phone storage, including
information about your Google Account, any
other accounts, your system and application
settings, and any downloaded applications.
Resetting the phone does not erase any
system software updates you’ve downloaded.
If you reset the phone in this way, you’re
prompted to re-enter the same kind of infor-
mation as when you first started Android.
When you are unable to power on your
cellphone, there is another way to perform a
factory data reset by pressing the Volume Up
key and the Power key simultaneously until
the screen lights up.
Other Applications 23. (1)
The previous applications in this section are
preinstalled on your phone.
To read a brief introduction of the preinstalled
3rd party applications, please refer to the
leaflet provided with the phone. You can also
download thousands of 3rd party applications
by going to Android Market on your phone.
(1) Application availability depends on country
and operator.

30
Making the Most of Your 24.
Phone
FOTA Upgrade
Using FOTA Upgrade tool you can update your
phone's software.
To access System Updates, please access
Settings > About Phone > AT&T software
Updates. Or you can directly touch from
the APPS. Touch Check for Updates, and the
phone will search for the latest software. If
you want to update the system, please touch
the button Download, after it's done please
touch Install to complete the upgrade. Now
your phone's software will be the latest ver-
sion.
You should turn on data connection before
searching for updates. Settings for auto-check
intervals and reminders about upgrades are
also available once you restart the phone.
If you have chosen auto-check, when the
system discovers the new version, the icon
will appear in the status bar. Touch the notifi-
cation to access the System Updates directly.
During FOTA downloading or updating,
to avoid errors in locating the correct
update packages, do not change your
default storage location.
Safety and Use25.
We recommend that you read this chapter
carefully before using your mobile phone.
The manufacturer disclaims any liability for
damage, which may result as a consequence
of improper use or use contrary to the instruc-
tions contained herein.
TRAFFIC SAFETY:•
Given that studies show that using a mobile
phone while driving a vehicle constitutes a
real risk, even when the hands-free kit is used
(car kit, headset...), drivers are requested to
refrain from using their mobile phone when
the vehicle is not parked. Check the laws and
regulations on the use of wireless mobile
phones and their accessories in the areas
where you drive. Always obey them. The
use of these devices may be prohibited or
restricted in certain areas.
When driving, do not use your mobile phone
and headphone to listen to music or to the
radio. Using a headphone can be dangerous
and forbidden in some areas.
When switched on, your mobile phone emits
electromagnetic waves that can interfere with
the vehicle’s electronic systems such as ABS
anti-lock brakes or airbags. To ensure that
there is no problem:
31
- do not place your mobile phone on top of
the dashboard or within an airbag deploy-
ment area,
- check with your car dealer or the car
manufacturer to make sure that the car’s
electronic devices are shielded from mobile
phone RF energy.
CONDITIONS OF USE:•
You are advised to switch off the mobile
phone from time to time to optimize its
performance.
Remember to abide by local authority rules of
mobile phone use on aircrafts.
Operational Warnings: Obey all posted signs
when using mobile devices in public areas.
Follow Instructions to Avoid Interference
Problems: Turn off your mobile device in any
location where posted notices instruct you
to do so. In an aircraft, turn off your mobile
device whenever instructed to do so by airline
staff. If your mobile device offers an airplane
mode or similar feature, consult airline staff
about using it in flight.
Switch the mobile phone off when you are
in health care facilities, except in designated
areas. As with many other types of equipment
now in regular use, mobile phones can inter-
fere with other electrical or electronic devices,
or equipment using radio frequency.
Switch the mobile phone off when you are
near gas or flammable liquids. Strictly obey
all signs and instructions posted in a fuel
depot, gas station, or chemical plant, or in any
potentially explosive atmosphere.
When the mobile phone is switched on, it
should be kept at least 15 cm from any medi-
cal device such as a pacemaker, a hearing aid
or insulin pump. In particular when using the
mobile phone you should hold it against the
ear on the opposite side to the device, if any.
Read and follow the directions from the manu-
facturer of your implantable medical device.
If you have any questions about using your
mobile device with your implantable medical
device, consult your healthcare provider.
To avoid hearing impairment, answer the call
before holding your mobile phone to your ear.
Also move the handset away from your ear
while using the “hands-free” option because
the amplified volume might cause hearing
damage.
It is recommended to have proper supervision
while small children use your mobile phone.
When replacing the cover please note that
your mobile phone may contain substances
that could create an allergic reaction.
Always handle your mobile phone with care
and keep it in a clean and dust-free place.

32
Do not allow your mobile phone to be exposed
to adverse weather or environmental condi-
tions (moisture, humidity, rain, infiltration of
liquids, dust, sea air, etc.). The manufacturer’s
recommended operating temperature range is
14°F (-10°C) to 131°F (+55°C) (the max value
depends on device, materials and housing
paint/texture).
Over 131°F (55°C) the legibility of the mobile
phone’s display may be impaired, though this
is temporary and not serious.
Do not open or attempt to repair your mobile
phone yourself.
Do not drop, throw or try to bend your mobile
phone.
Do not paint it.
Use only batteries, battery chargers, and
accessories which are recommended by
TCT Mobile Limited and its affiliates and are
compatible with your mobile phone model.
TCT Mobile Limited and its affiliates disclaim
any liability for damage caused by the use of
other chargers or batteries.
Your mobile phone should not be disposed
of in a municipal waste. Please check local
regulations for disposal of electronic products.
Remember to make back-up copies or keep
a written record of all important information
stored in your mobile phone.
Prolonged exposure to music at full vol-
ume using the music player may damage
your hearing. Set your mobile phone’s
volume to it’s lowest setting prior to
inserting headphones in your ears and
adjust the volume to your preference.
Only use headphones that are recom-
mended by TCT Mobile Limited and it’s
affiliates.
PRIVACY:•
Please note that you must respect the laws
and regulations in force in your jurisdiction or
other jurisdiction(s) where you will use your
mobile phone regarding taking photographs
and recording sounds with your mobile
phone. Pursuant to such laws and regulations,
it may be strictly forbidden to take photo-
graphs and/or to record the voices of other
people or any of their personal attributes, and
reproduce or distribute them, as this may be
considered to be an invasion of privacy.
It is the user’s sole responsibility to ensure
that prior authorization be obtained, if neces-
sary, in order to record private or confidential
conversations or take a photograph of another
person; the manufacturer, the seller or vendor
of your mobile phone (including the operator)
disclaim any liability which may result from
the improper use of the mobile phone.

33
BATTERY AND ACCESSORIES:•
Before removing the battery from your mobile
phone, please make sure that the mobile
phone is switched off.
Observe the following precautions for battery
use:
- Do not attempt to open the battery (due to
the risk of toxic fumes and burns).
- Do not puncture, disassemble or cause a
short-circuit in a battery,
- Do not burn or dispose of a used battery
in the garbage or store it at temperatures
above 140°F (60°C).
Batteries must be disposed of in accordance
with locally applicable environmental regula-
tions. Only use the battery for the purpose for
which it was designed. Never use damaged
batteries or those not recommended by TCT
Mobile Limited and/or its affiliates.
This symbol on your mobile phone,
the battery and the accessories means
that these products must be taken to
collection points at the end of their
life:
- Municipal waste disposal centers
with specific bins for these items of
equipment
- Collection bins at points of sale.
They will then be recycled, preventing sub-
stances being disposed of in the environment,
so that their components can be reused.
In European Union Countries:
These collection points are accessible free of
charge. All products with this sign must be
brought to these collection points.
In Non European Union Jurisdictions:
Items of equipment with this symbol are not
be thrown into ordinary bins if your jurisdic-
tion or your region has suitable recycling
and collection facilities; instead they are to
be taken to collection points for them to be
recycled.
In the United States you may learn more about
CTIA’s Recycling Program at www.recy-
clewirelessphones.com
CAUTION: RISK OF EXPLOSION IF BATTERY
IS REPLACED BY AN INCORRECT TYPE.
DISPOSE OF USED BATTERIES ACCORDING
TO THE INSTRUCTIONS.
CHARGERS
Home A.C./Travel chargers will operate within
the temperature range of: 32°F (0°C) to 104°F
(40°C).
The chargers designed for your mobile phone
meet with the standard for safety of informa-
tion technology equipment and office equip-
ment use. Due to different applicable electrical
34
specifications, a charger you purchased in one
jurisdiction may not work in another jurisdic-
tion. They should be used for this purpose
only.
Characteristics of power supply (depending
on the country):
Travel charger: Input: 100-240 V, 50/60 Hz,
150 mA
Output: 5 V, 1000 mA
Battery: Lithium 1400 mAh
RADIO WAVES:
THIS MOBILE PHONE MEETS THE GOVERN-
MENT’S REQUIREMENTS FOR EXPOSURE TO
RADIO WAVES.
Your mobile phone is a radio transmitter and
receiver. It is designed and manufactured not
to exceed the emission limits for exposure
to radio-frequency (RF) energy. These limits
are part of comprehensive guidelines and
establish permitted levels of RF energy for
the general population. The guidelines are
based on standards that were developed by
independent scientific organizations through
periodic and thorough evaluation of scientific
studies. These guidelines include a substantial
safety margin designed to ensure the safety of
all persons, regardless of age and health.
The exposure standard for mobile phones
employs a unit of measurement known as the
Specific Absorption Rate, or SAR. The SAR
limit set by public authorities such as the
Federal Communications Commission of the
US Government (FCC), or by Industry Canada,
is 1.6 W/Kg averaged over 1 gram of body
tissue. Tests for SAR are conducted using
standard operating positions with the mobile
phone transmitting at its highest certified
power level in all tested frequency bands.
Although the SAR is determined at the highest
certified power level, the actual SAR level of
the mobile phone while operating can be well
below the maximum value. This is because the
mobile phone is designed to operate at multi-
ple power levels so as to use only the power
required to reach the network. In general,
the closer you are to a wireless base station
antenna, the lower the power output of the
mobile phone. Before a mobile phone model
is available for sale to the public, compliance
with national regulations and standards must
be shown.
The highest SAR value for this model mobile
phone when tested is 1.158 W/Kg for use at
the ear and 1.174 W/Kg for use close to the
body.
While there may be differences between the
SAR levels of various mobile phones and at
various positions, they all meet the govern-
ment requirement for RF exposure. For
body-worn operation, the mobile phone meets
FCC RF exposure guidelines provided that it is
35
used with a non-metallic accessory with the
handset at least 10 mm from the body. Use of
other accessories may not ensure compliance
with FCC RF exposure guidelines.
Additional information on SAR can be found
on the Cellular Telecommunications & Internet
Association (CTIA) Web site: http://www.
phonefacts.net
The World Health Organization (WHO) consid-
ers that present scientific information does not
indicate the need for any special precautions
for use of mobile phones. If individuals are
concerned, they might choose to limit their
own or their children’s RF exposure by limit-
ing the length of calls, or using “hands-free”
devices to keep mobile phones away from the
head and body. (fact sheet n°193). Additional
WHO information about electromagnetic fields
and public health are available on the follow-
ing website: http://www.who.int/peh-emf.
Note: This equipment has been tested and
found to comply with the limits for a Class B
digital device pursuant to part 15 of the FCC
Rules. These limits are designed to provide
reasonable protection against harmful interfer-
ence in a residential installation. This equip-
ment generates, uses and can radiate radio
frequency energy and, if not installed and
used in accordance with the instructions, may
cause harmful interference to radio commu-
nications. However, there is no guarantee that
interference to radio or television reception,
which can be determined by turning the equip-
ment off and on, the user is encouraged to try
to correct the interference by one or more of
the following measures:
- Reorient or relocate the receiving antenna.
- Increase the separation between the equip-
ment and receiver.
- Connect the equipment into an outlet on
a circuit different from that to which the
receiver is connected.
- Consult the dealer or an experienced radio/
TV technician for help.
Changes or modifications not expressly ap-
proved by the party responsible for compli-
ance could void the user’s authority to operate
the equipment.
For the receiver devices associated with the
operation of a licensed radio service (e.g. FM
broadcast), they bear the following statement:
This device complies with Part 15 of the FCC
Rules. Operation is subject to the following
two conditions:
(1) this device may not cause harmful interfer-
ence
(2) this device must accept any interference
received, including interference that may
cause undesired operation.

36
Your mobile phone is equipped with a built-in
antenna. For optimal operation, you should
avoid touching it or degrading it.
As mobile devices offer a range of functions,
they can be used in positions other than
against your ear. In such circumstances the
device will be compliant with the guidelines
when used with headset or usb data cable. If
you are using another accessory ensure that
whatever product is used is free of any metal
and that it positions the mobile phone at least
10 mm away from the body.
LICENSE•
microSD Logo is a trademark.
The Bluetooth word mark
and logos are owned by the
Bluetooth SIG, Inc. and any use
of such marks by TCT Mobile
Limited and its affiliates is under
license. Other trademarks and
trade names are those of their
respective owners.
4015T Bluetooth QD ID
B021282
The Wi-Fi Logo is a certification
mark of the Wi-Fi Alliance.
Google, the Google logo,
Android, the Android logo,
Google Search TM, Google
MapsTM, Gmail TM, YouTube,
Google Play Store, Google
Latitude TM and Hangouts TM are
trademarks of Google Inc.
37
The Android robot is reproduced or modified
from work created and shared by Google and
used according to terms described in the
Creative Commons 3.0 Attribution License
(the text will show when you touch and hold
Google Legal in Settings > About Phone >
Legal Information) (1).
You have purchased a product which uses
the open source (http://opensource.org/)
programs mtd, msdosfs, netfilter/iptables and
initrd in object code and other open source
programs licensed under the GNU General
Public License and Apache License.
We will provide you with a complete copy of
the corresponding source codes upon request
within a period of three years from the distri-
bution of the product by TCT.
You may download the source codes from
http://sourceforge.net/projects/alcatel/files/.
The provision of the source code is free of
charge from internet.
(1) It may not available according to the coun-
tries.
Hearing Aid Compatibility
This phone has been tested and rated for use
with hearing aids for some of the wireless
technologies that it uses. However, there may
be some newer wireless technologies used in
this phone that have not been tested yet for
use with hearing aids. It is important to try the
different features of this phone thoroughly and
in different locations, using your hearing aid
or cochlear implant, to determine if you hear
any interfering noise. Consult your service
provider or the manufacturer of this phone for
information on hearing aid compatibility. If
you have questions about return or exchange
policies, consult your service provider or
phone retailer. Your telephone is rated: “For
Hearing Aid", to assist hearing device users in
finding phones that may be compatible with
their hearing devices.
Your telephone is rated: “For Hearing Aid", to
assist hearing device users in finding phones
that may be compatible with their hearing
devices.
This device is HAC M3/T3 compatible.
For more information please refer to "Hearing
Aid Compatibility with Mobile Phones" leaflet
or visit our website www.tctmobile.com
38
General Information26.
Website:• www.alcatelonetouch.com
Facebook: • http://www.facebook.com/
alcatelonetouchusa
Twitter: • http://www.twitter.com/
alcatel1touch
Hot Line Number:• In the United States, call
877-702-3444 for technical support.
On our Internet site, you will find our FAQ
(Frequently Asked Questions) section. You can
also contact us by e-mail to ask any questions
you may have.
An electronic version of this user guide is avail-
able in English and other languages according
to availability on our server: www.alcatelone-
touch.com
Your mobile phone is a transceiver
that operates on GSM in quad-band
(850/900/1800/1900 MHz) bands or UMTS in
dual-band (850/1900 MHz).
Protection Against Theft (1)
Your mobile phone is identified by an IMEI
(mobile phone serial number) shown on the
packaging label and in the product’s memory.
We recommend that you note the number the
first time you use your mobile phone by enter-
ing *#06# and keep it in a safe place. It may
be requested by the police or your operator if
your mobile phone is stolen.
Disclaimer
There may be certain differences between
the user manual description and the mobile
phone’s operation, depending on the software
release of your mobile phone or specific
operator services.
TCT Mobile shall not be held legally respon-
sible for such differences, if any, nor for their
potential consequences, which responsibility
shall be borne by the operator exclusively.
(1) Contact your network operator for service
availability.
39
Warranty27.
12 MONTH LIMITED WARRANTY
Quality One Wireless, LLC (the "Company")
warrants to the original retail purchaser
of this cellular handset or wireless device
(Product), that should this Product or any part
thereof during normal consumer usage and
conditions, be proven defective in material or
workmanship that results in the Product's fail-
ure within the first twelve (12) month period
from the date of purchase (proof of purchase
required), such defect(s) will be repaired or
replaced (with new or rebuilt parts) at the
Company’s option, without charge for parts or
labor directly related to the defect(s).
The antenna, keypad, display, rechargeable
battery and battery charger, if included with
the Product, are similarly warranted for twelve
(12) months from the date of purchase.
This Warranty extends only to consumers who
purchase the product in the United States or
Canada and it is not transferable or assign-
able.
This Warranty does not apply to:
(a) Product subjected to abnormal use or
conditions, accident, mishandling, neglect,
unauthorized alteration, misuse, improper
installation or repair or improper storage;
(b) Product whose mechanical serial number
or electronic serial number has been
removed, altered or defaced;
(c) Damage from exposure to moisture,
humidity, excessive temperatures or
extreme environmental conditions;
(d) Damage resulting from connection to, or
use of any accessory or other product not
approved or authorized by the Company;
(e) Defects in appearance, cosmetic,
decorative or structural items such as
framing and non-operative parts;
(f) Product damaged from external causes
such as fire, flooding, dirt, sand, weather
conditions, battery leakage, blown fuse,
theft or improper usage of any electrical
source;
g) Product subjected to unauthorized
modifications to the software of the
Product or to the Product itself;
(h) Product subjected to the unauthorized
opening or repair of the Product;
40
(i) Product subjected to hacking, password-
mining, jail breaking, the unlocking of the
boot loader using the fast boot program or
the tampering with or short-circuiting of
the battery;
(j) Product that has been modified to alter
functionality or capability of the Product
without the written permission of the
Company.
The Company disclaims liability for removal
or reinstallation of the Product, for geographic
coverage, for inadequate signal reception by
the antenna or for communications range or
operation of the cellular system as a whole.
When sending your wireless device to the
Company for repair or service, please note
that any personal data or software stored on
the Product may be inadvertently erased or al-
tered. Therefore, we strongly recommend you
make a back up copy of all data and software
contained on your Product before submitting
it for repair or service. This includes all con-
tact lists, downloads (i.e. third-party software
applications, ringtones, games and graphics)
and any other data added to your Product. In
addition, if your Product utilizes a SIM or Mul-
timedia card, please remove the card before
submitting the Product and store for later use
when your Product is returned.
The Company is not responsible for and does
not guarantee restoration of any third-party
software, personal information or memory
data contained in, stored on, or integrated
with any other wireless device, whether under
warranty or not, returned to the Company for
repair or service.
To obtain repairs or replacement within the
terms of this Warranty, the Product should
be delivered with proof of Warranty cover-
age (e.g. dated bill of sale), the consumer’s
return address, daytime phone number and/
or fax number and complete description of
the problem, transportation prepaid, to the
Company at the address shown below or to
the place of purchase for repair or replace-
ment processing. In addition, for reference to
an authorized Warranty station in your area,
you may telephone in the United States (800)
229-1235.
THE EXTENT OF THE COMPANY’S LIABILITY
UNDER THIS WARRANTY IS LIMITED TO
THE REPAIR OR REPLACEMENT PROVIDED
ABOVE AND, IN NO EVENT, SHALL THE
COMPANY’S LIABILITY EXCEED THE PUR-
CHASE PRICE PAID BY PURCHASER FOR THE
PRODUCT.
41
ANY IMPLIED WARRANTIES, INCLUDING
ANY IMPLIED WARRANTY OF MERCHANT-
ABILITY OR FITNESS FOR A PARTICULAR
PURPOSE, SHALL BE LIMITED TO THE
DURATION OF THIS WRITTEN WARRANTY.
ANY ACTION FOR BREACH OF ANY WAR-
RANTY MUST BE BROUGHT WITHIN A
PERIOD OF 18 MONTHS FROM DATE OF
ORIGINAL PURCHASE. IN NO CASE SHALL
THE COMPANY BE LIABLE FOR AN SPECIAL
CONSEQUENTIAL OR INCIDENTAL DAMAGES
FOR BREACH OF THIS OR ANY OTHER WAR-
RANTY, EXPRESS OR IMPLIED, WHATSO-
EVER. THE COMPANY SHALL NOT BE LIABLE
FOR THE DELAY IN RENDERING SERVICE
UNDER THIS WARRANTY OR LOSS OF USE
DURING THE TIME THE PRODUCT IS BEING
REPAIRED OR REPLACED.
No person or representative is authorized to
assume for the Company any liability other
than expressed herein in connection with the
sale of this product.
Some states or provinces do not allow limita-
tions on how long an implied warranty lasts
or the exclusion or limitation of incidental or
consequential damage so the above limitation
or exclusions may not apply to you. This War-
ranty gives you specific legal rights, and you
may also have other rights, which vary from
state to state or province to province.
IN USA: Quality One Wireless, LLC.
555 Wireless Blvd.
Hauppauge, NY 11788
(800) 229-1235