TCT Mobile 471 HSDPA/HSUPA/HSPA+/UMTS Bi bands / GSM quad bands/LTE 2 bands mobile phone User Manual Rio 4G TF A845L USA EN UM 20140509 for FCC 1 10
TCT Mobile Limited HSDPA/HSUPA/HSPA+/UMTS Bi bands / GSM quad bands/LTE 2 bands mobile phone Rio 4G TF A845L USA EN UM 20140509 for FCC 1 10
Contents
- 1. Rio 4G_TF_A845L_USA EN_UM_20140509_for FCC 1-10
- 2. Rio 4G_TF_A845L_USA EN_UM_20140509_for FCC-11-65
Rio 4G_TF_A845L_USA EN_UM_20140509_for FCC 1-10
For more information about how to use the cellphone, please go to www.
alcatelonetouch.com to download complete user manual. Moreover, from
the website you can also consult FAQ, realize software upgrade, etc.
1
Table of contents
1 Your mobile ��������������������������������������������������������������������������3
1.1 Keys and connectors ........................................................3
1.2 Getting started .................................................................4
1.3 Home screen ...................................................................6
2 Text input ���������������������������������������������������������������������������11
2.1 Using Onscreen Keyboard ..............................................11
2.2 Text editing ....................................................................12
3 Phone call, Call log and Contacts �������������������������������������12
3.1 Phone ............................................................................12
3.2 Call log ..........................................................................15
3.3 Contacts ........................................................................15
4 Messaging, Gmail/Email, Google Hangouts ����������������������19
4.1 Messaging .....................................................................19
4.2 Gmail/Email ...................................................................22
4.3 Google Hangouts ............................................................25
5 Calendar & Alarm clock & Calculator �������������������������������26
5.1 Calendar ........................................................................26
5.2 Time ..............................................................................27
5.3 Calculator ......................................................................28
6 Getting connected��������������������������������������������������������������29
6.1 Connecting to the Internet ..............................................29
6.2 Browser .........................................................................30
6.3 Connecting to Bluetooth devices ....................................34
6.4 Connecting to a computer ..............................................35
6.5 Connecting to virtual private networks ...........................35
7 Google Play Store ��������������������������������������������������������������36
7.1 Locate the item you want to download and install .........36
7.2 Download and install .....................................................37
7.3 Manage your downloads ................................................38
8 Multimedia applications ����������������������������������������������������39
8.1 Camera/Camcorder ........................................................39
8.2 Gallery ...........................................................................40
8.3 YouTube .........................................................................41
8.4 Music .............................................................................41
9 Google Maps ����������������������������������������������������������������������43
9.1 Get My Location .............................................................43
9.2 Search for a location ......................................................43
9.3 Get driving, public transport or walking directions..........44
9.4 Share a location .............................................................44
9.5 Map view .......................................................................44
10 Others ���������������������������������������������������������������������������������45
10.1 File Manager ..................................................................45
10.2 Sound Recorder .............................................................45
10.3 Video .............................................................................45
10.4 Radio .............................................................................46
10.5 Flashlight .......................................................................46
10.6 Notes .............................................................................46
10.7 Setup Wizard .................................................................47
10.8 Help Me .........................................................................47
10.9 Other applications ..........................................................47

2
11 Settings ������������������������������������������������������������������������������47
11.1 Wireless & network ........................................................47
11.2 Device ...........................................................................48
11.3 Personal .........................................................................50
11.4 Add account...................................................................53
11.5 System ..........................................................................53
12 Making the most of your phone ����������������������������������������55
12.1 FOTA Upgrade ................................................................55
Safety and use �����������������������������������������������������������������������������55
www.sar-tick.com
This product meets applicable national SAR
limits of 1.6 W/kg. The specific maximum SAR
values can be found on page 62 of this user
guide.
When carrying the product or using it while worn
on your body, either use an approved accessory
such as a holster or otherwise maintain a
distance of 1.0 cm from the body to ensure
compliance with RF exposure requirements.
Note that the product may be transmitting even
if you are not making a phone call.
BC
3
1 Your mobile �����������������������
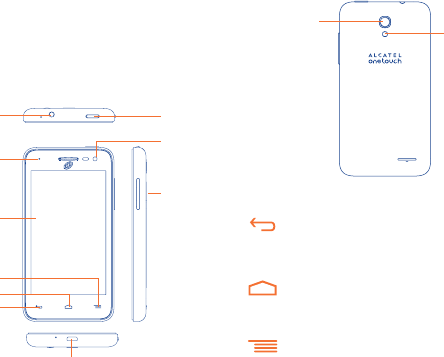
1�1 Keys and connectors
Micro-USB Connector
Front camera
LED indicator
Headset connector Power key
Home key
Touch screen
Back key
Menu key
Volume key
Camera
Camera Flash/
Flashlight
Back key
• Touch to go back to the previous screen, or to close a dialog
box, options menu, the notification panel, etc.
Home key
• From any application or screen, touch to return to the
Home screen.
Menu key
• Touch to access settings options.
• Touch and hold to open a list of thumbnail images of apps
you've worked with recently.
These keys are visible when the screen lights up.
4
Power key
• Press: Lock the screen/Light up the screen.
• Press and hold: Show the pop-up menu to select from Power
off/Restart/Airplane mode/Quick start.
• Press the Power key for more than 9 seconds to restart.
• Press the Power key and Volume up key to reset.
• Press the Power key and Volume down key to capture a
screenshot.
Volume Keys
• In call mode, adjusts the earpiece or headset volume.
• In Music/Video/Streaming mode, adjusts the media volume.
• In general mode, adjusts the ringtone volume.
• Mutes the ringtone of an incoming call.
1�2 Getting started
1�2�1 Set-up
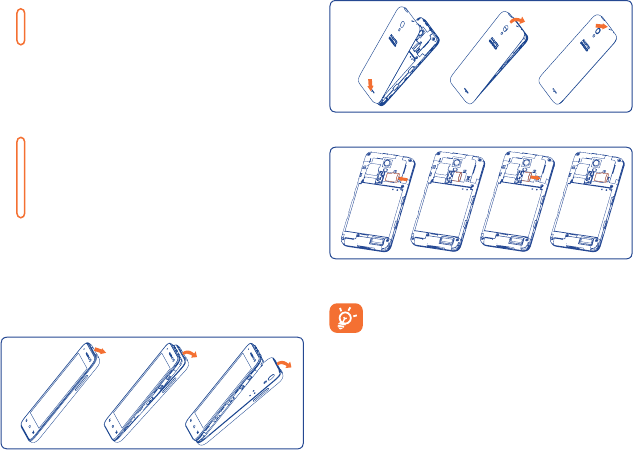
Removing or installing the back cover
Installing and removing the microSD card
Insert the microSD card with golden contact facing downwards into the slot.
Slide it out to remove the microSD card.
To avoid data loss and SD card damage, before removing the SD
card, please ensure that the SD card is unmounted (Settings\
Storage\Unmount SD card).
5
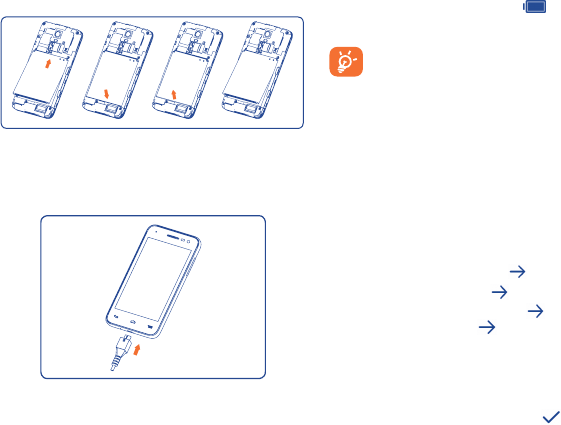
Installing or removing the battery
• To install, insert and click the battery into place, then close the phone cover.
• To remove the battery, first power the phone off. Then unclip the cover
and remove the battery.
Charging the battery
Connect the battery charger to your phone and main socket respectively, the
LED indicator will light while charging.
• Make sure the battery is correctly inserted before connecting the charger.
• When using your telephone for the first time, charge the battery fully
(approximately 3 hours).
You are advised to fully charge the battery ( ). Charging status is
indicated by the percentage on screen while the phone is powered off. The
percentage increases as the phone is charged.
To reduce power consumption and energy waste when the
battery is fully charged, disconnect your charger from the plug;
switch off Wi-Fi, GPS, Bluetooth or background-running
applications when not in use; reduce the backlight time, etc.
1�2�2 Power on your phone
Hold down the Power key until the phone powers on, unlock your phone
(Slide, PIN, Password, Pattern or Face unlock) if necessary and confirm. The
Home screen is displayed.
If you do not know your PIN code or if you have forgotten it, contact your
service provider. Do not leave your PIN code with your phone. Store this
information in a safe place when not in use.
Set up your phone for the first time
The first time you power on the phone, you should set the following options:
• Select the phone's language, then touch .
• Select the input method, then touch .
• Set your Mobile Data Connection, then touch .
• Set your Date & time, then touch .
• Setup Google Account: If you want to set your Google Account, touch
Setup Now to set. If you have a Google Account, touch Existing, then
enter your Email address and password. If you forget your password, you
can go to http://www.google.com to retrieve it. If you don’t own a Google
Account, you are prompted to create one by touching New.
• The screen of Setup complete will display, touch to confirm.
Even if no SIM card is installed, your phone will still power on and you will
be able to connect to a Wi-Fi network, (refer to section “6�1�2 Wi-Fi”), sign
into your Google account and to use some features.
6
1�2�3 Power off your phone
Hold down the Power key from the Home screen until the phone options
appear, select Power off.
1�3 Home screen
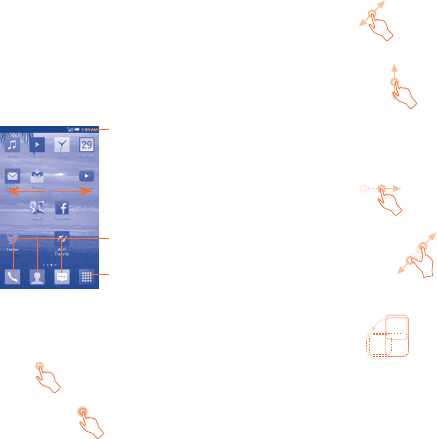
You can bring all the items (applications, shortcuts, folders and widgets) you
love or use most frequently to your Home screen for quick access. Touch the
Home key to switch to the Home screen.
Status bar
• Status/Notification indicators
• Touch and drag down to open the
notification panel.
Favourite tray applications
• Touch to enter the application.
• Touch and hold to move or change applications.
Application tab
• Touch to open main menu.
The Home screen is provided in an extended format to allow more space for
adding applications, shortcuts etc. Slide the Home screen horizontally left
and right to get a complete view.
1�3�1 Using the touchscreen
Touch
To access an application, touch it with your finger.
Touch and Hold
To enter the available options for an item, touch and hold the item. For
example, select a contact in Contacts, touch and hold this contact, an
options list will then appear on screen.
Drag
Place your finger on the screen to drag an object to another location.
Slide/Swipe
Slide the screen to scroll up and down the applications, images, web
pages… at your convenience. You could slide the screen horizontally too.
The device also supports one finger zooming in the Messaging, Browser,
Email, Camera and Gallery functions. Double tap the screen then slide with
one finger to zoom in/out.
Flick
Similar to swiping, but flicking makes it move quicker.
Pinch/Spread
Place your fingers of one hand on the screen surface and draw them apart
or together to scale an element on the screen.
Rotate
Automatically change the screen orientation from portrait to landscape by
turning the phone sideways to have a better screen view.
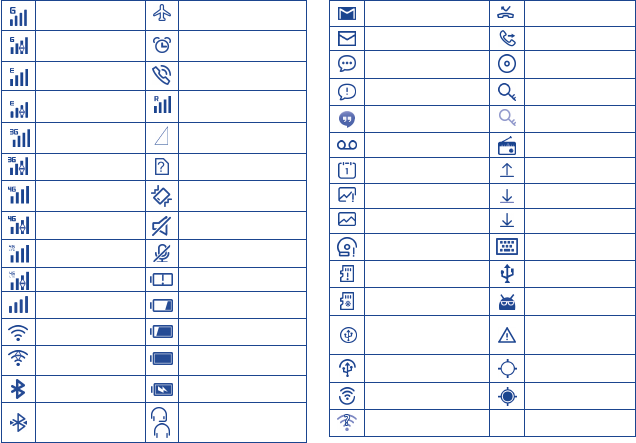
1�3�2 Status bar
From the status bar, you can view both phone status and notification
information.
7
Status icons
GPRS connected Airplane mode
GPRS in use Alarm is set
EDGE connected Speakerphone is on
EDGE in use Roaming
3G connected No signal
3G in use No SIM card installed
4G connected Vibrate mode
4G in use Ringer is silenced
4G LTE connected Phone microphone is mute
4G LTE in use Battery is very low
Signal strength Battery is low
Wi-Fi is on Battery is partially drained
Connected to a Wi-Fi
network Battery is full
Bluetooth is on Battery is charging
Connected to a Bluetooth
device
/ Headset connected
Notification icons
New Gmail message Missed call
New Email message Call forwarding is on
New text or multimedia
message Song is playing
Problem with SMS or MMS
delivery Connected to VPN
New Google Hangouts
message Disconnected from VPN
New voicemail Radio is on
Upcoming event Uploading data
Screenshot error Downloading data
Screenshot captured Download finished
microSD card is full Select input method
safe to remove SD card Phone is connected via
USB cable
preparing SD card System update available
Both USB tethering and
portable hotspot are on
Carrier data use
threshold approaching or
exceeded
USB tethering is on GPS is on
Portable Wi-Fi hotspot is on Receiving location data
from GPS
An open Wi-Fi network is
available
8
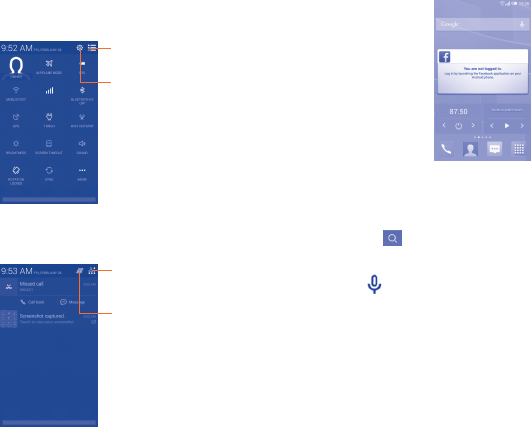
Touch and drag down the Status bar to open the Quick setting panel
or Notification panel. Touch and drag up to close it. When there are
notifications, you can touch them to access notifications directly.
Quick setting panel
Touch and drag down the Status bar to open the Quick setting panel, where
you can enable or disable functions or change modes by touching the icons.
Touch to switch to the notification panel.
Touch to access Settings,
where you can set more items.
Notification panel
When there are notifications, touch and drag down the Status bar to open
the Notification panel to read the detailed information.
Touch to open quick settings bar and
enable/disable functions or change modes.
Touch to clear all event–based notifications
(other ongoing notifications will remain).
1�3�3 Search bar
The phone provides a Search function which can be used to locate
information within applications, the phone or the web.
Search by text
• Touch Search bar from the Home screen.
• Enter the text/phrase you want to search for.
• Touch the icon on the keyboard if you want to search on the web.
Search by voice
• Touch from Search bar to display a dialog screen.
• Speak the word/phrase you want to search for. A list of search results
will display for you to select from.
1�3�4 Lock/Unlock your screen
To protect your phone and privacy, you can lock the phone screen by
choosing slide or creating a variety of patterns, PIN or password, etc.