TEAC CD400U CD PLAYER/TUNER User Manual
TEAC Corporation CD PLAYER/TUNER Users Manual
UserManual.wiki
>
TEAC
>
CD400U User Manual
Users Manual
Navigation menu
Upload a User Manual
Namespaces
Wiki Guide
HTML
PDF
Info
Views
User Manual
Discussion / Help
Navigation
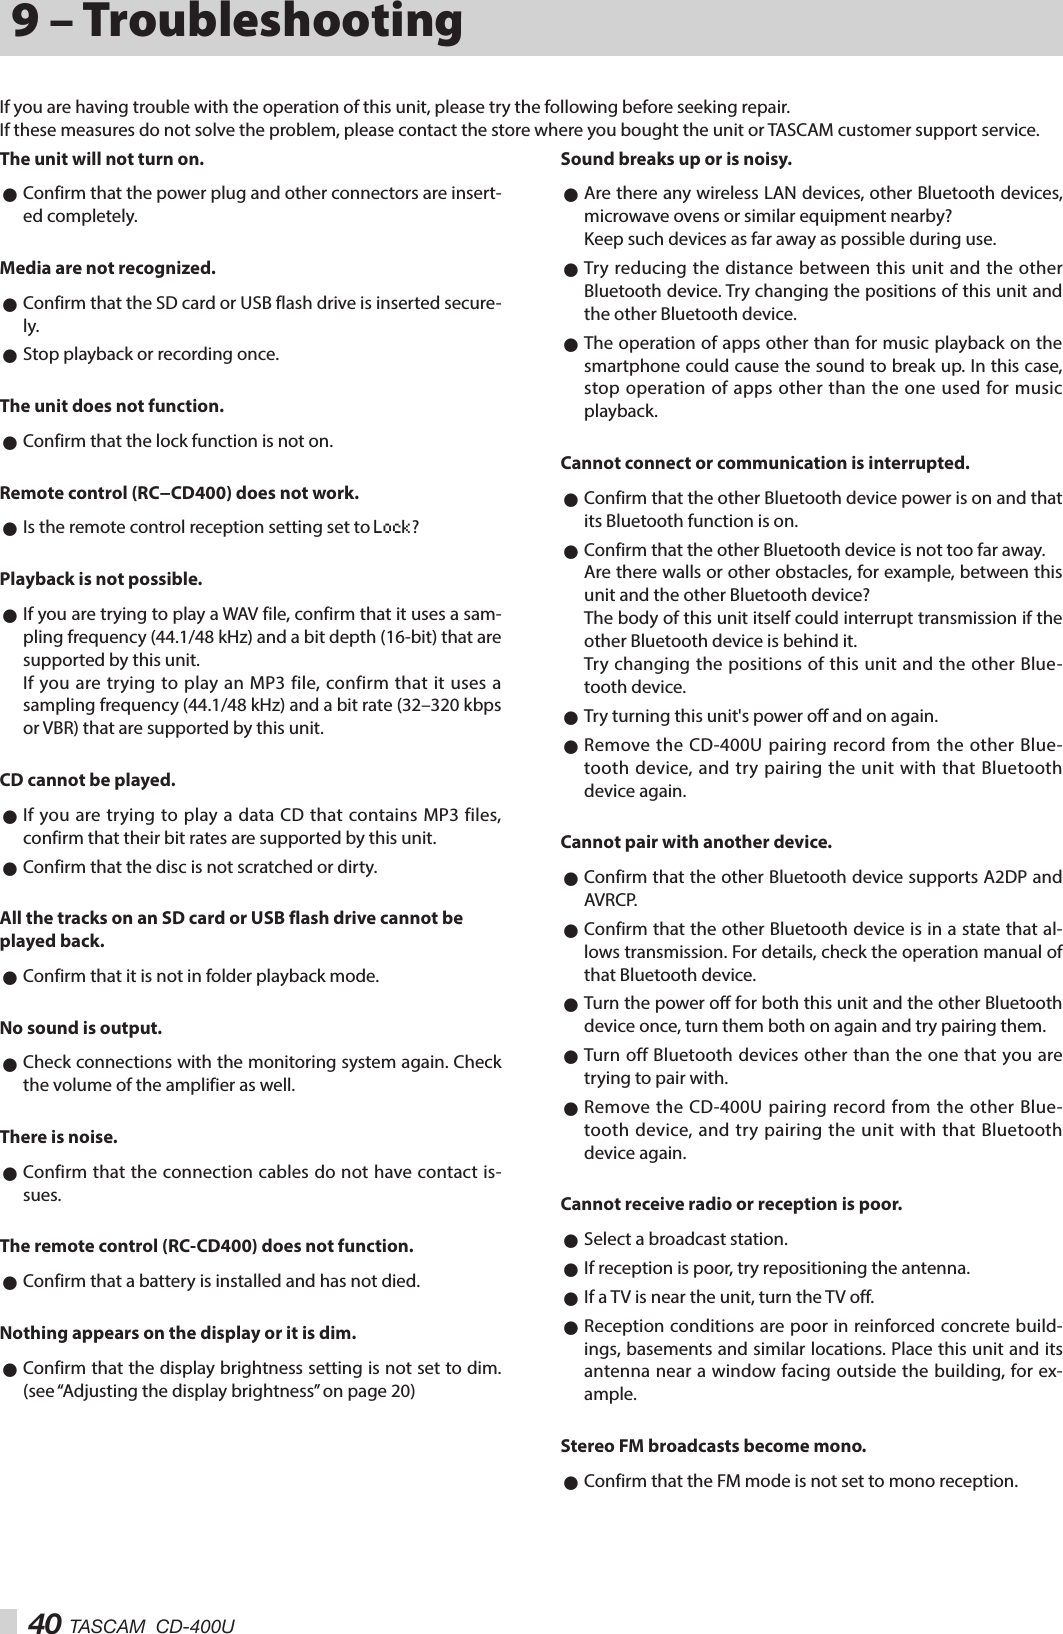
![4 TASCAM CD-400UIMPORTANT SAFETY INSTRUCTIONS 8For European CustomersDisposal of electrical and electronic equipment and batteries and/or accumulators(a) All electrical/electronic equipment and waste batteries/accumulators should be disposed of separately from the municipal waste stream via collection facilities designated by the government or local authorities.(b) By disposing of electrical/electronic equipment and waste batteries/accumulators correctly, you will help save valuable resources and prevent any potential negative effects on human health and the environment.(c) Improper disposal of waste electrical/electronic equipment and batteries/accumulators can have serious effects on the environment and human health because of the presence of hazardous substances in the equipment.(d) The Waste Electrical and Electronic Equipment (WEEE) symbols, which show wheeled bins that have been crossed out, indicate that electrical/electronic equipment and batteries/accumulators must be collected and disposed of separately from household waste. If a battery or accumulator contains more than the specified values of lead (Pb), mercury (Hg), and/or cadmium (Cd) as defined in the Battery Directive (2006/66/EC), then the chemical symbols for those elements will be indicated beneath the WEEE symbol.(e) Return and collection systems are available to end users. For more detailed information about the disposal of old electrical/electronic equipment and waste batteries/accumulators, please contact your city office, waste disposal service or the shop where you purchased the equipment.• Remove the batteries if you do not plan to use the unit for a long time. Batteries could rupture or leak, causing fire, injury or stains around them. If the battery fluid leaks, wipe away any fluid on the battery compartment before inserting new batteries.• Do not disassemble a battery. The acid inside the battery could harm skin or clothing.V WARNING DO NOT INGEST BATTERY, CHEMICAL BURN HAZARD followed by: [The remote control supplied with] This product contains a coin/button cell battery. If the coin/ button cell battery is swallowed, it can cause severe internal burns in just 2 hours and can lead to death. Keep new and used batteries away from children. If the battery compartment does not close securely, stop using the product and keep it away from children. If you think batteries might have been swallowed or placed inside any part of the body, seek immediate medical attention.Pb, Hg, Cd 8For China“仅适用于海拔 2000m 以下地区安全使用”“仅适用于非熱帯气候条件下安全使用”“环境保护使用年限”产品有毒有害物质或元素的名称及含量机种 : CD-400U 有毒有害物质或元素品名 铅(Pb)汞(Hg)镉(Cd)六价铬(Cr6+)多溴联苯(PBB)多溴二苯醚(PBDE)1 CHASSIS 部份 ○ ○ ○ ○ ○ ○2 FRONT PANEL 部份 ○ ○ ○ ○ ○ ○3 螺丝部份 ○ ○ ○ ○ ○ ○4 线材部份 ○ ○ ○ ○ ○ ○5 PCB Assy 部份 × ○ ○ ○ ○ ○6 电源部份 ○ ○ ○ ○ ○ ○7 附属品部份 × ○ ○ ○ ○ ○8 LABEL 部份 ○ ○ ○ ○ ○ ○9 包装部份 ○ ○ ○ ○ ○ ○ ○ :表示该有毒有害物质在该部件所有均质材料中的含有量均在 GB/T26572 标准规定的限量要求以下。 × :表示该有毒有害物质至少在该部件的某一均质材料中的含量超出 GB/T26572 标准规定的限量要求。 (针对现在代替技术困难的电子部品及合金中的铅 )IN USA/CANADA, USE ONLY ON 120 V SUPPLY.](https://usermanual.wiki/TEAC/CD400U/User-Guide-3670571-Page-4.png)

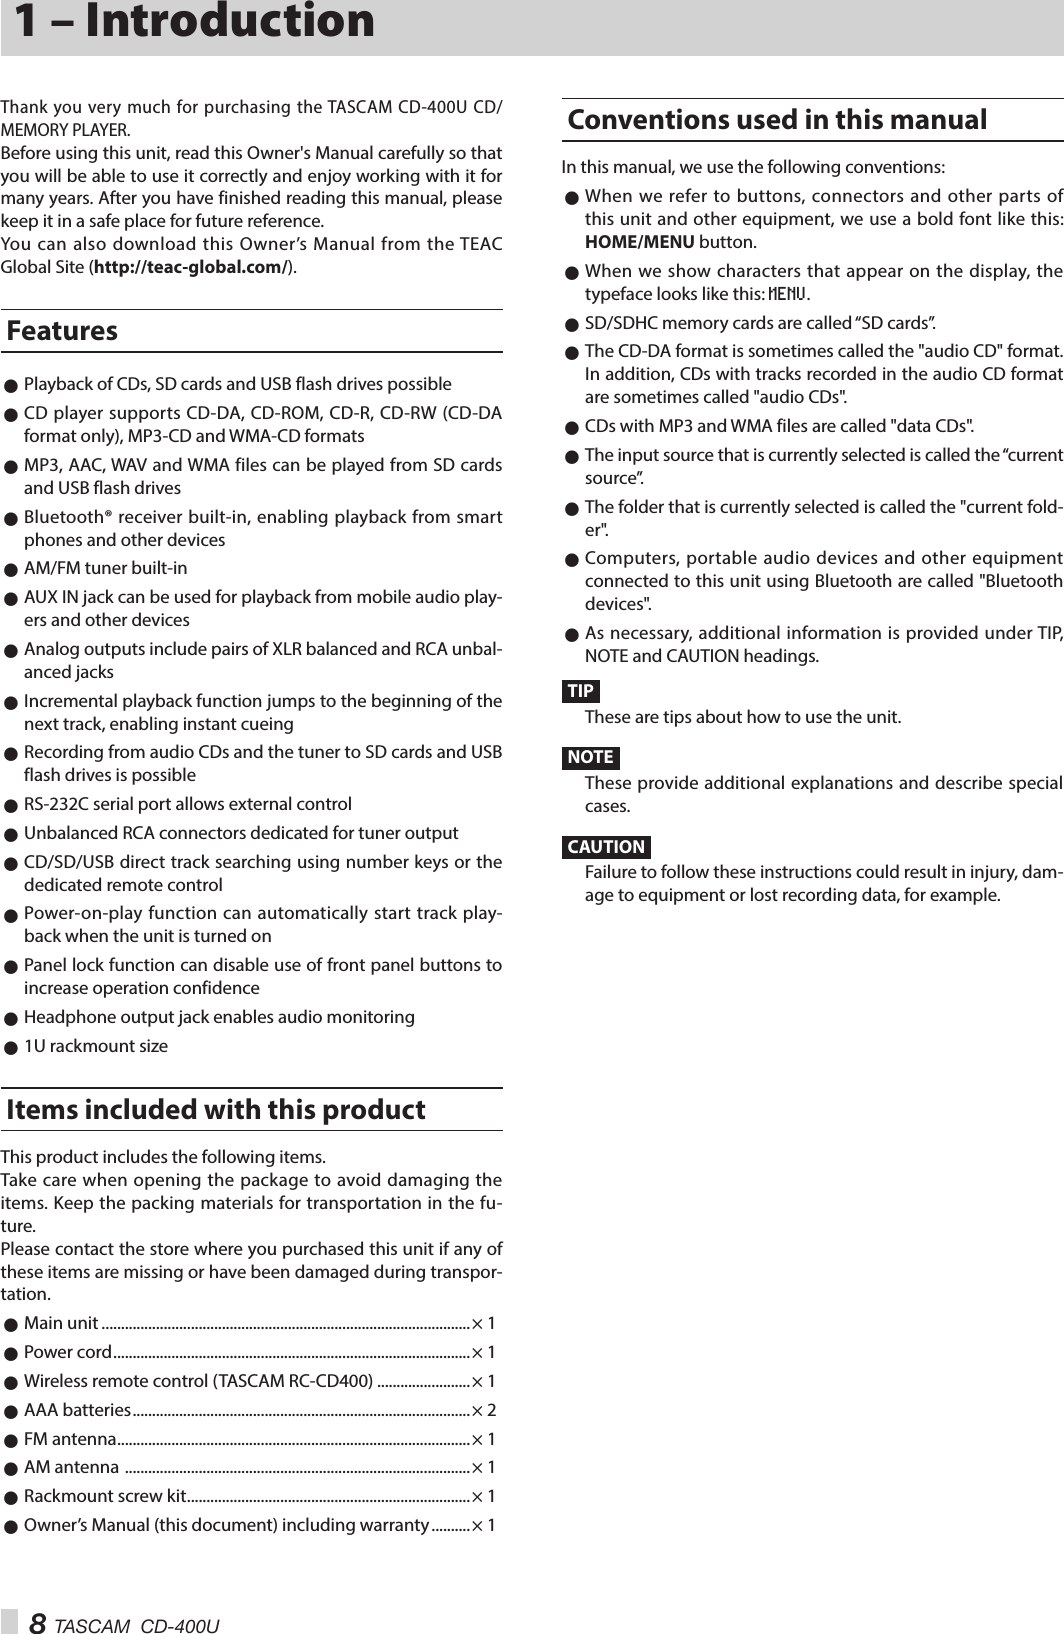
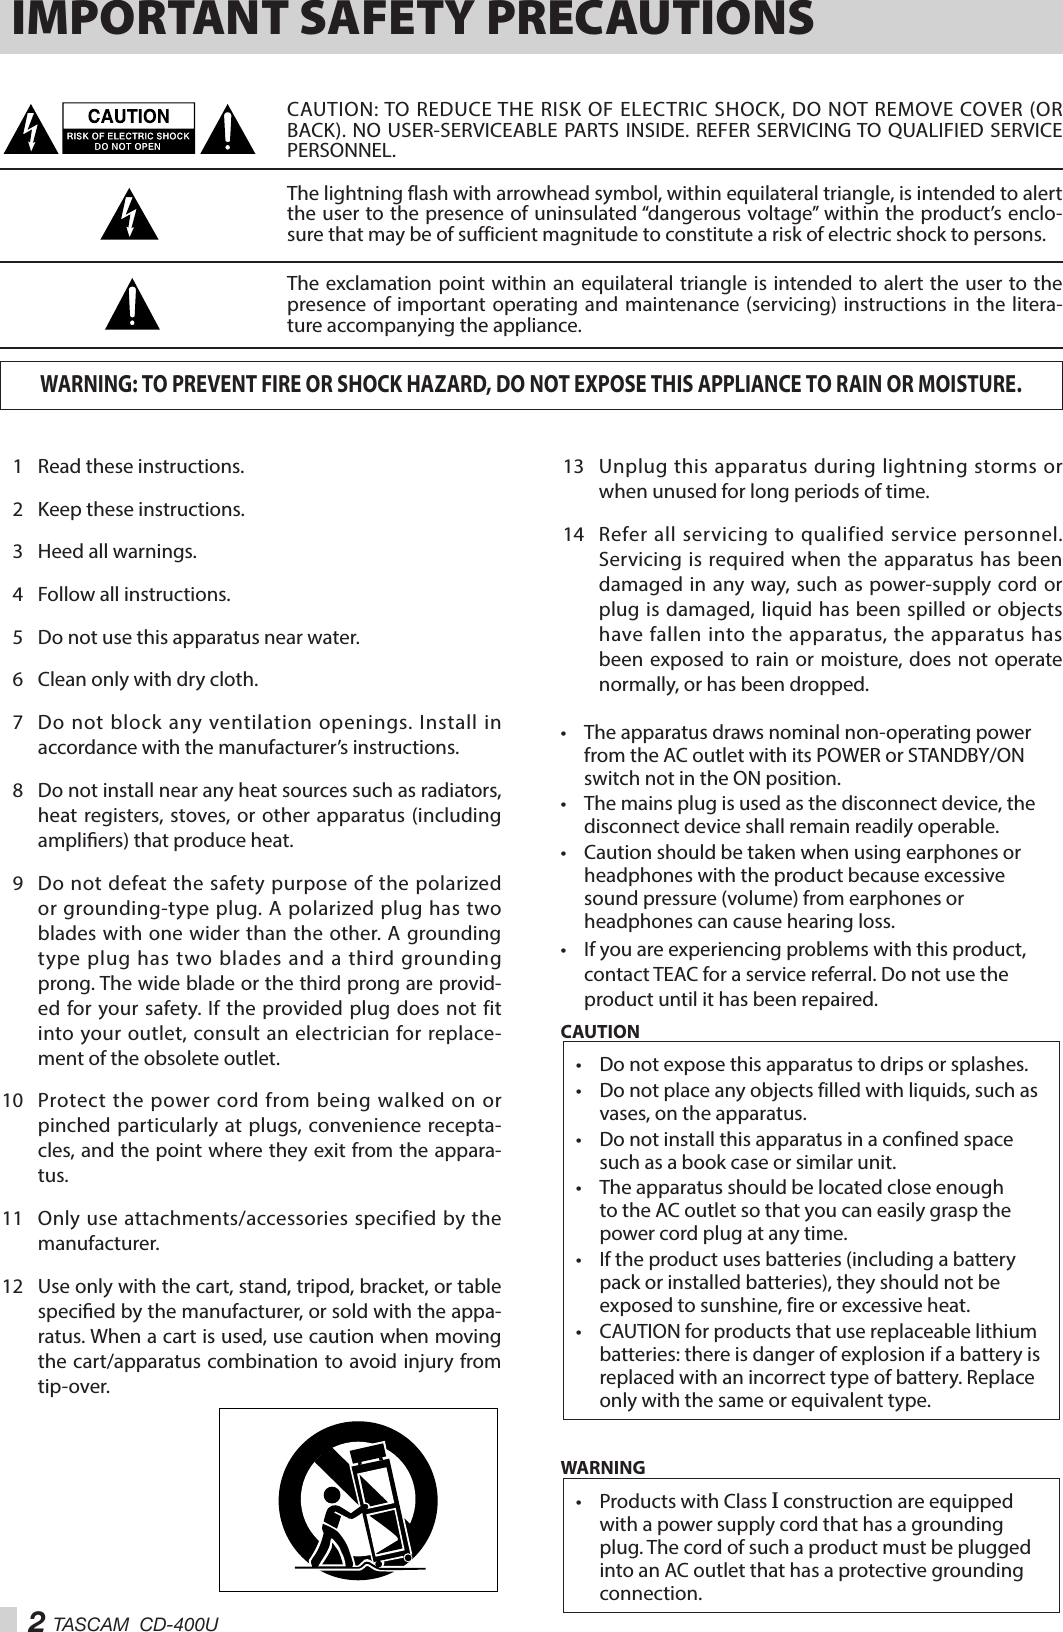
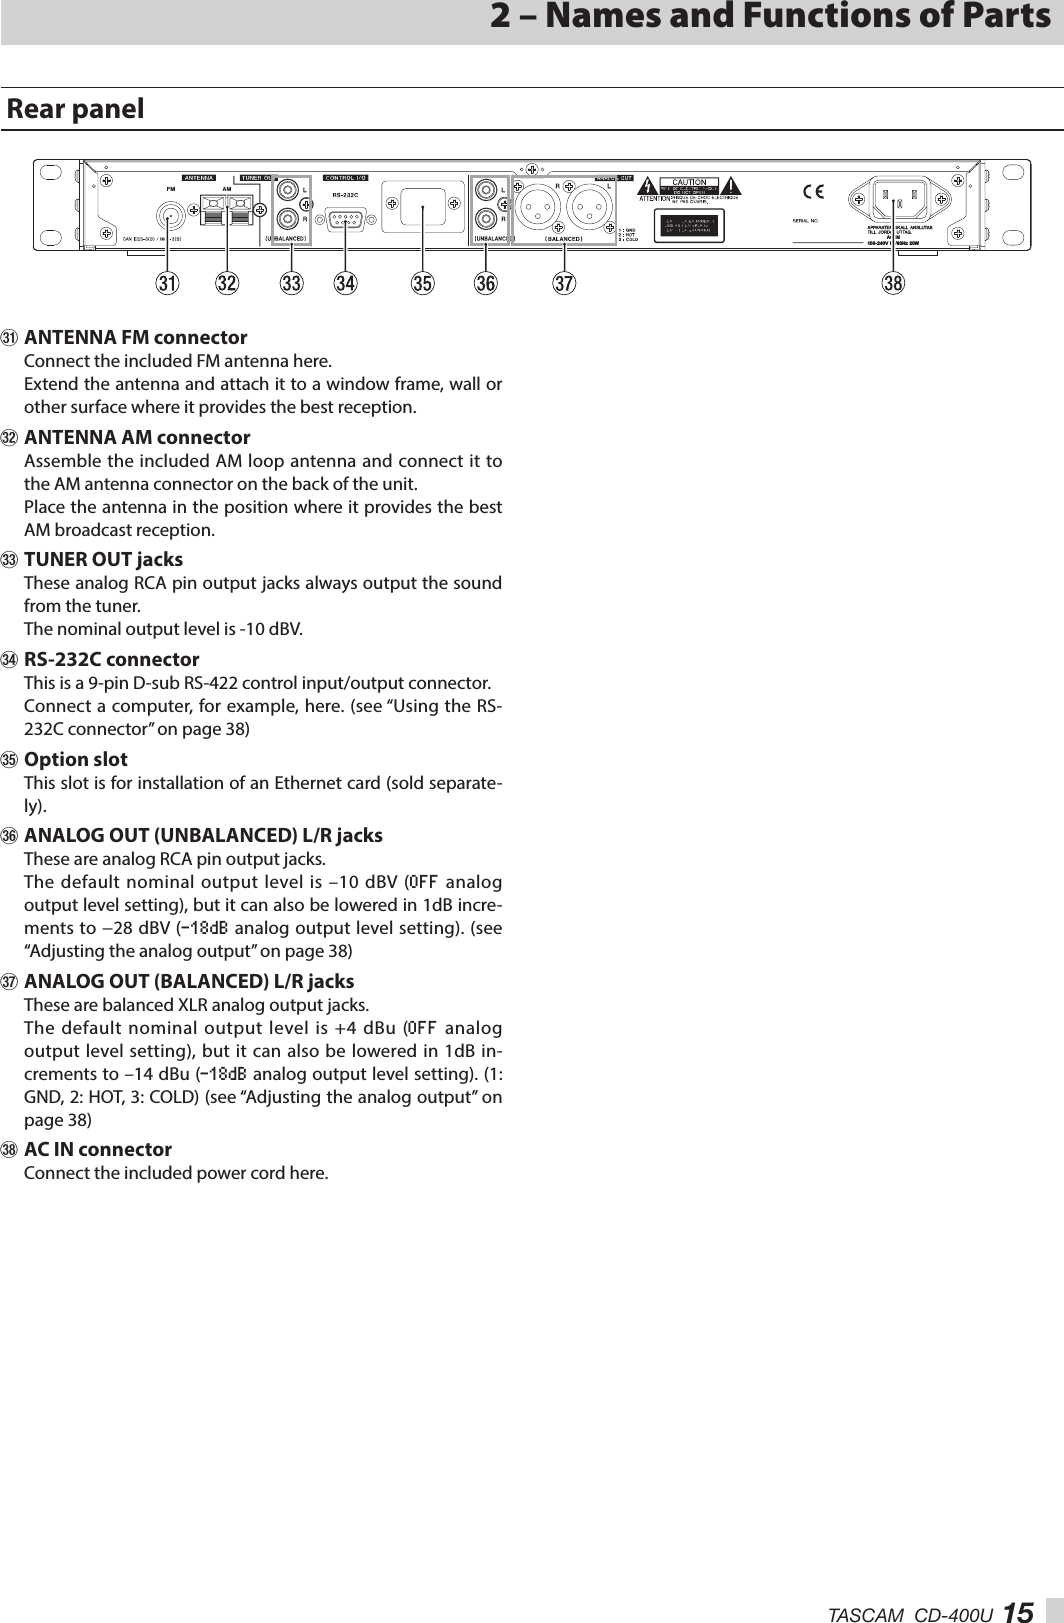
![12 TASCAM CD-400U2 – Names and Functions of PartsFront panel1 POWER switchThis turns the unit on and offCAUTIONBefore turning the unit on, lower the volumes of connected equipment to their minimum levels.Failure to do so could result in a sudden loud noise that could harm hearing, for example.NOTEDo not use this switch when the unit is operating (including dubbing, playing back, or writing data to an SD card or USB flash drive). Doing so could cause dubbing to fail or dubbed data to be lost, for example.2 Disc slotInsert a disc here.After a disc is inserted partway, the unit will automatically draw it in.3 EJECT buttonPress to eject a disc. (see “Inserting and removing discs” on page 21)Press and hold for at least 10 seconds to force-eject a disc. (see “Forcing disc ejection” on page 21)4 DisplayThis shows various types of information.5 HOME/MENU button i When the Home Screen is open, press to open the MENU screen. (see “Menu structure” on page 18) (see “Basic MENU screen operations” on page 18) i When the MENU screen is open, press this button to return to the Home Screen.6 MULTI JOG dialThis dial functions as a dial when turned and as a button when pressed.Dial functions i When the current source is CD, USB or SD and the play area is set to "ALL", turn the MULTI JOG dial to skip tracks. (see “Skipping to earlier and later tracks” on page 24) i When the current source is USB or SD and the play area is folder ( icon shown), turn the MULTI JOG dial to move among tracks and folders. (see “Folder playback (SD cards and USB flash drives only)” on page 25) i When the current source is AM/FM, turn the MULTI JOG dial to change the received frequency. (see “Tuning in radio sta-tions” on page 32) i When the current source is AM/FM and preset mode is en-abled, turn the MULTI JOG dial to move to the previous or next preset number. (see “Setting radio station presets” on page 32) i When a MENU screen is open, turn to select items and change setting values. (see “Basic MENU screen operations” on page 18) i When the unit is in shift mode (SHIFT indicator lit), turn the MULTI JOG dial to adjust the display brightness. (see “Ad-justing the display brightness” on page 20)Button function i When a Menu Screen is open, press to confirm selections and settings (ENTER button function).7 STOP button i Press to stop playback. i When the incremental playback function is on, press this button during playback to jump to the beginning of the next track and pause. (see “Using the incremental playback function” on page 29) i When the current source is AM or FM, press to switch be-tween frequency and preset modes. (see “Changing the received frequency” on page 32) i Press when dubbing to stop. (see “Dubbing procedures” on page 36)8 PLAY button i Press when stopped or in playback standby to start play-back. i When the incremental playback function setting is ON, press this button during playback to start playback of the next track. (see “Using the incremental playback function” on page 29)9 PAUSE buttonPress when stopped or playing back to start playback stand-by.0 m/, [FAST] buttons i Press and hold these buttons to search backward/forward. (see “Searching backward and forward” on page 27) i If the current source is CD and you are searching an audio CD backward/forward, press and hold the button for the opposite direction (m or ,) to search at high-speed. (see “Searching backward and forward” on page 27) i When the current source is AM or FM, press to automatically search received frequencies for that frequency mode. (see “Changing the received frequency” on page 32)](https://usermanual.wiki/TEAC/CD400U/User-Guide-3670571-Page-12.png)
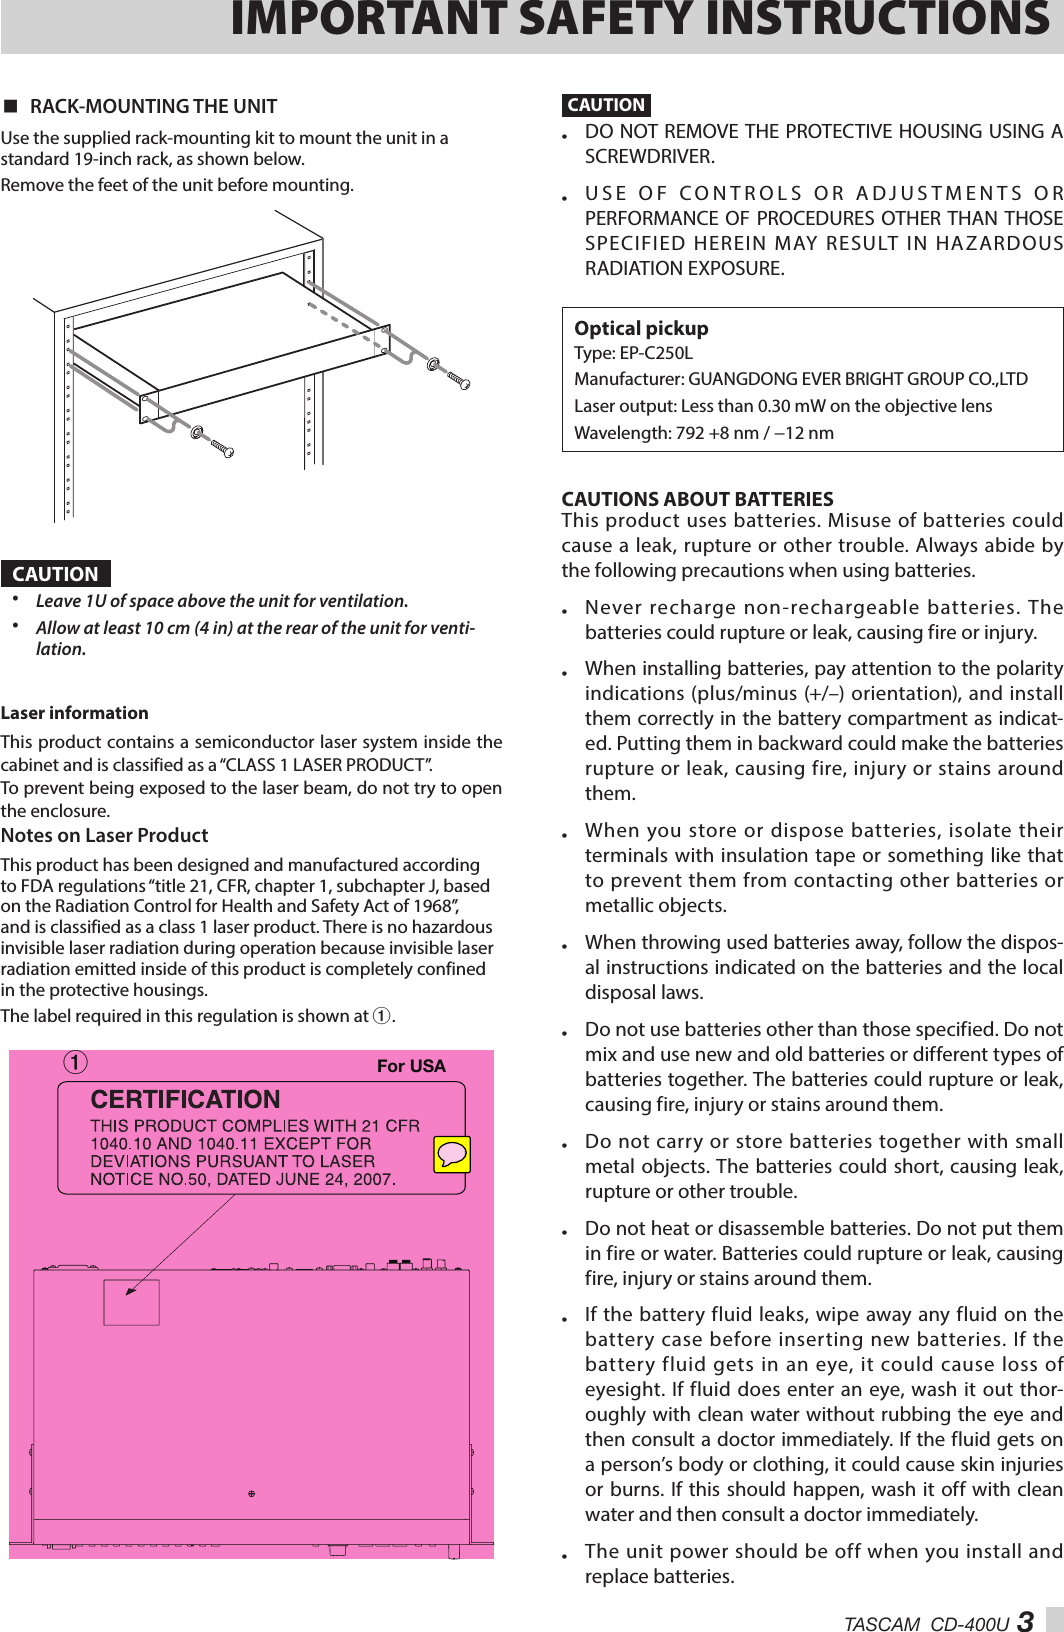
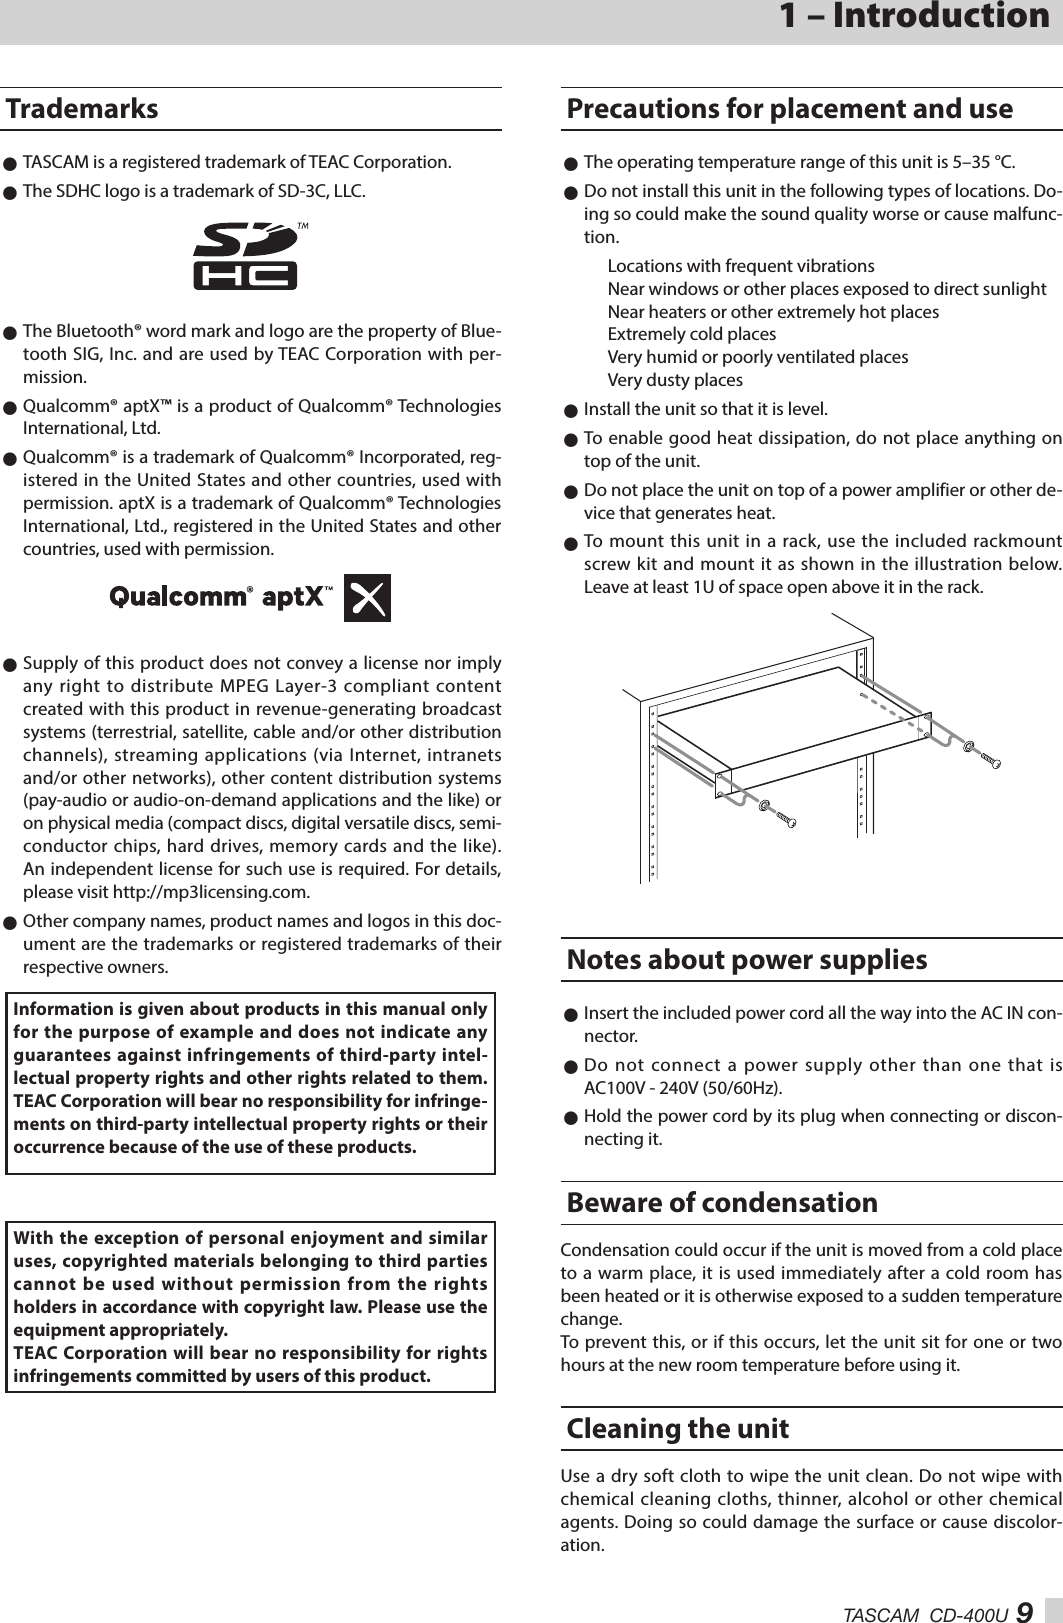
![TASCAM CD-400U 132 – Names and Functions of Partsq PHONES Use this standard stereo jack to connect stereo headphones.Use an adapter to connect headphones with a mini plug.Use the PHONES knob to adjust the headphone output level.PHONES jack output can be lowered up to −18 dB in 1dB intervals using the A.Out Att. setting screen. (see “Adjusting the analog output” on page 38)CAUTIONBefore connecting headphones, minimize the volume with the PHONES knob. Failure to do so could result in a sudden loud noise that could harm hearing, for example.w AUX IN jackThis stereo mini jack is an audio line input jack.Connect a portable digital player or other external audio de-vice here. (see “Using the AUX IN jack” on page 38)CAUTION i Before connecting another device to the AUX IN jack, mini-mize the volume of that device. Failure to do so could result in a sudden loud noise that could harm hearing, for example. i Before connecting or disconnecting with the AUX IN jack, set the current source to something other than AUX (CD or Blue-tooth) or turn the unit off.e Remote control signal receiverSignals from the wireless remote control (TASCAM RC-CD400) are received here. When operating the remote control, point it toward this receiver.r 1 [LOCK] button i Press to input track number 1 when the current source is CD, USB or SD and the play area is set to "ALL". (see “Selecting tracks directly” on page 25) i When the current source is AM or FM, press to tune in a pre-set station. i When the unit is in shift mode (SHIFT indicator lit), press to turn the panel lock function (which disables button use to prevent misoperation) on/off. (see “Panel lock functions” on page 22)NOTE i The number buttons on the unit (1 [FLASH] – 0 [DUB]) can be used to specify numbers for track selection. For track num-bers, a maximum of two digits can be input for audio CDs and three digits for data CDs. (see “Selecting tracks directly” on page 25) i When in SHIFT mode (SHIFT indicator lit), pressing a number button will change the setting of the function shown in white lettering below the button.t 2 [P.O.PLAY] button i Press to input track number 2 when the current source is CD, USB or SD and the play area is set to "ALL". (see “Selecting tracks directly” on page 25) i When the current source is AM or FM, press to tune in a pre-set station. i When in SHIFT mode (SHIFT indicator lit), press to turn the power-on-play function on/off. (see “Using the power-on-play function” on page 28)y 3 [P.MODE] button i Press to input track number 3 when the current source is CD, USB or SD and the play area is set to "ALL". (see “Selecting tracks directly” on page 25) i When the current source is AM or FM, press to tune in a pre-set station. i When the current source is CD, USB or SD, and shift mode is active (SHIFT indicator lit) press to cycle through the play-back modes (ordinary, single and random). (see “Playback modes” on page 26)u 4 [REPEAT] button i Press to input track number 4 when the current source is CD, USB or SD and the play area is set to "ALL". (see “Selecting tracks directly” on page 25) i When the current source is AM or FM, press to tune in a pre-set station. i When the current source is CD, USB or SD, and shift mode is active (SHIFT indicator lit) press to turn the repeat playback function on/off. (see “Ordinary repeat playback settings” on page 27)i 5 [A-B REP] button i Press to input track number 5 when the current source is CD, USB or SD and the play area is set to "ALL". (see “Selecting tracks directly” on page 25) i When the current source is AM or FM, press to tune in a pre-set station. i When the current source is CD, USB or SD, and shift mode is active (SHIFT indicator lit) press to set the A-B repeat function starting (A) and ending (B) points. (see “A-B repeat playback settings (audio CDs only)” on page 28)o 6 [A. PRESET] button i Press to input track number 6 when the current source is CD, USB or SD and the play area is set to "ALL". (see “Selecting tracks directly” on page 25) i When the current source is AM or FM, press to tune in a pre-set station. i When the current source is AM or FM and shift mode is ac-tive (SHIFT indicator lit) press to automatically program the preset stations. (see “Setting radio station presets automat-ically” on page 32)p 7 [M.PRESET] button i Press to input track number 7 when the current source is CD, USB or SD and the play area is set to "ALL". (see “Selecting tracks directly” on page 25) i When the current source is AM or FM, press to tune in a pre-set station. i When the current source is AM or FM and shift mode is active (SHIFT indicator lit) press to manually program the preset stations. (see “Setting radio station presets manually” on page 32)](https://usermanual.wiki/TEAC/CD400U/User-Guide-3670571-Page-13.png)
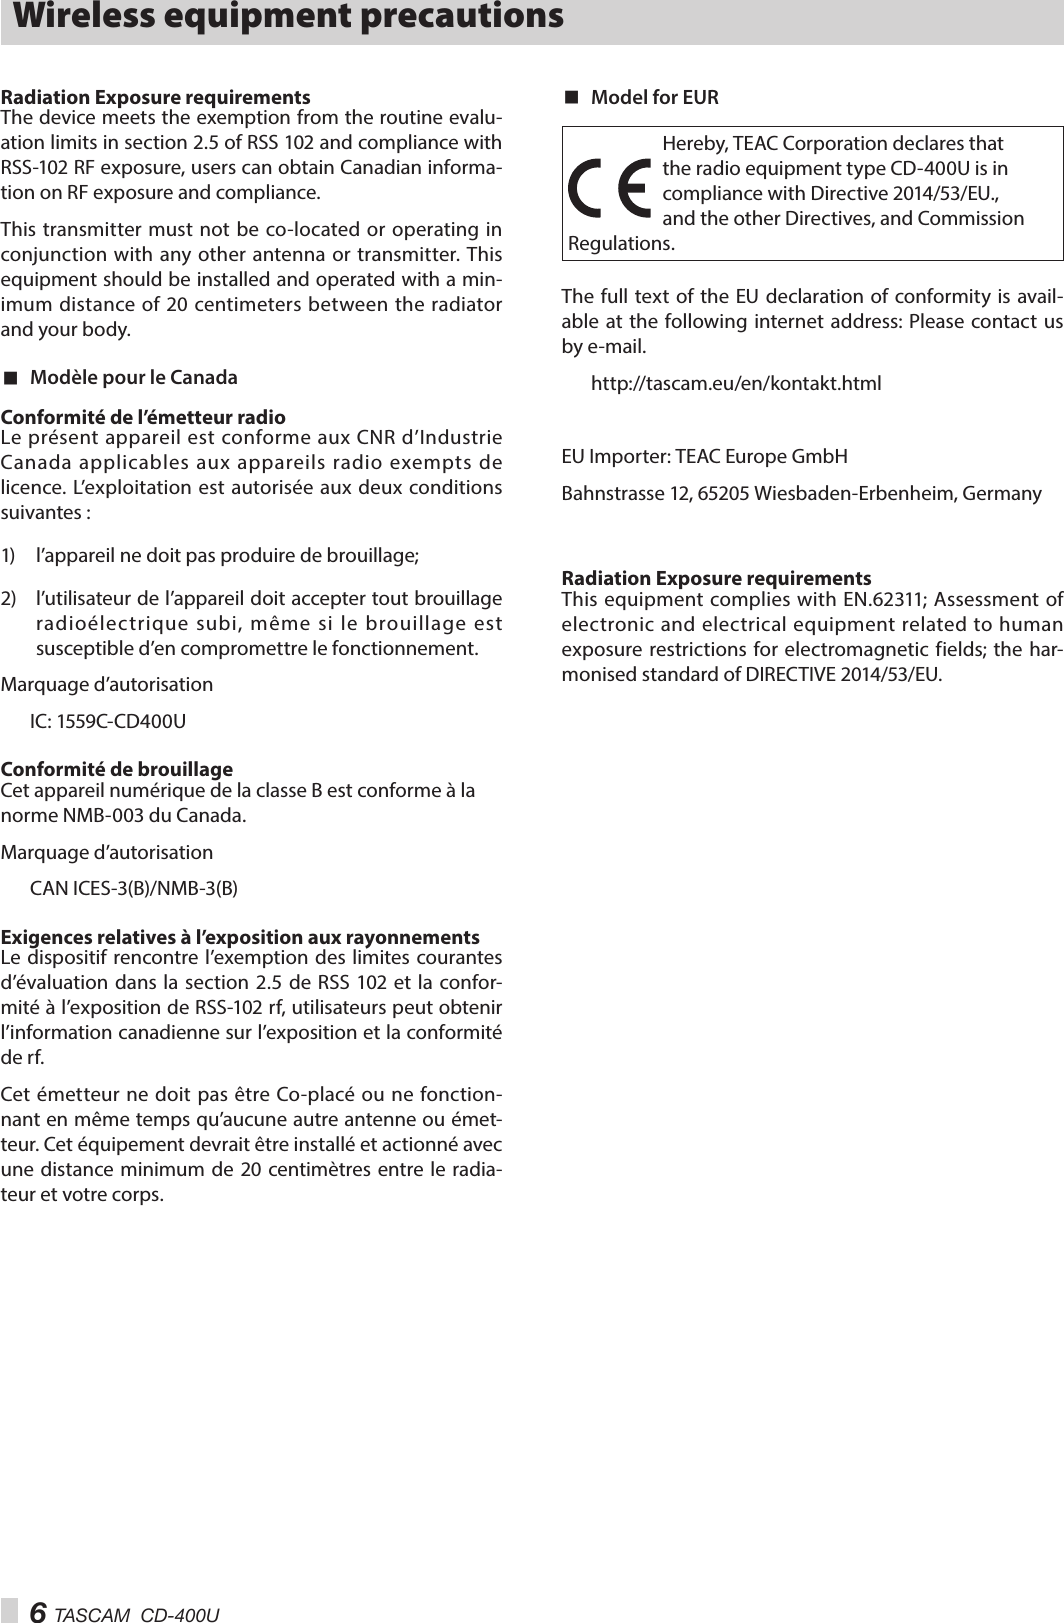
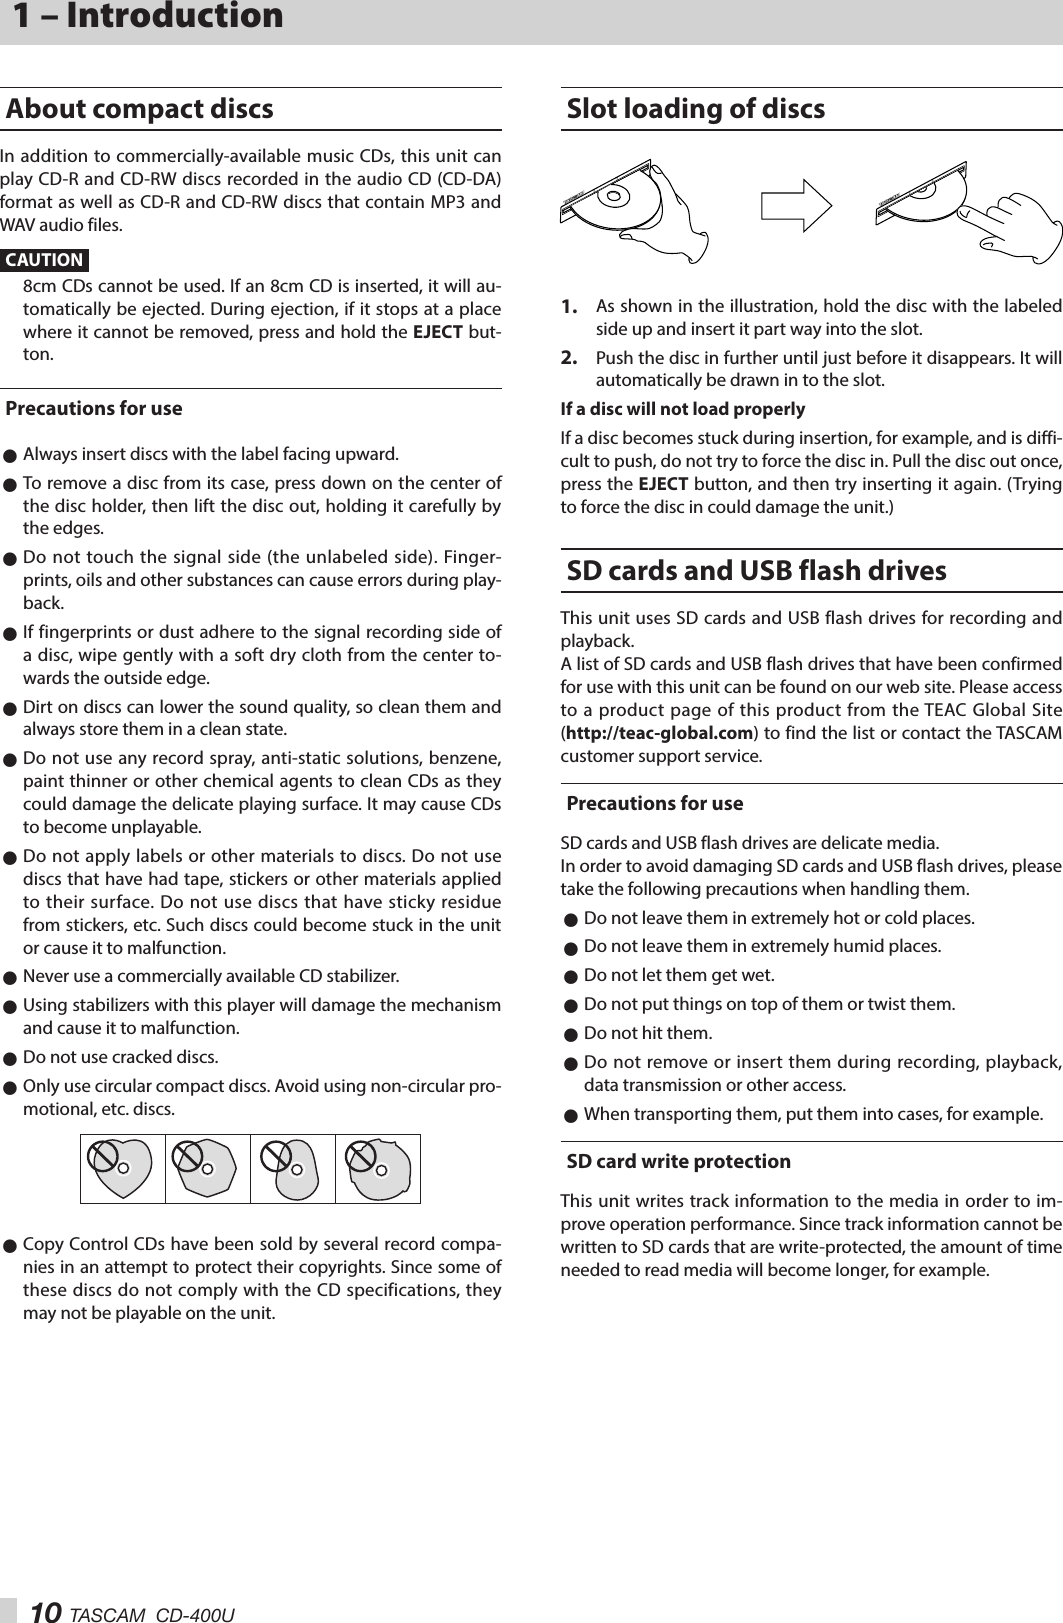
![14 TASCAM CD-400U2 – Names and Functions of Partsa 8 [FM MODE] button i Press to input track number 8 when the current source is CD, USB or SD and the play area is set to "ALL". (see “Selecting tracks directly” on page 25) i When the current source is AM or FM, press to tune in a pre-set station. i When the current source is FM, and shift mode is active (SHIFT indicator lit), press to switch between stereo and mono for FM broadcast reception. (see “Setting the FM mode” on page 32)s 9 [P.AREA] button i Press to input track number 9 when the current source is CD, USB or SD and the play area is set to "ALL". (see “Selecting tracks directly” on page 25) i When the current source is AM or FM, press to tune in a pre-set station. i When the current source is USB or SD and shift mode is active (SHIFT indicator lit), press to set the play area. (see “Setting the playback area” on page 24)d 0 [DUB] button and indicator i Press to input track number 0 when the current source is CD, USB or SD and the play area is set to "ALL". (see “Selecting tracks directly” on page 25) i When the current source is AM or FM, press to tune in a pre-set station. i When the current source is CD and playback is stopped or the current source is AM/FM, press with shift mode active (SHIFT indicator lit) to start dubbing (copying) preparation. The indicator lights when the dubbing (copying) function is active. (see “Dubbing procedures” on page 36)f CLEAR button i When the current source is CD, USB or SD, press this to clear values input with number buttons. i Press to close a warning message that has appeared on the Home Screen. i When the current source is AM or FM, press and hold to clear all preset stations for that source. (see “Clearing preset as-signments” on page 33)g SHIFT button and indicatorPress this button to light the indicator and enable shift mode, which activates the shift functions of other buttons. (These functions are shown below the buttons with white letters on dark blue backgrounds.)To deactivate the shift mode (SHIFT indicator unlit), press the SHIFT button again.h SOURCE buttonPress to switch the current source. (see “Selecting the play-back source.” on page 22)j DISPLAY button i Press during playback to show a variety of information. (see “Time and text information display” on page 30) i Please ignore INFO on the remote control unit. (INFO func-tion does not work on this unit.) This button does not work at all on the USA/Canadian model. i Press when the current source is FM to switch the RDS mode. (see “RDS (European model only)” on page 34)k BACK [PAIRING] button i When the MENU screen is open, press to return to the Home Screen. i When a MENU setting screen is open, press to go up one menu level. i When the current source is USB or SD and the play area is folder ( icon shown), press to move up one folder level. (see “Playback area” on page 24) i When the current source is BLUETOOTH, press and hold to activate Bluetooth pairing mode. When a Bluetooth con-nection is active (Connected shown), press to disconnect forcefully. (see “Pairing” on page 31)l SD card slotInsert SD cards in these slots. (see “Inserting and removing SD cards” on page 21); USB portConnect (and disconnect) USB flash drives here. (see “Con-necting and disconnecting USB flash drives” on page 22)](https://usermanual.wiki/TEAC/CD400U/User-Guide-3670571-Page-14.png)
![16 TASCAM CD-400U2 – Names and Functions of PartsWireless remote control (TASCAM RC-CD400)1 EJECT buttonThis has the same function as the EJECT button on the main unit. (see “Inserting and removing discs” on page 21)2 7 buttonThis has the same function as the PLAY button on the main unit.3 8 buttonThis has the same function as the STOP button on the main unit.4 MENU buttonThis has the same function as the HOME/MENU button on the main unit.5 m/. buttonsThese have the same functions as the m and , [FAST] buttons on the main unit.6 k/j buttons i When the current source is USB or SD and the play area is folder ( icon shown), press the k button to move up one folder level. (see “Playback area” on page 24) i When the current source is AM or FM, press the j button to select a preset station. i When a MENU setting screen is open, press the k button to move up one menu level. i The j button has the same function as the remote control ENTER button.7 Number (0–9) buttons i When the current source is CD, USB or SD and the play area is set to "ALL", use the number buttons to select tracks by their track numbers. For track numbers, a maximum of two digits can be input for audio CDs and three digits for data CDs. (see “Selecting tracks directly” on page 25) i When the current source is AM or FM, press to tune in a pre-set station.8 PRESET button i When the current source is AM or FM, press to program pre-set stations manually. (see “Setting radio station presets manually” on page 32) i When the current source is AM or FM, press and hold to program preset stations automatically. (see “Setting radio station presets automatically” on page 32)9 DUB buttonPress when stopped to start dubbing (copying) preparation. (see “Dubbing procedures” on page 36)0 FM MODE buttonWhen the current source is FM, press to switch between ste-reo and mono for FM broadcast reception. (see “Setting the FM mode” on page 32)q SOURCE buttonThis has the same function as the SOURCE button on the main unit. (see “Selecting the playback source.” on page 22)w 9 buttonThis has the same function as the PAUSE button on the main unit.e DISPLAY/RDS/INFO [PAIRING] button i Press during playback to show a variety of information. (see “Time and text information display” on page 30) i When the current source is BLUETOOTH, press and hold to activate Bluetooth pairing mode. Press when pairing to end pairing mode. (see “Pairing” on page 31) i Please ignore INFO on the remote control unit. (INFO func-tion does not work on this unit.) This button does not work at all on the USA/Canadian model. i Press when the current source is FM to switch the RDS mode. (see “RDS (European model only)” on page 34)r .// [l/;] buttons i When the current source is CD, USB or SD and the play area is set to "ALL", press to skip tracks. (see “Skipping to earlier and later tracks” on page 24) i When the current source is USB or SD and the play area is folder ( icon shown), press to move between tracks and folders. (see “Playback area” on page 24) i If the current source is AM or FM, press to change the fre-quency received. (see “Tuning in radio stations” on page 32) i When the current source is AM or FM and preset mode is enabled, press to move to the previous or next preset num-ber. (see “Setting radio station presets” on page 32) i When a MENU screen is open, turn to select items and change setting values. (see “Basic MENU screen operations” on page 18)t ENTER buttonWhen a MENU screen is open, press to confirm selections and settings.](https://usermanual.wiki/TEAC/CD400U/User-Guide-3670571-Page-16.png)
![18 TASCAM CD-400U2 – Names and Functions of PartsMenu structurePress the main unit HOME/MENU button or remote control MENU button to open the MENU screen.The various menu items are as follows.Menu item Function PageAPS SettingAutomatic power saving function set-ting see page 38Tuner AutoMute Tuner automatic mut-ing function setting see page 33DUB AutoMuteDubbing automatic muting function settingsee page 37A.Out Att.Analog output attenuation function settingsee page 38Resume Setting Resume playback function setting see page 29Inc Play Incremental playback function setting see page 29Serial Mode (when sold-separately Ethernet card installed)Serial Mode setting when Ethernet card installed (sold-sepa-rately)see page 38IRBaud Rate RS-232C transmission speed setting see page 38Tuner Out Sel Tuner broadcast sound output setting see page 33Information Show information see page 39MP3 Bit rate Set MP3 file bit rate see page 37IR Remote Lock Remote control lock function setting see page 22Network Set. (when sold-separately Ethernet card installed)Setting when Eth-ernet card installed (sold-separately)FACTORY PRESET Restore factory de-fault settings see page 39NOTEThe settings for all menu items are retained even when the unit is turned off.Basic MENU screen operationsOperations are conducted on the MENU screen as follows.Selecting items (moving vertically on a page):Turn the MULTI-JOG dial on the main unit.Use the .// [l/;] buttons on the remote control.Confirming a selected item:Press the MULTI-JOG dial on the main unit.Press the remote control ENTER button.Opening a submenu from a page:Press the MULTI-JOG dial on the main unit.Press the remote control ENTER button.Selecting an item in a submenu:Press the MULTI-JOG dial on the main unit.Use the .// [l/;] buttons on the remote control.Going back one step in a menu:Press the main unit BACK [PAIRING] button.Press the remote control k button.Returning directly to the Home Screen from a menu screen:Press the main unit HOME/MENU button.Menu operation proceduresThis example explains how to set the analog output attenuation function.1. Press the main unit HOME/MENU button or remote control MENU button to open the MENU screen. MENU< APS Setting >APS Setting menu item shown2. Turn the main unit MULTI JOG dial or use the remote con-trol .// [l/;] buttons to select the setting item. MENU< A.Out Att. >A.Out Att. selected3. Press the main unit MULTI JOG dial or remote control EN-TER button to open the various setting screens. A.Out Att.< OFF >A.Out Att. screen open4. Turn the main unit MULTI JOG dial or use the remote con-trol .// [l/;] buttons to change the setting.5. Press the main unit MULTI JOG dial or remote control EN-TER button to confirm the setting and return to the MENU screen.6. Repeat steps 3 to 5 as necessary to set each item.7. Press the main unit BACK [PAIRING] button or remote con-trol k button to return to the Home Screen.](https://usermanual.wiki/TEAC/CD400U/User-Guide-3670571-Page-18.png)
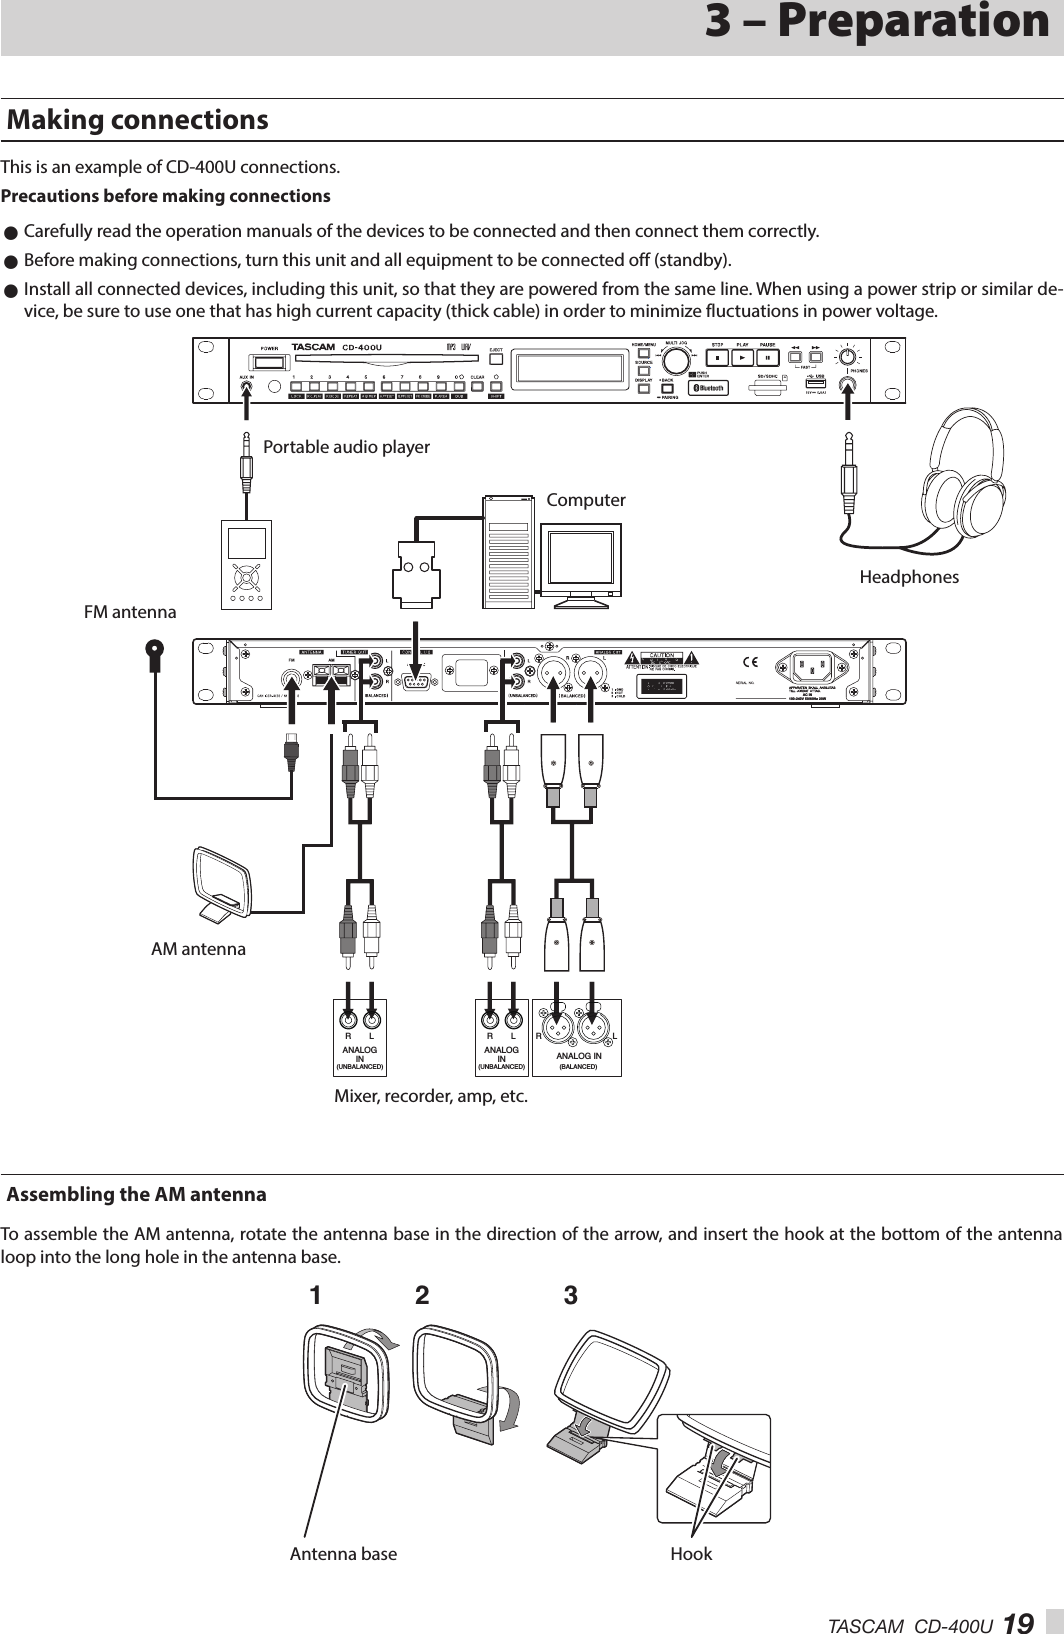
![22 TASCAM CD-400U3 – PreparationConnecting and disconnecting USB flash drivesConnecting USB flash drivesConnect a USB flash drive to the USB port on the front of the unit to enable playback and dubbing with this unit.NOTEYou can connect a USB flash drive when the unit is on or off.Disconnecting USB flash drivesTurn the unit off or stop operation before disconnecting a USB flash drive.CAUTIONNever disconnect a USB flash drive when the unit is operating (including playing back or writing data to the USB flash drive). Doing so could cause proper dubbing to fail, data to be lost, and sudden loud noises from monitoring equipment, which might damage the equipment, harm hearing or cause other trouble.Setting remote control receptionIn order to prevent misoperation, the unit can be set to not ac-cept remote control commands.Use the MENU screen IR Remote Lock item to set whether or not the unit accepts remote control commands. (Default: Unlock)NOTE i When the remote control reception setting is Lock, if a re-mote control button is pressed, IR Remote Locked will ap-pear on the display i The remote-control reception on/off setting is retained even when the unit is turned off.Panel lock functionsWhen the unit is in shift mode (SHIFT indicator lit), press the 1 [LOCK] button to turn the front panel lock function on/off. This disables front panel button operations.When the panel is locked, if a front panel button (excluding the SHIFT and 1 [LOCK] buttons) is used, Panel Locked will appear on the display.NOTE i Even when the panel is locked, external control operations will be received through the RS-232C connector on the back of the unit. i The panel lock function on/off setting is retained even when the unit is turned off.Selecting the playback source.Press the main unit or remote control SOURCE button to select the source played back by the main unit.This changes the current source in the following order.CDUSBSDBLUETOOTHFMAMAUXCurrent source switching orderThe name of the current source (CD, USB, SD, BLUETOOTH, AM, FM or AUX) appears in the current source display area on the Home Screen.NOTE i When the current source is switched from CD to any other in-put source, the CD will stop if it is playing back or paused.In the same way, when switching from an SD card to another medium or from a USB flash drive to another input source, the previous source will stop if playing back or pause. (Blue-tooth and AUX will not stop.) i The playback mode setting is not cleared when the current source changes.](https://usermanual.wiki/TEAC/CD400U/User-Guide-3670571-Page-22.png)
![24 TASCAM CD-400U4 – CD/SD/USB playbackPlayback areaThe range of tracks that can be selected for playback on the Home Screen is called the “playback area”.When using audio CDs and CD-R/CD-RW discs (CD DA only) with MP3 and WMA files, the entire disc is always set as the play area.When using SD cards and USB flash drives, you can set folders as the play area.Limiting the play area makes selection of playback tracks easier when you have numerous recorded files on an SD card or USB flash drive.Setting the playback areaWhen the current source is USB or SD, press the 9 [P.AREA] but-ton with the shift mode active (SHIFT indicator lit) or press the remote control P.AREA button to set the play area.Play area Folder icon MeaningAll Not shown Play all the files on the medi-um.Folder ShownPlay all the files in the folder that contains the currently selected file.The icon appears at the right side of the Home Screen when the play area is folder.USB MP3 001 Basic playback operationsThis section explains basic playback operations, including start-ing, stopping and pausing.This explanation assumes that you have already made necessary connections, turned the unit on, loaded a medium that contains audio files, selected the current source, and opened the Home Screen on the display.Playing tracksPress the main unit PLAY button or the remote control 7 but-ton to start playback.Stopping playback:Press the main unit STOP button or remote control 8 but-ton.Pausing playback:Press the main unit PAUSE button or remote control 9 but-ton.Selecting tracks for playbackThis is an explanation of how to select tracks if there are multiple tracks when the current source is CD and an audio CD is loaded, as well as when the current source is USB or SD and the play area is "All".The two ways to select tracks are moving (skipping) backward/forward by track number and specifying track numbers directly.NOTEWhen the current source is USB or SD and the play area is fold-er ( icon shown), the number buttons on the main unit and remote cannot be used to designate tracks.Skipping to earlier and later tracksTurn the main unit MULTI JOG dial or use the remote control .// [l/;] buttons to skip to the previous or next track. 0During track playback, turn the main unit MULTI JOG dial counterclockwise or press the remote control . [|] button to return to the track beginning. When already at the beginning of a track, turn the MULTI JOG dial counterclockwise or press the remote control . [|] button) to skip to the beginning of the previous track. 0When at the beginning or middle of a track, turn the main unit MULTI JOG dial clockwise or press the remote control / [;] button) to skip to the next track.After selecting a track, press the PLAY button or remote control 7 button to start playing it back. Instead of pressing the main unit PL AY button or remote control 7 button, press the PAUSE button or remote control 9 button to pause at the beginning of the selected track.NOTE i Only tracks in the current playback area can be played back. i The track number, file name and other file information for the currently playing file appear on the display. i Turn the main unit MULTI JOG dial or use the remote con-trol .// [l/;] buttons as necessary to move between tracks.](https://usermanual.wiki/TEAC/CD400U/User-Guide-3670571-Page-24.png)
![TASCAM CD-400U 254 – CD/SD/USB playbackSelecting tracks directlyThe number buttons on the main unit and the remote control can be used to directly enter track numbers.For track numbers, a maximum of two digits can be input for au-dio CDs and three digits for discs with MP3 and WAV format files.1. Use the number buttons on the main unit or the remote control to enter track numbers.Enter the track number digits in order, starting with the largest.Audio CD track number entrySet with two digits.Example: for track 9, input 0w9Data CD/USB/SD track number entrySet with three digits.Example 1: for track 105, input 1w0w5Example 2: for track 4, input 0w0w42. Press the main unit PL AY button or remote control 7 but-ton.The selected track will start to play.Playback can also be started by pressing the main unit MULTI JOG dial or remote control ENTER button.3. Press the main unit STOP button or remote control 8 but-ton to end track number input and return to the regular display.NOTE i If you input the wrong number, you can press the CLEAR but-ton to delete the input value. i The largest number that can be shown for the currently play-ing track is 999. If the track number exceeds 1000, --- will be shown. i In random mode, the number buttons cannot be used to set tracks.Folder playback (SD cards and USB flash drives only)When the current source is USB or SD and the play area is folder ( icon shown), the selected folder (the current folder) can be set as the play area.Follow the method explained below to designate the playback folder.1. Select USB or SD as the current source. (see “Selecting the playback source.” on page 22)2. Set the play area to folder ( icon shown). (see “Setting the playback area” on page 24)USB MP3 001 3. Turn the main unit MULTI JOG dial or use the remote con-trol .// [l/;] buttons to select a track/folder.The top line of the Home Screen shows the file or folder name, and the icon starts to blink.USB 02.File2.mp3 001 USB Foler01 001 USB Foler02 001 USB Foler03 001 USB 01.File1.mp3 001 NOTE i To cancel track/folder selection, press the CLEAR button on the main unit or remote control. i If you select a folder that does not contain any audio files, NO FILE will be shown. At this time, if you turn the main unit MULTI JOG dial or press the .// [l/;] buttons, the name of the currently selected file will be shown and move-ment might become impossible. If this happens, press the CLEAR button on the main unit or remote control to cancel selection. Then, try again. i The current folder will change along with movement be-tween folders.](https://usermanual.wiki/TEAC/CD400U/User-Guide-3670571-Page-25.png)
![26 TASCAM CD-400U4 – CD/SD/USB playback4. When the icon is blinking, press the main unit MULTI JOG dial or remote control ENTER button to start playback if a track is selected or to move down one level if a folder is se-lected.USB Foler01 001 USB 03.File3.mp3 001 To move up one level, press the main unit BACK [PAIRING] button or remote control k button.5. When the icon is blinking, press the main unit MULTI JOG dial or remote control ENTER button to select that track and start playback.USB Foler01 001 USB MP3 001 00:01NOTE i If repeat playback is activated during folder playback, the tracks in the current folder will be played repeatedly. i If random playback is activated during folder playback, the tracks in the current folder will be played randomly.Activating skip modeWhen the play area is folder ( icon shown), press and hold the main unit MULTI JOG dial or remote control ENTER button to activate skip mode. An S will appear on the Home Screen.USB MP3 S 001 In this mode, turn the main unit MULTI JOG dial or use the re-mote control .// [l/;] buttons to skip to earlier and later tracks that are on the same level. Tracks on the same level can also be designated directly. (see “Selecting tracks directly” on page 25)NOTEWhen in skip mode, press and hold the main unit MULTI JOG dial or remote control ENTER button to make S disappear and return to ordinary folder mode.Playback modesThis unit has three playback modes.The current playback mode is shown on the Home Screen.Continuous playback mode (default setting)Tracks in the playback area will be played in track number order.NOTEWhen using an SD card or USB flash drive and the play area is folder ( icon shown), tracks in the currently playing folder will be played in numerical order.Single playback modeThe selected track will be played and stop after playback.Random playback modeAll tracks in the playback area will be played in random order regardless of track number.NOTEWhen using an SD card or USB flash drive and the play area is folder ( icon shown), tracks in the current folder will be played in random order. (see “Folder playback (SD cards and USB flash drives only)” on page 25)Setting the playback modeWhen shift mode is active (SHIFT indicator lit), press the main unit 3 [P.MODE] button or the remote control P.MODE button to change the playback mode.Each time you press this button, the playback mode will change.Indicator Playback modeNot shown Continuous playback mode1Single playback modeRND Random playback modeCD 1 PLAY 01 00:01 Single playback mode activeCD RND PLAY 01 00:01 Random playback mode activeNOTE i Unless otherwise specified, explanations in this manual as-sume that the playback mode is set to continuous playback mode. i The current playback mode appears on the Home Screen.](https://usermanual.wiki/TEAC/CD400U/User-Guide-3670571-Page-26.png)
![TASCAM CD-400U 274 – CD/SD/USB playbackSearching backward and forwardYou can search backward and forward within a track while listen-ing to it.1. Play or pause the desired track.2. Press and hold the main unit m/, [FAST] buttons or the remote control m/, buttons to start searching backward/forward.3. To stop searching, release the button you are pressing.The state (playing or paused) before searching started will resume.NOTE i If the end of a track is reached when searching forward, the unit skips to the next track and starts searching it from the beginning. i If the end of the last track is reached when searching forward, the unit stops. i If the beginning of a track is reached when searching back-ward, the unit skips to the track before it and starts searching it from the end. i If the beginning of the first track is reached when searching backward, playback pauses, but will resume when the button is released. i When searching backward/forward by pressing the m/, button, press and hold the other m/, button for the opposite direction to search at high speed. (Audio CDs only)Using the repeat playback functionAll tracks in the playback area can be played back repeatedly. Specified intervals within a track can also be played back (A-B repeat playback).Ordinary repeat playback settingsWhen the repeat playback function is on, operation depends on the playback mode setting.Playback mode set-ting FunctionContinuous playback modeRepeat playback of the tracks in the set play areaSingle playback mode Repeat playback of the current trackTo turn the repeat playback function on/off, activate the shift mode (SHIFT indicator lit) and press the main unit 4 [REPEAT] button or remote control REPEAT button.REP appears on the Home Screen when the repeat function is on.CD REP PLAY 01 00:01Continuous playback mode activeCD 1REP PLAY 01 00:01Single playback mode activeNOTE i The repeat playback setting is retained even when the unit is turned off. i The repeat playback function cannot be turned on when the random playback mode is active (RND shown on display).](https://usermanual.wiki/TEAC/CD400U/User-Guide-3670571-Page-27.png)
![28 TASCAM CD-400U4 – CD/SD/USB playbackA-B repeat playback settings (audio CDs only)Specified intervals within a track can be played back (A-B repeat playback). Follow the procedures below to use A-B repeat play-back.1. Select CD as the current source. (see “Selecting the playback source.” on page 22)2. When playing back or when playback is paused at the point where you want to the repeat playback interval to start (A), press the main unit 5 [A-B REP] button when the shift mode is activated (SHIFT indicator lit) or press the remote control A-B REP button.A- appears on the Home Screen.CD A- PLAY 01 00:103. At the point where you want the repeat playback interval to stop (B), press the main unit 5 [A-B REP] button when the shift mode is activated (SHIFT indicator lit) or press the remote control A-B REP button.A-B appears on the Home Screen.This confirms the set interval (A-B) and starts A-B repeat playback.CD A-B PLAY 01 00:22CAUTIONA-B repeat is not possible with data CDs, SD cards or USB flash drives.NOTE i Press the main unit STOP button or remote control 8 button to stop the unit and clear the set A-B repeat interval. Chang-ing the track or the current source will also clear the repeat interval. i The A-B repeat playback interval cannot include more than one track. i The A-B repeat setting is not retained when the unit is turned off.Using the power-on-play functionBy using a commercially-available timer, for example, to turn this unit on, you can make it start playing at a desired time.1. Connect the unit to the timer so that it receives power from the timer power output in advance.2. Select the current source for playback. (see “Selecting the playback source.” on page 22)3. Press the main unit 2 [P.O PLAY] button when shift mode is active (SHIFT indicator lit) or press the remote control P. O PLAY button to turn the power-on-play function on. (De-fault: off) PWR On Play On 01 00:014. With this unit's POWER switch set to on, turn the power off from the timer, and set the timer to turn on at the desired time.The power will turn on at the desired time, and the unit will automatically start playback.NOTE i The P icon appears on the Home Screen when the power-on-play function is on.CD PLAY P 01 00:10 i The power-on-play function on/off setting is retained even when the unit is turned off.](https://usermanual.wiki/TEAC/CD400U/User-Guide-3670571-Page-28.png)
![30 TASCAM CD-400U4 – CD/SD/USB playbackTime and text information displayWhen the current source is CD, USB or SD, press the main unit DISPLAY button or remote control DISPLAY/RDS/INFO [PAIR-ING] button to select the time or text information shown on the Home Screen.Press the main unit DISPLAY button or remote control DISPLAY/RDS/INFO [PAIRING] button to cycle through the types of infor-mation shown.The types of information shown change according to the type and status of the media set as the current source as well as the unit operation status.Audio CDsWhen playing back or paused, you can cycle through what is displayed: track elapsed time w track remaining time w total track elapsed time w total track remaining time.Indicator MeaningNot shown Track elapsed timeTRACK-R Track remaining timeTOTAL Total track elapsed timeTOTAL-R Total track remaining timeData CDs, SD cards and USB flash drivesWhen playing back, paused or stopped, you can cycle through what is displayed: track elapsed time w file name of current track w title of current track w name of current track artist w name of current track album w folder name.Shown MeaningNot shown Track elapsed timeFILE File name of current trackTITLE Title of current trackARTIST Name of current track artistALBUM Name of current track albumFOLDER Folder nameNOTE i The text information shown on the display is from the ID3/WMA tags for data CDs and from the ID3/WMA/AAC tags for SD cards and USB flash drives.If this is information is not stored with the disc or file, nothing will appear after TITLE: and ARTIST:.If characters that cannot be displayed are included in the data, they will be replaced with *. i The information display setting is retained even when the unit is turned off. i On SD cards and USB flash drives written by Mac computers, the numbers of tracks in folders and the track numbers might not match. This is an existing problem in Mac system files, but it does not affect playback by this unit.](https://usermanual.wiki/TEAC/CD400U/User-Guide-3670571-Page-30.png)
![TASCAM CD-400U 315 – Bluetooth device playbackThis unit can output sound from a computer, portable audio de-vice or other equipment that supports Bluetooth (A2DP). More-over, if the Bluetooth device supports AVRCP, the PLAY button and other controls on this unit can be used to control playback on the Bluetooth device.PairingFollow the procedures below to enable communication with a Bluetooth device.NOTEPairing also requires operation of the Bluetooth device.Refer to the operation manual of the Bluetooth device for procedures.1. Select BLUETOOTH as the current source. (see “Selecting the playback source.” on page 22)2. Press and hold the main unit BACK [PAIRING] button or re-mote control DISPLAY/RDS/INFO [PAIRING] button.A PAIRING message will blink on the display.BLUETOOTH PAIRING 3. Enable Bluetooth transmission on the other Bluetooth de-vice.4. Select CD-400U (this unit) on the other Bluetooth device.When pairing succeeds, this unit and that device will be connected and Connected will appear on the Home Screen.BLUETOOTH Connected NOTE i Some older Bluetooth devices require the input of a passkey. Enter 0000 in such cases. i Pairing will automatically end if connection is not confirmed within two minutes. i When this unit is turned on, it will automatically try to con-nect with the Bluetooth device to which it was previously connected. At this time, pairing will automatically end after five minutes if connection is not possible because that Blue-tooth device is not turned on or its Bluetooth function is turned off.Usable controlsControls on the main unit and included wireless remote control (RC-CD400) can be used to control the connected Bluetooth de-vice if it supports AVRCP.Main unit Remote control FunctionPLAY button 7 button PlayPAUSE button 9 button PauseSTOP button 8 button StopMULTI JOG dial turning.// [l/;] buttons Selects tracksm/, [FAST] buttons m/, buttons Search backward and forwardCAUTIONOperation might not occur properly depending on the con-nected Bluetooth device.Playback from a Bluetooth device.After pairing with the other Bluetooth device in advance, follow the procedures below for playback from it.1. Select BLUETOOTH as the current source. (see “Selecting the playback source.” on page 22)2. Connect to CD-400U (this unit) on the other Bluetooth de-vice.Connected appears on the Home Screen when connection completes.Controls on the main unit and included wireless remote control (RC-CD400) can be used to control the connected Bluetooth device, and this unit can output the playback sound from the Bluetooth device.UnpairingThe Bluetooth device that is currently connected can be un-paired from the unit.1. Select BLUETOOTH as the current source. (see “Selecting the playback source.” on page 22)2. Press the main unit BACK [PAIRING] button or remote con-trol DISPLAY/RDS/INFO [PAIRING] button.A Disconnect? message will appear on the display.BLUETOOTH Disconnect? 3. Press the main unit MULTI JOG dial or remote control EN-TER button to unpair the device.Press the main unit BACK [PAIRING] button or remote con-trol CLEAR button to cancel unpairing.4. After unpairing, ordinary operation will start.](https://usermanual.wiki/TEAC/CD400U/User-Guide-3670571-Page-31.png)
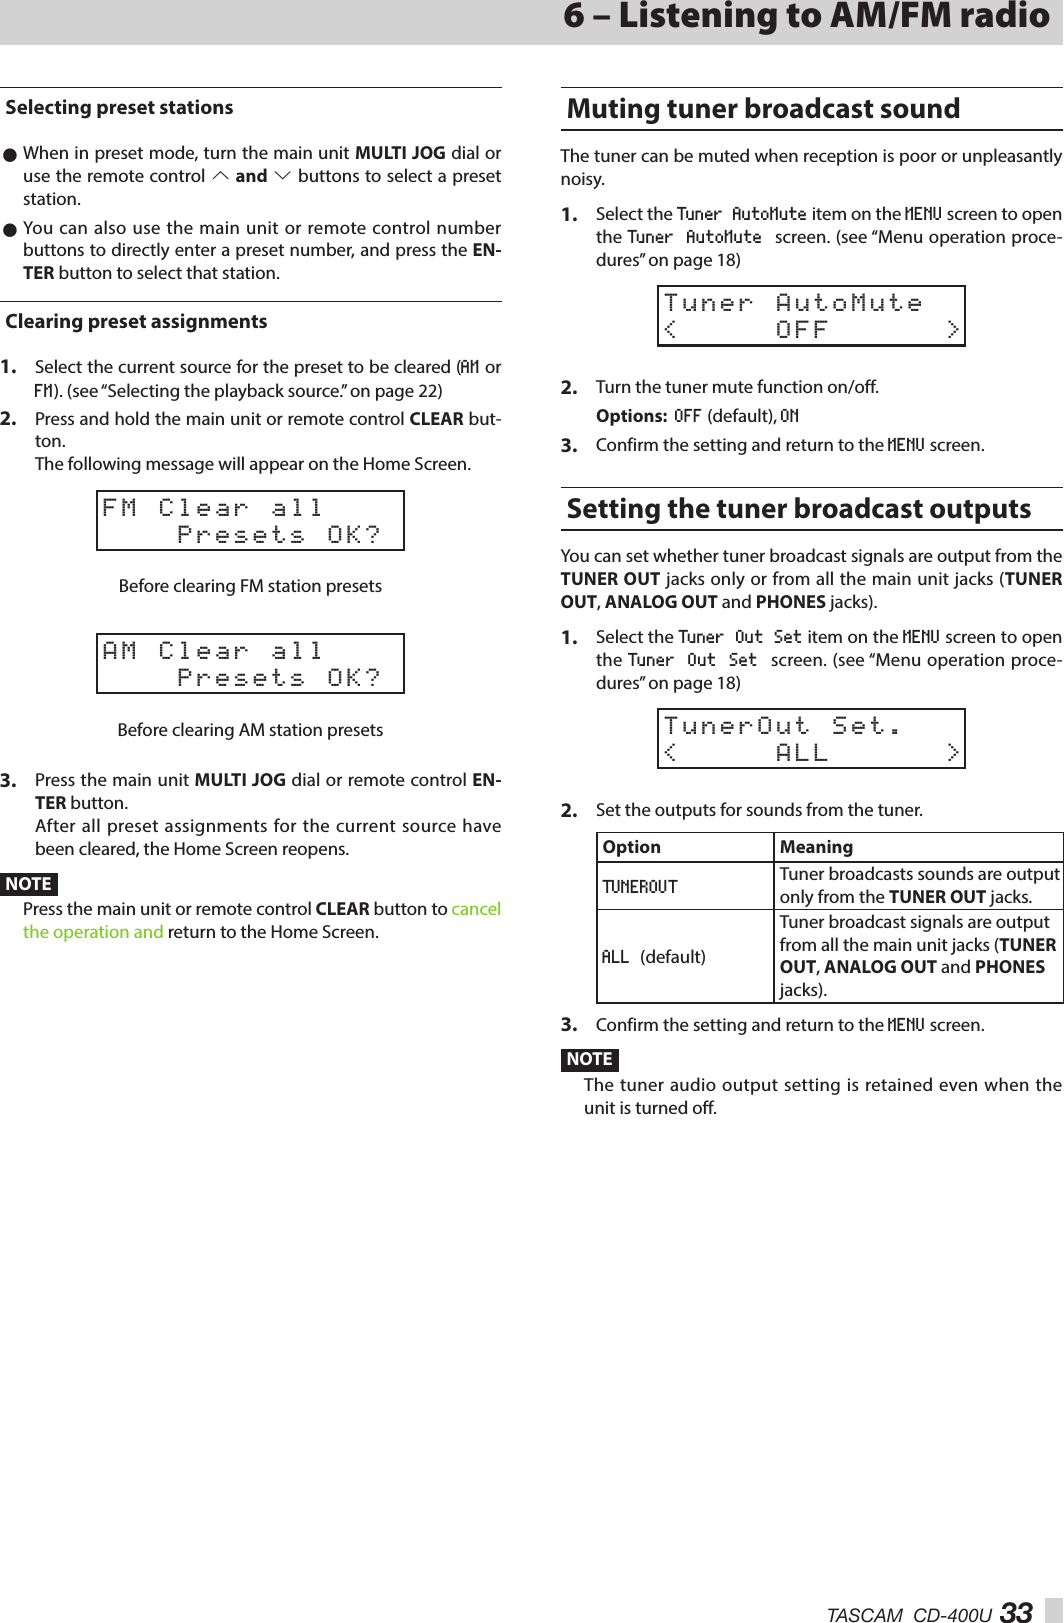
![32 TASCAM CD-400U6 – Listening to AM/FM radioThis unit can be used to listen to AM/FM radio.The following instructions assume that the current source has been set to AM or FM. (see “Selecting the playback source.” on page 22)Tuning in radio stationsChanging the received frequencyChanging the frequencyPress the main unit STOP or remote control 8 button to switch between frequency selection mode (preset numbers not shown) and preset mode (preset numbers shown).When in preset mode, PXX appears on the Home Screen.FM STEREOP01 80.00MHz Raising the received frequencyWhen in frequency selection mode, turn the main unit MULTI JOG dial clockwise or use the remote control / [;] button to raise the received frequency by one step.When in frequency selection mode, press the main unit , [FAST] button or remote control , button to automatically search for received frequencies in the higher direction.Lowering the received frequencyWhen in frequency selection mode, turn the main unit MULTI JOG dial counterclockwise or use the remote control . [|] button to lower the received frequency by one step.When in frequency selection mode, press the main unit m [FAST] button or remote control m button to automatically search for received frequencies in the lower direction.Setting the FM modeActivate shift mode (SHIFT indicator lit) and press the main unit 8 [FM MODE] button, or press the remote control FM MODE button to switch between stereo and mono reception.FM STEREO 80.00MHz STEREO (stereo, default)The unit will receive stereo FM broadcasts in stereo. o If reception is poor, switch to MONO (mono) reception.MONO (mono)The unit will receive FM broadcasts in mono. When the recep-tion of an FM stereo broadcast is poor, select this mode. The sound becomes mono, but noise is also reduced, making it sound better.NOTEMono reception mode will automatically be disabled when the received frequency is changed.Setting radio station presetsThis unit can have up to 20 FM and 20 AM presets.NOTEUnless the preset memory is cleared, preset radio stations will be retained even when the unit is turned off. (see “Clearing preset assignments” on page 33)Setting radio station presets automatically1. Select the current source for the presets (AM or FM). (see “Se-lecting the playback source.” on page 22)2. Press the main unit 6 [A.PRESET] button when shift mode is active (SHIFT indicator lit) or press and hold the remote control PRESET button.The following message will appear on the Home Screen.FM A.Preset OK? 3. Press the main unit MULTI JOG dial or remote control EN-TER button to start automatically setting presets.FM Auto Preset The unit will automatically search for radio stations and set them in order, starting with preset 01 (P01). The unit will stop automatically adding presets when 20 have been added or the reception frequency range has been searched completely.Setting radio station presets manually1. Select the current source for the presets (AM or FM). (see “Se-lecting the playback source.” on page 22)2. Tune in the station that you want to add as a preset. (see “Changing the received frequency” on page 32)3. Press the main unit 7 [M.PRESET] button when shift mode is active (SHIFT indicator lit) or press the remote control PRESET button.P01 will blink at the top of the Home Screen.FM P01 STEREOP01 80.00MHz NOTE i The blinking P01 will disappear after some time passes. i If * appears, the preset already has an assigned frequency.4. Turn the main unit MULTI JOG dial or use the remote con-trol .// [l/;] buttons to select the preset number to assign.5. Press the main unit MULTI JOG dial or remote control EN-TER button to confirm the preset.](https://usermanual.wiki/TEAC/CD400U/User-Guide-3670571-Page-32.png)
![34 TASCAM CD-400U6 – Listening to AM/FM radioRDS (European model only)The Radio Data System (RDS) is a broadcasting service that al-lows stations to send additional information along with the reg-ular radio program signal. 0RDS works on the FM frequency band in Europe only.1. Tune in to an FM RDS station. (see “Tuning in radio stations” on page 32)2. Press the main unit DISPLAY button or remote control DIS-PLAY/RDS/INFO [PAIRING] button to cycle through the following RDS modes.Program service (PS)When you select Program service, PS will appear to the right of FM and then the program service name or station's name will be displayed. If there is no program service data, the frequency will be displayed.RDS Program type (PTY)When you select RDS Program type, PTY will appear to the right of FM and then the program type will be displayed.RDS Radio text (RT)When you select RDS Radio text, RT will appear to the right of FM and then information from the station consisting of up to 64 characters will be displayed.PTY searchYou can search for stations by program type. This function is available only through the RDS services of FM frequency stations in Europe.1. Press the main unit 5 [A-B REP] button when shift mode is active (SHIFT indicator lit) or press the remote control A-B REP button.PTY SEARCH appears on the display.2. Turn the main unit MULTI JOG dial or use the remote con-trol .// [l/;] buttons to select the desired program.You can select from 31 program types (PTY).3. Press the main unit MULTI JOG dial or remote control EN-TER button to confirm the selection.The unit starts searching. oWhen the program type that you have selected is found, searching stops and the program type will be displayed. oIf a matching program type is not found during PTY Search, it will stop at the frequency set before search-ing started. oTo stop searching, press the main unit 5 [A-B REP] but-ton when shift mode is active (SHIFT indicator lit) or press the remote control A-B REP button.RDS Program typeNEWS:Brief announcements, events, public opinion, reports and real situations.AFFAIRS:Suggestions, including practical announcements other than news, documents, discussion and analysis.INFO:Useful and reference information, such as weather forecasts, consumer guides and medical advice.SPORT:Sports-related programs.EDUCATE:Educational and cultural information.DRAMA:All kinds of radio concerts and serial dramas.CULTURE:All aspects of national or local culture, including religious events, philosophy, social science, language and theatre.SCIENCE:Programs on natural science and technology.VARIED:Popular programs such as quizzes, entertainment news, inter-views, comedy and satire.POP M:Programs of commercial and popular songs, including music sales volumes, etc.ROCK M:Modern music generally composed and played by young musi-cians.EASY M:Popular music usually lasting for less than 5 minutes.LIGHT M:Classical music, instrumental music, chorus, and light music fa-vored by general audiences.CLASSICS:Orchestral music including great operas and symphonies,chamber music and so on.OTHER M:Other music styles, including rhythm & blues and reggae.WEATHER:Weather reports and forecasts.FINANCE:Financial reports, commerce and trading.CHILDREN:Children’s programs.SOCIAL:Social affairs.RELIGION:Religious programs.PHONE IN:Programs in which the public expresses its views by phone.TRAVEL:](https://usermanual.wiki/TEAC/CD400U/User-Guide-3670571-Page-34.png)
![36 TASCAM CD-400U7 – Dubbing (copying) functionsUsing the dubbing (copying) functions of this unit, the content of audio CDs and AM/FM broadcasts can be copied to SD cards and USB flash drives. The format used for the files on the dub-bing destination can also be changed.Dubbing overviewRegardless of the playback mode setting, audio CDs are played continuously while being dubbed to SD cards and USB flash drives. This unit can record AM/FM broadcasts to SD cards and USB flash drives.Some dubbing operations might delete existing files.NOTEThis unit cannot simultaneously dub to both an SD card and a USB flash drive.Dubbing file formatsThis unit can write the following file formats to the dubbing des-tination. 0Dubbing from audio CDs MP3 files (96/128/192/320 kbps) 0Dubbing from AM/FM radio MP3 files (96/128 kbps)For details about setting the MP3 file bit rate, see Make dubbing format settingspage 37.NOTEWhen dubbing, a folder named “/music/albumXXX/” is creat-ed and files named “trackXXX.wav/mp3” are created for each CD track on the destination. (“XXX” are three-digit numbers such as “001".)Operation when dubbingOperation is as follows when the unit is dubbing. 0Actions other than dubbing are not possible. 0While dubbing, the audio of the CD being dubbed is output. The DUB AutoMute item can be set to ON to stop output. (see “Muting analog outputs while dubbing” on page 37) 0Playback of SD cards and USB flash drives is not possible while dubbing. 0Regardless of the playback mode setting, audio CDs are played continuously while dubbing.NOTE i Depending on the SD card or USB flash drive used while dub-bing, errors could occur if writing cannot keep up with audio input. i When copying from an audio CD, silent gaps will occur even between tracks that sounded continuous on the CD.Dubbing from content on SD cards and USB flash drivesThis unit can only dub from CD and AM/FM radio sources. This unit cannot dub from data CDs, SD cards, USB flash drives, Bluetooth devices or the AUX input.Dubbing to write-protected mediaWrite Protected will appear on the Home Screen for several seconds before the display returns to the previous state.Dubbing to media that does not have enough open spaceMedia Full will appear on the Home Screen for several sec-onds before the display returns to the previous state. More-over, if the dubbing destination runs out of space while dub-bing, Media Full will appear on the Home Screen for several seconds and dubbing will stop.Dubbing procedures1. Load the audio CD or tune in the radio frequency that you want to dub.2. Select the media to copy as the current source (CD, AM or FM). (see “Selecting the playback source.” on page 22)3. When stopped, press the main unit 0 [DUB] button when shift mode is active (SHIFT indicator lit) or press the remote control DUB button to activate dubbing mode.CD DUBBING *USB <> SD4. Turn the main unit MULTI JOG dial or use the remote con-trol .// [l/;] buttons to select the dubbing destina-tion (USB or SD).NOTE i Regardless of the current source setting, dubbing will occur to the loaded SD card or USB flash drive if only one is loaded. i This unit cannot simultaneously dub to both an SD card and a USB flash drive.5. Press the main unit MULTI JOG dial or remote control EN-TER button to confirm the dubbing destination medium and open the following screen.CD ->USB DUBBING Selct folderUSB selectedNOTE i If the dubbing destination medium is write-protected, a Write Protected message will appear. Press the main unit or remote control CLEAR button to close the message and return to the Home Screen. i If the dubbing destination medium does not have enough open space, a Media Full message will appear. Press the main unit or remote control CLEAR button to close the mes-sage and return to the Home Screen. Moreover, if the dub-bing destination runs out of space while dubbing, a Media Full message will appear and dubbing will stop. Press the main unit or remote control CLEAR button to close the mes-sage and return to the Home Screen.6. Turn the main unit MULTI JOG dial or use the remote con-trol .// [l/;] buttons to select the dubbing destina-tion folder.CD ->USB DUBBING ROOT](https://usermanual.wiki/TEAC/CD400U/User-Guide-3670571-Page-36.png)
![TASCAM CD-400U 377 – Dubbing (copying) functions7. Press the main unit 0 [DUB] button or remote control DUB button again to start dubbing.CD ->USB DUBBING 01 00:018. To stop dubbing, press the main unit STOP button or re-mote control 8 button.A Complete message will appear, and the Home Screen will reopen.When the current source is CD, dubbing will automatically stop after the last track on the CD has been copied.NOTEThe date and time information for the folders and files creat-ed are fixed and might be different from the current date and time depending on the dubbing.Muting analog outputs while dubbingOutput from the ANALOG OUT (UNBALANCED) L/R and AN-ALOG OUT (BALANCED) L/R jacks can be muted to prevent the dubbed sound from being output to connected equipment while recording (dubbing).1. Select the DUB AutoMute item on the MENU screen to open the DUB AutoMute screen. (see “Menu operation proce-dures” on page 18) DUB AutoMute< OFF >2. Turn the dubbing mute function on/off.Options: OFF (default), ON3. Confirm the setting and return to the MENU screen.NOTEThe dubbing mute function on/off setting is retained even when the unit is turned off.Make dubbing format settingsSet the dubbing format.1. Select the Dubbing Format item on the MENU screen to open the MP3 Bit rate screen. (see “Menu operation pro-cedures” on page 18) Dubbing Format< mp3:128 kbps >2. Set the dubbing format.Options: 96 kbps, 128 kbps (default), 192 kbps, 320 kbps, wav3. Confirm the setting and return to the MENU screen.NOTEThe dubbing format setting is retained even when the unit is turned off. Recording times when dubbingThe table below shows maximum recording times when dubbing on SD/SDHC cards and USB flash drives of different capacities by file format.File format (set when dubbing) SD/SDHC card or USB flash drive capacity4 GB 8 GB 16 GB 32 GB 64 GBWAV (STEREO) 16-bit 44.1kHz 6 hours 17 min-utes12 hours 35 minutes25 hours 11 minutes50 hours 23 minutes About 100 hoursMP3 (STEREO)96kbps 44.1kHz 92 hours 35 minutes About 185 hours About 370 hours About 740 hours About 1481 hours128kbps 44.1kHz 69 hours 26 minutes About 138 hours About 277 hours About 555 hours About 1111 hours192kbps 44.1kHz46 hours 17 min-utes92 hours 35 min-utes About 185 hoursAbout 370 hoursAbout 740 hours320kbps 44.1kHz 27 hours 46 minutes55 hours 33 minutes About 111 hours About 222 hours About 444 hours 0The recording times shown above are estimates. They might differ depending on the SD/SDHC card or USB flash drive in use. 0The recording times shown above are not continuous recording times, but rather they are the total possible recording times for the SD/SDHC card or USB flash drive.](https://usermanual.wiki/TEAC/CD400U/User-Guide-3670571-Page-37.png)
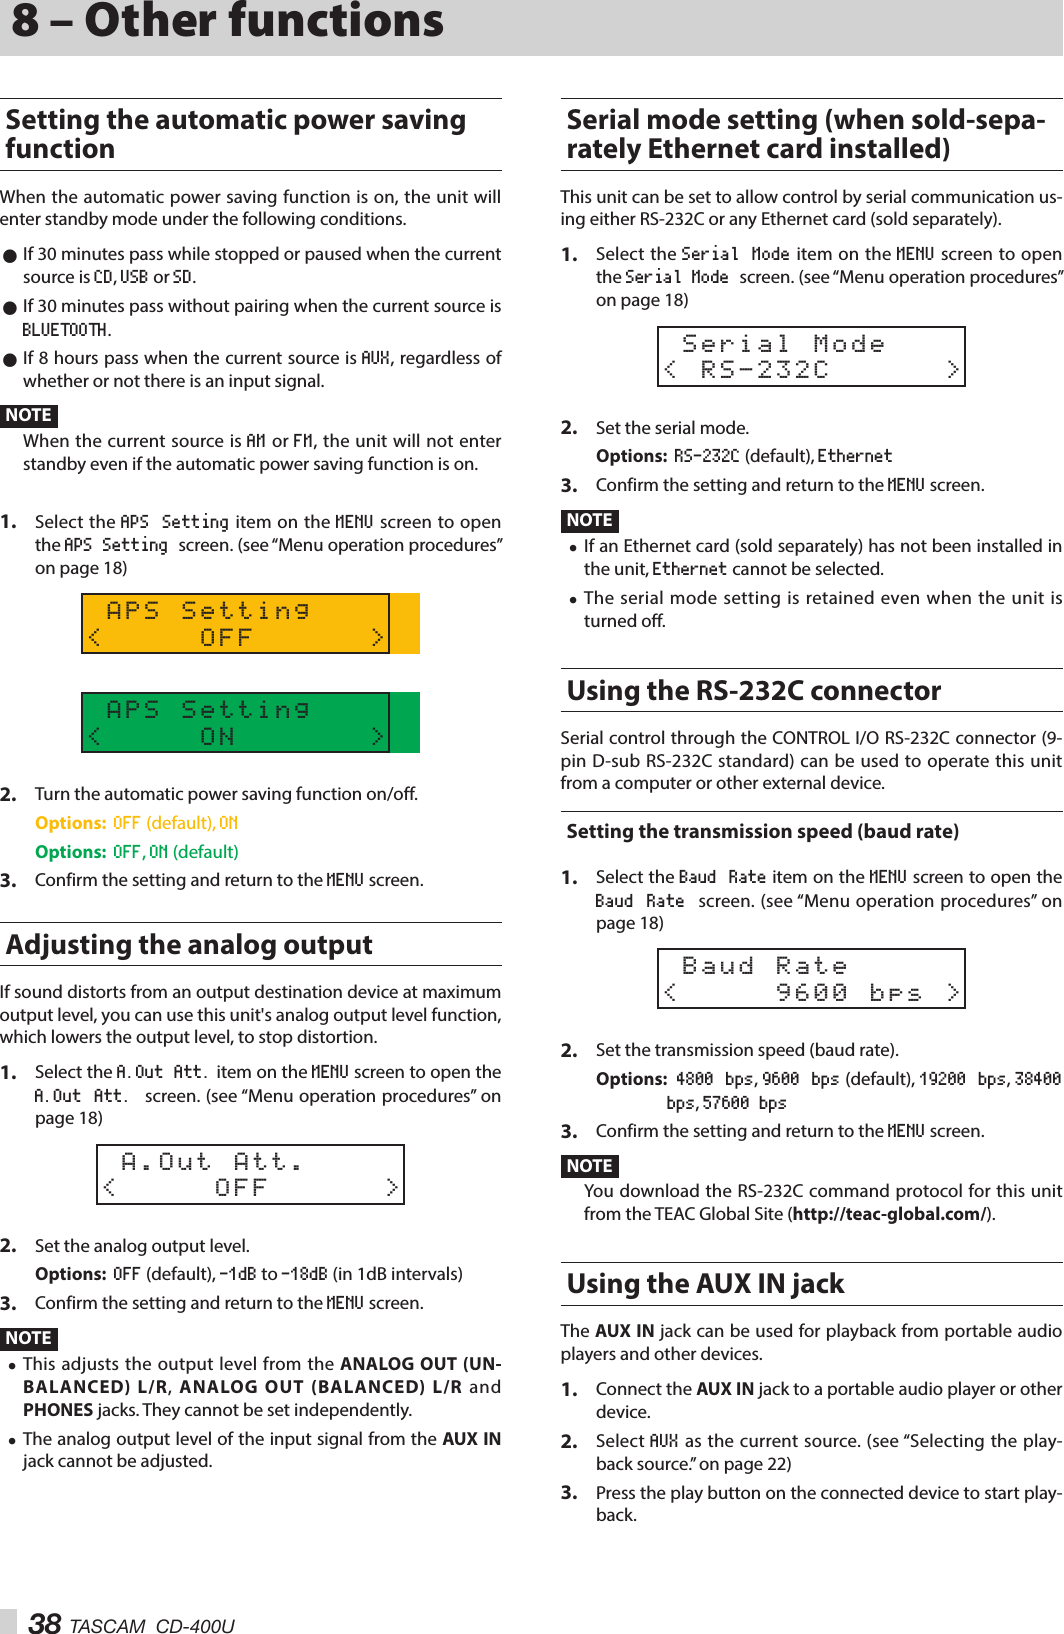
![TASCAM CD-400U 398 – Other functionsChecking the firmware versionYou can check the version of the system firmware used by this unit.1. Select the Information item on the MENU screen to open a screen where you can check the firmware version. (see “Menu operation procedures” on page 18) ver 1.00 Information The firmware version confirmation screen shows informa-tion about the system firmware version.2. Press the main unit MULTI JOG dial or remote control EN-TER button to confirm the content and return to the MENU screen.Restoring factory default settingsYou can restore the various settings stored in the backup memo-ry of the unit to their factory default values.Use the following menu procedures to do so.1. Select the Factory Preset item on the MENU screen. (see “Menu operation procedures” on page 18)2. Press the main unit MULTI JOG dial or remote control EN-TER button.A confirmation message will appear. OK? Factory PresetNOTETo cancel, press the main unit BACK [PAIRING] button or re-mote control k button.3. Press the main unit MULTI JOG dial or remote control EN-TER button to reset the unit to its factory settings.After it completes, the MENU screen will reopen.](https://usermanual.wiki/TEAC/CD400U/User-Guide-3670571-Page-39.png)