TECH AUDIO GC1 WI-FI Multlroom Loudspeaker User Manual
TECH-AUDIO CO., LTD WI-FI Multlroom Loudspeaker Users Manual
Users Manual
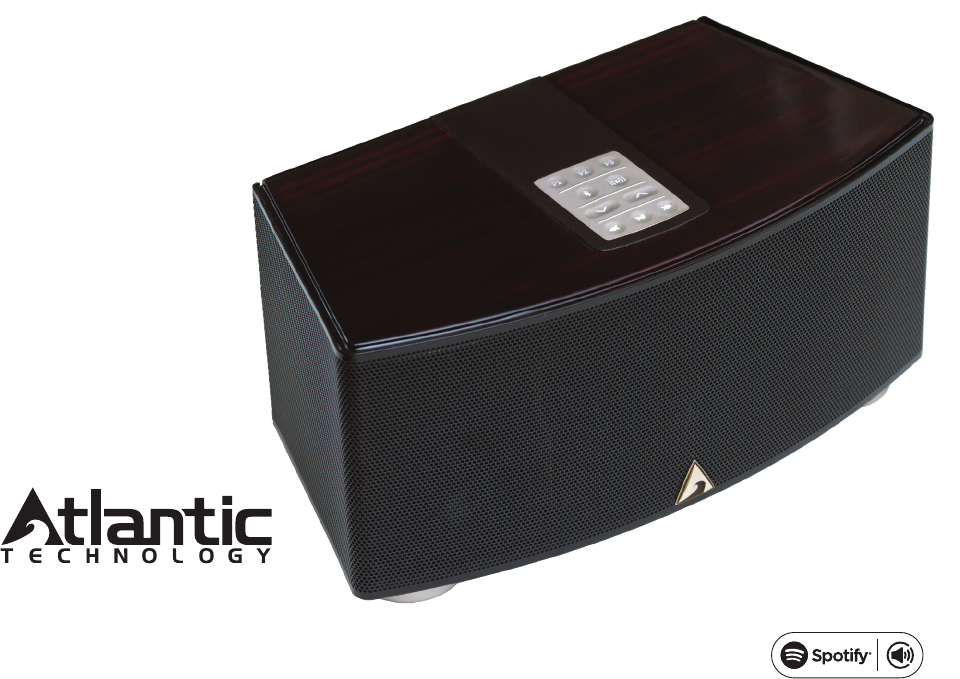
Gatecrasher 1
Wi-Fi Multiroom Loudspeaker
USER GUIDE
343 Vanderbilt Avenue
Norwood, MA 02062
Telephone: (781) 762-6300
Fax: (781) 762-6868

WARNING
TO PREVENT FIRE OR SHOCK HAZARD, DO NOT USE THIS PLUG WITH AN EXTENSION
CORD, RECEPTACLE OR OTHER OUTLET UNLESS THE BLADES CAN BE FULLY INSERTED
TO PREVENT BLADE EXPOSURE
TO PREVENT FIRE OR SHOCK HAZARD, DO NOT EXPOSE THIS APPLIANCE TO RAIN OR
MOISTURE.
The lightning flash with arrowhead
symbol, within an equilateral triangle,
is intended to alert the user to the
presence of uninsulated “dangerous
voltage” within the product’s
enclosure that may be of sufficient
magnitude to constitute a risk of electric
shock to persons.
The exclamation point within an
equilateral triangle, is intended to alert
the user to the presence of important
operating and maintenance (servicing)
instructions in the literature
accompanying the appliance.
CAUTION: TO REDUCE THE RISK OF
ELECTRIC SHOCK, DO NOT REMOVE
COVER (O R BACK). N O USER-
SERVICEABLE PARTS INSIDE.
REFER SERVICING TO QUALIFIED
SERVICE PERSONNEL.
CAUTION
RISK OF ELECTRIC SHOCK
DO NOT OPEN
12. Use only with the cart, stand, tripod, bracket, or table
specied by the manufacturer, or sold with the apparatus.
When a cart is used, use caution when moving the cart/
apparatus combination to avoid injury from tip-over.
13. Unplug this apparatus during lightning storms or when unused for long
periods of time.
14. Refer all servicing to qualied service personnel. Servicing is required
when the apparatus has been damaged in any way, such as power-
supply cord or plug is damaged, liquid has been spilled or objects have
fallen into the apparatus, the apparatus has been exposed to rain or
moisture, does not operate normally, or has been dropped.
15. Grounding or Polarization–This product may be equipped with a
polarized alternating-current line plug (a plug having one blade wider
than the other). This plug will t into the power outlet only one way. This
is a safety feature. If you are unable to insert the plug fully into the
outlet, try reversing the plug. If the plug should still fail to t, contact
your electrician to replace your obsolete outlet. Do not defeat the
safety purpose of the polarized plug.
Alternate Warnings–This product is equipped with a three-wire
grounding-type plug, a plug having a third (grounding) pin. This plug will
only t into a grounding-type power outlet. This is a safety feature. If
you are unable to insert the plug into the outlet, contact your electrician
to replace your obsolete outlet. Do not defeat the safety purpose of the
grounding-type plug.
16. Ventilation–Slots and openings in the cabinet are provided for
ventilation and to ensure reliable operation of the product and to
protect it from overheating, and these openings must not be blocked or
covered. The openings should never be blocked by placing the product
on a bed, sofa, rug, or other similar surface. This product should not
be placed in a built-in installation such as a bookcase or rack unless
proper ventilation is provided or the manufacturer’s instructions have
been adhered to.
17. The MAINS plug or an appliance coupler is used as the disconnect
device, the disconnect device shall remain readily operable.
18. CLASS II apparatus with double insulation, and no protective earth
provided.
19. CAUTION: Danger of explosion if the remote control battery is
incorrectly replaced. Replace only with the same or equivalent type.
20. WARNING: The remote control battery (battery or batteries or battery
pack) shall not be exposed to excessive heat such as sunshine, re or
the like.
21. No naked ame sources, such as lighted candles, should be placed on
the apparatus.
Important Safety Instructions
1. Read these instructions.
2. Keep these instructions.
3. Heed all warnings.
4. Follow all instructions.
5. Do not use this apparatus near water.
6. Clean only with dry cloth.
7. Do not block any ventilation openings. Install in accordance with the
manufacturer’s instructions.
8. Do not install near any heat sources such as radiators, heat registers,
stoves, or other apparatus (including ampliers) that produce heat.
9. Do not defeat the safety purpose of the polarized or grounding-type
plug. A polarized plug has two blades with one wider than the other.
A grounding type plug has two blades and a third grounding prong.
The wide blade or the third prong are provided for your safety. If the
provided plug does not t into your outlet, consult an electrician for
replacement of the obsolete outlet.
10. Protect the power cord from being walked on or pinched particularly at
plugs, convenience receptacles, and the point where they exit from
the apparatus.
11. Only use attachments/accessories specied by
the manufacturer.
European Union Information on Disposal
for Users of Waste Electrical &
Electronic Equipment (private households)
This symbol on the product(s) and / or accompanying documents means
that used electrical and electronic products should not be mixed with
general household waste. For proper treatment, recovery and recycling,
please take this product(s) to designated collection points where it will be
accepted free of charge.
Alternatively, in some countries you may be able to return your products to
your local retailer upon purchase of an equivalent new product.
Disposing of this product correctly will help save valuable resources and
prevent any potential negative effects on human health and the environ-
ment, which could otherwise arise from inappropriate waste handling.
Please contact your local authority for further details of your nearest desig-
nated collection point.
Penalties may be applicable for incorrect disposal of this waste, in accor-
dance with you national legislation.
For business users in the European Union
If you wish to discard electrical and electronic equipment, please contact
your dealer or supplier for further information.
Information on Disposal in other Countries outside the European Union
This symbol is only valid in the European Union. If you wish to discard this
product please contact your local authorities or dealer and ask for the cor-
rect method of disposal.
FCC Compliance Statement
This device complies with part 15 of the FCC Rules. Operation is subject to
the following two conditions:
1. This device may not cause harmful interference, and
2. This device must accept any interference received, including interfer-
ence that may cause undesired operation.
FCC WARNING
This equipment has been tested and found to comply with the limits for a
Class B digital device, pursuant to Part 15 of the FCC Rules. These limits
are designed to provide reasonable protection against harmful interference
in a residential installation.
This equipment generates, uses and can radiate radio frequency energy
and, if not installed and used in accordance with the instructions, may
cause harmful inerference to radio communications.
However, there is no guarantee that interference will not occur in a particu-
lar installation. If this equipment does cause harmful interference to
radio or television reception, which can be determined by turning the equip-
ment off and on, the user is encouraged to try to correct the interference
by one or more of the following measures:
• Reorient or relocate the receiving antenna.
• Increase the separation between the equipment and the receiver.
• Connect the equipment into an outlet different from that to which the
receiver is connected.
• Consult the dealer or an experienced radio/TV technician for help.
Caution:
To comply with the limits for an FCC Class B comput
ing device, always use any shielded signal cord supplied with this unit.
The Federal Communications Commission warns that changes or modica-
tions of the unit not expressly approved by the party responsible for compli-
ance could void the user’s authority to operate the equipment.
Radio Frequency Interference Statement
Warning:
This is a Class B product. In a domestic environment, this product may
cause radio interference in which case the user may be required to take
adequate measures.
Carton Content
Gatecrasher Music Player
Spotify document
Power Supply Adapter
This User Manual
Connection Cable
Gatecrasher Setup Overview
1 Download the Gatecrasher smart device
app from iTunes or Google Play.
2 Connect Gatecrasher to AC power.
3 Use the Gatecrasher app on your smart
device to link Gatecrasher with your Wi-Fi.
4 Then use the Gatecrasher app to se-
lect various audio sources, including:
• streaming audio sites on the internet.
• content stored on your smart device.
• content stored in shared folders on
your home network.
• a music source connected to the AUX
input of Gatecrasher.
Table of Contents
[ii][i]
Carton Content ........................................ i
Table of Contents and Overview .................ii
Controls and Input Diagrams .................... iii
Download The Gatecrasher app ................ 1
Connect Gatecrasher ............................... 2
Congure Gatecrasher app .....................3-7
Selecting Sources ...............................8-11
Adding More Gatecrashers .................11-12
Settings Options ...............................13-14
Spotify information ................................ 15
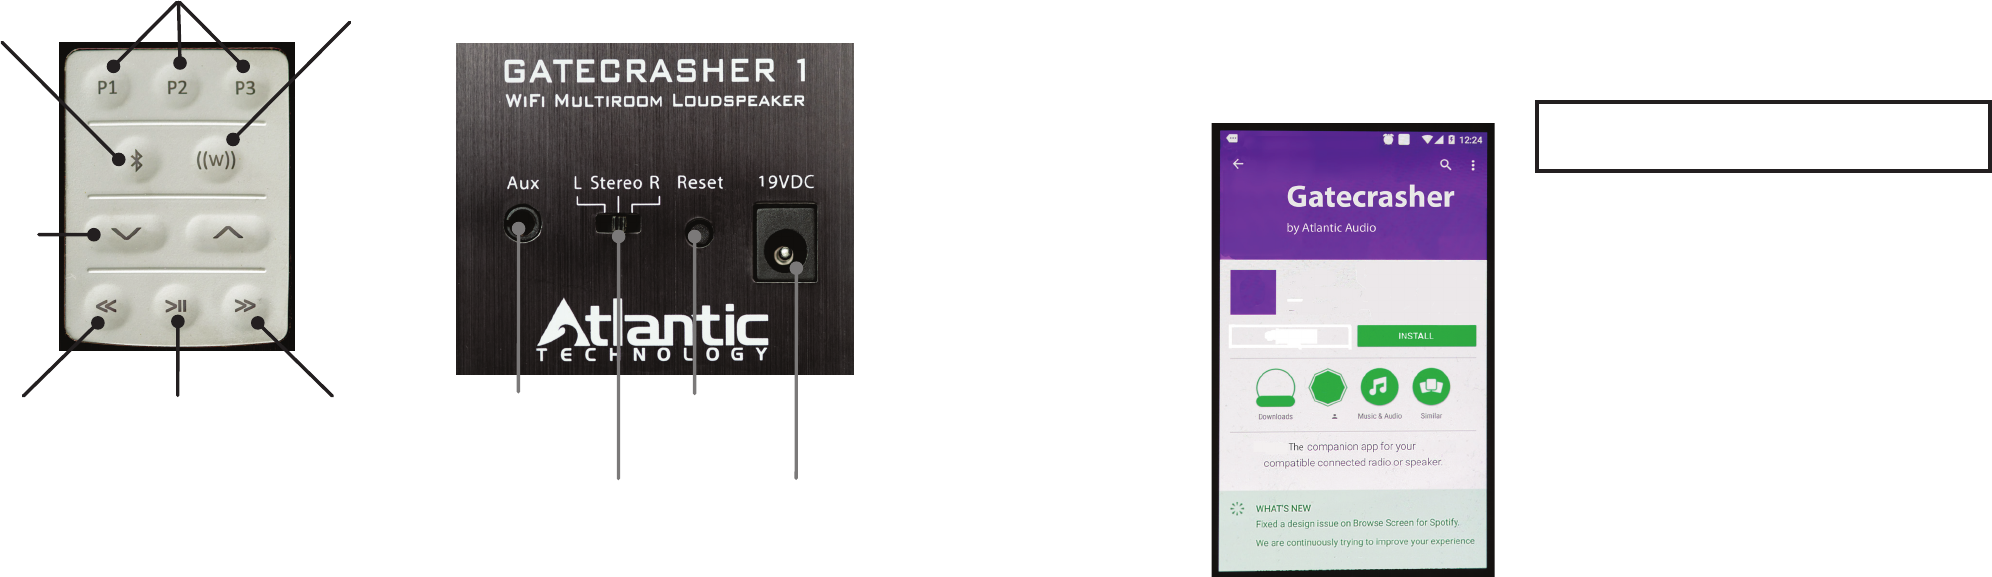
Gatecrasher Control Pad and Back Panel
Push these buttons to select
item 1, 2 or 3 from the
Preset Audio Sources
list in the Gatecrasher app.
Push to select a Bluetooth
audio source.
Push to go back
one track
or selection.
Volume Up and
Volume Down
buttons.
Push to go forward
one track
or selection.
Pause or restore
playback.
Connect an analog audio
source to this 3.5mm
stereo minijack input.
Pushing this button re-
stores Gatecrasher 1
to its “out of carton”
settings.
Choose Stereo output or
“L”– play just the Left channel
signal through both speakers or
“R”– play just the Right channel
signal through both speakers.
Connect the DC plug of
the external power supply
to this power input jack.
Push to select a Wi-Fi
audio source.
Gatecrasher is setup and controlled by a
smart device (like a phone or a tablet) using
the Atlantic Audio Gatecrasher app.
Download the app to your smart device from
the app page at either iTunes or Google Play.
Once you have downloaded the Gatecrasher
app to your smart device, you use app to lo-
cate your new Gatecrasher and then establish
communication between your Gatecrasher,
your smart device and your local wi setup.
[iii] [01]
This is the
Gatecrasher
download listing
as it appears in
Google Play.
Its listing in iTunes
is similar.
Once it is installed, run the
Gatecrasher app on your smart device.
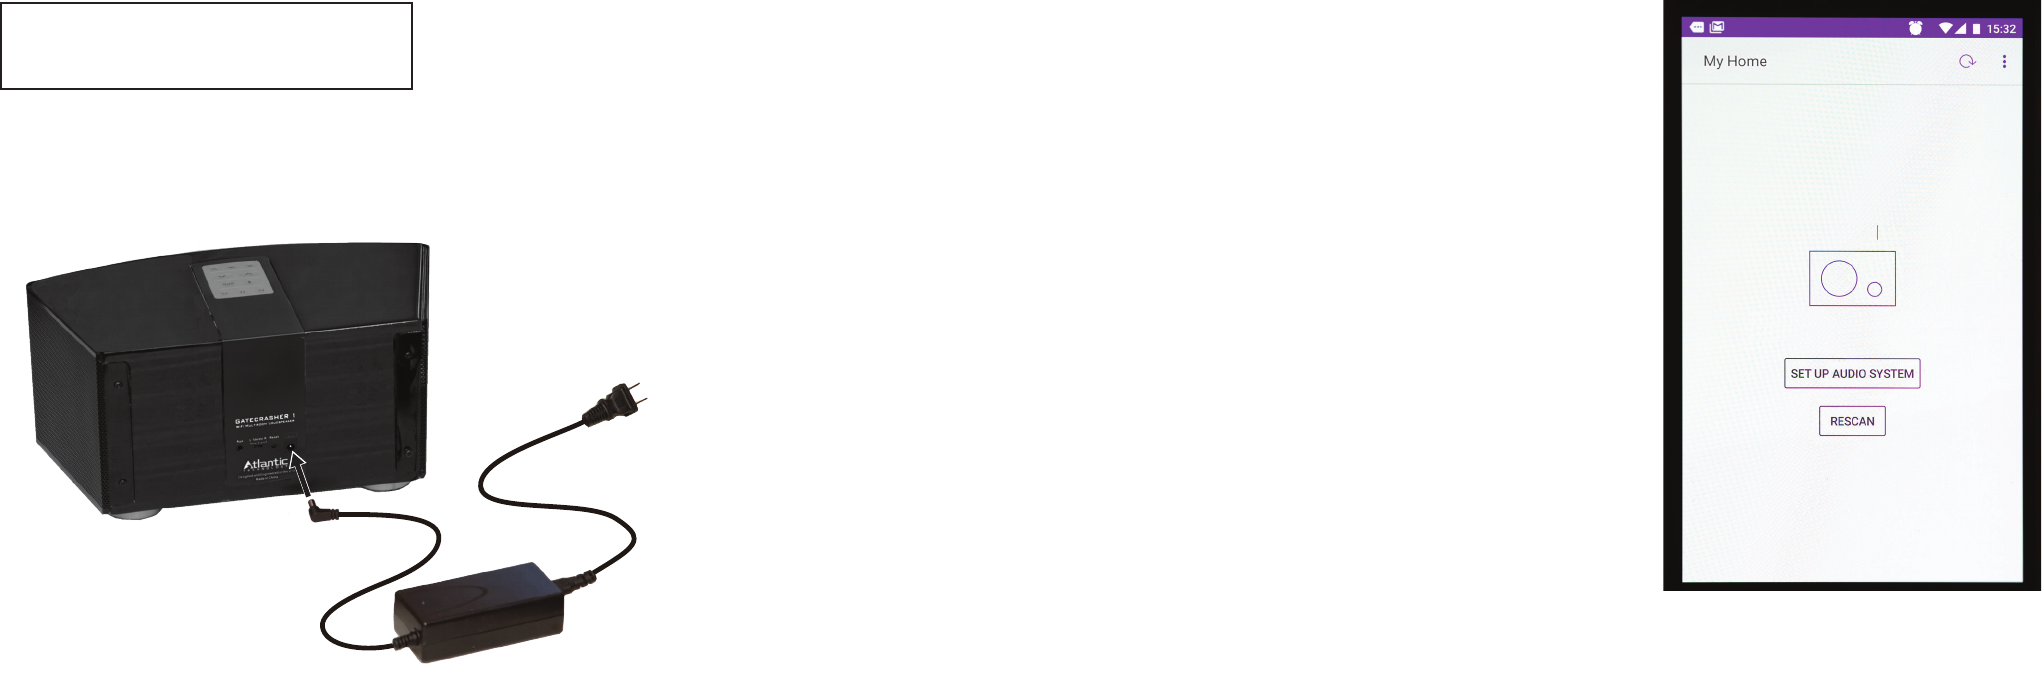
After Gatecrasher has been connected to
AC power for about 30 seconds, touch the
“SETUP AUDIO SYSTEM”
button on the app screen.
With the app running on your smart device,
connect your Gatecrasher to AC power.
Conguring the Gatecrasher app:
FIRST, connect the small DC plug on
the AC adapter to the 19VDC power
input on the back of Gatecrasher.
SECOND, connect the AC plug
to a power receptacle.
DC plug
AC adapter
This is an app screen on an Android
smart phone. The position of the
“Set Up Audio System” button
will vary depending on the smart device.
App STEP 1
Gatecrasher can be connected to any
100 to 240 Volt, 50 or 60 Hz
AC power source.
[03][02]

Conguring the Gatecrasher app, continued
The app will begin a scan to locate the
Gatecrasher.
When the app locates Gatecrasher, it will
display the default name for Gatecrasher.
The app lets you to rename Gatecrasher. The app next allows you to establish a
network connection to Gatecrasher.
Gatecrasher App STEP 2 Gatecrasher App STEP 3 Gatecrasher App STEP 4 Gatecrasher App STEP 5
[05][04]
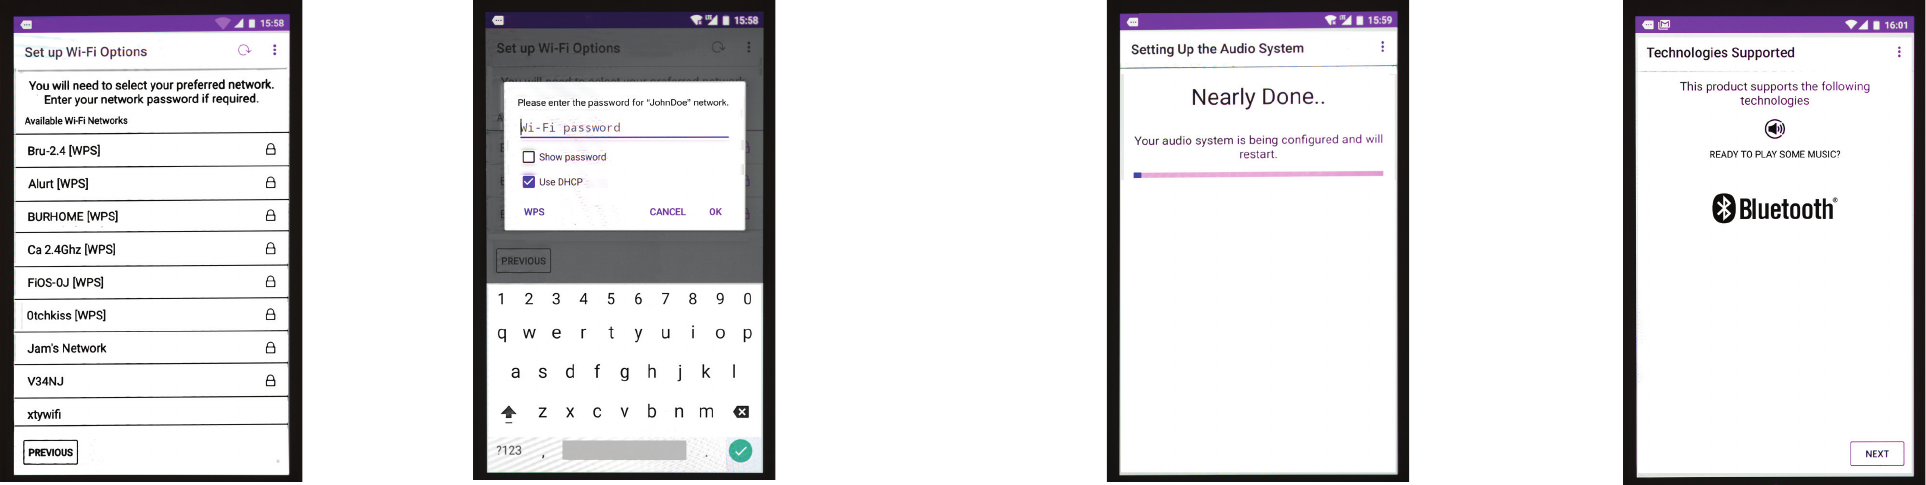
Conguring the Gatecrasher app, continued
Connecting to a Wi-Fi network is the best
choice for most users. After selecting Wi-
Fi, the app will present you with a list of
names of nearby Wi-Fi networks.
Selecting a Wi-Fi network. The log-on
screen for that network appears. Enter the
password for the network.
The app then congures Gatecrasher to
communicate with your smart device using
the chosen Wi-Fi network.
Once the Wi-Fi communication link has
been established, Gatecrasher will show
the credit screen and the
“READY TO PLAY SOME MUSIC?” link.
Gatecrasher App STEP 6 Gatecrasher App STEP 7 Gatecrasher App STEP 8 Gatecrasher App STEP 9
[07][06]
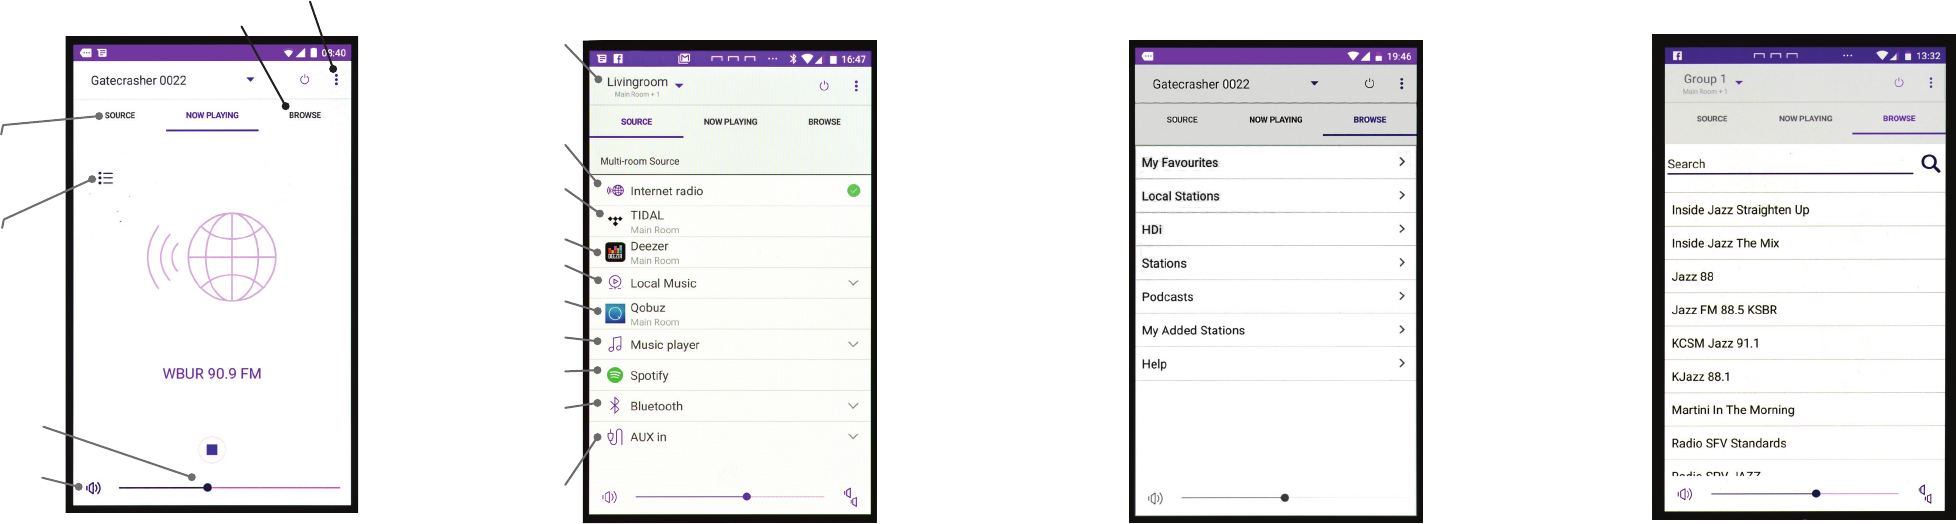
Selecting The Source You Want To Hear
When opened, the app selects the last
music source, like the streaming radio sta-
tion example below. Here’s how to choose
a different source.
Main Source Selection screen: When you
touch SOURCE, you reach this screen. Touch
an entry on the list to select it. The Sourc-
es available on your device may differ from
those shown in the image.
BROWSE for Internet Radio screen: Use
this screen to choose from a variety of sta-
tions streaming on the internet.
Touch this to see
the Preset Audio
Sources screen and
to add the current
station to the
Preset list.
Touch this slider to
adjust volume.
Mute/UnMute
Touch this to return
to the Main Source
Selection screen.
Touch this to see the OFF and Settings screen
Touch this to see the BROWSE screen
[09][08]
This entry shows if
linked Gatecrasher
systems are in use.
Listen to a
streaming
station
Listen to TIDAL
music service.
Listen to Deezer
music service.
Listen to Qobuz
music service.
Listen to Spotify
music service.
Play content stored
on the smart device.
Use a music player
on the smart device.
Select to send audio
to Gatecrasher using
a smart device’s
Bluetooth function.
Select to hear a
source connected to
Gatecrasher’s Aux
input.
Selecting The Source You Want To Hear, continued
Streaming Radio example: This screen
shows how streaming stations are listed
when you browse for stations by choosing
Stations>Location>California>Jazz
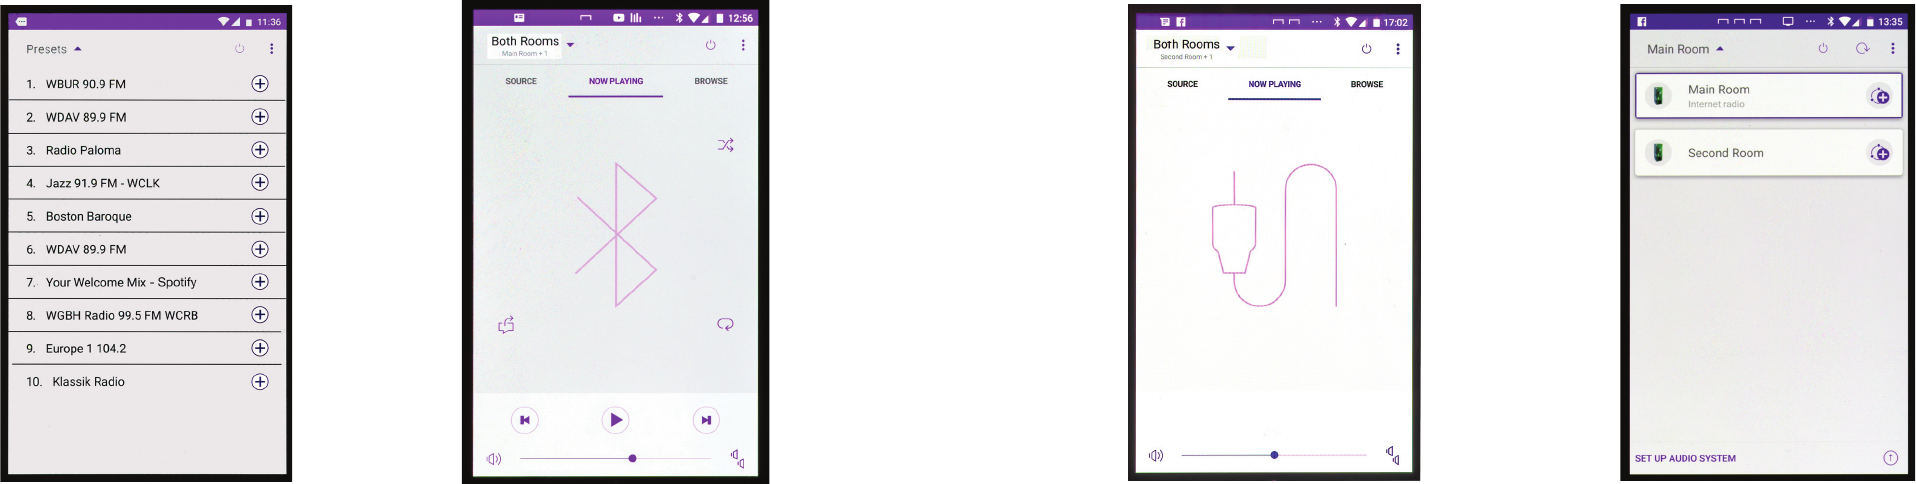
Selecting The Source You Want To Hear, continued Working with Additional Gatecrashers
[10]
Bluetooth Source screen: The Bluetooth
screen shows the status of your device’s
Bluetooth connection with Gatecrasher.
Use the Bluetooth function on your device
to conrm a Bluetooth pairing with Gate-
crasher.
Repeat the “Setup Audio System” routine as
described on Page 3 with a new Gatecrasher.
Change the name of the new system to make
it easy to identify.
You can choose to listen to a specic Gate-
crasher to hear by touching its entry.
AUX Source screen: Connect an audio
signal source to the Gatecrasher AUX IN
minijack. You can control playback volume
from Gatecrasher, but other playback func-
tions (Play/Pause/Stop) are controlled
from your audio signal source.
Preset Audio Sources screen: Store the
current source here by touching the + sign
at the end of a rank.
Touch an entry to hear it. Pressing P1, P2
and P3 on the Gatecrasher keypad directly
selects the station.
[11]
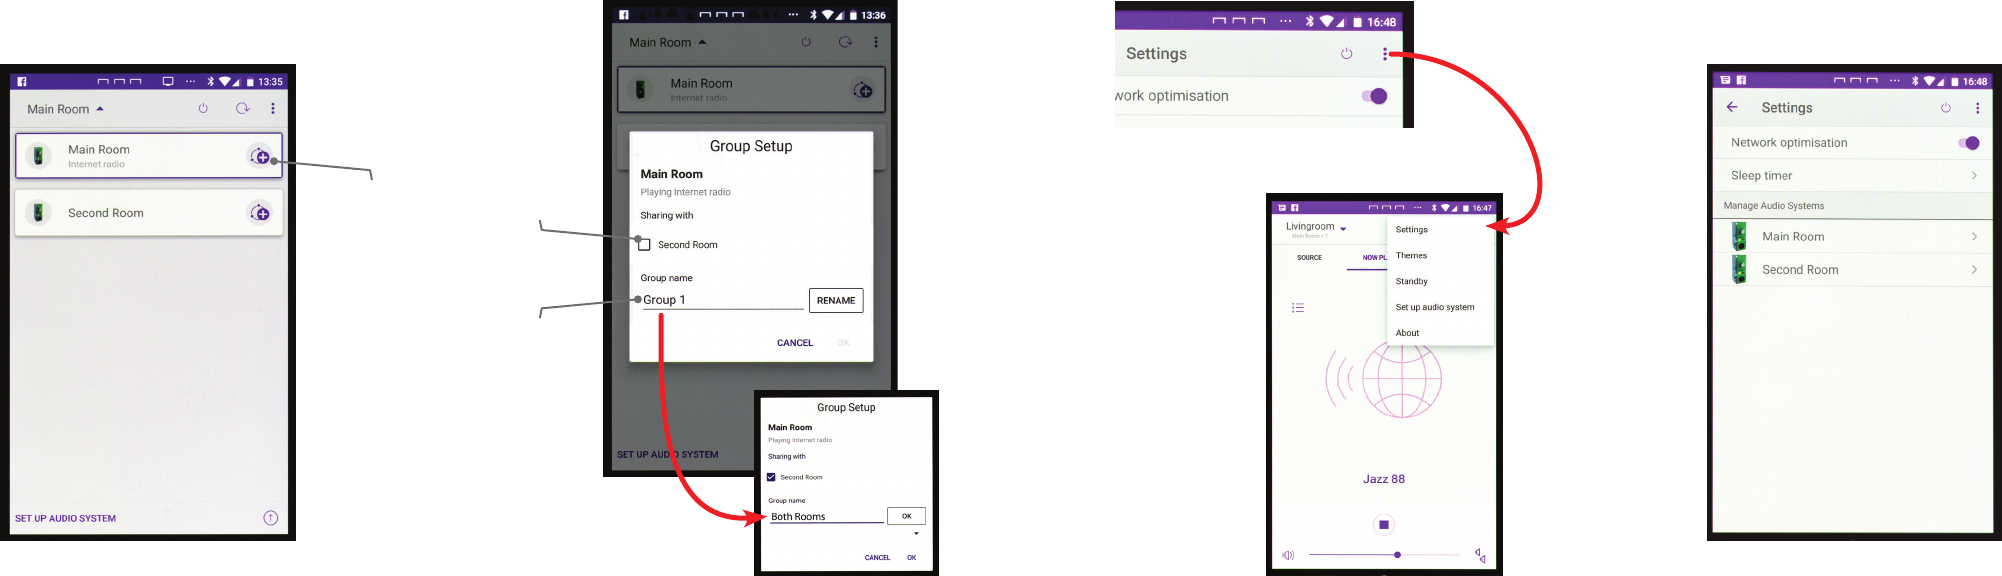
Working with Additional Gatecrashers - cont. Settings Options
Creating a Group: Create a Group to link
the two or more Gatecrashers. A Group
synchronizes play of any audio source on
all nearby Gatecrashers.
Touch the rst device’s “+” sign to start
the group creation routine.
Select the second device from the Group
Setup window, then choose a name for the
Group. Selecting OK creates the group.
Your devices are now synchronized.
From the Now Playing screen, touching the
three dots in the upper right brings up a
list with Settings at the top.
Touch Settings to see options that include
a Sleep timer and the ability to ne-tune a
Gatecrasher’s behavior.
Touch this icon to
create a group.
Check this box to
add Gatecrasher
“Second Room”
to Gatecrasher
“Main Room”
Touch RENAME to
choose a Group
name that ts your
Gatecrasher
installation.
[12] [13]
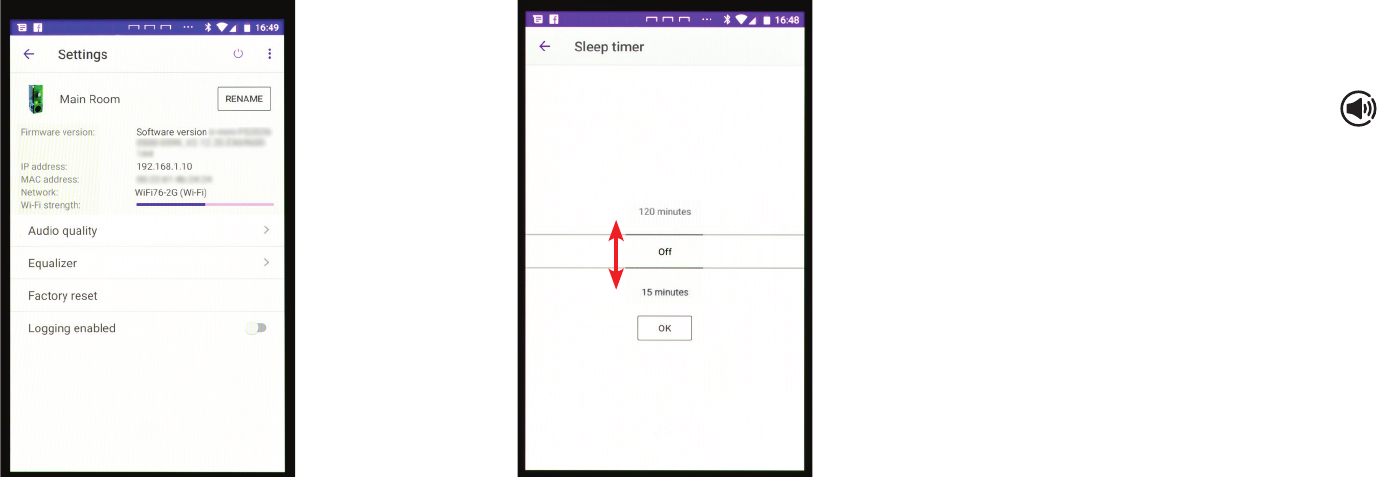
Settings Options
From Settings, you can rename a
Gatecrasher and adjust the tone of the
device (equalizer).
Sleep timer: Swipe up or down on the
Sleep timer screen to choose between 15
and 120 minutes of playtime before an
automatic turn-off.
Spotify Connect Information
How to use Connect
You’ll need Spotify Premium to use Connect, see details overleaf.
1. Add your new device to the same wi network as your phone, tablet
or PC (see product user instructions for details).
2. Open the Spotify app on your phone, tablet or PC, and play any song.
3. If you’re using the app on a phone - tap the song image in the bottom
left of the screen. For tablet and PC move to step 4.
4. Tap the Connect icon
5. Pick your device from the list. If you can’t see it, just check it’s
connected to the same wi network as your phone, tablet or PC.
All done! Happy listening.
Licenses
The Spotify Software is subject to third party licenses found here:
www.spotify.com/connect/third-party-licenses.
[14] [15]
FCC Statement:
This device complies with part 15 of the FCC Rules. Operation is subject to the
following
two conditions: (1) This device may not cause harmful interference, and (2) this
device
must accept any interference received, including interference that may cause
undesired
operation.
This equipment has been tested and found to comply with the limits for a Class B
digital
device, pursuant to part 15 of the FCC Rules. These limits are designed to provide
reasonable protection against harmful interference in a residential installation. This
equipment generates, uses and can radiate radio frequency energy and, if not installed
and used in accordance with the instructions, may cause harmful interference to radio
communications. However, there is no guarantee that interference will not occur in a
particular installation. If this equipment does cause harmful interference to radio or
television reception, which can be determined by turning the equipment off and on,
the
user is encouraged to try to correct the interference by one or more of the following
measures:
—Reorient or relocate the receiving antenna.
—Increase the separation between the equipment and receiver.
—Connect the equipment into an outlet on a circuit different from that to which the
receiver is connected.
—Consult the dealer or an experienced radio/TV technician for help.
Caution: Any changes or modifications not expressly approved by the party
responsible
for compliance could void the user's authority to operate the equipment.
This equipment complies with FCC radiation exposure limits set forth for an
uncontrolled environment. This transmitter must not be co-located or operating in
conjunction with any other antenna or transmitter.
This equipment complies with FCC radiation exposure limits set forth for an uncontrolled
environment.Thisequipment should be installed and operated with minimum distance
20cm between the radiator&your body.

343 Vanderbilt Avenue
Norwood, MA 02062
Telephone: (781) 762-6300
Fax: (781) 762-6868