TENDA TECHNOLOGY 4G600 3G/4G Wireless N150 Router User Manual 1
SHENZHEN TENDA TECHNOLOGY CO., LTD. 3G/4G Wireless N150 Router 1
Contents
- 1. User Manual-1
- 2. User Manual-2
User Manual-1

I
Copyright Statement
is the registered trademark of Shenzhen Tenda Technology Co.,
Ltd. All the products and product names mentioned herein are the trademarks or
registered trademarks of their respective holders. Copyright of the whole
product as integration, including its accessories and software, belongs to
Shenzhen Tenda Technology Co., Ltd. No part of this publication can be
reproduced, transmitted, transcribed, stored in a retrieval system, or translated
into any language in any form or by any means without the prior written
permission of Shenzhen Tenda Technology Co., Ltd. If you would like to know
more about our product information, please visit our website at
http://www.tendacn.com.
Disclaimer
Pictures, images and product specifications herein are for references only. To
improve internal design, operational function, and/or reliability, Tenda reserves
the right to make changes to the products described in this document without
obligation to notify any person or organization of such revisions or changes.
Tenda does not assume any liability that may occur due to the use or application
of the product or circuit layout(s) described herein. Every effort has been made
in the preparation of this document to ensure accuracy of the contents, but all
statements, information and recommendations in this document do not
constitute the warranty of any kind, express or implied.
II
About this Manual
Thank you for choosing Tenda! Before you start, please read this User Guide,
which instructs you to install and configure your device. This User Guide is
applicable to 4G600 and 4G630. Unless otherwise specified, the 4G630 is used
as an example throughout this User Guide.
Convention
This user guide uses the following formats to highlight special messages:
Icon
Description
Note
This format is used to highlight information of
importance or special interest. Ignoring this type
of note may result in ineffective configurations,
loss of data or damage to device.
Tip
This format is used to highlight a procedure that
will save time or resources.
Knowledge Center
Description of fields on the device GUI.
Technical Support
Website: http://www.tendacn.com
Email: support02@tenda.com.cn
Skype: tendasz
YouTube: Tendasz1999
Hotline:
1-800-570-5892 (USA) (061) 1300787922 (Australia)
(064) 800787922 (New Zealand) (0852) 36120883 (Hong Kong)

III
Contents
About this Manual .......................................................................................................... II
Convention ..................................................................................................................... II
Technical Support ........................................................................................................... II
I Product Overview .......................................................................................................... 1
1 Package Contents ......................................................................................................... 1
2 Getting to Know Your Device ....................................................................................... 1
2.1 What It Looks like .................................................................................................. 1
2.2 LED ....................................................................................................................... 2
2.3 Button & Interface.................................................................................................. 3
2.4 Label ..................................................................................................................... 4
II Quick Setup ................................................................................................................. 5
1 Hardware Install .......................................................................................................... 5
3G/4G Router Mode ..................................................................................................... 5
Wireless Router Mode .................................................................................................. 6
Universal Repeater Mode ............................................................................................. 7
2 Configure Your PC ....................................................................................................... 7
3 Web Login ................................................................................................................... 8
4 Quick Internet Setup & Wireless Security Setup ............................................................ 9
3G/4G Router Mode .................................................................................................... 10
Wireless Router Mode – DHCP .................................................................................... 12
Wireless Router Mode – PPPoE ................................................................................... 13
Universal Repeater Mode ............................................................................................ 15
Auto-switch System Mode & Priority ........................................................................... 17
III Features & Configurations ........................................................................................ 19
1 Status ......................................................................................................................... 19
WAN Status ................................................................................................................ 19
LAN Status ................................................................................................................. 21
Wireless Status ........................................................................................................... 21
System Status ............................................................................................................. 22
2 Basic Settings ............................................................................................................. 23
2.1 LAN Settings ........................................................................................................ 23
2.2 WAN Settings ........................................................................................................ 24
2.3 WAN Speed (Available only in Wireless Router Mode) ............................................ 32
2.4 DNS Settings ........................................................................................................ 33
2.5 MAC Clone (Available only in Wireless Router Mode) ............................................ 34
2.6 DHCP Server ......................................................................................................... 36
2.7 DHCP Client List .................................................................................................. 37
3 Wireless Settings ........................................................................................................ 40
3.1 Basic .................................................................................................................... 40
3.2 Security ................................................................................................................ 41
3.3 Access Control ...................................................................................................... 44
3.4 Connection Status .................................................................................................. 45

IV
4 Advanced Applications ................................................................................................ 47
4.1 DDNS Settings ...................................................................................................... 47
4.2 DMZ Host ............................................................................................................. 50
4.3 UPNP.................................................................................................................... 51
4.4 Remote Web Management ...................................................................................... 52
4.5 Bandwidth Control (Available only in 4G600) ........................................................ 53
4.6 Client Filter (Available only in 4G600) .................................................................. 55
5 Tools .......................................................................................................................... 59
5.1 Time & Date ......................................................................................................... 59
5.2 Firmware Upgrade ................................................................................................. 61
5.3 Backup & Restore.................................................................................................. 62
5.4 Restore to Factory Default ..................................................................................... 65
5.5 Change Password ................................................................................................... 66
5.6 Logs ..................................................................................................................... 67
5.7 Reboot .................................................................................................................. 68
IV Appendix .................................................................................................................... 69
1 Configure Your PC ...................................................................................................... 69
Windows 7 .................................................................................................................. 69
Windows XP ............................................................................................................... 71
2 Join Your Wireless Network ......................................................................................... 74
Windows 7 .................................................................................................................. 74
Windows XP ............................................................................................................... 75
3 FAQs .......................................................................................................................... 78
4 Remove Wireless Network from Your PC ...................................................................... 80
Windows 7 .................................................................................................................. 80
Windows XP ............................................................................................................... 81
5 Safety and Emission Statement .................................................................................... 83
1
I Product Overview | Tenda
I Product Overview
1 Package Contents
Unpack the package. Your box should contain the following items:
3G/4G Wireless Router
Ethernet Cable
Power Adapter
Install Guide
Resource CD
If any of the parts are incorrect, missing, or damaged, contact your Tenda dealer.
Keep the carton, including the original packing materials, in case you need to
return the product for repair.
2 Getting to Know Your Device
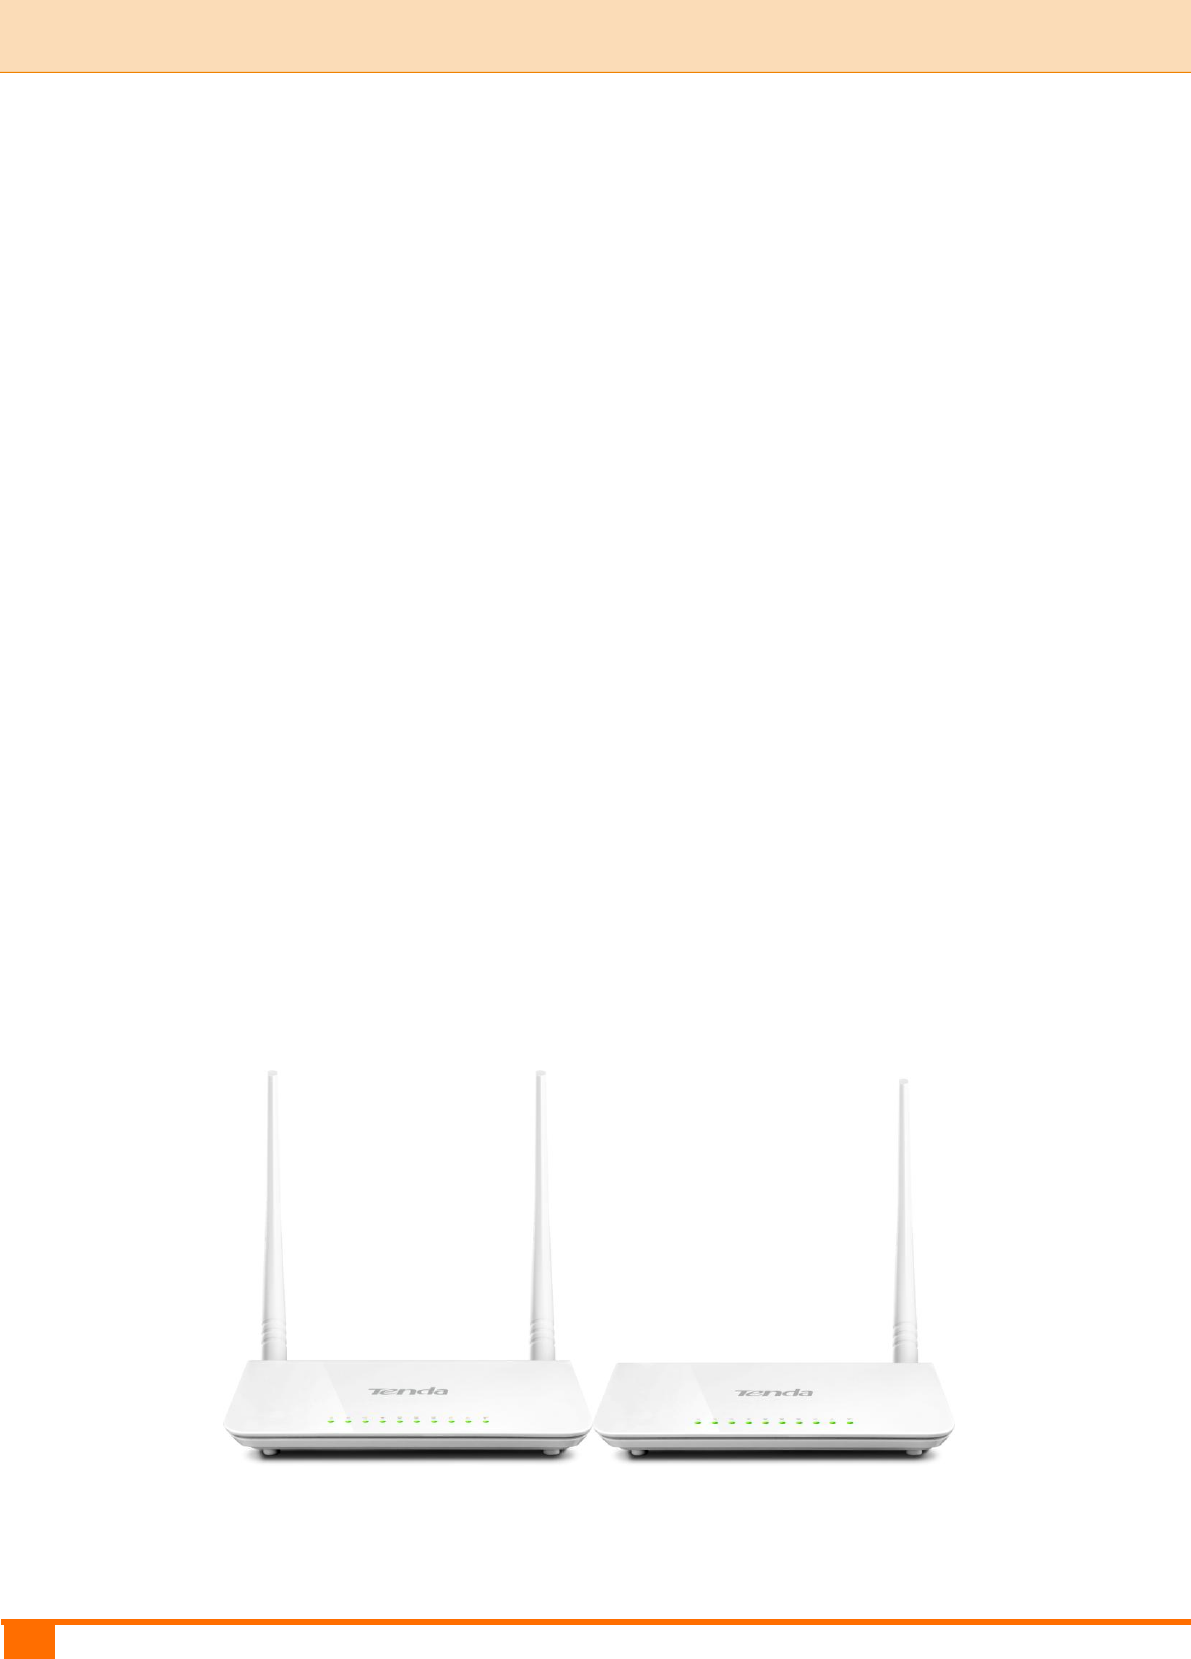
2.1 What It Looks like
4G630 4G600
2
I Product Overview | Tenda
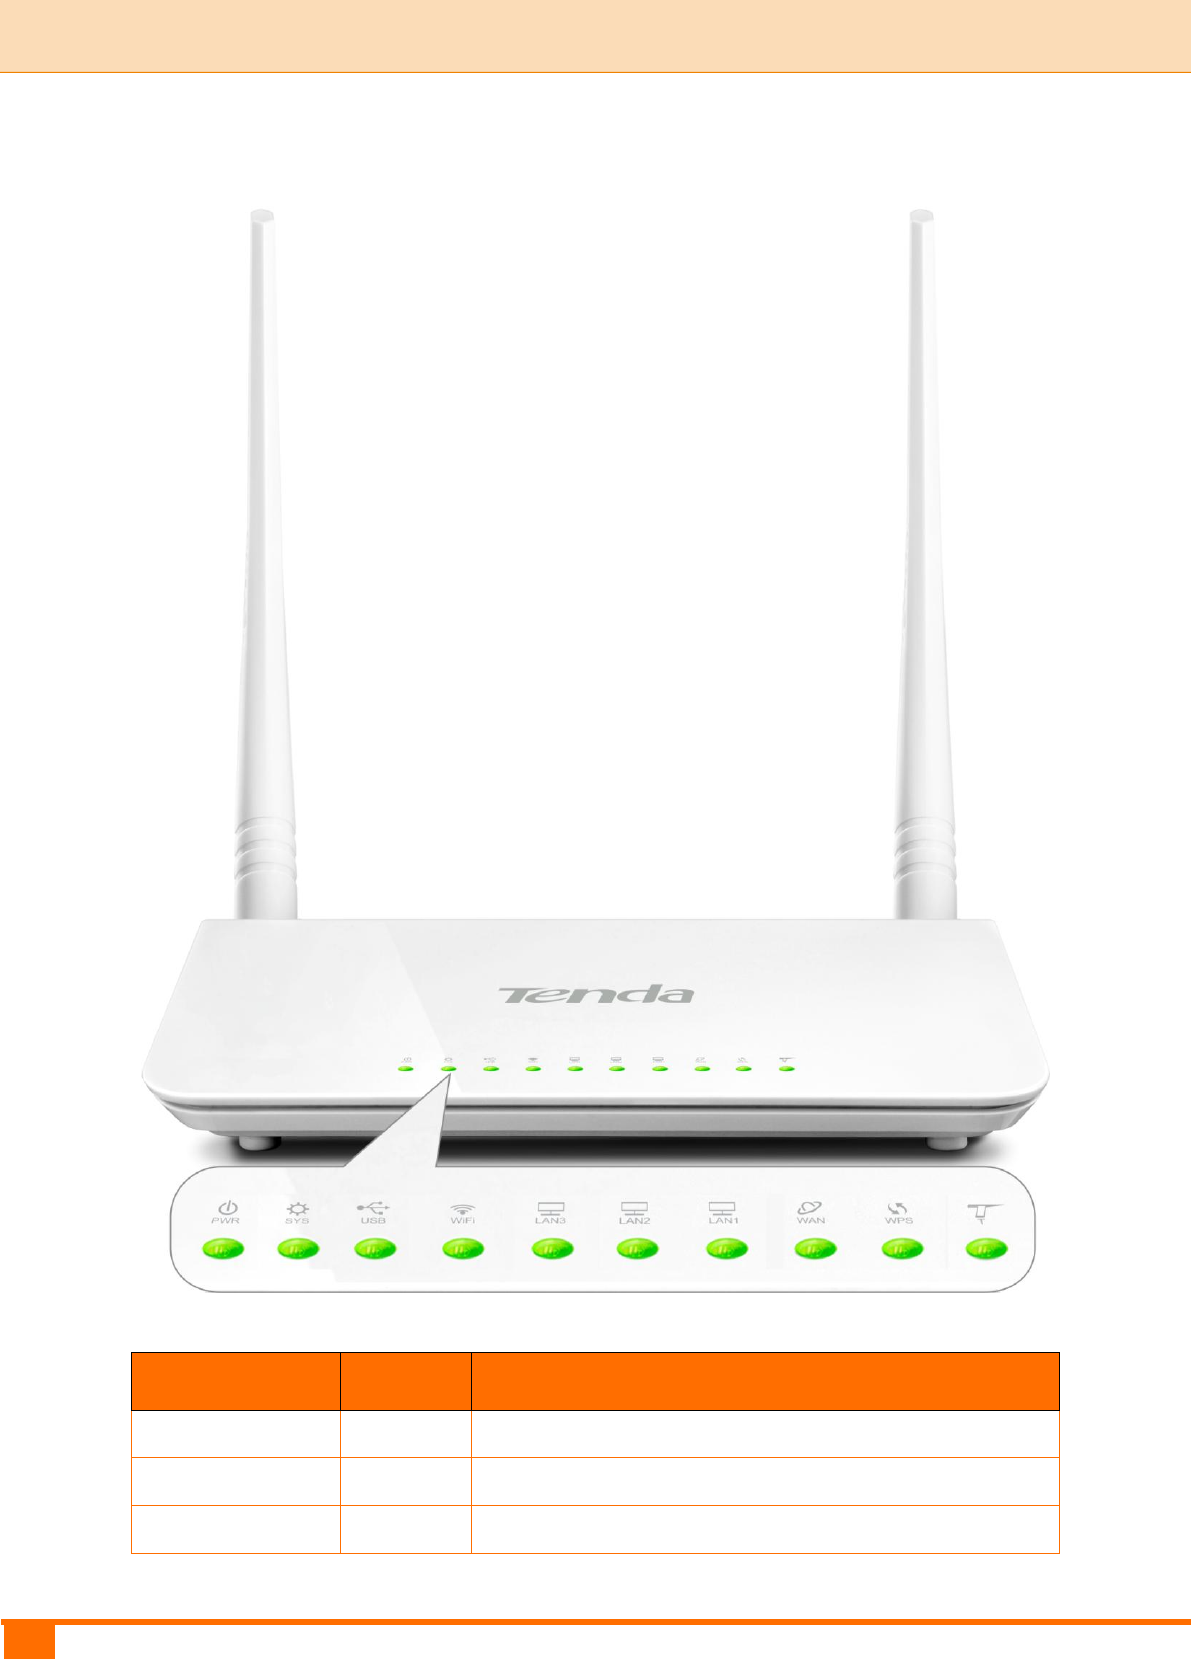
2.2 LED
LED
Status
Description
PWR
Solid
The device is receiving electric power.
SYS
Blinking
System is starting up properly.
WPS
Blinking
The device is functioning properly.
3
I Product Overview | Tenda
WAN/LAN/WiFi
Blinking
The WAN/LAN /WLAN interface is transmitting
data.
Solid
The WAN/LAN interface is connected correctly.
The WiFi radio is on.
USB
Solid
The USB port is connected correctly.
/
This icon indicates no actual meaning. It is only for
decoration.
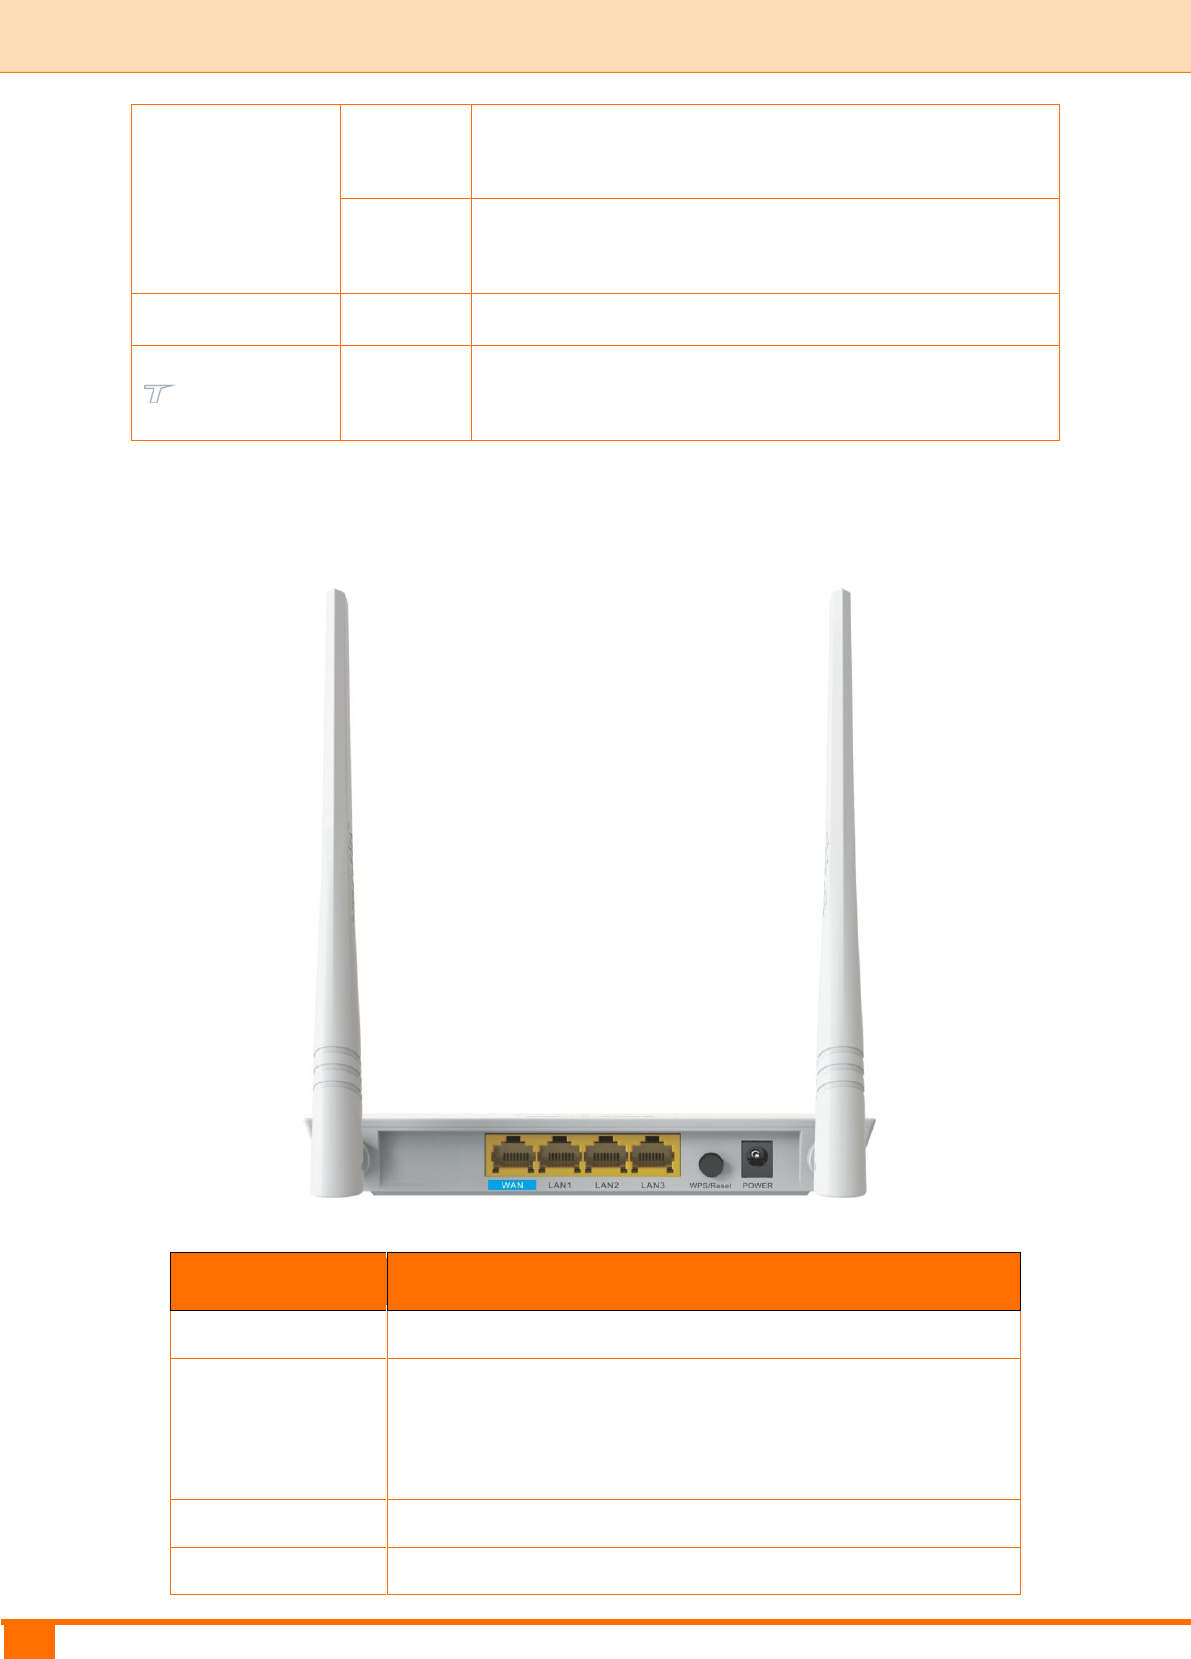
2.3 Button & Interface
Button/Interface
Description
USB
USB port for attaching a 3G/4G USB Modem
WPS/Reset
Pressing this button for over 6 seconds resets the
device to factory default settings or 1-3 seconds to
enable WPS quick encryption.
WAN
Internet port for cabling the device to the Internet side
LAN1/2/3
Local (LAN) Ethernet ports for cabling the device to
4
I Product Overview | Tenda
local computers, switches, etc.
POWER
Power port for connecting the device to a power outlet
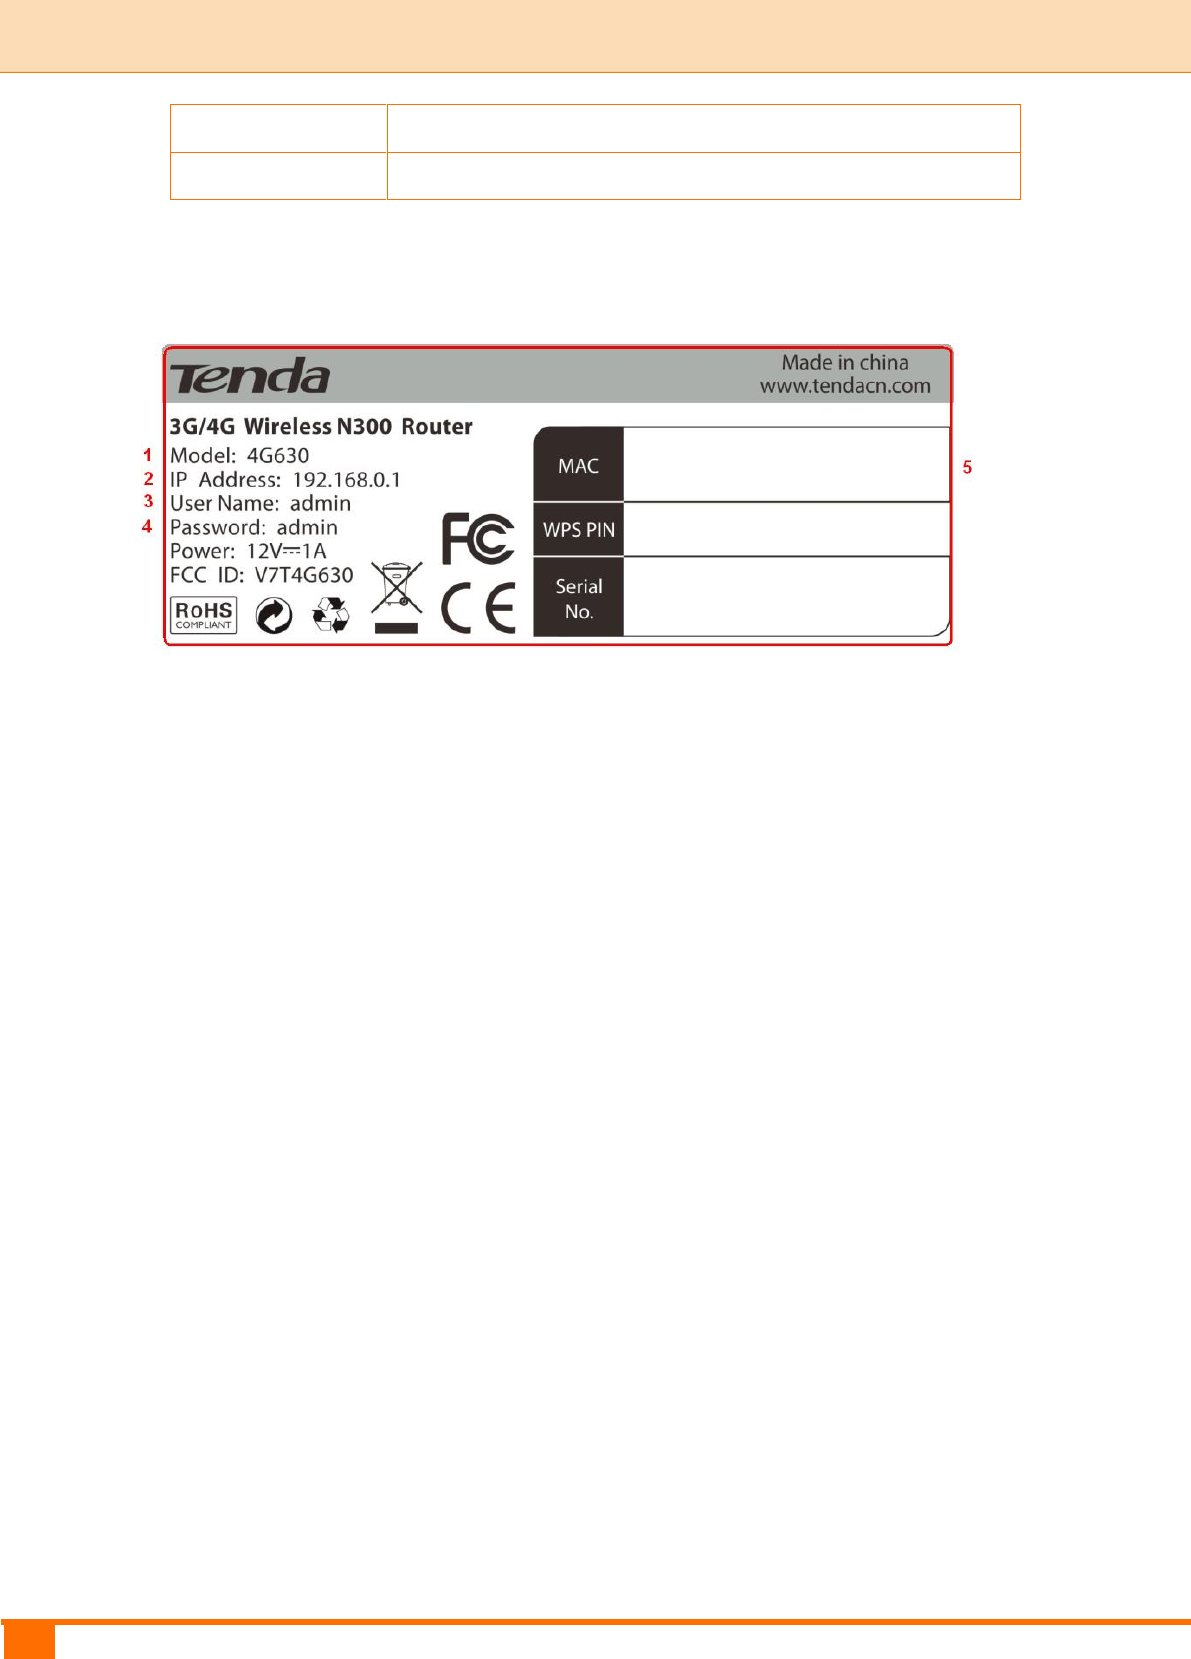
2.4 Label
1→Product Model
2→Default Login IP address
This IP address is to be used to access the device’s settings through a Web
browser.
3/4→Default login user name/password
This information is to be used for web access authentication.
5→Device’s physical address

5
II Quick Setup | Tenda
II Quick Setup
1 Hardware Install
You can either connect to the device wirelessly or using Ethernet cables. Select
an install method according to your network environment.
A. If you access the Internet via a 3G/4G USB modem, see 3G/4G Router
Mode.
B. If you access the Internet by connecting the device to the Ethernet cable
from the incoming Internet side, see Wireless Router Mode.
C. If you acquire Internet access from a remote AP on an existing network, see
Universal Repeater Mode.
Note
① DO NOT expose the device to heat sources.
② Disconnect the device from power supply in thunderstorm weather.
③ Keep the device away from electrical appliances (such as electromagnetic
cooker and cordless phone, etc.) to avoid electromagnetic interference.
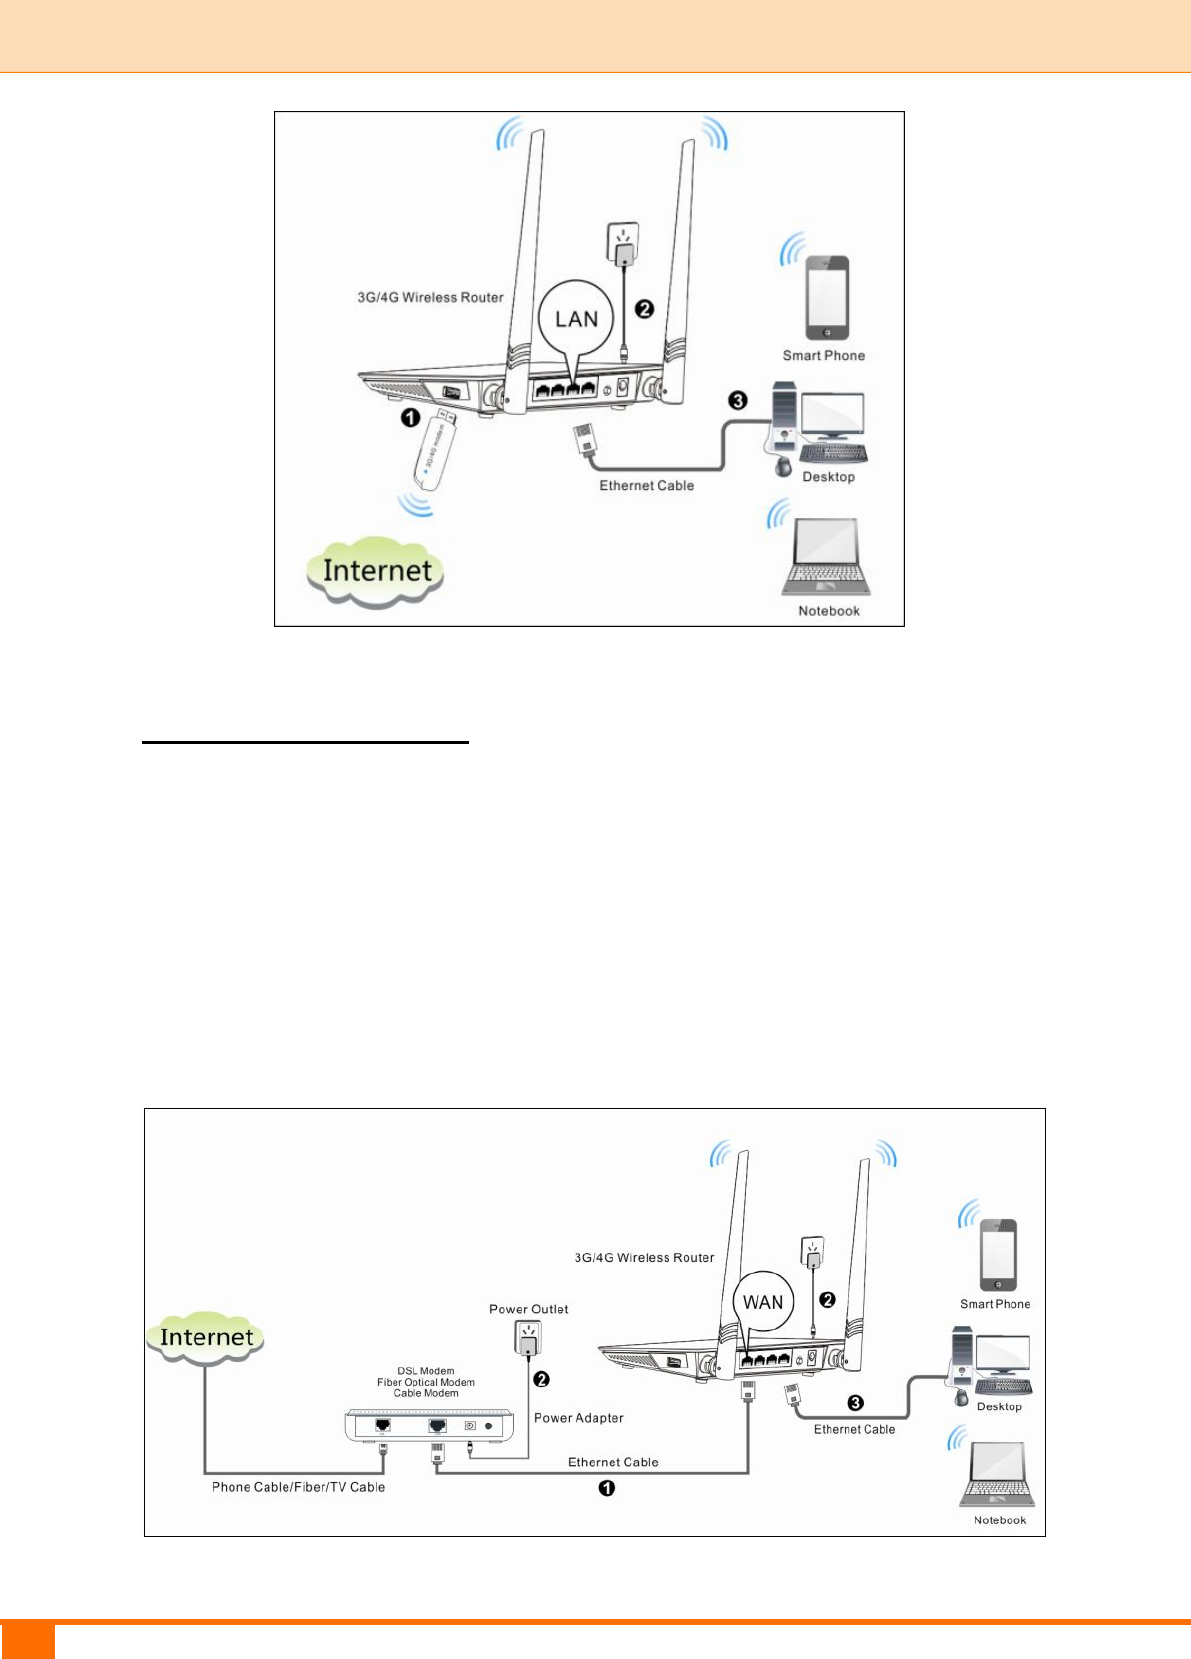
3G/4G Router Mode
By connecting an activated 3G/4G USB modem to your device and it gives you
the freedom to roam while staying connected to the Internet.
① Insert a 3G/4G USB modem to the device.
② Connect the device to a power outlet.
③ Connect your desktop, notebook and smart phone, etc. to the device.
6
II Quick Setup | Tenda
Wireless Router Mode
In this mode, your device functions as a common wireless router. Simply
connect it to an Internet-enabled DSL/fiber optical/cable modem.
① Connect the WAN port of the device to an Internet-enabled DSL/fiber
optical/cable modem.
② Connect the modem and the device to a power outlet.
③ Connect your desktop, notebook and smart phone to the device.
7
II Quick Setup | Tenda
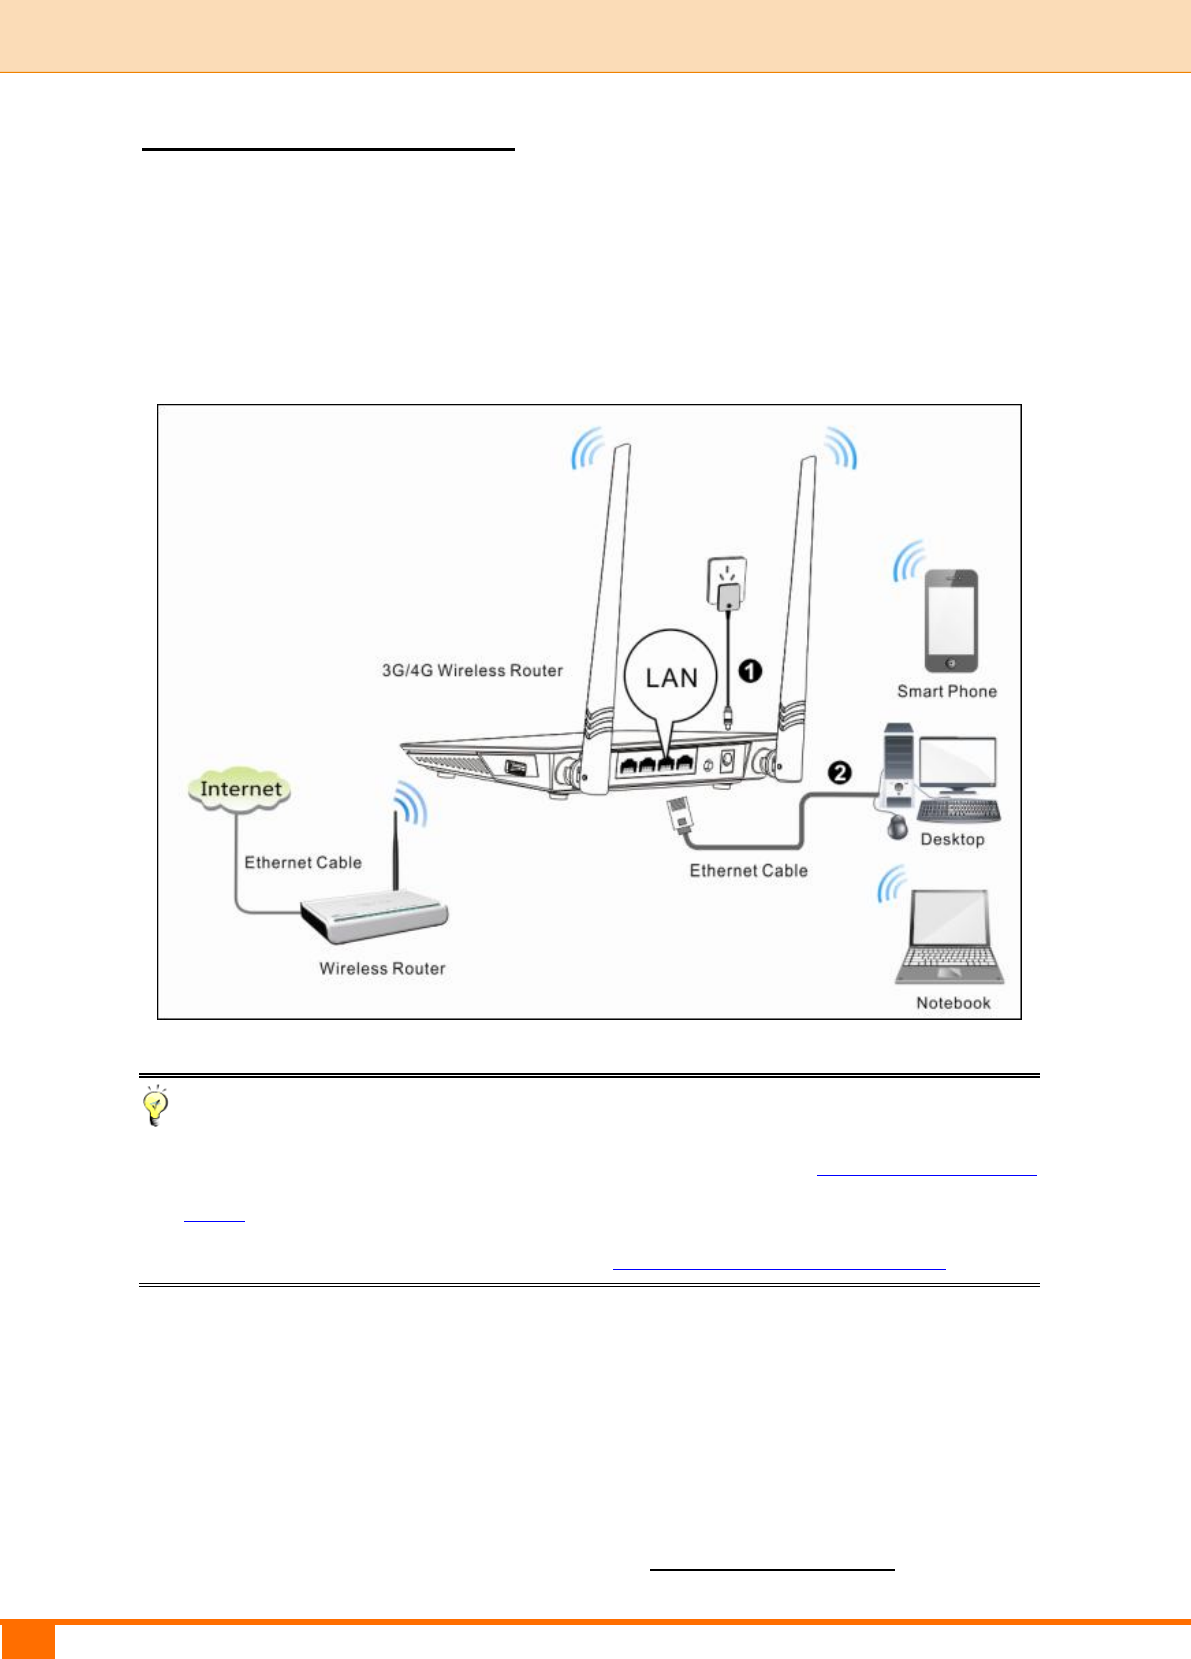
Universal Repeater Mode
The universal repeater feature can be used to extend your existing wireless
network coverage.
① Connect the device to a power outlet.
② Connect your desktop, notebook and smart phone to the device.
Tip
① To scan and connect to a remote wireless device see Universal Repeater
Mode in 4 Quick Internet Setup & Wireless Security Setup.
② To connect the device wirelessly, see 2 Join Your Wireless Network.
2 Configure Your PC
If your computer is set to a static or fixed IP address (This is uncommon),
change it to "Obtain an IP address automatically" and "Obtain DNS server
address automatically" from the device. See 1 Configure Your PC.

8
II Quick Setup | Tenda
3 Web Login
① Launch a Web browser, say, IE.
② In the address bar, input the device’s LAN IP address (192.168.0.1 by
default), and press Enter.
③ Enter the login password (admin by default) and click Login.
④ The Status screen appears. Click Wizard to enter the setup wizard
interface.
10
II Quick Setup | Tenda
Mode.
B. If your ISP provides you with a cable from the incoming Internet side but no
ISP login account or IP information, your ISP uses a DHCP connection. See
Wireless Router Mode – DHCP.
C. If your ISP provides you with a cable from the incoming Internet side and a
PPPoE login account, your ISP uses a PPPoE connection. See Wireless
Router Mode – PPPoE.
D. If you acquire Internet access from a remote AP on an existing network, see
Universal Repeater Mode.
E. To learn about the Auto-switch System Mode, 3G/4G Priority and/or
Ethernet Priority, see Auto-switch System Mode & Priority.
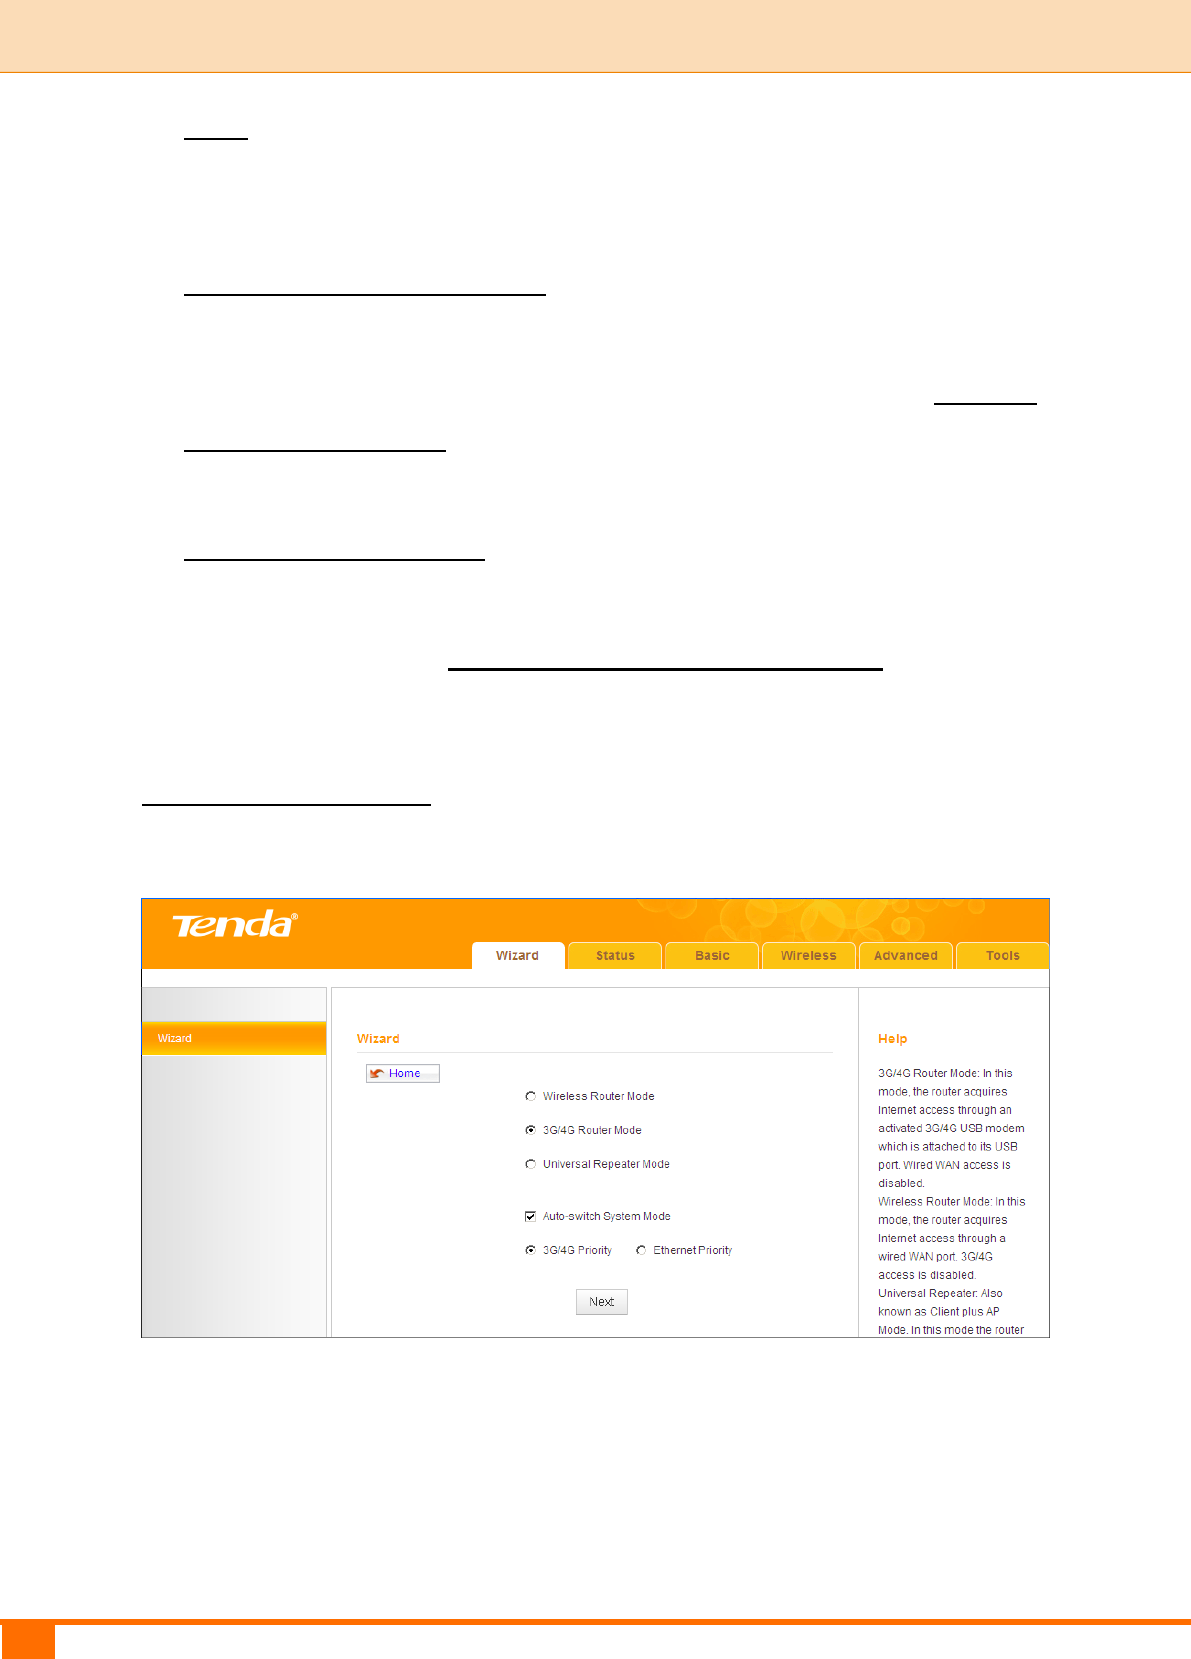
3G/4G Router Mode
① Select 3G/4G Router Mode and click Next.
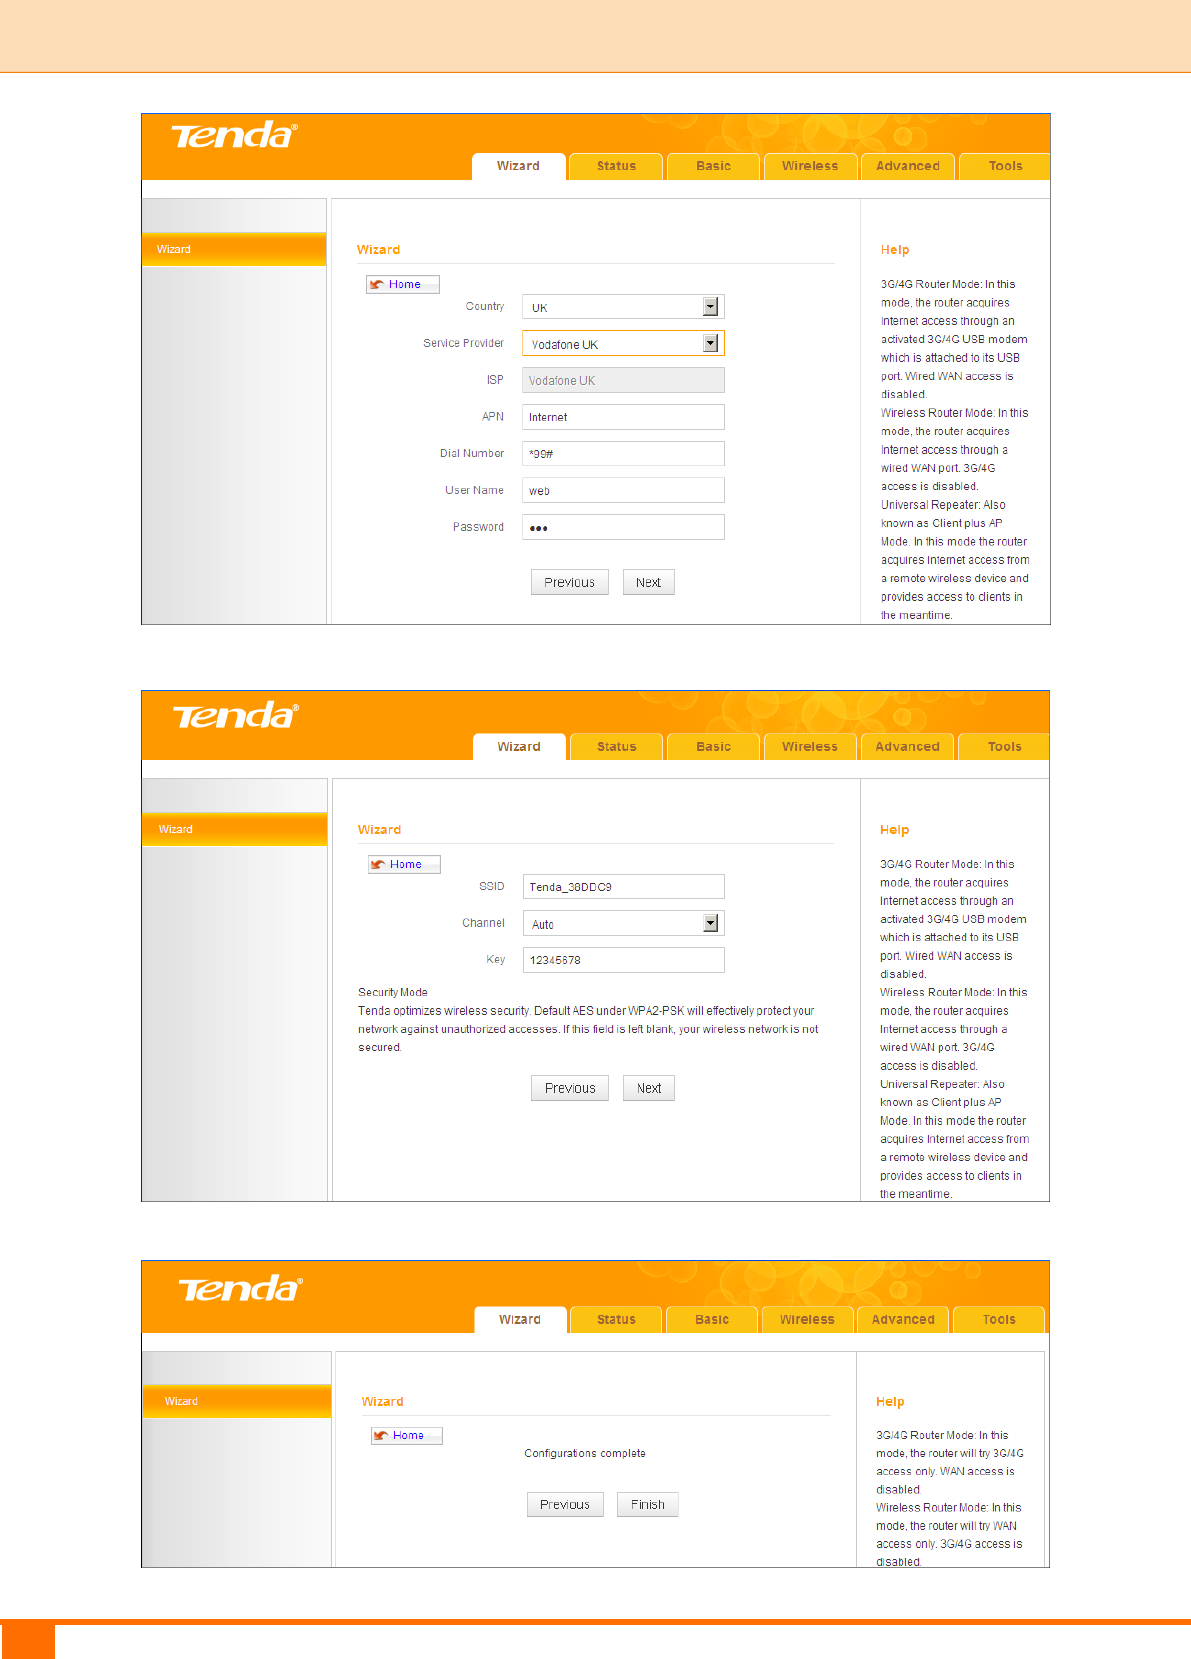
② Configure 3G/ 4G Internet connection settings and then click Next. If you
are not sure of which service provider to use, select Auto.
11
II Quick Setup | Tenda
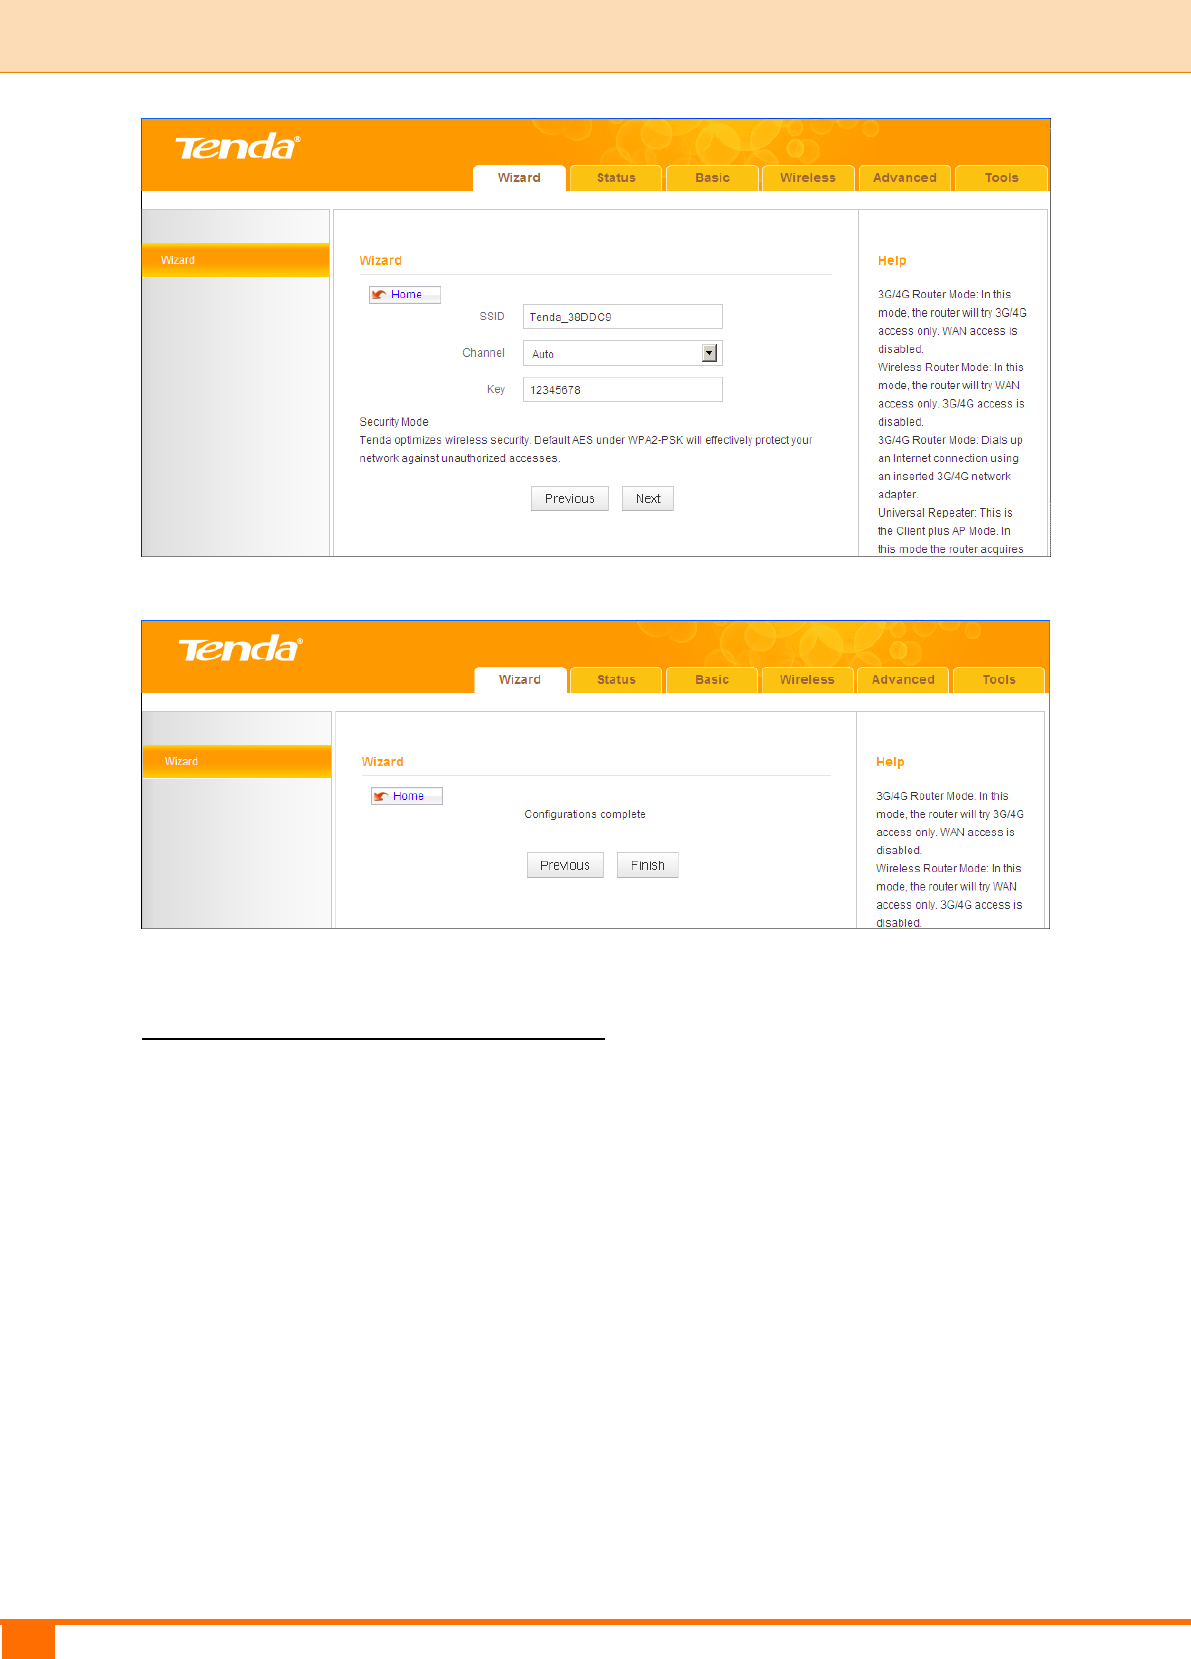
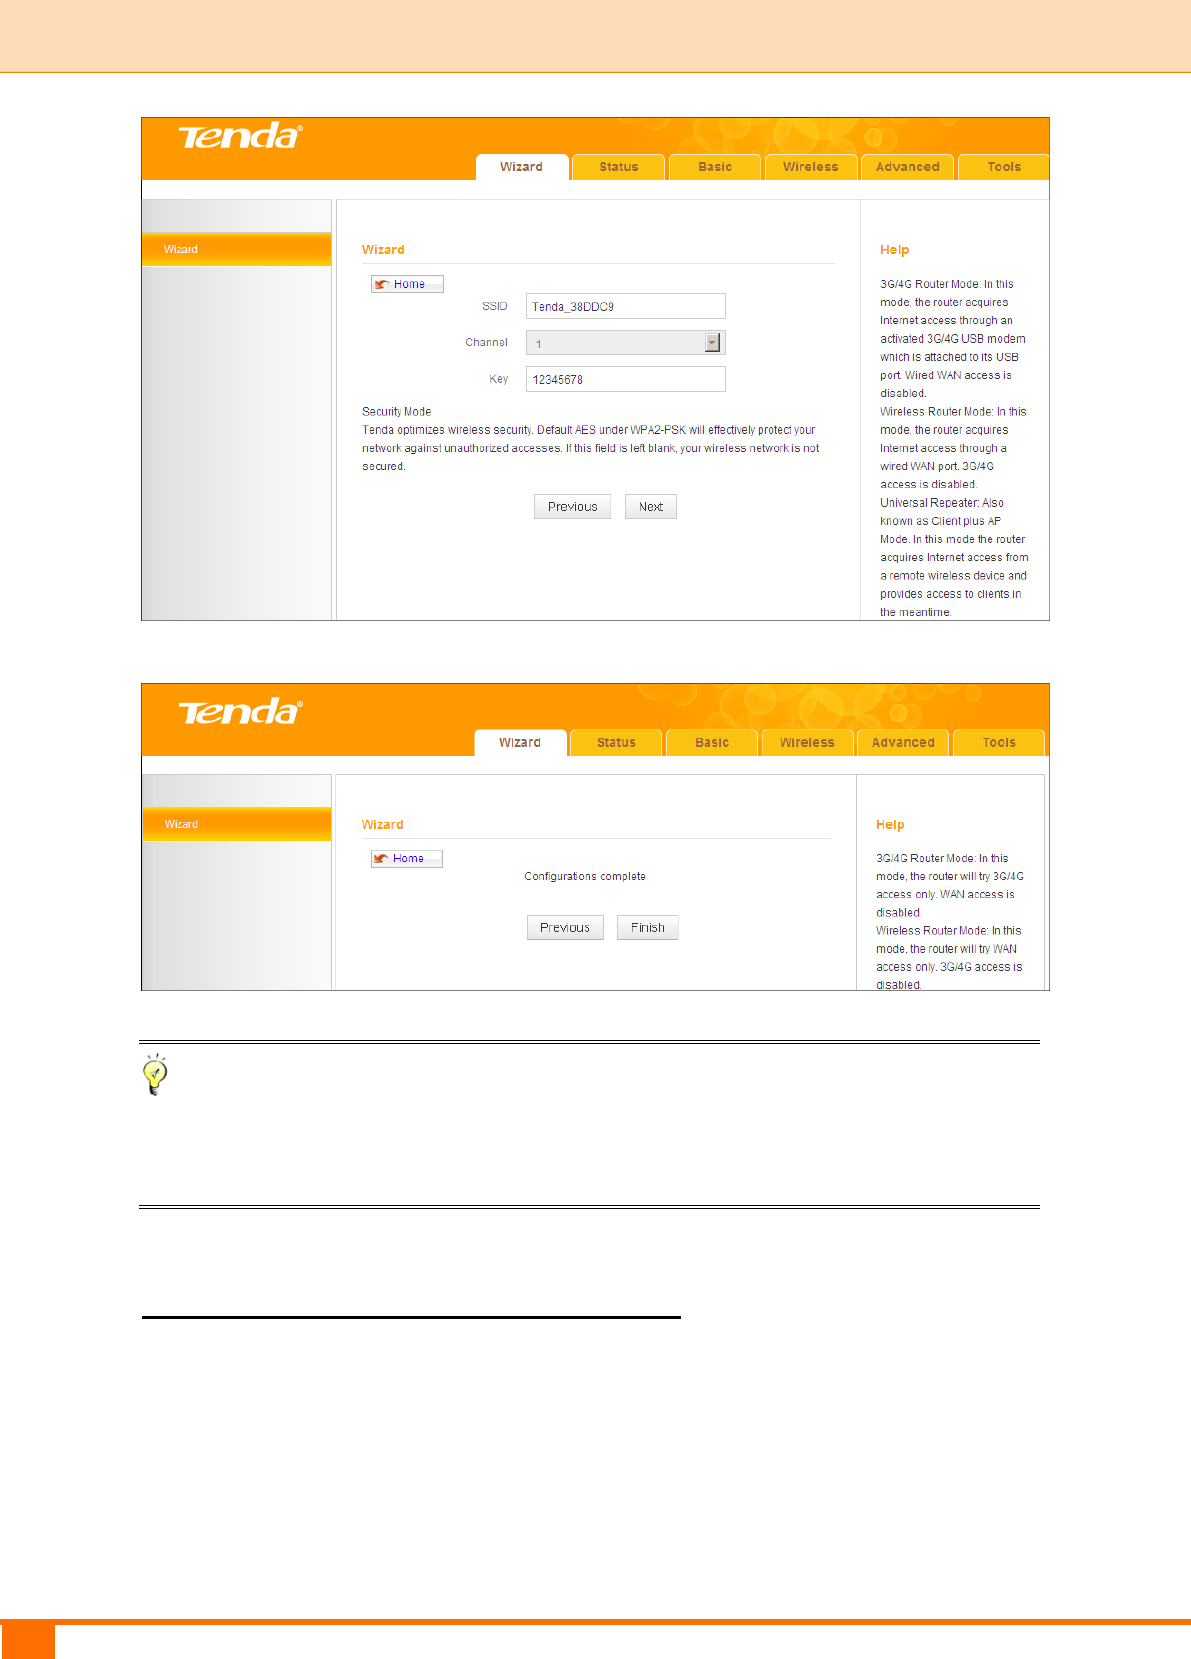
③ Configure your wireless network: SSID, Channel, Key and then click Next.
④ Click Finish and wait for the device to restart.
12
II Quick Setup | Tenda
Wireless Router Mode – DHCP
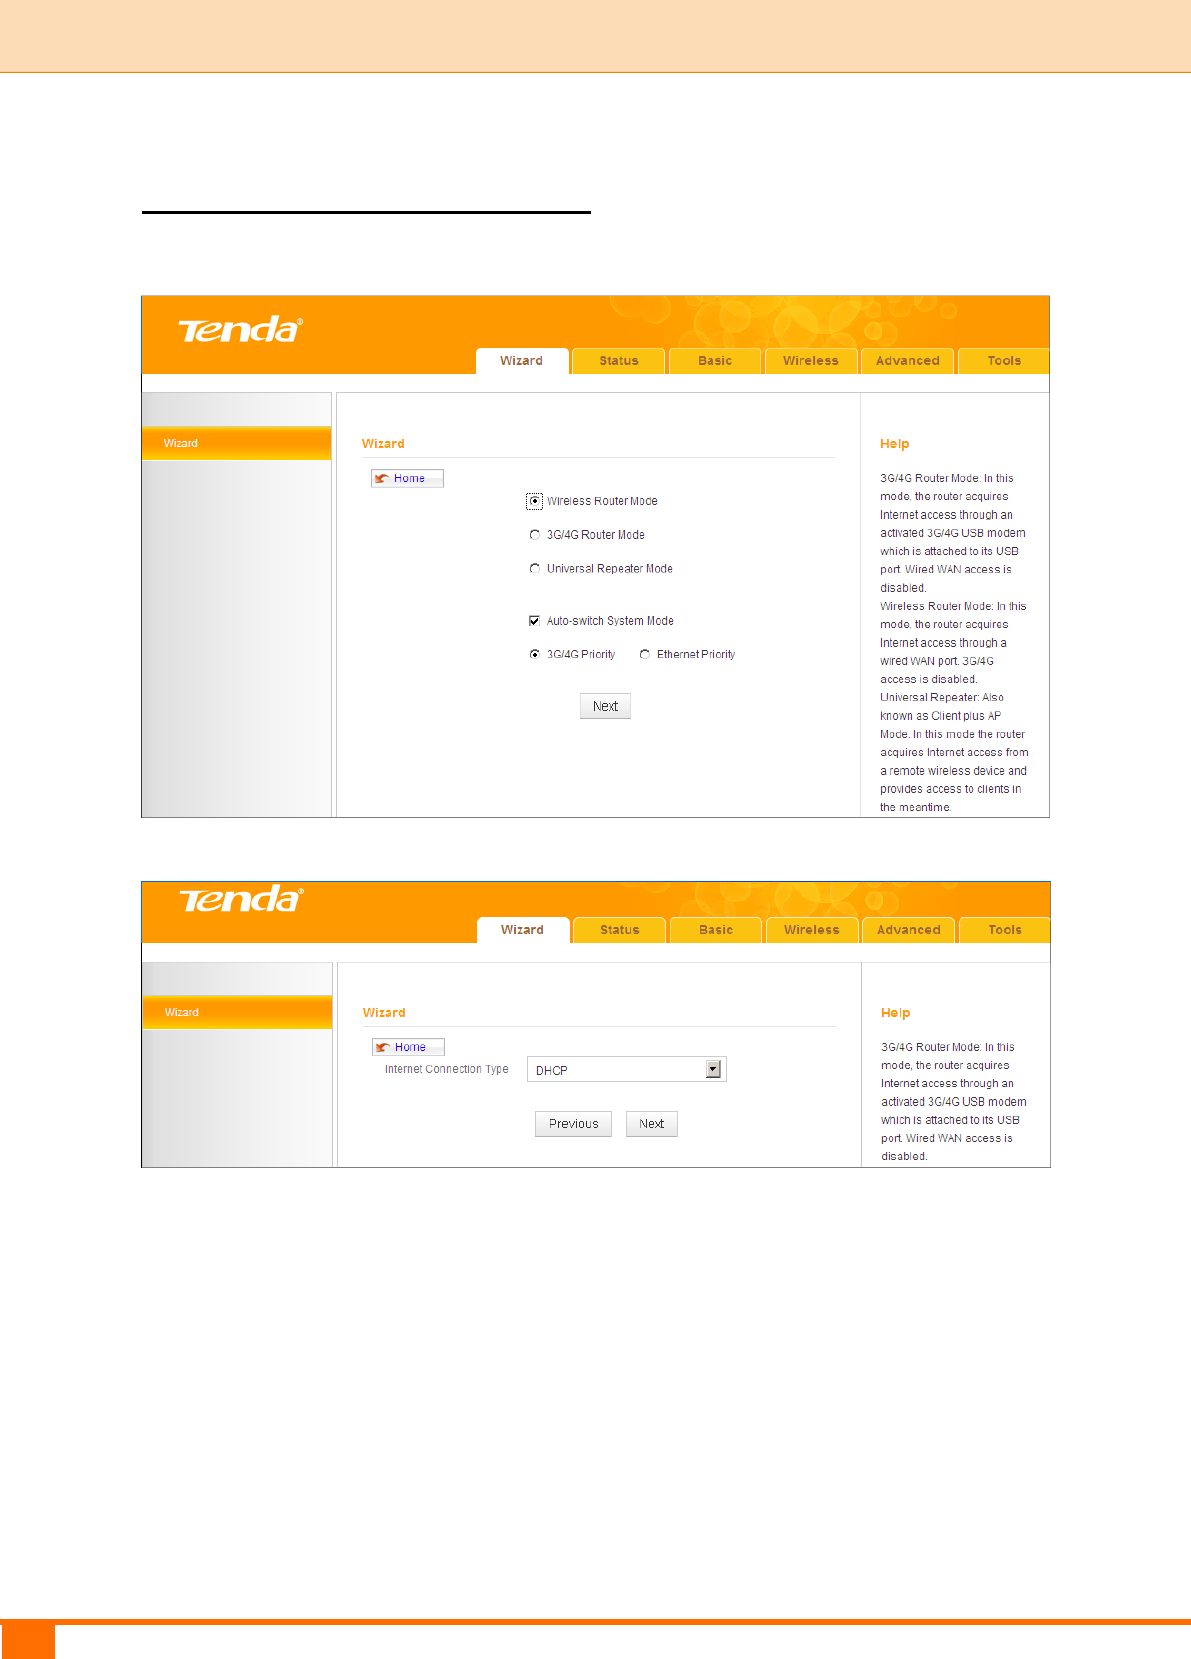
① Select Wireless Router Mode and click Next.
② Select DHCP and click Next.
③ Configure your wireless network: SSID, Channel, Key and then click Next.
13
II Quick Setup | Tenda
④ Click Finish and wait for the device to restart.
Wireless Router Mode – PPPoE
① Select Wireless Router Mode and click Next.
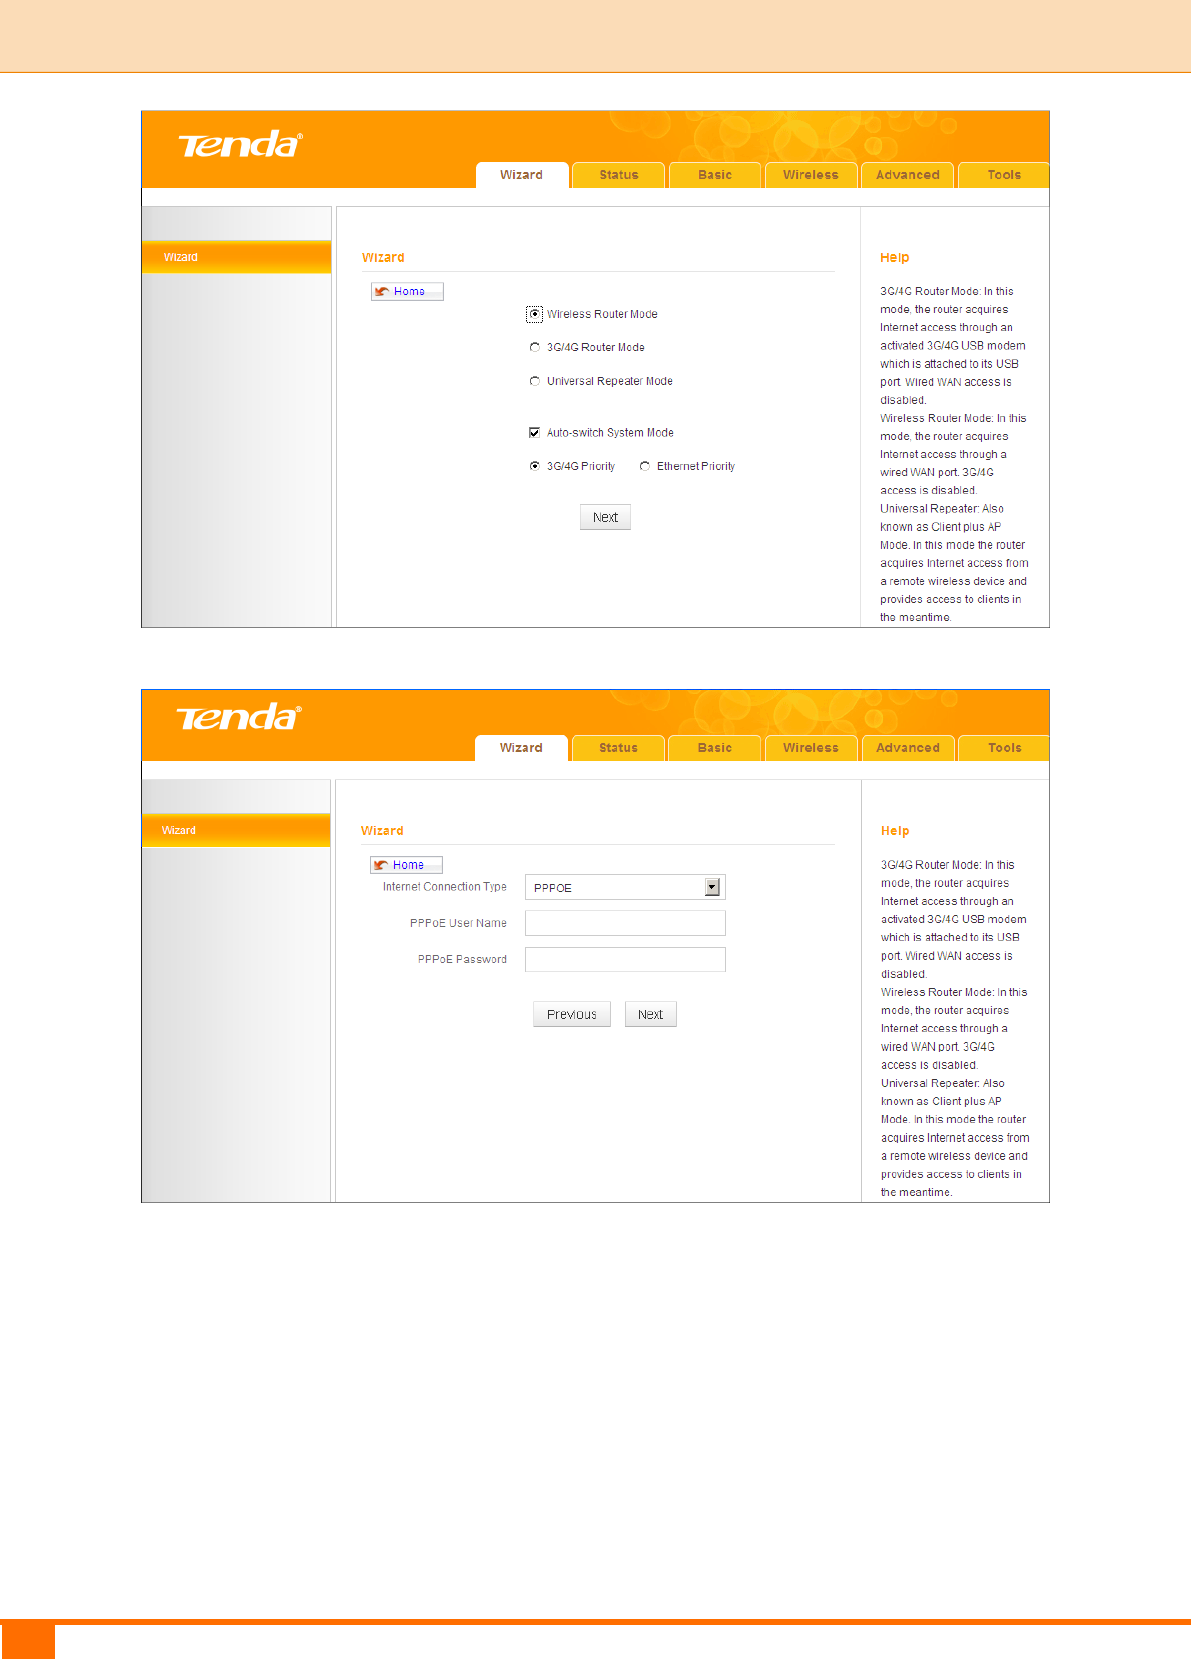
14
II Quick Setup | Tenda
② Select PPPoE, enter the PPPoE User Name/Password and click Next.
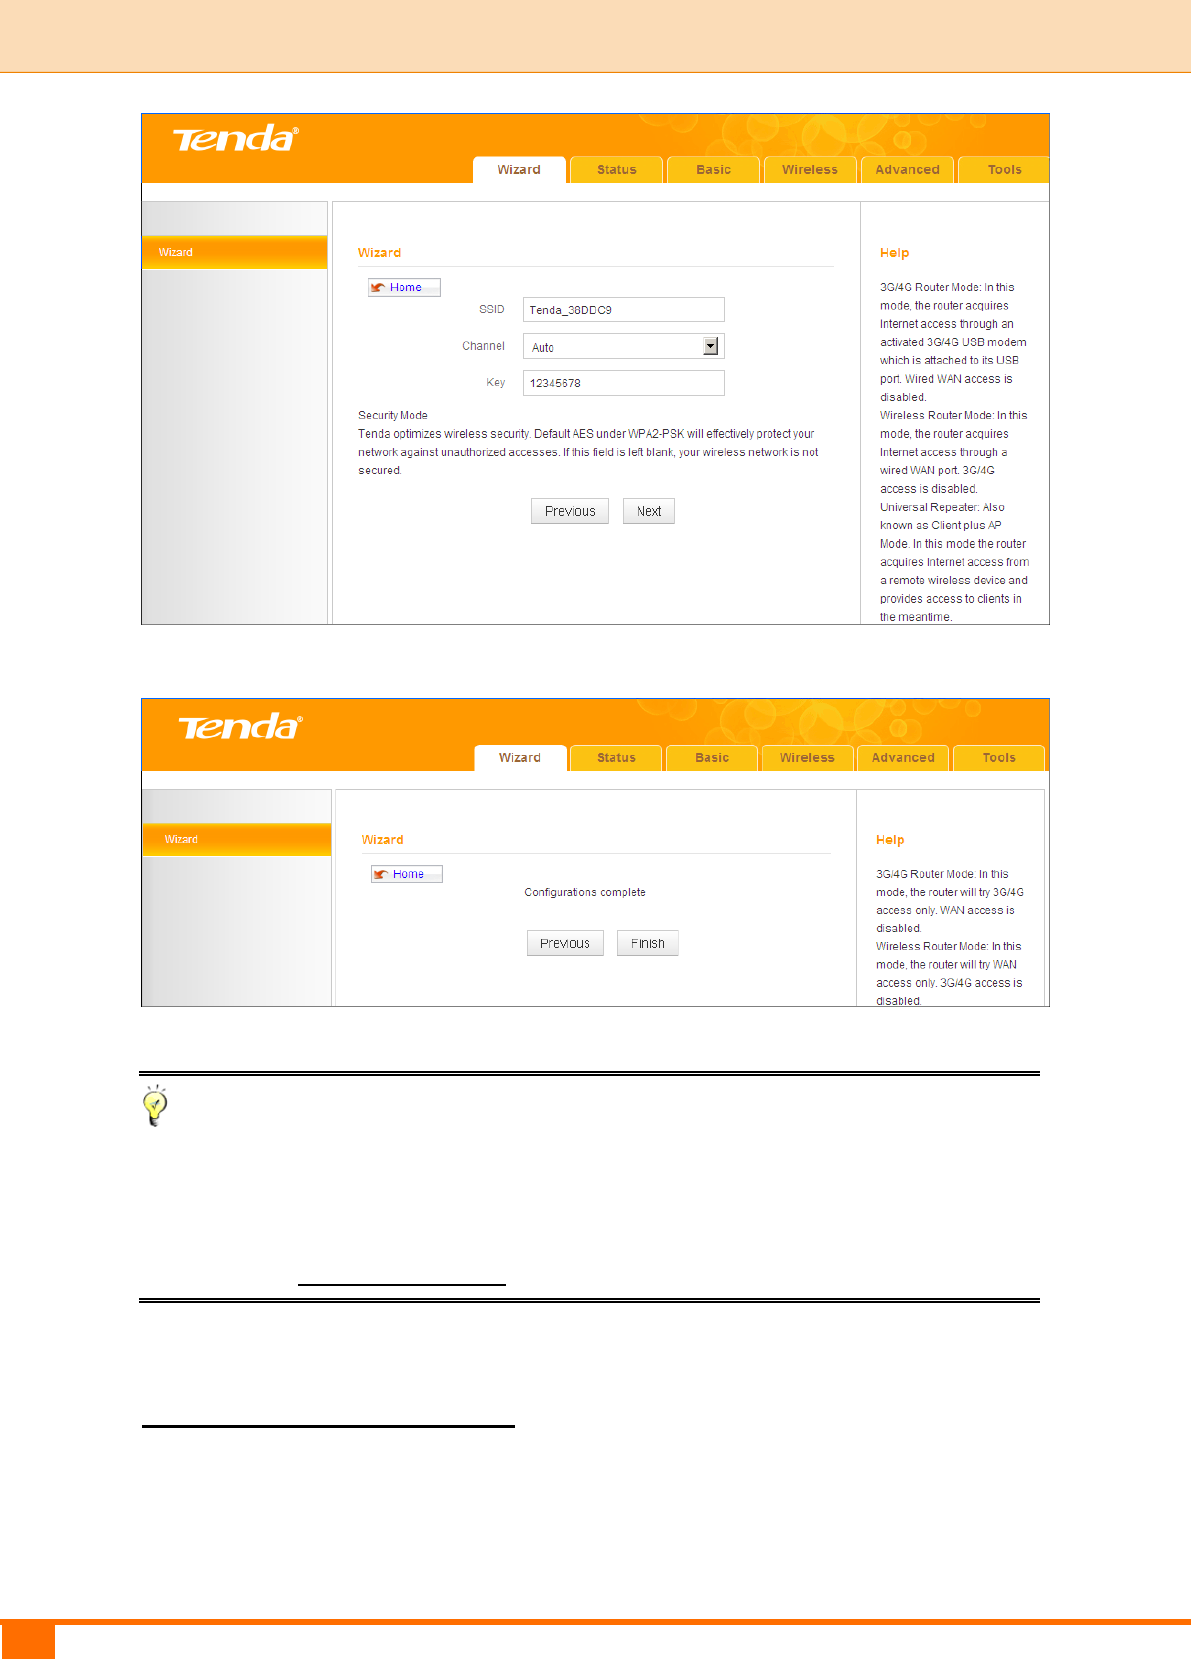
③ Configure your wireless network: SSID, Channel, Key and then click Next.
15
II Quick Setup | Tenda
④ Click Finish and wait for the device to restart.
Tip
Five Internet connection types are supported for the wired WAN connection
(Ethernet): DHCP, PPPOE, PPTP, L2TP and Static IP. For PPTP, L2TP and
Static IP, see 2.2 WAN Settings.
Universal Repeater Mode
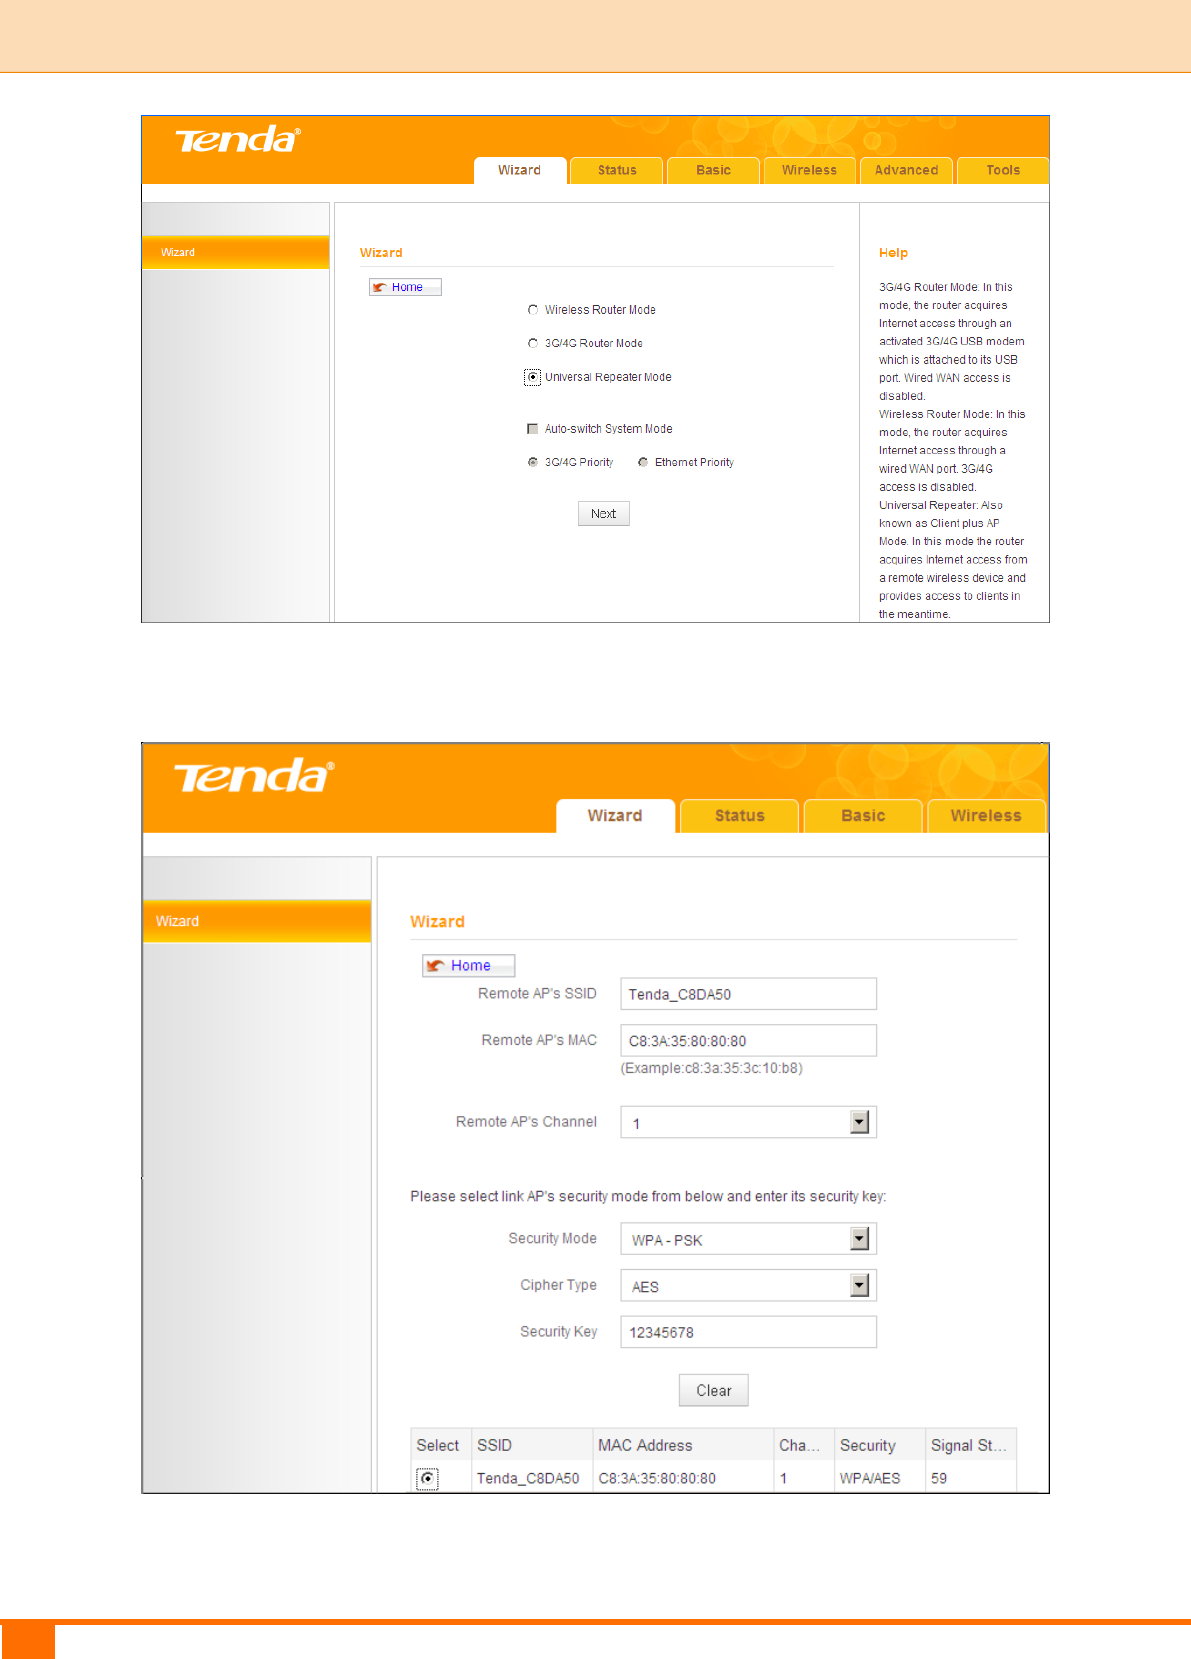
① Select Universal Repeater Mode and click Next.
16
II Quick Setup | Tenda
② Enter or select the SSID, MAC, Channel and security settings exactly the
same as the remote AP and then click Next.
③ Configure your wireless network: SSID and Key and then click Next.
17
II Quick Setup | Tenda
④ Click Finish and wait for the device to restart.
Tip
In Universal Repeater Mode, your wireless network must operate on the same
channel as the remote AP.
Auto-switch System Mode & Priority
Auto-switch System Mode: If unchecked, system will not switch between the
3G/4G Router Mode and Wireless Router Mode.
If the Auto-switch System Mode and 3G/4G Priority are selected, system
will:
prioritize the 3G/4G Router Mode when detecting the coexistence of an

18
II Quick Setup | Tenda
Ethernet cable and a 3G/4G USB modem.
operate in the 3G/4G Router Mode when only detecting a 3G/4G USB
modem.
toggle to the Wireless Router Mode when only detecting an Ethernet cable.
If the Auto-switch System Mode and Ethernet Priority are selected, system
will:
prioritize the Wireless Router Mode when detecting the coexistence of an
Ethernet cable and a 3G/4G USB modem.
toggle to the 3G/4G Router Mode when only detecting a 3G/4G USB
modem.
operate in the Wireless Router Mode when only detecting an Ethernet
cable.

19
III Features & Configurations | Tenda
III Features & Configurations
1 Status
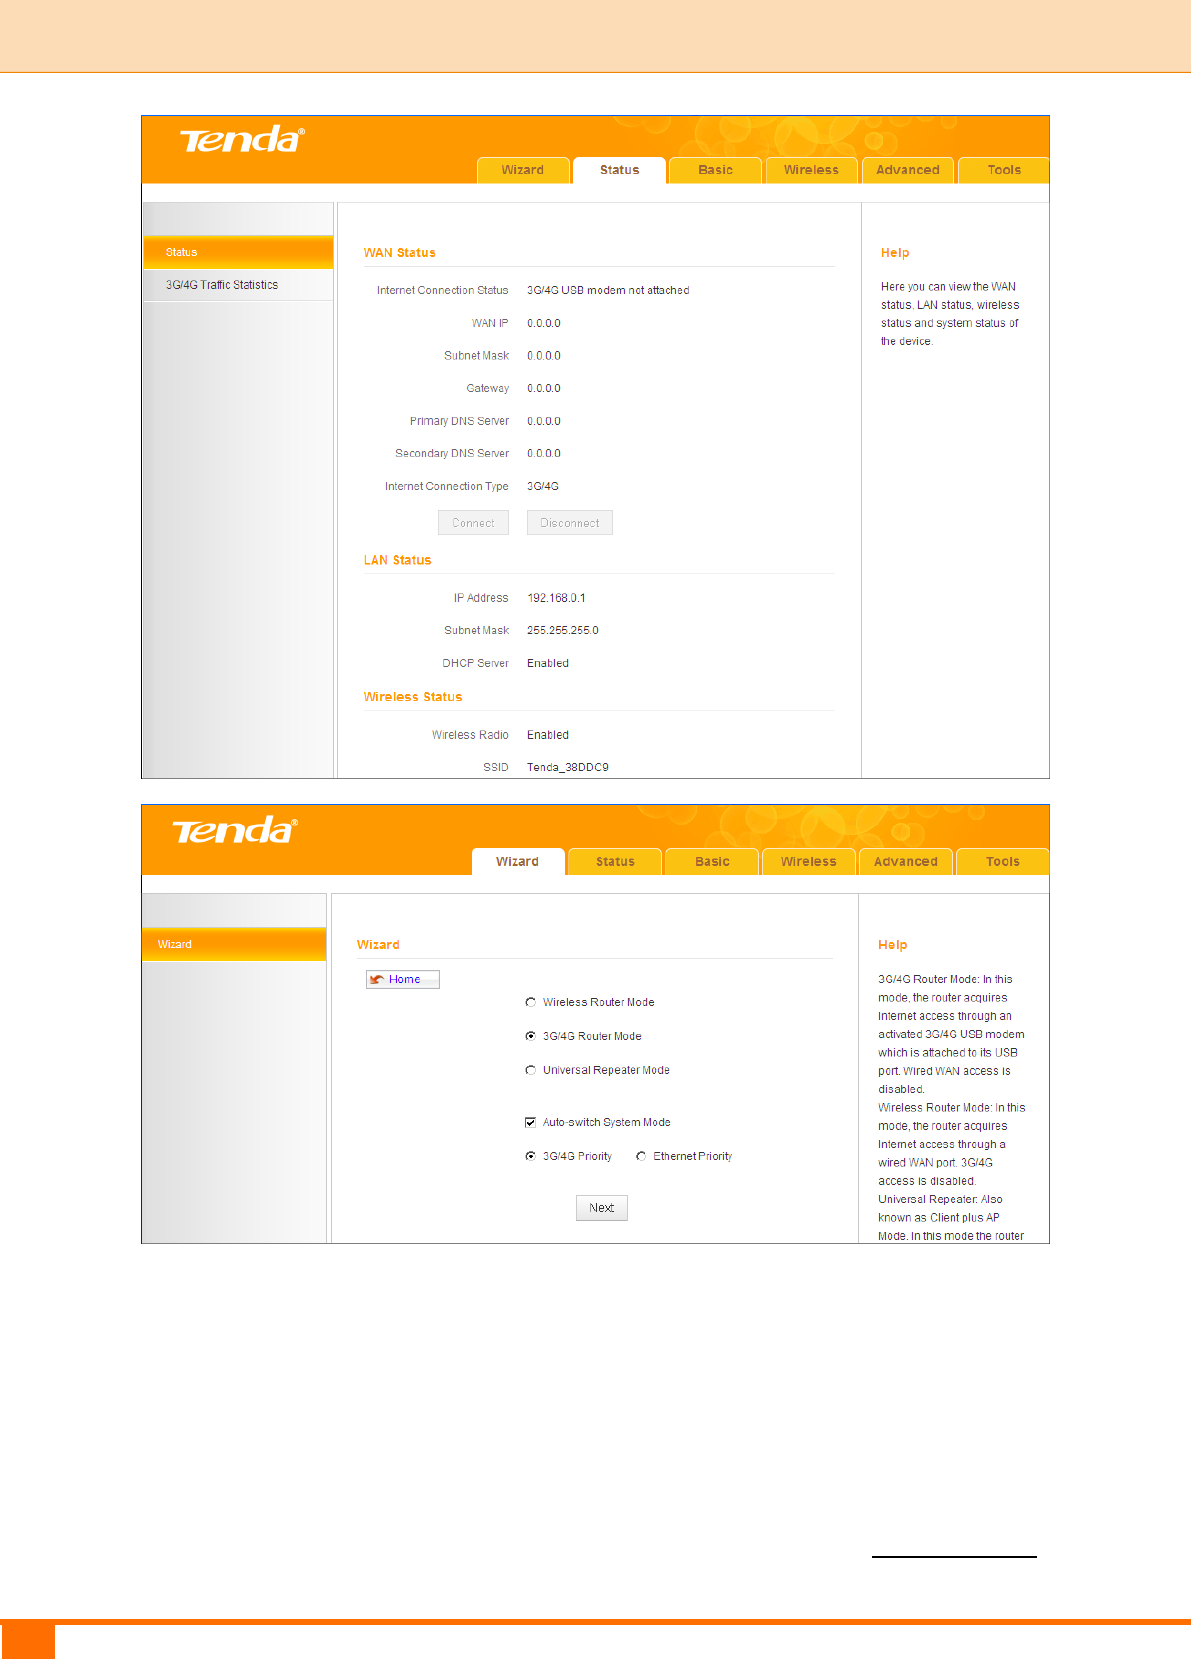
Click Status to enter the Status screen.
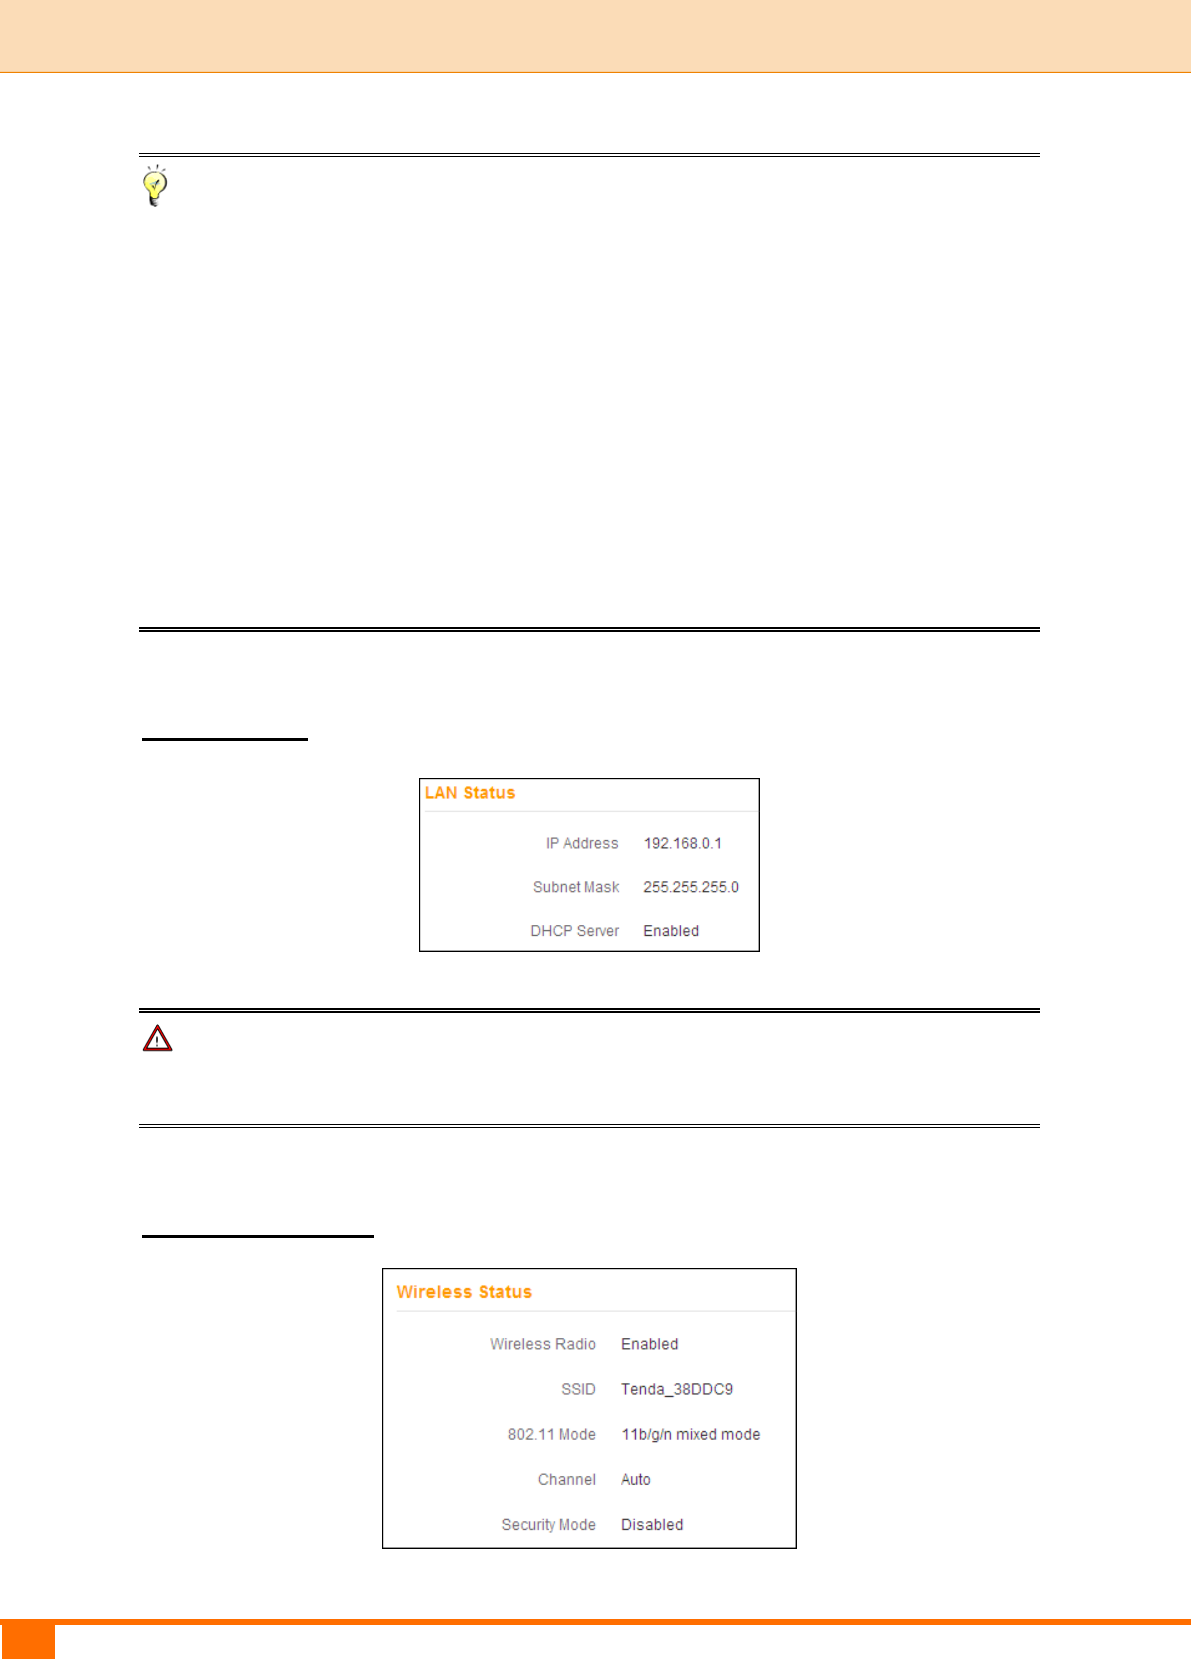
WAN Status
WAN Status in 3G/4G Router Mode:
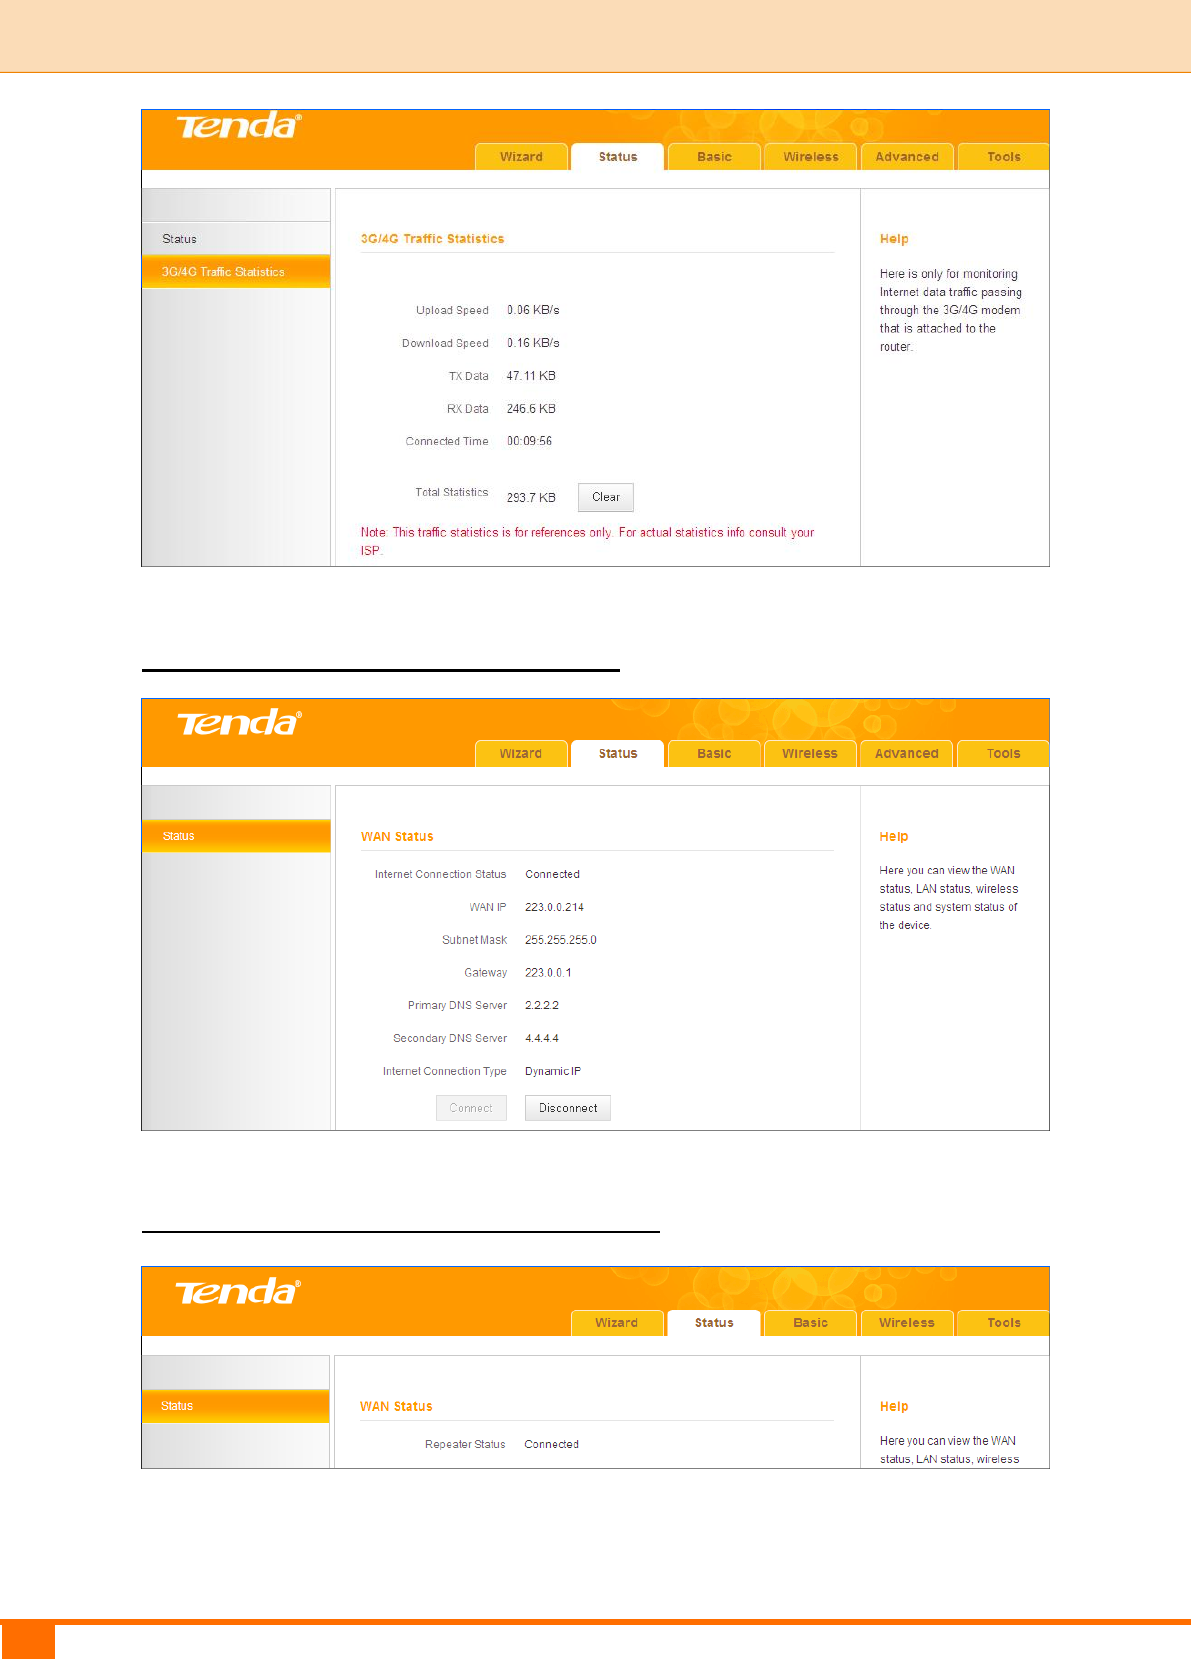
3G/4G Traffic Statistics
To view the 3G/4G traffic statistics, click Status -> 3G/4G Traffic Statistics.
This screen is available only in the 3G/4G Router Mode.
20
III Features & Configurations | Tenda
WAN Status in Wireless Router Mode
WAN Status in Universal Repeater Mode
21
III Features & Configurations | Tenda
Tip
① WAN IP/Subnet Mask/Gateway/Primary DNS Server/Secondary DNS
Server: This type of information appears only if the router successfully
connects to the Internet via a PPPoE or a DHCP (dynamic IP) connection.
However if you connect the router to the Internet with static IP settings
provided by your ISP, these fields will display the settings you entered
whether the router successfully connects to the Internet or not.
② If there is no available secondary DNS server, nothing appears in the
secondary DNS server field.
LAN Status
Note
The DHCP Server is disabled in Universal Repeater Mode.
Wireless Status
22
III Features & Configurations | Tenda
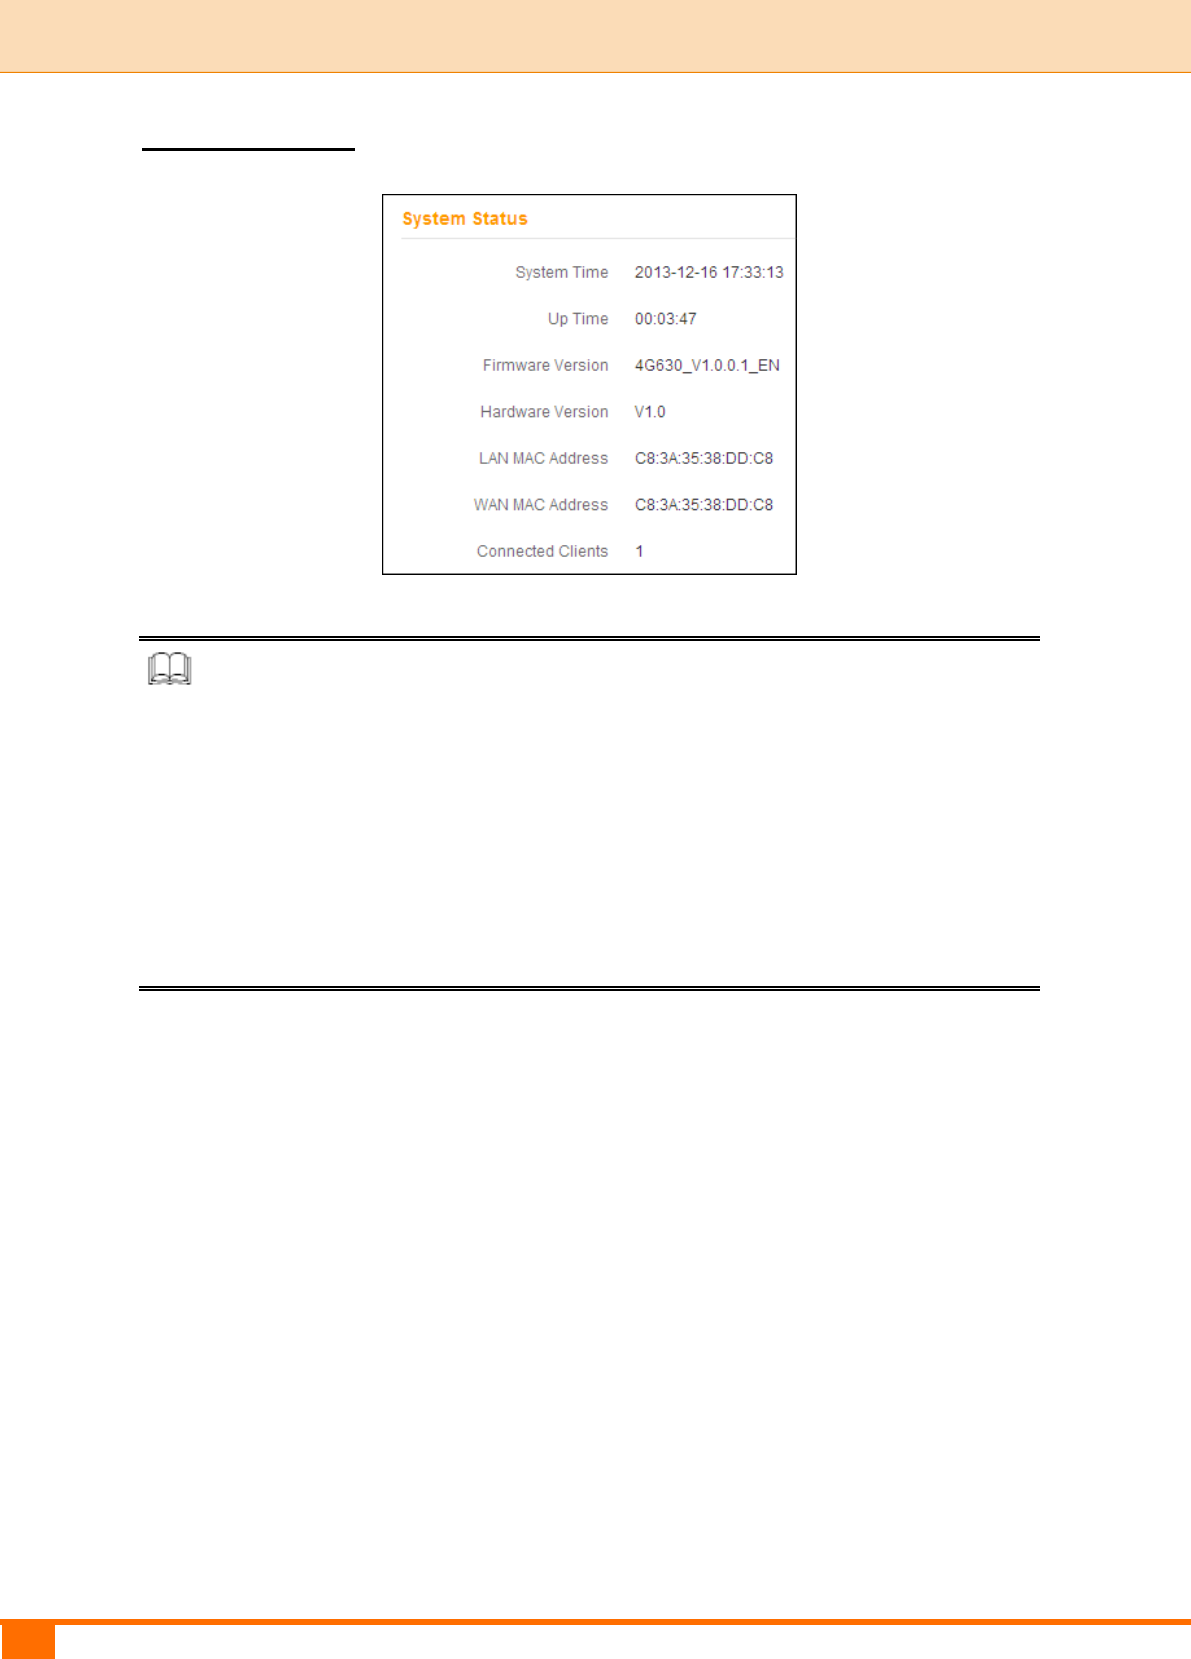
System Status
Knowledge Center
WAN MAC Address: The device’s current WAN MAC address.
System Time: Current system time on this device. The device automatically
synchronizes the system time with Internet time servers.
Up Time: Displays the time duration indicating how long t he router has been up
since startup. Up time is recounted and renewed upon power -off.
Connected Clients: Displays the number of DHCP clients.
23
III Features & Configurations | Tenda
2 Basic Settings
To change the device's login IP address, see 2.1 LAN Settings.
To set up the Internet, see 2.2 WAN Settings.
To set up speed and duplex mode for the WAN port, see 2.3 WAN Speed
(Available only in Wireless Router Mode).
To configure DNS server, see 2.4 DNS Settings.
To clone MAC address, see 2.5 MAC Clone (Available only in Wireless
Router Mode).
To configure DHCP server, see 2.6 DHCP Server.
To assign static IP addresses and view LAN device information, see 2.7
DHCP Client List.
Note
In the Universal Repeater Mode, only the LAN Settings screen is available.
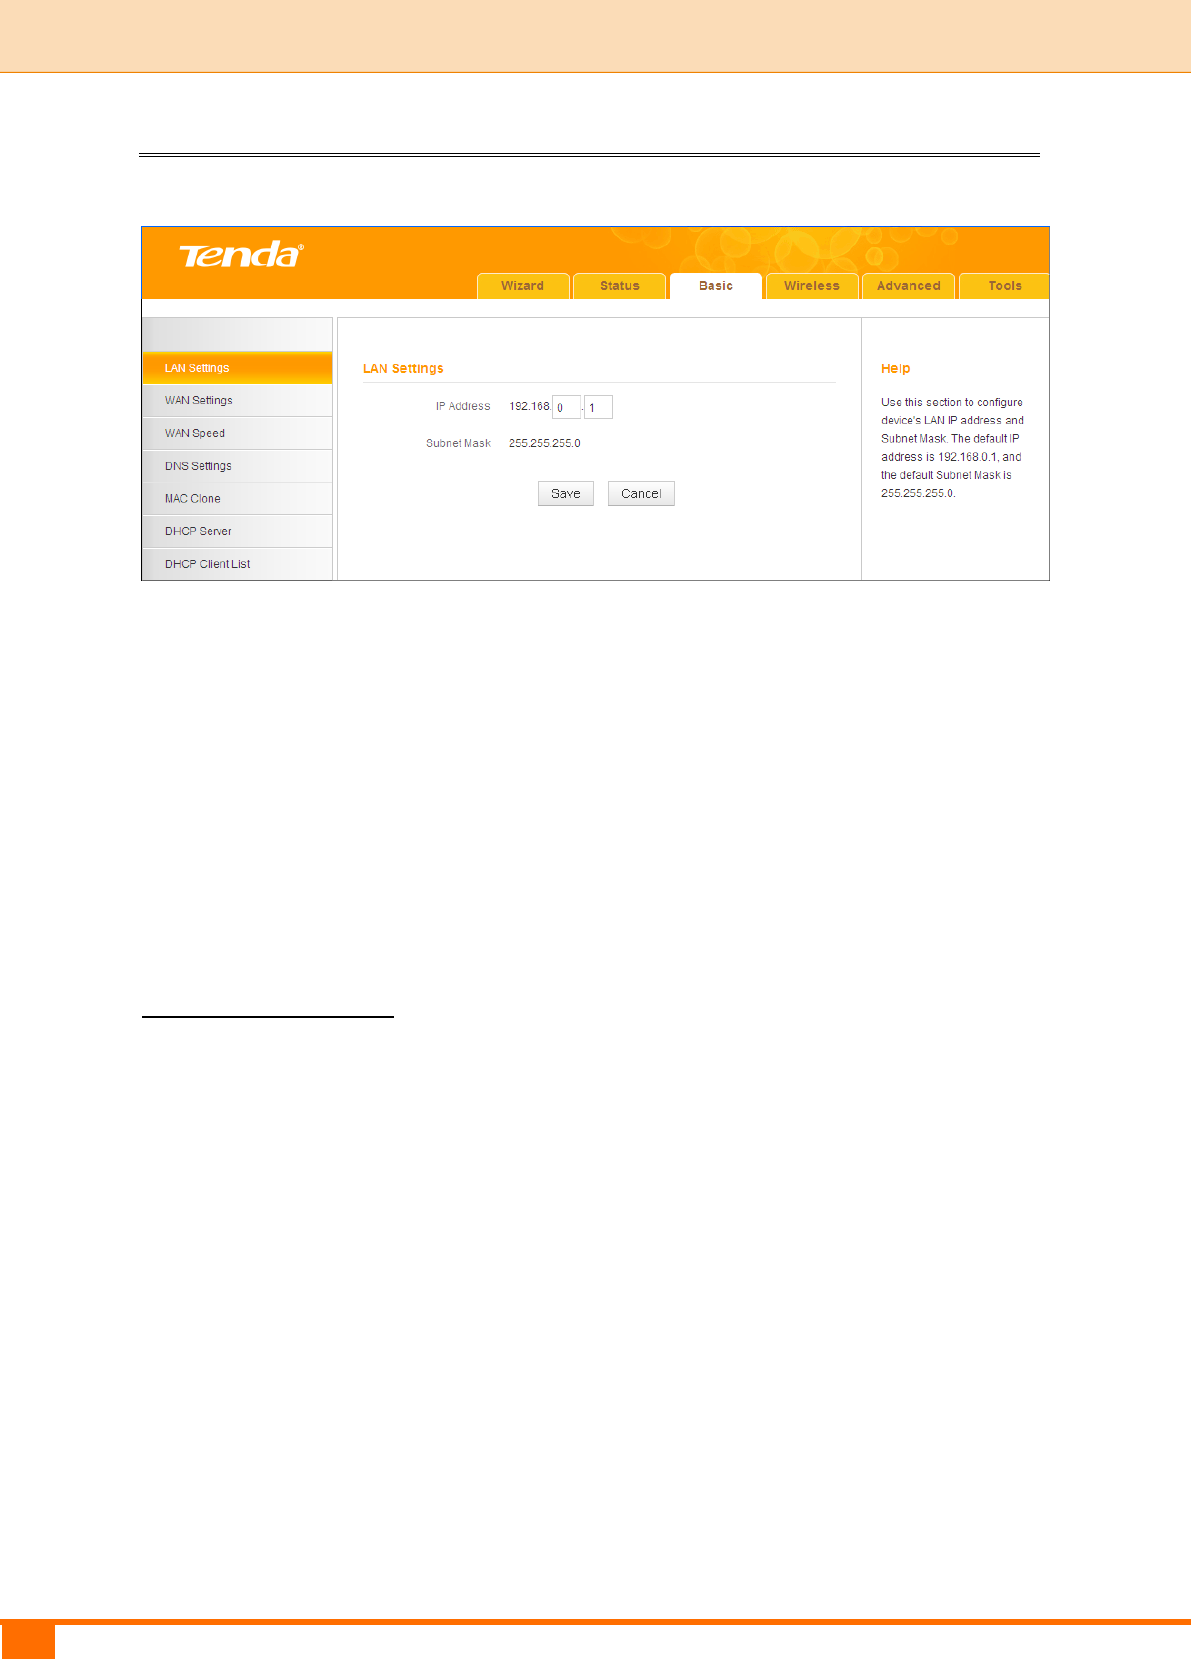
2.1 LAN Settings
Here you can configure the LAN IP address and subnet mask. This IP address is
to be used to access the device’s settings through a Web browser. Be sure to
make a note of any changes you apply to this page.
Tip
① Default IP address and subnet mask are respectively 192.168.0.1 and
255.255.255.0.
② If you change the LAN IP address of the device, you have to open a new
connection to the new IP address and log in again. Also, you have to set the
default gateway addresses of all LAN PCs to this new IP address.
③ The device's LAN IP address and WAN IP address must be on different IP
24
III Features & Configurations | Tenda
segments. If not, it will not be able to access the Internet.
Configuration Procedures:
① Change the IP address to the one you wish to use, for example,
192.168.10.1.
② Click Save to save your settings.
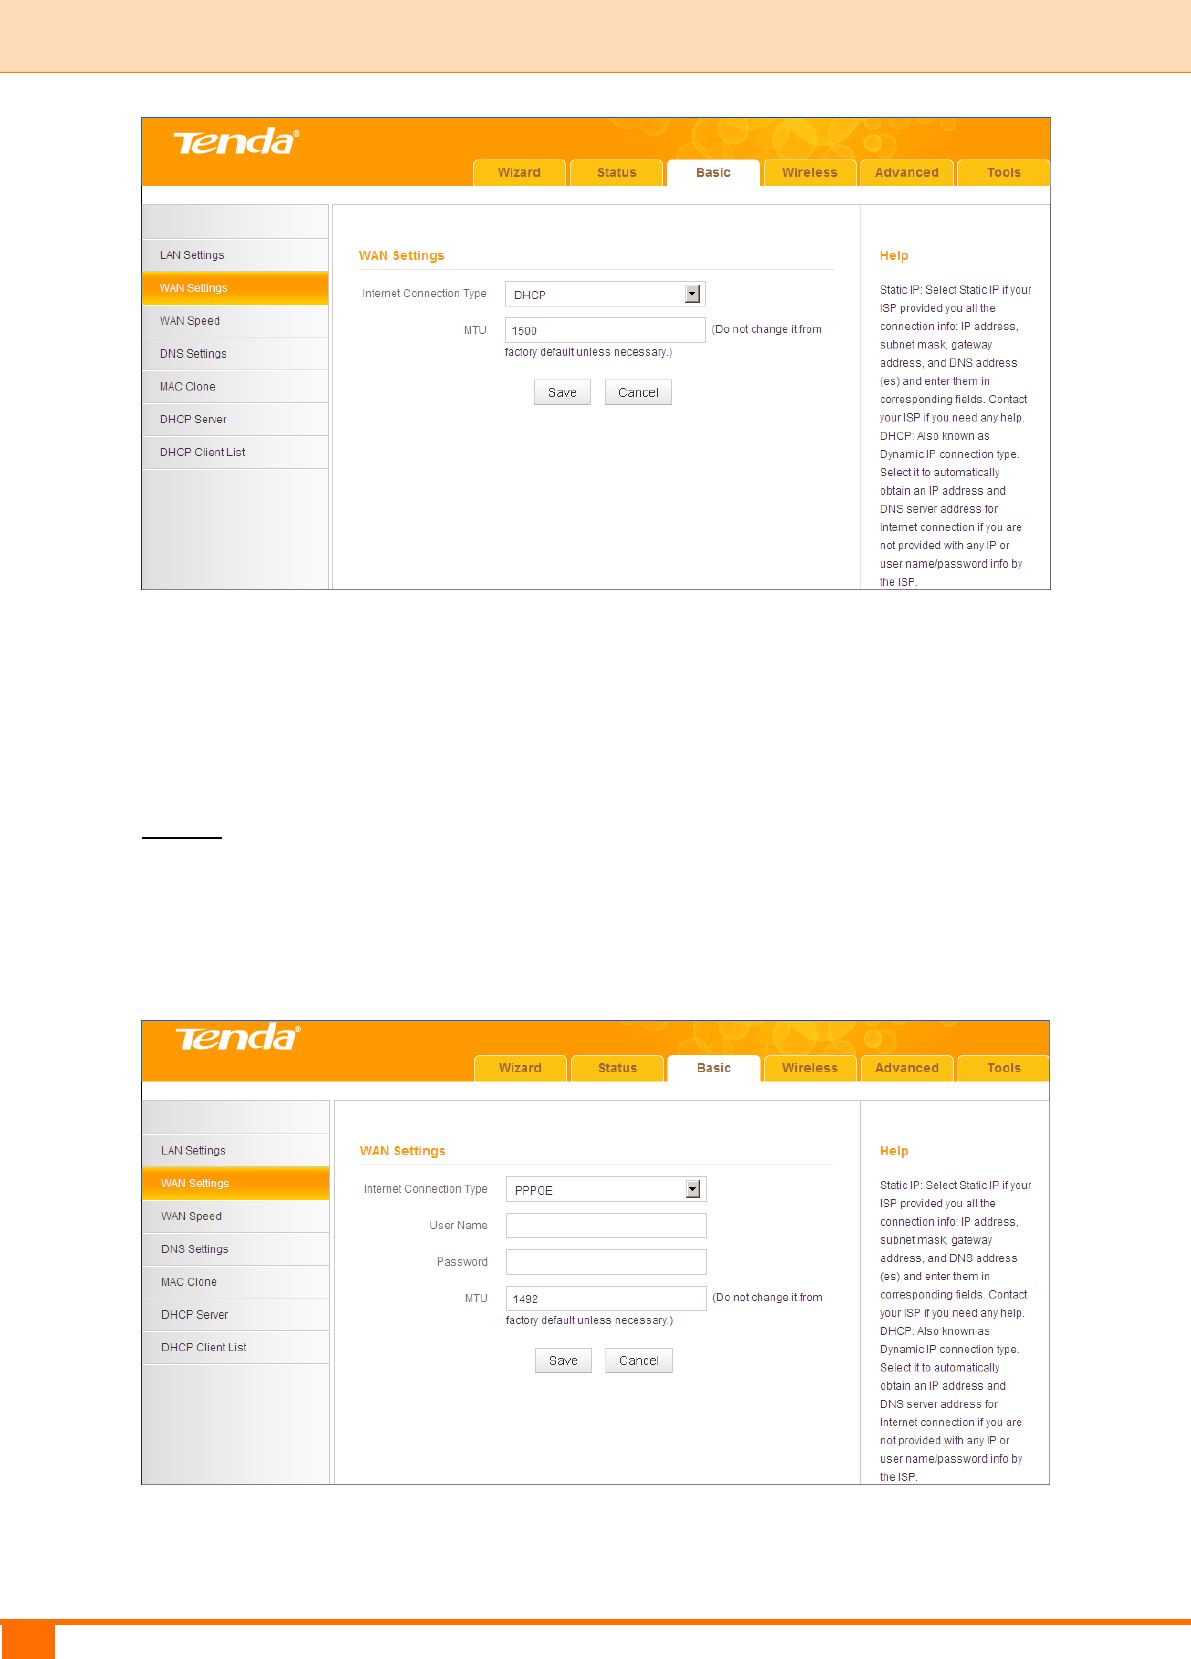
2.2 WAN Settings
Click Basic -> WAN Settings to configure your Internet connection settings.
3G/4G Router Mode

25
III Features & Configurations | Tenda
Configuration Procedures:
① Country: Select your country.
② Service Provider/ISP: Select your 3G/4G service provider and ISP.
③ APN: Access point Name. Consult your ISP if you are not clear.
④ Dial Number: Common numbers are *99#, #777 and *99***1. Consult your
ISP if you are not clear.
⑤ User Name/Password: Enter the user name and password for your 3G/4G
Internet service.
⑥ Click Save.
Knowledge Center
Connect Automatically: Connect automatically to the Internet after rebooting
the system or connection failure.

26
III Features & Configurations | Tenda
Connect Manually: Require the user to manually connect to the Internet before
each session.
Connect On Demand: Re-establish connection to the Internet only when there
is data transmitting.
Connect During Specified Time Period: Connect automatically to the Internet
during a specified time length.
Wireless Router Mode
The Wireless Router Mode includes the following Internet connection types:
DHCP
PPPoE
Static IP
L2TP
PPTP
A. Select PPPoE if your ISP uses a PPPoE connection and gives you a PPPoE
user name and a PPPoE password.
B. Select Static IP if your ISP provides you with fixed or static IP address
settings (special deployment by ISP; this is rare).
C. Select DHCP (Dynamic IP) if your ISP does not provide you with any ISP
login account or IP information.
D. Select L2TP (Layer 2 Tunneling Protocol) if your ISP uses an L2TP
connection.
E. Select PPTP (Point-to-Point-Tunneling Protocol) if your ISP uses a PPTP
connection.
DHCP
DHCP or Dynamic IP is a connection mode that allows the device to
automatically acquire IP information from your ISP or your existing networking
equipment.
27
III Features & Configurations | Tenda
Configuration Procedures:
① Internet Connection Type: Select DHCP.
② Click Save to save your settings.
PPPoE
PPPoE is a connection mode associated with some DSL connections that
requires user name and password. Contact your ISP if you need assistance with
these login credentials.
Configuration Procedures:
① Internet Connection Type: Select PPPoE.
28
III Features & Configurations | Tenda
② User Name: Enter the ISP login name.
③ Password: Enter the ISP login password.
④ Click Save to save your settings.
Knowledge Center
MTU: The MTU (maximum transmission unit) is the largest data packet a
network device transmits. The normal MTU value for most Ethernet networks is
1500 bytes, or 1492 bytes for PPPoE connections. For some ISPs, you might
need to change the MTU. This is rarely required, and should not be done unless
you are sure it is necessary for your ISP connection. For more information, see
WAN MTU Setup.
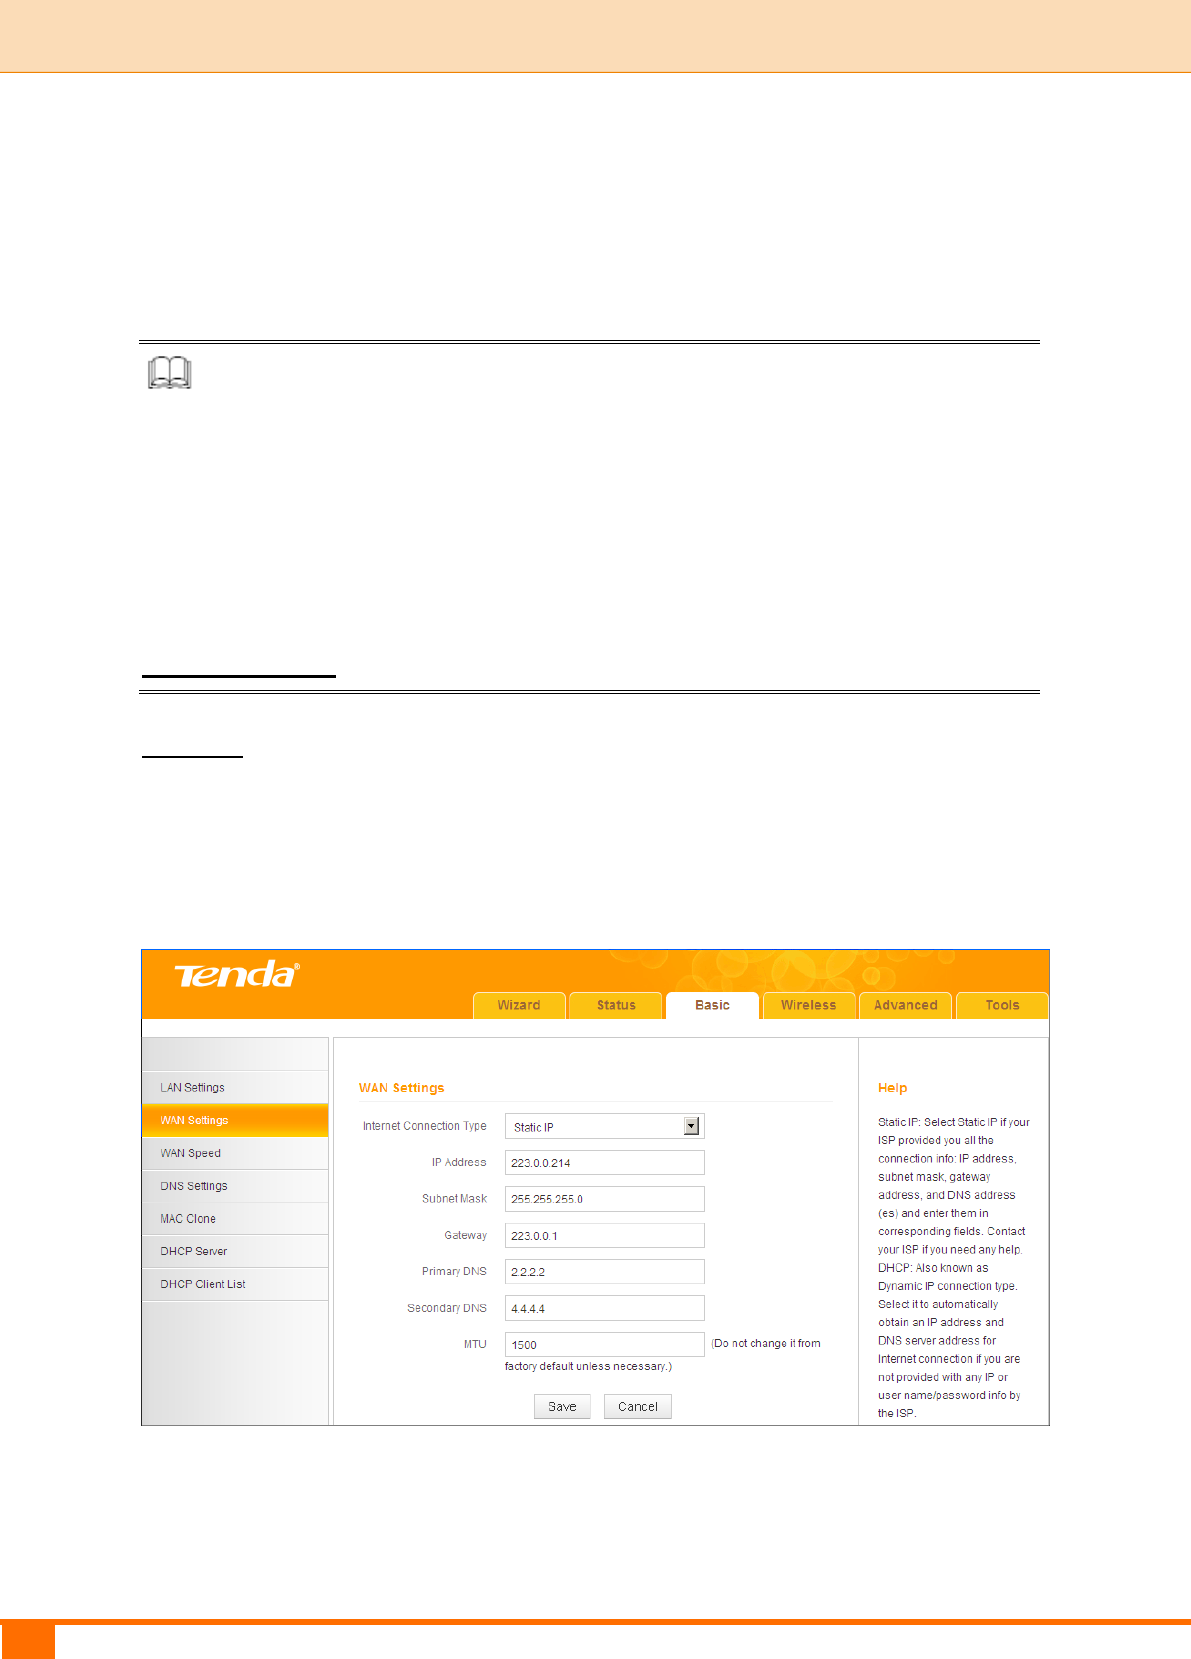
Static IP
Static IP is a connection mode that allows you to specify the Static IP
information provided by your ISP or that corresponds with your existing
networking equipment.
Configuration Procedures:
① Internet Connection Type: Select Static IP.
29
III Features & Configurations | Tenda
② IP Address/Subnet Mask/Gateway/Primary DNS/Secondary DNS: Enter
the information provided by your ISP.
③ Click Save to save your settings.
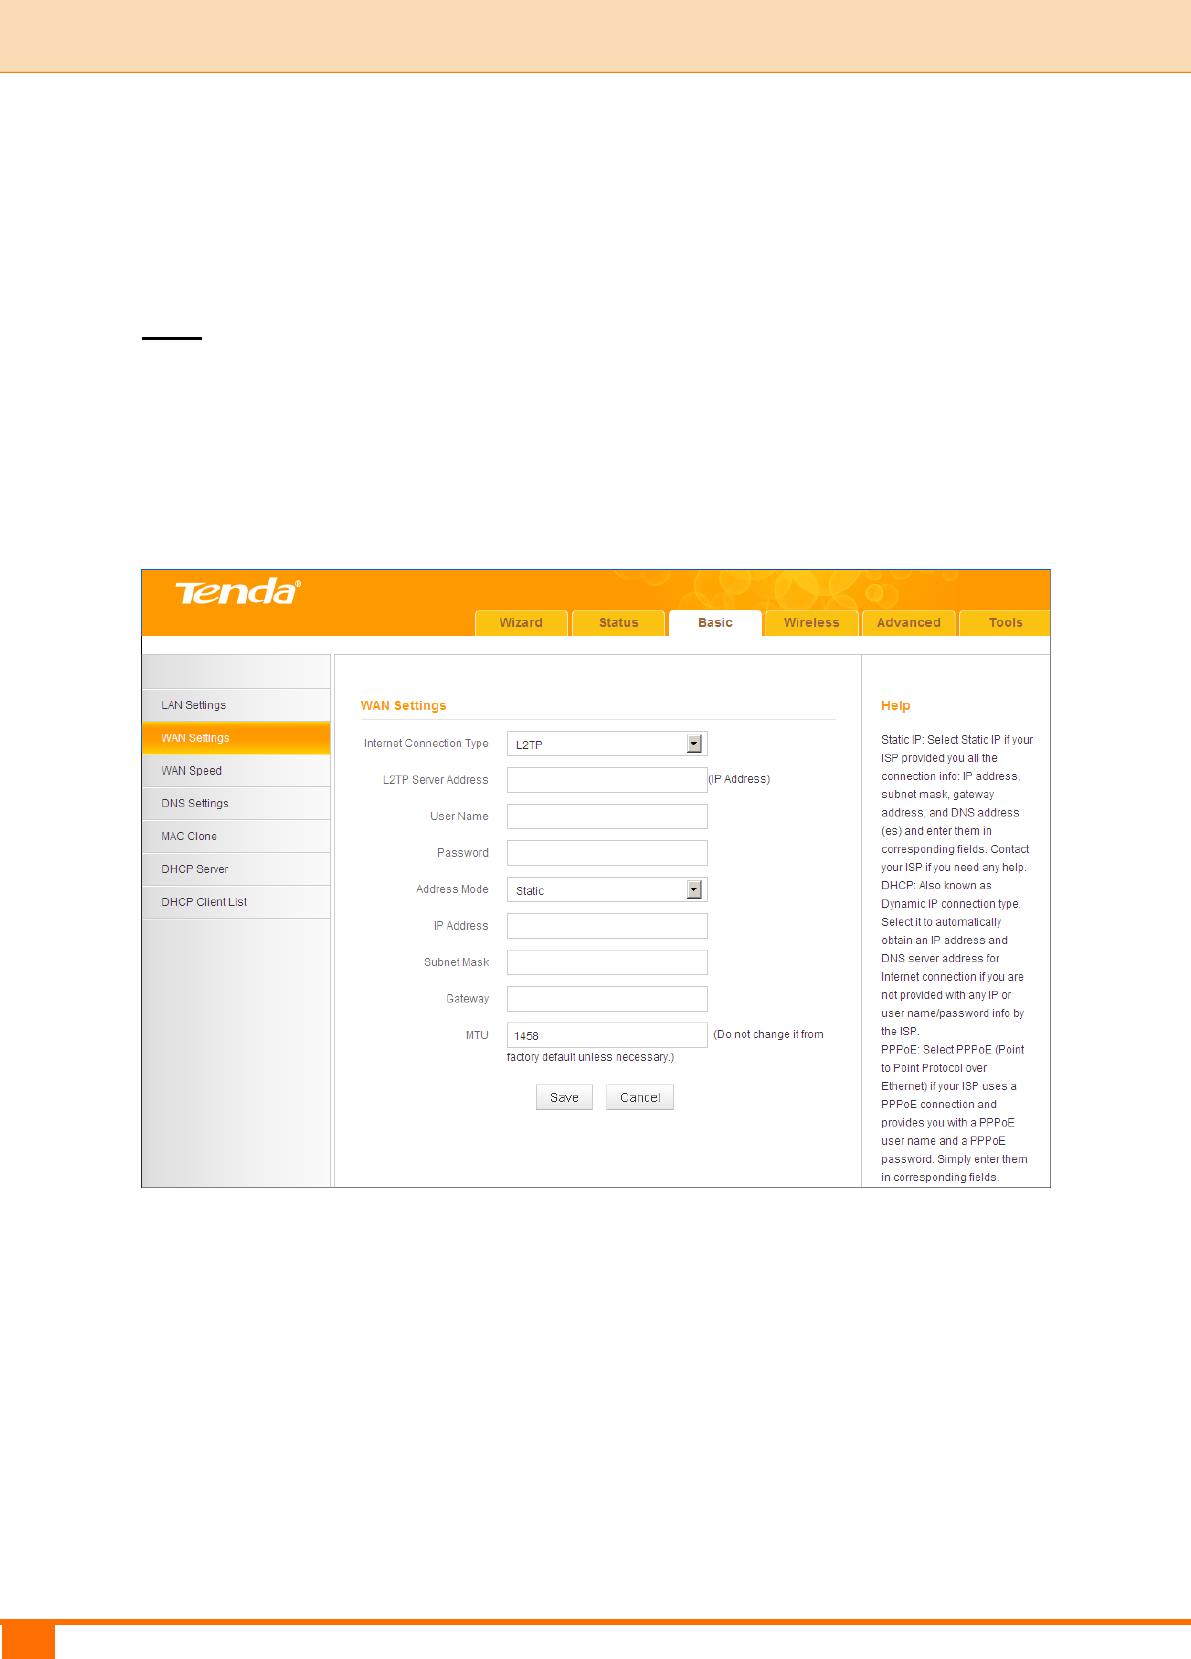
L2TP
L2TP (Layer 2 Tunneling Protocol) is a network protocol that enables the secure
transfer of data from a remote client to a private enterprise server by creating a
VPN across TCP/IP-based data. Enter your ISP provided information to
establish a connection.
Configuration Procedures:
① Internet Connection Type: Select L2TP.
② L2TP Server Address: E nt er the L 2T P I P address p r o v i d e d by yo u r
ISP.
③ User Name: E nt er you r L2TP us e r name.
④ P as sw or d: Enter your L 2T P Pa ssword.
⑤ Ad dre s s Mode: Select Dyna m i c i f y o u d o n ’ t g e t a n y I P i n f o rmation
f rom your ISP, o t h er wise s e l e ct Static. C o n s u lt you r I S P if you are
30
III Features & Configurations | Tenda
not clear.
⑥ IP Address: Enter the I P a ddr ess pr ovi d ed by yo ur I S P. C o nsu l t your
local ISP i f you are not c l e ar.
⑦ Subnet Mask: Ent er the subnet mask.
⑧ G at e w a y: Ent er t h e g at e wa y pr o vide d b y y o u r I SP. C o ns u l t yo u r
local ISP i f you are not c l e ar.
⑨ Click Save to save your settings.
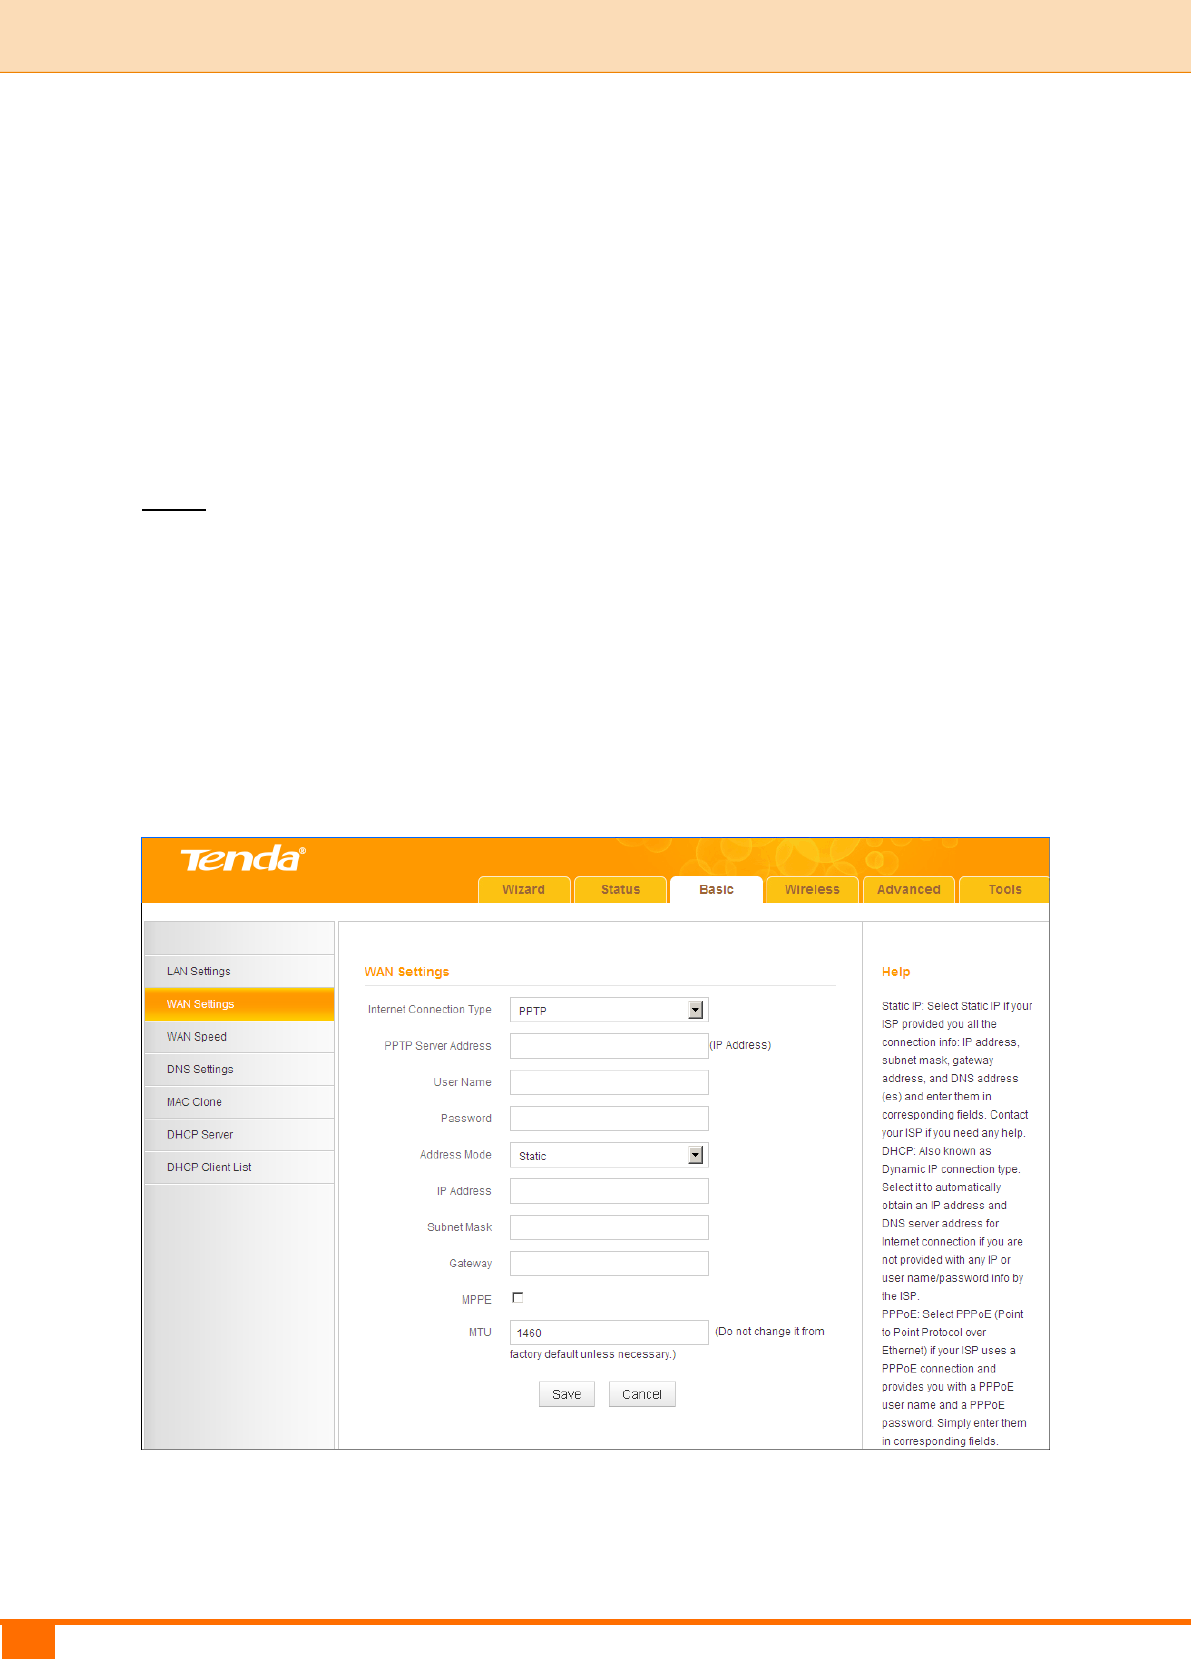
PPTP
PPTP (Point-To-Point Tunneling Protocol) is a network protocol that enables the
secure transfer of data from a remote client to a private enterprise server by
creating a VPN across TCP/IP-based data. Enter your ISP provided information
to establish a connection.
MPPE is an encryption technology developed by Microsoft to encrypt
point-to-point links.
Configuration Procedures:
① Internet Connection Type: Select PPTP.

31
III Features & Configurations | Tenda
② PPTP Server Address: Ent e r t h e PPTP I P address provid e d b y y o u r
ISP.
③ User Name: E nt er you r PPTP user name.
④ P as sw or d : Enter your PPTP password.
⑤ Ad dre s s Mode: Select Dyna m i c i f y o u d o n ’ t g e t a n y I P i n f o rmation
f rom your ISP, o t h er wise s e l e ct Static. C o n s u lt you r I S P if you are
not clear.
⑥ IP Address: Enter the I P a ddr ess pr o vi d ed by yo ur I S P. C o nsu l t your
local ISP i f you ar e n ot c l e ar.
⑦ Subnet Mask: Ent er the subnet mask.
⑧ G at e w a y: Ent er t h e g at e wa y pr o vide d b y y o u r I SP. C o ns u l t yo u r
local ISP i f you are not c l e ar.
⑨ Click Save to save your settings.
WAN MTU Setup
The MTU (maximum transmission unit) is the largest data packet a network
device transmits. The normal MTU value for most Ethernet networks is 1500
bytes, or 1492 bytes for PPPoE connections. For some ISPs, you might need to
change the MTU. This is rarely required, and should not be done unless you are
sure it is necessary for your ISP connection. When one network device
communicates across the Internet with another, the data packets travel through
many devices along the way. If a device in the data path has a smaller MTU
value than the other devices, the data packets have to be "fragmented" to
accommodate the device with the smallest MTU value.
The best MTU value is often just the factory default value. In some situations,
changing the MTU value fixes one problem but causes another. Leave the MTU
unchanged unless one of these situations occurs:
A. You have problems connecting to your ISP or other Internet service, and
either your ISP or our technical support suggests changing the MTU value.
Below Web-based applications might require an MTU change:
A secure Website that does not open, or displays only part of a Web
32
III Features & Configurations | Tenda
page
Yahoo email
MSN portal
B. You use VPN and encounter serious performance problems.
C. You used a program to optimize MTU for performance reasons, and now you
have connectivity or performance problems.
If you suspect an MTU problem, try changing the MTU to 1400. If this does not
help, gradually reduce the MTU from the maximum value of 1500 until the
problem disappears.
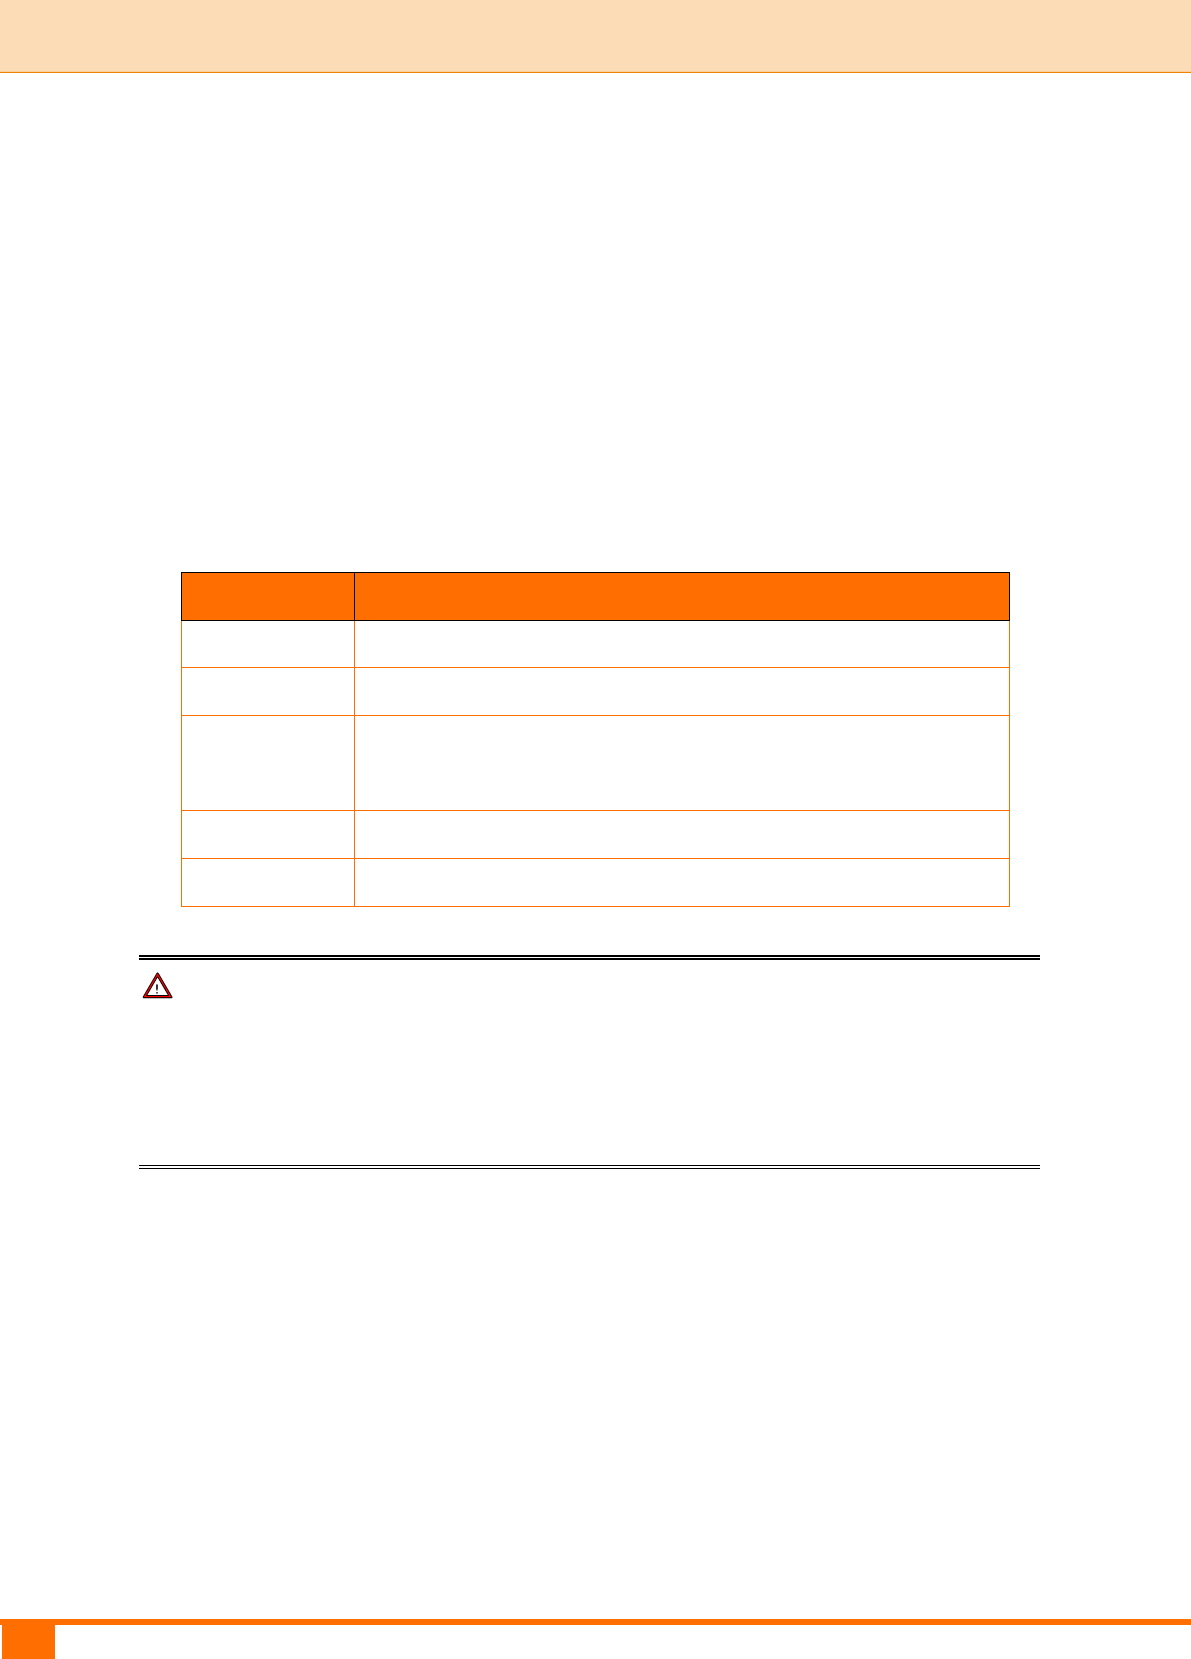
The common MTU sizes and applications are listed in the table below.
MTU
Application
1500
Typical for connections that do not use PPPoE or VPN.
1492
Used in PPPoE environments.
1472
Maximum size to use for pinging. (Larger packets are
fragmented.)
1468
Used in some DHCP environments.
1436
Used in PPTP environments or with VPN.
Note
A wrong/improper MTU value may cause Internet communication problems. For
example, you may be unable to access certain Websites, frames within
Websites, secure login pages, FTP or POP servers.
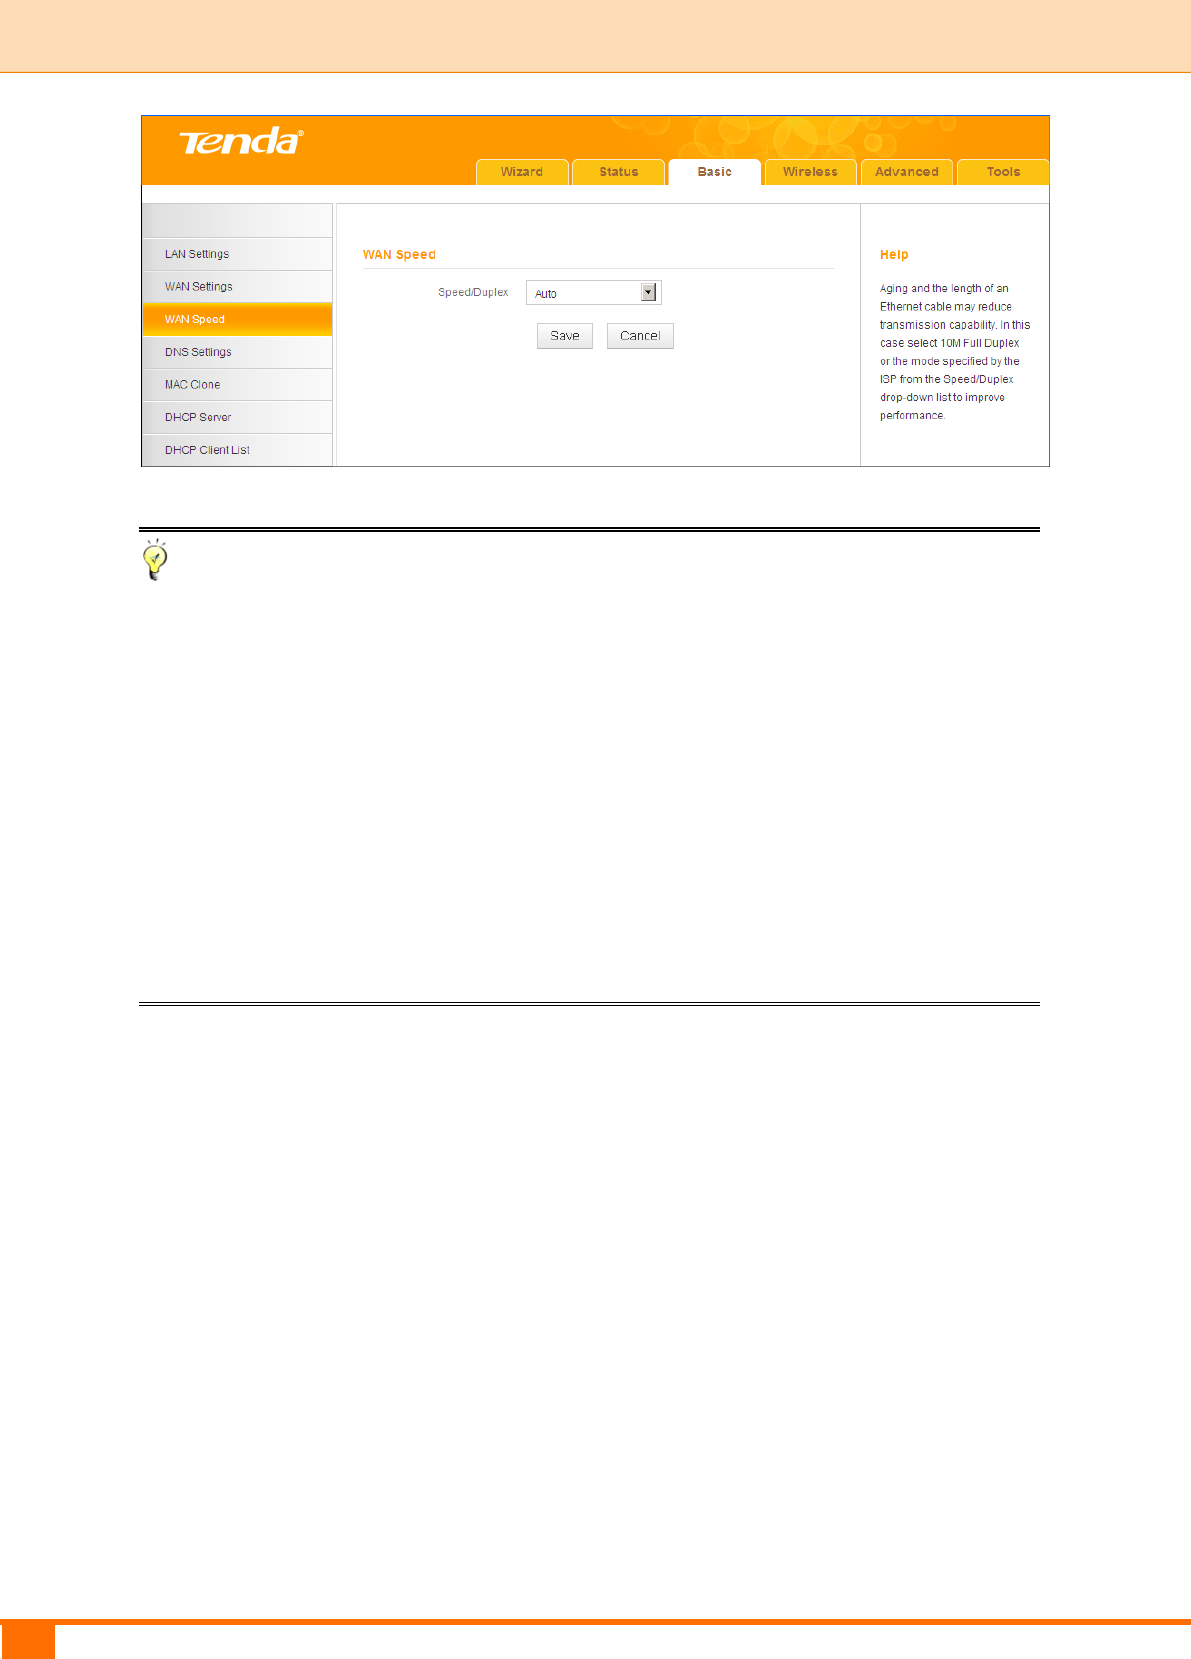
2.3 WAN Speed (Available only in Wireless Router Mode)
Click Basic -> WAN Speed to enter the configuration interface. Here you can
configure the WAN speed and duplex mode.
33
III Features & Configurations | Tenda
Tip
① The device operates in Auto (Auto-negotiation) mode by default. Usually, it
works for most cases.
② In some situations, you might need to change the speed/duplex mode. For
example, if the cable connected to your device's WAN port is longer than
100m, you may need to use 10M full-duplex or 10M half-duplex for better
performance. Ensure that your device's WAN port operates with the same
speed and duplex mode as the remote link partner. Otherwise, your device's
WAN port may not receive and send data.
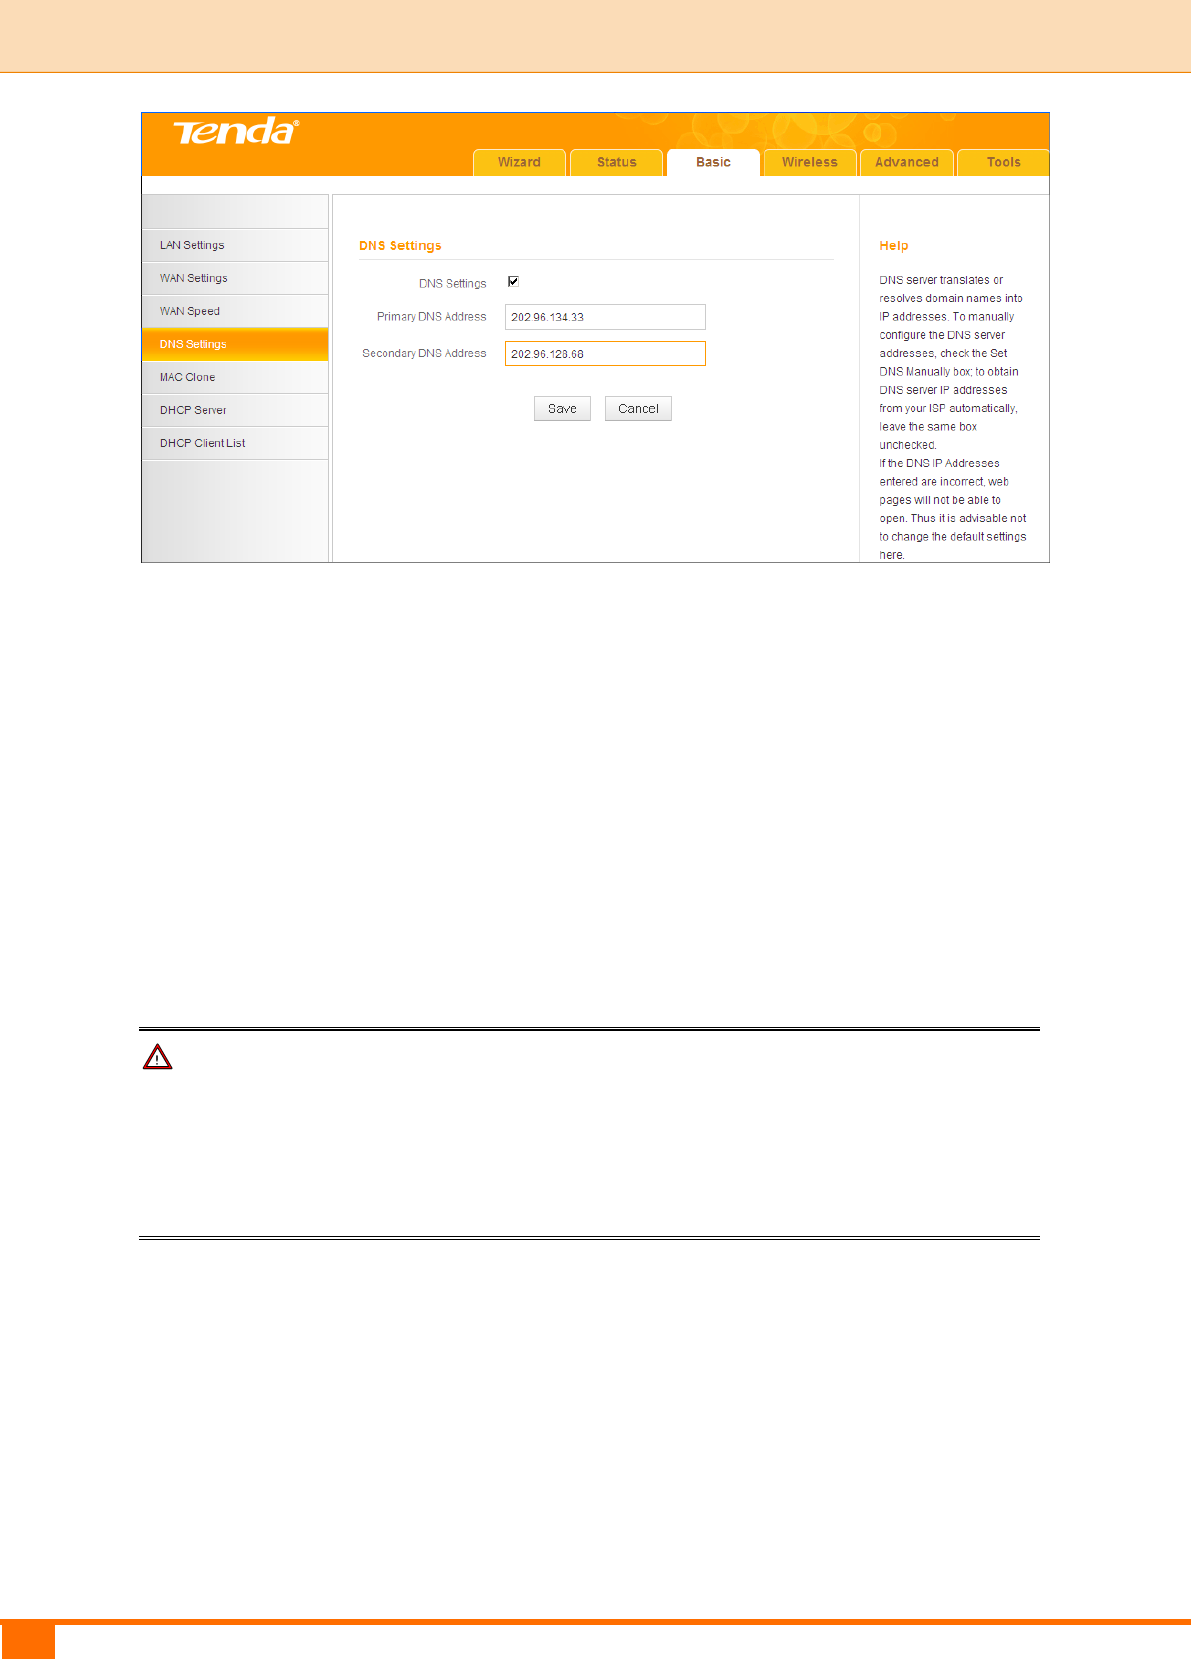
2.4 DNS Settings
Click Basic -> DNS Settings to enter the configuration interface.
34
III Features & Configurations | Tenda
Configuration Procedures:
① DNS Settings: Check/uncheck to enable/disable the DNS settings.
② Primary DNS Address: Enter the IP address of the primary DNS server
provided by your ISP.
③ Secondary DNS Address: If a secondary DNS server address is available,
enter it here. This field is optional.
④ Click Save to save your settings.
Note
The default DNS settings are recommended. Only change the DNS default
settings if you know that your ISP requires specific servers. If incorrect DNS
settings are configured, Webpages may not open.
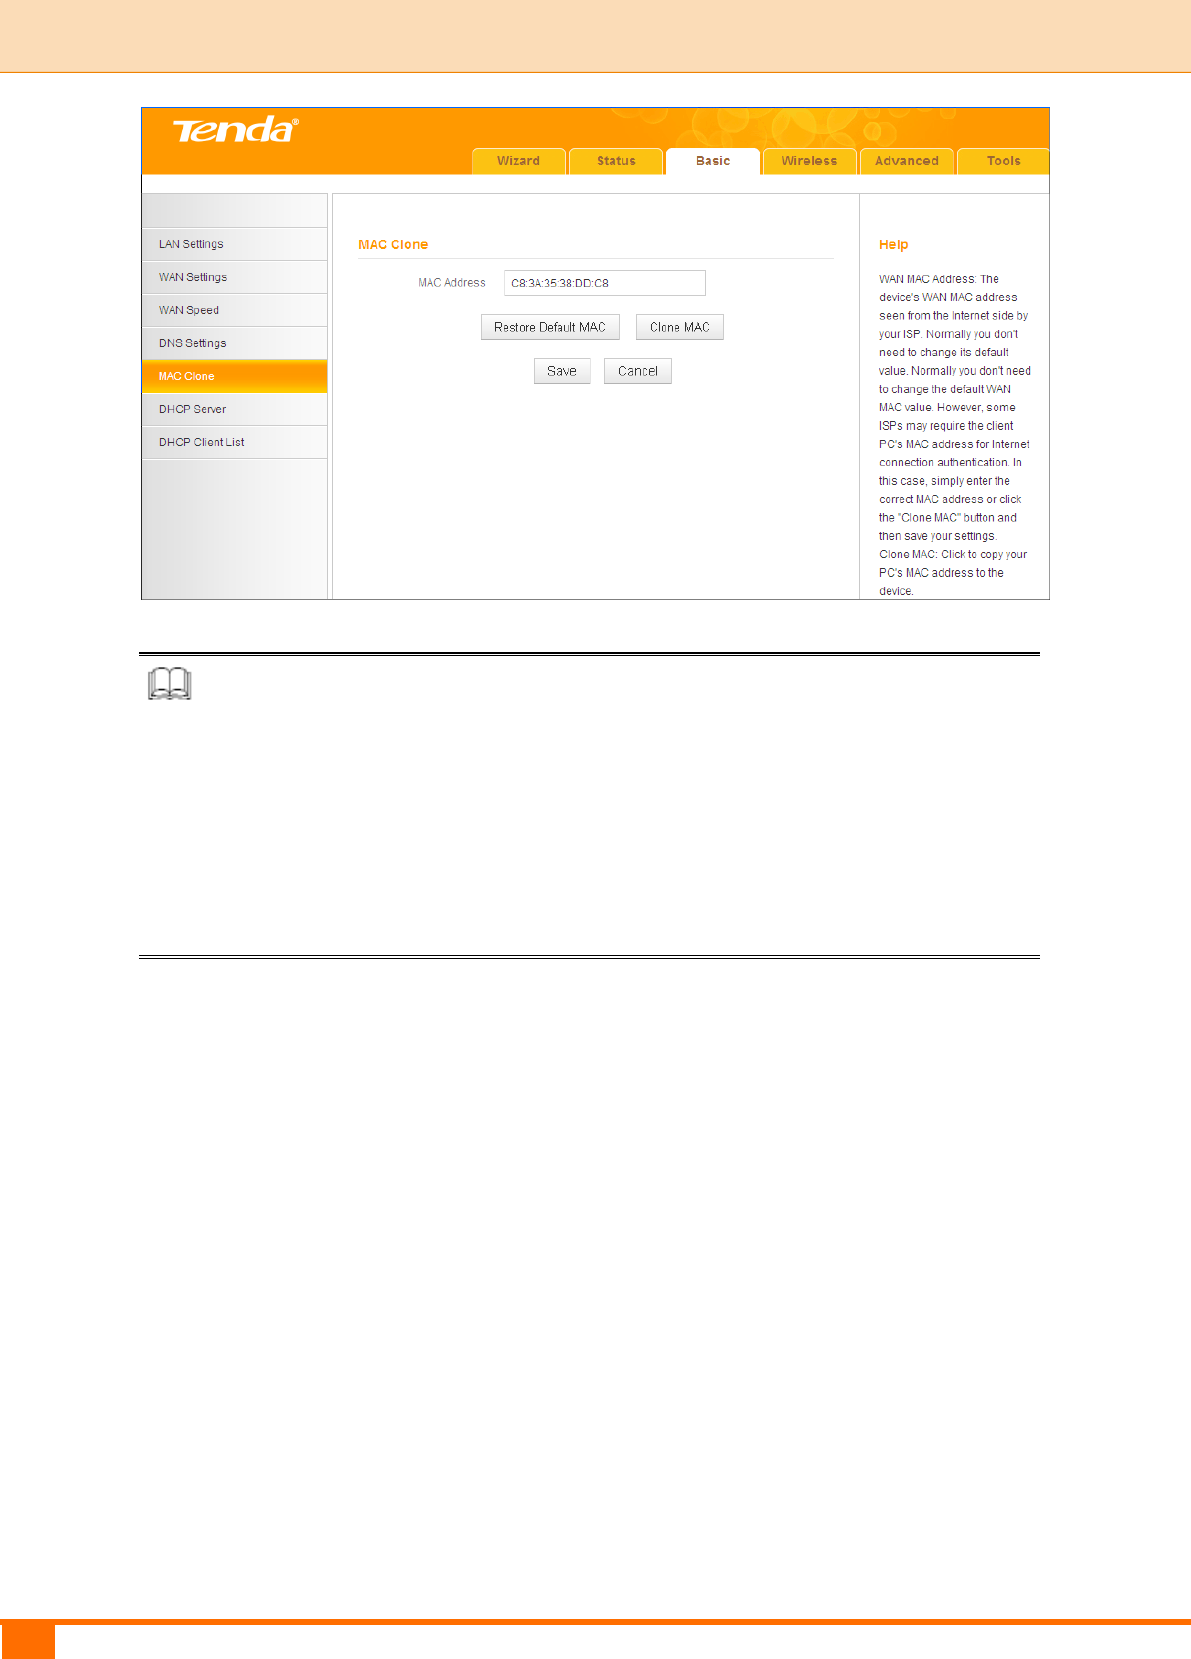
2.5 MAC Clone (Available only in Wireless Router Mode)
Some ISPs (Internet Service Providers) require end-user's MAC address to
access their network. This feature copies your current PC's MAC address to the
device.
Click Basic -> MAC Clone to enter the configuration screen.
35
III Features & Configurations | Tenda
Knowledge Center
Restore Default MAC: Reset the device’s WAN MAC address to factory default.
Clone MAC: Clicking this button copies the MAC address of the computer that
you are currently using to the router. Note that you have to use the computer
whose MAC address is allowed by your ISP. Also, you can manually enter the
MAC address that you want to use.
To restore default MAC address:
① Click Restore Default MAC.
② Click Save to save your settings.
To copy the MAC address of the computer that you are currently using to
the device:
① Click Clone MAC.
② Click Save to save your settings.
To manually enter the MAC address allowed by your ISP:
① Enter the MAC address allowed by your ISP.
② Click Save to save your settings.
36
III Features & Configurations | Tenda
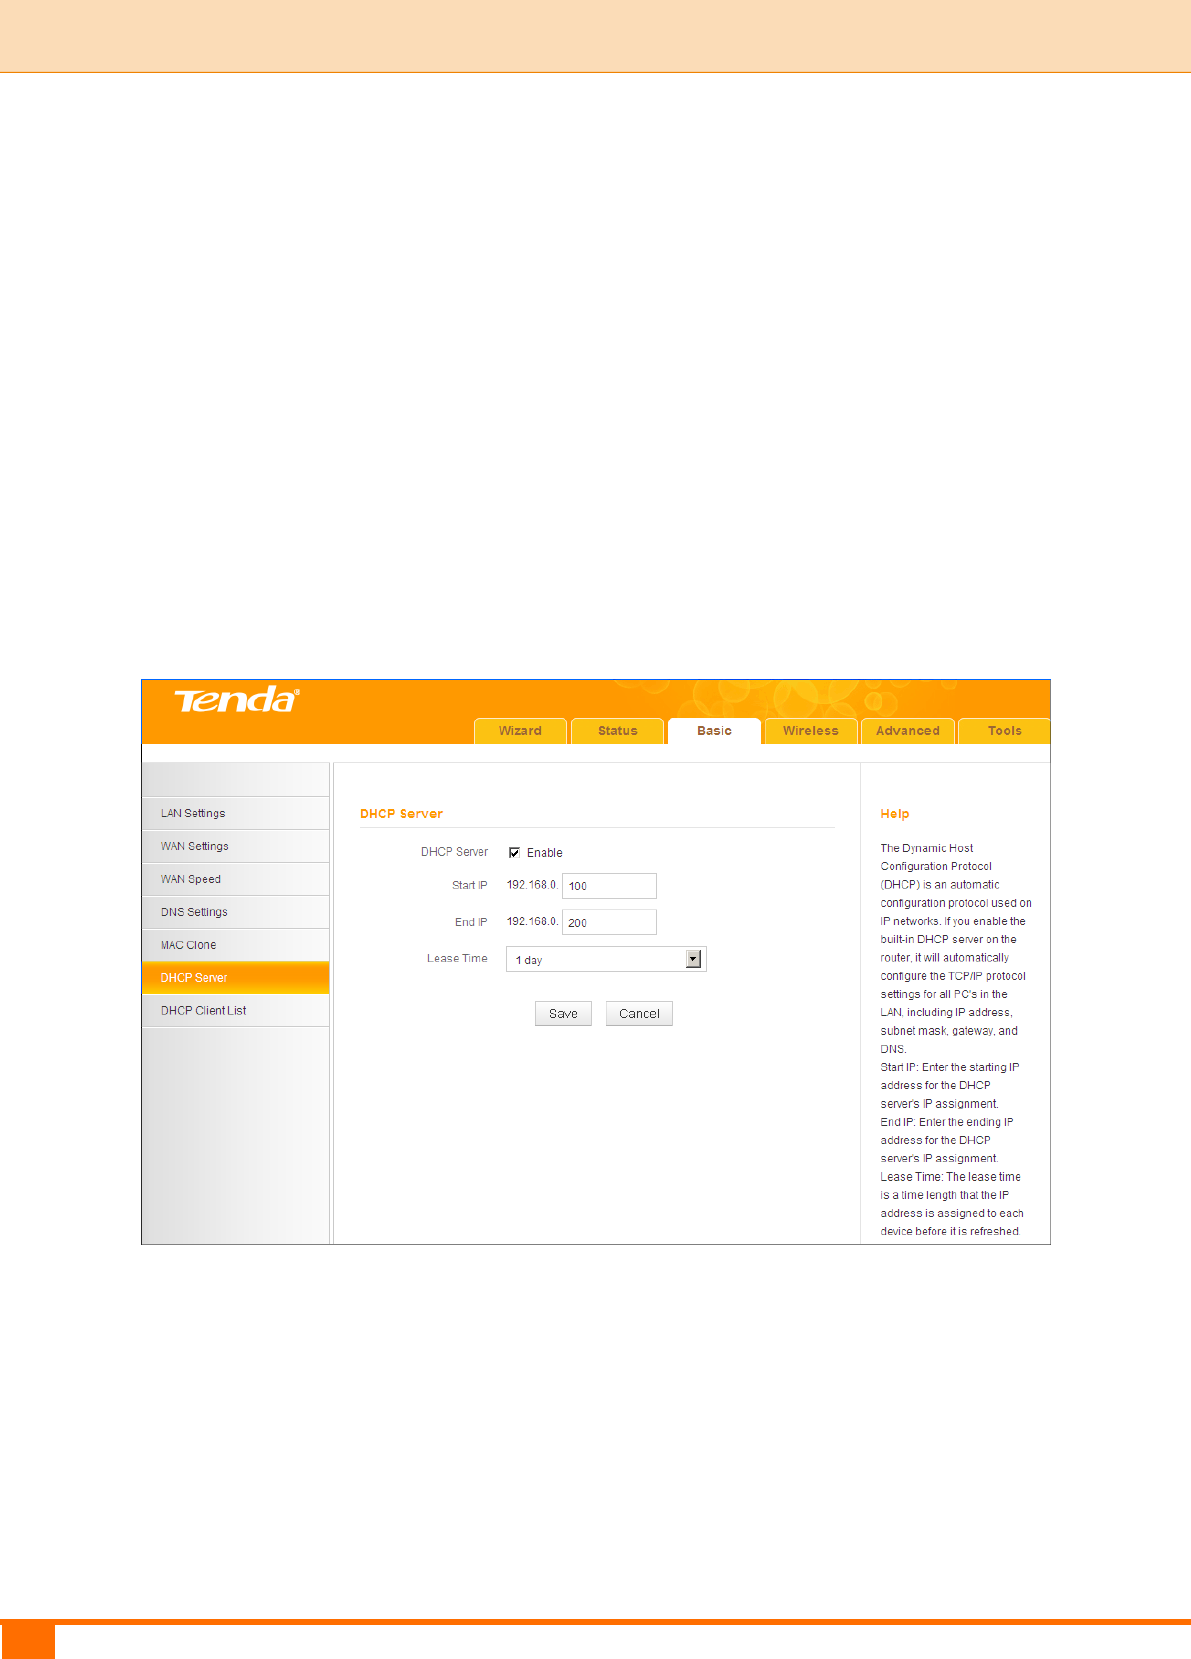
2.6 DHCP Server
DHCP (Dynamic Host Configuration Protocol) assigns an IP addr ess to each
device on the LAN/private network. When you enable the DHCP Server, the
DHCP Server will automatically allocate an unused IP address from the IP
address pool specified in this screen to the requesting device as long as the
device is set to "Obtain an IP Address Automatically". If you disable this feature,
you have to manually configure the TCP/IP settings for all PCs on your LAN to
access the Internet.
Click Basic -> DHCP Server to enter the screen below. Here you can change
the DHCP IP address pool and lease time.
Configuration Procedures:
① DHCP Server - Enable: Check/uncheck the box to enable or disable the
DHCP server feature.
② Start IP/End IP: You can specify the starting and ending addresses of the IP
address pool here. These addresses should be part of the same IP address
subnet as the device’s LAN IP address.
37
III Features & Configurations | Tenda
③ Lease Time: The lease time is a time length that the IP address is assigned
to each device before it is refreshed.
④ Click Save to save your settings.
Tip
① By default, the device functions as a DHCP server. Do not disable the DHCP
server feature unless you want to manually configure the TCP/IP settings for
all the PCs on your LAN.
② Lease time will be renewed automatically upon expiry.
③ If you are not an advanced user, the default DHCP server settings are
recommended.
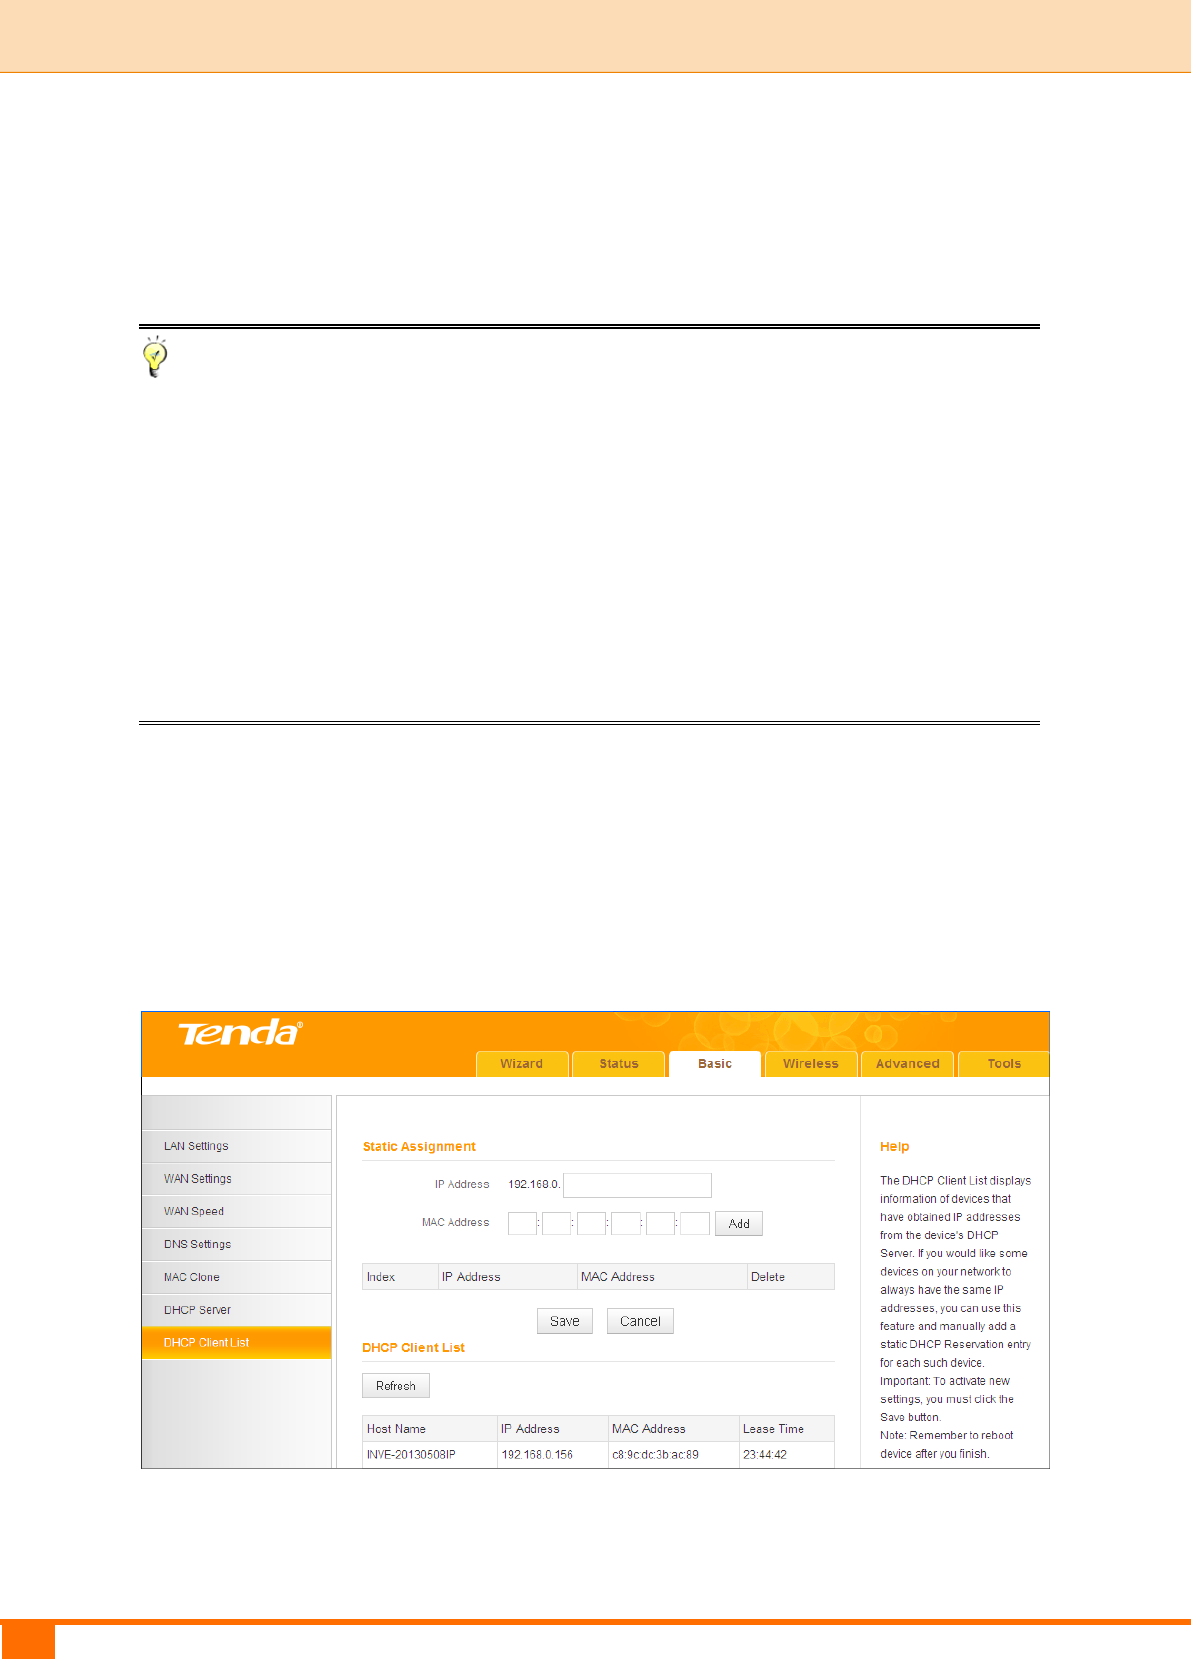
2.7 DHCP Client List
Click Basic -> DHCP Client List. Here you can see a list of the DHCP dynamic
clients (if any). By viewing this list, you can know whether there are
unauthorized accesses.
Also, you can specify a reserved IP address for a PC on your LAN. That PC will
always receive the same IP address each time when it accesses the DHCP
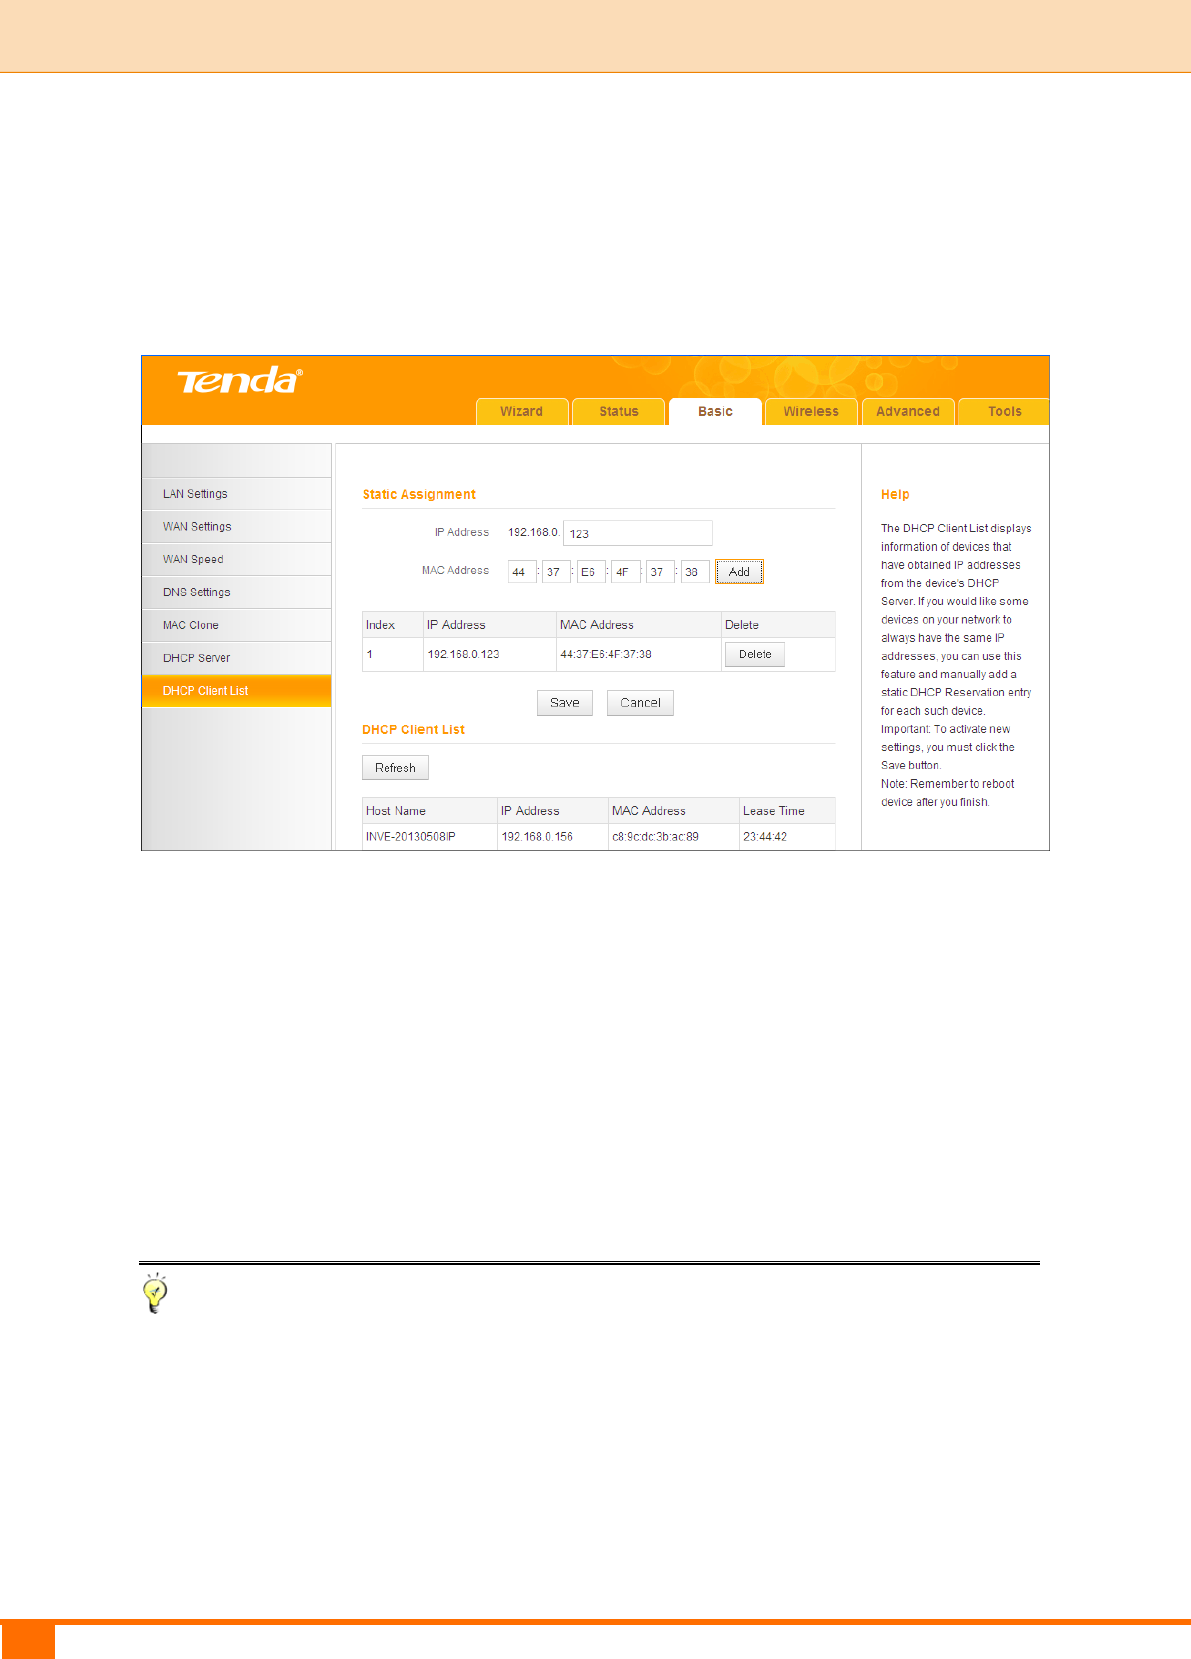
38
III Features & Configurations | Tenda
server. Reserved IP addresses could be assigned to servers that require
permanent IP settings.
Static Assignment Application Example:
To have a PC at the MAC address of 44:37:E6:4F:37:38 always receive the
same IP address of 192.168.0.123.
Configuration Procedures:
① Enter the last number of the IP address you want to reserve . Here in this
example, enter 123.
② Enter the MAC address of 44:37:E6:4F:37:38.
③ Click Add.
④ Click Save to save your settings.
Tip
① If the IP address you have reserved for your PC is currently used by another
client, then you will not be able to obtain a new IP address from the device's
DHCP server, instead, you must manually specify a different IP address for
your PC to access the Internet.
② For PCs that have already obtained IP addresses, you may need to perform

39
III Features & Configurations | Tenda
the Repair action to activate the configured static IP addresses.
40
III Features & Configurations | Tenda
3 Wireless Settings
To configure wireless network name, channel and other basic wireless
settings, see 3.1 Basic.
To secure your wireless network, see 3.2 Security.
To restrict access to your wireless network, see 3.3 Access Control.
To see who are connecting to your wireless network, see 3.4 Connection
Status.
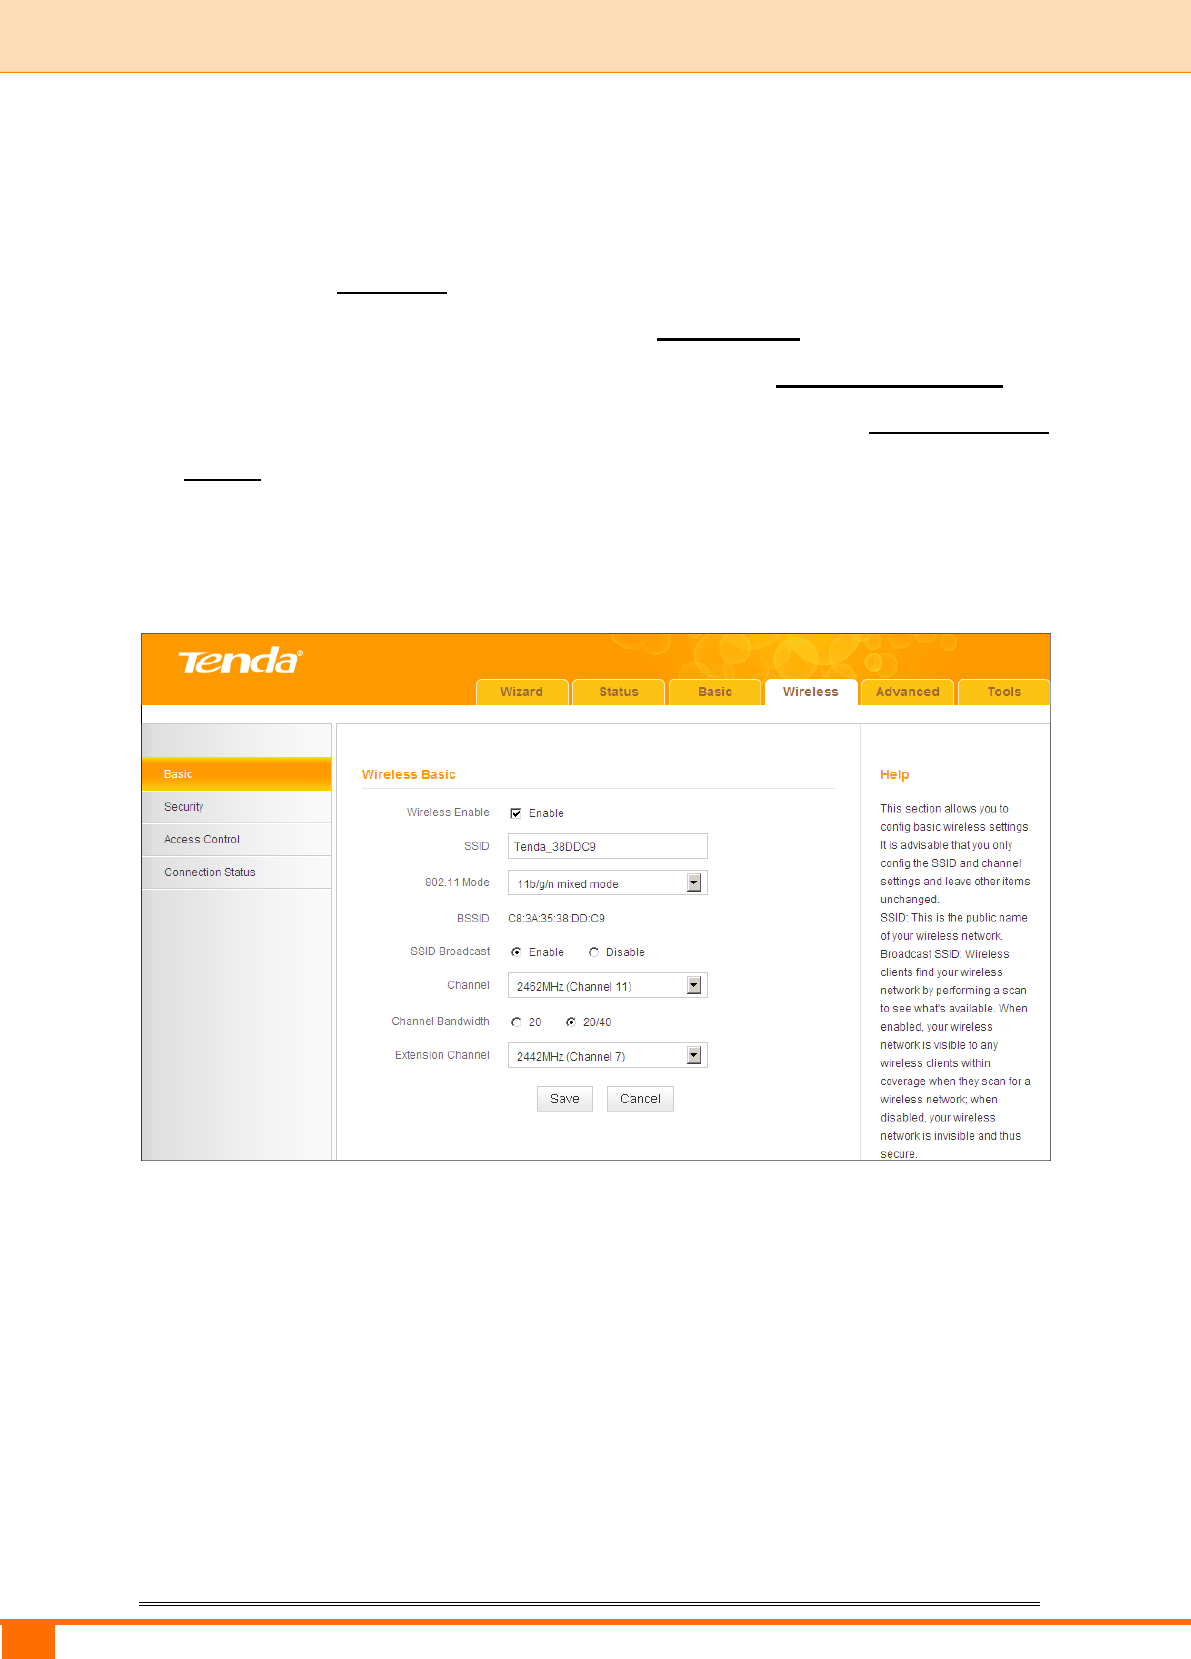
3.1 Basic
Here you can configure the basic wireless settings of the device.
Configuration Procedures:
① SSID: This is the public name of your wireless network.
② Channel: Select a channel or select Auto to let system automatically select
one for your wireless network to operate on if you are unsure of which channel
to use. The best selection is a channel that is the least used by neighboring
networks.
③ Click Save to save your settings.